

K1
BRASSO
BARRIER
Technical Manual


INDEX
1 - GATE OPERATOR CLASSIFICATIONS .......................................... 4
2 - SAFETY ACCESSORY SELECTION ................................................ 4
3 - ENTRAPMENT PROTECTION TYPES ........................................... 4
4 - IMPORTANT SAFETY INSTRUCTIONS ........................................ 5
4.1 – Safety Installation Information ............................. 5
5 - TECHNICAL SPECIFICATION ......................................................... 6
6 - GENERAL FEATURES ....................................................................... 6
7 – TECHNICAL SPECIFICATIONS AND DIMENSIONS ................ 7
8 - ELECTRICAL INSTALLATION ......................................................... 8
9 - CONCRETE PAD ................................................................................ 8
10 – BARRIER INSTALATION ................................................................ 9
11 - INTRODUCTION: ELECTRONIC SYSTEM’S TECHNICAL
FEATURES ...............................................................................................15
12 - CONTROL BOARD ........................................................................15
12.1 - Overview ................................................................... 15
12.2 - Power Supply ...........................................................16
12.3 - Induction Motor Connection ............................. 16
12.4 - ‘ENC’ encoder connection ...................................16
12.5 - ‘ TRAVA’ ........................................................................17
12.6 - ‘LUZ’ courtesy light connection ......................... 17
12.7 - ‘RX’ separated receiver connection .................. 17
12.8 - ‘BOT’ pushbutton connection ............................17
12.9 - ‘HIB’ end-of-stroke reeds connection ..............17
12.10 - ‘SCI’ connector .......................................................17
13 - ENTRAPMENT PROTECTION SYSTEMS .................................18
13.1 - Internal Entrapment Protection
System (Type A) ..................................................................18
13.2 - External Entrapment Protection
System (Type B1) ................................................................18
13.3 - ‘FOT’ closing cycle photoelectric sensor ........18
13.4 - ‘ABR’ .............................................................................19
13.5 - 'FEC' ............................................................................. 19
14 - GATE SYSTEM LOGIC FUNCTION ........................................... 19
14.1 – Getting started in barrier mode
(Barrier Arm travel recognition) ....................................19
14.2 – Barrier Operation after a power cycle
(travel recognized) .............................................................19
15 - INVERTER PARAMETERS PROGRAMMING ..........................20
15.1 - Operator model selection ................................... 20
15.2 - JUMPER TST ..............................................................20
15.3 - Adjustment of other parameters ......................20
16 - ERASING THE RECOGNIZED TRAVEL .....................................23
17 - APPLYING THE DEFAULT STANDARD SETTINGS ............... 23
18 - ACCESSORIES ................................................................................24
18.1 - Garage Light ............................................................24
18.2 - Flashing lights .........................................................24
19 - EVENT / FAILURE INDICATION .................................................24
19.1 - Microcontroller functioning indication ..........24
19.2 – Indication of over current or short
circuit on the motor .........................................................24
19.3 – EEPROM fault indication ..................................... 24
19.4 – EEPROM invalid data indication .......................24
19.5 - Open end-of-stroke indication .......................... 25
19.6 - Close end-of-stroke indication .......................... 25
19.7 - Capacitor load indication ....................................25
19.8 – Encoder Test ............................................................25
19.9 - Thermal Protection ................................................25
20 - MAINTENANCE .............................................................................25
21 – METHODS OF TRIGGERING BARRIERS .................................26
22 – PROCEDURES FOR CLEANING AND MAINTENANCE ......27
23 – OPERATION ON POWER OUTAGE .........................................27
24 - REPAIR PARTS ................................................................................28

1 - GATE OPERATOR CLASSIFICATIONS
All gate operators can be divided into one of four classes depending on their design and usage. Install this gate operator only when the
operator is appropriate for the construction and usage class as dened below:
Class I Residential Vehicular Gate Operator
A vehicular gate operator intended for use in a home or for one to four single family dwellings with a common garage or parking area
associated with these dwellings.
Class II Commercial / General Access Vehicular Gate Operator
A vehicular gate operator intended for use in a commercial location or building such as a multi-family housing unit of ve or more
single family units, hotel, retail store or other building servicing the general public.
Class III Industrial / Limited Access Vehicular Gate Operator
A vehicular gate operator intended for use in an industrial location or building such as a factory or loading dock area or other location
not intended to service the general public.
Class IV Restricted Access Vehicular Gate Operator
A vehicular gate operator intended for use in a guarded industrial location or building such as an airport security area or other restricted
access locations not servicing the general public, in which unauthorized access is prevented via supervision by security personnel.
2 - SAFETY ACCESSORY SELECTION
All UL325 PPA compliant gate operators will accept external entrapment protection devices to protect people from motorized gate
systems. UL325 requires that the type of entrapment protection correctly matches each gate application.
This equipment must be installed with at least two entrapment protection means. Below are the types of entrapment protection
systems recognized by UL325 for use on this operator.
3 - ENTRAPMENT PROTECTION TYPES
Type A:
Inherent obstruction sensing system, self-contained within the operator. This system must sense and initiate the reverse of the gate
within two seconds of contact with a solid object.
Type B1:
Connections provided for a non-contact device, such as a photoelectric eye can be used as a secondary protection.
NOTE: UL requires that all installations must have warning signs placed in plain view on both sides of the gate to warn pedestrians of the
danger of motorized gate systems.
Approved Non-contact Devices (Type B1)
The following non-contact obstruction detection devices have been approved for use with this slide gate operator (or barrier gate
operator) as part of a UL325 compliant installation:
Edge Miller 4-wire pulsed (monitored) devices.
4

4 - IMPORTANT SAFETY INSTRUCTIONS
WARNING
This equipment is to be installed and serviced by a professional gate
operator technician only. It is important that the specialized installer
follow all instructions given in this manual.
To Reduce the Risk of Severe Injury or Death:
1. READ AND FOLLOW ALL INSTRUCTIONS
2. Never let children operate or play with door controls. Keep the remote control away from children.
3. Always keep people and objects away from the gate. NO ONE SHOULD CROSS THE PATH OF THE MOVING GATE.
4. Test the gate operator monthly. The gate MUST reverse on contact with a rigid object or stop when an object activates the noncontact sensors. After adjusting the force or the limit of travel, retest the gate operator. Failure to adjust and retest the gate operator
properly can increase the risk of injury or death.
5. Use the emergency release only when the gate is not moving.
6. KEEP GATES PROPERLY MAINTAINED. Read the owner’s manual. Have a qualied service person make repairs to gate hardware.
7. The entrance is for vehicles only. Pedestrians must use separate entrance.
8. SAVE THESE INSTRUCTIONS.
4.1 – Safety Installation Information
1. Install the gate operator only when:
a) The operator is appropriate for the construction and the usage class of the gate.
b) All openings of a horizontal slide gate are guarded or screened from the bottom of the gate to a minimum of 6’ (1.83 m)
above the ground to prevent a 2 ¼” (6cm) diameter sphere from passing through the openings anywhere in the gate, and in
that portion of the adjacent fence that the gate covers in the open position.
c) All exposed pinch points are eliminated or guarded, and guarding is supplied for exposed rollers
2. The operator is intended for installation only on gates used for vehicles. Pedestrians must be supplied with a separate access
opening. The pedestrian access opening shall be designed to promote pedestrian usage. Locate the gate such that persons will
not come in contact with the vehicular gate during the entire path of travel of the vehicular gate.
3. The gate must be installed in a location so that enough clearance is supplied between the gate and adjacent structures when
opening and closing to reduce the risk of entrapment. Swinging gates shall not be open into public access areas.
4. The gate must be properly installed and work freely in both directions prior to the installation of the gate operator
5. Controls intended for user activation must be located at least six feet (6’) away from any moving part of the gate and where the
user is prevented from reaching over, under, around or through the gate to operate the controls. Outdoor or easily accessible
controls shall have a security feature to prevent unauthorized use.
6. The Reset switch must be located in the line-of-sight of the gate. Activation of the reset control shall not cause the operator to
start.
7. A minimum of two (2) WARNING SIGNS shall be installed, one on each side of the gate where easily visible.
8. For a gate operator utilizing a non-contact sensor:
a) Reference the owner’s manual regarding placement of non-contact sensor for each type of application.
b) Care shall be exercised to reduce the risk of nuisance tripping, such as when a vehicle trips the sensor while the gate is still
moving.
c) One or more non-contact sensors shall be located where the risk of entrapment or obstruction exists, such as the perimeter
reachable by a moving gate or barrier.
9. For a gate operator utilizing a contact sensor such as an edge sensor:
a) One or more contact sensors shall be located where the risk of entrapment or obstruction exists, such as the leading edge,
trailing edge and post mounted both inside and outside of a vehicular horizontal slide gate
b) One or more contact sensors shall be located at the bottom edge of a vehicular vertical lift gate.
c) A hard wired contact sensor such as the one that transmits radio frequency (RF) signals to the gate operator for entrapment
protection functions shall be located where the transmission of the signals are not obstructed or impeded by building structures,
natural landscaping or similar obstruction. A wireless contact sensor shall function under the intended end-use conditions.
d) One or more contact sensors shall be located on the inside and outside leading edge of a swing gate. Additionally, if the
bottom edge of a swing gate is greater than 6” (152 mm) above the ground at any point in its arc of travel, one or more contact
sensors shall be located on the bottom edge.
e) One or more contact sensors shall be located at the bottom edge of a vertical barrier (arm).
5
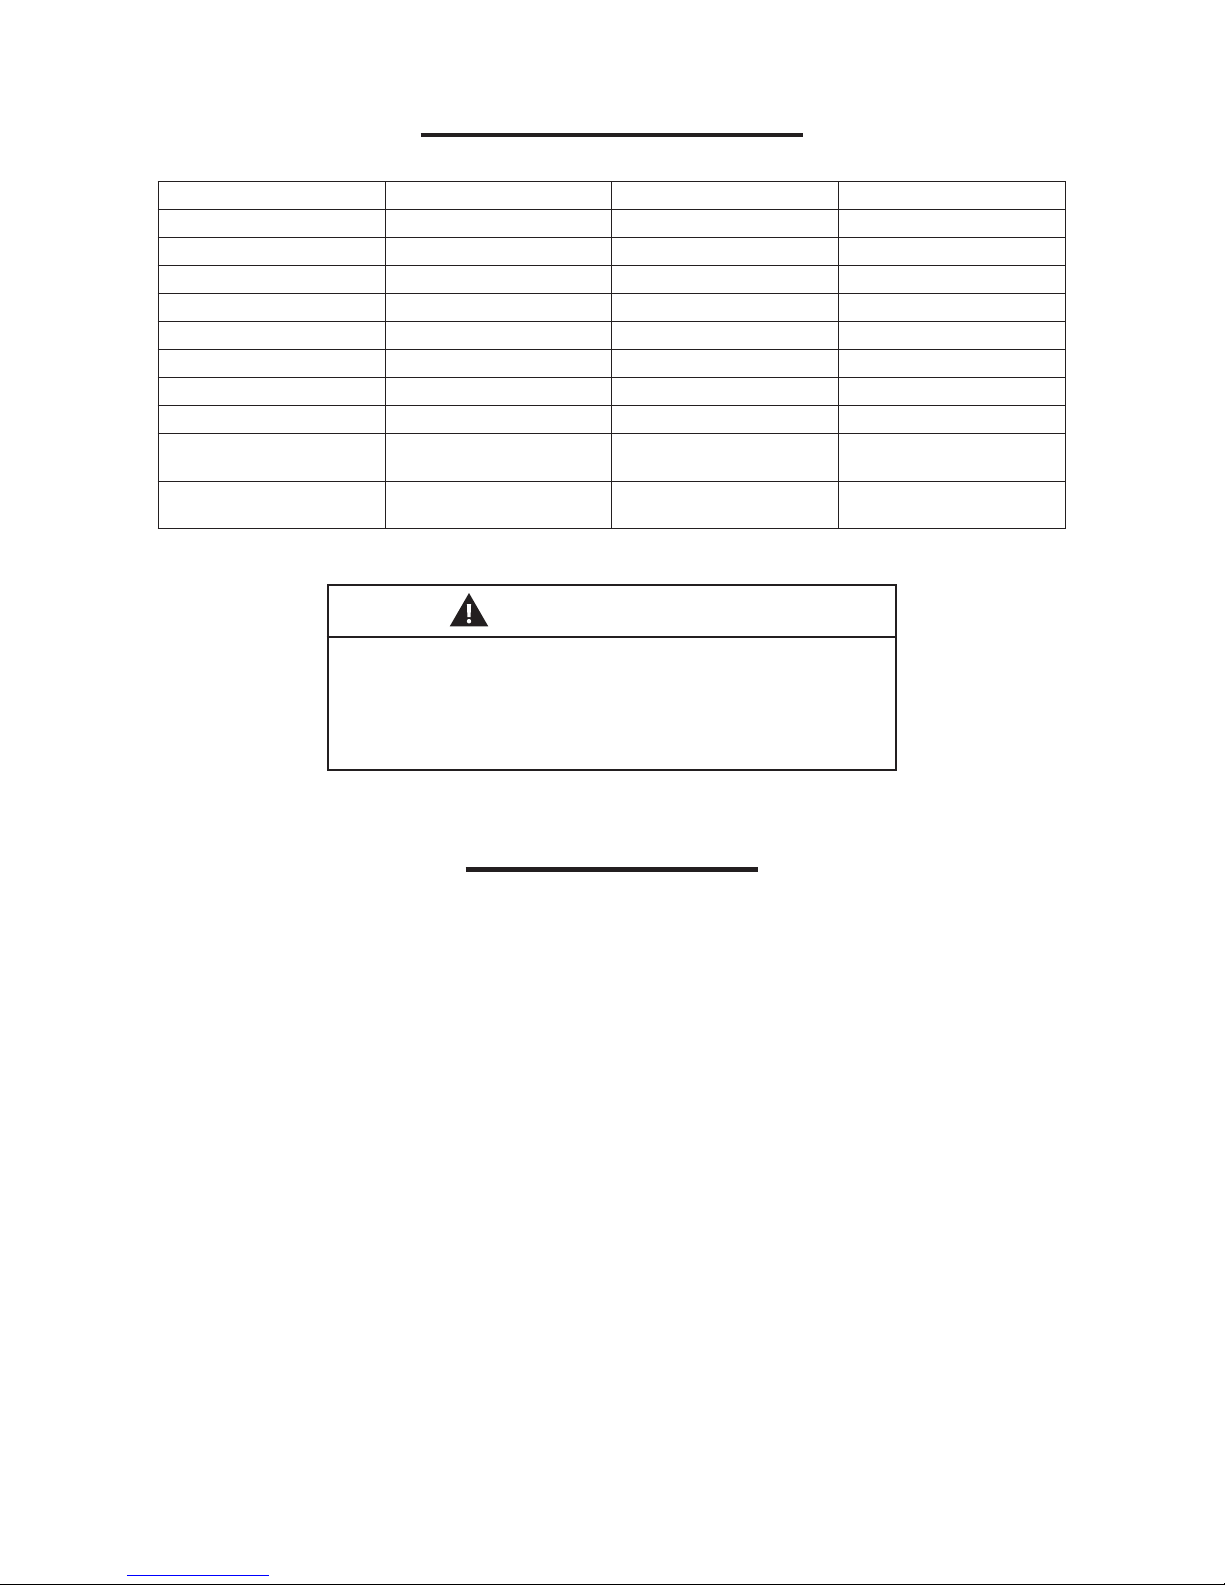
5 - TECHNICAL SPECIFICATION
External Entrapment Protection
Model K1 BRASSO BARRIER
Class of Operation UL325 Class I, II, III, IV UL325 Class I, II, III, IV UL325 Class I, II, III, IV
Type of Barrier Vehicular Barrier Vehicular Barrier Vehicular Barrier
Main AC Supply 120 Vac, 8.5 A (max) 120 Vac, 6 A (max) 120 Vac, 7 A (max)
Nominal Frequency 60 Hz 60 Hz 60 Hz
Rated Power 680 W, 120 Vac 500 W, 120 Vac 550 W, 120 Vac
Arm Speed Opens in 1.8 second Opens in 1.8 second Opens in 2 seconds
Cycles 60 100 350
Operating Temperature -4º F to 122º F -4º F to 122º F -4º F to 122º F
Inherent Entrapment
Protection (Type A)
(Type B1)
Dual – RPM (Encoder) and
Current Sense
2 inputs for photoelectric
devices
Dual – RPM (Encoder) and
Current Sense
2 inputs for photoelectric
devices
Dual – RPM (Encoder) and
2 inputs for photoelectric
WARNING
Do not use this equipment before read the manual.
Please read these instructions carefully for correct use and to ensure
proper installation of the system. All the information in this manual are
purely informational. All are reserved and any technical alterations to the
product without notice.
Current Sense
devices
6 - GENERAL FEATURES
• Universal Cabinet that allows the barrier installation on either side of the gate;
• The System of concealed for unlocking manual (up to 177 in);
• Electronic Central with inverter of frequency;
• Stop Mechanical with adjustment height;
• Activation System through the reduction gear, pulleys and belts;
• Cabinet Stainless Steel or Galvanized steel with anticorrosive treatment and electrostatic paint that guarantee great resistance to
weathering;
• Limit of -the system with encoder;
• Electronic Break;
• Allows the installation of various accessories (inductive loop, trac lights, photocell, pushbutton, etc.).
6
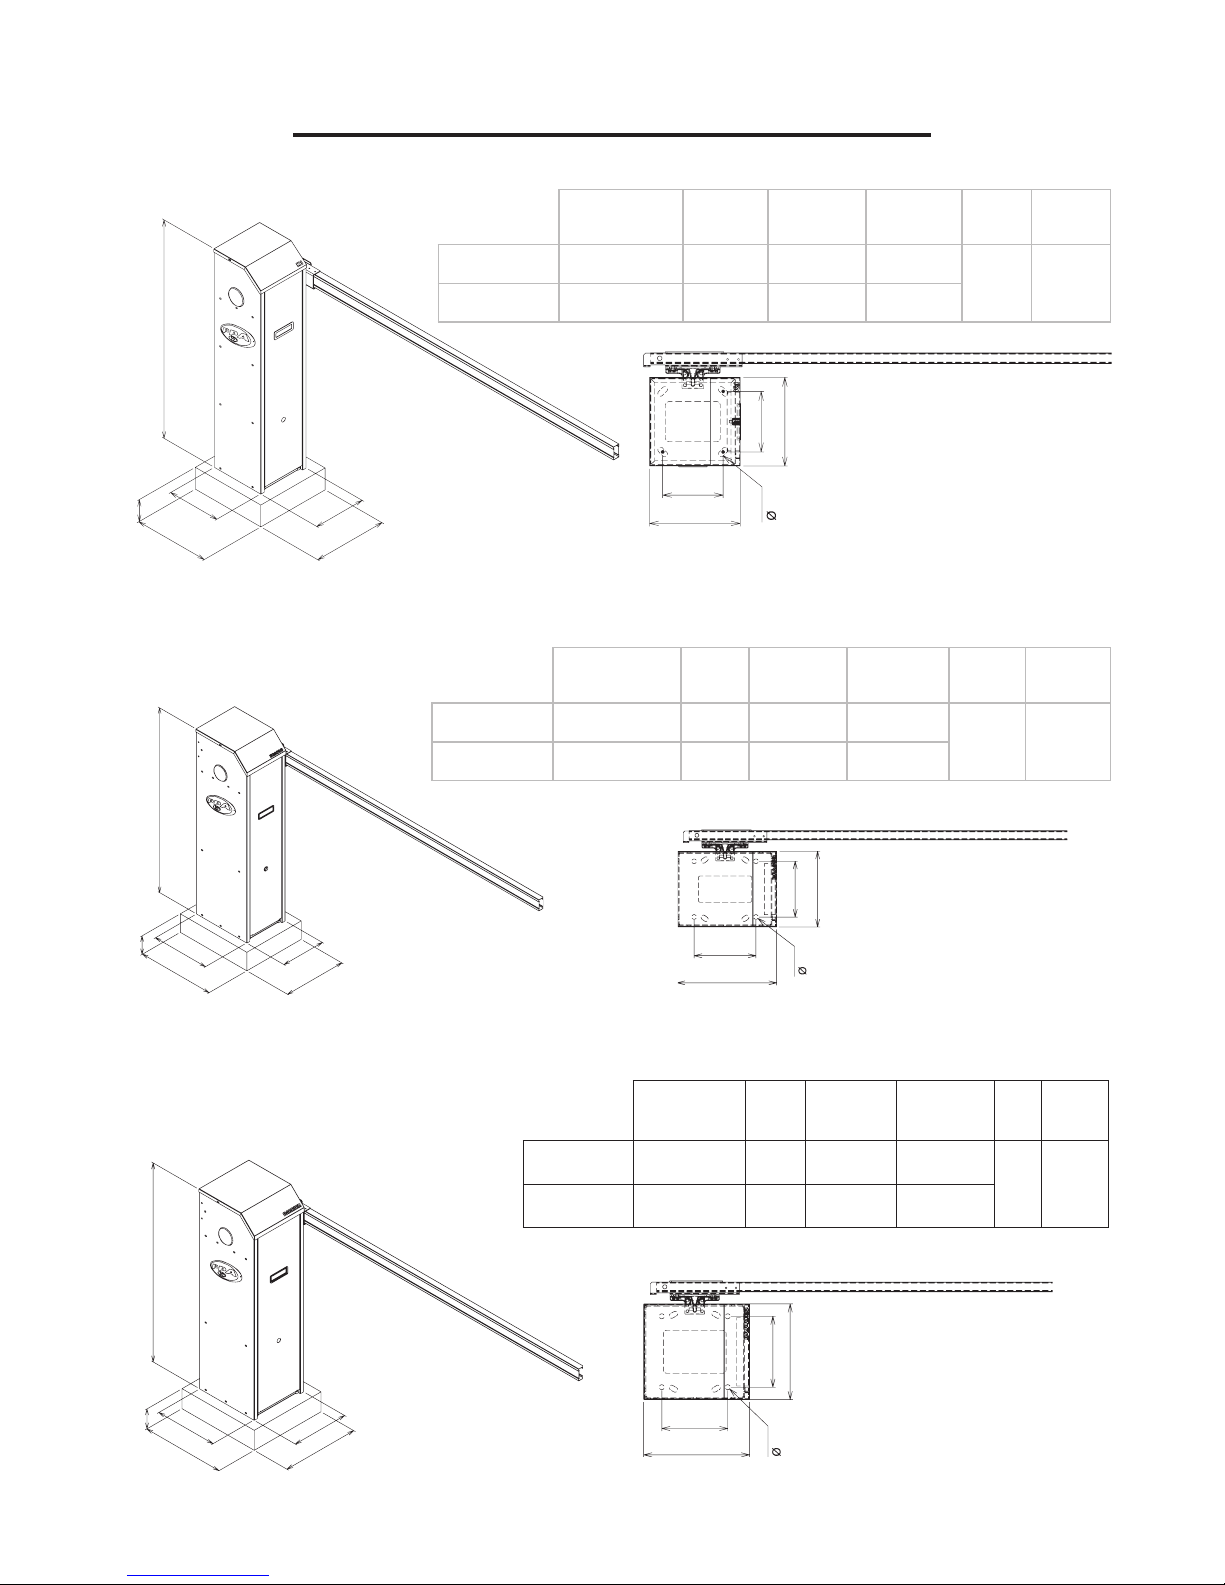
3.94
39.37
13.78
9.84
7 – TECHNICAL SPECIFICATIONS AND DIMENSIONS
Model: K1
9.56
13.78
Aluminum
Straight Arm
PVC
Straight Arm
Barrier arm length
Cycles /
Hour
(Adjustable)
Opening
speed
8.2 to 13.2 ft 60 1.8 second 2.5 seconds
8.2 to 9.84 ft 60 1.8 second 2.5 seconds
6.53
9.56
6.53
9.84
Measurement in inches
Drilling template
0.59
Model: BRASSO
(Adjustable)
Closing
speed
Front
Inspection Door
HP Voltage
1/2 HP 120V
3.94
39.37
12.68
16.53
9.64
13.78
Aluminum
Straight Arm
PVC
Straight Arm
Barrier Arm length
Cycles /
hour
(Adjustable)
Opening
speed
8.2 to 13.2 ft 100 1.8 second 3 seconds
8.2 to 9.84 ft 100 1.8 second 3 seconds
9.64
7.08
7.87
12.68
0.59
Model: BARRIER
hour
(Adjustable)
Opening
Aluminum
Straight Arm
PVC
Straight Arm
Barrier arm
Cycles /
length
8.2 to 13.2 ft 350 2 seconds 2.5 seconds
8.2 to 9.84 ft 350 2 seconds 2.5 seconds
Front
speed
(Adjustable)
Closing
speed
Inspection door
(Adjustable)
Closing speed
HP Voltage
1/2 HP 120V
HP Voltage
3/4 120V
39.37
3.93
12.68
16.53
11.42
15.75
8.46
Front
11.42
Inspection door
7.87
12.68
0.59
7
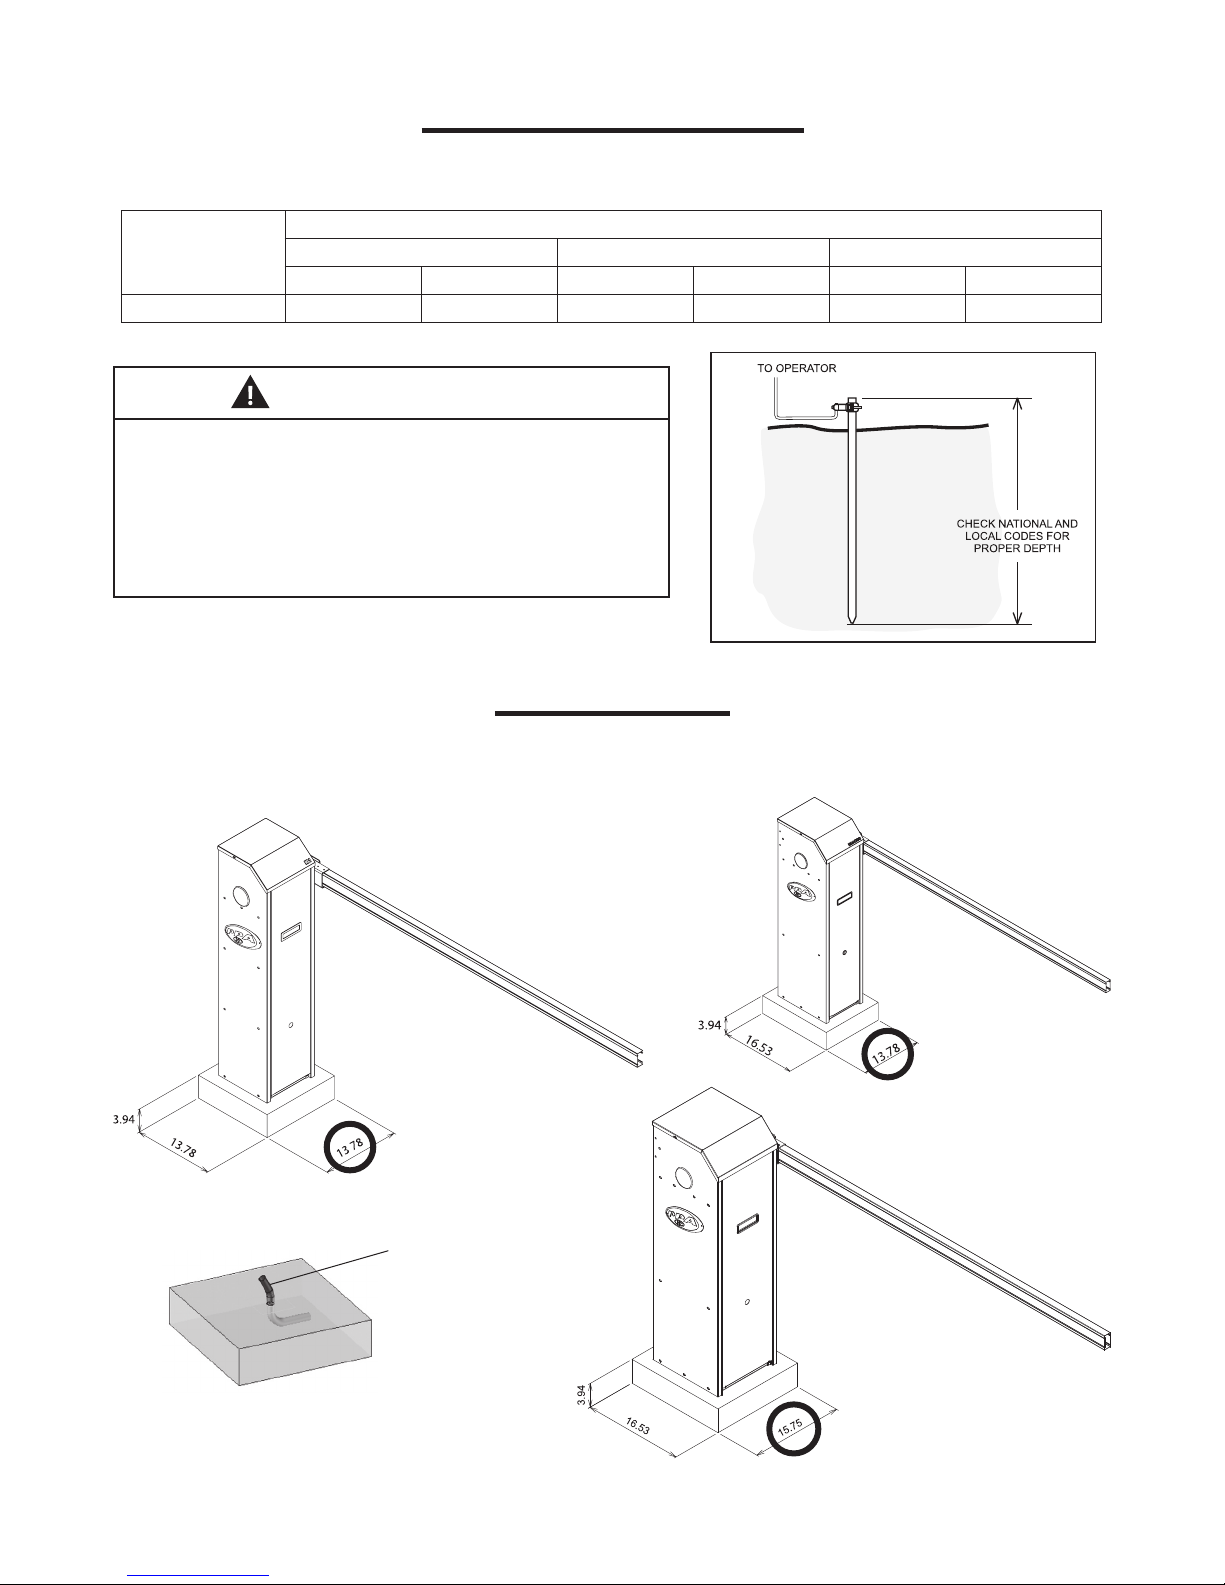
8 - ELECTRICAL INSTALLATION
This equipment must be wired with 120V as specied in the table below (assuming max current consumption).
Wire Size (American Wire Gauge) / Max Distance in Feet
AC power
14 AWG 12 AWG 14 AWG 12 AWG 14 AWG 12 AWG
120 VAC Single Phase 67 107 96 152 82 130
K1 BRASSO BARRIER
IMPORTANT
Be sure that the circuit breaker in the electrical panel is in the OFF
position before proceeding with the installation.
A separated power disconnect switch may be needed in your area.
Check your local building codes before installing this equipment.
The gate operator must be properly grounded, check your local electrical
codes before installing this equipment.
Install the earth ground rod as near as possible to the operator.
9 - CONCRETE PAD
Build a concrete base, so that the highlighted guidance (eg "13.78" K1, "13.78" Brasso and "15.75" Barrier) is located towards the curb
(street, vehicle pass), following the dimensions suggested:
.
CONDUIT OF 3/4" (MINIMUM)
FOR WIRE PASS, POSITIONED IN
THE BASE CENTER.
Note: Dimensions in "inches". It is very important that the base is
on level, it will allow the product to a better perform / operation.
8
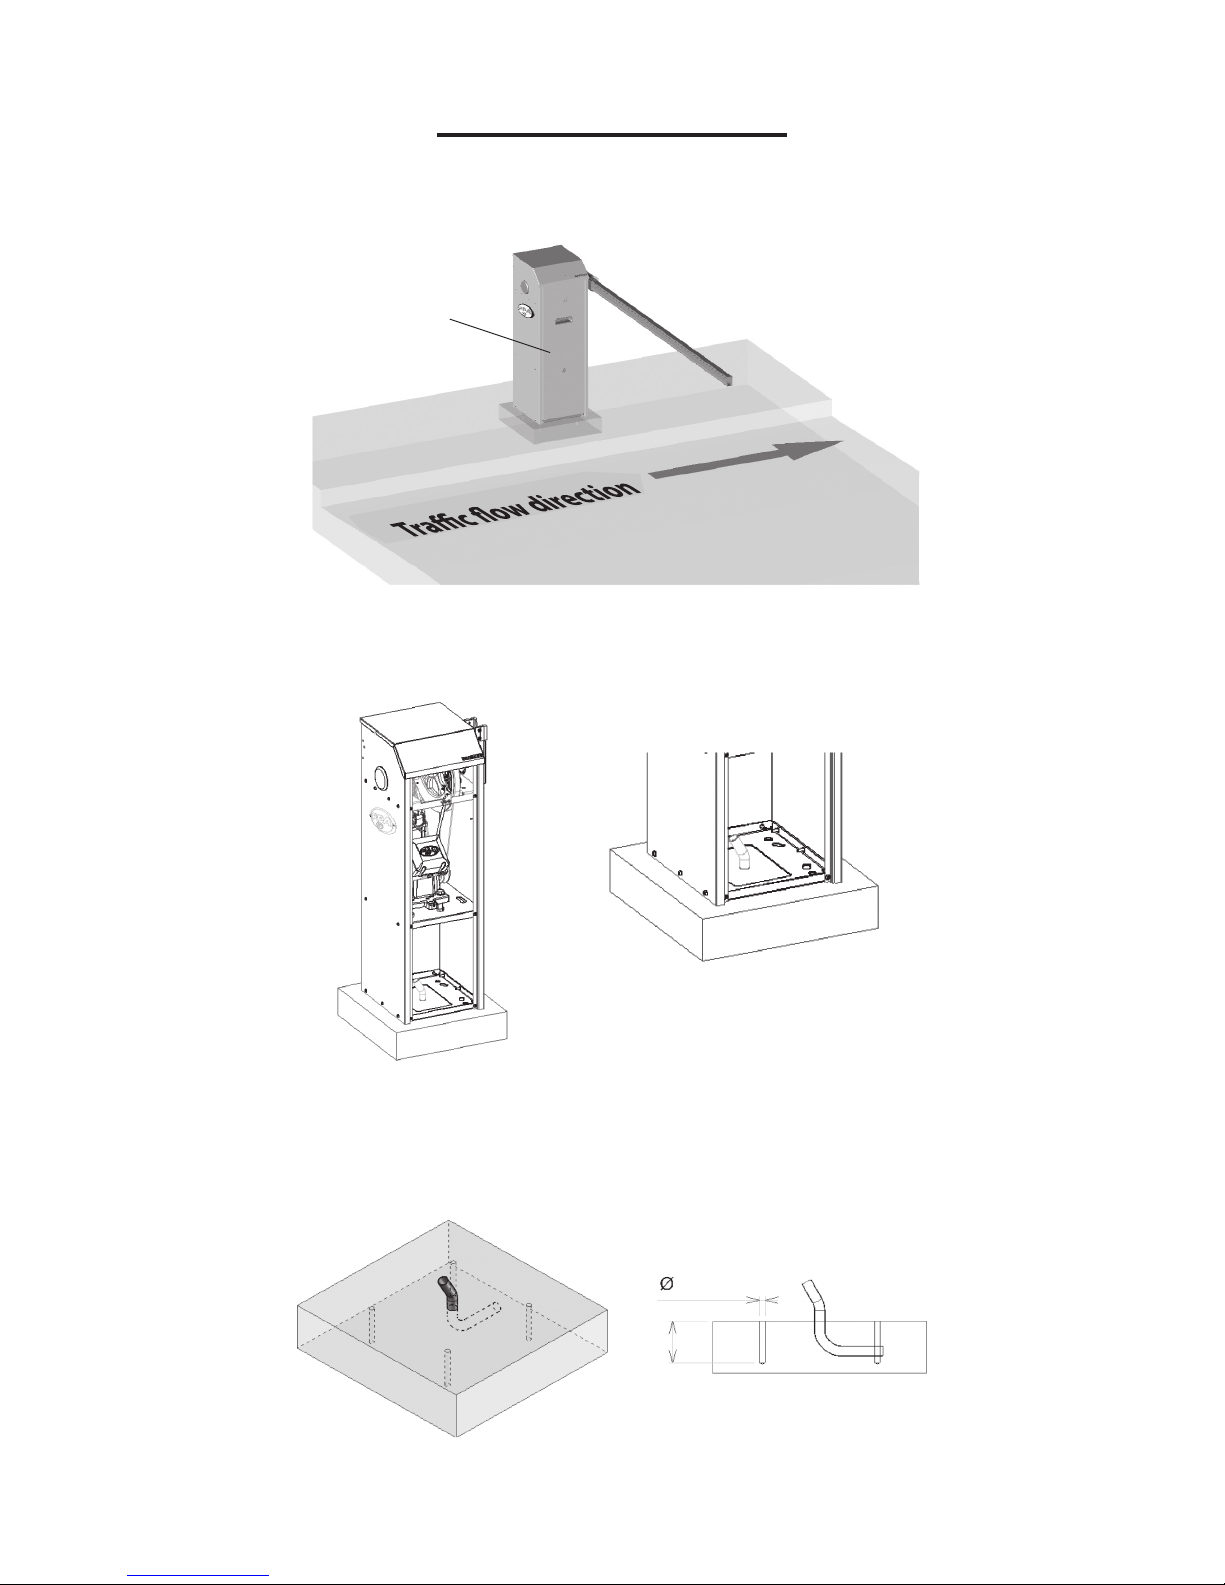
10 – BARRIER INSTALATION
To x the barrier note that the cabinet inspection door should face the side of the road or place of vehicular pass.
INSPECTION DOOR
Positioning / align the cabinet on the base and make the spot of the holes, so that the front of the barrier (side of the inspection door)
it is located towards the curb (street, passing vehicles)
Remove the cabinet to the base and do the drilling in the places previously marked
PS: Do 04 holes with a drill of Ø 0.39 inches at least 3.15 inches deep.
0.39 in (4 x)
3.15 in
9

Insert the parabolts holes in the base, as shown below
PS: The parabolts should not been tered completely, they must be about 0.59 inches above the base.
0.59 in
Place the cabinet on the base, tting the holes in the parabolts cabinet
PARABOLTS
Check again the alignment of the cabinet. If necessary, move it in a circular manner according to the desired
10
Insert the washers and nuts for a nal xing of the cabinet
WASHERS AND NUTS
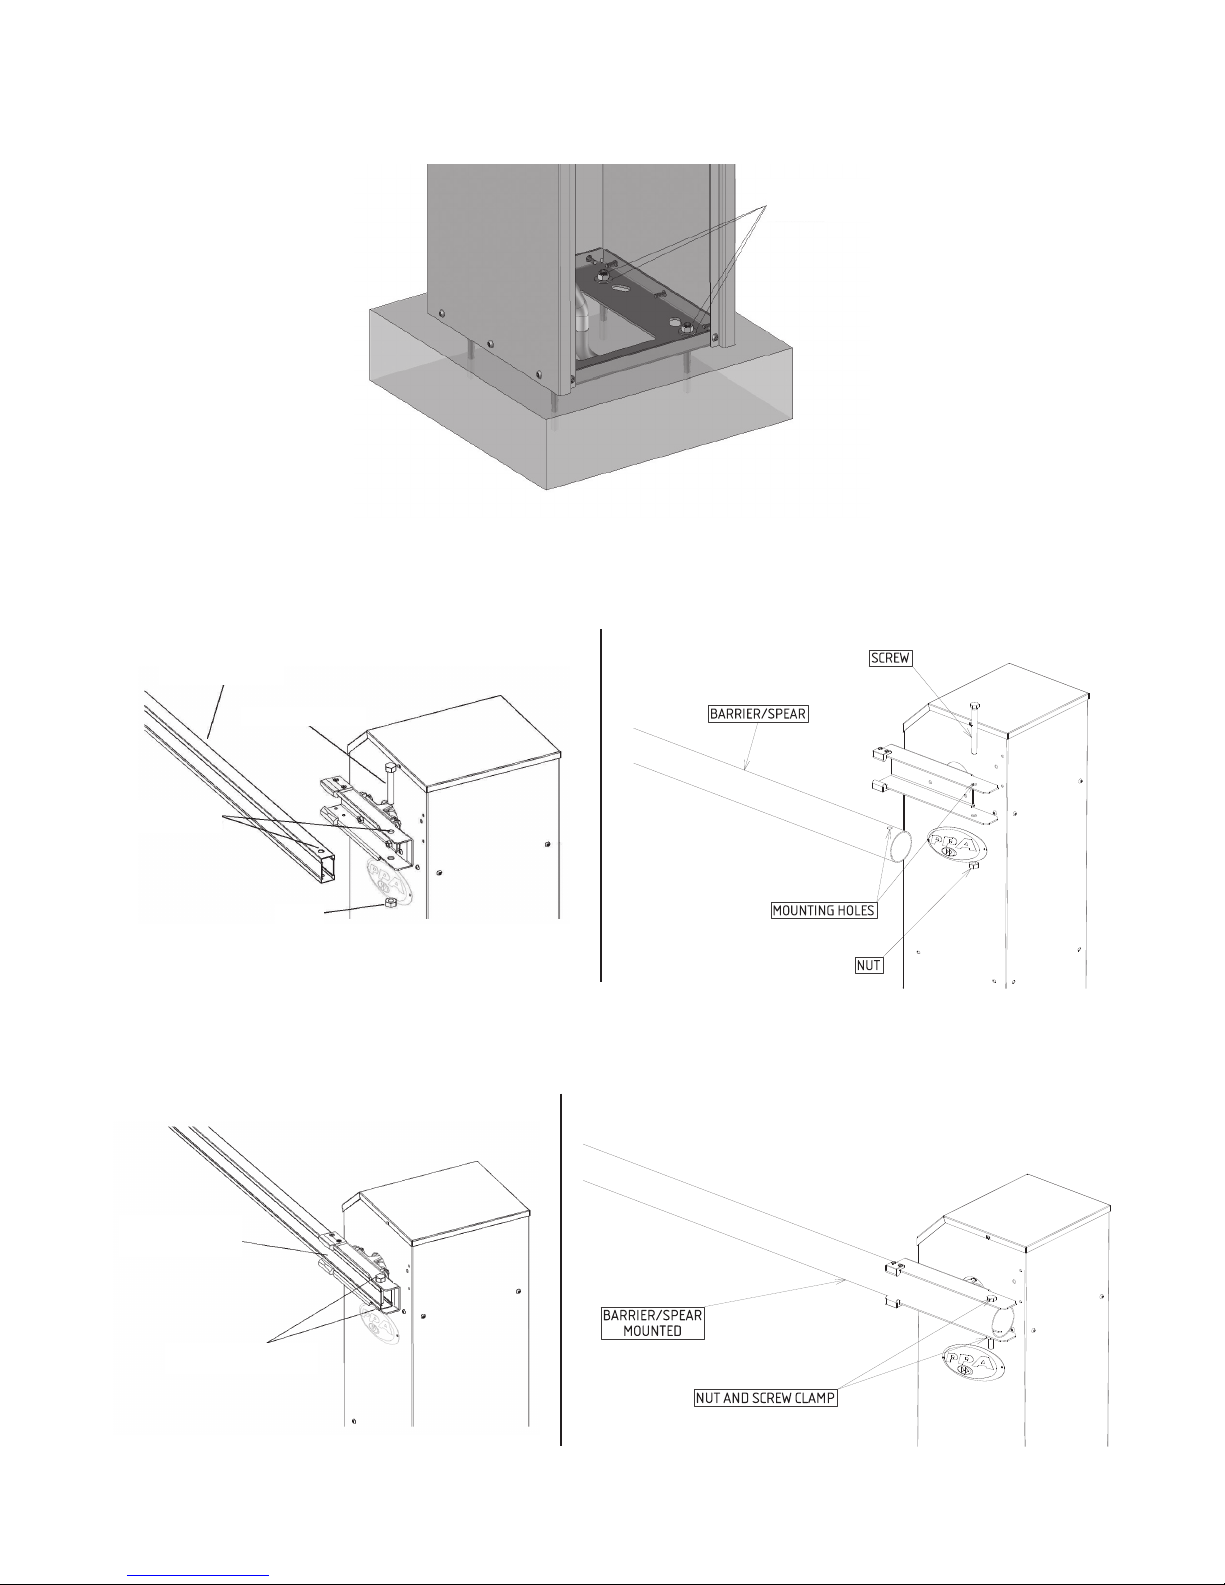
Insert the barrier / spear, the mounting assembly to the housing, aligning the mounting holes
BARRIER / SPEAR
SCREW
MOUNTING HOLES
NUT
After positioned, eect the tightening of the nut and bolt
BARRIER / SPEAR
MOUNTED
NUT AND SCREW CLAMP
11

Feed / energize the barrier with 120 V.
PS: Use wire 0.1 inches². Use a dedicated circuit breaker, ie a circuit breaker which is connected only to barrier.
Check / set the alignment of the barrier (opening and closing). Use this situation to the mechanical stops, moving them as needed
STOPS FOR OPENING AND
CLOSING ADJUSTMENT
The barrier will be in good working order at closing, when the barrier / spear is under the following conditions shown in the picture
The barrier will be in good working order at the opening, when the
barrier / spear is under the following conditions shown in the Picture
PS: It is not necessary to repeat the balancing of the barrier, as this
goes balanced from the manufactures. However if deemed necessary
following the guide lines below:
12

Barrier balancing and belt check
1. Remove the gear motor cabinet, leaving the free belt, make sure that the barrier remains in about 45° position. Other wise
the adjustment will be made through the spring bolt, dropping it or squeezing it until you nd the ideal setting.
2. Then, replace the gear box and belt, check that it is taut and ready for operation. With your thumb, make a regular pressure
on the belt. If it does not bend because it is taut. If the belt is loose, make the adjustment through the belt tensioning bolts
using a wrench in accordance with the respective nut.
Belt
Belt tensioners
Spring screw
Regulation of magnets bars
After properly balanced gate, and set the opening and closing "mechanical stops", check that it is necessary to make the adjustment of
the magnet bars.
1. Hold the barrier in the open position (90°).
2. Set the magnet bar so that the last magnet stand in front of the Hall sensor (encoder) and tighten the mounting screws.
Magnets Bar
Note: Do the same procedure with the barrier in the closed position (0°).
13

The barrier is ready to operate. Turn on the breaker, press the "+" button of the electronic board and the barrier will move
PS: On the rst triggering, the barrier will move slowly in the direction of opening, as will be making the path reading, after reading
the operation is normalized starting to operate in default speed manufactory for more accurate settings see options electronic board.
Operation:
The operation barrier is made by a central microcontrolled command, triggered by remote control or any other device that provides a
contact (Normally Open).
Control unit Triex:
The central command operates with a frequency inverter whose function is to trigger the three-phase induction motor from a single
phase AC network and a logical controller to the inverter operations.
System Encoder (Reed Digital)
The barrier position is monitored by an encoder. Also called Angular Positioning System transducer into digital signal, is used to control
and monitor accurately the movements of the gearbox.
Therefore, there is a possibility of recording, in memory, certain positions of the gate, and hence allow the opening and closing
automazed central control.
This is done by sensors which report the displacement direction and position of the barrier during operation.
Therefore, a device is responsible for reading, memorizing and accuracy of the route of a barrier.
14

11 - INTRODUCTION: ELECTRONIC SYSTEM’S TECHNICAL FEATURES
“Triex TOP” Control Board runs with a 32-bit processor able to perform 40 million instructions per second, with features which are
specic to electric motors control. Its processor can manage the entire operator setting, such as the motor, the encoder1 and even
receive a radiofrequency code from a transmitter.
It is endowed with an EEProm2 memory which stores the acquired remote controls’ codes in a encripted way. This memory can be
removed to be used in another compatible PPA product, such as PPA’s loose receiver ‘Alcance’ and vice versa. The control board is also
compatible to rolling code remote controls, with PPA’s protocol.
The system actuation can be performed via remote control through a embedded radiofrequency receiver, a loose receiver or any other
device with an NC (Normally closed) contact, such as a pushbutton.
The gate’s position control is performed through a PPA’s patented encoder system called “Reed Digital”.
12 - CONTROL BOARD
12.1 - Overview
15

12.2 - Power Supply
The power supply must be connected to the ‘R’ and ‘S’ inputs on the power terminal blocks, the CN7 Connector.
WARNING
Be sure that the circuit breaker in the electrical panel is in the OFF position
before attempting to connect any wiring to the control board.
It is required that the ground terminal
to be connected to the network
grounding cable.
12.3 - Induction Motor Connection
The three wires of the induction motor must be connected to the “MOTOR” terminal block. THERE IS NO NEED TO FOLLOW THE WIRES’
COLOR SEQUENCE3.
12.4 - ‘ENC’ encoder connection
It is used to connect, through a proper cable, the motor and the control board. There are sensors inside the gearbox which provides
information on displacement direction and position of the gate during operation. Such information is essential to the operator’s proper
running.
There are two sensors inside the encoder and each one is represented by the ENCA and ENCB LEDs. Each one lits according to the disk
position.
16

12.5 - ‘TRAVA’
In Barrier mode this output can be congured to signal “Arm Open”.
12.6 - ‘LUZ’ courtesy light connection
In case one opts to use the courtesy light, the ‘Optional Relay Module’ must be connected to this connector. The courtesy light will be
always enabled.
12.7 - ‘RX’ separated receiver connection
Input for connecting the separated receiver to the control board through the ‘RX’ connector. When a command is accepted, the ‘CMD’
(command) LED is activated. The HRF Jumper must be removed when the separated receptor is added to the system to switch o the
incorporated receptor.
12.8 - ‘BOT’ pushbutton connection
The control board acknowledges a pushbutton command when the ‘BOT’ terminal block is connected to the GND, i.e., a pulse t the GND.
Terminal block 1: GND (-);
Terminal block 4: BOT (NO Contact).
12.9 - ‘HIB’ end-of-stroke reeds connection
The control board acknowledges an activated ‘reed’ when the pin corresponding to it on the HIB pin bar is connected to the GND, i.e.,
a pulse to the GND.
The only condition that must be followed is that the reed that represents the open gate must be connected in such a way that the ‘RDA’
LED lits (HIB connector pin marked with an ‘A’). And the ‘RDF’ LED must lit when the gate is closed (HIB connector pin marked with an ‘F’).
12.10 - ‘SCI’ connector
Reserved for future use.
17

13 - ENTRAPMENT PROTECTION SYSTEMS
13.1 - Internal Entrapment Protection System (Type A)
This operator contains an inherent entrapment protection system (position sensor and current sensor) that allows the equipment to
detect the presence of obstacles during the closing cycle.
The barrier will reverse the arm direction if an obstruction is detected.
13.2 - External Entrapment Protection System (Type B1)
The external entrapment protection system is a non-contact sensor which also provides entrapment protection.
13.3 - ‘FOT’ closing cycle photoelectric sensor
WARNING
The control board only starts the closing movement when this sensor is
already working properly.
Use only Miller Edge 4-wire pulsed sensors to comply with UL325
WARNING
The logic controller supplies 15V (maximum
120 mA direct current) to power photocells and
receivers and IT DOES NOT HAVE OVERCURRENT
PROTECTION. In case the equipment need
a higher voltage or current, a further power
supply must be used.
IMPORTANT
For proper operation it is
important to connect the
enclosure of the sensors
(photoelectric receiver side)
to the chassis ground of the
operator.
18

13.4 - ‘ABR’
Connection for an external command to open the barrier arm.
Terminal block 1: GND (-);
Terminal block 5: ABR (N.O. Contact).
Connection for an external command to close the barrier arm.
13.5 - 'FEC'
Terminal block 1: GND (-);
Terminal block 6: FEC (N.O. Contact).
14 - GATE SYSTEM LOGIC FUNCTION
14.1 – Getting started in barrier mode (Barrier Arm travel recognition)
When the inverter is powered up, after being properly installed on the operator, the barrier should start an opening movement after an
external command or if the ‘+’ button is pressed.
If instead the barrier arm starts a closing movement, remove the ‘F/R’ jumper to change the direction of the motor. After removing the
jumper the barrier arm will stop. Press the ‘+’ button again or proceed with an external command. The barrier should start opening.
Afterwards, let the barrier open until it reaches the opening physical stop. Then, it will automatically reverse the movement direction
once again to close; let it reach the closing physical stop.
During the travel recognition only the obstruction of the external entrapment protection device can reverse the arm movement
direction.
Your automatic barrier is set and ready to use.
14.2 – Barrier Operation after a power cycle (travel recognized)
After the previous operation, the barrier does not need to recognize the travel again. When the inverter is powered up, the arm simply
opens slowly after a command (‘+’ button or external one), until it reaches the opening physical stop. The motor will turn o and the
barrier is ready to use again.
19

WARNING
It is important to properly locate the opening and closing stops so that
the gate can be automated.
15 - INVERTER PARAMETERS PROGRAMMING
15.1 - Operator model selection
The control board can operate, by using the same rmware, in both gates / doors and barriers.
To select the model, just remove the TST jumper and close the pines C/P (Cancel/Gate). When the function is selected the led “OSC”
ashes fast for a certain period of time and then indicates its value,
The following table shows the number of ashes for each function:
The pause between ashes is three seconds and ashes occur every half second, so they are very dierent.
To increase the values, just press the plus button "(+)" and to decrease just press the button less "(-)".
When you reach the desired template, return the jumper C / P to the TST position. Done that the plant is ready to operate in the chosen
gate operator model.
Numbers of ashes Referent Model
1 Nexus 600 / 900 / 1300 SL (SLS)
2 Nexus 2600 SL (SLS)
3 Dz Rio
4 Dz Predial / Condominium / 1500
5 Dz 2500 / 1500 HW
6 Barrier 14
15.2 - JUMPER TST
When the TST jumper is removed, the control board enters in a mode that allows to position the gate operator at a given point of its
travel to set limits or to verify the mechanical part.
In this mode, pressing the (-) button starts the motor clockwise rotation while the button is pressed, and when the (+) button is pressed
the motor rotates in direction counterclockwise in the same manner.
The control board also has other functions controlled by the DS1 DIP switch. When one selects one function, the 'OSC' LED rapidly blinks
for a specic period of time and the indicates its parameter. When the 'OSC' LED blinks each half second (0.5s), the minimum value is
selected; when it is o, a intermediate value is selected and when it keeps lit, the maximum value is selected. In order to increase the
values, just press the '+' button; to decrease the values, just press the '-' button when the desired function is selected.
When leaving the function, the 'OSC' LED rapidly blinks again for a specic period of time, and then blinks in a one-second interval
again.
15.3 - Adjustment of other parameters
20

Programming functions chart:
“FME” (Switches #1 and #6)
Function Description
Function selector. It selects the underlined functions and
selects the function to add and erase transmitters (TX).
Function: Add and erase transmitters (TX)
1 – Add: When this only switch is on 'ON" position, the
control board is ready to add or erase transmitters (TX).
In order to add a TX, press the transmitter button after
“_” or “TX (Switch #1)
“SA” (Switches #1 and #2)
“FCF” (Switches #1 and #3)
“FCA” (Switches #1 and #4)
“FOL” (Switches #1 and #5)
activating the aforementioned switch. Observe that the
'OSC' LED blinks rapidly if it is receivng a signal. Press '+'
button of the board to add it. Observe that the 'OSC' LED
keeps lit when the board receives a signal already added.
2 – Erase: In order to erase the transmitters added to the
memory, press both '-' and '+' button at the same time
for 10 seconds; observe that the LED will blink once per
second; afer the 10-second period is over, all transmitters
have been erased from the memory.
Push-to-close function / Pause time on auto-close mode.
Press “+” button for incrementing the pause time.
Press “-“ button for decrementing the pause time.
Each button pressed increment or decrement the pause
time from 2 seconds (1 seconds if in barrier mode).
After the pause time, the operator will close automatically.
To disable the auto-close function, set the pause time to
zero (Led OSC blinking).
The maximum pause time allowed is 240 seconds (Led
OSC ON).
Closed end-of-stroke.
Increases or decreases the distance in which the operator
starts to slow down when closing.
Open end-of-stroke.
Increases or decreases the distance in which the operator
starts to slow down when opening.
HOW TO SETUP THE BARRIER TO AUTOMATICALLY CLOSE
WHEN POWERED UP.
Press “-“ button to disable this function (Led OSC blinking).
Press “+” button to enable this function (Led OSC ON).
When this feature is enabled, the barrier will automatically
start the closing movement when powered up. This is
useful for the barrier to get its reference position after
a power cycle and become ready to use without any
previous command as explained in topic “15.2”. This
function also sets up the “LUZ” and “TRAVA” to signalize
“Barrier closed” and “Barrier open” respectively.
HOW TO DECREASE OR INCREASE THE FORCE OF THE
MOTOR DURING TRAVEL RECOGNITION.
If necessary, it is possible to decrease the motor force
during the travel recognition, for example, to avoid that
the rack bar breaks.
You can also increase the strength, in case it is necessary.
Press '+' button to increase the strength and the '-' button
to decrease it.
The minimum level is 40% (LED blinking) and it increases
four levels at a time (4%) up to the maximum 100% level
(LED lit).
This is the same force that will be used in the limits of the
gate travel (“Low Speed Force”). This is a very important
conguration because it is related to entrapment
protection adjustment. For more information see topic
‘14.2’
21

ENABLING FOLLOWER (MIRRORED) PHOTOCELL.
In some facilities, such as gated communities, it is
necessary to the gate to close automatically as soon as the
vehicle gets out from the gate path. In order to do so, one
must install one photocell and enable the 'follower' (AKA
mirrored) function.
Press '+' to enable it and include the period of time
“FSG” (Switches #1 and #7)
“TM” (Switches #1 and #8) Reserved for future use.
“LUZ” (Switch #2)
“VFC” (Switch #3)
allowed before the automatic closing.
The minimum level is zero (0 – LED blinking) and it
increases one levl at a time (1) up to its maximum
60-second level (LED lit).
Example: LED blinking (function disabled). When pressing
the '+' button once, the LED is turned o and the 'follower'
function is enabled. The pause time before the automatic
closing begins is zero (0) second. If one presses the button
once more, the pause now is one (1) second. And so on, up
to sixty (60) seconds, when the LED lits.
Courtesy light timing.
Selects the time interval the 'LG' output is kept activated
afer the gate closing. It increases ten seconds at a time
(10s), from zero (0s) up to two-hundred forty seconds
(240s). This output is automatically activated when a
switch from the DIP switch is activated or the acquiring
process begins.
Speed at the travel’s limits
Speed adjustment for starting and stopping region
•Dip3to"ON"("VFC");
•"(+)"Buttonincreasesthespeed;
•"(-)"Buttondecreasesthespeed;
“VEL” (Switch #4)
“PAA” (Switch #5)
In barriers, the adjustment is from 1 to 1Hz, from 4Hz up
to 20Hz.
Adjust the speed of opening and closing
•Key4to"ON"("VEL");
•"(+)"Buttonincreasesthespeed;
•"(-)"Buttondecreasesthespeed;
For barriers, the adjustment is from 2 to 2Hz, from 20Hz up
to 80Hz.
Gate:
TURN THE PAUSE OFF THROUGH A COMMAND DURING
OPENING.
When the operator is installed on gated communities,
it may be necessary to turn the function which 'stops'
(pauses) the gate o when receiving a command during
opening.
Press either the '-' button to turn the opening pause o
(LED blinking) or the '+' button to turn it on (LED lit).
22

In Barrier mode:
SETUP “BOT” FOR OPENNING ONLY.
“FOP” (Switch #6)
“VST” (Switch #7)
Press “-“ button to disable this function (Led OSC blinking).
Press “+” button to enable this function (Led OSC ON).
Whe this function is enabled, the “BOT” input will never
trigger a closing command, so any command through
“BOT” input will open the barrier arm.
Gate's start speed.
To change it: press '-' button to decrease and '+' to
increase.
Minimum 20Hz (OSC LED blinking) increasing from 10Hz
up to 60Hz ('OSC' LED lit).
16 - ERASING THE RECOGNIZED TRAVEL
In order to erase the acquired path, one must simply press both '+' and '-' buttons at the same time and keep them pressed until 'OSC'
LED lits. When the buttons are released, the acquired path is already erased.
Note: All switches on the DS1 DIP Switch must be on 'OFF' position.
17 - APPLYING THE DEFAULT STANDARD SETTINGS
To set all patterns to the factory standard, one must simply press both '+' and '-' buttons at the same time and keep them pressed until
'OSC' LED lits; after it lits, do not release the buttons; keep them pressed until 'OSC' LED starts blinking. When the buttons are released,
the acquired path is already erased and the settings are back to the default.
23

18 - ACCESSORIES
The electronic control unit allows the installation of other accessories (NOT INCLUDED) that add functions to operator and give more
comfort and safety to the user:
18.1 - Garage Light
Turns the light from the garage where the operator is installed, so that it is activated to open, allowing check for any individual near
the residence.
The light goes out only after the complete closure of the gate with adjustable time delay (this accessory not included).
18.2 - Flashing lights
Alert the pedestrian exit or driveway in a particular location.
The ag comes into operation when the gate is activated to open and o so that it is fully closed and o (this accessory not included).
19 - EVENT / FAILURE INDICATION
19.1 - Microcontroller functioning indication
The main function of the 'OSC' LED is to indicate if the board's microcontroller is properly running (it blinks with a stable frequency
(~1Hz), since it is connected to a power supply).
19.2 – Indication of over current or short circuit on the motor
'OSC' rapidly blinks in 0.1-second intervals, to warn that the capacitors have been disarmed due to over current or short circuit on the
motor. The board can normally run 10 seconds after the over current.
19.3 – EEPROM fault indication
'OSC' LED blinks twice when there is no memory inserted.
19.4 – EEPROM invalid data indication
'OSC' LED blinks three times when there is an available memory, but it has a content that the microcontroller does not identify as a Valid
Transmitter Code.
24

19.5 - Open end-of-stroke indication
'FC' LED blinks when the gate is on an open end-of-stroke area.
19.6 - Close end-of-stroke indication
'FC' LED keeps lit when the gate is on a closed end-of-stroke area.
19.7 - Capacitor load indication
'BUS' LED indicates that the high voltages capacitors are charged. Do not touch them while this LED is ON (even when the control board
is disconnected from the power supply.
19.8 – Encoder Test
It is possible to test the operator's encoder; to do so; simply connect it to the control board and check if the 'ENCA' and 'ENCB' are
blinking when the operator runs. Each LED corresponds to a specic sensor; for example, 'ENCA' LED corresponds to the 'A' sensor inside
the gear motor.
19.9 - Thermal Protection
The operator has a thermal protection device that shuts o the motor when it reaches a temperature above 266 ºF.
The control board receiving two consecutive commands during this period, it will enter in hardshutdown mode and the operator will
need to be reset.
20 - MAINTENANCE
On the table below, are cited some PROBLEMS - FAULTS, POSSIBLE CAUSES AND CORRECTION - which may occur in your operator.
Before any maintenance, the total disconnection from the mains is required.
TROUBLES / SOLUTIONS
FAIL CAUSE SOLUTION
The gate does not correspond to the
path of the place where the operator
has been installed (It breaks before it
reaches the stop or slams when closing).
Gate keeps open and whenever it
receives opening commands, it closes.
'OSC' LED blinks rapidly and the motor
turns itself o.
There is an acquired path dierent from
the place where the operator has been
installed.
Acquiring was not properly performed. Refer to item 'First operation after a
Current sensor activated. This may
happen when the motor has a
malfunction.
Press both '+' and '-' buttons at the
same time and keep them pressed until
'OSC' LED lits.
frequency inverter is installed on the
operator (Acquiring).
Check stator resistance. Check the
motor current (It must be less than
medium 3A RMS and 5A RMS peak
current (2s maximum)).
25

21 – METHODS OF TRIGGERING BARRIERS
WARNING
The described options below, vary according to the specic necessities for
each location, dened in the act of purchase and installing of the product
Some forms of triggering are:
Inductive loop:
Device installed below the oor through which vehicles whose function is to detect the presence of a metal body (vehicle), automatically
triggering the opening of the barrier. This device maintains the barrier open while the vehicle is over the loop, avoiding that it closes
over the vehicle. The barrier closes automatically after the passage of the vehicle through the loop.
RF device and remote controls:
Pressing a registered button of a remote control, the opening of the gate is triggered. The closing of the meeting may be automatic or
semiautomatic mode. In semi-automatic mode, the remote control button must be triggered again to close the barrier.
Buttonhole:
generally used in locations that have security booth with guard controlling the ow entry and exit of vehicles. It is a device which,
through a button triggers the opening of the barrier.
Totens access control with PVC card:
It is a frequently used system in parking lots of supermarkets, shopping malls, among other places, there may be charges or not. At the
entrance, the system issues a card that, when removed, the barrier opens. Later, the same card must be inserted in the output totem,
opening the barrier and releasing the passage of the vehicle.
WARNING
In some cases, we recommend installing photocells that detect any
obstacle in the barrier course. When it detects an object,on the sensor
transit camp, the photocell immediately will send a signal to the barrier,
keeping the same open or pressing it in the open direction, in case it is
closing to avoid possible accidents.
26

22 – PROCEDURES FOR CLEANING AND MAINTENANCE
Before cleaning or doing any maintenance on the barrier, always switch o the power as follows:
When the barrier is switched directly to the the power grid: To disable it, do the shutdown of bipolar breakers in the power input clock.
That way all the power of the place will be switched o.
When you have ON / OFF switch (recommended option): It is recommended the installation of an ON / OFF switch just to the barrier and
its peripherals. That way, the barrier can be connected or disconnected without the need to cut all the local power
WARNING
• Keep the cabinet always closed, opening it only for occasional
maintenance. The cabinet is all mechanical and electronic protection
systems.
• Do not route water jets into the cabinet as this may damage all the
equipment.
• Never use abrasive cleaning products, such as a steel sponge, thinner,
solupan and other solvents.
• Do not use any lubricant on the belt and the pulleys.
23 – OPERATION ON POWER OUTAGE
When there is a power failure, the barrier will operate in manual mode until the power is restored. The barrier of the barrier can be lifted,
lowered and retracted manually.
On returning to power, the barrier will make movement to calibration.
1. Set the barrier through any of the installed devices.
2. The barrier will open slowly.
3. Next, the barrier closed at normal speed, returning to work in automatic mode.
WARNING
If the product presents problems in its functioning, consult at Authorized
Service. Always perform periodic maintenance to maintain the correct
performance ande safety equipment conditions.
27

24 - REPAIR PARTS
K1 60HZ (NO ARM) U
28

29

BRASSO 60HZ (NO ARM) U
30

31

BARRIER 60HZ (NO ARM) U
32

33


www.ppa.com.br
Av. Dr. Labieno da Costa Machado, 3526 - Distrito Industrial - CEP 17400-000 - Garça - SP - Brazil
MOTOPPAR INDÚSTRIA E COMÉRCIO DE AUTOMATIZADORES LTDA.
 Loading...