

PP3DP UP! User Manual
Personal Portable 3D Printer
UP!
User Manual
www.PP3DP.com

UP! 3D Printer User Manual 1
Legal Notice
The information in this document is subject to change without notice.
PP3DP.COM MAKES NO WARRANTY OF ANY KIND WITH REGARD TO THIS
MATERIAL, INCLUDING, BUT NOT LIMITED TO, THE IMPLIED
WARRANTIES OF MERCHANTABILITY AND FITNESS FOR A PARTICULAR
PURPOSE. PP3DP.com shall not be liable for errors contained herein or for incidental
or consequential damages in connection with the furnishing, performance, or use of
this Material. Changes or modifications to the system not expressly approved by
PP3DP.com, the party responsible for compliance, could void the user’s authority for
use. This document is protected by copyright. All rights reserved. Its use, disclosure,
and possession are restricted by an agreement with PP3DP.com per software copyright.
No part of this document may be photocopied, reproduced or translated into another
language without the prior written consent of PP3DP.com.
© Copyright 2010 PP3DP.com All rights reserved.

1. Introduction
UP! 3D Printer User Manual 2
1.INTRODUCTION...........................................................................................................................3
1.1HOWTOUSETHISMANUAL....................................................................................................................3
1.2PRECAUTIONS.....................................................................................................................................3
1.2.1Safety.......................................................................................................................................3
1.2.2Protection............................................................................................................................... .4
2.OVERVIEW...................................................................................................................................5
2.1APPEARANCE......................................................................................................................................5
2.2 SPECIFICATIONS...............................................................................................................................8
2.2.1PrinterPhysicalCharacteristics................................................................................................8
2.2.2Specifications...........................................................................................................................8
2.2.3Environmentalspecifications...................................................................................................8
3.OPERATION.................................................................................................................................9
3.1 PREPARATION..................................................................................................................................9
3.1.1Installingtheprinter................................................................................................................9
3.1.2Installingthesoftware...........................................................................................................17
3.1.3Installingdrivers....................................................................................................................17
3.2 USING THE BASIC FUNCTIONS........................................................................................................19
3.2.1Starttheprogram..................................................................................................................19
3.2.2Loadinga3Dmodel............................................................................................................... 19
3.2.3ViewOptions.........................................................................................................................21
3.2.4Modeltransformations..........................................................................................................22
3.2.5Placingmodelsontothebuildplatform................................................................................24
3.3 GETTING READY TO PRINT............................................................................................................25
3.3.1InitializingthePrinter............................................................................................................25
3.3.2CalibratingtheNozzleHeight................................................................................................26
3.3.3Levelingtheprintplatform....................................................................................................28
3.3.4OtherMaintenanceOptions..................................................................................................29
3.3.5PreparingthePlatform..........................................................................................................31
3.3.6PrintSetupOptions................................................................................................................34
4.PRINTING..................................................................................................................................39
5.MODELREMOVAL......................................................................................................................41
REMOVINGSUPPORTMATE RI A L.................................................................................................................42
6.MAINTENANCE..........................................................................................................................44
CHANGINGTHEMATE RIA L.........................................................................................................................44
VERTICALCALIBRATION.............................................................................................................................44
CLEANINGTHENOZZLE..............................................................................................................................46
REMOVING/CHANGINGTHENOZZLE..........................................................................................................47
CLEANINGTHEPLATFORM.........................................................................................................................47
LUBRICATIONOFBEARINGS........................................................................................................................48
SPAR EPAR TS ...........................................................................................................................................48
7.0.TIPS&TRICKS.........................................................................................................................49
8.TROUBLESHOOTING...................................................................................................................51
SOLUTIONFOR"USB.DLLNOTFOUND"PROBLEM..........................................................................................51

1. Introduction
UP! 3D Printer User Manual 3
1. Introduction
1.1Howtousethismanual
This User Manual is divided into four sections which cover the Introduction,
Overview, Operation, and Troubleshooting. Please study this manual carefully before
installation, and use the printer according to these instructions. Keep this manual
handy and refer to it when necessary.
1.2Precautions
Please read this section carefully before using the printer.
1.2.1 Safety
The printer can only be used with the power adapters supplied by this company,
or the product may be damaged, with a risk of fire.
To avoid burning, or model deformation, do not touch the model, nozzle, or the
platform by hand, or any other part of the body, while the printer is working or
immediately after it has finished printing.
Protective glasses should always be worn when removing support material,
especially PLA.
The brown sections of the currently supplied gloves melt at around 200 degrees,
therefore please do not hold the extruder block with the gloves.
There is a slight smell from ABS when it is being extruded. The smell is, however,
not too unpleasant. A well ventilated room is recommended by most people to be
safe, however when printing keep the printer away from any draughts as this can
affect the warping of ABS prints. When ABS is burnt is releases toxic fumes.
The following classifications are used in this manual.
CAUTION: Indicates a potentially hazardous situation which, if not
avoided, may result in minor or moderate injury.
WARNING: Indicates a potentially hazardous situation which, if not
avoided, may result in serious injury.

1. Introduction
UP! 3D Printer User Manual 4
Gloves: When performing certain maintenance procedures, the machine
may be hot and gloves are required to avoid burns.
Safety Glasses: Wear safety glasses to avoid injury to your eyes.
1.2.2 Protection
The printer must not be exposed to water or rain, or damage may occur.
Do not shut down the UP! System or pull out the USB cable when loading a
digital model, or the model data may be lost.
When using the “Extrude” function, keep at least 50mm between the nozzle and
the platform. If too close, the nozzle may get blocked.
The printer is designed to work properly at an ambient temperature of between
15°C and 30°C and humidity of between 20% and 50%; Operating outside these
limits may result in low quality models.
2. Overview
UP! 3D Printer User Manual 5
2. Overview
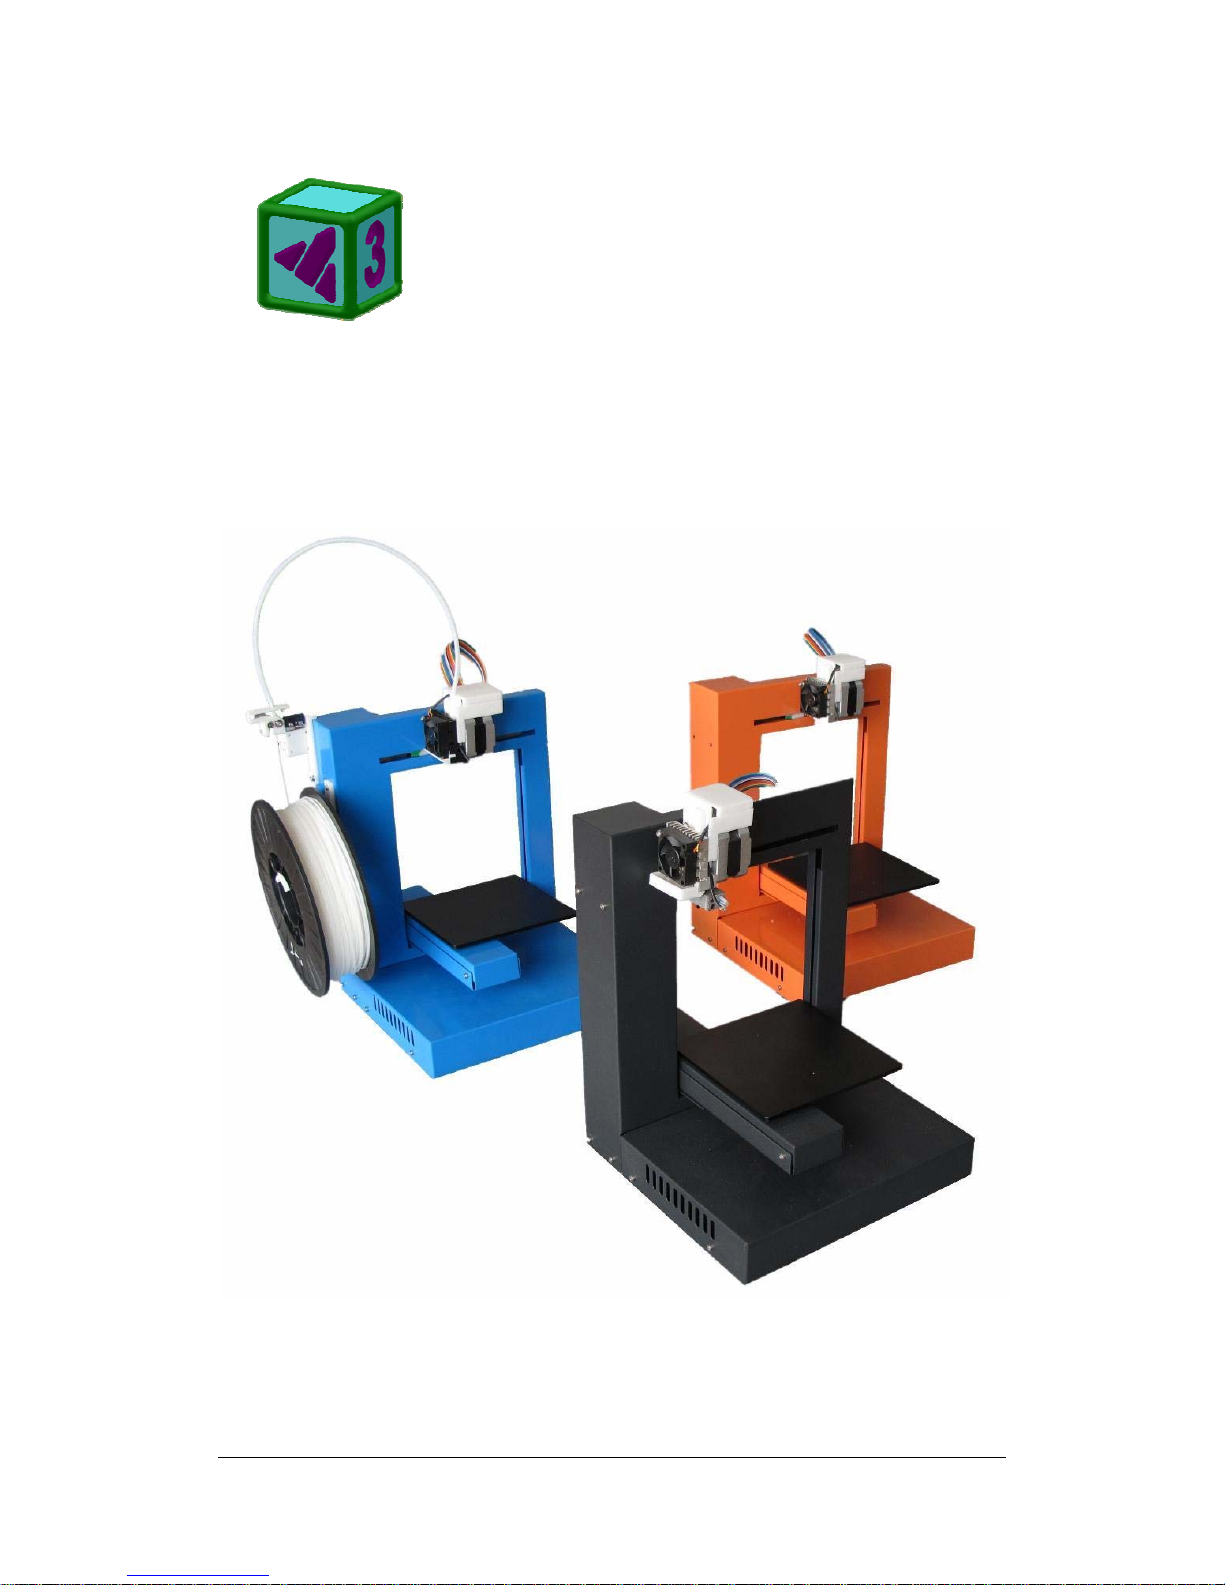
The UP! Printer is designed with ultimate portability and simplicity in mind. The
system and software allow you to print great models with only a few keystrokes, even
if you have never used a 3D printer before. The system uses a nozzle to deposit
molten plastic, so printed parts are strong and durable. Congratulations on purchasing
an UP! Printer.
2.1Appearance
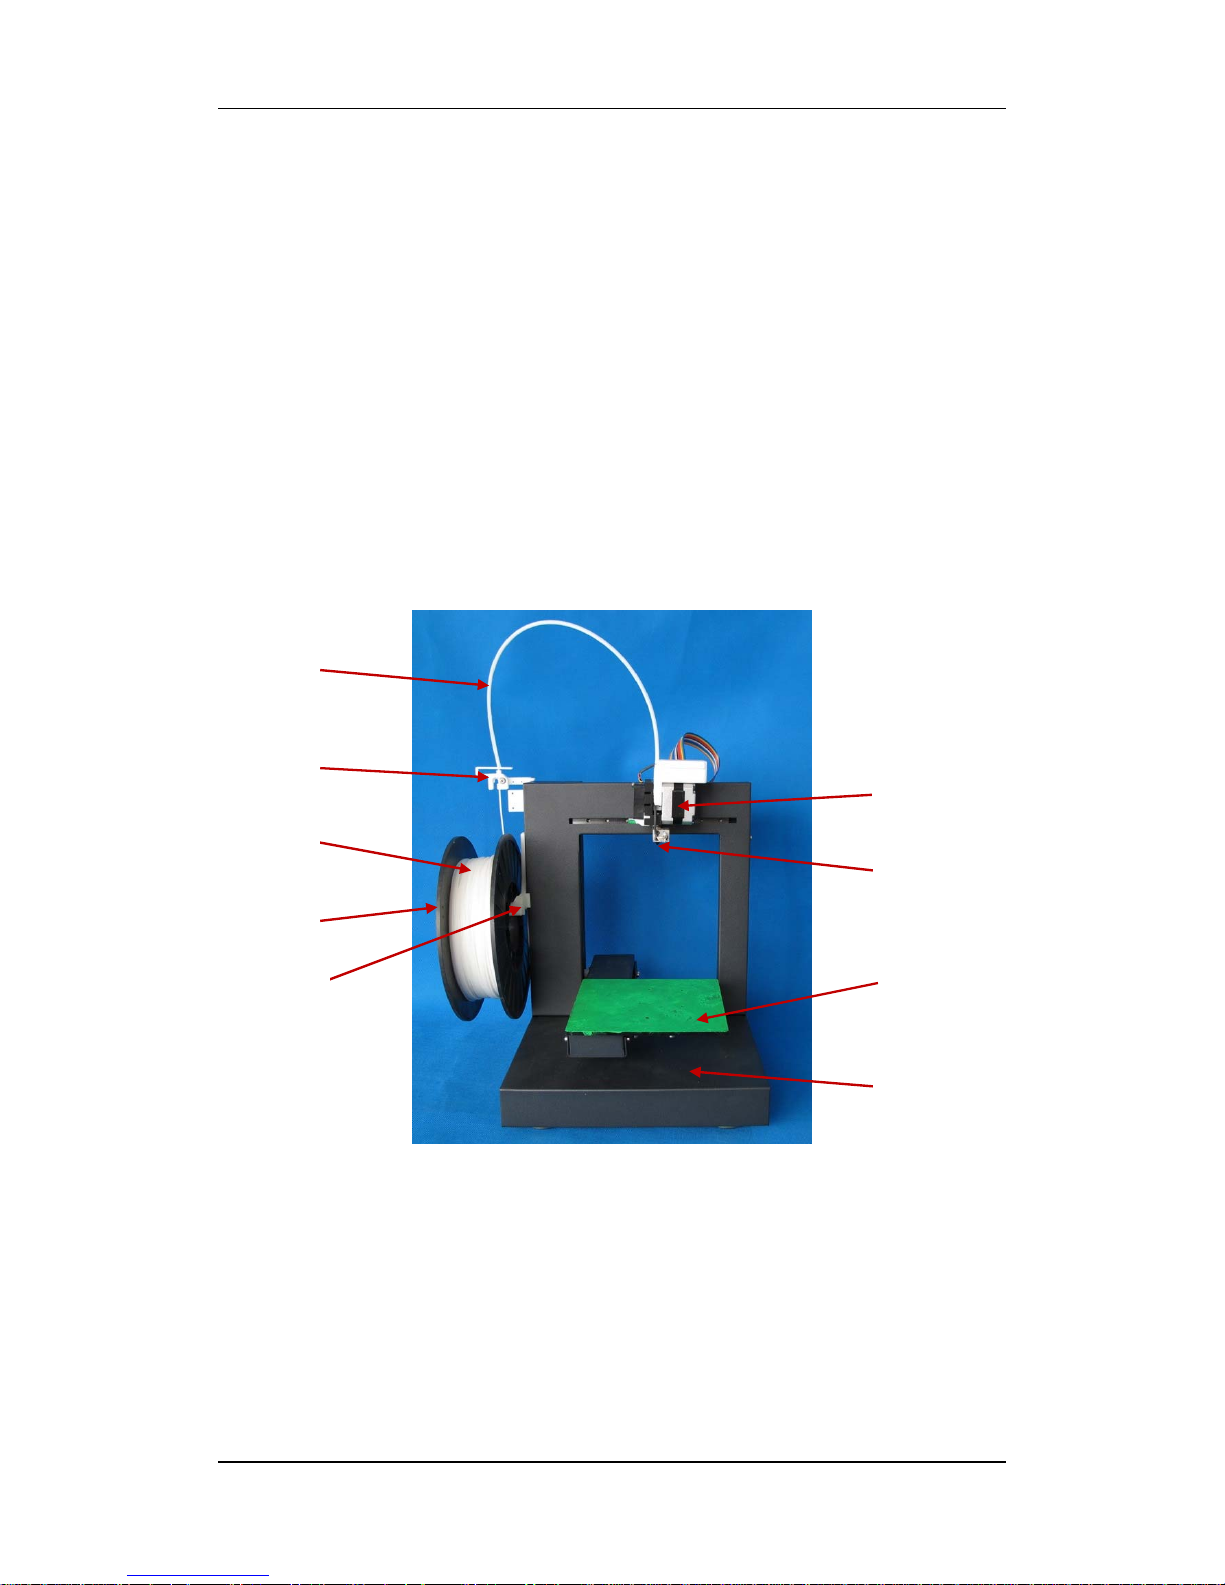
Figure 1. Front view of printer
①
Pedestal ② Platform
③ Nozzle ④ Extruder
⑤ Filament tube ⑥ Filament supplier
⑦ ABS plastic ⑧ Material spool
⑨ Material spool holder
①
②
③
④
⑥
⑤
⑧
⑦
⑨
2. Overview
UP! 3D Printer User Manual 6
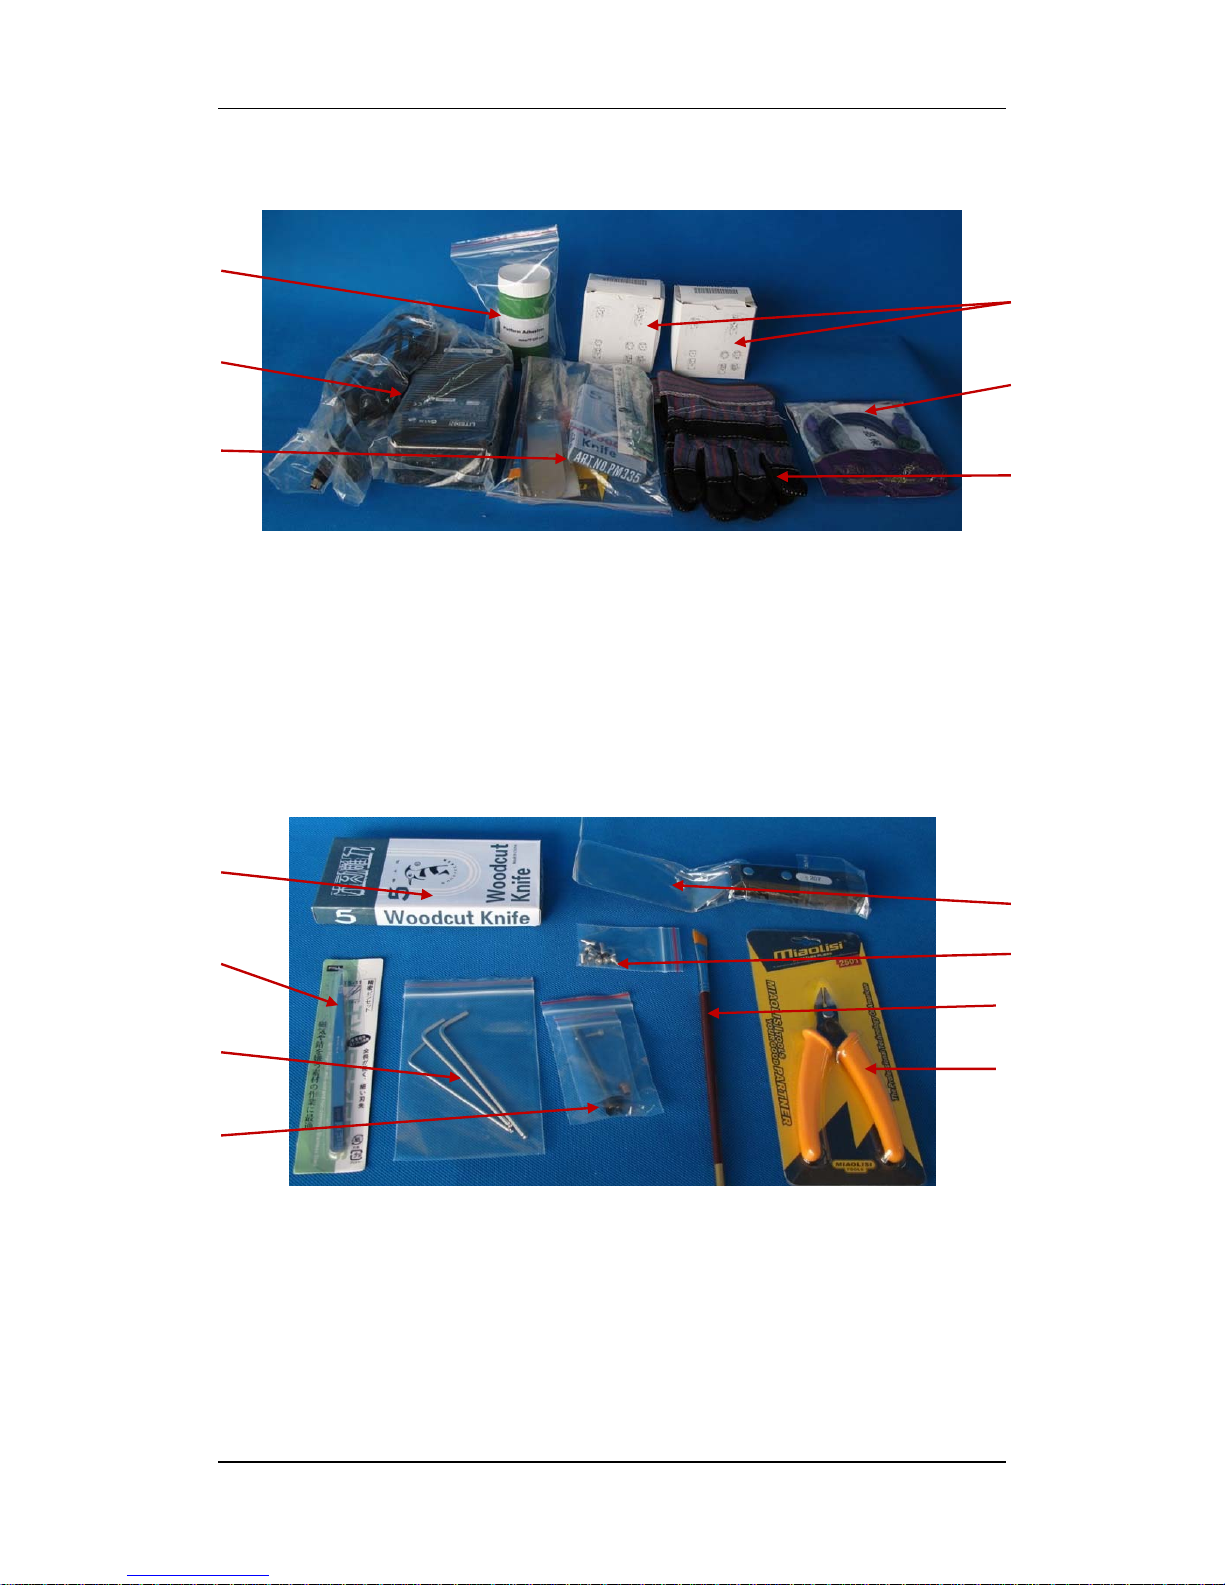
Figure 2. Kit contents
① Platform adhesives ② Power adapter (20 V)
③ Tool set ④ Power adapter (5 V)
⑤ USB cable & Filament tube ⑥ Gloves
Figure 3. Tool set
① Woodcut knife ② Tweezers
③ Hexagon wrench ④ Nozzle wrench & Nozzle
⑤ Shovel ⑥ Screws
⑦ Brush ⑧ Pliers
①
②
③
④
⑤
⑥
①
②
③
④
⑤
⑥
⑦
⑧

2. Overview
UP! 3D Printer User Manual 7
Figure 4. Axis
① Extruder axis
② Z axis
③ Platform axis
①
②
③
2. Overview
UP! 3D Printer User Manual 8
2.2 Specifications
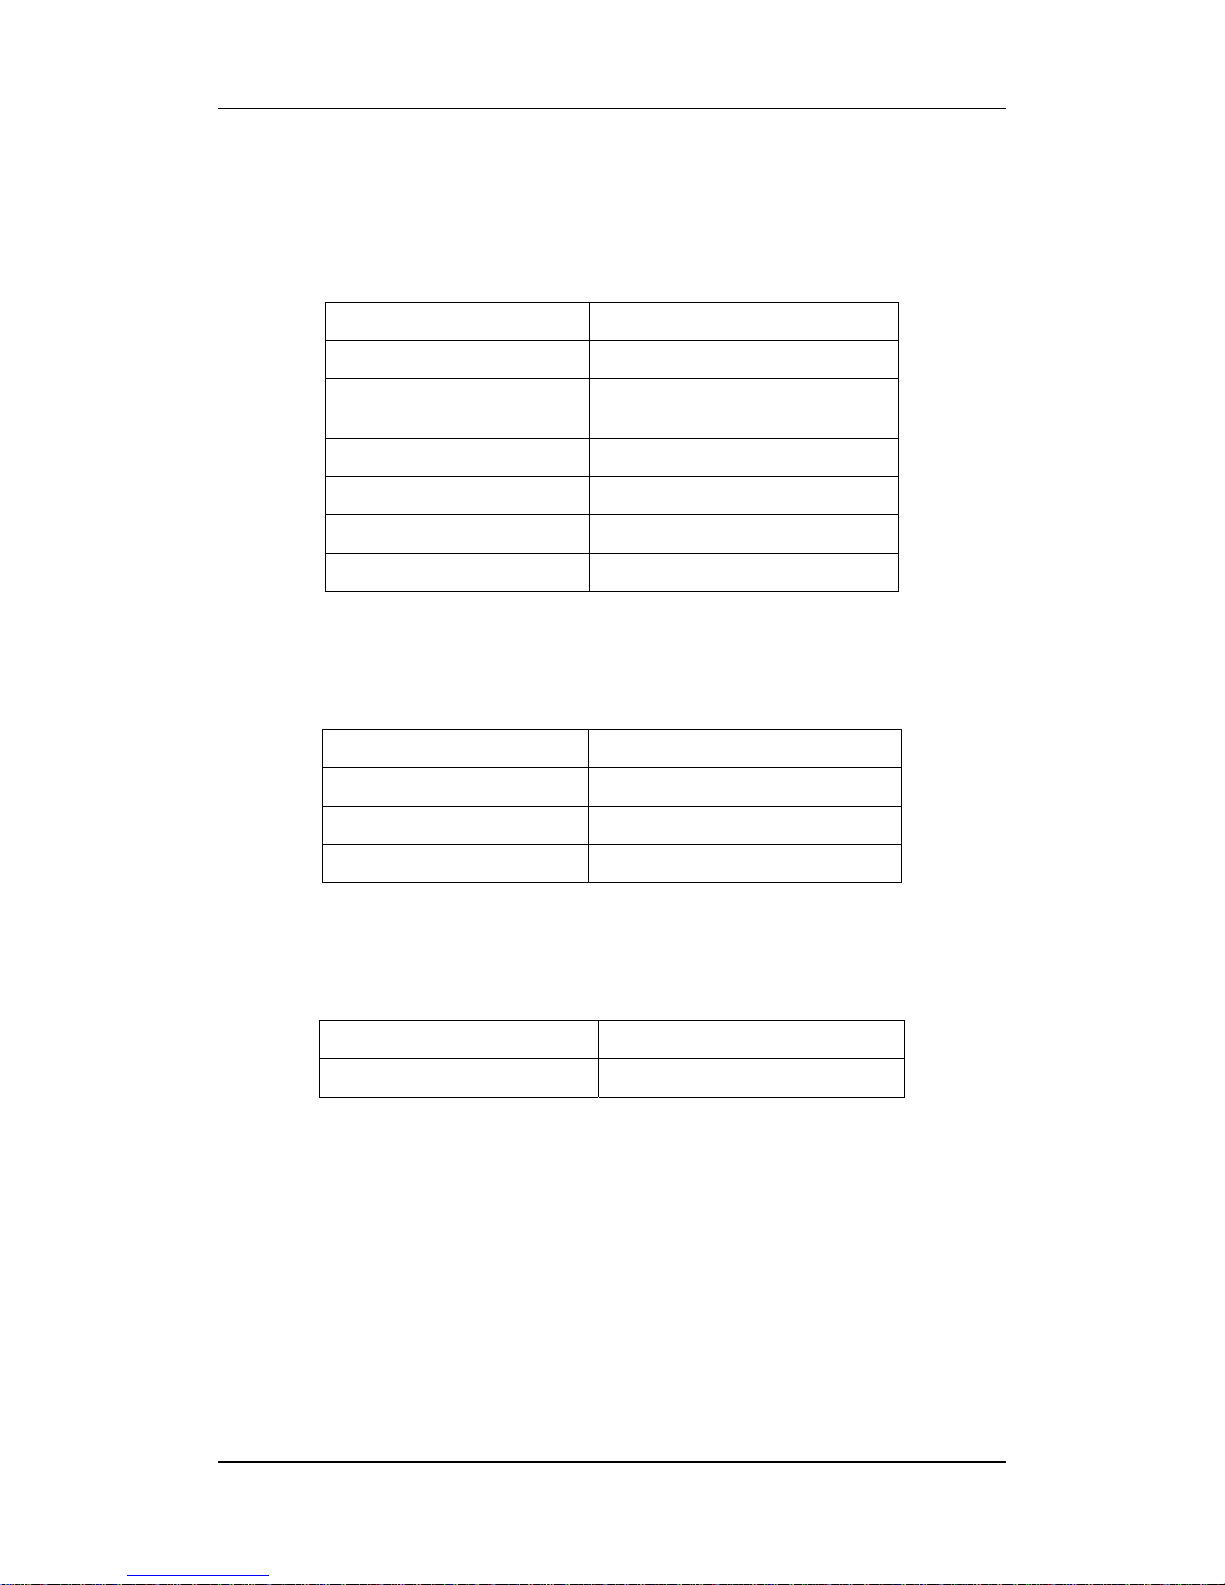
2.2.1 Printer Physical Characteristics
Printing Material ABS or PLA Plastic
Material Color White
Layer Thickness
0.20 – 0.40 or 0.25-0.35 mm,
depending on model
Print Speed 10-100 cm3/h
Print Size 140×140×135mm
Printer Weight 5 KG (11 lb)
Printer Size 245 × 260 × 350 mm
2.2.2 Specifications
Power Requirements 100-240 VAC, 50-60 Hz, 200W
Model Support Auto-generated Support
Input Format STL
Workstation compatibility Windows XP/Vista/Win7
2.2.3 Environmental specifications
Ambient temperature 15°C~30°C
Relative humidity 20%~50%
3.Operation
UP! 3D Printer User Manual 9
3. Operation
3.1 Preparation
3.1.1 Installing the printer
Open the box and take out the printer and accessories.
Assemble the parts contained in the box as follows:
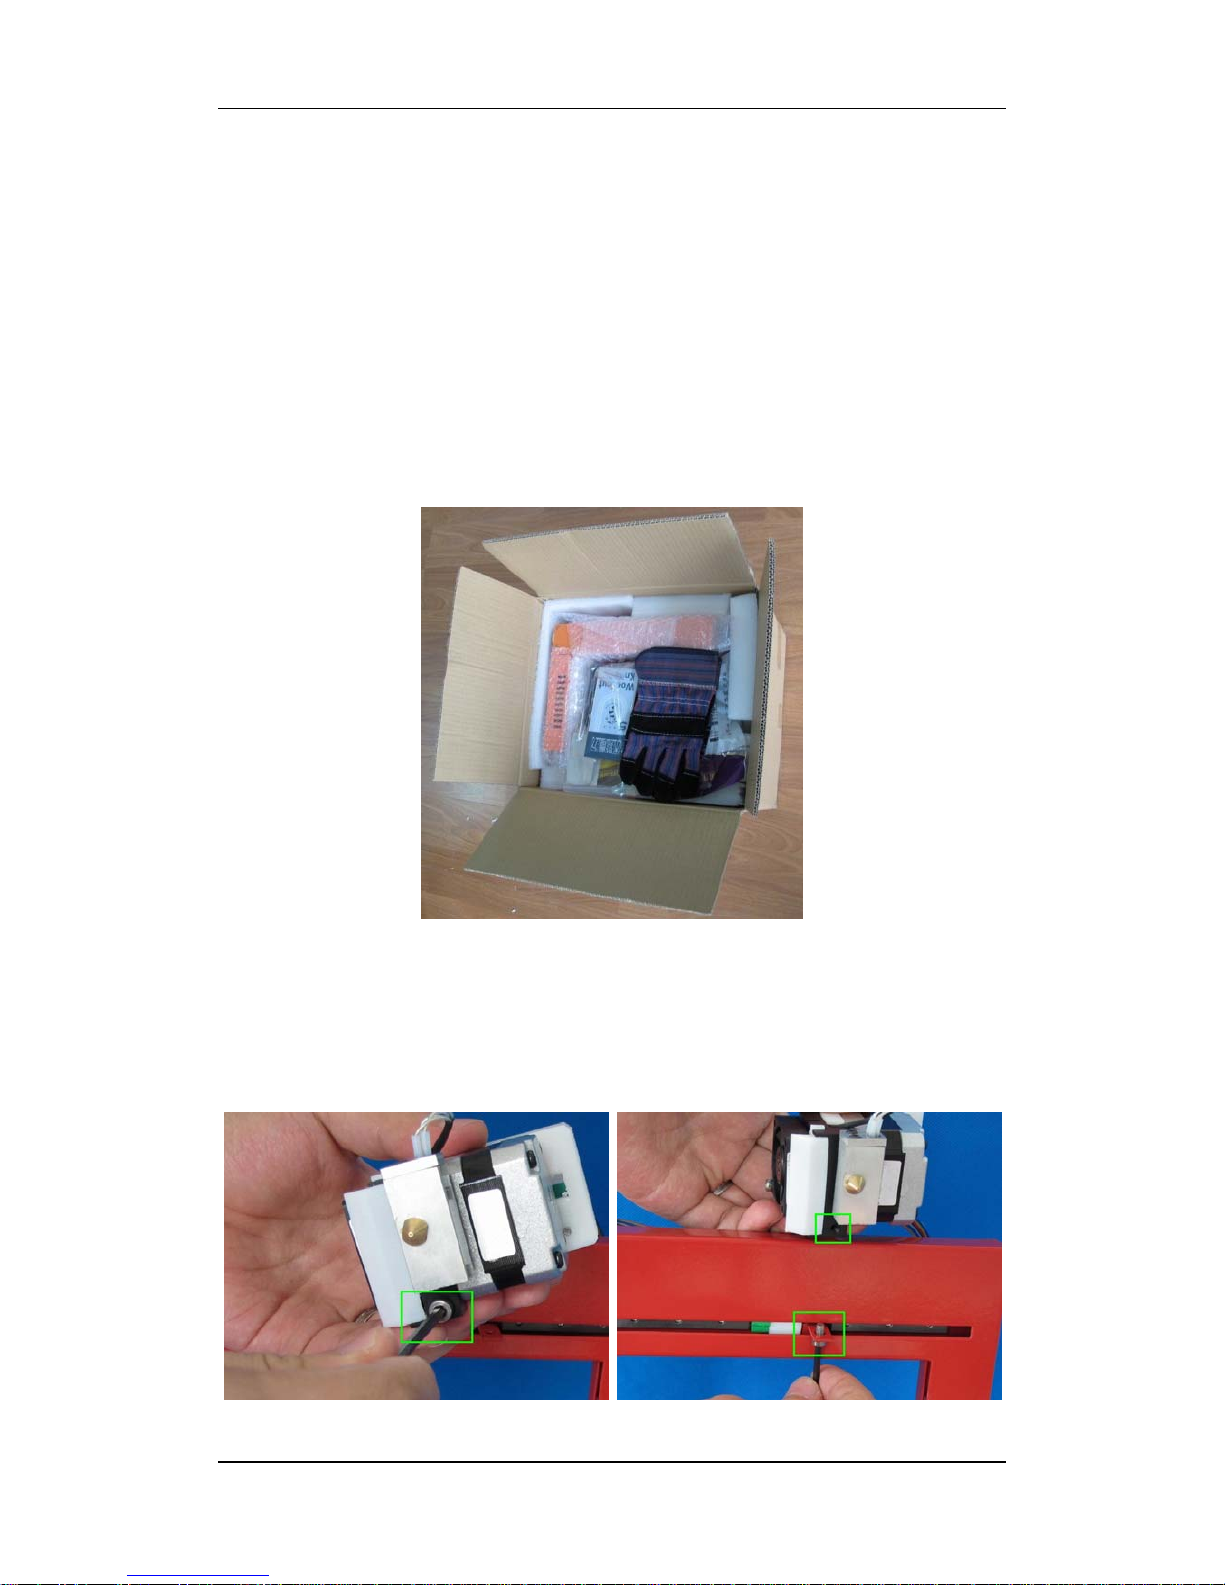
1. Unscrew the M4 screw from the extruder, and fix the extruder onto the holder.
Please make sure the extruder is parallel with the Extruder axis. (Tool set includes the
M4 screw and Allen key)

3.Operation
UP! 3D Printer User Manual 10
.
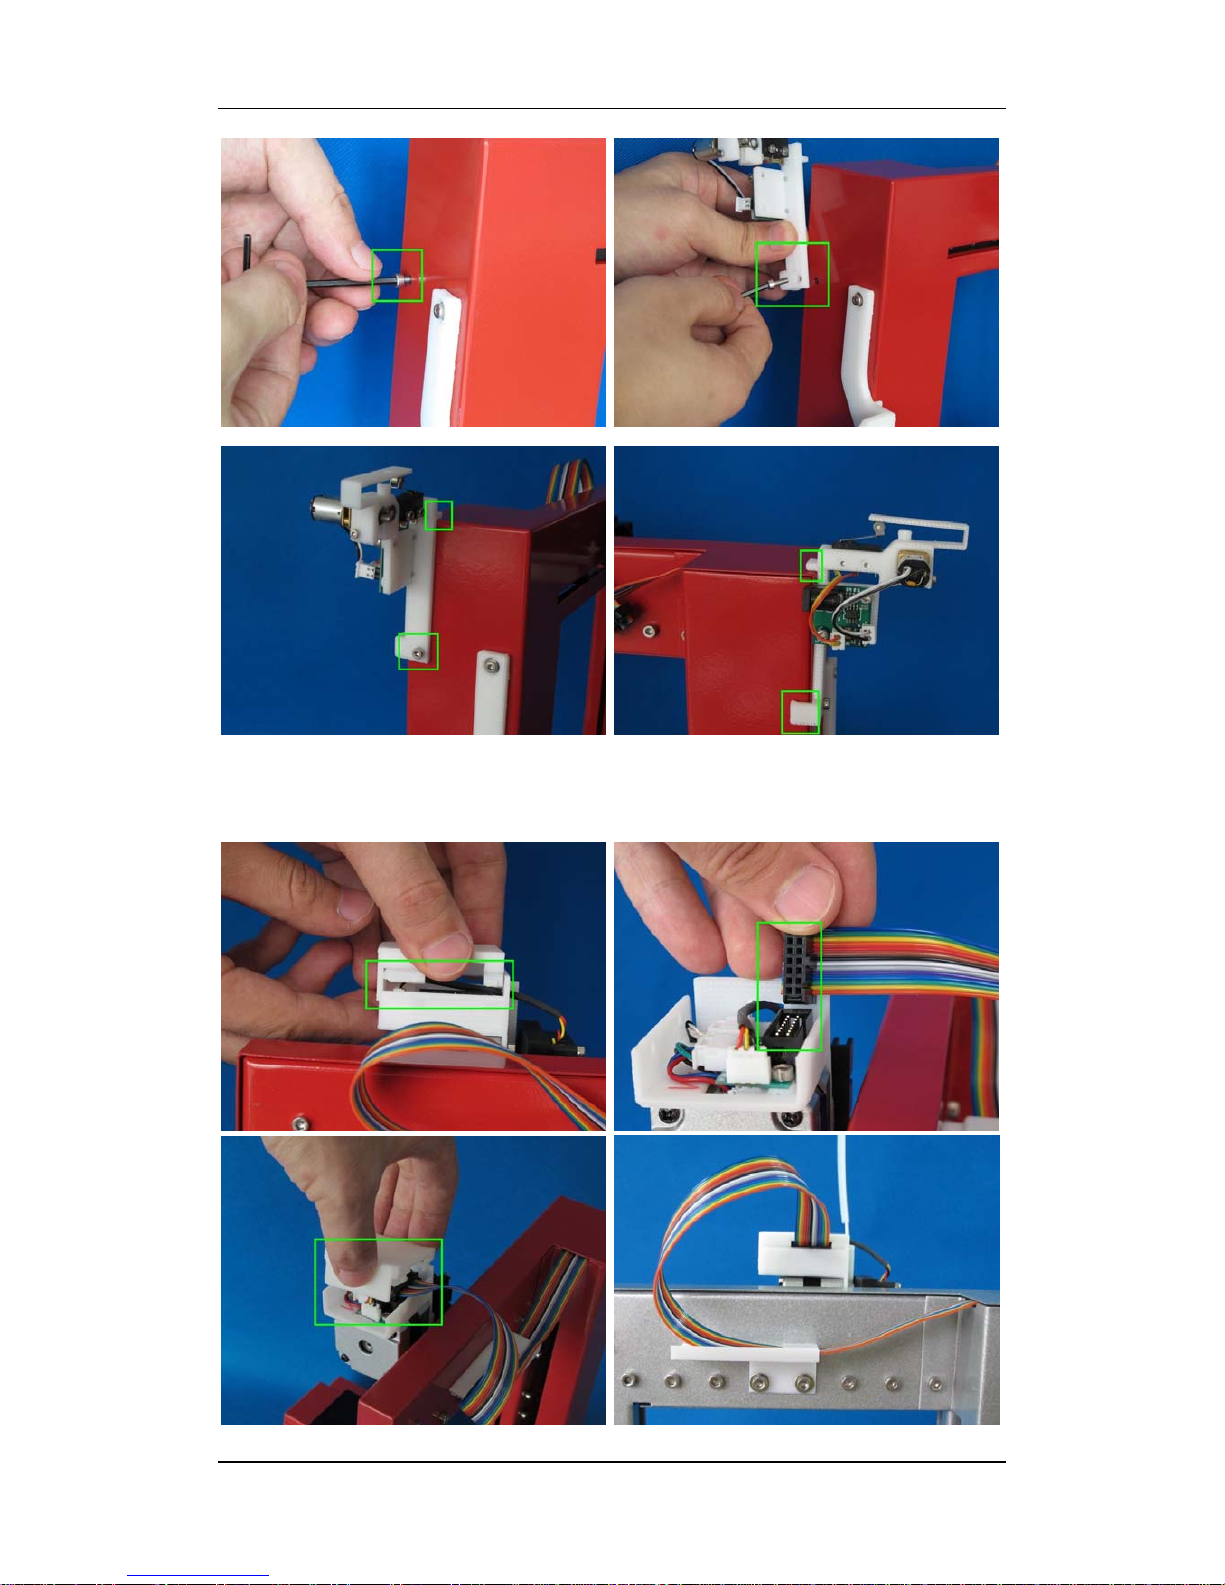
2. Install the ABS plastic spool holder. Unscrew the short M3 screw (M3X5) from the
printer, and then fix the spool holder with a long M3 screw (M3X8). Please note that
the spool holder should lock onto the printer’s corner.
3. Install the filament supplier. Unscrew the short M3 screw (M3X5) from the printer,
and then fix the filament supplier with a long M3 screw (M3X8). Please note that the
filament supplier should lock onto the printer’s corner.
3.Operation
UP! 3D Printer User Manual 11
4. Install the extruder cable (14-pin). Open the extruder upper lid and you will see a
14-pin socket. Connect the plug into the socket, and put the upper lid back on.
3.Operation
UP! 3D Printer User Manual 12
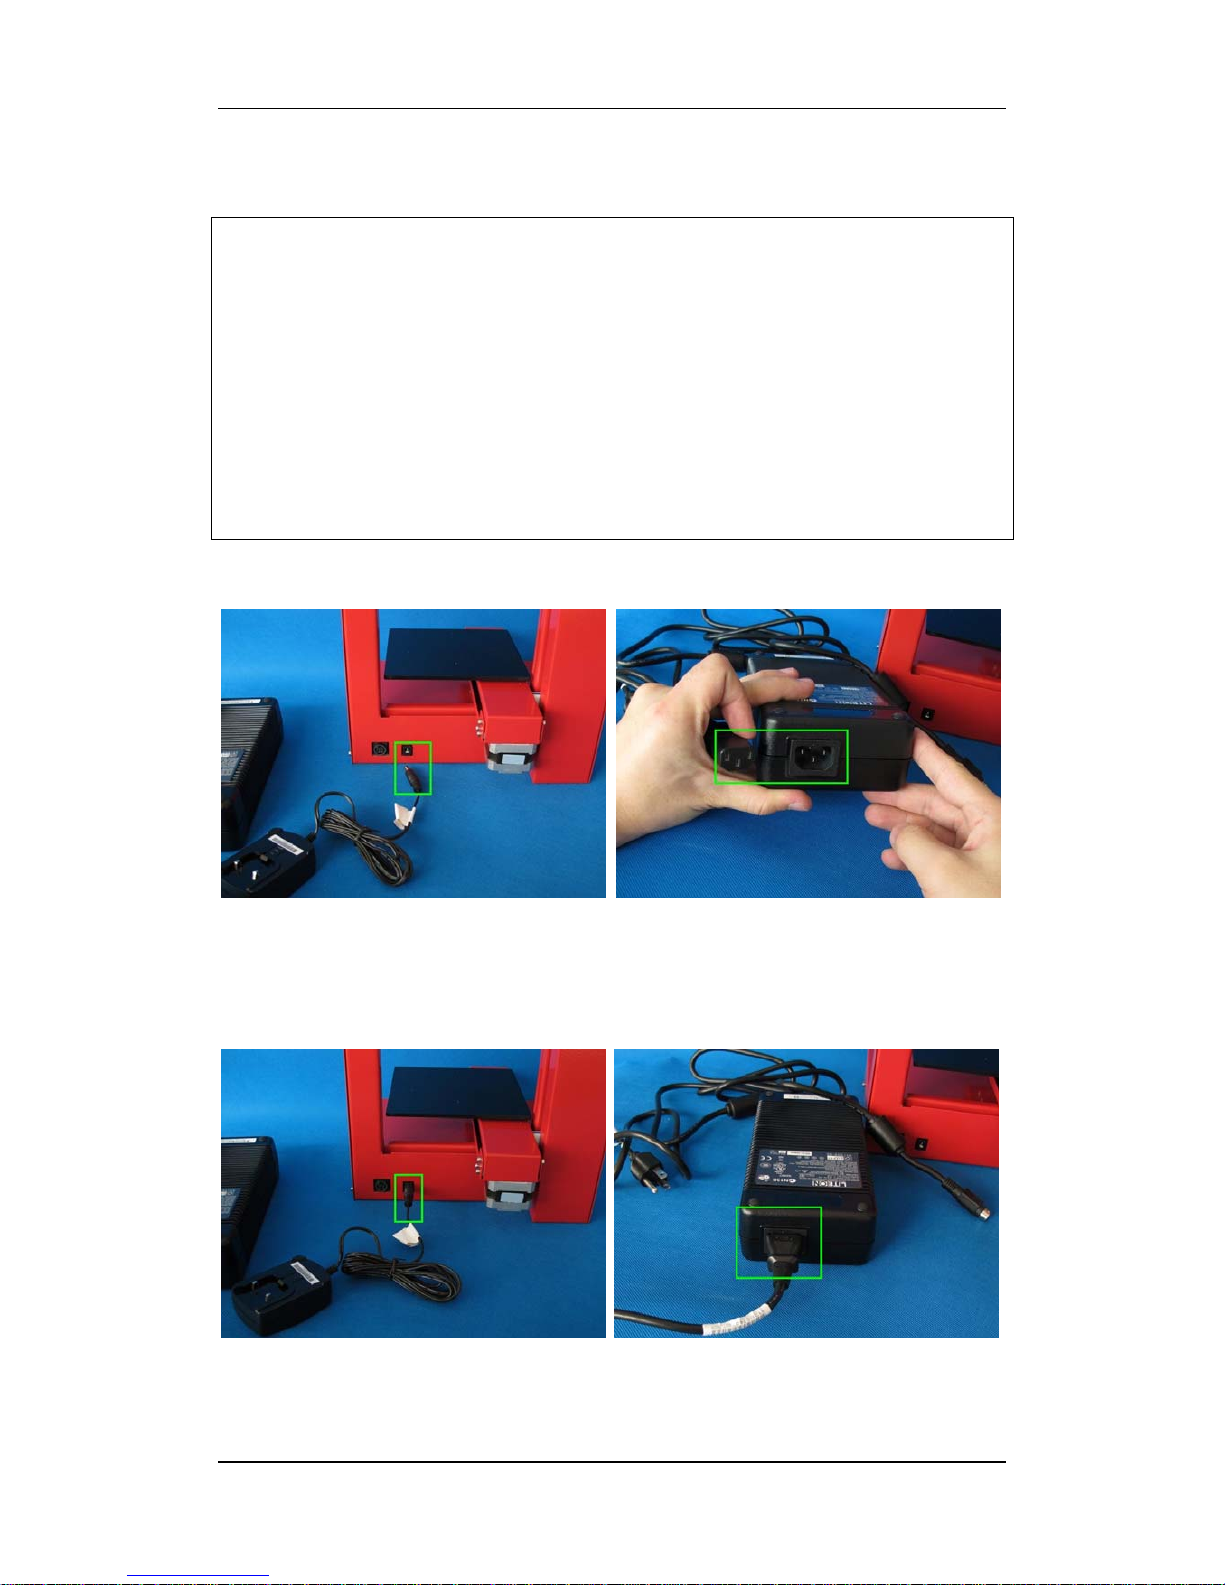
5. Connect all the power lines to the printer.
NOTE: Different version of the Up printer have different power supply
requirements!
1. if the printer has the new mainboard and new feeder, you can just link the
printer and feeder with the supplied link cable provided.
2. If the printer is in new mainboard and an old feeder, you need to use the
supplied 5V power supply for the old feeder.
3. if the printer has an old mainboard with a new feeder, we suggest you use a
separate 9V -24V power supply for the new feeder.
The procedure below relates to the oldest version of printer as this is the most
complex. The newer printers simply require you to plug in the power supply.
Connect one of the Power adapters (5 V) to the middle socket.
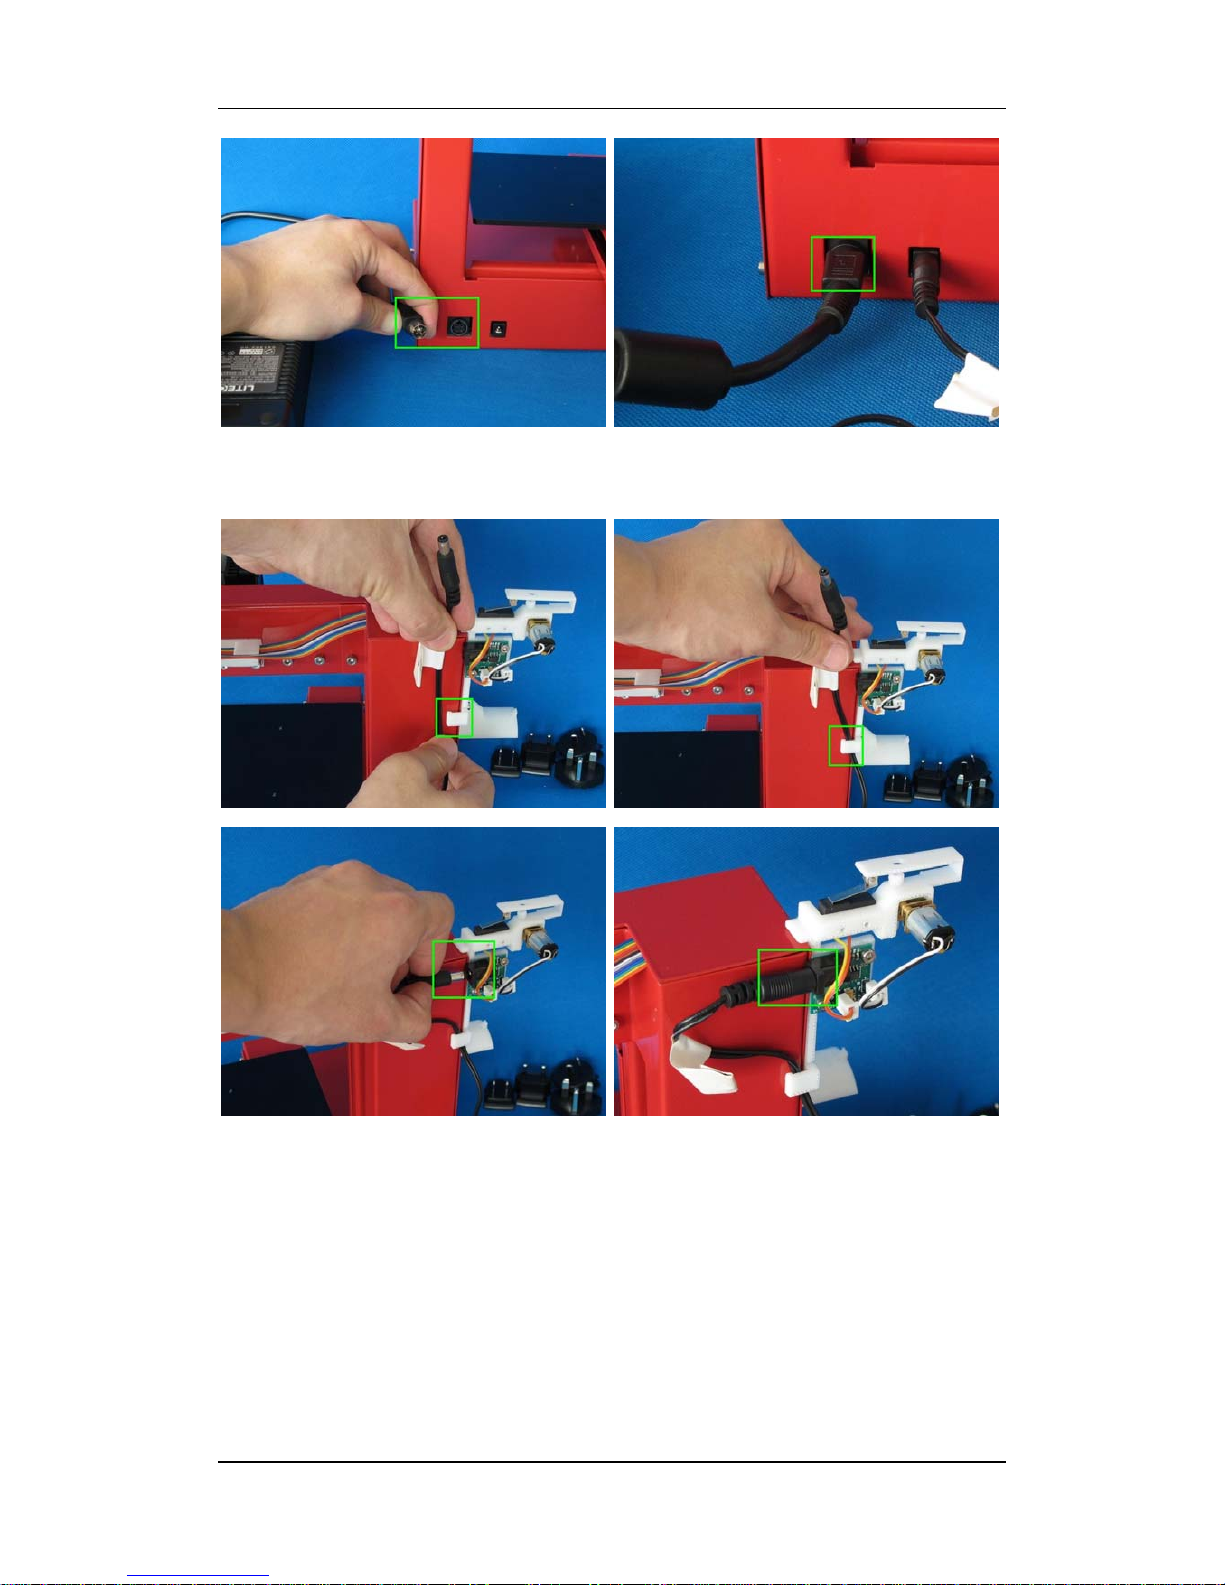
Connect the large Power adapter (20 V) to the power cable, and connect the 4-pin
plug to the socket on the printer. Please note that the flat side of the 4-pin plug, which
is marked with an arrow, should be at the top.
3.Operation
UP! 3D Printer User Manual 13
Connect the second power adapter (5 V) to the filament supplier. Please make sure the
power cable is clipped onto the side of filament holder as shown.
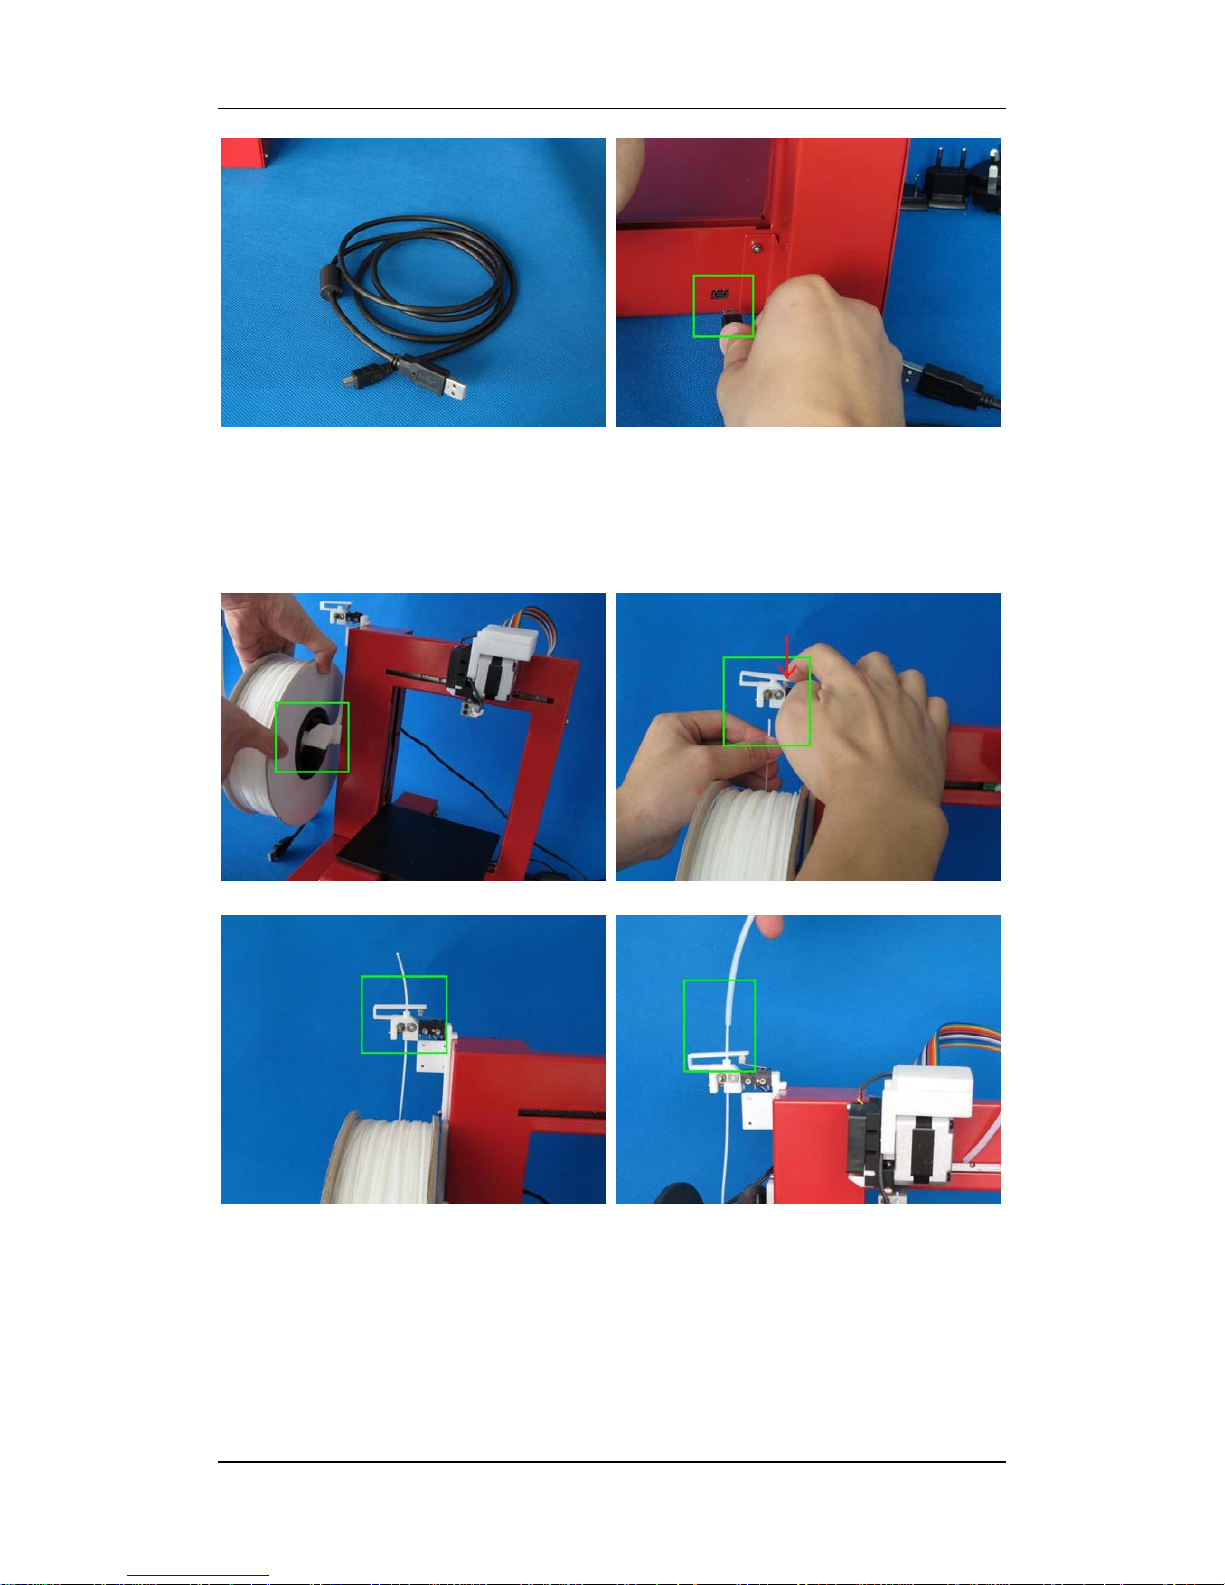
Finally, connect the printer to a computer using the provided USB cable.
3.Operation
UP! 3D Printer User Manual 14
6. Put the ABS plastic spool onto the holder, and thread the ABS filament into the
feeder and press the travel switch. The filament will automatically feed material for as
long as you hold down the switch. Please remember to insert the end of the ABS
filament into the filament tube.
7. Insert the end of ABS filament into the Filament tube. Press the feed switch until
the filament goes all the way through the filament tube, and about 10cm of filament
protrudes from the tube.
Start the UP! Software (refer to the software install procedure in 3.1.2 if you have not
already installed it), and press the “Extrude” button in the “maintain” dialogue box,
which is accessed from the “3D Print” menu. After the printer nozzle has warmed up
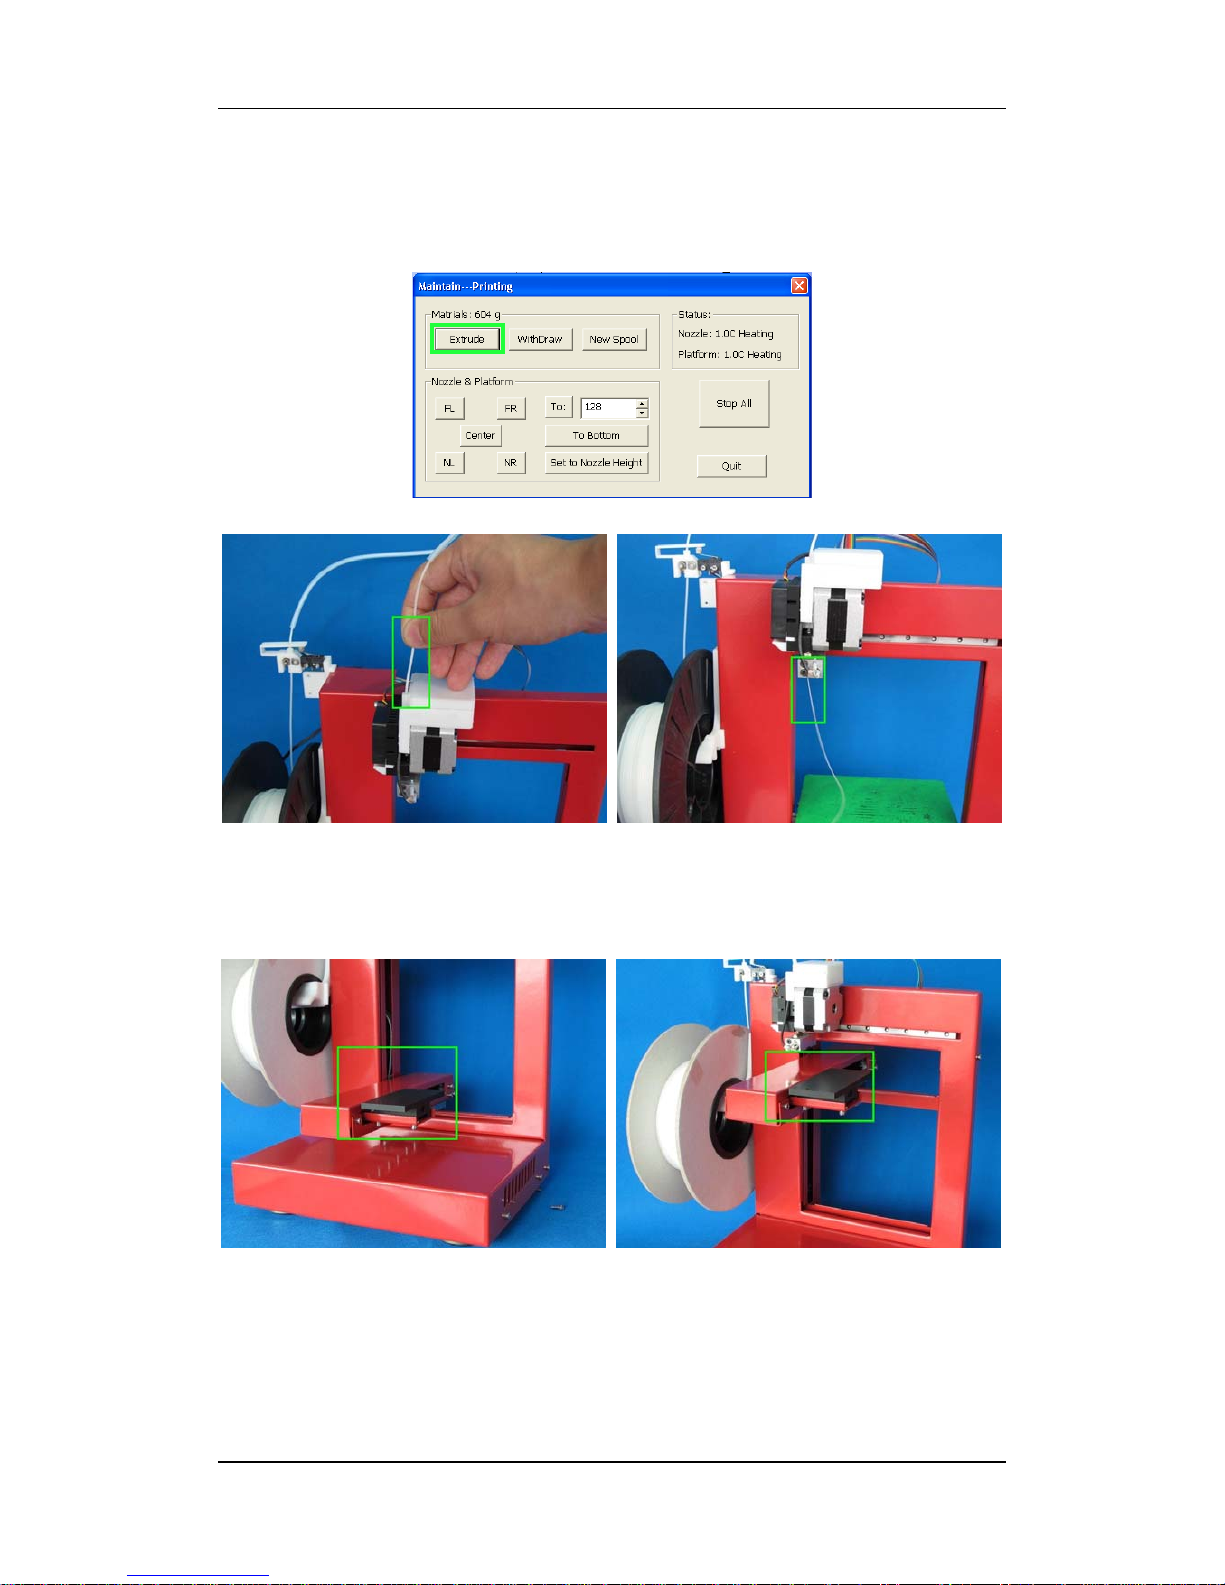
3.Operation
UP! 3D Printer User Manual 15
to 260°C, the printer will beep. Push the filament into the hole at the top of the
extruder head and hold it there with some gentle pressure until the extruder motor
grabs it and starts pulling it through the extrusion head. The extruder will then
automatically extrude a thin filament of material.
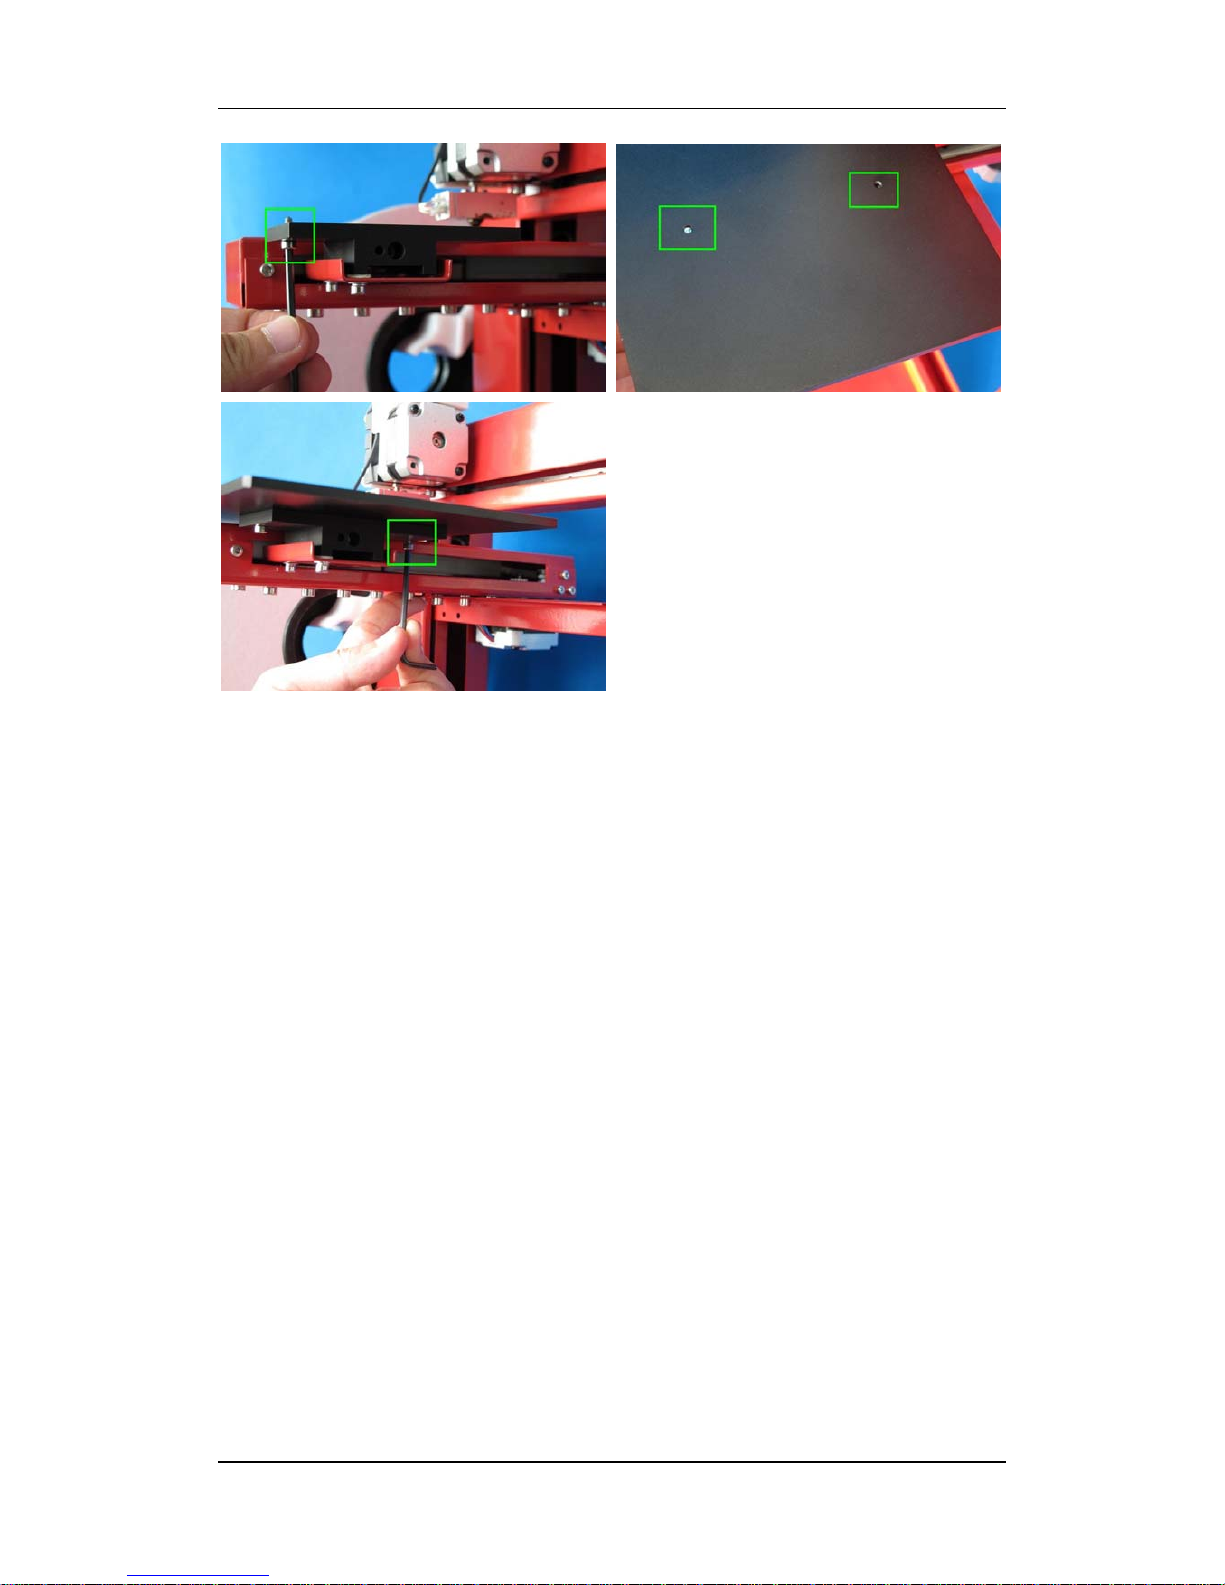
8. Install the print platform. Raise the platform axis to a height at which you can reach
under it to insert the screws. Line up the screw holes on the platform with the screw
holes on the heater base and insert the screws in from the bottom and tighten them.
3.Operation
UP! 3D Printer User Manual 16
 Loading...