

Page 1

Downloaded by
RadioAmateur.EU
FDK
INSTRUCTION MANUAL
MULTI-700AX
2m FM 1-25W
PLL TRANSCEIVER
Fukuyama
ELECTRONICS CO., LTd.
Page 2

GENERAL INFORMATION
The Fukuyama Electronics Co., Ltd. (FDK) Model MULTI-700AX mobile and
base station 2 meter transceiver is reliable and "MULTI" functionable amateur
radio equipment. It is designed and assembled with selected components to
give even characteristics and is all solid-state. In normal use, and with proper
care it will gíve long and trouble-free service.
Communication range depends upon the usual factors such as antenna in use,
operating location, RF output power level and band conditions. Read manual
carefully before taking the equipment into use.
TABLE CONTENTS
GENERAL INFORMATION........................................................................... 1
OUTSTANDING FEATURES ................. ………………………………………… 3
SPECIFICATIONS...................... ……........................................................... 4
CONTROLS AND LAYOUD........................................................................... 5
TOP VIEW WITH COVER REMOVED…………………………………………….. 6
BOTTOM VIEW WITH COVER REMOVED…………………………………….. 7
NAME OF FUNCTION ................................................................................. 8
GENERAL OPERATION........................................................... .. 10
REMOVAL OF TOP/BOTTOM COVERS AND FRONT/CHASSIS PANEL 10
OFFSET FREQUENCY PROGRAM…………………………………………….. 11
TONE BURST / SQUELCH INSTALLATION ………………………........ 12
BLOCK DIAGRAM ............................................................................. 18
SCHEMATIC DIAGRAM .............. ………………………………………… 21
Page 3

OUTSTANDING FEATURES
• Desirable Synthesizer Selection Plus Free One Memory Function:
Full an 800 channel from 144.000MHz to 147.995MHz each 5KHz step with
thece rotary and one push switches free selection frequency. Also desired
one channel free memorable frequency from entire the range.
• Dependable R.F Output Power Module:
Selectable an R.F Power output from 1 watt to upto 25 watts variable Power
control type, employed high efficient hy-brid Power module with dependable
performance and stability.
• Much Improved Cross-modulation and Blocking:
Employed dual stage an R.F helical-resonator section with dual-gate
MOSFET in R.F top circuit.
• Desirable Offset Function:
The transmit frequency provided at +/-600KHz shift frequency before
shipping factory and set an above frequency also available. Programmable
offset frequency appropriated for your local repeater facility.
• Built-in Automatic Protection:
In the event of accidental high VSWR open or short circuit antenna output,
there is automatic power¬ module protection.
• Employed Power Supply Noise Filter:
The supply line from battery to the equipment is a common source of high
noise level as a conductor of ignition and alternator interference. This is
eliminated by an effective line filter associated with the Power unit.
Page 4

SPECIFICATIONS
Downloaded by
RadioAmateur.EU
GENERAL;
Frequency range: 144.000 - 147.995MHz plus 143.950MHz
Channel capacity: 800 channels plus 143.950MHz, 1 channel
Mode: F3 (16F3)
Antenna impedance: 50 - 52 ohm (unbalanced)
Supply voltage: 11 - 15 volts D.C (13.8V nominal) Negative GND.
Consumption power: 6.0 amps at 25W transmit,
1.8 amps at 1W transmit,
1.7 amps at Audio max. receive, 1.0 amp at squelched
receive.
º
Temperature range: -10
Frequency tolerance: Within +/-0.002% ref, at 25
Dimensions: 162mm W x 70.5mm H x 260mm D.
Weight: Approx. 2.3 Kg
TRANSMITTER;
RF output power: 1 - 25 watts (continuous)
Modulation: Variable reactance frequency
Frequency deviation: +/-5KHz max. (factory preset)
Spurious and Harmonics: Less than 65 dB
Offset frequency: +/-600KHz and programmable frequency upto 1.6MHz
Optional tone function: Burst: 1,750 Hz +/ -1Hz, ap pro x. 1 seco nd du rati on
Microphone sensitivity: -43 dBm dynamic, 600 ohm with PTT function switch
RECEIVER;
Receiving method: Double superheterodyne
Sensitivity: Less than 0.4mV at 20 dB N.Q.
Squelch sensitivity: -5 dBu (threashold)
Intermediate frequency: 1st 16.9MHz
Spurious & image rejection: Less than 60 dB
Selectivity: More than +/-6KHz at -6 dB Less than +/-
Audio output power: Max. 1.8 watts at 10% THD.
Audio impedance: an 8 ohms
C to +60ºC degrees
º
C.
Squelch: Standard EIA frequency continuous
2nd 455 KHz
12KHz at 70 dB
Page 5
Simplex/of
h
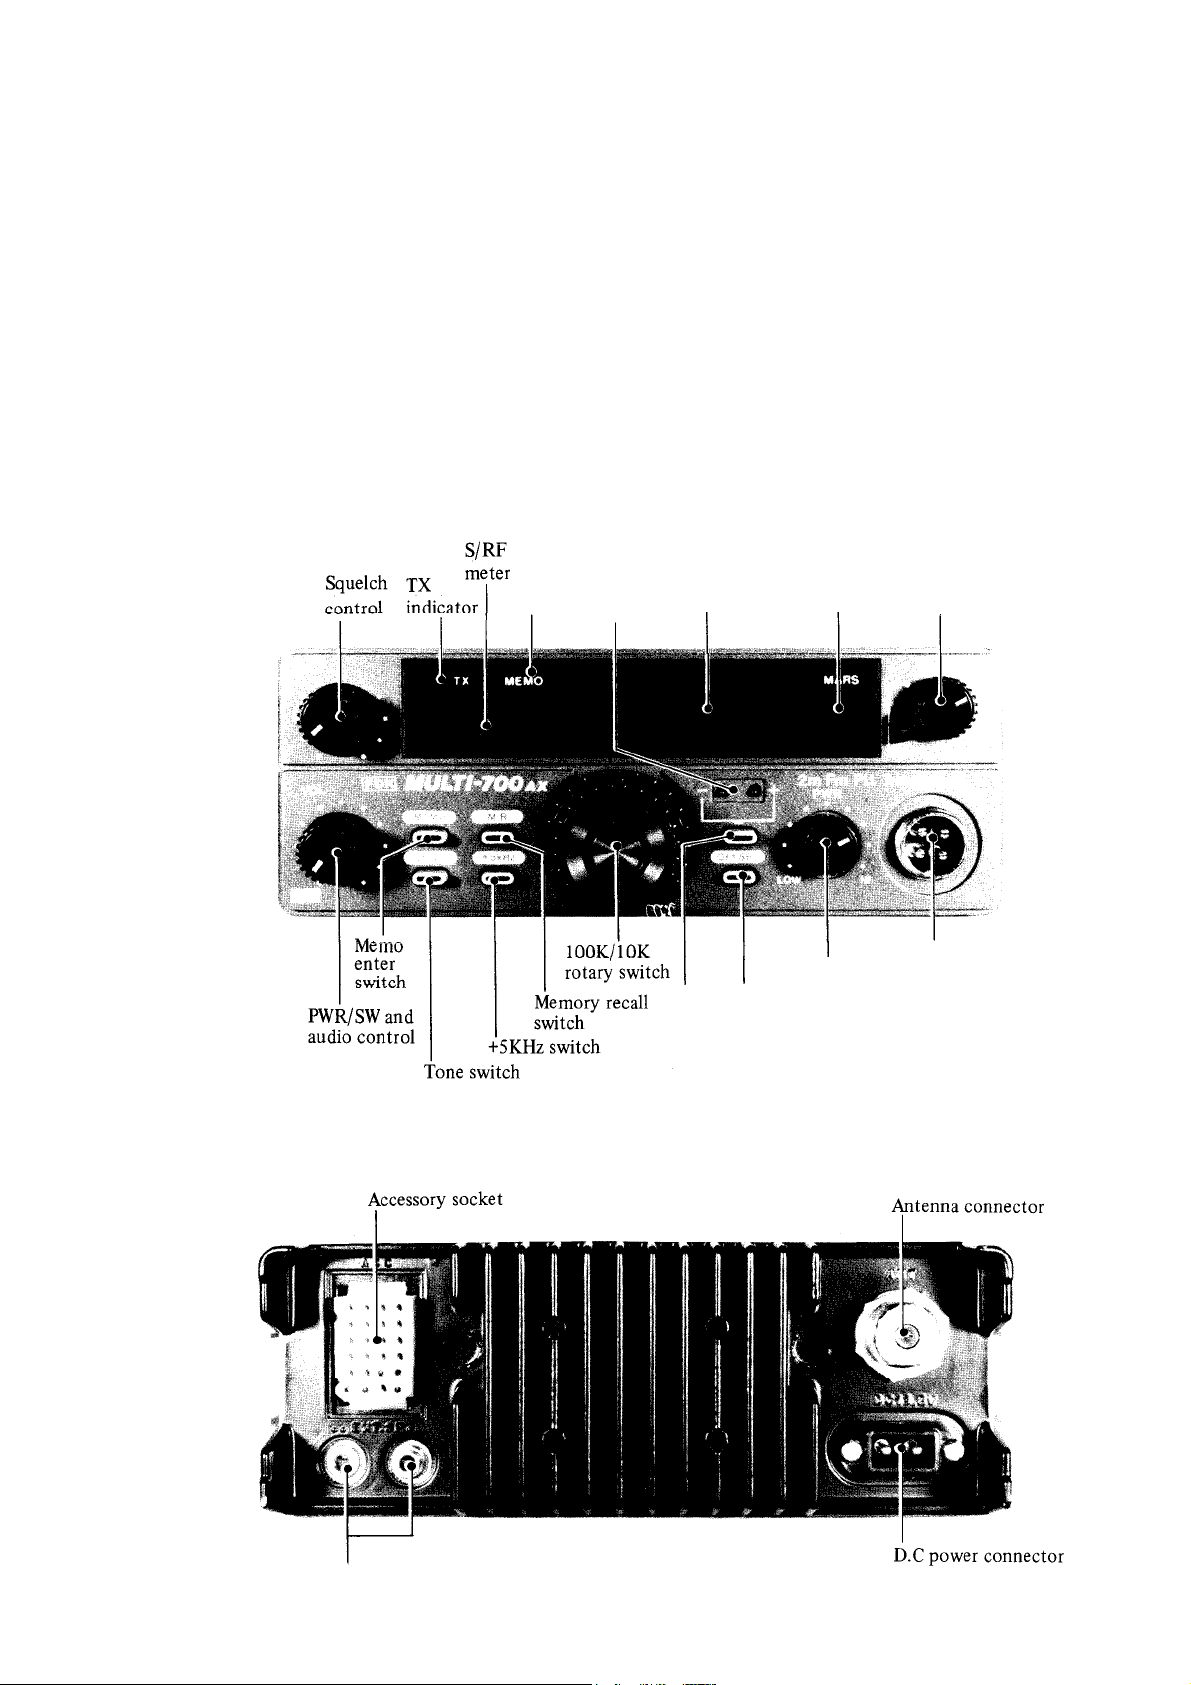
CONTROL AND LAYOUT
FRONT VIEW
Frequency
Offset
selector
REAR VIEW
MIC
switc
Ext. speaker jgck
Page 6
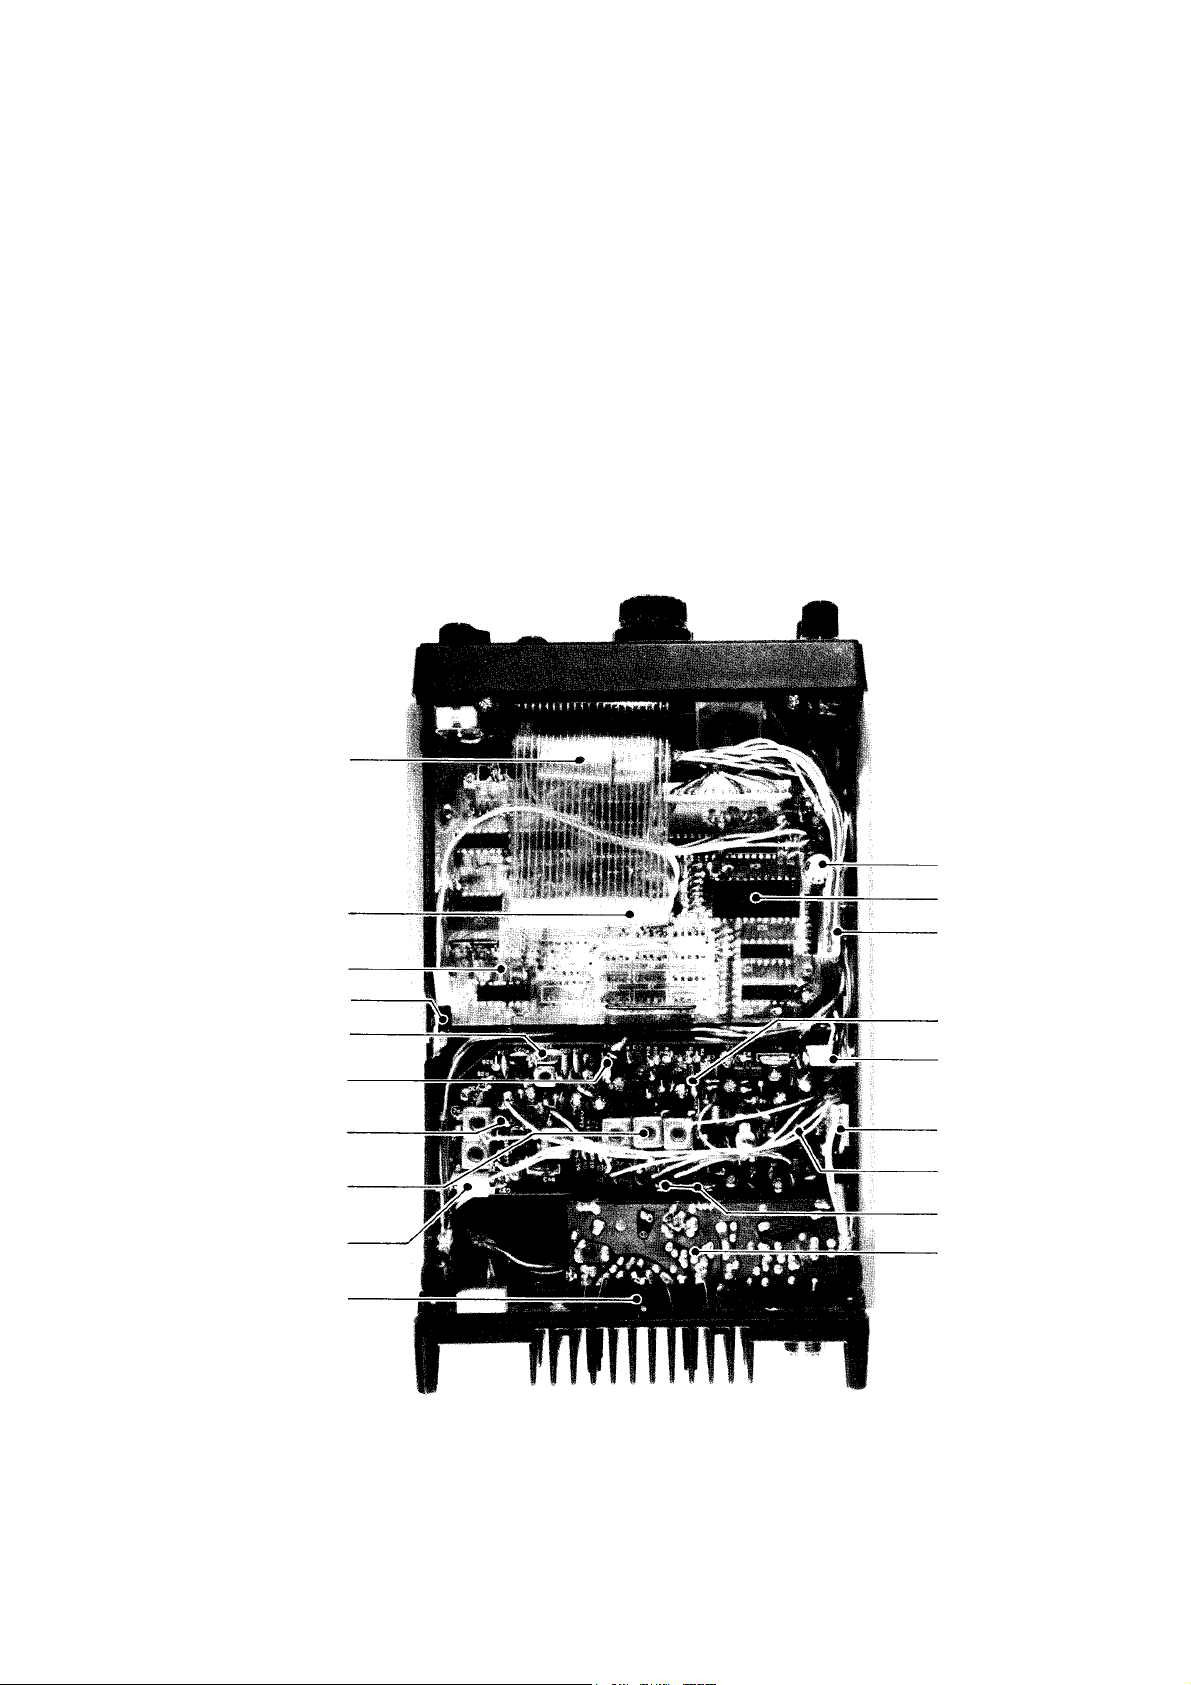
TOP VIEW WITH COVER REMOVED
g
Display
output leads
Channel
switching
Programmable
offset diode
ulator I.C
5V re
Transmitter local.
crystal
Deviation
adjustment
Balanced
mixer F.E.T
Transmitter
bandpass
coil
VCO local input
Power module
unit
Memory storage
capacitor
Memory I.C
Output code
harness
Transmitter
unit MIC input
connector
Transmitter output
harness
Driver TR,
2SC-741
Module APC pots
Transmitter power
unit
Page 7
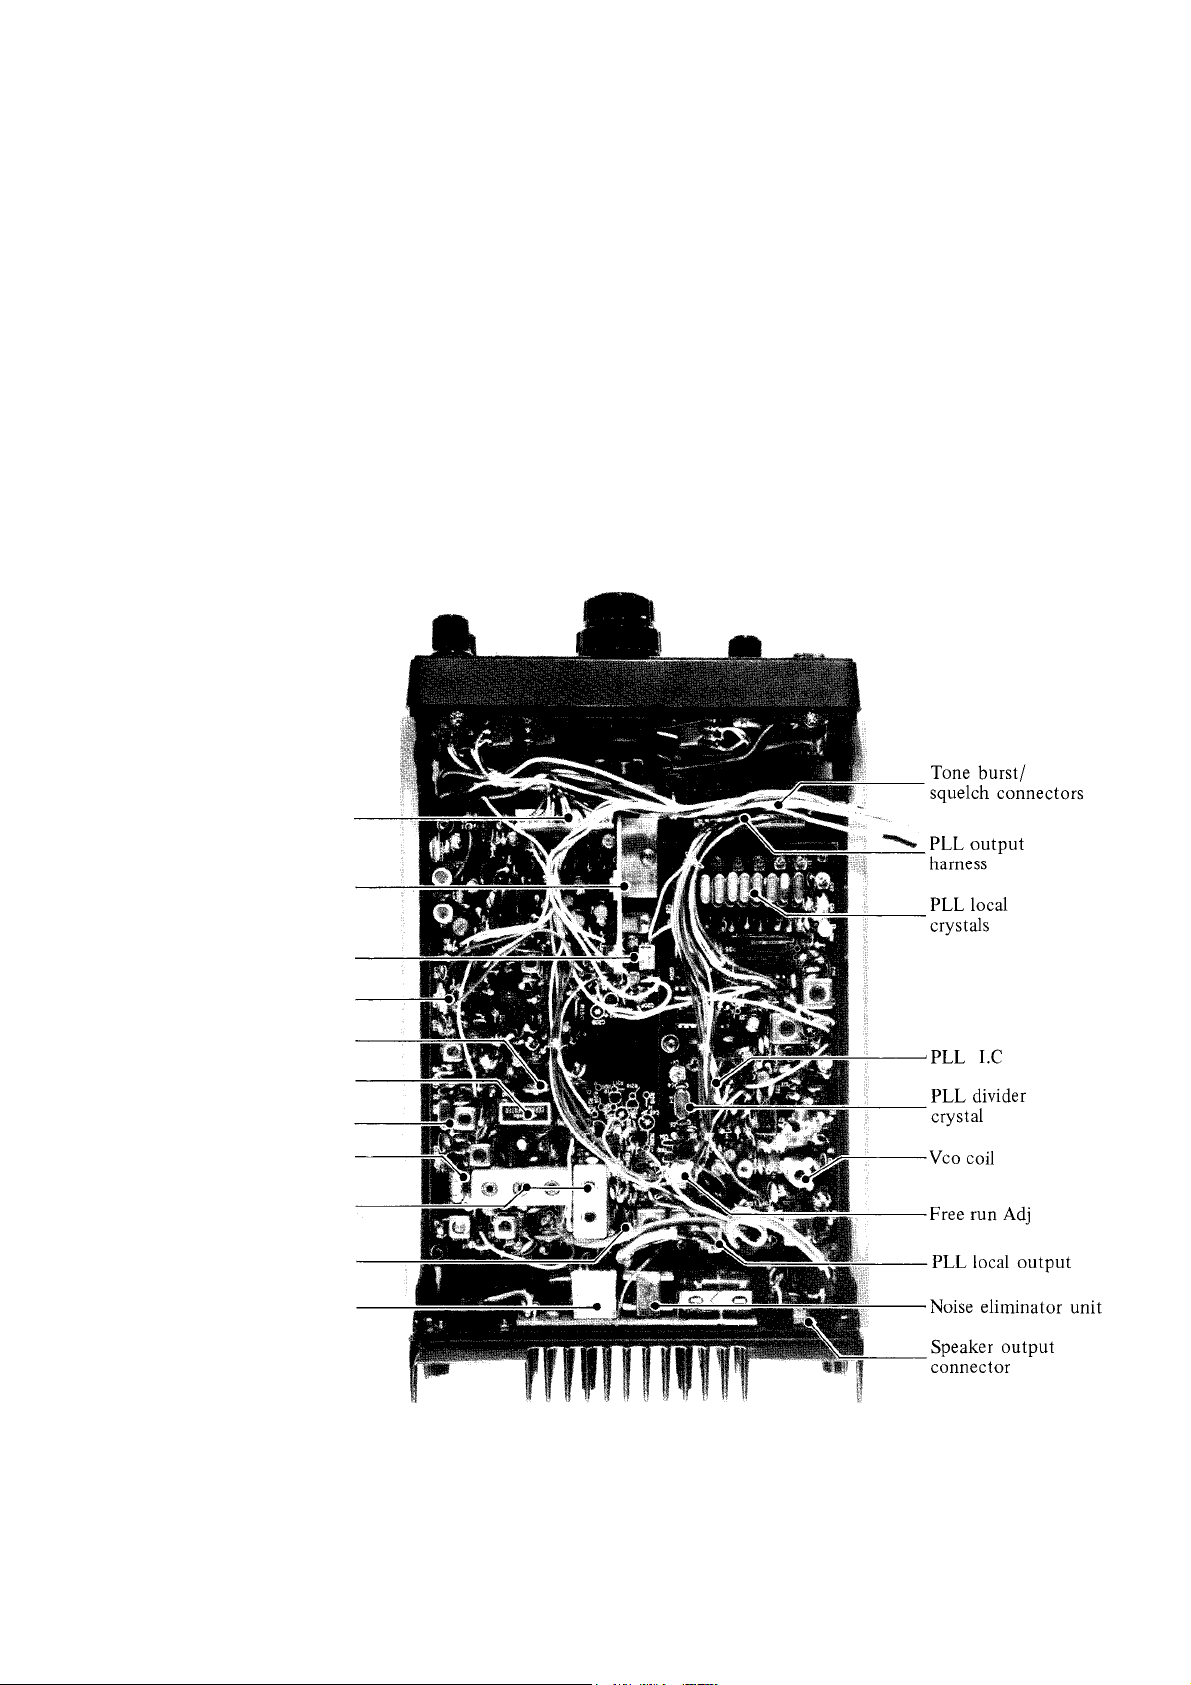
BOTTOM VIEW WITH COVER REMOVED
Receiver output
harness
Audio power
egulator I.C S-
meter adjust pot
Squelch adjust
pot
455KHz ceramic
filter
Receiver
local crystal
16.9MHz crystal
filter
Helical
R.F. top
fet D.C
output
Page 8

NAME OF FUNCTION
* S/RF METER * 100K/10K SELECTOR SWITCH
Indicates the strength of incoming signals on receive, and gives a
relative power output indication on transmit.
The normal reading at full power output is approx. 80% of full scale
but, can vary higher or lower if the antenna matching (SWR) is
higher than usual.
* OFF/VOL CONTROL
This is combined ON/OFF power switch and volume contr ol, which
sets the received signals to a comfortable level.
* SQUELCH CONTROL
The squelch control is used to mute the rece iver in the abs ence of
incoming signals, and removes the annoying rushing sound that
would otherwise be present. It is normally rot ated clockwise until
the background noise just disappears without an inc oming signal.
To advance the control beyond this point could mean missing a
weak signal.
In most usage 100KHz order outer and 10KHz inner knobs of
synthesizer rotary switch gives Binary Coded Decimal
programming PLL code shown direct LED frequency display.
* OFFSET SWITCH
Selects offset frequency -600KHz or +600KHz operation for local
repeater use, if in simplex oper ation, should be released position
at lower switch.
If required for local offset frequency program, shown above
OFFSET FREQUENCY PROGRAM page.
* POWER CONTROL KNOB
Ibis knob is an R.F outp ut power control for continuously covering
1 watt minimum through upto 25 watts adjustable. As general
indication, 12:00 at approx. 2-3 watts and 3:00 at approx. 10 watts
obtained.
* MIC CONNECTOR
* MEMO/M.R FUNCTION
Desired a frequency into the memory function, selects the
frequency from SYNTHESIZER channel. Then, push the M.R
(Memory Recall) switch and depress the MEMO switch. Desired
frequency has memorized with memory channel. Should be
returned to SYNTHESIZER position when released the M.R switch.
* TONE SWITCH
Desirable installed a Tone-Burst or Tone Squelch unit (option)
operable function switch give for repeater operation.
* +5KHz SWITCH
Synthesizer operation an additional 5KHz step push switch, direct
shown on the last digit frequency display.
The unit supplied with a correct Push-To-Talk hand type
microphone. When replacement, use dynamic type of 500600
ohms impedance will be suitable, but consult schematic diagram
for further detail and wiring.
* SELECTOR SWITCH
Change the Megahertz frequency from 144MHz to 147MHz
independently, plus factory provided 143.950MHz in simplex
MARS frequency operation.
This 143.950MHz MARS simplex frequency may not gives offset
facility and memory functions.
* FREQUENCY DISPLAY
Four digit red LED give an accurate frequency display from
desired synthesizer frequency or memory channel, even offset
transmission frequency if switched offset function. Except MARS
frequency, MARS position only gives right hand a LED indicator.
Page 9

* ACCESSORY SOCKET
This is for use with extension co ntrols - see schematic diag ram for co nnections .
* EXT. SPEAKER JACK
o Internal speaker disconnected.
99 Both Internal and External speaker live.
* ANTENNA CONNECTOR
This female SO-239 coaxial connector for connects to a suitable resonated 2 meter antenna. If the
antenna or cable is open or sho rted, will automaticall y o perates tr ansmitte r power protection circuit.
* D.C 13.8V POWER
Battery voltage should be checked on transmi t load as if this falls much below than 12 volts, an o utput
power, stability and, quality will insufficient. Must be correct connection battery polarity with supply
BLACK/RED twin cable.
When used power supply unit, it mus t be of a regulated type a nd capable of more than 6 Amps at 13.8
Volts for full 25 watts an output obtained.
ACCESSORIES
This transceiver with attached an accessories under
Microphone with conn ector . . . . . . . . . . . . . . . . . . . . . . . . . . . . . . .
Black/Red power cord with plug . . . . . . . . . . . . . . . . . . . . . . . . . . . 1
Mounting bracket with screws . . . . . . . . . . . . . . . . . . . . . . . . . . . . . . . 1
Desk top angle . . . . . . . . . . . . . . . . . . . . . . . . . . . . . . . . . . . . . . . 1
Speaker plug & fuse . . . . . . . . . . . . . . . . . . . . . . . . . . . . . . . . . . ea 1
Microphone hanger with screws . . . . . . . . . . . . . . . . . . . . . . . . . . . . . 1
Instruction manual . . . . . . . . . . . . . . . . . . . . . . . . . . . . . . . . . . . .
following;
. 1
.
1
Page 10

GENERAL OPERATION
Connection properly D.C power cable for power source, antenna connector for antenna
and plug into the microphone before operates recciving and transmitting.
RECEIVER OPERATION:
The receiver becomes operative when the audio volume
control is rotated clockwise. The power supply switch is a
part of the volume control and power is "ON" unless turned
fully counterclockwise. Adjust audio volume control to
appropriate sound level.
The -squelch control should be set either just below noise
level, or at a setting that will open the receiver at a desired
level of incoming signal.
The synthesizer MHz, 100K/10K rotary and offset normal or
reverse and/or programming switches must be set in
appropriate positions. Operation of the "+$KHz" push button
switch will give this facility if required.
REMOVAL OF TOP/BOTTOM COVERS
AND FRONT/CHASSIS PANEL
TOP COV E R:
When removed, this will give access to;
1) Channel switching selector board with OFFSET fre
quency program circuit.
2) Transmitter board.
3) Part of the Transmitter power board and Accessory
connector.
Remove the four black screws. Slide baclt and lift to clear.
BOTTOM COVE R:
TRANSMITTER OPERATION:
It is operating practice to use the minimum an R.F power
output to secure good communication according to distance
and back conditions. Output level is controlled by the
"PWR" knob setting.
The transmitter becomes operative on FM(voice) with the
microphone connected and Push-To-Talk switch depressed.
If memory channel operation, just depress the M.R (Memory
Recall) push switch, also operates memory channel to be
offset function if switched.
FRONT/CHASSIS PANEL:
It is necessary to remove both TOP/BOTTOM covers (see
above) and both end hanger rails before removal of the Front
panel and Front Chassis mount.
Removal of Front/Chassis panel gives access to;
1) VOL/SQ, BCD ROTARY SWITCH, PWR CONTROL and
MHz SELECTOR switches.
If further access to Chassis is required, first remove the two
Philips (metalized) top and bottom screws and the two black
screws at both end mid-panel height.
Remove slow1y with great care and it may also be necessary
to disconnect the ribbon wires from their channel switching
board connectors. (Straight slow pull from connectors. DO
NOT BEND OR FOLD THESE WIRES.)
When removed, this will give access to;
1) Main PLL board, with PLL local crystal and Main
receiver board with Helical-resonator and optional Tone
unit installation.
2) Power protect diode with Noise eliminator power board.
Remove the four black screws, slide way back to rear panel,
and slightly lift. It may also be necessary to remove speaker
connector leads from the receiver board.
WARNING
THE ABOVE PANELS AND COVERS SHOULD BE
REMOVED IF THE OWNER HAS THE NECESSARY
TECHNICAL ABILITY TO CARRY OUT THE REQUIRED
ADJUSTMENT ONLY. SUITABLE TEST EQUIPMENT
AND TOOLS MUST BE AVAILABLE. OTHERW1SE
REFER TO DEALER FOR SERVICE OR MAINTENANC E.
Page 11

T
)
)
Cut the pattern and remove a diode
. CUT
Downloaded by
RadioAmateur.EU
OFFSET FREQUENCY PROGRAM
he offset frequency has been programmed +/-600KHz
before shipping factory. If use your local repeater access
frequency, modification method under above following.
MODI FICATION:
1) Remove the an upper cover, upper side right hand of the
channel switching board, (see above illust.).
2
Further carefully remove the 3 terminal regulator I.C
mounted plastic screw from chassis, (should be use
fitted with the Philips type screw driver) and four edges
of screws from channel switching board.
3
The channel switching board (program side) turn-up only
45 degrees from chassis surface (if necessary remove
bottom side PLL output harness).
NOTE:
Modification diodes are not provided with the transceiver,
could be use any kind silicon type diode (example; 1N-914,
1S-1588 etc.).
Programmable frequency each individual, may not necessary
cut the pattern and remove diode, if required keep the "-
600KHz" position left side from the dot line.
1. +/-600KHz (before modify)
REMOVE DIODES
2. +/-700KHz program
4. +/-1,200KHz program
3. +/-1,000KHz
5. +/-1,600KHz program
Page 12

TONE SQUELCH/BURST INSTALLATION
This unit provide "Tone Squelch" a capability to exclude
unwanted transmissions by allowing the receiver to respond
only to an appropriate tone coded signal system or "Tone
Burst" for an open the repeater station facility system for
one of each unit are available to installation.
For both unit installation space at speaker side of bottom
cover, an optional installation and wiring detail figure
under shown above.
BOTTOM SIDE RECEIVER BOARD
Tone ON/OFF Switching
Tone Audio
NOTE:
The Tone Squelch unit may also be available to use a TS-1 made by communication specialists co., wiring connection
see above instruction sheet and above pin wiring schematic.
Page 13

Page 14

Downloaded by
RadioAmateur.EU
Page 15

Downloaded by
RadioAmateur.EU
Page 16

Downloaded by
RadioAmateur.EU
Page 17

Downloaded by
RadioAmateur.EU
Page 18

Downloaded by
RadioAmateur.EU
Page 19

Downloaded by
RadioAmateur.EU
Page 20

Downloaded by
RadioAmateur.EU
Page 21

Downloaded by
RadioAmateur.EU
FDK
FUKUYAMA electronics
TOKYO, JAPAN.
 Loading...