

Page 1
OPERATOR’S MANUAL
NEBULA
MISTER and SPECIALTY CLEANER
PFMS
WARNING: OPERATOR MUST READ AND UNDERSTAND THIS MANUAL
COMPLETELY BEFORE OPERATING THIS EQUIPMENT.
©
Tacony Corporation, All rights reserved
PFMS-MAN 09/2020
Save These Instructions
Page 2

Congratulations on your purchase of a Commercial Mister and Specialty Cleaner. You are now
equipped to handle any and all commercial misting and carpet cleaning jobs. Your new unit is
a high quality, precision-made product. All parts used in the manufacturing of this unit have
passed rigid quality control standards prior to assembly. Please safeguard the original receipt
/ invoice. If you experience any problems with your unit during the warranty period, the original
receipt / invoice will act as proof of purchase.
IMPORTANT SAFETY INSTRUCTIONS
READ AND UNDERSTAND ALL INSTRUCTIONS BEFORE USING THIS UNIT
Read and understand this owner’s manual and all labels on the unit before operating. Safety is a
combination of common sense,staying alert and knowing how your unit works. Use this unit only
as described in this manual. Use only manufacturer’s recommended attachments. To reduce the
risk of personal injury or damage to your unit use only recommended accessories.
WARNING To avoid fire, DO NOT use with a flammable or combustible liquid or floor cleaner.
WARNING To avoid electric shock, DO NOT expose to rain. Store Indoors.
To reduce risk of fire, electric shock, or injury:
• Do not use outdoors or on wet surfaces.
• Do not leave unit unattended when plugged in. Turn off the switch and unplug the electrical
cord when not in use and before servicing.
• Do not allow to be used as a toy. Close attention is necessary when used near children.
• Use only as described in this manual. Use only manufacturer’s recommended attachments.
• Do not use with damaged cord or plug. If unit is not working as it should, has been dropped,
damaged, left outdoors, or dropped into water, return it to a service center before using.
• Do not pull or carry by cord, use cord as a handle, close a door on cord, or pull a cord
around sharp edges or corners. Do not run the unit over cord. Keep cord away from heated
surfaces.
• Do not use extension cords or outlets with inadequate current carrying capacity.
• Turn off all controls before unplugging.
• Do not handle plug or unit with wet hands.
• Do not put any objects into openings. Do not use with any opening blocked, keep free of
dust, lint, hair, and anything that may reduce airflow.
• Keep hair, loose clothing, fingers, and all parts of body away from openings and moving
parts.
• Do not pick up anything that is burning or smoking, such as cigarettes, matches or hot
ashes.
• Use extra care when cleaning on stairs. Do not use to pick up flammable or combustible
liquids such as gasoline, or use in areas where they may be present.
• Store your unit indoors in a cool, dry area.
• Do not unplug by pulling on cord. To unplug, grasp the plug, NOT THE CORD.
• Follow these guidelines to ensure operator safety and to maintain equipment in running order.
• Make sure the machine is plugged into an electrical outlet with the same voltage rating as
shown on the nameplate of the machine.
• Do not attempt to plug a 115 volt machine into a 230 volt outlet or a 230 volt machine into a
115 outlet.
• Replace a damaged cord immediately.
• If an extension cord is necessary, use a three conductor grounding cord-12 gauge wire or
heavier to prevent motor burnout and over-heating of wires
• Do not expose the machine to freezing temperatures.
SAVE THESE INSTRUCTIONS FOR FUTURE REFERENCE
2
Page 3
RECOMMENDED
X
• Do not break off or pull out the ground prong on the plug.
• Do not attempt to repair a warranted machine unless instructed to do so by an authorized
shop or the factory.
• Do not use any replacement parts except those specified on the parts list. Proper
performance of the machine could be affected if substitutions are made.
• Use defoamer at all times to prevent damaging the vacuum motor.
• Do not use water in excess of 140° F (60° C).
• Failure to comply with the above warning instructions will void the warranty.
When using as an extractor
• Do not use the machine for totally dry vacuuming. This machine is not fitted with a fine dust
filter.
• Do not use citrus-based cleaners in this machine.
• Do not use cleaning chemicals in this machine except those recommended for commercial
extraction equipment.
• The use of any chemical with abrasive additives voids the warranty.
• Use defoamer at all times to prevent damaging the vacuum motor.
• Do not use water in excess of 140° F (60° C).
GROUNDING INSTRUCTIONS
This appliance must be grounded. If it should malfunction or breakdown, grounding provides
a path of least resistance for electric current to reduce the risk electric shock. This machine
is equipped with a cord having an equipment -grounding conductor and grounding plug. The
plug must be inserted into an appropriate outlet that is properly installed and grounded in
accordance with all local codes and ordinances.
WARNING: Improper connection of the equipment-grounding conductor can result in a risk
of electric shock. Check with a qualified electrician or service person if you are in doubt as to
whether the outlet is properly grounded. Do not modify the plug provided with the appliance - if
it will not fit the outlet, have a proper outlet installed by a qualified electrician.
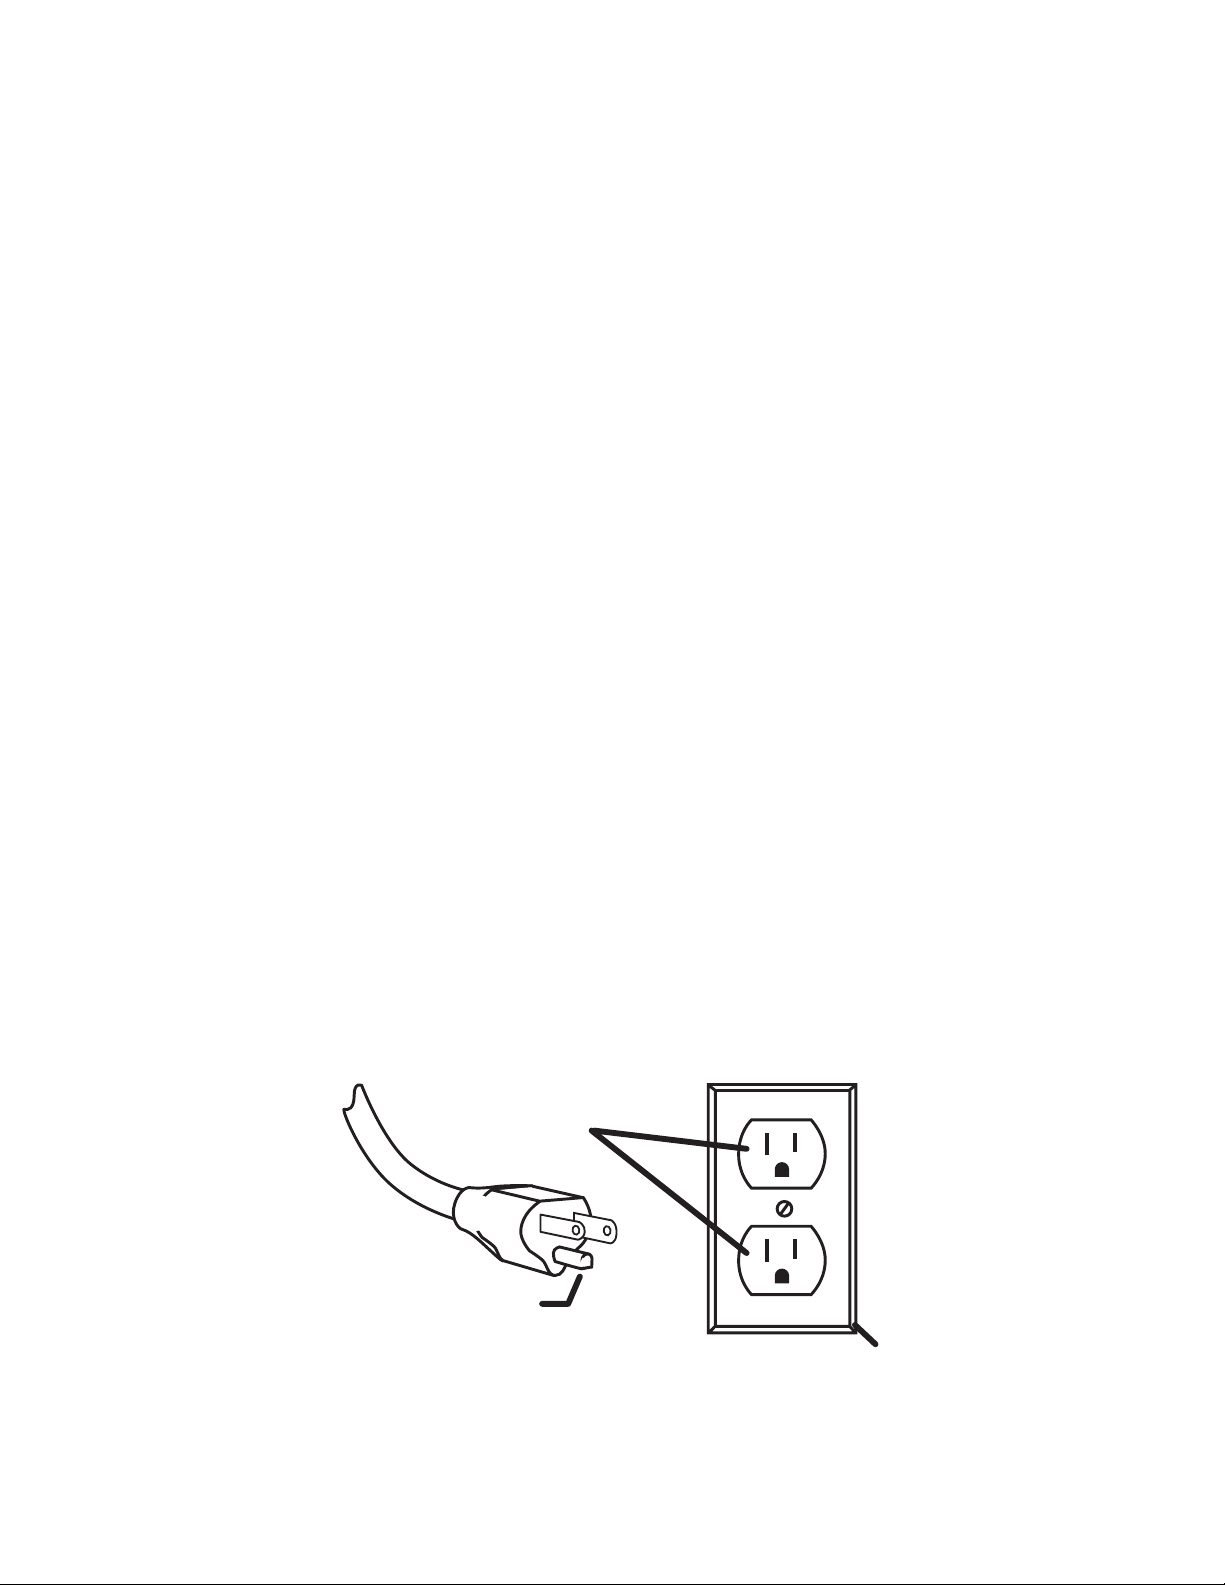
This appliance is for use on a nominal 115-volt circuit, and has a grounding plug that looks like
the plug illustrated in sketch A.
GROUNDING
OUTLET
GROUNDING
PIN
(A)
GROUNDED
OUTLET BO
2
A
3
Page 4

TECHNICAL SPECIFICATIONS
Model PFMS
Input Voltage 115 VAC
Plug Type US
Cord 25’ with on-board storage
GPM
Amps Mist Mode 1A/Extraction Mode 8.9A
Solution Tank 3.5 Gal/13.2 l
Recovery Tank 2.5 Gal/9.5 l
Dimensions 23” x 11” x 23” / 58.5cm x 28cm x 58.5 cm
Weight 41 lbs./18.5 kg
Waterlift 89”/226 cm
CFM/CMM 104/3
Solution Pressure 55 p.s.i./3.8 BAR
Coverage Mister model 7,500-10,000* sq.ft. per tank
.05 with Atomizer Nozzle/.25 with fan nozzle/.25 Extraction
Mode
Misting Hose 35’ with quick disconnect
Misting Wand 18”
*Variance dependent on user application method
4
Page 5

This unit can be used as either a Mister or an Extractor to use on upholstery and for detail work.
The brass atomizing nozzle provides lower saturation when spraying disinfectant while a larger
brass fan nozzle is provided for large area coverage.
NOTE: This mister is designed for use with all water-based disinfectants from
the EPA “List N”.
MISTER OPERATING INSTRUCTIONS
Filling the Mister
• Unplug the unit.
• Disconnect the solution and recovery tanks.
• Remove the upper recovery tank.
• Add water and manufacturer’s recommended solution ratio into solution tank. Fill only to the
fill line indicated on the label on the inside of the solution tank. The tank will hold up to 3.5
gallons.
Operating the Mister
• Attach misting wand pressure hose to the quick disconnect in the pocket at the front of the
machine.
• Turn the 3-way switch to MIST ONLY setting. (Allow approximately 30 seconds for the pump
to prime).
• Use the wand with spray tip to spray the solution. The atomizing nozzle that is pre-installed
on the wand applies smallest micron sized droplets and is perfect for most applications,
however proper application should still be followed to prevent over-saturation. To apply use
a natural up and down or side to side motion, slightly overlapping from one section to the
next. Do not dwell on a spot, as this will cause over-saturation.
• Refill solution tank, as recommended above, to resume cleaning.
After use
• Unplug the unit.
• Disconnect the solution line.
• Unlatch the recovery tank from the base of the unit and remove.
• Drain any remaining solution in the tank following EPA and Manufacturer guidelines for the
disposal of the chemical being used.
• Rinse the tank after each use.
• Allow it to air dry.
Note: If the spray jets become clogged, remove and soak them thoroughly for an hour in a 8 to 1
ratio of water to white vinegar or anti-browning solution, and blow-dry. Do not use wire or pins
to clean the nozzles as this will cause the spray pattern to become distorted.
5
Page 6

The wand will come with two spray tip options. The lower micron size atomizing spray tip will
already be installed on the wand. You will also get a higher micron fan nozzle as an option.
This additional nozzle option will be taped onto the wand when you receive the unit. The
installed atomizing nozzle is best for cleaning office areas, touch points, etc, as it does not
saturate things like paper and boxes that could be found in offices, retail, hospitality, restaurant,
educational type of environments. The attached additional fan nozzle spray tip is for application
in areas like warehouses, shipping carts, etc., where there is not a worry that the items being
sprayed could get oversaturated. This allows for a quicker application of the disinfectant to
cover larger areas. Care should be taken when applying disinfectant in food areas. Be sure to
read and follow the manufacturers instructions for disinfectant products.
WAN-PFMS
Replacing the Nozzle
Remove the misting nozzle from
the wand by loosening
counterclockwise.
Wrap Teflon tape around the
threads on the new nozzle twice
as shown. Avoid getting Teflon
tape into the fluid path as it can
cause clogs.
Screw the new nozzle on to the
wand clockwise until tight.
5/4/2020
WAN-PFMS
PAGE 1
6
Page 7

EXTRACTOR OPERATING INSTRUCTIONS
Filling the unit for use as an extractor
• Unplug the unit.
• Disconnect the solution and recovery tanks.
• Remove the upper recovery tank.
• Add water and/or chemicals to the lower solution tank. Fill only to the fill line indicated on
the label on the inside of the solution tank. The tank will hold up to 3.5 gallons.
Operating the extractor
• Attach the solution line from the vacuum hose assembly to the quick disconnect in the
pocket at the front of the machine.
• Attach the vacuum hose to the vacuum inlet (handle) above the recovery tank lid.
• Turn the 3-way switch to VAC PUMP. (Allow approximately 30 seconds for the pump to
prime).
• Attach the hand tool to the hose end. Use the hand tool to spray and recover the solution.
• The float shut-off will disable the suction of the unit when the recovery tank is full. The
operator will notice a distinctive change in the sound of the vacuum motor when the shut-off
is activated. Empty the recovery tank and then fill the solution tank to resume cleaning.
Emptying the Recovery Tank
• Unplug the unit.
• Disconnect the solution line and vacuum hose.
• Unlatch the recovery tank from the base of the unit and remove.
• Remove the drain plug.
• Drain the tank over a suitable outlet for wastewater.
• Rinse the tanks after each use.
• Store the unit with the lid off of the recovery and allow it to air dry.
Vacuum Hose Attachment
Latch Assembly
Spray Tip (included
both an atomizer
and fan spray tip)
Recovery Tank Drain
Extractor
Hose
Assembly
Wand Hose
Wand
7
Page 8

TROUBLESHOOTING
Problem
Solution Hose Connection
3-Way Switch
Possible Cause Solution
No Spray
Low Solution Flow
Low Suction
*Before re-filling the solution tank, always empty the recovery tank.
Pump is not primed. Depress lever on hand tool to
Solution tank level is low.
Clogged filter.
Clogged Spray jet.
Recovery tank is full.
Clogged Hand Tool or hose.
Excessive foam.
8
release pressure.
Refill Solution tank.*
Clean the screen filter on the
hose in the solution tank.
Clean the spray jet in the hand
tool.
Empty recovery tank.
Clean Hand Tool and hose.
Add defoamer to recovery
tank.
Page 9

1
2
3
4
5
6
7
13
53
60
59
14
15
16
17
18
19
20
21
8
9
11
12
10
44
30
56
43
57
50
58
55
54
53
52
51
22
49
48
35
16
47
46
45
22
23
24
25
26
27
28
29
30
31
32
33
61
42
41
40
39
38
35
31
34
37
36
63
62
9
Page 10

No. Part No. Qty Description
1 X8295 6 Screw #8 x 3/4”
2 PX103A 1 Lid 4” Clear w/Blk Ring
3 X9061 1 Shut Off Disk
4 X9087 1 Washer
5 X9088 1 Screw 8-18 x 1/2”
6 PX103AG 1 Lid Gasket
7 X9518 1 Deflector
8 X9062 1 Float
9 X9082 1 PVC Pipe 1-1/2” x 6-1/2”
10 X9076 1 Bulkhead Fitting 1-1/2” MPT x 1-1/2 “Female Slip
11 AA195 1 Extractor Detailer Tool 1-1/2”
12 X2058 1 Hose Assembly, Rigid, Crush Proof
13 PAS36 1 Drain Hose Plug
14 PX30 1 Solution Tank Filter
15 PX213 1 Nylon Fitting 1/4” MPT x 1/4” Hose Barb
16 7DL003 6 Hose Clamp
17 71817A 2 Braided Hose, 1/4” 250 PSI
18 PX14A 1 Dump Valve Gasket
19 PX46 1 Lock Nut
20 X9079 1 Gasket
21 X1920BLK 1 Solution Tank
22 PC66 2 Hose Barb 1/4”H x 1/8” MPT
23 X9740 1 Gasket
24 X8237 3 Nyloc Nut
25 X9060 1 Vacuum Motor Screen
26 1942-Kit 1 Vacuum Motor 2 Stage 115V w/Gasket
27 X9045 3 Spacer
28 PC10 1 QD Male 1/8” x 1/8” FPT
29 X9412 1 Washer
30 7AT006 2 Brass Fitting 90° 1/4” Barb x 1/8” MPT
31 X8212 7 Lock Washer
32 X8291 3 Screw 1/4-20 x 5-1/2”
33 X9047 2 Swivel Caster 45mm 1/4-20 x 3/4”
34 7BS003 2 Screw 1/4-20 x 1/2”
35 00-0600-0503 8 Washer
36 30676 5 Screw 10-24 x 5/8”
37 X9046 1 Base Plate Weldment
38 X9048 1 Rocker Switch
39 X8008N 1 Lock Nut Lock 1/2” Steel Conduit
40 PD8 1 Strain Relief
10
Page 11

No. Part No. Qty Description
41 19498 1 Power Cord 18/3 Ga. SJTW x 25’ Yellow
42 X8201 1 Screw #8 x 3/8”
43 7CZ001 18 Vacuum Hose 2”
44 PX215 2 Hose Clamp
45 FJ5082 1 Oscillating Pump
46 PX204 2 Pump Mount
47 PX214 1 Nylon Fitting 90° 1/8” MPT x 1/4” Hose Barb
48 X8271 5 Nyloc Nut
49 X9064 1 Gasket
50 PX209 1 Foam Filter
51 7AJ004 1 Brass Anchor Connector 1/8” FPT x MPT
52 72115A 1 Washer
53 X8262 6 Screw 8-32 x 1/4”
54 X9059 2 Latch w/Keeper
55 X8278 2 Screw 8-32 x 1/2”
56 X1921BLK 1 Recovery Tank
57 X9106 2 Nut
58 X9065 4 Screw 1/4-20 x 1”
59 X8990 1 Handle Assembly
60 72173A 1 Spring Clip
61 7CY001 1 Internal Tooth Lock Washer
62 WAN-PFMS 1 Wand Assembly
63 PX35-2-4-100 1 Hose Assembly
X2050 1 Atomizer Nozzle
X2051 1 Fan Spray Nozzle
11
Page 12

X9082-KIT Standpipe Kit
1
No. Part No. Qty Description
1 X9082 1 PVC Pipe 1-1/2” x 6-1/2”
Bulkhead Fitting 1-1/2”
2 X9076 1
MPT x 1-1/2” Female
Slip
3 PX14A 1 Gasket
2
3
12
Page 13

PX30-KIT Filter and Hose Assembly
21 3
4
5
6
7
8
No. Part No. Qty Description
1 PX30 1 Solution Tank Filter
2 PX213 1 Nylon Fitting 1/4” MPT x 1/4” Hose Barb
3 7DL003 2 Hose Clamp
4 71817A 1 Braided Hose 1/4” 250 P.S.I.
5 7AT006 1 Brass Fitting 90° 1/4” Barb x 1/8” MPT
6 72115A 1 Washer
7 7AJ004 1 Brass Anchor Connector 1/8” FPT x MPT
8 PC66 1 Fitting 1/4” Barb x 1/8” MPT
For warranty information go to www.Powr-Flite.com
13
 Loading...