


Provided By
http://www.MyBinding.com
http://www.MyBindingBlog.com
Powis Fastback
Foilfast P-21x Printer
Instruction Manual

C O N T E N T S
I SAFETY & COMFORT ......................2
II INTRODUCTION ...........................5
III FIRST TIME SET-UP ........................7
IV INSTALLING SOFTWARE ..................11
Windows ................................11
Mac OSX ................................13
V ABOUT FOIL PRINTING ..................16
VI-A PRINTING WITH FOILFAST (Windows) ...17
Comp Covers ............................17
Clear Covers .............................21
Foilfast Title Sheets ........................25
VI-B PRINTING WITH FOILFAST (Mac OSX) ...34
Comp Covers ............................34
Clear Covers .............................38
Foilfast Title Sheets ........................42
Information for Your Reference:
Serial Number:
Purchase Date:
VII ABOUT PRINTING PROPERTIES ..........51
VIII INSTALLING SOFTWARE (Alt.) ...........55
IX TROUBLESHOOTING ......................57
X SPECIFICATIONS ..........................61
XI FCC NOTICE ..............................62
XII WARRANTY ..............................63
Dealer Name:
Dealer Phone:
FASTBACK P-21x FOILFAST PRINTER USER’S MANUAL,204952 Rev. E 1

I
SAFETY & COMFORT
Please read through this manual before setting up and using
your printer.
1. Read all of these instructions and save them for future
reference.
2. Follow all warnings and instructions marked on the product.
3. Unplug this product from its power source before cleaning.
Do not use liquid or aerosol cleaners. Use a damp cloth for
cleaning.
4. Do not use this product near water.
5. Do not place this product on an unstable cart, stand or
table. The product may fall, causing serious damage to the
product.
6. Slots and openings on the cabinet are provided for
ventilation. To ensure reliable operation of the product and
to protect it from overheating, do not block or cover these
openings. The openings should never be blocked by placing
the product on a bed, sofa, rug or other cushioned surfaces.
This product should never be placed near or over a radiator
or heat register. This product should not be placed in a builtin installation unless proper ventilation is provided.
7. This product should be operated from the type of power
source indicated on the marking label of the AC adaptor. If
you are not sure of the type of power available, consult your
dealer or local power company.
8. Do not allow anything to rest on the power cord. Do not
locate this product where the cord will be walked on.
9. If an extension cord is used with this product, make sure
that the total of the ampere ratings on the products plugged
into the extension cord do not exceed the extension cord
ampere rating. Also, make sure that the total of all products
plugged into the wall outlet does not exceed 15 amperes.
10. Never push objects of any kind into this product through
cabinet slots as they may touch dangerous voltage points or
short out parts that could result in a risk of fire or electric
shock. Never spill liquid of any kind on the product.
2 FASTBACK P-21x FOILFAST PRINTER USER’S MANUAL,204952 Rev. E

SAFETY & COMFORT (continued)
11. Except as explained elsewhere in this guide, do not attempt
to service this product yourself. Opening and removing those
covers that are marked “Do Not Remove” may expose you to
dangerous voltage points or other risks. Refer all servicing on those
compartments to service personnel.
12. Unplug this product from its power source and refer servicing to
qualified service personnel under the following conditions:
A. When the power cord or plug is damaged or frayed.
B. If liquid has been spilled into the product.
C. If the product has been exposed to rain or water.
D. If the product does not operate normally when the operating
instructions are followed. Adjust only those controls that are
mentioned in the operating instructions, since improper adjustment
of other controls may result in damage and will often require
extensive work by a qualified technician to restore the product to
normal operation.
E. If the product has been dropped or the cabinet has been damaged.
F. If the product exhibits a distinct change in performance, indicating a
need for service.
FASTBACK P-21x FOILFAST PRINTER USER’S MANUAL,204952 Rev. E 3

I
SAFETY & COMFORT (continued)
!
In recent years, medical attention on occupational injuries has identified
common, seemingly harmless activities as potential causes of a wide range
of problems collectively known as Repetitive Stress Injuries or Cumulative
Trauma Disorders. It is now recognized that any repetitive motion may
contribute to these health problems. Depending on how it is used, the
prolonged or repetitive use of almost any machine might have a potential
for discomfort or injur y. As a user of this printer, you might also be at risk.
The most commonly accepted causes of this type of disorder are
repeated, forceful actions, usually in an awkward position or posture,
without sufficient rest to allow the body to recover. These repetitive
actions may cause nerves, tendons, ligaments, and other soft body parts
to become irritated and inflamed.
By paying attention to the way you perform your work, and do other
activities, you can identify the behaviors that could put you at risk.
The precautions outlined below are examples you can take to help
reduce the likelihood of developing these problems and work more
comfortably with your new printer. Keep in mind, however, that these are
only suggestions. Comfort is personal and only you may be able to judge
what works best for you.
• Youmayndthatyourbodywillbemostcomfortableandrelaxed
with the printer placed directly in front of you. The printer and your
supplies should be within easy reach —avoid excessive stretching.
• Theprintermaybeusedineitherastandingorseatedposition.
If you are standing, make sure that the work surface height that the
printer is on does not require you to bend over in a way that would
strain your back or arms.
• Ifyouareseated,adjusttheheightofyourchairtoyourtableso
your body is naturally aligned and make sure you have adequate
legroom. Stay relaxed and relatively upright. Don’t force yourself
into an uncomfortable position.
• Donotbendyourwristsunnaturallyduringuse.
• Don’tstayinonepositionfortoolong.Tr ychanginghandsand
varying your posture.
• Takebreaks.Frequentshortbreaksareprobablybetterthanafew
long ones.
Many factors go into creating a comfortable workspace, including proper
placement and adjustment of furniture and equipment. A thorough work
site analysis by a qualified expert is impor tant in order to reduce the risk
of repetitive motion injuries. If you experience pain, throbbing, aching,
tingling, stiffness, a burning sensation, swelling, numbness, or weakness in
your wrists, hands, arms or legs, see your physician immediately.
DO NOT IGNORE THESE WARNING SIGNS. Even if symptoms occur
when you are not using the printer, they can be associated with painful and
sometimes permanently disabling injuries or disorders of the ner ves, muscles,
tendons, or other parts of the body. These symptoms could mean that
you are developing a repetitive stress injury that requires prompt medical
attention. For more detailed information, consult your doctor.
4 FASTBACK P-21x FOILFAST PRINTER USER’S MANUAL,204952 Rev. E

II
INTRODUCTION
Congratulations on the purchase of your new Fastback®
Foilfast® P-21x printer. As with all our products, this Foilfast
printer was carefully assembled and tested prior to packing. You
will find it fast and easy to use.
The Foilfast printer lets you print up to seven colors of foil
at one time, all registered accurately. The printer works with
virutally all PC and Mac design programs.
A
B
C
D
E
F
G
F I G U R E 1
A Paper Feed Guide
B Paper Support
C Paper Stop
D Paper Feed
E Front Cover Release Button
F Front Cover
G Output Tray
The illustrations on the next two pages will help familiarize you
with the Foilfast printer and its components. Please look them
over carefully before proceeding.
TIP: For best results, use Comp Covers and Clear Covers for
tape-bound documents, and Foilfast Title sheets for Fastback
Hardcover books. These materials will produce the optimal
results with your Foilfast printer.
FASTBACK P-21x FOILFAST PRINTER USER’S MANUAL,204952 Rev. E 5
II
INTRODUCTION (Cont.)
A
B
C
E
D
A Marking Sticker
B Cartridge Holder Plate
C Carriage
D Print Head
E Release Lever
A
B
C
F I G U R E 2
F I G U R E 3
6 FASTBACK P-21x FOILFAST PRINTER USER’S MANUAL,204952 Rev. E
A USB port
B Parallel Port
C Power Cord Socket
III
FIRST TIME SETUP
remove tape
F I G U R E 4
F I G U R E 5
A. What’s Included Inside the Box
Fastback P21x Printer
Printer output tray
Accessory box, which contains:
User’s manual
Printer Installation CD
Sample covers
Power cord
If any of the preceding items are damaged or missing,
contact your dealer immediately.
B. Setting Up Printer
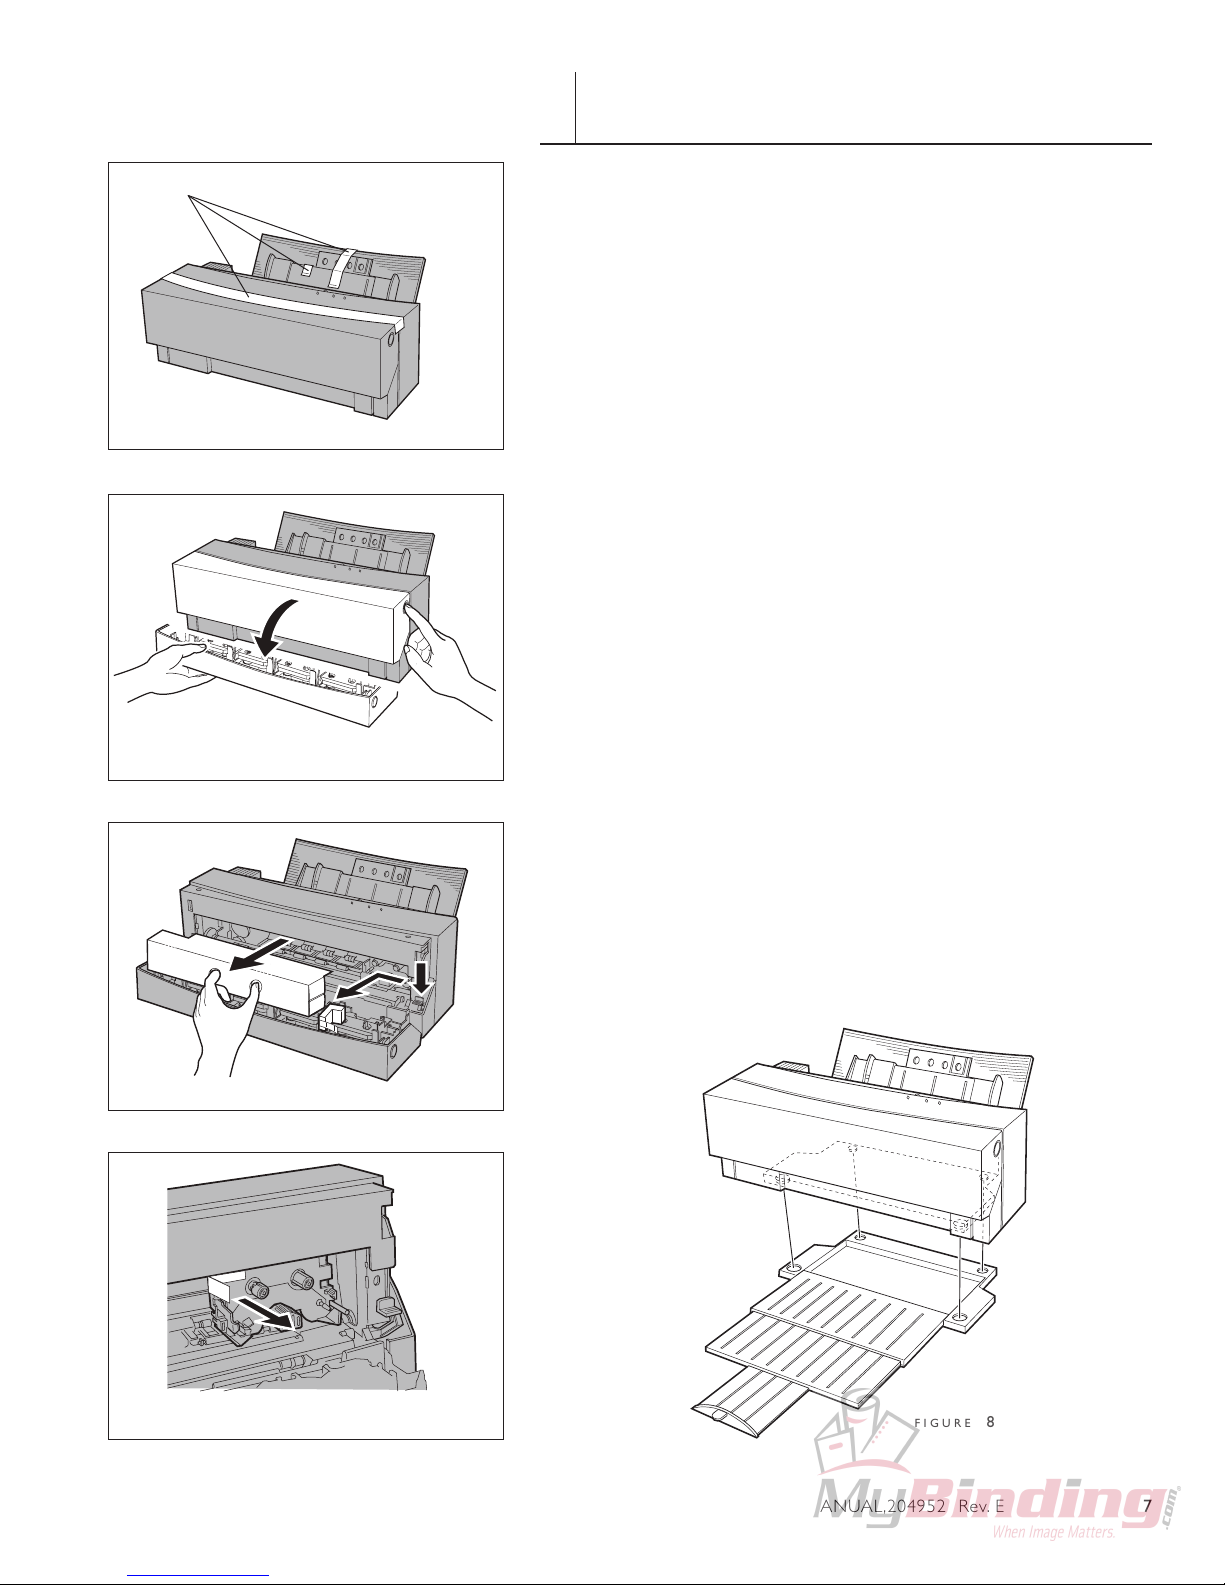
Please remove the tape (three locations) from the printer cover before
going to the next step (Figure 4).
Carefully open the front cover of the printer (Figure 5).
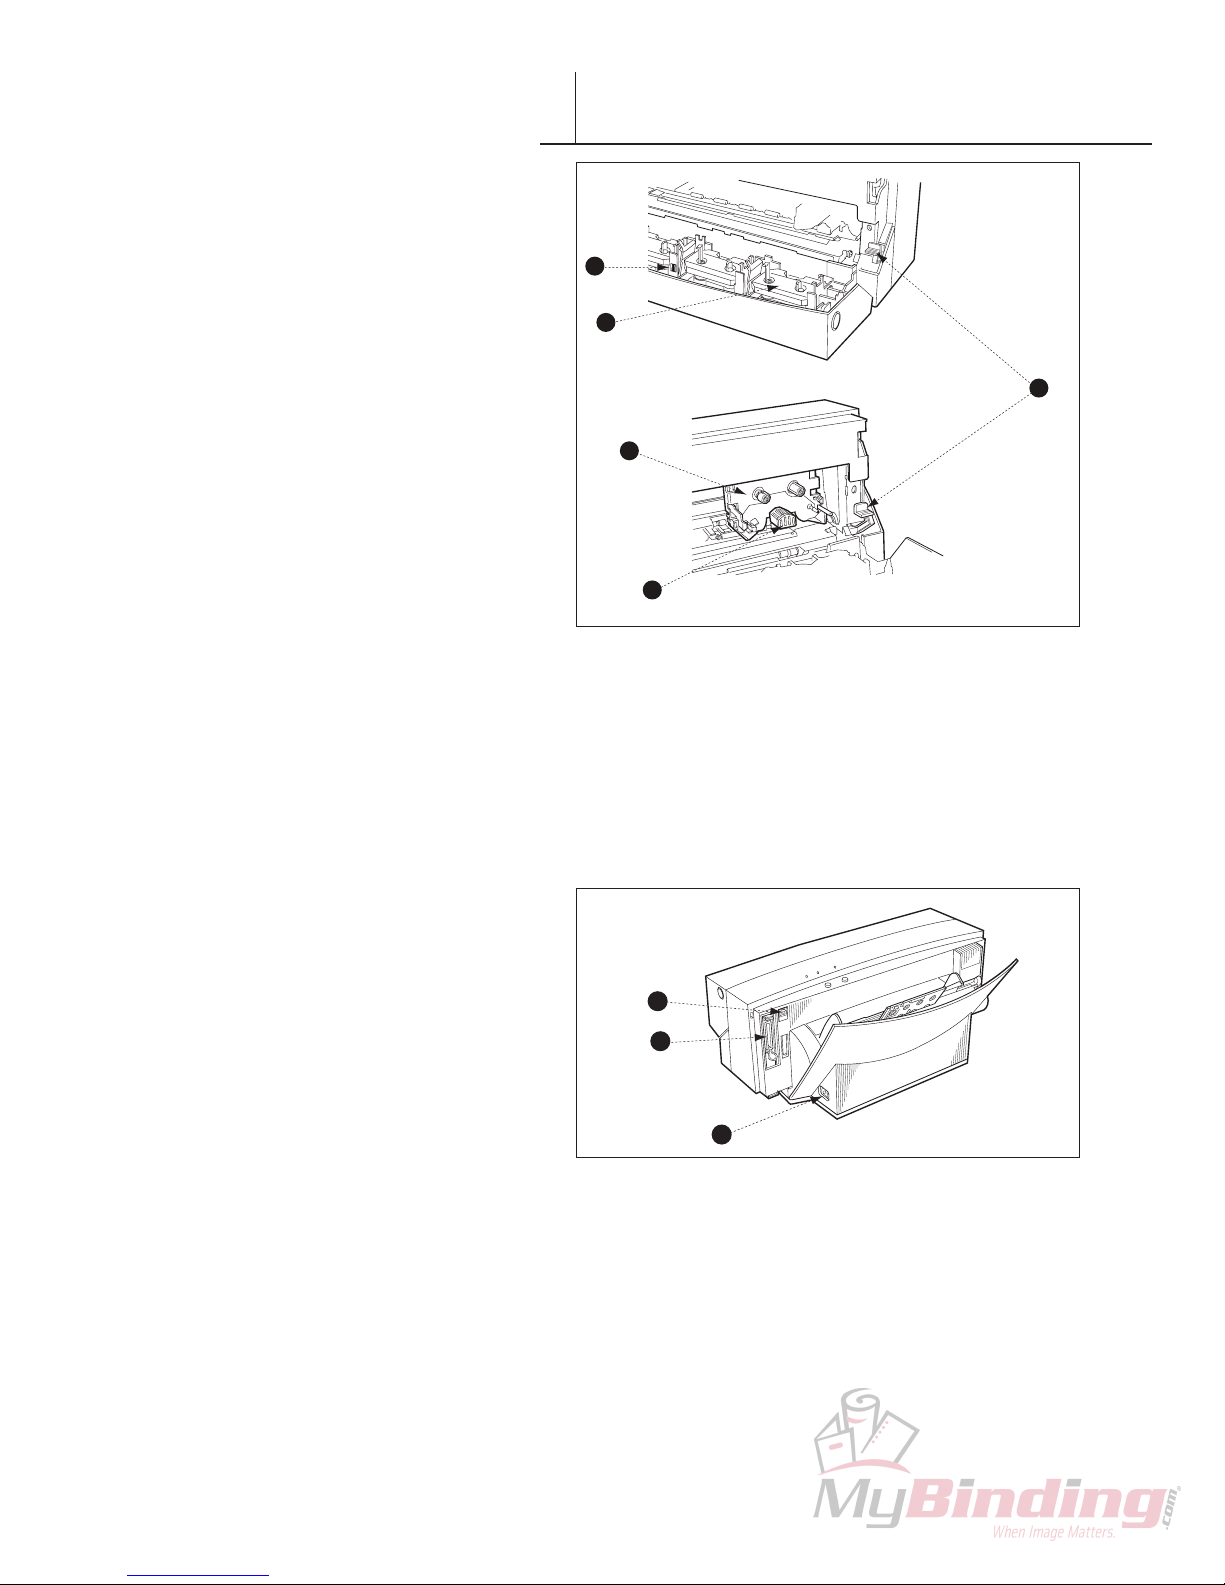
1. Remove the cardboard carriage packing material that is to the left of
the carriage (Figure 6).
2. Press down on the blue paper release lever located to the right of
the carriage. Remove the tape from the metal frame that holds the
small white foam carriage packing material in place and remove the
foam piece (Figure 6).
3. Remove the tape located on the left side of the carriage by gently
grasping the tape and pulling slightly toward the left and forward at
the same time (Figure 7).
F I G U R E 6
F I G U R E 7
Close the front cover after removing the carriage packing material.
Place the printer on the output tray (Figure 8). Tray may be pushed out
of the way under the printer when the printer is not in use.
F I G U R E 8
FASTBACK P-21x FOILFAST PRINTER USER’S MANUAL,204952 Rev. E 7
FIRST TIME SET-UP (Cont.)
III
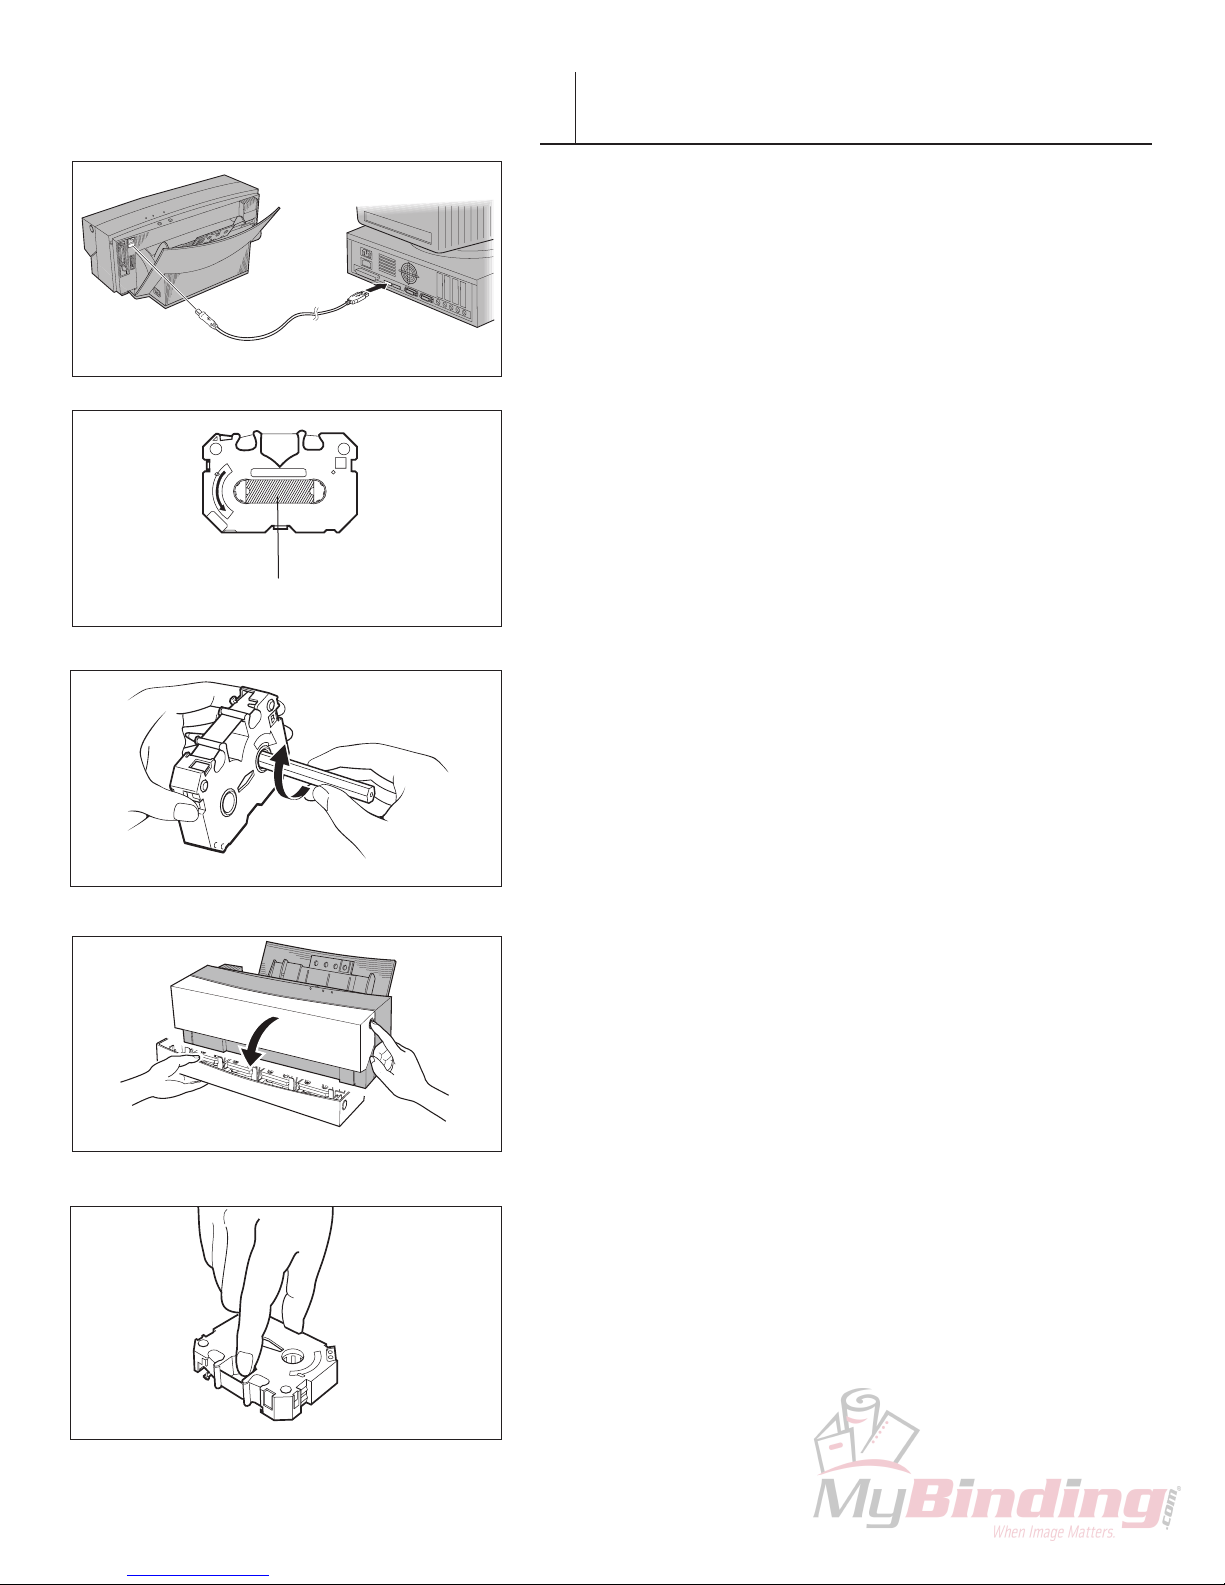
C. Connecting USB Cables
1. Make sure that the power to your computer is completely
turned off. If the computer is running, quit all running
applications, shut down the system, and turn off the power.
2. The Type ‘B’ plug END (the smaller, square plug) is inserted
into the USB socket at the rear of the printer.
cardboard insert
D
N
I
W
F I G U R E 8
F I G U R E 9
F I G U R E 10
3. The Type ‘A’ plug (the flat rectangular plug) is inserted into
the USB socket on the computer (Figure 8).
NOTE: The placement of the USB port varies from
computer to computer. Please check your original computer
manual to verify the location of the USB plug on your
computer.
D. Installing Foil Cartridges
1. Remove the cardboard insert from the car tridge (Figure 9)
2. Insert a pencil into the side marked “B”. Turn the pencil slowly
to take up any slack in the foil (Figure 10).
3. Open the front cover of the printer (Figure 11).
4. Insert the cartridges.
•Holdthecartridgesothatthesidewiththeletter“B”faces
upward, and the “B” is on the upper right of the cartridge. Hold
the center of the cartridge with your thumb and index finger
(Figure 12).
•Inserttheleftendofthecartridge,whilepushingtheleft
side latch of the cartridge holder slightly to the left with the
cartridge (Figure 13).
F I G U R E 11
F I G U R E 12
8 FASTBACK P-21x FOILFAST PRINTER USER’S MANUAL,204952 Rev. E
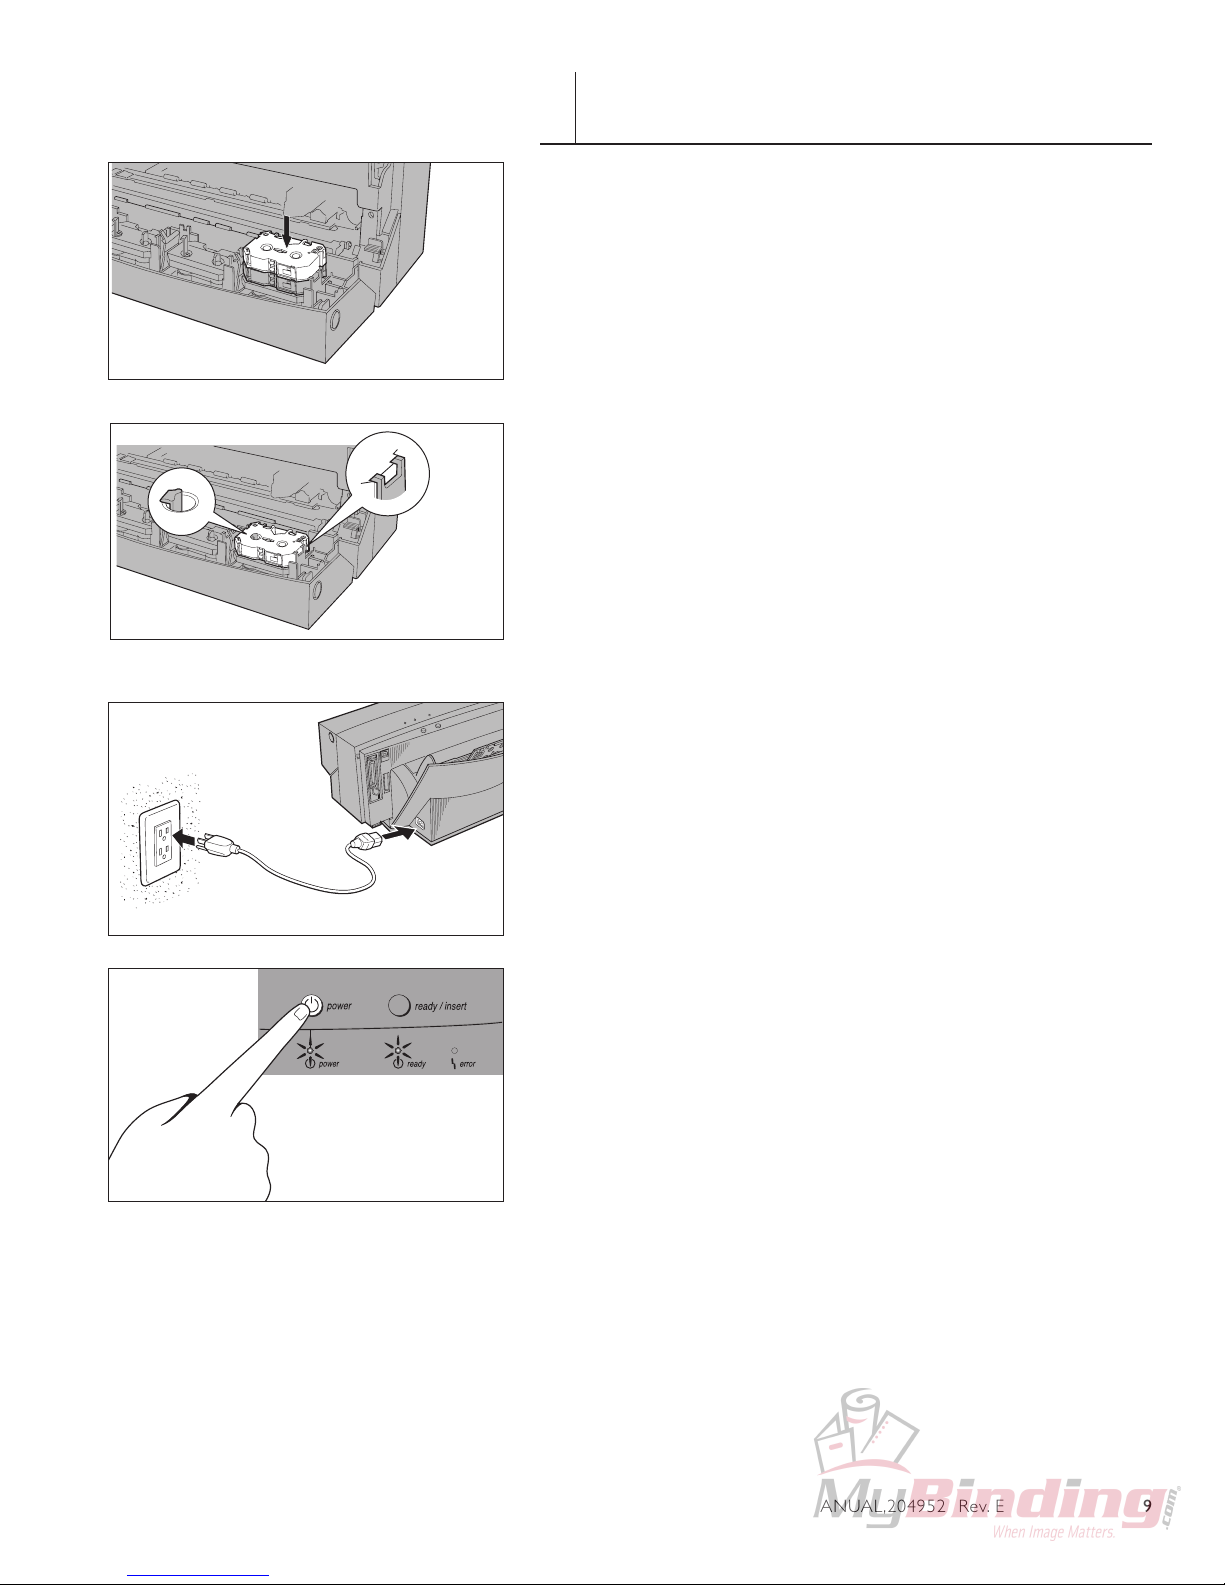
•Pushdowntherightsideofthecartridge.Makesurethatthe
cartridge is securely locked into the holder, and that there is no
slack in the foil (Figure 14).
•Putthesecondcartridgeontopofthecartridgealready
installed. Gently push down the center of the cartridge.
FIRST TIME SET-UP (Cont.)
III
E. Connect Power Cord
Attach the power cord to the printer, and plug into a wall outlet.
(Figure 15)
F. Ready To Go
F I G U R E 13
F I G U R E 14
F I G U R E 15
Turn the power switch on by pressing the power switch (Figure 16).
Now the machine is ready to install the printing software.
TIP: Power to the printer is completely cut off only when the
cord is unplugged. Place the printer where you can easily unplug it
from the power source. Also, pull the plug and not the cord when
unplugging the printer.
F I G U R E 16
FASTBACK P-21x FOILFAST PRINTER USER’S MANUAL,204952 Rev. E 9

10 FASTBACK P-21x FOILFAST PRINTER USER’S MANUAL,204952 Rev. E

INSTALLING PRINTER SOFTWARE
(Windows)
IV
IMPORTANT: All previously installed Foilfast software
must be removed before installing new Foilfast software.
Please make sure that you have uninstalled all old Foilfast
software before continuing.
1. Turn printer on (Figure 16).
The “Found New Hardware Wizard screen appears (Figure 17).
NOTE: If you did not receive a disk with your printer, you
can obtain the software from the Powis website
(http://www.powis.com/software).
F I G U R E 17
F I G U R E 18
2. Click on ‘Install from a list of specific location’ and click
‘Next.’
The Hardware Wizard will ask you to locate your installation
software (Figure 18).
3. Click ‘Browse’ and locate your software, or insert you
installation CD into the computer. When you have located
the folder that contains the installation software, the ‘OK’
button will become available. If you are not in a folder or
subdirectory that contains the installation software, the ‘OK’
button will remain grayed-out (Figure 19).
4. Click ‘OK.’
The Hardware Wizard will now show the location of the
software in the window labeled “Include this location in the
search.” Make sure that the box above this selection is checked
(Figure 18).
5. Click ‘Next.”
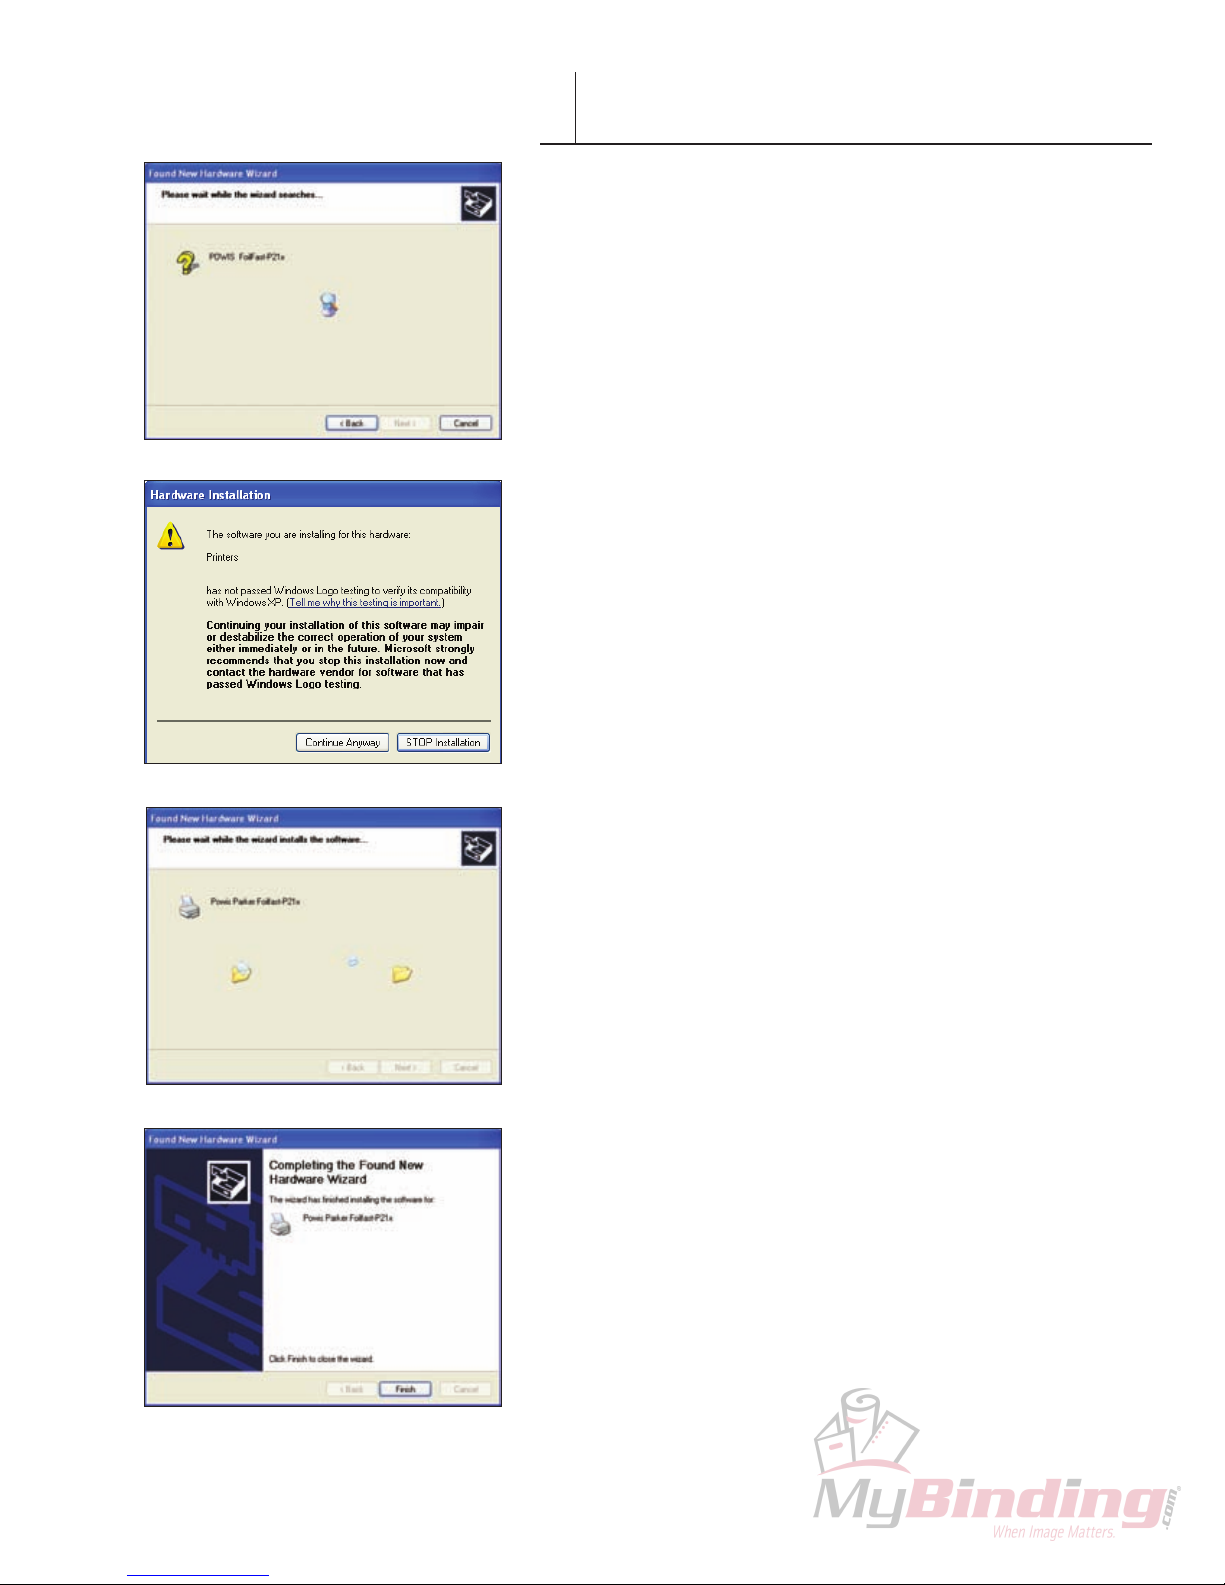
The program searches for the new software (Figure 20).
6. At this point, a screen warning that that the software you
are about to install has not passed Windows Logo testing
(Figure 21). If this window appears, click ‘Continue Anyway.’
F I G U R E
19
FASTBACK P-21x FOILFAST PRINTER USER’S MANUAL,204952 Rev. E 11
F I G U R E 20
INSTALLING PRINTER SOFTWARE
IV
(Windows—Continued)
The Hardware Wizard should now install the software to your
computer (Figure 22).
7. The Hardware Wizard will notify you when it has finished
installing the printer software (Figure 23). Click ‘Finish.’
Your printer is now ready to use. If, for any reason, your
installation was not successful, remove all components of
the Foilfast software from your computer and try again. See
Troubleshooting for more information or contact Powis Tech
Support.
F I G U R E 21
F I G U R E 22
F I G U R E 23
12 FASTBACK P-21x FOILFAST PRINTER USER’S MANUAL,204952 Rev. E
F I G U R E 25
INSTALLING PRINTER SOFTWARE
(Mac OSX)
IV
Installing the Foilfast P21x on the Mac is a two part process.
First, you must install the printer software, and then use the
Printer Setup Utility to add the Foilfast to the System’s available
printer list.
To access the printer installation software, insert the Software
Installation CD in your CD drive and open the folder titled
“OSX,” or download the software from the Powis website
(http://www.powis.com/software).
A. INSTALLING PRINTER SOFTWARE
1. Double click on the the disk image fi le (FoilfastP21.dmg).
This will install an image disk on your desktop.
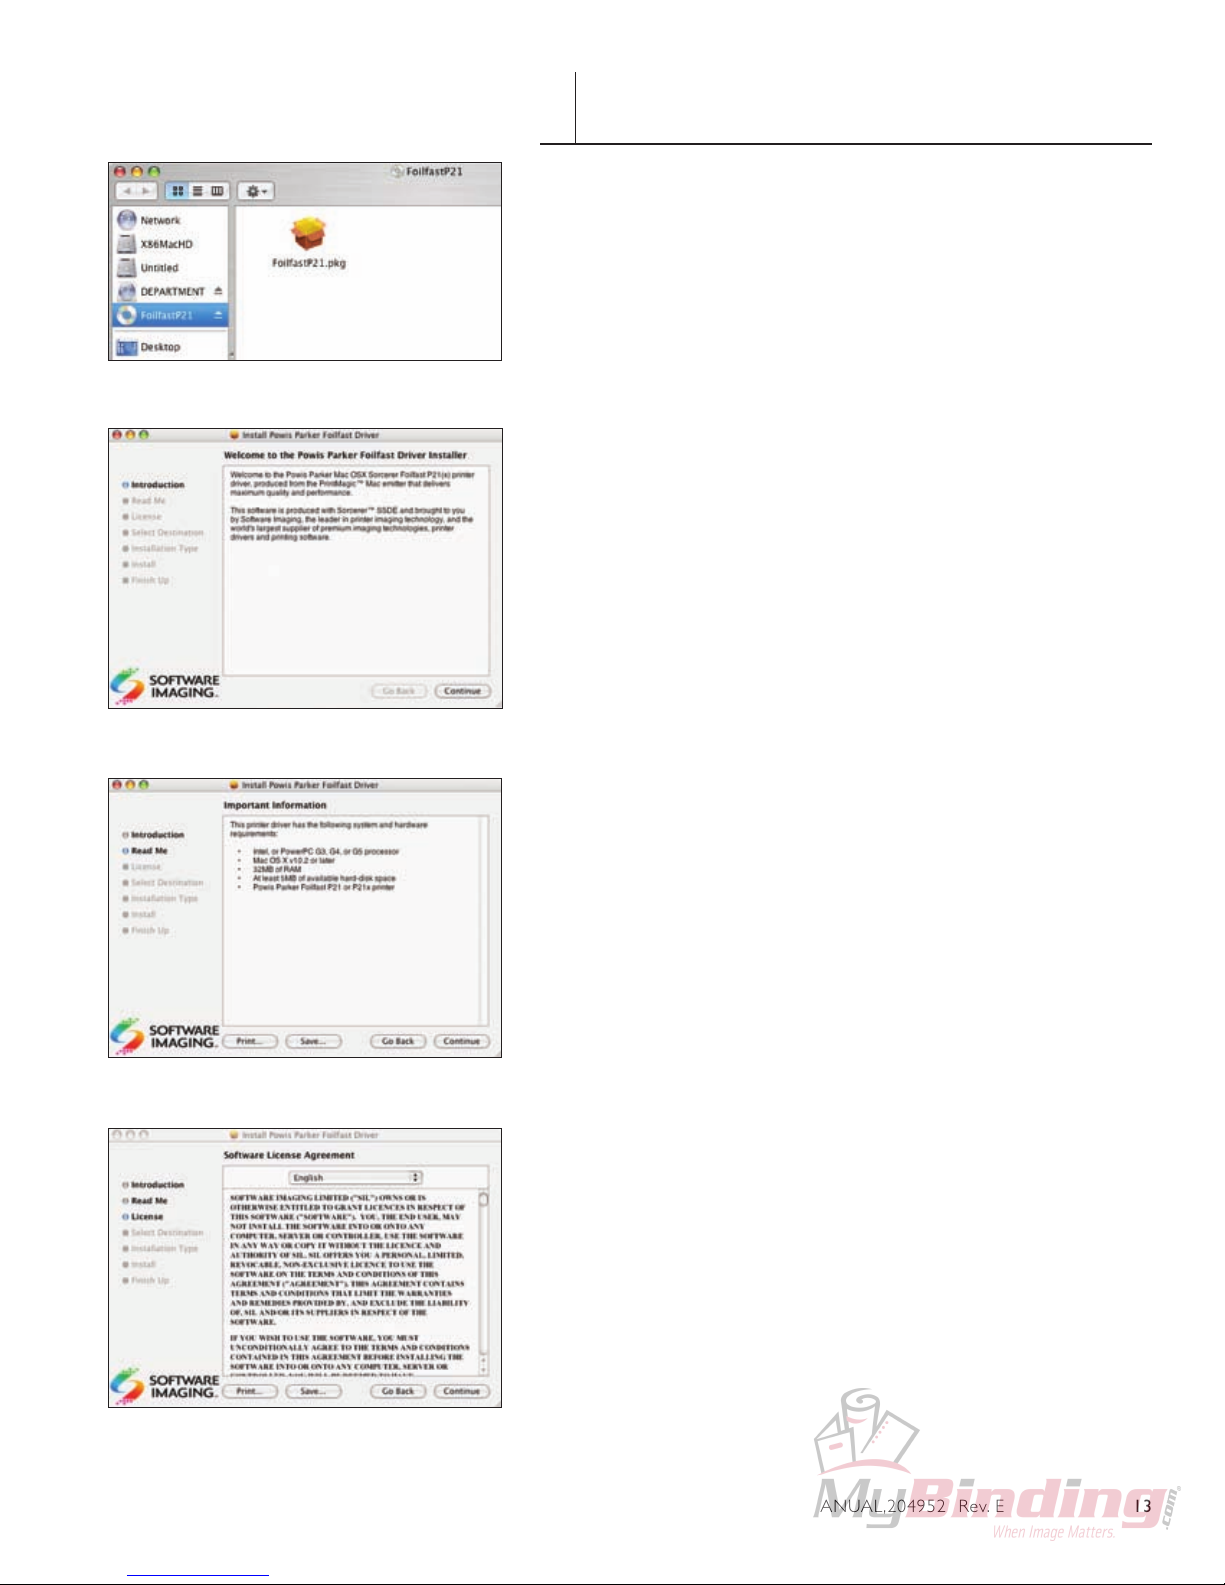
2. Open the image disk and double click on the fi le titled
“FoilfastP21.pkg” (Figure 25)
The Introduction dialog box appears (Figure 26).
3. Click ‘Continue.’
F I G U R E 26
F I G U R E 27
The Read Me dialog box appears (Figure 27). You may print or
save this information as a text fi le by clicking the appropriate
buttons.
4. Click ‘Continue.’
The Software License Agreement dialog box appears
(Figure 28). You may print the agreement by clicking the ‘Print’
button, or save it as a text fi le by clicking the ‘Save’ button.
5. Click ‘Continue.’
F I G U R E 28
FASTBACK P-21x FOILFAST PRINTER USER’S MANUAL,204952 Rev. E 13
F I G U R E 29
INSTALLING PRINTER SOFTWARE
IV
(Mac OSX—Continued)
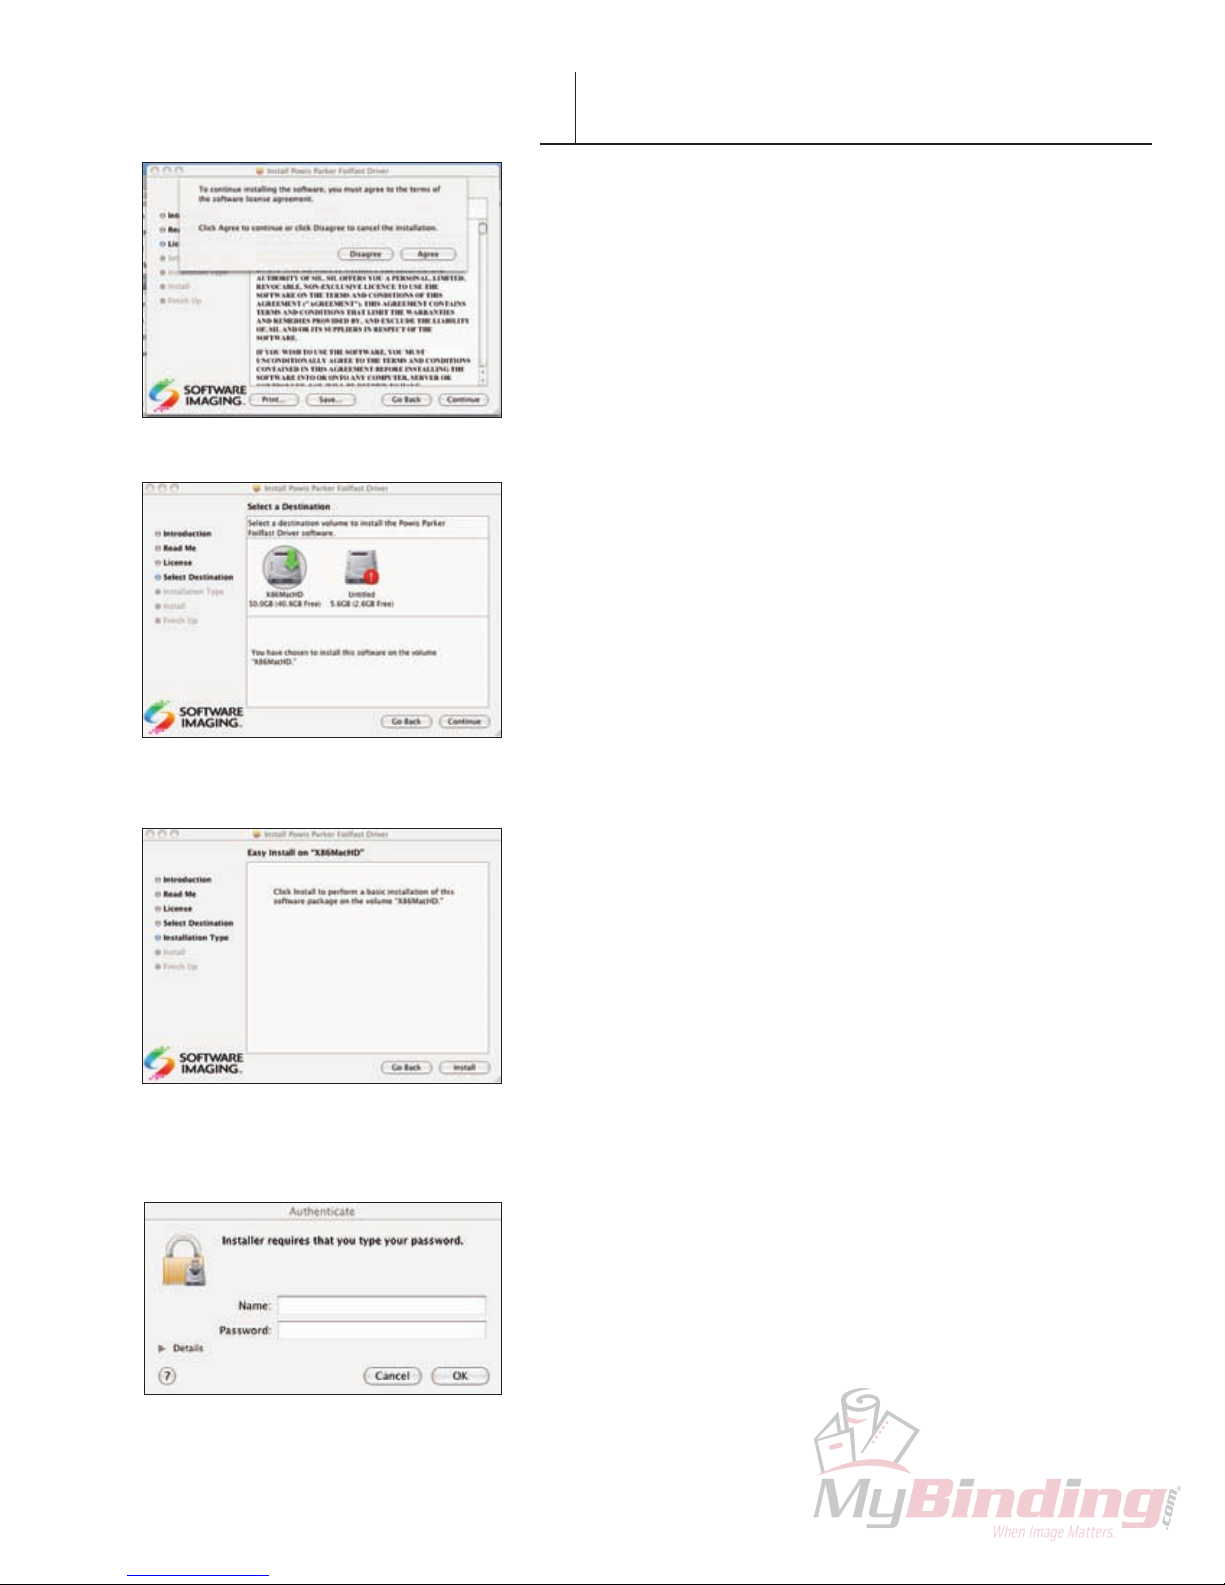
A dialog box appears asking you to verify that you agree with
the terms of the Software License Agreement (Figure 29).
If you do not agree with the terms of the Software License
Agreement, click Disagree’ and exit the installation program.
Otherwise, click ‘Agree.’
A dialog box showing the hard drives that are available for
installation (Figure 30).
6. Click on the drive that you want the printer software
installed on. For best results, always install the printer on the
same drive as your System. The chosen drive appears with a
green arrow. Click ‘Continue.’
The Easy Install dialog box appears (Figure 31).
7. Click ‘Install.’
The software will take a few minutes to install. After it is fi nished
installing, a dialog box will open to indicate that the software
was successfully installed (Figure 32).
F I G U R E 30
F I G U R E 31
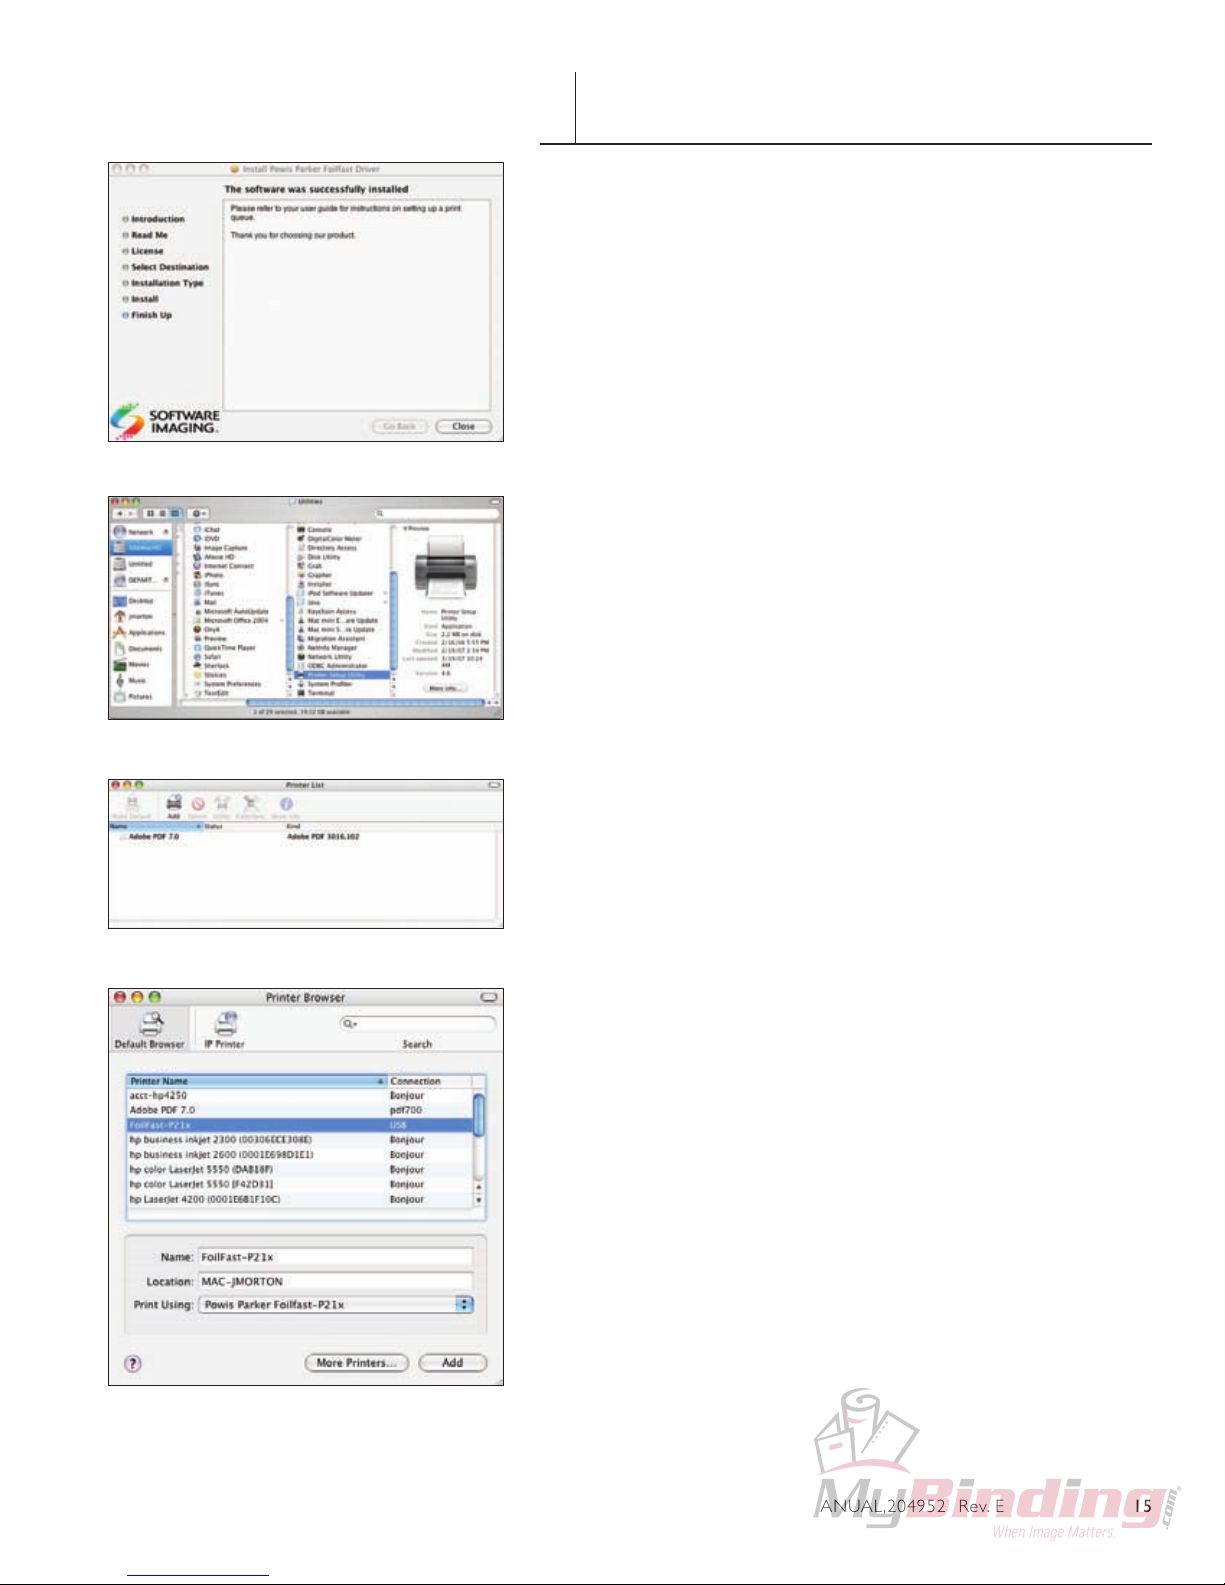
8. Click ‘Close.’
You may now drag the disk image to the Trash to eliminate it.
This fi nishes the software installation, now you must use Printer
Setup Utility to add the Foilfast printer to your computer’s
available printer list.
F I G U R E 32
14 FASTBACK P-21x FOILFAST PRINTER USER’S MANUAL,204952 Rev. E
F I G U R E 32
INSTALLING PRINTER SOFTWARE
IV
(Mac OSX—Continued)
B. PRINTER SETUP UTILITY
1. Locate the Apple Printer Setup Utility and double-click on it
(Figure 33).
The Available Printer List appears (Figure 34).
NOTE: The default location for the Printer Setup Utility in OSX is the
Utilities folder in Applications.
2. Click the ‘Add’ button.
The list of available printers appears (Figure 35).
3. Locate the Foilfast printer on the list and click ‘Add.’
Your printer is now ready to use. If, for any reason, your installation was
not successful, remove all components of the Foilfast software from your
computer and try again. See Troubleshooting for more information or
contact Powis Tech Support.
F I G U R E 33
F I G U R E 34
F I G U R E 35
FASTBACK P-21x FOILFAST PRINTER USER’S MANUAL,204952 Rev. E 15

ABOUT FOIL PRINTING
V
The Foilfast printer is designed to work with vir tually any
graphics program that you might use on a Mac or a PC. The
printer automatically interprets the colors used in your artwork
and converts them to one of the seven available colors of
foil. Medium grays are interpreted as silver, and light grays are
interpreted as white.
Foilfast foil cartridges are available in seven colors (red, green,
blue, silver, gold, white, and black). You may load up to seven
colors into the Foilfast printer at the same time, or you may load
just a single color.
Additionally, there is a Foil Primer car tridge. The Foil Primer
cartridge is used to print on surfaces that normally would not
accept the foil, such as Clear Cover and Suede Foilfast Title
sheets.
Single Ink (one foil color)
This print mode allows you to print a document in monochrome
using one cartridge. It does not matter which color, or colors,
you use in your artwork, all colors will print in the chosen color.
TIP: If you are printing in gold foil only, you do not need to make
your art yellow. Create your artwork in black. This will make it
easier to read and adjust.
Multiple Inks (2 or more colors)
This print mode allows you to print a document in multiple
colors. The colors you use are automatically assigned to the
closest color space, this includes spot colors such as Pantone
colors. You can use up to seven colors on Comp Cover and six
colors on Clear Cover.
To print with the white foil, you must have some light tone
assigned to an object. If an object is assigned 0% value in all
colors, it will not print with any of the foils, whereas a 1% value
in any color will print as white. We recommend using 1%–5%
black for white values, and 50% black for silver values. 100% black
will print with black foil.
16 FASTBACK P-21x FOILFAST PRINTER USER’S MANUAL,204952 Rev. E
TIP: Avoid colors that have no foil cartridge equivalent, such as
purple or orange. These may not print in the color you desire.
Undercoat (Foil Primer)
The Undercoat feature of the Foilfast printer is designed to let
you print on surfaces that normally would not accept the foil,
such as Clear Cover and Suede Foilfast Title sheets. Undercoat
uses the Foil Primer cartridge. Unlike the other foil cartridge, the
Foil Primer is listed in the multiple inks menu, but is chosen by
checking the Undercoat button in the Properties dialog box (see
Foilfast printing-Chapter x for more information). Undercoat can
also be assigned when you are using a single color of foil. Some
of the presets in the Properties window are preassigned for
Undercoat Printing
NOTE: If you are using the Foil Primer car tridge to apply and
undercoat to the sheet you are printing, you can only use six
colors at a time.
F I G U R E 35
PRINTING COMP COVERS WITH
VI-A
THE FOILFAST® PRINTER (Windows)
A. SINGLE COLOR PRINTING
IMPORTANT: The printing procedures for Adobe programs
(Illustrator, InDesign, etc.) are slightly different from the
printing procedures for non-Adobe programs. Because of the
common use of Adobe Illustrator with the Foilfast, both sets of
procedures are given here.
NOTE: When printing in single color mode, the colors that
appear in you artwork do not matter. All artwork will print
in the chosen foil color. If, for instance, you have created your
artwork in black, but you choose red foil to print, all artwork
will appear in red instead of black. If you have used more than
one color in your artwork, all colors will print in the specified
color when single color printing is chosen.
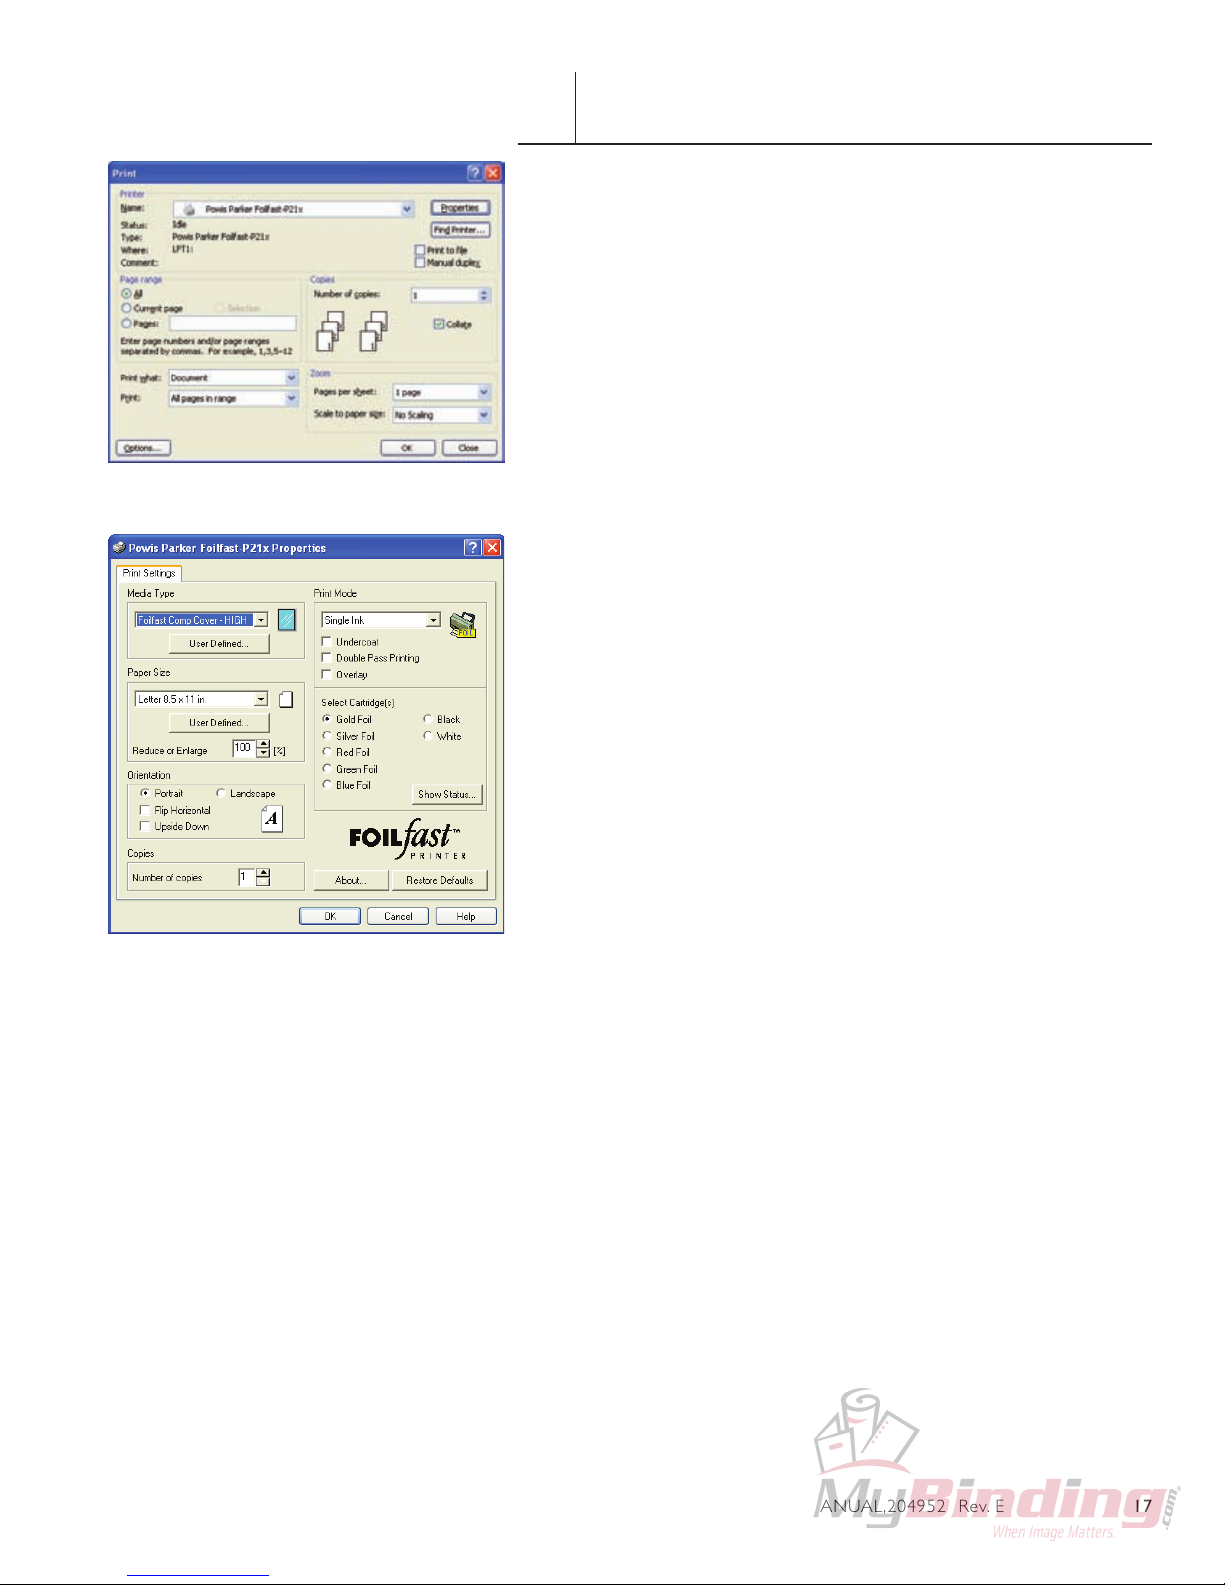
1. Choose Print from File menu.
The main Print dialog box appears (Figure 35).
2. In the Printer Name selection menu, choose the Foilfast
printer and click ‘Properties.’
The Properties dialog box appears (Figure 36). Verify that
“Foilfast Comp Cover-HIGH” is selected in the Media Type box,
and that “Single Ink” is chosen in the Print Mode. For Comp
covers printing in single color Gold foil, the default settings
should need no adjustment. If you are printing in a color other
than Gold, Click on the button next to the desired color under
‘Select Cartridge(s).’ For more information on the choices in this
dialog box, see About Printing Properties, C hapter VII.
F I G U R E 36
3. Click ‘OK.’
The Print dialog box appears (Figure 35).
4. Verify that the paper size matches the setting in the
Properties dialog box. Adjust the number of copies as
required.
5. Load paper into the paper feed.
NOTE: If you are using Comp cover, you may load up to ten
sheets at a time in the paper feed. Clear Cover and Fastback
Title sheets should be loaded one at a time to avoid jamming.
6. Click ‘Print.’
FASTBACK P-21x FOILFAST PRINTER USER’S MANUAL,204952 Rev. E 17
F I G U R E 37
PRINTING COMP COVERS WITH
VI-A
THE FOILFAST® PRINTER (Windows)
B. SINGLE COLOR PRINTING (Adobe)
NOTE: When printing in single color mode, the colors that
appear in you artwork do not matter. All artwork will print
in the chosen foil color. If, for instance, you have created your
artwork in black, but you choose red foil to print, all artwork
will appear in red instead of black.
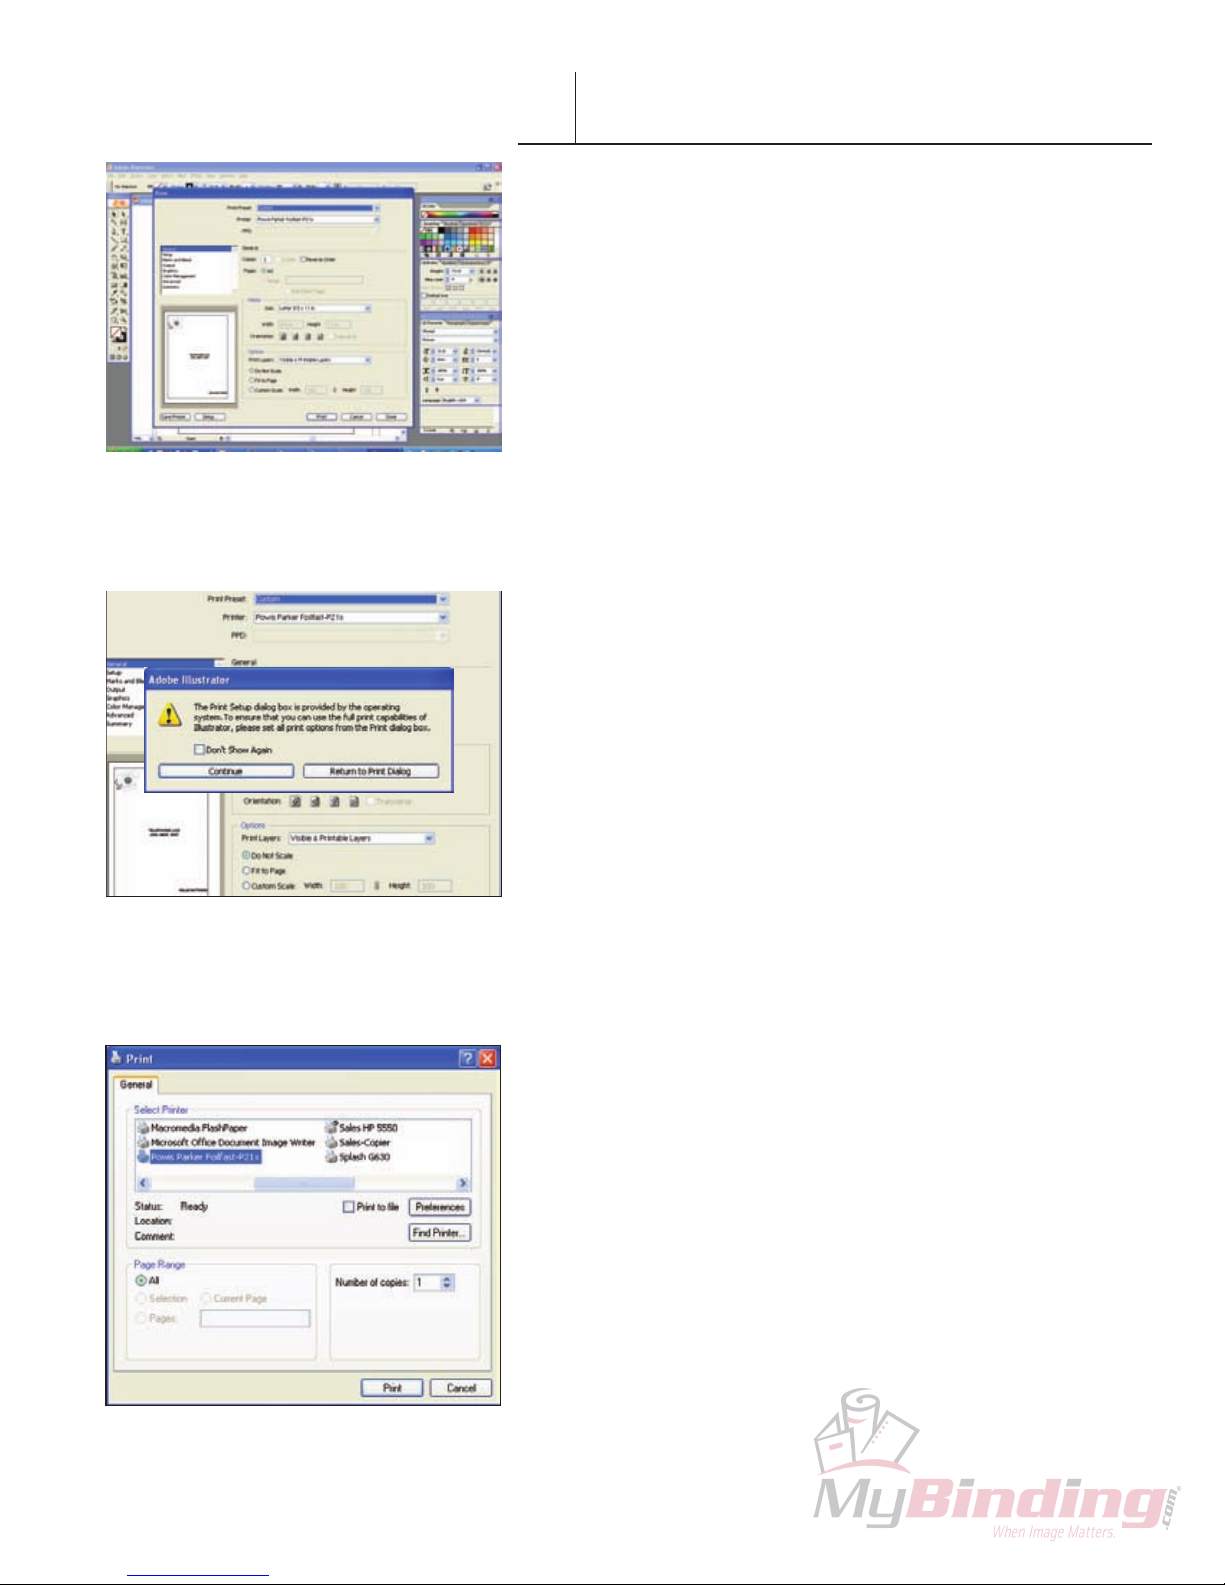
1. Choose Print from File menu.
The main Print dialog box appears (Figure 37).
2. Choose the Foilfast Printer in Printer selection menu and
click ‘Setup.’
A warning appears asking if you want to continue or return to
the Print dialog box (Figure 38).
3. Click ‘Continue.’
The Print Setup dialog box appears (Figure 39).
4. Click ‘Preferences.’
The Print Preferences dialog box appears (Figure 40). Verify that
“Foilfast Comp Cover-HIGH” is selected in the Media Type box,
and that “Single Ink” is chosen in the Print Mode. For Comp
covers printing in single color Gold foil, the default settings
should need no adjustment. If you are printing in a color other
than Gold, Click on the button next to the desired color under
‘Select Cartridge(s).’ For more information on the choices in this
dialog box, see About Printing Properties, C hapter VII.
F I G U R E 38
F I G U R E 39
5. Click ‘OK.’
The Print Setup dialog box appears (Figure 39).
6. Click ‘Print.’
The Print dialog box appears (Figure 37).
7. Verify that the paper size matches the setting in the Printing
Preferences dialog box. Adjust the number of copies as
required.
8. Load paper into the paper feed.
NOTE: If you are using Comp cover, you may load up to ten
sheets at a time in the paper feed. Clear Cover and Fastback
Title sheets should be loaded one at a time to avoid jamming.
9. Click ‘Print.’
18 FASTBACK P-21x FOILFAST PRINTER USER’S MANUAL,204952 Rev. E
PRINTING COMP COVERS WITH
VI-A
THE FOILFAST® PRINTER (Windows)
C. MULTIPLE COLOR PRINTING
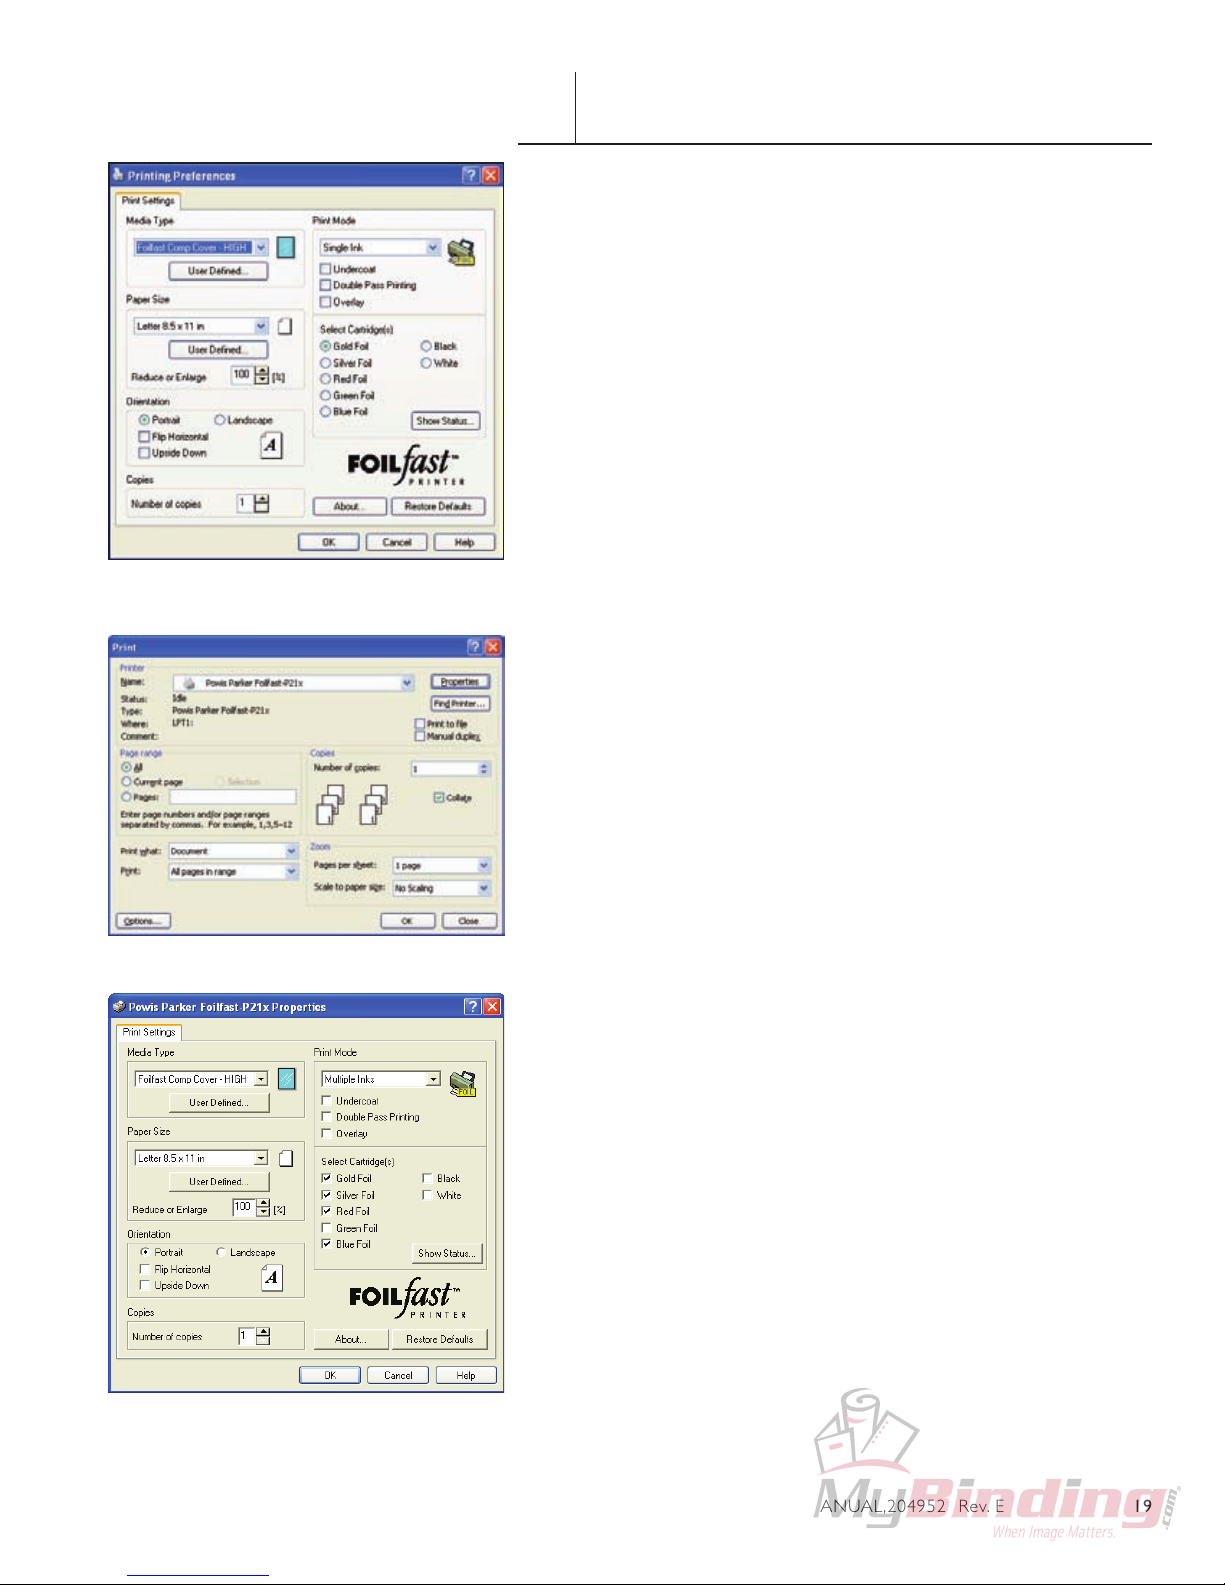
1. Choose Print from File menu.
The main Print dialog box appears (Figure 41).
2. In the Printer Name selection menu, choose the Foilfast
printer and click ‘Properties.’
The Print Properties dialog box appears (Figure 42). Verify that
“Foilfast Comp Cover-HIGH” is selected in the Media Type box.
3. Select “Multiple Colors” in the Print Mode.
4. Click on the buttons next to the desired colors under
‘Select Cartridge(s)’ (Figure 42).
5. Click ‘OK.’
The Print dialog box appears (Figure 41).
F I G U R E 40
F I G U R E 41
6. Verify that the paper size matches the setting in the Printing
Preferences dialog box. Adjust the number of copies as
required.
7. Load paper into the paper feed.
NOTE: If you are using Comp cover, you may load up to ten
sheets at a time in the paper feed. Clear Cover and Fastback
Title sheets should be loaded one at a time to avoid jamming.
8. Click ‘Print.’
For more information on the choices in the Properties dialog
box, see About Printing Properties, C hapter VII.
F I G U R E 42
FASTBACK P-21x FOILFAST PRINTER USER’S MANUAL,204952 Rev. E 19
F I G U R E 43
PRINTING COMP COVERS WITH
VI-A
THE FOILFAST® PRINTER (Windows)
D. MULTIPLE COLOR PRINTING (Adobe)
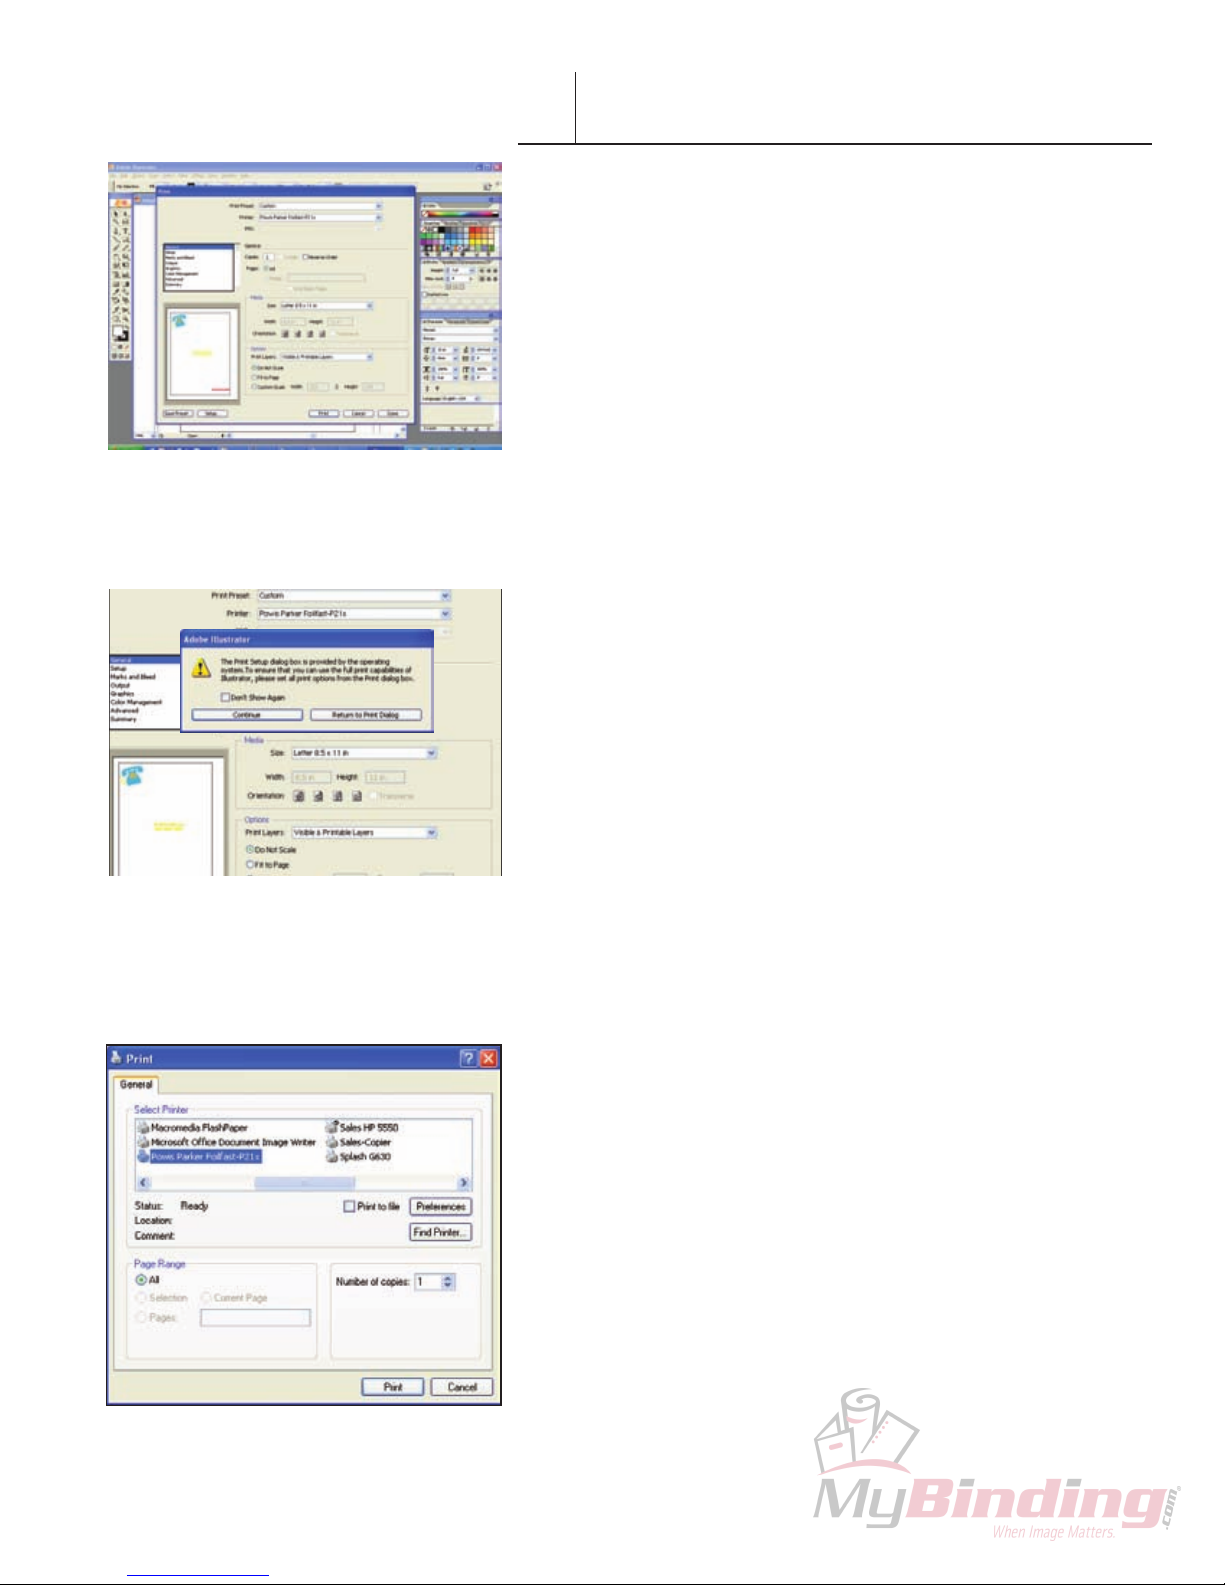
1. Choose Print from File menu.
The main Print dialog box appears (Figure 43).
2. Choose the Foilfast Printer in Printer selection menu and
click ‘Setup.’
A dialog box will appear asking if you want to continue or
return to the Print dialog box (Figure 44).
3. Click ‘Continue.’
The Print Setup dialog box appears (Figure 45).
4. Click ‘Preferences.’
The Print Preferences dialog box appears (Figure 46). Verify that
“Foilfast Comp Cover-HIGH” is selected in the Media Type box.
5. Select “Multiple Colors” in the Print Mode.
6. Click on the buttons next to the desired colors under
‘Select Cartridge(s)’ (Figure 46).
5. Click ‘OK.’
F I G U R E 44
The Print Setup dialog box appears (Figure 45).
6. Click ‘Print.’
The Print dialog box appears (Figure 43).
7. Verify that the paper size matches the setting in the Printing
Preferences dialog box. Adjust the number of copies as
required.
8. Load paper into the paper feed.
NOTE: If you are using Comp cover, you may load up to ten
sheets at a time in the paper feed. Clear Cover and Fastback
Title sheets should be loaded one at a time to avoid jamming.
9. Click ‘Print.’
For more information on the choices in the Properties dialog
box, see About Printing Properties, C hapter VII.
F I G U R E 45
20 FASTBACK P-21x FOILFAST PRINTER USER’S MANUAL,204952 Rev. E

PRINTING CLEAR COVERS WITH
VI-A
THE FOILFAST® PRINTER (Windows)
A. SINGLE COLOR PRINTING
IMPORTANT: The printing procedures for Adobe programs
(Illustrator, InDesign, etc.) are slightly different from the
printing procedures for non-Adobe programs. Because of the
common use of Adobe Illustrator with the Foilfast, both sets of
procedures are given here.
NOTE: When printing in single color mode, the colors that
appear in you artwork do not matter. All artwork will print
in the chosen foil color. If, for instance, you have created your
artwork in black, but you choose red foil to print, all artwork
will appear in red instead of black. If you have used more than
one color in your artwork, all colors will print in the specified
color when single color printing is chosen.
1. Choose Print from File menu.
F I G U R E 46
F I G U R E 47
The main Print dialog box appears (Figure 47).
2. In the Printer Name selection menu, choose the Foilfast
printer and click ‘Properties.’
The Properties dialog box appears (Figure 48). Verify that
“Foilfast ClearCover” is selected in the Media Type box, and
that “Single Ink” is chosen in the Print Mode. For Comp covers
printing in single color Gold foil, the default settings should need
no adjustment.
Note that when “Foilfast ClearCover” is chosen, ‘Undercoat’
is automatically checked. Do not uncheck this selection when
printing on Clear Cover. Make sure that the Foil Primer
cartridge is loaded into the Foilfast printer before proceeding.
If you are printing in a color other than Gold, Click on the
button next to the desired color under ‘Select Cartridge(s).’ For
more information on the choices in this dialog box, see About
Printing Properties, C hapter VII.
3. Click ‘OK.’
The Print dialog box appears (Figure 47).
4. Verify that the paper size matches the setting in the
Properties dialog box. Adjust the number of copies as
required.
F I G U R E 48
5. Load paper into the paper feed.
NOTE: Clear Cover should be loaded one at a time to avoid
jamming.
6. Click ‘Print.’
FASTBACK P-21x FOILFAST PRINTER USER’S MANUAL,204952 Rev. E 21

F I G U R E 49
PRINTING CLEAR COVERS WITH
VI-A
THE FOILFAST® PRINTER (Windows)
B. SINGLE COLOR PRINTING (Adobe)
NOTE: When printing in single color mode, the colors that
appear in you artwork do not matter. All artwork will print
in the chosen foil color. If, for instance, you have created your
artwork in black, but you choose red foil to print, all artwork
will appear in red instead of black.
1. Choose Print from File menu.
The main Print dialog box appears (Figure 49).
2. Choose the Foilfast Printer in Printer selection menu and
click ‘Setup.’
A warning appears asking if you want to continue or return to
the Print dialog box (Figure 50).
3. Click ‘Continue.’
The Print Setup dialog box appears (Figure 51).
4. Click ‘Preferences.’
The Print Preferences dialog box appears (Figure 52). Verify that
“Foilfast ClearCover” is selected in the Media Type box, and
that “Single Ink” is chosen in the Print Mode. For Comp covers
printing in single color Gold foil, the default settings should need
no adjustment.
F I G U R E 50
Note that when ClearCover is chosen, ‘Undercoat’ is
automatically checked. Do not uncheck this selection when
printing on Clear Cover. Make sure that the Foil Primer
cartridge is loaded into the Foilfast printer before proceeding.
If you are printing in a color other than Gold, Click on the
button next to the desired color under ‘Select Cartridge(s).’ For
more information on the choices in this dialog box, see About
Printing Properties, C hapter VII.
5. Click ‘OK.’
The Print Setup dialog box appears (Figure 51).
6. Click ‘Print.’
The Print dialog box appears (Figure 46).
7. Verify that the paper size matches the setting in the Printing
Preferences dialog box. Adjust the number of copies as
required.
8. Load paper into the paper feed.
NOTE: Clear Cover and Fastback Title sheets should be
loaded one at a time to avoid jamming.
9. Click ‘Print.’
F I G U R E 51
22 FASTBACK P-21x FOILFAST PRINTER USER’S MANUAL,204952 Rev. E

F I G U R E 52
PRINTING CLEAR COVERS WITH
VI-A
THE FOILFAST® PRINTER (Windows)
C. MULTIPLE COLOR PRINTING
1. Choose Print from File menu.
The main Print dialog box appears (Figure 53).
2. In the Printer Name selection menu, choose the Foilfast
printer and click ‘Properties.’
The Print Properties dialog box appears (Figure 54). Verify that
“Foilfast ClearCover” is selected in the Media Type box.
Note that when “Foilfast ClearCover” is chosen, ‘Undercoat’
is automatically checked. Do not uncheck this selection when
printing on Clear Cover. Make sure that the Foil Primer
cartridge is loaded into the Foilfast printer before proceeding.
3. Select “Multiple Colors” in the Print Mode.
4. Click on the buttons next to the desired colors under
‘Select Cartridge(s)’ (Figure 54).
5. Click ‘OK.’
The Print dialog box appears (Figure 53).
F I G U R E 53
6. Verify that the paper size matches the setting in the Printing
Preferences dialog box. Adjust the number of copies as
required.
7. Load paper into the paper feed.
NOTE: If you are using Comp cover, you may load up to ten
sheets at a time in the paper feed. Clear Cover and Fastback
Title sheets should be loaded one at a time to avoid jamming.
8. Click ‘Print.’
For more information on the choices in the Properties dialog
box, see About Printing Properties, C hapter VII.
F I G U R E 54
FASTBACK P-21x FOILFAST PRINTER USER’S MANUAL,204952 Rev. E 23

PRINTING CLEAR COVERS WITH
VI-A
THE FOILFAST® PRINTER (Windows)
D. MULTIPLE COLOR PRINTING (Adobe)
1. Choose Print from File menu.
The main Print dialog box appears (Figure 55).
2. Click ‘Setup.’
A dialog box will appear asking if you want to continue or
return to the Print dialog box (Figure 56).
3. Click ‘Continue.’
The Print Setup dialog box appears (Figure 57).
F I G U R E 55
F I G U R E 56
4. Click ‘Preferences.’
The Print Preferences dialog box appears (Figure 58). Verify that
“Foilfast ClearCover” is selected in the Media Type box, and
that “Single Ink” is chosen in the Print Mode. For Comp covers
printing in single color Gold foil, the default settings should need
no adjustment.
Note that when “Foilfast ClearCover” is chosen, ‘Undercoat’
is automatically checked. Do not uncheck this selection when
printing on Clear Cover. Make sure that the Foil Primer
cartridge is loaded into the Foilfast printer before proceeding.
5. Select “Multiple Colors” in the Print Mode (Figure 58).
6. Click on the buttons next to the desired colors under
‘Select Cartridge(s).’
5. Click ‘Okay.’
The Print Setup dialog box appears (Figure 55).
6. Click ‘Print.’
The Print dialog box appears (Figure 53).
7. Verify that the paper size matches the setting in the Printing
Preferences dialog box. Adjust the number of copies as
required.
F I G U R E 57
24 FASTBACK P-21x FOILFAST PRINTER USER’S MANUAL,204952 Rev. E
8. Load paper into the paper feed.
NOTE: Clear Cover and Fastback Title sheets should be
loaded one at a time to avoid jamming.
9. Click ‘Print.’
For more information on the choices in the Properties dialog
box, see About Printing Properties, C hapter VII.

PRINTING FOILFAST® TITLE SHEETS
VI-A
WITH FOILFAST PRINTER (Windows)
A. SINGLE COLOR PRINTING—Comp FTS
IMPORTANT: The printing procedures for Adobe programs
(Illustrator, InDesign, etc.) are slightly different from the
printing procedures for non-Adobe programs. Because of the
common use of Adobe Illustrator with the Foilfast, both sets of
procedures are given here.
NOTE: When printing in single color mode, the colors that
appear in you artwork do not matter. All artwork will print
in the chosen foil color. If, for instance, you have created your
artwork in black, but you choose red foil to print, all artwork
will appear in red instead of black. If you have used more than
one color in your artwork, all colors will print in the specified
color when single color printing is chosen.
1. Choose Print from File menu.
F I G U R E 58
F I G U R E 59
The main Print dialog box appears (Figure 59).
2. In the Printer Name selection menu, choose the Foilfast
printer and click ‘Properties.’
The Properties dialog box appears (Figure 60). Verify that
“Foilfast Title Sheet - Comp” is selected in the Media Type box,
and that “Single Ink” is chosen in the Print Mode. For Comp
covers printing in single color Gold foil, the default settings
should need no adjustment. If you are printing in a color other
than Gold, Click on the button next to the desired color under
‘Select Cartridge(s).’ For more information on the choices in this
dialog box, see About Printing Properties, C hapter VII.
3. Click ‘OK.’
The Print dialog box appears (Figure 59).
4. Verify that the paper size matches the setting in the
Properties dialog box. Adjust the number of copies as
required.
5. Load paper into the paper feed.
NOTE: Fastback Title sheets should be loaded one at a time
to avoid jamming.
6. Click ‘Print.’
F I G U R E 60
FASTBACK P-21x FOILFAST PRINTER USER’S MANUAL,204952 Rev. E 25

F I G U R E 61
PRINTING FOILFAST® TITLE SHEETS
VI-A
WITH FOILFAST PRINTER (Windows)
B. SINGLE COLOR PRINTING—Comp FTS (Adobe)
NOTE: When printing in single color mode, the colors that
appear in you artwork do not matter. All artwork will print
in the chosen foil color. If, for instance, you have created your
artwork in black, but you choose red foil to print, all artwork
will appear in red instead of black.
1. Choose Print from File menu.
The main Print dialog box appears (Figure 61).
2. Choose the Foilfast Printer in Printer selection menu and
click ‘Setup.’
A warning appears asking if you want to continue or return to
the Print dialog box (Figure 62).
3. Click ‘Continue.’
The Print Setup dialog box appears (Figure 63).
4. Click ‘Preferences.’
The Print Preferences dialog box appears (Figure 64). Verify that
“Foilfast Title Sheet - Comp” is selected in the Media Type box,
and that “Single Ink” is chosen in the Print Mode. For Comp
covers printing in single color Gold foil, the default settings
should need no adjustment. If you are printing in a color other
than Gold, Click on the button next to the desired color under
‘Select Cartridge(s).’ For more information on the choices in this
dialog box, see About Printing Properties, C hapter VII.
F I G U R E 62
F I G U R E 63
5. Click ‘OK.’
The Print Setup dialog box appears (Figure 63).
6. Click ‘Print.’
The Print dialog box appears (Figure 62).
7. Verify that the paper size matches the setting in the Printing
Preferences dialog box. Adjust the number of copies as
required.
8. Load paper into the paper feed.
NOTE: Fastback Title sheets should be loaded one at a time
to avoid jamming.
9. Click ‘Print.’
26 FASTBACK P-21x FOILFAST PRINTER USER’S MANUAL,204952 Rev. E
PRINTING FOILFAST® TITLE SHEETS
VI-A
WITH FOILFAST PRINTER (Windows)
C. MULTIPLE COLOR PRINTING—Comp FTS
1. Choose Print from File menu.
The main Print dialog box appears (Figure 65).
2. In the Printer Name selection menu, choose the Foilfast
printer and click ‘Properties.’
The Print Properties dialog box appears (Figure 66). Verify that
“Foilfast Comp Cover-HIGH” is selected in the Media Type box
3. Select “Multiple Colors” in the Print Mode.
4. Click on the buttons next to the desired colors under
‘Select Cartridge(s)’ (Figure 66).
5. Click ‘OK.’
The Print dialog box appears (Figure 65).
F I G U R E 64
F I G U R E 65
6. Verify that the paper size matches the setting in the Printing
Preferences dialog box. Adjust the number of copies as
required.
7. Load paper into the paper feed.
NOTE: Fastback Title sheets should be loaded one at a time
to avoid jamming.
8. Click ‘Print.’
For more information on the choices in the Properties dialog
box, see About Printing Properties, C hapter VII.
F I G U R E 66
FASTBACK P-21x FOILFAST PRINTER USER’S MANUAL,204952 Rev. E 27

PRINTING FOILFAST® TITLE SHEETS
VI-A
WITH FOILFAST PRINTER (Windows)
D. MULTIPLE COLOR PRINTING—Comp FTS
(Adobe)
1. Choose Print from File menu.
The main Print dialog box appears (Figure 67).
2. Choose the Foilfast Printer in Printer selection menu and
click ‘Setup.’
A dialog box will appear asking if you want to continue or
return to the Print dialog box (Figure 68).
3. Click ‘Continue.’
F I G U R E 67
F I G U R E 68
The Print Setup dialog box appears (Figure 69).
4. Click ‘Preferences.’
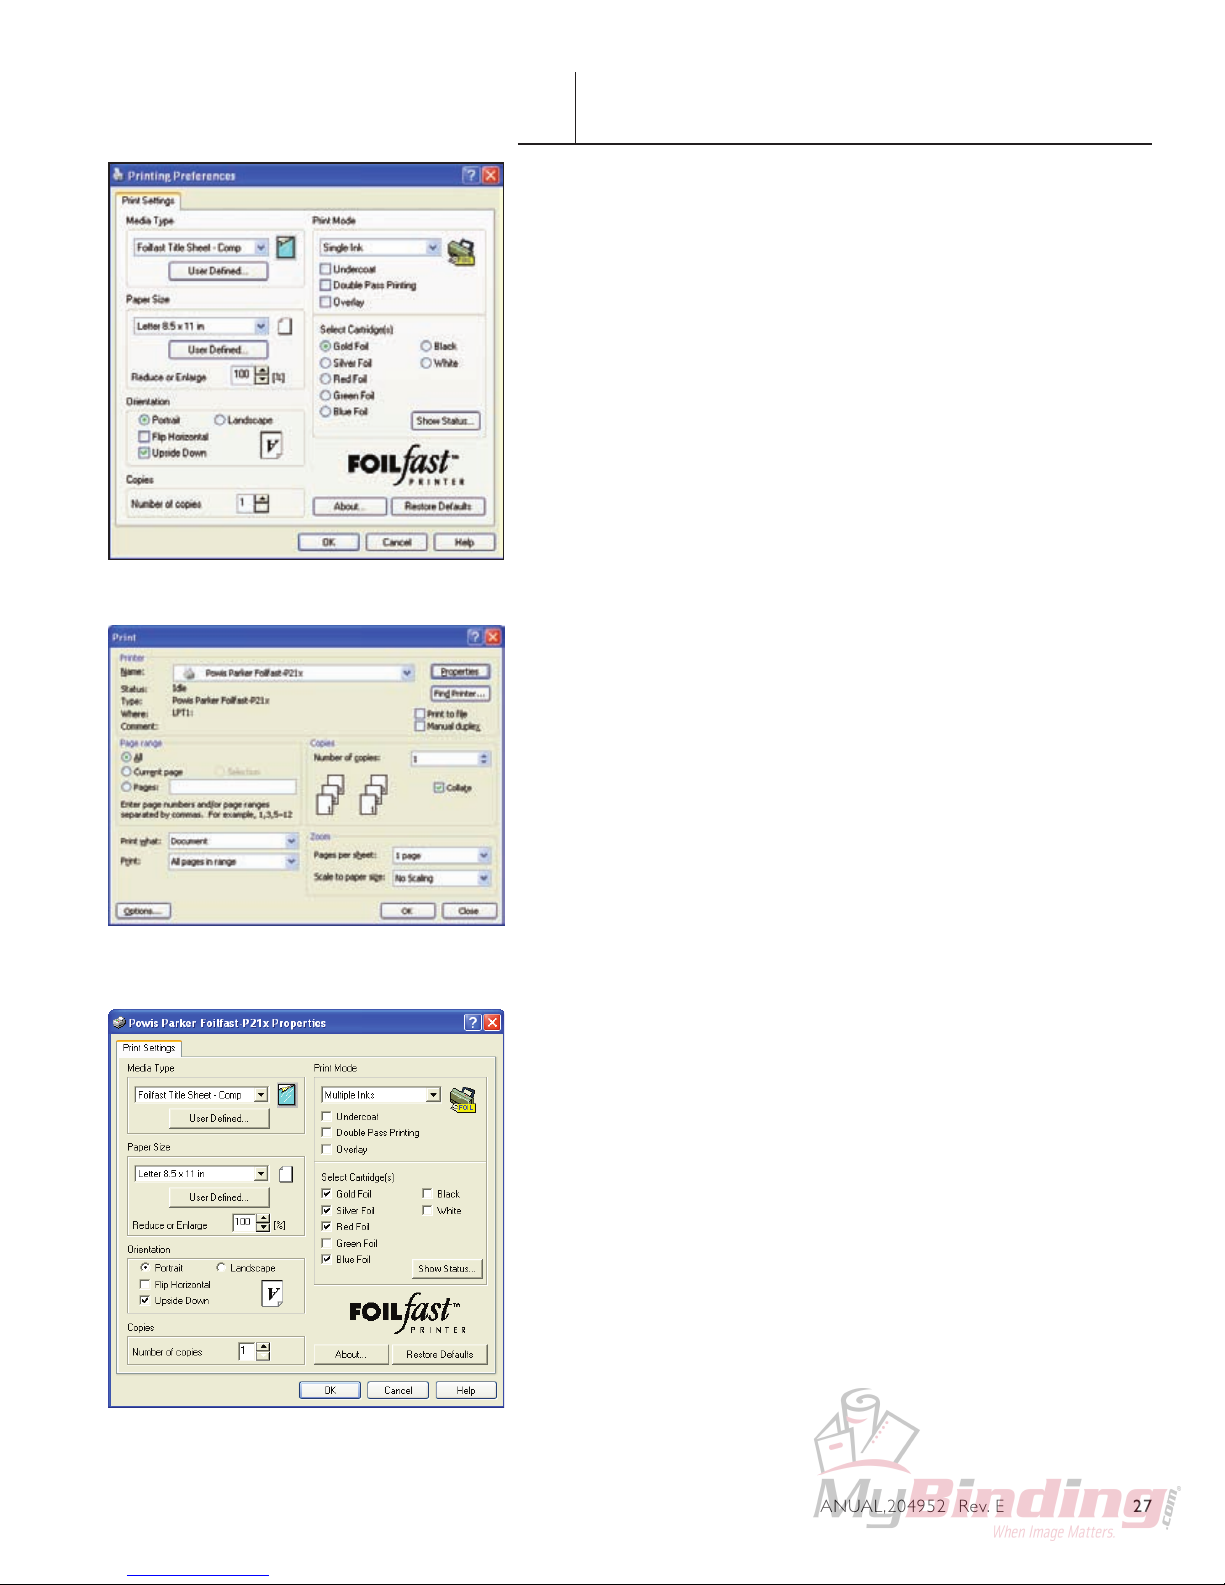
The Print Preferences dialog box appears (Figure 70). Verify that
“Foilfast Title Sheet - Comp” is selected in the Media Type box.
5. Select “Multiple Colors” in the Print Mode.
6. Click on the buttons next to the desired colors under
‘Select Cartridge(s)’ (Figure 70).
5. Click ‘OK.’
The Print Setup dialog box appears (Figure 69).
6. Click ‘Print.’
The Print dialog box appears (Figure 67).
7. Verify that the paper size matches the setting in the Printing
Preferences dialog box. Adjust the number of copies as
required.
8. Load paper into the paper feed.
NOTE: Fastback Title sheets should be loaded one at a time
to avoid jamming.
9. Click ‘Print.’
F I G U R E 69
28 FASTBACK P-21x FOILFAST PRINTER USER’S MANUAL,204952 Rev. E
For more information on the choices in the Properties dialog
box, see About Printing Properties, C hapter VII.

PRINTING FOILFAST® TITLE SHEETS
VI-A
WITH FOILFAST PRINTER (Windows)
E. SINGLE COLOR PRINTING—Suede FTS
IMPORTANT: The printing procedures for Adobe programs
(Illustrator, InDesign, etc.) are slightly different from the
printing procedures for non-Adobe programs. Because of the
common use of Adobe Illustrator with the Foilfast, both sets of
procedures are given here.
NOTE: When printing in single color mode, the colors that
appear in you artwork do not matter. All artwork will print
in the chosen foil color. If, for instance, you have created your
artwork in black, but you choose red foil to print, all artwork
will appear in red instead of black. If you have used more than
one color in your artwork, all colors will print in the specified
color when single color printing is chosen.
1. Choose Print from File menu.
F I G U R E 70
F I G U R E 71
The main Print dialog box appears (Figure 71).
2. In the Printer Name selection menu, choose the Foilfast
printer and click ‘Properties.’
The Properties dialog box appears (Figure 72). Verify that
“Foilfast Title Sheet - Suede” is selected in the Media Type box,
and that “Single Ink” is chosen in the Print Mode. For Comp
covers printing in single color Gold foil, the default settings
should need no adjustment.
Note that when “Foilfast Title Sheet - Suede” is chosen,
‘Undercoat’ is automatically checked. Make sure that the Foil
Primer cartridge is loaded into the Foilfast printer before
proceeding.
If you are printing in a color other than Gold, Click on the
button next to the desired color under ‘Select Cartridge(s).’ For
more information on the choices in this dialog box, see About
Printing Properties, C hapter VII.
3. Click ‘OK.’
The Print dialog box appears (Figure 71).
4. Verify that the paper size matches the setting in the
Properties dialog box. Adjust the number of copies as
required.
F I G U R E 72
5. Load paper into the paper feed.
NOTE: Clear Cover should be loaded one at a time to avoid
jamming.
6. Click ‘Print.’
FASTBACK P-21x FOILFAST PRINTER USER’S MANUAL,204952 Rev. E 29

PRINTING FOILFAST® TITLE SHEETS
VI-A
WITH FOILFAST PRINTER (Windows)
F. SINGLE COLOR PRINTING—Suede FTS (Adobe)
NOTE: When printing in single color mode, the colors that
appear in you artwork do not matter. All artwork will print
in the chosen foil color. If, for instance, you have created your
artwork in black, but you choose red foil to print, all artwork
will appear in red instead of black.
1. Choose Print from File menu.
The main Print dialog box appears (Figure 73).
2. Choose the Foilfast Printer in Printer selection menu and
click ‘Setup.’
F I G U R E 73
F I G U R E 74
A warning appears asking if you want to continue or return to
the Print dialog box (Figure 74).
3. Click ‘Continue.’
The Print Setup dialog box appears (Figure 75).
4. Click ‘Preferences.’
The Print Preferences dialog box appears (Figure 76). Verify that
“Foilfast Title Sheet - Suede” is selected in the Media Type box,
and that “Single Ink” is chosen in the Print Mode. For Comp
covers printing in single color Gold foil, the default settings
should need no adjustment.
Note that when “Foilfast Title Sheet - Suede” is chosen,
‘Undercoat’ is automatically checked. Make sure that the Foil
Primer cartridge is loaded into the Foilfast printer before
proceeding.
If you are printing in a color other than Gold, Click on the
button next to the desired color under ‘Select Cartridge(s).’ For
more information on the choices in this dialog box, see About
Printing Properties, C hapter VII.
5. Click ‘OK.’
The Print Setup dialog box appears (Figure 72).
F I G U R E 75
30 FASTBACK P-21x FOILFAST PRINTER USER’S MANUAL,204952 Rev. E
6. Click ‘Print.’
The Print dialog box appears (Figure 70).
7. Verify that the paper size matches the setting in the Printing
Preferences dialog box. Adjust the number of copies as
required.
8. Load paper into the paper feed.
NOTE: Fastback Title sheets should be loaded one at a time
to avoid jamming.
9. Click ‘Print.’

F I G U R E 76
PRINTING FOILFAST® TITLE SHEETS
VI-A
WITH FOILFAST PRINTER (Windows)
G. MULTIPLE COLOR PRINTING—Suede FTS
1. Choose Print from File menu.
The main Print dialog box appears (Figure 77).
2. In the Printer Name selection menu, choose the Foilfast
printer and click ‘Properties.’
The Print Properties dialog box appears (Figure 78). Verify that
“Foilfast Title Sheet - Suede” is selected in the Media Type box.
Note that when “Foilfast Title Sheet - Suede” is chosen,
‘Undercoat’ is automatically checked. Make sure that the Foil
Primer cartridge is loaded into the Foilfast printer before
proceeding.
3. Select “Multiple Colors” in the Print Mode.
4. Click on the buttons next to the desired colors under
‘Select Cartridge(s)’ (Figure 78).
5. Click ‘OK.’
The Print dialog box appears (Figure 77).
F I G U R E 77
6. Verify that the paper size matches the setting in the Printing
Preferences dialog box. Adjust the number of copies as
required.
7. Load paper into the paper feed.
NOTE: Fastback Title sheets should be loaded one at a time
to avoid jamming.
8. Click ‘Print.’
For more information on the choices in the Properties dialog
box, see About Printing Properties, C hapter VII.
F I G U R E 78
FASTBACK P-21x FOILFAST PRINTER USER’S MANUAL,204952 Rev. E 31

F I G U R E 79
PRINTING FOILFAST® TITLE SHEETS
VI-A
WITH FOILFAST PRINTER (Windows)
H. MULTIPLE COLOR PRINTING—Suede FTS
(Adobe)
1. Choose Print from File menu.
The main Print dialog box appears (Figure 79).
2. Click ‘Setup.’
A dialog box will appear asking if you want to continue or
return to the Print dialog box (Figure 80).
3. Click ‘Continue.’
The Print Setup dialog box appears (Figure 81).
4. Click ‘Preferences.’
The Print Preferences dialog box appears (Figure 82). Verify that
“Foilfast Title Sheet - Suede” is selected in the Media Type box,
and that “Single Ink” is chosen in the Print Mode. For Comp
covers printing in single color Gold foil, the default settings
should need no adjustment.
Note that when “Foilfast Title Sheet-Suede” is chosen,
‘Undercoat’ is automatically checked. Make sure that the Foil
Primer cartridge is loaded into the Foilfast printer before
proceeding.
F I G U R E 80
If you are printing in a color other than Gold, Click on the
button next to the desired color under ‘Select Cartridge(s).’ For
more information on the choices in this dialog box, see About
Printing Properties, C hapter VII.
5. Select “Multiple Colors” in the Print Mode.
6. Click on the buttons next to the desired colors under
‘Select Cartridge(s)’ (Figure 82).
5. Click ‘OK.’
The Print Setup dialog box appears (Figure 81).
6. Click ‘Print.’
The Print dialog box appears (Figure 79).
7. Verify that the paper size matches the setting in the Printing
Preferences dialog box. Adjust the number of copies as
required.
8. Load paper into the paper feed.
NOTE: Clear Cover and Fastback Title sheets should be
loaded one at a time to avoid jamming.
9. Click ‘Print.’
F I G U R E 81
32 FASTBACK P-21x FOILFAST PRINTER USER’S MANUAL,204952 Rev. E

F I G U R E 82
VI-A
PRINTING FOILFAST® TITLE SHEETS
WITH FOILFAST PRINTER (Windows)
FASTBACK P-21x FOILFAST PRINTER USER’S MANUAL,204952 Rev. E 33

F I G U R E 83
PRINTING COMP COVERS WITH
VI-B
THE FOILFAST® PRINTER (Mac OSX)
A. SINGLE COLOR PRINTING
NOTE: When printing in single color mode, the colors that
appear in you artwork do not matter. All artwork will print
in the chosen foil color. If, for instance, you have created your
artwork in black, but you choose red foil to print, all artwork
will appear in red instead of black. If you have used more than
one color in your artwork, all colors will print in the specifi ed
color when single color printing is chosen.
1. Choose Print from File menu.
NOTE: If you are using an Adobe program (Illustrator,
InDesign, etc.) a print dialog box will appear that is unique to
the Adobe programs. For non-Adobe programs, go directly to
step 4.
The Adobe Print dialog box appears (Figure 83).
2. Click ‘Printer.’
A warning appears (Figure 84).
F I G U R E 84
F I G U R E 85
3. Check the box labeled ‘Don’t Show Again’ and click
‘Continue.’
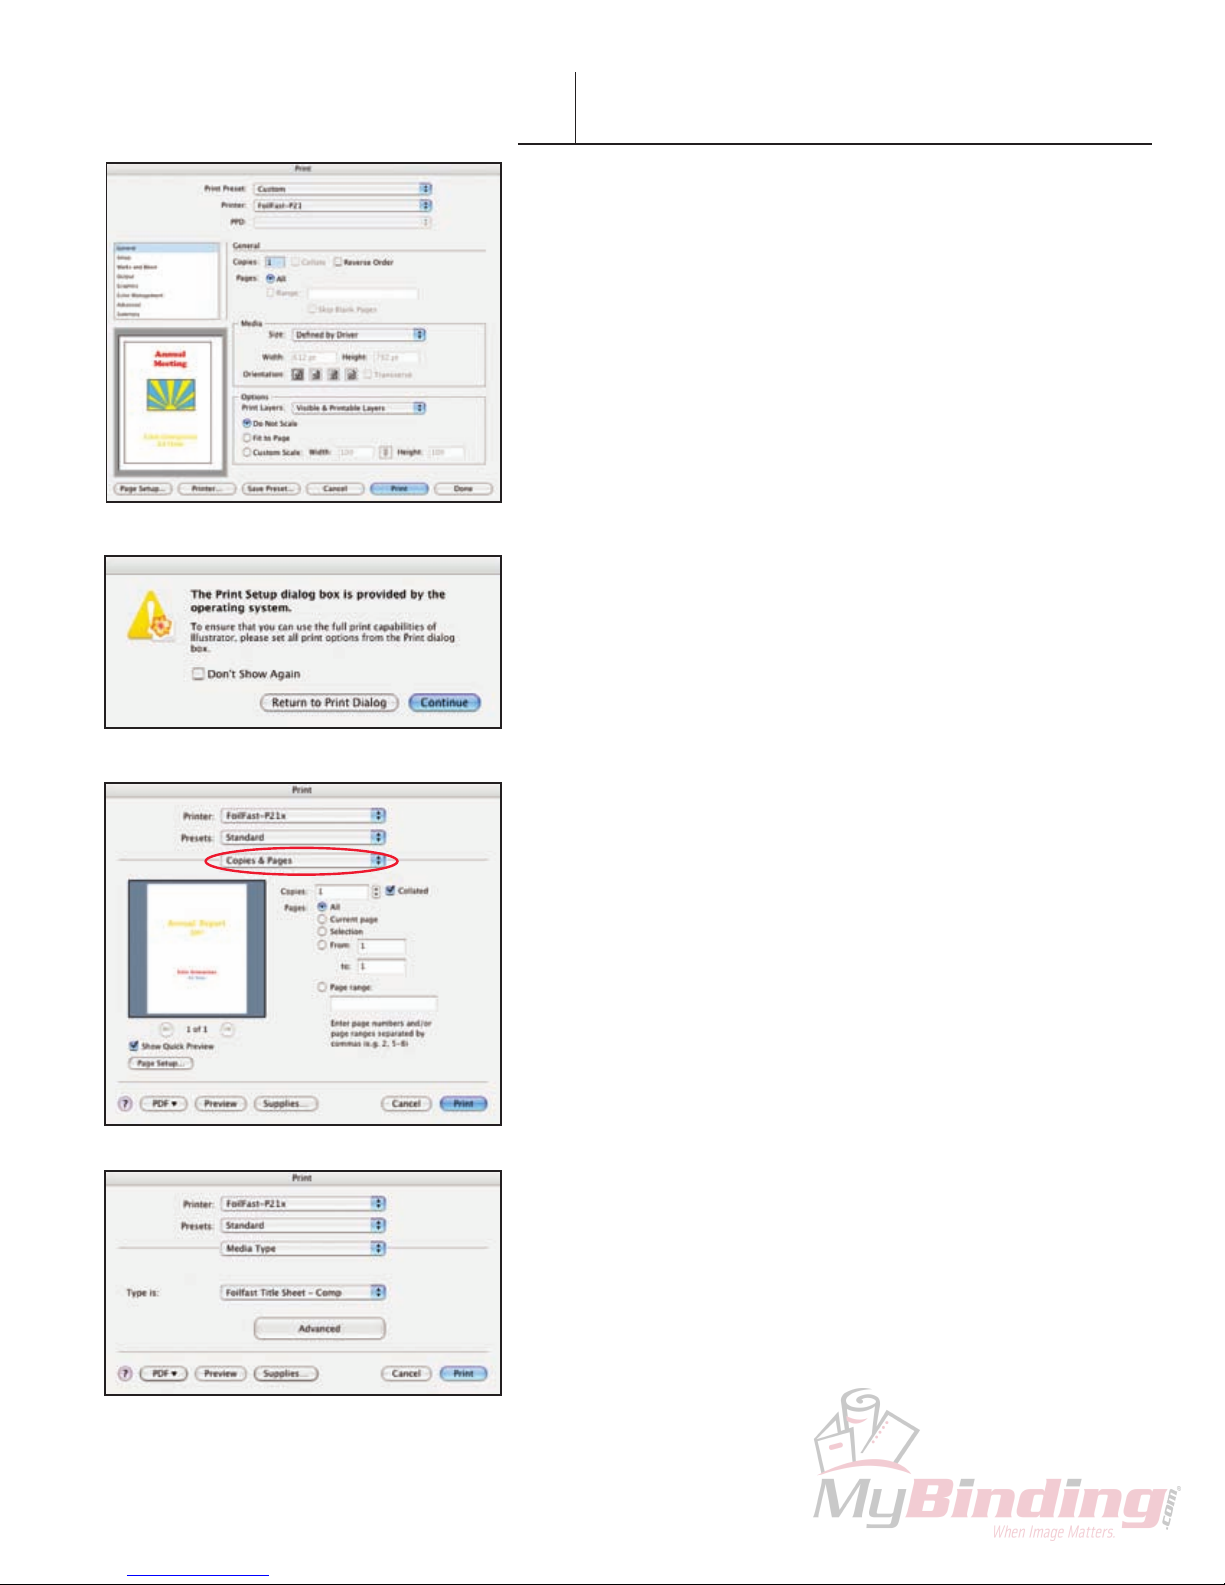
The Print dialog box appears (Figure 85).
NOTE: The appearance of this dialog box may vary.
4. Click and hold on the Print Properties pop-up menu
(circled in red). A scroll box appears with several choices.
Scroll down to ‘Media Type’ and release the mouse button.
The Media Type information appears in the Print dialog box
appears (Figure 86). Verify that “Foilfast Comp Cover-HIGH” is
selected in the “Type is” pop-up menu.
5. Click and hold on the Print Properties pop-up menu again.
Scroll down to ‘Print Mode’ and release the mouse button.
The Print Mode information appears in the Print dialog box
(Figure 84). Verify that “Single Ink” is selected in the “Mode is”
menu.
F I G U R E 86
34 FASTBACK P-21x FOILFAST PRINTER USER’S MANUAL,204952 Rev. E

F I G U R E 87
PRINTING COMP COVERS WITH
VI-B
THE FOILFAST® PRINTER (Mac OSX)
6. Click and hold on the Print Properties pop-up menu
again. Scroll down to ‘Select Cartridges’ and release
the mouse button.
The Cartridge Selection information appears in the Print
dialog box appears (Figure 88). Because “Single Ink” was
chosen as the Print Mode, the various colors appear as
buttons, and only one color can be selected at a time.
7. Load paper into the paper feed.
NOTE: If you are using Comp cover, you may load up
to ten sheets at a time in the paper feed. Clear Cover
and Fastback Title sheets should be loaded one at a time
to avoid jamming.
8. Click ‘Print.’
For more information on the available printing choices,
see About Printing Properties, C hapter VII.
F I G U R E 88
FASTBACK P-21x FOILFAST PRINTER USER’S MANUAL,204952 Rev. E 35

PRINTING COMP COVERS WITH
VI-B
THE FOILFAST® PRINTER (Mac OSX)
B. MULTIPLE COLOR PRINTING
1. Choose Print from File menu.
NOTE: If you are using an Adobe program (Illustrator,
InDesign, etc.) a print dialog box will appear that is unique to
the Adobe programs. For non-Adobe programs, go directly to
step 4.
The Adobe Print dialog box appears (Figure 89).
2. Click ‘Printer...’ button at the bottom of the Print window.
A warning appears (Figure 90).
F I G U R E 89
F I G U R E 90
3. Check the box labeled ‘Don’t Show Again’ and click
‘Continue.’
The Print dialog box appears (Figure 91).
NOTE: The appearance of this dialog box may vary.
4. Click and hold on the Print Properties pop-up menu
(circled in red). A scroll box appears with several choices.
Scroll down to ‘Media Type’ and release the mouse button.
The Media Type information appears in the Print dialog box
appears (Figure 92). Verify that “Foilfast Comp Cover-HIGH” is
selected in the “Type is” pop-up menu.
5. Click and hold on the Print Properties pop-up menu again.
Scroll down to ‘Print Mode’ and release the mouse button.
The Print Mode information appears in the Print dialog box
(Figure 93). Choose “Multiple Inks” in the “Mode is” menu.
6. Click and hold on the third pop-up menu again. Scroll
down to ‘Select Cartridges’ and release the mouse button.
F I G U R E 91
F I G U R E 92
36 FASTBACK P-21x FOILFAST PRINTER USER’S MANUAL,204952 Rev. E

F I G U R E 93
PRINTING COMP COVERS WITH
VI-B
THE FOILFAST® PRINTER (Mac OSX)
The Cartridge Selection information appears in the Print dialog box
appears (Figure 94). Because “Multiple Inks” was chosen, you may now
select as many of the cartridge colors as you wish.
NOTE: To avoid error messages, be sure that the colors you have
chosen match the available cartridges in the Foilfast printer.
7. Load paper into the paper feed.
NOTE: If you are using Comp cover, you may load up to ten sheets at
a time in the paper feed. Clear Cover and Fastback Title sheets should be
loaded one at a time to avoid jamming.
8. Click ‘Print.’
For more information on the available printing choices, see About Printing
Properties, C hapter VII.
F I G U R E 94
FASTBACK P-21x FOILFAST PRINTER USER’S MANUAL,204952 Rev. E 37

F I G U R E 95
PRINTING CLEAR COVERS WITH
VI-B
THE FOILFAST® PRINTER (Mac OSX)
A. SINGLE COLOR PRINTING
NOTE: When printing in single color mode, the colors that
appear in you artwork do not matter. All artwork will print
in the chosen foil color. If, for instance, you have created your
artwork in black, but you choose red foil to print, all artwork
will appear in red instead of black. If you have used more than
one color in your artwork, all colors will print in the specifi ed
color when single color printing is chosen.
1. Choose Print from File menu.
NOTE: If you are using an Adobe program (Illustrator,
InDesign, etc.) a print dialog box will appear that is unique to
the Adobe programs. For non-Adobe programs, go directly to
step 4.
The Adobe Print dialog box appears (Figure 95).
2. Click ‘Printer...’ button at the bottom of the Print window.
A warning appears (Figure 96).
F I G U R E 96
F I G U R E 97
3. Check the box labeled ‘Don’t Show Again’ and click
‘Continue.’
The Print dialog box appears (Figure 97).
NOTE: The appearance of this dialog box may vary.
4. Click and hold on the Print Properties pop-up menu
(circled in red). A scroll box appears with several choices.
Scroll down to ‘Media Type’ and release the mouse button.
The Media Type information appears in the Print dialog box
appears (Figure 98). Select “Foilfast ClearCover” from the “Type
is” pop-up menu.
5. Click and hold on the third pop-up menu again. Scroll
down to ‘Print Mode’ and release the mouse button.
F I G U R E 98
38 FASTBACK P-21x FOILFAST PRINTER USER’S MANUAL,204952 Rev. E
PRINTING CLEAR COVERS WITH
VI-B
THE FOILFAST® PRINTER (Mac OSX)
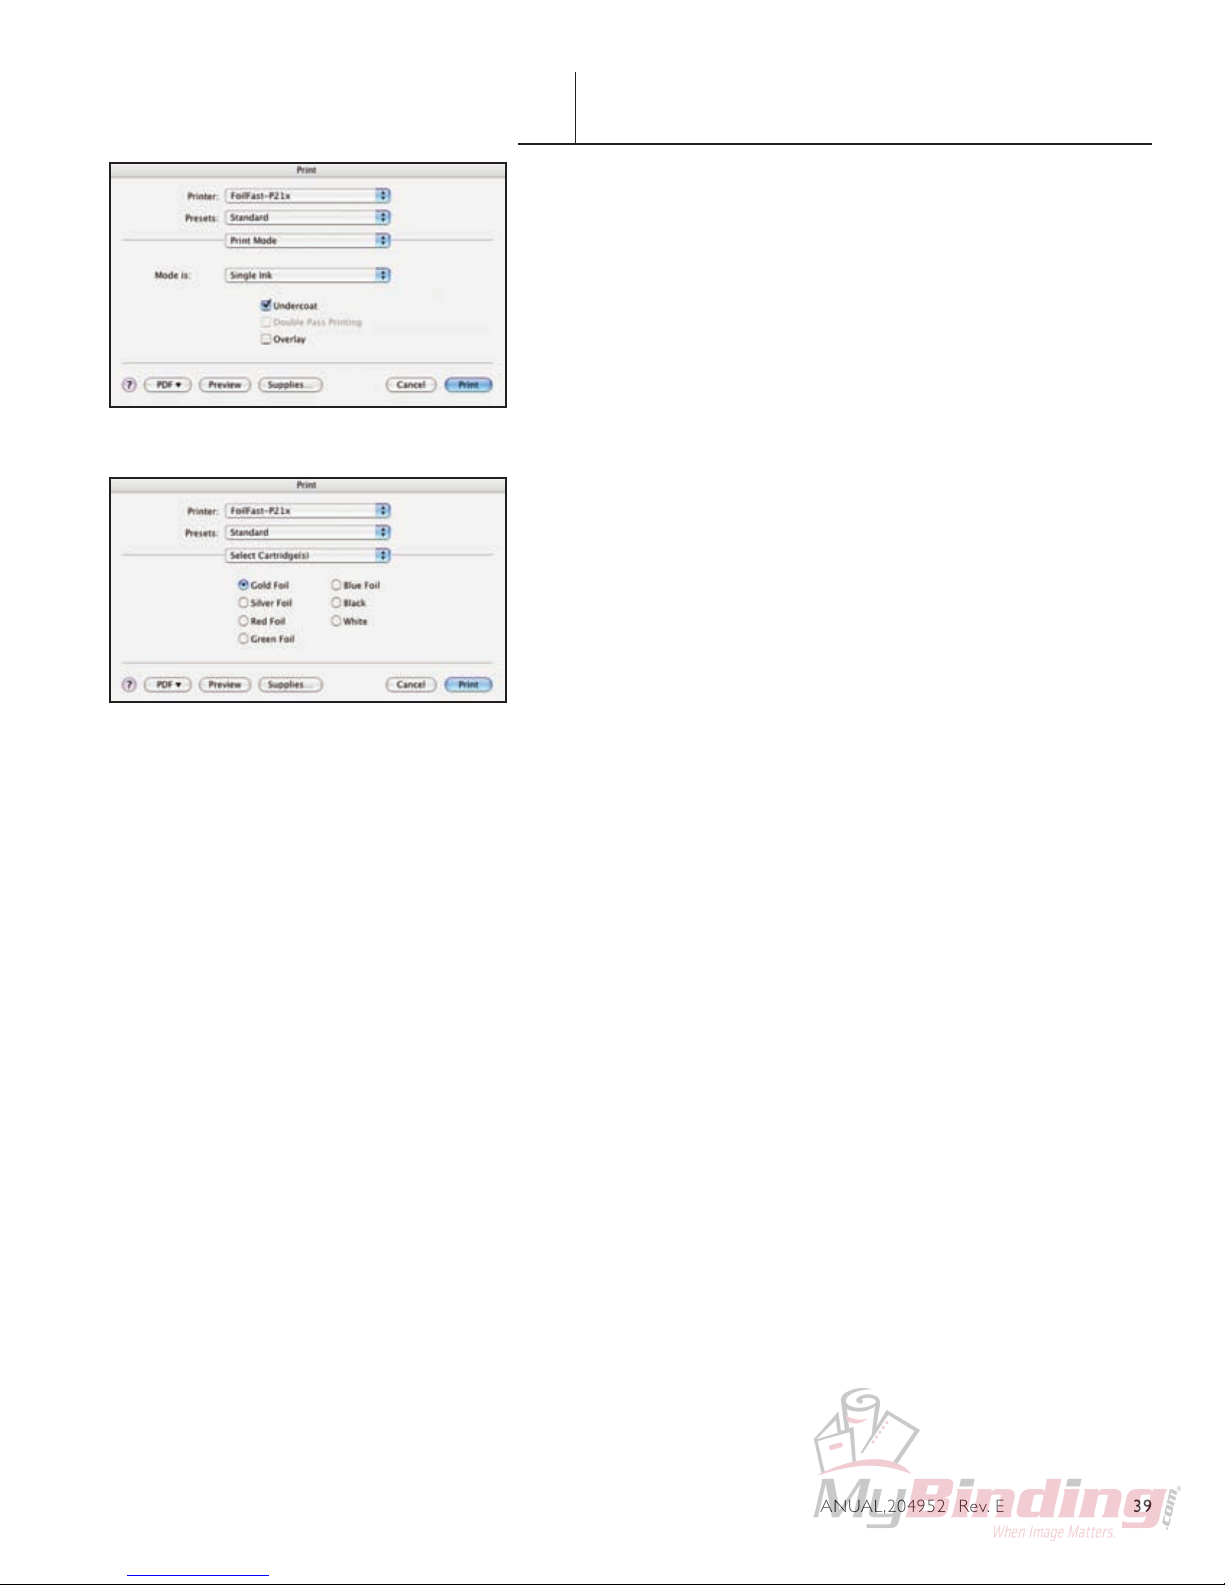
The Print Mode information appears in the Print dialog
box (Figure 99). Verify that “Single Ink” is selected in the
“Mode is” menu.
Note that when “Foilfast ClearCover” is chosen,
‘Undercoat’ is automatically checked. Do not uncheck this
selection when printing on Clear Cover. Also make sure
that the Foil Primer cartridge is loaded into the Foilfast
printer before printing.
F I G U R E 99
F I G U R E 100
6. Click and hold on the third pop-up menu again.
Scroll down to ‘Select Cartridges’ and release the
mouse button.
The Cartridge Selection information appears in the Print
dialog box appears (Figure 100). Because “Single Ink” was
chosen as the Print Mode, the various colors appear as
buttons, and only one color can be selected at a time.
NOTE: To avoid error messages, be sure that the colors
you have chosen match the available cartridges in the
Foilfast printer.
7. Load paper into the paper feed.
NOTE: If you are using Comp cover, you may load up
to ten sheets at a time in the paper feed. Clear Cover
and Fastback Title sheets should be loaded one at a time
to avoid jamming.
8. Click ‘Print.’
For more information on the available printing choices,
see About Printing Properties, C hapter VII.
FASTBACK P-21x FOILFAST PRINTER USER’S MANUAL,204952 Rev. E 39

PRINTING CLEAR COVERS WITH
VI-B
THE FOILFAST® PRINTER (Mac OSX)
B. MULTIPLE COLOR PRINTING
1. Choose Print from File menu.
NOTE: If you are using an Adobe program (Illustrator,
InDesign, etc.) a print dialog box will appear that is unique to
the Adobe programs. For non-Adobe programs, go directly to
step 4.
The Adobe Print dialog box appears (Figure 101).
2. Click ‘Printer...’ button at the bottom of the Print window.
A warning appears (Figure 102).
F I G U R E 101
F I G U R E 102
3. Check the box labeled ‘Don’t Show Again’ and click
‘Continue.’
The Print dialog box appears (Figure 103).
NOTE: The appearance of this dialog box may vary.
4. Click and hold on the Print Properties pop-up menu
(circled in red). A scroll box appears with several choices.
Scroll down to ‘Media Type’ and release the mouse button.
The Media Type information appears in the Print dialog box
appears (Figure 104). Select “Foilfast ClearCover” from the
“Type is” pop-up menu.
5. Click and hold on the third pop-up menu again. Scroll
down to ‘Print Mode’ and release the mouse button.
The Print Mode information appears in the Print dialog box
appears (Figure 105). Choose “Multiple Inks” in the “Mode is”
menu.
6. Click and hold on the Print Properties pop-up menu again.
Scroll down to ‘Select Cartridges’ and release the mouse
button.
F I G U R E 103
F I G U R E 104
40 FASTBACK P-21x FOILFAST PRINTER USER’S MANUAL,204952 Rev. E

F I G U R E 105
PRINTING CLEAR COVERS WITH
VI-B
THE FOILFAST® PRINTER (Mac OSX)
The Cartridge Selection information appears in the Print dialog box
appears (Figure 106). Because “Multiple Inks” was chosen, you may now
select as many of the cartridge colors as you wish.
NOTE: To avoid error messages, be sure that the colors you have
chosen match the available cartridges in the Foilfast printer.
7. Load paper into the paper feed.
NOTE: If you are using Comp cover, you may load up to ten sheets at
a time in the paper feed. Clear Cover and Fastback Title sheets should be
loaded one at a time to avoid jamming.
8. Click ‘Print.’
For more information on the available printing choices, see About Printing
Properties, C hapter VII.
F I G U R E 106
FASTBACK P-21x FOILFAST PRINTER USER’S MANUAL,204952 Rev. E 41
F I G U R E 107
PRINTING FOILFAST® TITLE SHEETS
VI-B
WITH FOILFAST PRINTER (Mac OSX)
A. SINGLE COLOR PRINTING–FTS Comp
NOTE: When printing in single color mode, the colors that
appear in you artwork do not matter. All artwork will print
in the chosen foil color. If, for instance, you have created your
artwork in black, but you choose red foil to print, all artwork
will appear in red instead of black. If you have used more than
one color in your artwork, all colors will print in the specifi ed
color when single color printing is chosen.
1. Choose Print from File menu.
NOTE: If you are using an Adobe program (Illustrator,
InDesign, etc.) a print dialog box will appear that is unique to
the Adobe programs. For non-Adobe programs, go directly to
step 4.
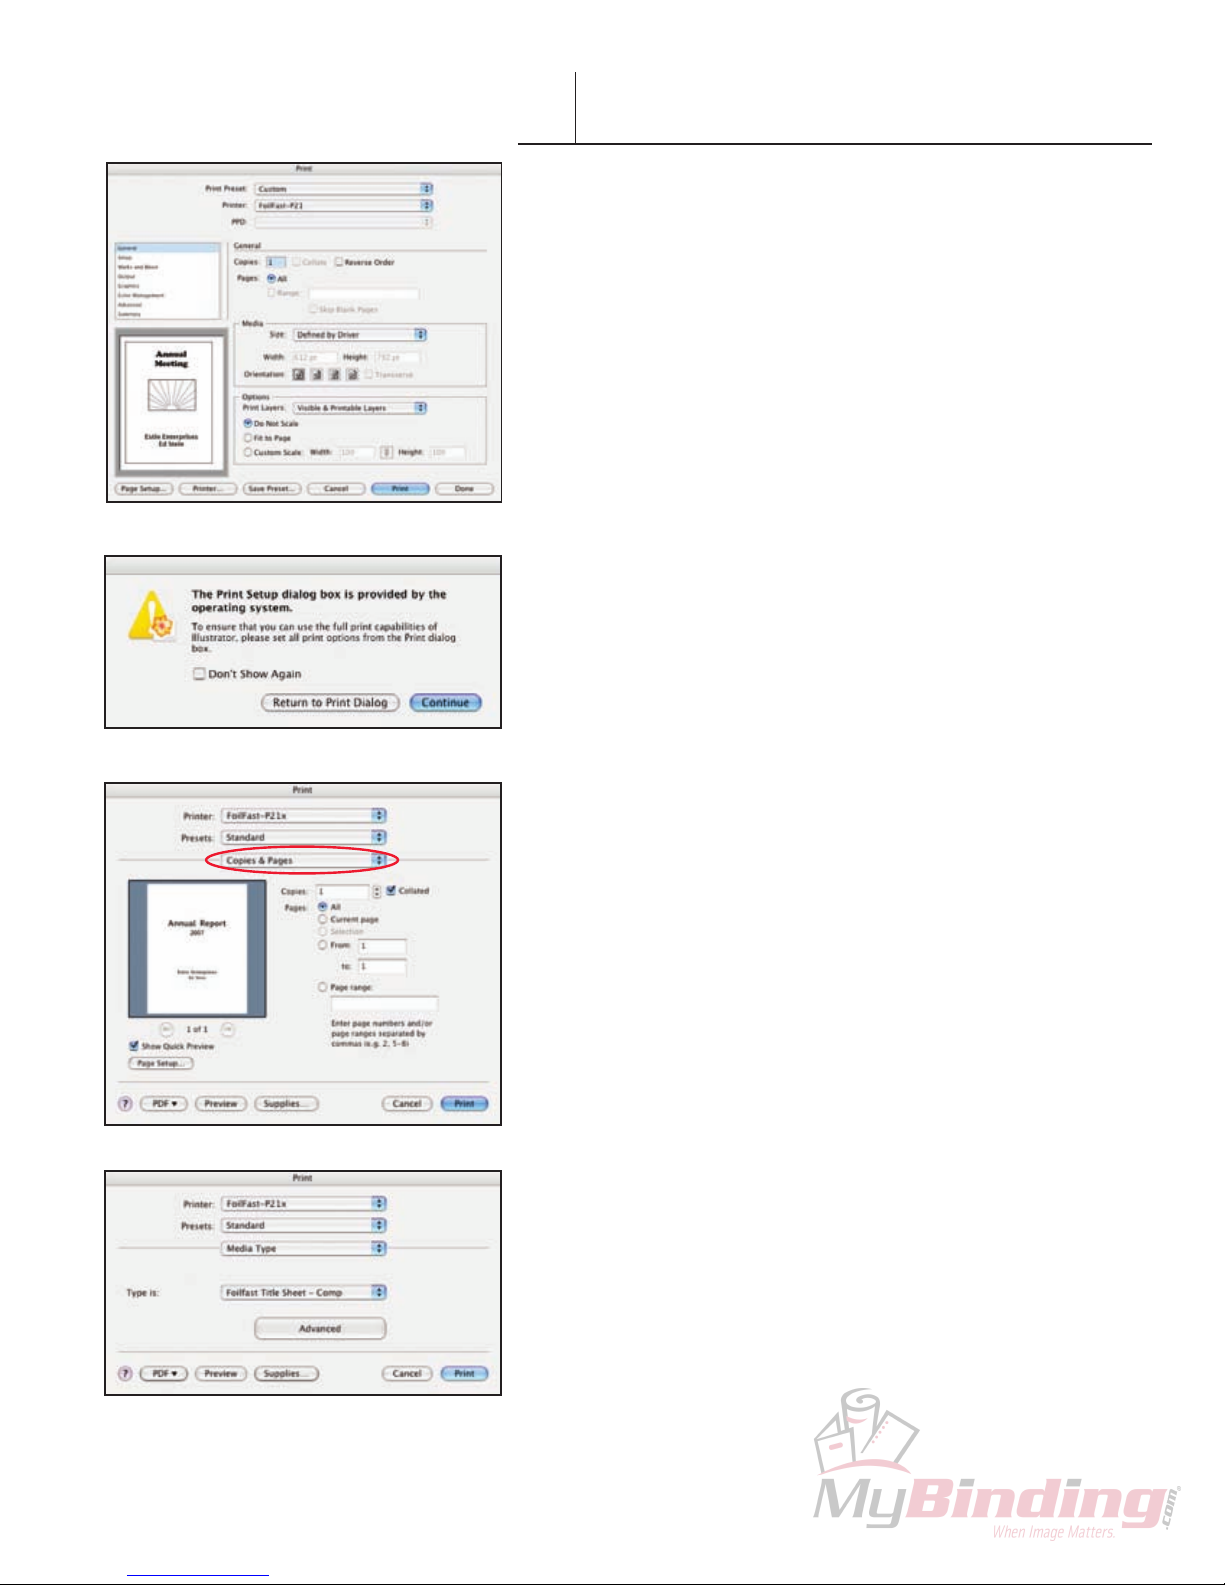
The Adobe Print dialog box appears (Figure 107).
2. Click ‘Printer...’ button at the bottom of the Print window.
A warning appears (Figure 108).
F I G U R E 108
F I G U R E 109
3. Check the box labeled ‘Don’t Show Again’ and click
‘Continue.’
The Print dialog box appears (Figure 109).
NOTE: The appearance of this dialog box may vary.
4. Click and hold on the Print Properties pop-up menu
(circled in red). A scroll box appears with several choices.
Scroll down to ‘Media Type’ and release the mouse button.
The Media Type information appears in the Print dialog box
appears (Figure 110). Verify that “Foilfast Title Sheet - Comp” is
selected in the “Type is” pop-up menu.
5. Click and hold on the Print Properties pop-up menu again.
Scroll down to ‘Print Mode’ and release the mouse button.
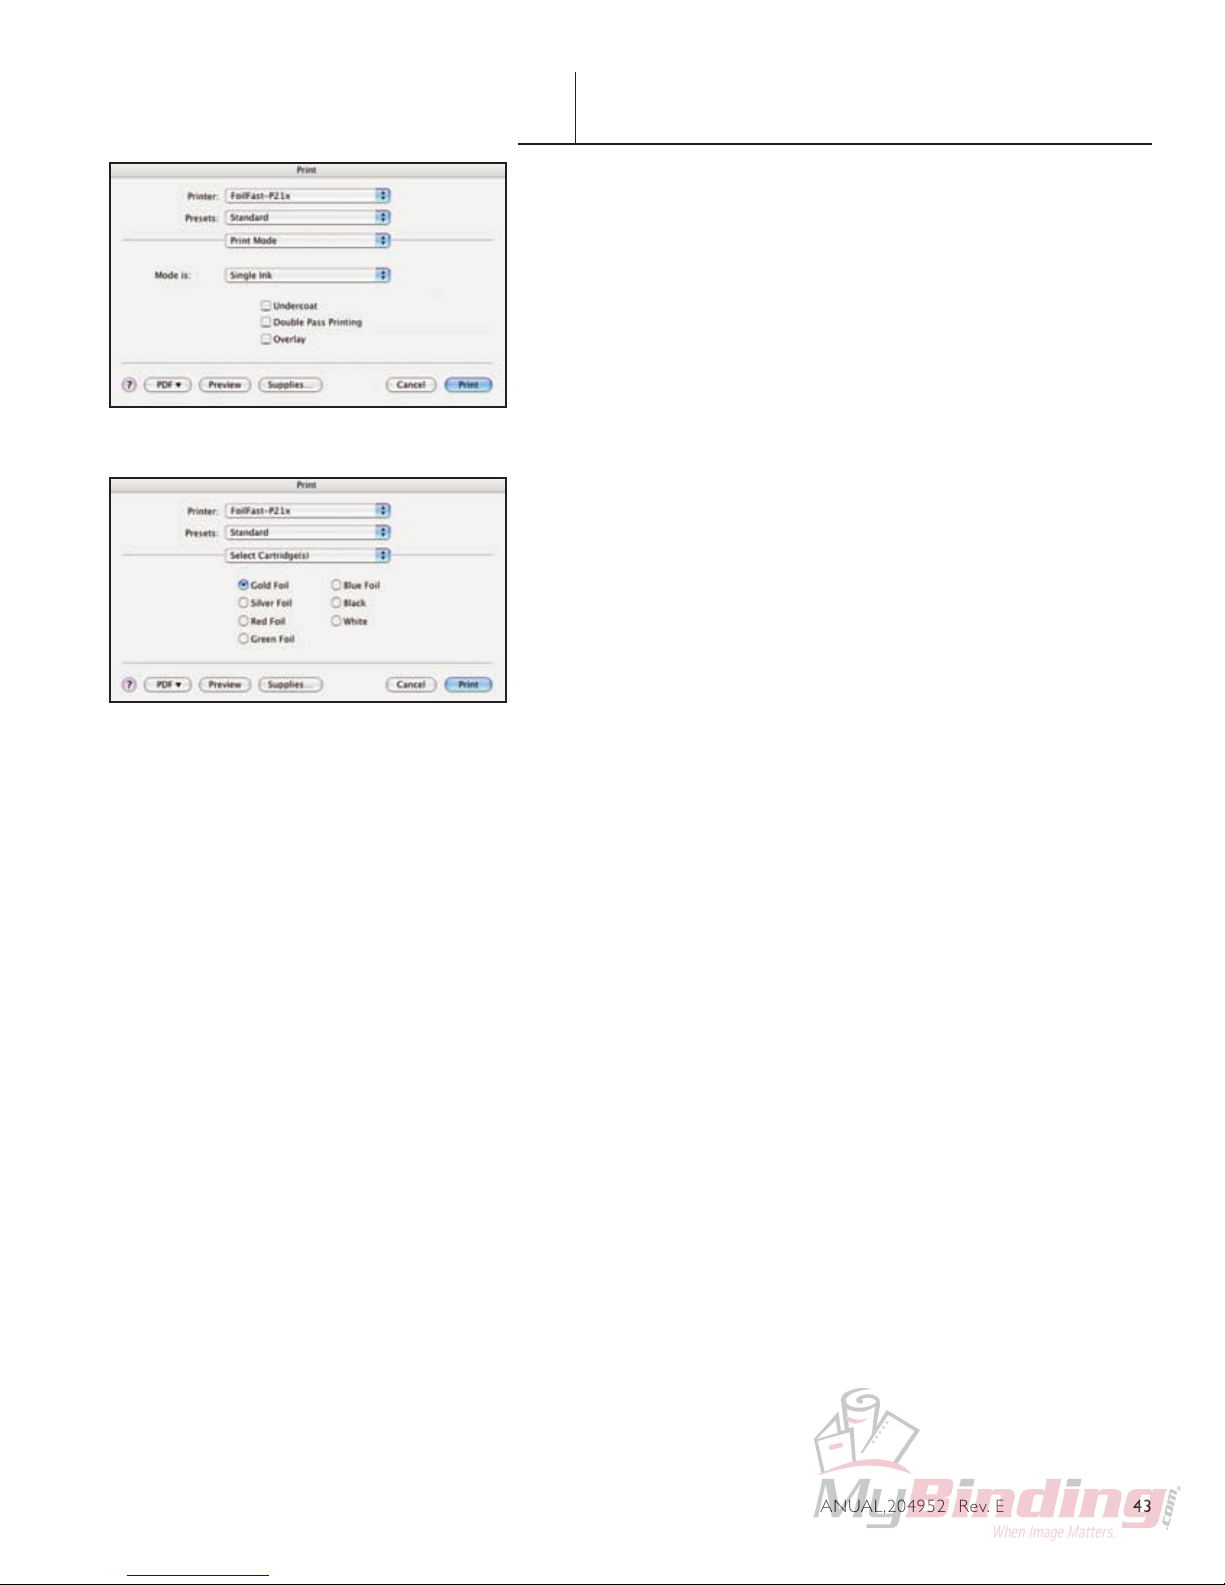
The Print Mode information appears in the Print dialog box
(Figure 111). Verify that “Single Ink” is selected in the “Mode is”
menu.
F I G U R E 110
42 FASTBACK P-21x FOILFAST PRINTER USER’S MANUAL,204952 Rev. E
F I G U R E 111
PRINTING FOILFAST® TITLE SHEETS
VI-B
WITH FOILFAST PRINTER (Mac OSX)
6. Click and hold on the Print Properties pop-up menu
again. Scroll down to ‘Select Cartridges’ and release
the mouse button.
The Cartridge Selection information appears in the Print
dialog box appears (Figure 112). Because “Single Ink” was
chosen as the Print Mode, the various colors appear as
buttons, and only one color can be selected at a time.
7. Load paper into the paper feed.
NOTE: Fastback Title sheets should be loaded one at a
time to avoid jamming.
8. Click ‘Print.’
For more information on the available printing choices,
see About Printing Properties, C hapter VII.
F I G U R E 112
FASTBACK P-21x FOILFAST PRINTER USER’S MANUAL,204952 Rev. E 43
PRINTING FOILFAST® TITLE SHEETS
VI-B
WITH FOILFAST PRINTER (Mac OSX)
B. MULTIPLE COLOR PRINTING–FTS Comp
1. Choose Print from File menu.
NOTE: If you are using an Adobe program (Illustrator,
InDesign, etc.) a print dialog box will appear that is unique to
the Adobe programs. For non-Adobe programs, go directly to
step 4.
The Adobe Print dialog box appears (Figure 113).
2. Click ‘Printer...’ button at the bottom of the Print window.
A warning appears (Figure 114).
F I G U R E 113
F I G U R E 114
3. Check the box labeled ‘Don’t Show Again’ and click
‘Continue.’
The Print dialog box appears (Figure 115).
NOTE: The appearance of this dialog box may vary.
4. Click and hold on the pop-up menu (circled in red). A
scroll box appears with several choices. Scroll down to
‘Media Type’ and release the mouse button.
The Media Type information appears in the Print dialog box
appears (Figure 116). Verify that “Foilfast Title Sheet - Comp” is
selected in the “Type is” pop-up menu.
5. Click and hold on the third pop-up menu again. Scroll
down to ‘Print Mode’ and release the mouse button.
The Print Mode information appears in the Print dialog box
(Figure 117). Choose “Multiple Inks” in the “Mode is” menu.
6. Click and hold on the third pop-up menu again. Scroll
down to ‘Select Cartridges’ and release the mouse button.
F I G U R E 115
F I G U R E 116
44 FASTBACK P-21x FOILFAST PRINTER USER’S MANUAL,204952 Rev. E

F I G U R E 117
PRINTING FOILFAST® TITLE SHEETS
VI-B
WITH FOILFAST PRINTER (Mac OSX)
The Cartridge Selection information appears in the Print dialog box
appears (Figure 118). Because “Multiple Inks” was chosen, you may now
select as many of the cartridge colors as you wish.
NOTE: To avoid error messages, be sure that the colors you have
chosen match the available cartridges in the Foilfast printer.
7. Load paper into the paper feed.
NOTE: Fastback Title sheets should be loaded one at a time to avoid
jamming.
8. Click ‘Print.’
For more information on the available printing choices, see About Printing
Properties, C hapter VII.
F I G U R E 118
FASTBACK P-21x FOILFAST PRINTER USER’S MANUAL,204952 Rev. E 45

F I G U R E 119
PRINTING FOILFAST® TITLE SHEETS
VI-B
WITH FOILFAST PRINTER (Mac OSX)
A. SINGLE COLOR PRINTING – FTS Suede
NOTE: When printing in single color mode, the colors that
appear in you artwork do not matter. All artwork will print
in the chosen foil color. If, for instance, you have created your
artwork in black, but you choose red foil to print, all artwork
will appear in red instead of black. If you have used more than
one color in your artwork, all colors will print in the specifi ed
color when single color printing is chosen.
1. Choose Print from File menu.
NOTE: If you are using an Adobe program (Illustrator,
InDesign, etc.) a print dialog box will appear that is unique to
the Adobe programs. For non-Adobe programs, go directly to
step 4.
The Adobe Print dialog box appears (Figure 119).
2. Click ‘Printer...’ button at the bottom of the Print window.
A warning appears (Figure 120).
F I G U R E 120
F I G U R E 121
3. Check the box labeled ‘Don’t Show Again’ and click
‘Continue.’
The Print dialog box appears (Figure 121).
NOTE: The appearance of this dialog box may vary.
4. Click and hold on the Print Properties pop-up menu
(circled in red). A scroll box appears with several choices.
Scroll down to ‘Media Type’ and release the mouse button.
The Media Type information appears in the Print dialog box
appears (Figure 122). Select “Foilfast Title Sheet - Suede” from
the “Type is” pop-up menu.
5. Click and hold on the third pop-up menu again. Scroll
down to ‘Print Mode’ and release the mouse button.
The Print Mode information appears in the Print dialog box
(Figure 123). Verify that “Multiple Inks” is selected in the “Mode
is” menu.
F I G U R E 122
46 FASTBACK P-21x FOILFAST PRINTER USER’S MANUAL,204952 Rev. E

F I G U R E 123
PRINTING FOILFAST® TITLE SHEETS
VI-B
WITH FOILFAST PRINTER (Mac OSX)
Note that when “Foilfast Title Sheet - Suede” is chosen,
‘Undercoat’ is automatically checked. Make sure that the
Foil Primer cartridge is loaded into the Foilfast printer
before printing.
6. Click and hold on the Print Properties pop-up menu
again. Scroll down to ‘Select Cartridges’ and release
the mouse button.
The Cartridge Selection information appears in the Print
dialog box appears (Figure 124). Because “Single Ink” was
chosen as the Print Mode, the various colors appear as
buttons, and only one color can be selected at a time.
NOTE: To avoid error messages, be sure that the colors
you have chosen match the available cartridges in the
Foilfast printer.
7. Load paper into the paper feed.
NOTE: Fastback Title sheets should be loaded one at a
time to avoid jamming.
F I G U R E 124
8. Click ‘Print.’
For more information on the available printing choices,
see About Printing Properties, C hapter VII.
FASTBACK P-21x FOILFAST PRINTER USER’S MANUAL,204952 Rev. E 47

PRINTING FOILFAST® TITLE SHEETS
VI-B
WITH FOILFAST PRINTER (Mac OSX)
B. MULTIPLE COLOR PRINTING–FTS Suede
1. Choose Print from File menu.
NOTE: If you are using an Adobe program (Illustrator,
InDesign, etc.) a print dialog box will appear that is unique to
the Adobe programs. For non-Adobe programs, go directly to
step 4.
The Adobe Print dialog box appears (Figure 125).
2. Click ‘Printer...’ button at the bottom of the Print window.
A warning appears (Figure 126).
F I G U R E 125
F I G U R E 126
3. Check the box labeled ‘Don’t Show Again’ and click
‘Continue.’
The Print dialog box appears (Figure 127).
NOTE: The appearance of this dialog box may vary.
4. Click and hold on the Print Properties pop-up menu
(circled in red). A scroll box appears with several choices.
Scroll down to ‘Media Type’ and release the mouse button.
The Media Type information appears in the Print dialog box
appears (Figure 128). Select “Foilfast Title Sheet - Suede” from
the “Type is” pop-up menu.
5. Click and hold on the third pop-up menu again. Scroll
down to ‘Print Mode’ and release the mouse button.
The Print Mode information appears in the Print dialog box
appears (Figure 129). Choose “Multiple Inks” in the “Mode is”
menu.
6. Click and hold on the third pop-up menu again. Scroll
down to ‘Select Cartridges’ and release the mouse button.
F I G U R E 127
F I G U R E 128
48 FASTBACK P-21x FOILFAST PRINTER USER’S MANUAL,204952 Rev. E

F I G U R E 129
PRINTING FOILFAST® TITLE SHEETS
VI-B
WITH FOILFAST PRINTER (Mac OSX)
The Cartridge Selection information appears in the Print dialog box
appears (Figure 130). Because “Multiple Inks” was chosen, you may now
select as many of the cartridge colors as you wish.
NOTE: To avoid error messages, be sure that the colors you have
chosen match the available cartridges in the Foilfast printer.
7. Load paper into the paper feed.
NOTE: Fastback Title sheets should be loaded one at a time to avoid
jamming.
8. Click ‘Print.’
For more information on the available printing choices, see About Printing
Properties, C hapter VII.
F I G U R E 130
FASTBACK P-21x FOILFAST PRINTER USER’S MANUAL,204952 Rev. E 49

50 FASTBACK P-21x FOILFAST PRINTER USER’S MANUAL,204952 Rev. E
VII
ABOUT PRINTING PROPERTIES
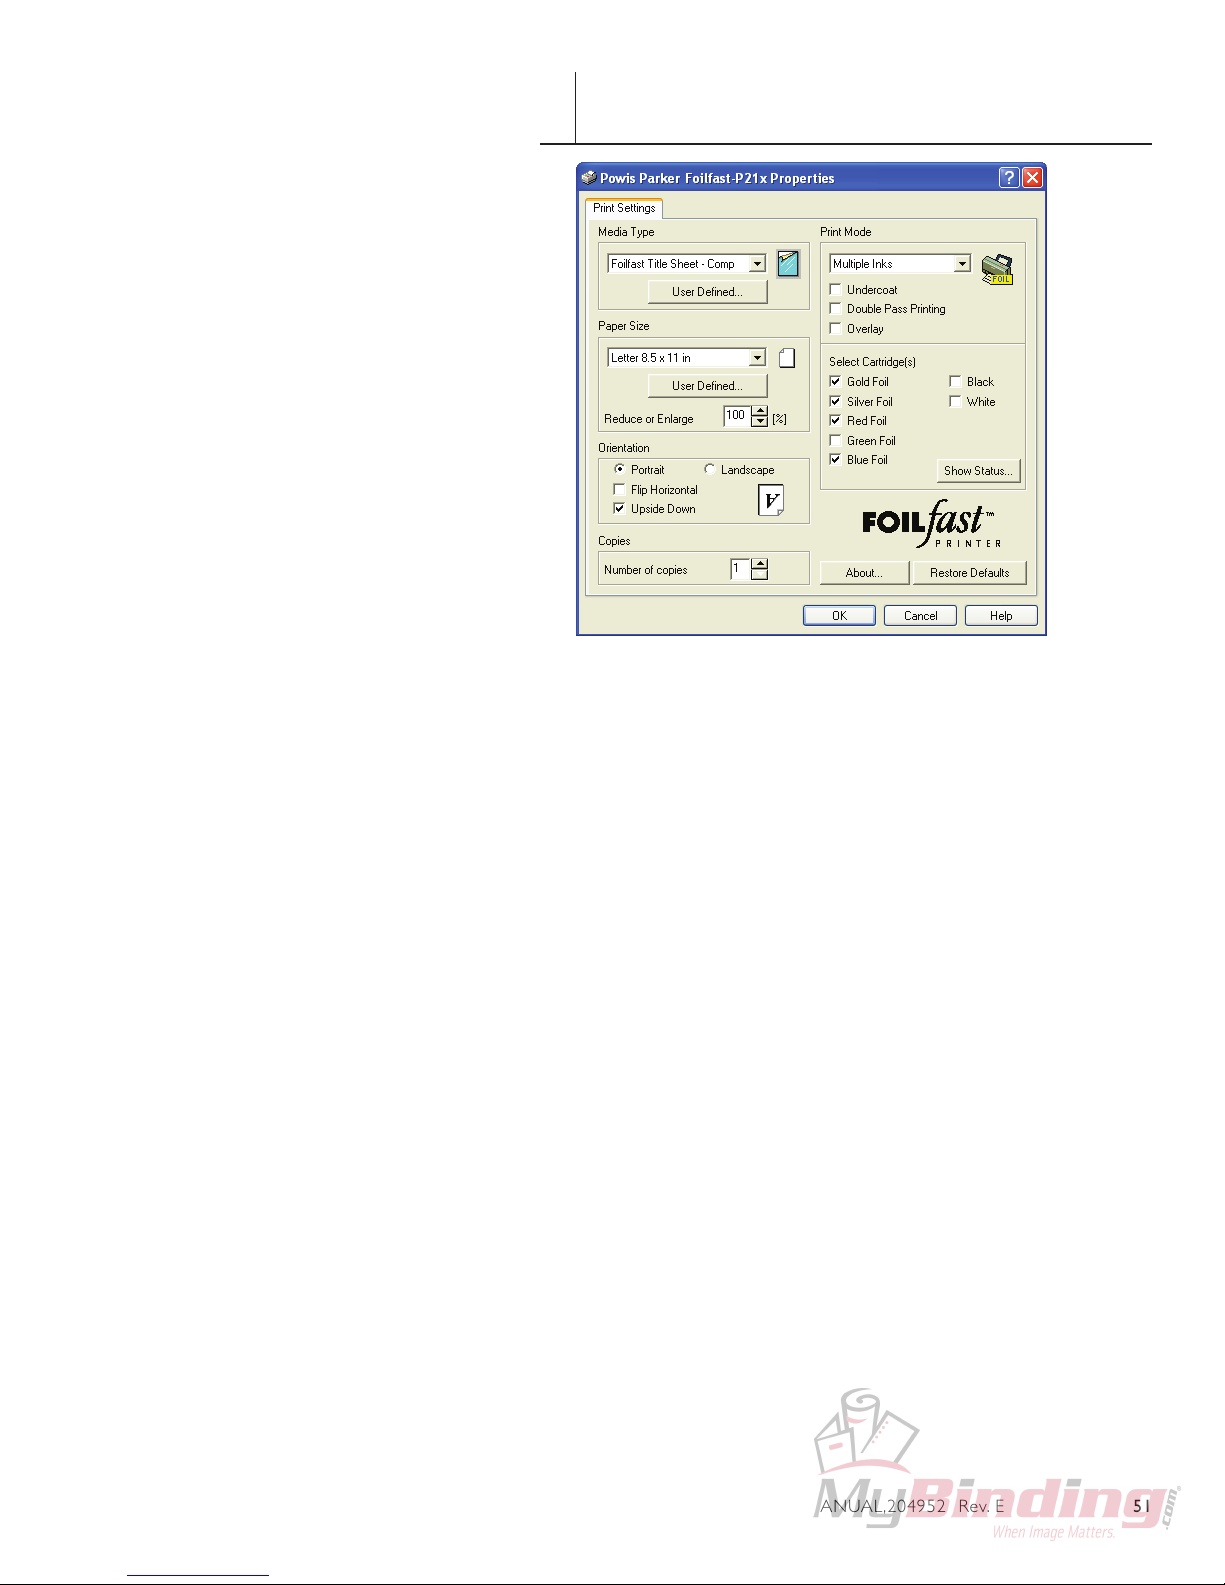
F I G U R E 131
The Printing Properties window that appears after you have
chosen either ‘Properties’ from the Print Window in most
programs, or ‘Preferences’ from the Print Setup window in
Adobe programs (InDesign, Illustrator), is the primary console
for printing configuration with your Foilfast printer. Here is
where you wil choose whether you want to print in one or
more colors, whether you want to use the Foil Primer for an
undercoat, which material you wish to print on, and more.
The Print Properites window has five sections:
• MediaType
• PaperSize
• Orientation
• Copies
• PrintMode
A. Media Type
In Media Type, you choose which material you are using to print.
There are six choices available:
Foilfast Comp Cover - HIGH
Foilfast Comp Cover - LOW
Foilfast Coated Paper Cover
Foilfast ClearCover
Foilfast Title Sheet - Suede
Foilfast Title Sheet - Comp
1. Foilfast Comp Cover - HIGH
Used with the Foilfast Comp Covers available from Powis.
This is the default setting.
FASTBACK P-21x FOILFAST PRINTER USER’S MANUAL,204952 Rev. E 51

F I G U R E 132
VII
ABOUT PRINTING PROPERTIES
2. Foilfast Comp Cover - LOW
Used with the Foilfast Comp Covers available from Powis.
This is setting is not normally used and is intended for use
when problems occur using the standard HIGH setting.
3. Foilfast Coated Paper Cover
Used with Coated Paper Cover materials. If you intend to
print on coated paper materials that are sold by a vendor
other than Powis, make sure that you test the materials
before proceeding.
4. Foilfast ClearCover
Used with Powis Clear Cover. This setting requires an
undercoat of Foil Primer to achieve optimal results.
5. Foilfast Title Sheet - Suede
Used with Powis Suede Foilfast Title Sheets. This setting
requires an undercoat of Foil Primer to achieve optimal
results. For more information on Foilfast Title Sheets, see
The Fastback Hardcover Guide Manual (P.N.: L5648).
5. Foilfast Title Sheet - Comp
F I G U R E 133
Used with Powis Comp Foilfast Title Sheets. For more
information on Foilfast Title Sheets, see The Fastback
Hardcover Guide Manual (P.N.: L5648).
IMPORTANT: When printing Foilfast Title sheets, it is
very impor tant that the narrow release strip on the back of
the Foilfast Title Sheet is on the left (Figure 132).
6. User Defined...
Click this button to save your individual settings. This is
useful if you plan to use a certain confguration on a regular
basis. To save your settings click the ‘User Defined...’ button
in the Media Type section. The User Defined Document
Type dialog box is displayed (Figure 133). Type the setting
name of your choice in the “Save as” field, then click the
Save button. Up to ten document types can be saved. To
delete a document type, click the document type name you
want to delete in the list, then click the Delete button.
B. Paper Size
In Paper Size, you choose the size of your paper or cover
material. There are six standrad paper sizes listed:
• Letter8.5x11in
• Legal8.5x14in
• HalfLetter5.5x8.5in
• A4210x297mm
• A5148x210mm
• B5182x257mm
52 FASTBACK P-21x FOILFAST PRINTER USER’S MANUAL,204952 Rev. E

VII
ABOUT PRINTING PROPERTIES
• UserDened...
To open the User Defined Paper Size dialog box, select the User
Defined... option from the Paper Size menu. In this dialog, you can
create your custom size. Enter the width and length, and type the
name of your custom size. Then click “Save” to save the settings. Up
to ten settings can be saved. To delete a setting, click the saved name
in the list, then click the Delete button.
• ReduceorEnlarge
Scaling can be set between 25% to 400%. This control is grayed out
when you select “User Defined…” (including user defined names)
for paper size. The default setting is 100%.
C. Orientation
Orientation determines the direction of the image as it prints on the
cover, and whether it is right or reverse reading.
•Portrait/Landscape
Click one of the radio buttons to set the orientation to either
Portrait or Landscape.
•FlipHorizontal
Turning on this option prints an image flipped horizontally, the mirror
image of the document as it displays on your screen. You may want
to use this feature when printing in black or white on Clear Covers.
•UpsideDowncheckbox
Check this box to rotate the image 180º when printing. Make sure
this box in checked whenever you are printing with Foilfast Title
Sheets.
D. Copies
You may enter the numbers of copies you wish to print here
(optional). This feature is also available in the main Print Window.
E. Print Mode
This section is where you decide which and how many colors you
wish to print.
• SingleInk(onefoilcolor)
The Single Ink print mode allows a document to be printed in one
specific color using any selected foil color cartridge. When you
select Single Ink mode, all selectable cartridges are shown with
radio buttons in the Select Cartridge(s) area. The default cartridge
selection is Gold Foil.
• MultipleInk(multiplefoilcolors)
FASTBACK P-21x FOILFAST PRINTER USER’S MANUAL,204952 Rev. E 53

VII
ABOUT PRINTING PROPERTIES
This print mode allows a document to be printed in
multi-color using any selected cartridges. When you select
Multiple Ink mode, all selectable cartridges are shown with
checkboxes in the Select Cartridge(s) area. You must select
at least 1 and no more than 7 colors. The default car tridge
is Gold Foil.
• Undercoat
The primer cartridge will be used for printing when
Undercoat is checked. The primer cartridge is required
for printing on Clear Covers, and it may improve the
print quality on other print media. The default setting is
Undercoat off.
• DoublePassPrinting
When using sheets with a rough texture, you may want
to check Double Pass Printing to increase the density of
the foil. When Double Pass Printing is checked, the printer
prints each line twice. This check box is grayed out when
Foilfast ClearCovers is selected. In the Default setting, the
Double Pass printing checkbox is not checked.
NOTE: Double Pass printing doubles the foil consumption
rate.
• Overlay
This option allows two consecutive pages of a document
to be printed on the same sheet.
• ShowStatus
Show Status checks the Foilfast for installed cartridges and
how much foil is left in each cartridge.
F. About
Clicking the ‘About’ button displays the versions numbers
for the Foilfast software and its components.
G. Restore Defaults
Click ‘Restrore Defaults’ to set the Foilfast software back to
its factory settings.
54 FASTBACK P-21x FOILFAST PRINTER USER’S MANUAL,204952 Rev. E
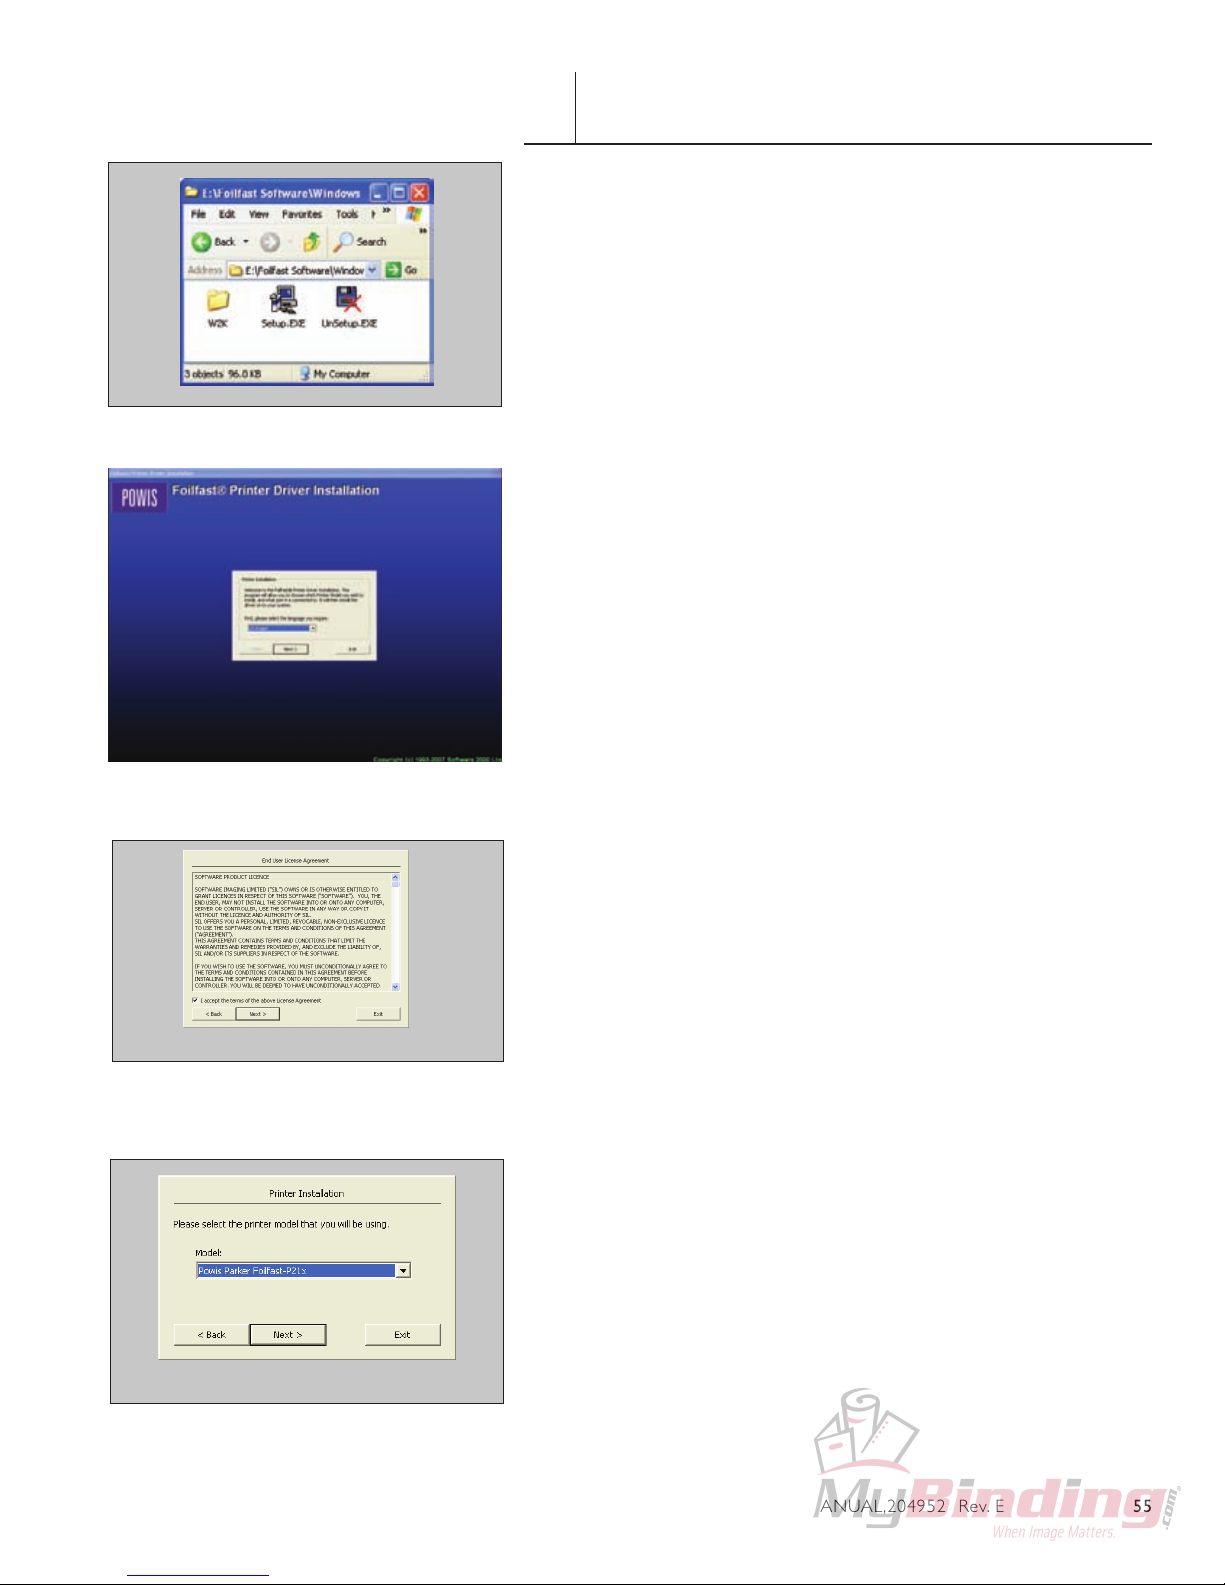
INSTALLING PRINTER SOFTWARE
(Windows Alternative Installation)
To access the printer installation software, insert the Software
Installation CD in your CD drive and open the folder titled
“Windows,” or download the software from the Powis website
(http://www.powis.com/software).
IMPORTANT: All previously installed Foilfast software
must be removed before installing new Foilfast software.
Please make sure that you have uninstalled all old Foilfast
software before continuing.
1. Double click on the file titled “Setup.exe” (Figure 134).
F I G U R E 134
The Printer Driver Installation screen appears (Figure 135).
NOTE: If you did not receive a disk with your printer, you
can obtain the software from the Powis website at:
http://www.powis.com/software.
2. Choose the language you prefer for installation. Click ‘Next.’
The End User License Agreement dialog box appears
(Figure 136). Please read the agreement carefully.
3. Click to check the box labeled “I accept the terms of the
above License Agreement.” If you do not agree to the
license terms, click ‘Exit.’ Otherwise, click ‘Next.’
F I G U R E 135
F I G U R E
136
The second Printer Installation dialog box appears (Figure 137).
4. Choose the appropriate printer. Click ‘Next.’
The Available Platforms dialog box appears (Figure 138).
Make sure that the appropriate software platform is chosen
(Windows 2000/XP/2003). Under “Do you want to share this
printer?” click the button labeled ‘No.’
5. Click ‘Next.’
The third Printer Installation dialog box appears (Figure 139).
6. The software will find the port that it determines is the
most suitable choice for you computer. If you want to
switch ports, click the arrow to the right of the chosen
port and other available ports will appear.
F I G U R E 137
FASTBACK P-21x FOILFAST PRINTER USER’S MANUAL,204952 Rev. E 55

VIII
INSTALLING PRINTER SOFTWARE
(Windows Alternative Installation)
7. Under ‘Printer Name’ you can change the name of your printer as
you wish.
8. If you wish to use the Foilfast printer as your default printer (not
recommended), check the button labeled ‘Yes.’ The default is ‘No.’
9 Click ‘Next.’
The “Ready to Start Copying” dialog box appears (Figure 140).
10. Click Finish.
After the installation has finished, a dialog announcing that the installation
F I G U R E 138
was successful should appear (Figure 141).
10. Click ‘Exit t o Windows.’
Your printer is now ready to use. If, for any reason, your installation was
not successful, remove all components of the Foilfast software from your
computer and try again using a different Port. See Troubleshooting for
more information or contact Powis Tech Support.
F I G U R E 139
F I G U R E 140
F I G U R E 141
56 FASTBACK P-21x FOILFAST PRINTER USER’S MANUAL,204952 Rev. E

IX
TROUBLESHOOTING
Problems Solution
Cartridge is stuck in the carriage 1. Turn off the power.
2. Open the front cover and remove all cartridges on the
cartridge holder plates.
3. Close the front cover, and turn on the power. The carriage
will reset.
Problems Solution
Power does not come on 1. Is the power cord disconnected?
2. Make sure the power cord is plugged into an outlet as
well as connected to the printer. After checking the power
cord, push the power button to turn on the printer. Is the
printer plugged into an extension block or power strip?
3. After turning on the extension block or power strip, press
the power button on the printer.
Problems Solution
Printing is light, distorted, or has gaps Stop the printing and reinstall all the cartridges. Take up any
slack in the foils. If a particular cartridge repeatedly causes
problems, try a different cartridge.
Clean the head by following the directions in this guide for
cleaning the printer and head. The platen often gets dirty at
the same time as the head, so it is recommended to clean
the platen after cleaning the head.
Clean the platen by following the directions in this guide.
If anything is stuck to the platen, remove it, being careful
not to damage the platen. The platen often gets dirty at
the same time as the head so it is recommended to clean
the platen as well as the head. If cleaning the head and the
platen does not work, contact the Fastback dealer from
whom you purchased the printer.
FASTBACK P-21x FOILFAST PRINTER USER’S MANUAL,204952 Rev. E 57

IX
TROUBLESHOOTING
Problems Solution
Printer does not print or stops while printing Before printing make sure the printer is turned on.
Make sure that the front cover is closed properly.
Press the ready/insert button and make sure that the ready light
comes on.
After connecting the cable, make sure nothing is putting pressure on
the cable, and tighten the fastening screws and clamps to secure the
cable.
Remove the sheet. If the sheet is caught in the rollers, open the
front cover, push down on the release lever, and gently remove the
sheet.
Recheck the printer settings in the application.
NOTE: To use the parallel port for P21x printing you will have to set
the printer port to LPT1 and not use the PPI_LPT1 port
Install the printer driver from the Installation Disc.
When one of the followings occurs, it is possible that the cable is
broken or disconnected.
1) The gauge in the Print dialog box does not progress.
2) The “Out of Sheets” message appears repeatedly.
Replace the cable with a new one.
Are you using a printer selection switch or a printer buffer?
With bi-directional interfaces, operation is sometimes unreliable
when using printer switching boxes or printer buffers. If you are
using a printer selection switching box or printer buffer, use one-way
communication.
Do not use a cable that is longer than you need. The signals become
more unstable as the cable gets longer.
Use the correct cartridges. The Foilfast printer will only accept
Foilfast™ premium foil cartridges.
Insert cartridges in the holders with the B side up.
When the foil in a cartridge has been spent, black and silver stripes
will be visible on the ribbon. Install a new cartridge. After replacing
the cartridge, printing will continue from where it left off.
58 FASTBACK P-21x FOILFAST PRINTER USER’S MANUAL,204952 Rev. E
Do you have enough hard disk space?
The Foilfast requires work space on the hard disk when it prints.
Keep enough free disk space to ensure that you can print without
problems.
IX
TROUBLESHOOTING
Printing is not working or is extremely slow Make sure there is enough space on your hard disk. (The
Problems Solution
working space is released once printing is finished.)
Some applications have color printing enable/disable settings.
Some applications do not support color printing. Read the
manual for the application and check the color settings.
When very little memor y is available for print processing,
printing may take a long time or fail. Close as many
applications as possible and try again.
Handling color images requires a lot of memory for the
application and for the data. Sometimes there is insufficient
memory left for printing. Make sure your computer has
enough memory to print the size of images you are using.
General protection fault errors can occur when there is
insufficient memory for color printing or when par t of the
hard disk has become corrupted. After decreasing the size of
the print data or scanning the hard disk, try printing again.
The time required for printing can increase dramatically if
the free space on the disk drive is extremely fragmented.
Clean up your files and defragment the disk by periodically
running a utility like DEFRAG, which comes with Windows.
Problems Solution
Printer makes strange noises when the
power is turned on, and the error lights blink
Has the carriage packing material been removed?
Refer to Chapter III of this guide for detailed unpacking instructions.
Has the packing tape on the case been removed?
Refer to Chapter III of this guide for detailed unpacking instructions.
Cork pieces
Has a cartridge become dislodged from a cartridge holder?
Open the front cover and make sure the cartridges are correctly
installed.
FASTBACK P-21x FOILFAST PRINTER USER’S MANUAL,204952 Rev. E 59

IX
TROUBLESHOOTING
Problems Solution
Paper is not feeding correctly or not ejecting
correctly from the sheet feeder
The cover material you are using may not be copmatible
with the Foilfast printer.
A curled sheet will cause sheet jams. The sheet should be
curled the opposite way to flatten it out before it is used.
Sheets with folded or cut corners can cause problems if the
sheet does not activate the position sensor and sheet length
sensor properly.
Set the feed guide so that there is approximately 0.02”
between it and the sheets themselves.
The sheet feeder can hold up to 10 composition covers, 1
Clear Cover, or 1 Foilfast Title Sheet.
Composition covers should be between 16 – 18.5 points
thick (.0157 – .0180 inches). Clear covers should be
between 6.5 – 7.5 points thick (.0065 – .0075 inches).
Covers that fall outside the bounds of these thickness ranges
may work in the Foilfast printer, but Powis Parker does not
recommend using them. Covers that fall substantially beyond
these thickness ranges may damage the printer’s feeding
mechanism and may void your warranty.
Make sure nothing is on the output tray as this can cause
sheet jams.
Sheets must fanned at least once before they are loaded
into the sheet feeder. If not, sheets may stick to one another,
and cause multiple sheets to feed into the printer at one
time, or other forms of misfeeding.
60 FASTBACK P-21x FOILFAST PRINTER USER’S MANUAL,204952 Rev. E

X
SPECIFICATIONS
Power Requirements: USA: 115 VAC, 60 Hz, 0.65 amps
EU: 230 VAC, 50 Hz, 0.3 amps
Japan: 100 VAC, 50 Hz, 0.7 amps
Recommended Operating
Temperature and
Humidity:
Maximum Weight: 12 lbs. (5.4 kg)
Dimensions: 18.2”W × 7.5”H × 11.8”D
Average P rinting Time: 1.5 Minutes
15 to 35 degrees (C), 59 to 95 degrees (F)
Humidity Range: 5 to 80% RH noncondensing
46.2cm W × 19cm H × 30cm D
FASTBACK P-21x FOILFAST PRINTER USER’S MANUAL,204952 Rev. E 61

XI
FCC NOTICE
• Modifications made to the product, unless expressly approved by Powis Parker, could void the
user’s authority to operate the equipment.
Note: This equipment has been tested and found to comply with the limits for a Class B digital
device, pursuant to Part 15 of the FCC Rules. These limits are designed to provide reasonable
protection against harmful interference in a residential installation. This equipment generates,
uses, and can radiate radio frequency energy and, if not installed and used in accordance with
the instruction, may cause harmful interference to radio communications. However, there is no
guarantee that interference will not occur in a particular installation. If this equipment does cause
harmful interference to radio or television reception, which can be determined by turning the
equipment off and on, the user is encouraged to try and correct the interference by one or more of
the following measures:
• Reorient or locate the receiving antenna.
• Increase the separation between the equipment and receiver.
• Connect the equipment into an outlet on a circuit from that to which the receiver is connected.
• Consult the dealer or an experienced radio/TV technician for help.
DECLARATION OF CONFORMITY
We, Powis Parker, Incorporated
775 Heinz Avenue
Berkeley, CA 94710 U.S.A
1-800-321-2463
declare under our sole responsibility that the product
Foilfast P-21x Printer
complies with Part 15 of FCC Rules.
Operation is subject to the following two conditions: (1) this device may not cause harmful
interference, and (2) this device must accept any interference received, including interference that
may cause undesired operation.
• Binder does not contain any user serviceable parts. Return unit to an authorized Powis Parker
representative for repair or service.
62 FASTBACK P-21x FOILFAST PRINTER USER’S MANUAL,204952 Rev. D
POWIS PARKER PART NUMBERS FOR YOUR REFERENCE:

COPYRIGHT I NFORMATION
Copyright© 2007 by Powis Parker Inc.
This guide may not be copied wholly or in part without prior written permission from Powis Parker Inc.
Regardless of the contents of this guide, Powis Parker Inc. will not bear the responsibility for negative
effects incurred as a result of the operation of this equipment.
The contents of this guide are subject to change without prior notification.
MS-DOS, Microsoft, Windows XP, and the Windows logo are registered trademarks of Microsoft
Corporation. Apple, Macintosh, iMac, iBook, are registered trademarks of Apple Computer. Other brand
or product names are trademarks or registered trademarks of their respective holders.
As an ENERGY STAR® Partner, Powis Parker Inc. has determined that this product meets the ENERGY
STAR guidelines for energy efficiency.
WARRANTY
The information contained in this document is subject to change without notice.
PPI makes no warranty of any kind with respect to this information. PPI specifically disclaims the implied
warranty of merchantability and fitness for a particular purpose.
PPI shall not be liable for any direct, indirect, incidental, consequential, or other damage alleged in
connection with the furnishing or use of this information.
NOTICE
Changes are periodically made to this document. Revisions, changes, any technical inaccuracies, and
typographical errors will be corrected in any subsequent editions.
POWIS PARKER INC.
775 Heinz Avenue
Berkeley, CA 94710
Telephone: (800) 321-2463, or (510) 848-2463
FAX: (510) 848-2462
www.powis.com
Printed in USA
FASTBACK P-21x FOILFAST PRINTER USER’S MANUAL,204952 Rev. E 63

64 FASTBACK P-21x FOILFAST PRINTER USER’S MANUAL,204952 Rev. E
 Loading...