

Power Wheels FMD26 User Manual
12-Volt Quick Charger
Cargador rápido de 12V
Chargeur rapide de 12 V
FMD26powerwheels.com

BEFORE YOU BEGIN
• Please read this manual before first-time use and save it with your
original sales receipt.
• Keep these instructions for future reference, as they contain
important information.
• This product does not include a battery. Please use this product
only with a Power Wheels
• This product is not intended for children. It is for adult use only.
• This product quickly charges your Power Wheels
battery in approximately 6 hours.
• Failure to follow these instructions may damage your battery and
will void your warranty.
• Before charging the battery, examine the battery case for cracks
and other damage which may cause sulfuric acid (electrolyte) to
leak during the charging process. If damage is detected, do not
charge the battery or use it in your vehicle. Battery acid is very
corrosive and can cause severe damage to surfaces it contacts.
• Do not charge the battery on a surface (such as kitchen countertops) which could be damaged by the acid contained inside the
battery. Take precautions to protect the surface on which you place
your battery.
• Charge the battery in a well-ventilated area.
• Input: 120/240 VAC 0.8amp 50/60Hz
Output: 12V DC 2.5A
®
12V, 12 Ah lead acid battery.
®
12V, 12 Ah
2
WARNING
To prevent fire or injury
• Never modify the electrical system.
Alterations could cause a fire.
• Use only a Power Wheels
and charger. Other batteries or
chargers could cause a fire
or explosion.
• Only adults should charge batteries.
3
®
battery
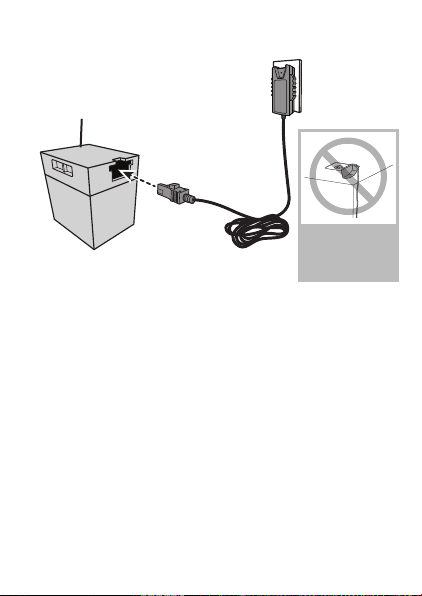
LET’S GET STARTED
Battery must be upright
while charging.
Do not plug the
charger into
a ceiling outlet.
• Plug the charger into a wall outlet. The charger LED is blue,
indicating that there’s power.
Note: If the LED is not blue, you may not have power to the outlet.
If there is a switch that controls power to the outlet, make sure
it’s ON.
• Plug the charger into battery. The charger LED should change to
red or green. If it remains blue, make sure the charger is firmly
plugged into the battery.
• Allow 6 hours for a full charge. The charger LED should be green.
Remove the charger connector from the battery and then unplug
the charger from the wall outlet.
• The battery is now ready to be installed in your vehicle. Please
refer to the vehicle Owner’s Manual for instructions to install the
battery in your vehicle.
4
898
20-0
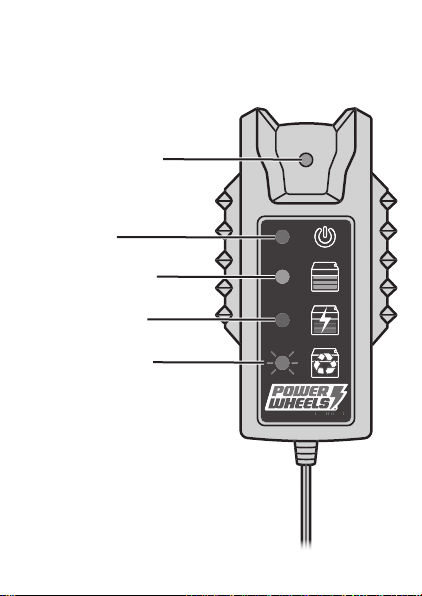
CHARGER LED
This charger has an LED to indicate charger power and the battery’s
charge status.
LED
Solid Blue - Charger is
plugged into a power
source but not plugged
into the battery.
Solid Green - Battery is
fully charged.
Solid Red - Battery is
charging.
Flashing Red - Battery
is damaged/dead.
Replace the battery.
1101
1
5

PROBLEMS?
• If the charger operates erratically, you may need to reset the
electronics. Unplug the charger from the wall outlet and then the
battery. Wait 30 seconds. Reconnect in this order:
1) Plug the charger into the wall outlet.
2) Plug the charger connector into the socket in battery.
• Remember, if the LED on the charger flashes red, your battery is
damaged and will not accept a charge. You’ll need to replace
the battery.
6

Adults note: Periodically
examine this battery
charger for damage to
the cord, housing or
other parts that may
result in the risk of fire,
electric shock or injury.
If the battery charger is
damaged, do not use it.
7

FCC STATEMENT (UNITED STATES ONLY)
This equipment has been tested and found to comply with the limits
for a Class B digital device, pursuant to Part 15 of the FCC rules.
These limits are designed to provide reasonable protection against
harmful interference in a residential installation.This equipment
generates uses and can radiate radio frequency energy and, if
not installed and used in accordance with the instructions, may
cause harmful interference to radio communications.However,
there is no guarantee that interference will not occur in a particular
installation.If this equipment does cause harmful interference to
radio or television reception, which can be determined by turning
the equipment off and on, the user is encouraged to try to correct
the interference by one or more of the following measures:
• Reorient or relocate the receiving antenna.
• Increase the separation between the equipment and receiver.
• Connect the equipment into an outlet on a circuit different from
that to which the receiver is connected.
• Consult the dealer or an experienced radio/TV technician for help.
NOTE: Changes or modifications not expressly approved by the
manufacturer responsible for compliance could void the user’s
authority to operate the equipment.
This device complies with Part 15 of the FCC Rules. Operation
is subject to the following two conditions: (1) This device may
not cause harmful interference, and (2) this device must accept
any interference received, including interference that may cause
undesired operation.
• Protect the environment by not disposing of this
product or any batteries with household waste. This
symbol indicates that this product shall not be treated
as household waste. Check your local authority for
recycling advice and facilities.
8
 Loading...