

Page 1
TERA
TERA
www.tera.co
www.tera.co
User Manual
User Manual
TR-500
TR-505
Page 2

TERA
Welcome to TERA Product Line of Radios
Congratulations on your purchase of TERA high quality two-way radio. The TR-505 model
represents the state-of-the-art in high-tech design and features. This radio model features 16
channels. Your two-way radio is designed for reliable and trouble free performance
GMRS
2
for years to come.
Features:
-UHF Dual-band (GMRS
-16 Pre-Programmed GMRSChannels
-121 Quiet Codes (38 CTCSS / 83 DCS)
-Time-Out Timer
-Voice Announcements for Channel and Battery Level
-Selectable Hi/Low Power Settings
-Speaker Mic and Earphone Jacks
-Includes long life (25-30 hour) Li-Ion Battery and desk charger
To get the most out of your radio, please rea
)
d this manual carefully before use.
TERA
Page 3

TR-505
3
Page 4

TERA
Online Service and Support
The TERA website provides additional information about
obtaining service or support for the TERA line of two-way
4
radios and accessories.
Visit: www.tera.co
TERA
Page 5
User Manual
Safety Matters
The following recommendations will help you understand this radios safety requirements.
1. Only qualified TERA technicians are allowed to service this two-way radio. Do not
disassemble the radio by yourself as it will void the warranty.
2. Use only the TERA brand battery pack and desk charger, so as to not damage the
transceiver.
3. Do not expose this radio to long periods of direct sunlight, or hot or humid areas.
4. Do not put this radio in dusty or dirty locations.
5. Do not use harsh chemicals, cleaning solvents, or strong detergent to wash this radio.
6. Never transmit on this radio without an antenna connected.
Caution
Safety and operability of this radio can’t be guaranteed unless TERA brand accessories or parts
are used.
TR-505
5
Page 6

Content
Initial Programming ............................................ 3
Included In Box ..................................................... 9
Installing The Belt Clip ....................................... 10
Getting Acquainted ............................................. 10
Battery Information ............................................ 10
Charging The Battery Pack .............................. 12
Antenna Information .......................................... 14
6
Radio Overview .................................................... 16
Basic Operations .................................................. 18
Power ON/OFF and Volume Control ............ 18
Channel Selection ................................................ 18
Monitor Function ................................................. 19
Make A Call ............................................................ 19
Receive A Call ........................................................ 19
Side Key Operation .............................................. 20
GMRS Radio Programming ............. 22
Wired Clone ........................................................... 24
Troubleshooting ................................................... 25
Specification ......................................................... 27
TERA
Optional Accessories .......................................... 28
Service and Support ............................................ 30
Warranty and Repair Services ........................ 30
Terms of Warranty .............................................. 32
Warning Notes ...................................................... 34
Safety ....................................................................... 35
Page 7

TR-505
7
Page 8
8
Check Product
Please unpack the radio and the included accessories. We recommend that you check the box
for the items listed below to ensure everything is in the box.
Please contact your dealer should any items be missing from the box.
TERA
Page 9
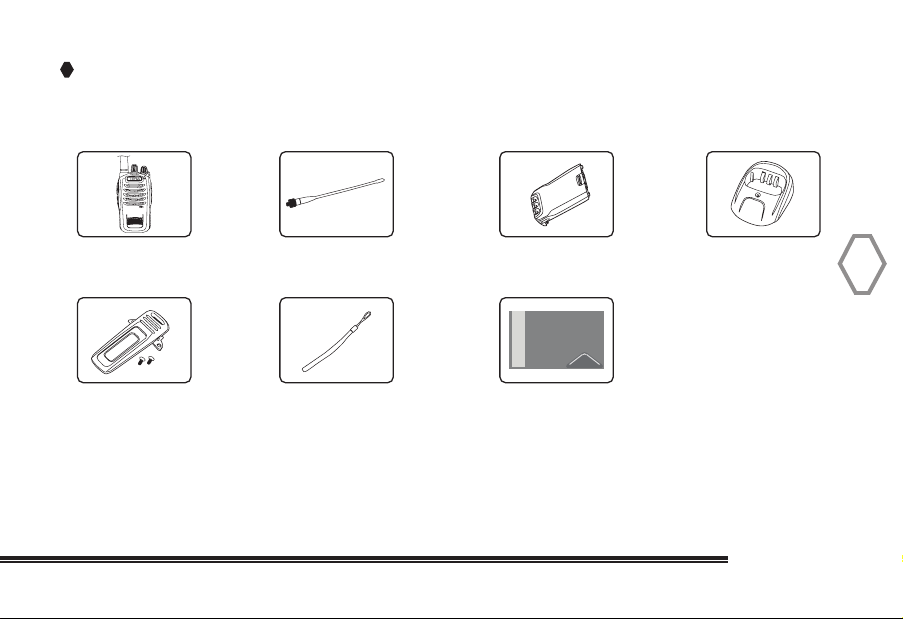
Included In Box
Radio Antenna Battery Charger
TERA
Belt Clip Hand Strap User Manual
TR-505
9
Page 10
Installing The Belt Clip
To install the belt clip. Place the belt clip over the two rear mounting holes and insert the
two supplied phillips mounting screws and secure them into the rear of the radio body.
HINT: Install the belt clip with the battery removed as the install will be easier.
Getting Acquainted
Battery Information
10
Battery Type: Li-Ion 1600 mAh Battery. Please charge the included TERA battery for
1-2 hours before use. Leave the radio or battery pack in the supplied charger cup until
the red charging light goes off and the green LED light comes on which indicates the
battery pack is fully charged and ready to use.
Note:
1. Do not short-circuit the battery terminals or dispose the battery in fire. Never attempt to
disassemble the battery pack.
2. Charge the battery in 32-105 F temperature. Otherwise the battery may not fully charge.
3. Turn off the radio before your initial charge. Use of the radio while charging may cause noise
or interfere during reception or transmission.
TERA
Page 11

4. Avoid pulling the Radio in and out of the charger during charging to avoid interference with the
charging procedure.
5. If the battery life quickly runs down even if it is fully and correctly charged, this means the
battery life is over and this battery will need replacing. Please contact your authorized TERA
dealer to purchase a new battery.
6. NEVER charge the battery or radio with battery if they are wet. Before charging, you should dry
battery off with a towel or cloth to avoid danger.
Warning:
Conductive metals such as jewelry, keys or coins may result in short circuit and generate a large quantity of heat when coming to contact with battery electrodes. Treat
any battery carefully especially when placing it into pocket, wallet or other metal
container as they can short out.
TR-505
11
Page 12
Charging The Battery Pack
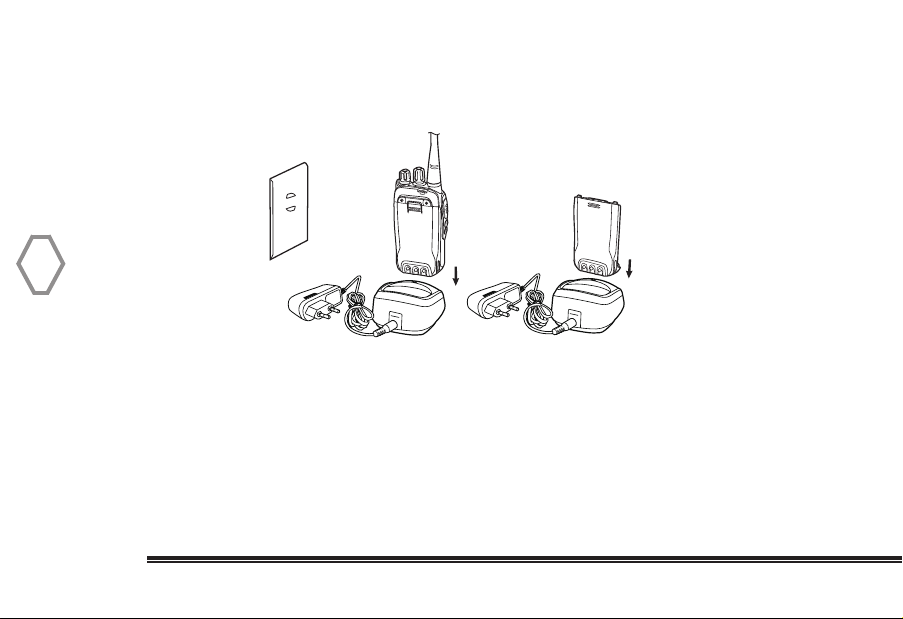
The Radio Battery Pack may be charged either by itself or when connected to the radio body.
To Charge your Battery Pack:
12
1. Insert the AC power cord into the rear of the desk top charging base. Connect the opposite AC
cord and safely plug it into an AC power outlet.
2. Place the battery pack or radio with battery into the charging base with the radio facing forward.
3. A solid red colored LED light will come ON indicating fast charging function. The LED light will
change to a green color once the battery pack is fully charged. Typical charging time is 1/2-2 hours
depending on your battery level at the time of re-charging.
TERA
Page 13
4. NOTE: If the desk charger has a FLASHING red colored LED light, this means the battery pack is
completely discharged. The charger will automatically slow charge the battery pack for 30 minutes
then switch to the normal solid red LED charging mode. If the battery charger stays in the FLASHING red LED mode more than 30 minutes, the battery pack may need to be replaced.
Note
Trickle charge is not allowed to exceed 30 minutes. If the LED is still flashing in red after 30
minutes, it means that the charger cannot provide power to the battery. Check if the battery or
charger is damaged.
Caution when Charging the Battery
1. The battery is not fully charged from the factory. Please charge the battery before initial use or
after long-period of storage.
2. Repeat charging 2 to 3 times will make the battery reach its best capacity. Please replace or
charge the battery if battery power is low.
3. The supplied Li-ion battery includes a (6) six month warranty and is good for typically 400-500
charging cycles.
TR-505
13
Page 14
TIP
When storing radio for more then 3 weeks at a time, it is best to remove the TERA battery from
radio. This will maintain a full charge in battery so it’s ready for use. Batteries will hold a charge
6-12 months when removed from radio.
Antenna Information
The supplied flexible antenna is suitable for standard-distance communications. TERA
14
also offers extended length higher gain antennas to increase your communications
range. For more information about available accessories, visit: www.tera.co
CAUTION
Radio communication range may be greatly reduced when operating inside of concrete
structures like buildings and parking structures.
TERA
Page 15

TR-505
15
Page 16
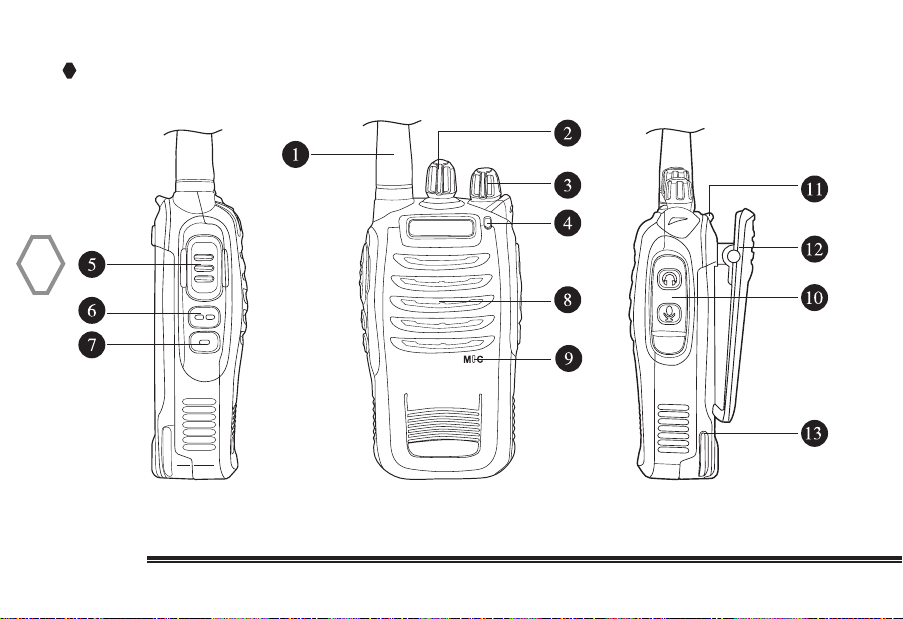
Radio Overview
16
TERA
TERA
Page 17
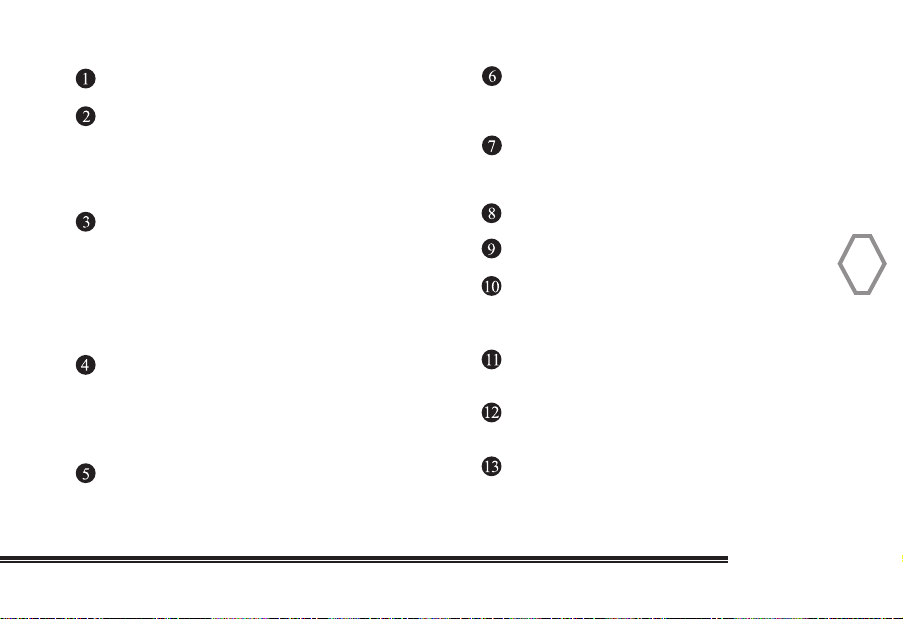
Antenna
Channel Selector
Rotate the knob to select channel 1 to 16. The
radio will announce the selected channel number,
if voice prompt is switched on. Turn to channel 16
to enable scan (see page 18)
Power Switch / Volume Control
This knob turns on/off the radio and adjusts
the volume. Rotate knob clockwise until a
click sound, to turn on the radio; rotate it
further to adjust audio volume. Rotate the
knob clockwise until the click sound indicates
the radio is turned off.
LED Indicator
A red glowing LED indicates the radio
is transmitting; green when it is receiving;
it flashes red when battery power is insufficient;
and flashes green during scanning.
PTT Key
To transmit, press the PTT-Key and speak
into the mic; release it to receive.
Mid Key: programmable key
Short press default setting is battery level
Long press default setting is channel lock
Low
Left Key: programmable key
Short press default setting is TX power level
Long press default setting is monitor
Speaker
Microphone
MIC-SP Jack / Data Port
To connect the earphone / microphone or
data cable
Strap Hole
To be used with hand strap
Belt Clip
Stable the radio for easy carry
Li-ion Battery
TR-505
17
Page 18
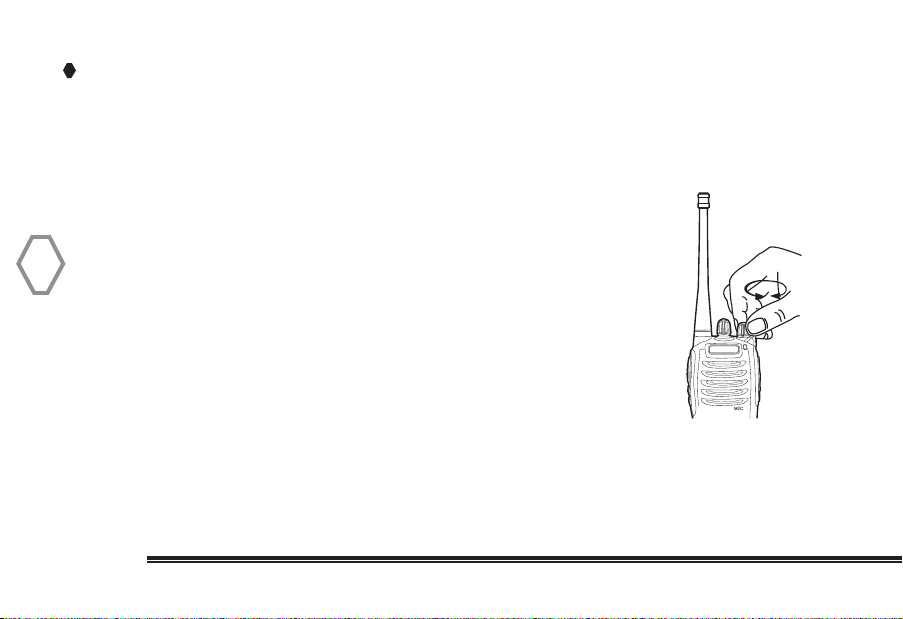
Basic Operations
Power ON/OFF and Volume Control
On top of the radio, the right mounted top knob turns the radio ON/OFF. In addition,
turning this knob clockwise increases the volume of the radio. Adjust the volume to your
desired audio level.
Channel Selection
18
Rotate the top mounted center knob to select any of the 16 preprogrammed channels. A voice will announce which channel
you are on as the channel knob is rotated.
TERA
Page 19

Monitor Function
Long press the bottom left side key button to open squelch and monitor. Release to
enable quiet mode.
Make A Call
To make a call, hold down [PTT] key and speak into the microphone with normal voice.
Please keep the microphone 2 to 4 inches away from your mouth.
Note:
1. Hold down [PTT] key and the LED glows red, the radio begins to transmit.
2. If LED flashes red during TX, the battery needs re-charging. The radio can not transmit when
battery is low. Reduce your TX power level or recharge the battery
as soon as possible.
Receive A Call
Release [PTT] key to receive a call. A green LED lights up when a signal is incoming.
TR-505
19
Page 20

Channel Scan Function
NOTE: this function is disabled when radio is shipped from the factory. The channel
scan function may be turned ON with the optional programming software and cable. To
enable this function, go into the programming software and select which channels you
would like to scan by selection “Yes” in the Scan Add column. You can scan from 2-15
channels. To start the channel scan mode, rotate the top mounted channel selector
knob on the radio to channel “16” and the radio will begin to scan your pre-selected
memory channels. To answer a calling station when scanning, press the radio’s PTT
button and talk. The radio will transmit on the last received channel while in the scan
20
mode. The scan feature will then auto resume channel scanning after 5 seconds of your
last transmit or receive audio activity on that channel. Channel “16” is not available for
a memory channel if the scan function is enabled for use.
Side Key Operation
The radio’s small side keys are programmed from the factory to the following:
Top small key: Short Press: Battery Level, Long Press: Channel Lock.
Bottom small key: Short press: Select TX Power level, Long Press: Monitor function
on. The radio’s side keys may be re-programmed to perform other functions with the
optional programming software and cable.
TERA
Page 21

Pre-Programmed Channels
Your radio is pre-programmed with GMRS channels. TERA radios operate on
GMRS radio frequencies that are regulated by the FCC. In order to transmit on these
frequencies, you are required to have a license issued by the FCC.
http://www.fcc.gov/encyclopedia/general-mobile-radio-service-gmrs
Visit:
TR-505
21
Page 22
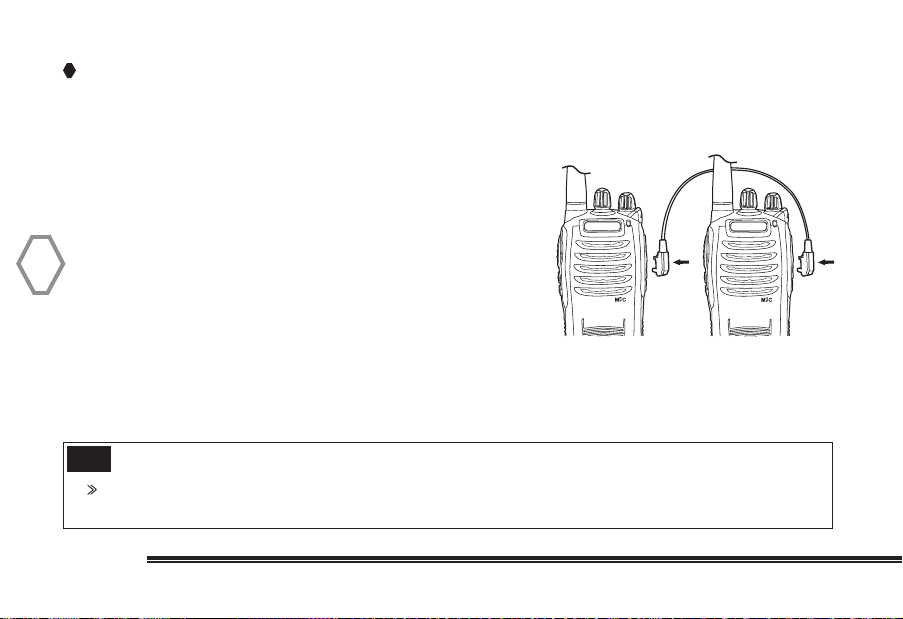
Wired Clone
1. Turn clone function by programming software or
contact your local dealer.
2. Connect source radio and target radio with clone cable,
and turn target radio on.
3. Hold down [Side Key] on Source Radio, then power
it up. About 3 seconds later, the LED glows red,
24
which means the Source Radio is ready for cloning.
4. Press [Side Key] on Source Radio again, and the
LED on Source Radio flashes red and LED on Target
Radio flashes green.The LED on Target Radio goes
out when the cloning is finished.
5. Replace the Target Radio with another, then press
[Side Key] on Source Radio to begin cloning.
Tip
If the LEDs on both Source Radio and Target Radio flashes red and green alternatively, it means
the cloning has failed.
TERA
Source Radio Target Radio
TERA
TERA
Page 23
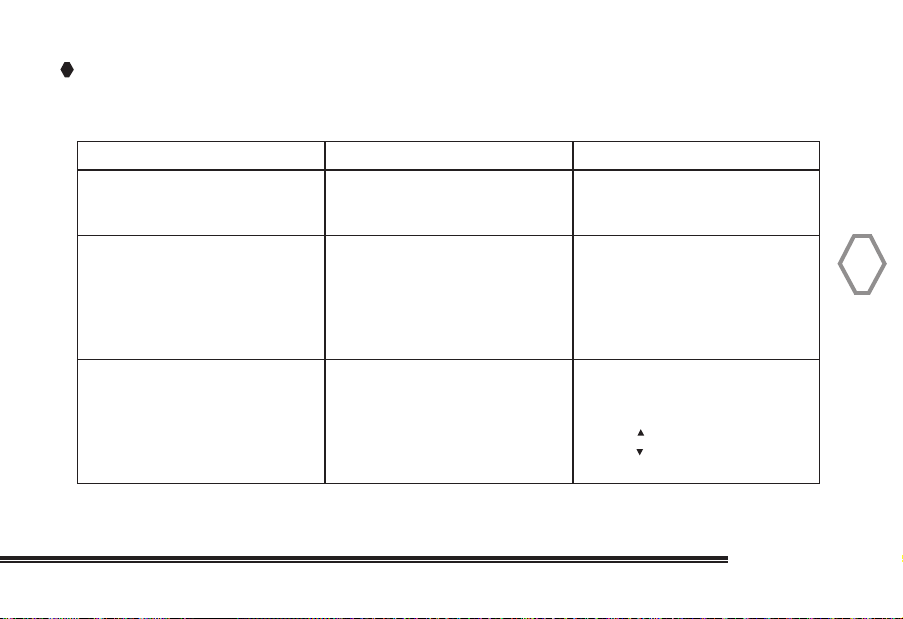
Troubleshooting
Please check the radio with the troubleshooting chart below to correct any issues.
Fault Possible Causes Solution
Radio will not turn ON 1. Battery is not installed correctly
Receiving light remains on, but the
speaker is silent
No audio from radio speaker 1. Tighten the antenna
2. Battery power is exhausted
3. Battery aging
1. Volume switch is turned down
2. CTCSS enc/decode wrong
2. The local radio FM signal is too
weak
1. Install the battery again
2. Charge battery for two hours
3. Purchase a new battery
1. Check and adjust volume
2. Ensure you use the correct
mute method
3. Ensure you have the correct
CTCSS/CDCSS tone in use or
turned off
1. Screw antenna down until snug
2. Move to place where radio
signal is strong
3. Press key to reset radio, then
press key to select the radio
frequency
TR-505
25
Page 24
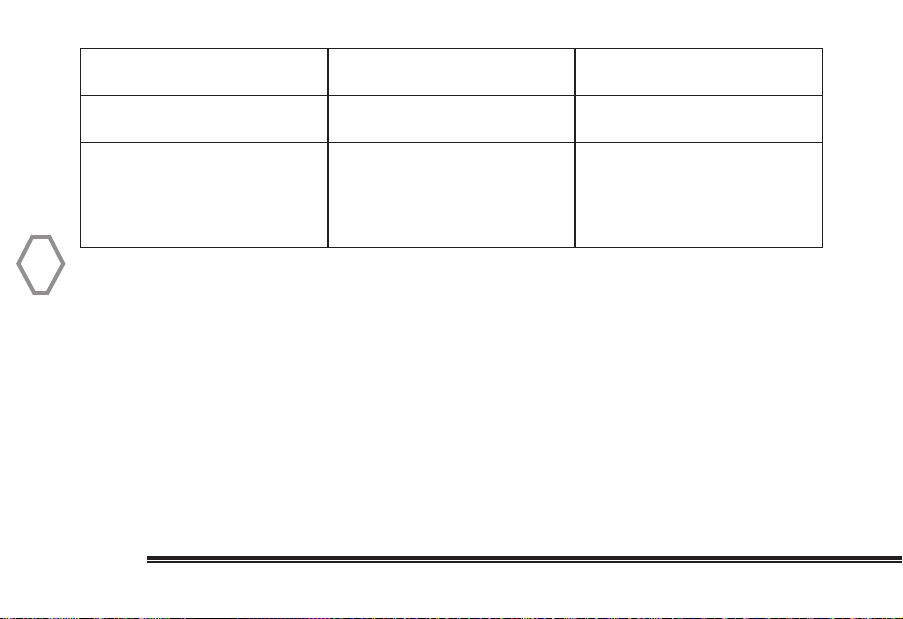
Receiving light remains on, and
you can’t transmit
Radio is transmitting while no one
is talking
Receive voice or interferences 1. You may set a wrong frequency
1. BCLO could be turned on 1. Turn off BCLO in software
1. VOX level is set to low (too
sensitive)
2. Others on that frequency use
the same CTCSS/CDCSS tone
26
1. Turn VOX off, or set it to a higher
level
1. Double check your frequency,
change to a different one,
if needed
2. Choose a different CTCSS/
CDCSS tone
TERA
Page 25
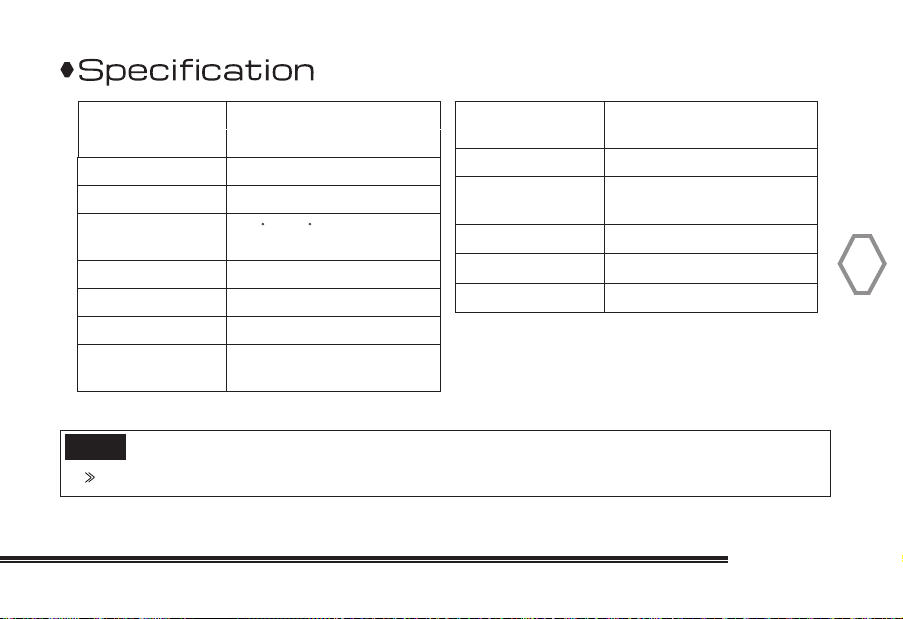
Frequency Range
UHF: GMRS
Channel Number 16 Channels
Voltage DC 6.6 V ~ 8.4 V
Termperature
-25 C ~ 55 C
Range
Operation
UHF
Output Power 2W
Modulation
Max. Deviation 5
Note
Without notice, specification are subject to change, according to technological improvements.
FM
KHz
Residual Wave
≤-36 dB
Transmit
Frequency Stability ±2.5 PPM
Receiving
0.2 µV ( ≥18 dB )
Sensitivity
Max. Audio Power
Weight
Dimension
≥700 mW
237g
124x62x36 mm
TR-505
27
Page 26

Optional Accessories
Battery & Chargers
AAA-50 AAA Alkaline Battery Case
BAT-50 1600 mAh Li-ion Battery
BTE-50 Battery Eliminator w/ cigarette lighter plug
CRG-50 Single Unit Desk Charger
28
CRG-56 6-Unit Multi Charger
External Speaker Mics
CEP-50 Covert Earpiece and lapel mic
OEP-50 Over the ear earpiece w/ lapel microphone
SPMIC-50 Compact Speaker Microphone
SPMHD-50 Heavy duty Speaker Microphone
TERA
Page 27

Antennas
ANT-50 Stock Rubber Duck Antenna
WXGAT-RV UHF High Gain 18” Rubber Duck Antenna
WXSTB-RV UHF 2 ½” Stubby Flexible Antenna
Radio Programming
CLN-50 Clone Cable (radio to radio)
PRG-50 USB to Radio Programming Cable
RPS-TR505-USB Enhanced Windows Pgm Software w/ USB cable
Others / Misc.
CLP-50 Belt Clip
CSC-50 HD Canvas Carry case w/ Stainless swivel belt clip
29
TR-505
Page 28

Service and Support
TERA Radio provides warranty and non-warranty support for this radio and accessories.
Warranty and Repair Services
1. TERA two-way radio body has a 1-year warranty. Radio accessories
(battery, charge adapter, charger and antenna, speaker mics) include a 6 month
30
warranty from date of purchase.
2. The radio warranty of 1-year is in effect from the original purchase date on the sales
receipt or invoice.
3. Repair or Replacement is available provided the original purchaser’s sales receipt copy
is included when the radio or accessories are sent in for repairs.
4. Replacement and repair or radios and accessories is provided at the discretion of TERA
radio
5. All repaired parts have its own warranty of 90-days from the repair date or the original
radio warranty depending on the longer one is valid.
TERA
Page 29

6. The warranty is only valid using this radio for normal use. And guaranty is unavailable
under such conditions: dissembling or modifications, damages caused by outside
force, water or moisture and usage of unapproved accessories or antenna, not
according to the instruction manual and so on.
7. Warranty is void if the TERA label or Serial Number label is missing or torn off.
Caution
1. Read the user manual before use the radio.
2. Do not use the radio with damaged antenna. Use the radio only with standard
antenna or optional TERA accessories.
3. Turn off the radio in potential dangerous environment.
4. Avoid the contact between battery and metal objects, oily objects or corrosive objects.
5. Do not dip the radio or battery into water or throw them in fire.
6. Use the radio only with standard battery, adapter, charger and earphone.
TR-505
31
Page 30

Terms of Warranty
1. TERA two-way radio body has a 1-year guarantee; accessories (battery, charge
adapter, charger and antenna), earphone 6 months.
2. Only the original purchasing sales receipt or valid dealer’s invoice (The invoice will give
clear indication of items purchased and the radio serial-number, and purchasing date).
3. Replacement and repair is available subject to the presentation of original purchasing
invoice in case that the radio cannot work normally as the instruction says within 30
days from the purchase date. (Note that there must not be visible abrasion on radio
32
body and accessories.
4. Repair of accessories (battery, adapter, charger and antenna) is available to the
presentation of original purchasing invoice.
5. The cost of materials and labor for repair are covered in warranty.
6. Warranty is void in case that the TERA mark or the serial-number mark is torn off.
7. Warranty is void in cases below:
1) Beyond the warranty period;
2) Defects or damages under abnormal use;
3) Defects or damages because of abuse, accident, water penetration
TERA
Page 31

and carelessness;
4) Defects or damages because of incorrect testing, operation, repair, installation,
reconfiguration or adjustment;
5) Defects or damages to antenna because of non-material or non-processing
problems;
6) Defects or damages because of unauthorized repair and disassembling;
7) Product that the serial-number marks is torn off or unable to identify;
8) Product with unclear purchasing date on original sales receipt.
9) Battery under such conditions:
a. Any damages or unsealing to the battery pack;
b. Defects or damages to battery because of charging with improper equipment
or use beyond regulated maintain condition;
TR-505
33
Page 32

Warning Notes
Every effort has been made to ensure that the information in this document is complete,
accurate, and up to-date. TERA Radio assumes no responsibility for the results of errors
beyond its control. The manufacturer of this equipment also cannot guarantee that
changes in the equipment made by non-authorized users will not affect the information
in it.
FCC Licensing Information
34
This TERA radio operates on GMRS frequencies which require a license from the Federal
Communications Commission (FCC) for business, personal, education and recreational
use. To obtain forms, call the FCC forms hotline at:
1-800-418-3676 or go to http://www.fcc.gov.
For questions concerning GMRS licensing, contact the FCC at 1-888-CALL-FCC
(1-888-225-5322).
TERA
Page 33

Safety
The TERA TR-505 handheld transceiver has been carefully designed to provide you with
years of safe, reliable operation. As with all electrical equipment, however, there are a
few basic precautions you should take to avoid hurting yourself or damaging the radio:
• Read the instructions in this handbook carefully. Be sure to save it for future reference.
• Read and follow all warning and instruction labels on the radio and owner’s manual.
• Do not carry the transceiver by the antenna. This may damage the antenna or antenna
terminal. Grasp the handheld by its base (not the antenna) when you need to place or
remove it.
• Do not keep the radio with the antenna very close to, or touching exposed parts of the
body, while transmitting. TERA radios will perform best, if you speak 2-4 inches away
from the microphone and the radio is vertical.
• Be sure the “PTT” key is not pressed when you do not need to transmit.
• Do not operate the radio near unshielded electrical blasting caps or in an explosive
atmosphere.
• Do not transmit without the antenna fitted on the radio.
TR-505
35
Page 34

• Respect the environment conditions. The radio is designed to be used in heavy
environments, however avoid exposing it to extremely hot or cold temperature (out of
the range between –20 to +140°F). Do not expose the transceiver to excessive
vibrations as well as dusty or rainy locations.
• Never try to disassemble or service the radio by yourself (aside from the routine
maintenance described in this handbook). It may cause damage to the radio transceiver
and void your warranty requiring extensive repair work. Always contact your local
dealer for assistance.
• Use only authorized accessories. Using non TERA radio brand accessories may
36
seriously damage your handheld transceiver and void your warranty.
• Do Not spill liquid of any kind into your radio. If the transceiver gets wet, immediately
dry it by a soft and clean cloth.
• Switch the radio off before you clean it. Follow the directions described in the
paragraph “Care and maintenance”.
• Handle the battery properly. Never place the LI-ion battery in your pocket or purse with
loose coins. This could result in short circuiting the battery.
• Be certain that your power source matches the rating listed for the supplied battery
charger (AC adapter). If you are not sure, check with your authorized TERA dealer.
TERA
Page 35
• Avoid damaging the power cable of the battery charger. Do not step on or place
anything on it as this could result in a damaged charger power cord. This product
complies with the requirements of the Council Directives 89/336/EEC and
73/23/EEC on the approximation of the laws of the member states relating to
electromagnetic compatibility and low voltage.
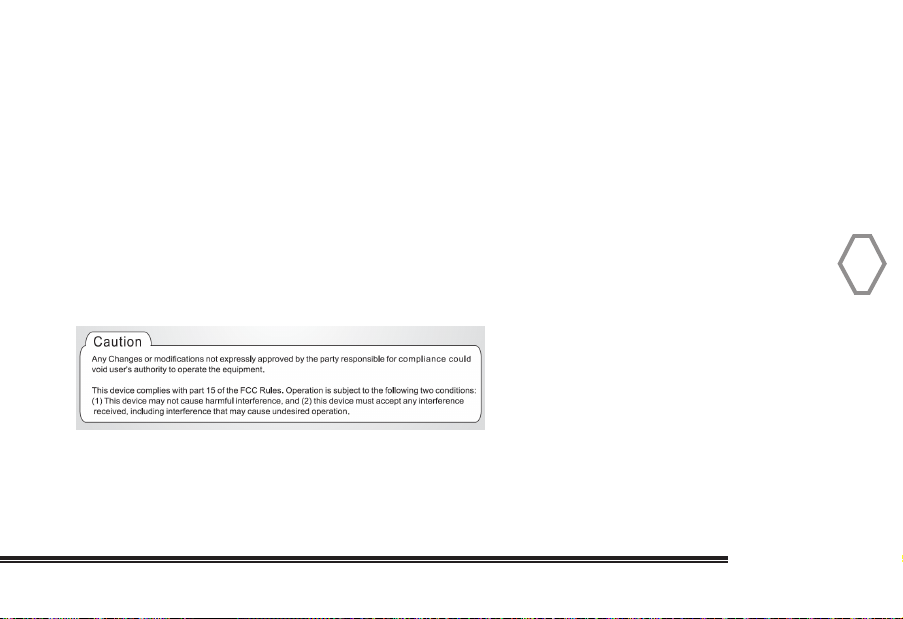
WARNING
Your wireless hand-held portable transceiver contains a low power transmitter. When
device is authorized to operate at a duty factor not to exceed 50% TX and 50% RX.
guidelines with safety levels for hand-held wireless devices. To maintain compliance
a separation distance of least 2 inches from your face. Speak in a normal voice, with the
clip is for storage purposes only. AVOID TRANSMITING ON HIGH POWER WHILE RADIO
sure the antenna is at least 2 inches from your body when transmitting.
the Push-to-Talk (PTT) button is pressed it sends out radio frequency (RF) signals. The
In August 1996, the Federal Communications Commission (FCC) adopted RF exposure
with the FCC’s RF exposure guidelines, this transmitter and it’s antenna must maintain
antenna pointed up and away from the face at the required separation distance. The belt
IS ATTACHED TO YOUR BELT. To transmit, hold the device away from your body and en
TR-505
37
-
Page 36

 Loading...