

User Manual
PowerWalker Basic VI STL Ser ies
600/800/1000/1200/1500/2200
IMPORTANT SAFETY INSTRUCTIONS
(SAVE THESE INSTRUCTIONS)
This manual contains important safety instructions. Please read and follow all instructions carefully during installatio n and
operation of the unit. Read this manual thoroughly before attempting to unpack, install, or operate your UPS.
CAUTION! To prevent the ri sk of fire or electric shock, install i n a temperature and humidity controlled i ndoor area free of
conductive contaminants. (See the specifications for the acceptable temperature and humidity range.)
CAUTION! To reduce the risk of overheating the UPS, do not cover the UPS' cooling vents and avoid exposing the unit to
direct sunlight or installing the unit near heat emitting appliances such as space heaters or furnaces.
CAUTION! Do not attach non-computer-related items, such as medical equipment, life-support equipment, microwave ovens,
or vacuum cleaners to UPS.
CAUTION! Do not plug the UPS input into its own output.
CAUTION! Do not allow liquids or any foreign object to enter the UPS. Do not place beverages or any other liquid-containing
vessels on or near the unit.
CAUTION! In the event of an emergency, press the OFF button and disconnect the power cord from the AC power supply to
properly disable the UPS.
CAUTION! Do not attach a power strip or surge suppressor to the UPS.
CAUTION! Unplug the UPS prior to cleaning and do not use liquid or spray detergent.
CAUTION! Servicing of batteries should be performed or supervised by personnel knowledgeable of batteries and the
required precautions. Keep unauthorized personnel away from batteries.
CAUTION! The battery supply should be therefore disconnected in the plus and minus pole at the quick connectors of the
battery when maintenance or service work inside the UPS is necessary.
CAUTION! Internal battery voltage is 12Vdc. Sealed, lead-acid, 6-cell battery.
CAUTION! When replacing the batteries, use the same number and type of batteries.
CAUTION! Do not dispose of batteries in a fire. The battery may explode. Do not open or mutilate the battery or batteries.
Released electrolyte is harmful to the skin and eyes.
INSTALLING YOUR UPS SYSTEM
UNPACKING
The box should contain the following:
(1) UPS Unit x1; (2) User Manual x 1;
OVERVIEW
The UPS provides automatic voltage regulation for inconsistent utility power, and provides battery backup during power
outages, and ensures consistent power to your computer system.
HARDWARE INSTALLATION GUIDE
1.Your new UPS may be used immediately upon receipt. However, recharging the battery for at least 8 hours is
recommended to ensure that the battery's maximum charge capacity is achieved. Charge loss may occur during shipping
and storage. To recharge the battery, simply leave the unit plugged into an AC outlet. The unit will charge in both the on
and off position.
2.With the UPS unit off and unplugged, connect the computer, monitor, and any externally powered data storage device
(Zip drive, Jazz drive, Tape drive), etc. into the battery power supplied outlets. DO NOT plug a laser printer, copier,
space heater, vacuum, paper
shredder or other large electrical device into the battery power supplied outlets. The power demands of these devices
will overload and possibly damage the unit.
3.Plug the UPS into a 2 pole, 3 wire grounded receptacle (wall outlet). Make sure the wall branch outlet is protected by a
fuse or circuit breaker and does not service equipment with large electrical demands (e.g. air conditioner, refrigerator,
copier, etc. Avoid using extension cords.
4.Press the power switch to turn the unit on. The power on indicator light will illuminate and the unit will "beep".
5.If an overload is detected, an audible alarm will sound and the unit will emit one long beep. To correct this, turn the UPS off
and unplug at least one piece of equipment from the battery power supplied outlets. Wait 10 seconds. Make sure the circuit
breaker / fuse is normal and then turns the UPS on.
6.To maintain optimal battery charge, leave the UPS plugged into an AC outlet at all times.
7.To store your UPS for an extended period, cover it and store with the battery fully charged. Recharge the battery every
three months to ensure battery life.
BASIC OPERATION
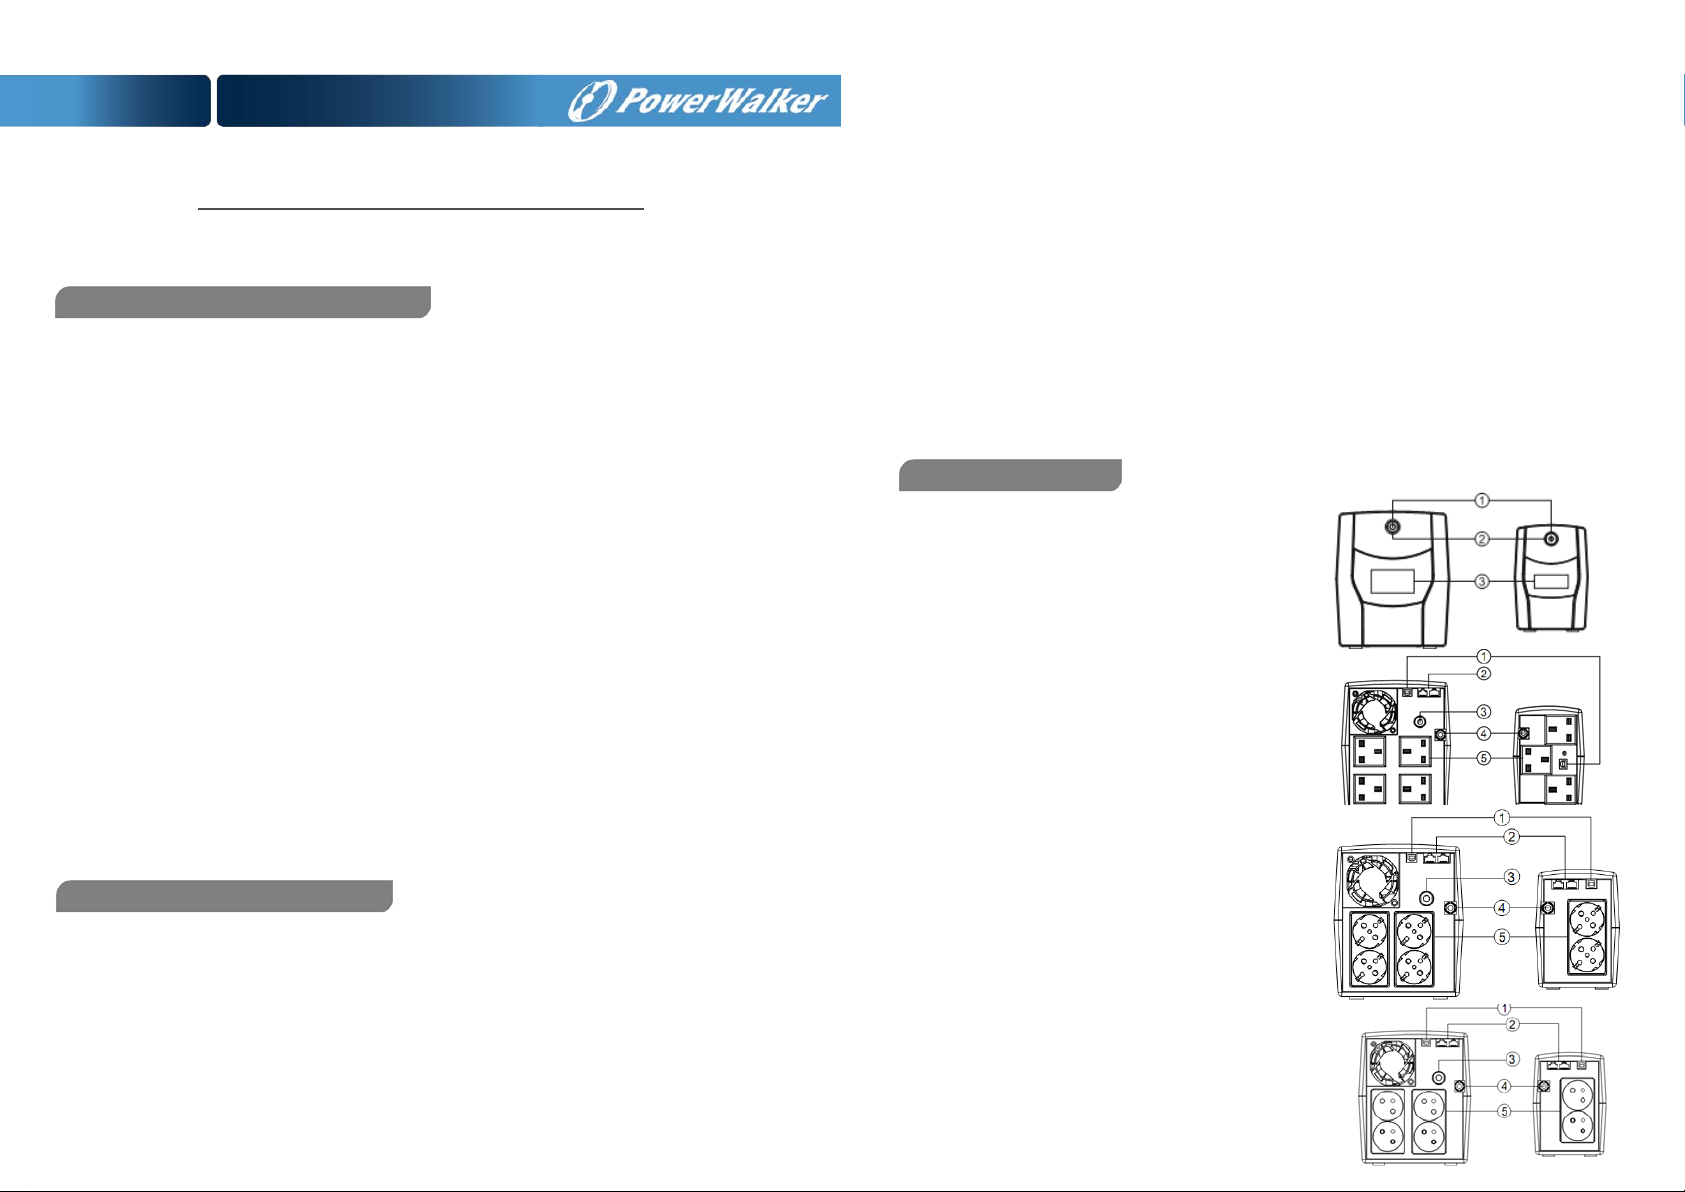
Front panel
1.LCD Display
The LCD will display the UPS status including input
voltage, output voltage, percentage of load and
battery…etc.
2.Power Switch
Press the switch for 2 seconds to turn the UPS
ON or OFF.
3.Led Indicators
This LED is illuminated when the UPS is working.
Rear panel
1. USB COMM. Port
This port allows connection and communication from
the USB port on the computer to the UPS unit.
2. RJ45/11 Communication Protection Ports
Communication protection ports will protect any
standard modem, fax, telephone line, or network
cable
3. Input Circuit Breaker
The circuit breaker provides optimal overload
protection.
4. Input power cord Connect to utility power.
5. Battery Backup & Surge Protected Outlets
Provide battery backup and surge protection. They
ensure power is provided to connected equipment
over a period of time during a power failure.
1200/1500/2200 600/800/1000
Model
VI 600 STL
VI 800 STL
VI 1000 STL
VI 1200 STL
VI 1500 STL
VI 2200 STL
Capacity(VA/W)
600/360
800/480
1000/600
1200/720
1500/900
2200/1320
Input
Voltage Range
162~290Vac
Nominal Frequency
50/60Hz
Output
On Battery Output Voltage
Simulated Sine Wave at 230Vac +/-10%
On Battery Output Fr e qu enc y
50/60Hz +/-1%
Overload Protection
Breaker / Fuse
Physical
Dimensions (W x H x D)(mm)
96 x 138 x 286
148 X 178 X 298
Battery
Sealed Maintenance
12V 7AH x1
12V 7.2AH x1
12V 9AH x1
12V 7AH x2
12V 7.2AH x2
12V 9AH x2
Free Lead Acid Battery
Typical Recharge Time
8 Hours
Warning Diagnostics
Indicators
Power On
Audible Alarms
On Battery, Low Battery, Overload, Fault
Environmental
Operating Temperature
Operating Relative Humidity
0 to 90%
Management
Auto-Charger
Yes
Auto-Restart
Yes
USB COMM. Port
Yes, with HID support
RJ45/11 Communication
Protection Ports
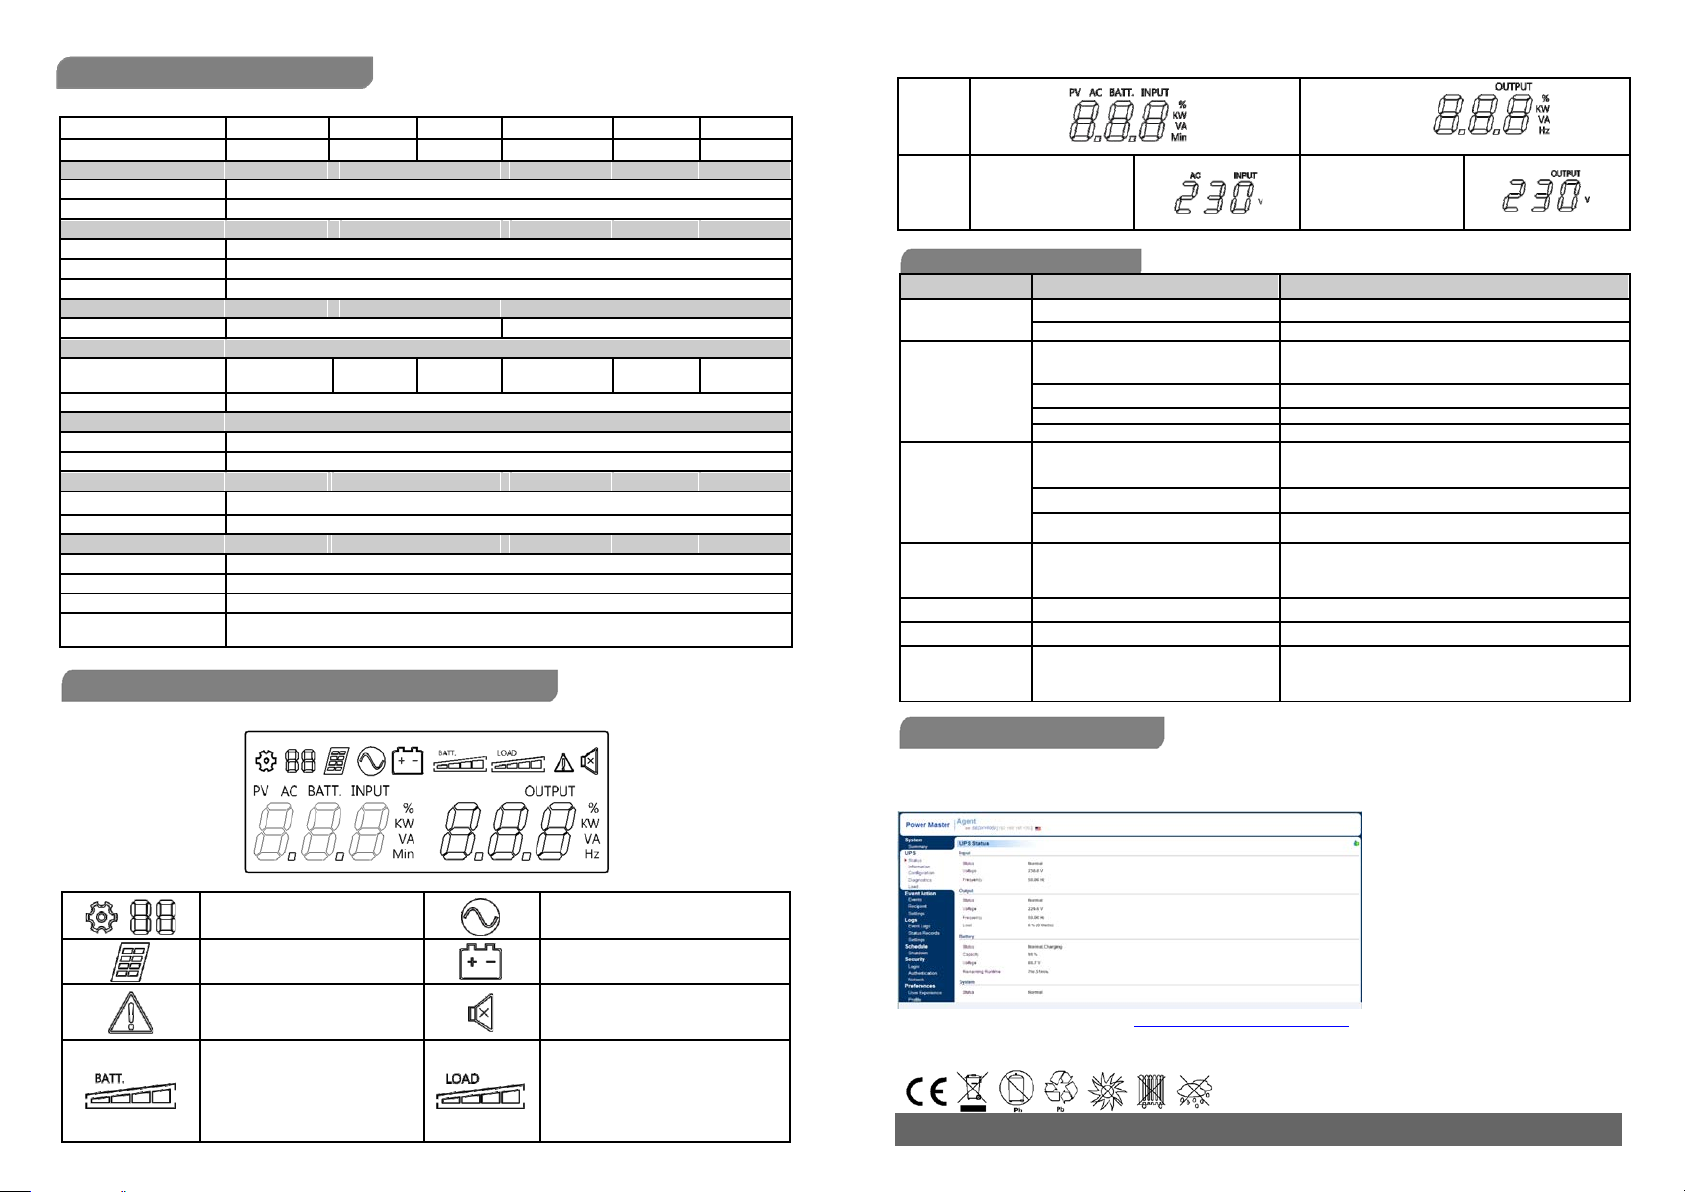
Setting Item Line mode
Reserved function
not available for this model
Bat-mode
Sound disable
Fault
(Press the display key 3s to disable
and enable the buzzer sound)
Bat mode: battery capacity
Line mode:
1.
Battery charging: cycle lighting
Load capacity
2.
Battery full charged: lighting
Initial
AC INPUT(Voltage)
OUTPUT
(Voltage)
V
V
Problem
Possible Cause
Solution
The UPS does not
runtime
Battery is slightly worn out.
Contact Technical Support.
ill not turn
The battery is worn out.
Contact Technical Support.
Mechanical problem.
Contact Technical Support.
Turn the UPS off and unplug at least one piece connected
Unit has been damaged by a surge or
spike
.
TECHNICAL SPECIFICATIONS
Line mode & Batt. Mode
TROUBLE SHOOTING
0℃ to 40℃
Yes, surge protection
DEFINITIONS FOR ILLUMINATED LCD INDICATORS
LCD Indication
perform expected
The UPS w
on.
Outlets do not
provide power to
equipment
Fault code F09
Fault code F12 Battery voltage is too low. Shutdown your computer and recharge the battery immediately
Fault code F13 Battery is overcharged. Contact Technical Support.
Fault code F14
Batteries are not fully charged. Recharge the battery by leaving the UPS plugged in.
The on/off switch is designed to prevent
damage by rapidly turning it off and on.
The unit is not connected to an AC outlet.
Circuit breaker is tripped due to overload
Batteries are discharged Allow the unit to recharge for at least 4 hours.
Output Short :
Output circuit short.
Overload occurs:
Your equipment requires more power than
the UPS can provide. It will shutdown.
Turn the UPS off. Wait 10 seconds and then turn the
UPS on.
The unit must be connected to a 230Vac 50/60Hz outlet.
equipment. Unplug the power cord of the UPS then press
the circuit breaker knob.
Contact Technical Support.
Shut down the UPS
Your attached equipment may have problems, please remove
them and check again.
Shut off non-essential equipment.
If this solves the overload problem, the UPS will transfer to
normal operation.
SOFTWARE DOWNLOAD
PowerMaster management software provides a user-friendly interface for your power systems. The graphic user interface is intuitive
and displays essential power information at a glance. Please follow procedure below to install the software.
Installation procedure:
1.Download PowerMaster from the website: http://powermaster.powerwalker.com/
2. Double-click the file and follow the installation steps.
When your computer restarts, the Power Master software will appear as a blue icon located in the system tray.
All rights reserved. Reproduction without permission is prohibited
Instrukcja Obsługi
Seria PowerWalker Basic VI STL
600/800/1000/1200/1500/2200
WAŻNE INSTRUKCJE BEZPIECZEŃSTWA
(ZACHOWAJ TĄ INSTRUKCJĘ)
Ta instrukcja zawiera ważne wskazówki dotyczące bezpieczeństwa. Proszę przeczytać i dokładnie przestrzegać wszystkich
uwag podczas instalacji i użytkowania urządzenia. Przeczytaj tą instruckję przed odpakowaniem urządzenia.
UWAGA! Aby uniknąć ryzyka pożaru lub porażenia prądem, należy urządzenie zainstalować w pomieszczeniu z
kontrolowaną wilgotnością i temperaturą wewnątrz budynku.
UWAGA! Aby uniknąć ryzyka przegrzenia urządzenia, nie należy przykrywać otworów wentylacyjnych, użytkować urządzenia
w pełnym słońcu ani przy urządzeniach emitujących ciepło (jak np. grzejniki)
UWAGA! UPS przeznaczony jest tylko do urządzeń komputerowych, nie należy podłączać urządzeń medycznych,
podtrzymujących życie, mikrofalówek, odkurzaczy itp
UWAGA! Nie należy podłączać UPS do swojego własnego wyjścia
UWAGA! Należy chronic UPS przed dostępem płynów lub jakichkolwiek obiektów do środka urzadzenia.
UWAGA! W nagłym przypadku należy nacisnąć przycisk OFF i odłączyć napięcie od urządzenia, aby prawidłowo wyłączyć
UPS z użytkowania
UWAGA! Nie należy podłączać rozgałęziaczy lub listw przeciwprzepięciowych do UPSa
UWAGA! Odłącz UPS przed czyszczeniem, nie używaj detergentów w spreju ani w płynie
UWAGA! Wymiana baterii powinna być wykonywana przez osobę do tego przeszkoloną.
UWAGA! Baterie powinny być odłączone (zacisk plus i minus) podczas pracy serwisowej wewnątrz UPSa.
UWAGA! Wewnętrzne napięcie baterii wynosi 12Vdc. Wewnątrz znajduje się akumulator kwasowo-ołowiowy z 6 komorami.
UWAGA! W przypadku wymiany baterii, należy użyć baterii o dokładnie takich samych parametrach
UWAGA! Elektrolit wewnątrz baterii jest niebezpieczny dla skóry i oczu. Zużytych baterii nie należy wyrzucać do śmieci.
ALACJA SYSTEMU UPS
ROZPAKOWYWANIE
Opakowanie powinno zawierać:
(1) UPS x1; (2) Instrukcja obsługi x 1;
OPIS
UPS reguluje niestabilne napięcie wejściowe oraz dostarcza napięcie z baterii podczas awarii sieci zabezpieczając ciągłą
pracę systemów komputerowych.
INSTALACJA URZĄDZENIA
1.Urządzenie może być używane bezpośrednio po rozpakowaniu. Jednak pełną sprawność urządzenie osiąga po pełnym
naładowaniu baterii, które trwa przynajmniej 8 godzin. Utrata ładunku baterii może nastapić podczas transportu i
magazynowania. Urządzenie rozpocznie automatycznie ładować baterie po podłączeniu zasilania (niezależnie czy wyjście
jest włączone czy wyłączone).
2.Podłącz urządzenia do wyjścia UPSa, nie podłączaj drukarek laserowych, kopiarek, ogrzewaczy, odkurzaczy,
niszczarek do papieru ani żadnych dużych urządzeń elektrycznych do UPSa (te urządzenia mogą przekroczyć
dopuszczalny limit mocy).
3.Podłącz wejście UPSa do dwubiegunowego, uziemionego gniazdka. Upewnij się, że gniazdko jest chronione
bezpiecznikiem albo wyłącznikiem nadprądowym.
4.Naciśnij przycisk ON. Dioda LED oznaczająca stan urządzenia włączy się, a urządzenie wyda sygnał dźwiękowy.
5.Jeśli przeciążenie zostanie wykryte, UPS wyda ciągły alarm dźwiękowy. Wyłącz UPS i odłącz część urządzeń
podłączonych do wyjścia. Odczekaj 10s, sprawdź czy żaden bezpiecznik nie został uszkodzony i włącz ponownie UPS.
6.Pozostaw UPS podłączony do sieci przez cały czas, aby automatycznie kontrolowany obwód ładowania baterii zapewnił jej
długą żywotność.
7.Przed długotrwałym magazynowaniem UPSa, naładuj baterie do pełna I spakuj UPS w oryginalne opakowanie. Naładuj
baterie (podłącz UPS do sieci na 8h) raz na 3 miesiące, aby zapewnic bateriom żywotność.
PODSTAWOWE OPERACJE
Przedni panel
1. Wyświetlacz LCD
Wyświetlacz LCD pokazuje status urządzenia,
włączając napięcie wyjścia I wejścia, poziom
naładowania baterii itp.
2. Przycisk ON/OFF
Naciśnij przycisk przez 2s aby włączyć lub
wyłączyć UPS.
3. Dioda LED
Dioda Led za przeciskiem świeci się podczas pracy
UPSa.
Tylni panel
1 1Port USB COMM.
Port umożliwia komunikacją z komputerem.
2 Zabezpieczenie portów RJ45/11
Zabezpieczenie przeciewprzepięciowe portów RJ45
lub RJ11 chroni modemy, faxy lub linie telefoniczne.
3 Wyłącznik nadprądowy wejściowy
Służy do ochrony przed przeciążeniem.
4 Przewód zasilający
Podłącz do gniazda napięcia.
5 Gniazda wyjściowe
Wszystkie gniazda oferują ochronę
przeciwprzepięciową, wybrane gniazda zapewnią
również zasilanie z baterii podczas awarii sieci.
1200/1500/2200 600/800/1000
Model
VI 600 STL
VI 800 STL
VI 1000 STL
VI 1200 STL
VI 1500 STL
VI 2200 STL
Moc (VA/W)
600/360
800/480
1000/600
1200/720
1500/900
2200/1320
Wejście
Zakres napięcia
162~290Vac
Częstotliwośc znamionowa
50/60Hz
Wyjście
Napięcie w trybie baterii
Simulowana sinusoida 230Vac +/-10%
Częstotliwośc w trybie baterii
50/60Hz +/-1%
Ochrona przeciwprzeciążeniu
Wyłącznik / Bezpiecznik
Obudowa
Wymiary (S x W x G)(mm)
96 x 138 x 286
148 X 178 X 298
Baterie
Akumulatory kwasowo-
12V 7AH x1
12V 7.2AH x1
12V 9AH x1
12V 7AH x2
12V 7.2AH x2
12V 9AH x2
ołowiowe
Typowy czas ładowania
8 godzin
Sygnalizacja
Diody
Włączony
Alarmy
Tryb baterii, słaba bacteria, przeciążenie, awaria
Środowisko
Zakres temperatury pracy
Zakres wilgotności pracy
0 do 90%
Kontrola
Automatyczne ładowanie
Tak
Automatyczny restart
Tak
Port USB
Tak, z obsługa HID
Ochrona RJ45/11
Przeciwprzepięciowa
Pozycja ustawień
Tryb pracy z sieci
Funkcja zarezerwowana
Niedostępne dla tego modelu
Tryb pracy z baterii
Alarm wyłączony
Awaria
(Naciśnij przecisk ON/OFF przez 3s aby
wyciszyć lub przywrócić alarm)
Tryb baterii: poziom naładowania
Tryb sieci:
1.
Ładowanie: mruganie w kolejności
Poziom obciążenia
2.
Naładowane: zapalone
WEJŚCIE AC (NAPIĘCIE)
WYJŚCIE
(Napięcie)
V
V
Problem
Possible Cause
Solution
Czas pracy na baterii
Pozostaw UPS podłączony do sieci na kilkanaście godzin aby
naładować baterie
Baterie są już trochę zużyte
Należy wymienić baterie
Baterie są już całkowicie zużyte
Nalezy wymienić baterie
Uszkodzenie mechaniczne
Skontaktuj się z support.powerwalker.com
Brak napięcia na
UPS rozłączył napięcie ze względu na
przeciążenie
Wyłącz UPS, odłącz część obciążeń. Sprawdź czy bezpiecznik
się nie przepali ł, włącz UPS.
Pozostaw UPS podłączony do sieci na kilka godzin aby
naładować baterie
UPS został uszkodzony przez przepięcie w
sieci przekraczające jego limit
Zwarci a na wy jściu
Skontaktuj się z support.powerwalker.com
SPECYFIKACJA TECHNICZNA
Tryb sieci I tryb baterii
ROZWIĄZYWANIE PROBLEMÓW
OPIS WYŚWIETLACZA
Wyświetlacz LCD
0℃ do 40℃
jest zbyt krótki
UPS nie włącza się
wyjściu
Kod F09
Kod F12 Napięcie baterii jest za niskie Wyłącz komputer I naładuj baterie
Kod F13 Napięcie baterii jest za wysokie
Kod F14 Przeciążenie Odłącz część obciążeń.
Baterie nie są w pełni naładowane
Zbyt krótkie naciskanie przycisku
UPS nie jest podłączony do sieci
Baterie są rozładowane
Wyłącz UPS, odłącz obciążenie I sprawdź potencjalne zwarcia
Aby włączyć lub wyłączyc UPS należy trzymać przycisk przez
ponad 10s
Sprawdź czy UPS jest prawidłowo podłączony do sieci
Skontaktuj się z support.powerwalker.com
ŚCIĄGNIJ OPROGRAMOWANIE
Oprogramowanie PowerWalker PowerMaster zapewnia przyjazdy interfejs do kontroli I monitorowania UPSa.Intuicyjny interfejs
graficzny pozwala szybko zorientować się o stanie urządzenia jak i ustawić wymagane parametry.
Procedura instalacji:
1.Ściągnij oprogramowanie ze strony: http://powermaster.powerwalker.com/
2.Otwórz plik I podążaj za instrukcjami installatora.
Po zrestartowaniu komputera, program pojawi się w zasobniku systemowym.
Wszelkie prawa zastrzeżone. Powielanie bez zgody jest zabronione.
K01-C000439-00

Manual d’utilisateur
PowerWalker Basic VI STL Series
600/800/1000/1200/1500/2200
CONSIGNES DE SÉCURITÉ IMPORTANTE
(Conservez ces instructions)
Ce manuel contient des instructions de sécurité importantes. Veuillez lire et suivre attentivement toutes les
instructions lors de l'installation et de l'utilisa tion de l'appareil. Lisez atte ntivement ce manuel avant de dé baller,
d'installer ou de faire fonctionner votre onduleur.
ATTENTION! Pour éviter tout risque d'incendie ou de choc électrique, installer L'onduleur á l'intérieur dans un endroit
ou de température et d'humidité pourront être contrôlés. (Voir les spécifications pour la plage acceptable de
température et d'humidité.)
ATTENTION! Pour réduire le risque de surchauffe de l'onduleur, ne couvrez pas les orifices de refroidissement de l'onduleur
et évitez d'exposer l'appareil à la lumière directe du soleil ou de l'installer à proximité d'appareils émettant de la chaleur, tels
que les appareils de chauffage ou les générateurs d'air chaud.
ATTENTION!
micro-ondes ou des aspirateurs à cet onduleur à cet onduleur.
ATTENTION! Ne branchez pas l'entrée de l'onduleur sur sa propre sortie.
ATTENTION! Ne laissez aucun liquide ou corps étranger pénétrer dans l'onduleur. Ne placez pas de boissons ou tout autre
récipient contenant des liquides sur l'appareil ou à proximité de celui-ci.
ATTENTION! En cas d'urgence, appuyez sur le bouton OFF et débranchez le cordon d'alimentation du secteur pour
désactiver correctement l'onduleur.
ATTENTION! N'attachez pas de barrette d'alimentation ou de parafoudre à l'onduleur.
ATTENTION! Débrancher l'onduleur avant le nettoyage et ne pas utiliser de liquide ou de détergent en aérosol.
ATTENTION! L'entretien des batteries doit être effectué ou supervisé par du personnel qualifier. Tenez le personnel non
autorisé éloigné des batteries.
ATTENTION! L'alimentation de la batterie doit donc être déconnectée du le pôle positif et négatif au niveau des connecteurs
rapidement lorsque des travaux de maintenance ou d'entretien à l'intérieur de l'onduleur sont nécessaires.
ATTENTION! La tension interne de la batterie est de 12Vdc. Batterie scellée, au plomb-acide, 6 cellules.
ATTENTION! Lors du remplacement des batteries, utiliser le même nombre et le même type de batteries.
ATTENTION! risque d'explosion si vous jetez les batteries au feu. Ne pas ouvrir ou mutiler la batterie. L'électrolyte libéré est
nocif pour la peau et les yeux.
Ne connectez pas les appareils tels que, du matériel médical, de l'équipement de survie, des fours à
INSTALLATION DE VOTRE SYSTEME D’ONDULEUR
DÉBALLAGE
L’emballage doit cont eni r des él ém en t sui va nt: un on dul eur et un man uel d’uti l i sati o n
OVERVIEW
L'onduleur régule automatiquement la tension du secteur pour une alimentation électrique, et fourni une alimentation
secours pendant les pannes de courant grâce á une batterie. il assure une alimentation électrique constante à votre
système informatique.
GUIDE D’INSTALATION DU MATÉRIEL
1. Votre nouvel onduleur peut être immédiatement utilisé. Cependant, il est recommandé de recharger la batterie pendant au
moins 8 heures pour s'assurer que la capacité de charge maximale de la batterie est atteinte. Une perte de charge peut
survenir pendant l'expédition et le stockage. Pour recharger la batterie, laissez simplement l'appareil branché dans une
prise secteur. L'appareil se charge en mode marche et arrêt.
2. Une fois l'onduleur hors tension et débranché, branchez l'ordinateur, le moniteur et tout périphérique de stockage
de données alim e nt é en externe (lect e ur Zi p, lecteur Ja zz, l e cte ur d e bande, etc.) dans les prises d'alimentation de
la batterie.
déchiqueteur de p apier ou tout autre gros a ppareil électrique dans les prises d'alimentation de l a batterie. Les
demandes d’alimentation de ces appareils surchargerons et endommagerons l’onduleur.
3. Branchez l'onduleur dans une prise 2 pôles à 3 fils avec mise à la terre (prise murale). Assurez-vous que la prise
4. Appuyez sur le bouton ON pour allumer l'appareil. Le voyant de mise sous tension s'allume et l'appareil émet un bip
sonore.
5. une surcharge est détectée, une alarme sonore retentira et l'appareil émettra un long bip. Pour y remédier,
éteignez l'onduleu r et débranchez au moins un e pièce d'équipement des pris es d'alim e nt a tion de la bat terie.
Attendez 10 secondes. Assurez-vous que le disjoncteur / fusible est normal et allume l'onduleur.
6. Pour maintenir une charge optimale de la batterie, laissez l'onduleur branché en tout temps sur une prise secteur.
7. Pour stoker votre onduleur pendant une longue période, couvrez-le et conservez-le avec la batterie complètement
chargée. Recharger la batterie tous les mois pour assurer sa durée de vie.
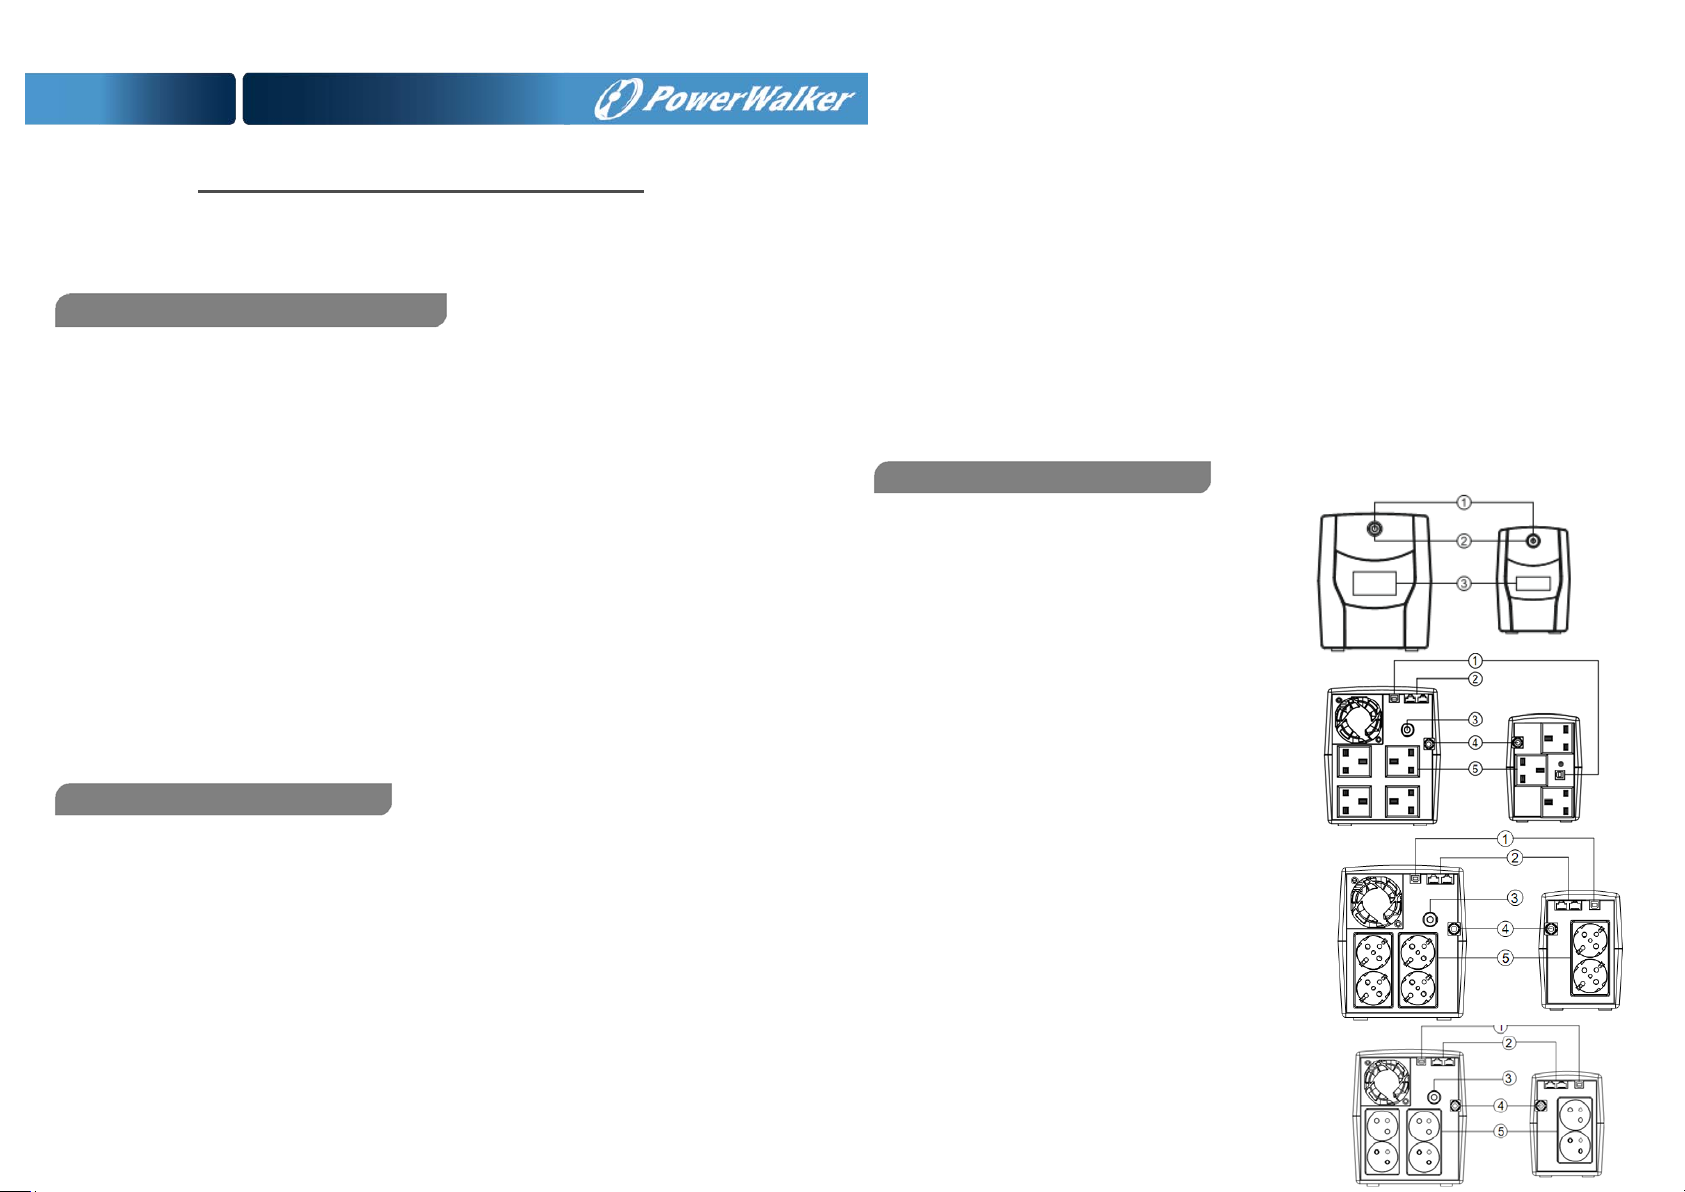
Panneau frontal
1. Afficheur LCD
2. Interrupteur d’alimentation
3. témoin LED
Panneau arrière
1 Port de communication USB
2 Ports RJ45/11 de Protection de communication
3 Disjoncteur d’entrée
4 Brancher le cordon alimentation au secteur.
5 Autonomie de la batterie et protection des pri ses
Ne branchez pas une imprimante laser, un copieur, un appareil de chauffage, un aspirateur, un
murale est protégée par un fusible ou un disjoncteur et qu'elle n'alimente pas les équipements qui exigent beaucoup
d'électricité (par exemple, climatiseur, réfrigérateur, photocopieur, etc.
OPERATION BASIC
.
1200/1500/2200 600/800/1000
L’écran LCD affiche l’état de l’onduleur, y compris la
tension d’entrée, la tension de sortie, le pourcentage
de charge et de batterie…etc.
Appuyer sur le bouton ON/OFF pour allumer et
éteindre l’onduleur.
Le témoin LED s’allume lorsque l’onduleur fonctionne
Ce port permet la connexion entre l’ordinateur et
l’onduleur.
Ce port protégé tous les modems standard, fax,
ligne téléphonique ou câble de réseau
Il assure la protection optimale contre la
surcharge
contre la surtension
Prévoir l’autonomie et la protection des prises contre la
surtension. Il assure que l’équipement raccordé est
alimenté pendant une panne d’électricité.

Modèles
VI 600 STL
VI 800 STL
VI 1000 STL
VI 1200 STL
VI 1500 STL
VI 2200 STL
Puissance (VA/W)
600/360
800/480
1000/600
1200/720
1500/900
2200/1320
Entrée
Gamme de tension
162~290Vac
Fréquence nominal
50/60Hz
sortie
Tension de sortie batterie
Simulated Sine Wave at 230Vac +/-10%
Frequence sorti e ba tterie
50/60Hz +/-1%
Protection anti-surcharge
Breaker / Fuse
Dimension
Dimensions (W x H x D)(mm)
96 x 138 x 286
148 X 178 X 298
Batteries
Type VRLA à plomb étanche
12V 7AH x1
12V 7.2AH x1
12V 9AH x1
12V 7AH x2
12V 7.2AH x2
12V 9AH x2
sans entretien
Temps de recharge
8 Hours
Avertisements
Indicateurs
Mise sous tension
Alarmes audible
Mode batterie, batterie faible, surcharge, faute
Environment
Temperature de
fonctionnement
Humidité relative
d’exploitation
0 à 90%
Management
Auto-Chargeur
oui
Re-demarrage automatique
oui
USB COMM. Port
oui, con HID
RJ45/11 de protection
Communication
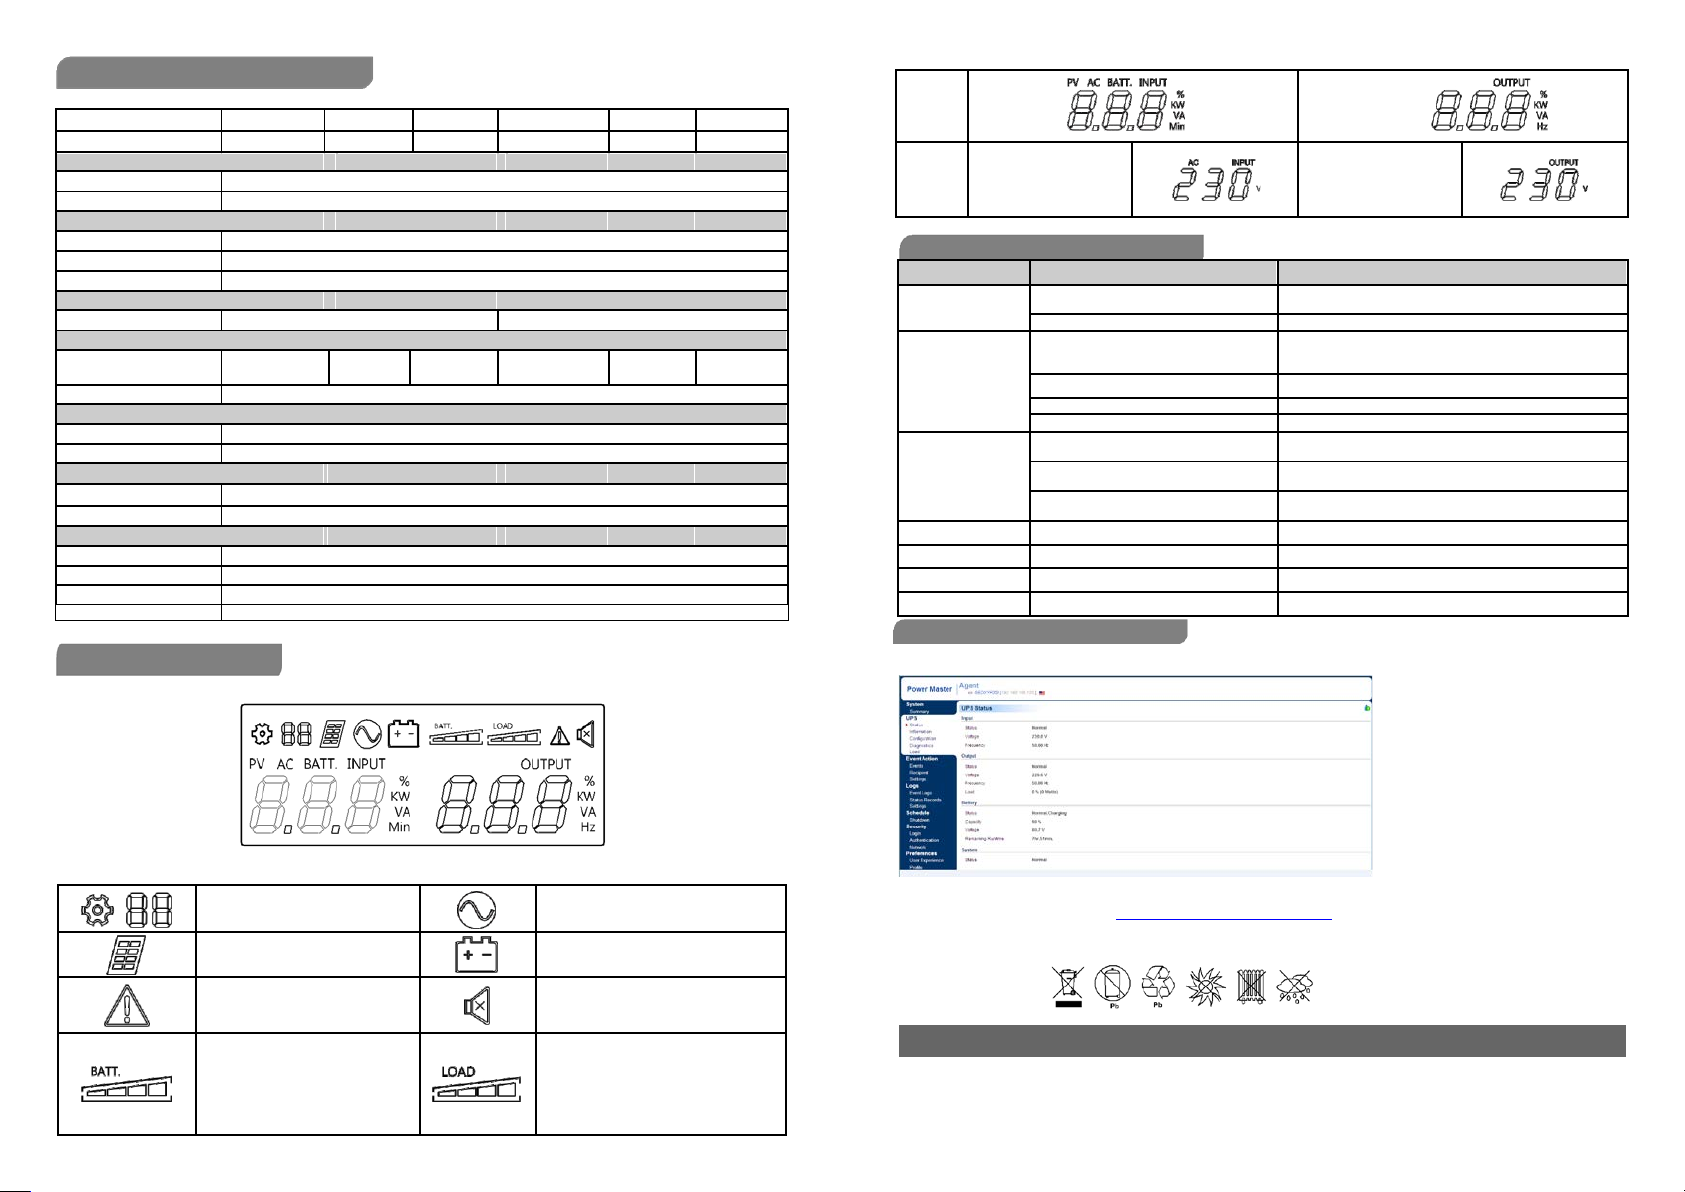
Réglage
Mode line-interactive
PV mode Mode Batteries
Désactivé le son
Faute
(Appuyer sur la touche d’affichée 3s pour
désactiver et activer le signal sonore)
Mode Batterie: capacité de la batterie
Mode Line-interactive:
1.
Battery charging: cycle lighting
Capacité de la Charge
2.
Battery full charged: lighting
Line mode without charger:
battery capacity
Initial
ENTRÈE AC (Tension)
SORTIE
(Tension)
V
V
Problème
Possible Causes
Solutions
L’onduleur ne
prévu
Batterie légèrement usée.
Replace the battery
Le bouton on/off protège l’onduleur des
allumant et s’étteignant
rapidement
Eteignez
Attendre 10 secondes puis allumez de nouveau
l’onduleur
L’onduleur doit etre raccordé á une prise 230 V 50/60 Hz
La batteries est usée
Contactez le support technique
problème mechanique.
Contactez le support technique
Eteidre l’onduleur de debrancher au moins une des charges
connectée. Debrancher le cordon d’alimentation puis appuyer sur
le disjoncteur
puissance que l'onduleur ne peut en fournir.
SPECIFICATIONS TECHNIQUES
Mode line-interactive & Mode batterie
DÉPANNAGE
oui, protection antisurtension
DEFINITIONS DES INDICATEURS LCD ECLAIRES
Indicateurs LCD
0℃ à 40℃
fonctionne pas comme
El UPS no se
enciende.
Les prises du secteur
ne fournissent plus
d’énergie à
l’équipement
Code d'erreur F09
Code d'erreur F12 La tension de la batterie est trop basse. Eteignez votre ordinateur et rechargez immédiatement la batterie
Code d'erreur F13 Batterie surchargée. Contactez le support technique.
Code d'erreur F14
Batteries pas correctement chargée Recharge the battery by leaving the UPS plugged in.
pannes en s’
L’onduleur n’est pas branché sur le secteur
Disjoncteur déclenche en cas de surcharge
Batteries sont déchargées Laissez l’onduleur se recharger pendant au moins 4 heures
L’appareil a été endommagé par une sur- Contacter le support technique http://support.powerwalker.com
Tension ou une pique de tension Contacter le support technique http://support.powerwalker.com
Sortie Courte:
court-circuit á la sortie.
Une surcharge se produit:
Votre équipement nécessite plus de
Il s'éteindra.
l’onduleur.
Arretez l’onduleur
Votre équipement attaché peut avoir des problèmes, veuillez l’
enlever et vérifier de nouveau.
débrancher l'équipement non essentiel.
Si cela résout le problème de surcharge, l'onduleur passera en
fonctionnement normal.
TÉLÉCHARGEMENT DU SOFTWARE
Le logiciel de gestion PowerMaster fournit une interface conviviale pour vos systèmes d'alimentation. L'interface
Utilisateur graphique est intuitif et affiche en un coup d'œil les informations essentielles sur la puissance. Veuillez
suivre la procédure ci-dessous pour installer le logiciel
Procédure d’installation :
1. Téléchargez PowerMaster à partir du sit e Web:
http://powermaster.powerwalker.com/
2. Double-cliquez sur le fichier et suivez les étapes
D’installation. Lor sq ue votr e ordinateur redémar re, le logiciel PowerMaster apparaît sous la forme d’une icône
Bleu situé sur la barre de tâche.

Manual do Utilizador
PowerWalker VI STL Series
600/800/1000/1200/1500/2200
INSTRUÇÕES DE SEGURANÇA IMPORTANTES
(GUARDE ESTAS INSTRUÇOES)
Este manual contém instruções de segurança importantes. Leia e siga todas as instruções cuidadosamente durante a
instalação e operação da unidade. Leia este manual detalhadamente antes de tentar desembalar, instalar ou operar a sua
unidade UPS.
CUIDADO! Para evitar o risco de incêndio ou choque el étrico, instale numa área interior com temperatura e humidade
controlada e livre de condutores contaminantes. (Veja as especificações para o intervalo de temperatura e humidade
aceitável).
CUIDADO! Para reduzir o risco de sobreaquecimento da UPS, não cubra os orifícios de ventilação e evite expor a unidade à
luz solar direta ou instalando a unidade perto de aparelhos que emitem calor, como aquecedores ou fornos.
CUIDADO! Não ligue equipamentos não relacionados ao computador, como equipamentos médicos, equipamentos de
suporte de vida, fornos de microondas ou aspiradores.
CUIDADO! Não ligue a entrada da UPS á sua própria saída.
CUIDADO! Não permita que líquidos ou objetos estranhos entrem na UPS. Não coloque bebidas ou quaisquer outros
recipientes contendo líquido sobre a unidade.
CUIDADO! Em caso de emergência, pressione o botão DESLIGAR e desligue o cabo de alimentação da fonte AC para
desativar completamente a UPS.
CUIDADO! Não ligue extensões electricas ou supressores de ruido á UPS.
CUIDADO! Desligue a UPS antes de limpar e não use detergente líquido ou spray.
CUIDADO! A manutenção das baterias deve ser realizada ou supervisionada por técnico especializado em baterias.
Mantenha pessoal não autorizado longe das baterias.
CUIDADO! Quando necessário manutenção ou serviço no interior da UPS, deve desligar o fornecimento de corrente da
baterias nos polos positivo e negativo.
CUIDADO! A voltagem interna da bateria é de 12Vdc. Bateria de 6 células do tipo Selada, Chumbo-Acido.
CUIDADO! Quando substituir baterias use a mesma referência e tipo de baterias.
CUIDADO! Não exponha as baterias ao fogo. A bateria pode explodir. Não abra ou quebre a bateria ou as baterias. O
eletrólito libertado é prejudicial à pele e aos olhos.
INSTALAÇÃO DA UPS
DESEMBALAR
A embalagem deve conter o seguinte:
(1) UPS x1; (2) Manual Utilizador x 1;
VISÃO GERAL
A UPS assegura a regulação automática da tensão quando a entrada de corrente é inconsistente e fornece autonomia de
bateria durante os cortes de energia, garantindo um fornecimento constante ao seu sistema informático.
GUIA DE INSTALAÇÃO DA UNIDADE
1.A sua nova UPS pode ser usada imediatamente após receber. No entanto, deve carregar a bateria durante pelo menos 8
horas para garantir que a carga máxima da bateria seja alcançada. A perda de carga pode ocorrer durante o transporte e
armazenamento. Para recarregar a bateria, deixe a unidade ligada a uma tomada AC. A unidade irá carregar em ambas
as posições, esteja ligada ou desligada.
2.Com a UPS desligada no interrutor e cabo de alimentação AC, ligue o computador, o monitor e qualquer dispositivo de
armazenamento de dados alimentado externamente (unidade Zip, unidade Jazz, unidade de fita, etc. ás tomadas
fornecidas pela bateria. NÃO ligue impressora a laser, copiadora , aquecedor ambiente, vácuo, triturador de papel ou
outro grande dispositivo elétrico nas tomadas fornecidas pela bateria. Os requisitos energéticos desses dispositivos
vão sobrecarregar e possivelmente danificar a unidade.
3.Ligue a UPS a uma tomada de parede AC com ligação á terra (tomada 3 fios). Certifique-se de que a saída da tomada da
parede está protegida por um fusível ou disjuntor e não estão ligados equipamentos com grandes requisitos elétricos (por
exemplo, ar-condicionado, frigorífico, copiadora, etc. Evite usar cabos de extensão.
4.Pressione o interruptor de alimentação para ligar a unidade. A luz indicadora de alimentação acenderá e a unidade irá dar
sinal sonoro "beep".
5.Se for detectada uma sobrecarga, ouvirá um sinal de alarme e a unidade emitirá um sinal sonoro longo. Para corrigir isso,
desligue a UPS e pelo menos um equipamento das tomadas fornecidas pela bateria. Aguarde 10 segundos. Verifique se o
disjuntor / fusível está normal e depois volte a ligar a UPS.
6.Para manter a carga ideal da bateria, deixe a UPS permanentemente ligada a uma tomada de alimentação AC..
5. Se pretende armazenar a sua UPS por um período prolongado, cubra-a e guarde com a bateria totalmente
carregada. Deve recarregar a bateria a cada três meses para garantir a vida da bateria.
OPERAÇÃO BASICA
Painel Frontal
1.Ecran LCD
O ecran LCD da UPS mostra o seu estado incluindo
tensão de entrada, tensão de saída, capacidade
usada e nivel de bateria.
2.Interruptor Alimentação
Pressione o interruptor durante 2 segundos para
ligar ou desligar a UPS.
3.Indicadores Led
Este LED fica iluminado quando a UPS está em
funcionamento.
Painel Traseiro
1. Porta Comunicação USB
Esta porta permite comunicação pela porta USB entre
o computador e a UPS.
2. Proteção Rede RJ45/11
Proteção a portas de comunicação irá proteger
qualquer porta standard modem, fax, tel ephone ou
cabo de rede.
3. Fusível Entrada
O fusivel de entrada garante proteção contra
sobrecargas na entrada de corrente.
4. Cabo Entrada Liga o cabo á tomada AC .
5. Tomadas Autonomia Bateria e Proteção a Picos
Fornece a autonomia dada pela bateria e proteção a
picos de corrente. Garantem alimentação ao
equipamento ligado num periodo de temp o durante a
falha de energia.
1200/1500/2200 600/800/1000

Modelo
VI 600 STL
VI 800 STL
VI 1000 STL
VI 1200 STL
VI 1500 STL
VI 2200 STL
Capacidade(VA/W)
600/360
800/480
1000/600
1200/720
1500/900
2200/1320
Entrada
Variação Tensão
162~290Vac
Frequencia Nominal
50/60Hz
Saída
Tensão Saida em Bateria
Onda Sinusoidal Simulada a 230Vac +/-10%
On Battery Output Fr e qu enc y
50/60Hz +/-1%
Proteção Sobrecarga
Fusivel
Dimensões Físicas
Dimensões (W x H x D)(mm)
96 x 138 x 286
148 X 178 X 298
Baeria
Bateria Selada Chumbo
Acido Sem Manutenção
12V 7AH x1
12V 7.2AH x1
12V 9AH x1
12V 7AH x2
12V 7.2AH x2
12V 9AH x2
Tempo Recarga Típico
8 Hours Avisos Diagnósticos
Indicadores
Ligado
Audible Alarms
Em bateria, Bateria Baixa, Sobrecarga, Falha
Ambiente
Temperatura Operação
Humidade Relativa em
Operação
0 to 90%
Gestão
Carregamento Automático
Sim
Reinício Automático
Sim
Porta USB
Sim, com suporte HID support
Portas Proteção RJ45/11
Item Configuração
Modo Linha
Função Reservada
Não disponivel neste modelo
Modo-Bat
Som desativado
Falha
(Pressione botão 3s para desativar e ativar o
som do alarme
Modo Bat: capacidade bateria
Modo Linha:
1.
Carregar Bateria: pisca
Capacidade de Carga
2.
Bateria carregada: ligado
Inicial
Entrada AC
V
SAÍDA
(Voltagem)
V
Problema
Causa Possiveis
Solução
não tem a
Bateria ligeiramente gasta.
Contacte Apoio Técnico.
O interruptor on/off destina-se a prevenir
danos podendo rapidamente desligar ou ligar
a unidade.
A unidade não está ligada á tomada de
alimentação AC.
A bateria está gasta.
Contacte Apoio Técnico.
Problema mecânico
Contacte Apoio Técnico.
A tomada de saida
não fornece energia
ao equipamento
Fusivel disparou ou queimou devido a
Desligue a UPS e retire o cabo de ali m ent ação de um equipamento
pressione o
botão do fusivel para dent ro.
A unidade foi afetada por descarga ou pico
de corrente.
Desligue a UPS
verifique novamente.
Ocorreu Sobrecarga:
desligar.
ESPECIFICAÇÕES TECNICAS
Modo Linha e Modo Bateria
(voltagem)
RESOLUÇÃO PROBLEMAS
DEFINIÇÕES PARA INDICADORES LUMINOSOS
Indicadores LCD
Bateria não está completamente carregada. Recarregue a bateria deixando a UPS ligada á corrente.
A Turn the UPS off. Wait 10 seconds and then turn the
UPS on.
Ligue a unidade a uma tomada 230Vac 50/60Hz.
sobrecarga
Baterias estão descarregadas Deixe a unidade recarregar pelo menos 4 horas.
O seu equipamento requer mais potencia
do que a UPS consegue fornecer. Irá
Desligue o c abo de alimen tação da UPS e, em seguida,
Contacte Apoio Técnico.
O seu equipamento ligado pode ter problemas, remova-o e
Desligue o seu computador e recarregue imediatamente a
bateria.
Desligue equipamento desnecessário.
Se isso resolver o problema, a UPS entra em modo normal de
operação.
ligado de uma peça.
0℃ to 40℃
Sim, proteção a picos
A UPS
autonomia esperada
A UPS não liga.
ligado.
Falha codigo F09 Problem na Saida : Saida em curto-circuito.
Falha codigo F12 Tensão da Bateria muito baixa.
Falha codigo F13 Bateria em sobrecarga. Contacte Apo io Técnico.
Falha codigo F14
SOFTWARE DOWNLOAD
O software de gestão PowerMaster fornece ao Utilizador um interface amigável para os seus sistemas de energia. Tem um interface
gráfico intuitivo e exibe informações essenciais e de acesso rápido. Siga o procedimento abaixo para instalar o software.
Procedimentos de instalação:
1. Descarrgue o PowerMaster da página: http://powermaster.powerwalker.com/
2. Faça duplo cliqe no ficheiro e siga os passos de instalação.
Após reiniciar o computador, o PowerMaster parecerá omo um icon azul localizado na bandeja de Sistema.
Todos direitos reservados. Reprodução poibida sem permissão.

Ръководство за потребителя
PowerWalker VI STL Серия
600/800/1000/1200/1500/2200
ВАЖНИ ИНСТРУКЦИИ ЗА БЕЗОПАСНОСТ
(ЗАПАЗЕТЕ ТЕЗИ ИНСТРУКЦИИ)
Моля, прочетете и следвайте всички инструкции внимателно по време на инсталирането и работата на устройството.
Прочетете внимателно това ръководство, преди да опитате да работите с вашето UPS устройство.
ВНИМАНИЕ! За да предотвратите риска от пожар или токов удар, монтирайте в контролирано за температура и
влажност помещение без проводими замърсители. (Вижте спецификациите за приемливия диапазон на
температурата и влажността.)
захранващите изводи на батерията. НЕ свързвайте лазерен принтер, ксерокс, отоплителен уред, прахосмукачка,
уред за
ВНИМАНИЕ! За да се намали рискът от прегряване на UPS устройството, не покривайте охлаждащите отвори на UPS
устройството и избягвайте излагането на уреда на пряка слънчева светлина или инсталирането му в близост до
уреди, излъчващи топлина, като нагреватели или фурни.
ВНИМАНИЕ! Не свързвайте към UPS устройството уреди, които не са свързани с компютър, като медицинско
оборудване, животоподдържащо оборудване, микровълнови фурни или прахосмукачки.
ВНИМАНИЕ! Не включвайте UPS устройството в неговия собствен изход.
ВНИМАНИЕ! Не позволявайте течности или други чужди обекти да влязат в UPS устройството. Не поставяйте
напитки или други съдове, съдържащи течности, върху или близо до устройството.
ВНИМАНИЕ! В случай на спешност, натиснете бутона OFF (ИЗКЛ.) и изключете захранващия кабел от
променливотоковото захранване, за да изключите правилно UPS устройството.
ВНИМАНИЕ! Не свързвайте оголен електрически проводник или устройството за защита срещу пренапрежение към
UPS устройството.
ВНИМАНИЕ! Преди да почиствате UPS устройството, го откачете от кабелите и не използвайте течен почистващ
препарат или спрей.
ВНИМАНИЕ! Обслужването на батериите трябва да се извършва или да се контролира от персонал, който е запознат
с батериите и изискваните предпазни мерки. Неоторизирания персонал пазете далеч от батериите.
ВНИМАНИЕ! Батерията трябва да се изключи в плюсовия и минусовия полюс на бързите конектори на батерията, ако
се налага извършване на техническа поддръжка или сервизна дейност по UPS устройството.
ВНИМАНИЕ! Когато подменяте батериите, използвайте същия номер и тип батерии.
ВНИМАНИЕ! Не излагайте батериите на огън. Батерията може да експлодира. Не отваряйте или не повреждайте
батерията или батериите. Освободеният електролит е вреден за кожата и очите.
ИНСТАЛИРАНЕ НА ВАШАТА UPS-СИСТЕМА
РАЗОПАКОВАНЕ
Кутията трябва да съдържа следното:
(1) UPS устройство x1; (2) Ръководство за потребителя x 1;
РЪКОВОДСТВО ЗА ХАРДУЕРНА ИНСТАЛАЦИЯ
1. Вашият нов UPS може да бъде използван веднага след получаването му. Препоръчително е, обаче, зареждане на
батерията за поне 8 часа, за да се подсигури достигането на максималния капацитет на зареждане на батерията.
По време на доставката или съхранението на устройството може да са възникнали загуби в заряда на батерията.
За да презаредите батерията, просто включете устройството в изход с променливотоково захранване (AC).
Устройството ще се зареди както във включено, така и в изключено положение.
раздробяване на хартия или друго голямо електрическо устройство в захранващите изводи на батерията.
Захранването на тези устройства ще претовари и в крайна сметка ще повреди устройството.
2. С изключено и извадено от контакта UPS устройство свържете компютъра, монитора и всяко външно захранващо
се устройство за съхранение на данни (Zip устройство, Jazz устройство, лентово устройство) и т.н. в
3.Свържете UPS устройството в 2-полюсна, 3-жилна заземена розетка (контакт на стената). Уверете се, че стенният
контакт е защитен с предпазител или прекъсвач и не обслужва уреди с големи електрически изисквания (напр.
климатик, хладилник, копирна машина и др. Избягвайте използването на удължителни кабели.
4. Натиснете превключвателя на захранването, за да включите устройството. Индикаторът за включване на
захранването ще светне и уредът ще издаде звуков сигнал “бийп”.
5. Ако е открито претоварване, звуковата аларма ще се включи и от устройството ще прозвучи дълъг звуков сигнал.
За да коригирате това, изключете UPS устройството и извадете поне едно от устройствата от захранващите изводи
на батерията. Изчакайте 10 секунди. Уверете се, че прекъсвачът / предпазителят е в нормално положение и след
това включете UPS устройството.
6.За да поддържате оптимално зареждане на батерията, оставяйте UPS устройството винаги включено в изход с
променливотоково захранване.
7. За да съхранявате вашия UPS за продължителен период от време, го покрийте и го съхранявайте с напълно
заредена батерия. Презареждайте батерията на всеки три месеца, за да удължите живота й.
ОСНОВНА ЕКСПЛОАТАЦИЯ
Преден панел
1.LCD дисплей
LCD дисплеят показва UPS-статуса, включващ
входно и изходно напрежение, процент на
зареждане на батерията...и т.н.
2. Превключвател на захранването
Натиснете превключвателя за 2 секунди, за да
ВКЛЮЧИТЕ или ИЗКЛЮЧИТЕ UPS
устройството.
3. LED индикатори
LED индикаторът свети, когато UPS устройството
работи.
Заден панел
1. USB COMM. Порт
Този порт позволява връзка и комуникация от USBпорта на компютъра до UPS-устройството.
2. RJ45/11 Комуникационни защитни портове
Комуникационните защитни портове защитават
всеки стандартен модем, факс, телефон или
мрежов кабел
3. Входен прекъсвач на веригата
Прекъсвачът на веригата осигурява
оптимална защита от претоварване.
4. Входящ захранващ кабел Свържете към
общото захранване.
5. Изходи за резервно захранване на батерията и
защита от пренапрежение
Осигуряват резервно захранване на батерията и
защита от пренапрежение. Те осигуряват
захранване на свързаните устройства за
определен период от време по време на
прекъсване на захранването.
1200/1500/2200 600/800/1000

Модел
VI 600 STL
VI 800 STL
VI 1000 STL
VI 1200 STL
VI 1500 STL
VI 2200 STL
Капацитет (VA/W)
600/360
800/480
1000/600
1200/720
1500/900
2200/1320
Вход
Диапазон на напрежението
162~290Vac
Номинална честота
50/60Hz
Изход
напрежение на батерията
Симулирана синусова вълна при 230Vac +/-10%
честота на батерията
50/60Hz +/-1%
Защита от претоварване
Прекъсвач / предпазител
Физически
Размери (Ш х В х Д)(mm)
96 x 138 x 286
148 X 178 X 298
Батерия
12V 7AH x1
12V 7.2AH x1
12V 9AH x1
12V 7AH x2
12V 7.2AH x2
12V 9AH x2
батерия VRLA
време за зареждане
8 часа
Предупреждение за диагностика
Индикатори
Вкл. захранване
Звукови аларми
На батерия, спадане на батерията, претоварване, повреда
Екологически свързан с
околната среда
Работна температура
Работна относителна
влажност
от 0 до 90%
Управление
Авто-зарядно
Да
Авто-рестарт
Да
USB COMM. Порт
Да, с HID поддръжка
RJ45/11 Комуникация
Защитни портове
Икона за настройка
Линеен режим на работа
Резервната функция не е
налична за този модел
Режим на батерия
Звук забранен
Повреда
(Натиснете копчето на дисплея за 3
секунди, за да забраните
и разрешите зумерния сигнал)
Режим на батерия: капацитет на
батерията
Линеен режим на работа:
1.
Зареждане на батерията:
циклично светене Зареден капацитет
2. Батерия напълно заредена: свети
чален
ВХОД
захранване)
ИЗХОД
(Напрежение)
V
V
Проблем
Възможна причина
Решение
UPS устройството
не изпълнява
време на работа
Презаредете батерията, като оставите UPS устройството
свързано.
Превключвателят за включване /
изключване е създаден, за да
предотврати повреда, като бързо
изключва и включва устройството.
Изключете UPS устройството. Изчакайте 10 секунди и след
Устройството не е включено към изход с
променливотоково захранване (AC).
Батерията е изхабена.
Свържете се с Техническа поддръжка.
Механичен проблем.
Свържете се с Техническа поддръжка.
Прекъсвачът е изключен поради
Изключете UPS устройството и откачете поне едно от
свързаните устройства. Изключете захранващия кабел на
копчето на прекъсвача.
ТЕХНИЧЕСКИ ХАРАКТЕРИСТИКИ
Линеен режим на работа и на батерии Режим на работа
от 0℃ до 40℃
Да, защита от пренапрежение
ОПРЕДЕЛЕНИЯ ЗА СВЕТЕЩИ LCD ИНДИКАТОРИ
LCD Индикация
Първона
AC(променливотоково
ОТСТРАНЯВАНЕ НА ПРОБЛЕМИ
Батериите не са напълно заредени.
очакваното
UPS устройството
няма да се включи.
Изходите не
предоставят
енергия на
оборудването
Код на грешка F09
Код на грешка F12
Код на грешка F13 Батерията е презаредена. Свържете се с Техническа поддръжка.
Код на грешка F14
Батерията е леко изхабена. Свържете се с Техническа поддръжка.
това включете UPS устройството.
Устройството трябв а да бъде свързано с изход 230Vac 50/60Hz.
претоварване
Батериите са разредени Позволете на устройството да се зареди за поне 4 часа.
Уредът е повреден от удар или острие Свържете се с Техническа поддръжка.
Изход на късо:
Изходна верига на късо.
Напрежението на батерията е твърде
ниско.
Настъпва претоварване:
Вашето оборудване изисква повече
енергия отколкото UPS устройството
може да осигури. Ще се изключи.
UPS устройството, след това натиснете
Изключете UPS устройството с Shut down
Свързаните към него устройства могат да имат проблеми,
моля, отстранете ги и проверете отново.
Изключете компютъра с Shut down и незабавно
презаредете батерията.
Изключете несъщественото оборудване.
Ако това реши проблема с претоварването, UPS
устройството ще премине към нормална работа.
ИЗТЕГЛЯНЕ НА СОФТУЕР
Управляващия софтуер на Power Master предоставя
лесен потребителски интерфейс за вашите
енергийни системи. Графичният потребителски
интерфейс е интуитивен и показва кратка и
съществена информация за захранването. Моля,
следвайте процедурата преди да инсталирате
софтуера.
1. Изтеглете Power Master от уебсайта: http://powermaster.powerwalker.com/
2. Кликнете два пъти на файла и следвайте инсталационните стъпки.
Когато компютърът ви се рестартира, софтуерът на Power Master ще се появи като синя икона, разположена в системната лента.
Всички права запазени. Възпроизвеждането без разрешение е забранено

Manual de utilizare
PowerWalker seria VI STL
600/800/1000/1200/1500/2200
INSTRUCŢIUNI DE SIGURANŢĂ IMPORTANTE
(PĂSTRAŢI ACESTE INSTRUCŢIUNI)
Prezentul manual conţine instrucţiuni de siguranţă importante. Vă rugăm să citiţi şi să urmaţi cu atenţie toate aceste
instrucţiuni pe parcursul instalării şi operării dispozitivului. Parcurgeţi până la sfârşit prezentul manual înainte de a încerca să
desfaceţi din ambalaj, să instalaţi sau să folosiţi sursa de alimentare neîntreruptibilă.
AVERTIZARE! Pentru a preîntâmpina riscul de izbucnire a unui incendiu sau riscul de şoc electric, instalaţi dispozitivul într-un
spaţiu interior, cu temperatură şi umiditate controlate, fără agenţi contaminanţi conductibili. (Consultaţi specificaţiile referitoare
la intervalele acceptabile de temperatură şi umiditate.)
AVERTIZARE! Nu conectaţi la sursa de alimentare neîntreruptibilă dispozitive fără legătură cu calculatorul, cum ar fi
echipamente medicale, echipamente de reanimare, cuptoare cu microunde, sau aspiratoare.
AVERTIZARE! În vederea reducerii riscului de supraîncălzire a sursei de alimentare neîntreruptibilă, nu acoperiţi fantele de
ventilare ale acesteia şi evitaţi depozitarea sursei în bătaia directă a razelor soarelui sau instalarea acesteia în apropierea
unor dispozitive care emit căldură, cum ar fi calorifere sau încălzitoare.AVERTIZARE! Nu conectaţi fişa de alimentare a sursei
neîntreruptibile la propria sa priză de ieşire.
AVERTIZARE! Nu permiteţi pătrunderea lichidelor sau introducerea de obiecte străine în sursa de alimentare neîntreruptibilă.
Nu poziţionaţi băuturi sau recipiente care conţin lichide pe sau în apropierea dispozitivului.
AVERTIZARE! În eventualitatea unei urgenţe, apăsaţi butonul OFF (OPRIT) şi deconectaţi fişa de alimentare de la sursa de
c.a., pentru a scoate complet din funcţiune sursa de alimentare neîntreruptibilă.
AVERTIZARE! Nu conectaţi la sursa de alimentare neîntreruptibilă.prelungitoare sau dispozitive de protecţie la supratensiune.
AVERTIZARE! Scoateţi din priză sursa de alimentare neîntreruptibilă.înainte de a trece la curăţarea acesteia şi nu folosişi
detergenţi lichizi sau sub formă de spray.
AVERTIZARE! Servisarea acumulatorilor se va efectua sau se va superviza de personalul specializat în gestionarea
acumulatorilor şi în luarea măsurilor de precauţie care se impun. Asiguraţi-vă că personalul neautorizat nu are acces la
acumulatori.
AVERTIZARE! În eventualitatea în care se impune desfăşurarea de lucrări de întreţinere sau de service în interiorul sursei de
alimentare neîntreruptibile, se va deconecta alimentarea de la acumulator de la fazele plus şi minus ale racordurilor tip cuple
rapide ale acumulatorului.
AVERTIZARE! În cazul înlocuirii acumulatorilor, utilizaţi acelaşi număr şi acelaşi tip de acumulatori.
AVERTIZARE! Nu aruncaţi bateriile în foc. Acestea prezintă risc de explozie. Nu deschideţi şi nici nu încercaţi să deformaţi
sau distrugeţi acumulatorul sau bateriile. Electrolitul din acestea este dăunător pentru piele şi ochi.
INSTALAREA SURSEI DVS. DE ALIMENTARE NEÎNTRERUPTIBILĂ
ÎNDEPĂRTAREA AMBALAJULUI
Cutia ar trebui să conţină următoarele:
(1) 1 bucată sursă de alimentare neîntreruptibilă, (2) 1 bucată manual de utilizare;
GHID DE INSTALARE HARDWARE
1. Noua dvs. sursă de alimentare neîntreruptibilă poate fi folosită imediat după primire. Cu toate acestea, se recomandă
încărcarea acumulatorului timp de cel puţin 8 ore pentru a se asigura atingerea capacităţii maxime de încărcare a
acumulatorului. În timpul transportului şi depozitării, se poate pierde din capacitatea de încărcare. Pentru reîncărcarea
acumulatorului, pur şi simplu lăsaţi dispozitivul conectat la o sursă de alimentare cu c.a. Dispozitivul se va alimenta
atât din poziţia On (Pornit), cât şi din poziţia Off (Oprit).
2.Cu sursa de alimentare neîntreruptibilă oprită şi scoasă din priză, conectaţi calculatorul, monitorul şi orice dispozitive de
stocare a datelor alimentate extern (unitate Zip, unitate Jaz, unitate Tape), etc. la prizele alimentate pe acumulator. NU
conectaţi imprimante laser, copiatoare, încălzitoare, aspiratoare, maşini de distrus documentesau alte aparate electrice
cu consum mare la prizele alimentate pe acumulator. Necesarul mare de energie electrică al acestor aparate va
supraîncărca şi este posibil să chiar avarieze sursa de alimentare neîntreruptibilă.
3.Conectaţi sursa de alimentare neîntreruptibilă la o priză de curent cu împământare, cu 2 faze şi 3 fire (priză de perete).
Asiguraţi-vă că priza de perete este protejată printr-o siguranţă sau un disjunctor şi că nu deserveşte echipamente
electrice cu consum mare (spre exemplu, aer condiţionat, frigider, copiator, etc.). Evitaţi folosirea prelungitoarelor.
4.Apăsaţi comutatorul pentru a porni aparatul. Se va aprinde becul lămpii indicatoare. iar sursa de alimentare va emite un
sunet de avertizare specific („bip”).
5. Dacă se detectează o supraîncărcare, se va auzi o alarmă sonoră, iar dispozitivul va emite un sunet lung de avertizare.
Pentru a remedia problema, opriţi sursa de alimentare neîntreruptibilă.şi scoateţi din priză cel puţin unul dintre dispozitivele
conectate la prizele alimentate de la acumulator. Aşteptaţi 10 secunde. Asiguraţi-vă că disjunctorul / siguranţa funcţionează
normal, iar apoi porniţi din nou sursa de alimentare neîntreruptibilă.
6. Pentru a păstra încărcarea optimă a acumulatorului, lăsaţi permanent sursa de alimentare neîntreruptibilă conectată la o
priză de alimentare cu CA.
7. În vederea depozitării sursei de alimentare neîntreruptibilă pentru o perioadă îndelungată, acoperiţi sursa pentru a o
proteja şi stocaţi-o cu acumulatorul complet încărcat. Reîncărcaţi acumulatorul la fiecare trei luni, pentru a-i asigura o
durată îndelungată de viaţă.
FUNCŢIONARE DE BAZĂ
Panoul frontal
1. Afişaj LCD
Ecranul LCD va afişa starea sursei de alimentare
neîntreruptibile, inclusiv tensiunea de intrare,
tensiunea de ieşire, procentul de încărcare şi
acumulatorul... etc.
2. Întrerupătorul
Apăsaţi întrerupătorul timp de 2 secunde pentru a
pune sursa de alimentare neîntreruptibilă pe
poziţia ON (PORNIT) sau OFF (OPRIT).
3. Indicatoare LED
Indicatorul LED este iluminat atunci când sursa de
alimentare neîntreruptibilă funcţionează.
Panou posterior
1. USB COMM. Port
Acest port permite conectarea şi comunicarea dintre
portul USB de pe calculator şi sursa de alimentare
neîntreruptibilă.
2. Porturi de protecţie a comunicării RJ45/11
Porturi de protecţie a comunicării vor proteja orice
modem, fax, linie telefonic sau cablu de reţea
standard
3. Disjunctor intrare
Disjunctorul asigură protecţie optimă împotriva
supraîncărcării.
4. Cablu de alimentare Conectaţi la UPS.
5. Rezervă acumulator şi protecţie împotriva
supratensiunii
Asiguraţi rezerva acumulatorului şi protecţia împotriva
supratensiunii.
1200/1500/2200 600/800/1000

Model
VI 600 STL
VI 800 STL
VI 1000 STL
VI 1200 STL
VI 1500 STL
VI 2200 STL
Capacitate (VA-W)
600/360
800/480
1000/600
1200/720
1500/900
2200/1320
Intrare
Interval tensiune
162~290V c.a
Frecvenţă nominală
50/60Hz
Ieşire
Tensiune de ieşire pe baterie
Undă sinusoidală simulată la 230V c.a. +/-10%
Frecvenţă de ieşire pe baterie
50/60Hz +/-1%
Protecţie supratensiune
Disjunctor / Siguranţă
Caracteristici fizice
Dimensiuni (W x H x D)(mm)
96 x 138 x 286
148 X 178 X 298
Acumulator
Acumulator VRLA
12V 7AH x1
12V 7,2AH x1
12V 9AH x1
12V 7AH x2
12V 7.2AH x2
12V 9AH x2
Timp tipic de încărcare
8 ore
Diagnostice de avertizare
Indicatoare
Pornit
Alarme sonore
Pe acumulator, Baterie la nivel scăzut, Supraîncărcare, Eroare
Factori de mediu
Temperatura de funcţionare
Umiditatea pentru funcţionare
între 0 şi 90%
Gestionare
Auto-încărcare
Da
Auto-Restart
Da
USB COMM. Port
Da, cu suport HID
Comunicare RJ45/11
Porturi de protecţie
Articol setare Mod linie
Funcţie rezervată nedisponibilă
pentru acest model
Mod acumulator
Dezactivare sunet
Eroare
(Apăsaţi tasta de pe afişaj timp de 3s pentru a
dezactiva
şi activa sunetul)
Mod acumulator: capacitate baterie
Mod linie:
1.
Încărcare acumulator: iluminare
ciclu Capacitate de încărcare
2.
Acumulator complet încărcat:
iluminare
Iniţial
INTRARE C.A. (tensiune)
IEŞIRE
(Tensiune)
V
V
Problemă
Cauză posibilă
Soluţie
Sursa de alimentare
nu face faţă la durata
aşteptată
Reîncărcaţi acumulatorul lăsând sursa de alimentare
neîntreruptibilă conectată la o priză de alimentare.
Sursa de alimentare
neîntreruptibilă nu
Comutatorul pornit/oprit este proiectat să
varierea datorită trecerii rapide de
pe poziţia Off pe On.
Opriţi sursa de alimentare neîntreruptibilă. Aşteptaţi 10
secunde, iar apoi porniţi din nou sursa de alimentare
neîntreruptibilă.
Dispozitivul nu este conectat la o priză de
c.a.
Dispozitivul trebuie să fie conectat la o priză de 230Vc.a.
50/60Hz.
Acumulatorul este uzat.
Luaţi legătura cu echipa de asistenţă tehnică.
Problemă mecanică.
Luaţi legătura cu echipa de asistenţă tehnică.
pentru funcţionarea
Disjunctorul a fost decuplat datorită unei
Opriţi sursa de alimentare neîntreruptibilă şi deconectaţi cel
puţin unul dintre echipamentele conectate. Scoateţi cablul de
butonul disjunctorului.
Dispozitivul a fost avariat de o supratensiune
sau descărcare electrică
Echipamentele ataşate ar putea avea probleme, vă rugăm să le
Dacă în acest fel se rezolvă problema supraîncărcării, sursa de
SPECIFICAŢII TEHNICE
Mod linie şi Acumulator. Mod
DEPANARE
0℃ to 40℃
Da, protecţie la supratensiune
DEFINIŢII PENTRU INDICATOARELE LCD ILUMINATE
Indicaţie LCD
neîntreruptibilă
de funcţionare
porneşte.
Ieşirile nu asigură
tensiunea necesară
echipamentelor
Cod eroare F09
Cod eroare F12
Cod eroare F13 Bateria este încărcată peste limita maximă. Luaţi legătura cu echipa de asistenţă tehnică.
Cod eroare F14
Acumulatorii nu sunt complet încărcaţi.
Acumulatorul este uşor uzat. Luaţi legătura cu echipa de asistenţă tehnică.
prevină a
supraîncărcări
Acumulatorii sunt descărcaţi Permiteţi dispozitivului să se reîncarce timp de cel puţin 4 ore.
Scurt ieşire:
Scurt-circuit ieşire.
Tensiunea acumulatorului este prea
scăzută.
A survenit o suprasolicitare:
Echipamentele dvs. au un necesar de
energie electrică mai mare decât poate să
furnizeze sursa de alimentare
neîntreruptibilă. Aceasta se va opri.
alimentare ale sursei, iar apoi apăsaţi
Luaţi legătura cu echipa de asistenţă tehnică.
Opriţi sursa de alimentare neîntreruptibilă
deconectaţi şi să mai verificaţi o dată.
Opriţi calculatorul şi reîncărcaţi imediat acumulatorul.
Opriţi toate echipamentele neesenţiale.
alimentare neîntreruptibilă va reveni la funcţionarea normală.
DESCĂRCARE SOFTWARE
Software-ul de gestionare Power Master furnizează o
interfaţă prietenoasă cu utilizatorii pentru sistemele
dvs. de alimentare cu energie electrică. Interfaţa
utilizator grafică este intuitivă şi afişează la o singură
privire informaţiile esenţiale. Vă rugăm să urmaţi
procedura descrisă mai jos pentru a instala
componentele software.
Procedura de instalare:
1.Descărcaţi Power Master de pe site-ul web: http://powermaster.powerwalker.com
2. Faceţi dublu clic pe fişier şi urmaţi apoi paşii pentru instalare.
La repornirea calculatorului dvs, software-ul Power Master va apărea sub forma unei pictograme albastre, amplasate în zona de
notificare.
Toate drepturile rezervate. Se interzice reproducerea fără permisiune

Руководство пользователя
PowerWalker VI серии STL
600/800/1000/1200/1500/2200
ВАЖНЫЕ ИНСТРУКЦИИ ПО БЕЗОПАСНОСТИ
(СОХРАНИТЕ ДАННЫЕ ИНСТРУКЦИИ)
Данное руководство содержит важные инструкции по безопасности. Внимательно простите и строго следуйте всем
инструкциям во время установки и эксплуатации устройства. Полностью прочтите данное руководство перед
распаковкой, установкой или эксплуатацией ИБП.
ВНИМАНИЕ! Во избежание риска поражения электрическим током устройство должно устанавливаться в закрытом
помещении с контролируемой температурой и влажностью, без посторонних токопроводящих материалов.
(Допустимый диапазон температуры и влажности указан в спецификациях.)
ВНИМАНИЕ! Для предотвращения опасности перегрева блока ИБП запрещается накрывать вентиляционные
отверстия прибора и подвергать устройство воздействию прямых солнечных лучей, также нельзя устанавливать ИБП
вблизи таких тепловыделяющих приборов, как обогреватели или печи.
ВНИМАНИЕ! Запрещается подключать к блоку ИБП не связанное с применением компьютера оборудование,
например, медицинское оборудование, аппараты жизнеобеспечения, микроволновые печи или пылесосы.
ВНИМАНИЕ! Не включайте вход ИБП к его собственному выходному разъему.
ВНИМАНИЕ! Не допускайте попадания внутрь ИБП жидкостей или инородных предметов. Не ставьте на блок ИБП
или вблизи него напитки или другие емкости с жидкостью.
ВНИМАНИЕ! В случае аварийной ситуации необходимо нажать кнопку OFF (Выкл.) и отсоединить кабель питания от
источника переменного тока, чтобы обеспечить надежное отключение ИБП.
ВНИМАНИЕ! Не подсоединяйте к ИБП сетевой фильтр или ограничитель перенапряжения.
ВНИМАНИЕ! Перед чисткой прибора следует отключить его от сети переменного тока.
ВНИМАНИЕ! Обслуживание батарей должно производиться квалифицированными специалистами или под их
наблюдением с соблюдением всех мер предосторожности. Не следует допускать к работе с батареями лиц, не
имеющих необходимой подготовки.
ВНИМАНИЕ! Поэтому, если требуется провести техническое обслуживание внутри блока ИБП, необходимо отключить
питание от батареи на положительном и отрицательном полюсе через быстрые соединители аккумуляторной батареи.
ВНИМАНИЕ! Замену батарей может производить только опытный персонал, при этом необходимо соблюдать меры
предосторожности.
ВНИМАНИЕ! Сменные батареи должны быть одного и того же типа. Батареи могут взорваться. Не вскрывайте и не
деформируйте батареи. Вытекший электролит при попадании на кожу или в глаза может привести к травмам.
УСТАНОВКА СИСТЕМЫ ИБП
РАСПАКОВКА
Коробка должна включать следующие составляющие:
(1) блок ИБП x 1; (2) руководство пользователя x 1.
РУКОВОДСТВО ПО МОНТАЖУ ОБОРУДОВАНИЯ
1. Ваш новый ИБП можно использовать сразу после получения. Тем не менее, рекомендуется заряжать
аккумуляторную батарею в течение минимум 8 часов, чтобы обеспечить максимальную зарядную емкость
аккумуляторной батареи. Во время транспортировки и хранения может возникнуть потеря заряда. Чтобы зарядить
аккумуляторную батарею, просто оставьте устройство подключенным к розетке переменного тока. Устройство
будет заряжаться как в положении «включено», так и «выключено».
2. При выключенном и отключенном блоке ИБП подключите компьютер, монитор и любое внешнее устройство
хранения данных (Zip-диск, Jazz-диск, ленточное устройство) и т. д. к розеткам с батарейным питанием. НЕ
подключайте лазерный принтер, копировальный аппарат, нагревательный прибор, пылесос, устройство для
уничтожения бумаги или другое крупное электрическое устройство к розеткам с батарейным питанием.
Потребляемая мощность данных устройств приведет к перегрузке и, возможно, повреждению устройства.
3. Подключите ИБП к двухполюсной заземленной розетке с 3 контактами (сетевая розетка). Убедитесь, что сетевая
розетка защищена предохранителем или автоматическим выключателем и не обслуживает оборудование с
высоким потреблением энергии (например, кондиционер, холодильник, копировальный аппарат и т. д. Избегайте
использования удлинителей.
4. Нажмите выключатель питания, чтобы включить устройство. Загорится индикатор включения питания, и
устройство издаст «звуковой сигнал».
5. В случае обнаружения перегрузки раздастся звуковой сигнал, и устройство издаст один длинный звуковой сигнал.
Чтобы исправить эту ситуацию, выключите ИБП и отсоедините, по крайней мере, одну единицу оборудования от
розетки с батарейным питанием. Подождите 10 секунд. Убедитесь, что автоматический выключатель/
предохранитель исправен, а затем включите ИБП.
6. Для поддержания оптимальной зарядки аккумулятора всегда оставляйте ИБП включенным в розетку переменного
тока.
7. Для хранения ИБП в течение длительного периода времени, закройте его и храните с полностью заряженной
батареей. Заряжайте аккумуляторную батарею каждые три месяца, чтобы обеспечить длительный срок службы
батареи.
ОСНОВНЫЕ ОПЕРАЦИИ
Передняя панель
1. ЖК-дисплей
На ЖК-дисплее отображается состояние ИБП,
включая входное напряжение, выходное
напряжение, процент нагрузки и аккумуляторной
батареи и т. д.
2. Кнопка включения/выключения питания
Нажмите на кнопку и удерживайте ее нажатой
в течение 2 секунд, чтобы включить или
выключить ИБП.
3. Светодиодные индикаторы
Данный светодиод загорается, когда ИБП работает.
Задняя панель
1. КОММ. USB- ПОРТ
Данный порт обеспечивает подключение и связь
USB-порта компьютера с блоком ИБП.
2. Порты защиты связи RJ45/11
Порты защиты связи защищают любой
стандартный модем, факс, телефонную линию
или сетевой кабель.
3. Автоматический выключатель на входе
Автоматический выключатель обеспечивает
оптимальную защиту от перегрузки.
4. Кабель входной мощности Подключение к
электросети.
5. Резервная аккумуляторная батарея и розетки с
защитой от перенапряжения
Обеспечение резервной аккумуляторной батареи и
защиты от перенапряжения.
1200/1500/2200 600/800/1000

Модель
VI 600 STL
VI 800 STL
VI 1000 STL
VI 1200 STL
VI 1500 STL
VI 2200 STL
Мощность (ВА/Вт)
600/360
800/480
1000/600
1200/720
1500/900
2200/1320
Вход
Диапазон напряжений
162~290 В перем. тока
Номинальная частота
50/60 Гц
Выход
напряжение батареи
Имитированная синусоидальная волна при 230 В пер. тока +/- 10 %
Выходная частота батареи
50/60 Гц ± 1 %
Защита от перенапряжения
Выключатель/предохранитель
Размеры и масса
Размеры (Ш x В x Г) (мм)
96 x 138 x 286
148 X 178 X 298
Батарея
Батарея VRLA
12В/7Ач x 1
12В/7,2Ач x 1
12В/9Ач x 1
12/В/7Ач x 2
12В/7,2Ач x 2
12В/9Ач x 2
время зарядки
8 ч
Предупредительная диагностика
Индикаторы
Питание вкл.
Звуковые сигналы
Батарея вкл., низкий заряд батареи, перегрузка, неисправность
Данные об условиях эксплуатации
Рабочая температура
влажность воздуха
От 0 до 90 %
Управление
Автом. зарядное
устройство
Да
Автом. повторный пуск
Да
КОММ. USB- ПОРТ
Да, с поддержкой ЧМИ
Связь RJ45/11
Защищенные порты
Элемент настройки
Линейный режим
Функция резервирования
модели Режим батареи
Звук отключен
Неисправность
(Нажмите на клавишу на дисплее и
отключения
и включения звукового сигнала)
Режим батареи: емкость батареи
Линейный режим:
1.
Зарядка аккумуляторной батареи:
круговое освещение
Допускаемая нагрузка
2.
Аккумуляторная батарея
полностью заряжена: освещение
Исходны
данные
пер. тока
ВЫХОДНЫЕ
ХАРАКТЕРИСТИКИ
(Напряжение)
В
В
Неисправност
ь
Возможная причина
Решение
ИБП не
времени работы
Зарядите аккумуляторную батарею, оставив ИБП
подключенным.
Кнопка включения/выключения питания
предназначена для предотвращения
повреждения в результате быстрого
выключения и включения.
секунд, а затем включите
Устройство не подключено к розетке
переменного тока.
Устройство должно быть подключено к розетке 230 В
пер. тока, 50/60 Гц.
Батарея изношена.
Обратитесь в службу технической поддержки.
Механическая проблема.
Обратитесь в службу технической поддержки.
Автоматический выключатель отключен
Выключите ИБП и отсоедините, по крайней мере, одну
о оборудования. Отсоедините шнур
на кнопку автоматического выключателя.
Устройство повреждено в результате
скачка напряжения или тока
ТЕХНИЧЕСКИЕ СПЕЦИФИКАЦИИ
Линейный режим и режим батареи
От 0 ℃ до 40 ℃
Да, защита от перенапряжения
ОПРЕДЕЛЕНИЯ ДЛЯ ГОРЯЩИХ ЖК-ИНДИКАТОРОВ
ЖК индикатор
недоступна для данной
удерживайте ее в течение 3 секунд для
е
ВХОДНОЕ (напряжение)
УСТРАНЕНИЕ НЕИСПРАВНОСТЕЙ
соответствует
ожидаемому
ИБП не включается.
Розетки не
обеспечивают
питание для
оборудования
Код неисправности
F09
Код неисправности
F12
Код неисправности
F13
Код неисправности
F14
Батареи заряжены не полностью.
Батарея слегка изношена. Обратитесь в службу технической поддержки.
Выключите ИБП. Подождите 10
ИБП.
из-за перегрузки
Батареи разряжены Дайте устройству зарядиться не менее 4 часов.
Замыкание выхода:
Короткое замыкание выхода.
Слабое напряжение аккумуляторной
батареи.
Аккумуляторная батарея перезаряжена. Обратитесь в службу технической поддержки.
Произошла перегрузка:
Ваше оборудование требует большую
мощность, чем может обеспечить ИБП.
Обо будет отключено.
единицу подключенног
питания ИБП, затем нажмите
Обратитесь в службу технической поддержки.
Выключите ИБП
У подключенного оборудования могут быть проблемы,
устраните их и повторите проверку.
Выключите компьютер и немедленно зарядите
аккумуляторную батарею.
Отключите ненужное оборудование.
Если это решит проблему перегрузки, ИБП перейдет в
нормальный режим работы.
ЗАГРУЗКА ПРОГРАММНОГО ОБЕСПЕЧЕНИЯ
Программное обеспечение для управления Power
Master обеспечивает удобный интерфейс для ваших
энергосистем. Графический пользовательский
интерфейс интуитивно понятен и удобно отображает
важную информацию о питании. Для установки
программного обеспечения выполните
представленные ниже действия.
1. Загрузите Power Master с веб-сайта: http://powerguide.powerwalker.com
2. Дважды щелкните по файлу и следуйте инструкциям по установке.
После перезагрузки компьютера в системной области появится синий значок программного обеспечения Power Master.
Все права защищены. Воспроизведение без разрешения запрещено
 Loading...