


3
The PANORAMA X2 Blackbox will record and play Full-HD video
files. We want you to get the most out of your new premium dualc
hannel solution. You can use the built-in HD LCD to monitor and
play back files stored in the SDHC memory card slots. This allows
for quick access to view videos as needed.
1.
Automatic recording
2.
3.5” Capacitive TOUCHSCREEN LCD Display
3. 1920x1080pixel 30fps FULL HD recording and playback
Dual Channel Front & Rear (2CH Blackbox!)
4.
Records audio from within the car
5.
16-128GB Micro-SD memory c
ards (>32GB if formatted as FAT32 in PC)
6.
Record up to 6 hours if using a 32GB memory card
(Larger than 32GB also supported, see page 27)
7.
Built-in G-Sensor
8.
Motion detection (pre-buffered events are captured moments before)
9.
Parking mode (Low voltage cut-off, power control).
10.
For Playback (maps with Optional GPS logger) use the following
software
http://RegistratorViewer.com
http://DashCamViewer.com
http://VideoLan.org
*Important Note
The information contained in this guide is subject to change. For more
detailed information, visit our web site at http://www.powerucc
.com
Features Include

4
Table of Contents
Blackbox Main Features
Warnings
Main Features
Operation
Menu
Product Contents
1.
Auto Recording
2. Loop Recording
3. 3.5”TOUCH LCD
4. 2CH F/R FULL HD 1080p
5. Motion Detection
6. Playback
7. G-Sensor
8. Parking mode Power control
7
7
7
7
8
8
8
8
Notification
Interference
Compatibility
Service & Repair
Blackbox Features
9
11
11
11
11
1. Main Features
Front View (Lens)
Back View (LCD)
Left (AV-out)
Right (Memory)
Top (Power, Rear camera, GPS)
2. Power
3. Line (3-wire) cable
12
12
12
12
12
12
13
13
1. Preparations
2. Turning the Power On, Off
3. Power saving
14
14
14
1. Preview 15
6

5
Table of Contents
GPS
Playing recorded files
Specifications
Self-Diagnosis&Precautions
Warranty
External receiver Options
25
26
30
27
33
Parking mode
Setup
Beep
Rec minute
Format
Driving G-sensor
File playback
Movie size
1. Parking G-Sensor
2. Parking time
3. Motion detection
4. Power control
Date & Time
Language
GPS Zone
LCD Standby
AV-out (NTSC/PAL)
Speaker
Rear View Camera About,
Firmware Upgrade
On/Off
1, 2, 3, 5min
Front memory / Rear memory
High, Middle, Low, Off
File List/play
Front/Rear 1080p, 720p, 720p60fps
16
20
18
21
18
21
19
21
Main page
Recording Menu
18
18
18
18
23
23
23
23
23
23
24
24
6
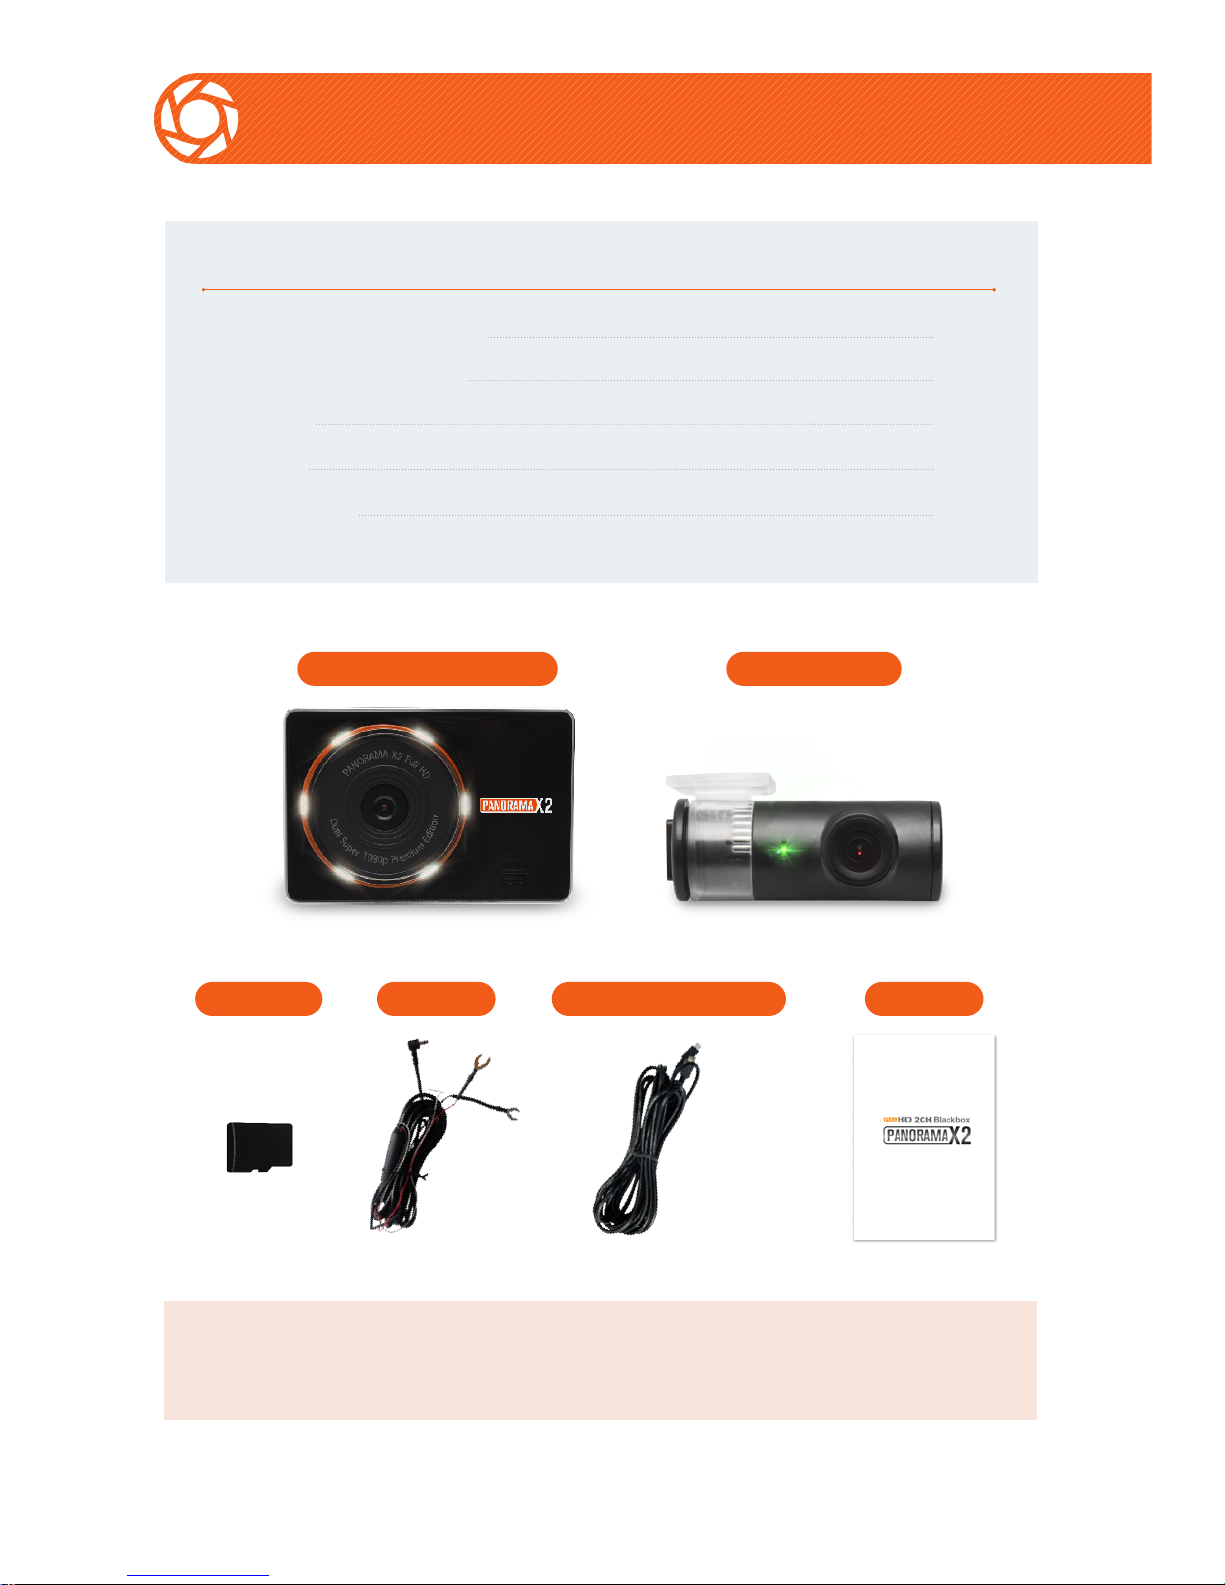
Main Features
Main Features
·
Blackbox (Front FULL HD)
·
Rear camera (FULL HD)
·SD Card
·Power
·Manual
1
1
2
1
1
Q'
Power Rear Camera cableSD Card
Manual
Full HD Blackbox Rear Camera
*Important note
The components shown are subject to change

7
Main Features
1.
Automatic Recording
Starts recording automatically when you start the car.
Stops recording and auto-saves after power is turned
off.
▶
Continuous Recording (not recommended)
▶
The following chart shows the maximum continuous
recording time. Micro-SD MEMORY Card
4GB - approximately 45 minutes
8GB - approximately 2 hours
16GB - approximately 3 hours
32GB - approximately 6 hours
2.
Loop Saving (recommended)
Once the card capacity is reached, the oldest MP4 file
segment will be deleted and over-written with the newest one
3.
3.5” Touch LCD
▶
You can check the recording screen while driving* and
parking recording. (*where local laws allow for video up front)
4.
Front/Rear Full-HD 1920 x 1080 pixels 30fps (frames per second)
▶
-Records 30 frames per second at 1920 x 1080 (Full-HD)
-Recording gap between file segm
ents is approximately 0.1 second.

8
Main Features
5.
Motion Detection
▶
The X2 automatically switches to standby mode when you park or
stop the car. The X2 starts recording when motion is detected.
6. MPEG MP4
▶
The X2 records v
ideo in the MPEG H.264 MP4 format.
7. G-sensor
▶
If the G-sensor is triggered, the current file will be moved into a protected folder
and will no longer be overwritten until the card is formated.
IMPORTANT NOTE: Formatting the memory card WILL DELETE ALL FILES
including protected files. Save and back-up all files prior to formatting the memory
card.
8.
Parking Mode Power Control (Low Voltage Cut-Off)
▶
Select a constant voltage that matches the battery of your vehicle.The battery
discharge prevention system is meant to prevent a complete discharge of the
vehicle battery. When the vehicle battery voltage is below the X2 set voltage,
the X2 will power off. This way you can be sure you always have plenty of
power remaining to start your vehicle
9.
Dual Slot System
▶
The X2 contains two separate memory card slots. A Micro-SD card must
be inserted in each of 2 slots to record both front and rear cameras. The top slot
is for the rear camera, and is marked with the letter "R". The bottom slot is for the
front camera and is marked with the letter "F".
9
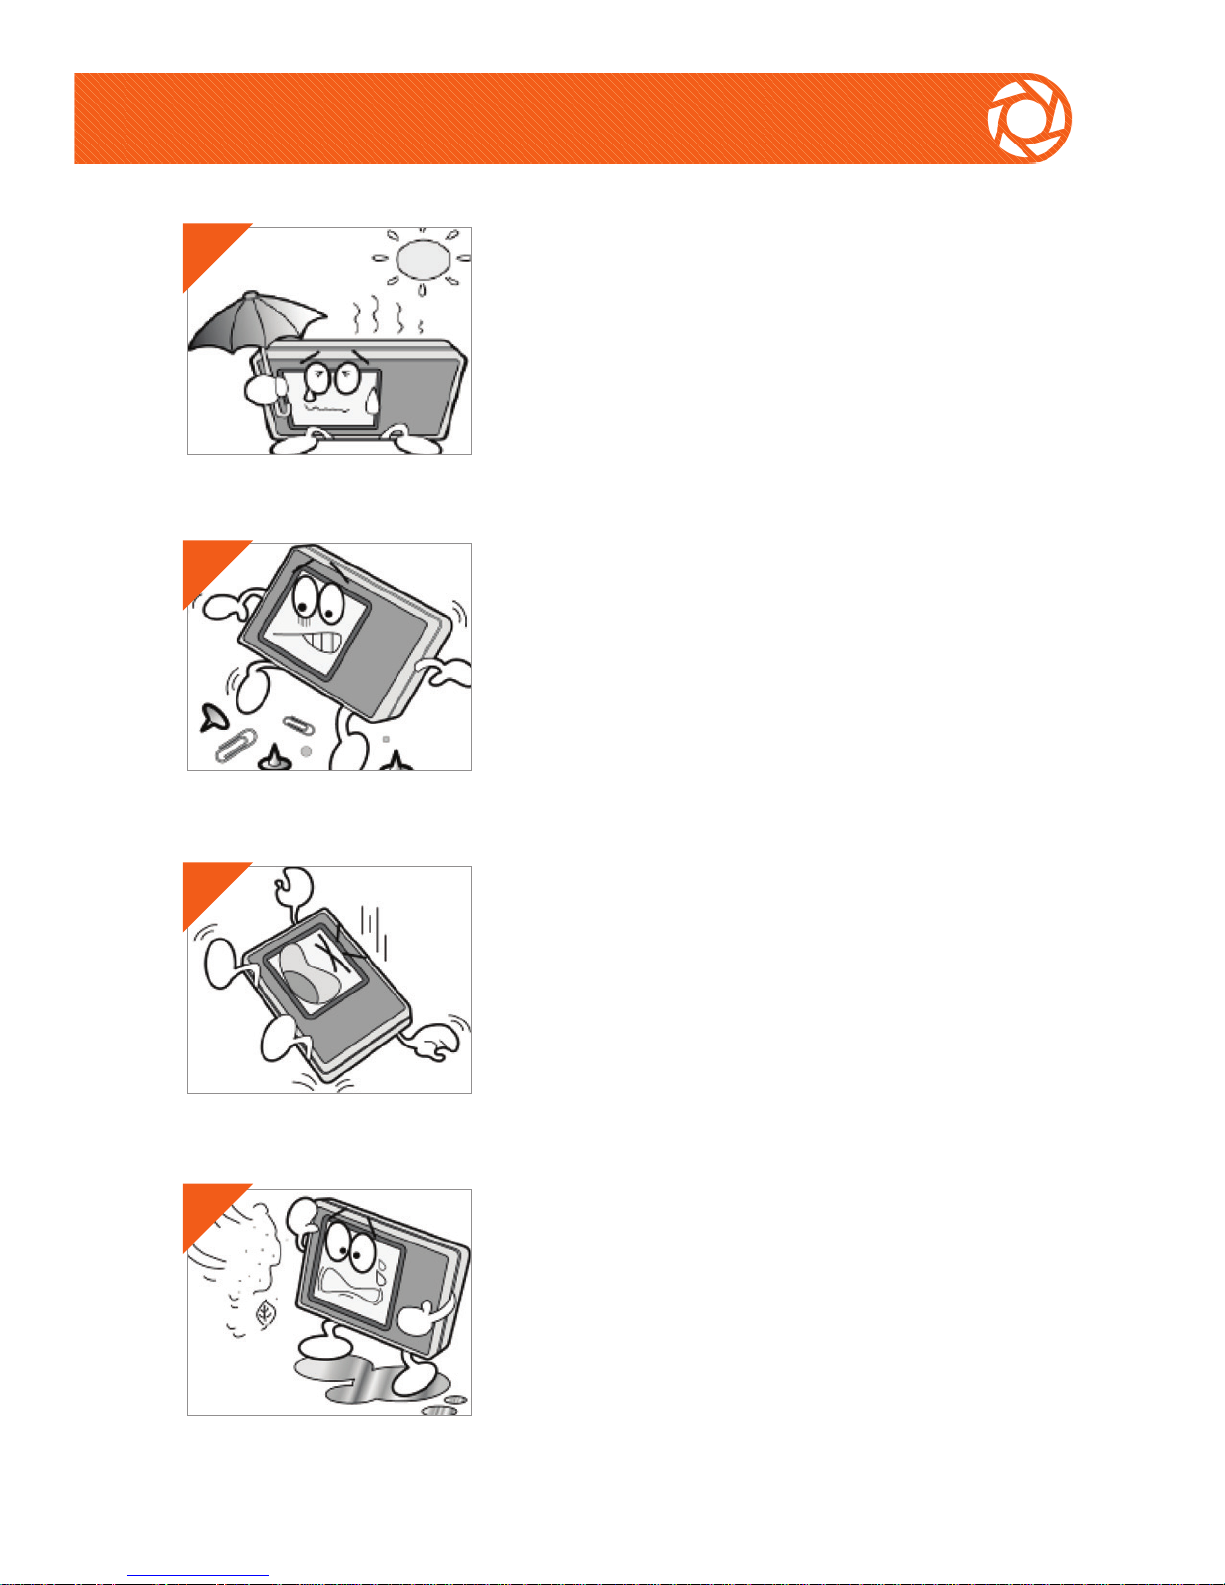
Warnings
Avoid placement AND use of the X2 in
excessive heat or in direct sunlight. If subjected
to these conditions, allow the unit to cool down
before operating.
Do not insert foreign objects into unit or use
near flammable substances. Doing so can lead
to damage and void the warranty.
Handle the X2 with care, do not toss or
drop the Blackbox. This can cause
damage to the circuits and/or screen.
Accidental damage is not covered by
warranty.
Do not place the Blackbox in a humid,
foggy, or smoke-filled area.
These conditions may damage the X2.
1
2
3
4

10
Warnings!
Do not hit the Blackbox with solid objects.
Never place the Blackbox in close proximity
to other electronic devices or magnetic
sources.
Do not attempt to disassemble or alter any
part of the equipment.
We make no warranties for damages resulting
from disassembly.
The power adaptor is designed for exclusive use
with this equipment.
Do not use other products.
(Damage resulting from using other than the
supplied accessories will void your warranty)
Securely connect the Blackbox with the supplied
cable.
5
6
7
8

11
Warnings
Notice
1. Use only supplied power adaptor.
(Damages resulting from the use of other power sources will void your warranty)
2. Do not allow flammable substances near device.
3.
Strong sunlight or direct bright lights may result in dark
recordings. Select a proper location when you install the
Blackbox cameras (40% sky - 60% road).
Interference and compatibility
- Do not place the Blackbox near other electronic devices
It may cause the image to be distorted.
(1) If the Blackbox is installed near other GPS devices,
it may cause interference with X2 GPS reception.
(2) Do not connect the power adaptor to multi-cigar jacks or other
shared devices, because it may lead to malfunction of video quality.
▶
Please be careful when you install the Black
box.
Repair
Only authorized service centers should perform sy
stem
maintenance and repairs. We are not responsible for data loss
resulting from malfunction of defective micro-SD memory cards.
Disposal
If you ever dispose of your Blackbox, discard
properly according to the recycling laws of your
country, state, and local governments.

12
Main Features
Front
(LENS)
Left
(AV-out)
Back
(LCD)
Right
(Memory)
Top
(Power)
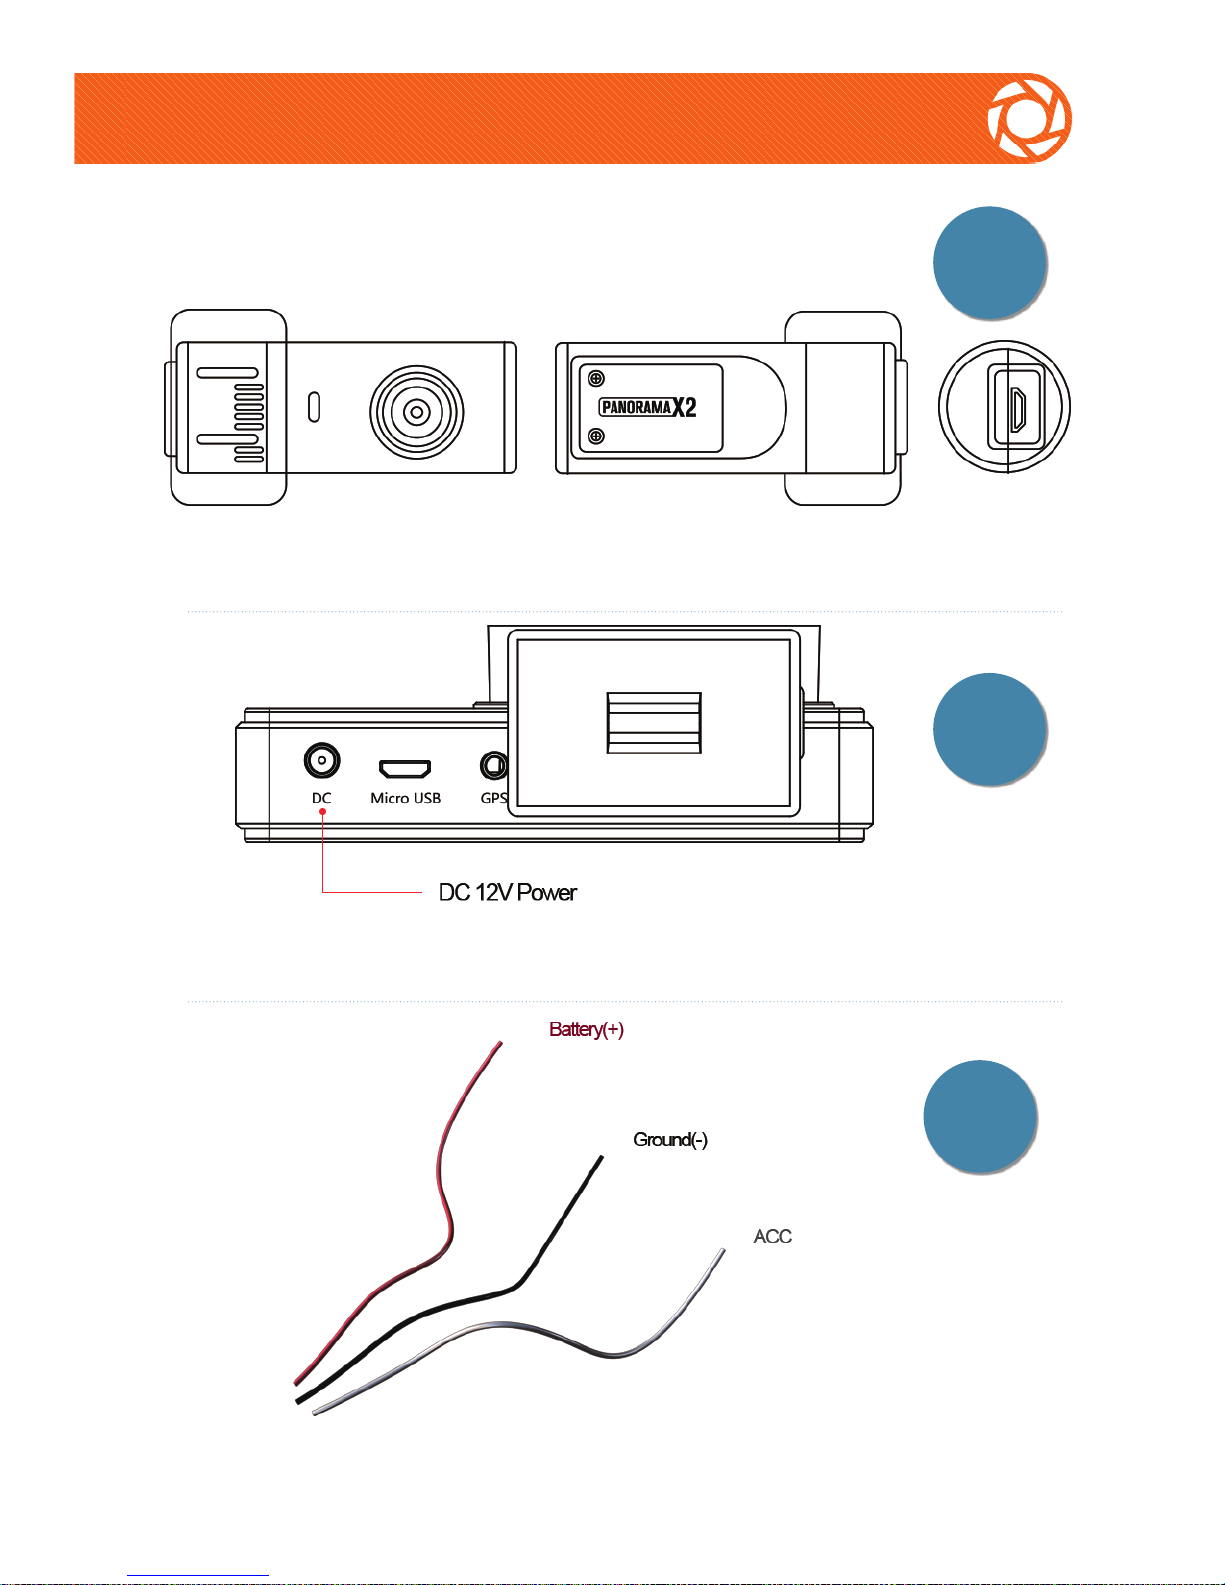
13
Main Features(Power connect)
Power
connect
Rear
Camera
3 W ire
Cable

14
Operation
1.
Prov
iding Power
1. Connecting to the Power
(1) Connect the blackbox to the power by using the supplied power adaptor.
*
Use a 12V power adaptor.
The Blackbox uses 12V-24V DC as a power source.
(2) Please use a qualified automobile electrician to connect the unit to the vehicle power
and to ensure that the wires and connections allow safe driving with no obstructions.
2. Turning the Power On, Off and Power Saving Function
(1) Turning the Power On
When you start a car, the BlackBox is turned on automatically.
Recording starts in approximately in 5~15sec.
The indicator light (LED) on the upper-right side is off when the
Blackbox is turned off.
(2) Turning the Power Off
To turn the Blackbox off, you must stop the car & turn
your ignition off, or remove the Power cable.
3.Power Saving Function
-You can turn the LCD monitor on to watch recordings or
turn the LCD monitor off during recording.

15
Menu
Movie-GPS-Time
Front/Rear Camera Select
Main page
Mic/Mute
Event
Current Rec Time
Preview screen

16
Main page
▶
Parking Mode
P G-sensor sensitivity, Motion detection, Parking time, Power
control, Rearview camera
▶
Beep On/Off
This is for the alarm caused by the G-sensor
▶
Format
Formats the micr
o-SD card(s)
▶
Play
Real-time playback of recorded files
▶
Menu
Record minute (Unit:min), D G-sensor sensitivity, Movie size, Setup
Go to the outside camera image
Select, Go to the previous screen

17
Parking mode
▶ P G-Sensor sensitivity
High, Middle, Low, Off
▶
Parking time
6 hours, 12 hours, 18 hours, 24 hours, Off (Off = Continous, no time-out)
▶ Motion detection
High, Middle, Low, Off
▶
Power control
11.8V, 12.1V, 12.4V, 13.5V, Off, Drive Only
▶
Rearv
iew camera
Camera On/Off
Go to the camera image
Select, Go to the previous screen
A. Parking mode
Off = Continous, no voltage cut-off Drive Only = Never Record while
ignition is off, X2 will power off until engine is started

18
Parking mode
1. P G-Sensor sensitivity
3. Motion detect
B. Beep
2. Parking time
4. Power control
C. Format

19
Play
D. Play
- The recorded files are
stored separately in
front / rear memory cards
- Files are stored in three different
folders, depending on the
nature of the file, for each
Micro-SD memory card.
- N (Nomal file folder)
(Regular location of the file
to be saved when driving)
- E (Impact Detection folder)
(Location of the G-Sensor,
motion detection trigged files, or
manual event button)
- P (Parking watched folder)
(Location of the file is store
in parking surveillance)
- Play the files in
each folder, search
- File can include views,
quick flip, delete again, and
then must retrieve important
files,
Download files to a
separate computer
periodically, clean up the
memory by deleting files or
formatting.
File list
Play/File delete

20
Menu
1.
Record minute
1 min, 2 min, 3 min, 5 min
2. Driving G-Sensor sensitivity
High, Middle, Low, Off
3.
Mov
ie size
Front camera : 1080p 30fps, 720p 30fps, 720p 60fps
Rear camera : 1080p 30fps, 720p 30fps, 720p 60fps
4.
Setup
Date & time, Language, GPS Zone, LCD Standby, AVout, Speaker, Rear Camera, About (Firmware Upgrade).
E. Menu

21
Menu
1. Record minute
2. Driving G-Sensor sensitivity
3. Movie size

22
Setup
- Date & time
Set date & tim
e
- Language
English,
日本語
, 한국어
, Русский,
繁体中文
- GPS Zone
Set the local time zone (Add Summer Time / Daylight Savings Time)
- LCD Standby
LCD standby time set
- AV-out (NTSC & PAL)
TV type. NTSC (USA), PAL (EU)
- Speak
er
Volume Set
- Rear view camera
Rear camera (Parking) On/Off
- About(Information)
Information, Firmware version, Firmware Upgrade
4. Setup

23
Setup
1. Date&time
3. GPS Zone
5. AV-out(NTSC&PAL)
2. Language
4. LCD Standby
6. Speaker

24
Setup
Rear view camera
Working On = Parking Mode Enabled for Rear Camera
Working Off = Parking Mode Disabled for Rear Camera
About
Firmware Upgrade
- Copy the update file to the r
oot directory in each of the memory front / rear
cards, press the About menu "Upgrade" button to perform firmware
upgrade.
*Important Note
Please consult your service center or distributor about
firmware information and upgrades.
*
Ensure the vehicle is started and do not disconnect or turn the power off
during the firmware upgrade process!!!!"

25
GPS (External receiver Option)
1. You can capture speed and location information by the signals
received from GPS satellites.
2.
Information differences may occur due to signal delay.
3.
You can check the GPS information on the left bottom of the screen.
4.
GPS receiver is an optional accessory purchased separately.
GPS
N : 37.317492
Y : 126.569746
61.75km/h
2014 / 09 / 16 11 : 31 : 07
N : 37.317492 Y : 126.569746 61.75km/h
Urgent record
Rear 1080p 30fps
x : y : z :
Rear 1080p 30fps
x : -0.063 y : -0.063 z : +0.969

26
Playing the recorded file
*
The recorded files
can be played back
on your computer.
1.
The MP4 file ty
pe is H.264 codec
2.
Recommended players are available at:
VideoLan.org, RegistratorViewer.com,
DashCamViewer.com, & GoPro Studio
http://shop.gopro.com/softwareandapp/gopro-studio/GoPro-Studio.html
3.
GoPro Studio will allow adjustments
such as brightness
level,
c
hroma, removing after images, removing block and removing
noise when playing video.
4.
The files
can also be viewed on other programs where the H.264 codec is
s
upported.
*This will appear when you connect a memory card
*
For smooth viewing of recorded files, save files directly to
computer or use of USB 3.0 ports and SDXC card reader is
recommended.
FILE FOLDER

27
Self-Diagnosis and Safety Precaution
Q1: How can I check the firmware?
A1:
Check t
h
e About section on the main home screen
You can check the available firmware version number(s) on our website,
where you will find continuing support.
Q2: Can I reinstall the Blackbox in another car and use it?
A2: Yes, the X2 Blackbox may be moved between vehicles,
use existing mount or new mount as needed.
Q3: How can I format the micro-SD memory cards?
A3: Y
ou can format the micro-SD memory cards in setup mode
in your Blackbox.
Please format the micro-SD memory cards in your Blackbox
*
The X2 will recognize pre-formatted memory cards
.
* You can format a memory card in setup mode.
*
It is recommended that < 32GB micro-SD memory cards be
formatted in the blackbox. > 32GB micro-SD memory cards
should be pre-fomatted FAT32 in your PC for optimal results.
Q4: I installed the blackbox. Is it possible to control the angle?
A4:
The
joint can move 90 degrees. Ad
justments are limited.
Q5: Where is
a suitable location to install the Black
box?
A5:
Please install it without blocking the driver's v
iew.
The Blackbox was designed for a car, but you can also use it at
home or in a store or in a business location. (It is recommended to
install the blackbox in a location you can watch the LCD monitor.)
Q6: How do I manually start and stop the X2 recording?
A6: You will see see a red box with a dotted outline at the bottom of the
screen. Engine running - Touching anywhere in this area will toggle
start/stop recording. It is important to stop the recording before ejecting
the microSD cards. BAT(parking mode) This area will power off the X2

28
Self-Diagnosis and Safety Precaution
Q6: How can I check that the Blackbox is working properly?
A6:
You will see the recording screen after the car is started.
The Blackbox starts recording automatically after your
vehicle starts. You can also check the red indicator in the upper
left hand corner on the screen.
Q7: The power or external camera wire is not long enough!
A7:
The power wire is 3.5 meter (11.5 feet), the external camera wire is 6 meter
(19.5 feet) please
choose a better routing & mounting location for optimal installation.
Q8: micro-SD memory cards do not work.
A8:
Please contact the distributor or authorized service center.
If you bought the SD memory cards yourself, contact the store.
Q9: Blackbox does not turn off when car is off
A9:
Please unplug from the socket, which may continue
supplying power.
Only use the included power adaptor when you
install it in your vehicle by yourself. If you connect it to a different
voltage source, the result may be a broken unit or dead car
battery.
* In this case, you must pay for the repair.
*
Do not cut off the cigar jack.
* Use only included cigar jack.
Q10: Traffic lights blink or fade in recorded file
A10:
This is a common occurrence in devices containing lens.

29
Self-Diagnosis and Safety Precaution
Q11: When the Blac
kbox housing is broken in an accident, can it be repaired?
A11:
In this case, we cannot repair the Blackbox because of damage to the other
components.
Safety Precaution
*
When the X2 is connected to cigar jack in extreme hot conditions,
please be sure to power off when not in use.
*
If the X2 is connected directly to the car battery, ensure the car has the ability to
start after extended time. To do this, raise the voltage in power control settings.
*
If the X2 is connected directly to car battery, for safety, turn off unit
before starting and power on after the car has started.
If the temperature in the car exceeds 75 C (167 F), allow the unit to cool down
before operating to avoid damage.
*
Formatting of memory cards on a regular basis (weekly) offers best
performance. Remember to save important files and back up to a computer
prior to formatting!
In the case where the X2 Blackbox cannot record because the
memory card is not recognized, format the memory card in the Setup
Menu. (During recording, the RED indicator is on)
*
*

30
Specification
Named
Memory type
Impact sensor
Camera Support
Temperature
DC Adaptor Input:
Output:
Display
Power cable
Mic
A/V interface
Camera angle
Front/Rear Micro-SD card,
4~128GB
G-sensor
Bosch 3G Sensor
SONY CMOS 2.0M
-10 C ~ 75 C (14 F to 167 F)
DC 12~24V
DC 12V
Display 3.5" TOUCH LCD
DC 12V
Built-in microphone
TV-Out
Front 120o, Rear 120
o
Specification
Codec
Resolution
Recording Format
Special Features
Time Stamp
GPS
Record Format
File System
File format
Component Video Signal
H.264 MPEG-4
Front/Rear 1920x1080@30fps (NTSC)
MP4
One Button Recording(Power On)
Timer saving
External receiver Option
FAT32
MP4
NTSC/PAL
*Special function
This manual is subject to change depending on the function of the
additions or changes.
For more detailed information about firmware or product
visit our web site. Set the function appropriate for the environment.

Warranty
Our warranty for this product is limited to the rule of consumer
compensation for damage.
- Please attach this warranty when you need to repair.
- This warranty is invalid if the date of purchase or store you
purchased from has been removed.
- If you do not have this warranty, please attach the proof of
purchase in the form of a bill of sale or receipted invoice.
Customer
Model Name
The date
Warranty
Store
Name
Phone
Address
One Year
Contents Remarks
This warranty does not cover for free as follows.
▶ Damage due to act of God, fire, earthquake
▶ Damage due to disassemble or to alter any part of the product
▶ Modifications
- Damaged cigar jack adaptor
- Damage due to connection to improper power adaptor
▶ Damage due to drop during moving
▶ Without this warranty
▶ Consumables
▶ Damage due to putting the something into the blackbox or
cleaning with toxic substance
▶ Component combustion due to using for a long time
*
Recommend daily use is 12hours.
*
Warranty of memory is 3 months
A/S Center Tel : 070-8230-3469 www.powerucc.com
COMPANY : POWERUCC
A/S
Center

www.powerucc.com
 Loading...