

Page 1
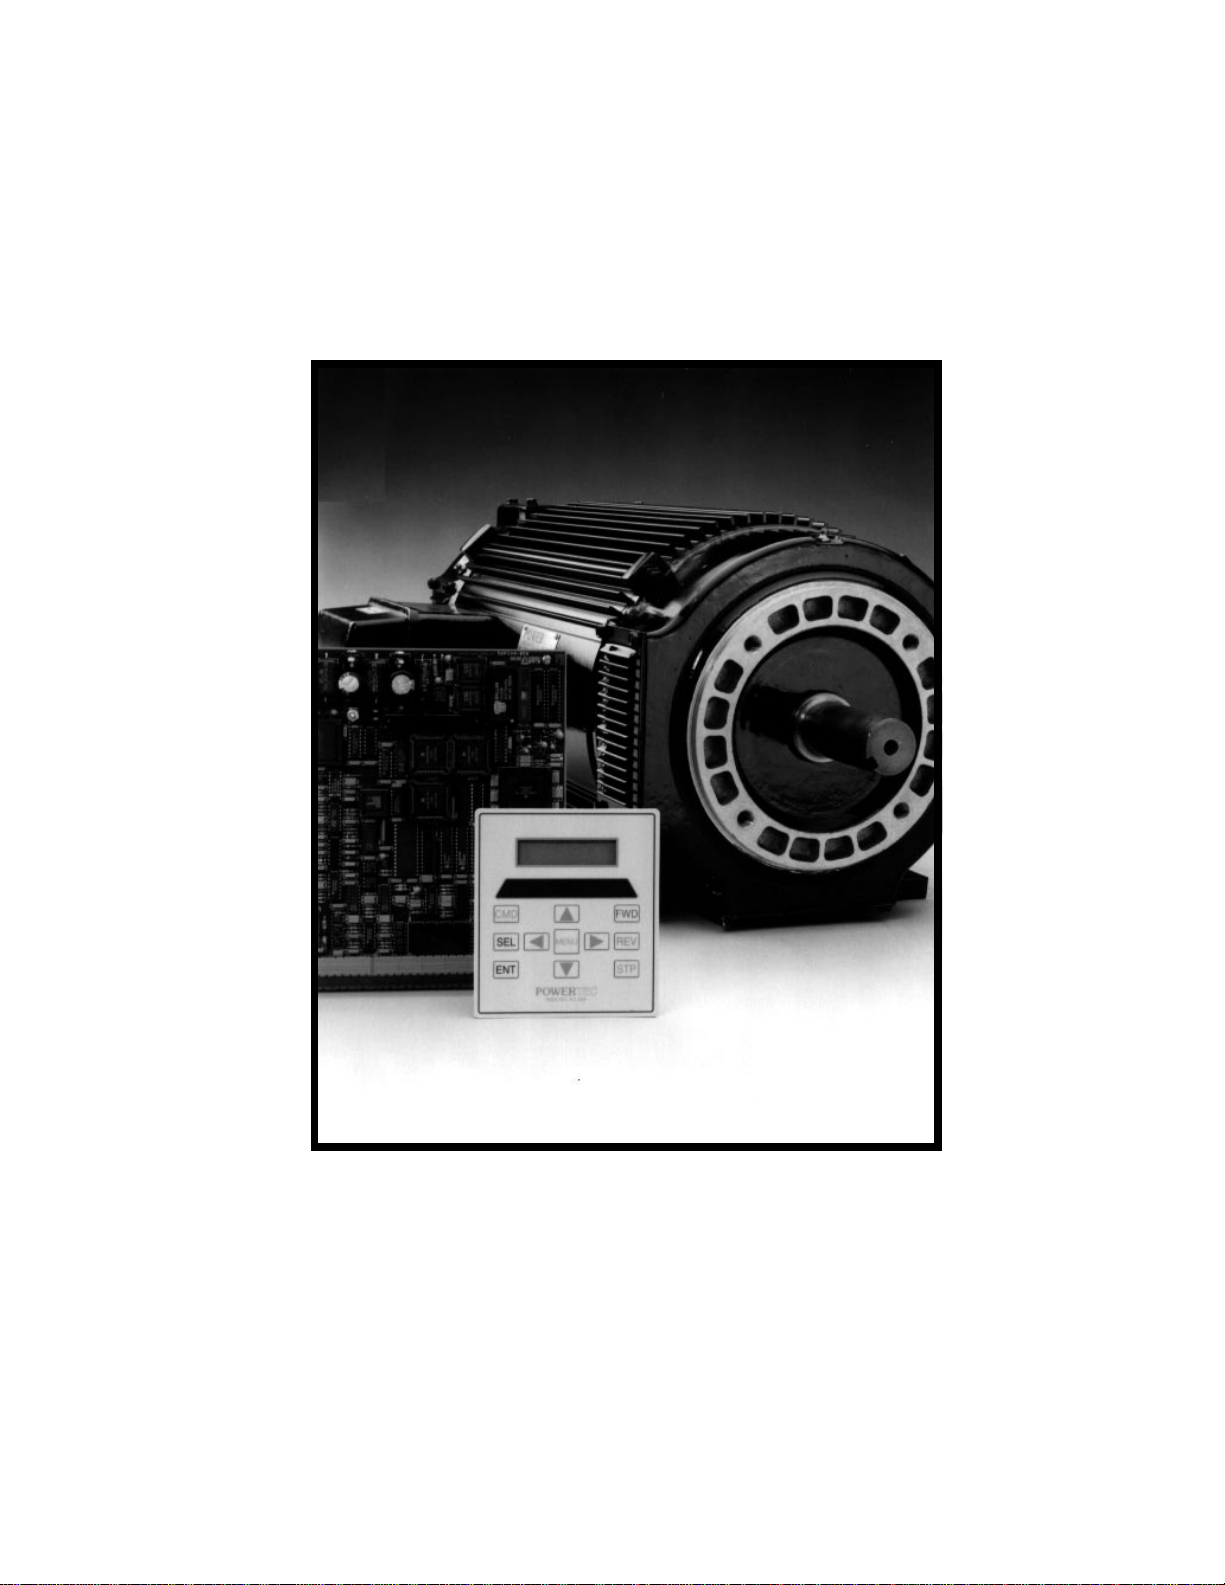
POWERTEC
Industrial Motors
DFS-1
DFS-1
SOFTWARE RELEASE 1.0
SOFTWARE RELEASE 1.0
MICROPROCESSOR B ASED
BRUSHLESS D.C.
MOTOR CONTROLLER
INSTALLATION AND
OPERATION
INSTRUCTION MANUAL
PRODUCTION RELEASE
AUGUST, 1994
Page 2

A subsidiary of
POWERTEC Industrial Corporation
Mailing Address: P.O.Box 2650 • Rock Hill, South Carolina USA 29732 • PHONE: 803-328-1888
Shipping Addre
ss: 2606 Eden Terrace • Rock Hill, South Carolina USA 29730 • FAX: 803-328-1870
© POWERTEC Publication # DFS-1
PM080994
Page 3

Corrections to page 44 of the manual, Attachment A: Detailed Commands
Read Speed/Status (81)
Changes shown in gray
[ST2] - 7 6 5 4 3 2 1 0
Local/Remote (0,1)
Master/slave (0,1)
At Speed (1)
Fwd. Dir. Set
Fault Detected (1)
Drive Enabled (1)
Microprocessor Fault
Zero Speed
ERRA T A
[ST1] - 7 6 5 4 3 2 1 0
Bus not charged (1)
IOC (1)
Stall
Inverse Time OL (1)
Heatsink Thermal OT
Commutation Fault
Overvolt
Undervolt
DFS-01IM
PM94290
Page 4

Additional Info
DFS Software Modification For
Dynamic Braking or Output Contactor
Operation
25 October, 1994
Functional Description
A new function for Contactor Aux has been added to the digital input choices. When configured as described
in the example, 24VDC must be present at this input for the drive to run. Parameter #62, Contactor Delay, is a
number of 25ms intervals that will occur between the DFS controller acceptance of a run command and the
firing of the transistors. If the Contactor Aux input signal is low, the DFS starts the timer and closes the
Contactor Output. If the Contactor Aux input does not switch high before the timer runs out, the drive will
return to the stop condition. If the Contactor Aux input does switch high, the drive will start running when the
timer runs out.
Example Setup for Dynamic Braking
1 Set Digital Input #7 mode to Contactor Aux, polarity to Active Low .
2 Set Digital Output #4 mode to Contactor, polarity to Normally Closed.
3 Set Contactor Delay to 20 (20 x 25ms = 500ms = 1/2 second).
Run command causes the Contactor Output to close, the Contactor Relay opens, the feedback contacts close
and the drive starts to run.
Example Setup for Output Contactor
1 Set Digital Input #7 mode to Contactor Aux, polarity to Active Low .
2 Set Digital Output #4 mode to Contactor, polarity to Normally Closed.
3 Set Contactor Delay to 10 (10 x 25ms = 250ms = 1/4 second).
Run command causes the Contactor Output to close, the Contactor Relay closes, the feedback contacts close
and the drive starts to run.
The difference in the operation of the two types of contactors is that the Dynamic Braking Contactor is
normally closed whereas the Output Contactor is normally open. In both contactors, the auxilliary contacts are
normally open.
Terms Used
1 Contactor Aux - The digital input on the DFS board which is connected to the feedback contacts on the
contactor relay.
2 Contactor Output - The digital output on the DFS board which activates the solenoid on the contactor
relay.
3 Signal low - 0VDC
4 Signal high - 24VDC
Page 5
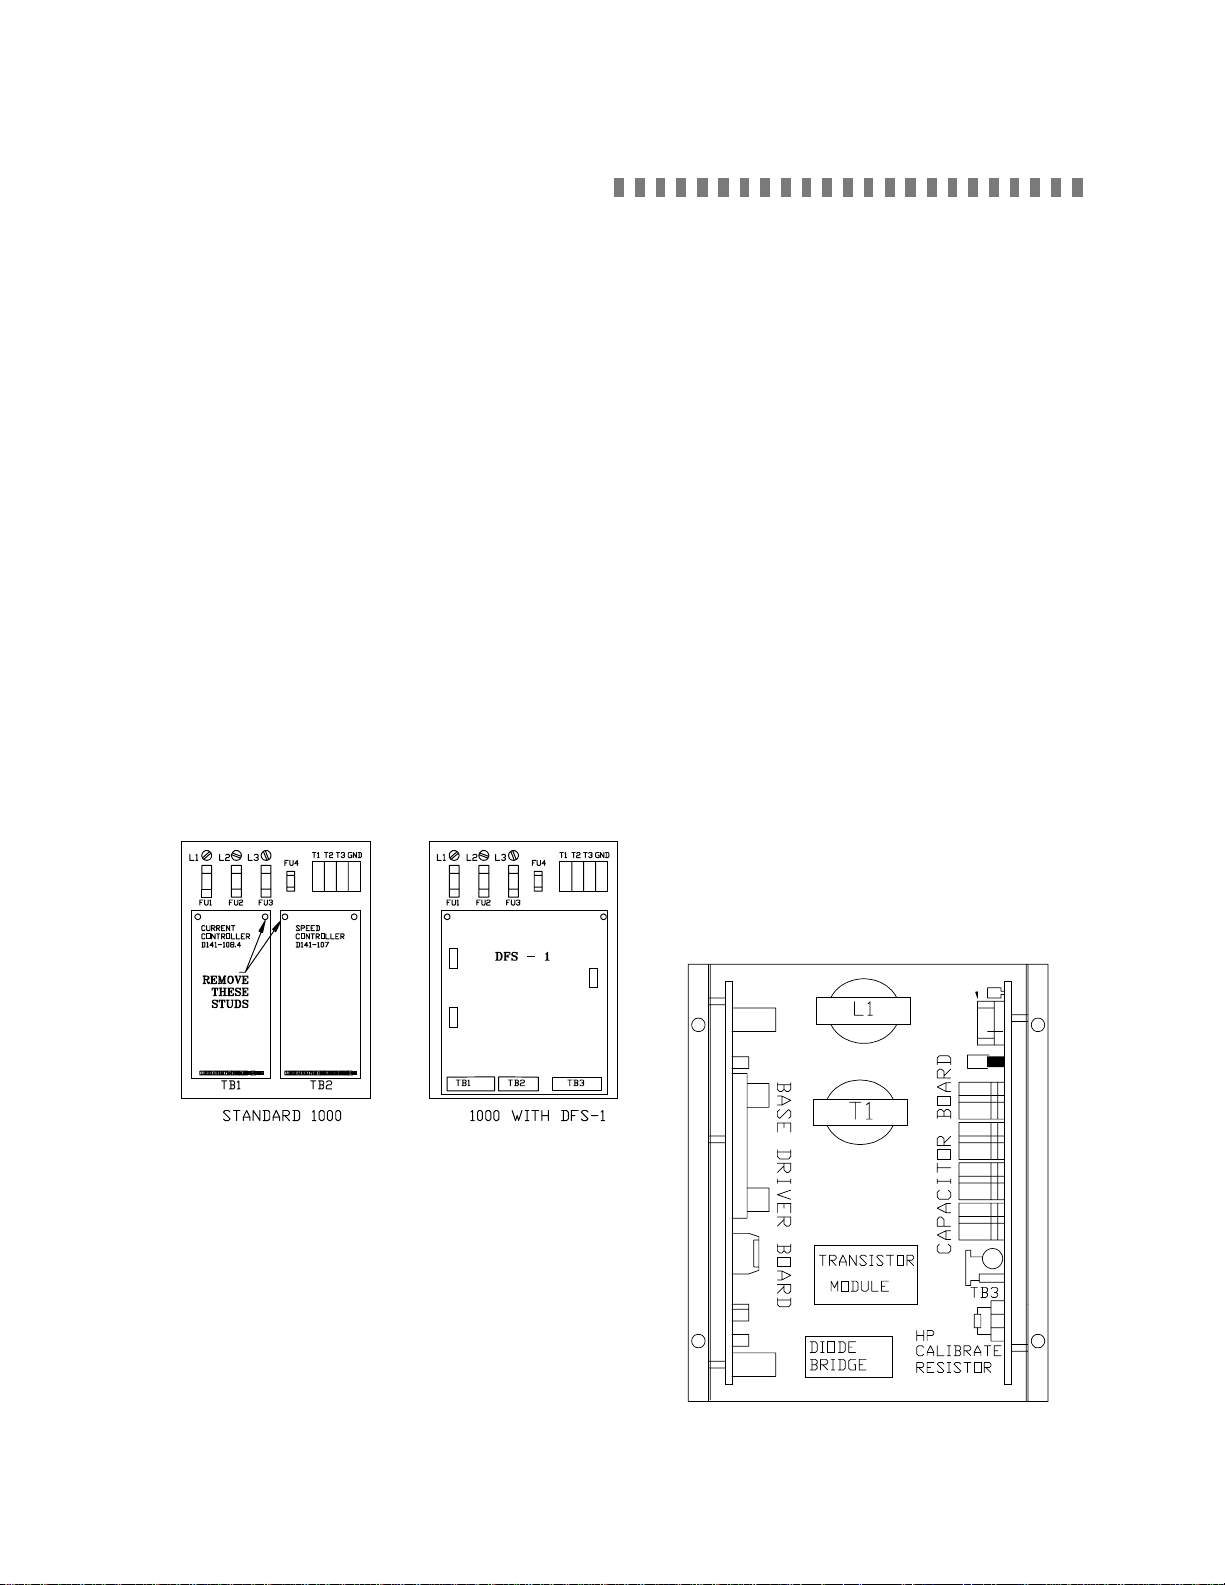
1.0 INSTALLATION
The DFS-1 printed circuit board mounts on
any POWERTEC Brushless DC motor control
except the Model 500. The Model 1000 is used here
for illustration purposes only.
1.1 MOUNTING -- READ THIS ENTIRE
SECTION BEFORE STARTING!
The DFS-1 printed circuit board mounts on
the Model 1000 or Model 1000AR motor control in
place of both the Current Controller board (part
#141-108) and the Speed Controller board (part
#141-107 on the non-regenerative model 1000, part
# 147-101 on the regenerative model 1000AR).
These boards are mounted side by side on all
standard motor controls. TB1 is located on the
Current Controller (left hand board) and TB2 is on
the Speed Controller (right hand board). The first
eight connections which normally come into TB1
(the motor cable leads) will connect to the same
places on the DFS-1. The connections going into
TB2 (mainly operators and speed pot) on the
standard motor control will go to different connections on the DFS-1.
There are two flat ribbon cables which must be
connected from the DFS-1 to the other parts of the
motor control: one goes to the Base Driver Board
(part #141-105), and the other cable goes to the
Capacitor Board (part #141-106). See figure 2 for
the physical layout of the control and the location of
these boards. If the DFS-1 board is being installed
in the field, the cables should come with the new
board, since the connectors on the DFS-1 end are
different from the connectors on the Speed and
Current controller ends of the previous cables. Make
sure that you have these new cables before proceeding to install the board. If you do not have them, call
POWERTEC's service department before proceeding.
The DFS-1 board may be used as either a nonregenerative control or as a regenerative control.
This selection is made by one of its parameter
settings. The DFS-1 may be installed on a Model
1000 non-regenerative brushless DC control, but if
the unit is to be used for a regenerative application,
a bus loader of the appropriate voltage and resistors
of sufficient wattage must be added before the drive
may be used regeneratively. If a bus loader is not
installed before regenerative operation occurs, it is
likely that the control will trip out repeatedly. A
Model 1000AR will already have a bus loader and
resistors attached.
Figure 1: The DFS-1 replaces two boards.
If the board is being installed to replace the
boards on a standard control, unplug the strips on
TB1 and TB2, but do not disconnect any wires from
them yet. Unplug the 14-pin connector on P2 (at the
Base Driver Board) and the 10-pin connector on P3
(at the Capacitor Board). Remove these cables and
the Speed and Current controller boards from the
chassis and set them aside. Remove the studs at the
top right of where the Current Controller board was,
and at the top left of where the Speed Controller was
located ( the center studs - see figure 1).
Figure 2: The Model 1000 chassis
Page 1
Page 6

CONTENTS
Introduction ...............................................................................................................................1
Summary of Warranty and Disclaimer ......................................................................................2
WARNING!...............................................................................................................................2
1.0 Connections ........................................................................................................................3
POWER CONNECTIONS: ............................................................................................................. ............... 3
MOTOR ENCODER CABLE: ....................................................................................................................... 4
ANALOG INPUTS:........................................................................................................................................ 4
ANALOG OUTPUTS:................................................................................................................................... 5
FREQUENCY INPUT:................................................................................................................................... 5
FREQUENCY OUTPUT:............................................................................................................................... 6
DIGITAL INPUTS:......................................................................................................................................... 6
DIGITAL OUTPUTS:..................................................................................................................................... 7
COMMUNICATIONS:................................................................................................................................... 7
DEFAULT SETUP.......................................................................................................................................... 9
2.0 Specifications ................................................................................................................... 11
POWER SUPPLIES...................................................................................................................................... 11
ANALOG INPUTS....................................................................................................................................... 11
ANALOG OUTPUTS................................................................................................................................... 11
FREQUENCY INPUTS AND OUTPUTS...................................................................................................12
DIGITAL INPUTS........................................................................................................................................ 12
DIGITAL OUTPUTS.................................................................................................................................... 12
COMMUNICATIONS.................................................................................................................................. 13
3.0 DFS-1 Parameters.............................................................................................................15
1. UNIT ID ................................................................................................................................................ 15
2. BAUD RATE......................................................................................................................................... 15
3. LOCAL / REMOTE CONTROL ........................................................................................................... 15
4. COMMUNICATIONS PROTOCOL ..................................................................................................... 16
5. MODES OF OPERATION..................................................................................................................... 16
6. MAXIMUM MOTOR SPEED...............................................................................................................17
7. ENCODER PULSES PER REVOLUTION .......................................................................................... 17
8. MASTER RAMP UP TIME .................................................................................................................. 18
9. MASTER RAMP DOWN TIME ........................................................................................................... 18
10. SLAVE RAMP UP TIME ...................................................................................................................... 1 8
11. SLAVE RAMP DOWN TIME............................................................................................................... 18
12. MASTER PRESET SPEED ................................................................................................................... 19
13. SLAVE RATIO PRESET ....................................................................................................................... 1 9
14. ENGINEERING UNITS ........................................................................................................................ 19
15. BASE RATIO......................................................................................................................................... 19
16. MAXIMUM RATIO ..............................................................................................................................20
17. ANALOG INPUT #1 MODE SELECT................................................................................................. 20
18. ANALOG INPUT #1 SIGNAL CONDITIONING............................................................................... 21
19. ANALOG INPUT #1 LOW ENGINEERING UNITS (EGU).............................................................. 21
20. ANALOG INPUT #1 HIGH ENGINEERING UNITS (EGU) ............................................................. 22
21. ANALOG INPUT #2 MODE SELECT................................................................................................. 22
22. ANALOG INPUT #2 SIGNAL CONDITIONING............................................................................... 22
Page 7

23. ANALOG INPUT #2 LOW ENGINEERING UNITS (EGU).............................................................. 22
24. ANALOG INPUT #2 HIGH ENGINEERING UNITS (EGU) ............................................................. 22
25. ANALOG OUTPUT #1 MODE SELECT............................................................................................. 23
26. ANALOG OUTPUT #1 LOW ENGINEERING UNITS (EGU).......................................................... 23
27. ANALOG OUTPUT #1 HIGH ENGINEERING UNITS (EGU) ......................................................... 23
28. ANALOG OUTPUT #2 MODE SELECT............................................................................................. 23
29. ANALOG OUTPUT #2 LOW ENGINEERING UNITS (EGU).......................................................... 24
30. ANALOG OUTPUT #2 HIGH ENGINEERING UNITS (EGU) ......................................................... 24
31. DIGITAL INPUT #1 FUNCTION......................................................................................................... 25
32. DIGITAL INPUT #2 FUNCTION......................................................................................................... 25
33. DIGITAL INPUT #3 FUNCTION......................................................................................................... 25
34. DIGITAL INPUT #4 FUNCTION......................................................................................................... 25
35. DIGITAL INPUT #5 FUNCTION......................................................................................................... 26
36. DIGITAL INPUT #6 FUNCTION......................................................................................................... 26
37. DIGITAL INPUT #7 FUNCTION......................................................................................................... 26
38. DIGITAL OUTPUT #1 FUNCTION..................................................................................................... 26
39. DIGITAL OUTPUT #2 FUNCTION..................................................................................................... 27
40. DIGITAL OUTPUT #3 FUNCTION..................................................................................................... 27
41. DIGITAL OUTPUT #4 FUNCTION..................................................................................................... 27
42. DRIVE GAIN SETTING ....................................................................................................................... 27
43. DRIVE STABILITY SETTING............................................................................................................. 27
44. DRIVE MOTORING CURRENT LIMIT ............................................................................................. 27
45. DRIVE REGENERATIVE CURRENT LIMIT..................................................................................... 28
46. PULSE MULTIPLIER ........................................................................................................................... 28
47. MODULATION AND OPERATION MODES..................................................................................... 28
48. JUMP OR MOP OPERATION .............................................................................................................. 28
49. MASTER JUMP UP AMOUNT............................................................................................................ 29
50. MASTER JUMP DOWN AMOUNT .................................................................................................... 29
51. SLAVE JUMP UP AMOUNT................................................................................................................ 29
52. SLAVE JUMP DOWN AMOUNT ........................................................................................................ 29
53. INPUT DEBOUNCE VALUE ............................................................................................................... 30
54. FLOAT OR FREEZE ............................................................................................................................. 30
55. MINIMUM RATIO................................................................................................................................30
56. COMMUNICATIONS TURNAROUND DELAY................................................................................ 30
57. MASTER JOG SPEED .......................................................................................................................... 31
58. SLAVE JOG RATIO .............................................................................................................................. 31
59. EGU TAG SELECT ............................................................................................................................... 31
60. MASTER PRESET #2 ........................................................................................................................... 31
61. SLAVE PRESET #2...............................................................................................................................31
4.0 DFS - 1 Setup ..................................................................................................................33
4.1 BASIC SETUP OF THE DFS-1 CONTROLLER................................................................................. 34
4.2 MASTER MODE SETUP..................................................................................................................... 35
4.3 SLAVE MODE SETUP......................................................................................................................... 36
4.4 INPUTS AND OUTPUTS SETUP....................................................................................................... 37
4.5 COMMUNICATIONS SETUP.............................................................................................................38
Page 8

5.0 DFS-1 ERROR CODES ..................................................................................................39
6.0 COMMUNICATION PROTOCOL..................................................................................41
COMMAND LIST........................................................................................................................................ 42
PARAMETER LIST ..................................................................................................................................... 43
ATTACHMENT A: DETAILED COMMANDS......................................................................................... 44
ATTACHMENT B: PARAMETER DESCRIPTION.................................................................................. 50
Additional Info ................................................................................................................ ........51
Typical Output Contactor Connections ........................................................................................................ 52
Typical Dynamic Braking Connections........................................................................................................ 53
Appendix A .............................................................................................................................55
RETROFITTING THE MODEL 1000,1000A, OR 1000AR
Appendix B..............................................................................................................................57
MENU AND KEYPAD HIERARCHY
Page 9

THIS PAGE WAS INTENTIONALLY LEFT BLANK.
Page 4
DFS-1 Manual Revised 7/95
POWERTEC Ind. Corp.©
Page 10

INTRODUCTION
s the computer revolution takes greater
control of industrial processes, there is
A
the process parameters. It is becoming ever more
necessary to control the important characteristics of
motors directly from computers and microprocessorbased controllers. Such control cannot wait for
operator intervention when changes occur in milliseconds and tolerances are measured in thousandths.
are controllable by manipulating its speed, torque,
and power. POWERTEC digitally implemented,
speed, torque, and power control - the DFS-1.
digitally based, and are a natural choice for a
computer controlled environment. Now computers
and PLC's talk to the drive itself when the field-
installable DFS-1 control board replaces the Speed
and Current boards on the standard POWERTEC
Brushless DC drive.
DFS-1 is that there are no adjustment potentiometers
and no setup switches. All characteristics of the drive
are controlled by software parameters which may be
entered by the optional KDU-1 keypad or host
computer. The KDU-1 keypad can be mounted on the
DFS-1 board, in a remote location (usually the
enclosure door), or in a handheld unit. A default set
of parameters which represent the most common
operating conditions will facilitate immediate
operation and testing after installation.
networks, the DFS-1 is programmable by an optional
keypad with its two line, 16-character display. A
single computer port may be used to monitor and
control up to 32 units in an RS-485 communications
link.
a growing need for more intimate control of
All of the operational characteristics of a motor
The Brushless DC motor and its control are
One of the first things you will notice about the
Capable of operating on a single drive or in
Programmable analog inputs and analog outputs
allow many possibilities for control through external
voltages, currents, and frequencies. They may also be
used to monitor drive operation. Digital inputs and
outputs (also programmable) give control and
monitoring flexibility as well as coordination
functions.
Provision is made for plug-in options which add
input and output options and accomplish special
functions. Optional software packages may be
ordered for specific application needs.
Revised 7/95 DFS-1 Manual
POWERTEC Ind. Corp.©
Page 5
Page 11

SUMMARY OF WARRANTY AND DISCLAIMER
POWERTEC Industrial Corporation warrants the DFS-1 to be free from defects in materials and work-
manship for a period of one year from the date of shipment from the factory, or if purchased from an authorized POWERTEC distributor or Original Equipment Manufacturer, not more than 18 months from the date
of shipment from the factory. Upon written notification to the factory of a possible defect in materials or
workmanship, POWERTEC will, at its sole option, repair or replace, at the factory, such defective parts as it
deems necessary to restore the unit to its original specifications.
There is no other warranty, express or implied, including fitness of purpose for the application intended.
This warranty does not cover accidental or intentional damage; physical or electrical misuse or abuse; defective or incorrect installation; effects on other equipment or caused by other equipment; attempted use outside
of specified ranges; or any other situation outside of the control of POWERTEC Industrial Corporation.
The user is responsible for the application of the DFS-1 product and the programming thereof.
This warranty does not encompass any other claims, including, but not limited to, special, incidental, or
consequential damages.
This manual has been assembled as a guide to the use of a POWERTEC product. It represents the best
efforts to compile and present the information herein. Such errors as may appear in no way affect the above
stated warranty. If mistakes of fact are found or suspected in this manual, please notify the factory or your
distributor at once.
WARNING!
The DFS-1 contains static sensitive parts which may be damaged by careless handling of the printed
circuit board. You can avoid this type of damage by always touching the frame of the drive before you touch
the printed circuit board or any of its connections.
The DFS-1 is supplied for field installation in a protective bag. Bring the bag into contact with the
motor controller frame before removing the board from the bag.
Page 6
DFS-1 Manual Revised 7/95
POWERTEC Ind. Corp.©
Page 12
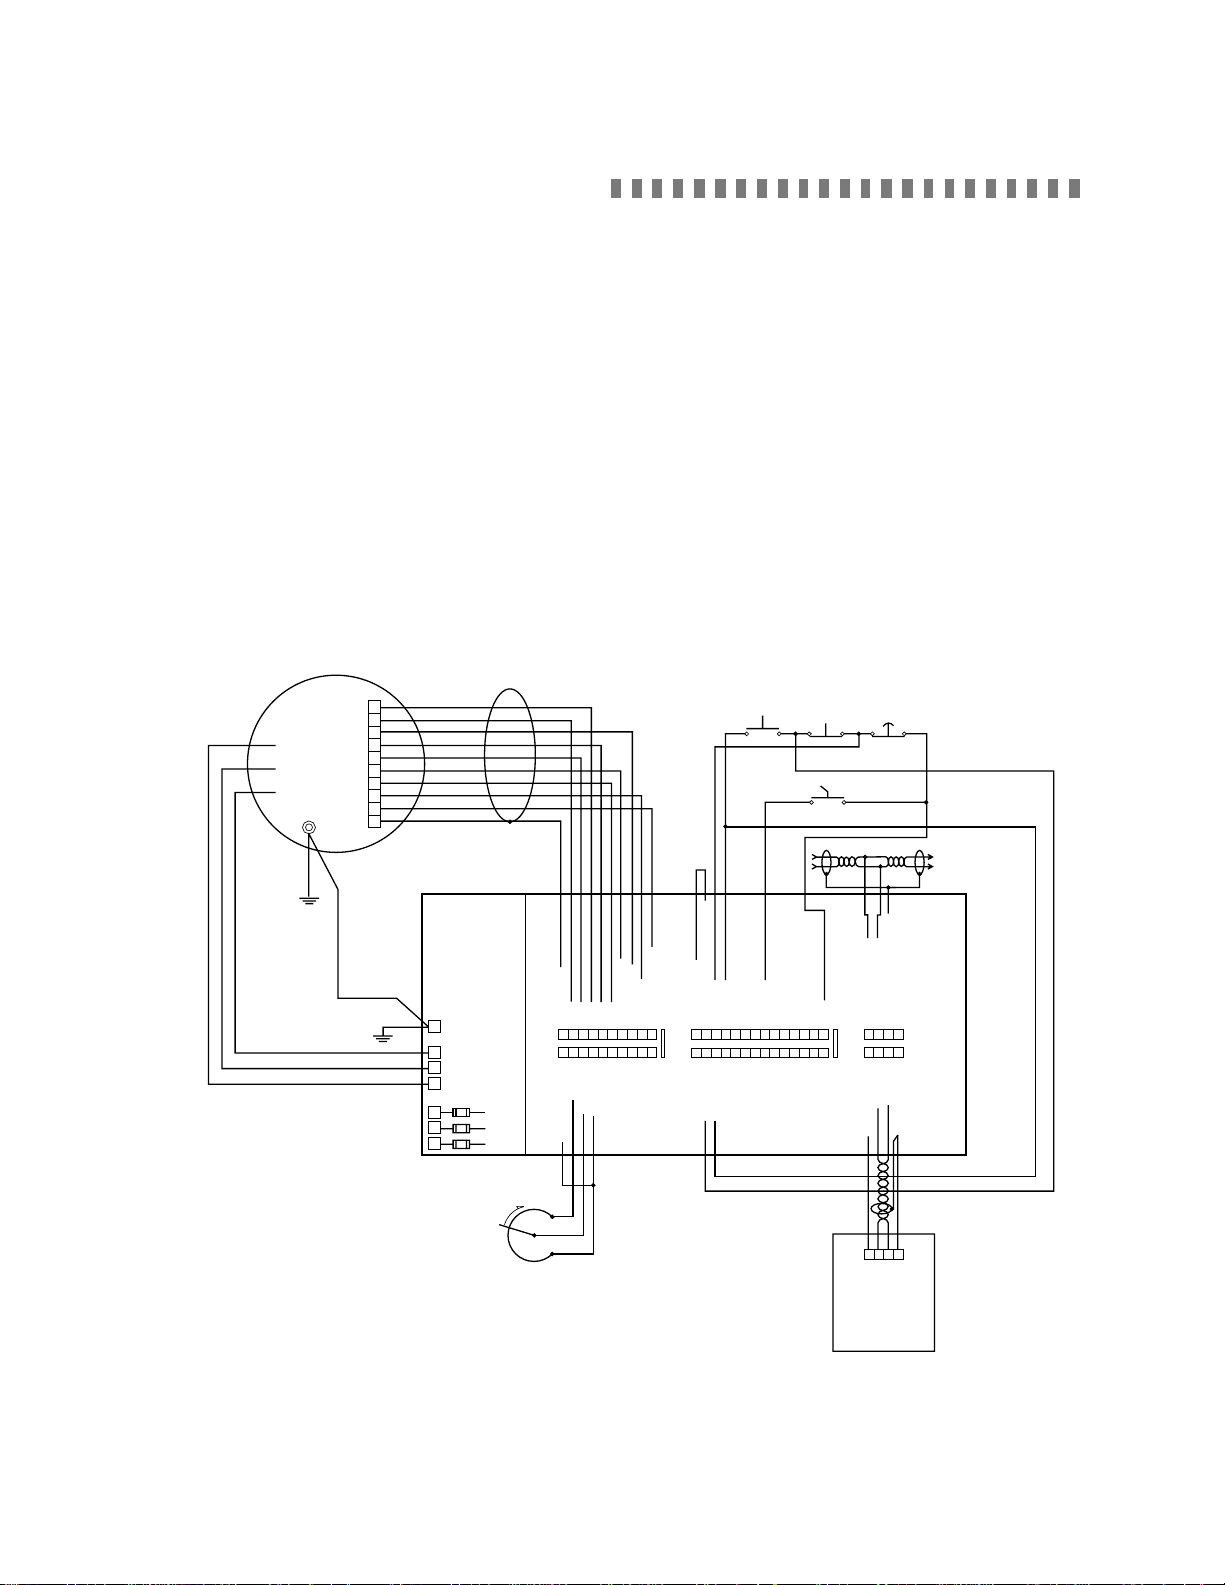
1.0 CONNECTIONS
POWER CONNECTIONS:
POWERTEC Brushless DC motor controllers
are supplied with nominal input voltages of 230, 380,
and 460VAC. Three phase input power is required.
The input is not phase sensitive. Connect the appropriate power supply to the input fuses at L1, L2, and
L3 (check nameplate for proper input voltage and
capacity).
Connect the output terminals T1, T2, and T3 to
the respective terminals on the Brushless DC motor.
It is very important that the T1 terminal on the motor
connects to T1 on the drive, T2 of the motor connects
to T2 of the drive, and T3 of the motor connects to
T3 of the drive. An earth ground wire of the same
gauge as the motor power leads or one gauge smaller
(no smaller than #14 AWG) must be run from a bolt
Orange
Motor
T1
T2
T3
1
Brown
2
Red
3
Blue
4
Yellow
5
Black
6
Green
7
Purple
8
White
9
Shield
10
in the motor junction box to the ground terminal on
the drive. A wire must then be run from the ground
terminal on the drive (next to the motor terminals) to
an earth ground at or near the power source. The
Model 1000 drive does not have the common
circuitry connected to earth ground (chassis). In
most cases this works best, but in some cases it does
not. POWERTEC recommends connecting a short
jumper wire from the drive common at any one of the
several places available on the terminal strips to a
nearby point on the drive chassis or backpanel that
will establish this ground. This is more important in
applications where multiple drives are connected
together or serial communications from a host are
used. All other POWERTEC drives have the
common grounded by mounting screws on the
regulator boards.
Run
Stop
Fwd Rev
E-Stop
RS-485
Communications
POWERTEC
Brushless
DC Drive
COMMUNICATIONS+
COMMUNICATIONS-
COMMUNICATIONS SHIELD
24V COMMON
Digital Input COMMON Cathodes
E-STOP
Digital In 1
Digital In 2
Digital In 3
Digital In 4
Digital In 5
Digital In 6
Digital In 7
FREQ REF IN+
FREQ IN-
FREQ REF SHIELD
Digital Out 4A
Digital Out 4B
FREQ REF OUT-
FREQ REF OUT+
+24V
Spacer
TB3
Spacer
SPEED OUT
Speed Out COMMON
FREQ REF COMMON
HALL SHIELD
HS1
HS3
HS2
HS4
HS5
HALL COMMON
HALL POWER
THERMAL
THERMAL POWER
-10VREF
Analog In 2-
Analog Out 1+
Spacer
1 2 3 4 5 6 7 8 9 10 11 12 13 14
A
TB2
1 2 3 4 5 6 7 8 9 10 11 12 13 14
B
+24V
Spacer
Analog Out 2+
Digital Out 1A
Analog Out COMMON
Digital Out 1B
Digital Out 2A
Digital Out 2B
Digital Out 3A
Digital Out 3B
G
T3
T2
T1
L3
L2
L1
Analog
Speed Pot
A
1 2 3 4 5 6 7 8 9 10
TB1
B
1 2 3 4 5 6 7 8 9 10
+10VDC
Analog In 1+
Analog In COMMON
Analog In 1-
Analog In 2+
1 2 3 4
A
1 2 3 4
B
DISPLAY POWER
1 2 3 4
Keypad
Display
Unit
COMMUNICATIONS COMMON
DISPLAY-
DISPLAY +
Display COMMON
DFS-1
Board
KDU Cable is
Belden # 9463
“Blue Hose” or
equivalent
Figure 3: Basic connections to the DFS-1 controlled POWERTEC Brushless DC motor control, using the factory default
settings for some of the inputs and outputs. Note that the speed pot input is the default, and that using the 4-20mA input
will require a change in the DFS-1 setup.
Revised 7/95 DFS-1 Manual
POWERTEC Ind. Corp.©
Page 7
Page 13

MOTOR ENCODER CABLE:
The motor encoder cable is connected to plug-in
terminal strip TB1:A on the DFS-1 PC board. A
shielded cable must be used for the motor encoder
cable. The recommended cable is a 9-conductor
shielded cable (Belden Cable part # 9539 or equivalent). The shield should be connected at the drive end
to the shield terminal (TB1:A1) and to terminal 10 (if
there is one) at the motor terminal strip and if not (as
on motors built prior to April 1992), the shield
should be cut off at the motor end and taped up.
The DFS-1 PC Board contains all of the func-
tions necessary to operate the Brushless DC motor
control according to the inputs connected to its
terminals and the programmed information in
memory. The DFS-1 board takes care of all speed,
torque, and control functions. It takes speed information from the encoder, environmental information and
current (load) information from the power output
circuits of the drive, and compares all that information to the input conditions and programmed parameters. It processes this information and turns the
power transistors on and off according to the needs of
the system.
The DFS-1 is delivered with an installed set of
default parameters which will allow it to operate with
a standard set of connections (as illustrated in Figure
3) of the types used with standard motor controls.
However, these standard connections will not be in
the same physical positions as they are in the
standard control, and the default setting will not
take care of any optional modes of operation.
There are three plug-in terminal strips on the
bottom of the DFS-1 PC board labelled in sections
from left to right: TB1, TB2, and TB3. Though the
three sections look like two rows of strips, there is a
small separator between each of the sections. Each
of the sections has an upper row (A) and a lower row
(B). The B row is closest to the PC board. The
terminals are numbered consecutively from left to
right on each level.
ANALOG INPUTS:
There are two analog input ports to the DFS-1 on
TB1:B. When used as a voltage input, both of the
analog inputs are a differential type of input with a
minimum input impedance of 200 Kohms. When
using one of the analog inputs for a voltage input, the
input common at terminal 1 on TB1:B should be used
for shields.
When using an analog input as a milliamp input,
the (-) side of the input (terminal 4 for Analog Input
#1 or terminal 6 for Analog Input #2) should be
connected to the common of the milliamp current
source. The milliamp source should be connected to
the (+) input (terminal 3 for Analog Input #1 or
terminal 5 for Analog Input #2).
COMMUNICATIONS+
COMMUNICATIONS-
COMMUNICATIONS SHIELD
1 2 3 4
1 2 3 4
DISPLAY-
DISPLAY +
DISPLAY POWER
COMMUNICATIONS COMMON
Display COMMON
HALL SHIELD
HS1
HS3
HS2
A
1 2 3 4 5 6 7 8 9 10
TB1
B
1 2 3 4 5 6 7 8 9 10
+10VDC
Analog In 1+
Analog In COMMON
HS4
HS5
HALL COMMON
-10VREF
Analog In 1-
Analog In 2-
Analog In 2+
HALL POWER
THERMAL
THERMAL POWER
Spacer
TB2
Spacer
Analog Out 1+
Analog Out 2+
Analog Out COMMON
COMMON
Digital Input COMMON Cathodes
E-STOP
Digital In 1
Digital In 2
Digital In 3
Digital In 4
Digital In 5
Digital In 6
Digital In 7
1 2 3 4 5 6 7 8 9 10 11 12 13 14
A
1 2 3 4 5 6 7 8 9 10 11 12 13 14
B
+24V
Digital Out 1A
Digital Out 1B
Digital Out 2A
Digital Out 2B
Digital Out 3A
Digital Out 3B
Digital Out 4A
Digital Out 4B
FREQ REF OUT+
FREQ REF IN+
FREQ IN-
FREQ REF SHIELD
+24V
Spacer
TB3
Spacer
SPEED OUT
FREQ REF OUT-
Digital out COMMON
Speed Out COMMON
A
B
Figure 4: Assignments of the DFS-1 terminals. There are default assignments, but any of the analog and digital inputs
and outputs (except the motor connections, power supplies, commons, emergency stop input, and frequency input) may be
changed by setup.
Page 8
DFS-1 Manual Revised 7/95
POWERTEC Ind. Corp.©
Page 14

The default speed reference input is Analog
Input #1, located on TB1:B. The default input is for
a 0 to +10VDC for zero to full speed of the motor.
Terminal 3 is the positive side of the input and
terminal 4 is the negative side. If the speed signal
being used is externally supplied, the differential
input will have a noise cancelling effect. Terminal 1
on TB1:B is a common for shields.
Reference sources of +10VDC and -10VDC are
supplied on the terminal strips at TB2:B2 and
TB2:B7, respectively. The default speed pot connections should be made as illustrated in figure 3. Notice
that the (-) side of the differential input (terminal 4)
is connected by a jumper to common (terminal 1),
because the DFS-1 reference source is being used. If
an external reference source is to be used, no jumper
is necessary.
IN THE DEFAULT SETUP, ONLY ANALOG
INPUT #1 IS ACTIVE. WHILE THE OTHER
ANALOG INPUT HAS A DEFAULT SETUP, IT IS
NOT ACTIVE UNTIL THE USER CHANGES THE
SETUP TO MAKE IT ACTIVE.
The microprocessor will look ONLY to Analog
Input #1 for speed information until it is told to do
otherwise in the setup program.
The other analog input to the DFS-1 is at TB1:B
(lower level) terminals 5 (+) and 6 (-). Both of the
inputs may be programmed for one of six inputs as
shown in the table below.
4. Comm set (value is set via Communications)
5. Commanded speed
Analog Output #1 default is a -10 to +10VDC
signal representing motor speed. The outputs are on
TB1:B terminals 8 (+) and 10 (-). The opposite
polarity is available by a parameter change. See the
description for parameters #26 and #27.
The default for Analog Output #2, terminals 9
(+) and 10 (-), is -10 to +10VDC representing motor
load, 0% to 150% load. The opposite polarity is
available by changing a parameter.
The maximum output current for the analog
outputs is 20 milliamps.
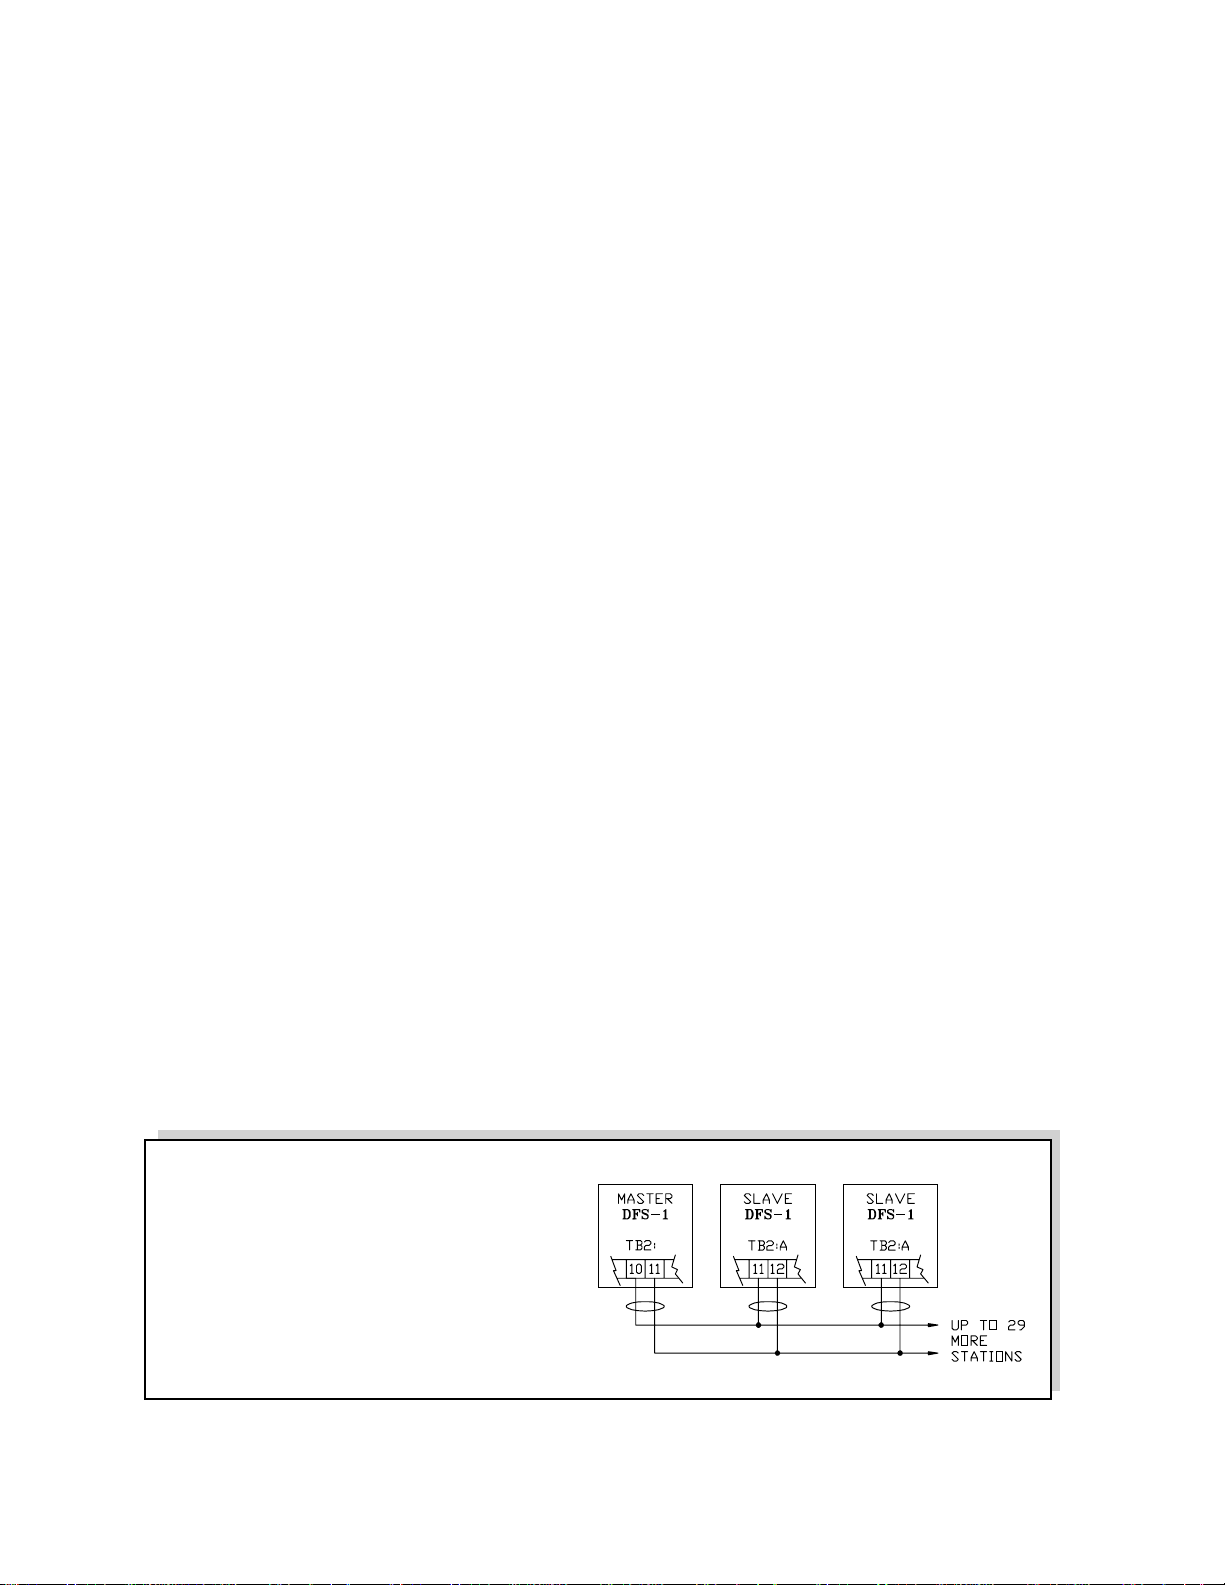
FREQUENCY INPUT:
There is only one frequency input on the DFS-1.
This input is used by the drive as the reference to
follow when the drive is in the SLAVE Mode of
operation. This input cannot be reassigned.
If the DFS-1 is in the MASTER mode, it will
ignore the frequency input.
The Frequency input is located at TB2:A
terminals 11(+) and 12 (-). This input is a differential
line receiver type intended to interface directly with
another DFS-1, a BCDMAX or CRM-1. There may
be multiple slaves connected to a single Master by
Input Signal Level (+) input term (-) input term jumper terms input impedance
-10 to +10 VDC 3 or 5 4 or 6 none ** 200 Kohms
0 to +10 VDC 3 or 5 4 or 6 none ** 200 Kohms
0 to +5 VDC 3 or 5 4 or 6 none ** 200 Kohms
1 to +5 VDC 3 or 5 4 or 6 none ** 200 Kohms
0 to 20 mADC 3 or 5 1 4 or 6 to 1 250 ohms
4 to 20 mADC 3 or 5 1 4 or 6 to 1 250 ohms
TB1:B TB1:B
** if the DFS-1 supplies are used, jumper 4 or 6 to 1 to establish the reference common.
ANALOG OUTPUTS:
daisy-chaining the frequency reference line. The last
slave on the line should have the jumper at JP1 on the
There are two analog outputs on TB1:B. Each of
the outputs may be programmed in several ways:
1. Disabled
2. Actual speed (value is proportional to motor
speed)
3. Load output (value is proportional to motor
load)
Revised 7/95 DFS-1 Manual
POWERTEC Ind. Corp.©
two rightmost pins. This inserts a terminating
resistor at the end of the line to help eliminate
electrical noise from the system. All others should
be on the two leftmost pins.
Contact POWERTEC’ s Application Engineering
Department before trying to use another type of
frequency on this input.
Page 9
Page 15
FREQUENCY OUTPUT:
DIGITAL INPUTS:
There are two outputs available to supply a
frequency for external use.
The first is located at TB2:B terminal 10 (+) and
11 (-). This is an output which is intended to provide
a reference frequency input for another DFS-1,
BCDMAX or CRM-1. This output is not compatible
with the DIGIMAX. It will provide a signal of +/-
1.5V minimum when connected to another DFS-1's
reference frequency input. This output on a unit
configured as a master, operates at 16 times the
frequency of the motor speed output reference. There
is a 120 ohm termination resistor built into the output
for transmission line termination.
When operating the DFS as a slave, the output
frequency is internally divided by 16 in addition to
being multiplied by the set ratio from the slave. As a
consequence, the frequency output from a DFS slave
cannot be used as the reference to another DFS slave
without some way of first multiplying this frequency
by 16. POWERTEC’s Cascade Ratio Multiplier
option board (4001-153430-XXX) can be used for
this purpose. Contact the factory for any frequency
following application which requires a reference
source other than a master DFS.
The other frequency output is at TB2:B13. This
is a 24VDC peak square wave referenced to the DFS-
1 common (TB2:B14). This signal is at the motor
speed output reference frequency and may be used
to interface with a DIGIMAX or a BLDC motor
control. This output sources a maximum of 10mA
and can sink 30mA.
There are eight digital control inputs on TB2:A
as well as a +24VDC supply (TB2-A14) and common (TB2-A1). The eight inputs are optical isolator
input diodes with a common cathode connection at
TB2-A2. When the +24VDC, DFS-1 supply is used
to power the inputs, TB2:A2 must be jumpered to
the 24VDC common terminal on TB2:A1.
The functions of all inputs are programmable
except Emergency Stop (TB2-A3). All digital inputs
are electrically isolated from the DFS-1 power
supplies and common when an external power supply
is used to power the digital inputs (such as from a
PLC).
The default parameter setup is for a set of
standard motor controller input connections on
TB2:A terminal strip (see figure 3 on page 3).
Five of the inputs are set up for standard pushbutton operation of the DFS-1. They are:
Run 4 (+)
Preset 5 (+)
UP (increase) 6 (+)
DOWN (decrease) 7 (+)
Reverse 8 (+)
All of these inputs are referred to TB2-A2. Note
that TB2-A2 (the common cathode connection) must
be jumpered to common (TB2:A1) in the basic
connections.
Each of these inputs will take a +24VDC input
(no more than 30VDC, not less than 18VDC). If an
external source of +24VDC is used, TB2-A2 on the
upper level must be connected to the negative side of
the external source.
Mode of Operation: differential
Number of receivers: 32 maximum
Maximum Cable Length: 4000 feet
Maximum Frequency: 10 Megahertz
Common Mode Voltage: +12V, -7V
maximum
Driver Output: +/-1.5V minimum
Driver Load: 60 ohm minimum
Driver Short Circuit: 1 50 mA to ground
Driver Output Resistance: 120 ohms (ON)
Receiver Input Resistance: 12 Kohms
Receiver Sensitivity: +/-200 mA
Figure 5: Slaving DFS-1 units with the Reference Frequency Output.
Page 10
B
DFS-1 Manual Revised 7/95
POWERTEC Ind. Corp.©
Page 16

The programmable inputs (TB2-A4 through
TB2-A10) may be programmed for jog, thread, or
other preset speeds. The inputs may also be used to
change torque levels, trim values, or ramp rates. Any
value which can be affected by a parameter can be
changed by a digital input.
DIGITAL OUTPUTS:
Digital outputs are located on TB2:B. The four
outputs are normally open relay contacts. The
contacts are rated at 120VAC at 1 amp, resistive.
The default setup assigns the outputs as follows:
Digital Out #1 Run
Digital Out #2 No Fault
Digital Out #3 At Speed
Digital Out #4 Reverse
These assignments may be changed by parameters.
All of the digital outputs are programmable and
may be configured as Normally Open or Normally
Closed. If more than one contact is required for a
certain function, an external relay may be used, or
more than one output may be programmed for the
same function.
COMMUNICA TIONS:
The standard communications for the DFS-1 is
the EIA standard RS-485 communications format
over a single twisted pair cable into TB3:A terminals
1 and 2. Terminal 3 is for the shield. DO NOT
CONNECT TERMINAL 3 TO GROUND! Maximum allowable distance for twisted pair operation is
4000 meters (about 12,000 feet). Maximum nodes
without repeaters is 32. Maximum communications
rate is 38.4 kilobaud. The last unit on the comm line
should have a jumper at JP2 on the rightmost 2 pins.
All other units should have the jumper on the
leftmost two pins.
There is an RS-485 local programming input at
TB3:B for an optional keypad display unit.
RS485 Communications Connections:
Most host or converter devices (including the
RS232/485 converter made by POWERTEC) include
1.2 Kohm pull up resistors which insure rx-tx- is
pulled down to ground and rx/tx+ is pulled up to +5V
when the line is inactive (tristated). This ensures the
high impedance (floating) line does not change state
due to noise when the line is not being driven. No
matter how many units are connected in the network,
only one such set of pull ups should be installed.
NOTE: The Allen Bradley RS485 connections
on their coprocessor module for the Series 5 PLCs do
not provide these pull ups and must be installed or
noise will prevent proper communications.
1.2K ohm
tx/rx+
tx/rx-
1.2K ohm
Revised 7/95 DFS-1 Manual
POWERTEC Ind. Corp.©
TB1A-8
TB3A-1
TB3A-2
TB3A-4
Page 11
Page 17

THIS PAGE WAS INTENTIONALLY LEFT BLANK.
Page 12
DFS-1 Manual Revised 7/95
POWERTEC Ind. Corp.©
Page 18

The concept behind the DFS-1 calls for fully
programmable inputs and outputs. The ability to
change analog and digital inputs and outputs at will
lends a whole new meaning to the word "flexibility".
POWERTEC has established a set of "default"
parameters which will leave the setup of the DFS-1
in a way that will operate a motor in the basic
configuration (see figure 3 on page 3 and figure 4 on
page 4). There are two good reasons for doing this:
1. This default setup allows the user to connect
and operate a motor using common, everyday
connections without having to program the DFS-1
prior to its initial use.
2. The default setup provides a baseline to
which the user can return if it appears that something
is wrong with either the user's setup or the motor
control. There is a command which allows the "reset"
of the setup to the default configuration.
DEFAULT SETUP
Revised 7/95 DFS-1 Manual
POWERTEC Ind. Corp.©
Page 13
Page 19

THIS PAGE WAS INTENTIONALLY LEFT BLANK.
Page 14
DFS-1 Manual Revised 7/95
POWERTEC Ind. Corp.©
Page 20

2.0 SPECIFICATIONS
POWER SUPPLIES
+24VDC • Available at TB2:A14, and TB2:B1.
• The combination is fused at 250 milliamps
(mA). The fuse is self-healing.
• The opening of the fuse alerts the microprocessor.
• These supplies should only be used for
push-buttons, relays, PLC outputs, etc.
which interface directly with the DFS-1.
They should not be used as general purpose supplies.
+10VDC • Reference supply available at TB1:B2.
This output is rated at 100mA. This output is current limited and thermally protected.
-10VDC • Reference supply available at TB1:B7.
This output is rated at 100mA, current
limited and thermally protected.
+5VDC • Supply for motor encoder available at
TB1:A9. This supply is fused at 100mA
with a self-healing fuse. When the fuse
opens, it alerts the microprocessor.
5.0 Each of the two inputs may be set up one of
six ways:
1. -10 to +10 VDC
2. 0 to +10 VDC
3. 0 to 5 VDC
4. 1 to 5 VDC
5. 0 to 20 mADC
6. 4 to 20 mADC
6.0 Setup is by parameter selection (#18 for
Analog Input #1 and parameter #22 for Analog
Input #2).
7.0 Voltage inputs are a differential input connection.
8.0 Input impedance of each input in voltage input
mode is 200 Kilohms minimum.
9.0 Input impedance in milliamp input mode is
250 ohms.
Factory default setups are included so that the
DFS-1 does not have to be programmed prior to its
initial use. Factory defaults are only one of the many
ways the DFS-1 can be set up.
Default setups are as follows:
INPUT SETUP FUNCTION
1. 0 to +10VDC Speed Reference Input
2. -10 to +10VDC General Purpose Input
THIS SUPPLY IS FOR THE MOTOR ENCODER
ONLY!
ANALOG INPUTS
1.0 There are two analog inputs on TB1:B. (see
section 1.2, page 4)
2.0 Each input may be set up in one of several
modes.
3.0 Pre-programmed modes are:
3.1 General purpose Input
3.2 Speed Reference Input
3.3 Trim (dancer or load cell) Input
3.4 External Motoring Torque Limit
3.5 External Regenerative Torque Limit
3.6 Horsepower Mode
4.0 The mode of the input is set by parameter (#17
for Analog Input #1 and parameter #21 for
Analog Input #2).
Revised 7/95 DFS-1 Manual
POWERTEC Ind. Corp.©
ANALOG OUTPUTS
1.0 There are two analog outputs on TB1:B.
2.0 The analog outputs may be programmed for
3.0 Output impedance is less than 100 ohms.
4.0 Maximum output voltage is +/- 10VDC.
5.0 Maximum current is 25mADC.
one of five modes:
2.1 Disabled
2.2 Motor Speed Output -10 to +10VDC
= 0 to 100% (Actual Motor Speed)
Default - Analog Output #1
2.3 Motor Load Output -10 to +10VDC
= 0 to 150%
Default - Analog Output #2
2.4 Set by Communications Link
2.5 Commanded Motor Speed
Page 15
Page 21

FREQUENCY INPUTS AND
OUTPUTS
There is one frequency input and there are two
frequency outputs available.
INPUT
#1 REFERENCE FREQUENCY INPUT
TB2:A Terminals 11 (+) and 12 (-).
• This is a line receiver type input which must be
driven by a differential line driver output.
• This frequency input requires a frequency 16
times the feedback from the motor.
• The feedback from the motor is normally 120
PPR for 4 pole motors and 240 PPR for 8 pole
motors.
• Normal input is 56 Kilohertz for 0 to full speed
for a 1750 RPM motor with a 120ppr encoder.
• Terminal 13 is for the shield. Do not ground
terminal 13 directly. It is internally terminated.
OUTPUTS
#1 REFERENCE FREQUENCY OUTPUT
TB2:B Terminals 10 (+) and 11 (-),
• This is a differential line driver output which
must be used with a differential line driver input.
• This frequency output is 16 times the reference
frequency to the motor.
• This output may drive up to 32 receivers.
• Connect the shield to terminal 12. This will
ground the shield internally.
#2 MOTOR SPEED FREQUENCY OUTPUT
TB2:B Terminals 13 (+) and 14 (common),
• This output is a +24VDC peak square wave at
the motor feedback pulse rate, which is 2 times
RPM for 4 pole motors and 4 times RPM for 8
pole motors.
The reference frequency input and output are
capable of receiving and sending at up to 1 Megahertz.
Motor Speed output emits frequencies up to 100
Kilohertz.
DIGITAL INPUTS
The eight digital inputs of the DFS-1 are
optically coupled requiring +24VDC (+/-6VDC) at
about 5mA each. These inputs are isolated from the
common of the board.
All inputs are programmable as to function,
EXCEPT the EMERGENCY STOP input. Inputs #1
through #7 may be assigned as general purpose
inputs.
The defaults are as follows:
TB2:A terminal 3(+) Emergency Stop
(Cannot be reassigned)
DI 1. TB2:A4(+) Run
DI 2. TB2:A5(+) Preset Speed
DI 3. TB2:A6(+) Up (Increase)
DI 4. TB2:A7(+) Down (Decrease)
DI 5. TB2:A8(+) Reverse
DI 6. TB2:A9(+) Frequency Mode
DI 7. TB2:A10(+) Local/Remote
Inputs #1 through #7 may also be programmed
for inverted input, i.e., active when input is low.
DIGITAL OUTPUTS
There are four dry contact outputs from the
DFS-1. All of these outputs are on TB2:B. All
outputs are programmable as to function, and all
outputs may be set up as either normally open or
normally closed.
Each relay output has a single, isolated, contact
output which may be programmed as normally open
or normally closed, with the contact rated at 1 Amp,
125VAC resistive.
The default assignments are as follows:
DO 1. TB2:B terminals 2 and 3 Run relay contact
Closed while running
DO 2. TB2:B terminals 4 and 5 No fault relay
Closed while no faults
DO 3. TB2:B terminals 6 and 7 At Speed relay
Closed when at speed
DO 4. TB2:B terminals 8 and 9 Remote Mode
Closed when in Remote
Page 16
DFS-1 Manual Revised 7/95
POWERTEC Ind. Corp.©
Page 22

COMMUNICA TIONS
Standard: RS-485
Data Rates: 300, 600, 1200, 2400, 4800, 9600,
19.2K, and 38.4K baud
Addresses: 1 to 255
Protocols: POWERTEC Binary protocol
Distance: 4000 meters (about 12,000 feet)
maximum with twisted pair shielded
cable
Nodes: 32 maximum
Revised 7/95 DFS-1 Manual
POWERTEC Ind. Corp.©
Page 17
Page 23

THIS PAGE WAS INTENTIONALLY LEFT BLANK.
Page 18
DFS-1 Manual Revised 7/95
POWERTEC Ind. Corp.©
Page 24

3.0 DFS-1 PARAMETERS
DFS-1 parameters are stored as DOUBLE
WORD values (32 bits), regardless of the actual size
of the data. This method is used to simplify the entire
system at a cost of a little extra data storage.
A double word consists of four BYTES (8 bits).
Each byte is a hexadecimal (base 16) value which
ranges from 00h (0 decimal) to FFh (255 decimal).
The largest number used in the DFS-1 parameters is
99,999 decimal, which, in hexadecimal notation is
0001 869Fh.
In many cases, information other than numbers
is passed and stored in the parameters. The left byte
is the most significant and the last byte is the least
significant. The arrangement of the bytes for this
purpose is: VL4 VL3 VL2 VL1 where VL4 is the
Most Significant Bit (MSB) and VL1 is the Least
Significant Bit (LSB). Each parameter breaks down
the bytes accordingly.
All four bytes are required in communications. A
number which must be either 0 or 1 must be passed
as either 0000 0000h or 0000 0001h.
1. UNIT ID
USE PARAMETER #1 TO IDENTIFY THE ADDRESS OF THE UNIT ON A NETWORK.
RANGE OF VALUES: 0000 0001h to 0000 00FFh
1 to 255 (decimal)
Default Value: 0000 0001h 1 (decimal)
The Unit ID number is installed in parameter #1.
This serves as an address on the external communications link. Two DFS-1 units cannot have the same
address while installed on the same communications
link.
There are 254 possible addresses if the default
value of 1 is not used as an address. Since the default
value is 1, there could be a problem if a new unit is
installed without changing the #1 parameter.
2 . BAUD RA TE
USE PARAMETER #2 TO SET THE COMMUNICATIONS SPEED OF THE NETWORK.
RANGE OF VALUES: 0000 0000h to 0000 0007h
0 to 7 (decimal)
Default Value: 0000 0002h 2 (decimal)
This establishes the rate at which data is exchanged in the communications link. Every DFS-1 in
the communications link must have the same baud
rate set up in parameter #2. The parameter selects
from among eight industry standard baud rates:
NUMBER BAUD RATE
0000 0000h 38.4 Kilobaud (38,400 baud)
. . . . 01 19.2 Kilobaud (19,200 baud)
. . . . 02 9,600 baud
. . . . 03 4,800 baud
. . . . 04 2,400 baud
. . . . 05 1,200 baud
. . . . 06 600 baud
. . . . 07 300 baud
3 . LOCAL / REMOTE CONTROL
USE PARAMETER #3 TO SET UP WHICH
FUNCTIONS ARE CONTROLLED REMOTELY.
RANGE OF VALUES: 0000 0000h to 0000 007Fh
0 to 127 (decimal)
Default Value: 0000 0000h 0 (decimal)
Parameter #3 is first broken down into bytes, and
then VL1 is further broken down into bits.
When broken down into bits, 00h = 0000 0000b,
and 7Fh = 0111 1111b.
VL4 is always 00h.
VL3 is always 00h.
VL2 is always 00h.
VL1 is broken down into eight bits, which are
numbered from right to left: 7654 3210h.
Functions are assigned as follows:
Bit Position Function
7 NOT USED
6 Master/Slave (not presently functional)
5 Frequency Mode
4 Reverse
3 Down
2Up
1 Preset
0 Run
A zero in a bit position means that function may
be controlled from an input terminal assigned to it. A
one in a bit position means that the function may
only be controlled via a communications link, such as
the operator’s station connection or the external RS485 communications link.
For instance, if VL1 is given a value of 01 (0000
Revised 7/95 DFS-1 Manual
POWERTEC Ind. Corp.©
Page 19
Page 25

0001b) , the Run FUNCTION cannot be controlled
from the terminal strip, but can only be controlled
through the external communications link or the local
comm link (keypad display unit).
If VL1 has a value of 73 (0111 0011b), all
functions except UP and DOWN are controlled
remotely.
NOTE: Parameter #3 ONLY determines
whether a FUNCTION is controlled locally or
remotely. This parameter has nothing to do with the
assignment of functions to terminals.
Any input function can be assigned to any input
terminal with the exception of the Emergency Stop
input. The Emergency stop function is hard-wired on
the DFS-1 board and cannot be changed by either
programming or parameters.
If the RUN function is assigned to an input
terminal, and this parameter is set to remote the RUN
function control, the terminal will be IGNORED.
4. COMMUNICATIONS
PROTOCOL
5 . MODES OF OPERA TION
USE PARAMETER #5 TO SET UP MASTER/
SLAVE AND TORQUE LIMITING MODES.
RANGE OF VALUES: 0000 0000h to 0003 0002h
no decimal significance
Default Value: 0000 0000h no decimal
significance
This parameter is a dual purpose command used
to set operational modes of the DFS-1:
VL2 VL1 sets the basic operation of the board.
There are three modes of basic operation used to
determine where the speed and/or torque commands
originate:
0000h MASTER mode (the board generates its
own speed/torque based on its parameters)
0001h SLAVE mode (the board follows an
external signal in direct proportion)
0002h INVERSE Slave mode (board follows
an external signal in inverse
proportion)
USE PARAMETER #4 TO IDENTIFY THE NETWORK COMMUNICATIONS LANGUAGE.
RANGE OF VALUES: 0000 0000h to 0000 0001h
0 to 1 (decimal)
Default Value: 0000 0000h 0 (decimal)
At the present time, the only communications
protocol available is Powertec’ s Binary protocol.
This parameter has been included with the intent of
providing alternative protocols at some time in the
future.
The DFS-1 board in MASTER mode generates
its own speed and torque commands.
In SLAVE mode the board follows a reference
frequency at TB2:A terminals 11(+) and 12(-), which
should be nominally 16 times the desired speed of the
motor. This signal is available from another DFS-1
board or from a BCDMAX board. It may also come
from another source which has a compatible line
driver output. (See the description for frequency
input elsewhere in this manual).
In INVERSE slave mode, the board follows the
external frequency in a proportion of 1/RATIO.
Instead of setting a direct ratio of 0.5000, a ratio of
2.0000 may be entered for half speed. This is useful
in cases requiring draw settings where the slave is
physically located before the master, which is set for
line speed.
VL4 VL3 contains information on modified
operational modes in which the torque in the motor is
limited below the current limit level (current limits
are always set by parameters 44 and 45). These
optional modes are defined as follows:
Page 20
DFS-1 Manual Revised 7/95
POWERTEC Ind. Corp.©
Page 26

0000h Normal current limits (motor current
not limited at a lower level)
0001h Motoring torque setpoint (motoring
current to be limited at a lower level)
0002h Regenerative torque setpoint (regenera-
tive current to be limited at a lower
level)
0003h Horsepower setpoint (the product of
motor current and motor speed is
limited)
0004h through 000Fh available for future use
When in the normal mode, the current in the
motor is not controlled below current limit.
If one of the modified operational modes is
chosen, the torque/horsepower setpoint is selectable
in one of three places:
1. Analog Input #1 (must be set up in
parameter #17)
2. Analog Input #2 (must be set up in
parameter #21)
3. The Set Application Mode (8F)
Command via communications
If one of these three setpoints is not present, the
setpoint defaults to the appropriate current limit
level.
6. MAXIMUM MOTOR SPEED
USE PARAMETER #6 TO SET THE ABSOLUTE
MAXIMUM MOTOR SPEED.
RANGE OF VALUES: 0000 0001h to 0000 2710h
1 TO 10,000 (decimal)
Default Value: 0000 06D6h 1750 (decimal)
The maximum motor speed parameter is set
directly in Revolutions Per Minute (RPM) once the
Encoder Pulses Per Revolution (PPR) is set in
parameter # 7. If the incorrect PPR is set in parameter #7, the maximum motor speed will not be correct
and the motor may overspeed or not be able to go fast
enough.
The maximum motor speed is normally the
number given on the nameplate of the motor. This
number may be set higher than the motor nameplate
in some situations because the Brushless DC motor is
capable of some overspeed with light loads.
This parameter may be set to a value which is
lower than the motor’s base speed in cases where it is
not desired to use the full speed of the motor.
7 . ENCODER PULSES PER
REVOLUTION
USE PARAMETER #7 TO ESTABLISH THE
PULSE FEEDBACK RATE FROM THE MOTOR.
RANGE OF VALUES: 0000 0001h to 0000 4E20h
1 TO 20,000 (decimal)
Default Value: 0000 0078h 120 (decimal)
This parameter tells the DFS-1 the resolution of
the encoder in Pulses Per Revolution (PPR). This is
normally four times (4X) the rate of one channel of
the motor’s encoder.
Motors from the 42 frame through the 259T
frame have a 30 PPR, two channel, quadrature
internal encoder. For these motors using the internal
encoders the parameter should be set to 120 PPR.
Motors from 287TZ through 5010ATZ have an
internal 60 PPR, two channel, quadrature encoder.
The parameter for these motors using the internal
encoders should be set to 240 PPR.
External encoders may have almost any PPR
rate, and they must have two channels in quadrature
(the channels have the same pulse rate, but they are
90° out of phase with each other). The pulse rate will
be on the ENCODER nameplate.
Encoders with higher pulse rates are normally
used to obtain lower speeds and/or finer resolution of
motor shaft position. The most common external
encoder on POWERTEC motors is a 600 PPR, two
channel, quadrature optical encoder. For this encoder
the PPR in this parameter will be 2400.
For other encoders, multiply the pulse rate for
one channel (the usual number given on the nameplate) by four and enter that number in this parameter.
This parameter may not be changed while
running. Attempting to change this parameter while
running will result in the effect being delayed until
the next time a setpoint command is given or until
the control is stopped. Changing this number will
drastically affect the calibration of the system.
(Also see Parameter 46)
Revised 7/95 DFS-1 Manual
POWERTEC Ind. Corp.©
Page 21
Page 27

8. MASTER RAMP UP TIME
10. SLA VE RAMP UP TIME
USE PARAMETER #8 TO SET THE TIME TO
RAMP FROM ZERO TO FULL SPEED.
RANGE OF VALUES: 0000 0001h to 0003 E418h
1 TO 255,000 (decimal)
Default Value: 0000 2710h 10,000 (decimal)
This is the acceleration time from zero speed to
full speed in the MASTER mode. The time may be
set from 1 millisecond (.001 sec.) to 255 seconds.
The default is 10 seconds (10,000 mSec).
The acceleration rate is calculated from zero to
maximum motor speed (parameter 6). This rate is
used when the speed command in MASTER mode is
changed from a lower speed (including 0) to a higher
speed.
If the change in speed is from zero speed to full
speed, the full amount of time will be used. If the
change is from 25% speed to 75% speed, it will take
1/2 of the time set in this parameter to reach the new
speed. If the change is from 80% speed to 90%
speed, it will take 1/10th the time in this parameter.
The acceleration rate does not affect the JUMP
UP change in speed.
9 . MASTER RAMP DOWN TIME
USE PARAMETER #9 TO SET THE TIME TO
RAMP FROM FULL TO ZERO SPEED.
RANGE OF VALUES: 0000 0001h to 0003 E418h
1 TO 255,000 (decimal)
Default Value: 0000 2710h 10,000 (decimal)
This is the deceleration rate in the MASTER
mode. The rate may be set from 1 millisecond (.001
sec.) to 255 seconds. The default is 10 seconds.
The rate is calculated from maximum speed
(parameter 6) to zero speed. This rate is used
whenever the speed command in the MASTER mode
is changed from a higher speed to a lower speed
(including 0).
If the change in speed is from full speed to zero
speed, the full amount of time will be used. If the
change is from 75% speed to 25% speed, it will take
1/2 of the time set in this parameter to reach the new
speed. If the change is from 80% speed to 90%
speed, it will take 1/10th the time in this parameter.
The deceleration rate does not affect the JUMP
DOWN change in speed.
USE PARAMETER #10 TO SET THE UP RAMP
TIME WHEN THE RATIO IS CHANGED.
RANGE OF VALUES: 0000 0001h to 0003 E418h
1 TO 255,000 (decimal)
Default Value: 0000 2710h 10,000 (decimal)
This is the acceleration rate in the SLAVE mode.
The rate may be set from 1 millisecond (.001 sec.) to
255 seconds. The default is 10 seconds (10,000
mSec).
This parameter sets a rate determined by the
amount of time it takes to change from a ratio of
0.0000 to a ratio of 1.0000. This rate is used whenever the ratio setpoint in the SLAVE or INVERSE
SLAVE mode is changed from a lower ratio (including 0) to a higher ratio.
This rate does not affect the rate at which the
DFS-1 responds to changes in the reference frequency, nor does it affect the ratio when the drive is
started as a slave if parameter #54 is set to Freeze.
This rate does not affect the Slave JUMP UP
time.
11. SLAVE RAMP DOWN TIME
USE PARAMETER #11 TO SET THE down RAMP
TIME WHEN THE RATIO IS CHANGED.
RANGE OF VALUES: 0000 0001h to 0003 E418h
1 TO 255,000 (decimal)
Default Value: 0000 2710h 10,000 (decimal)
This is the deceleration rate in the SLAVE mode.
The rate may be set from 1 millisecond (.001 sec.) to
255 seconds. The default is 10 seconds (10,000
mSec).
This parameter sets a rate determined by the
amount of time it takes to change from a ratio of
1.0000 to a ratio of 0.0000. This rate is used whenever the ratio setpoint in the SLAVE or INVERSE
SLAVE mode is changed from a higher ratio to a
lower ratio (including 0).
This rate does not affect the rate at which the
DFS - 1 responds to changes in the reference
frequency, nor does it affect the ratio when the drive
is stopped as a slave if parameter #54 is set to Freeze.
This rate does not affect the slave JUMP time.
Page 22
DFS-1 Manual Revised 7/95
POWERTEC Ind. Corp.©
Page 28

12. MASTER PRESET SPEED
USE PARAMETER #12 TO SET A PRESET SPEED
WHICH CAN BE TOGGLED IN AND OUT.
RANGE OF VALUES: 0000 0000h to 0000 2710h
0 TO 10,000 (decimal)
Default Value: 0000 00C8h 100 (decimal)
The MASTER preset speed is the speed to which
the motor will go when a PRESET input is activated
on one of the Digital inputs (any of the seven digital
inputs may be programmed as a PRESET input)
when the DFS-1 is in the MASTER mode. If more
than one input is programmed as a PRESET input,
they must both be present to activate the PRESET
Speed function (the inputs are logically ANDed).
13. SLA VE RA TIO PRESET
USE PARAMETER #13 TO SET A PRESET RATIO
WHICH CAN BE TOGGLED IN AND OUT.
RANGE OF VALUES: 0000 0000h to 0001 869Fh
0 TO 99,999 (decimal)
Default Value: 0000 2710h 10,000 (decimal)
The SLAVE preset ratio is the ratio to which the
motor will go when a PRESET input is activated on
one of the Digital inputs (any of the seven digital
inputs may be programmed as a PRESET input)
when the DFS-1 is in the SLAVE mode. If more than
one input is programmed as a PRESET input, they
must both be present to activate the PRESET Speed
function (the inputs are logically ANDed).
Note: For all ratio setpoints, 4 decimal places
are implied. Therefore, the maximum ratio setpoint
is 9.999.
tionship between motor speed and EGU is defined in
parameter #14, which sets the value of EGU’s at full
motor speed. This parameter is used to determine the
relationship between units of commanded speed and
RPM. The number entered in this parameter is
equivalent to the number in parameter #6. This
allows the user to enter speed commands in engineering units (such as Feet Per Minute, Yards Per Minute,
etc).
Speed commands entered by commands #82 and
#84 are entered in terms of this parameter. If the
value of this parameter is the same as the value of
parameter #6, then there is a 1:1 relationship between
the Engineering Units and the RPM (i.e., enter 1750
(06D6h) as a speed command for 1750 RPM).
However, if this parameter is set to 1000
(03E8h) and #6 is set to 1750, then the relationship is
1:1.75. Entering 1000 (03E8h) as a command results
in 1750 RPM, but entering 500 (01F4h) results in
875 RPM.
15. BASE RATIO
USE PARAMETER #15 TO SET THE “GEAR
RATIO” OF THE MOTOR IN A SLAVE SYSTEM.
RANGE OF VALUES: 0000 0001h to 0001 869Fh
1 TO 99,999 (decimal)
Default Value: 0000 2710h 10,000 (decimal)
This is the “gearing” ratio which corrects for the
mechanics of the system and also for differences in
motor speeds. The output frequency at TB2:B
terminals 10 (+) and 11(-) is determined by the
settings of the maximum motor speed (parameter #6)
and the encoder PPR (parameter #7). The output
frequency will be:
1 4. ENGINEERING UNITS
x Encoder PPR x 16 / 60
USE PARAMETER #14 TO SET THE ENGINEERING UNITS AT MAXIMUM MOTOR SPEED.
RANGE OF VALUES: 0000 0001h to 0001 869Fh
1 TO 99,999 (decimal)
Default Value: 0000 06D6h 1750 (decimal)
Engineering Units (EGU) define the relationship
between motor speed or torque and process reference
points. It allows setting and reading of parameters in
terms other than speed and torque. The basic rela-
Revised 7/95 DFS-1 Manual
POWERTEC Ind. Corp.©
puts out a reference frequency of 56 Kilohertz. This
frequency varies with the commanded speed. When
this frequency is used as a reference, it is first
multiplied by the base ratio, and then by the SETPOINT. These steps change the frequency to the
proper level.
system to be able to enter a SETPOINT of 1.0000 on
Output Reference Frequency = Motor max RPM
A 1750 RPM motor with a 120 PPR encoder
For example, it is generally useful in a slave
Page 23
Page 29

the slave unit to match the line speed, motor speed,
or section (master). Many times, however, the
gearing between the slave motor and the surface of a
roll is not the same as the master, or the diameter of
the rolls vary from section to section, or motors of
different RPM’s may have to be tracked. The BASE
RATIO is a correction factor which allows the
SETPOINT to be adjusted.
The following are other examples of how the
Base Ratio parameter is used: if a standard 2500
RPM motor is to follow a standard 1750 RPM motor,
and both motors must attain their full speed at the
same time, and a setpoint of 1.0000 is desired, enter
1.4826 (2500/1750) into parameter #15 to make the
follower motor go 48.26% faster when the setpoint is
1.0000.
If the surface speed of a lead roll is 100 FPM at
1750 RPM (4-pole motor, 120 PPR encoder), and the
surface speed of the follower roll is 100FPM at 1550
RPM (4-pole motor, 120 PPR encoder), enter 0.8857
in parameter #15 to make the follower roll go
88.57% of the speed of the lead when the setpoint is
set to 1.0000.
If the lead motor is a 100 HP, 1750 RPM (8-pole,
240PPR), and the follower is a 5 HP, 3000 RPM (4pole, 120 PPR) motor, the reference output frequency
of the lead is 1750 x 240 *16 / 60 = 112 kHz. The
follower motor needs a frequency of 3000 x 120 *
16 / 60 = 96 kHz to operate at a 1.0000 setpoint.
Therefore the maximum 112 kHz must be reduced to
a maximum of 96 kHz by setting the base ratio to
0.8571.
If the SETPOINT needs to be something other
than 1.0000, make a proportional adjustment in the
base ratio. If the desired SETPOINT is 2.0000, use a
base ratio of 1/2 of the value necessary for a 1.0000
setpoint.
16 . MAXIMUM RATIO
USE PARAMETER #16 TO SET THE HIGHEST
ALLOWABLE RATIO IN A SLAVE SYSTEM.
RANGE OF VALUES: 0000 0001h to 0001 869Fh
1 TO 99,999 (decimal)
Default Value: 0001 869Fh 99,999 (decimal)
Set the maximum ratio in the system if it is to
be lower than the default, which is the absolute
maximum.
Note: For all ratio setpoints, 4 decimal places
are implied. Therefore, the maximum ratio setpoint
is 9.999.
17. ANALOG INPUT #1 MODE
SELECT
USE PARAMETER #17 TO SELECT THE PURPOSE OF A SIGNAL AT ANALOG INPUT #1.
RANGE OF VALUES: 0000 0000h to 0000 001Fh
0 TO 32 (decimal)
Default Value: 0000 0001h 1 (decimal)
Analog Input #1 is a general purpose input
which may be programmed for one of several modes
of operation. The mode affects how the signal is used
for setting or changing of the motor’s speed and/or
torque.
The following modes are provided for:
0000 0000h General Purpose Input - can be
read via the COMM port
0000 0001h Speed Reference input - Sets the
speed of the motor (see below)
0000 0002h Trim Input - may be used for
dancer or other transducer input
(not yet implemented)
0000 0003h External Torque Limit, Motoring -
Used in conjunction with parameter #5
0000 0004h External Torque Limit, Regenera-
tive - Used in conjunction with
parameter #5
0000 0005h External Horsepower Limit - Used
in conjunction with parameter #5
0000 0006h to 0000 001Fh Undefined -
Reserved for future use
If an undefined mode (...06h through ...1Fh) is
selected, Analog Input #1 will be inoperative.
The type of input is selected by parameter #18.
Each type of input has a lowest value and a highest
value.
The effective range of the input is set by parameters #19 and #20. Parameter #19 sets the low
threshold level and parameter #20 sets the highest
effective level. These two levels are set in EGU (see
parameter #14).
As a general purpose input ( ... 00h) Analog
input #1 may be used by the program to sense any
analog signal representing an external parameter for
use by the program.
Page 24
DFS-1 Manual Revised 7/95
POWERTEC Ind. Corp.©
Page 30

As a Speed Reference input ( ...01h), Analog
input #1 sets the speed of the controlled motor
directly if the DFS-1 is set up in Master Mode
(parameter #5 - VL2 VL1).
If the DFS-1 is in SLAVE mode, Analog Input
#1, when set to ...01h will act as a Ratio SETPOINT.
The External Torque Limits are used to set limits
on the motor current which are below the current
limit level. When parameter #5 VL4 VL3 is set to 00
01h, or 00 02h, Analog Input #1 may be set to ...03h
or ...04h respectively to supply the torque limiting
reference.
The External Horsepower Limit sets the maximum horsepower produced by the drive. Horsepower
is the PRODUCT of speed and torque. When motor
speed is low, motor current is high, and when speed
is high, current is low. The drive increases speed until
sufficient load is developed and the product of load
and speed equals the setpoint. After that is achieved,
increasing load reduces speed, and decreasing load
increases speed.
18 . ANALOG INPUT #1 SIGNAL
CONDITIONING
USE PARAMETER #17 TO SELECT THE FORM
OF THE SIGNAL AT ANALOG INPUT #1.
RANGE OF VALUES: 0000 0000h to 0000 001Fh
0 TO 32 (decimal)
Default Value: 0000 0001h 1 (decimal)
Six types of signals will be accepted by Analog
Input #1. Parameter #18 selects the form of signal to
be processed.
The six types of signals are:
0000 0000h -10VDC to +10VDC
bipolar voltage input with zero
center value
0000 0001h 0 to +10VDC
unipolar voltage signal
0000 0002h 0 to +5VDC
unipolar voltage signal
0000 0003h 1 to +5VDC
unipolar voltage signal
0000 0004h 0 to 20mA
unipolar current signal
0000 0005h 4 to 20mA
unipolar current signal
0000 0006h to 0000 001Fh
Undefined - Reserved for
future use
If an undefined mode (...06 through ...1F) is
selected, Analog Input #1 will be inoperative.
Choosing the incorrect signal conditioning for
the actual input signal will result in erratic operation.
19 . ANALOG INPUT #1 LOW
ENGINEERING UNITS (EGU)
USE PARAMETER #17 TO SELECT THE
THRESHOLD OF ANALOG INPUT #1 EFFECT.
RANGE OF VALUES: FFFE 7961h to 0001 869Fh
-99,999 to +99,999(dec.)
Default Value: 0000 0000h 0 (decimal)
(See Parameter 14 for the definition
and purpose of EGU)
Parameter #19 sets the threshold level for
effectiveness of Analog Input #1 at the lowest signal
level.
Assume that the maximum speed of the 1750
RPM motor is set to 12500 EGU’s in parameter #14
(representing, perhaps, 125.00 RPM on an extruder
screw) and the Analog input is set for a Speed
Reference Input of 0 to +10VDC. The default value
of parameter 19 is 0. This means that when 0VDC is
present at Analog Input #1, the result will be zero
speed.
Now, if we want to set a minimum speed on this
system, we can set a value of 500 in parameter #19.
This means that when 0VDC is present at Analog
Input #1, the motor will run at a speed of 500/12500
or 4 percent (70 rpm) of the maximum speed of the
motor. (see also parameter #20).
Revised 7/95 DFS-1 Manual
POWERTEC Ind. Corp.©
Page 25
Page 31

20. ANALOG INPUT #1 HIGH
ENGINEERING UNITS (EGU)
USE PARAMETER #18 TO SELECT THE MAXIMUM ANALOG INPUT #1 EFFECT.
RANGE OF VALUES: FFFE 7961h to 0001 869Fh
-99,999 to +99,999 (dec.)
Default Value: 0000 06D6h 1750 (decimal)
Input may not be set up as a Speed Reference Input.
Attempting to set up a second Analog Input as a
Speed Reference Input when one is already set up in
that mode will cause the second input to be inoperative.
22. ANALOG INPUT #2 SIGNAL
CONDITIONING
(See Parameter 14 for the definition
and purpose of EGU)
Parameter #20 sets the maximum level for
effectiveness of Analog Input #1 at the highest signal
level.
Assume that the maximum speed of the 1750
RPM motor is set to 12500 EGU’s in parameter #14
(representing, perhaps, 125.00 RPM on an extruder
screw) and the Analog input is set for a Speed
Reference Input of 0 to +10VDC. The default value
of parameter 20 is 1750. This means that when
10VDC is present at Analog Input #1, the resulting
speed will be 1750/12500 = 14 percent of maximum
speed, or 245 RPM.
Now, if we want to set the maximum speed of
this system at 100.00, we set a value of 10000 in
parameter #20. This means that when 10VDC is
present at Analog Input #1, the motor will run at a
speed of 10000/12500 = 80 percent of the maximum
speed of the motor, or 1400 RPM. (see also parameter #19).
21. ANALOG INPUT #2 MODE
SELECT
USE PARAMETER #21 TO SELECT THE PURPOSE OF A SIGNAL AT ANALOG INPUT #2.
RANGE OF VALUES: 0000 0000h to 0000 001Fh
0 TO 32 (decimal)
Default Value: 0000 0000h 0 (decimal)
See parameter #17. The operation of Analog
Input #2 is identical to the operation of Analog Input
#1, EXCEPT the parameters which set the form of
the input signal (#22) and low and high EGU’s ( #23
and #24).
Both Analog Inputs #1 and #2 may be set up as
General Purpose Inputs, but all other modes are
mutually exclusive. If one of the Analog Inputs is set
up as a Speed Reference Input, the other Analog
USE PARAMETER #17 TO SELECT THE FORM
OF THE SIGNAL AT ANALOG INPUT #1.
RANGE OF VALUES: 0000 0000h to 0000 001Fh
0 TO 32 (decimal)
Default Value: 0000 0000h 0 (decimal)
See parameter #18. Signal conditioning selection
for Analog Input #2 is identical to Analog Input #1.
2 3. ANALOG INPUT #2 LOW
ENGINEERING UNITS (EGU)
USE PARAMETER #23 TO SELECT THE
MAXIMUM ANALOG INPUT #2 EFFECT.
RANGE OF VALUES: FFFE 7961h to 0001 869Fh
-99,999 to +99,999 (dec.)
Default Value: 0000 0000h 0 (decimal)
Analog Input #2 works exactly the same way
that Analog Input #1 works. Parameter #23 does for
Analog Input #2 what parameter #19 does for Analog
Input #1. Refer to parameter #19.
24. ANALOG INPUT #2 HIGH
ENGINEERING UNITS (EGU)
USE PARAMETER #24 TO SELECT THE
MAXIMUM ANALOG INPUT #2 EFFECT.
RANGE OF VALUES: FFFE 7961h to 0001 869Fh
-99,999 to +99,999 (dec.)
Default Value: 0000 0000h 0 (decimal)
Analog Input #2 works exactly the same way
that Analog Input #1 works. Parameter #24 does for
Analog Input #2 what parameter #20 does for Analog
Input #1. Refer to parameter #20.
Page 26
DFS-1 Manual Revised 7/95
POWERTEC Ind. Corp.©
Page 32

25. ANALOG OUTPUT #1 MODE
SELECT
USE PARAMETER #25 TO SELECT THE
SOURCE OF A SIGNAL AT ANALOG
OUTPUT #1.
RANGE OF VALUES: 0000 0000h to 0000 0003h
0 to 4 (decimal)
Default Value: 0000 0001h 1 (decimal)
27. ANALOG OUTPUT #1 HIGH
ENGINEERING UNITS (EGU)
USE PARAMETER #27 TO SELECT THE MAXIMUM ANALOG OUTPUT #1 EFFECT.
RANGE OF VALUES: FF FE 79 61h to 00 01 869Fh
-99,999 to +99,998 (dec.)
Default Value: 0000 06D6h 1750 (decimal)
Analog Output #1 may be programmed for
several modes of operation. The mode affects where
the signal at Analog Output #1 comes from. The
following modes are provided for:
0000 0000h Disabled.
0000 0001h Actual Speed - Represents the speed
of the motor from 0 to parameter #14.
0000 0002h Load Output - Represents the load on
the motor from 0 to 1500.
0000 0003h Analog Output voltage set by
communications from parameters #26
and #27.
0000 0004h Commanded Speed
If an undefined mode (...05h through ...1Fh) is
selected, Analog Input #1 will be inoperative.
26. ANALOG OUTPUT #1 LOW
ENGINEERING UNITS (EGU)
USE PARAMETER #26 TO SELECT THE
THRESHOLD OF ANALOG OUTPUT #1 EFFECT.
RANGE OF VALUES: FFFE 7961h to 0001 869Fh
-99,999 to +99,998 (dec.)
Default Value: 0000 0000h 0 (decimal)
Parameter #26 sets the point, in EGU’s, at which
the Analog Output #1 will be -10VDC.
If parameter #27 is greater on the absolute scale
than #26, voltage at Analog Output #1 will be scaled
proportionally from low EGU’s (parameter #26) to
+10VDC at the high engineering units (parameter
#27).
If #27 is less than #26, then output sense is
inverted, i.e., the higher voltage (from -10VDC to
+10VDC) will be at the low EGU setting (#26) and
the lower voltage will be at the high EGU setting
(parameter #27).
28. ANALOG OUTPUT #2 MODE
SELECT
USE PARAMETER #28 TO SELECT THE
SOURCE OF A SIGNAL AT ANALOG
OUTPUT #2.
RANGE OF VALUES: 0000 0000h to 0000 0003h
0 to 4 (decimal)
Default Value: 0000 0000h 0 (decimal)
Analog Output #2 is a general purpose analog
output which may be programmed for one of several
modes of operation. The mode defines the origin of
the signal at Analog Output #2. The following modes
are provided for:
0000 0000h Disabled.
0000 0001h Actual Speed - Represents the speed
of the motor from 0 to parameter #14.
0000 0002h Load Output - Represents the load on
the motor from 0 to 1500.
0000 0003h Analog Output voltage set by commu-
nications from parameters #29 and
#30.
0000 0004h Commanded Speed
If an undefined mode ...05h through ...1Fh is
selected, Analog Input #2 will be inoperative.
Revised 7/95 DFS-1 Manual
POWERTEC Ind. Corp.©
Page 27
Page 33

29. ANALOG OUTPUT #2 LOW
ENGINEERING UNITS (EGU)
30. ANALOG OUTPUT #2 HIGH
ENGINEERING UNITS (EGU)
USE PARAMETER #29 TO SELECT THE
THRESHOLD OF ANALOG OUTPUT #2 EFFECT.
RANGE OF VALUES: FFFE 7961h to 0001 869Fh
-99,999 to +99,998 (dec.)
Default Value: 0000 0000h 0 (decimal)
(See Parameter 14 for the definition
and purpose of EGU)
Parameter #29 sets the point, in EGU’s, at which
the Analog Output #2 will be -10VDC.
USE PARAMETER #30 TO SELECT THE MAXIMUM ANALOG OUTPUT #2 EFFECT.
RANGE OF VALUES: FFFE 7961h to 0001 869Fh
-99,999 to +99,998 (dec.)
Default Value: 0000 0096h 150 (decimal)
If parameter #30 is greater on the absolute scale
than parameter #29, the voltage at Analog Output #2
will be proportionally scaled from the low EGU’s
(#29) to +10VDC at the high engineering units
(#30).
If parameter #30 is less than parameter #29 on
the absolute scale, then the sense of the output will be
inverted, i.e., the higher voltage (on an absolute scale
from -10VDC to +10VDC) will be present at the low
EGU setting (parameter #29) and the lower voltage
will be output at the high EGU setting (parameter
#30).
Page 28
Low EGU High EGU Speed Vout
0 +1750 0 -10
0 +1750 1750 (FWD) +10 VDC
0 +1750 1750 (REV) 0 VDC
-1750 +1750 0 0 VDC
-1750 +1750 1750 (FWD) +10 VDC
-1750 +1750 1750 (REV) -10 VDC
-100 +400 0 -6 VDC
+400 -100 0 +6 VDC
+1750 0 875 (FWD) +5 VDC
Table of Values for Analog Outputs
DFS-1 Manual Revised 7/95
POWERTEC Ind. Corp.©
Page 34

31. DIGIT AL INPUT #1 FUNCTION
32 . DIGIT AL INPUT #2 FUNCTION
USE PARAMETER #31 TO SELECT THE #1
DIGITAL INPUT FUNCTION.
RANGE OF VALUES: 0000 0000h to 0001 000Fh
no decimal significance
Default Value: 0001 0001h no decimal
significance
VL4 and VL2 are always 00. VL1 determines
function of the input. The following are predefined:
00h General Purpose Input
01h Run Input
02h Preset Input
03h Up Input
04h Down Input
05h Reverse Input
06h Frequency Mode
07h Remote Input
08h Master/Slave (not functional at present)
09h Jog
0Ah Preset 2
0Bh Contactor Aux
0Ch through 0Fh Not Assigned, selection
will cause input to be General Purpose
Input.
Any digital input may be assigned to any
function. The factory defaults are included for testing
purposes, to provide a baseline setup, and to be able
to run the DFS-1 the first time before programming.
VL3 contains the polarity flag, which is either
00h or 01h. A 01h setting means that +24VDC must
be applied to the input to make it active. A 00h
setting means the input is active with no voltage
applied.
A Digital Input may get its +24VDC signal from
any source with TB2:A1 common, and may be any
parameter, transducer, or switch at which the program or communications wishes to look.
The default, by factory setting, is 0001 0001h,
which is a run input which must have +24VDC
applied with respect to TB2:A1 to be active.
USE PARAMETER #32 TO SELECT THE #2
DIGITAL INPUT FUNCTION.
RANGE OF VALUES: 0000 0000h to 0001 000Fh
no decimal significance
Default Value: 0001 0002h no decimal
significance
The setting options are the same as parameter
#31. The default, by factory setting, is 0001 0002h,
which is a preset input which must have +24VDC
applied with respect to TB2:A1 to be active.
3 3. DIGIT AL INPUT #3
FUNCTION
USE PARAMETER #33 TO SELECT THE #3
DIGITAL INPUT FUNCTION.
RANGE OF VALUES: 0000 0000h to 0001 000Fh
no decimal significance
Default Value: 0001 0003h no decimal
significance
The setting options are the same as parameter
#31. The default, by factory setting, is 0001 0003h,
which is an UP (increase) input which must have
+24VDC applied with respect to TB2:A to be active.
34. DIGITAL INPUT #4
FUNCTION
USE PARAMETER #34 TO SELECT THE #4
DIGITAL INPUT FUNCTION.
RANGE OF VALUES: 0000 0000h to 0001 000Fh
no decimal significance
Default Value: 0001 0004h no decimal
significance
The setting options are the same as parameter
#31. The default, by factory setting, is 0001 0004h,
which is an DOWN (decrease) input which must
have +24VDC applied with respect to TB2:A1 to be
active.
Revised 7/95 DFS-1 Manual
POWERTEC Ind. Corp.©
Page 29
Page 35

35 . DIGIT AL INPUT #5
FUNCTION
38. DIGITAL OUTPUT #1
FUNCTION
USE PARAMETER #35 TO SELECT THE #5
DIGITAL INPUT FUNCTION.
RANGE OF VALUES: 0000 0000h to 0001 000Fh
no decimal significance
Default Value: 0001 0005h no decimal
significance
The setting options are the same as parameter
#31. The default, by factory setting, is 0001 0005h,
which is a reverse input which must have +24VDC
applied with respect to TB2:A 1 to be active.
36. DIGITAL INPUT #6
FUNCTION
USE PARAMETER #36 TO SELECT THE #6
DIGITAL INPUT FUNCTION.
RANGE OF VALUES: 0000 0000h to 0001 000Fh
no decimal significance
Default Value: 0001 0006h no decimal
significance
The setting options are the same as parameter
#31. The default, by factory setting, is 0001 0006h,
which is the frequency mode input which must have
+24VDC applied with respect to TB2:A 1 to be
active.
3 7. DIGIT AL INPUT #7
FUNCTION
USE PARAMETER #37 TO SELECT THE #7
DIGITAL INPUT FUNCTION.
RANGE OF VALUES: 0000 0000h to 0001 000Fh
no decimal significance
Default Value: 0001 0007h no decimal
significance
The setting options are the same as parameter
#31. The default, by factory setting, is 0001 0007h,
which is a local/remote input which must have
+24VDC applied with respect to TB2:A 1 to activate
remote.
USE PARAMETER #38 TO SELECT THE #1
DIGITAL OUTPUT FUNCTION.
RANGE OF VALUES: 0000 0000h to 0001 000Fh
no decimal significance
Default Value: 0001 0004h no decimal
significance
VL4 and VL2 are always 00. VL3 determines
the function of the output. The following have been
predefined:
00h General Purpose Output
01h No Fault Output
02h At Speed Output
03h Remote Output
04h Run Hold
05h Zero Speed
06h Set by comm
07h Contactor
08h through 0Fh - Not Assigned,
selection will cause output to be
General Purpose Output.
ANY DIGITAL OUTPUT MAY BE ASSIGNED
ANY FUNCTION. The factory defaults are included
for testing purposes, to provide a baseline setup, and
to be able to run the DFS-1 the first time.
VL3 contains the sense flag, which is either 00h
or 01h. A 01h setting means that contact between the
output terminals will be closed when the output
function is active (a normally open contact). A 00h
setting in VL3 means that the contact will be closed
when the function is not active (a normally closed
contact).
A General Purpose Output may be controlled by
the program or communications.
The default, by factory setting, is 0001 0004h,
which is a run output which is a closed output contact
when the run is active (true). This is normally used as
a run hold contact, but it may be used as a run output
contact for some other purpose if the run signal is
maintained, rather than a momentary push-button.
Page 30
DFS-1 Manual Revised 7/95
POWERTEC Ind. Corp.©
Page 36

39. DIGITAL OUTPUT #2
FUNCTION
USE PARAMETER #39 TO SELECT THE #2
DIGITAL OUTPUT FUNCTION.
RANGE OF VALUES: 0000 0000h to 0001 000Fh
no decimal significance
Default Value: 0000 0001h no decimal
significance
The setting options are the same as parameter
#38. The default, by factory setting, is 0000 0001h,
which is the FAULT output. The internal FAULT
circuitry of the DFS-1 is off when the input power is
applied and energizes if there are NO FAULTS in the
drive (the contact closes because VL1 is set to 01h).
40. DIGIT AL OUTPUT #3
FUNCTION
USE PARAMETER #40 TO SELECT THE #3
DIGITAL OUTPUT FUNCTION.
RANGE OF VALUES: 0000 0000h to 0001 000Fh
no decimal significance
Default Value: 0001 0002h no decimal
significance
The setting options are the same as parameter
#38. The default, by factory setting, is 0001 0002h,
which is the AT SPEED output. The internal AT
SPEED circuitry of the DFS-1 is on when the actual
speed of the motor matches the commanded speed
(the contact closes because VL3 is set to 01). There
are no AT SPEED window parameters because the
microprocessor filters and averages the speed signal.
which is the REMOTE output. When the DFS-1 is in
the remote mode, the contact between the terminals
closes (the contact closes because VL3 is set to 01h).
42. DRIVE GAIN SETTING
USE PARAMETER #42 TO SET THE INTERNAL
CURRENT GAIN OF THE DRIVE.
RANGE OF VALUES: 0000 0000h to 0000 00FFh
0 to 255 (decimal)
Default Value: 0000 0080h 128 (decimal)
The gain of the DFS-1 is set by parameter #42.
The effect of the gain setting is to adjust an internal
value which determines how many pulses of accumulated shaft position error it takes to reach current
limit. A 00h will allow about 90 pulses of position
error while a setting of FFh allows only about 9
pulses, which makes the motor shaft very “stiff”, in
that turning it only a few degrees causes current to
increase very rapidly. A middle setting is the default.
43. DRIVE STABILITY SETTING
USE PARAMETER #43 TO SET THE INTEGRAL
CURRENT GAIN OF THE DRIVE.
RANGE OF VALUES: 0000 0000h to 0000 00FFh
0 to 255 (decimal)
Default Value: 0000 0080h 128 (decimal)
The stability of the DFS-1 is set by parameter
#43. The effect of the setting is to adjust an internal
value which controls the integral and differential
gains of the drive. Smaller numbers mean faster
reaction to changes and for higher numbers reaction
is more damped. A middle setting is the default.
41 . DIGIT AL OUTPUT #4
FUNCTION
USE PARAMETER #41 TO SELECT THE #4
DIGITAL OUTPUT FUNCTION.
RANGE OF VALUES: 0000 0000h to 0001 000Fh
no decimal significance
Default Value: 0001 0003h no decimal
significance
The setting options are the same as parameter
#38. The default, by factory setting, is 0001 0003h,
Revised 7/95 DFS-1 Manual
POWERTEC Ind. Corp.©
44. DRIVE MOTORING
USE PARAMETER #44 TO SET THE MOTORING
CURRENT LIMIT OF THE DRIVE.
RANGE OF VALUES: 0000 0000h to 0000 0096h
Default Value: 0000 0032h 50% (decimal)
to 150% and must be set in terms of MOTOR
current. Other circuitry in the motor control will
CURRENT LIMIT
0 to 150% (decimal)
Parameter #44 allows current limit settings of up
Page 31
Page 37

limit the output DRIVE current to 150%. This
parameter CANNOT OVERRIDE that limit, but this
parameter may be set for an ultimate current limit on
drives which are built with more capability than the
motors they run. In this way, short term 300% current
ratings can be obtained.
45. DRIVE REGENERATIVE
CURRENT LIMIT
USE PARAMETER #45 TO SET THE REGENERATIVE CURRENT LIMIT OF THE DRIVE.
RANGE OF VALUES: 0000 0000h to 0000 0096h
0 to 150% (decimal)
Default Value: 0000 0032h 50% (decimal)
Parameter #44 allows current limit settings of up
to 255% and must be set in terms of MOTOR
current. Other circuitry in the motor control will limit
the output DRIVE current to 150%. This parameter
CANNOT OVERRIDE that limit, but this parameter
may be set for an ultimate current limit on drives
which are built with more capability than the motors
they run. In this way, short term 300% current ratings
can be obtained.
46. PULSE MULTIPLIER
USE PARAMETER #46 TO SET THE VALUE BY
WHICH THE ENCODER PULSE WILL BE
MULTIPLIED.
RANGE OF VALUES: 0000 0000h to 0000 0003h
0 to 3 (decimal)
Default Value: 0000 0002h 2 (decimal)
0= X 1 2= X 4
1= X 2 3= Commutation Mode
Encoder loss detection applies only when pulse
multiplier is set to 4X.
Parameter #47 contains two pieces of informa-
tion.
VL4 VL3 sets the operational mode of the drive:
0000h sets the drive for non-regenerative
operation.
0001h sets the drive for regenerative
operation.
VL2 VL1 sets the modulation mode for the
drive:
0000h sets the modulation for bottom
transistors only.
000h1 sets the modulation for top and bottom
transistors.
Normal setup is:
Non-regenerative drives: 0000 0000h
Regenerative drives: 0001 0001h
Normally, in POWERTEC Brushless DC motor
controls, non-regenerative drives modulate the
bottom transistors only (this generates less heat and
makes them more efficient). Regenerative drives
modulate both top and bottom transistors for better
control. There are some cases where modulating both
top and bottom transistors in a non-regenerative drive
may be desirable. This can be done by setting VL2
VL1 to 0001h.
Note: If regenerative mode is used, the drive
may require an optional DC bus loader to dissipate
the regenerative energy and avoid over voltage faults.
48. JUMP OR MOP OPERATION
USE PARAMETER #48 TO SET TEMPORARY OR
PERMANENT UP/DOWN SPEED/RATIO
CHANGES.
RANGE OF VALUES: 0000 0000h to 0000 0001h
0 to 1 (decimal)
Default Value: 0000 0000h 0 (decimal)
47. MODULATION AND
OPERA TION MODES
USE PARAMETER #47 TO SET REGEN / NONREGEN AND MODULATION MODES.
RANGE OF VALUES: 0000 0000h to 0001 0001h
no decimal significance
Default Value: 0000 0000h no decimal
significance
Page 32
DFS-1 Manual Revised 7/95
Parameter #48 selects whether the change in
speed or ratio made by the up/down inputs is a
temporary change which lasts as long as the up or
down input is active (JUMP mode), or whether the
change will remain after the up/down input has been
released (MOP mode). The up/down functions may
be generated by software through setting of parameter #3.
POWERTEC Ind. Corp.©
Page 38

When parameter #48 is set to 0000 0000h, the
DFS-1 is in the JUMP mode. In MASTER mode (set
by parameter #5), when the UP input function is
activated, the speed will increase by the amount set
in parameter #49. As long as the UP function is
active, the speed change will be held. When the UP
function is released the speed returns to the SETPOINT. The same action applies to the DOWN
function, the speed change set by parameter #50. In
SLAVE mode, there is a temporary change in ratio
determined by parameter #51 for UP and #52 for
DOWN.
When parameter #48 is set to 0000 0001h, the
DFS-1 is in the MOP mode. The MOP mode acts like
a Motor Operated Potentiometer. When the UP
function is activated, the speed, in MASTER mode,
will change immediately by the amount in parameter
#49. If the function is released within 1/2 second, that
speed becomes the new SETPOINT. If the UP
function is held for more than 1/2 second, the speed
will begin to increase at the ACCEL rate (determined
by parameter #8), increasing until the UP function is
released. After the UP function is released, the speed
will remain at the latest, which becomes the new
SETPOINT. The same action applies in the MASTER mode to the DOWN function (with parameter
#50 and the DECEL rate in parameter #9). In SLAVE
mode, the immediate increase is set by parameter
#51, the immediate decrease by parameter #52, and
the rates by parameters #10 and #11, respectively.
49. MASTER JUMP UP AMOUNT
USE PARAMETER #49 TO SET THE AMOUNT
OF SPEED CHANGE ON AN UP FUNCTION.
RANGE OF VALUES: 0000 0000h to 0001 869Fh
0 to 99,999 (decimal)
Default Value: 0000 0001h 1 (decimal)
50. MASTER JUMP DOWN
AMOUNT
USE PARAMETER #50 TO SET THE AMOUNT
OF SPEED CHANGE ON A DOWN FUNCTION.
RANGE OF VALUES: 0000 0000h to 0001 869Fh
0 to 99,999 (decimal)
Default Value: 0000 0001h 1 (decimal)
Parameter #50 is the amount, in Engineering
Units, by which the speed changes when the DOWN
function is active.
51. SLAVE JUMP UP AMOUNT
USE PARAMETER #51 TO SET THE AMOUNT
OF RATIO CHANGE ON AN UP FUNCTION.
RANGE OF VALUES: 0000 0000h to 0001 869Fh
0 to 99,999 (decimal)
Default Value: 0000 0001h 1 (decimal)
Parameter #51 is the amount, in Engineering
Units, by which the ratio changes when the UP
function is active.
52 . SLAVE JUMP DOWN
AMOUNT
USE PARAMETER #52 TO SET THE AMOUNT
OF RATIO CHANGE ON A DOWN FUNCTION.
RANGE OF VALUES: 0000 0000h to 0001 869Fh
0 to 99,999 (decimal)
Default Value: 0000 0001h 1 (decimal)
Parameter #52 is the amount, in Engineering
Units, by which the ratio changes when the DOWN
function is active.
Parameter #49 is the amount, in Engineering
Units, by which the speed changes when the UP
function is active.
Revised 7/95 DFS-1 Manual
POWERTEC Ind. Corp.©
Page 33
Page 39

53 . INPUT DEBOUNCE V ALUE
55. MINIMUM RA TIO
USE PARAMETER #53 TO SET THE LENGTH OF
TIME AN INPUT MUST BE ACTIVE TO BE
ACTED UPON.
RANGE OF VALUES: 0000 0000h to 0000 00FFh
0 to 256 (decimal)
Default Value: 0000 0001h 1 (decimal)
Parameter #53 is the length of time, in 10
milliseconds (1 millisecond =.01 second), that a
digital input must be active before it is considered
legitimate. It is used primarily to eliminate the
contact bounce (which may generate multiple
commands) from relays used on inputs, but it can
also prevent noise problems from push-buttons.
54. FLOA T OR FREEZE
USE PARAMETER #54 TO SELECT WHERE THE
SETPOINT WILL BE ON START-UP.
RANGE OF VALUES: 0000 0000h to 0000 0001h
0 to 1 (decimal)
Default Value: 0000 0000h 0 (decimal)
When parameter #54 is set to 0000 0000h, the
SETPOINT at start-up (whether after a stop or after a
power loss) is always at zero. The speed SETPOINT
“floats” down with the motor speed. A new speed
SETPOINT must be entered or the UP MOP function
may be used to set speed.
When parameter #54 is set to 0000 0001h, the
SETPOINT at stop or power loss is “frozen” at the
current value, and the DFS-1 will return to this speed
when the drive next starts up. It is not necessary to
enter a new SETPOINT on start-up if a return to the
previous speed is desired.
Parameter #54 also affects the SLAVE mode, but
the SETPOINT cannot go to less than the value of
the minimum ratio (parameter #55) in FLOAT mode.
USE PARAMETER #55 TO SET THE LENGTH OF
TIME AN INPUT MUST BE ACTIVE TO BE
ACTED UPON.
RANGE OF VALUES: 0000 0000h to 0001 869Fh
0 to 99,999 (decimal)
Default Value: 0000 0000h 0 (decimal)
Parameter #55 is the minimum ratio allowed at
any time in SLAVE mode.
NOTE THAT THE RATIO CANNOT GO
BELOW THIS VALUE, EVEN IN RESPONSE TO
DOWN FUNCTIONS OR WHEN THE FLOAT
PARAMETER IS SET. This parameter must be set
with these restrictions in mind.
56. COMMUNICATIONS
TURNAROUND DELA Y
SETS THE # OF 500 MICROSECOND DELAYS
FROM TRANSFER TO TRANSMIT
RANGE OF VALUES: 0000 0000h to 0000 007Fh
0 to 128 (decimal
5 7. MASTER JOG SPEED
USE PARAMETER #57 TO SET A JOG SPEED
WHICH CAN BE TOGGLED IN AND OUT.
RANGE OF VALUES: FFFE 7961h to 0001 869Fh
-99,999 to 99,999 (decimal)
Default Value: 0000 00C8h 100 (decimal)
The MASTER JOG Speed is the speed to which
the motor will go when a JOG input is activated on
one of the Digital inputs (any of the seven digital
inputs may be programmed as a JOG input) when the
DFS-1 is in the MASTER mode. If more than one
input is programmed as a JOG input, they must both
be present to activate the Master Jog Speed function
(the inputs are logically ANDed).
Page 34
DFS-1 Manual Revised 7/95
POWERTEC Ind. Corp.©
Page 40

58. SLAVE JOG RA TIO
61. SLAVE PRESET #2
USE PARAMETER #58 TO SET A JOG SPEED
WHICH CAN BE TOGGLED IN AND OUT.
RANGE OF VALUES: FFFE 7961h to 0001 869Fh
-99,999 to 99,999 (decimal)
Default Value: 0000 00C8h 100 (decimal)
The SLAVE JOG Speed is the speed to which
the motor will go when a JOG input is activated on
one of the Digital inputs (any of the seven digital
inputs may be programmed as a JOG input) when the
DFS-1 is in the SLAVE mode. If more than one input
is programmed as a JOG input, they must both be
present to activate the SLAVE JOG Speed function
(the inputs are logically ANDed).
59. EGU TAG SELECT
(Parameter 59 not functional at present)
RANGE OF VALUES: 0 TO F
0= UNK 6= LBS/HR
1= RPM 7= PCT
2= GPM 8= CFM
3= FPM 9= Y/MIN
4= SPM 10= M/MIN
5= LBS-FT 11= IN/SEC
Default Value: 0000 0000h 0 (decimal)
USE PARAMETER #61 TO SET A
PRESET SPEED WHICH CAN BE TOGGLED IN
AND OUT.
RANGE OF VALUES: FFFE 7961h to 0001 869Fh
-99,999 to 99,999 (decimal)
Default Value: 0000 00C8h 100 (decimal)
The SLAVE PRESET #2 is the speed to which
the motor will go when a PRESET #2 input is
activated on one of the Digital inputs (any of the
seven digital inputs may be programmed as a
PRESET #2 input) when the DFS-1 is in the SLAVE
mode. If more than one input is programmed as a
PRESET #2 input, they must both be present to
activate the SLAVE PRESET #2 function (the inputs
are logically ANDed).
62. CONTACTOR DELAY
USE PARAMETER #62 TO SET TIME
INTERVAL BETWEEN RUN COMMAND AND
INITIAL FIRING OF TRANSISTORS.
RANGE OF VALUES: 0000 0000 to 0000 0028h
0 TO 40 (decimal)
Default Value: 0000 0000h 0 (decimal)
60. MASTER PRESET #2
acceptance of a run command and the initial firing of
USE PARAMETER #60 TO SET A PRESET SPEED
WHICH CAN BE TOGGLED IN AND OUT.
RANGE OF VALUES: FFFE 7961h to 0001 869Fh
-99,999 to 99,999 (decimal)
Default Value: 0000 00C8h 100 (decimal)
The MASTER PRESET #2 is the speed to which
the motor will go when a PRESET #2 input is
activated on one of the Digital inputs (any of the
seven digital inputs may be programmed as a
PRESET #2 input) when the DFS-1 is in the MASTER mode. If more than one input is programmed as
a PRESET #2 input, they must both be present to
activate the MASTER PRESET #2 function (the
inputs are logically ANDed).
Revised 7/95 DFS-1 Manual
POWERTEC Ind. Corp.©
the transistors. If the Contactor Aux input does not
become active in this time period, the transistors will
not fire and the drive will return to a stop condition.
The value of this parameter is in increments of 25ms.
See the Additional Info section for examples.
This parameter sets the time interval between the
Page 35
Page 41

THIS PAGE WAS INTENTIONALLY LEFT BLANK.
Page 36
DFS-1 Manual Revised 7/95
POWERTEC Ind. Corp.©
Page 42

4.0 DFS - 1 SETUP
Parameter
Maximum Motor Speed
High Engineering Units
Encoder Pulses Per Rev
Pulse Multiplier
PWM Mode
Drive Gain
Drive Stability
Motoring Current Limit
Regenerative Current Limit
Up/Down Function
Float or Freeze Setpoint
Mode of Operation
Master Accel Rate
Master Decel Rate
Master Preset Speed
No. Value
6 1750
14 1750
Master Jump Up Amount
Master Jump Down Amount
7 120
46 x4
Non-Regen Analog Output #2
47
42 128
Input Debounce Value
43 128
44 100
45 100
48 Jump
54 Float
5 Master
8 10k mSec
9 10k mSec
12 200
Parameter
Analog Input #1
Analog Output #1
Digital Input #1
Digital Input #2
Digital Input #3
Digital Input #4
Digital Input #5
Digital Output #1
Digital Output #2
Digital Output #3
Digital Output #4
No. Value
49
50
17
25
28
53
31
32
33
34
35
38
39
40
41
1
1
0-10VDC
Speed
Load
10 mSec
RUN
PRESET
UP
DOWN
REVERSE
RUN
NO FAULT
AT SPD
REMOTE
The DFS-1 is shipped with a default set of
parameters which allows it to be connected as shown
in Figure 3 on page 3 and run with basic push-
keypad display unit or a computer with serial
communications capability.
buttons and a speed pot. This supplies a "baseline" of
operation which may be used to test the functionality
of the board.
set up the DFS-1 beyond the needs of the default
parameters. The setup is arranged roughly from the
The above parameters are the most commonly
used ones. For other default settings, refer to the
parameter descriptions beginning on page 15.
If your needs are met by the list above, then all
most basic and common steps to the least commonly
used parameter changes. You need only follow the
steps until you have all the parameters you will use
checked and/or changed.
you have to do is hook up the drive to power and to
the motor and run it. No changes in parameter
settings are necessary.
For the purposes of this chapter, it will be
assumed that the setup is being accomplished
through the use of the KDU-1 keypad display unit.
Revised 7/95 DFS-1 Manual
POWERTEC Ind. Corp.©
Making parameter changes requires the optional
This section covers the basic steps necessary to
Page 37
Page 43

4.1 BASIC SETUP OF THE DFS-1 CONTROLLER
1. SET PARAMETER #6 FOR THE MAXIMUM
SPEED OF THE MOTOR IN RPM.
The base speed of the motor is listed on the
nameplate of the motor. If the base speed of the
motor is other than 1750, you must change
parameter #6. For instance, if the base speed of your
motor is 2500 RPM, enter 2500 into parameter #6.
2. SET PARAMETER #14 TO THE
ENGINEERING UNITS VALUE FOR
PARAMETER #6.
This is a number which is set equal to the base speed
of the motor. It may be any convenient value in
process or reference terms. If the speed of the motor
is 2500 RPM, but you want to scale this to 0 to
100.00 %, enter 10000 in parameter #14.
3. SET PARAMETER #7 TO THE PULSES PER
REVOLUTION OF THE ENCODER.
If the motor is a 4 pole motor (259TZ frame or
smaller) this number will be 120 (the default). If
the motor is an 8 pole motor, the number will be
240. A 600 PPR quadrature encoder will be set up
as 2400 in this parameter.
4. SET PARAMETER #46 TO X4 FOR MOST
APPLICATIONS.
Notable exceptions are for a servo application with
a 600 ppr encoder or other application where the
output frequency of the encoder may exceed 40
Khz. For example, a motor with a 600 ppr encoder
will reach 46Khz at 1150 rpm. This assumes that
parameter #7 (Encoder PPR) is set to 2400 and the
pulse multiplier is set to X4. Where the motor
would run faster than 1150 rpm, this parameter
should be set to X2 and parameter #7 should be set
to 1200 ppr. With these settings, the encoder
frequency would reach 50 Khz @ 2500rpm. Above
2500 rpm, the settings should be X1 for Pulse
Multiplier and 600 ppr for parameter #7.
5. SET PARAMETER #47 FOR THE
MODULATION MODE.
This parameter is defaulted to Non-Regenerative
operation. If you want Regenerative operation, you
must change it. Servo operation is regenerative
operation. There is also an option for the method
of modulation. See page 28.
Note: If regenerative mode is used, the drive may
require an optional DC bus loader to dissapate the
regenerative energy and avoid over voltage faults.
6. SET PARAMETER #42 FOR THE DRIVE
GAIN.
This value is defaulted to 50% of the range and
therefore set to 128. This should be adequate for
many applications. If you are doing VERY close
tracking with other motors, it may be necessary to
increase this value, but it may be better to leave it
alone in the initial setup.
7. SET PARAMETER #43 FOR THE DRIVE
ST ABILITY.
This value is also defaulted to 50% and, like
parameter #42, is set to 128. If you have a high
inertia or pulsating load, it may be necessary to
increase this value, but it may be better to leave it
alone in the initial setup.
8. SET PARAMETER #44 FOR MOTORING
CURRENT LIMIT.
This value is defaulted to 100% of motor current.
There may be reasons to set this to a lower value
(such as during start-up), but, unless the drive is
specially set up, it doesn't do any good to set it to a
higher value. Other circuitry limits output current
to 150% of drive rating.
9. SET PARAMETER #45 FOR REGENERATIVE
CURRENT LIMIT.
This value is defaulted to 100% of motor current.
There may be reasons to set this to a lower value
(such as during start-up), but, unless the drive is
specially set up, it doesn't do any good to set it to a
higher value. Other circuitry limits output current
to 150% of drive rating.
10. SET PARAMETER #5 FOR MASTER MODE
OR A SLAVE MODE
Setting this parameter determines which remaining
parameters must be set up.
If setting up in MASTER Mode, proceed to
MASTER MODE SETUP (Section 4.2).
If setting up in a SLAVE mode, proceed to SLA VE
MODE SETUP (Section 4.3).
After setting MASTER or SLAVE, proceed to
INPUTS AND OUTPUT (Section 4.4).
If using an external communications, proceed to
COMMUNICATIONS setup (Section 4.5).
Page 38
DFS-1 Manual Revised 7/95
POWERTEC Ind. Corp.©
Page 44

4.2 MASTER MODE SETUP
1. SET PARAMETER #5 FOR THE MASTER
MODE.
Set the basic operation in this parameter to
MASTER.
This parameter also has options for current control
(see page 16). Selecting MASTER into the
parameter takes care of the normal MASTER mode
operation case because the default is normal current
limits.
Other choices are torque limiting (either motoring
or regenerative) and horsepower control. If one of
these choices is made, it will be necessary to either:
1. Set up one analog input for a reference (see
INPUTS and OUTPUTS), or
2. Make provision to supply reference through
communications (see page 16).
2. SET PARAMETER #17 OR PARAMETER #21
IF AN ANALOG INPUT IS TO BE USED.
If an analog speed reference is to be used, either
Analog Input #1 (see page 20) or Analog Input #2
(see page 22) must be set to Speed Reference Input.
By default, Analog Input #1 is set up as a Speed
Reference Input and Analog Input #2 is a General
Purpose Input.
You must also set parameter #18 (0 to 10VDC by
default) or parameter #22 (4 to 20 milliamps default)
for the type of input. Then set up the scaling
(Engineering units) in parameters #19 and #20 for
Analog Input #1, or parameters #22 and #23 for
Analog Input #2.
If neither analog input is set up as a speed reference,
then the speed reference must be supplied from the
optional front panel control or from the
communications.
5. SET PARAMETER #12 FOR A MASTER
PRESET SPEED.
This step is optional, if you wish to use a preset
speed which can be toggled by the PRESET
function. Enter the speed in Engineering Units.
6. SET PARAMETER #54 FOR SETPOINT
CONDITION (FLOAT OR FREEZE) AT
START-UP.
If you want the motor to return to the speed at which
it was running prior to shutdown or power loss, set
this parameter to Freeze.
If you want the motor to wait for the speed to be
reentered after a stop or power loss, enter Float in
this parameter. See page 30.
7. SET PARAMETER #48 FOR JUMP OR MOP
MODE.
Jump mode operation is to make UP/DOWN speed
changes temporary. MOP mode makes the DFS-1
act like a Motor Operated Potentiometer. See page
28.
8. SET PARAMETER #49 FOR MASTER JUMP
UP AMOUNT.
This is the amount (in Engineering Units) by which
the speed command will increase when the UP
function is activated. See page 29.
9. SET PARAMETER #50 FOR MASTER JUMP
DOWN AMOUNT.
This is the amount (in Engineering Units) by which
the speed command will decrease when the DOWN
function is activated. See page 29.
3. SET PARAMETER #8 FOR THE MASTER
ACCELERATION RATE.
Set the master speed acceleration time in
milliseconds (1 millisecond = .001 second). The
range is from 0 (speed changes are step functions)
to 255 seconds.
4. SET PARAMETER #9 FOR THE MASTER
DECELERATION RATE.
Set the master speed deceleration time in
milliseconds (1 millisecond = .001 second). The
range is from 0 (speed changes are step functions)
to 255 seconds.
Revised 7/95 DFS-1 Manual
POWERTEC Ind. Corp.©
Page 39
Page 45

4.3 SLA VE MODE SETUP
1. SET PARAMETER #5 FOR THE SLAVE
MODE.
Set basic operation in this parameter to 1 for SLA VE
mode. For INVERSE SLAVE mode enter 2.
INVERSE SLAVE mode affects the way a setpoint
is entered.
This parameter also has options for current control
(see page 16). Setting a 1 takes care of the normal
SLA VE mode because the default is normal current
limits.
Other choices are torque limiting (either motoring
or regenerative) and horsepower control. For these
options see page 16.
2. SET PARAMETER #17 OR PARAMETER #21
IF AN ANALOG INPUT IS TO BE USED.
If an analog speed reference is to be followed in
SLAVE mode, either Analog Input #1 (see page
20) or Analog Input #2 (see page 22) must be set to
1 (Speed Reference Input). By default, Analog Input
#1 is set up as a Speed Reference Input.
You must also set parameter #18 (0 to 10VDC by
default) or parameter #22 for the type of input. Then
set up the scaling parameters #19 and #20, or #22
and #23.
If neither analog input is set up as a speed reference
input, then the speed reference to be followed must
be supplied from the Frequency Reference In.
3. SET PARAMETER #15 FOR THE BASE
RATIO.
This is the number which is used to allow the
SETPOINT to be set at a desired number instead
of at a number dictated by gear ratios, motor speeds,
and other factors. See page 19.
4. SET PARAMETER #16 FOR THE MAXIMUM
RATIO.
This setting is the highest ratio allowed under any
circumstances.
5. SET PARAMETER #55 FOR THE MINIMUM
RATIO.
This setting is the smallest ratio allowed under any
circumstances.
6. SET PARAMETER #10 FOR THE SLAVE
ACCELERATION RATE.
Set slave speed acceleration time in milliseconds
(1 millisecond = .001 second). The range is from 0
(speed changes are step functions) to 255 seconds.
See page 18.
7. SET PARAMETER #11 FOR THE SLAVE
DECELERATION RATE.
Set the slave speed deceleration time in milliseconds
(1 millisecond = .001 sec). The range is from 0
(speed changes are step functions) to 255 seconds.
See page 18.
8. SET PARAMETER #13 FOR A SLAVE
PRESET RATIO.
This step is optional, if you wish to use a preset
ratio which can be toggled by the PRESET function.
Enter the speed in Engineering Units.
9. SET PARAMETER #54 FOR SETPOINT
CONDITION AT START-UP.
If you want the motor to return to the ratio at which
it was running prior to shutdown or power loss, set
this parameter to 1. If you want the motor to wait
for the ratio to be reentered after a stop or power
loss, enter 0. See page 30.
10. SET PARAMETER #48 FOR JUMP OR MOP
MODE.
Jump mode operation is to make UP/DOWN ratio
changes temporary. MOP mode makes the DFS-1
act like a Motor Operated Potentiometer. See page
28.
11. SET PARAMETERS #51 AND #52 FOR SLAVE
JUMP UP/DOWN AMOUNTS.
These are the amounts (in Engineering Units) by
which the ratio command will increase or decrease
when the UP or DOWN functions are activated.
See page 29.
Page 40
DFS-1 Manual Revised 7/95
POWERTEC Ind. Corp.©
Page 46

4.4 INPUTS AND OUTPUTS SETUP
1. SET PARAMETERS #17, #18, #19, AND #20
TO SET UP ANALOG INPUT #1.
If Analog Input #1 is to be used for speed reference,
which is the default mode, and the reference is to
be 0 to +10VDC, no action is necessary to change
from the defaults. If the input is to be 4 to 20mA,
then parameter #18 must be changed. Set up
parameters #19 and #20 to conform with the speed
range set up by parameter #14.
If Analog Input #1 is not used as a speed reference,
it may be used for any other signal which may be
useful to the processor or the external program. Preprogrammed purposes are listed on page 20, but
the uses of the analog inputs are not limited to those
items.
2. SET PARAMETERS #21, #22, #23, AND #24
TO SET UP ANALOG INPUT #2.
If Analog Input #2 is to be used for Speed Reference
Input, Analog Input #1 must be changed to
something else by changing parameter #17 to
something other than 1, and then changing
parameter #21 to 1. Parameter #22 must be set up
for the form of input (4 to 20mA is the default),
and parameters #23 and #24 set up in EGU's
conforming to parameter #14.
Analog Input #2 may be used for any analog input
the processor or program may need, either as a
predefined use (see page20) or as a General Purpose
Input.
3. SET PARAMETERS #25, #26, AND #27 TO
SET UP ANALOG OUTPUT #1.
If Analog Output #1 is to be used for a Speed Output
signal from -10 to +10VDC, then nothing needs to
be done. If not used for this purpose, it may be used
as a General Purpose Output, a Load Output, or a
communications output port by changing parameter
#25. Parameters #26 and #27 may be set up in
Engineering Units.
4. SET PARAMETERS #28, #29, AND #30 TO
SET UP ANALOG OUTPUT #2.
If Analog Output #2 is to be used for a Load Output
signal from -10 to +10VDC, then nothing needs to
be done. If not used for this purpose, it may be used
as a General Purpose Output, a Load Output, or a
communications output port by changing parameter
#28. Parameters #29 and #30 may be set up in
Engineering Units.
5. SET PARAMETERS #31 THROUGH #37 FOR
DIGITAL INPUT FUNCTIONS.
If the digital inputs as listed on page 6 are suitable,
then no changes need to be made. However, note
that any Digital Input may be used for ANY purpose
and more than one input may be used for the same
purpose (the inputs will be logically ANDed - i.e.,
they must both be present to function). The same
parameters make provisions for input sense. See
page 25.
6. SET PARAMETERS #53 FOR DEBOUNCE
TIME.
If the inputs are driven by relays or push-button,
contact bounce and/or noise could generate multiple
commands. This command sets the minimum time
(in milliseconds) that a command must be present
before it is considered valid.
7. SET PARAMETERS #38, #39, #40, AND #41
FOR DIGITAL OUTPUT FUNCTIONS.
If the outputs listed on page 7 (the defaults) are
suitable, no changes need to be made, but each
output can be reassigned as necessary (see page 26
- parameter #38) as required. The output relays can
also be assigned as normally open or normally
closed.
Revised 7/95 DFS-1 Manual
POWERTEC Ind. Corp.©
Page 41
Page 47

4.5 COMMUNICA TIONS SETUP
The local operator's panel operates at CPU level
and does not require the setup of any
communications parameters. The following setup
is for an external communications link.
Before connecting to the external communications
link, the following parameters must be set properly .
The other parameters may be set after the link is
established.
The default parameters set up the DFS-1 as follows:
• the unit has an address of 001
• the baud rate is 9600
• The unit is in local mode
• using a binary communications protocol
1. SET PARAMETER #1 FOR
COMMUNICATIONS NETWORK ADDRESS.
This is the address which the DFS-1 will respond
to on the external comm link. Since the default is
001, it might be a good idea to start the network
addresses at 002 so that a unit being replaced does
not cause an addressing conflict.
Addresses up to 255 are valid, but the RS-485
protocol only allows for 32 units on a single line
without repeaters.
3. SET PARAMETER #3 TO SELECT WHICH
FUNCTIONS ARE REMOTE.
This parameter may be used to include or exclude
control functions from local control and assign them
to the remote link. The setup of this parameter has
nothing to do with assigning functions to input
terminals! This parameter ONLY AFFECTS
WHETHER THE CONTROL OF THE
FUNCTION IS LOCAL OR REMOTE.
4. SET PARAMETER #4 TO SELECT THE
COMMUNICATIONS PROTOCOL.
This parameter selects the POWERTEC binary
protocol.
5. SET PARAMETER #56 FOR
COMMUNICATIONS TURN AROUND
DELAY.
Set parameter #56 to default to 2 though it may
have to be set to 6 or 8 for most reliable
communications with Allen Bradley devices.
2. SET PARAMETER #2 FOR
COMMUNICATIONS NETWORK SPEED.
This is the communications rate at which the DFS-
1 will operate on an external comm link. Rates
range from 300 baud to 38.4 Kilobaud (see page
16).
Page 42
DFS-1 Manual Revised 7/95
POWERTEC Ind. Corp.©
Page 48

5.0 DFS - 1 ERROR CODES
ERROR CODES FOR ON-BOARD DISPLA Y
The DFS-1 has a single-digit alphanumeric display to show error codes when something is wrong. Following is a
list of the meanings of the numbers in that display:
0 All conditions nominal
1 Undervoltage trip .................................................Line voltage dropped below minimum level
2 Overvoltage trip of drive ......................................Bus voltage exceeded safe limit
3 Undervoltage timer tripped ..................................Line voltage low for too long
4 Instantaneous overcurrent ....................................Excessive transistor current
5 Loss of encoder signal..........................................Encoder speed signals lost.
Encoder loss detection applies only when pulse
multiplier is set to 4X
6 Motor thermal tripped ..........................................Motor is too hot or thermal is disconnected
7 Commutation fault ...............................................Signals from position encoder lost
8 +24VDC lost at TB2-A14 and TB2-B1 ...............Fuse FR1 overloaded
9 +24VDC lost at TB3-B1 ......................................Fuse FR2 overloaded
A +5VDC lost at TB1-A8........................................Fuse FR4 overloaded
B +24VDC lost at TB1-A10 ....................................Fuse FR3 overloaded
C Current limit .........................................................Drive is at maximum current output
D T imed Overload....................................................Timed overcurrent has occured
E Display fault.........................................................Fault in display module
F Applications fault .................................................Fault in applications program
Revised 7/95 DFS-1 Manual
POWERTEC Ind. Corp.©
Page 43
Page 49

THIS PAGE WAS INTENTIONALLY LEFT BLANK.
Page 44
DFS-1 Manual Revised 7/95
POWERTEC Ind. Corp.©
Page 50

6.0 COMMUNICATIONS PROTOCOL
GENERAL DEFINITIONS:
[STX] - 02h - Start of data
[ETX] - 03h - End of data
[ACK] - 06h - Acknowledge
[NAK] -15h - Negative Acknowledge
[DLE] - 10h - Data Link Escape
[CMD] -xxh - Command to be executed
[CSM] -xxh - Checksum, 2’s complement sum of the
data between the [STX] and [ETX] characters
GENERAL NOTES:
1. The use of brackets in this document means that
there is a single byte of information contained
within the brackets. This convention is used to
insure that the construction of the message is clear.
2. If the below message was sent, the following
checksum would be computed:
DLE STX UID CMD DATA DLE ETX CSM
[10] [02] [01] [82] [00][00][10][10][00] [10] [03] [6D]
Note the delimited datum character. Since a 10h is
the DLE, the only way the software can know that
a 10h in the middle of a data word is datum and
not the DLE is to put the datum in twice. The
driver software must know that a single 10h is the
DLE and not datum! The driver software must
actually use only one 10h to compute the checksum value.
01 + 82 + 00 + 00 + 10 + 00 = 93: 2’s complement = 6D
3. All data is sent in four bytes regardless of the
needed length of data. For instance, parameter 48
has the value of 0 for jump and 1 for MOP. The
actual parameter is passed in communications
however as a [00][00][00][00] for jump mode and
a [00][00][00][01] for MOP mode. In this way, all
data has an expected length of 4 bytes.
Revised 7/95 DFS-1 Manual
POWERTEC Ind. Corp.©
Page 45
Page 51

COMMAND LIST
Following is a list of commands to the unit.
Detailed descriptions of each command are shown in
attachment A beginning on page 55.
Cmd # Description:
81h Description: (Status Request)
Respond with the current operating status
which includes commanded speed, actual
speed, and status bits.
82h Description: (Set Speed)
Commands the unit to set a new speed (or
ratio) but to delay changing to the new speed
until a command to do so is given ( #83)
83h Description: (Execute Speed)
Commands the unit to execute the speed
commanded in (#82) above.
84h Description: (Set and Execute Speed)
Commands the unit to set a new speed (or
ratio) and change to it immediately without
waiting for an execution command.
85h Description: (Read Parameter)
Commands the unit to send a specified current
parameter setting.
8Ah Description: (Read Digital Input)
Commands the unit to send the status of a
digital input.
8Bh Description: (Read Digital Output)
Commands the unit to send the status of a
digital output.
8Ch Description: (Set Digital Output)
Commands the unit to turn on or off a specific
digital output.
8Dh Description: (Set Operational Mode)
Allows setting run, stop, preset, reverse
commands via comm link rather than through
the hardwired inputs.
8Eh Description: (Read Operational Mode)
Allows reading the status of all command
conditions.
8Fh Description: (Application Mode)
Sets the setpoint for torque control or horsepower control or other type of special
application when the setpoint is to be set by
communication rather than analog input
value.
86h Description: (Write Parameter)
Commands the unit to change a specific
parameter to a new value.
87h Description: (Read Analog Input)
Commands the unit to send the value of an
analog input.
88h Description: (Read Analog Output)
Commands the unit to send the value of an
analog output.
89h Description: (Write Analog Output)
Commands the unit to put a specific value out
on one of the analog outputs.
Page 46
DFS-1 Manual Revised 7/95
POWERTEC Ind. Corp.©
Page 52

P ARAMETER LIST:
Following is a list of the parameters used in
DFS-1. For a detailed description of each parameter
see the list in attachment B beginning on page 57.
Param# Description
COMMUNICATIONS SETUP
1 Unit Identification number
2 Baud Rate
3 Local/Remote
4 Communications Protocol
5 Mode of Operation
56 Communication Response Delay
BASIC DRIVE SETUP
6 Maximum Motor Speed
7 Encoder Pulses per Revolution
42 Drive Gain Setting
43 Drive Stability Setting
44 Motoring Current Limit
45 Regenerative Current Limit
46 Pulse Multiplier
47 Pulse Width Modulation Mode
48 Jump Or MOP Function
14 High Engineering units
53 Input Debounce Value
54 Freeze or Float Setpoint
59 EGU Tag Select
MASTER SETUP ONLY
12 Master Preset Speed
8 Master Acceleration Rate
9 Master Deceleration Rate
49 Master Jump Up Amount
50 Master Jump Down Amount
57 Master Jog Speed
60 Master Preset #2
SLAVE SETUP ONLY
10 Slave Acceleration Rate
11 Slave Deceleration Rate
13 Slave Preset Ratio
15 Base Ratio for Slave
16 Maximum Ratio for slave
51 Slave Jump Up Amount
52 Slave Jump Down Amount
55 Slave Minimum Ratio
58 Slave Jog Ratio
61 Slave Preset #2
INPUT/OUTPUT SETUP
17 Analog Input #1 Mode Select
18 Analog Input #1 Input Signal Conditioning
19 Analog Input #1 Low Engineering Units
20 Analog Input #1 High Engineering Units
21 Analog Input #2 Mode Select
22 Analog Input #2 Input Signal Conditioning
23 Analog Input #2 Low Engineering Units
24 Analog Input #2 High Engineering Units
25 Analog Output #1 Mode Select
26 Analog Output #1 Low Engineering Units
27 Analog Output #1 High Engineering Units
28 Analog Output #1 Mode Select
29 Analog Output #1 Low Engineering Units
30 Analog Output #1 High Engineering Units
31 Digital Input #1 Mode and Polarity
32 Digital Input #2 Mode and Polarity
33 Digital Input #3 Mode and Polarity
34 Digital Input #4 Mode and Polarity
35 Digital Input #5 Mode and Polarity
36 Digital Input #6 Mode and Polarity
37 Digital Input #7 Mode and Polarity
38 Digital Output #1 Mode and Polarity
39 Digital Output #2 Mode and Polarity
40 Digital Output #3 Mode and Polarity
41 Digital Output #4 Mode and Polarity
62 Contactor Delay
FUTURE EXPANSION
63 Future General use parameters
80-95 Future Special use parameters
Revised 7/95 DFS-1 Manual
POWERTEC Ind. Corp.©
Page 47
Page 53

ATT A CHMENT A: DET AILED COMMANDS
Read Speed/Status (81)
Command: Read Speed/Status
Description:
This command tells the unit to respond with it’s
current commanded speed, actual speed, load value,
& status.
CMD = [81]
UID = [01] - [FF]
Message:
[DLE][STX][UID][CMD][DLE][ETX][CSM]
Response:
[DLE][STX][UID][ACK][CS4][CS3][CS2][CS1][AS4][AS3][AS2]
[AS1][LOD][ST2][ST1][DLE][ETX][CSM]
Definitions:
[CS4]..[CS1] - Commanded speed, unsigned long integer
[AS4]..[AS1] - Actual speed, unsigned long integer
[LOD] - Load percent
[ST2]..[ST1] - UNIT Status. ST1 is fault codes.
[ST2] - 7 6 5 4 3 2 1 0
Local/Remote (0,1)
Master/slave (0,1)
At Speed (1)
FWD Direction Set (1)
Fault Detected (1)
Drive Enabled (1)
Microprocessor
Zero Speed
[ST1] - 7 6 5 4 3 2 1 0
Bus not charged (1)
IOC (1)
Stall (1)
Inverse Time OL (1)
Heatsink Thermal OT
Commutation Fault
Over Volt
Under Volt
Set Speed (82)
Command: Set Speed
Description:
This command tells the unit to set the new
commanded speed to the value but not to execute it
until told to do so by #83.
CMD = [82]
UID = [01] - [FF]
Message:
[DLE][STX][UID][CMD][CS4][CS3]
[CS2][CS1][DLE][ETX][CSM]
Response:
If no errors
[DLE][STX][UID][ACK][DLE][ETX][CSM]
else
[DLE][STX][UID][NAK][ERR][DLE][ETX][CSM]
Definitions:
[CS4]..[CS1] - Commanded speed, unsigned
long integer
[ERR] - Reported Error.
[80] - Unit not in remote mode
[81] - Illegal speed value
[86] - Illegal command number
Execute Speed (83)
Command: Execute Speed
Description:
This command tells the unit to execute the new
commanded speed set in 82.
CMD = [83]
UID = [00] - [FF]
[ERR]- Reported error
[86]- Illegal command number.
Page 48
DFS-1 Manual Revised 7/95
POWERTEC Ind. Corp.©
Page 54

Message:
[DLE][STX][UID][CMD][DLE][ETX][CSM]
Response:
If no errors and unit i.d. does not equal 0
[DLE][STX][UID][ACK][DLE][ETX][CSM]
If unit i.d. = 0 (global command) then no
response at all but all DIGIMAXes will execute
simultaneously.
else
[ERR] - Reported Error.
[80] - Unit not in remote mode
[81] - Illegal speed value
[86] - Illegal Command number
Read Parameter (85)
Command: Read Parameter
Description:
This command tells the unit to send the value of
the selected parameter.
[DLE][STX][UID][NAK][ERR][DLE][ETX][CSM]
Definitions:
[ERR] - Reported Error.
[80] - Unit not in remote mode
[86] - Illegal Command number
Set & Execute Speed (84)
Command: Set & Execute Speed
Description:
This command tells the unit to set the new
commanded speed to the value and execute it
immediately.
CMD = [84]
UID = [01] - [FF]
Message:
[DLE][STX][UID][CMD][CS4][CS3][CS2][CS1][DLE][ETX][CSM]
Response:
If no errors
[DLE][STX][UID][ACK][DLE][ETX][CSM]
else
[DLE][STX][UID][NAK][ERR][DLE][ETX][CSM]
Definitions:
[CS4]..[CS1] - Commanded speed, unsigned
long integer
CMD = [85]
UID = [01] - [FF]
Message:
[DLE][STX][UID][CMD][PRM][DLE][ETX][CSM]
Response:
If no errors
[DLE][STX][UID][ACK][DT4][DT3][DT2]DT1][DLE][ETX][CSM]
else
[DLE][STX][UID][NAK][ERR][DLE][ETX][CSM]
Definitions:
[DT4] THRU [DT1] Datum is returned as an
long integer.
[PRM] - Parameter number
[ERR] - Reported Error
[82] - Illegal parameter number
[86] - Illegal Command number
Write Parameter (86)
Command: Write Parameter
Description:
This command tells the unit to change the value
of the selected parameter.
CMD = [86]
UID = [01] - [FF]
Revised 7/95 DFS-1 Manual
POWERTEC Ind. Corp.©
Page 49
Page 55

Message:
[DLE][STX][UID][CMD][PRM][VL4]
[VL3][VL2][VL1][DLE][ETX][CSM]
Response:
If no errors
[DLE][STX][UID][ACK][DLE][ETX][CSM]
else
[DLE][STX][UID][NAK][ERR][DLE][ETX][CSM]
[ERR] - Reported error
[80] - Unit not in remote mode
[84] - Illegal channel number
[86] - Illegal Command number
Read Analog Output (88)
Command: Read Analog Output
Definitions:
[PRM] - Parameter number
[VL4]..[VL1] - parameter value cast as a long
integer
[ERR] - Reported Error
[80] - Unit not in remote mode
[82] - Illegal parameter number
[83] - Illegal parameter value
[86] - Illegal Command number
Read Analog Input (87)
Command: Read Analog Input
Description:
This command tells the unit to return the value
of one of the analog inputs.
CMD = [87]
UID = [01] - [FF]
ATD = [01 ]or [02] depending on which Analog input
is being read.
Message:
[DLE][STX][UID][CMD][ATD][DLE][ETX][CSM]
Response:
If no errors
[DLE][STX][UID][ACK][AD4][AD3]
[AD2][AD1][DAT][DLE][ETX][CSM]
else
[DLE][STX][UID][NAK][ERR][DLR][ETX][CSM]
Description:
This command tells the unit to return the value
of one of the analog outputs.
CMD = [88]
UID = [01] - [FF]
DTA = [01] or [02] depending on which Analog
output is being read.
Message:
[DLE][STX][UID][CMD][DTA][DLE][ETX][CSM]
Response:
If no errors
[DLE][STX][UID][ACK][DA4][DA3]
[DA2][DA1][DLE][ETX][CSM]
else
[DLE][STX][UID][NAK][ERR][DLE][ETX][CSM]
Definitions:
[DTA] - Analog output number 01 or 02
[DA4] - [DA1] Value of analog output, cast as
unsigned long.
[ERR] - Reported error
[80] - Unit not in remote mode
[84] - Illegal channel number
[86] - Illegal Command number
Write Analog Output (89)
Command: Write Analog Output
Definitions:
[ATD] - Analog input number [01] or [02]
[AD4] - Value of analog input, Most Sig Byte
[AD1] - Value of analog input, Least Sig Byte
Page 50
Description:
This command tells the unit to put out a specific
value of analog voltage on a selected analog output.
DFS-1 Manual Revised 7/95
POWERTEC Ind. Corp.©
Page 56

CMD = [89]
UID = [01] - [FF]
DTA = [01 ]or [02] depending on which analog
output
Message:
[DLE][STX][UID][CMD][DTA][VL4]
[VL3][VL2][VL1][DLE][ETX][CSM]
Response:
If no errors
[DLE][STX][UID][ACK][DLE][ETX][CSM]
else
[DLE][STX][UID][NAK][ERR][DLE][ETX][CSM]
Definitions:
[DTA] - Analog output number 01 or 02
[VL4]..[VL1] - Analog value cast as sealed
between low EGU and high EGU.
[ERR] - Reported Error
[80] - Unit not in remote mode
[84] - Illegal channel number
[85] - Illegal channel value
[86] - Illegal Command number
Response:
If no errors
[DLE][STX][UID][ACK][VL4][VL3]
[VL2][VL1][DLE][ETX][CSM]
else
[DLE][STX][UID][NAK][ERR][DLE][ETX][CSM]
Definitions:
[DIG] - Digital input number [01]* thru [07]
([00]=Estop) not used
[VL4] - Always 00
[VL3] - Always 00
[VL2] - Always 00
[VL1] - Status of input [00] = off [01] = on
[ERR] - Reported error
[80] - Unit not in remote mode
[84] - Illegal channel number
[86] - Illegal Command number
Read Digital Output (8B)
Command: Read Digital Output
Description:
This command tells the unit to return the value
of one of the digital outputs.
Read Digital Input (8A)
CMD = [8B]
UID = [01 ]- [FF]
DIG = [01] - [04] depending on which Digital
Command: Read Digital Input
Description:
Message:
This command tells the unit to return the value
of one of the digital inputs.
CMD = [8A]
[DLE][STX][UID][CMD][DIG][DLE][ETX][CSM]
Response:
UID = [01] - [FF]
DIG = [01] - [07] depending on which digital input is
being read.
Message:
[DLE][STX][UID][ACK][VL4][VL3]
[VL2][VL1][DLE][ETX][CSM]
[DLE][STX][UID][NAK][ERR][DLR][ETX][CSM]
[DLE][STX][UID][CMD][DIG][DLE][ETX][CSM]
Revised 7/95 DFS-1 Manual
POWERTEC Ind. Corp.©
output is being read.
If no errors:
else
Page 51
Page 57

Definitions:
[DIG] - Digital output number 01 to 04
[VL4] - Always 00
[VL3] - Always 00
[VL2] - Always 00
[VL1] - Status of output 00 = off 01 = on
[ERR] - Reported error
[80] - Unit not in remote mode
[84] - Illegal channel number
[86] - Illegal Command number
Write Digital Output (8C)
Set Operational Mode (8D)
Command: Set Operational Mode
Description:
This command tells the unit to turn on or off
specific input control functions such as run, stop, etc.
Refer to parameter 3 which defines which input
controls are allowed by communications link and
which MUST BE controlled by inputs on the terminal
strip. An error message will be produced if set mode
attempts to change the condition of an input that is
not allowed to be remotely changed.
Command: W rite Digital Output
Description:
This command tells the unit to turn on or off a
specific digital output contact.
CMD = [8C]
UID = [01] - [FF]
DIG = [01] - [04] depending on which Digital output
Message:
[DLE][STX][UID][CMD][DIG][VL4]
[VL3][VL2][VL1][DLE][ETX][CSM]
Response:
If no errors
[DLE][STX][UID][ACK][DLE][ETX][CSM]
else
[DLE][STX][UID][NAK][ERR][DLE][ETX][CSM]
Definitions:
[DIG] - Digital Output channel choice [00] thru
[04]
[VL4] - Always 00
[VL3] - Always 00
[VL2] - Always 00
[VL1] - [00] or [01] contact being open or
closed.
[ERR] - Reported Error
[80] - Unit not in remote mode
[84] - Illegal channel number
[85] - Illegal channel value
[86] - Illegal Command number
CMD = [8D]
UID = [01] - [FF]
SMH = [00] - [FF]
SML = [00] - [FE]
7 6 5 4 3 2 1 0—Bit Position
depending on which CONTROL
INPUT SEE PARAMETER # 3 FOR
DEFINITION. This is a bit map that
defines the desired stateof each
control input as follows:
0 0 0 0 0 0 0 0—Bit value can be 0 (off) or 1 (on)
7 6 5 4 3 2 1 0—Digital input number
BIT PSN SML
where: 0 is Estop
1 is Run
2 is Preset
3 is Up input
4 is Down input
5 is Reverse mode
6 is Frequency mode
7 is Local/Remote (0 for local)
BIT PSN SMH
where: 0 is unused
1 is Jog
2 is Preset 2
3 is Contactor Aux
Note that input 1 is Estop which must always be
0 since this cannot be set remotely. This can ONLY
be a hardwired function. This means the largest
value for [00][00][SMH][SML] is [00][00][FF][FE].
Example: To turn on inputs 1 and 5 the value for
[00][00][SMH][SML] is 0000 0022, or [22]. Inputs
1 and 5 are defaulted to RUN and Reverse but can be
redefined in parameters 31 through 37.
Page 52
DFS-1 Manual Revised 7/95
POWERTEC Ind. Corp.©
Page 58

Message:
[DLE][STX][UID][CMD][00][00]
[SMH][SML][DLE][ETX][CSM]
Response:
If no errors
[DLE][STX][UID][ACK][DLE][ETX][CSM]
else
[DLE][STX][UID][NAK][ERR][DLE][ETX][CSM]
Definitions:
[ERR] - Reported Error
[80] - Unit not in remote. Returned if this
command is sent and remote mode is not
allowed in parameter 3.
[86] - Illegal Command number.
[87] - Illegal input number.
[88] - Illegal input value. Returned if remote
mode is allowed but the specific input asked to
be changed is not allowed in remote by parameter # 3.
Read Operational Mode (8E)
Command: Read Operational Mode
Description:
This command tells the unit to return the current
status of the commands which are active whether
from hardwired inputs or by remote. Note that run,
for instance may not be allowed by param #3 from
the terminal strip, but could be active from the comm
link, or for that matter may even be mapped to
operate from a different digital input. THE STATUS
SHOWN HERE HAS NOTHING DIRECTLY TO
DO WITH THE STATUS OF THE DIGITAL
INPUTS EXCEPT FOR E-STOP STATUS
WHICH IS ALWAYS HARDWIRED TO INPUT
# 1. THE OTHER COMMANDS MAY OR MAY
NOT BE ACTIVE FROM THE HARDWIRED
INPUTS OR COULD BE REMAPPED. DO NOT
BE CONFUSED BETWEEN COMMANDS
SUCH AS RUN, STOP, REVERSE AND THE
SOURCE OF THOSE COMMANDS WHICH
MAY BE ANY OF THE DIGITAL INPUTS,
EITHER OF THE TWO COMM INPUTS, OR
INTERNAL SOFTWARE IN SPECIAL CASES.
If you wish to determine the status of the digital
inputs you must use command 8A (Read Digital
Input).
CMD = [8E]
UID = [01] - [FF]
Message:
[DLE][STX][UID][CMD][DLE][ETX][CSM]
Response:
If no errors
[DLE][STX][UID][ACK][00][00]
[RMH][RML][DLE][ETX][CSM]
else
[DLE][STX][UID][NAK][ERR][DLE][ETX][CSM]
Example: If the drive was in remote mode (from
Parameter #3) and if the input assignments were the
factory defaults, and the drive was in run, reverse,
Down and not E-Stopped, then the value for [RML]
would be constructed as follows:
7 6 5 4 3 2 1 0 Bit Positions
0 0 1 1 0 0 1 1 Input Status
[3 3] [RMH][RML]= [00][33]
BIT PSN RML
where: 0 is E-stop
1 is Run
2 is Preset
3 is Up input
4 is Down input
5 is Reverse mode
6 is Frequency mode
7 is Local/Remote (0 for local)
BIT PSN RMH
where: 0 is unused
1 is Jog
2 is Preset 2
3 is Contactor Aux
Definitions:
[ERR] - Reported error
[82] - Illegal parameter number
[86] - Illegal Command number
Revised 7/95 DFS-1 Manual
POWERTEC Ind. Corp.©
Page 53
Page 59

Application Mode (8F)
Command: Application Mode Command
Description:
This command reads/sets the operating setpoint
by communications rather than using an analog input
for the setpoint when a special application mode is
active (see parameter 5). The modes currently
defined are shown below. It is possible in the future
that additional application modes may be added.
CMD = [8F]
UID = [01] - [FF]
AMD = [20],[21],[22],[23],[30],[31],[32]
Message:
[DLE][STX][UID][CMD][AMD][VL4]
[VL3][VL2][VL1][DLE][ETX][CSM]
Response:
If no errors,
[DLE][STX][UID][ACK][DLE][ETX][CSM]
else,
[DLE][STX][UID][NAK][ERR][DLE][ETX][CSM]
Definitions:
[AMD] - Application Mode
[20] - Set Motoring torque setpoint
[21] - Set Regen torque setpoint
[22] - Set Horsepower setpoint
[23] - Set Speed/Ratio with ramp rate
[30] - Read Motoring Torque Setpoint
[31] - Read Regen Torque Setpoint
[32] - Read Horsepower Setpoint
[VL4] - Depends on value passed
[VL3] - Depends on value passed
[VL2] - Depends on value passed
[VL1] - Depends on value passed
[ERR] - Reported Error
[80] - Unit not in remote
[82] - Illegal parameter number
[86] - Illegal Command number
[89] - Illegal Application value
[8A] - Illegal Application
any other mode than horsepower.
Examples:
[20] Motoring Torque setpoint can be 0 to 1000 (hex
3E8) where torque is set in tenths of percent
(1000 equals 100.0%) A torque of 100.0%
would then be sent as [00][00][03][E8].
[21] Regen Torque same description as above
[22] Horsepower setpoint has the same description
as torque where hp is set in tenths of percent,
100% maximum
[23] Set speed/ratio with accel and decel ramp.
This is used whenever a temporary setpoint for
speed is desired and the ramp up and down rates
are different from those in the parameter table.
This setpoint and ramp rate is temporary and the
drive will revert automatically back to the
normal setpoint and ramp rates on any successive commands. Speed/ratio requires 4 bytes,
accel requires 4 bytes and decel requires 4 bytes.
For instance a complete message including the
header, etc. for a speed of 1400 rpm and accel
rate of 10 seconds and decel rate of 5 seconds to
unit # 5 would be:
[10][02][05][8F[23][00][00][05][78][00][00]
[00][0A][00][00][00][05][10][03][CSM]
ATTACHMENT B:
P ARAMETER DESCRIPTION:
Following is a list of the parameters for the DFS-
1. All parameters are 4 byte values regardless of the
data. For instance, parameter 5 is master slave and
can be only [00] or [01] but the data bytes required
for the parameter are [00][00][00][01] or
[00][00][00][00]. This is done to keep communications simple when dealing with parameter information, especially with any packed message.
59 through 63 are general use parameters for
future use and not currently defined.
80 through 95 are special use parameters for
future use and not currently defined.
An error message [8A] will be sent if a setpoint
for horsepower [22] for instance is sent when
parameter 5 is set to allow motoring torque limit, or
Page 54
DFS-1 Manual Revised 7/95
POWERTEC Ind. Corp.©
Page 60

Additional Info
DFS SOFTWARE MODIFICATION FOR
DYNAMIC BRAKING OR OUTPUT CONT ACT OR
OPERATION
Functional Description
A new function for Contactor Aux has been added to the digital input choices. When configured as
described in the example, 24VDC must be present at this input for the drive to run. Parameter #62, Contactor
Delay, is a number of 25ms intervals that will occur between the DFS controller acceptance of a run command
and the firing of the transistors. If the Contactor Aux input signal is low, the DFS starts the timer and closes
the Contactor Output. If the Contactor Aux input does not switch high before the timer runs out, the drive will
return to the stop condition. If the Contactor Aux input does switch high, the drive will start running when the
timer runs out.
Example Setup for Dynamic Braking
1 Set Digital Input #7 mode to Contactor Aux, polarity to Active Low.
2 Set Digital Output #4 mode to Normally Open, polarity to Normally Closed.
3 Set Contactor Delay to 20 (20 x 25ms = 500ms = 1/2 second).
Run command causes the Contactor Output to close, the Contactor Relay opens, the feedback contacts
close and the drive starts to run.
Example Setup for Output Contactor
1 Set Digital Input #7 mode to Contactor Aux, polarity to Active Low.
2 Set Digital Output #4 mode to Normally Open, polarity to Normally Closed.
3 Set Contactor Delay to 10 (10 x 25ms = 250ms = 1/4 second).
Run command causes the Contactor Output to close, the Contactor Relay closes, the feedback contacts
close and the drive starts to run.
The difference in the operation of the two types of contactors is that the Dynamic Braking Contactor is
normally closed whereas the Output Contactor is normally open. In both contactors, the auxilliary contacts are
normally open.
Terms Used
1 Contactor Aux - The digital input on the DFS board which is connected to the feedback contacts on the
contactor relay.
2 Contactor Output - The digital output on the DFS board which activates the solenoid on the contactor
relay.
3 Signal low - 0VDC
4 Signal high - 24VDC
Revised 7/95 DFS-1 Manual
POWERTEC Ind. Corp.©
Page 55
Page 61

+24V
DigitalOut 1A
DigitalOut 1B
DigitalOut 2A
DigitalOut 2B
DigitalOut 3A
DigitalOut 3B
DigitalOut 4A
DigitalOut 4B
FREQ REF OUT+
FREQ REF OUT-
Digitalout COMMON
SPEED OUT
SpeedOut COMMON
TB2
A
B
COMMON
Digital Input COMMON Cathodes
E-STOP
Digital In 1
Digital In 2
Digital In 3
Digital In 4
Digital In 5
Digital In 6
Digital In 7
FREQ REF IN+
FREQ IN -
FREQ REF SHIELD
+24V
DISPLAY POWER
DISPLA Y +
DISPLAY-
Display COMMON
COMMUNICATIONS+
COMMUNICATIONS-
COMMUNICATIONS SHIELD
COMMUNICATIONS COMMON
Spacer Spacer
TB3
A
B
Analog In COMMON
+10VDC
Analog In 1+
Analog In 1-
Analog In 2+
Analog In 2-
-10VREF
Analog Out 1+
Analog Out 2+
Analog Out COMMON
HALL SHIELD
HS1
HS3
HS2
HS4
HS5
HALL COMMON
HALL POWER
THERMAL
THERMALPOWER
TB1
A
B
Spacer
Spacer
12345678910
12345678910
1234567891011121314
1234567891011121314
1234
1234
t
Typical
Connections
Output Contactor
Page 56
DFS-1 Manual Revised 7/95
POWERTEC Ind. Corp.©
Page 62

+24V
DigitalOut 1A
DigitalOut 1B
DigitalOut 2A
DigitalOut 2B
DigitalOut 3A
DigitalOut 3B
DigitalOut 4A
DigitalOut 4B
FREQ REF OUT+
FREQ REF OUT-
Digitalout COMMON
SPEED OUT
SpeedOut COMMON
TB2
A
B
COMMON
Digital Input COMMON Cathodes
E-STOP
Digital In 1
Digital In 2
Digital In 3
Digital In 4
Digital In 5
Digital In 6
Digital In 7
FREQ REF IN+
FREQ IN -
FREQ REF SHIELD
+24V
DISPLAY POWER
DISPLA Y +
DISPLAY-
Display COMMON
COMMUNICATIONS+
COMMUNICATIONS-
COMMUNICATIONS SHIELD
COMMUNICATIONS COMMON
Spacer Spacer
TB3
A
B
Analog In COMMON
+10VDC
Analog In 1+
Analog In 1-
Analog In 2+
Analog In 2-
-10VREF
Analog Out 1+
Analog Out 2+
Analog Out COMMON
HALL SHIELD
HS1
HS3
HS2
HS4
HS5
HALL COMMON
HALL POWER
THERMAL
THERMALPOWER
TB1
A
B
Spacer
Spacer
12345678910
12345678910
1234567891011121314
1234567891011121314
1234
1234
t
Typical
Connections
Dynamic Braking
Revised 7/95 DFS-1 Manual
POWERTEC Ind. Corp.©
Page 57
Page 63

THIS PAGE WAS INTENTIONALLY LEFT BLANK.
Page 58
DFS-1 Manual Revised 7/95
POWERTEC Ind. Corp.©
Page 64

APPENDIX A
RETROFITTING THE MODEL 1000, 1000A, OR 1000AR
The DFS-1 Model 1000 series retro-fit kit consists of:
Quantity 1 DFS-1 Printed Circuit Board with connector plugs
Quantity 1 10 Pin Connector Cable Part # 3570-141420-001
Quantity 1 14 Pin Connector Cable Part # 3570-141419-001
Quantity 2 Nylon Spacer #6 x 1/4” diam x 1/4” long
Quantity 2 Machine Screw, Pan-head, 6/32 x 1/2” long
Quantity 4 Star Washer, #6
1. Disconnect the cables from the Current Controller board to the Driver board (P2) and
the Capacitor board (P3) and let them hang for the time being.
2. Remove the 141-108 Current Controller board and the 141-107 Speed Controller
board and set them aside. These boards have two screws each which hold them to the
metal rail at the bottom and two hex nuts each which hold them to the Fuse board at
the top. Save two of the hex nuts to mount the DFS-1 board.
3. There are four metal studs on the bottom of the Fuse board at the top of the drive. The
two outside studs will be used to mount the DFS board, but the two center studs must
be removed. Remove them and set them aside.
4. Remove the 14 pin connector cable connected to the Driver board (left side of the
chassis), and replace it with the new cable 3570-141419-001. WARNING: Do
NOT use the original drive cables with the DFS-1 board. This will cause damage
to the drive circuitry. Either end of the cable may be plugged into the Driver board.
Let the other end hang down the left side of the chassis because it will connect to the
left side of the DFS board.
5. Remove the 10 pin connector cable connected to the Capacitor board (right side of
the main chassis) and replace it with the new cable 3570-141420-001. Either end of
the cable may be plugged into the Capacitor board. The other end of this cable will
connect to the left side of the DFS-1 board, so make sure you stretch it across the
chassis behind the DFS-1 board.
6. Mount the top of the DFS-1 board on the two outside studs at the bottom of the Fuse
board using a star washer on each and the hex nuts saved when the other boards were
removed.
7. Secure the bottom of the DFS-1 board to the rail, which previously supported the
bottom of the Current and Speed boards, with the two screws supplied. The nylon
spacers must be mounted between the DFS-1 board and the metal rail. Use a star
washer between the DFS-1 board and the head of the screw.
8. Connect the 14 Pin connector cable to P2 on the left side of the DFS-1 board.
9. Connect the 10 Pin connector cable to P4 on the left side of the DFS-1 board.
Turn to section 1.0 of the DFS-1 manual to make the connections required.
Revised 7/95 DFS-1 Manual
POWERTEC Ind. Corp.©
Page 59
Page 65

THIS PAGE WAS INTENTIONALLY LEFT BLANK.
Page 60
DFS-1 Manual Revised 7/95
POWERTEC Ind. Corp.©
Page 66

APPENDIX B
MENU AND KEYPAD HIERARCHY
When the DFS-1 is shipped, the factory presets
the unit’s parameters according to the motor and
drive’s specifications. The following pages describe
the keypad’s hierarchal menus when the KDU-1
keypad and display unit has been installed and
configured.
At the opening menu level, the DFS-1’s status is
displayed. The STATUS display shows the commanded speed, the load as a percent of Full Load
Amps, and the actual motor speed. If speed setpoint
changes are allowed, the up and down arrows can be
used to trim the drive.
Of the seven keys on the keypad, the CMD key is
the only one which always has the same function. If
the drive is in LOCAL and there is no analog input
associated with speed reference, the CMD key will return to the status display in the edit mode. This edit
mode can be recognized by the presence of a cursor
under one digit position of the commanded speed being displayed. In this mode, the right and left arrow
keys move the cursor left and right changing the digit
position being edited. The up and down arrows will
modify the value of the digit being edited by incrementing or decrementing the value by one unit.
The SEL key will always return to the next
higher level without saving changes.
The ENT key will save changes and return to the
status display except in the Setup/Parameters mode
where it will save changes and return to the previous
parameter menu.
NEMA standards define forward as counterclockwise rotation of the shaft as viewed facing the
front of the motor. On a brush DC motor, the front
end is the commutator end while on a brushless DC
motor the front end is the encoder end (normally
opposite from the output shaft).
While in the status display mode, pressing the
FWD key will cause the motor to run in the forward
(clockwise) mode.
Likewise, pressing the REV key will cause the
motor to run in the reverse (counterclockwise) mode.
Pressing the STP key will command the motor to
stop. The manner in which the motor stops is
determined by Setup Parameters.
In order to begin changing drive setup parameters, one must first press the MENU button. This
action will return the options represented by Fig. 1 on
the following page.
The charts on the following pages, show the
hierachal order of the options available. In most
every case, up and down arrow keys scroll through
selection for a particular menu level while the
ENTER key will either move to the next hierarchal
level or set a point and save the change. The
SELECT key will return to the top of the hierarchal
level without saving any change. For example,
pressing the Menu button will result in a two line
display of SETUP/PARAMETERS. Pressing the
down triangle (arrow) will cause the next menu item,
SETUP/ENB/DSB BKLT to appear. At this point
pressing ENT will result in choices of up arrow to
Enable and Down arrow to disable the LCD backlight. On the other hand, choosing the SEL will go
back to the SETUP/ENB/DSB BKLT menu. In
cases where a selection will go to another hierarchal
level, this chart will show a Fig. number which refers
to the next chart. For example, in Figure 1, Parameters, pressing the ENTER key will take one to . . .
Fig. 2.
Revised 7/95 DFS-1 Manual
POWERTEC Ind. Corp.©
Page 61
Page 67

POWERTEC Ind. Corp.
1
Revised 7/95
C
Figure 1.0
Status
Select
Date
Menu
Enter
DFS-1 Manual
*Local/Remote
*Parameters
History
Enb/Dsb Bklt
Contrast
Time
Enter
Enter
Enter
Enter
Enter
Enter
Fig. 2
Fig. 30
* Not visible in some modes.
Page 63
IGURE
F
Page 68

T
HIS
PAGE
INTENTIONALL Y
WAS
LEFT
BLANK
.
Page 64
DFS-1 Manual
Revised 7/95
POWERTEC Ind. Corp.
C
Page 69

POWERTEC Ind. Corp.
4
Revised 7/95
Fig. 2
Fig. 3
Fig. 4
C
DFS-1 Manual
Fig. 1
Select
Parameters
Select
Communications
Reset Parameters
Input/Output
Slave
Master
Drive Setup
Enter
Enter
Enter
Enter
Enter
Enter
Enter
Fig. 3
Fig. 4
Fig. 5
Fig. 6
Fig. 7
Fig. 2
Select
Communication
Select
Unit ID
Delay
Protocol
Remote Modes
Baud Rate
Enter
Enter
Enter
Enter
Enter
Enter
Fig. 8
Fig. 2
Select
Input/Output
Select
Analog Out
Analog In
Digital Out
Digital In
Enter
Enter
Enter
Enter
Enter
Fig. 9
Fig. 12
Fig. 11
Fig. 10
Page 65
IGURES
F
2 -
Page 70

T
HIS
PAGE
INTENTIONALL Y
WAS
LEFT
BLANK
.
Page 66
DFS-1 Manual
Revised 7/95
POWERTEC Ind. Corp.
C
Page 71

POWERTEC Ind. Corp.
Revised 7/95
Fig. 5
Fig. 6
Fig. 7
C
DFS-1 Manual
Fig. 2
Select
Slave
Select
Preset Ratio 1
Jog Ratio
Minimum Ratio
Maximum Ratio
Base Ratio
Jump Down Delta
Jump up Delta
Decel Rate
Enter
Enter
Enter
Enter
Enter
Enter
Enter
Enter
Enter
Enter
Fig. 2
Select
Master
Select
Preset Speed 1
Jog Speed
Jump Down Delta
Jump Up Delta
Decel Rate
Accel Rate
Preset 2
Enter
Enter
Enter
Enter
Enter
Enter
Enter
Enter
Fig. 2
Select
Drive Setup
Select
Mode
Set Point Control
Input Debounce
High EGU
Up/Dn Function
PWM Mode
Pulse Multiplier
Regen I Limit
Enter
Enter
Enter
Enter
Enter
Enter
Enter
Enter
Enter
Fig. 24
Fig. 29
Fig. 28
Fig. 27
Fig. 26
Page 67
Accel Rate
Preset 2
Enter
Enter
Motor I Limit
Stability
Gain
Encoder PPR
Max. Speed
Aux. Mode
Enter
Enter
Enter
Enter
Enter
Enter
Fig. 25
F
IGURES
5 -
Page 72

T
HIS
PAGE
INTENTIONALL Y
WAS
LEFT
BLANK
.
Page 68
DFS-1 Manual
Revised 7/95
POWERTEC Ind. Corp.
C
Page 73

POWERTEC Ind. Corp.
R
2
u
#
#
#
#
Revised 7/95
Fig. 4
Select
.
Fig. 9
Analog In
Enter
Fig. 4
Select
Fig. 10
Analog Out
Enter
Fig. 4
Select
.
Fig. 11
Digital In
Enter
Fig. 4
Select
.
Fig.1
Digital O
C
DFS-1 Manual
Select
Fig. 8
Channel # 1
Channel # 2
Enter
Enter
Fig. 13
Fig. 13
Select
Channel # 1
Channel # 2
Enter
Enter
Fig. 16
Fig. 16
Select
Channel # 1
Channel # 7
Channel # 6
Channel # 5
Channel # 4
Channel # 3
Channel # 2
Enter
Enter
Enter
Enter
Enter
Enter
Enter
Fig. 18
Fig. 18
Fig. 18
Fig. 18
Fig. 18
Fig. 18
Fig. 18
Select
Channel
Channel
Channel
Channel
Page 69
Fig. 3
Select
Remote Modes
Ente
Enter
r
Remote Remote Remote Remote Remote Remote Remote
Select
Jog
Local Local Local Local Local Local Local
Run Preset Up Input Down Input Reverse Input Freq. Mode
IGU
F
Page 74

T
HIS
PAGE
INTENTIONALL Y
WAS
LEFT
BLANK
.
Page 70
DFS-1 Manual
Revised 7/95
POWERTEC Ind. Corp.
C
Page 75

POWERTEC Ind. Corp.
E
n
n
n
Revised 7/95
Fig. 13
Fig. 14
Fig. 15
Fig. 16
C
DFS-1 Manual
Fig. 9
Select
.
AI Channel
#1or2
Select
Mode
Calibration
High EGU
Low EGU
Signal Condition
Ente
r
Enter
Enter
Enter
Enter
Enter
Fig. 14
Fig. 15
Fig. 13
Select
AI Mode
Select
General Purpose
Modes 15 - 6
Horsepower
Torq Limit Regen
Torq Limit Motor
Trim (Dancer)
Speed Reference
Enter
Enter
Enter
Enter
Enter
Enter
Enter
Enter
Enter
Fig. 13
Select
AI Sig. Condition
Select
-10 to +10VDC
4 to 20mADC
0 to 20mADC
1 to +5VDC
0 to +5VDC
0 to +10VDC
Enter
Enter
Enter
Enter
Enter
Enter
Enter
Enter
Fig. 10
Select
Select
AO Channel
#1 or 2
Mode
High EGU
Low EGU
Enter
E
E
E
Page 71
IGUR
F
Page 76

T
HIS
PAGE
INTENTIONALL Y
WAS
LEFT
BLANK
.
Page 72
DFS-1 Manual
Revised 7/95
POWERTEC Ind. Corp.
C
Page 77

POWERTEC Ind. Corp.
E
g
P
v
v
Revised 7/95
Fig. 17 Fig. 18
Fig. 19
Fi
Fig. 16
C
DFS-1 Manual
Select
AO Mode
Select
General Purpose
Modes 15 - 5
Commanded Speed
Set by Comm
Load Output
Actual Speed
Enter
Enter
Enter
Enter
Enter
Enter
Enter
Fig. 11
Select
Select
DI Channel
#1or2
Mode
Polarity
Enter
Enter
Enter
Fig. 19
Fig. 20
Fig. 18
Select
DI Mode
Select
General Purpose
Modes 15-11
Contactor Aux.
Preset 2
Master/Slave
Local/Remote
Frequency Mode
Jog
Enter
Enter
Enter
Enter
Enter
Enter
Enter
Enter
Enter
Fig. 18
Select
Select
DI
Acti
Acti
Page 73
Reverse Input
Up Input
Down Input
Preset Input
Run Input
Enter
Enter
Enter
Enter
Enter
F
IGUR
Page 78

T
HIS
PAGE
INTENTIONALL Y
WAS
LEFT
BLANK
.
Page 74
DFS-1 Manual
Revised 7/95
POWERTEC Ind. Corp.
C
Page 79

POWERTEC Ind. Corp.
E
l
S
Revised 7/95
Fig. 21 Fig. 22 Fig. 23
Fig. 12 Fig. 21
C
Select
Select
DO Channel
#1or2
Mode
Polarity
Enter
Enter
Enter
Fig. 22
Fig. 23
DFS-1 Manual
Select
DO Polarity
Select
Normally Open
Normally Closed
Enter
Enter
Enter
Fig. 21 Fig. 7
Select
DO Mode
Select
General Purpose
Modes 15 - 6
Contactor
Set by Comm
Zero Speed
Run hold
Remote/Local
Enter
Enter
Enter
Enter
Enter
Enter
Enter
Enter
Se
Page 75
At Speed
No Fault
Enter
Enter
IGUR
F
Page 80

T
HIS
PAGE
INTENTIONALL Y
WAS
LEFT
BLANK
.
Page 76
DFS-1 Manual
Revised 7/95
POWERTEC Ind. Corp.
C
Page 81

POWERTEC Ind. Corp.
S
F
J
c
M
Revised 7/95
Fig. 25 Fig. 26
Fig. 27
C
DFS-1 Manual
Fig. 7
Select
Select
Aux. Mode
Normal
Modes 15 - 4
Horsepower
Regen I Limit
Motor Torque
Enter
Enter
Enter
Enter
Enter
Enter
Fig. 7
Select
Pulse Multiplier
Select
Commutation Mode
X1
X4
X2
Enter
Enter
Enter
Enter
Enter
Fig. 7 Fig. 7
Select
PWM Mode
Select
Non Regen Norm
Regen, Both
Regen, Normal
Non Regen Both
Enter
Enter
Enter
Enter
Enter
Select
Sele
Up
Page 77
IGURE
F
Page 82

T
HIS
PAGE
INTENTIONALL Y
WAS
LEFT
BLANK
.
Page 78
DFS-1 Manual
Revised 7/95
POWERTEC Ind. Corp.
C
Page 83

POWERTEC Ind. Corp.
Revised 7/95
C
DFS-1 Manual
Fig. 7
Fig. 29
Select
Setpoint Control
Select
Freeze
Float
Enter
Enter
Enter
Fig. 1
Fig. 30
Select
History
Select
KDU-1 Version
Comm Version
Application Version
Control Version
Last Motor Start
Last Power On
Motor Runtime
Enter
Enter
Enter
Enter
Enter
Enter
Enter
Enter
Page 79
Trips (last four)
Reset Faults
Enter
Enter
F
IGURES
29 - 30
Page 84

T
HIS
PAGE
INTENTIONALL Y
WAS
LEFT
BLANK
.
Page 80
DFS-1 Manual
Revised 7/95
POWERTEC Ind. Corp.
C
 Loading...