

PowerTec DC1080 Owner's Manual
Owner’s Manual
Model No. DC1080
17-0619
You will need this manual for safety instructions, operating procedures, and warranty.
Put it and the original sales invoice in a safe, dry place for future reference.
Visit us on the web at www.southerntechllc.com
Dust Collector
QUESTION...
1•847•780•6120
Horsepower ..................................1 HP
Voltage .................................120/240V
Hertz ......................................60 Hz
Phase .........................................1
Motor Speed ............................3450 RPM
Air Capacity .............................. 800 CFM
Max. Static Pressure ...........................5.67"
Main Inlet Size .........................4"(101.6 mm)
Impeller Type ............................Radial Fin
Impeller Size ..........................10" (254 mm)
Collection Bags
Upper bag (filter) ....................... 2.5 micron
Lower bag( collection) .......................plastic
Bag Overall Dimensions ............... 14-1/2" x 22"
Weight ..............................55 lbs (25 kgs)
NOISE DATA
a weighted sound pressure level measuring (no load)
Operators position .......................... 83dB
a weighted sound pressure level measuring (loaded) .....
. . . . . . . . . . . . . . . . . . . . . . . . . . . . . . . . . . . . . . . . . . . 85dB
TABLE OF CONTENTS
PRODUCT
SPECIFICATIONS
SAFETY RULES 1
Work Preparation
Work Area Preparation
Tool Maintenance
Tool Operation
Specific Safety Instructions
ASSEMBLY 2
Unpacking
Installation
Test
Power Source
Grounding Instructions
Extension Cords
Motor
Electrical Connections
OPERATION 7
Basic Operations
MAINTENANCE 8
General Maintenance
Cleaning
Lubrication
Machine Storage
Tool Repairs
TROUBLESHOOTING 9
PARTS ILLUSTRATION & 10
LIST
WARRANTY 12
SECTION PAGE

SAFETY RULES
1
WARNING
For your own safety, read and understand all warnings
and operating instructions before using any tool or
equipment.
WARNING
Some dust created by power sanding, sawing, grinding,
drilling and other construction activities contains chemicals
known to the State of California to cause cancer, birth
defects or other reproductive harm.
Some examples of these chemicals are:
• Lead from lead-based paints.
• Crystalline silica from bricks and cement and other
masonry products.
• Arsenic and chromium from chemically-treated
lumber.
Your risk from these exposures vary, depending on how
often you do this type of work. To reduce your exposure to
these chemicals: work in a well ventilated area and work
with approved safety equipment. Always wear OSHA/
NIOSH approved, properly fitting face mask or respirator
when using such tools.
WARNING
Always follow proper operating procedures as defined in
this manual even if you are familiar with the use of this or
similar tools. Remember that being careless for even a
fraction of a second can result in severe personal injury.
WORK PREPARATION
• Wear proper apparel. Do not wear loose clothing,
gloves, neckties, rings, bracelets or other jewelry which
may get caught in moving parts of the tool.
• Wear protective hair covering to contain long hair.
• Wear safety shoes with non-slip soles.
• Wear safety glasses complying with United States ANSI
Z87.1. Everyday glasses have only impact resistant
lenses. They are NOT safety glasses.
• Wear face mask or dust mask if operation is dusty.
• Be alert and think clearly. Never operate power tools
when tired, intoxicated or when taking medication that
cause drowsiness.
WORK AREA PREPARATION
• Keep work area clean. Cluttered work areas invite
accidents.
• Do not use power tools in dangerous environments. Do
not use power tools in damp or wet locations. Do not
expose power tools to rain.
• Work area should be properly lit.
• Ground all tools. Proper electrical receptacle should
1
SAFETY RULES
be available for tool. Three-prong plug should be
plugged directly into properly grounded, three-prong
receptacle. If an adapter is used to accomodate a
two-prong receptacle, the adapter lug MUST be to a
known ground.
• Extension cords should have a grounding prong and
the three wires of the extension cord should be of the
correct gauge.
• Keep visitors at a safe distance from work area.
• Keep children out of the work area. Ensure your work
shop is child-proof. Use padlocks, master switches or
remove switch keys to prevent any unintentional use of
power tools.
TOOL MAINTENANCE
• Always unplug tool prior to inspection.
• Consult manual for specific maintaining and
adjusting procedures.
• Keep tool lubricated and clean for a safe operation.
• Remove adjusting tools. Form habit of checking to
see adjusting tools or accessories are removed before
switching tool on.
• Keep all parts in working order. Check to determine that
guard or other parts will operate properly and perform
their intended function.
• Check for damaged parts. Check for alignment of
moving parts, binding, breakage, mounting and any
other condition that may affect tool’s operation.
• A guard or any other part that is damaged should
be properly repaired or replaced. Do not perform
makeshift repairs.
TOOL OPERATION
• Use the right tool for your job. Do not force your tool or
attachment to do a job for which it was not designed.
• Avoid accidental start-up. Make sure that the tool is in
the “OFF" position before plugging in.
• Never leave tool running unattended.
• Know your tool. Learn the tool’s operation, application
and specific limitations before using it.
CAUTION
Think safety! Safety is a combination of operator common
sense and alertness at all times when tool is being used.
WARNING
Do not attempt to operate tool until it is completely
assembled according to the instructions.
SAVE ALL WARNINGS AND INSTRUCTIONS
FOR FUTURE REFERENCE
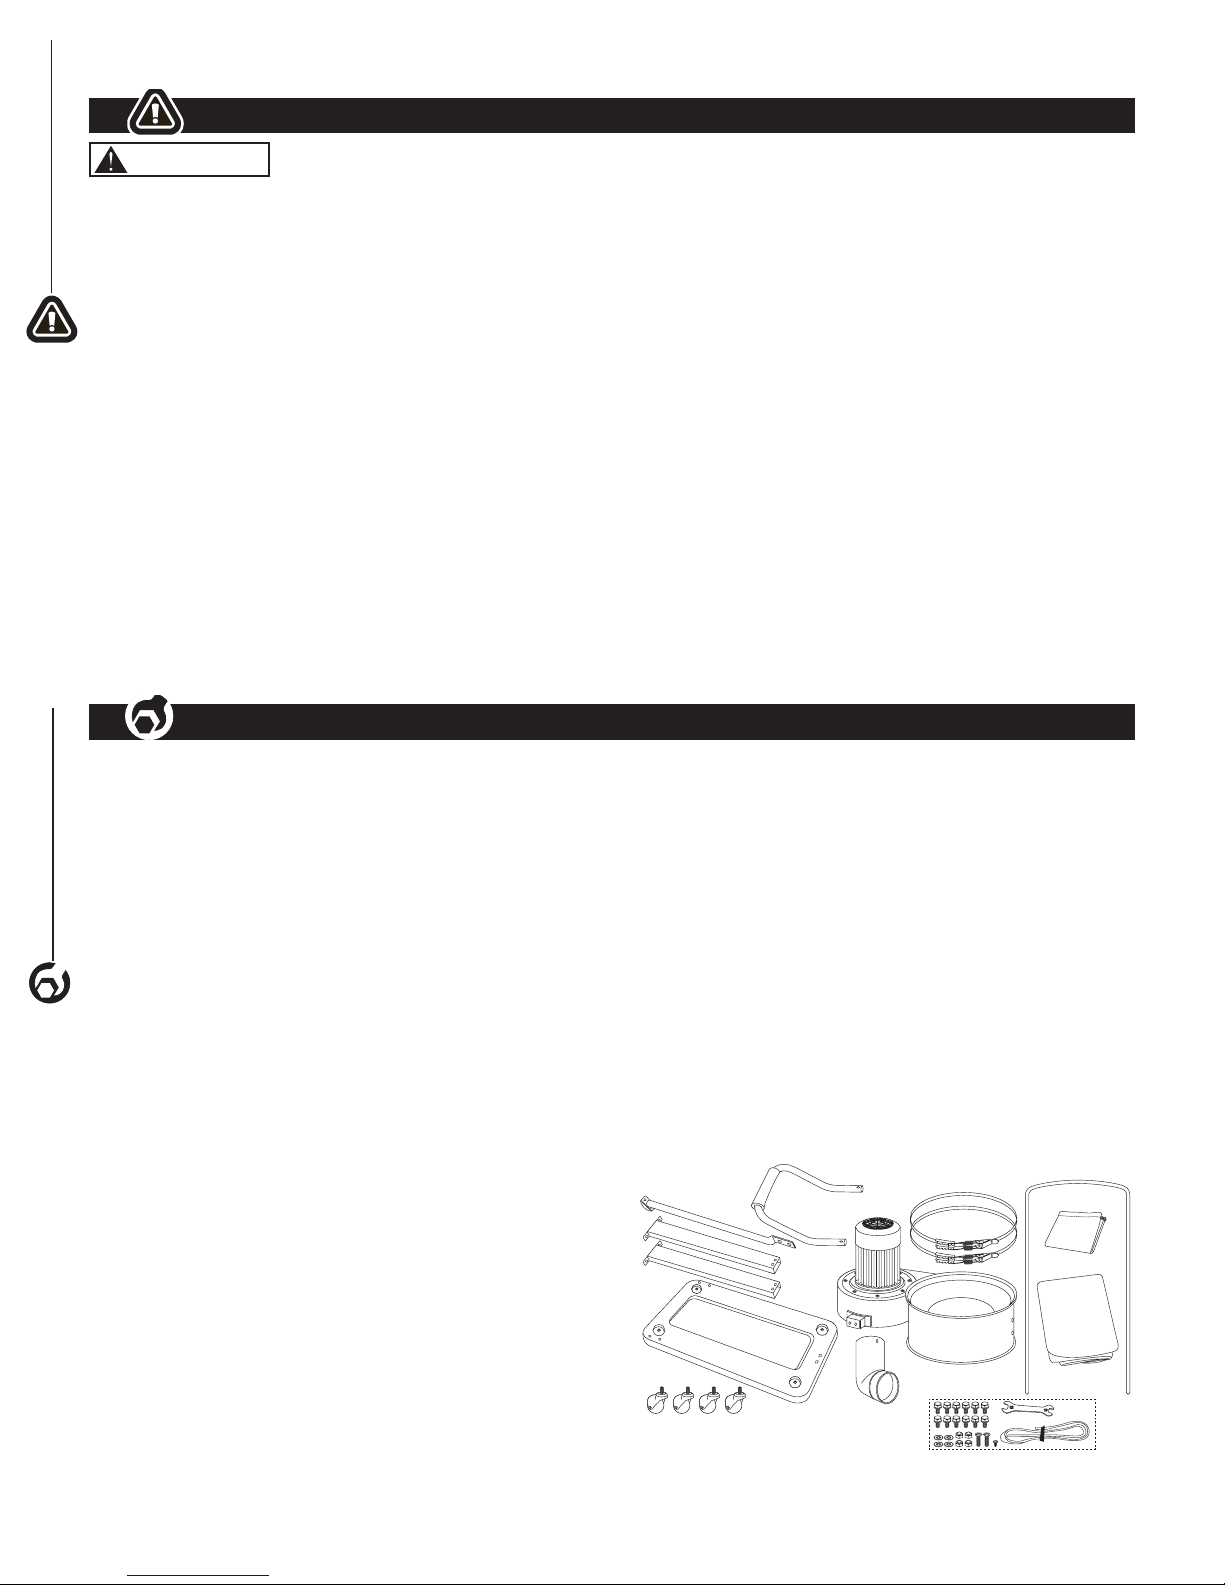
UNPACKING
Refer to Figure 1.
Check for shipping damage. Check immediately whether all
parts and accessories are included. If anything is missing or
broken, contact your retailer or call 847-780-6120.
• Carefully remove all contents from shipping carton. The
shipping carton contains:
ITEM DESCRIPTION QUANTITY
A Collector Body/Motor 1
B Base 1
C Casters 4
D Supports (rectangular) 2
E Support (round) 1
F Handle 1
G Filter Bag 1
H Collection Bag 1
I Upper Bag Support 1
J Elbow 1
K Quick Release Bag Clamp 2
ASSEMBLY
2
2
2
SAFETY RULES
SPECIFIC SAFETY INSTRUCTIONS
2
WARNING
Read and understand the instruction manual before
operating the dust collector. Basic precautions listed
below should always be followed when using your dust
collector to reduce the risk of injury, electrical shock
or fire.
• This dust collector is designed to collect sawdust only.
• Never attempt to use this dust collector to collect water
or any other liquids.
• Never try to use this dust collector to collect large
wood pieces.
• Never attempt to use this dust collector to collect metal
materials such as screws, nails or other metal parts.
• Never attempt to use this dust collector to collect
flammable or combustible dust/gas. DO NOT use near
any flammable or combustible liquids.
• Never attempt to use this dust collector to collect
anything that is burning or smoking.
• DO NOT use outdoors or on wet surfaces.
• Turn machine off, disconnect power cord and ensure all
moving parts have stopped completely before servicing
or changing/emptying the bags.
• Always wear approved eye protection and respirator
when emptying collection/filter bags.
• Ensure the machine is turned off before unplugging the
dust collector.
• Unplug dust collector when not in use.
• Grasp the plug not the cord to unplug the dust collector.
• Never pull the dust collector by the power cord.
• ALWAYS ensure collection/filter bags are secured
in place.
• Do not place your hand or tools near the open inlet
while operating. Serious personal injury or damage to
the machine can happen.
• Always connect dust collector to the matched
power source.
IMPORTANT : Always consider safety first as it applies
to your individual working conditions, the environment in
every shop is different.
SAVE ALL WARNINGS AND INSTRUCTIONS
FOR FUTURE REFERENCE
L Hardware Bag Contains
5/16" nuts (caster) 4
5/16-18" washer (caster)
4
Hex head screws 5/16" x 1/2"
(supports) 12
Phillips head screws 5/16" x
1/2" (handle) 2
Flange screw 10-24-3/8"
(Elbow) 1
12-10 mm Wrench 1
Foam Strip 1
Owner's Manual (not shown)
Figure 1
A
G
H
B
D
E
C
J
L
K
I
F
ASSEMBLY
3
ASSEMBLY
INSTALLATION
Refer to Figures 2 - 14
CAUTION
Do not attempt assembly if parts are missing.
Call the Customer service line to obtain replacement parts.
WARNING
Do not operate dust collector until completely assembled.
Do not operate this tool until you have completely read
and understood this manual.
NOTE: After unit is assembled dispose of all packaging
material in an environmentally safe way.
Tools required for assembly:
• 10-12 mm Wrench
• Phillips Screwdriver
WARNING
Ensure the dust collector is unplugged before
assembling.
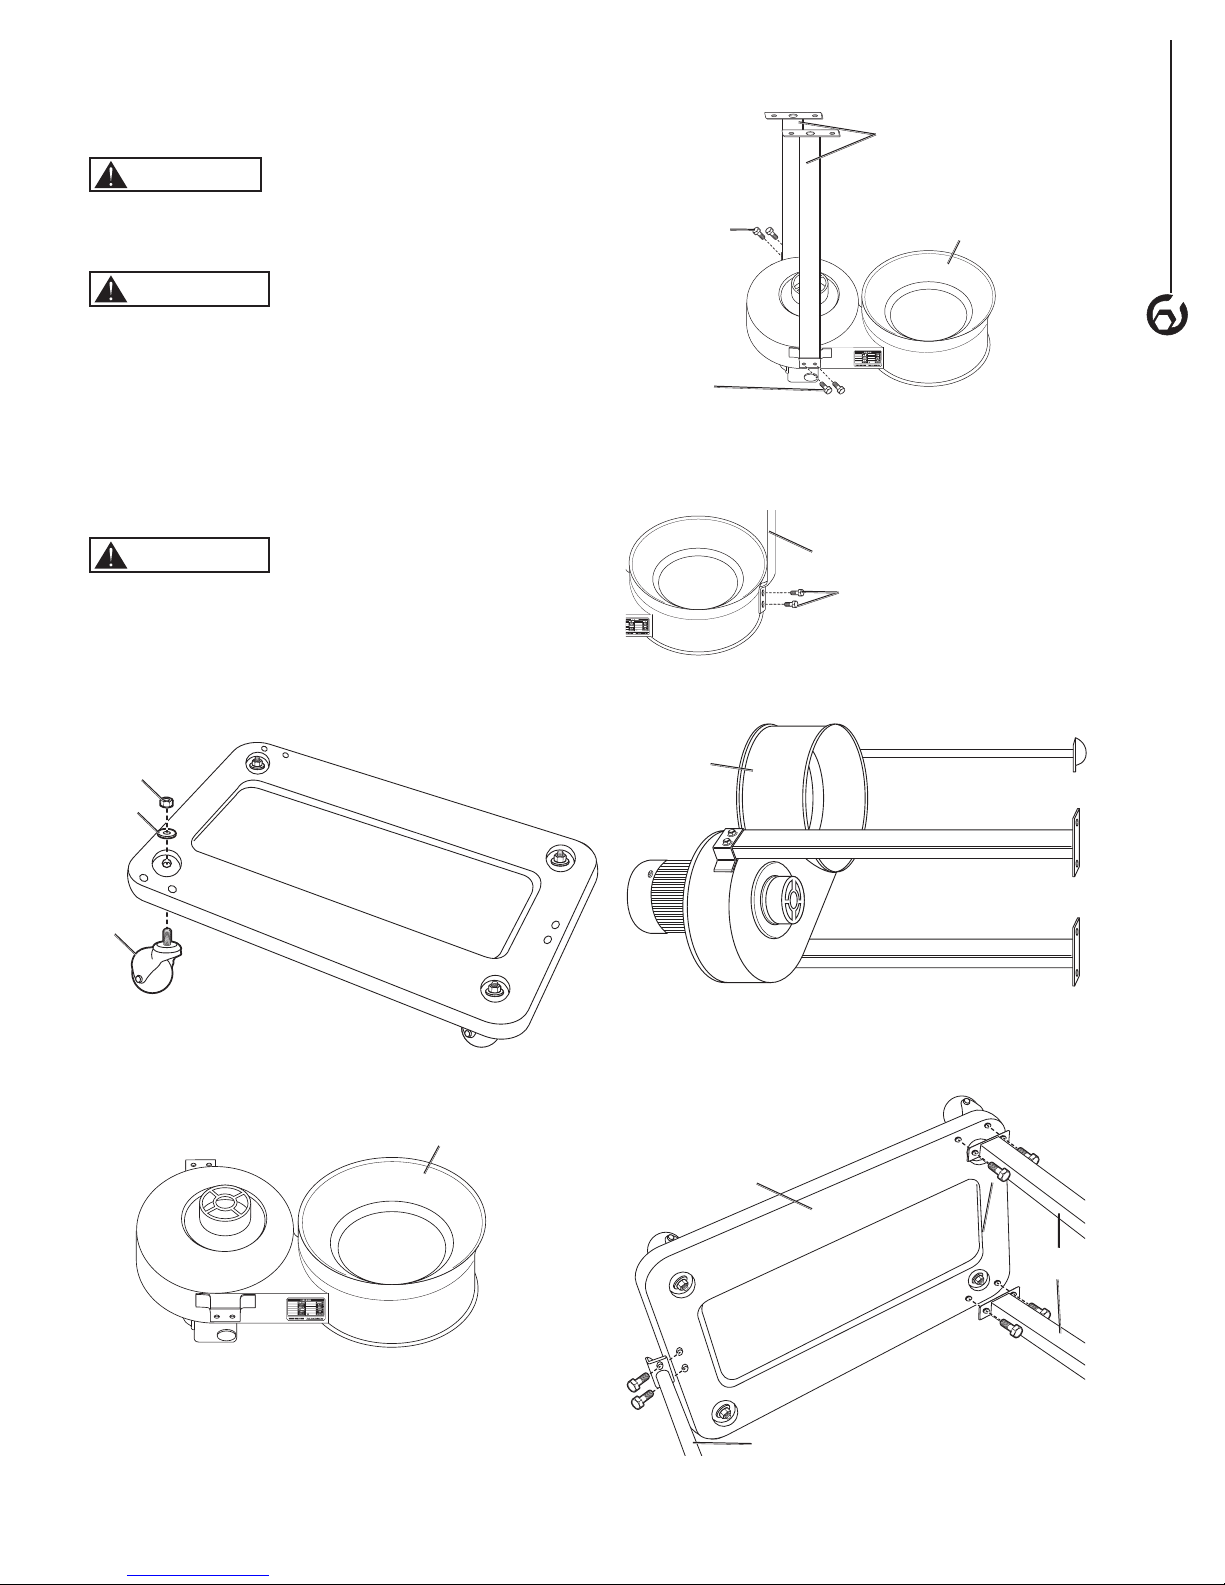
1. Place the four casters through the bottom of the base
plate. Secure with the 5/16-18 washers and 5/16"
nuts, use the 12 mm wrench to tighten hardware.
Figure 2
Caster
Nut
Washer
2. Lay the collection body upside down on a
protective surface as shown.
Figure 3
Collection Body
3. Attach the two rectangular supports to the collection
body using the 5/16 x 1/2" hex head screws, use the
12 mm wrench to tighten hardware.
Figure 4
Collection
Body
Rectangular
Supports
5/16 X 1/2" Hex
Head Screws
5/16 X 1/2" Hex
Head Screws
4. Attach the round support to collection body with the
5/16 x 1/2" hex head screws, use the 12 mm wrench
to tighten hardware.
Figure 5
Round
Support
5/16 X 1/2" Hex
Head Screws
5. Lay the collection body assembly on its side.
Figure 6
Collection
Body
6. Use 5/16 x 1/2" hex head screws to attach the
collection body assembly to the base assembly as
shown. Use the 12 mm wrench to tighten hardware.
Round
Support
Base
Assembly
Rectangular
Supports
Figure 7
 Loading...