

PowerTec 11801, 11802 Owner's Manual
Owner’s Manual
QUESTION...
1•877•393•7121
6" / 8” BENCH GRINDER
Model No. 11801 / 11802
Visit us on the web at www.southerntechllc.com
You will need this manual for safety instructions, operating procedures, and warranty.
Put it and the original sales invoice in a safe, dry place for future reference.
10-0531
TABLE OF CONTENTS
PRODUCTION
SECTION PAGE
SAFETY RULES 1
Work Preparation
Work Area Preparation
Tool Maintenance
Tool Operation
ASSEMBLY 3
Unpackaging
Tools Needed
Mounting Safety Shield Assembly
Mounting Work Rest
Mounting Grinder to Workbench
Power Source
Grounding Instructions
Extension Cords
Electrical Connections
OPERATION 6
Basic Precautions
Using the Cooling Tray
ON/OFF Switch
Sharpening Twist Drill Bits
Sharpening Lawn Mower Blades
Sharpening Chisels and Screwdriver Blades
MAINTENANCE 7
SPECIFICATIONS
6” BENCH GRINDER
Voltage . . . . . . . . . . . . . . . . . . . . . . . . . . . . . . . . . . . . 120
Amps . . . . . . . . . . . . . . . . . . . . . . . . . . . . . . . . . . . . . . .2.1
Hertz . . . . . . . . . . . . . . . . . . . . . . . . . . . . . . . . . . . . . . . 60
Phase . . . . . . . . . . . . . . . . . . . . . . . . . . . . . . . . . . . Single
RPM . . . . . . . . . . . . . . . . . . . . . . . . . . . . . . . . . . . . . 3600
Wheel Diameter . . . . . . . . . . . . . . . . . . . . . . . . . . . . . . . .6”
Wheel Thickness . . . . . . . . . . . . . . . . . . . . . . . . . . . . 3/4"
Arbor Hole . . . . . . . . . . . . . . . . . . . . . . . . . . . . . . . . . . 1/2”
NeT Weight . . . . . . . . . . . . . . . . . . . . . . . . . . . . . . . . 24 lb.
8” BENCH GRINDER
Voltage . . . . . . . . . . . . . . . . . . . . . . . . . . . . . . . . . . . . 120
Amps . . . . . . . . . . . . . . . . . . . . . . . . . . . . . . . . . . . . . . . 3.5
Hertz . . . . . . . . . . . . . . . . . . . . . . . . . . . . . . . . . . . . . . . 60
Phase . . . . . . . . . . . . . . . . . . . . . . . . . . . . . . . . . . . Single
RPM . . . . . . . . . . . . . . . . . . . . . . . . . . . . . . . . . . . . . 3600
Wheel Diameter . . . . . . . . . . . . . . . . . . . . . . . . . . . . . . . .8”
Wheel Thickness . . . . . . . . . . . . . . . . . . . . . . . . . . . . . .1"
Arbor Hole . . . . . . . . . . . . . . . . . . . . . . . . . . . . . . . . . . 5/8”
NeT Weight . . . . . . . . . . . . . . . . . . . . . . . . . . . . . . 41.2 lb.
General Maintenance
Wheel Replacement
Lubrication
Worklight Bulb Replacement
Keep Tool in Repair
TROUBLESHOOTING 9
PARTS ILLUSTRATION & 10
LIST
6” Parts Illustration and List
8” Parts Illustration and List
WARRANTY 14

SAFETY RULES
1
WARNING
For your own safety, read and understand all warnings
and operating instructions before using any tool or
equipment.
WARNING
Some dust created by operation of power tool contains
chemicals known to the State of California to cause
cancer, birth defects or other reproductive harm.
To reduce your exposure to these chemicals: work in a
well ventilated area and work with approved safety
equipment. Always wear OSHA/NIOSH approved,
properly fitting face mask or respirator when using such
tools.
WARNING
Failure to follow these rules may result in serious personal
injury. Remember that being careless for even a fraction
of a second can result in severe personal injury.
WORK PREPARATION
• Wear proper apparel. Do not wear loose clothing,
gloves, neckties, rings, bracelets or other jewelry which
may get caught in moving parts of the tool.
• Nonslip protective footwear is recommended.
• Wear protective hair covering to contain long hair.
• Wear eye and hearing protection. Always use safety
glasses. Eye protection equipment should comply with
ANSI Z87.1 standards. Hearing equipment should
comply with ANSI S3.19 standards.
• Wear face mask or dust mask if operation is dusty.
• Be alert and think clearly. Never operate power tools
when tired, intoxicated or when taking medications that
cause drowsiness.
WORK AREA PREPARATION
• Keep work area clean. Cluttered work areas and
benches invite accidents.
• Work area should be properly lighted.
• Do not use the machine in a dangerous environment.
The use of power tools in damp or wet locations or in
rain can cause shock or electrocution.
• Three-prong plug should be plugged directly into
properly grounded, three-prong receptacle.
• Use the proper extension cord. Make sure your
extension cord is in good condition. It should have
grounding prong and should be of the correct gauge.
• Keep children and visitors away. Your shop is a poten tially dangerous environment. Children and visitors can
be injured.
• Make your workshop childproof with padlocks, master
switches or remove switch keys to prevent any uninten tional use of power tools.
TOOL MAINTENANCE
• Turn the machine "OFF", and disconnect the machine
from the power source prior to inspection.
• Maintain all tools and machines in peak condition. Keep
tools sharp and clean for best and safest performance.
• Follow instructions for lubricating and changing
accessories.
• Check for damaged parts. Check for alignment of
moving parts, binding, breakage, mounting and any
other condition that may affect tool's operation.
• Poorly maintained tools and machines can further
damage the tool or machine and/or cause injury.
• A guard or any other part that is damaged should be
repaired or replaced. Do not perform makeshift repairs.
TOOL OPERATION
• Avoid accidental start-up. Make sure that the tool is in
the “OFF” position before plugging in.
• Use the right tool for your job. Do not force your
tool or attachment to do a job for which it was not
designed.
• Disconnect tool when changing parts.
• Don't force the workpiece on the machine. Damage to
the machine and/or injury may result.
• Never leave tool running unattended. Turn the power off
and do not leave tool until it comes to a complete stop.
• Do not overreach. Loss of balance can make you fall
into a working machine, causing injury.
• Never stand on tool. Injury could occur if the tool tips, or
if you accidentally contact the cutting tool.
• Know your tool. Learn the tool’s operation, application
and specific limitations before using it.
• Use recommended accessories. Use of improper
accessories may cause damage to the machine or injury
to the user.
• Handle workpiece correctly. Keep hands away from
moving parts.
• Turn tool off if it jams.
• Do not stand in front of the bench grinder when starting
it. Stand to one side and turn the bench grinder ON.
Wait at the side for one minute until the grinder comes
up to full speed. There is always a possibility that
debris from a damaged grinding wheel may be
discharged toward the operator.
• Sparks and debris are normally produced during
grinding operations. Be sure that there are not any
flammable materials in the vicinity. Frequently clean
grinding dust from the back of bench grinder.
• Replace a cracked or damaged grinding wheel
immediately. A damaged wheel can discharge debris at
a high velocity towards the operator.
• Carefully handle the grinding wheel since it is abrasive.
Prior to replacing a grinding wheel, check it for cracks.
Do not remove the labels from a grinding wheel.
• Never start the grinder when the wheel is in contact with
the workpiece.

• Secure work. Always hold workpiece firmly against the
work rest.
• Do not use the bench grinder if the flange nut or clamp
SAFETY RULES
nut is missing or if the spindle shaft is bent. Frequently
clean grinding dust from beneath grinder.
• Tighten the spindle nut just enough to hold the grinding
wheel firmly to the bench grinder. Do not overtighten,
Excessive clamping force can damage the grinding
wheel.
• Adjust distance between wheel and work rest to
maintain 1/16 in. or less separation as the diameter
of the wheel decreases with use. The value of
2
separation used in the marking is to be the separation
recommended by the manufacturer but shall not be
more than 1/8 in.
• Only use the wheel flanges provided with the grinder.
When selecting a replacement grinding wheel, verify
that the grinding wheel has a higher RPM rating than
the maximum RPM of the bench grinder.
• Never force the workpiece against a grinding wheel,
especially if the wheel is cold. Apply the workpiece
slowly, allowing the grinding wheel an opportunity to
warm up. This will minimize the chance of wheel
breakage.
• Never use the bench grinder with the wheel guards
removed.
• Do not grind using the sides of the grinding wheels.
CAUTION: Think safety! Safety is a combination of operator common sense and alertness at all times when tool is
being used.
WARNING
Do not attempt to operate tool until it is completely
assembled according to the instructions.
ASSEMBLY
3
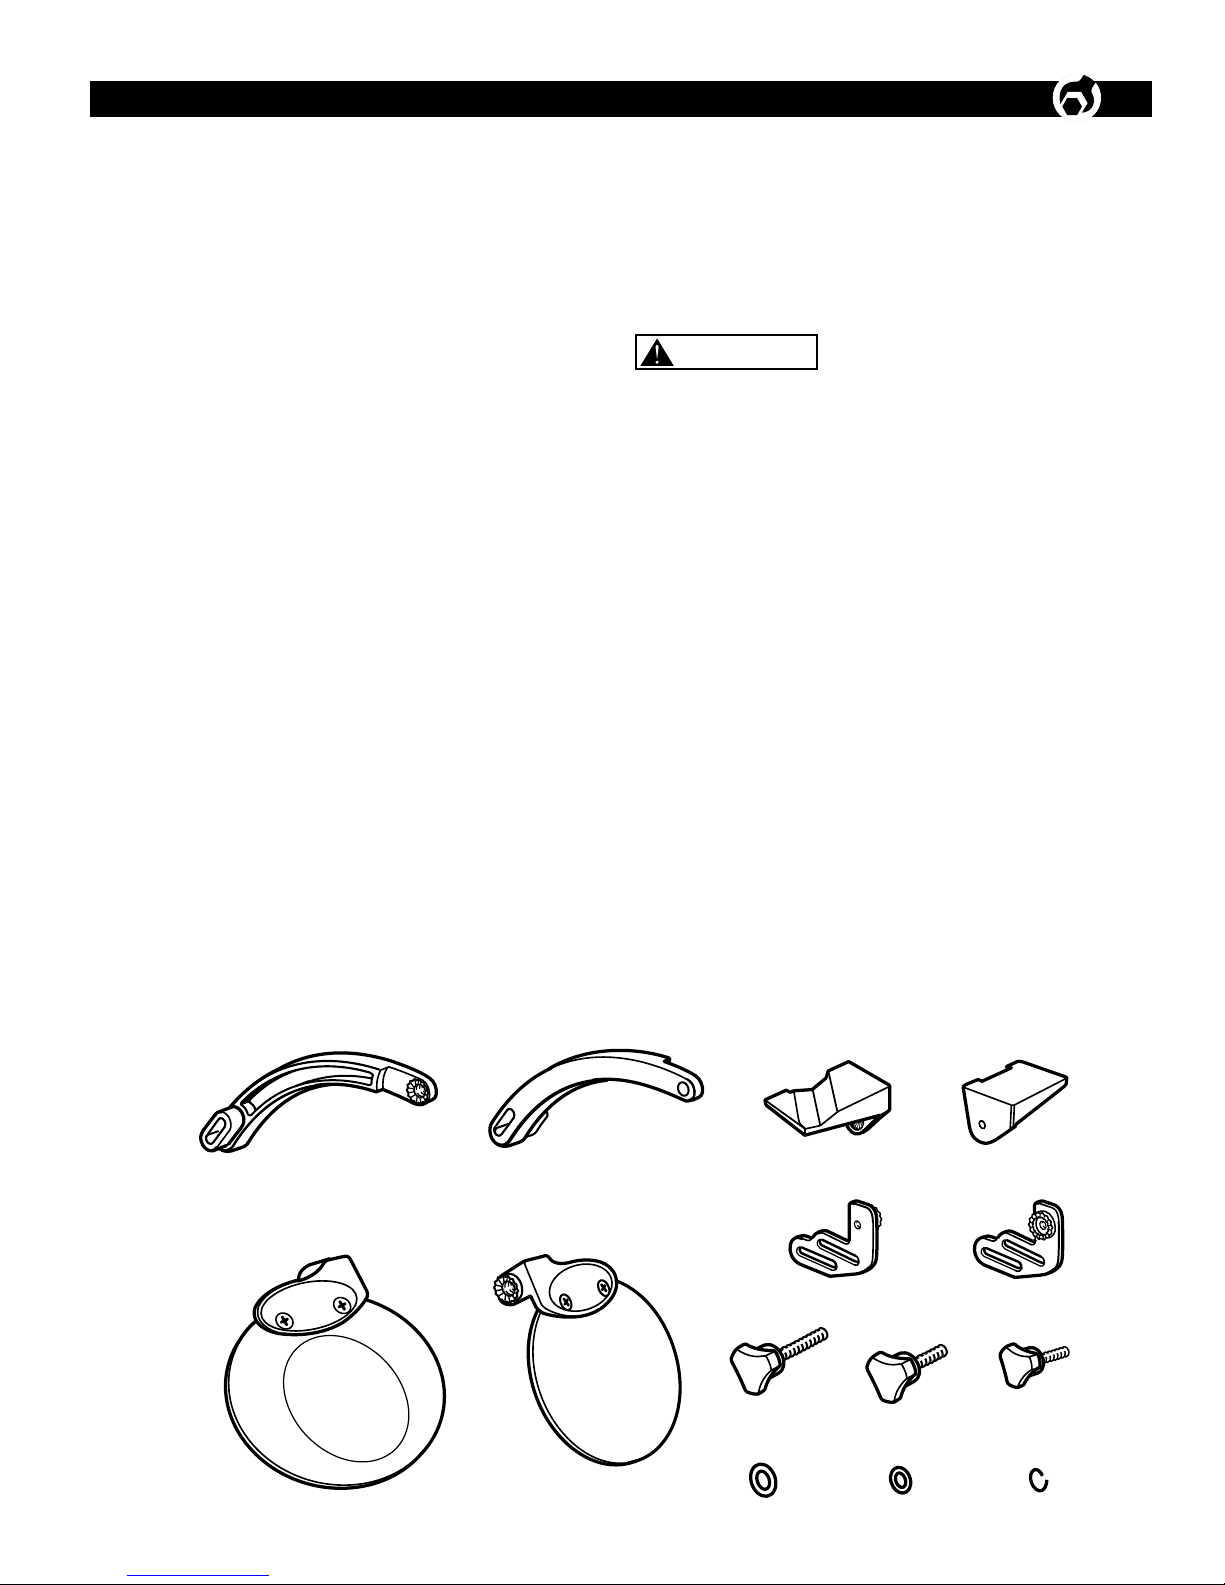
UNPACKAGING
Refer to Figure 1.
• Check for shipping damage. Check immediately
whether all parts and accessories are included. The
grinder itself comes assembled as one unit. Additional
parts(listed below) which need to be fastened to sander,
should be located and accounted for before assembling.
• The following items are included with your Bench
Grinder:
Item Description Qty.
A. Shield Bracket left 1
B. Shield Bracket right 1
C. Safety Shield Assembly - left (magnified) 1
D. Safety Shield Assembly – right 1
E. Work Rest – left (grooved) 1
F. Work Rest – right (flat) 1
G. Work Rest Brackets 2
H. Rear Shield Bracket Knobs 2
I. Work Rest Knobs 2
J. Safety Shield Knobs 2
K. Washers (6 mm) 4
L. Washers (5 mm) 2
M. Lock Washers (6 mm) 2
• Carefully remove the tool and any accessories from the
box.
• Make sure that all items listed in the packing list are
included.
• Inspect the tool carefully to make sure no breakage
or damage occurred during shipping. Do not discard the
packing material until you have carefully inspected and
satisfactorily operated the tool.
WARNING
Do not use the machine until it is completely assembled
and you have read and understood the entire operating
manual.
TOOLS NEEDED
You will need the following tools to assemble and adjust
the machine. (The tools are not included.)
• Combination Wrench (3) 7mm, 10mm, 12mm
• Phillips Head Screwdriver
• Adjustable Wrench
Figure 1
A B E F
C
G G
D
H J J
K L M
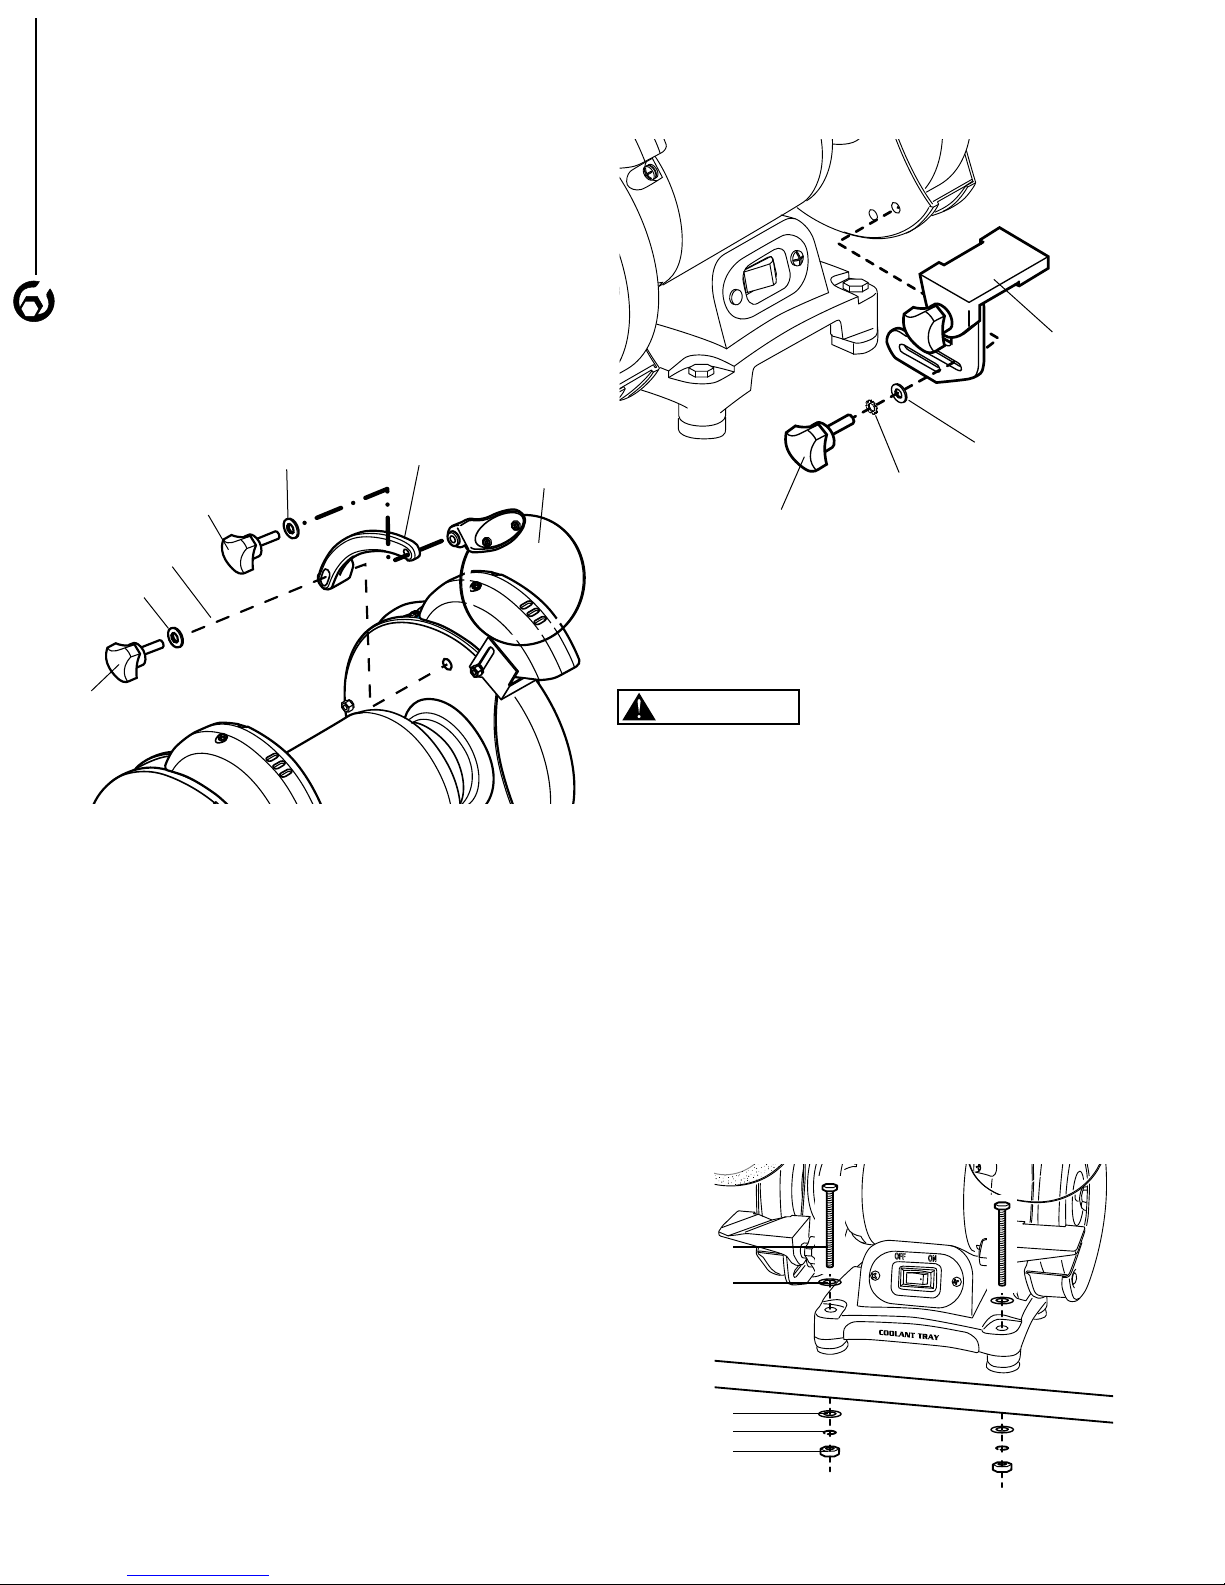
MOUNTING SAFETY SHIELD ASSEMBLY
ASSEMBLY
Refer to Figure 2
• Fasten the Safety Shield Assemblies to the Safety
Shield Brackets using the Safety Shield knobs and the
5mm washers. NOTE: The slotted part of the safety
shield bracket must face towards the grinding wheel
guard.
• Attach the Safety Shield Assembly and bracket to the
wheel guard using a washer, lock washer and rear
shield bracket knob.
4
Figure 2
Figure 3
Work Rest
Assembly
Small Washer
Small Knob
Washer
Lock Washer
Rear Shield
Bracket Knob
MOUNTING WORK REST
Refer to Figure 3
Shield Bracket
(Right)
Safety Shield
(Right)
Washer
Star Washer
Knob
MOUNTING GRINDER TO WORKBENCH
Refer to Figure 4
WARNING
Always make sure your bench grinder is securely mounted
to a workbench. Failure to do so could result in an accident resulting in possible serious personal injury.
• Use 1/4 in. bolts, washers, and nuts (not included). The
bolt length should be 1-1/2 in. plus the thickness of the
workbench.
• Locate and mark the holes where the grinder is to be
mounted.
• Drill four 3/8 in. diameter holes through workbench.
• Place sander on workbench, aligning holes in base with
holes drilled in workbench.
• Insert four 1/4 in. diameter bolts and washers and attach
nuts securely.
• Remove the knob, star washer, and washer from the
carriage bolt on the lower portion of wheel guard.
• Using the slotted screw, lock washer, washer and
fastening knob, attach the work rest bracket to the
inside of the wheel guard as shown.
NOTE: The grooved work rest mounts on the left side.
NOTE: The work rest bracket’s lower slot must be
positioned over the pin on the guard.
• With the remaining fastening knob, install the work rest
to the bracket.
NOTE: Adjust the distance between the wheel and the
work rest to maintain 1/16 in. or less separation as the
diameter of the wheel decreases with use.
Figure 4
Hex Bolt
Washer
Washer
Lock Washer
Hex Nut
 Loading...