

E9R
USER MANUAL
TACTICAL FLASHLIGHT
RECHARGEABLE
INTRODUCTION
The Powertac E9R is extremely powerful and compact. Second to none for its tactical applications; Featuring one handed operation to control four brightness levels and a direct
to strobe function. Using the latest CREE XM-L2 U3 LED to produce a maximum of 1020 Lumens. The E9R is machined from aircraft grade aluminum, which makes it lightweight
and durable. Having an IPX-6 waterproof rating gives you peace of mind when using in inclement weather. Able to be submersible up to 2 meters makes a perfect t for law
enforcement, outdoor enthusiasts, hunters, and EDC. The included tactical holster is perfect for law enforcement, security guards, and soldiers alike. With the ability to mount the
E9R on any weapon platform, it elevates the light’s tactical functionality. Disrupting vision with every push of the button when set on high or strobe. The advantage denitely
goes to the person who wields the E9R.
USAGE INSTRUCTIONS
1. To install battery: Unscrew tail cap. Insert positive end of the battery
towards LED. Tighten the tail cap till it’s completely closed.
2. To turn the light ON: Push the back switch to click. Once Turned on the
ashlight will access the mode last used. To Turn the Light OFF, push the
back button to click.
3. To switch light levels: Turn the light on and press the side switch (click).
Press side switch again (click) will cycle to next light level.
4. Access the direct to strobe function: When the light is o , hold down the
side switch or turn light on and hold down side switch (long click, 0.3
seconds). The light will remain on strobe until you switch light levels.
5. Toggle Strobe / High Function: Access direct to strobe function; release
side switch; hold down side switch again (long click) and light will toggle
to high mode. Hold down side witch again (long click) and toggle to
strobe again.
Maintenance
Every 3 months, threads should be wiped with a clean cloth followed by a
thin coating of silicon-based lubricant.
LED TYPE: CREE XM-L2 U3 LED
ILLUMINATION FUNCTIONS
Mode: Firey Low Medium High Strobe
Output: 1 lm 150 lm 415 lm 1020 lm 1020 lm
Runtime: 305 hrs 13.6 hrs 5.3 hrs 2.4 hrs 5 hrs
Battery: (2) CR123A or (1) 18650 Rechargeable Li-ion.
or (2) RCR123A / 16340
Size: Length: 140mm
Bezel Diameter: 25.4mm
Body Diameter: 23mm
Weight: 82.7g (without battery)
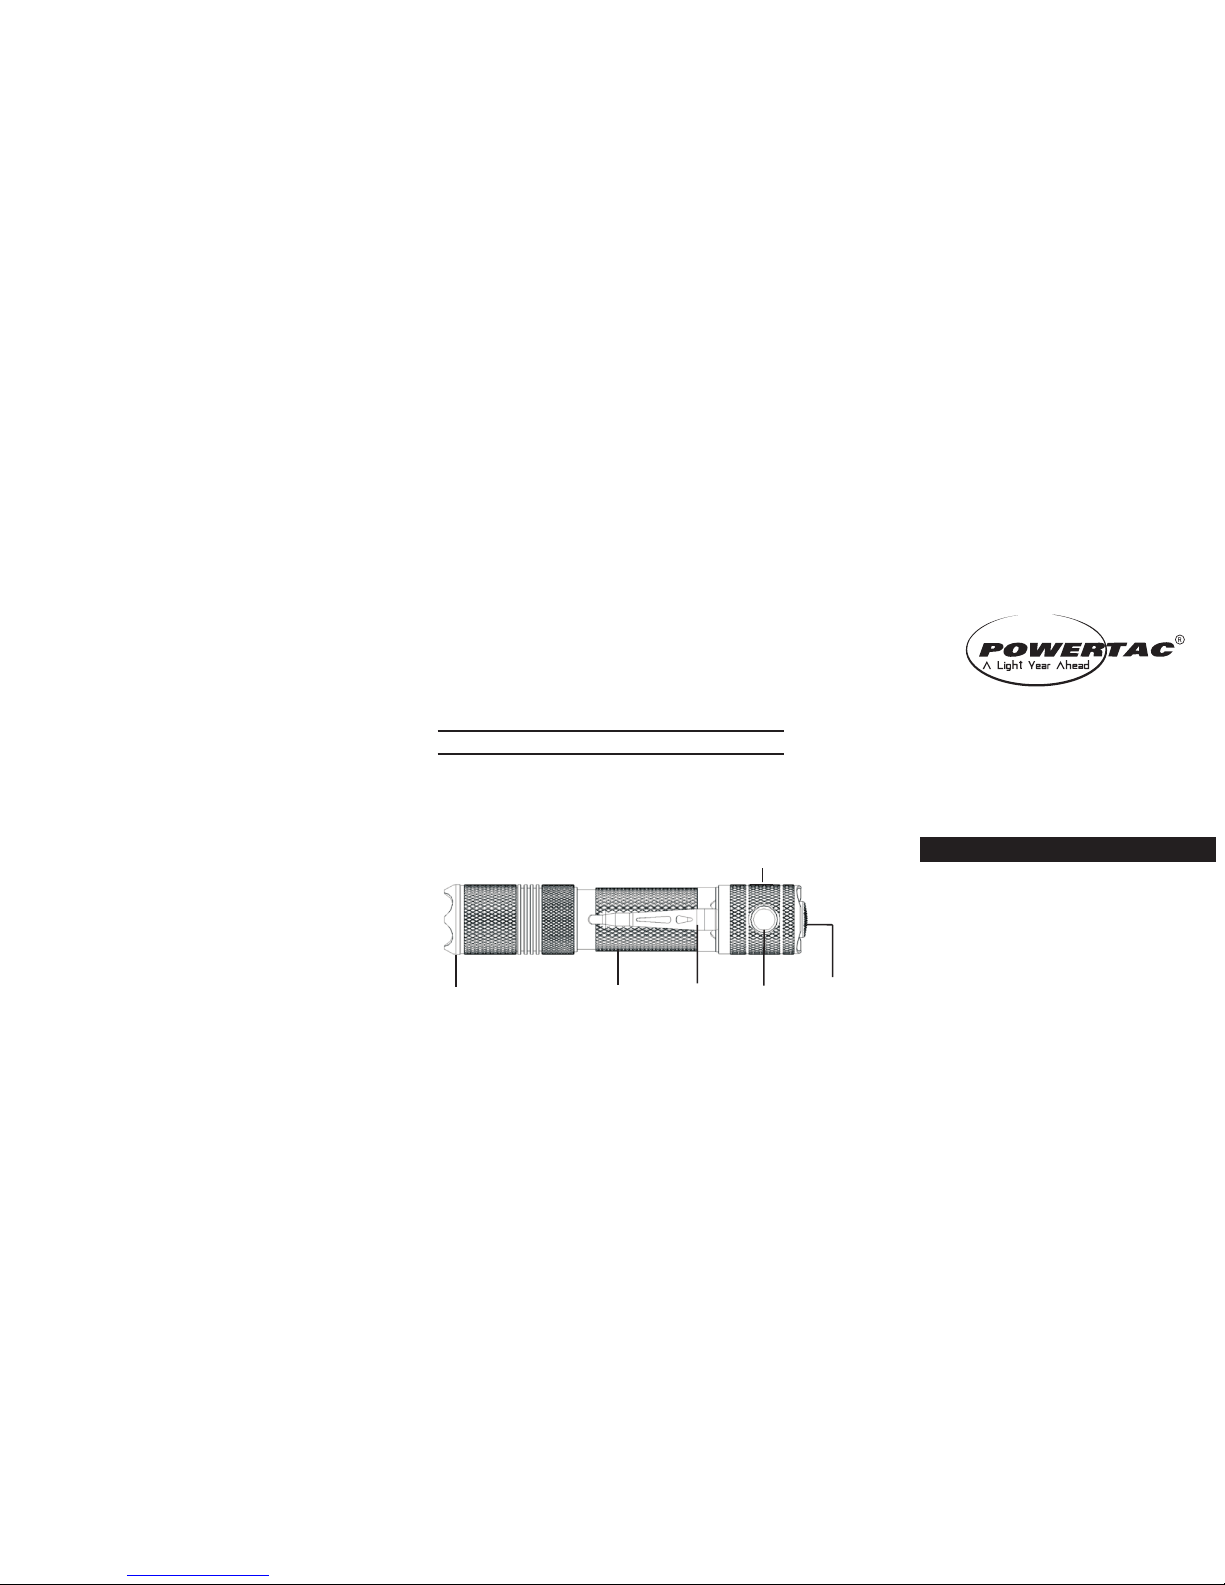
HEAD
POCKET CLIP
SIDE SWITCH
USB RECHARGE PORT
BATTERY TUBE
BACK SWITCH

FEATURES & SPECIFICATIONS
• Powerful CREE XM-L2 U3 LED produces 1020 Lumens at
the brightest setting including strobe.
• 200+ meters of throw to illuminate both long and short
distances.
• Simple user interface for tactical and self-defense .
Integrated side switch for quick access of functions.
• Unique digital circuit technology to maximize battery
life and give consistent light output.
• Reverse polarity protection. Protects from improper
battery installation.
• 5 dierent settings that include 4 levels of brightness
plus a strobe. Auto memorization for all settings.
• Machined from aircraft grade aluminum. Has type lll
anodized nish.
• Double coated glass lens to give maximum OTF (Out
The Front) brightness and beam distance.
• Tempered glass to resist breaking and scratching upon
impact.
• Waterproof to IPX6 standard. Submersible up to 2
meters under water.
RECHARGE INSTRUCTIONS
1. Using your ngernail lift the rubber usb cover. Be
careful to open in the correct direction as not to tear
the rubber cover. If this does happen you can replace
with the replacement cover that was provided with
your light. Additional Covers are available for purchase
on our website.
2. Insert the USB port into the USB Type-c port. Be careful
not to break the connecting chip inside the tail cap.
Due to temperature changes in the molding process
the Adaptor cable might need a slight wiggle to to t
in the openeing.
3. Connect to your cable to the supplied wall adaptor or
directly to a usb outlet.
DISCLAIMER
• After long periods of use on the highest setting, the
surface area may get hot. Please use caution when
using the ashlight in a constant high brightness level.
It is recommended to let the ashlight cool down to
prevent any injury.
• High intensity light is harmful to human eyes. This
product is not meant to be handled by children under
the age of 18 without adult supervision.
• Use the highest quality, protected-circuit batteries to
insure maximum performance and safety. Consult
with the manufacturer regarding any questions or
concerns.
• PowerTac’s liability is voided if the light is not used in a
proper manner or if modied.
• PowerTac reserves the right to change the design
and/or specications of all PowerTac products without
prior notice.
• Please do not change batteries at dangerous locations
such as gas stations. Batteries must only be changed
or removed when light is o.
• Do not use or attempt to recharge a disposable CR123
battery! Do not throw the ashlight into a re as an
explosion may occur.
THE POWERTAC NO-HASSLE LIFETIME WARRANTY
Please visit our website at powertac.com for full
warranty policy.
WARRANTY DISCLAIMER
The above warranty is exclusive, and to the extent
permitted by applicable laws, shall be in lieu of all other
warranties, express or implied, including, without
limitation, any warranty of merchantability or tness for a
particular use or purpose. PowerTac disclaims any and all
liability for product malfunctions, physical injuries, or
property damages that result in whole, or in part, from
the criminal, negligent, or improper use of the product,
or from modications or alterations thereto. In no event
shall PowerTac be liable for any incidental, special, or
consequential damages relating to the purchase, use, or
performance of any PowerTac product.
WARRANTY CLAIMS
Please go to www.powertac.com/warranty and follow
instructions.
USAGE INSTRUCTIONS
1. To install battery: Unscrew tail cap. Insert positive end of the battery
towards LED. Tighten the tail cap till it’s completely closed.
2. To turn the light ON: Push the back switch to click. Once Turned on the
ashlight will access the mode last used. To Turn the Light OFF, push the
back button to click.
3. To switch light levels: Turn the light on and press the side switch (click).
Press side switch again (click) will cycle to next light level.
4. Access the direct to strobe function: When the light is o , hold down the
side switch or turn light on and hold down side switch (long click, 0.3
seconds). The light will remain on strobe until you switch light levels.
5. Toggle Strobe / High Function: Access direct to strobe function; release
side switch; hold down side switch again (long click) and light will toggle
to high mode. Hold down side witch again (long click) and toggle to
strobe again.
© 2017 POWERTAC USA, INC. ALL RIGHTS RESERVED
WWW.POWERTAC.COM
 Loading...