

PowerSpec 1710 Instructions For Care And Operation

1710

Contents
Instructions for Care and Operation .................................................. 1
System Startup ................................................................................... 3
System Map: Front View with LCD Panel Open ............................. 4
LED Indicators .................................................................................. 5
Keyboard & Function Keys ............................................................... 6
System Map: Front, Rear, Right & Bottom Views ............................ 9
System Map: Left View ...................................................................10
Control Center ................................................................................. 11
GPU Overclocking .......................................................................... 14
Flexikey® Application .................................................................... 15
Video Features ................................................................................. 19
Audio Features .................................................................................22
PC Camera ....................................................................................... 23
Power Options ................................................................................. 23
Troubleshooting ............................................................................... 26
1710.book Page I Monday, August 7, 2017 2:45 PM

1
Instructions for Care and Operation
The computer is quite rugged, but it can be damaged. To prevent this, follow these suggestions:
• Don’t drop it, or expose it to shock. If the computer falls, the case and the components could be damaged.
• Keep it dry, and don’t overheat it. Keep the computer and power supply away from any kind of heating element. This is an electrical
appliance. If water or any other liquid gets into it, the computer could be badly damaged.
• A void interfer ence. Keep the computer away fro m high capacity transformers, electric motors, and other strong magnetic fields. These can
hinder proper performance and damage your data.
• Follow the proper working proc edur e s for the comp uter. Shut th e computer down properly and don’t forget to save your work. Remem-
ber to periodically save your data as data may be lost.
Power & Battery Safety
• Only use an AC/DC adapter approved for use with this computer.
• Use only the power cord and batteries indicated in this manual.
• Your AC/DC adapter may be designed for international travel b ut it still requires a steady, uninterrup ted power supply. If you are unsure of
your local power specifications, consult your service representative or local power company.
• When you want to unplug the power cord, be sure to disconnect it by the plug head, not by its wire.
• Make sure the socket and any extension cord(s) you use can support the total current load of all the connected devices.
• Make sure that your computer is completely powered off before putting it into a travel bag (or any such container).
• Only use batteries designed for this computer. The wrong battery type may explode, leak or damage the computer.
• Do not continue to use a battery that has been dropped, or that appears damaged (e.g. bent or twisted) in any way. Even if the computer continues to work with a damaged battery in place, it may cause circuit damage, which may possibly result in fire.
• Recharge the batteries using the computer’s system. Incorrect recharging may make the battery explode.
• Do not try to repair a battery pack. Refer any battery pack repair or rep lac ement to your service representative or qualified service personnel.
• Keep children away from, and promptly dispose of a damaged battery . Always dispose of batteries care fully. Batterie s may explode or leak
if exposed to fire, or improperly handled or discarded.
• Keep the battery away from metal appliances.
• Affix tape to the battery contacts before disposing of the battery.
• Do not dispose of batteries in a fire. They may explode. Check with local codes for possible special disposal instructions.
• Do not touch the battery contacts with your hands or metal objects.
1710.book Page 1 Monday, August 7, 2017 2:45 PM

2
Polymer Battery Precautions
Note the following information which is specific to polymer batteries only, and where applicable, this overrides
the general battery precaution information.
• Polymer batteries may experience a slight expansion or swelling,
however this is part of the battery’s safety mechanism and is not a
cause for concern.
• Use proper handling procedures when using polymer batteries.
Do not use polymer batteries in high ambient temperature environments, and do not store unused batteries for extended periods.
Cleaning
• Use a soft clean cloth to clean the computer, but do not apply
cleaner directly to the computer.
• Do not use volatile (petroleum distillates) or abrasive cleaners on
any part of the computer.
Servicing
Attempting to service the computer yourself may violate
your warranty and expose you and the computer to electric
shock. Refer all servicing to qualified service personnel,
particularly under any of the following conditions:
• When the power cord or AC/DC adapter is damaged or frayed.
• If the computer has been exposed to any liquids.
• If the computer does not work normally when you follow the
operating instructions.
• If the computer has been dropped or damaged (do not touch the
poisonous liquid if the LCD panel breaks).
• If there is an unusual odor, heat or smoke coming from your computer.
Battery Disposal & Caution
The product that you have purchased contains a rechargeable battery. The battery is recyclable. At the end of its useful life, under various state and local laws, it may be illegal
to dispose of this battery into the municipal waste stream.
Check with your local solid waste officials for details in your
area for recycling options or proper disposal.
Danger of explosion if battery is incorrectly replaced. Replace only with the same or equivalent type recommended
by the manufacturer. Discard used battery according to the
manufacturer’s instructions.
CPU Speed & Computer in DC Mode
Note that when the computer is in DC mode (powered by
the battery only) the CPU may not run at full speed. This is
a design feature implemented in order to protect the battery.
1710.book Page 2 Monday, August 7, 2017 2:45 PM
3
System Startup
1. Remove all packing materials.
2. Place the computer on a stable surface.
3.
Do not attach any external devices except the power cord and
AC adapter to the system until Windows is fully configured..
4. When first setting up the computer use the following
procedure (as to safeguard the computer during shipping, the
battery will be locked to not power the system until first
connected to the AC/DC adapter and initially set up as below):
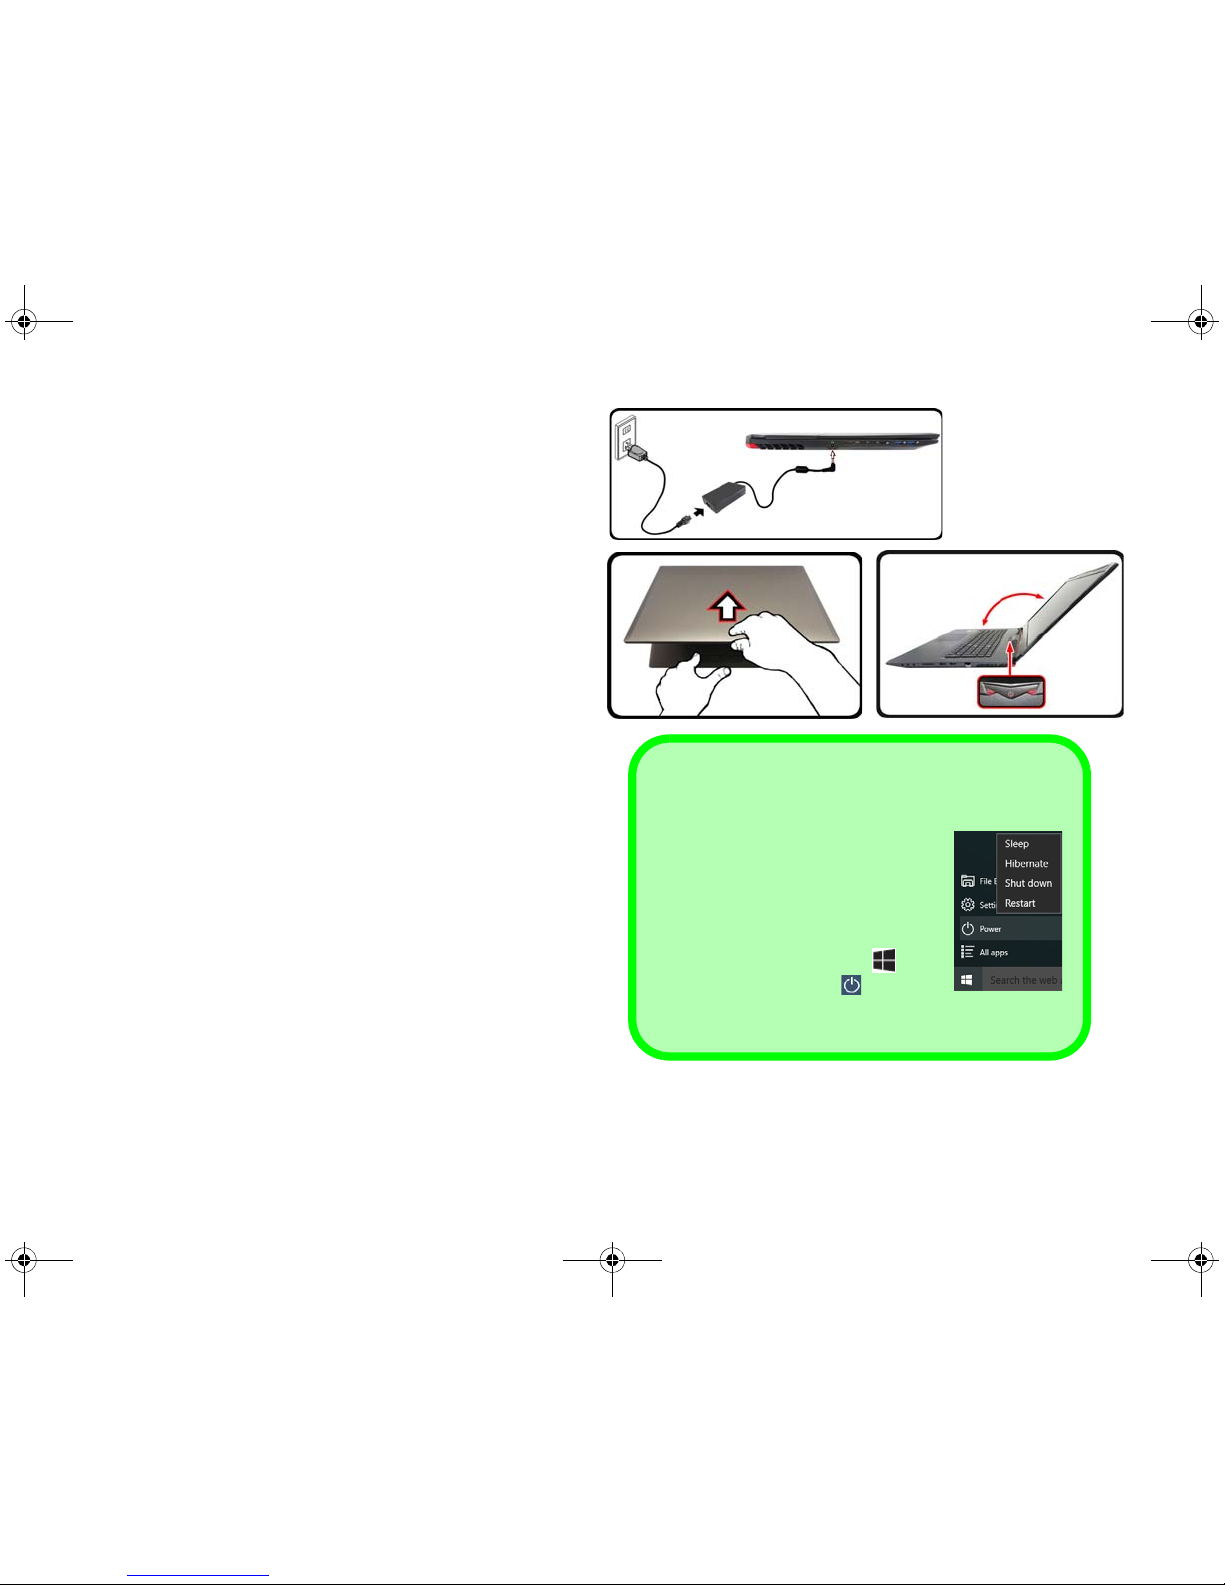
• Attach the AC/DC adapter cord to the DC-In jack on the left
of the computer, then plug the AC power cord into an outlet,
and connect the AC power cord to the AC/DC adapter and
leave it there for 6 seconds or longer.
• Remove the adapter cord from the computer’s DC-In jack,
and then plug it back in again; the battery will now be
unlocked.
5. Use one hand to raise the lid/LCD to a comfortable viewing
angle (do not to exceed 135 degrees);
use the other hand (as
illustrated in Figure 1) to support the base of the computer
(Note: Never lift the computer by the lid/LCD).
6. Press the power button to turn the computer “on”.
135°
Figure 1
Opening the Lid/
LCD/Computer
with AC/DC Adapt-
er Plugged-In
Shut Down
Note that you should always shut
your computer down by choosing the
Shut down command in Windows
(see below). This will help prevent
hard disk or system problems.
1. Click the Start Menu icon .
2. Click the Power item .
3. Choose Shut Down from the
menu.
1710.book Page 3 Monday, August 7, 2017 2:45 PM

4
System Map: Front View with LCD Panel Open
2 1
8
7
4
3 3
5
5
6
Figure 2
Front View with LCD Panel
Open
1. PC Camera
2. *PC Camera LED
*When the PC camera is in
use, the LED will be
illuminated.
3. Built-In Array Microphone
4. LCD
5. Speakers
6. Power Button
7. Keyboard
8. Touchpad & Buttons
1710.book Page 4 Monday, August 7, 2017 2:45 PM
5
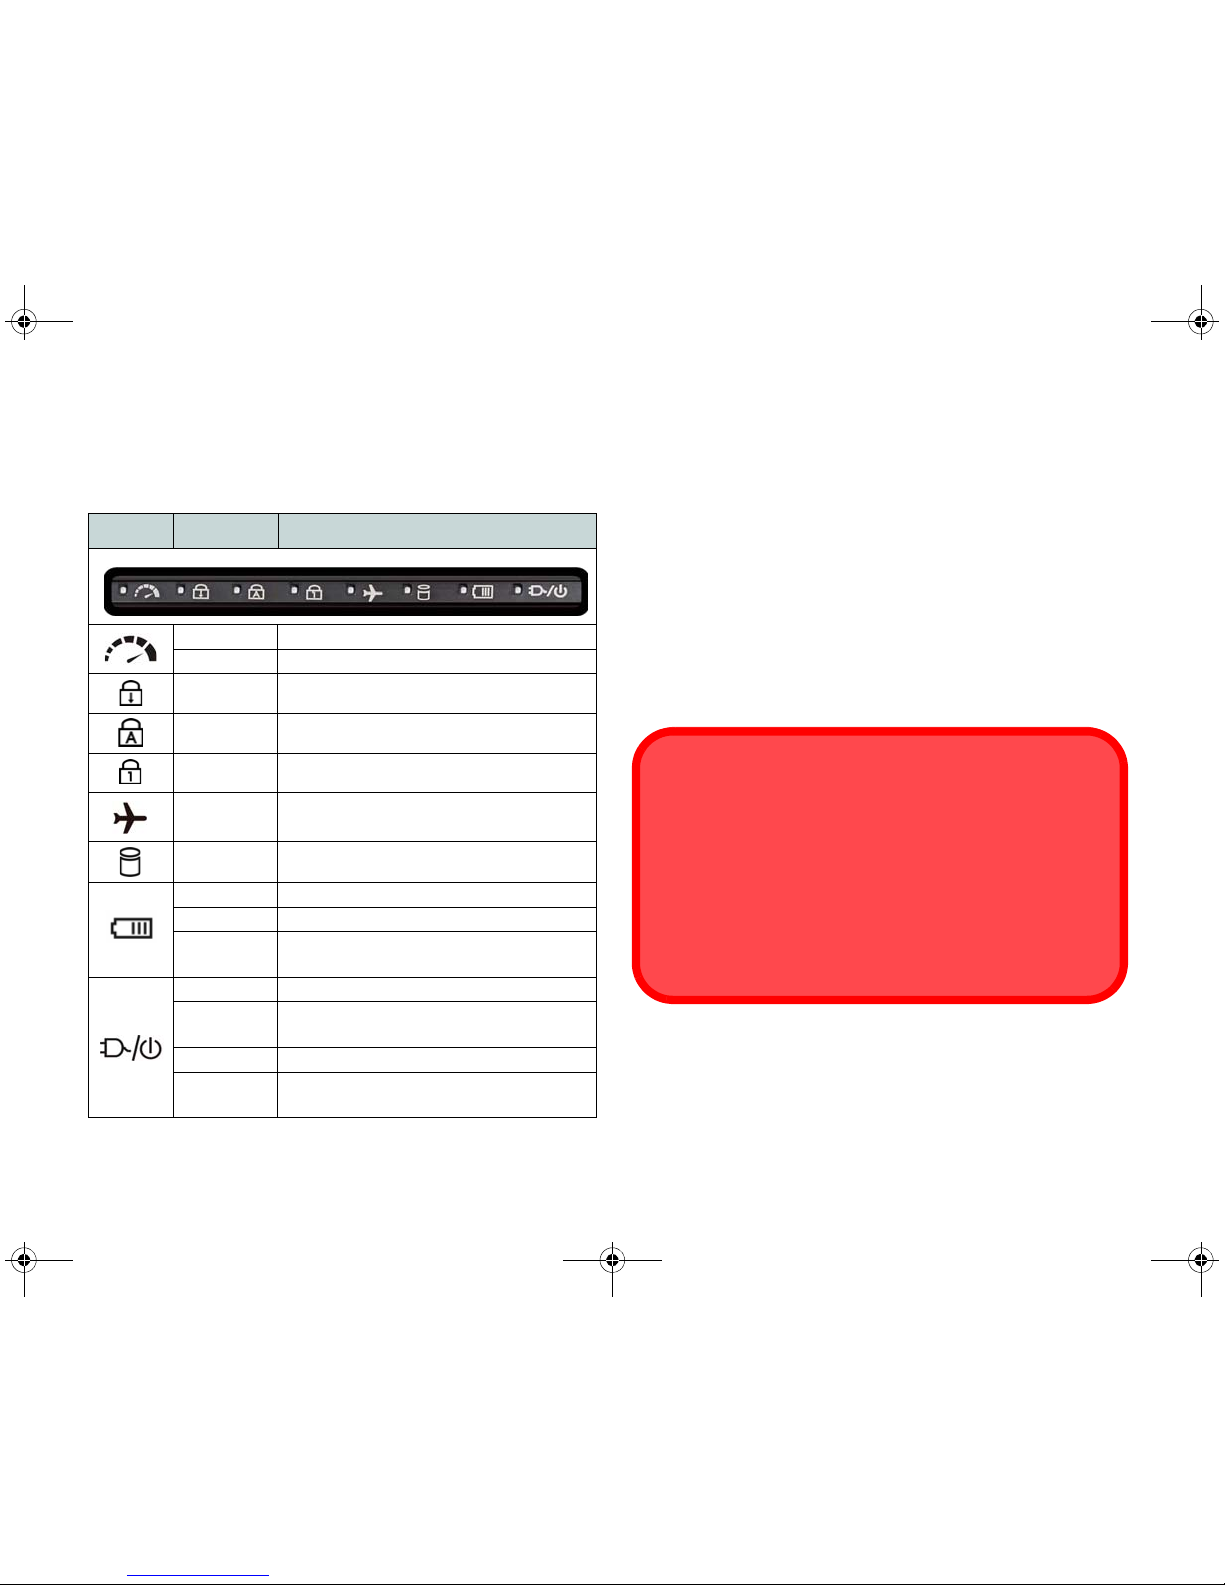
LED Indicators
The LED indicators on the computer display helpful information about the current status of the computer.
Table 1 - LED Indicators
*The powered USB 3.0 (USB 3.1 Gen 1) port (see page 9)
may be toggled on /off by means of the Fn + Power But-
ton key combination. When the powered USB port is on
it will supply power (for charging devices only, not for
operating devices) when the system is off but still powered by the AC/DC adapter plugged into a working outlet,
or powered by the battery with a capacity level above 20%
(this may not work with certain devices - see page 26).
Icon Color Description
Off MSHYBRID Mode
Green DISCRETE Mode
Green Scroll Lock Activated
Green Caps Lock Activated
Green Number Lock (Numeric Keypad) Activated
Green
Airplane Mode is ON (the WLAN and
Bluetooth Modules are OFF)
Green The Hard Disk is in use
Orange The Battery is Charging
Green The Battery is Fully Charged
Blinking
Orange
The Battery Has Reached Critically Low
Power Status
Orange The AC/DC Adapter is Plugged In
Blinking
Orange*
The AC/DC adapter is plugged in and the
powered USB Port is on*
Green The Computer is On
Blinking
Green
The Computer is in Sleep Mode
Wireless Device
Operation Aboard Aircraft
The use of any portable electronic transmission devices
aboard aircraft is usually prohibited.
Make sure the wireless modules are OFF if you are using
the computer aboard aircraft by putting the system in to Airplane Mode.
1710.book Page 5 Monday, August 7, 2017 2:45 PM
6
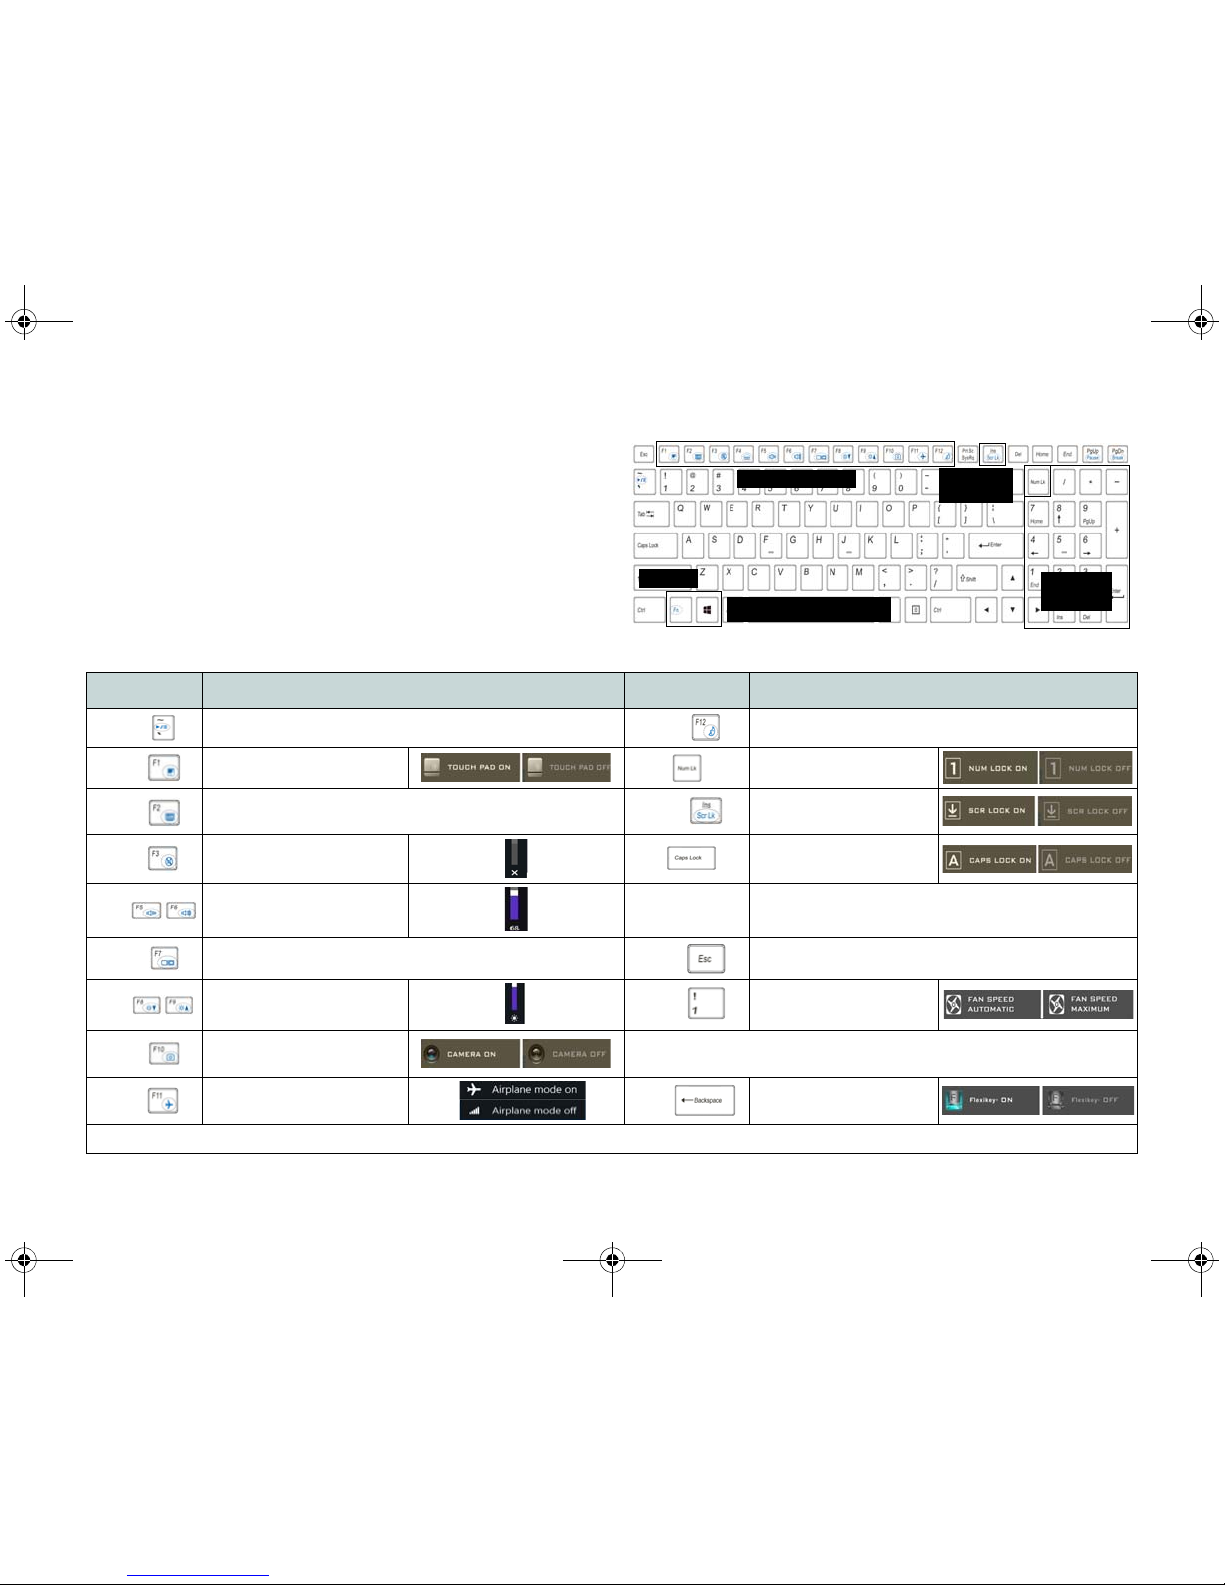
Keyboard & Function Keys
The keyboard includes a numeric keypad for easy numeric
data input. Pressing NumLk turns on/off the numeric keypad. It also features function keys to allow you to change
operational features instantly. The function keys (F1 - F12
etc.) will act as hot keys when pressed while the Fn key is
held down. In addition to the basic function key combinations, some visual indicators are available when the Control Center driver is installed.
Keys Function/Visual Indicators Keys Function/Visual Indicators
Fn +
Play/Pause (in Audio/Video Programs)
Fn +
Sleep Toggle
Fn +
Touchpad Toggle Number Lock Toggle
Fn +
Turn LCD Backlight Off
(Press a key to or use Touchpad to turn on)
Fn +
Scroll Lock Toggle
Fn +
Mute Toggle
Caps Lock Toggle
Fn +
Volume Decrease/Increase
Fn + Power But-
ton
Powered USB Port Power Toggle (see page 9)
Fn +
Change Display Configuration (see page 21)
Fn +
Control Center Toggle (see page 11)
Fn +
Brightness Decrease/
Increase
Fn +
Fan Automatic Control/
Full Power
Fn +
PC Camera Power
Toggle
*Note: It is recommended that you use Maximum fan speed when
playing games.
Fn +
Airplane Mode Toggle
Fn +
Disable/Enable
Flexikey® (see page 15)
Table 2 - Function Keys & Visual Indicators
Numeric
Keypad
Fn Key
Windows Logo Key
ScrLk &
NumLk
Figure 3 - Keyboard
Function Keys
1710.book Page 6 Monday, August 7, 2017 2:45 PM

7
Colored Keyboard Backlight LED
Press Fn plus the key to toggle the keyboard LED on /
off. The keyboard LED may be configured using the Fn +
key combination outlined in the table below. In addition
press Fn plus the key to launch the keyboard backlight
application to configure the settings.
Table 3 - Keyboard LEDs
Keyboard Backlight Application
The Keyboard Backlight application can be accessed by
pressing the Fn plus key.
Modes
The buttons surrounding the swatch allow you to alter the
effects of the keyboard backlight. Click on any of the buttons to view the effects on the keyboard. Click Save when
exiting the application to retain the setting.
Table 4 - Mode Buttons
Keyboard LED Function key Combinations
Fn +
Launch the Keyboard Backlight Application
Fn +
Toggle the Keyboard LED On/Off
Fn +
Keyboard LED Illumination Decrease
Fn +
Keyboard LED Illumination Increase
Fn +
Toggle the Left keyboard LED On/Off
Fn +
Toggle the Middle keyboard LED On/Off
Fn +
Toggle the Right keyboard LED On/Off
123
1
3
2
Mode Buttons
Random Color Wave Up/Down
Custom - Display & Configure
Keyboard Sections & Colors
Dancing Effect
Breathe (All Colors) Tempo Beat
Cycle Colors
Flashing
Figure 4
Keyboard
Backlight
Application
1710.book Page 7 Monday, August 7, 2017 2:45 PM
 Loading...