

Multicooker
SkyCooker RMC-M92S-A
User manual
A1
9
1
13
14
2
10
3
8
7
4
11
15
5
6
160
120
2
12
16
A2
9
1
2
3
REHEAT
CANCEL
TIME DELAY
TEMPERATURE
HOUR
4 5
MIN
QUICK COOK
START
MENU
KEEP WARM
8
7
6
3
A3
A3
3
2
1
QUICK COOK
MULTICOOK OATMEAL STEW / CHILI SAUTE
4 6
TEMP.
0
F
0
C
COOK TIME
TIME DELAY
5
7
PAS TABOIL / STEAM SOUP
SLOW COOK
8
PILAFRICE / GRAINSBAKEVACUUM
YOGURT
PIZZA
BREAD
DESSERT
4
A4
2 3 4
1
а
b
5
6 7 8
5

A5
1 2
c
а
b
3
c
bb
4 5 6
6
а

SkyCooker RMC-M92S-A
ENG
Carefully read all instructions before operating the unit and save them for future reference. By carefully following these
instructions you can considerably prolong the service life of your appliance.
NOTE:
READ ALL INSTRUCTIONS
•
This equipment has been tested and found to comply with the limits for a
Class B digital device, pursuant to Part 15 of the FCC Rules. These limits are
designed to provide reasonable protection against harmful interference in a
residential installation. This equipment generates uses and can radiate radio
•
frequency energy and, if not installed and used in accordance with the instructions, may cause harmful interference to radio communications.
This device complies with Part 15 of the FCC Rules and Industry Canada licenceexempt RSS standard(s). Operation is subject to the following two conditions:
•
(1) this device may not cause interference, and (2) this device must accept any
interference, including interference that may cause undesired operation of
the device.
However, there is no guarantee that interference will not occur in a particular
installation. If this equipment does cause harmful interference to radio or
•
•
television reception, which can be determined by turning the equipment off
and on, the user is encouraged to try to correct the interference by one or
more of the following measures:
•
Reorient or relocate the receiving antenna.
•
Increase the separation between the equipment and receiver.
•
Connect the equipment into an outlet on a circuit different from that
to which the receiver is connected.
•
Consult the dealer or an experienced radio/TV technician for help.
•
•
•
IMPORTANT SAFEGUARDS
•
When using electrical appliances, basic safety precautions should always
be taken including the following:
•
Do not use the appliance for other than intended use or specied purposes.
Failure to follow product instructions may result in damage that will not be
covered by the warranty. The manufacturer is not responsible for the consequences of improper use.
Before installing the appliance, ensure that its voltage corresponds with the
supply voltage in your home (refer to the specications on the appliance
rating plate or technical data). Using a different voltage may result in re,
accident or damage to the appliance.
When using the extension cord, ensure that its voltage is the same as spec-
ied on the appliance. The appliance must be grounded. Ensure that it is
connected to a properly grounded power outlet. Failing to do so may result
in electric shock. Use only grounded extension cords.
Cook only in the bowl.
During use, the appliance becomes hot! Do not touch hot surfaces. To avoid
an injury, do not lean over the open appliance. Do not lift or move the unit
while it is operating.
Unplug from outlet when not in use and before cleaning. Allow the appliance
to cool before putting on or taking off parts. Never handle the plug with wet
hands. Do not pull power cord to disconnect from the outlet; instead, grasp
the plug and pull to disconnect.
Always attach plug to appliance rst, then plug cord into the wall outlet. To
disconnect, turn any control to “off”, then remove plug from wall outlet.
Do not let cord hang over edge of table or counter, or touch hot surfaces.
Damaged cord may cause a shock, re, or lead to a failure that will not be
covered by the warranty.
Do not operate any appliance with a damaged cord or plug or after the ap-
pliance malfunctions or has been damaged in any manner. Return appliance
7

to the nearest authorized service facility for examination, repair, or adjust-
ment. Any kinds of modications or adjustments to the product are not
allowed. All the repairs should be carried out by an authorized service
repair center.
•
Never operate the appliance on soft surfaces.
•
Do not cover the unit with any cloth or material during operation. Failure
to do so may result in overheating or malfunction.
•
Extreme caution must be used when moving an appliance containing hot
oil or other hot liquids.
•
Use handle to carry the appliance only with an empty inner bowl.
•
Do not use outdoors.
•
Follow cleaning and general maintenance guidelines when cleaning the unit.
•
To protect against electrical shock do not immerse cord, plugs, or appliance
in water or other liquids. Do not wash the device under running water.
•
Close supervision is necessary when any appliance is used by or near
children.
•
This appliance can be used by children aged 8 years and older and people
with reduced physical, sensory, or mental capabilities or lack of experience
and knowledge if they have been given supervision or instruction concerning use of the appliance in a safe way and understand the hazards involved.
Children shall not play with the appliance. Keep the appliance, its cord,
and all packaging materials out of reach of children aged less than 8 years.
Cleaning and user maintenance shall not be made by children without
supervision.
•
The use of accessory attachments not recommended by the appliance
manufacturer may cause injuries.
•
Do not place the appliance on or near a hot gas, an electric burner, or in a
heated oven.
SAVE THESE INSTRUCTIONS FOR
HOUSEHOLD USE ONLY
CAUTION!
•
A short detachable power-supply cord should be used to reduce the risks
resulting from becoming entangled in or tripping over a longer cord.
•
Longer detachable power-supply cords or extension cords are available and
may be used if care is exercised in their use.
•
If a longer detachable power-supply cord or extension cord is used:
•
The marked electrical rating of the cord set or extension cord should be at
least as great as the electrical rating of the appliance. Using different voltage
may result in a re or other accident, causing the device damage or shorting
the circuit.
•
The cord should be arranged so that it will not drape over the countertop
or tabletop where it can be pulled on by children or tripped over unintention
ally.
•
If the appliance is of the grounded type, the extension cord should be a
grounding-type 3-wire cord.
WARNING!
•
Changes or modications to this unit not expressly approved by the party
responsible for compliance could void the user’s authority to operate the
equipment.
-
8

SkyCooker RMC-M92S-A
ENG
Technical specifications
Model................................................................................................................................................................................. SkyCooker RMC-M92S-A
Power ................................................................................................................................................................................................................... 860 W
Voltage .....................................................................................................................................................................................................120 V, 60 Hz
Electric shock protection ................................................................................................................................................................................class I
Bowl capacity .........................................................................................................................................................................................5.25 Qt / 5 L
Bowl coating....................................................................................................................................................................................................ceramic
Display.........................................................................................................................................................................................................digital LED
Steam valve ............................................................................................................................................................................................... removable
Type of control .............................................................................................................................................. electronic, remote (Ready for Sky)
Data transfer protocol ....................................................................................................................................................................Bluetooth v4.0
Supported operating systems ........................................................................................................................................................... iOS, Android
Net weight ...............................................................................................................................................................................................2.4 kg ± 3%
Programs
1. MULTICOOK
2. OATMEAL
3. STEW/CHILI
4. SAUTE
5. SOUP
6. BOIL/STEAM
Functions
The Ready for Sky technology (remote control)..................yes
Keep Warm function ...............................................up to 24 hours
Disabling “Keep Warm” in advance ......................................... yes
Package includes
Multicooker ..................................................................................1 pc.
Bowl ...............................................................................................1 pc.
Steaming container ...................................................................1 pc.
Measuring cup ............................................................................1 pc.
Serving spoon .............................................................................1 pc.
Stirring paddle ............................................................................1 pc.
In accordance with the policy of continuous improvement, the manufacturer reserves the right to make any modications to
design, packaging arrangement, or technical specications of the product without prior notice.
WARNING: Changes or modications to this unit not expressly approved by the party responsible for compliance could void the
user’s authority to operate the equipment.
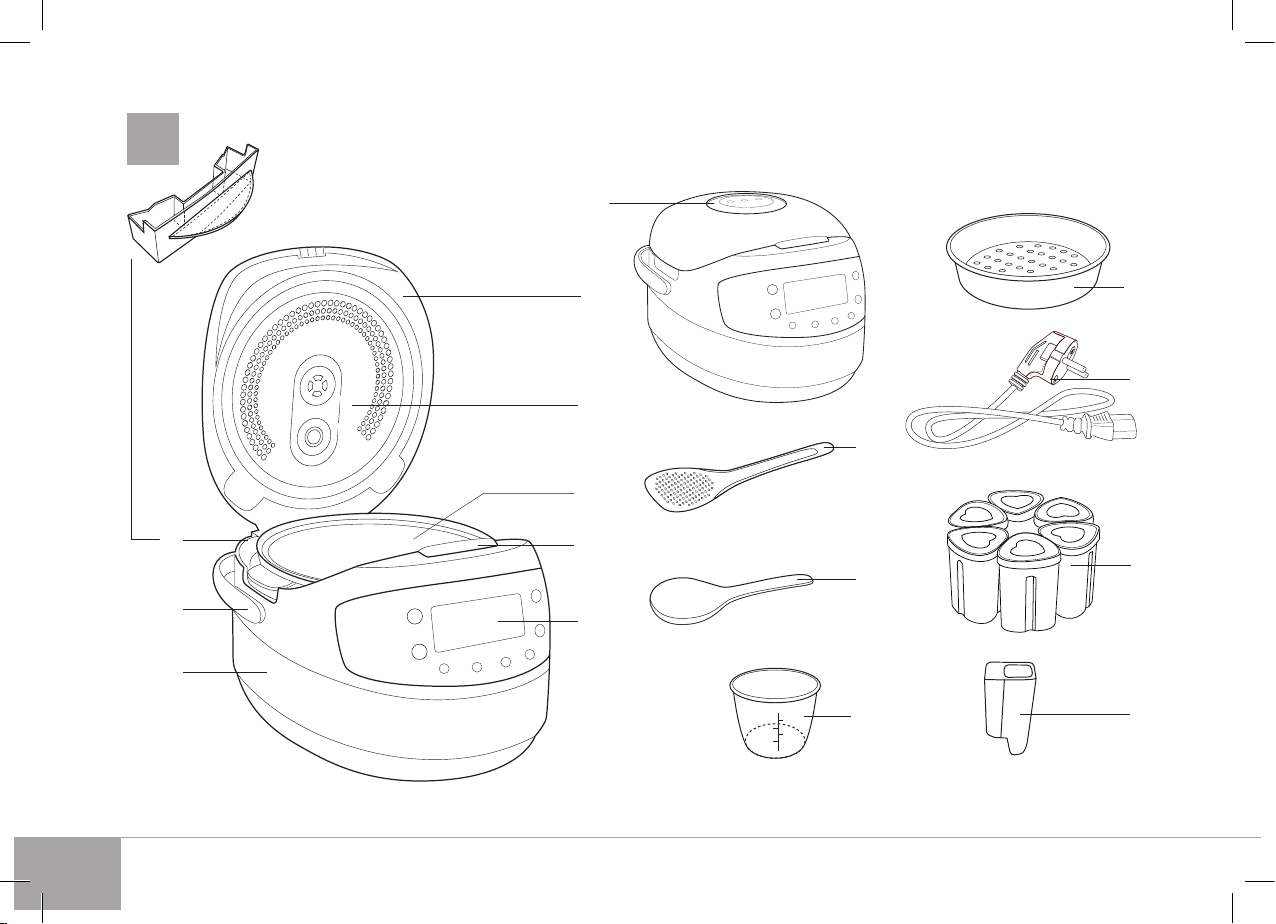
Multicooker parts (scheme A1, p. 2 )
1. Main lid
2. Removable inner lid
3. Bowl
4. Lid release button
5. Control panel with display
6. Housing
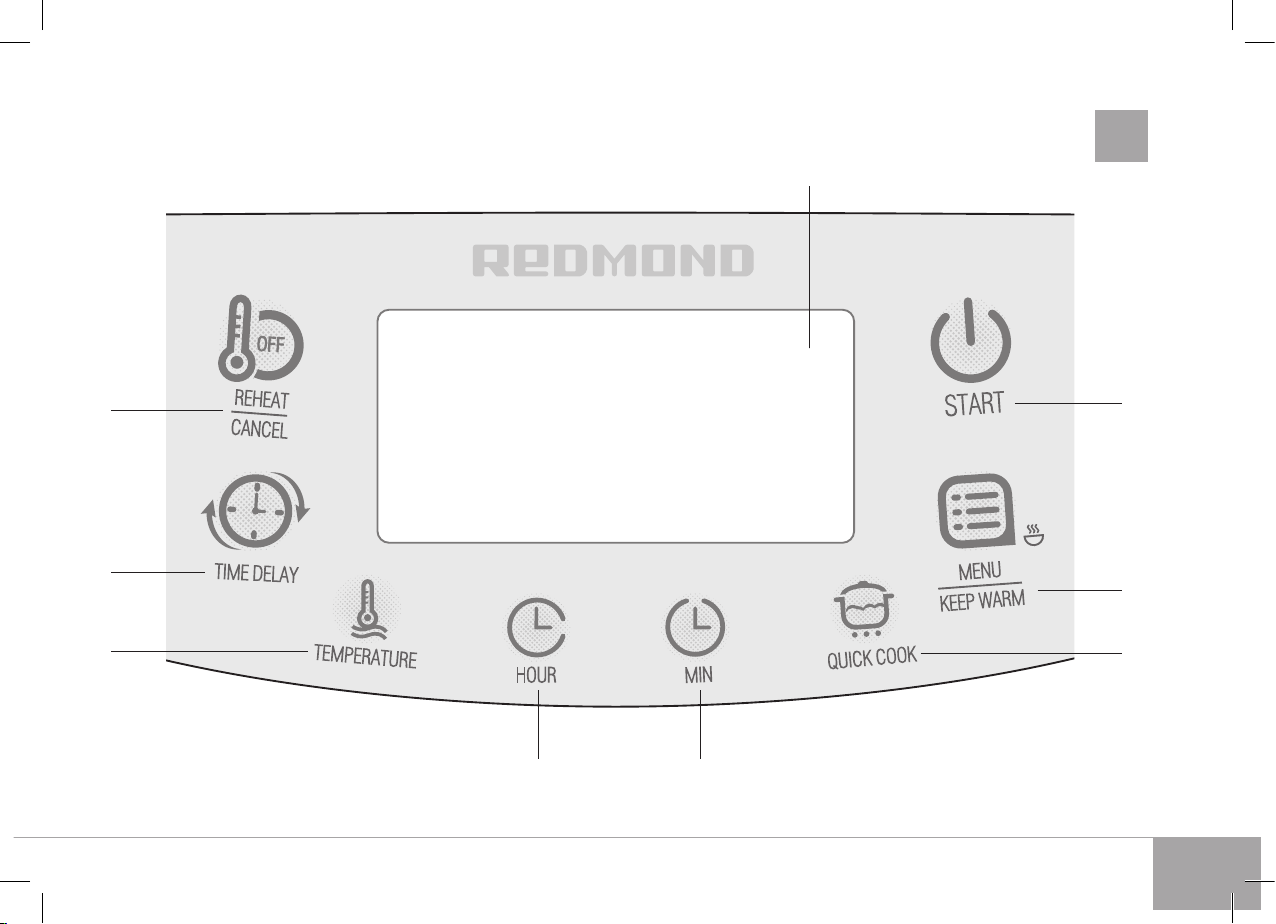
Control panel (scheme A2, p. 3 )
1. “Reheat/Cancel” button disables/reactivates the Reheat function, interrupts the program and cancels all settings.
2. “Time Delay” button is used to enter the time setting mode in Time Delay function, to enable / disable Bluetooth function.
3. “Temperature” button is used to adjust the temperature, to set the temperature measurement units.
4. “Hour” button is used to adjust the hours.
5. “Min” button is used to adjust the minutes in time setting Time Delay modes.
6. “QUICK COOK” button starts “QUICK COOK” program.
7. “Menu / Keep Warm” button is used to select an automatic cooking program and to disable the Keep Warm function in
advance.
7. PASTA
8. SLOW COOK
9. VACUUM
10. BAKE
11. RICE/GRAINS
12. PILAF
Reheat function .......................................................up to 24 hours
Time Delay function ...............................................up to 24 hours
Spoon/paddle holder ................................................................1 pc.
Yogurt jars ..................................................................................6 pcs.
Cookbook ......................................................................................1 pc.
User manual ................................................................................1 pc.
Service booklet ...........................................................................1 pc.
Power cord ...................................................................................1 pc.
7. Carrying handle
8. Condensate container
9. Removable steam valve
10. Stirring paddle
11. Serving spoon
12. Measuring cup
13. YOGURT
14. PIZZA
15. BREAD
16. DESSERT
17. QUICK COOK
13. Steaming container
14. Power cord
15. Yogurt jars
16. Spoon/paddle holder
8. “Start” button starts the cooking program.
9. Display.
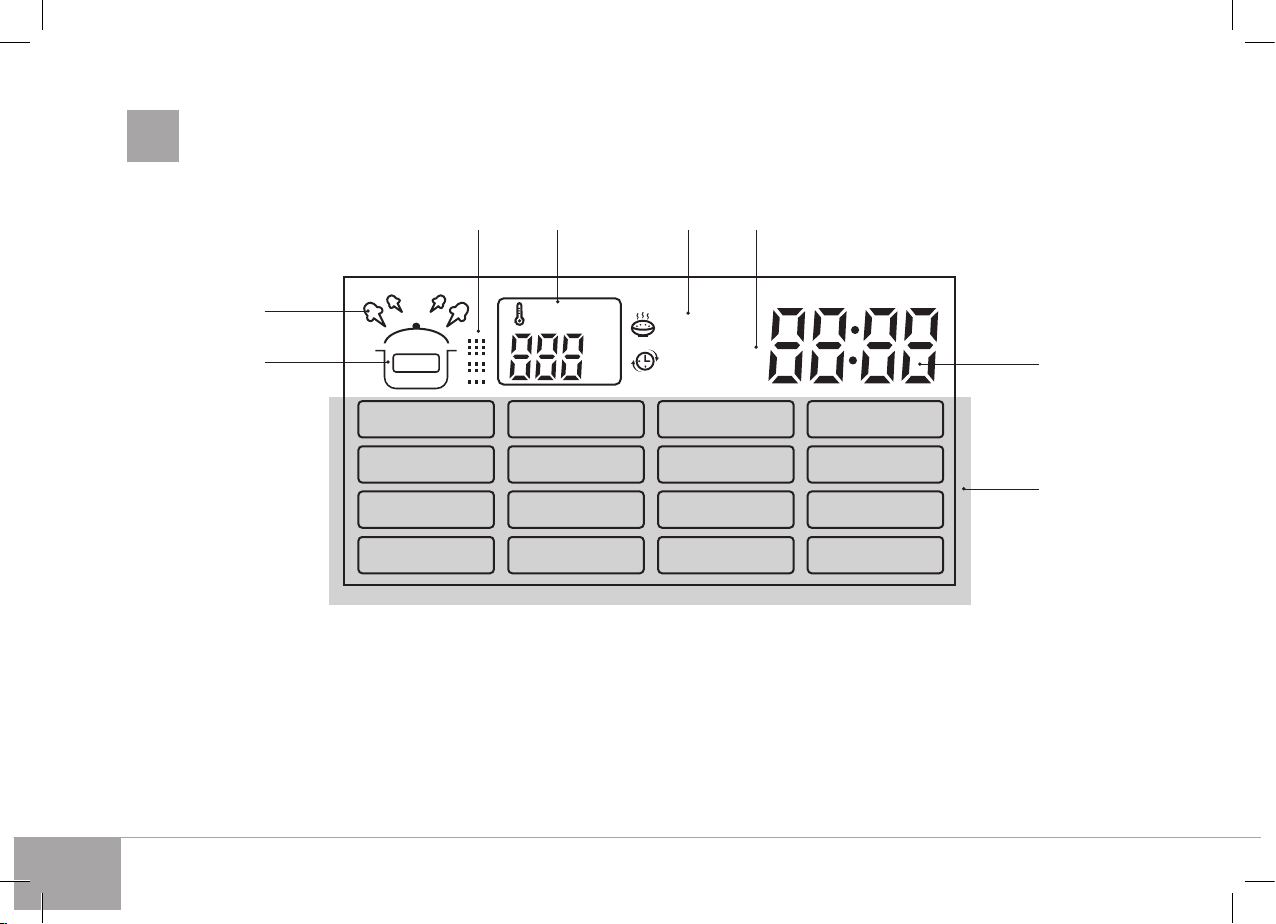
Display (scheme A3, p. 4 )
1. “QUICK COOK” program indicator
2. Operating program/Reheat function indicator
3. Cooking stage indicator
4. “MULTICOOK” temperature indicator
I. PRIOR TO FIRST USE
Carefully remove the multicooker and its accessories from the packaging. Dispose of all packaging materials.
Keep all warning labels, including the serial number identication label located on the housing. The absence of the serial
number will deprive you of your warranty benets!
After transportation or storage at low temperatures allow the appliance to stay at room temperature for at least 2 hours before using.
Place the device on a at, stable, and hard surface away from any objects or cabinets that could be damaged by steam, humidity, or high temperatures.
Before operating, make sure that the outer and inner parts of the multicooker have no dents, cracks or any other visible
damages. There should not be any obstructions between the heating element and the bowl.
5. “Time Delay” indicator
6. Cooking program operation indicator.
7. Time value indicator.
8. Cooking program indicators.
I I . OPERATION
The Ready for Sky technology
The Ready for Sky technology enables to use the software app of the same name to control the appliance remotely from a
smartphone or tablet.
1. Download the software from the App Store or Google Play (depending on your operating system) onto your smartphone
or tablet.
2. Open the Ready for Sky app, create an account, and follow the prompts that appear on the screen.
3. Enable the Bluetooth function on the multicooker. To do this, press and hold down the “Time Delay” button, the beep will be
supplied, and the button indicator will come on. The appliance should be in the standby mode (the display is not illuminated).
The remote control of the multicooker SkyCooker RMC-M92S-A is only possible when the Bluetooth function is on (the Time
Delay button indicator in standby mode is always on).
4. Press and hold down the “Hour” button for 5 seconds on the control panel of the multicooker.
5. The changing symbols and will be displayed during connection on the multicooker display. After the connection is made
an audible signal will be heard and appliance will switch to the standby mode.
6.
To disable the multicooker from the mobile device press and hold down the “Min” button until an audible signal is heard,
when the multicooker is in the standby mode.
To provide stable connection the mobile device should be located within no more than 15 metres from the appliance.
Setting the Temperature Measurement Units
In the multicooker SkyCooker RMC-M92S-A you can choose one of two temperature units: Fahrenheit (°F) and Celsius (°C)
degrees. By default, the temperature measurement unit is set to Fahrenheit (°F).
To congure the temperature units, follow the following steps:
1. In standby mode (the display is not illuminated), press and hold down the “Temperature” button, the display will show
the value of 212°F.
2. Press shortly the “Temperature” button to select the desired temperature units: 100°C or 212°F will ash on the display,
switching is performed in a circle.
3. Do not press the buttons on the control panel for a few seconds. Wait until the selected value on the display goes off.
4. Next time you turn on the multicooker, it will display the temperature in the selected measurement units.
Setting The Cooking Time
The multicooker allows manually adjusting the cooking time, set by default for each program (except “QUICK COOK”). Time
adjustment range and interval depend on the program of cooking selected.
9

The time indicator will start ashing when the cooking program is selected. To increase the hour value press the “Hour” button,
to increase the minute value – the “Min” button. Press and hold the corresponding button down to scroll through the digits.
In certain automatic programs countdown starts only when the device reaches its operating temperature. E.g. If you set “BOIL/
STEAM” program on 5 minutes, the countdown of the program begins only when the water comes to a full boil providing enough
steam. In “PASTA” program, the countdown begins after water starts boiling and “Start” button is being repressed.
Time Delay Function
This function allows setting the program to nish by certain time. Cooking time may be delayed for a period from 10 minutes
to 24 hours with 10 minute intervals. Setting Time Delay function, take the cooking time of the program into consideration.
The time of a delay should be longer than the cooking time of the program selected; otherwise the program starts running
right after you press “Start”.
To set the time of delay press the “Time delay” button after the program selection. To increase the hour value press the “Hour”
button, to increase the minute value – the “Min” button. Press and hold the corresponding button down to scroll through the
digits.
Time Delay function is available in all automatic programs except “SAUTE”, “PASTA” and “QUICK COOK”.
It is not recommended to use Time Delay function if dairy and other perishable products are being used (eggs, fresh milk, meat,
cheese etc.).
Keep Warm Function
Function is being automatically activated at the end of the cooking program. When the program nishes, the temperature of
the meal 160-170°F (70–75°C) is being maintained for a period of time up to 24 hours. The “Reheat/Cancel” indicator is lit
with the enabled Keep Warm, the direct counting of the program time in this mode is displayed.
Keep Warm may be disabled if necessary by pressing and holding the “Reheat/Cancel” button until an audible signal is heard.
The function is not applicable in “PASTA”, “YOGURT” and “QUICK COOK” programs.
When setting the cooking temperature below 175°F (80°C) in the “MULTICOOK” program the Keep Warm function will be
disabled by default. To enable Keep Warm press and hold down the “Menu / Keep Warm” button during program operation.
Disabling The “Keep Warm” In Advance
Automatic activation of the Keep Warm function at the end of the program may sometimes be undesirable. The multicooker
allows disabling the function in advance, while setting the program or during its operation. Press and hold down the “Menu
/ Keep Warm” button to cancel the function. “Reheat/Cancel” button indicator goes off. To reactivate the function, repress and
hold down the “Menu / Keep Warm” button (“Reheat/Cancel” button indicator goes off).
Reheat Function
The multicooker can be used for warming up cold meals. To reheat:
• Put the products into the bowl. Place the bowl inside the device.
• Close the lid until it clicks into place and plug in the unit.
• Press and hold down “Reheat/Cancel” button for a few seconds until an audible sound is produced. Corresponding indica-
tors light up and “reheating” process begins. The timer starts its countdown.
The meal will be warmed up to 160-170°F (70–75°C) and the temperature will be maintained for the next 24 hours. To
cancel the function press and hold down “Reheat/Cancel” button. Corresponding indicators go off.
The function may operate for a period of 24 hours, however, we recommend using it moderately, because a prolonged thermal
exposure may sometimes affect avor characteristics of the meal.
Standard Operating Procedure for Automatic Programs
1. Measure the ingredients according to the recipe.
2.
Put them into the bowl. Make sure that all the ingredients including liquid are below the scale mark indicating maximum
capacity. Place the bowl inside the device. The bowl and the heating element must t tightly.
3. Close the lid until it clicks into place. Plug in the unit.
4. Repeatedly press “Menu / Keep Warm” button to select the program (corresponding indicator lights up).
To start the “QUICK COOK” program from the standby mode press and hold down the “QUICK COOK” button, until the “QUICK
COOK” indicator lights up on display. During this program operation the program countdown is not displayed.
5.
The “MULTICOOK” program provides the cooking temperature adjustment before the start of the program (default
temperature is 210°F (100°С)). Set the desired value by pressing the “Temperature” button.
6. You can adjust cooking time value.
7. Set time of delay if necessary.
8. Press and hold for several seconds the “Start” button to begin cooking cycle. “Start” and “Reheat/Cancel” indicators will
light up solid. Depending on the selected cooking program the countdown will start immediately or after water in the
bowl comes to the boil.
When using the “PASTA” program an audible signal will inform you of water boiling and the necessity of adding the ingredients.
The time starts to countdown after repressing “Start”.
9. To preliminarily disable the Keep Warm function, press and hold down the “Menu / Keep Warm” button (the (“Reheat/
Cancel” button indicator will go out). You may reenable this function by repressing the “Menu / Keep Warm” button.
10. An audible signal will be produced to indicate that cooking cycle is complete. Depending on selected programme or
current settings the appliance will either enter Keep Warm (“Reheat/Cancel” is lit on the display) or Standby mode “Start”
button indicator is ashing).
To interrupt cooking process at any stage, to cancel set program or the Keep Warm function press and hold down “Reheat/
Cancel” button.
“MULTICOOK” Program
This program can be used to cook any meal with your personal time and temperature settings. REDMOND SkyCooker RMCM92S-A, featuring ”MULTICOOK” program will be able to replace a big number of kitchen appliances. Now any recipe, either
from your family cookbook or Internet, can be adjusted for your multicooker.
For your convenience, the device does not switch to “Keep Warm” automatically by the end of the program if the cooking
temperature was less than 175°F (80°C). It may be manually reactivated by pressing and holding down the “Menu / Keep
Warm” button right after the program starts running. ”Reheat/Cancel” button indicator lights up.
Program’s default temperature is 210°F (100°C), default time is 15 minutes. Temperature adjustment range (use “Temperature” button to adjust) is from 95°F (35°C) to 340°F (170°C) with 34°F (1°C) intervals. Cooking time adjustment range
is from 2 minutes to 15 hours with the following intervals: less than 1 hour — 1 minute, over an hour — 5 minutes.
A big number of various dishes can be prepared with the help of “MULTICOOK”. Follow recommendations of our chefs given in
the recipe book and the table of recommended temperature settings.
“OATMEAL” Program
This program is recommended for cooking various porridges using milk. Program’s default time is 10 minutes. Manual time
adjustment is available. Time adjustment range is from 5 minutes to 1.5 hours with 1 minute intervals.
“OATMEAL” program is recommended for cooking various oat porridges using pasteurized low fat milk. To avoid boiling away,
we recommend you do the following:
• rinse grain thoroughly before cooking;
• grease the sides of the bowl with butter;
• follow proportions suggested in the recipe book. Increase or reduce amount of ingredients proportionally;
• using whole milk dilute it by half with water.
Cooking results may vary depending on the place of origin and the manufacturer of the products used.
If you did not manage to achieve the desired result, please consult the chapter “Cooking Tips” to receive necessary recom-
mendations on cooking or use the multifunctional program “MULTICOOK”. Set the temperature of 200°F (95°C). Follow the
proportions and cooking time settings given in the recipe.
“STEW/CHILI” Program
This program is recommended for stewing vegetables, meat, sh, poultry, and seafood. Program’s default time is 1 hour.
Manual time adjustment is available. Time adjustment range is from 20 minutes to 12 hours with 5 minute intervals.
“SAUTE” Program
This program is recommended for sauteing meat, vegetables, poultry, and seafood. Program’s default time is 15 minutes.
Manual time adjustment is available. Cooking time adjustment range is from 5 minutes to 1.5 hours with 1 minute intervals.
Time Delay function is not available in this program.
To prevent food from burning follow instructions given in the recipe book and stir ingredients thoroughly while sauteing.
10

SkyCooker RMC-M92S-A
ENG
“SOUP” Program
This program is recommended for cooking various broths, soups (chunky, bisque, cream soup etc.) and making fruit and
berry drinks. Program’s default time is 1 hour. Manual time adjustment is available. Cooking time adjustment range is from
20 minutes to 8 hours with 5 minute intervals.
“BOIL/STEAM” Program
This program is recommended for boiling/steaming meat, sh, vegetablesе and children meals. Program’s default time is
15 minutes. Manual time adjustment is available. Cooking time adjustment range is from 5 minutes to 2 hours with 5 minute
intervals. Use the steaming container provided to steam the foods.
1. Pour 600–1000 ml of water into the bowl. Place the steaming container in.
2. Measure the ingredients and put them into the container. Place the bowl inside the device. The bowl and the heating
element must t tightly.
3. Follow steps 3 to 10 given in “Standard operating procedure for automatic programs”.
Countdown of the program does not start until the device reaches its operating temperature (water comes to a full boil).
If you want to adjust the default settings of the program we advise consulting the table of recommended steaming time settings
for various products.
“PASTA” Program
This program is recommended for cooking pasta, sausages, eggs, etc. Program’s default time is 8 minutes. Manual time adjustment is available. Cooking time adjustment range is from 2 minutes to 20 minutes with 1 minute intervals. Cooking time of
the program covers the period of time needed to bring water to a boil and to cook the ingredients. The device produces an
audible sound upon boiling alarming you to put ingredients inside the bowl. Repress the “Start” button to begin the countdown.
Time Delay function is not available in this program.
During preparation of certain products (pasta, etc.), foam might arise. To avoid foam boiling over, we recommend you to open
the lid a few minutes after the products have been added into boiling water.
“SLOW COOK” Program
This program is recommended for making slow cooked dishes. Program’s default time is 3 hours. Manual time adjustment is
available. Cooking time adjustment range is from 30 minutes to 12 hours with 10 minute intervals.
“VACUUM” Program
This program is recommended for cooking vacuum sealed products. Program’s default time is 2 hours 30 minutes. Manual
time adjustment is available. Cooking time adjustment range is from 10 minutes to 12 hours with 5 minute intervals. Keep
Warm function is not available in this program.
“BAKE” Program
This program is recommended for baking cakes, puddings, pies, puff, and yeast pastry. Program’s default time is 1 hour.
Manual time adjustment is available. Cooking time adjustment range is from 20 minutes to 8 hours with 5 minute intervals.
The readiness of the cake may be checked with a toothpick. Insert a toothpick in and if it comes out dry, your cake is ready.
We recommend disabling the Keep Warm function when baking.
“RICE/GRAINS” Program
This program is recommended for cooking rice and other grains. Program’s default time is 35 minutes. Manual time adjustment
is available. Cooking time adjustment range is from 5 minutes to 4 hours with 5 minute intervals.
“PILAF” Program
This program is recommended for cooking different pilafs, paella or risotto. Program’s default time is 1 hour. Manual time
adjustment is available. Cooking time adjustment range is from 20 minutes to 1.5 hours with 10 minute intervals.
“YOGURT” Program
This program is recommended for making healthy and delicious homemade yogurts. Default time is 8 hours. Manual time
adjustment is available. Cooking time adjustment range is from 10 minutes to 12 hours with 10 minute intervals. Keep Warm
function is not available in this program. Adding ingredients into the bowl make sure that it is lled only to half of its size.
“PIZZA” Program
This program is recommended for making pizza. Default time is 25 minutes. Manual time adjustment is available. Cooking
time adjustment range is from 10 minutes to 1 hour with 5 minute intervals.
“BREAD” Program
This program is recommended for baking white and wheat-rye breads. The program includes complete baking cycle starting
from the process of proong the dough and up until the moment you take the freshly baked product out. Default time is
3hours. Manual time adjustment is available. Cooking time adjustment range is from 1 to 6 hours with 10 minute intervals.
Keep Warm function is not available in this program. Adding ingredients into the bowl make sure that it is lled only to half of its size.
Remember, that the baking starts one hour after the beginning of the program when the dough has proofed.
• Before using baking our, we advise you sift it, removing any impurities and adding to it some air.
• It is not recommended to use “Time Delay” function because this may affect the quality of pastry.
• Do not open the lid until the program nishes!
• In order to minimize the cooking time and to simplify the process of baking we advise using baking our mixes.
“DESSERT” Program
This program is recommended for making various desserts using fruits and berries. Default time is 1 hour. Manual time adjustment is available. Cooking time adjustment range is from 5 minutes to 4 hours with 5 minute intervals.
“QUICK COOK” Program
This program is recommended for quick cooking rice and other grains. Manual time adjustment and Time Delay function are
not available in this program.
III. ADDITIONAL FEATURES
• Proong Dough
• Making Fondue
• Making Cheese, Cottage Cheese
You may nd recipes of the dishes, indicated in the section in the cookbook or on website www.redmond.company.
• Deep sauteing
• Making khalvah
• Sterilizing tableware
• Pasteurizing liquid foods
• Baby food heating
IV. COOKING TIPS
Common Cooking Mistakes and Ways of Solving Them
This table familiarizes you with the practical tips and solutions to some common problems you may experience when using
the multicooker.
THE DISH IS UNDERCOOKED
Possible causes Solutions
The lid of the device was open or was not closed properly,
so the cooking temperature was not high enough
Cooking temperature was not observed because the bowl
and the heating element did not t tightly
Wrong ingredients or settings were chosen.
General proportions were not observed, the foods were cut
into pieces that are a bit too big.
Wrong time settings.
Chosen recipe is not appropriate for the appliance
Steaming: the amount of water in the bowl is not enough to
provide enough steam density
Sauteing
Too much vegetable oil was
added
Try to avoid opening the lid while cooking.
Close the lid until it clicks into place. Make sure that the rubber sealing ring
located on the inner side of the lid is not deformed or damaged in any way
There should not be any foreign objects between the lid and the housing of
the device, remove if any.
Always make sure that the heating element is clean and ts tightly with the
bowl before cooking
We recommend that you use recipes adapted for the device. Choose proven
recipes only.
Set the time and cooking programme, choose ingredients, proportions, and
the size of pieces according to the recipe
Use the amount of water recommended. If in doubt, check the water level
while steaming
For regular sauteing add an amount of vegetable oil just enough to cover
the bottom of the bowl.
Follow recommendations given in the recipe while deep sauteing
11

Possible causes Solutions
Sauteing Too much liquid inside the bowl
Boilng: the broth boiled away while cooking acidic foods
While proving the dough has
Baking (dough failed to
bake through)
reached the inner lid and covered the steam valve
Too much dough in the bowl
Do not close the lid of the device while sauteing unless specied in the
recipe. Defrost and let drain the ingredients before sauteing
Certain foods need to be washed or sautéed before cooking. Follow recommendations given in the recipe
Use a smaller amount of dough
Take the product out of the bowl, turn it over and place back. Bake until
ready, next time use smaller amount of dough
THE DISH IS OVERCOOKED
Wrong ingredients or time settings, the foods were
cut into pieces that are a bit too small
The dish was in the bowl on the Keep Warm function
for too long after being cooked
We recommend that you use the recipes adapted for your model.
Set the time and cooking programme, choose ingredients, proportions and the size
of the pieces according to the recipe
We recommend that you use the Keep Warm function mode moderately. If your device
enables you to switch “Keep Warm” off in advance, use it to avoid the problem
LIQUID BOILS AWAY WHILE COOKING
Milk boils away
Foods were not properly processed
(were not rinsed well, etc.).
Wrong general proportions or ingredients
he product froths
Depending on both quality and properties of the milk used, it may boil away. To avoid this, we recommend that you use only ultra-pasteurized skimmed milk. Mix the milk with some water if needed
We recommend that you use the recipes adapted for the device. Try choosing proven recipes only. Set
the time and cooking programme, choose ingredients, proportions, and the size of the pieces according to the recipe.
Whole grains, meat, sh, and seafood need to be thoroughly rinsed before cooking
T We recommend you to rinse the product thoroughly, to remove the steam valve, or to cook with the
lid open
THE DISH GETS BURNT
The bowl was not properly washed before cooking.
Non-stick coating is damaged
General amount of ingredients is smaller than recommended
Cooking time was too long
Sauteing: oil was not added; the ingredients have
not been stirred or turned over
Stewing: not enough liquid Add more liquid. Avoid opening the lid while cooking
Boiling: not enough liquid in the bowl (proportions
were not observed)
Baking: the bowl was not greased before baking
Before cooking ensure that the bowl is clean and has no coating defects
Use proven recipes adapted for the device
Reduce the cooking time or follow recommendations given in the recipe adapted for
your model
For regular sauteing add an amount of vegetable oil just enough to cover the bottom
of the bowl.
For proper sauteing stir or turn the ingredients occasionally in the bowl while cooking
Follow recommended amounts of liquids and solids while cooking
Grease the bottom and sides of the bowl with butter or vegetable oil before baking
(do not pour oil inside)
INGREDIENTS LOSE THEIR SHAPE WHEN COOKED
The ingredients have been stirred a bit too often
While sauteing foods, it is enough to stir the ingredients every 5-7 minutes
Cooking time was too long Reduce cooking time or follow recommendations given in the recipe adapted for the device
PASTRY IS DAMP
Improper ingredients were used (juicy fruit or vegetables, frozen berries, sour cream, etc.)
The baked product has been left in the multicooker
with the closed lid for too long
Use ingredients according to the recipe. Avoid using ingredients that contain excess
moisture or use them in smaller amounts
We recommend that you take the baked product out of the bowl right after the
baking cycle is over or leave it on “Keep Warm” mode for a short period of time
only
PASTRY WON’T RISE
Eggs and sugar were not whisked well
The dough sat for too long before being baked
The our wasn’t sifted or the dough was not kneaded well
Wrong ingredients
Wrong recipe
Certain REDMOND multicookers feature overheat protection in the “STEW/CHILI” and “SOUP” programmemes. In case there is
not enough liquid in the bowl, the appliance activates overheat protection, automatically interrupts the programmeme, and
switches to the Keep Warm.
Use proven recipes adapted for the device. Choose,
measure and process the ingredients according to the
recommendations given in the recipe
Table of Default Settings
Program Recommendations for use
Cooking various meals with your personal time and
MULTICOOK
temperature settings
OATMEAL Cooking porridges using milk 45 min 1 min – 4 h / 1min 24 12
STEW/CHILI Stewing meat, sh, vegetables, etc. 1 h 1 min – 12 h / 1 min 24 12
SAUTE Sauteing meat, sh, vegetables, etc. 18 min
SOUP Making various soups and broths 1 h 1 min – 8 h / 1 min 24 12
BOIL/STEAM Boiling/steaming meat, sh, vegetables, etc. 35 min 1 min – 2 h / 1 min 24 12
Cooking pasta, sausages and other semi-nished
PASTA
products
SLOW COOK Making slow cooked dishes 3 h 1 min – 12 h / 1 min 24 12
VACUUM Cooking vacuum sealed products 2 h 30 min 10 min – 12 h / 5 min 24 –
BAKE Baking cakes, puddings, pies, puff and yeast pastry 1 h 20 min – 8 h / 5 min 24 4
RICE/GRAINS
Cooking rice and other grains 20 min 1 min – 4 h / 1 min 24 12
Default
cooking Time
operating
parameters
Waiting to access to
30 min 1 min – 12 h / 1 min 24 12
1 min – 2 h /
8 min 1 min – 1 h / 1 min – –
Time range/interval
1 min
Time
– 12
Keep
Delay, h
Warm, h
12

SkyCooker RMC-M92S-A
ENG
Program Recommendations for use
PILAF Making meat, sh, poultry and seafood pilafs 1 h 1 min – 2 h / 1 min 24 12
YOGURT Making different kinds of yogurt; proong dough 8 h 5 min – 12 h / 5 min 24 –
PIZZA Making pizza 20 min 1 min – 4 h / 1 min 24 4
Baking white and wheat-rye breads including the
BREAD
proong cycle
DESSERT Making desserts using fresh fruits and berries 40 min 1 min – 8 h / 1 min 24 12
QUICK COOK Quick cooking rice and other grains – – – –
Recommended Steaming Time Settings For Various Products
(for 500 g of product with the volume of water 600 - 1000 ml)
Product Cooking time, min Product Cooking time, min
Pork/beef llet (cut into 1.5 cm cubes) 20/30 Dumplings/Khinkali
Mutton llet (cut into 1.5 cm cubes) 30 Potatoes (cut into 1.5 cm cubes)
Chicken llet (cut into 1.5 cm cubes) 15 Carrots (cut into 1.5 cm cubes)
Meatballs/cutlets 15/20 Beet (cut into 1.5 cm cubes)
Fish llet 10 Frozen vegetables
Shrimps (cooked, peeled, frozen) 5 Egg
Please note that these are only approximate guidelines. Steaming times may vary, depending on the quality of foods and your
personal preferences.
Default
cooking Time
operating
parameters
Waiting to access to
3 h 10 min – 4 h / 1 min 24 3
Time
Time range/interval
20
20
30
80
15
10
Recommended Temperatures in “MULTICOOK”
Temperature, °F (°С) Recommendations for use Temperature, °F (°С) Recommendations for use
95°F (35°C)
100°F (40°C)
110°F (45°C)
120°F (50°C)
130°F (55°C)
140°F (60°C)
150°F (65°C)
160°F (70°C)
170°F (75°C)
Proong dough, cooking vinegar
Making yogurts
Starter
Fermentation
Cooking vacuum sealed sh and seafood, making fondant
Cooking vacuum sealed chicken, making green
tea or baby food
Cooking vacuum sealed meat
Making punch
Pasteurizing, making white tea
220°F (105°C)
230°F (110°C)
240°F (115°C)
250°F (120°C)
260°F (125°C)
270°F (130°C)
275°F (135°C)
280°F (140°C)
290°F (145°C)
Making pilaf
Sterilization
Making sugar syrup
Making knuckle
Making oor sauteing for soup and sauce
dressing
Making pudding
Browning cooked foods
Smoking foods
Baking vegetables and sh in foil
Temperature, °F (°С) Recommendations for use Temperature, °F (°С) Recommendations for use
175°F (80°C)
Keep
Delay, h
Warm, h
180°F (85°C)
190°F (90°C)
200°F (95°C)
210°F (100°C)
Making mulled wine
Making cottage cheese and other dishes, requiring long cooking times
Making red tea
Making milk porridge, meat jelly
Cooking soup, meringues or jam, stewing or
boiling vegetables and meat
300°F (150°C)
310°F (155°C)
320°F (160°C)
330°F (165°C)
340°F (170°C)
Baking meat in foil
Baking pizza
Sauteing poultry
Sauteing steaks
Deep sauteing
V. CLEANING AND MAINTENANCE
General Guidelines
• Prior to rst use or in order to remove the odor after cooking steam half a lemon for 15 minutes using the “BOIL/STEAM”
programme.
• Do not leave cooking bowl with foods or liquids inside closed multicooker for over 24 hours. Store cooked foods in refrigerator and reheat when required, using Reheat function.
• If not in use for an extended period of time, unplug the appliance. Cooking chamber, heating disc, cooking bowl, inner lid
and steam valve must be dry and clean.
• Before you start cleaning the appliance, make sure that it is unplugged and has completely cooled down. Use soft cloth
and mild soap to clean.
DO NOT use a sponge or tissue with hard or abrasive surface or abrasive pastes. DO NOT use any chemically aggressive substances or any other agents which are not recommended for cleaning items that come into contact with food.
DO NOT immerse the appliance in water or wash under running water!
• Be careful when cleaning rubber parts of the multicooker, because damaged or deformed parts may lead to malfunction
of the unit.
• Clean the housing when necessary. Cooking bowl, inner lid and removable steam valve need to be cleaned after each use.
Condensate, accumulating during cooking, needs to be removed after each use. Clean the interior of the cooking chamber
when necessary.
To Clean the Housing
Use soft damp cloth or sponge to clean the housing. If necessary, use a mild soap solution and wipe the surface dry to remove
soap residue and water spots.
To Clean the Bowl
Wash the bowl by hand, using soft sponge and mild soap, or in a dishwasher (following its manufacturer’s recommendations).
If necessary ll the bowl with warm water, let soak and clean. Wipe the outer surface of the bowl dry before positioning it
back inside the multicooker. When the multicooker is used on a regular basis, inner non-stick coating of the bowl may partially or completely change color, which does not indicate a defect.
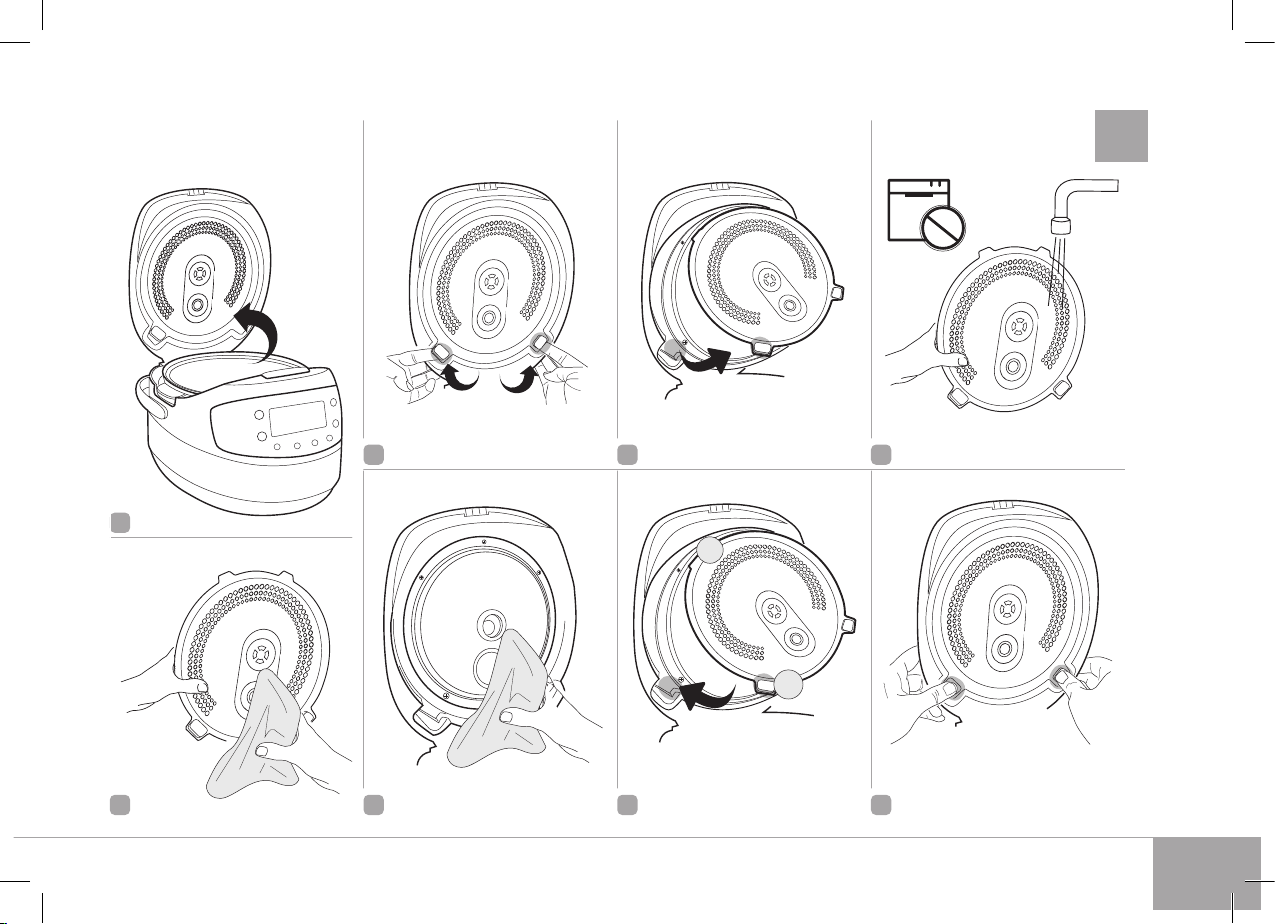
To Clean Inner lid
To see the order of removal and adjustment of the inner lid ref to the scheme
able inner lids use a damp kitchen cloth or a sponge. Before adjusting the inner lid wipe the surfaces of both lids dry.
To Clean Removable Steam Valve
Steam valve is located in the special slot on the inner surface of the lid. To see the cleaning order ref to the scheme A5 (p. 6).
CAUTION! Do not twist or stretch sealing insert to avoid its deformation.
To Remove Condensate
Condensate accumulates in the special cavity on the housing around the bowl and ows into a special container in the back
of the appliance. To clean the container rinse it under running water, following above mentioned rules. Remove the remaining
condensate using a kitchen cloth.
A4
(p. 5). To clean the main and remov-
13

To Clean Cooking Chamber
Compliance with the user manual guidelines minimizes the risk of food particles or liquids accumulating inside the cooking
chamber. However, if the inside of the chamber gets dirty, clean it to prevent improper operation or malfunction of the unit.
Before cleaning cooking chamber ensure, that the multicooker is unplugged and has completely cooled down!
Walls of the cooking chamber, surface of the heating disk, and the casing of central thermal sensor (located in the middle of the heating
disk) can be cleaned with a damp (not wet!) sponge or cloth. Remove any traces of soap or detergent if using any to prevent unwanted
odors during cooking. If there is a foreign object in the cavity around central thermal sensor, carefully remove it using tweezers, trying
to avoid pressing on the casing of the sensor. Clean heating disk with a damp medium-hard sponge or synthetic brush, if necessary.
When the multicooker is used on a regular basis, heating disk may partially or completely change color, which does not indicate
a defect and does not affect proper operation of the unit.
V I . ADDITIONAL ACCESSORIES
Additional accessories for the multicooker and information on the innovations are available through www.redmond.company
and our authorized dealers.
VII. BEFORE CONTACTING SERVICE CENTER
Problem Possible cause Solution
Unplug the device and let cool down. Check the presence
Display shows the error
code: Е1 – Е5
Appliance does not
switch on
Dish is taking too long to
cook
Hot steam escapes from
under lid during cooking
System error, device overheating, failure of control
board or heating element are possible
Power cord is not connected to the appliance and/
or socket
Wall socket is not working properly Connect to a properly working wall socket
Power supply failure
Power supply interruption (power supply is unstable/underrated)
There is a foreign object between the bowl and the
heating element (grain, food particles, debris, etc.)
The bowl is not properly positioned Properly position the bowl into place
Heating disk is dirty
The bowl is not properly
positioned
Inner lid and cooking
bowl fail to seal
hermetically
The lid is not closed properly; foreign object under
lid
Sealing ring is dirty, deformed, or damaged in any
way
of the bowl in the device and sufcient volume of the
product in it, close the lid tightly. Plug in the appliance
and restart the program. If the problem persists, contact
an authorized service center
Ensure that the power cord is connected to the corresponding inlet on the housing of the appliance and to
the socket
Check the power supply. If not available, contact local
electricity supply company
Ensure that the power supply is stable. If unstable /underrated, contact local electricity supply company
Unplug the appliance and let cool down. Remove foreign
object or objects
Unplug the appliance and let cool down. Clean heating
disk
Properly position the bowl into place
Remove foreign objects (grain, food particles, debris, etc.)
from under the rim, if any. Always close the lid until it
clicks into place
Check the sealing ring. Replace, if necessary
Problem Possible cause Solution
The attempt of synchronization or transferring
the data from the appliance to the mobile device
failed (error message will
be displayed).
The packaging, user manual and the device itself may not be treated as household waste. Instead, it shall be taken to the applicable collection point for the recycling of electrical and electronic equipment.
Bluetooth is the registered trademark of Bluetooth SIG, Inc.
App Store is the service mark of Apple Inc., registered in the USA and other countries.
Google Play is the registered trademark of Google Inc.
Bluetooth function on the mobile device is disabled
Ready for Sky app on the mobile device is deactivated
The multicooker and mobile device are far away
from each other or there are strays for the radio
signal.
Bluetooth function on the multicooker is disabled Enable Bluetooth function on the multicooker
Enable Bluetooth function on the mobile device
Run the Ready for Sky app on the mobile device
Ensure the distance between devices does not exceed
15 metres and there are no strays for transmission of
radio signal.
14

Manufacturer: GUANGDONG ENAITER ELECTRICAL APPLIANCE CO., LTD.
Address: No.5, Donghai road, Dongfeng Town, Zhongshan city, Guangdong, 528425, China.
© REDMOND. All rights reserved. 2019.
Reproduction, transfer, distribution, translation or other reworking of this document or any part thereof
without prior written permission of the legal owner is prohibited.

 Loading...