

Page 1

POWXG7540 EN
1 APPLIANCE ..................................................................................... 3
2 DESCRIPTION ................................................................................. 3
3 PACKAGE CONTENT LIST ............................................................. 3
4 SYMBOLS ........................................................................................ 3
5 SAFE OPERATION PRACTICES .................................................... 4
5.1 Training.................................................................................................................... 4
5.2 Preparation .............................................................................................................. 4
5.3 Operation ................................................................................................................. 5
5.4 Maintenance and storage ....................................................................................... 5
6 PETROL SAFETY WARNINGS ....................................................... 6
7 UNPACKING AND ASSEMBLY ...................................................... 6
7.1 Unpack ..................................................................................................................... 6
7.2 Assembly ................................................................................................................. 6
7.2.1 Install the bottom handlebar ...................................................................................... 6
7.2.2 Install the top handlebar ............................................................................................ 6
7.2.3 Mount the grass bag ................................................................................................. 6
8 OPERATION ..................................................................................... 6
8.1 Pre-Start Inspection ................................................................................................ 6
8.2 Start the Engine ...................................................................................................... 7
8.3 Stop the Engine ....................................................................................................... 7
8.4 Adjustment .............................................................................................................. 7
8.4.1 Working depth ........................................................................................................... 7
8.4.2 Working without grass bag ........................................................................................ 8
8.5 Tips for proper working .......................................................................................... 8
9 CLEANING AND MAINTENANCE ................................................... 8
9.1 Scarifier Maintenance ............................................................................................. 8
9.2 Engine Maintenance ............................................................................................... 8
9.2.1 Spark Plug ................................................................................................ ................ 8
9.2.2 Engine Oil Replacement............................................................................................ 8
9.2.3 Air Filter .................................................................................................................... 9
Copyright © 2014 VARO P a g e | 1 www.varo.com
Page 2

POWXG7540 EN
9.2.4 Fuel Tank Filter ......................................................................................................... 9
9.3 Long Term Storage ................................................................................................. 9
10 TECHNICAL DATA .......................................................................... 9
11 NOISE ............................................................................................... 9
12 SERVICE DEPARTMENT .............................................................. 10
13 WARRANTY ................................................................................... 10
14 ENVIRONMENT ............................................................................. 10
15 DECLARATION OF CONFORMITY .............................................. 11
Copyright © 2014 VARO P a g e | 2 www.varo.com
Page 3

POWXG7540 EN
Warning / Danger
Caution! Always wear
earmuffs!
PETROL ENGINE SCARIFIER
POWXG7540
1 APPLIANCE
The equipment is designed for scarifying lawned areas. The scarifying process is designed for
ripping moss and weeds - complete with their roots - out of the soil and for loosening the soil.
As a result your lawn can absorb nutrients better and is cleaned. We recommend you to
scarify your lawn in the spring (April) and autumn (October).
WARNING! For your own safety, read this manual and the general safety
instructions carefully before using the appliance. Your power tool should
only be given to other users together with these instructions.
2 DESCRIPTION
1. Brake Lever
2. Handlebar
3. Air Filter
4. Muffler
5. Fuel Tank
6. Belt Guard
3 PACKAGE CONTENT LIST
Remove all packaging materials.
Remove remaining packaging and packing inserts (if included).
Check that the package contents are complete.
Check the appliance, the power cord, the power plug and all accessories for transportation
damage.
Keep the packaging materials as far as possible until the end of the warranty period. Then
take it to your local waste disposal system.
7. Oil Cap
8. Grass Bag
9. Wheel
10. Starter Rope
11. Depth Adjusting Handle
1 Petrol engine scarifier
1 set grasopvangzak
1 spark Plug Spanner
1 wrench 10-13
1 manual
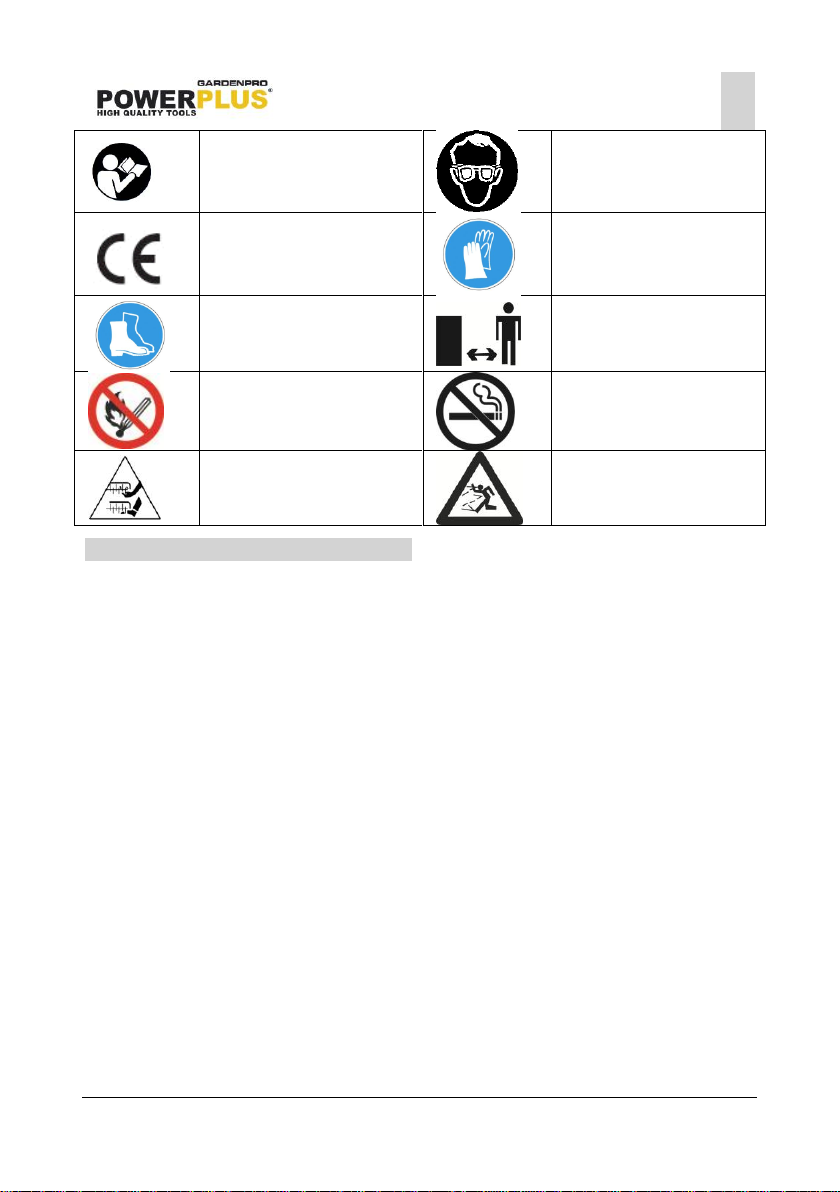
4 SYMBOLS
The following symbols are used in this manual and/or on the machine:
Copyright © 2014 VARO P a g e | 3 www.varo.com
WARNING Packaging materials are not toys! Children must not play with
plastic bags! There is a danger of suffocation!
If any parts are missing or damaged, please contact your dealer.
Page 4
POWXG7540 EN
Read the manual carefully
before use.
Caution! Always wear eye
protection!
In accordance with essential
applicable safety standards
of European directives
Use protective gloves
Wear sturdy, non-slip
footwear
Keep bystanders away
No naked flame
No smoking
Sharp tines — Beware of
cutting fingers or toes
Warning! Flying objects
5 SAFE OPERATION PRACTICES
5.1 Training
Read the instructions carefully. Be familiar with the controls and the proper use of the
machine.
5.2 Preparation
Never allow people unfamiliar with these instructions or children to use the machine. Local
regulations can restrict the age of the operator;
Never operate the machine while people, especially children, or pets are nearby;
Keep in mind that the operator or user is responsible for accidents or hazards occurring to
other people or their property;
Wear ear protection and safety glasses at all times while operating the machine;
While operating the machine. Always wear substantial footwear and long trousers. Do not
operate the machine when barefoot or wearing open sandals;
Thoroughly inspect the area where the machine is to be used and remove all stones,
sticks, wires, bones and other foreign objects;
WARNING — Petrol is highly flammable;
Store fuel in containers specifically designed for this purpose;
Refuel outdoors only and do not smoke while refuelling;
Add fuel before starting the engine. Never remove the cap of the fuel tank or add petrol
while the engine is running or when the engine is hot;
If petrol is spilled, do not attempt to start the engine but move the machine away from the
area of spillage and avoid creating any source of ignition until petrol vapours have
dissipated;
Replace all fuel tanks and container caps securely;
Replace faulty silencers;
Before using, always visually inspect to see that the tines, bolts are not worn or damaged.
Replace worn or damaged tines and bolts in sets to preserve balance;
Copyright © 2014 VARO P a g e | 4 www.varo.com
Page 5

POWXG7540 EN
For rear discharge appliances with exposed rear rollers, when used without a catcher, full
eye protection shall be worn.
5.3 Operation
Do not operate the engine in a confined space where dangerous carbon monoxide fumes
can collect;
Operate the machine only in daylight or in good artificial light;
Avoid operating the machine in wet grass or take additional precautions to avoid slipping;
Always be sure of your footing on slopes;
Walk, never run;
Always work across the face of slopes, never up and down;
Exercise extreme caution when changing direction on slopes;
Do not operate the machine on steep slopes;
Use extreme caution when reversing or pulling the machine towards you;
Stop the tines if the machine has to be tilted for transportation. Do not operate the tines
when crossing surfaces other than grass, and when transporting the machine to and from
the working area;
Never operate the machine with defective guards, or without safety devices, for example
deflectors and/or catchers, in place;
Do not change the engine governor settings or over-speed the engine;
Disengage all tine and drive clutches before starting the engine;
Start the engine or switch on the motor carefully according to instructions and with feet
well away from the tine(s);
Do not tilt the machine when starting the engine or switching on the motor, except if the
machine has to be tilted for starting. In this case, do not tilt it more than absolutely
necessary and lift only the part which is away from the operator;
Do not start the engine when standing in front of the discharge chute;
Do not put hands or feet near or under rotating parts. Keep clear of the discharge opening
at all times;
Never pick up or carry a machine while the engine is running;
Stop the engine, disconnect the spark plug wire and for battery start machines remove the
ignition key:
Before clearing blockages or unclogging chute;
Before checking, cleaning or working on the machine;
After striking a foreign object. Inspect the machine for damage and make repairs before
restarting and operating the machine;
If the machine starts to vibrate abnormally (check immediately);
Stop the engine, disconnect the spark plug wire and for battery start machines remove the
ignition key:
Whenever you leave the machine;
Before refuelling;
Reduce the throttle setting during engine shut down and, if the engine is provided with a
shut-off valve, turn the fuel off at the conclusion of aerating or scarifying.
5.4 Maintenance and storage
Keep all nuts, bolts and screws tight to be sure the machine is in a safe working condition;
Never store the machine with petrol in the tank inside a building where fumes can reach
an open flame or spark;
Allow the engine to cool before storing in any enclosure;
To reduce the fire hazard, keep the engine, silencer, battery compartment and petrol
storage area free of grass, thatch, moss, leaves or excessive grease;
Check the catcher frequently for wear or deterioration;
Copyright © 2014 VARO P a g e | 5 www.varo.com
Page 6

POWXG7540 EN
Examine the machine regularly and replace worn or damaged parts for safety;
If the fuel tank has to be drained, this should be done outdoors. The drained fuel should
be stored in a container specifically designed for fuel storage or it should be disposed of
carefully.
6 PETROL SAFETY WARNINGS
WARNING: Use extra care when handling fuels. They are inflammable and
the vapours are potentially explosive. The following points must be
observed.
Use only an approved container.
Never remove the fuel cap or add fuel when the engine is running. Allow engine exhaust
components to cool before refuelling.
Do not smoke.
Never refuel the machine indoors.
Never store the machine or fuel containers in places where there is a naked flame, such
as a water heater.
If fuel is spilt, do not attempt to start the power source before moving the machine away
from the spillage area.
Always replace and securely tighten the fuel cap after refuelling.
Whenever the tank is drained, this should be done outdoors.
7 UNPACKING AND ASSEMBLY
7.1 Unpack
Carefully lift the machine out of the box, remove any packing material.
7.2 Assembly
7.2.1 Install the bottom handlebar
Fit the bottom handlebar using the accompanying bolts. (Fig. 1)
7.2.2 Install the top handlebar
Fit the top handlebar, unfold the handlebar and secure it in the required position with the
knobs. (Fig. 2)
7.2.3 Mount the grass bag
Raise the ejection guard and slide the grassbag frame lugs into the locating slots each side of
the axle frame. (Fig. 3)
Always stop the engine and wait for the rollers to stop before removing and
replacing the grassbag.
8 OPERATION
8.1 Pre-Start Inspection
Make sure all safety guards are in place and all nuts and bolts are secure.
Check oil level in engine crankcase.
Copyright © 2014 VARO P a g e | 6 www.varo.com
Page 7

Important! Engine is shipped from the factory without oil. You must add
POWXG7540 EN
engine oil before starting engine.
Inspect air filter for cleanliness.
Check the fuel supply. Do not fill gas tank completely full, allow space for fuel to expand.
Be sure spark plug wire is attached and spark plug is tightened securely.
Check depth regulator lever position.
Examine underneath and around engine for signs of oil or fuel leaks.
Inspect fuel hoses for tightness and fuel seepage.
Look for signs of engine damage.
Remove excessive debris from muffler area and recoil starter.
8.2 Start the Engine
In order to avoid any unintentional start-ups of the engine, it comes equipped with an engine
brake which must be pressed at all times whilst the device is in use, otherwise the engine will
stop.
Important! When the engine brake lever is released it must return to its
initial position and the engine must stop. If this is not the case, do not use
the equipment again.
Set the fuel switch to position “ON”.
For cold start, Set the choke lever to position “ON”.
Move the throttle lever to middle position.
Press the brake lever (Fig. 4), and pull the recoil starter rope forcefully until the engine
starts.
Switch off “CHOKE“.
Give full throttle.
Important: Always pull the starter rope slowly until you feel the initial
resistance then pull it quickly to start the engine. Do not allow the starter
rope to whip back of its own accord.
Important: The scarifier roller begins to rotate as soon as the engine is
started.
Important: Never open the ejection guard when the motor is running. A
rotating cutting unit can cause injuries.
8.3 Stop the Engine
Release the brake lever, the engine will be stopped.
Set the fuel switch to position “OFF”.
8.4 Adjustment
8.4.1 Working depth
To set the working depth, push the depth adjusting handle gently away from the device, set
the required depth and then lock the lever back into position. (Fig. 5)
Important! For transport move the depth adjusting handle to the highest position. (Fig. 6)
Copyright © 2014 VARO P a g e | 7 www.varo.com
Page 8

POWXG7540 EN
8.4.2 Working without grass bag
If using the scarifier withtout bag:
Pull the fixing pole and lift the ejection gurad, then release the fixing pole. (Fig. 7)
The ejection guard will flip back and open an angle. (Fig. 8)
8.5 Tips for proper working
It is recommended that you overlap scarifying paths a little. Try to scarify in straight lines for a
nice, clean look. Insodoing, the aeration swaths should always overlap each other by a few
centimeters in order to avoid bare strips.
As soon as grass clippings start to trail the scarifier, it is time to empty the grass basket.
Important! Before taking off the grass basket, switch off the motor and wait until the roller has
come to a stop.
To remove the grass basket, lift up the ejector flap with one hand, while unhooking the basket
with the other.
How frequently you should scarify your lawn is determined primarily by the speed at which the
grass grows and the hardness of the soil.
Keep the underside of the equipment clean and remove soil and grass build-up. Deposits
make it more difficult to start the aerator and decrease the quality of the scarifying.
Always scarify along inclines (not up and down).
Switch off the motor before doing any checks on the roller.
Important! The roller rotates for a few seconds after the motor is switched off. Never attempt to
stop the roller.
In the event that the rotating roller strikes an object, immediately switch off the equipment and
wait for the roller to come to a complete stop. Then inspect the condition of the roller. Replace
any parts that are damaged.
9 CLEANING AND MAINTENANCE
9.1 Scarifier Maintenance
The scarifier should be cleaned thoroughly every time after it has been used. This particularly
applies to its underside and the blades. To do so tip the scarifier slightly on to its side and
remove the dirt.
Important! Before you tip the equipment, the petrol tank must be emptied to
prevent petrol leaking out. Ideally you should use a conventional petrol
extraction pump for this purpose.
9.2 Engine Maintenance
Please follow engine manual to maintain the engine.
9.2.1 Spark Plug
After every 50 hours of running the spark plug should be removed. Check the color of the
deposits on the end of the spark plug it should be a “Tan” color. Remove all deposits using a
stiff brush a brass wire brush is ideal. Check the spark plug gap and adjust if required. The
correct gap should be 0.7 to 0.8mm.
9.2.2 Engine Oil Replacement
We recommend that the oil be changed after the first 40 hours of use, then once every
100 hours.
Place the machine on a level surface and warm up the engine for several minutes. Then
stop the engine.
Copyright © 2014 VARO P a g e | 8 www.varo.com
Page 9

POWXG7540 EN
POWXG7540
Engine displacement
118cc
Weight
34.5 kg
Idling speed
3600 min-1
Working Width
400 mm
Working Depth
-15 / -10 / -5 / 0 / 4 / 8 / 12 mm
Volume collection bag
60 l
Motor Power
2,37 kW
Oil Tank Capacity
600 ml
Fuel tank capacity
2000 ml
Acoustic pressure level LpA
86 dB(A)
Acoustic power level LwA
104 dB(A)
Remove the oil filler cap.
Place an oil pan under the engine.
Remove the oil drain plug so that the oil can be completely drained. You will need to use a
tube or other similar device to prevent the oil leaking onto the machine.
Check the oil drain plug, gasket, oil filler cap and O-ring and if damaged replace.
Reinstall the oil drain plug and gasket, tighten the oil drain plug securely..
Add engine oil up to at least half of the dipstick.
Reinstall the oil filler cap securely.
Please dispose of used oil in a manner that is compatible with the environment. We suggest
you take used oil in a sealed container to your local recycling centre. Do not throw it in a trash
or pour it on the ground or down a drain.
9.2.3 Air Filter
After every 100 hours of running or every month, the air filter should be removed, examined
for deterioration and cleaned. Clean the air filter thoroughly using environmentally friendly
water based degreasing agent. Allow to dry fully then replace the air filter. Warning! Never run
the engine without the air filter fitted.
9.2.4 Fuel Tank Filter
After every 150 hours of running or every three months the fuel tank filter should be removed
and cleaned. Remove the fuel tank filler cap and the filter, clean the filter thoroughly using
environmentally friendly water based degreasing agent and refit.
9.3 Long Term Storage
If your cultivator will not be used for more than one month, prepare it for long term storage.
Drain the gasoline in the fuel tank and carburettor.
Check oil. Remove the spark plug, add a little oil into the cylinder, fit spark plug, rotate the
crankshaft and let oil be well-distributed in the inside surface of the cylinder.
Pull the starter rope slowly until you feel resistance, tie a knot to fix the rope, then close
the air valve to keep out the dust and other pollutants.
Remove all debris from cultivator tines and engine.
Store cultivator in a clean and dry place.
10 TECHNICAL DATA
11 NOISE
Noise emission values measured according to relevant standard. (K=3)
Copyright © 2014 VARO P a g e | 9 www.varo.com
Page 10

ATTENTION! Wear hearing protection when sound pressure is over 85
aw (Vibration):
8.5 m/s²
K = 3 m/s²
dB(A).
12 SERVICE DEPARTMENT
POWXG7540 EN
Damaged switches must be replaced by our after-sales service department. If the connecting
cable (or mains plug) is damaged, it must be replaced by a special connecting cable which is
available from our service department. Replacement of the connecting cable should only be
carried out by our service department or by a qualified specialist (qualified electrician).
13 WARRANTY
This product is warranted for a 36-month period effective from the date of purchase by the
first user.
This warranty covers all material or production flaws excluding: batteries, chargers,
defective parts subject to normal wear & tear such as bearings, brushes, cables, and
plugs, or accessories such as drills, drill bits, saw blades, etc. ; damage or defects
resulting from maltreatment, accidents or alterations; nor the cost of transportation.
Damage and/or defects resulting from inappropriate use also do not fall under the
warranty provisions.
We also disclaim all liability for any bodily injury resulting from inappropriate use of the
tool.
Repairs may only be carried out by an authorised customer service centre for Powerplus
tools.
You can always obtain more information at the number 00 32 3 292 92 90.
Any transportation costs shall always be borne by the customer, unless agreed otherwise
in writing.
At the same time, no claim can be made on the warranty if the damage of the device is the
result of negligent maintenance or overload.
Definitely excluded from the warranty is damage resulting from fluid permeation, excessive
dust penetration, intentional damage (on purpose or by gross carelessness), inappropriate
usage (use for purposes for which the device is not suitable), incompetent usage (e.g. not
following the instructions given in the manual), inexpert assembly, lightning strike,
erroneus net voltage. This list is not exhaustive.
Acceptance of claims under warranty can never lead to the prolongation of the warranty
period nor commencement of a new warranty period in case of a device replacement.
Devices or parts which are replaced under the warranty therefore remain the property of
Varo NV.
We reserve the right to reject a claim whenever the purchase cannot be verified or when it
is clear that the product has not been properly maintained. (Clean ventilation slots, carbon
brushes serviced regularly, etc.).
Your purchase receipt must be kept as proof of date of purchase.
Your appliance must be returned undismantled to your dealer in an acceptably clean state,
(in its original blow-moulded case if applicable to the unit), accompanied by proof of
purchase.
14 ENVIRONMENT
Should your appliance need replacement after extended use, do not dispose of it with the
household refuse, but in an environmentally safe way.
Please dispose of used motor oil in a manner that protects the environment. We suggest you
take it in a sealed container to your local service station for recycling. Do not throw it into the
refuse or pour it on the ground.
Copyright © 2014 VARO P a g e | 10 www.varo.com
Page 11

POWXG7540 EN
15 DECLARATION OF CONFORMITY
VARO N.V. - Joseph Van Instraat 9 - BE2500 Lier - BELGIUM, declares that,
Product: PETROL ENGINE SCARIFIER
trade mark: POWERplus
model: POWXG7540
is in conformity with the essential requirements and other relevant provisions of the applicable
European Directives, based on the application of European harmonized standards. Any
unauthorized modification of the apparatus voids this declaration.
European Directives (including, if applicable, their amendments up to the date of signature);
2004/108/EC
2006/42/EC
2000/14/EC Annex V LwA 100dB(A) / 104dB(A)
97/68/EG Engine Class SN3
EDP 125h
Testing Authority NSAI / Dublin
European harmonized standards (including, if applicable, their amendments up to the date of
signature);
EN13684: 2004-A3
EN ISO 14982: 2009
Keeper of the Technical Documentation : Philippe Vankerkhove, VARO – Vic. Van Rompuy
N.V.
The undersigned acts on behalf of the company CEO,
Philippe Vankerkhove
Regulatory Affairs – Compliance Manager
Date: 13/09/2013
Copyright © 2014 VARO P a g e | 11 www.varo.com
 Loading...