

Page 1

POW5535 EN
1 DESCRIPTION (FIG A) .................................................................... 3
2 PACKAGE CONTENT LIST ............................................................. 3
3 SYMBOLS ........................................................................................ 4
4 GENERAL POWER TOOL SAFETY WARNINGS .......................... 4
4.1 Work area ................................................................................................................ 4
4.2 Electrical safety ....................................................................................................... 4
4.3 Personal safety ....................................................................................................... 4
4.4 Power tool use and care ......................................................................................... 5
4.5 Service ..................................................................................................................... 5
5 PRECAUTIONS ................................................................................ 5
5.1 Safety instructions for working with copressed air and blasting guns ............... 5
5.2 Safety information for paint spraying .................................................................... 6
5.3 Operating pressure vessels ................................................................................... 6
6 POINTS TO NOTE WHEN SETTING UP THE COMPRESSOR ..... 6
7 ASSEMBLY AND STARTING .......................................................... 7
7.1 Fitting the wheels (3) .............................................................................................. 7
7.2 Fitting the supporting foot (4) ................................................................................ 7
7.3 Voltage ..................................................................................................................... 7
7.4 On/Off switch (8) ..................................................................................................... 7
7.5 Adjusting the pressure: (Fig. 1).............................................................................. 7
7.6 Setting the pressure switch.................................................................................... 7
8 CLEANING AND MAINTENANCE ................................................... 7
8.1 Cleaning................................................................................................................... 7
8.2 Condensation water ................................................................................................ 8
8.3 Safety valve (10) ...................................................................................................... 8
8.4 Storage .................................................................................................................... 8
9 PAINT SPRAY GUN GB .................................................................. 8
9.1 Using the spray gun ................................................................................................ 8
9.2 Tips for using the paint spray gun ......................................................................... 9
9.3 Maintenance ............................................................................................................ 9
Copyright © 2011 VARO Page | 1 www.varo.com
Page 2

POW5535 EN
10 INFLATION GUN .............................................................................. 9
10.1 Use of the inflation gun .......................................................................................... 9
10.2 Maintenance .......................................................................................................... 10
11 AIR BLOW GUN GB ...................................................................... 10
11.1 Using the air blow gun .......................................................................................... 10
11.2 Tips for using the air blow gun ............................................................................ 10
11.3 Maintenance .......................................................................................................... 10
12 TECHNICAL DATA ........................................................................ 10
13 POSSIBLE FAULTS AND RELATED PERMITTED REMEDIES .. 11
14 WARRANTY ................................................................................... 11
15 ENVIRONMENT ............................................................................. 12
16 DECLARATION OF CONFORMITY .............................................. 13
Copyright © 2011 VARO Page | 2 www.varo.com
Page 3

POW5535 EN
OILLESS COMPRESSOR + 7PCS KIT
POW5535
WARNING! Read this manual and general safety instructions carefully
before using the appliance, for your own safety. Your power tool should
only be passed on together with these instructions.
1 DESCRIPTION (FIG A)
1. Housing cover
2. Pressure vessel
3. Wheel
4. Supporting foot
5. Quick-lock coupling (regulated
compressed air)
6. Pressure gauge (for reading the
preset tank pressure)
2 PACKAGE CONTENT LIST
§ Remove all packing materials
§ Remove remaining packaging and transit supports (if existing)
§ Check the completeness of the packing content
§ Check the appliance, the power cord, the power plug and all accessories for transportation
damages.
§ Keep the packaging materials as far as possible till the end of the warranty period.
Dispose it into your local waste disposal system afterwards.
WARNING Packing materials are no toys! Children must not play with
plastic bags! Danger of suffocation!
7. Pressure regulator
8. ON/OFF switch
9. Transportation handle
10. Safety valve
11. Drainage screw for condensation
water
Compressors
Paint spray gun
Rubber hose (5 m)
Inflation gun
Air nozzle
3 Inflation adapters
Manual
When parts are missing or damaged, please contact your dealer.
Copyright © 2011 VARO Page | 3 www.varo.com
Page 4
POW5535 EN
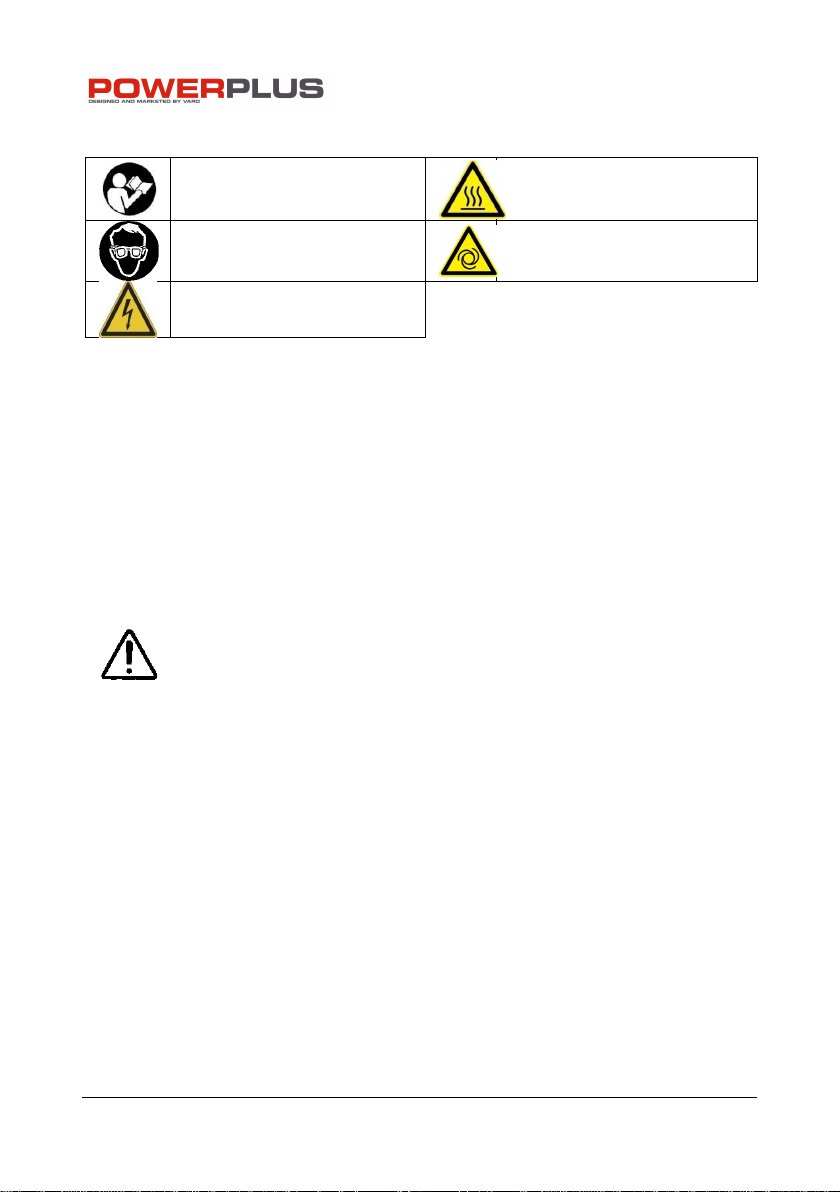
3 SYMBOLS
In this manual and/or on the machine the following symbols are used:
Before use, read the handbook
carefully
Warning, hot surfaces
Obligatory eye protection
Dangerous voltage
Danger - automatic control
(closed loop)
4 GENERAL POWER TOOL SAFETY WARNINGS
Read all safety warnings and all instructions. Failure to follow all warnings and instructions
may result in electric shock, fire and/or serious injury. Save all warnings and instructions for
future reference. The term "power tool" in the warnings refers to your mains operated (corded)
power tool or battery operated (cordless) power tool.
4.1 Work area
§ Keep work area clean and well lit. Cluttered and dark areas invite accidents.
§ Do not operate power tools in explosive atmospheres, such as in the presence of
flammable liquids, gases or dust. Power tools create sparks which may ignite the dust or
fumes.
§ Keep children and bystanders away while operating a power tool. Distractions can cause
you to lose control.
4.2 Electrical safety
Always check that the power supply corresponds to the voltage on the
rating plate.
§ Power tool plugs must match the outlet. Never modify the plug in any way. Do not use
any adapter plugs with earthed (grounded) power tools. Unmodified plugs and matching
outlets will reduce risk of electric shock.
§ Avoid body contact with earthed or grounded surfaces such as pipes, radiators, ranges
and refrigerators. There is an increased risk of electric shock if your body is earthed or
grounded.
§ Do not expose power tools to rain or wet conditions. Water entering a power tool will
increase the risk of electric shock.
§ Do not abuse the cord. Never use the cord for carrying, pulling or unplugging the power
tool. Keep cord away from heat, oil, sharp edges or moving parts. Damaged or entangled
cords increase the risk of electric shock.
§ When operating a power tool outdoors, use an extension cord suitable for outdoor use.
Use of a cord suitable for outdoor use reduces the risk of electric shock.
§ If operating a power tool in a damp location is unavoidable, use a residual current device
(RCD) protected supply. Use of an RCD reduces the risk of electric shock.
4.3 Personal safety
§ Stay alert, watch what you are doing and use common sense when operating a power
tool. Do not use a power tool while you are tired or under the influence of drugs, alcohol or
medication. A moment of inattention while operating power tools may result in serious
personal injury.
Copyright © 2011 VARO Page | 4 www.varo.com
Page 5

POW5535 EN
§ Use safety equipment. Always wear eye protection. Safety equipment such as dust mask,
non-skid safety shoes, hard hat, or hearing protection used whenever conditions require
will reduce personal injuries.
§ Avoid accidental starting. Ensure the switch is in the off position before plugging in.
Carrying power tools with your finger on the switch or plugging in power tools that have
the switch on invites accidents.
§ Remove any adjusting key or wrench before turning the power tool on. A wrench or a key
left attached to a rotating part of the power tool may result in personal injury.
§ Do not overreach. Keep proper footing and balance at all times. This enables better
control of the power tool in unexpected situations.
§ Dress properly. Do not wear loose clothing or jewellery. Keep your hair, clothing and
gloves away from moving parts. Loose clothes, jewellery or long hair can be caught in
moving parts.
§ If devices are provided for the connection of dust extraction and collection facilities,
ensure these are connected and properly used. Use of these devices can reduce dust
related hazards.
4.4 Power tool use and care
§ Do not force the power tool. Use the correct power tool for your application. The correct
power tool will do the job better and safer at the rate for which it was designed.
§ Do not use the power tool if the switch does not turn it on and off. Any power tool that
cannot be controlled with the switch is dangerous and must be repaired.
§ Disconnect the plug from the power source before making any adjustments, changing
accessories, or storing power tools. Such preventive safety measures reduce the risk of
starting the power tool accidentally.
§ Store idle power tools out of the reach of children and do not allow persons unfamiliar with
the power tool or these instructions to operate the power tool. Power tools are dangerous
in the hands of untrained users.
§ Maintain power tools. Check for misalignment or sticking of moving parts, breakage of
parts and any other condition that may affect the power tool’s operation. If damaged, have
the power tool repaired before use. Many accidents are caused by poorly maintained
power tools.
§ Keep cutting tools sharp and clean. Properly maintained cutting tools with sharp cutting
edges are less likely to stick and are easier to control.
§ Use the power tool, accessories and tool bits etc., in accordance with these instructions
and in the manner intended for the particular type of power tool, taking into account the
working conditions and the work to be performed. Use of the power tool for operations
different from intended could lead to a hazardous situation.
4.5 Service
§ Have your power tool serviced by a qualified repair person using only identical
replacement parts. This will ensure that the safety of the power tool is maintained.
5 PRECAUTIONS
5.1 Safety instructions for working with copressed air and blasting guns
§ Compressors and lines reach high temperatures during operation. Avoid contact! Risk of
burns!
§ Gases or vapours drawn in by the compressor have to be kept free of constituents that
may cause fire or explosions inside the compressor.
§ When you disconnect the hose coupling, hold the coupling element in your hand to
prevent injury from the whiplashing hose.
§ Wear goggles when working with the blow-out gun. Injuries may easily result from foreign
bodies and blasted parts.
Copyright © 2011 VARO Page | 5 www.varo.com
Page 6

POW5535 EN
§ Never point the blow-out gun at other persons and never use it to clean clothes that are
still being worn.
5.2 Safety information for paint spraying
§ Never process paints or solvents with a flash point below 55°C.
§ Never heat paints or solvents.
§ It is imperative to use filtering equipment (face masks) when processing harmful liquids.
Note also the information concerning safety precautions published by the manufacturers of
these liquids.
§ Smoking is prohibited during the spraying operation and in the work room. Paint vapours
are highly flammable.
§ Make sure there are no open fires or open lights in the work room. Sparking machines are
not to be used.
§ Do not keep or consume food and drink in the work room. Paint vapours are harmful.
§ The details and designations of the Ordinance on Hazardous Substances, which are
displayed on the outer packaging of the processed material, must be observed. Additional
protective measures are to be undertaken if necessary, particularly the wearing of suitable
clothing and masks.
§ The work room has to be bigger than 30 m3 and have sufficient ventilation for spraying
and drying. Never spray into the wind. It is always imperative to observe the regulations of
your local police authorities when spraying combustible or hazardous substances.
§ Never process media such as white petroleum spirit, butyl alcohol and methylene chloride
with the PVC pressure hose (reduced life span).
5.3 Operating pressure vessels
§ An operator of a pressure vessel is required to keep the pressure vessel in good working
order, to operate it properly, to supervise its use, to carry out essential maintenance and
repair work immediately, and to introduce essential safety measures according to
requirements.
§ The supervisory authorities may order essential safeguards from case to case.
§ A pressure vessel may not be operated if it has any defects which constitute a danger to
employees or third parties.
§ The pressure vessel must be regularly inspected for damage, e.g. rust. If you discover any
damage, then please contact the customer service workshop.
6 POINTS TO NOTE WHEN SETTING UP THE COMPRESSOR
§ Examine the machine for signs of transit damage. Report any damage immediately to the
company which delivered the compressor.
§ The compressor should be set up near the working consumer.
§ Avoid long air lines and long supply lines (extensions).
§ Make sure the intake air is dry and dust-free.
§ Do not set up the compressor in damp or wet rooms.
§ The compressor may only be used in suitable rooms (with good ventilation and an ambient
temperature from +5°C to +40°C). There must be no dust, acids, vapors, explosive gases
or inflammable gases in the room.
§ The compressor is designed to be used in dry rooms. It is prohibited to use the
compressor in areas where work is conducted with sprayed water.
Copyright © 2011 VARO Page | 6 www.varo.com
Page 7

POW5535 EN
7 ASSEMBLY AND STARTING
Important! You must fully assemble the appliance before using it for the
first time.
7.1 Fitting the wheels (3)
Fit the supplied wheels as shown in Fig. 3.
7.2 Fitting the supporting foot (4)
Fit the supplied rubber stopper as shown in Fig. 4.
7.3 Voltage
The compressor is equipped with a mains cable with shock-proof plug. This can be connected
to any 230V ~ 50Hz shock-proof socket which is protected by a 16 A fuse. Before you use the
machine, make sure that the mains voltage complies with the specifications on the rating plate.
Long supply cables, extensions, cable reels etc. cause a drop in voltage and can impede
motor start-up. In the case of low temperatures below +5°C, motor start-up is jeopardized as a
result of stiffness.
7.4 On/Off switch (8)
To switch on the equipment set the On/Off switch (8) to position 1.
Move the On/Off switch (8) to position 0 to switch off the equipment.
7.5 Adjusting the pressure: (Fig. 1)
You can adjust the pressure on the pressure gauge (6) using the pressure regulator (7).
The set pressure can be taken from the quicklock coupling (5).
7.6 Setting the pressure switch
The pressure switch is set at the factory.
Switch-on pressure 6 bar
Switch-off pressure 8 bar
8 CLEANING AND MAINTENANCE
Important! Pull the power plug before doing any cleaning and maintenance
work on the appliance.
Important! Wait until the compressor has completely cooled down. Risk of
burns!
Important! Always depressurize the tank before carrying out any cleaning
and maintenance work.
8.1 Cleaning
§ Keep the safety devices free of dirt and dust as far as possible. Wipe the equipment with a
clean cloth or blow it with compressed air at low pressure.
§ We recommend that you clean the appliance immediately after you use it.
§ Clean the appliance regularly with a damp cloth and some soft soap. Do not use cleaning
agents or solvents; these may be aggressive to the plastic parts in the appliance. Ensure
that no water can get into the interior of the appliance.
§ You must disconnect the hose and any spraying tools from the compressor before
cleaning. Do not clean the compressor with water, solvents or the like.
Copyright © 2011 VARO Page | 7 www.varo.com
Page 8

POW5535 EN
8.2 Condensation water
The condensation water must be drained off each day by opening the drain valve (11) (on the
floor of the pressure vessel).
Important! The condensation water from the pressure vessel will contain
residual oil. Dispose of the condensation water in an environmentally
compatible manner at the appropriate collection point.
8.3 Safety valve (10)
The safety valve has been set for the highest permitted pressure of the pressure vessel. It is
prohibited to adjust the safety valve or remove its seal. Actuate the safety valve from time to
time to ensure that it works when required. Pull the ring with sufficient force until you can hear
the compressed air being released. Then release the ring again.
8.4 Storage
I mportant! Pull the mains plug out of the socket and ventilate the appliance
and all connected pneumatic tools. Switch off the compressor and make
sure that it is secured in such a way that it cannot be started up again by
any unauthorized person.
Important! Store the compressor only in a dry location which is not
accessible to unauthorized persons. Always store upright, never tilted!
9 PAINT SPRAY GUN GB
For spraying of paint, stain and lacquers
PRESSURE LEVEL: 3
Always wear a protective mask, goggles and protective gloves when spray
painting. Spray paint only in a well-ventilated area. The accessory must
always be used in accordance with the Manufacturer’s instructions and
safety regulations.
Some paints and other materials are combustible when sprayed and should
not therefore be sprayed close to flames or any heat source or any areas
where sparks may occur. If in doubt about the safe use of materials, please
consult the Manufacturer before use
9.1 Using the spray gun
§ Connect the paint spray gun to the compressor as explained in chapter 2 “CONNECTING
THE ACCESSORIES TO YOUR AIR COMPRESSOR”
§ Adjust working pressure to the value indicated for this accessory
§ Position the paint cup A and screw it into the so cket B (fig. 1). Make sure that the paint
cup is securely screwed into the socket, otherwise paint may leak during use
§ Remove the lid C of paint cup A (fig. 2)
§ The paint or the material (max. 0.5 lt.) to be sprayed can now be inserted in paint cup A
§ Replace paint cup lid C by securely pushing this into paint cup A (fig. 2)
§ The spray pattern (horizontal or vertical spraying) can be adjusted by loosening ring D and
turning nozzle E and then retightening ring D (fig. 3)
Copyright © 2011 VARO Page | 8 www.varo.com
Page 9

POW5535 EN
§ The width of the spray pattern can be adjusted by rotating the adjustment knob F (fig. 3)
§ The volume of paint/material sprayed can be adjusted by reducing or increasing the stroke
of trigger G, turning the adjustment knob H (fig. 3)
§ To operate the paint spray gun, pull trigger G (fig. 3). Pulling the trigger half way,
compressed air only is passed through nozzle E. This facility is useful when you have
finished painting and want to clean the gun. Pulling trigger G so that it is fully engaged,
material is introduced in the gun and spray painting can begin
§ During spraying, release the vent valve I of paint cup A (fig. 4)
9.2 Tips for using the paint spray gun
Before using the spray gun, practice on a test material in order to establish the correct pattern
of spray and the correct quantity of material to be applied. Never exceed the recommended air
pressure The paint or material to be sprayed may require thinning. The thinning fluid and
dilution formula should be obtained from the Manufacturer. Paint/material that is too thick may
block the nozzle on the spray gun, preventing use. When filling the paint cup with
paint/material, maintain the spray gun in a vertical position to avoid spillage.
9.3 Maintenance
§ After use, the paint spray gun must be cleaned thoroughly.
§ After disposing of any material not used, add a small quantity of paint thinner to paint cup
A and use the spray paint gun again as during spraying, fully pressing trigger G and
complying with the same safety precautions. This operation permits initial cleaning of the
fluid ducts.
§ To clean, unscrew nozzle D and ring E (fig. 5).
§ Disassemble the spraying needle by unscrewing knob H and extracting spring L and
needle M (fig. 6).
§ Lubricate the socket of the spraying needle N at regular intervals (fig. 6).
§ Thoroughly clean these items with a suitable product.
§ Also clean the fluid passage through the socket of paint cup A (fig. 1).
10 INFLATION GUN
For inflating tires, rubber dinghies, air beds, footballs and other objects
PRESSURE LEVEL: 3
Do not direct the jet of compressed air towards the people or animals.
Never inflate the objects above the recommended inflation pressure as this
may be dangerous and cause damage and injuries
10.1 Use of the inflation gun
§ Connect the inflation gun to the compressor, as explained in chapter 2 “CONNECTING
THE ACCESSORIES TO YOUR AIR COMPRESSOR”
§ When inflating car tires or certain bicycle tires, it is not necessary to insert any of the
adapters (fig. 2). Press tab A and connect the hose to the tire pushing the fitting on the
valve (fig. 3) and then releasing the tab.
§ Regulate working pressure to the value indicated for this accessory
§ Inflate the tire pressing lever B until the inflation pressure required, indicated on gauge C,
is reached (figures 1-4). In the case of over-inflation, press button D to reduce inflation
pressure (figures 1-4)
Copyright © 2011 VARO Page | 9 www.varo.com
Page 10

POW5535 EN
Type POW5535
§ When inflating footballs, rubber dinghies, certain bicycle tires and children’s inflatable
swimming-pools, you may have to use a suitable adapter (fig. 2) Adapter E is used for
footballs Adapter F is used for rubber dinghies, air beds and children’s swimming-pools
Adapter G is used for certain bicycles Select the suitable adapter and insert it in the
inflation hose pressing tab A (fig. 5) Push the adapter in the inflation hose a shown in
figure 5 and release tab A. To fasten the adapter, turn it slightly in a clockwise direction
§ Inflate the object required as described in point 4) above
10.2 Maintenance
After use, always store the inflation gun in a dry, clean environment. Do not use solvents,
flammable or toxic liquids to clean the inflation gun.
11 AIR BLOW GUN GB
For pressure cleaning of dust and dirt from everyday objects
PRESSURE LEVEL: 2
Always wear safety goggles when using the air blow gun. Never direct the jet of
compressed air towards people or animals. Take care not to blow dust and dirt
towards yourself or others.
11.1 Using the air blow gun
§ After unscrewing inflation hose C, connect nozzle B to the gun A (figures 1-2-3)
§ Connect the air blow gun to the compressor as explained in chapter 2 “CONNECTING
THE ACCESSORIES TO YOUR AIR COMPRESSOR”
§ Adjust working pressure to the value indicated for this accessory
§ To use the air blow gun, press lever D and direct the nozzle B towards the surface to be
cleaned
11.2 Tips for using the air blow gun
Clean the carpets of your home or car mats very efficiently using the blow gun. It is also ideal
for keyboards, electrical items refrigerators, cameras, TV cameras, glassware and vacuum
cleaners.
11.3 Maintenance
After use, always store the air blow gun in a dry, clean environment. Do not use solvents,
flammable or toxic liquids to clean the gun.
12 TECHNICAL DATA
Rated power 1.5hp
Current take-off 5A
Power supply voltage 230 V/50 Hz
Air intake 180l/min
Maximum pressure 8bar
Weight 20kg
Isolation class B
Tank capacity 24l
Copyright © 2011 VARO Page | 10 www.varo.com
Page 11

POW5535 EN
Fault Cause
Remedy
13 POSSIBLE FAULTS AND RELATED PERMITTED REMEDIES
The compressor
does not start
The compressor
starts but there is
no pressure
The compressor
starts, pressure is
shown on the
pressure gauge,
but the tools do
not start.
1. No supply voltage 1. Check the supply voltage, the
2. Insufficient supply voltage 2. Make sure that the extension
3. Outside temperature is too
low
4. Motor is overheated 4. Allow the motor to cool down. If
1. Leak in the non-return
valve
2. The seals are damaged. 2. Check the seals and have any
3. The drainage screw for
condensation water (11)
leaks.
1. Loose hose connections 1. Check the compressed air hose
2. Leak in a quick-lock
coupling
3. Insufficient pressure set on
the pressure regulator.
power plug and the socket-outlet.
cable is not too long. Use an
extension cable with large enough
wires.
3. Never operate with an outside
temperature of below +5°C.
necessary, remedy the cause of the
overheating.
1. Replace the non-return valve
damaged seals replaced by a service
center
3. Tighten the screw by hand. Check
the seal on the screw and replace if
necessary.
and tools and replace if necessary.
2. Check the quick-lock coupling and
replace if necessary.
3. Open the pressure regulator
further.
14 WARRANTY
§ This product is warranted as provided by law for a 24 -month period effective from the
date of purchase by the first user.
§ This warranty covers all material or production flaws. It does not include defective parts
subject to normal wear & tear such as bearings, brushes, cables, and plugs, or
accessories such as drills, drill bits, saw blades, etc. ; damage or defects resulting from
maltreatment, accidents or alterations; nor the cost of transportation.
§ This warranty covers all material or production flaws, excluding batteries, chargers,
defective parts subject to normal wear and tear such as, in particular, bearings, brushes,
cables, plugs… Accessories such as drills, drill bits, saw blades etc. also do not fall under
this warranty.
§ Damage and/or defects resulting from inappropriate use also do not fall under the
warranty provisions.
§ We also disclaim all liability for any bodily injury resulting from inappropriate use of the
tool.
§ Repairs may only be carried out by an authorised customer service centre for Powerplus
tools.
§ You can always obtain more information at the number 00 32 3 292 92 90.
§ Any transportation costs shall always be borne by the customer, unless agreed otherwise
in writing.
§ At the same time, no claim can be made on the warranty if the damage of the device is the
result of negligent maintenance or overload.
Copyright © 2011 VARO Page | 11 www.varo.com
Page 12

POW5535 EN
§ Definitely excluded from the warranty is damage resulting from fluid permeation, excessive
dust penetration, intentional damage (on purpose or by gross carelessness), inappropriate
usage (use for purposes for which the device is not suitable), incompetent usage (e.g. not
following the instructions given in the manual), inexpert assembly, lightning strike,
erroneus net voltage. This list is not exhaustive.
§ Acceptance of claims under warranty can never lead to the prolongation of the warranty
period nor commencement of a new warranty period in case of a device replacement.
§ Devices or parts which are replaced under the warranty therefore remain the property of
Varo NV.
§ We reserve the right to reject a claim whenever the purchase cannot be verified or when it
is clear that the product has not been properly maintained. (Clean ventilation slots, carbon
brushes serviced regularly, etc.).
§ Your purchase receipt must be kept as proof of date of purchase.
§ Your appliance must be returned undismantled to your dealer in an acceptably clean state,
(in its original blow-moulded case if applicable to the unit), accompanied by proof of
purchase.
15 ENVIRONMENT
Should your appliance need replacement after extended use, do not discard it
with the household rubbish but dispose of it in an environmentally safe way.
Waste produced by electrical machine items should not be handled like normal
household rubbish. Please recycle where recycle facilities exist. Check with your
Local Authority or retailer for recycling advice.
Copyright © 2011 VARO Page | 12 www.varo.com
Page 13

POW5535
BELGIUM, declares that,
ntial requirements and other relevant provisions of the applicable
European Directives, based on the application of European harmonized standards. Any
on behalf and under the power of attorney of the company
16 DECLARATION OF CONFORMITY
VARO N.V. - Joseph Van Instraat 9 - BE2500 Lier -
product : Oilless compressor
trade mark : POWERplus
model : POW5535
is in conformity with the esse
unauthorized modification of the apparatus voids this declaration.
European Directives (including, if applicable, their amending directives):
2006/95/EC The Low Voltage Directive
2004/108/EC The Electromagnetic Compatibility Directive
2006/42/EC The Machinery Directive
2000/14/EC The Outdoor Noise Directive
Annex VI
LwA 96dB(A) / 97dB(A)
Authority DNV
IT
87/404/EC The Singe Vessel Pressure Directive
Testing Authority CPM
IT
European harmonized standards, and their amendments:
EN1012-1 : 1996
EN60204-1 : 2006
EN55014-1 : 2006
EN55014-2 : 1997
EN61000-3-2 : 2006
EN61000-3-3 : 1995
The undersigned acts
management,
EN
Philippe Vankerkhove
Certification Manager
15/02/11
Copyright © 2011 VARO Page | 13
www.varo.com
 Loading...