

Page 1
Page 2

Welcome to the PowerNAS CMA Quick Start Guide. Here you’ll find everything you need to get started and to
configure your device for use within your network. The PowerNAS CMA is designed to be easy to setup with
just a few mouse clicks using the Microsoft Windows 8.1 familiar interface.
Parts List
One (1) PowerNAS CMA Device
One (1) UK Mains Cable
Two (2) Case Door Keys
One (1) 1m White Cat5e Cable
One (1) Wireless Antenna
One (1) Windows 8.1 Restore DVD
One (1) PowerNAS CMA Quick Start Guide
If you ordered a device pre-populated with drives:
Four (4) drive trays, populated with drives, separated from the PowerNAS CMA device.
If you ordered a diskless model:
Four (4) drive trays, filled with dummy drives secured by two (2) screws each.
Eight (8) additional hard drive screws.
Setting up your PowerNAS CMA
To connect to your PowerNAS CMA appliance in order to set it up you will need the following:
a USB keyboard and mouse
a suitable video display – connected to either of the HDMI ports or DVI video port
an Ethernet cable (if connecting to a wired network)
a Phillips screwdriver (if installing your own hard drives)
Page 3

Installing Hard Drives
If you ordered a PowerNAS CMA with hard drives, they will already be installed in the drive trays. Insert them
into the drive bays, with the tray numbered ‘0’ at the bottom, followed by 1, 2, and 3 at the top. Drive
numbering is for your convenience only and has no bearing on the operation of your PowerNAS CMA.
If you ordered a diskless PowerNAS CMA, your drive trays will be in the PowerNAS CMA device, filled with
dummy drives secured by two screws each. Remove the dummy drives and use those screws and the
additional eight screws in the accessories kit to install your chosen drives into the drive carriers.
Plugging in your PowerNAS CMA Appliance
To connect the appliance to your network and prepare it for configuration, perform the following steps. Refer
to page 4 for a guide to the back panel of your PowerNAS CMA.
1. Connect a HD-ready monitor to either of the HDMI ports, or a PC monitor to the DVI port
2. If connecting to a wired network
a. Plug one end of an Ethernet cable into the Ethernet port. Connect the other end to a switch
or router connected in turn to the device you plan to use to configure your PowerNAS CMA.
3. If connecting to a wireless network
a. Attach the wireless antenna to the rear of the PowerNAS CMA. The wireless antenna is
magnetic and we suggest attaching it in the middle of the rear cooling fan. Connect up the 2
wireless screw connectors from the antenna to the rear of the system – Take care when
screwing these in.
4. Plug one end of the power cord into the back panel of the device and plug the other end into a power
socket or UPS device.
5. Plug the USB keyboard and keyboard into the ports at the rear panel.
6. If required, connect up any ancillary devices, such as USB, Analogue or Digital Audio SPDIF cables.
Page 4
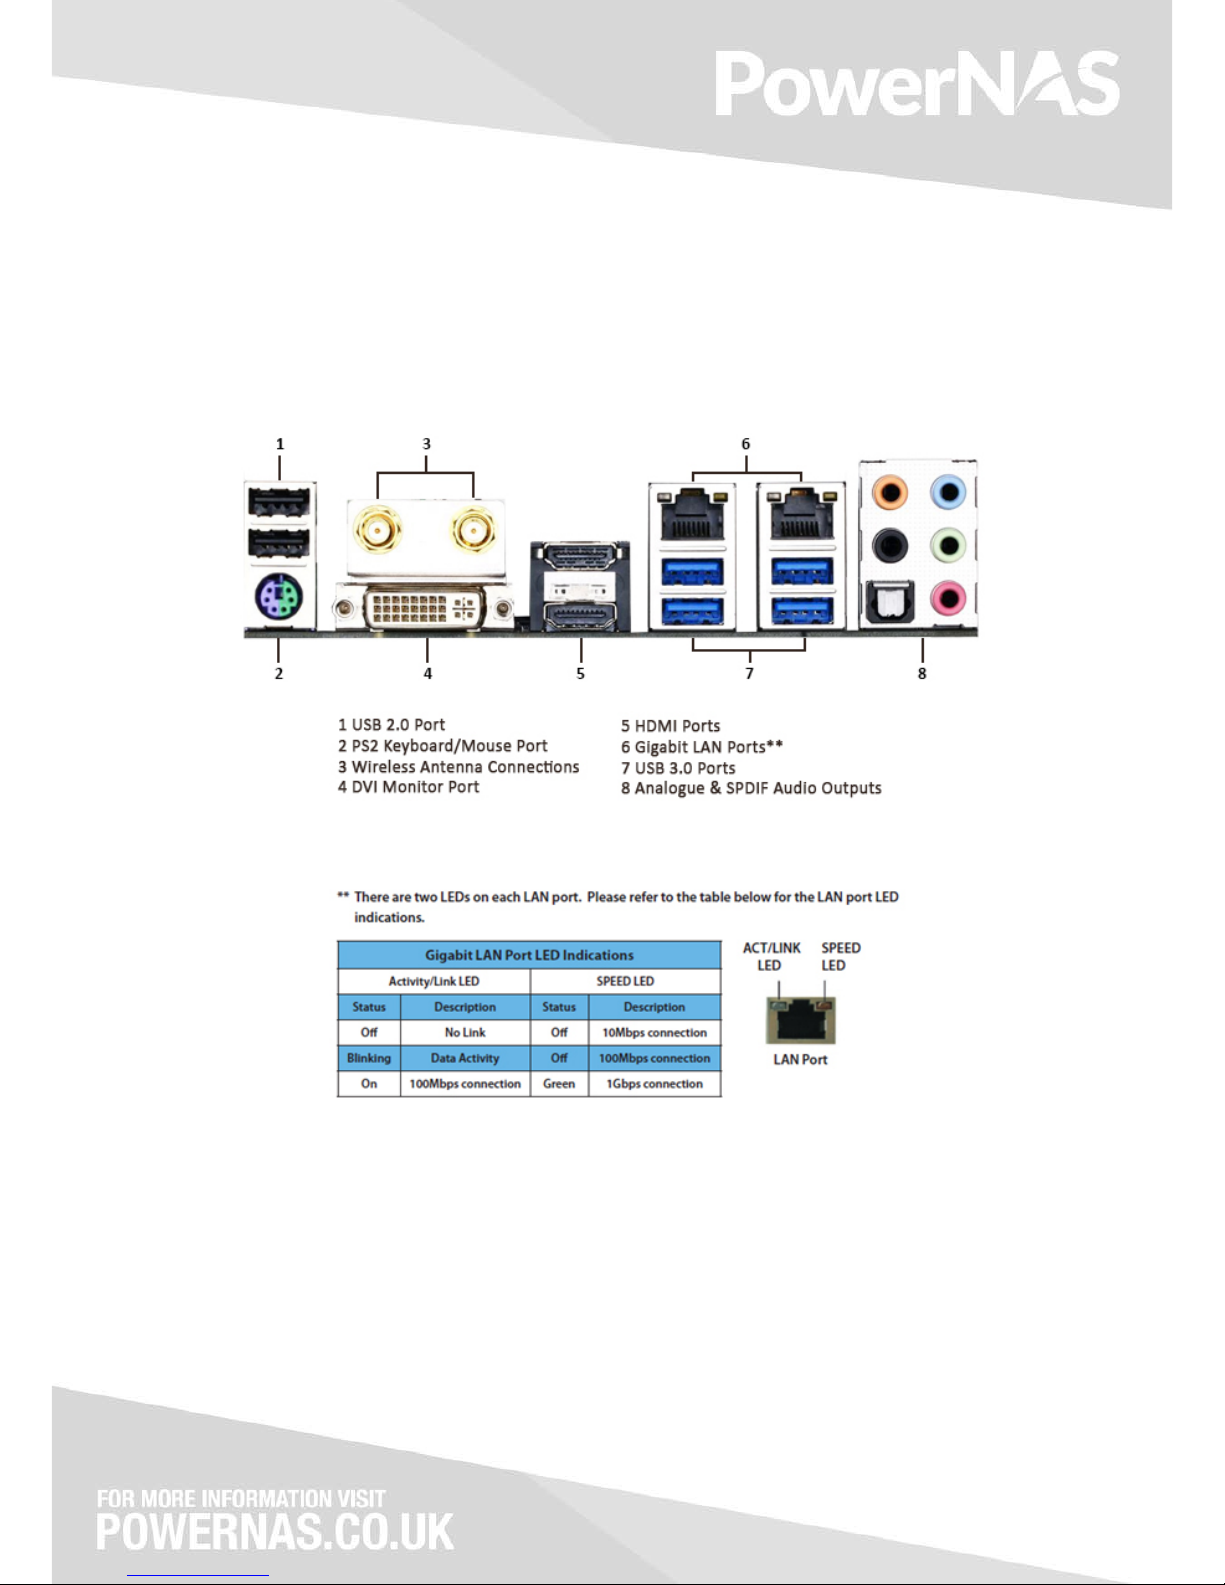
Back Panel Layout and LED Indicators
Page 5
Boot into Windows
The device will boot up and you’ll see some text messages on the display as the operating system loads. When
the system has finished booting (it will take longer than usual for the initial boot up while it sets things up), you
will be presented with the quick setup wizard for Windows 8.1
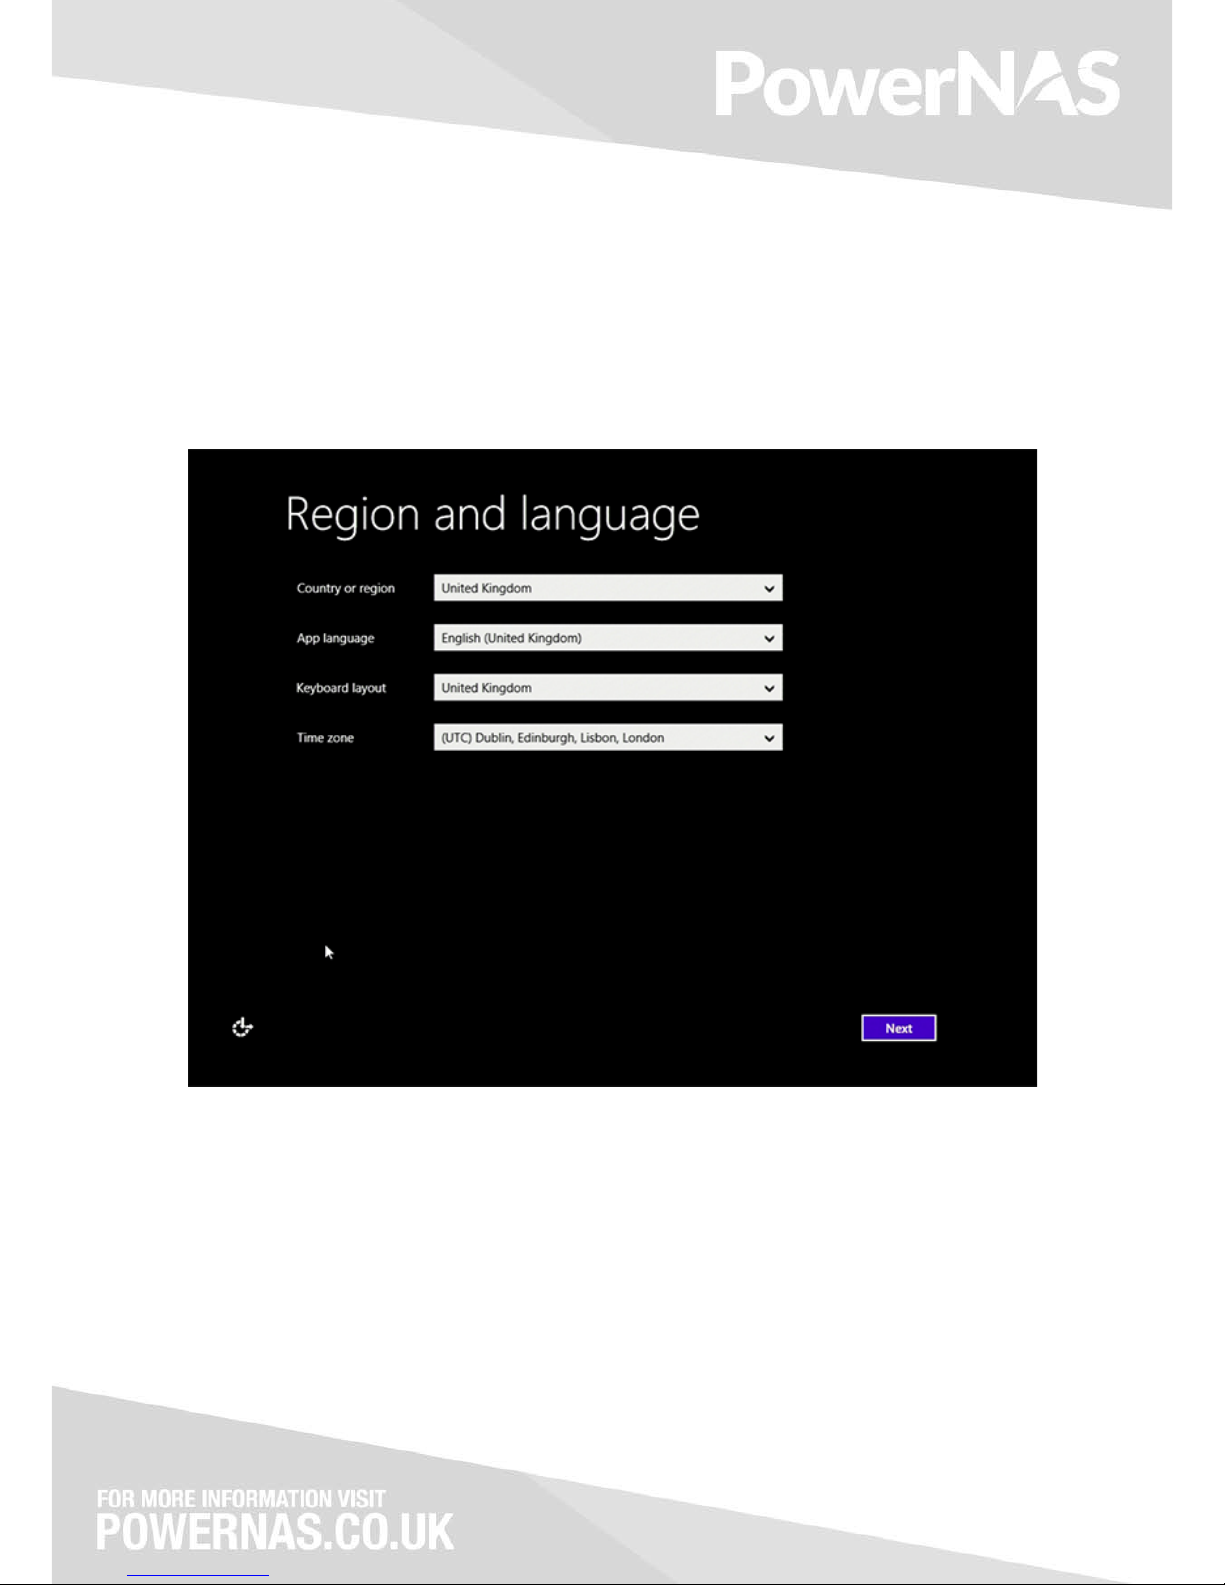
Figure 1: Windows Initial Setup Screen
The first screen will be pre-populated and show United Kingdom. If you are outside of the United Kingdom
please change these values to your local country. Click on Next to continue.
Page 6
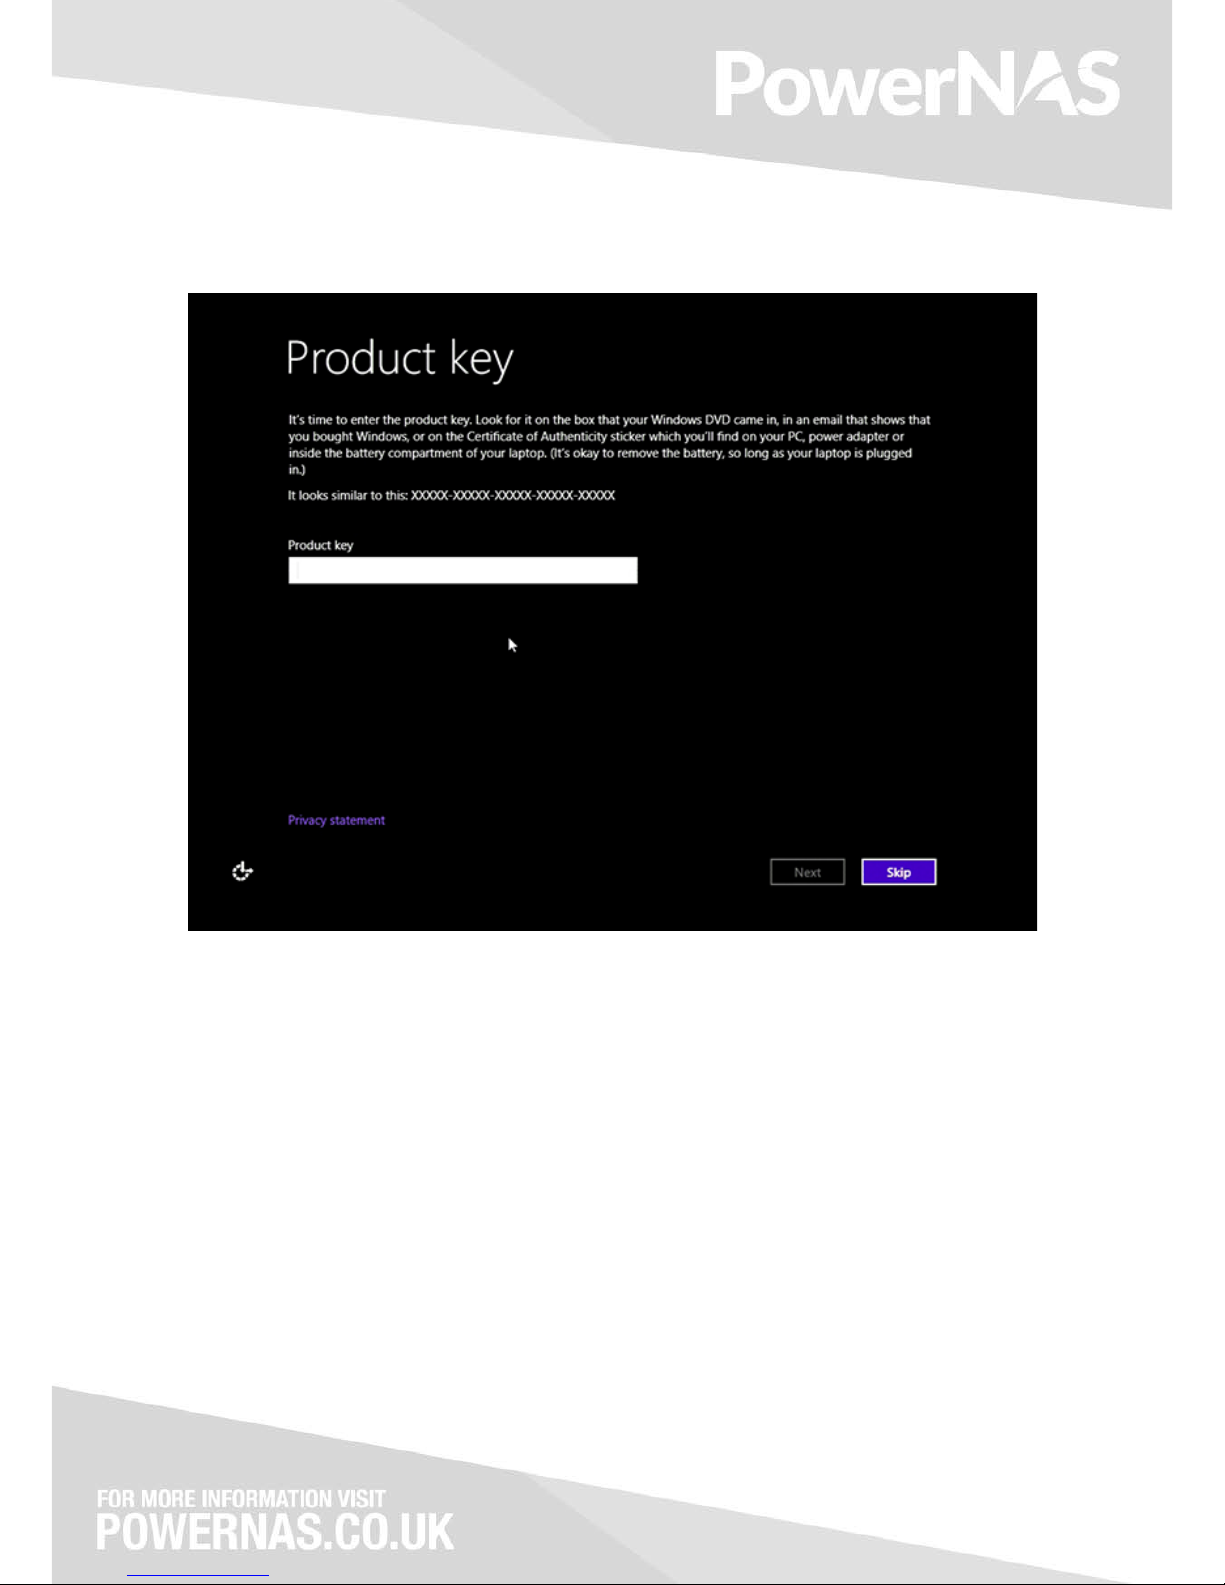
Figure 2: Enter Product Key
You must enter the Windows Product Key. This will be found at the bottom of your PowerNAS CMA product.
You can skip this step, but you must enter this key within 3 days otherwise Windows will not function properly
and prompt you randomly for the product key.
Page 7
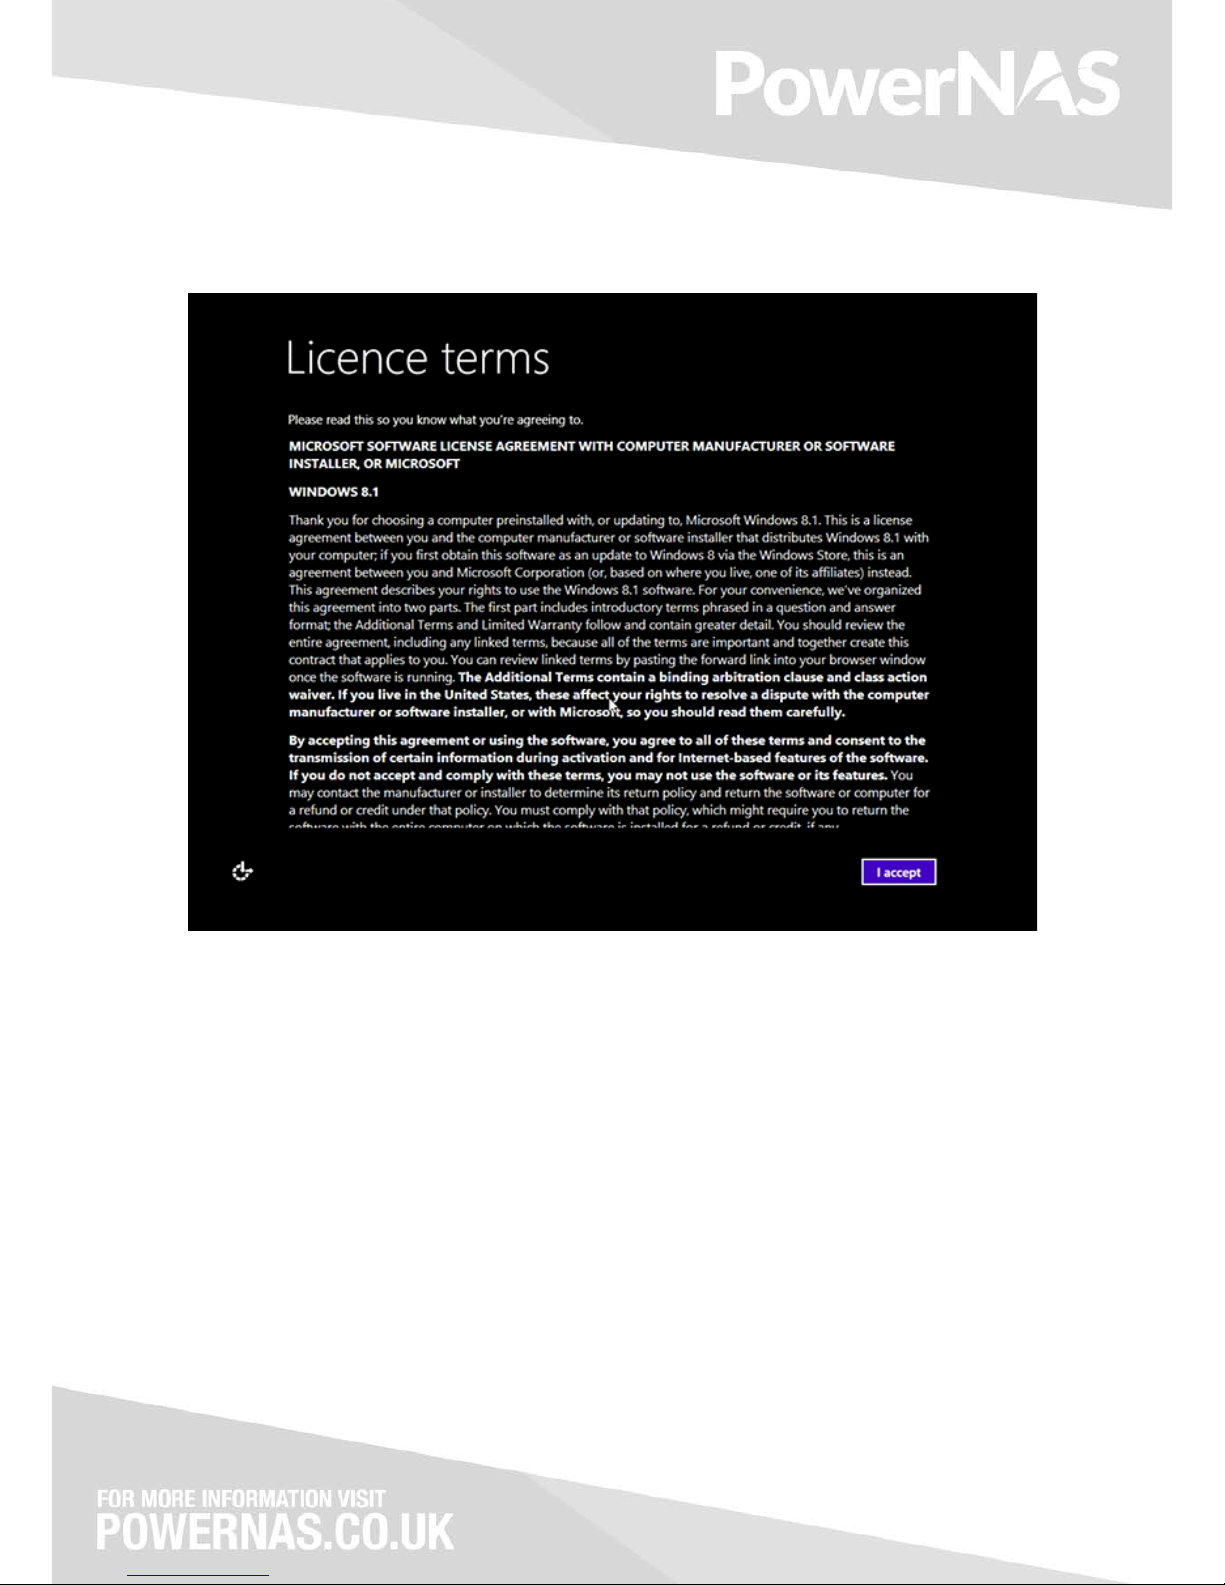
Figure 3: Accept Windows Licence
Once you’ve entered your licence key you will be presented with the Licence terms. Please read these and click
on I accept once read and understood.
Page 8
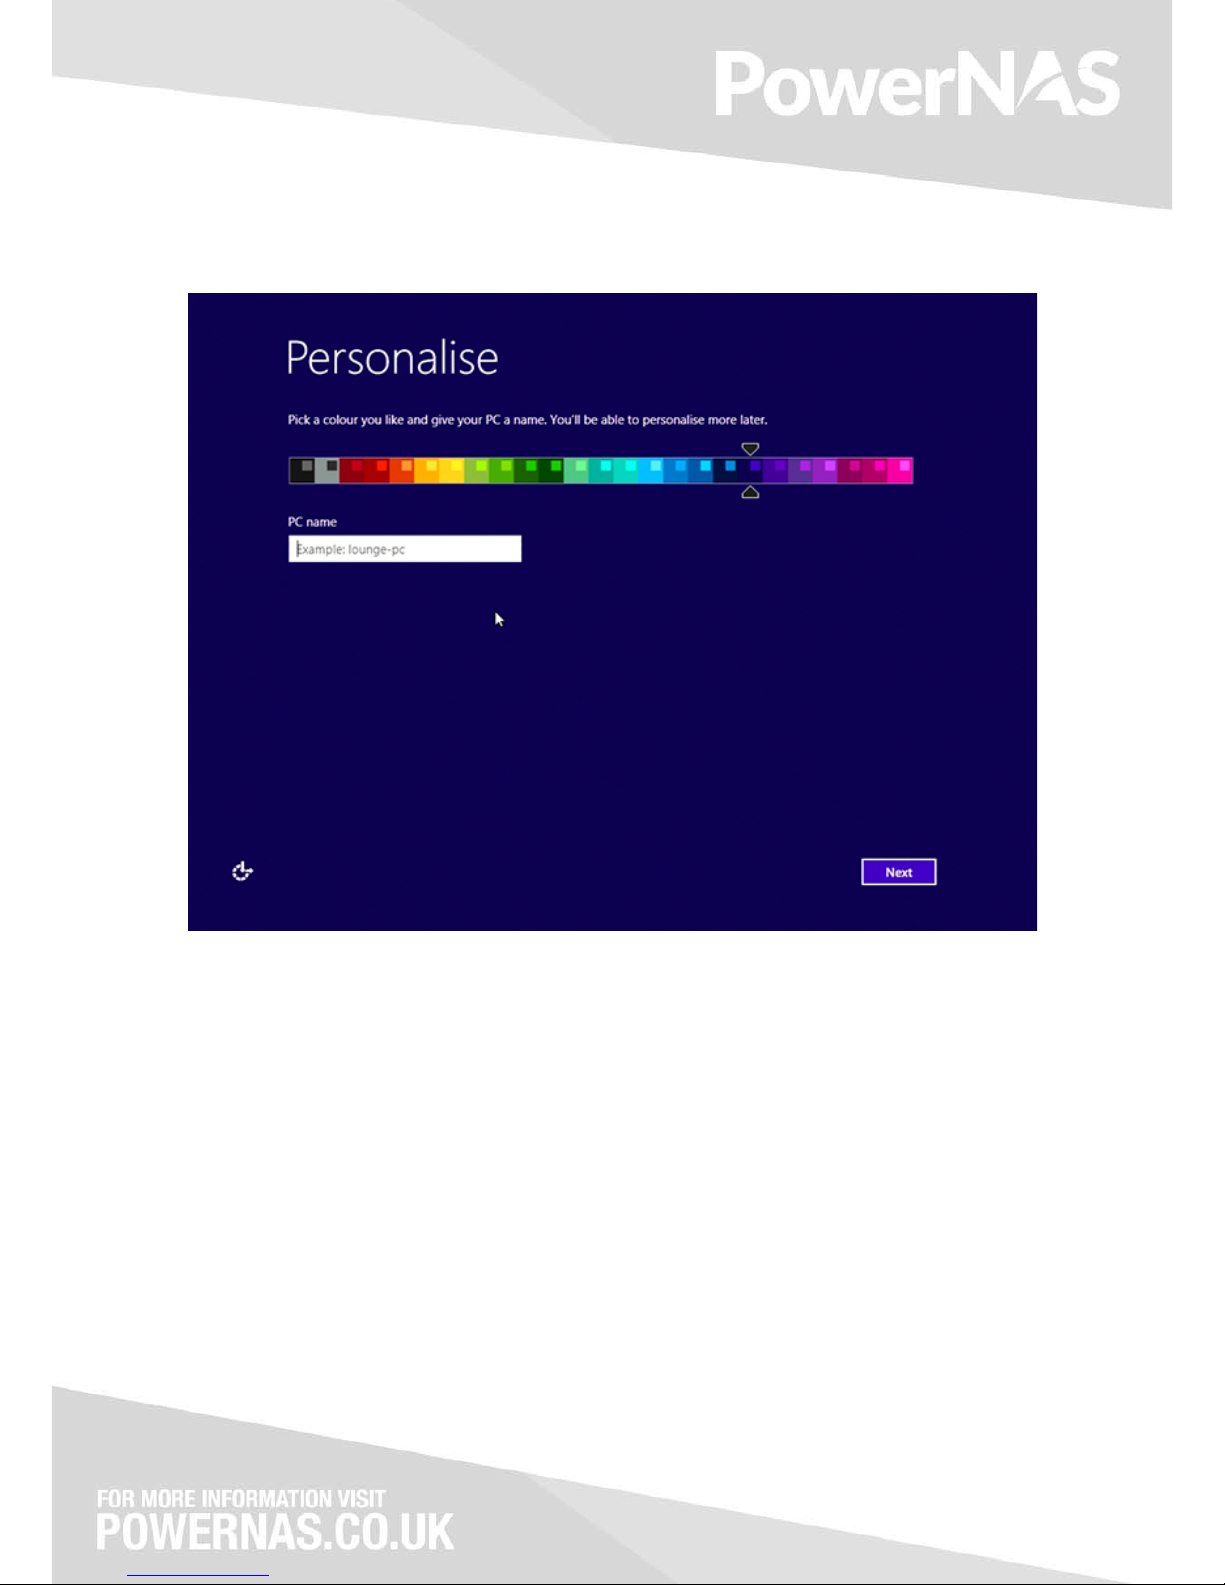
Figure 4: Enter PC Name
Now you’ve agreed to the Windows Licence you can personalise and get started with your new PowerNAS
CMA. Please select your colour scheme and enter in a name for your PC. This is the name that identify the
system on your network. Click on Next to continue.
Page 9
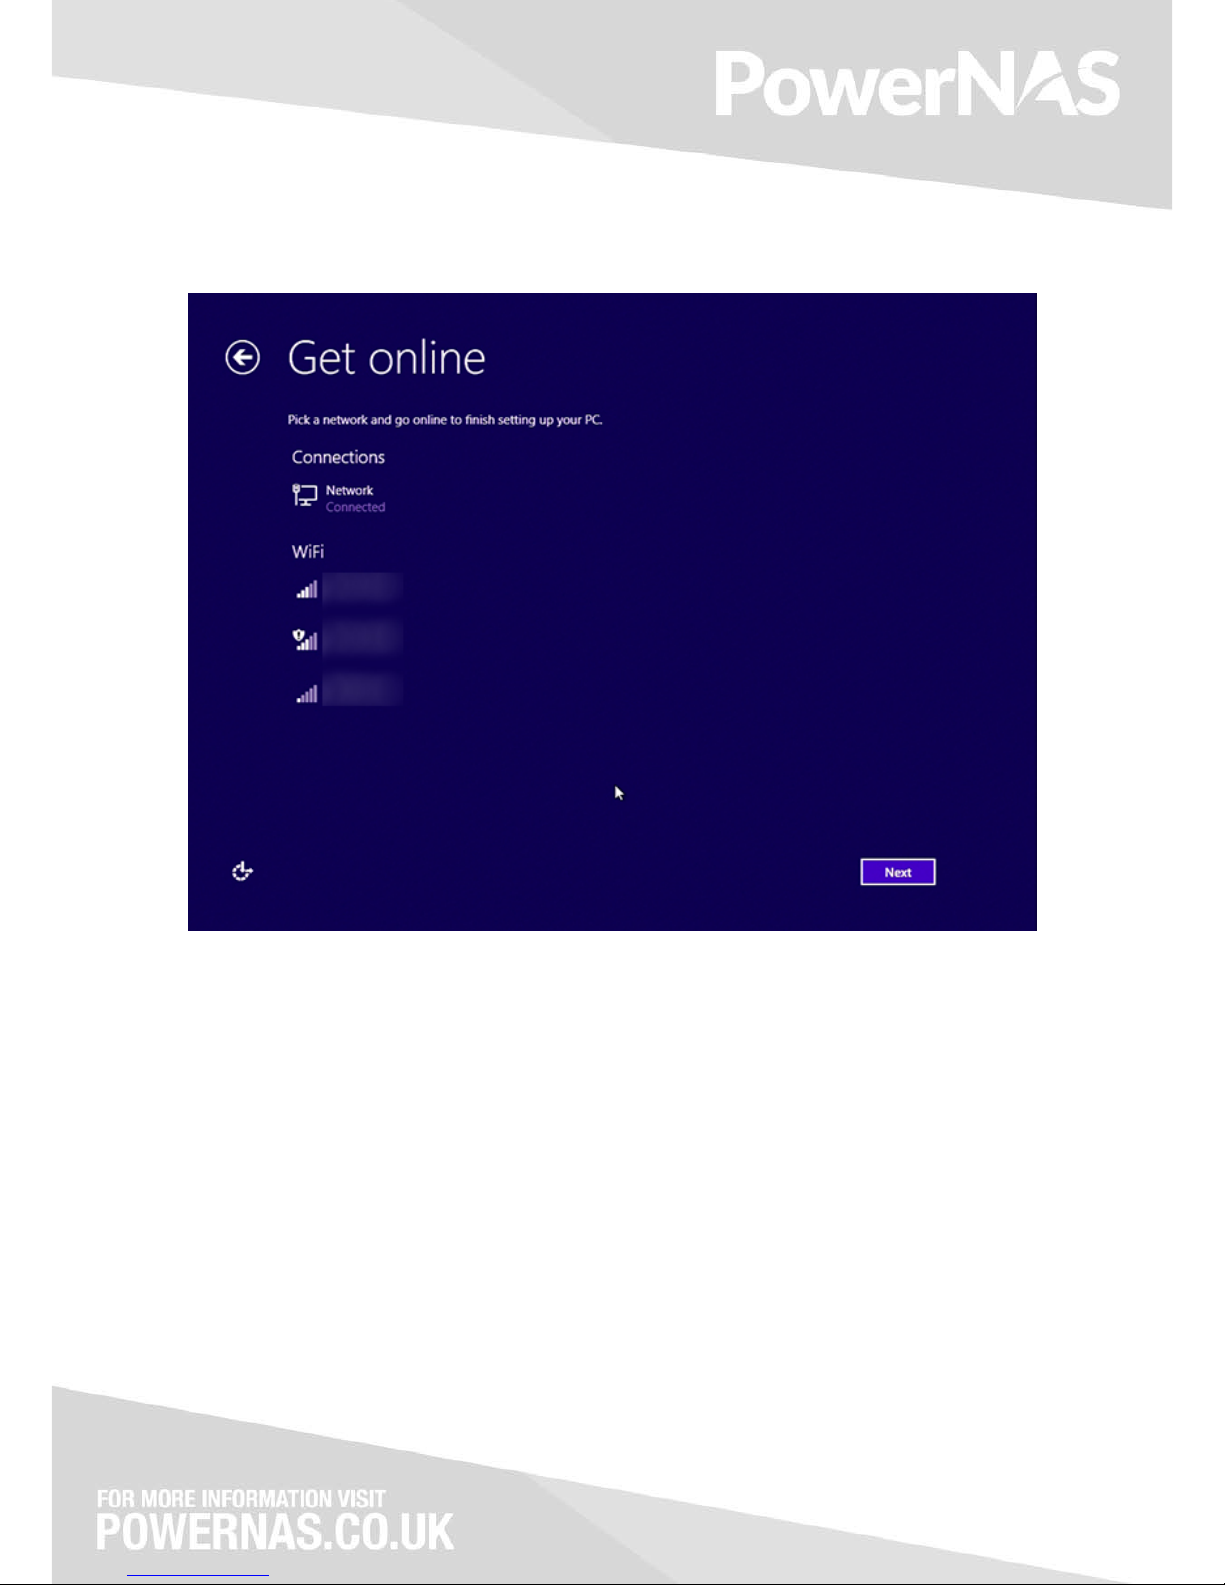
Figure 5: Select your network
You will now be presented with the wireless networks local to you. These will be listed under WiFi. If you have
connected your PowerNAS CMA directly via an Ethernet cable to a Switch/Router then this will show the
Network connected at the top of the list.
To connect to a wireless network, please select the network from the list and if appropriate, enter your
Wireless Key to connect, following the on-screen instructions.
Page 10
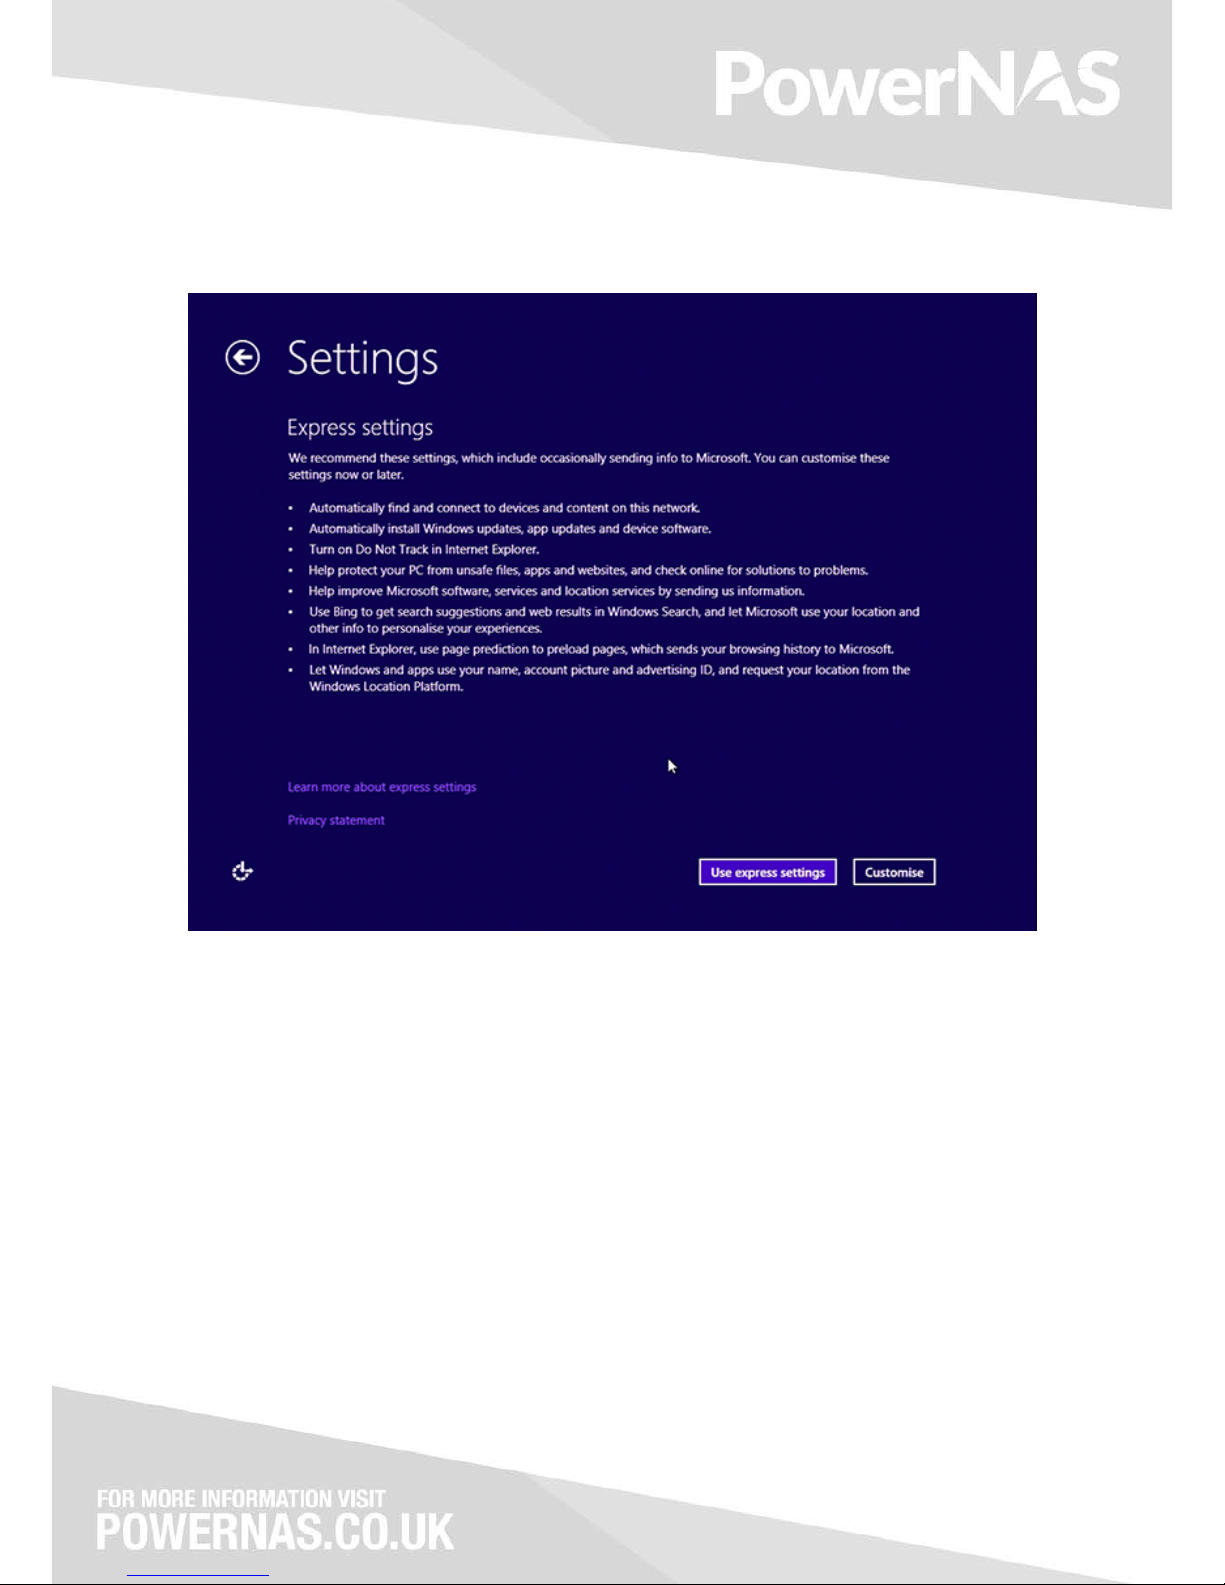
Figure 6: Choose settings preference
Once you’ve connected to your network on the previous step you will be presented with the above screen. We
suggest using Use express settings, but you may click on Customise if you wish to set personal preferences.
Once you’ve proceeded you will be presented with further options to setup Windows – This will include signing
into Microsoft Online – You may choose to setup an account with Microsoft at this point. Please follow the
steps shown on screen.
Page 11

Figure 7: All done
Your PowerNAS CMA will now setup the final few steps. This process will take a couple of minutes to complete.
Once setup it will show the Windows desktop, and you can immediately start using your new PowerNAS CMA.
Page 12
Setup Windows Storage Spaces
Windows Storage Spaces is how you setup data protection on your installed hard drives. This is a superb
feature of Windows 8.1
Storage Spaces is similar to traditional RAID protection, but is more flexible and allows easy configuration and
expansion using the familiar Windows GUI interface.
The Storage Spaces setup is based on your own requirements; however have put together a common setup for
multiple drives in a Parity mode setup. This allows for data protection in case of a single hard drive failure.
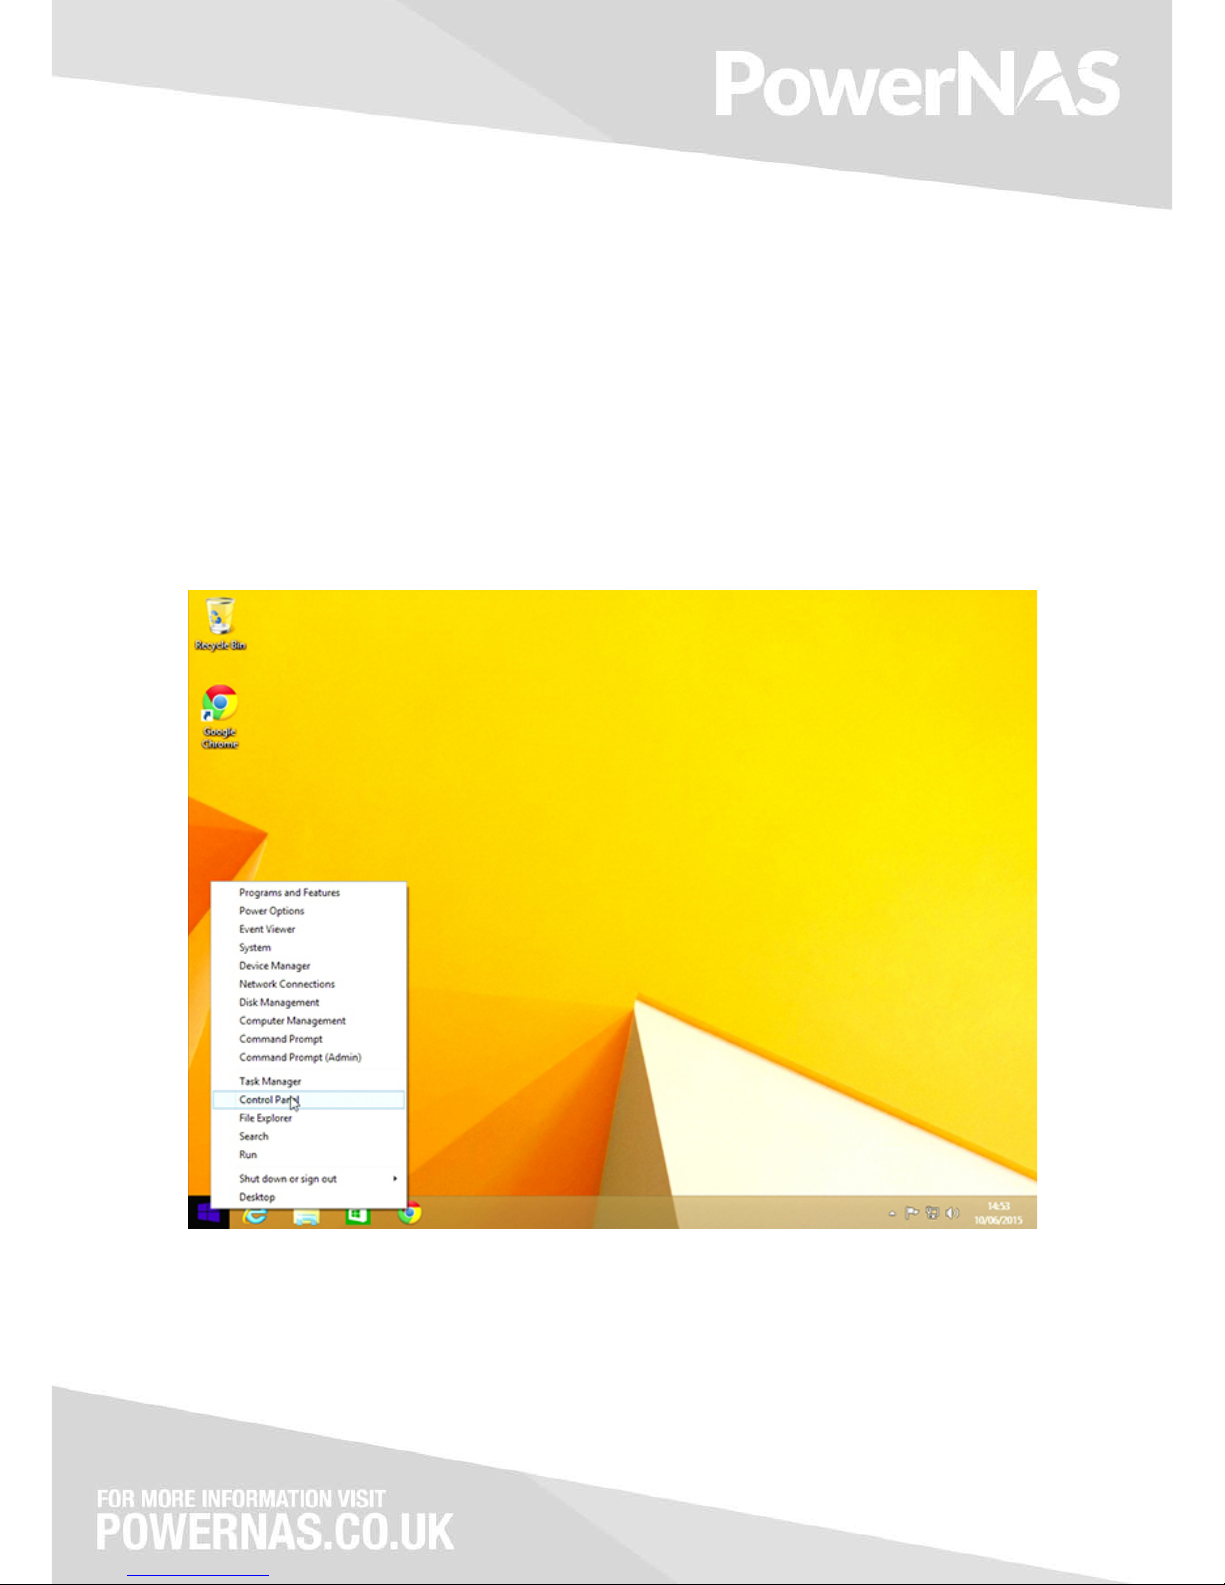
Figure 1: Launch Storage Spaces
To launch Storage Spaces, right click on the Start Menu and select Control Panel
Page 13
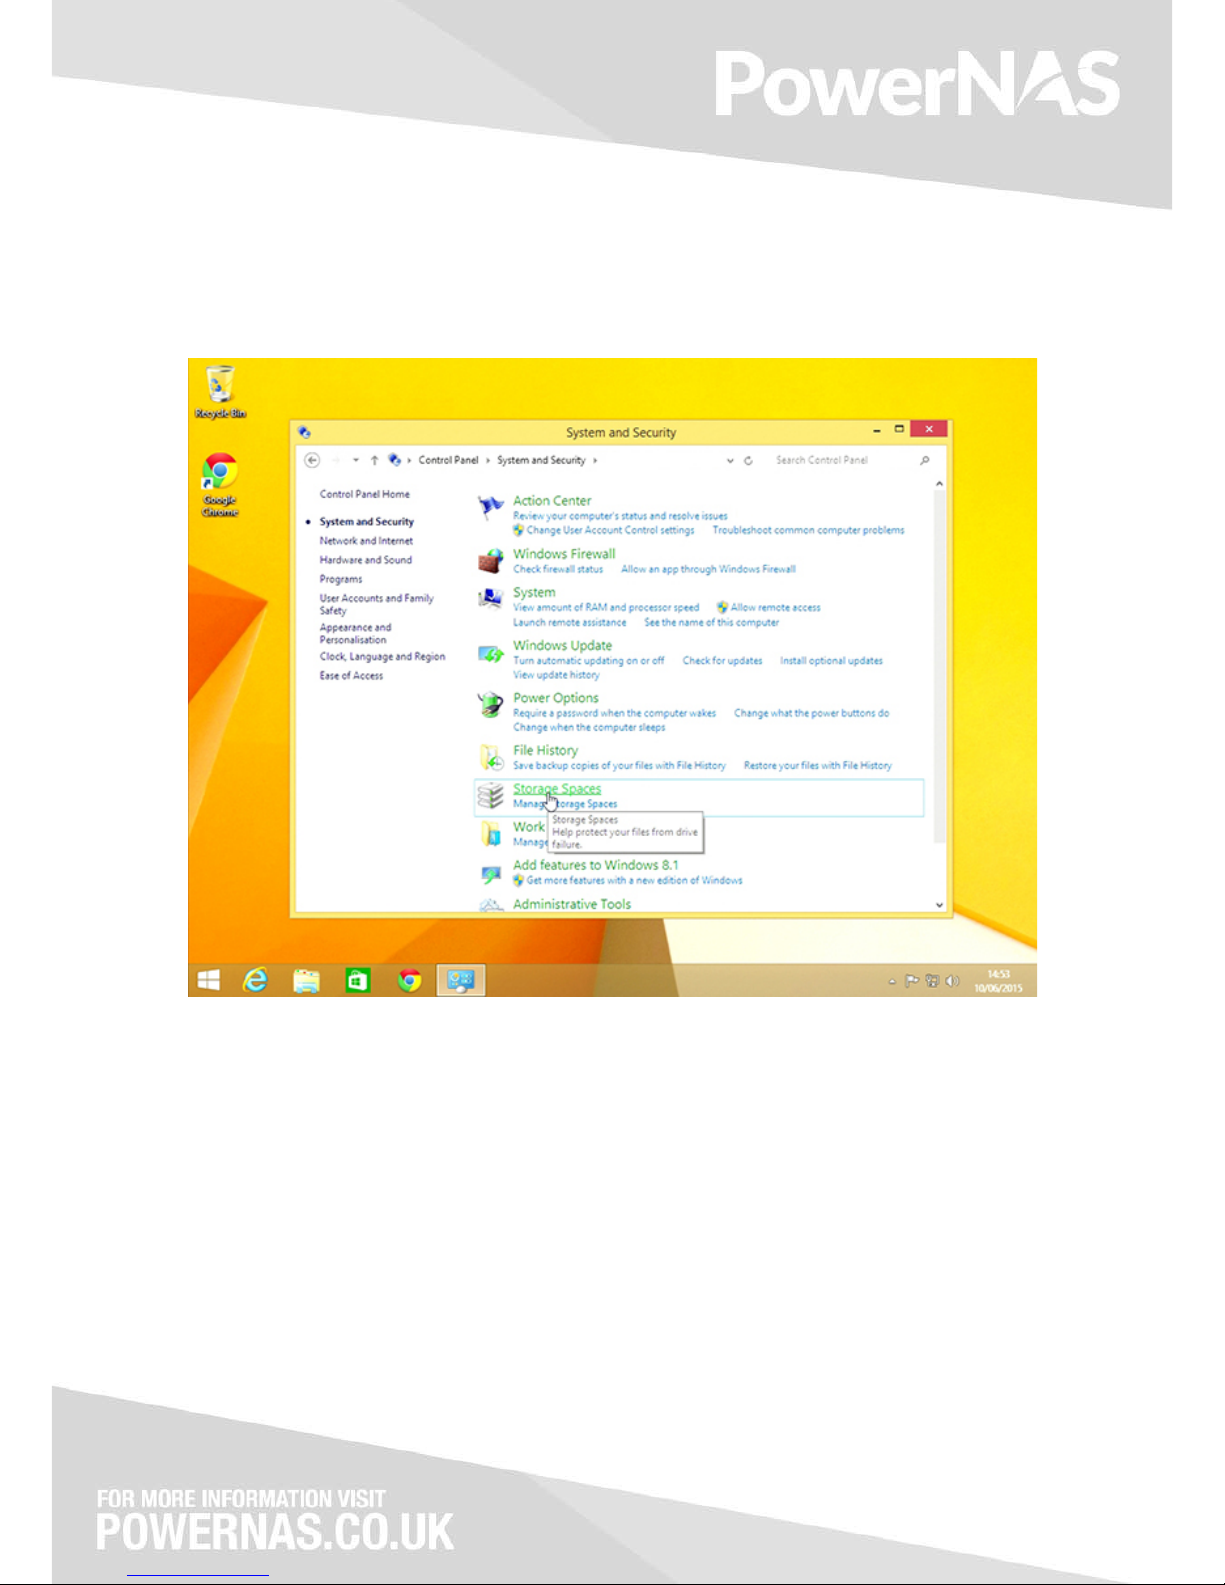
Figure 2: Storage Spaces
When the Control Panel loads, click on System and Security. You will then be presented with a list of options –
Click on Storage Spaces towards the bottom of the list.
Page 14
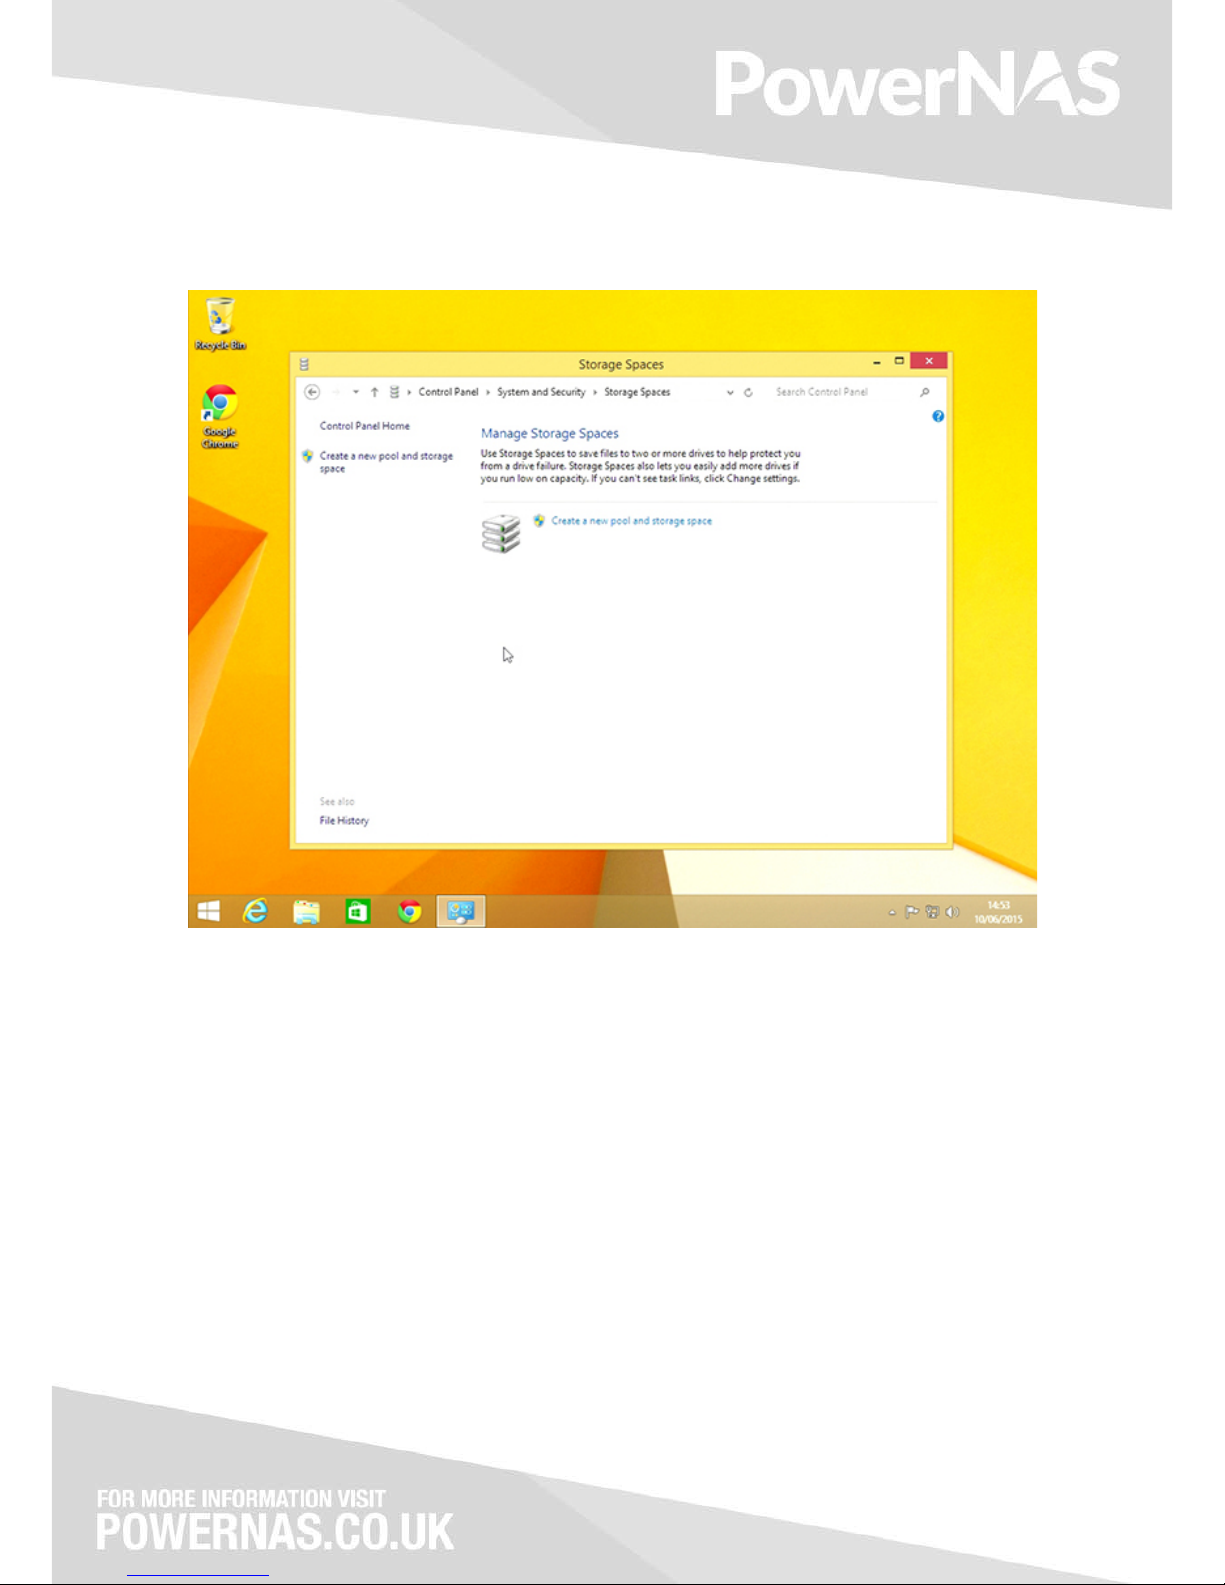
Figure 3: New Storage Pool Wizard
The New Storage Pool Wizard will launch. If you have not setup a Storage Space on this system before you will
be presented with the above – Allowing a single option, to create a new pool and storage space. Click on this
and it will take you through to the simple wizard.
Page 15
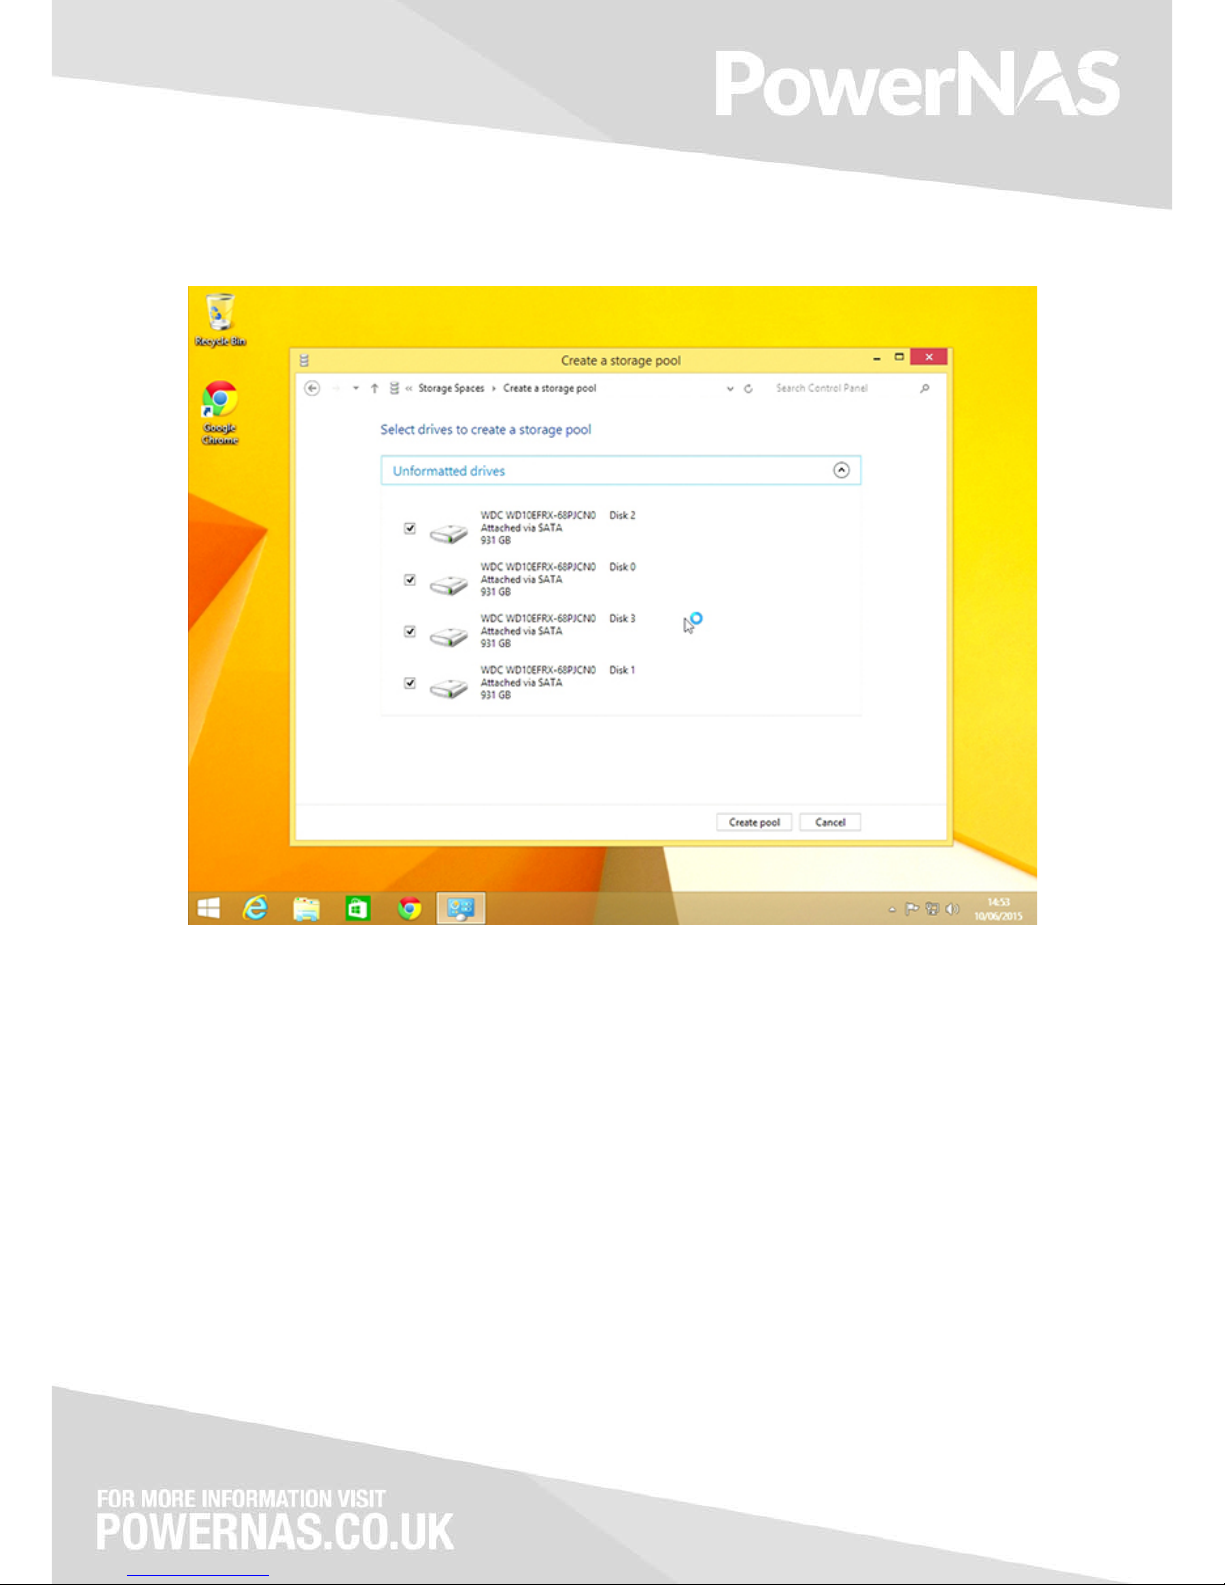
Figure 4: New Storage Pool Wizard
You will be shown the hard disks you have installed in your system. If your system was pre-populated by us
then these will show the model of drives you purchased and were assembled into the system during
manufacture of your system.
In our example above there are 4x 1TB SATA Western Digital hard drives. Your configuration can consist of 2
drives up to 4 drives in the PowerNAS CMA system.
Select the number of drives you would like to use for your new Storage Pool and click on Create Pool.
Page 16
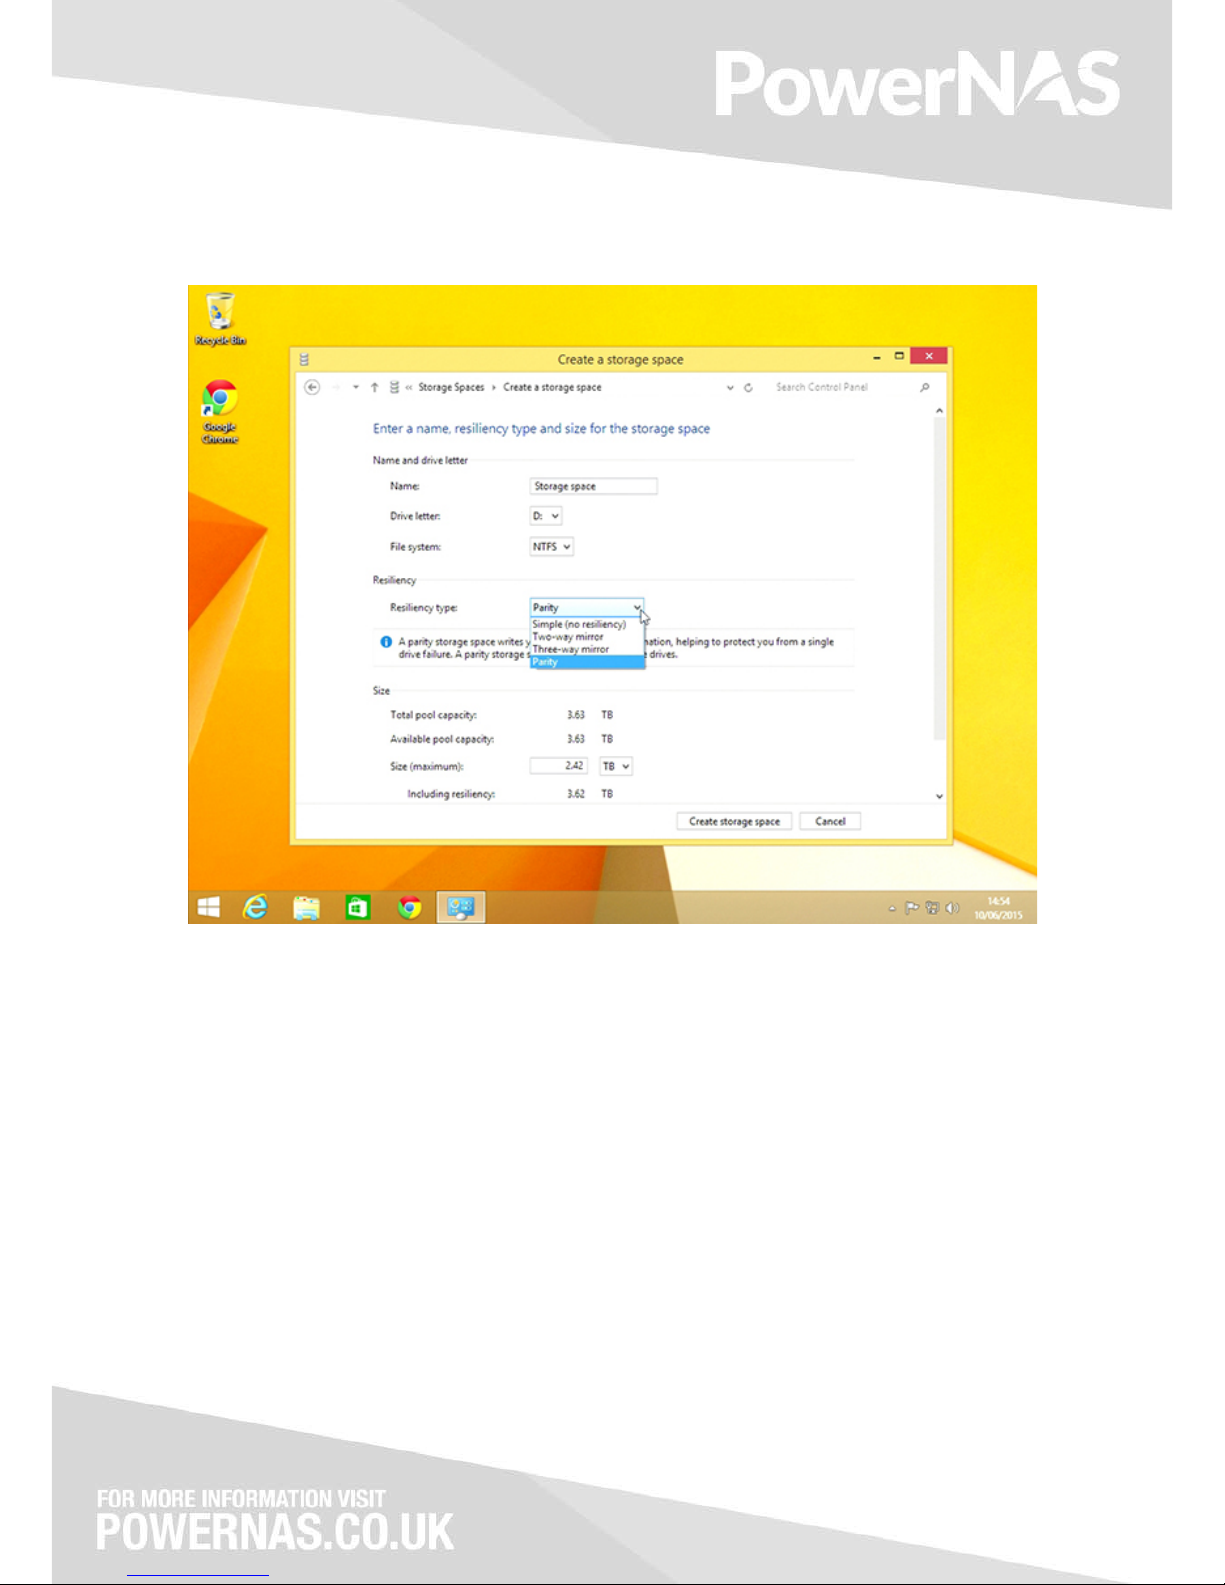
Figure 5: New Storage Pool Wizard
You will now be presented with a screen to show the basic configuration of your new Storage Space Pool.
We recommend leaving the Name and Drive Letter as default, but please change these to suit your
requirements or preferences.
Under Resiliency, it will by default select Simple (no resiliency). We do not recommend this option as it will not
provide any form of data protection. If a single drive fails you will lose all data on your storage space.
Depending on the number of drives installed and your desired setup we would recommend using Parity mode.
This will span the parity data over the drives and allow for up to one drive failure at a time. Parity is only
available if you have 3 or more drives installed. If you have 2 drives installed you will not be presented with
this option, and only show Simple and Two-way mirror.
Click on Create storage space to continue.
Page 17
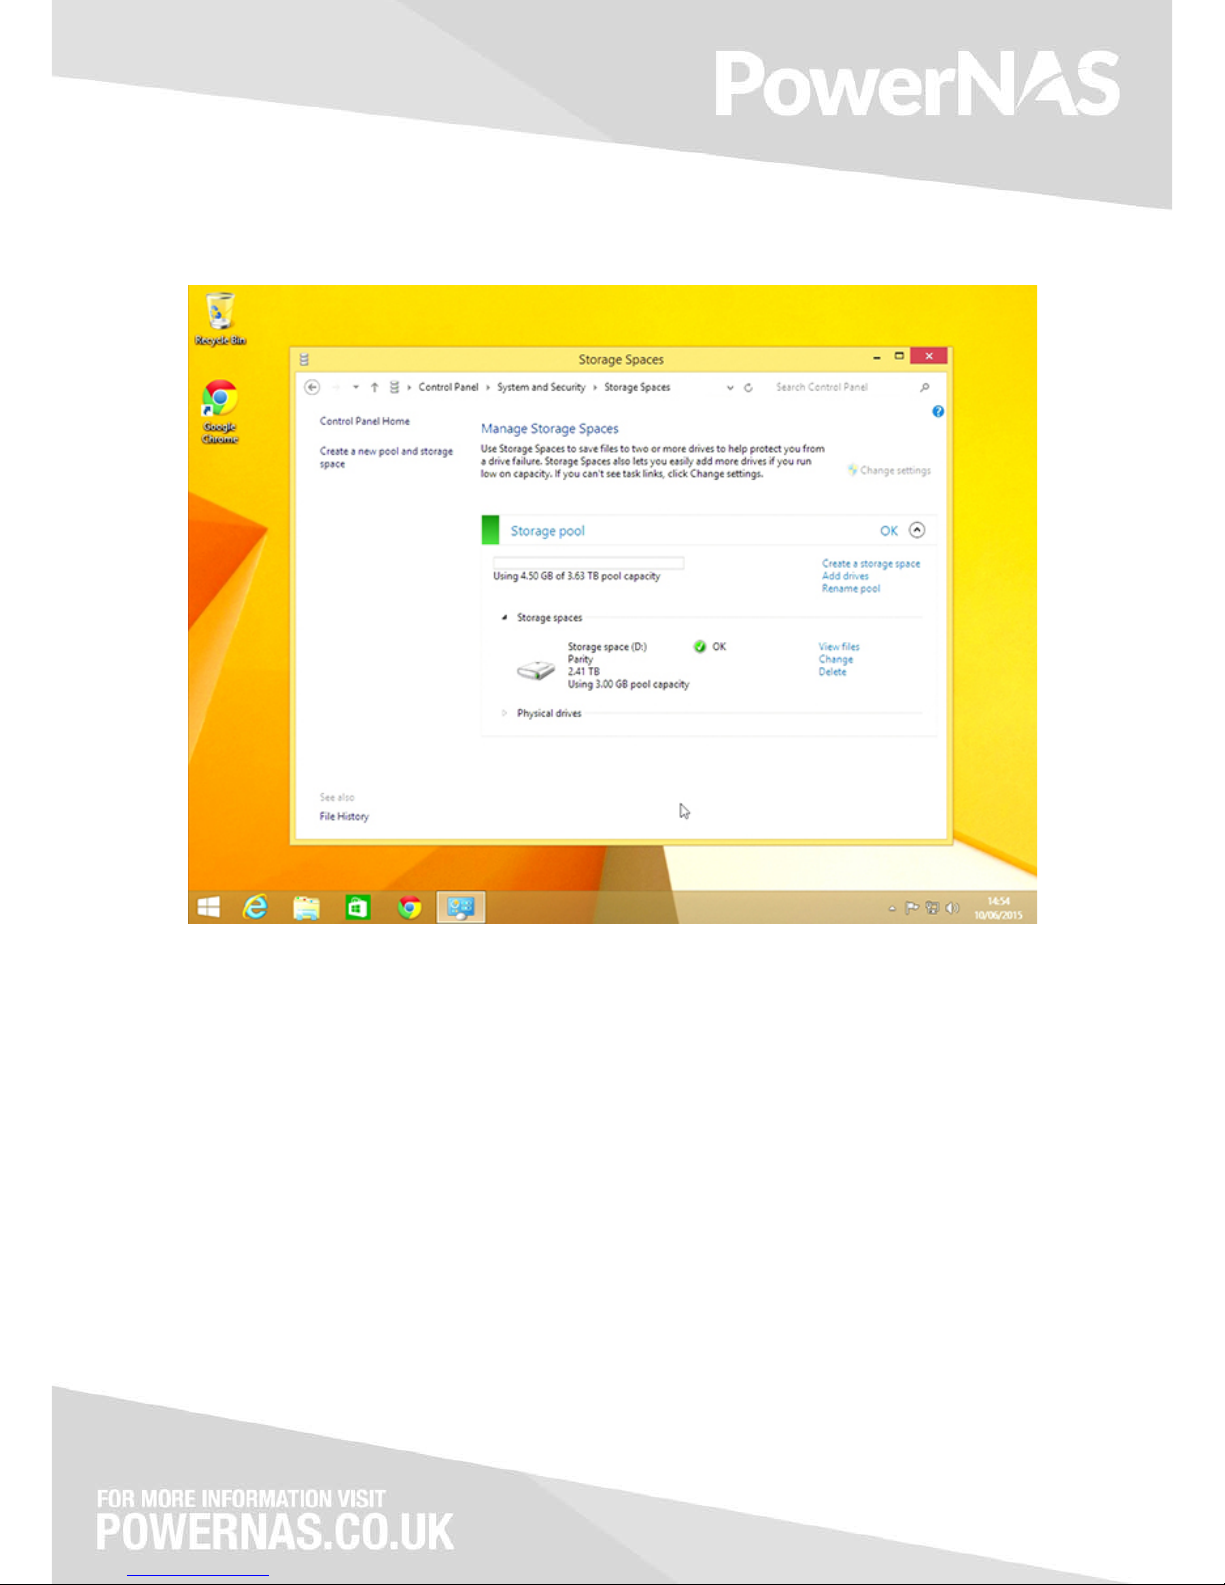
Figure 6: Storage Pool Setup Confirmation
Once you have completed the storage space setup wizard you will be presented with the below confirmation.
This should show the name of your Pool, the size and should also show a green tick to indicate correct health
operation.
Page 18
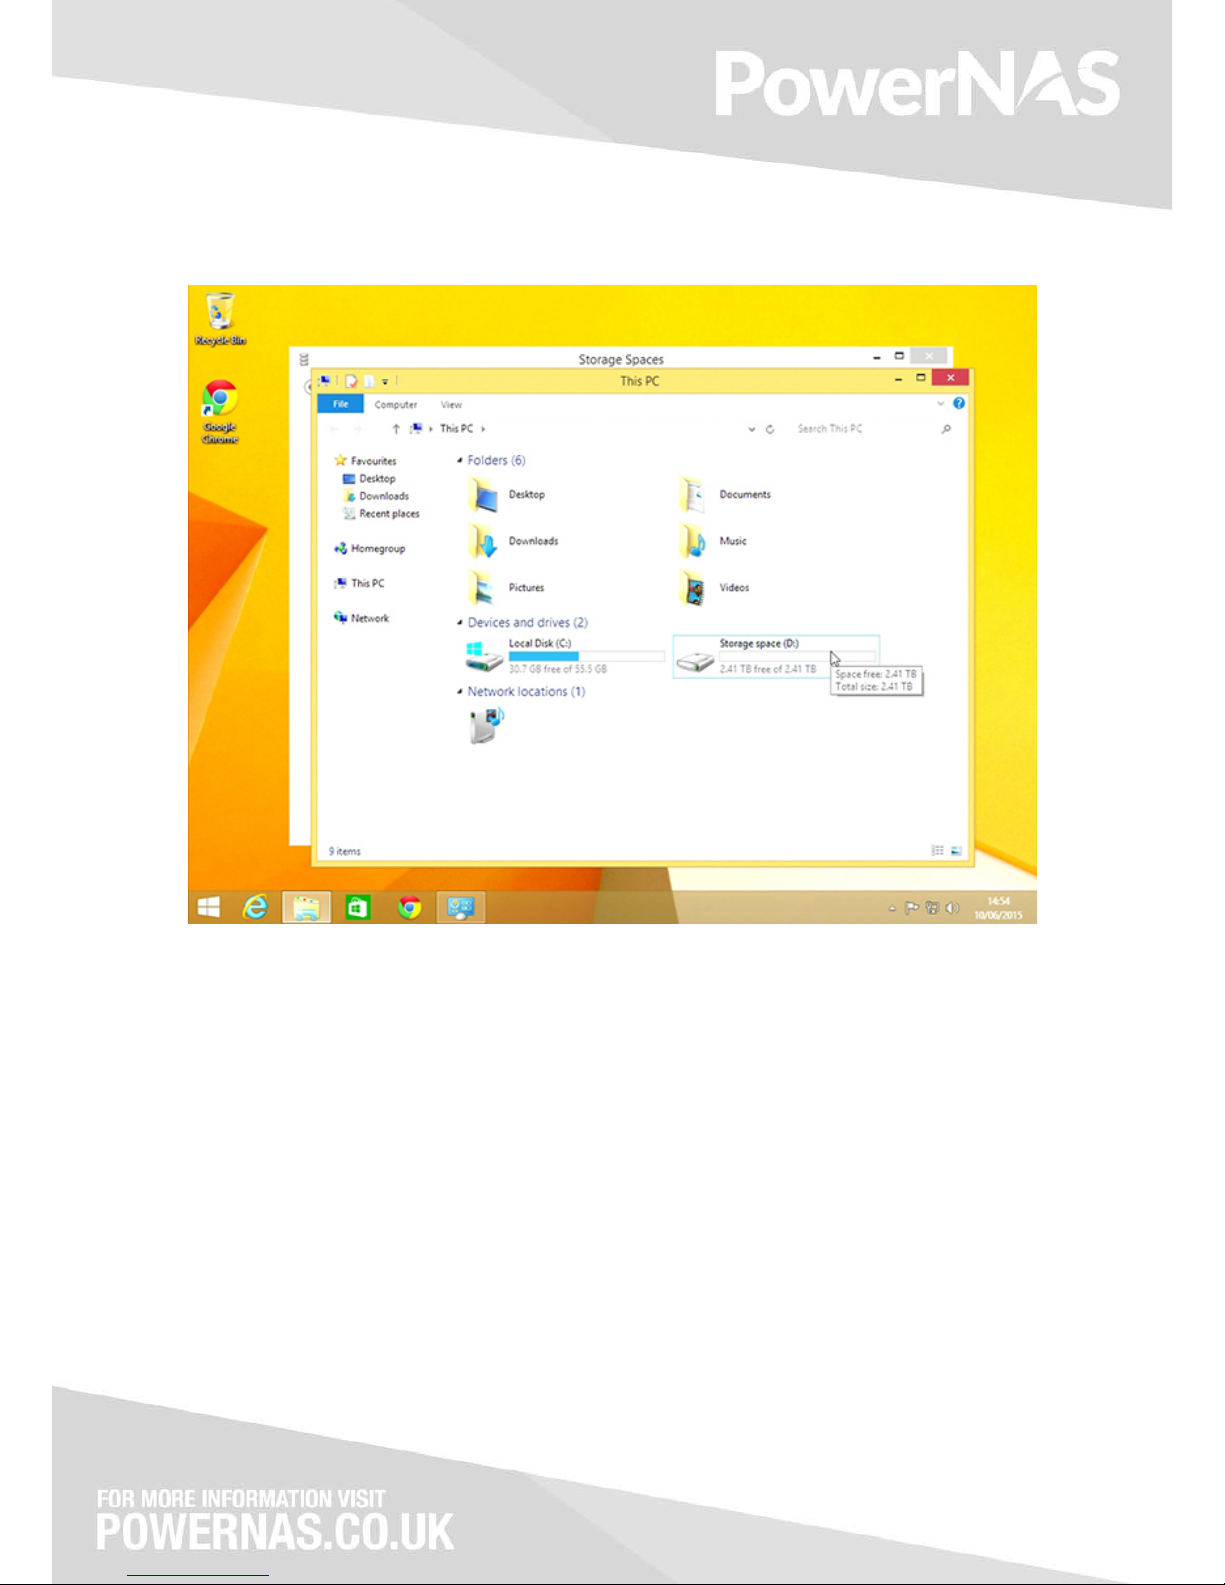
Figure 7: Check My Computer
To verify the new drive has been setup, launch My Computer. You should now see a new drive for the total
storage space setup. You can now use this new storage!
 Loading...