

Powernail 50M, 50P Operation And Maintenance Manual

POWERNAIL® CO.
1300 Rose Road, Lake Zurich, IL 60047
Phone: 1-800-323-1653
Website: www.powernail.com
Operation and Maintenance Manual
POWER ROLLER Conversion Kit
For the FLEX, Model 50P or 50M 18 Gauge Nailer
The Power Roller speeds up installation time and requires less
effort on the part of the installer.
WARNING
Read this manual before you use the Power Roller. Follow all safety warnings and instructions. If you
are uncertain about the operation of the Power Roller, call us directly at 1-800-323-1653 for assistance
or contact the closest Powernail Dealer for help. Please retain this information for future reference.
REV 2019.04.18

FLEX POWER ROLLER
Adding to the fl exibility of the Powernail
FLEX, the new Power Roller speeds up the
installation and requires less effort on the
part of the installer.
The FLEX uses an adjustable foot and you
can fi ne-tune the nailer height according to
different wood profi les. No need for extra
shims and pads!
The Flex with Power Roller is recommended
for use on 3/8", 1/2" and 5/8" Tongue and
OPERATION
Read these instructions carefully before you use the Nailer.
To use the Powernail Flex with Power Roller,
adjust the nailer FLEX foot to a sample of your
fl ooring.
Then, simply place the nailer on the fl oor, pull
nailer back so the no-mar triangle and 9mm
roller catch the edge of the fl oor above the
tongue, tap the plunger with the rubber capped
mallet end to let the Nailer drive and set the nail
at the correct 45 degree angle.
Note: If your nailer is equipped with a safety
trigger, hold down on the trigger before tapping
the plunger with the rubber capped mallet.
Groove fl ooring as well as some 3/4" exotics, bamboo,
and other solid wood fl ooring.
The Powernail Flex uses an 18 gauge Powercleat
that is less likely to split the tongue on denser, more
brittle woods and provides an excellent bond to the
underlayment. The Powernail FLEX is designed to use
cleat lengths of 1", 1-1/4", 1-1/2", and 1-3/4".
Nailing with the Power Roller is faster and easier. The
nailer is designed to nail from left-to-right and aides
the installer by guiding the nailer into the fl ooring as
the nailer is rolling along.
Consult the fl ooring manufacturers recommended
nailing schedule and ensure you are nailing over a
proper subfl oor.
See page 3 for instructions on correct FLEX foot
adjustment.
Powernailers® are constructed in the USA and are made
of the best materials available.
2
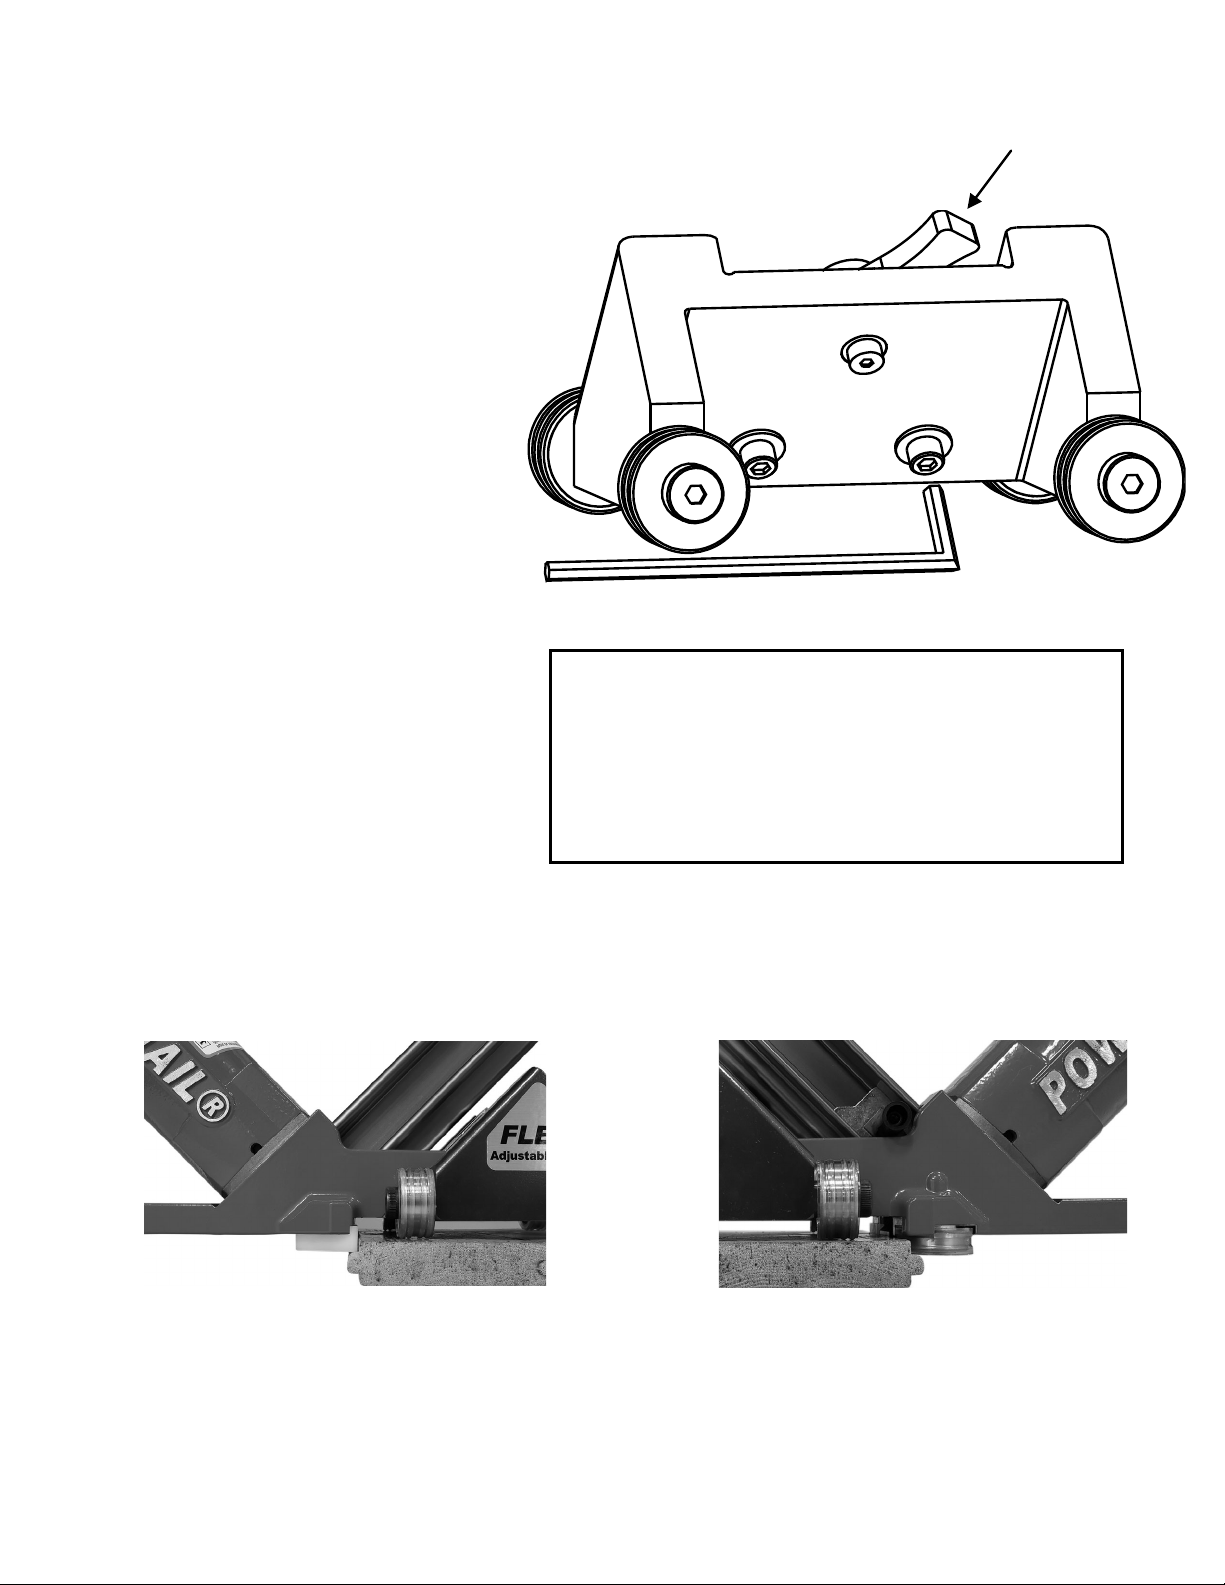
FLEX Foot Adjustment:
FLEX Foot Adjustment Lever
Wood varies from one manufacturer to the
next. The different wood profi les may be due
to height and length of the fl ooring tongue and
whether or not there is a nail pocket.
First, loosen the two hex bolts under the FLEX
foot with the Allen Wrench supplied with the
nailer. (Figure 1.)
Next, set the nailer on a sample of your fl ooring
(see Figure 2).
Use the adjustment lever at the back of the
nailer foot to raise or lower the nailer to the
wood.
Match the Adapter Foot no-mar triangle and
9mm roller so that it is pointing into the 90°
angle created by the tongue and the top of the
wood (see Figure 2).
For wood with a nail pocket, line up the no-mar
triangle and 9mm roller so at the top of the nail
pocket.
When the adjustment lever is in the correct
position for your wood sample, tighten the two
hex bolts to lock the FLEX foot into place.
Always check your adjustment with a sample to
ensure the nail is driving into the nail pocket
Figure 1.
Hex Allen Wrench
1. Loosen 2 hex screws.
2. Raise or lower the FLEX to your wood sample.
3. Match the
no-mar triangle and 9mm roller to the
nail pocket.
4. Tighten 2 hex screws.
5. Test wood sample with new adjustment.
Figure 2.
Raise the nailer foot to leave a small gap between the
triangle & 9mm roller and the fl ooring tongue.
Adjust FLEX lever so the triangle & 9mm roller is above the fl ooring tongue
3
 Loading...