

Power Master PM-DBC-1012DF, PM-DBC-0612F, PM-DBC-0424F, PM-DBC-0124F, PM-DBC-0724DF User Manual
...Page 1
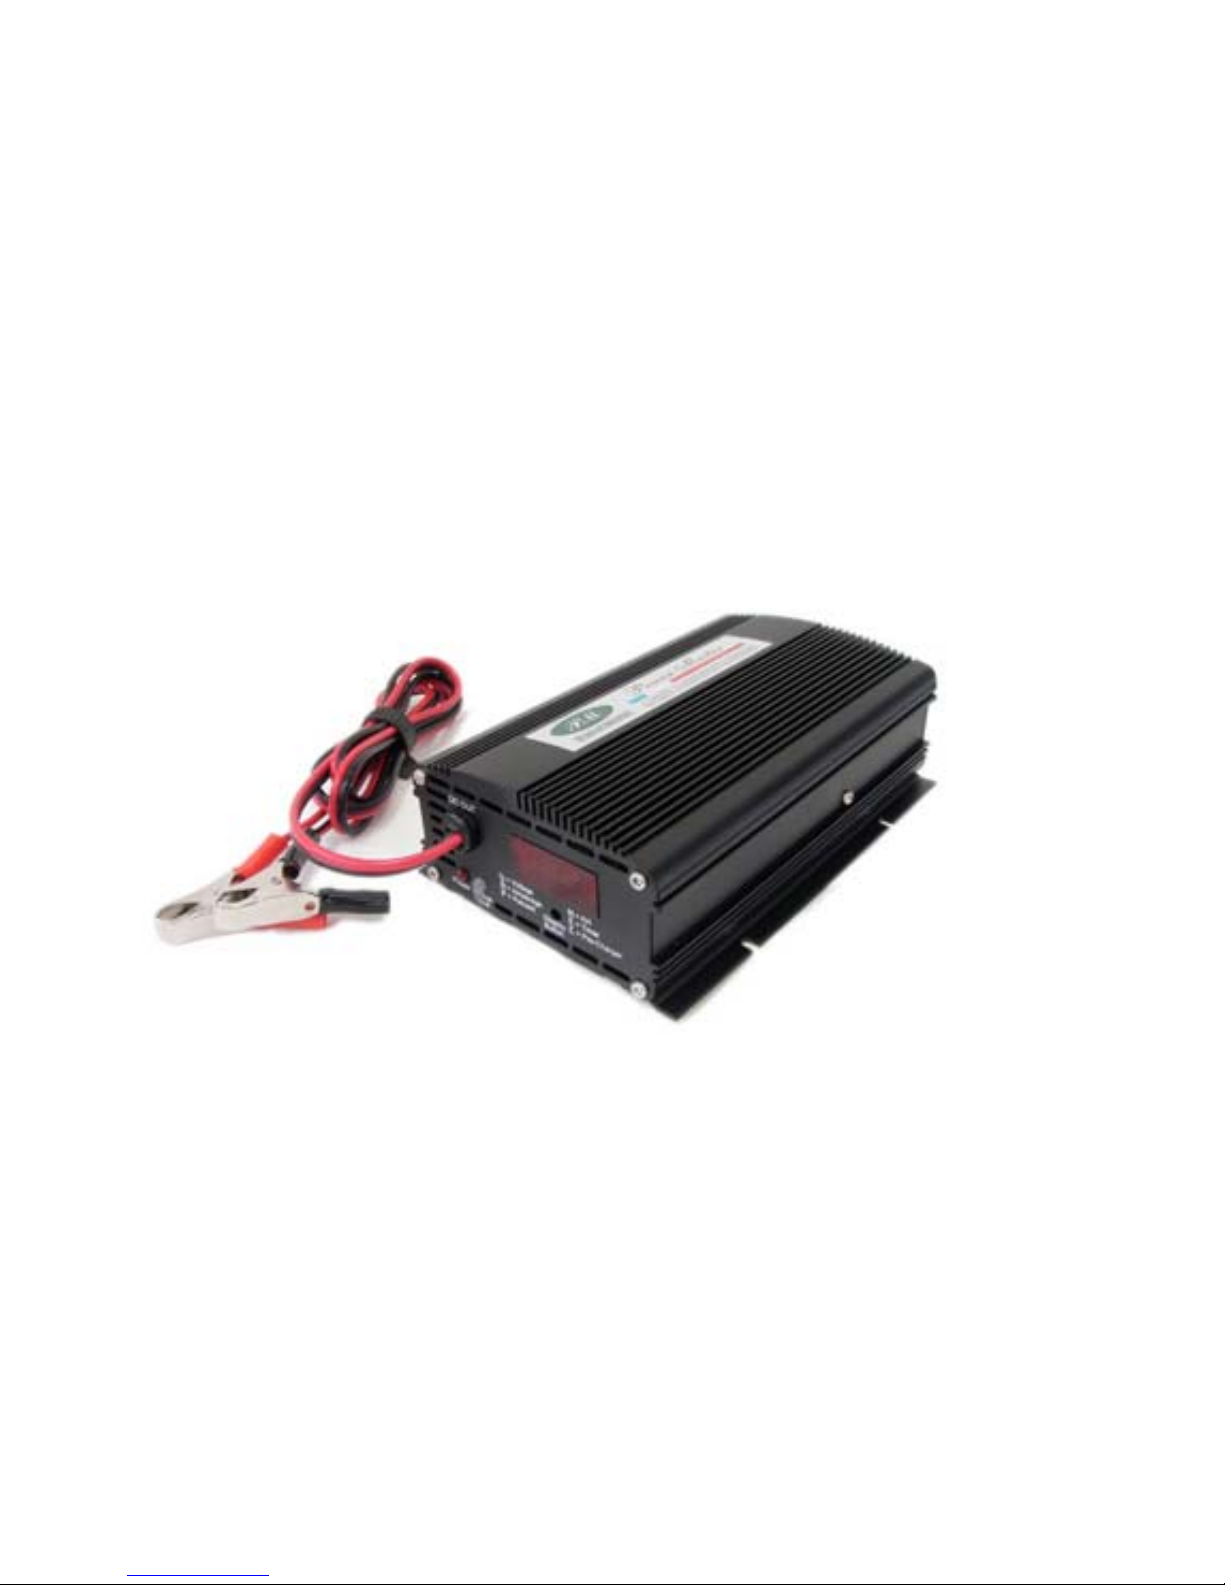
Power Master
AC/DC DIGITAL BATTERY CHARGER
DBC Series
USER MANUAL
Page 2

1
CONTENTS
Introduction....................................................................................................................2
Battery Charger Features..............................................................................................2
Safety Instruction..........................................................................................................4
LCD (Digital Meter) Display Guide ...............................................................................6
Front Panel & Back Panel Display ...............................................................................8
Charging Curve LED Indication..................................................................................16
Battery Charging Instruction......................................................................................18
Specification................................................................................................................19
Page 3

2
INTRODUCTION
Power Master Digital Battery Charger, or DBC in short, is a smart and light weighted battery charger
with unique LCD & LED Displays to allow users to read all information while charging, and to adjust
charging current, charging time, etc. With this smart battery charger, dual output and pulse charge
are also available with larger power models. To prolong battery lifespan, protections, pre-charge,
and automatic multi-rate charging functions are specially designed for this purpose.
BATTERY CHARGER FEATURES
Using DBC series battery chargers can save more than 25% of main power cost, and in addition to
protect your batteries and to extend lifespan of batteries.
Main Features
1. Unique LCD (digital meter) Display
For all models except 2Amp(12Vdc), 6Amp(12Vdc), 1Amp(24Vdc), and 4Amp(24Vdc), a unique
LCD Display is attached for indicating both status of the charger and battery level, voltage,
current and capacity. This further extends the function of a battery charger as it is now more
intelligent and more user-friendly. Adjustments for charging current and charging time are
possible.
2. LED Display
Clear and easy to understand LED Displays: Red (power), Green (floating charge), Orange
(equalizer charge)
3. Automatic Multi-Rate Charging Function
The DBC chargers are able to detect the rate of current needed during charging and enable
pre-charge, equalizer charge, or floating charge accordingly.
4. Dual Output
For models with 25Amp(12Vdc), 14Amp(24Vdc), 9Amp(36Vdc), 7Amp(48Vdc) and above, dual
output is designed for connecting to two battery banks and charging both batteries at the same
time. Each output has one rectifier to prevent countercurrent from happening. Ideally, the two
battery banks should have same battery capacity, else the unbalance in different capacities may
cause over charging.
5. Pulse charge
For models with 45Amp(12Vdc), 23Amp(24Vdc), 15Amp(36Vdc), 11Amp(48Vdc) and above,
this function is available to fully charge the batteries and to increase the charging efficiency. For
all other models except 2Amp(12Vdc), 6Amp(12Vdc), 1Amp(24Vdc), and 4Amp(24Vdc), pulse
charge at beginning can be added for 12V and 24V upon request.
Page 4

3
6. Pre-charge
When batteries are over discharged, bulk charging could damage the batteries. In order to
prevent this from happening, pre-charge function will be initiated automatically once the charger
detects battery voltage under 10V. When start charging, the charging current is limited to 50%
and pre-charge timer will start counting for 30 minutes. If the battery voltage increases to above
11.5V within 30 minutes, the charging current will return to 100% again.
This function is available for models
12Vdc: 10A~30Amp 24Vdc: 7A~17Amp 36Vdc: 4A~11Amp 48Vdc: 3A~8Amp
7. Cooling fan controlled by floating voltage
When reaching to floating stage, rotating speed of the fan will slow down or the fan will stop in
order to increase lifespan of fan. During bulk charging, the fan will rotate in fast speed to
lowering the temperature.
With 2Amp(12Vdc), 6Amp(12Vdc), 1Amp(24Vdc), and 4Amp(24Vdc) models, cooling fans are
controlled by temperature instead of floating voltage.
8. Exquisite case design
The aluminum housing makes the charger to have best thermally conductive performance with
modern case design.
9. Adapted to each battery technology
Chargeable for Lead-Acid Battery (liquid electrolyte, gel electrolyte, lead calcium, etc…)
DBC for Lithium Battery, please contact sales persons individually.
Protections
1. Short-circuit Protection
The charger output will cut-off automatically when short circuit.
2. Overload protection
The charger output current is limited automatically when overload.
3. Reverse polarity protection
The charger output will cut-off automatically when batteries are in reverse connection. Models of
30Amp(12Vdc), 17Amp(24Vdc), 11Amp(36Vdc), 8Amp(48Vdc) and above are protected by fuse;
all other models are protected by circuit.
4. Over charge protection
Using fixed voltage and limited current to avoid overcharging the batteries
5. Temperature protection
If the temperature of environment or the case of battery charger is too high (around 65 ~75 ), ℃℃
the unit will adjust the current automatically to protect battery charger and batteries.
Page 5

4
SAFETY INSTRUCTION
Misusing or incorrectly connecting the Battery Charger may damage the equipment or create
hazardous conditions for users. Read the following safety instructions and pay special attention to
all Caution and Warning statements in the guide.
Warnings identify conditions that may result in personal injury or loss of life.
Cautions identify conditions or practices that may damage the unit or other equipment.
Battery Related
1. To reduce the risk of battery explosion, follow these instructions and those marked on the
battery.
2. Never smoke or allow an open spark or flame in the vicinity of the battery or engine.
3. DBC Series was designed for charging Lead-Acid batteries only (liquid electrolyte, gel
electrolyte, lead calcium, etc... ).
4. Never charge a frozen battery. Not to recharging non-rechargeable batteries.
5. Take necessary safety precautions when installing the charger near a battery or in a battery
compartment (Follow safety instructions given by the battery manufacturer).
6. Never place the charger directly above or below the battery being charged; gases or fluids from
the battery will corrode and damage the charger. Locate the charger as far away from the
battery as DC cables permit.
Charger Related
1. Do not operate the charger in a closed-in area or restrict ventilation in any way. Install in a well
ventilated, cool, dry place.
2. Do not expose the Battery Charger to moisture, rain, or snow.
3. The charger must not be operated in a damp or wet environment. When mounting in a boat,
make sure it is not subjected to bilge water splash.
4. Disconnect the AC input power to the charger before connecting / disconnecting the batteries
or other DC loads or when working on the charger.
5. To reduce risk of damage to electric plug and cord, pull by plug rather than cord when
disconnecting the Battery Charger.
6. Do not operate the charger if the power cord is damaged. Do not operate Battery Charger with
damaged cord or plug—have the cord or plug replaced.
7. The battery charger must only be plugged into an earthed socket-outlet.
Page 6

5
Personal Related
1. Someone should be within range of your voice or close enough to come to your aid when you
work near a battery.
2. Have plenty of fresh water and soap nearby in case battery acid contacts skin, clothing, or
eyes.
3. Wear complete eye protection and clothing protection. Avoid touching eyes while working near
battery.
4. If battery acid contacts skin or clothing, wash immediately with soap and water. If acid enters
eye, immediately flood eye with running cold water for at least 10 minutes and get medical
attention immediately.
5. NEVER smoke or allow a spark or flame in the vicinity of battery or engine.
6. Be extra cautious to reduce risk of dropping a metal tool onto a battery. It might spark or
short-circuit the battery or other electrical part that may cause an explosion.
7. Remove personal metal items such as rings, bracelets, necklaces, and watches when working
with a battery.
DC Connection Precautions
Use red insulated wire(s) for positive connection(s) and black for negative connection(s).
Polarity errors are excluded from warranty.
1. Connect and disconnect the DC cables only after removing the AC cord from the electric outlet.
2. When attaching the clips to the battery posts, twist or rock back and forth several times to make
a connection. This tends to keep the clips from slipping off the terminals and helps to reduce the
risk of sparking. Failure to follow these safety guidelines may cause personal injury and/or
damage to the Battery Charger.
Page 7
6
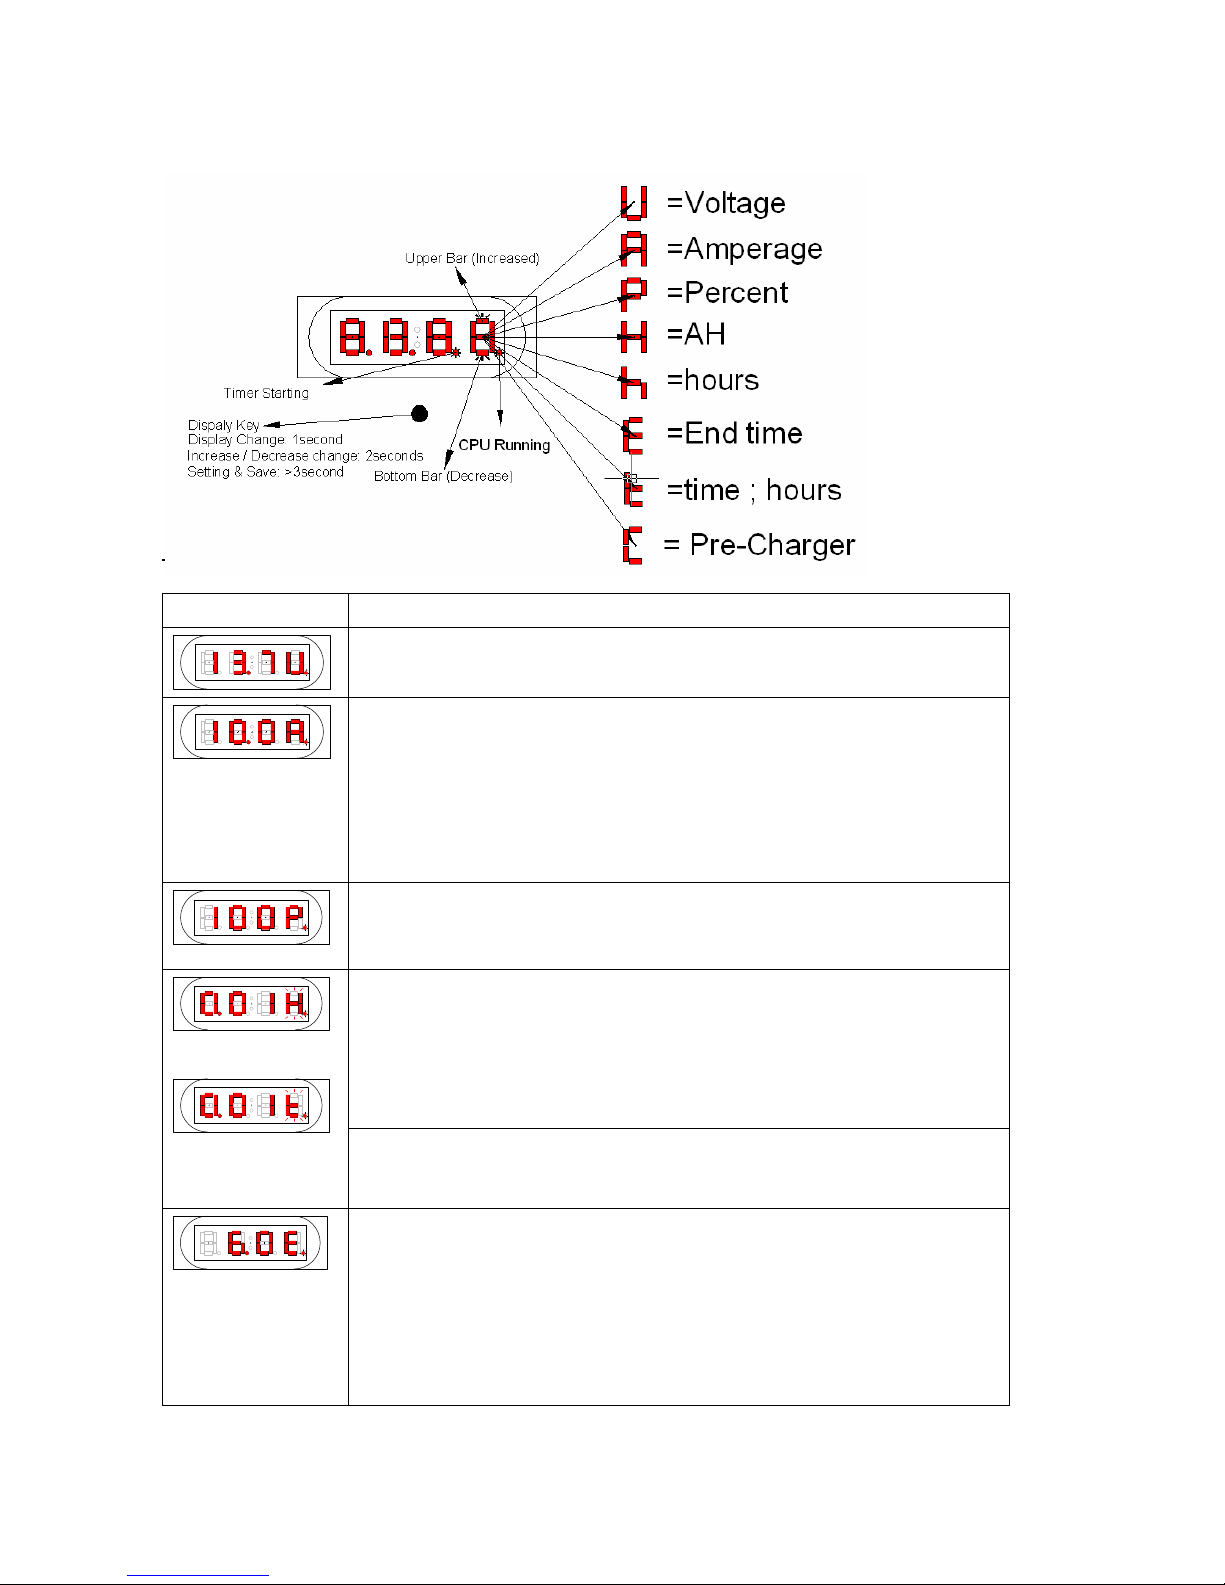
LCD (Digital Meter) DISPLAY GUIDE
Item Descriptions
O/P Voltage "V":
Default display
O/P Current, Charging Current "A":
The O/P current will display after pressing "Display Key" for 1 second
while displaying "V".
Press & hold “Display Key” for 3 seconds while displaying “A” to
enable O/P current “zero calibration” (the period approx. 10 seconds)
Press “Display Key” for 2 seconds to disable “zero calibration.”
(For safety concerns, zero calibration is not recommended)
Battery Level "P":
The percentage of battery capacity at the moment will display after
pressing "Display Key" for 1 second while displaying "A".
Total Charging Capacity "AH" (Ampere-Hour):
AH calculation will be initiated when charging current >1A, "H"
twinkles when “AH" is operating.
Press and hold "Display Key" for 3 seconds while displaying "H" to
enable AH to zero. "H" stops twinkling when "AH" function stops
operating.
Timer for AH "t":
Start counting after "AH" function is operating. This is to allow users to
know AH value within certain period of time.
Charging End Time Setting "E":
Initiates when voltage >setting value or charging current <30% of
rating. Press & hold "Display Key" for 3 seconds while displaying "E"
to enable timer setting. (Upper Bar twinkle: increase; Bottom Bar
twinkle: decrease)
Press and hold "Display Key" for 3 seconds to save the new setting
value. The 3
rd
dot signal flashes light means the timer is starting and
while the timer stops, the 3
rd
dot signal solid lights.
Page 8
7
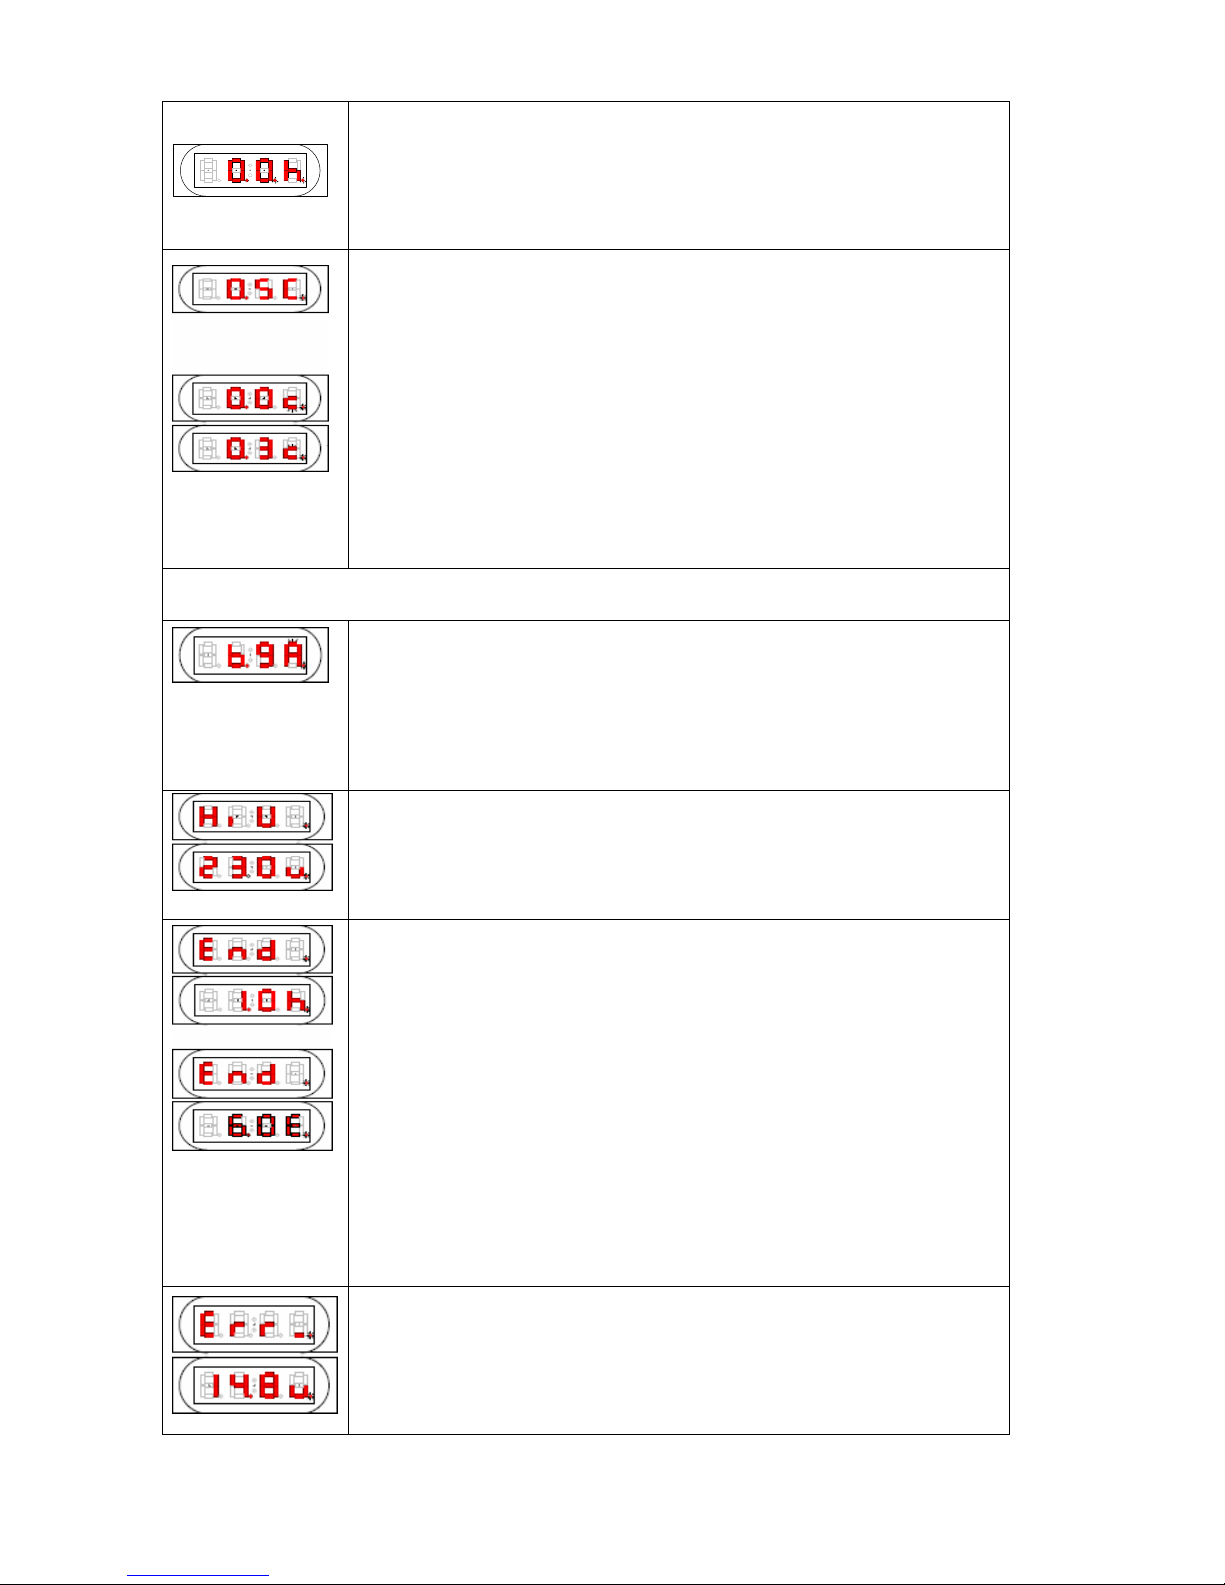
Timer for E "h":
Start counting after "E" (timer) function is operating. When O/P current
is under setting value, the 3
rd
dot signal flashes. It will display the total
time of charge after battery has been fully charged. According to the
value, the user can set the perfect charging time for his own battery.
Ex. If the total time is 1 hour, user can then set the value at 1.0.E.
Pre-charging "C":
When battery voltage < setting value, the pre-charge timer starts
counting. Press & hold “Display Key” for 3 seconds while displaying
“C” to enable timer setting (Upper Bar twinkle: increase; Bottom Bar
twinkle: decrease. Each increment or decrement represents 0.1 hour).
Press & hold “Display Key” for 3 seconds to save the new setting
value.
The bottom bar of small letter “c” twinkle means the charger is
charging the battery by 25% of rating current.
The upper bar of small letter “c” twinkle means the charger is charging
the battery by 50% of rating current.
When battery voltage > setting value, the charger will switch to
equalizer charge stage, and LCD Display will show O/P voltage.
Other Settings & Displays
O/P Current Adjustment:
Press and hold "Display Key" for 3 seconds while displaying "P" to
enable O/P current adjustment.
Upper Bar twinkle: Press “Display Key” to increase the value;
Bottom Bar twinkle: Press “Display Key” to decrease the value.
This function is for authorized technicians only.
High Voltage (Over Charging):
If the battery voltage is over setting value, the display will show "H.V."
& "xx.xv" alternately; the small letter “v” (high voltage) is to distinguish
from capital “V” (O/P voltage); meanwhile, the charger will stop
charging & LED off. Press “Display Key” to reset.
Stop Charging:
1. Current < 10% of rating, the display will show “End” & ”x.x h.”
alternately.
a. Chargers without float charge stage will stop charging and
have LED off.
b. Chargers with float charge stage available will switch to float
charging and have green LED on.
2. When over timer setting but current >10% of rating, the display will
show “End” & “x.x E.” alternately.
a. Chargers without float charge stage will stop charging and
have LED off.
b. Chargers with float charge stage available will switch to float
charging and have green LED on.
3. Press “Display Key” to reset
Battery Error:
If the battery voltage cannot rise to the setting value while the setting
time of 25% of rating current pre-charging is over , the disp lay will show
“Err_” & “xx.x v” alternately. This value represents the final battery
voltage. The small letter “v” (final battery voltage) to distinguish from
capital “V” (O/P voltage).
Page 9
8
FONT PANEL & BACK PANEL DISPLAY
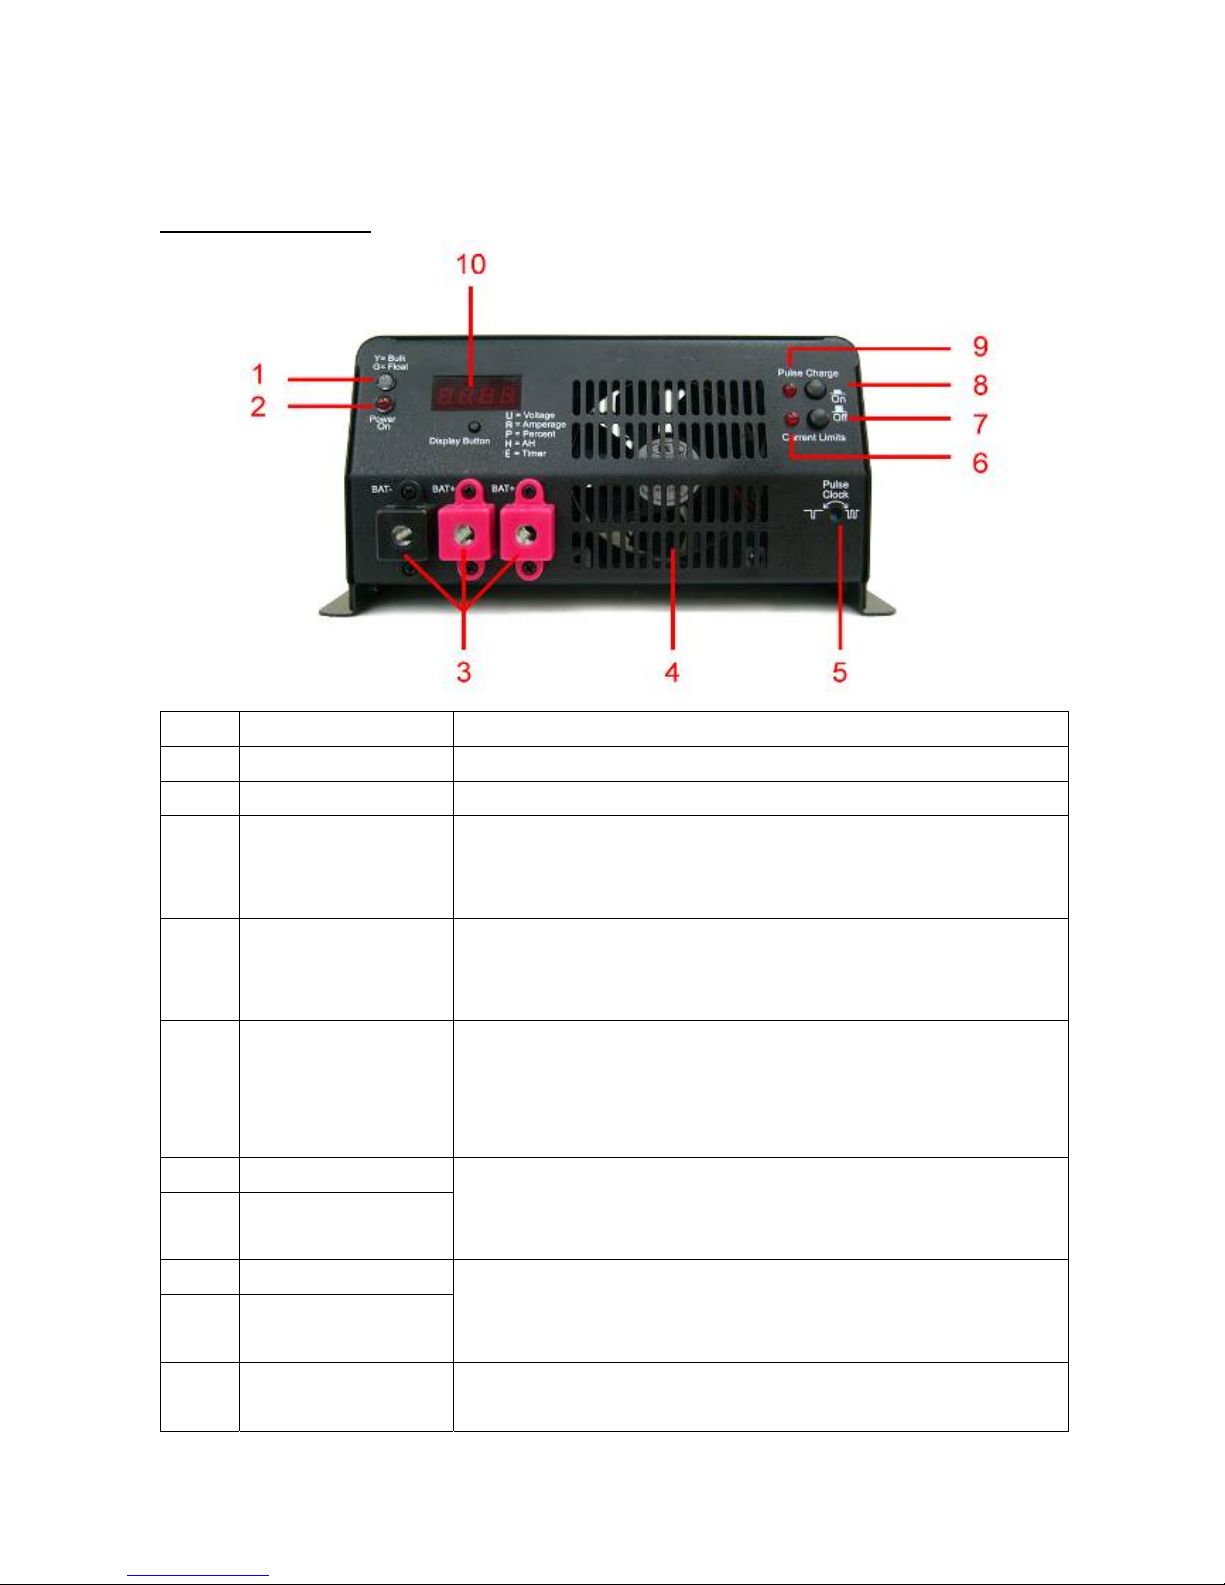
Front Panel Display (Model: PM-DBC-4512D)
Items Name Description
Item 1 Charging LED Green (floating charge), Orange (equalizer charge)
Item 2 Power LED Red (power)
Item 3 Battery POS+/ NEG- Dual output
[ For 25Amp(12Vdc), 14Amp(24Vdc), 9Amp(36Vdc), 7Amp(48Vdc) and
above only ]
Item 4 Fan Fan automatically slows down or stops when reaching floating voltage.
[ 2Amp(12Vdc), 6Amp(12Vdc), 1Amp(24Vdc), and 4Amp(24Vdc)
chargers are controlled by temperature ]
Item 5 Pulse Clock Turn left: low frequency (charge 1 sec. with 3 sec. of pause)
Turn right: fast frequency (charge 1 sec. with 1 sec. of pause )
[ For 45Amp(12Vdc), 23Amp(24Vdc), 15Amp(36Vdc), 11Amp(48Vdc)
and above only ]
Item 6 Current Limited LED
Item 7 Current Limited Switch
Adjust largest current to half current to charge your smaller batteries.
[ For 45Amp(12Vdc), 23Amp(24Vdc), 15Amp(36Vdc), 11Amp(48Vdc)
and above only ]
Item 8 Pulse Charge Switch
Item 9 Pulse Charge LED
It’s difficult to have batteries fully charged, even with float charging. In
this case, turn on Pulse Charge function will help to fully charge the
batteries and increase charging efficiency.
Item10 LCD Display [ All models except 2Amp(12Vdc), 6Amp(12Vdc), 1Amp(24Vdc), a nd
4Amp(24Vdc) ]
Page 10
9
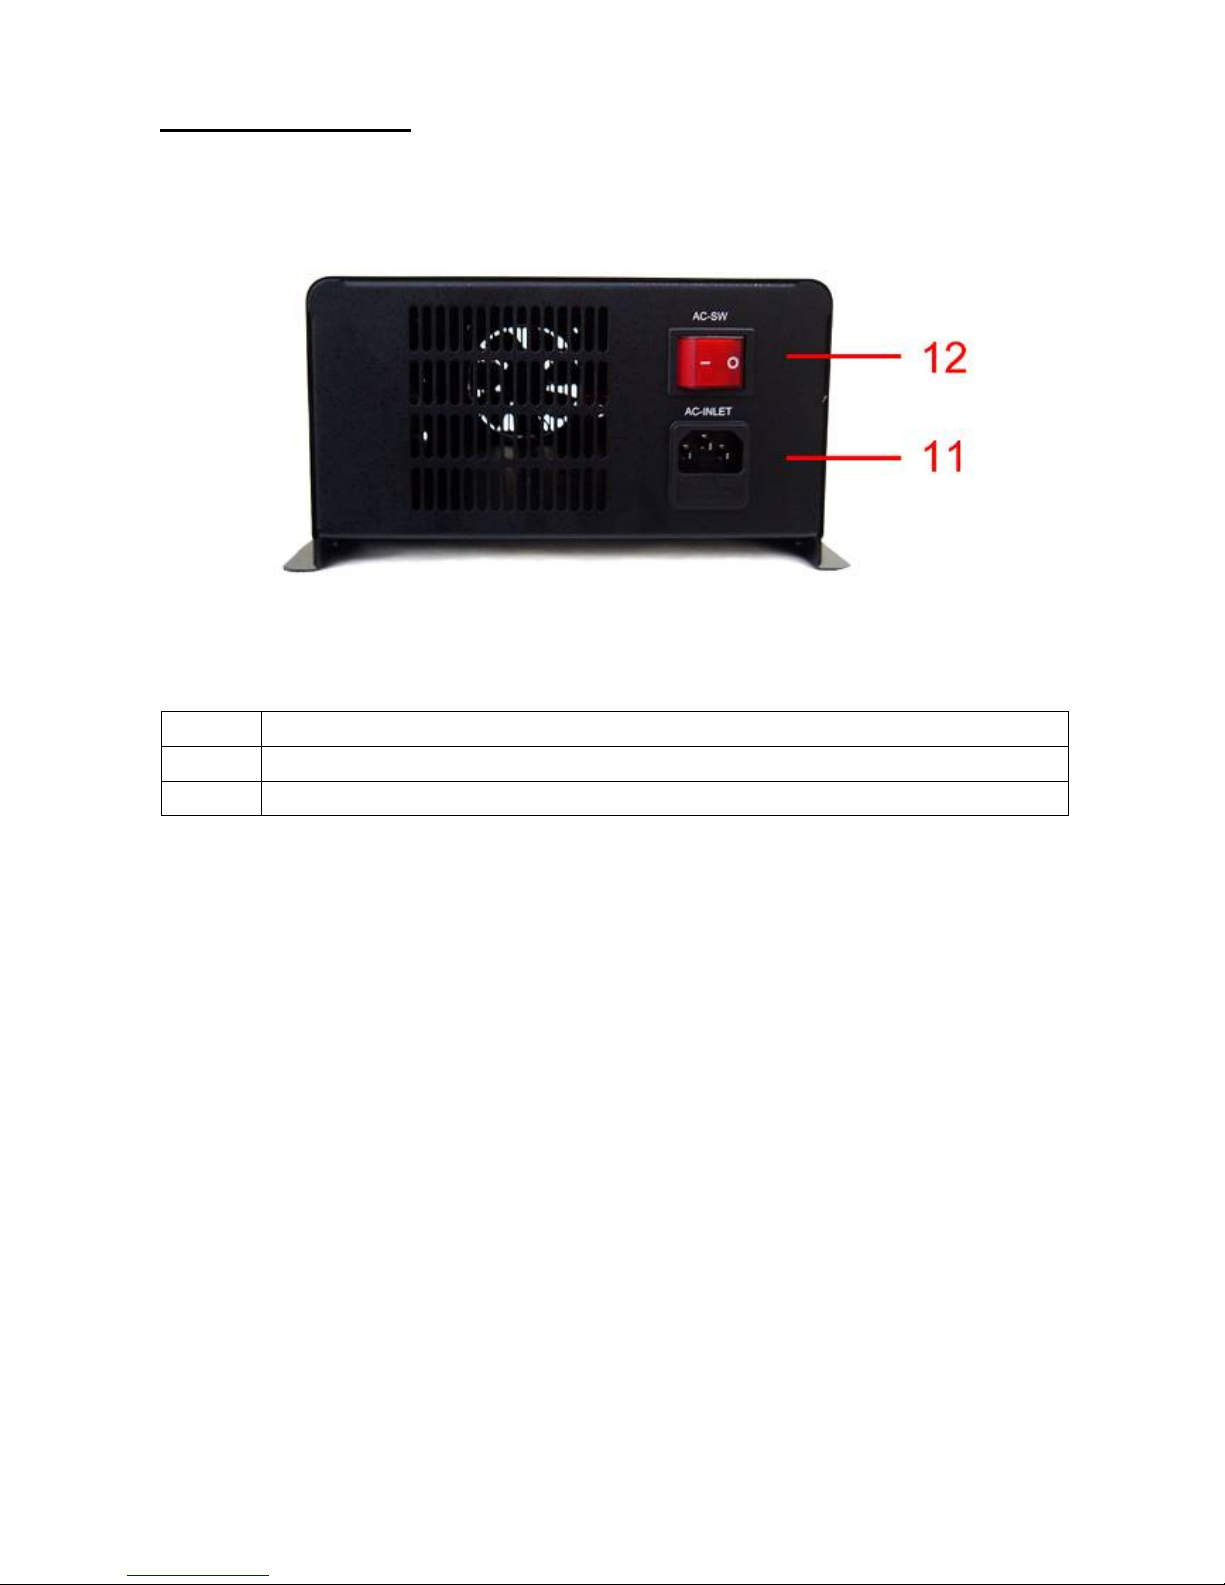
Back Panel Connecting (Model: PM-DBC-4512D)
Items Name
Item 11 Connecting with AC input
Item 12 ON/OFF Switch
Page 11
10
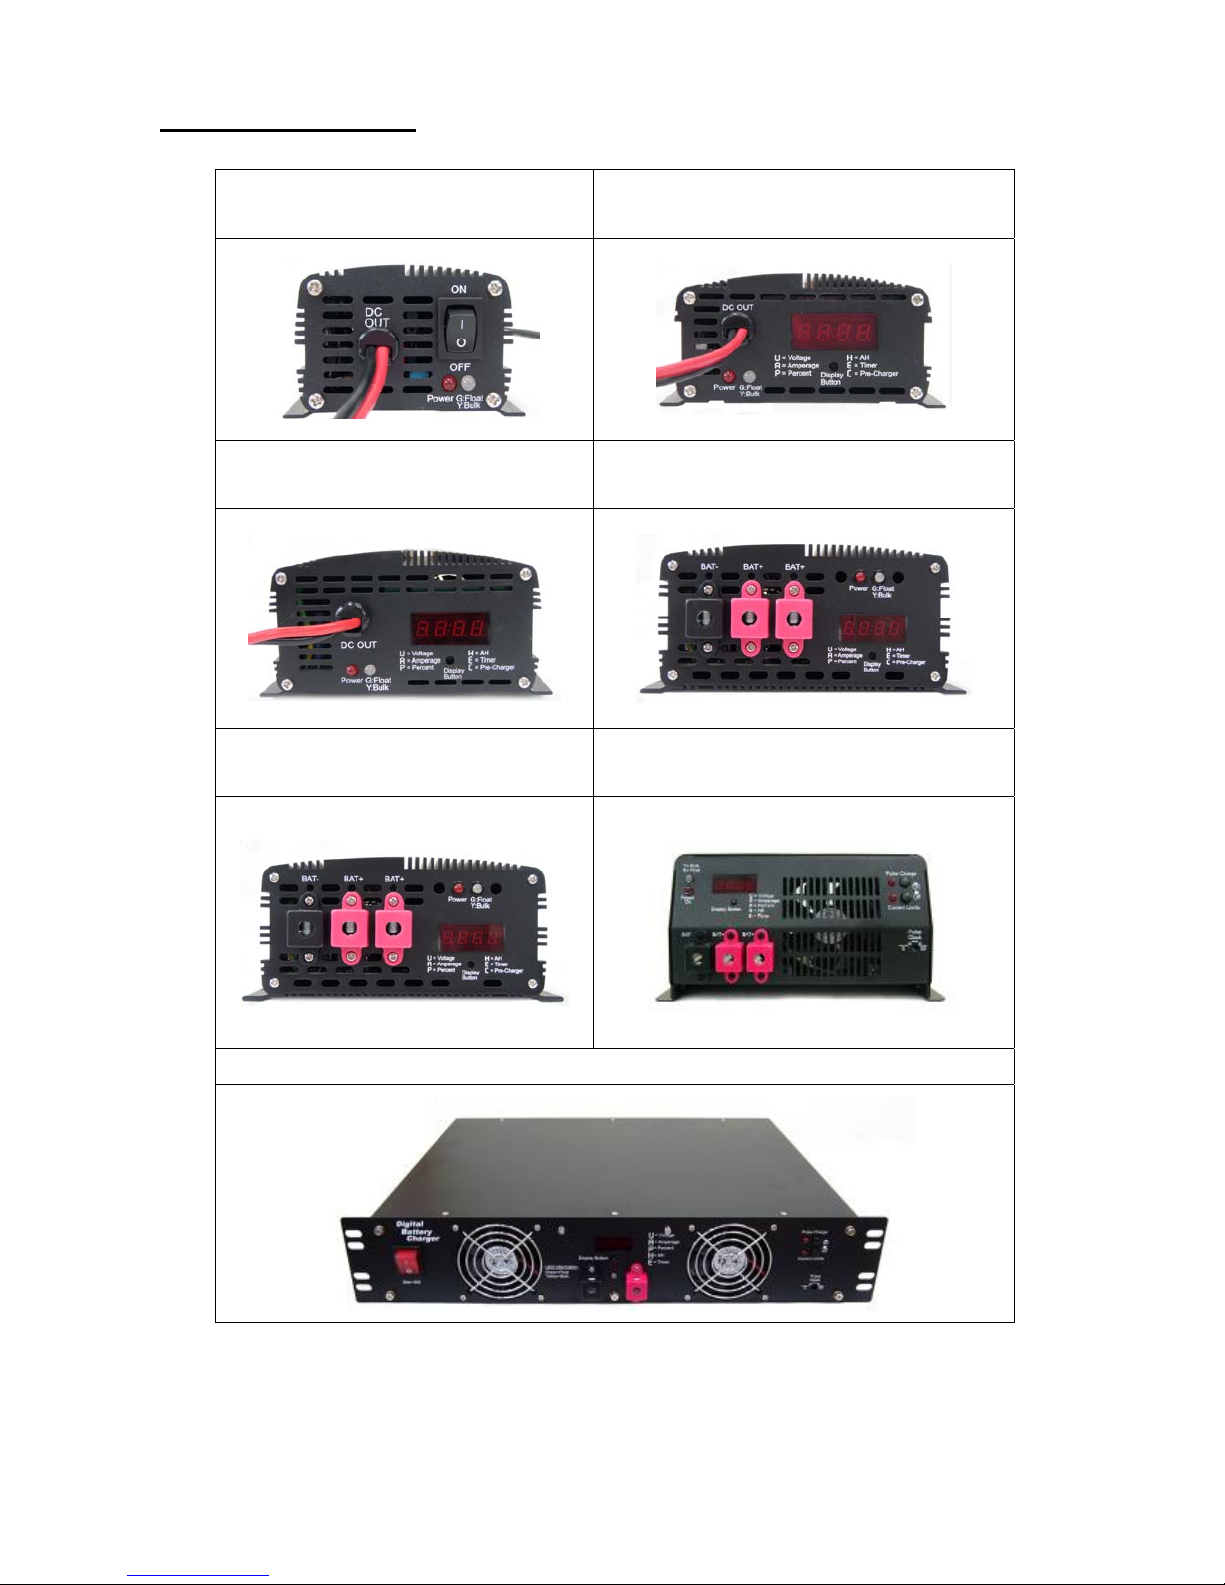
Front Panel - All Models
PM-DBC-0212F, PM-DBC-0612F
PM-DBC-0124F, PM-DBC-0424F
PM-DBC-1012DF, PM-DBC-0724DF
PM-DBC-0436DF, PM-DBC-0348DF
PM-DBC-2012D, PM-DBC-1224D
PM-DBC-0836D, PM-DBC-0648D
PM-DBC-2512D, PM-DBC-1424D
PM-DBC-0936D, PM-DBC-0748D
PM-DBC-3012D, PM-DBC-1724D
PM-DBC-1136D, PM-DBC-0848D
PM-DBC-4512D, PM-DBC-2324D
PM-DBC-1536D, PM-DBC-1148D
PM-DBC-9012D, PM-DBC-4524D, PM-DBC-3036D, PM-DBC-2248D
Page 12
11
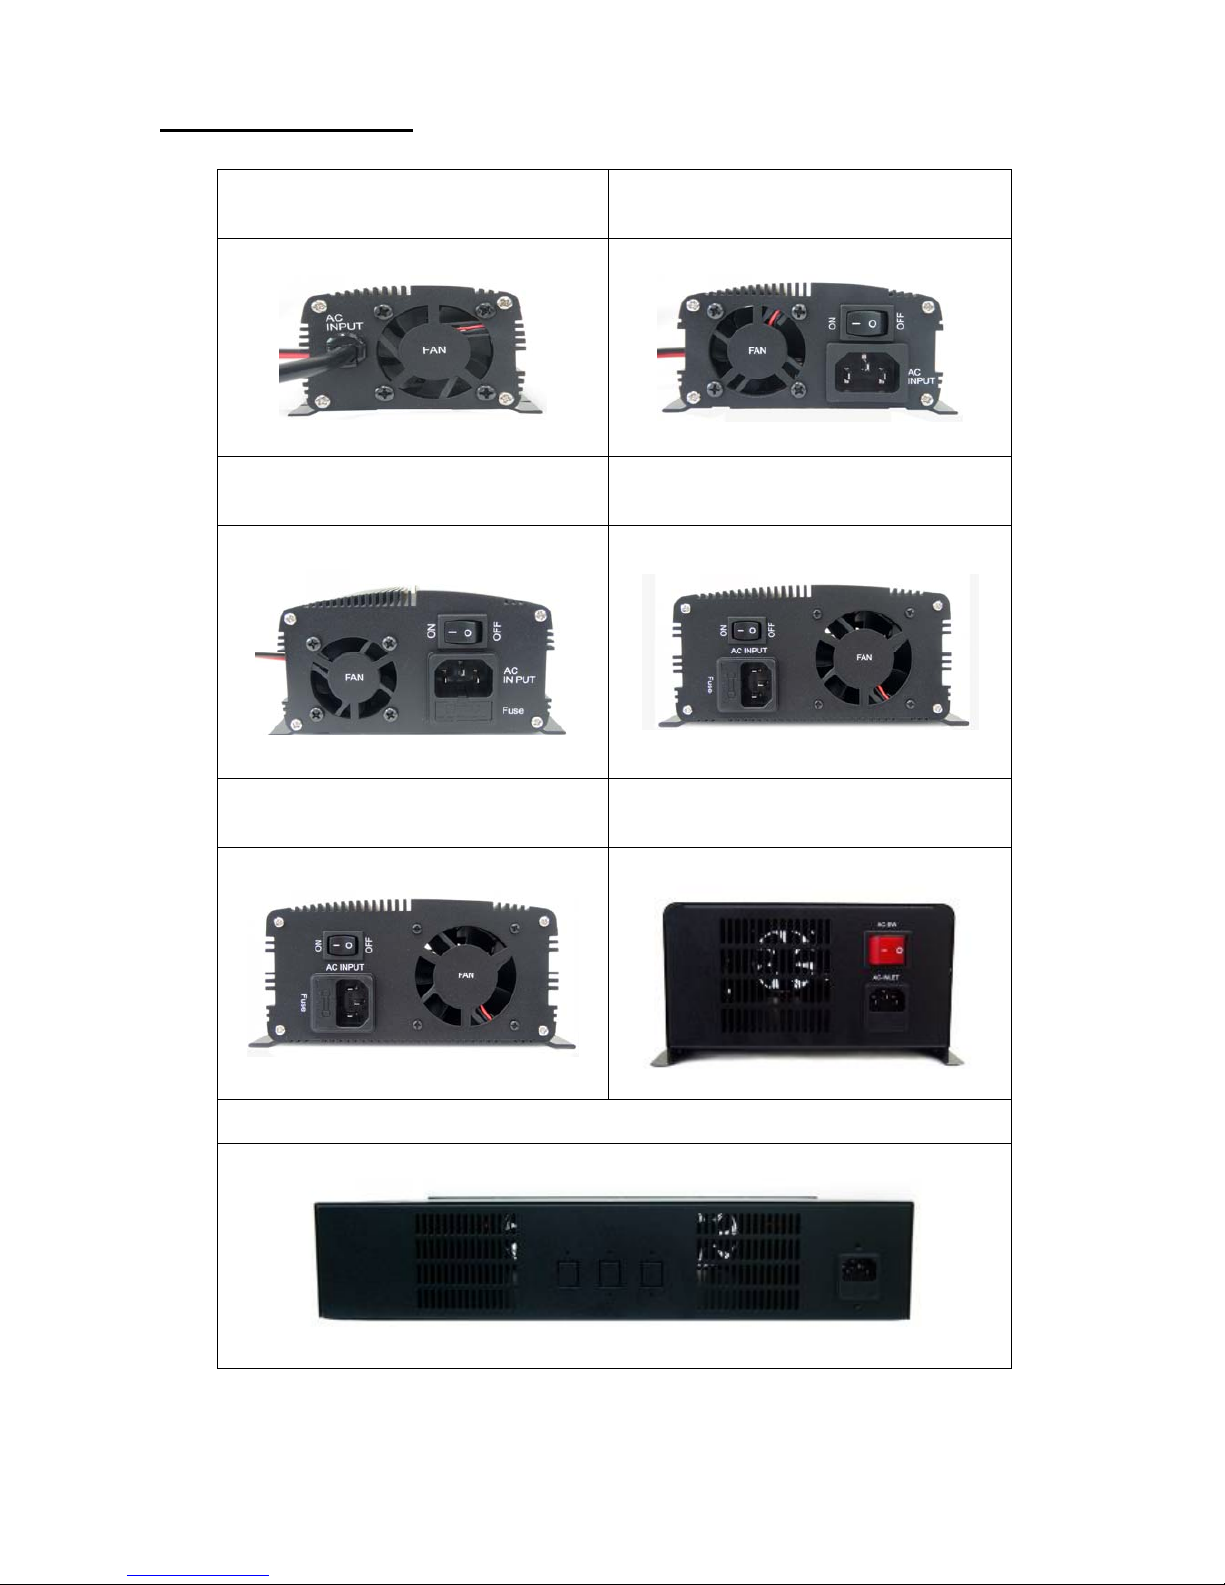
Back Panel - All Models
PM-DBC-0212F, PM-DBC-0612F
PM-DBC-0124F, PM-DBC-0424F
PM-DBC-1012DF, PM-DBC-0724DF
PM-DBC-0436DF, PM-DBC-0348DF
PM-DBC-2012D, PM-DBC-1224D
PM-DBC-0836D, PM-DBC-0648D
PM-DBC-2512D, PM-DBC-1424D
PM-DBC-0936D, PM-DBC-0748D
PM-DBC-3012D, PM-DBC-1724D
PM-DBC-1136D, PM-DBC-0848D
PM-DBC-4512D, PM-DBC-2324D
PM-DBC-1536D, PM-DBC-1148D
PM-DBC-9012D, PM-DBC-4524D, PM-DBC-3036D, PM-DBC-2248D
Page 13
12
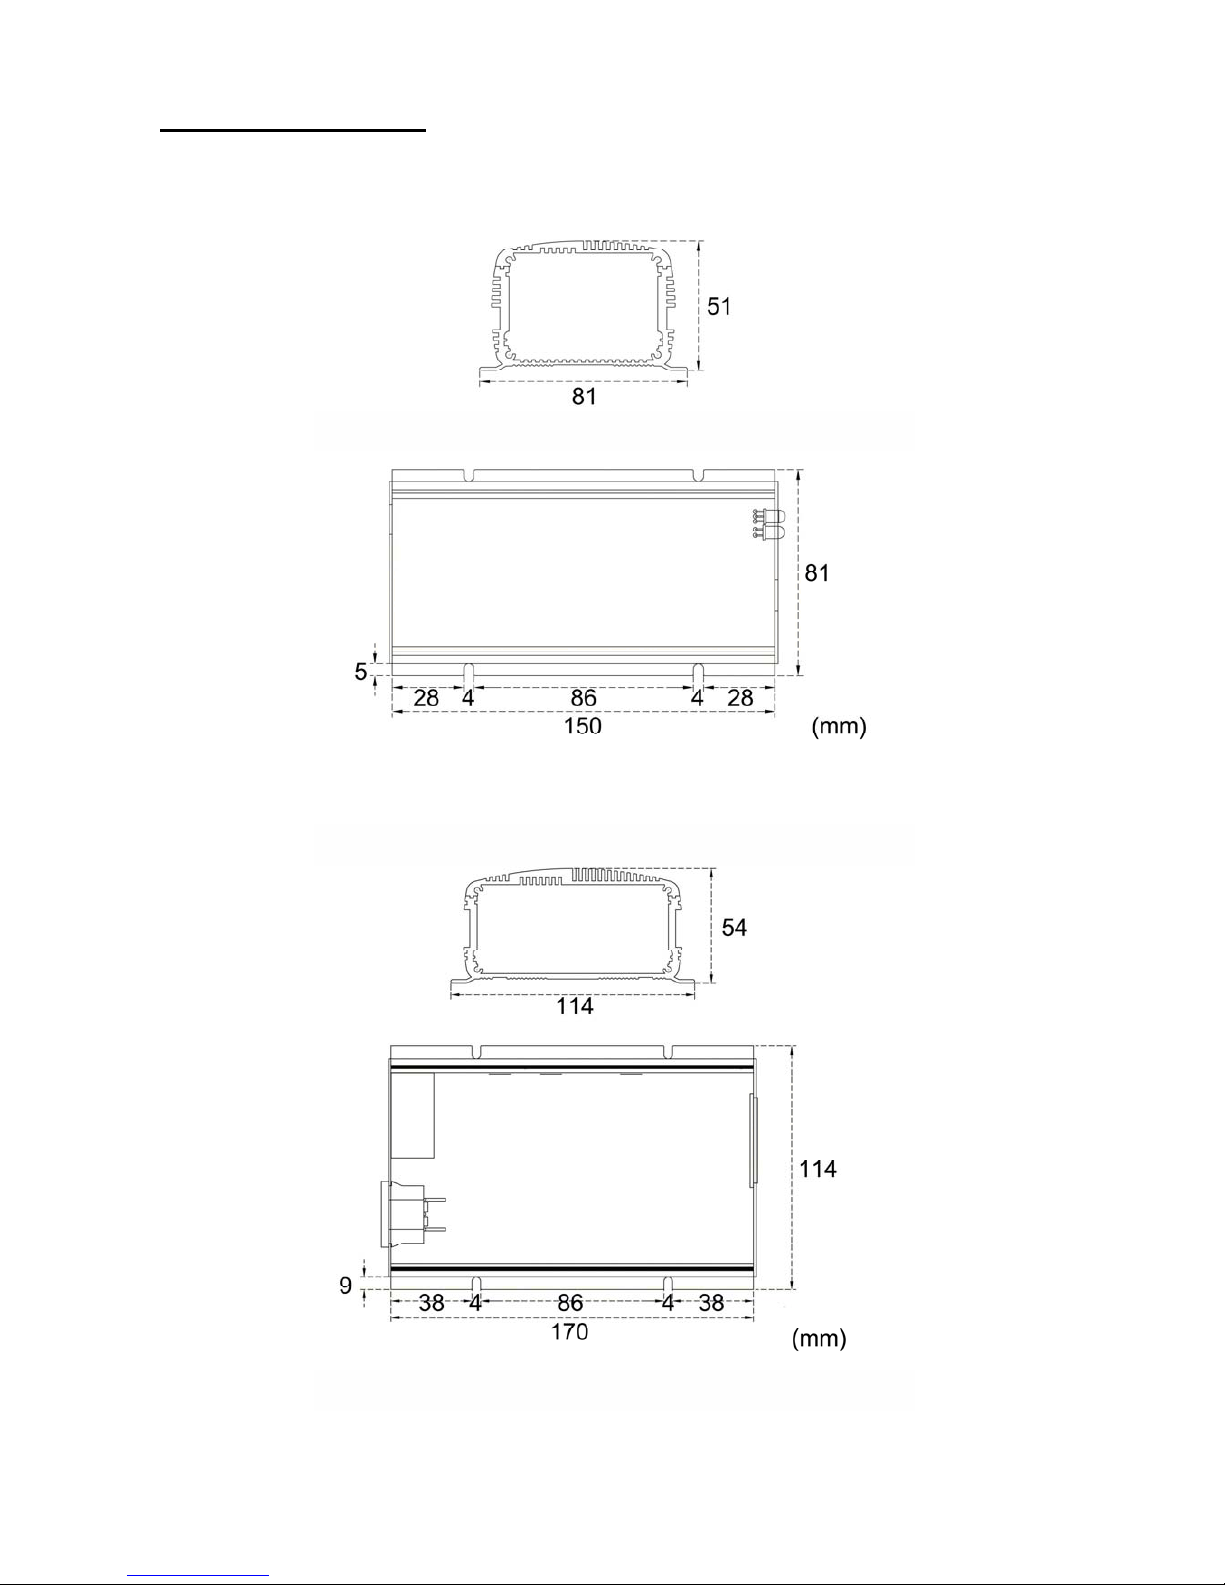
Dimensions – All Models
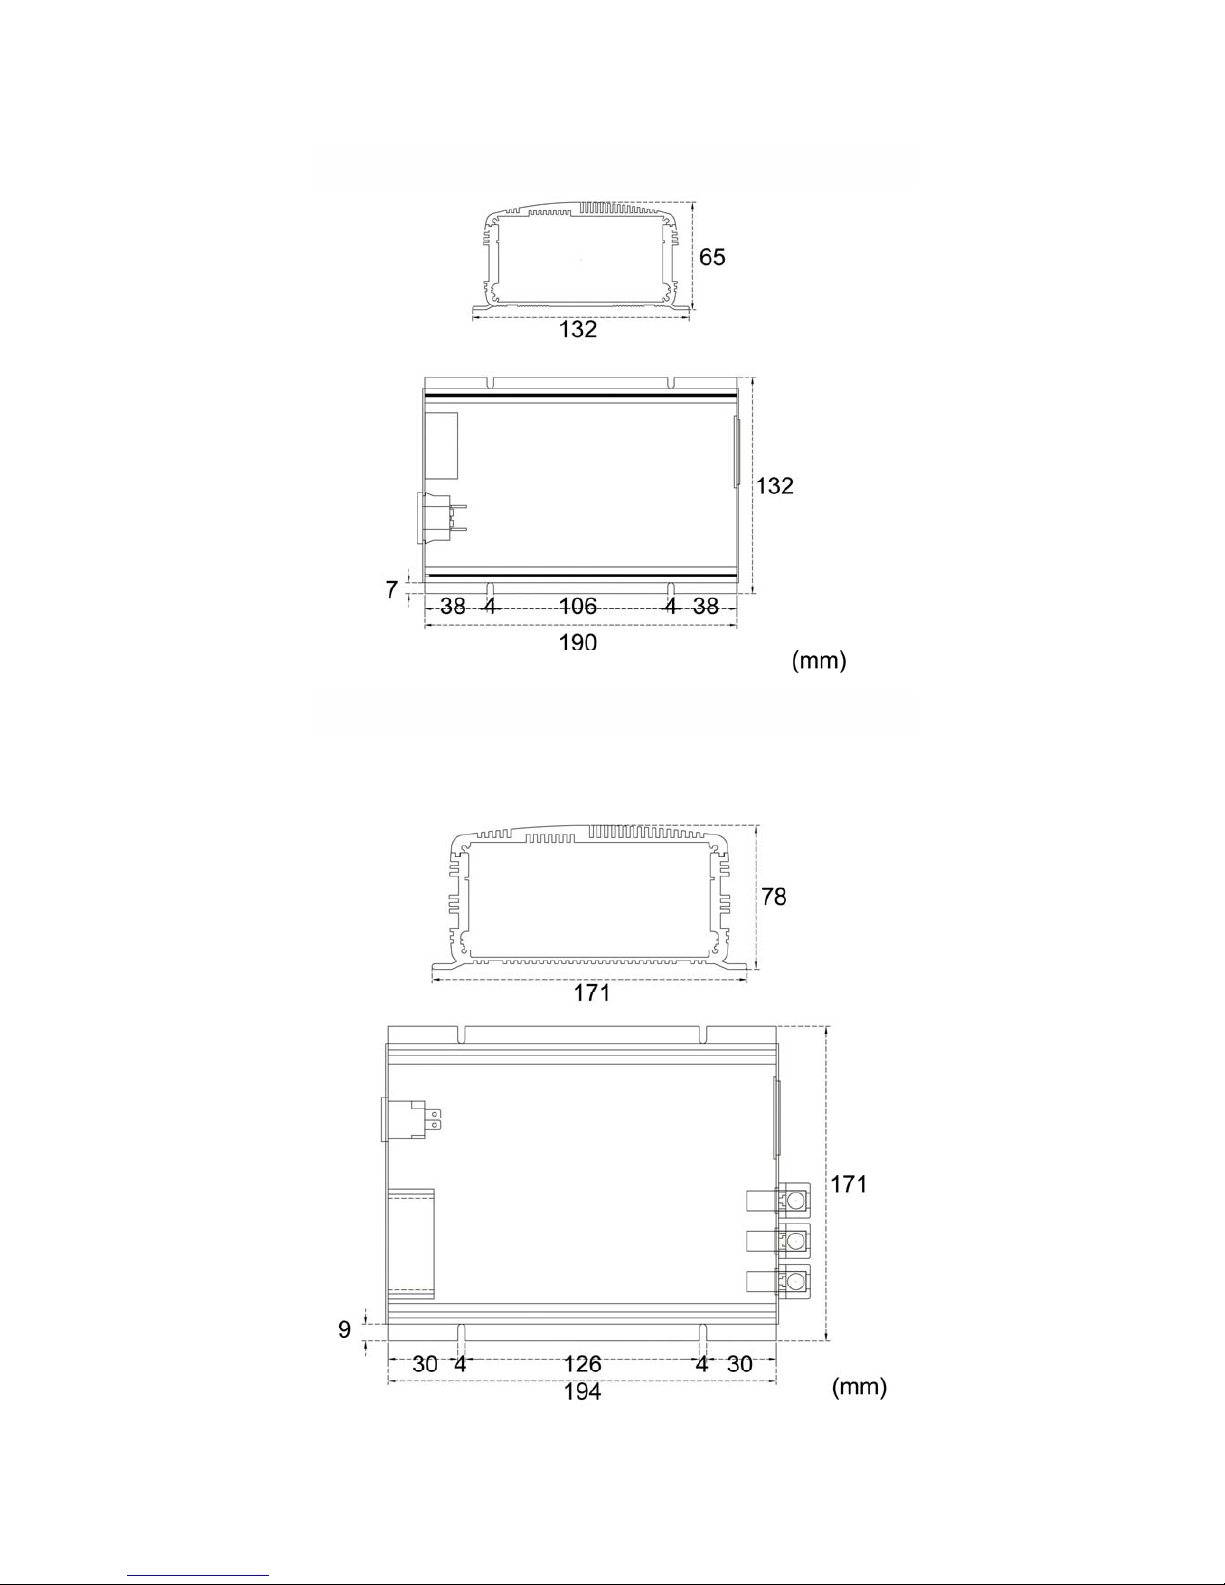
z PM-DBC-0212F, PM-DBC-0612F, PM-DBC-0124F, PM-DBC-0424F
z PM-DBC-1012DF, PM-DBC-0724DF, PM-DBC-0436DF, PM-DBC-0348DF
Page 14
13
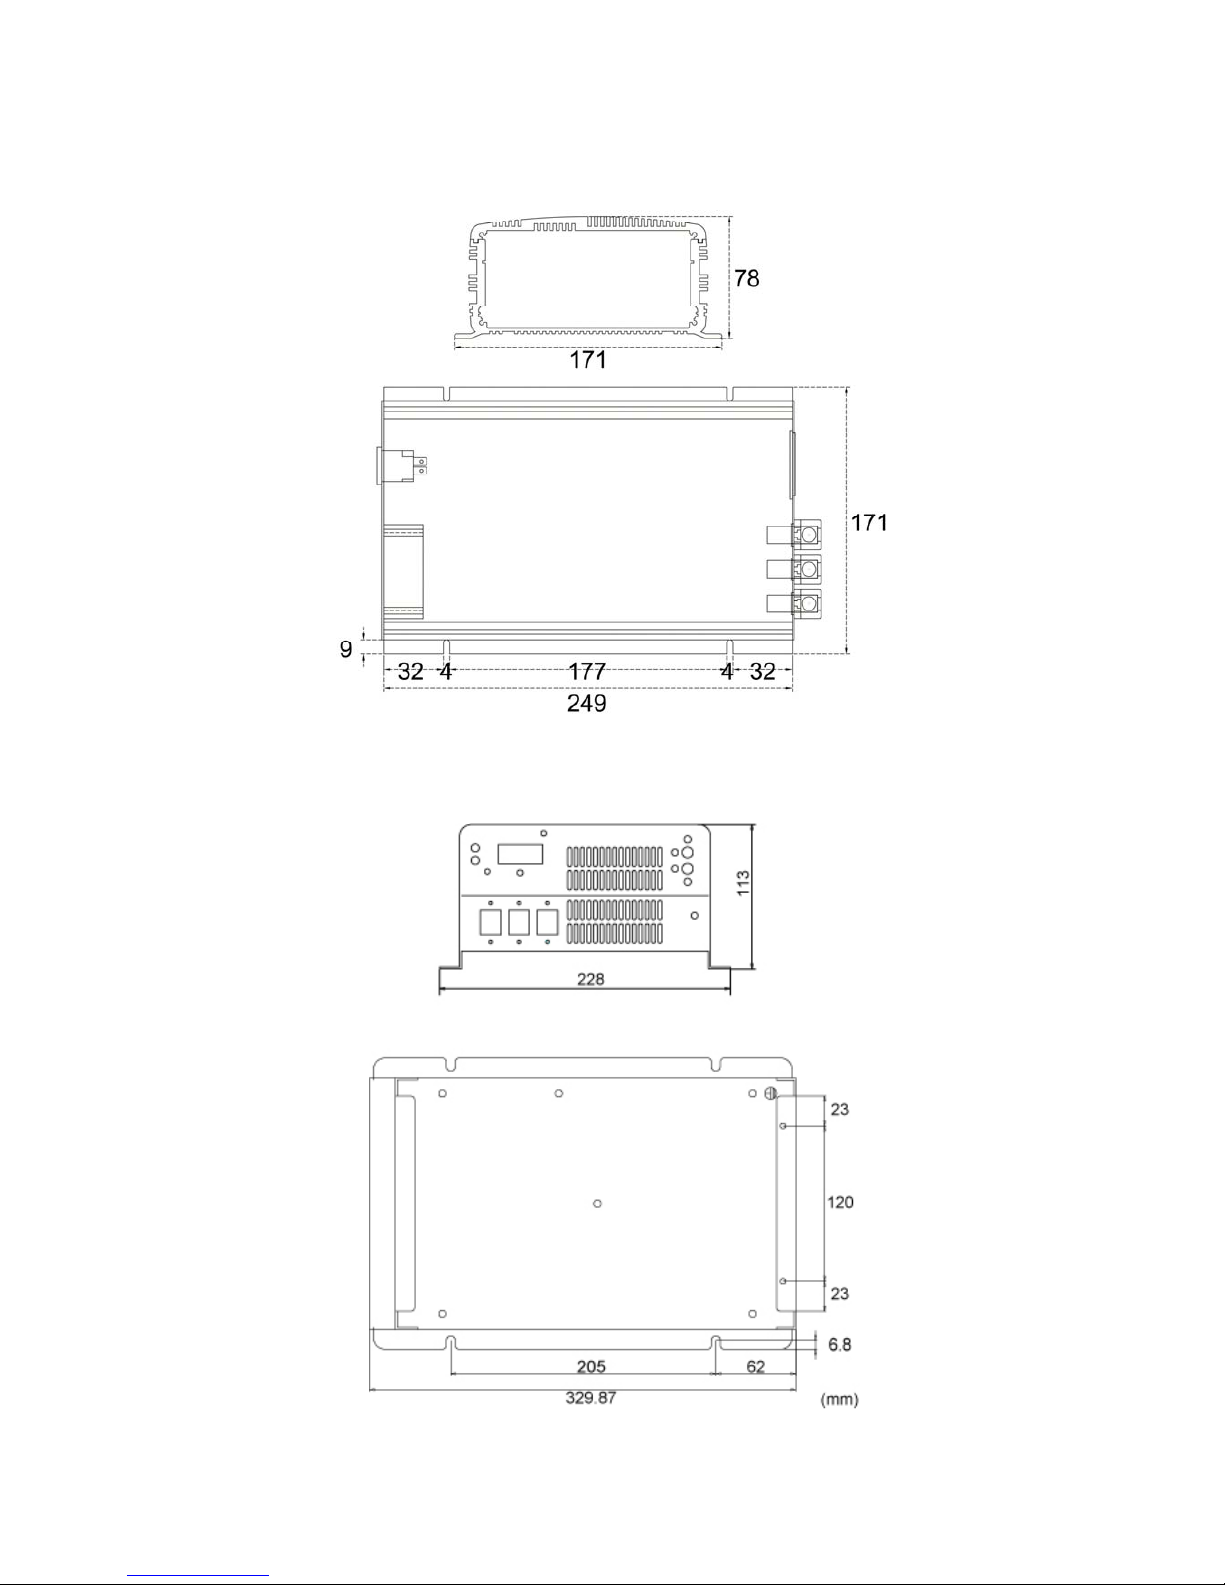
z PM-DBC-2012D, PM-DBC-1224D, PM-DBC-0836D, PM-DBC-0648D
z PM-DBC-2512D, PM-DBC-1424D, PM-DBC-0936D, PM-DBC-0748D
Page 15
14
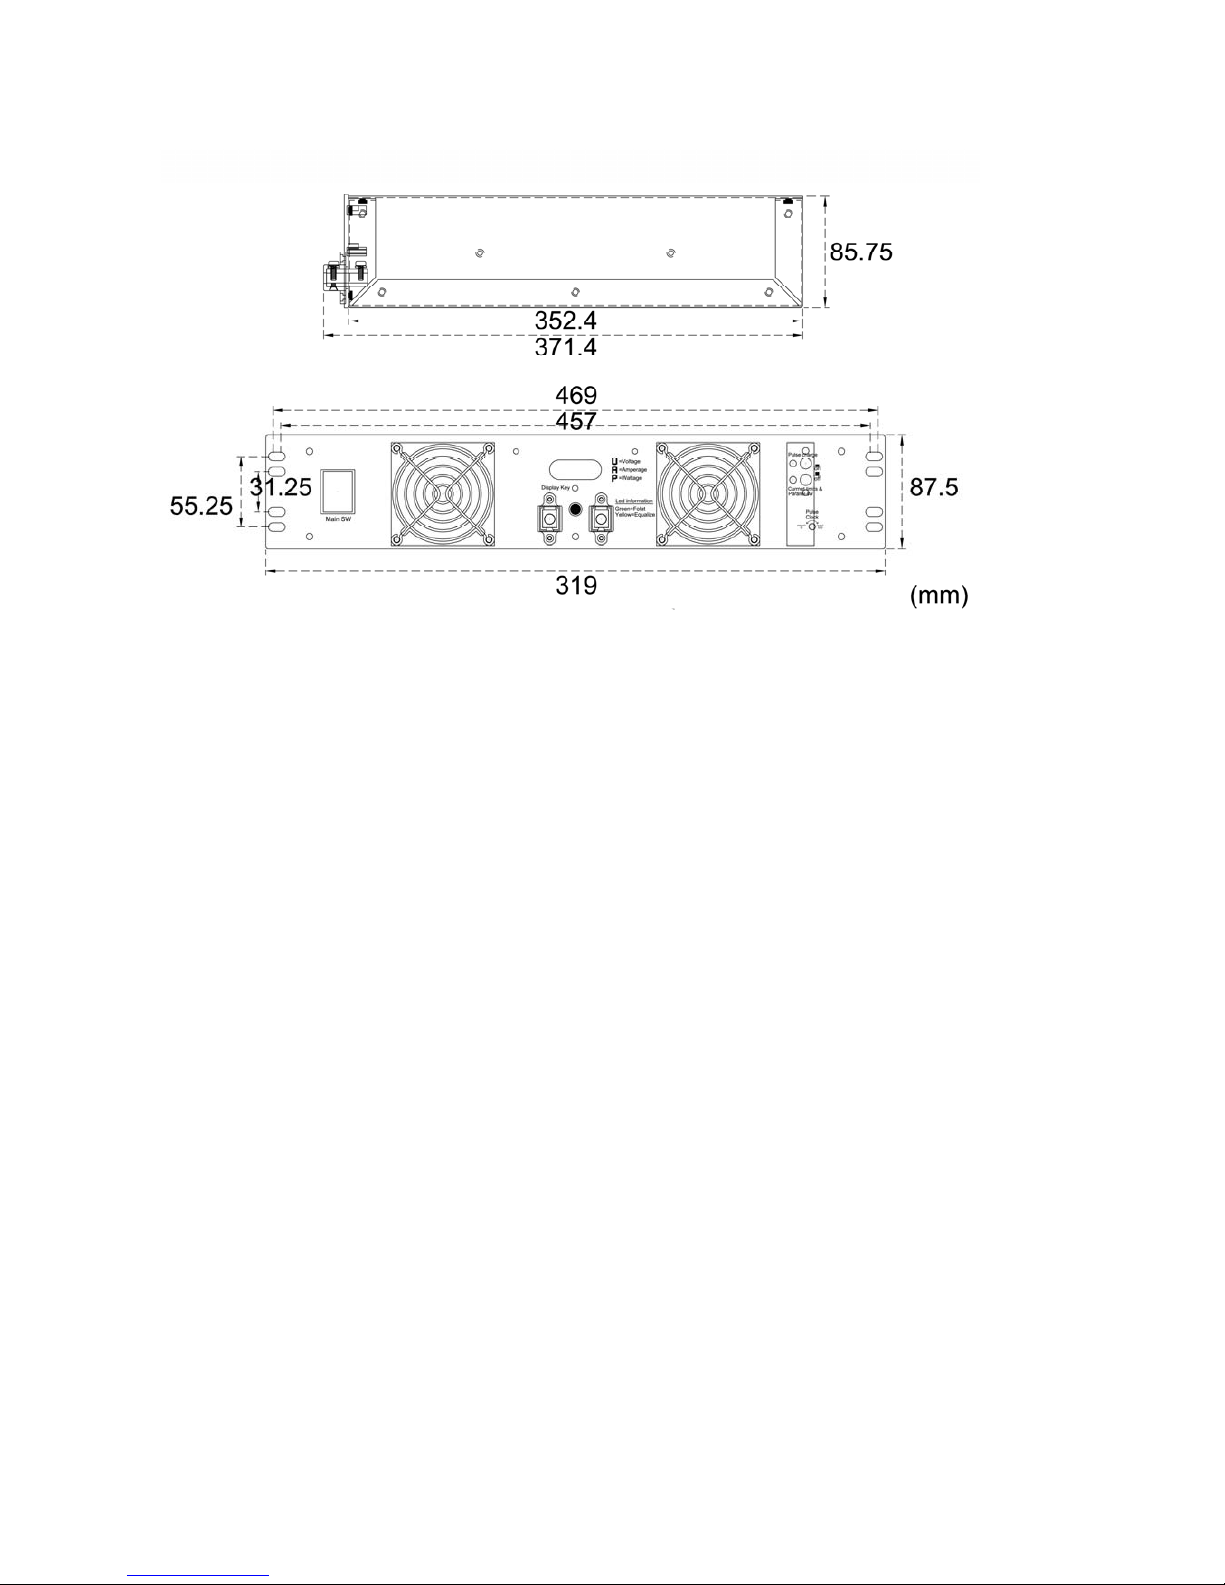
z PM-DBC-3012D, PM-DBC-1724D, PM-DBC-1136D, PM-DBC-0848D
z PM-DBC-4512D, PM-DBC-2324D, PM-DBC-1536D, PM-DBC-1148D
Page 16
15
z PM-DBC-9012D, PM-DBC-4524D, PM-DBC-3036D, PM-DBC-2248D
Page 17
16
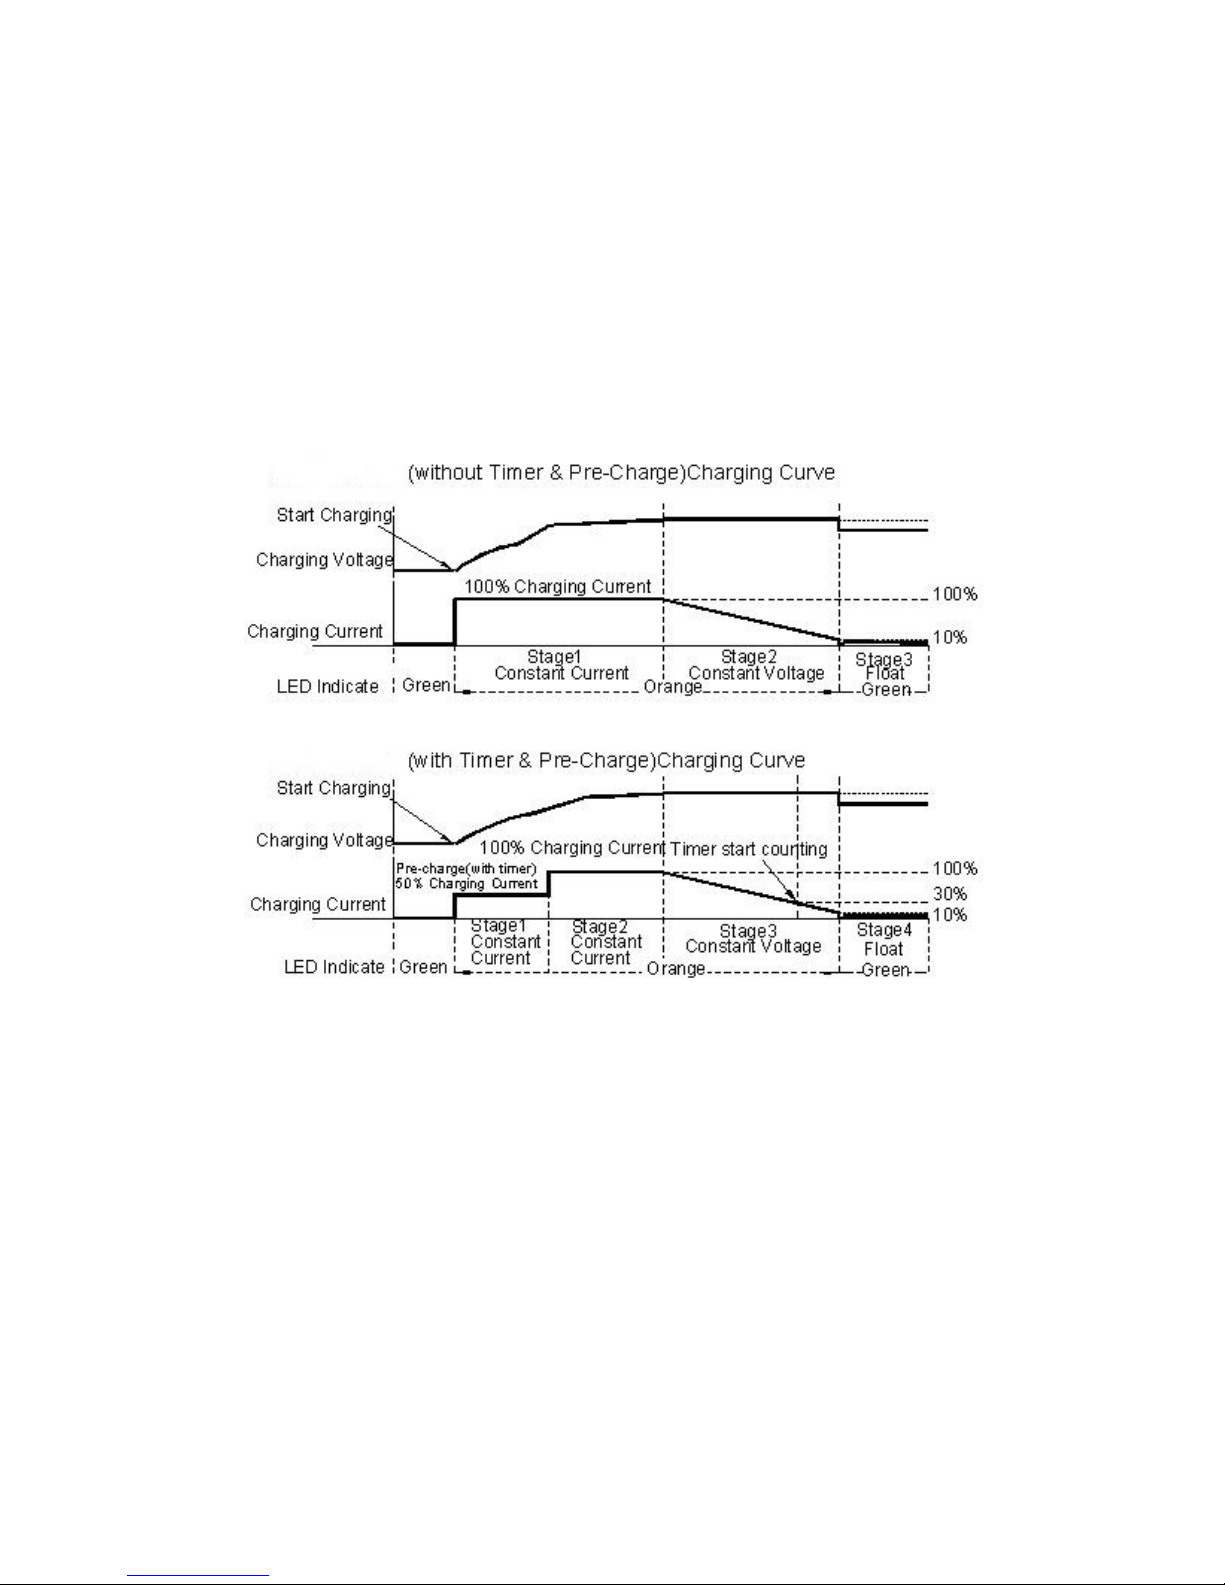
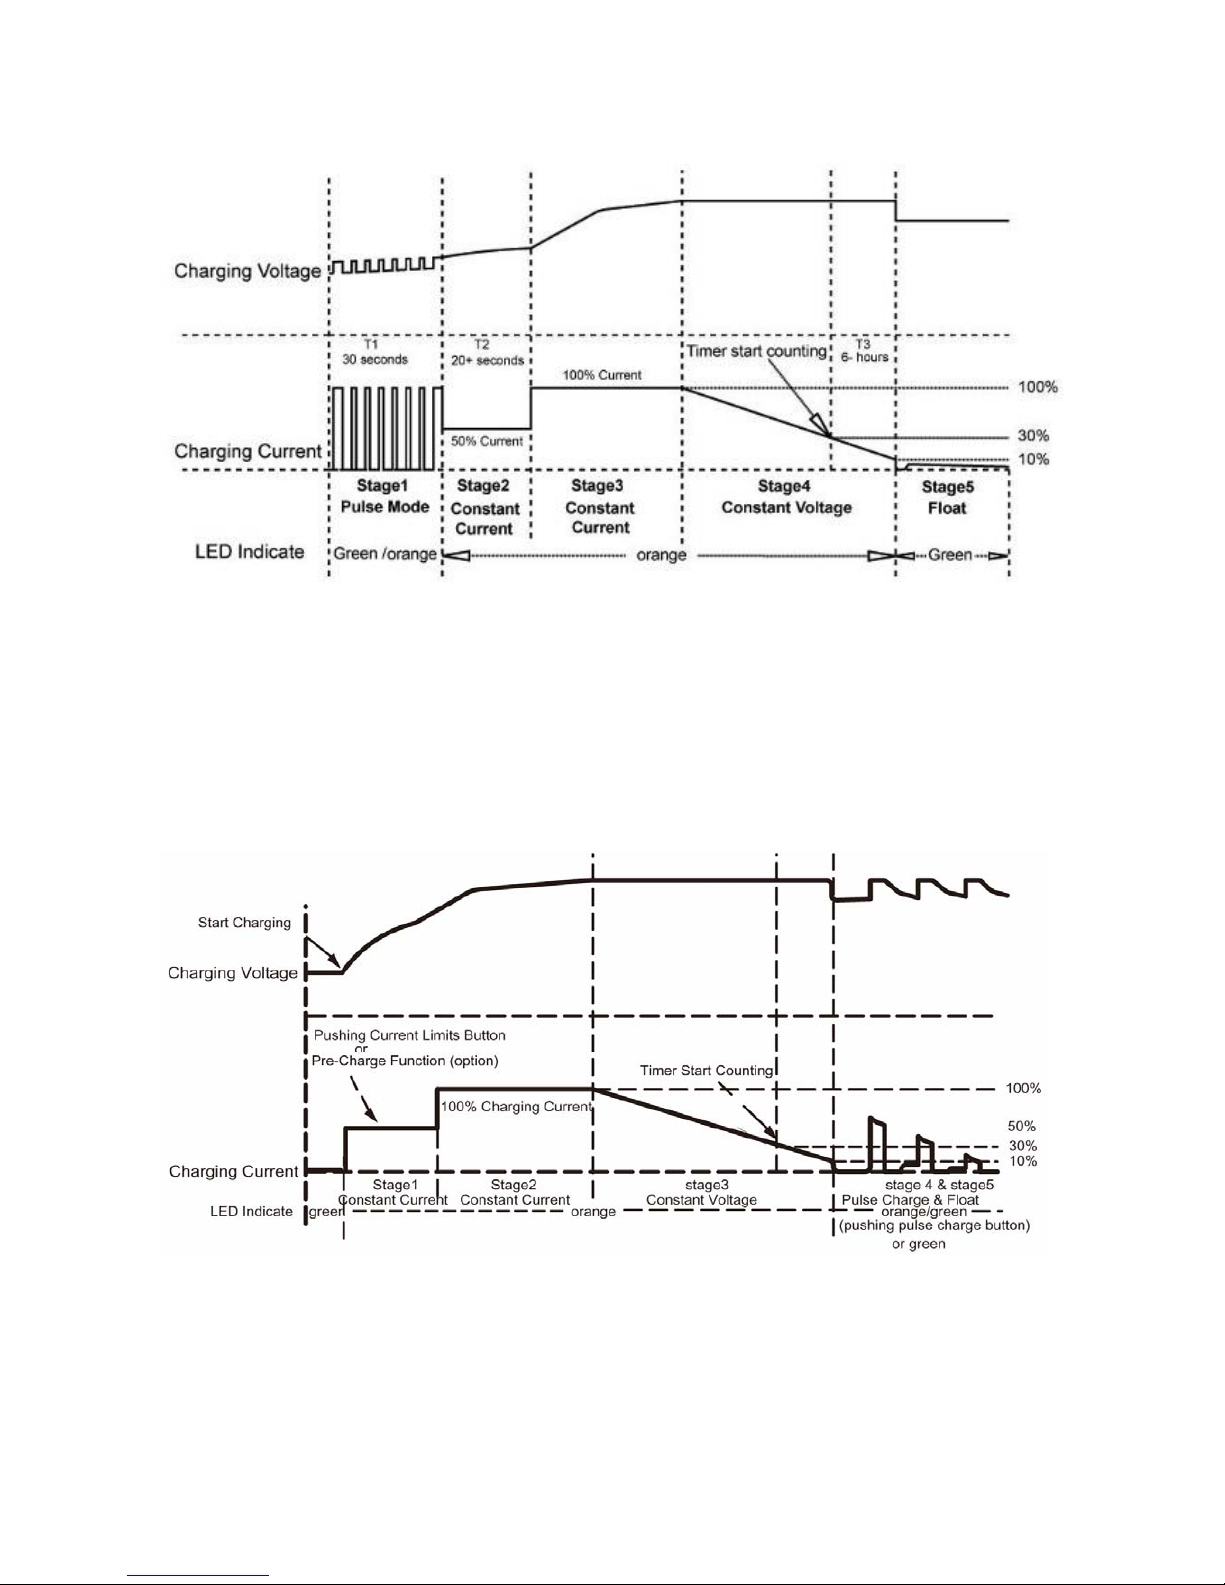
CHARGING CURVE LED INDICATION
Multi-stage charging ensures batteries receive optimum charging with minimal wear and tear, at the
same time regulates the voltage and current delivered to the batteries in three stages automatically.
Automatic multi-rate charging function “Pre-charge, equalizer charge and floating charge”.
z 3 LED Display: Red (power), Green (floating charge), Orange (equalizer charge)
Pre-charge Diagram
DBC battery chargers with pre-charge functions include:
12Vdc: 10A~30Amp 24Vdc: 7A~17Amp 36Vdc: 4A~11Amp 48Vdc: 3A~8Amp
Page 18
17
Pulse Charge Diagram (At beginning)
Pulse charge at beginning is used to reviving battery when there are many formations of crystals
inside the battery and making the batteries unable to be fully recharged. The constant currents
charging will knock the crystals into smaller pieces and bring the battery back to life.
For the following models, this function can be added upon request:
12Vdc: 10A~30Amp 24Vdc: 7A~17Amp
Pulse Charge Diagram (At end)
Pulse Charge at end is to fully charge the battery when it is unable to achieve by float charge.
Through this step, the charging efficiency will increase and temperature rises slower during
charging process.
This function is available with models 45Amp(12Vdc), 23Amp(24Vdc), 15Amp(36Vdc),
11Amp(48Vdc) and above only.
Page 19

18
BATTERY CHARGING INSTRUCTION
A spark near the battery may cause an explosion. Follow instructions carefully to reduce the risk of
spark near the battery.
1. Connect the charger system to a wall receptacle strongly.
2. Connect the alligator clips to battery terminals (red clip--->positive terminal; black
clip--->negative terminal) For dual output connection, Battery NEG- port is shared for two sets
of battery cables
3. Position the AC and DC cords to reduce the risk of damage by a hood, door, or moving engine
part.
4. Turn on the power switch which is located on the front panel/back panel of charger, then the
red LED lits and bi-color LED will confirm the charger's stage.
5. Do not face the battery when making the connection.
6. Once the battery is fully charged, disconnect the AC cord, remove the clip from the electrical
items and then remove the clip from the battery terminal.
7. The battery maybe damaged if charging status LED cannot change to green after long time
charge.
8. The battery charger was designed by aluminum housing with good thermal dissipation.
However, avoid touching the case for safety purpose because the temperature may reach to
about 50 degree C on the case when charging.
9. After using battery for certain period of time, the increase of battery impedance will make the
charger unable to identify whether the battery is fully charged. In this case, the charger will
continue charging the battery with equalizer charge, which may cause over charge and reduce
the lifespan of battery. To prevent this from happening, whenever charging new batteries, it is
recommended to record the perfect charging time from “Charging End Time Setting.”
CAUTION: Keep the charger in a well ventilated, cool and open area. Do not block the vent
holes on the sides or the discharge openings of the cooling fan.
Page 20

19
SPECIFICATION
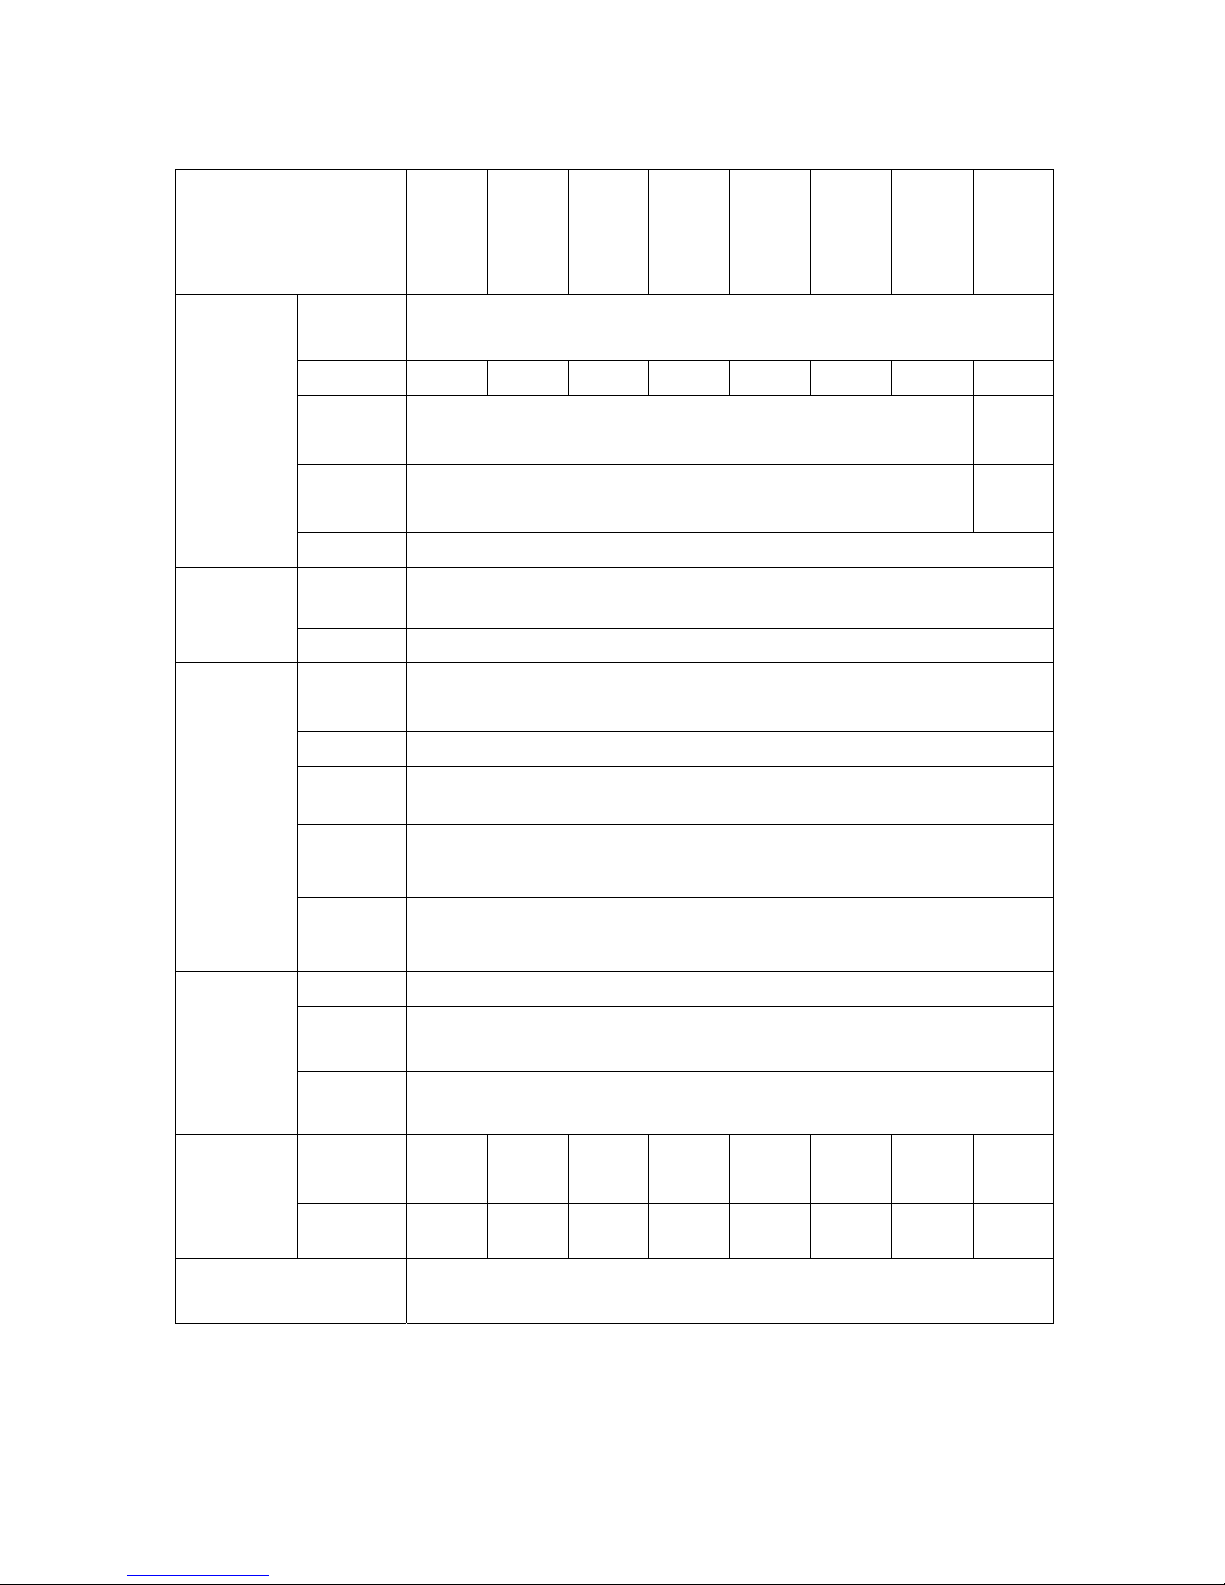
Model
PM-DBC
-0212F
PM-DBC
-0612F
PM-DBC
-1012DF
PM-DBC
-2012D
PM-DBC
-2512D
PM-DBC
-3012D
PM-DBC
-4512D
PM-DBC
-9012D
Voltage
12V
Current
2A 6A 10A 20A 25A 30A 45A 90A
Equalizer
Charge
14.4V +/- 0.1V
14.4V +/-
0.2V
14.4V +/- 0.1V
Float Charge
13.6V +/- 0.1V
13.6V +/-
0.2V
13.6V +/- 0.1V
OUTPUT
Efficiency
> 87% (at full load)
Voltage
110V or 220V (110V & 220V: 0212F, 0612F, 1012DF)
INPUT
Frequency
47~63HZ
Battery
Reverse
Yes
Short Circuit
Yes
Overload
Yes
Temperature
Yes, when degree around 65°C~75°C, it will stop charging
(except for 0212F, 0612F)
PROTECTION
Cooling fan
Fans are controlled by floating voltage.
(Fans are controlled by temperature (45 °C) for 0212F, 0612F)
LED
3 LED Display: Red (power), green (floating charge), orange (equalizer charge)
LCD
YES (except for 0212F, 0612F)
INDICATORS
Current
Meter
YES (except for 0212F, 0612F)
Dimensions
(mm)
51*81*
152
51*81*
152
54*114*
172
65*131*
192
79*170*
196
79*170*
251
110*229
*335
85*356*
479
MECHANICAL
Weight
(KGS)
0.8 0.8 1.0 1.5 2.0 2.5 4.1 8.5
O/P Wires or Terminal
2A~25A: Microphone Connector or Alligator Clips ; Other models: Terminal
Page 21
20
SPECIFICATION
Model
PM-DBC
-0124F
PM-DBC
-0424F
PM-DBC
-0724DF
PM-DBC
-1224D
PM-DBC
-1424D
PM-DBC
-1724D
PM-DBC
-2324D
PM-DBC
-4524D
Voltage
24V
Current
1A 4A 7A 12A 14A 17A 23A 45A
Equalizer
Charge
28.8 +/- 0.2V
28.8 +/-
0.1V
Float Charge
27.2 +/- 0.2V
27.2 +/-
0.1V
OUTPUT
Efficiency
> 87% (at full load)
Voltage
110V or 220V (110V & 220V: 0124F, 0424F, 0724DF)
INPUT
Frequency
47~63HZ
Battery
Reverse
Yes
Short Circuit
Yes
Overload
Yes
Temperature
Yes, when degree around 65°C~75°C, it will stop charging
(except for 0124F, 0424F)
PROTECTION
Cooling fan
Fans are controlled by floating voltage.
(Fans are controlled by temperature (45 °C) for 0124F, 0424F)
LED
3 LED Display: Red (power), green (floating charge), orange (equalizer charge)
LCD
YES (except for 0124F, 0424F)
INDICATORS
Current Meter
YES (except for 0124F, 0424F)
Dimensions
(mm)
51*81*
152
51*81*
152
54*114*
172
79*170*
196
79*170*
196
79*170*
251
N/A N/A
MECHANICAL
Weight (KGS) 0.8 0.8 1.0 2.0 2.0 2.5 N/A N/A
O/P Wires or Terminal
1A~12A: Microphone Connector or Alligator Clips ; Other models: Terminal
Page 22

21
SPECIFICATION
Model
PM-DBC0436DF
PM-DBC0836D
PM-DBC0936D
PM-DBC1136D
PM-DBC1536D
PM-DBC3036D
Voltage
36V
Current
4A 8A 9A 11A 15A 30A
Equalizer Charge
43.2V +/- 0.1V
43.2V +/-
0.2V
43.2V +/- 0.1V
Float Charge
40.8V +/- 0.1V
40.8V +/-
0.2V
40.8V +/- 0.1V
OUTPUT
Efficiency
> 87% (at full load)
Voltage
110V & 220V 110V or 220V
INPUT
Frequency
47~63HZ
Battery Reverse
Yes
Short Circuit
Yes
Overload
Yes
Temperature
Yes
PROTECTION
Cooling fan Fans are controlled by floating voltage.
LED
3 LED Display: Red (power), green (floating charge), orange (equalizer charge)
LCD
YES
INDICATORS
Current Meter
YES
Dimensions (mm)
54*114*
172
65*131*
192
79*170*
196
79*170*
251
48.5*51*
22
85*356*
479
MECHANICAL
Weight (KGS) 1.0 1.5 2.0 2.5 9.6 8.5
O/P Wires or Terminal
4A~9A: Microphone Connector or Alligator Clips ; Other models: Terminal
Page 23

22
SPECIFICATION
Model
PM-DBC0348DF
PM-DBC0648F
PM-DBC0748DF
PM-DBC0848D
PM-DBC1148D
PM-DBC2248D
Voltage
48V
Current
3A 6A 7A 8A 11A 22A
Equalizer
Charge
57.6 +/- 0.1V
57.6 +/-
0.2V
57.6 +/- 0.1V
Float Charge
54.4 +/- 0.1V
54.4 +/-
0.2V
54.4 +/- 0.1V
OUTPUT
Efficiency
> 87% (at full load)
Voltage
110V &
220V
110V or 220V
INPUT
Frequency
47~63HZ
Battery Reverse
Yes
Short Circuit
Yes
Overload
Yes
Temperature
Yes
PROTECTION
Cooling fan Fans are controlled by floating voltage.
LED
3 LED Display: Red (power), green (floating charge), orange (equalizer charge)
LCD
YES
INDICATORS
Current Meter
YES
Dimensions
(mm)
54*114*
172
65*131*
192
79*170*
196
79*170*
251
48.5*51*
22
85*356*
479
MECHANICAL
Weight (KGS) 1.0 1.5 2.0 2.5 9.6 8.5
O/P Wires or Terminal
3A~7A: Microphone Connector or Alligator Clips ; Other models: Terminal
------------------------------------------------------------
Power Master Technology Co., Ltd.
8F, No.651-3, Chung Cheng Rd.,
Hsinchuang Dist., New Taipei City 24257,
Taiwan (R.O.C.)
Tel: 886-2-6626-6660 Fax: 886-2-6626-6800
Email: [email protected]
Website: www.powermaster.com.tw
 Loading...