

Page 1
4
4
MODEL “CSG”
TABLE OF CONTENTS
SLIDE GATE OPERATOR
Important Safety Information……………..…………….......3
UL Installation and Safety Considerations……..…....……4-5
System Designer Safety Instructions……...…….……..........6
Installer Safety Instructions ………...……....…………...... 7-10
End User Safety Warnings …….………………………11-14
Manual
Installation & Setup Procedure
Safety Warnings………………………………………..16-17
Before Installing Operator……..
Installation of Cement Pad………......………..…………...19
Installation of Operator
Electrical Connections
Left Hand/Right Hand Conversion …………….……........26
Master/Slave Installation ……………………….…….…...27
Emergency Control Station ……………………….……....29
Timer To Close……….………………
Audible Pre-Move Warning…
Auxiliary Circuit …….………………...……………31-32
Limit Adjustment ……..…….…...………….…………33-36
Accessory Connections
Connection of a 3 Button……….………..…….……….…37
Connection of a Radio………….….………………..
Loop Detector Systems…..…………………….…….…….40
Loop Installation (Standard Layout Chart)....…………..….41
Cutting The Required Groove……..........……....................42
Loop Connections………………..…...……..….…………..........43
Safety Device Connections
Inherent Obstruction Sensing Device…………………….……....4
Secondary Obstruction Sensing Devices
2004 Gate Board Overview……………...………………....49
2004 LED & Dipswitch Information……….……................50
Maintenance Log/Notes……………….………..............51-53
Warranty……………….……………..…………………….54
Operation………………….…..……...….…….....15
…...……..……...………18
………………..……….…....19-23
………………..………………….2
…….…….….……30
...……….…………...…….31
…38-39
Contact - Sensing Edge ……………….
Non-Contact – Photo Eyes …………..…
..........45
.…...47
2
Page 2
IMPORTANT!
FOR SLIDE GA TE OPERA TING SYSTEMS
Automatic gate operators provide convenience and security to
users. However, because these machines can produce high
levels of force, it is important that all gate operator system
designers, installers, and end users be aware of the potential
hazards associated with improperly designed, installed, or
maintained systems. Keep in mind that the gate operator is a
component part of a total gate operating system.
SAFETY IS EVER YONE’S BUSINESS
U/L INST ALLA TION AND SAFETY
CONSIDERA TIONS
INSTALLATION CLASSES
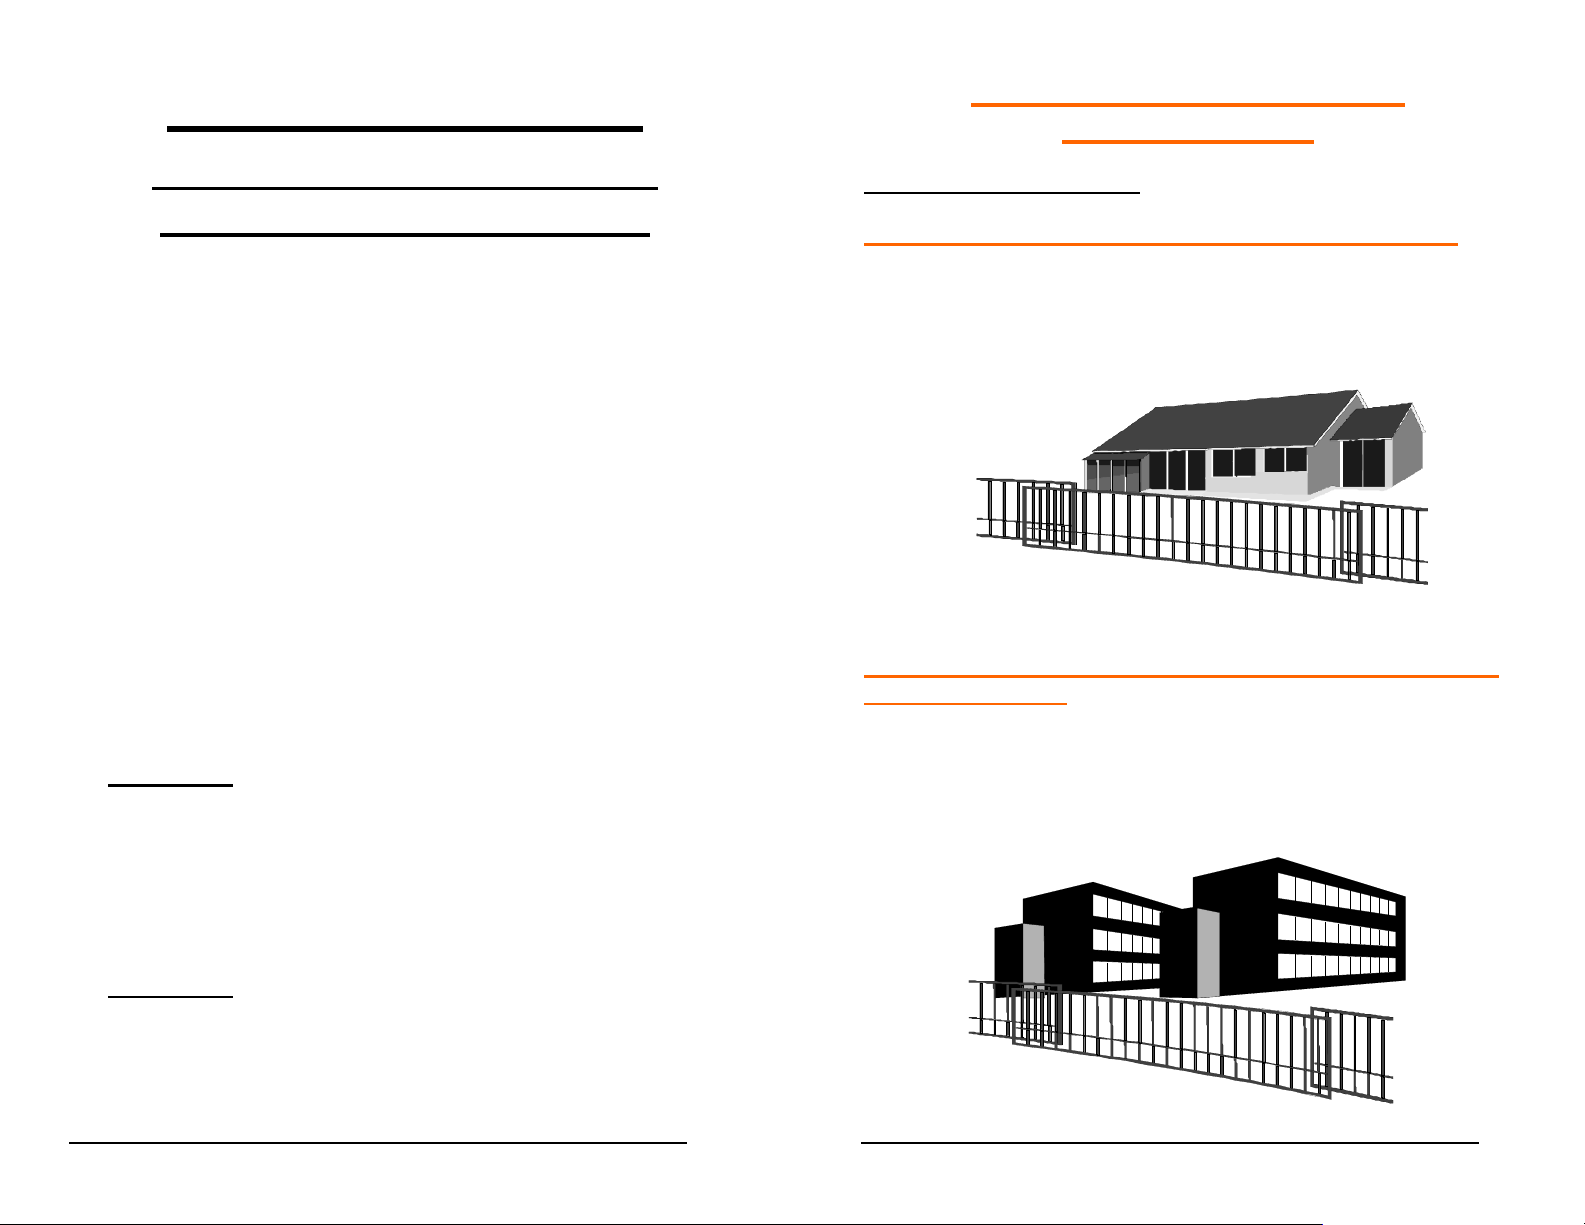
CLASS I – RESIDENTIALVEHICULAR GATE OPERATOR
A vehicular gate operator (or system) intended for use in
a home of one to four single-family dwellings, or a garage or
parking area associated therewith.
The following information contains various safety precautions
and warnings for the system designer, installer and end user.
These instructions provide an overview of the importance of
safe design, installation, and use.
Warnings are identified with the ▲ symbol. This symbol will
identify some of the conditions that can result in serious injury or
death. Take time to carefully read and follow these precautions
and other important information provided to help ensure safe
system design, installation and use.
▲ WARNING: Gate operators are only one part of a
TOTAL GATE OPERATING SYSTEM. It is the
responsibility of purchaser, designer, and installer to ensure
that the total system is safe for its intended use. All
secondary entrapment safety devices must be
RECOGNIZED by U/L to ensure the safety of the complete
operating system.
▲ WARNING: This operator is only intended for installation
on gates used for vehicular traffic. A separate pedestrian
access opening shall be provided which is designed to
promote pedestrian usage and shall be located such that
persons will not come in contact with the vehicular gate
during its entire path of travel.
3
CLASS II–COMMERCIAL/GENERAL ACCESS VEHICULAR
GATE OPERATOR
A vehicular gate operator (or system) intended for use in a
commercial location or building such as a multifamily housing
unit (five or more single family units), hotel, garages, retail store
or other building servicing the general public.
4
Page 3
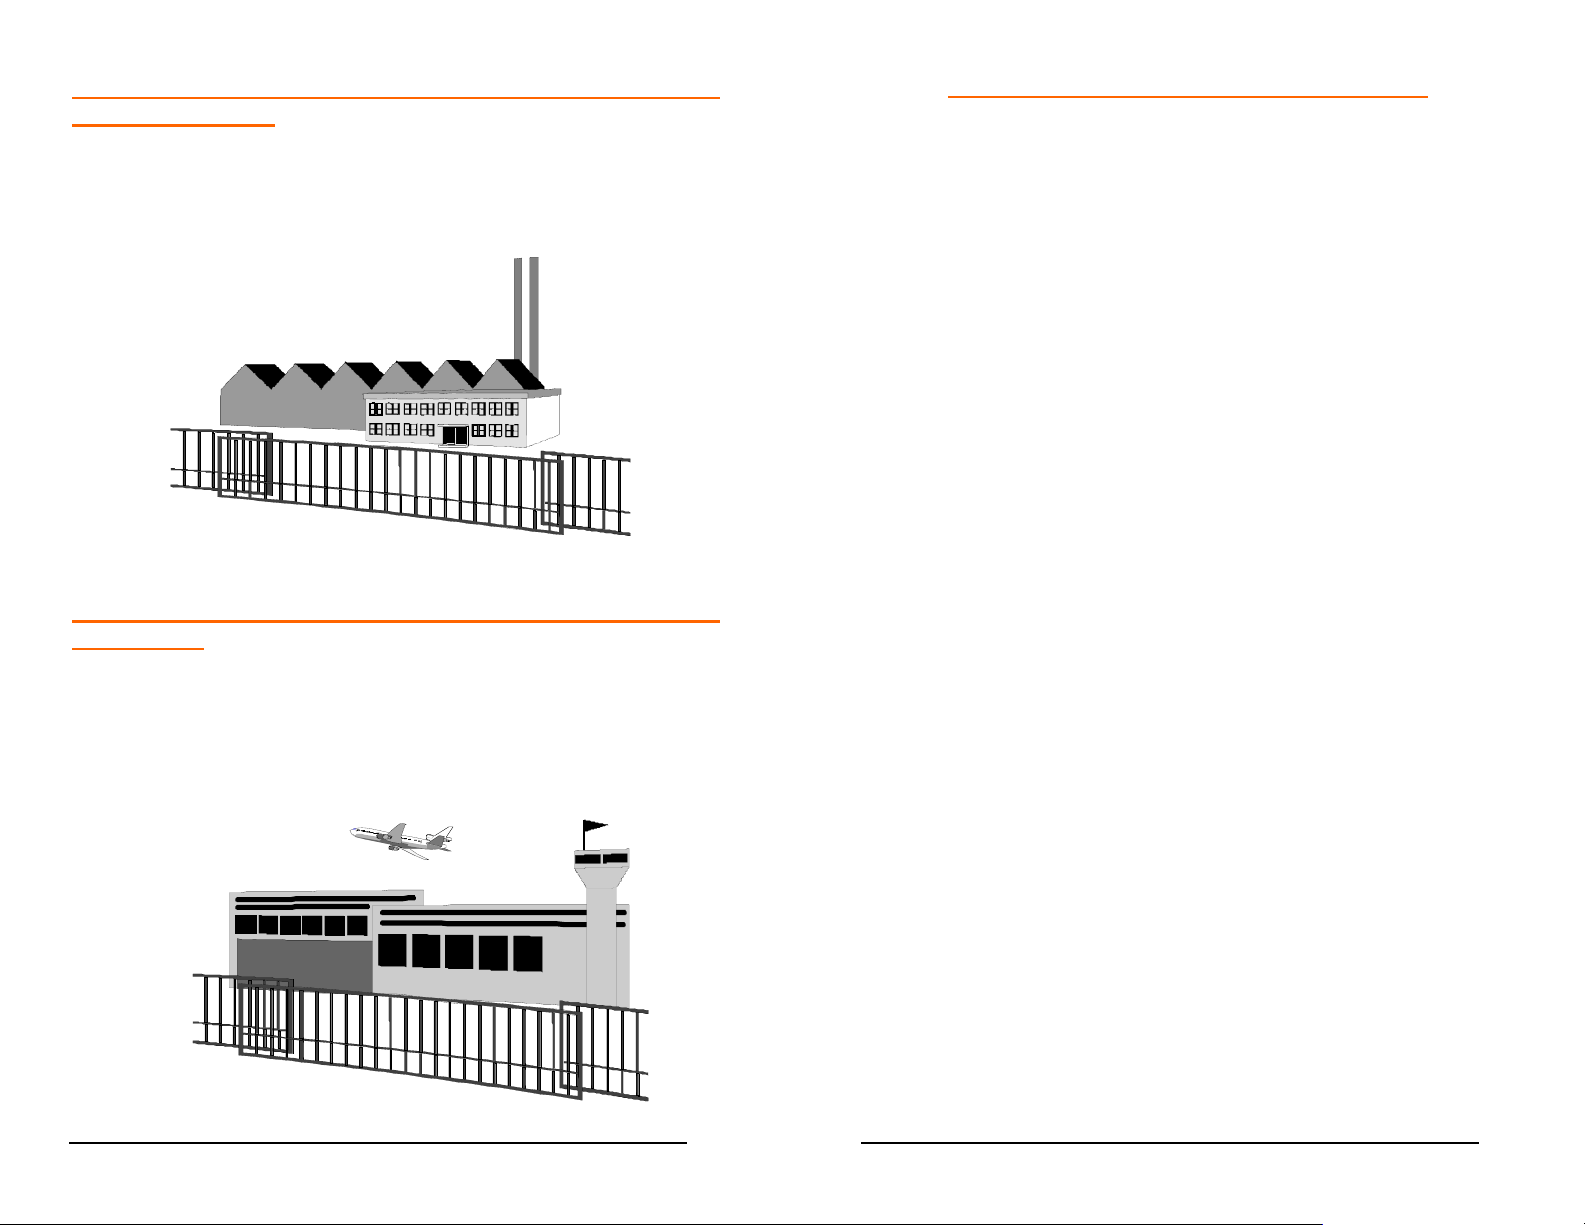
CLASS III- INDUSTRIAL/LIMITED ACCESS VEHICULAR
GATE OPERATOR
A vehicular gate operator (or system) intended for use in an
industrial location or building such as a factory or loading dock
area or other locations not intended to service the general
public.
CLASS IV- RESTRICTED ACCESS VEHICULAR GATE
OPERATOR
A vehicular gate operator (or system) intended for use in a
guarded industrial location or building such as an airport area or
other restricted access locations not servicing the general
public, in which unauthorized access is prevented via
supervision by security personnel.
SYSTEM DESIGNER SAFETY INSTRUCTIONS
▲ 1. Familiarize yourself with the precautions and
warnings for the installer. Users are relying on your
design to provide a safe installation.
▲ 2. The operator is supplied with a primary obstruction
sensing entrapment protection system. The
installation must also have a secondary entrapment
protection system installed, such as photoelectric
sensors or an electric edge system.
▲ 3. When designing a system that will be entered from a
highway or main thoroughfare be sure the system is
placed far enough away from the road to eliminate
traffic backup. Distance from the road, size of the
gate, usage levels, and gate cycle/speed must be
considered to eliminate potential traffic hazards.
▲ 4. The majority of injuries from slide gate operator
systems occur with Open Roller or Ornamental Grille
Type Gates. We strongly recommend the use of
roller guards. The illustrations and descriptive
captions found on the following pages provide
precautions to help eliminate injuries or fatalities.
Familiarize yourself with them when designing the
total system.
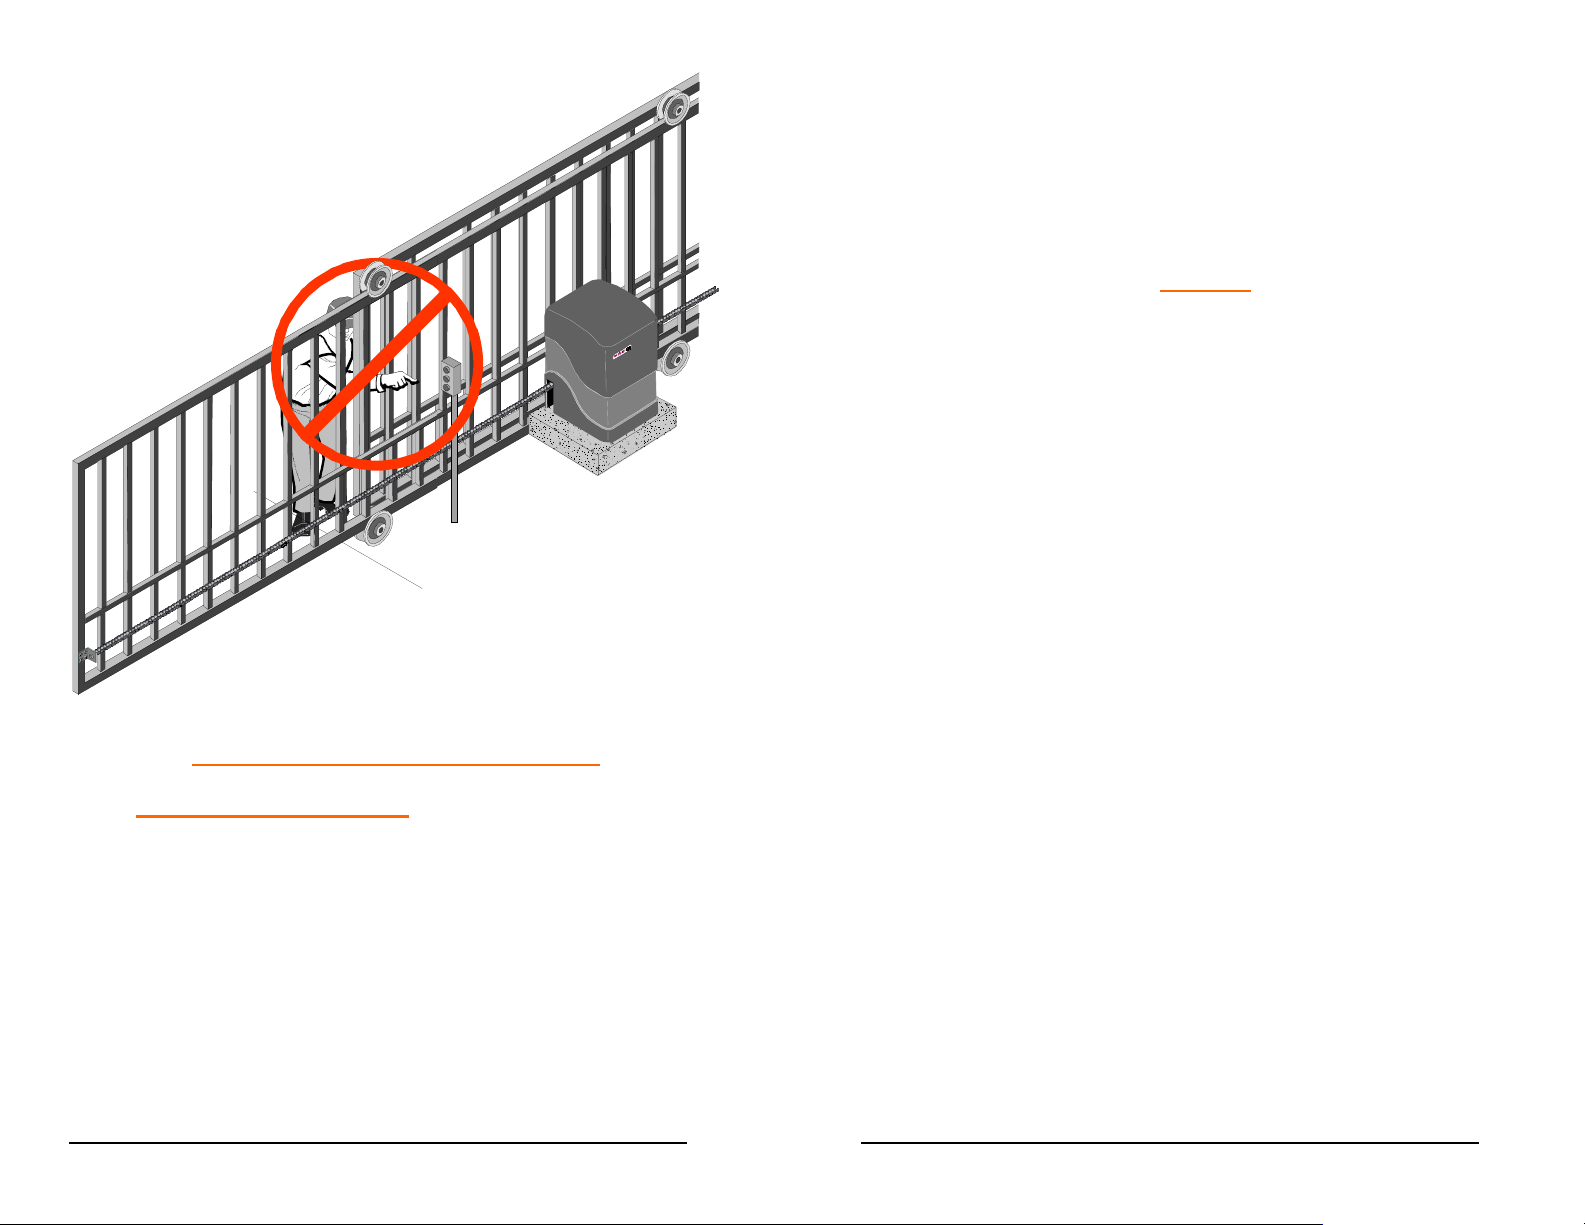
▲ 5. Design the gate system so a person cannot reach
over, under, around, or through the gate to operate
any controls. Never place controls on the gate
operator itself.
5
6
Page 4
▲ 4. Install the gate operator on the inside of the property
▲ 5. Severe injury or death can result from entrapment by
▲ 6. Review the operation of the unit and become familiar
▲ 7. You must install a pushbutton control or key switch
INSTALLER SAFETY INSTRUCTIONS
BEFORE INSTALLATION
▲ 1. Check to see that the operator is proper for this type,
size and class of gate and its frequency of use. If
you are not sure, consult factory.
▲ 8. Outdoor or easily accessed gate controls should be
▲ 2. Check to see that there are no structures adjacent to
the area, which may pose a risk of entrapment when
gate is opening or closing.
▲ 3. You must ensure that the gate has been properly
installed and works freely in both directions. Replace
or service any worn or damaged gate hardware prior
to installation. A freely moving gate will require less
force to operate and enhance the performance of
the operator as well as the safety devices used
within the system.
and/or fence line. DO NOT install an operator on the
public side of the gate.
a gate. The operator is supplied with an obstruction
sensing primary entrapment protection system.
Additional safety equipment such as electric edges
or photocell sensors must be installed to provide the
required secondary entrapment protection system.
For assistance in selecting the correct type of safety
equipment, consult the factory.
with the manual operation procedure and safety
features of the system.
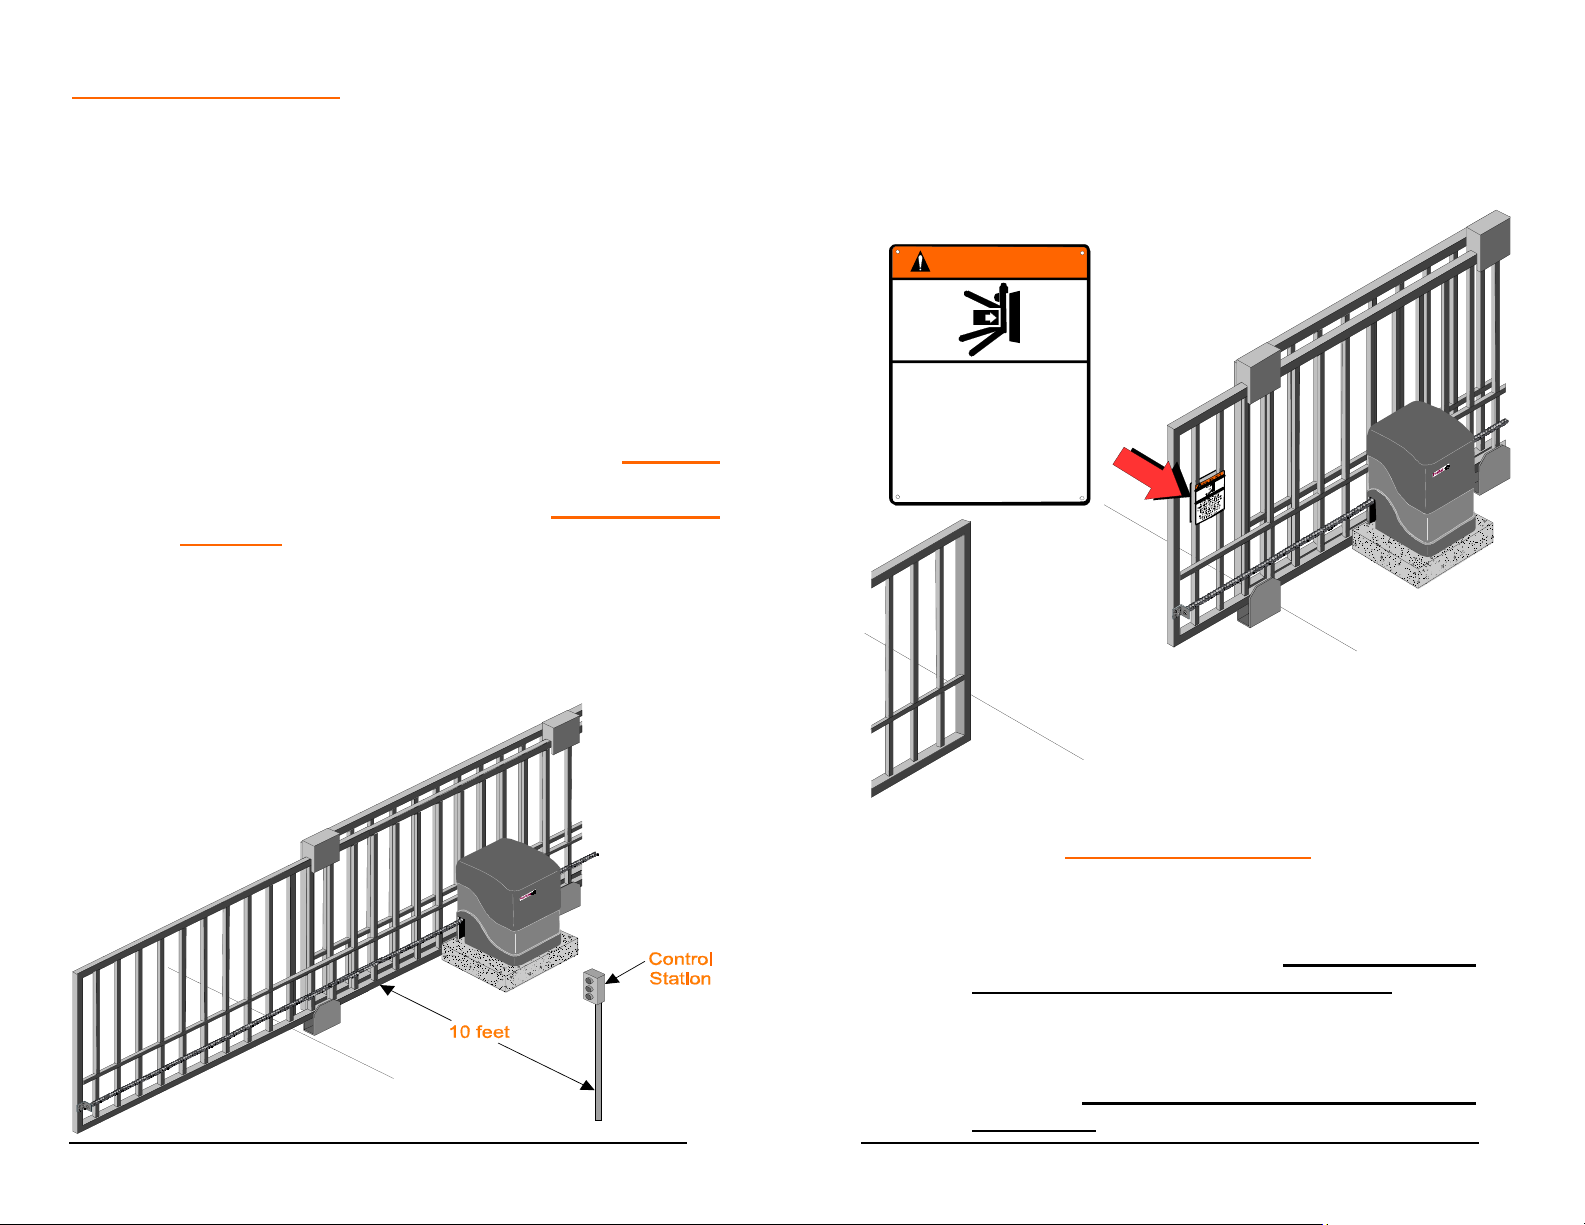
to allow for normal operation of the gate if the
automatic controls do not work. Locate the push
button or key switch and small warning placard
within sight of the gate in a secured area at least 10
feet or more from the gate and fence to keep users
away from the moving gate and fence.
of the security type to prohibit unauthorized use.
7
8
Page 5
DURING INSTALLATION
▲ 1. Be aware of all moving parts and avoid close
proximity to any pinch points.
▲ 2. Disconnect power at the control panel before making
any electric service connections. Connection
location for controls and safety equipment can be
found on the wiring diagram, and in this manual.
▲ 3. Know the procedure for engaging and manually
operating the unit.
▲ 4. Adjust the open and close force adjustment on the
control board in each direction to the minimum force
required to operate the gate smoothly. DO NOT
increase the force adjustment setting to makeup
for rough spots in gate travel - FIX THE GATE
INSTEAD!
▲ 5. Locate the controls at least 10 feet from the moving
gate so that the user can observe the gate operation,
but is not able to come in contact with the gate while
operating the controls.
▲ 6. Attach large warning signs provided to each side
of gate in the most conspicuous place. Mount
control station and smaller warning placard
together within sight of the gate opening.
A
W
R
N
N
I
G
Moving Gate Can Cause
Serious Injury or Death.
KEEP CLEAR! Ga te May Move
at Any Time. Children Should
Not Operate Ga te. Opera te
Gate Only When Area is in
Sight and Free of People
and Obst r uc t i on s.
AFTER INSTALLATION
▲ You are responsible for ensuring that the end
user understands the basic operations and
safety systems of the unit, INCLUDING THE
MANUAL OPERATION PROCEDURE.
▲ Point out that the safety instructions in
brochure are the responsibility of the end user,
and then LEAVE THIS MANUAL WITH THE
9
END USER
10
Page 6
END-USER SAFETY WARNINGS
The manufacturer of the gate operator does not know what
type of gate you have, or what type of automatic system is
installed on your gate. Be sure you’ve been fully instructed
on the sequence of operation for your specific gate
system(s). Keep the gate properly maintained and have a
qualified service person make repairs.
▲ 1. Be sure the following safety instructions are
distributed to all persons authorized to use your
gate.
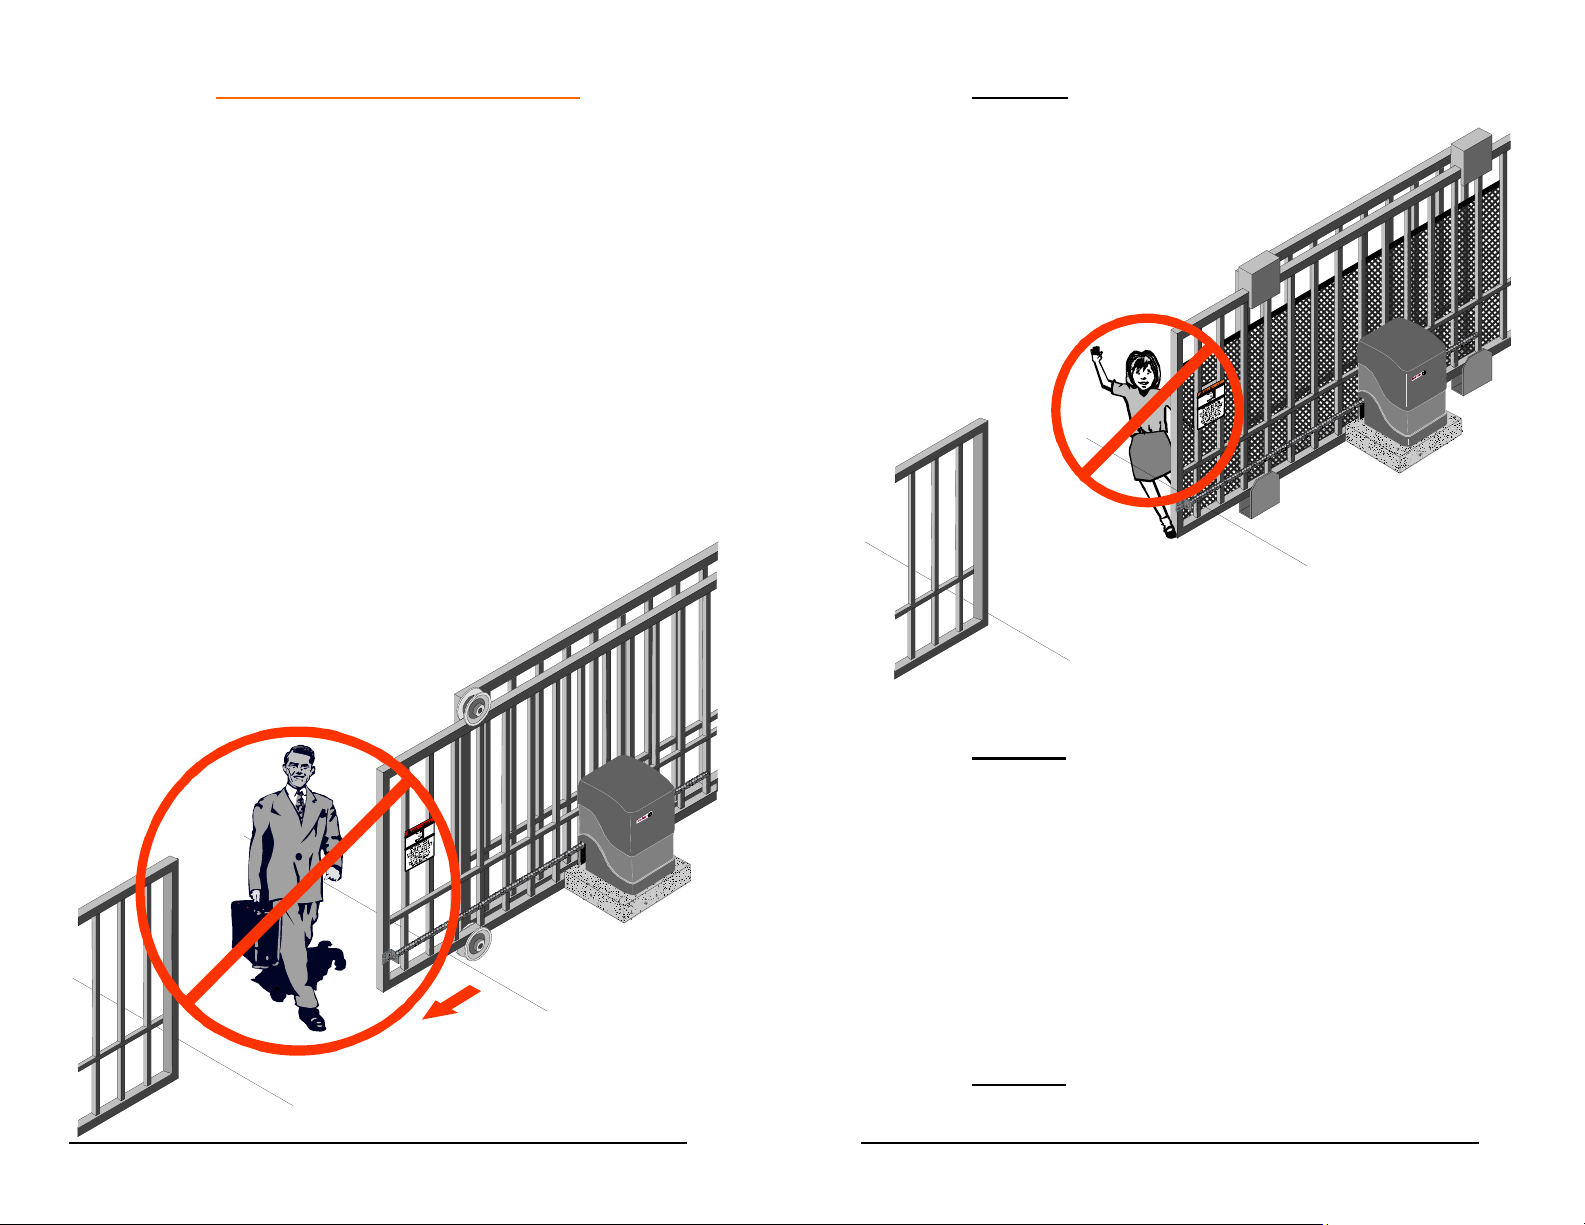
▲ 2. KEEP GATEWAY CLEAR (Front and Back) AT
ALL TIMES. Your automatic gate is not for
pedestrian use. No one should ever cross the path of
the moving gate.
▲ 3. DO NOT allow children to play near your gate, or
to operate the gate.
▲ 4. DO NOT operate your gate system unless you can
see it when the gate moves.
▲ 5. Be sure a pushbutton or key switch has been
installed for manual electric operation in the event
your radio or card key does not work. Any
mounted control station should be located a
minimum of 10 feet from the gate so the gate
cannot be reached through or touched. Any
pushbutton located in a building should be
installed within sight of the gate.
▲ 6. DO NOT operate any controls without watching
the movement of the gate.
11
12
Page 7
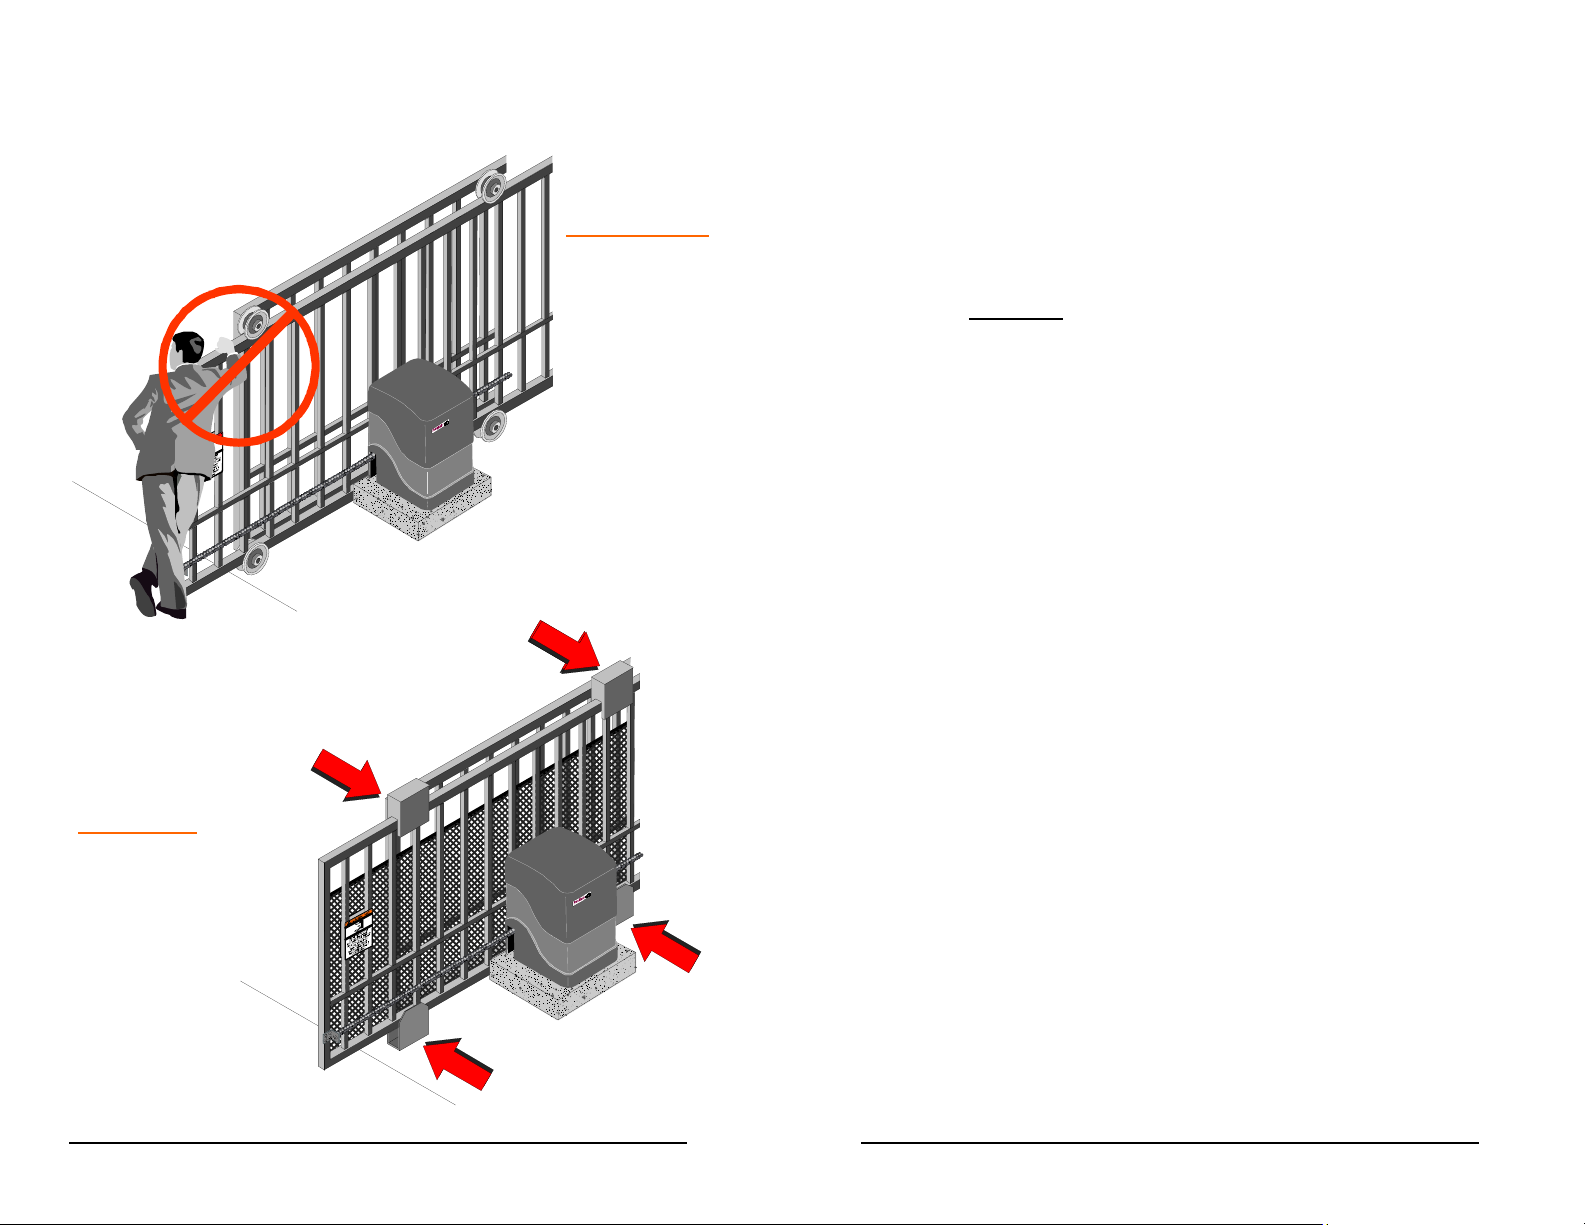
▲ 7. If your gate has open rollers, be sure roller guards
have been purchased and installed.
INCORRECT
CORRECT
13
▲ 8. Your gate system is required to have a primary
and a secondary entrapment safety system
installed and maintained.
▲ 9. If your gate closes automatically, loop detectors
should be installed to detect the presence of a
vehicle.
▲ 10 DO NOT increase force adjustment to compensate
for a damaged gate. The gate should always be
maintained to operate manually as easily as
possible to provide maximum protection.
▲ 11. Check all safety systems at least once per month
for the correct force, speed and sensitivity. Gate
must reverse when hitting a rigid object, or when a
non-contact sensor is activated. If these
functions are observed to operate improperly,
discontinue use and have it serviced
immediately!
▲ 12. You are responsible for ensuring that warning
signs are installed and maintained on both sides
of your gate.
▲ 13. To ensure safe operation of this equipment, you
must read this safety manual and keep it for
reference.
14
Page 8
MANUAL OPERATION
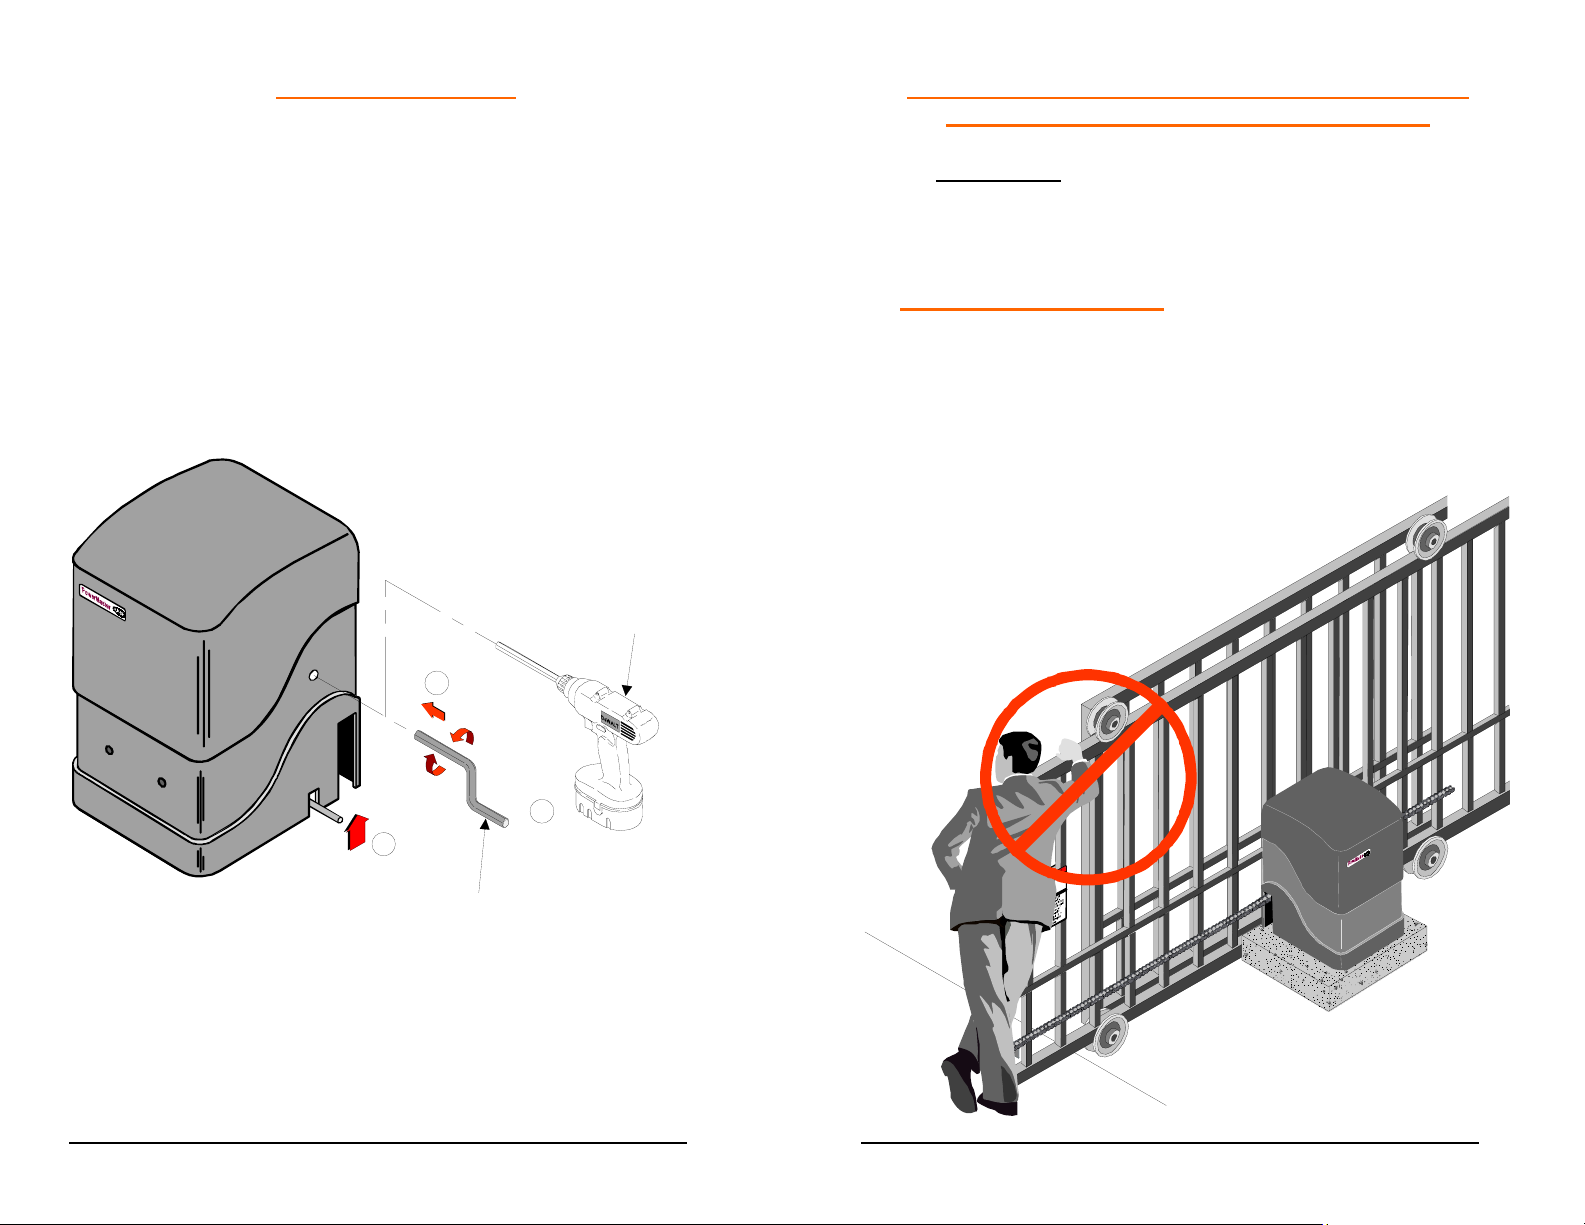
▲ Your operator is equipped with a hand crank for
manual operation. Be sure you have the crank or
cordless drill with 5/16 hex key bit available and
understand how to operate this equipment.
1. Lift interlock lever at base of cover.
2. Insert hand crank or cordless electric drill bit into
hole in side of cover until it locates in 5/16” hex
socket of drive hub.
Cordless Electric
Drill With 5/16"
Hex Key Bit
SAFETY WARNINGS FOR OPEN-ROLLER GATES
AND ORNAMENTAL GRILLE-TYPE GATES
▲ WARNING: INJURIES ASSOCIATED WITH
AUTOMATIC GATES ARE MAINLY INCURRED
WITH OPEN-ROLLER GATES AND ORNAMENTAL
“GRILLE TYPE” GATES.
OPEN-ROLLER GATES
▲ Injuries occur when people get their hands caught
between the top of the gate and the roller. This
potential pinch point should be guarded whenever an
automatic operator is installed. Roller Guards are
available from various fence suppliers for refitting of
these rollers.
2
3
1
5/16" Hex Key
Hand Crank
3. Rotate hand crank or use cordless drill to
manually move gate in the desired direction.
15
16
Page 9
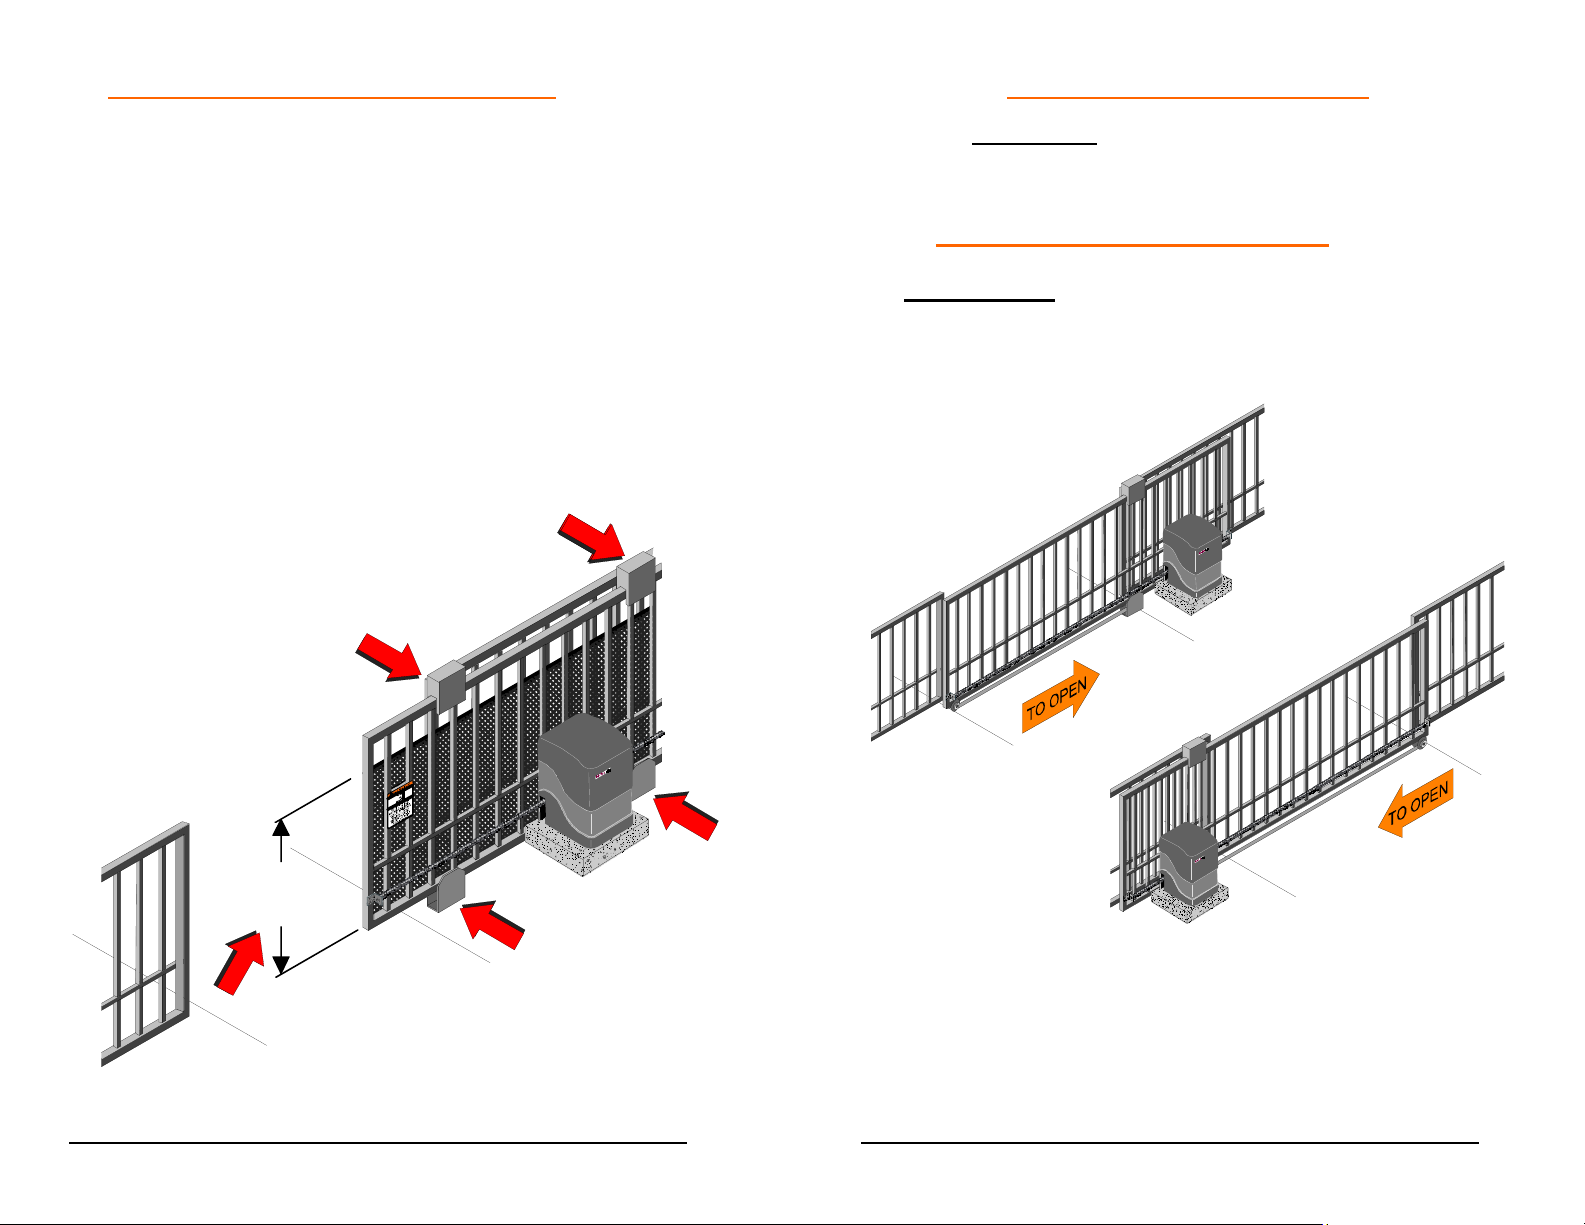
ORNAMENTAL “GRILLE TYPE” GATES
▲ Injuries occur when people put their arms through
openings in the grilles when the gate is operated. The
person cannot retract his/her arm and it gets caught
between the grille and the fence post or fence. The
potential hazard must be guarded. It can be simply
done by placing a screen mesh on the gate and fence
in the area of the gate. The screen must be a
minimum of 4 feet high from the bottom (unless the
gate and fence are shorter) with openings that a 2¼inch sphere cannot fit through. This will help to
prevent access through openings when the gate
travels.
INSTALLATION INSTRUCTIONS
▲ WARNING: DO NOT APPLY POWER UNTIL
TOLD TO DO SO! RISK OF ELECTRICAL
SHOCK OR INJURY MAY RESULT!
BEFORE INSTALLING OPERATOR
IMPORTANT: Operator should always be mounted
inside the gate. Determine whether the installation is Left
hand or Right hand by the direction the gate moves in
order to open, when viewed from inside the fence.
PUBLIC AREA
OR STREET
PUBLIC AREA
OR STREET
RIGHT HAND
LEFT HAND
4'
MINIMUM
1. Gate must slide freely to fully opened and fully
closed position.
2. Gate and/or extension must extend beyond the
17
position of the operator. The operator will be
located as shown above, for left and right hand
installation.
18
Page 10
INSTALLATION OF CEMENT PAD
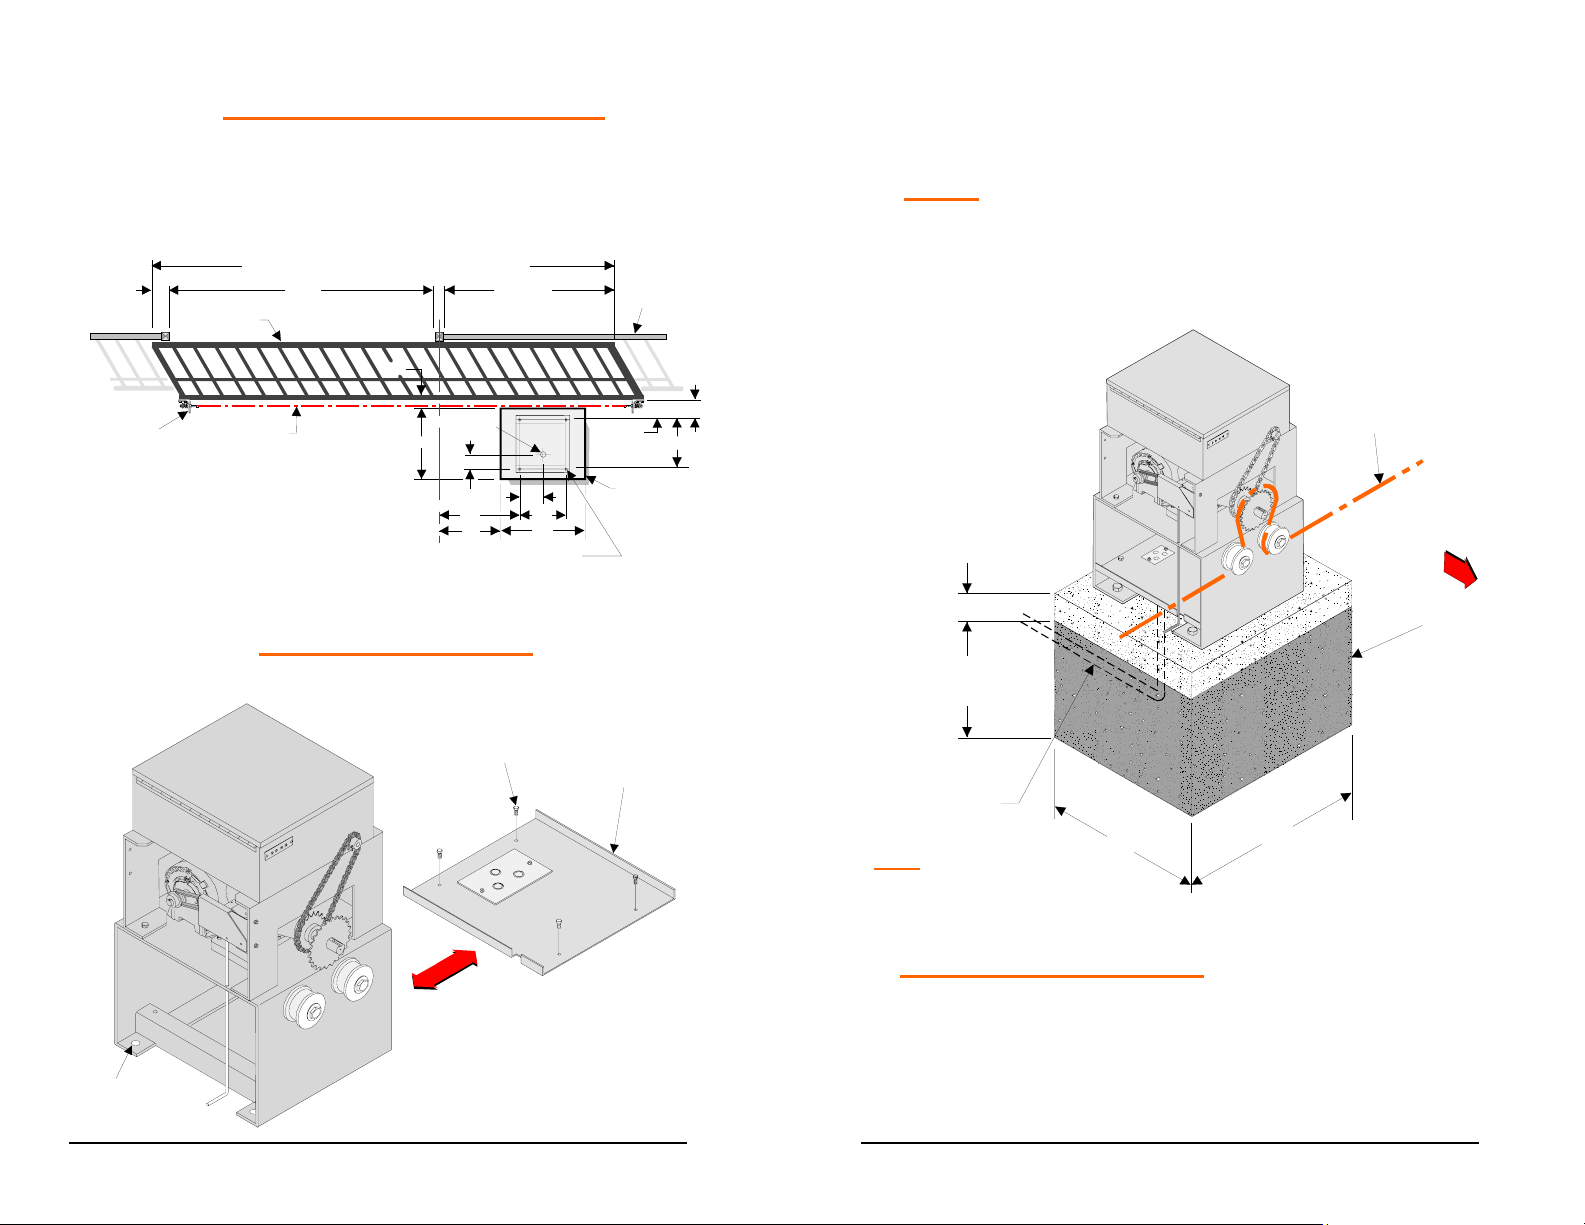
Lay out the cement pad as shown. Be sure top surface
is level. Allow 2 days cure time before installing
operator. Bolt pattern must be parallel to the gate.
Min. Gate Length = Gate Opening +A +B +30"
AGate
Gate
Opening
2"
B
30" Min.
Fence
2. Using 1/2” hardware (Not Supplied) bolt assembled
unit to the pad, being sure to align operator parallel to
the fence.
NOTE: Drive sprocket, and rollers must face the
fence.
3. Replace auxiliary shelf in operator and secure position
with 1/4” hardware.
Electrical
Gate
Bracket
C
L
Of Drive Chain
19"
Conduit
3-1/4"
9"
4"
6"
12"
22"
1/2" Mountin g
Hardware
( By Others)
INSTALLATION TO PAD
1. Remove auxiliary shelf from operator frame.
(4) 1/4" HEX
BOLTS
MOUNTING
HOLES
Parallel
To Gate
19" X 22"
Cement
Pad
AUX. SHELF
13"
5"
Drive Chain
FENCE
Electrical Conduit
Depth As Required
By Local Code
NOTE: Separate Conduit
Should Be Used For
Incoming Power And
Control Wiring.
2" Min.
36" In Ground Or
As Required
By Local Code
19"
22"
Cement Pad
ATTACHING DRIVE CHAIN
1. Install gate brackets at each end of the gate with Ubolts provided. Do not fully tighten at this time.
2. Attach a chain take up bolt to one end of the drive
chain using a #41 connecting link.
19
20
Page 11
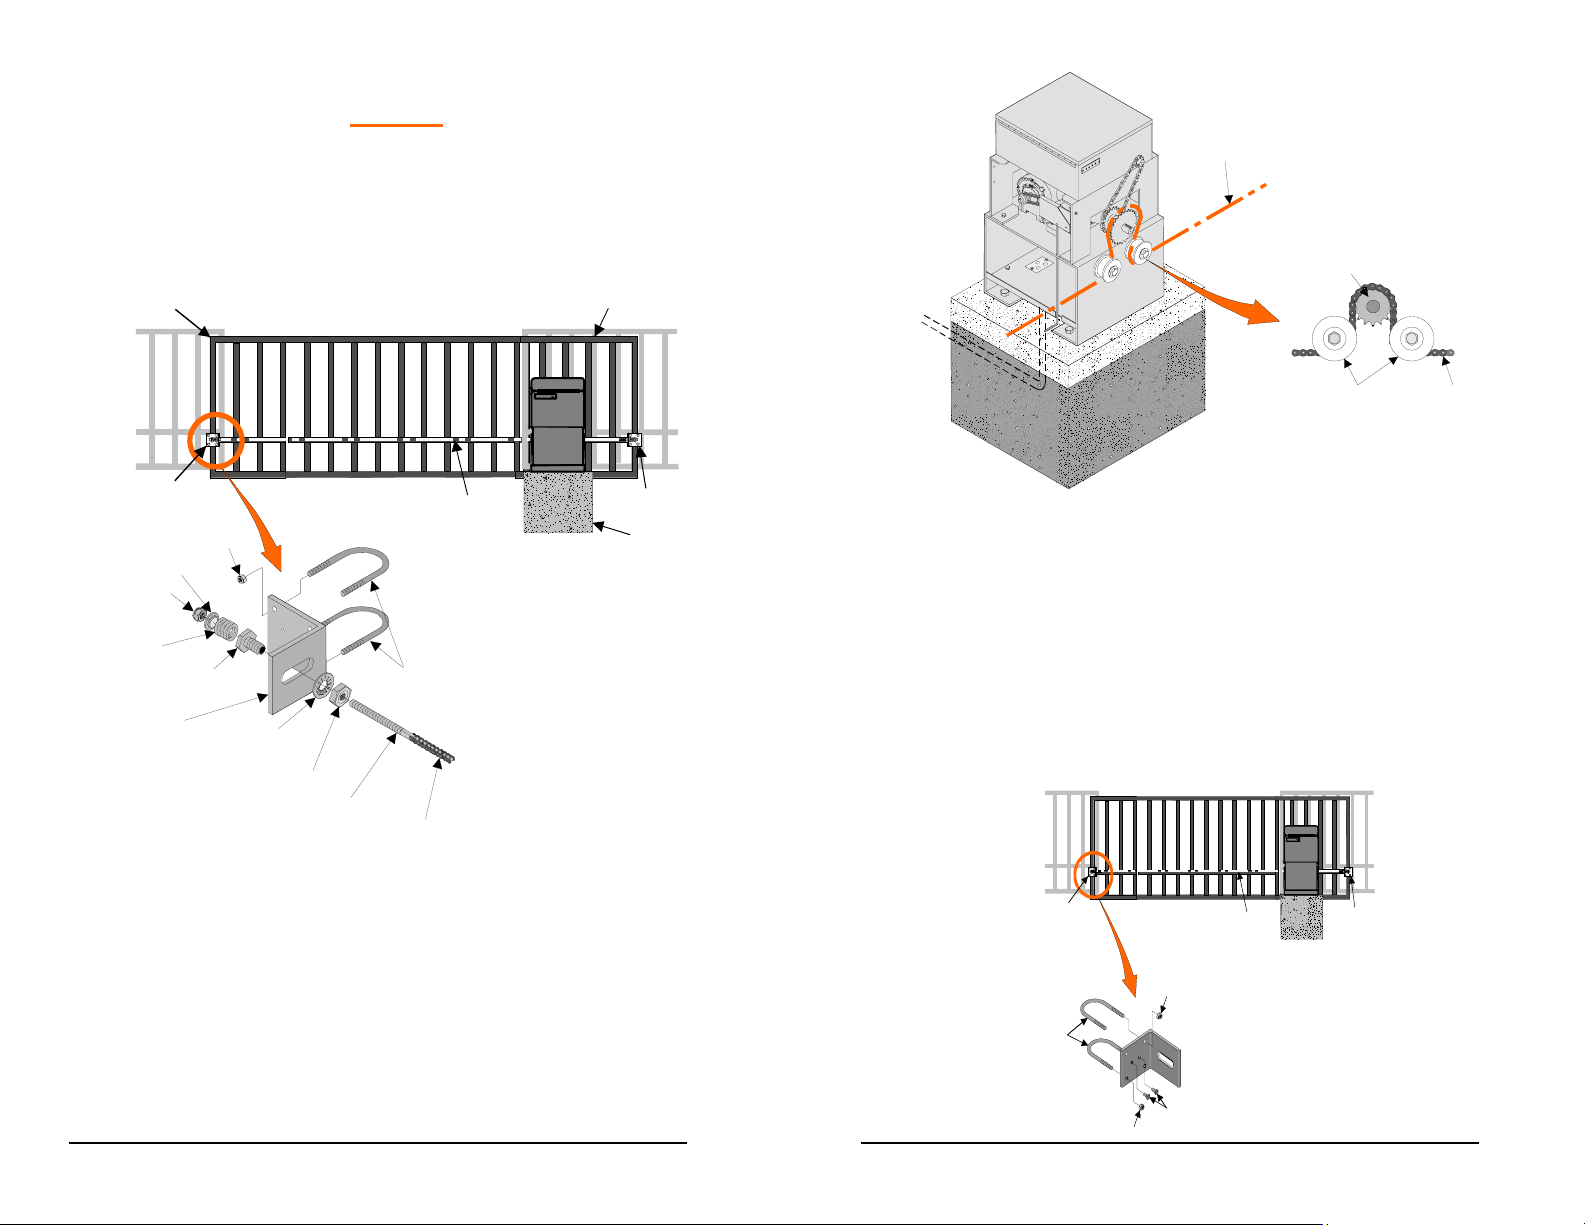
3. Install spring fittings into gate brackets using 3/4” nuts
and lock washers. DO NOT tighten.
4. Install chain take up bolt, previously attached to the
chain, into spring fitting in furthest gate bracket.
Secure it in position with spring, spring washer, and
1/2” elastic stop nut.
Gate
Leading Edge
Gate
Extension
Drive Chain
Drive
Sprocket
PowerMaster
Gate
Bracket
1/2-13 Elastic
Stop Nut
Chain
Tensioning
Spring
Gate
Bracket
Nut
Spring
Washer
Spring
Fitting
3/4 Internal Tooth
Lock Washer
Drive Chain
3/8"
U-Bolts
3/4-10 Jamb Nut
Chain take-up Bolt
#50 Connecting Link
Gate
Bracket
Cement Pad
5. Thread chain under first idler roller, up and over drive
sprocket, then under the second idler roller.
6. Move gate to tighten drive chain between operator
drive sprocket and gate bracket.
7. Secure gate position with rope or chock.
8. Measure out required length of drive chain needed for
attaching to remaining gate bracket.
21
Idler
Rollers
9. Cut the chain to the correct length, attach remaining
chain take-up bolt and install in the gate bracket as in
steps 2 through 4.
10. Adjust the gate bracket height at both ends of the
gate to insure the drive chain aligns with the operator
idler rollers.
11. Tighten the gate brackets securely and lock in
position with the setscrews provided.
Drive Chain
PowerMaster
Gate
Bracket
Gate
Bracket
Nut
U-Bolts
Set
Screw
Nut
22
Page 12
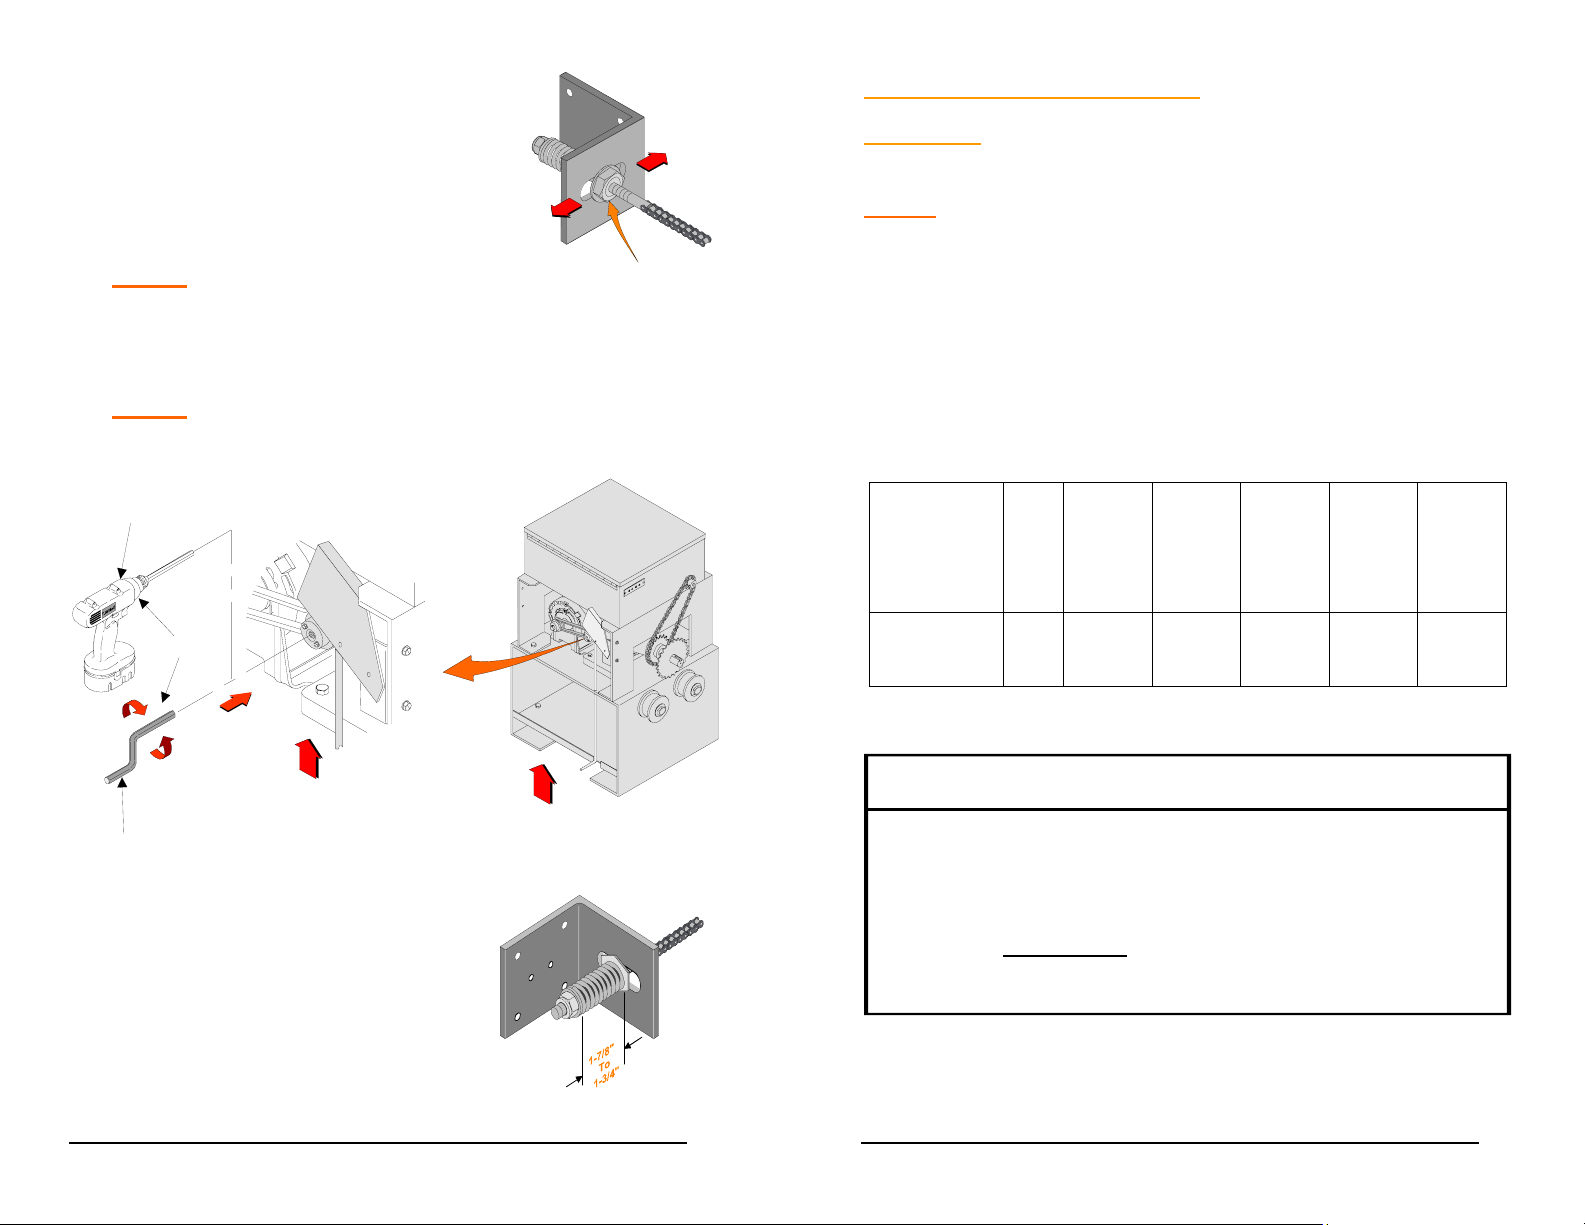
12. Align drive chain to the drive
sprocket and ensure it is parallel to
gate using slots in gate bracket as
shown below.
NOTE: If required, reposition drive sprocket
Jamb Nut
by loosening set screws and relocating drive sprocket on
operator drive shaft. Tighten set screws after desired
location is obtained.
NOTE: By moving the gate manually to each end of its
travel, chain alignment is simplified.
Cordless Electric
Drill With 5/16"
Hex Key Bit
ELECTRICAL CONNECTIONS
WARNING- DO NOT APPLY POWER UNTIL TOLD TO DO
SO. RISK OF SHOCK OR INJURY MAY RESULT!
NOTE: Wiring to operator must use watertight materials in
accordance with local electric code. See wire gauge/distance
charts for proper sizing. Master/Slave installations should have
SEPARATE power supply wiring or length of wire runs should
be figured at half that shown on the chart. This unit must be
grounded in accordance with N.E.C. and local codes.
Before connecting the operator, use a voltmeter to determine
that the electrical service is 115V. THIS OPERATOR CANNOT
BE CONNECTED AT 230 VOLTS. Damage will result which is
not covered under warranty.
Line
Voltage
HP
14
AWG
12
AWG
10
AWG8 AWG
6
AWG
OR
115 VAC 1/2 150’ 250’ 400’ 500’ 650’
Lift Interlock lever
5/16" Hex Key
Hand Crank
To Expose Drive Hub
13. Adjust chain tension so that the
chain tension springs are
reduced to a length within 17/8” and 1-3/4”.
23
Adjust Spring Length
As Shown For Proper
Chain Tension
Control w iring should be run as tw isted
pairs.
sam e conduit as power w ires. telephone
LOW VOLTAG E W IRE
GAUGE /DISTANCE CHART
2 4 A W G : U p to 1 5 0 '
20 AW G : 150' - 200'
2 5 0 ' - 1 ,5 0 0 '
18 A W G :
D O N O T ru n c o n tro l w ire s in th e
wires, or loop detector leads.
24
Page 13
1. Be sure power switches at source and operator are
OFF.
2. Connect incoming power lines and ground wire as
shown below.
Hot leg (black) to BLACK; Neutral (white) to
White: Ground to GREEN
BLK
OPERATOR
WHT
BLK
WHT
UTILITY BOX
GRN
INSIDE UTILITY BOX,
CONNECT AS SHOWN
GND
INCOMING
POWER
115V - 1Ø
INSTALLATION OPTIONS
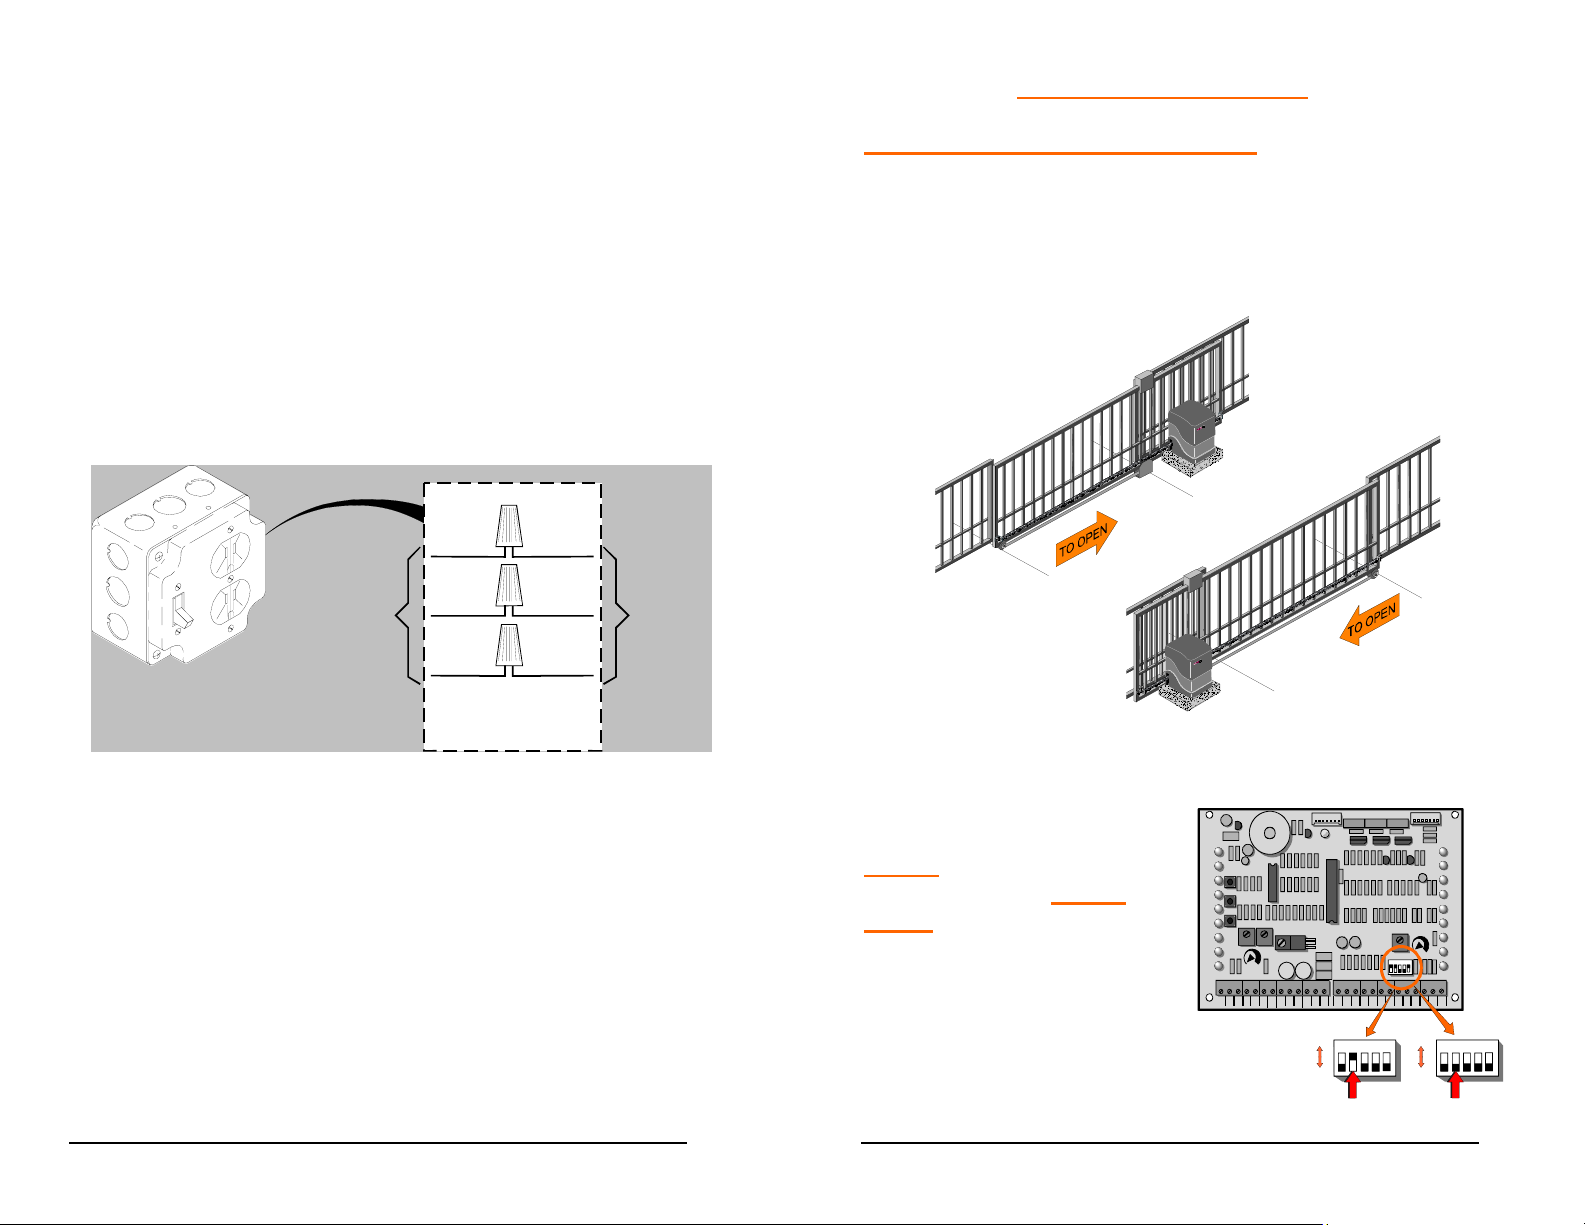
LEFT/RIGHT HAND CONVERSION:
Determine the hand of the operator required for this
installation by checking the direction the gate moves in order
to open, when viewed from inside the fence. Slides RIGHT
to open is a right hand installation, slides Left to open is a
left hand installation.
PUBLIC AREA
OR STREET
PUBLIC AREA
OR STREET
RIGHT HAND
LEFT HAND
FRE
OPN
U4
CLO
ON
OFF
P3
LD1
POWER
U1
TB2
COM
STO
COM
COM
1234
Left Hand
Operation
P4
LD19
MID
LIMIT
LD2
REV
LOOP
LD3
OPN
EDGE
LD4
CLO
EDGE
LD5
RH OPN
LH CLO
LIMIT
LD6
RH CLO
LH OPN
LIMIT
LD8
12345
OPN
EDG
MOTOR
OPEN
LD9
MOTOR
CLOSE
OFF MAX
LD7
SHADOW
LOOP
COM
CLO
EDG
MST
OPN
MST
CLO
COM
COM
ON
1234
5
AUTO
RECLOSE
TIMER
CLO
OPN
PHO
PHO
SHW
REV
5
OFF
Right Hand
Operation
NOTE: This unit is
factory setup for RIGHT
HAND operation. To
convert operator to left
hand operation move
dipswitch #2 to “ON”
position.
LD18
OPEN
PUSH
LD10
FREE
EXT
LD11
OPEN
ALT
LD12
RADIO
CLOSE
OPN/
CLO
LD15
RADIO
OPEN
STOP
LD14
CLOSE
OPEN CLOSE
PUSH
LD16
STOP
PUSH
LD17
OPEN
PHOTO
LD13
CLOSE
PHOTO
FORCE
ADJUSTMENT
TB1
24VAC24VACALT
COM
COM
COM
Place Dipswitch #2
In "ON" Position For Left
Hand Operation And
"OFF" Position For Right
Hand Operation.
U2
RDO
OPN
CRO
25
26
Page 14
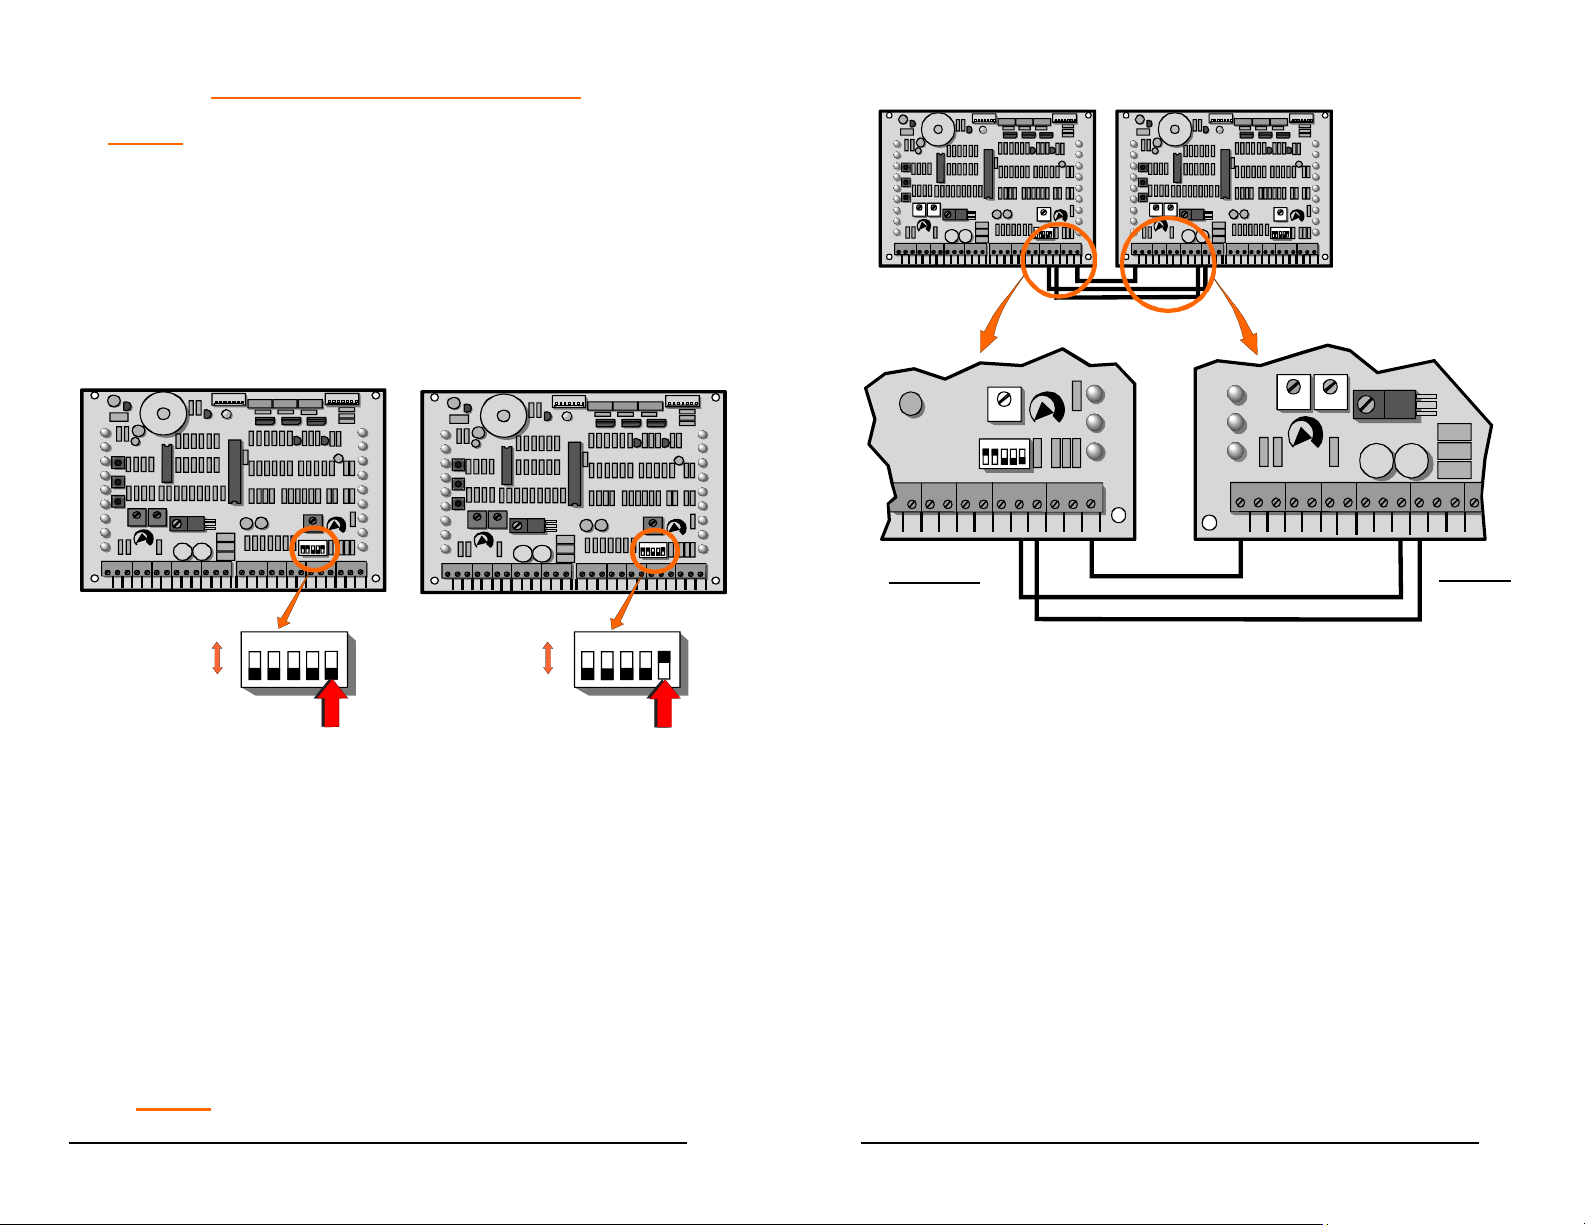
MASTER/SLAVE INSTALLATION
NOTE: A single unit is considered a Master.
1. Place dipswitch #5 on the MASTER operator’s control
board in the “OFF” position.
2. Place dipswitch #5 on the SLAVE operator’s control
board in the “ON” position.
MASTER OPERATOR
CONTROL BOARD
LD1
LD18
OPEN
PUSH
LD10
FREE
EXT
LD11
OPEN
ALT
LD12
RADIO
CLOSE
OPN/
CLO
LD15
RADIO
OPEN
STOP
LD14
CLOSE
OPEN CLOSE
PUSH
LD16
STOP
PUSH
LD17
OPEN
PHOTO
LD13
CLOSE
PHOTO
ADJUSTMENT
TB1
COM
COM
COM
POWER
U2
U4
FORCE
24VAC24VACALT
COM
RDO
OPN
CRO
FRE
OPN
CLO
STO
SLAVE OPERATOR
P3
U1
TB2
CLO
COM
COM
OPN
PHO
PHO
P4
LD19
MID
LIMIT
LD2
REV
LOOP
LD3
OPN
EDGE
LD4
CLO
EDGE
LD5
RH OPN
LH CLO
LIMIT
LD6
RH CLO
LH OPN
LIMIT
LD8
AUTO
RECLOSE
TIMER
SHW
MOTOR
OPEN
LD9
MOTOR
CLOSE
OFF MAX
LD7
12345
SHADOW
LOOP
OPN
EDG
MST
CLO
COM
COM
COM
REV
CLO
EDG
MST
OPN
CONTROL BOARD
LD18
OPEN
PUSH
LD10
U2
FREE
EXT
LD11
OPEN
ALT
LD12
RADIO
CLOSE
OPN/
CLO
LD15
RADIO
OPEN
STOP
LD14
CLOSE
OPEN CLOSE
PUSH
LD16
STOP
PUSH
LD17
OPEN
PHOTO
LD13
CLOSE
PHOTO
FORCE
ADJUSTMENT
TB1
COM
24VAC24VACALT
COM
COM
RDO
OPN
CRO
FRE
P3
LD1
POWER
U1
U4
TB2
COM
CLO
OPN
CLO
STO
COM
COM
OPN
PHO
PHO
P4
LD19
MID
LIMIT
LD2
REV
LOOP
LD3
OPN
EDGE
LD4
CLO
EDGE
LD5
RH OPN
LH CLO
LIMIT
LD6
RH CLO
LH OPN
LIMIT
LD8
AUTO
RECLOSE
TIMER
SHW
MOTOR
OPEN
LD9
MOTOR
CLOSE
OFF MAX
LD7
12345
SHADOW
LOOP
OPN
EDG
MST
CLO
COM
COM
COM
REV
CLO
EDG
MST
OPN
MASTER OPERATOR
CONTROL BOARD
P3
LD1
LD18
OPEN
PUSH
LD10
FREE
EXT
OPEN
LD11
ALT
LD12
RADIO
CLOSE
OPN/
CLO
LD15
RADIO
OPEN
STOP
LD14
CLOSE
OPEN CLOSE
PUSH
LD16
STOP
PUSH
LD17
OPEN
PHOTO
LD13
CLOSE
PHOTO
FORCE
ADJUSTMENT
TB1 TB2
COM
COM
COM
24VAC24VACALT
POWER
U2
U1
U4
RDO
OPN
CRO
FRE
OPN
CLO
STO
ON
COM
COM
COM
1234
AUTO
RECLOSE
TIMER
12345
OPN
PHO
CLO
PHO
SHW
REV
OPN
OFF
P4
LD19
MID
LIMIT
LD2
REV
LOOP
LD3
OPN
EDGE
LD4
CLO
EDGE
LD5
RH OPN
LH CLO
LIMIT
LD6
RH CLO
LH OPN
LIMIT
LD8
MOTOR
OPEN
LD9
MOTOR
CLOSE
OFF MAX
LD7
SHADOW
LOOP
EDG
CLO
EDG
MST
OPN
MST
CLO
COM
COM
COM
5
SLAVE OPERATOR
CONTROL BOARD
P3
LD1
LD18
OPEN
PUSH
LD10
FREE
EXT
OPEN
LD11
ALT
LD12
RADIO
CLOSE
OPN/
CLO
LD15
RADIO
OPEN
STOP
LD14
CLOSE
OPEN CLOSE
PUSH
LD16
STOP
PUSH
LD17
OPEN
PHOTO
LD13
CLOSE
PHOTO
FORCE
ADJUSTMENT
TB1 TB2
AC
ALT
COM
COM
COM
24VAC24V
U2
RDO
OPN
CRO
U4
FRE
OPN
CLO
ON
OFF
POWER
U1
STO
COM
COM
1234
COM
OPN
PHO
AUTO
RECLOSE
TIMER
OFF MAX
12345
CLO
PHO
SHW
REV
OPN
EDG
CLO
EDG
MST
OPN
MST
CLO
COM
5
Master Slave
3. Connect a wire from the “MST OPN” terminal on the
Master operators control board, to the “OPN” terminal
on the Slave operators control board.
4. Connect a second wire from the “MST CLO” terminal
on the Master operators control board, to the “CLO”
terminal on the slave operators control board.
5. Connect a third wire from any “COM” terminal on the
Master operators control board, to any “COM”
terminal on the Slave operators control board.
NOTE: In a Master/Slave installation, one unit must be
converted to LEFT HAND operation.
27
OPEN CLOSE
P4
LD19
MID
LIMIT
LD2
REV
LOOP
LD3
OPN
EDGE
LD4
CLO
EDGE
LD5
RH OPN
LH CLO
LIMIT
LD6
RH CLO
LH OPN
LIMIT
LD8
MOTOR
OPEN
LD9
MOTOR
CLOSE
LD7
SHADOW
LOOP
COM
COM
AUTO
RECLOSE
TIMER
OPN
PHO
CLO
PHO
SHW
MASTER
REV
1234
OPN
EDG
OFF MAX
5
CLO
EDG
MST
OPN
MST
CLO
MOTOR
OPEN
LD9
MOTOR
CLOSE
LD7
SHADOW
LOOP
COM
COM
COM
STOP
PUSH
OPEN
PHOTO
CLOSE
PHOTO
LD16
LD17
LD13
FORCE
ADJUSTMENT
TB1
COM
COM
24VAC24VACALT
COM
CRO
RDO
OPN
FRE
OPN
CLO
U4
STO
COM
SLAVE
28
Page 15
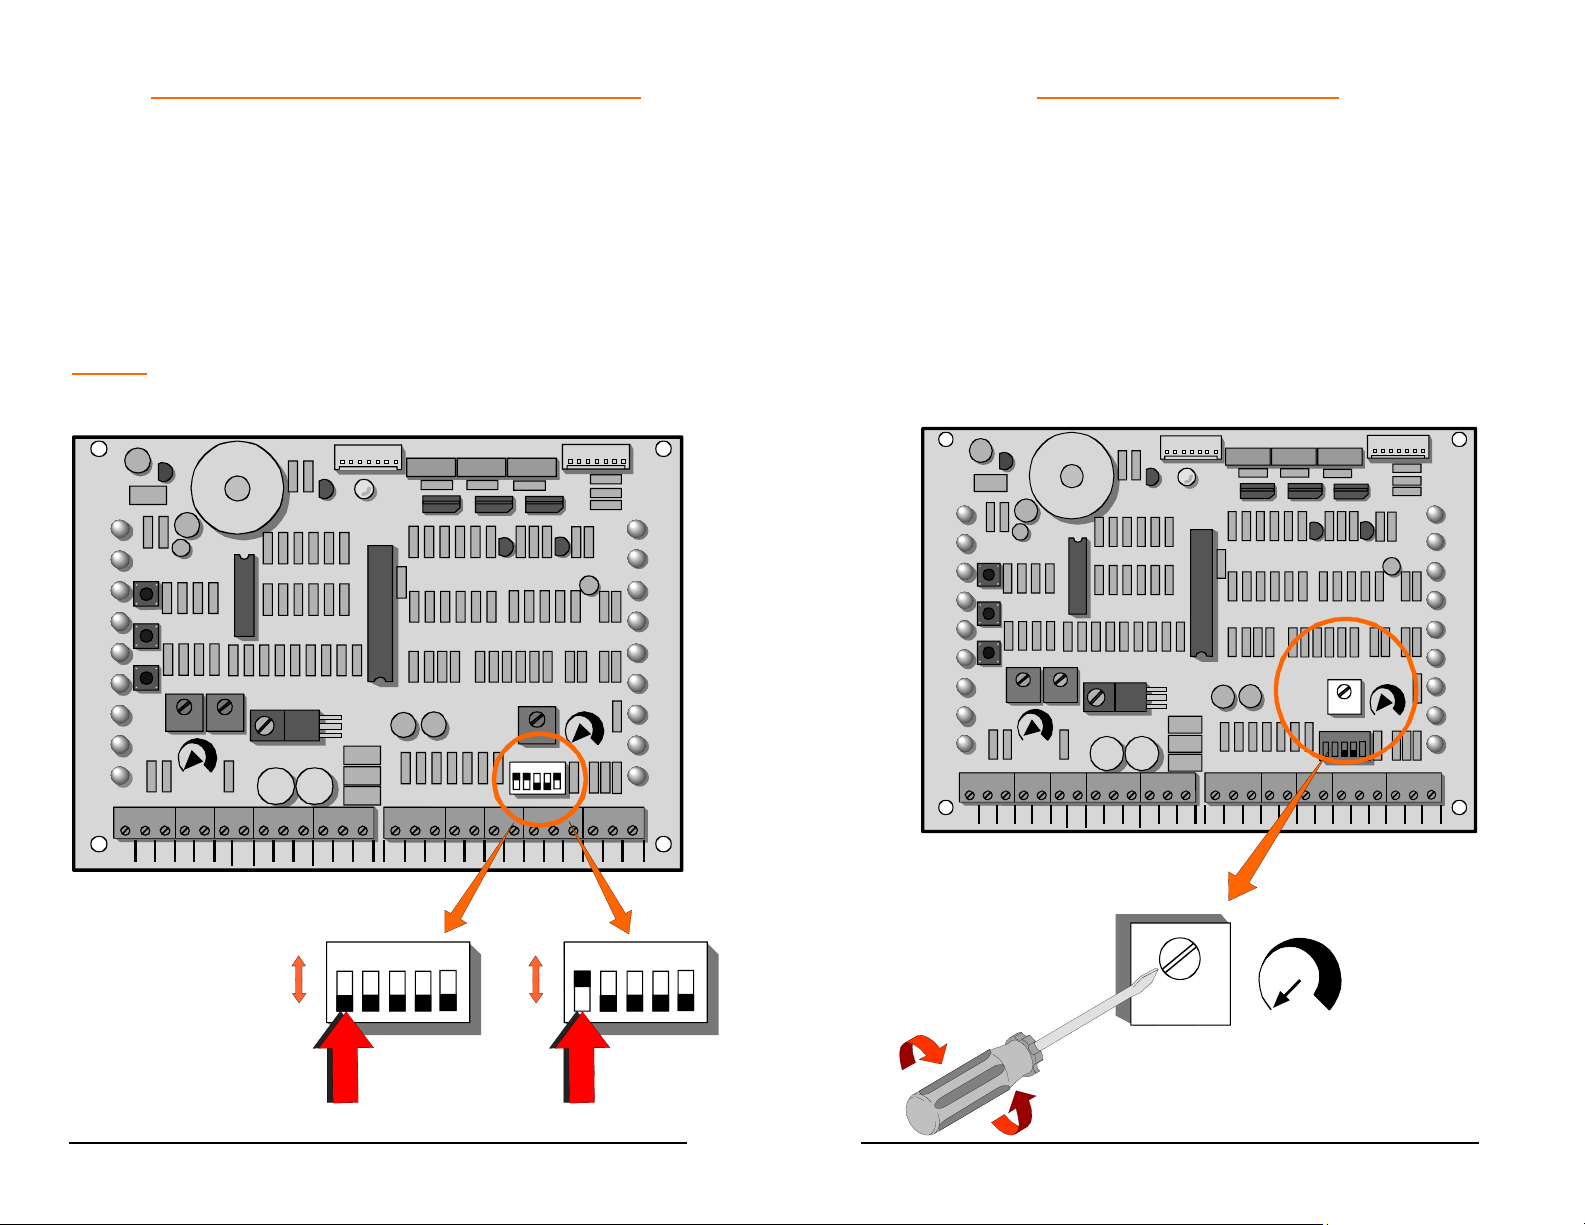
EMERGENCY CONTROL STATION OPTION
Provision has been made to change the control station
operational mode to one that would only be activated when
the entrapment sensing system is in stop mode; with the
warning horn activated. This would give a person access to
control the gate in an emergency situation, but it would be
inoperative under normal circumstances. To activate this
option, move dipswitch #1 to the “ON” position.
NOTE: When this emergency mode of operation is activated,
the control station functions as a constant pressure control.
LD18
OPEN
PUSH
LD10
FREE
EXT
LD11
OPEN
ALT
LD12
RADIO
CLOSE
OPN/
CLO
LD15
RADIO
OPEN
STOP
LD14
CLOSE
PUSH
STOP
PUSH
OPEN
PHOTO
CLOSE
PHOTO
OPEN CLOSE
LD16
LD17
LD13
ADJUSTMENT
TB1 TB2
COM
COM
COM
Emerge nc y C on tr o l
Option
FORCE
24VAC24VACALT
U2
RDO
OPN
CRO
FRE
ON
OFF
U4
OPN
CLO
STO
1234
OFF
LD1
POWER
P3
U1
AUTO
RECLOSE
TIMER
COM
CLO
COM
SHW
COM
OPN
PHO
PHO
REV
5
12345
OPN
EDG
CLO
EDG
ON
OFF MAX
MST
MST
OPN
1234
P4
LD19
MID
LIMIT
LD2
REV
LOOP
LD3
OPN
EDGE
LD4
CLO
EDGE
LD5
RH OPN
LH CLO
LIMIT
LD6
RH CLO
LH OPN
LIMIT
LD8
MOTOR
OPEN
LD9
MOTOR
CLOSE
LD7
SHADOW
LOOP
CLO
COM
COM
COM
5
OFF
ON
29
TIMER TO CLOSE OPTION
The operator is equipped with a timer to close option for use
with OPEN ONLY control devices such as a radio control, or
card key control. The AUTO RECLOSE TIMER adjustment
screw is located on the printed circuit board. The operator is
shipped from the factory with this timer preset to the off
position; fully counter clockwise. As the timer adjustment
screw is rotated clockwise, the closing of the gate can be
delayed from 2 seconds to 60 seconds. The timer to close
will be activated whenever the gate is stopped, except in the
closed position.
OPEN
PUSH
FREE
EXT
ALT
RADIO
OPN/
CLO
RADIO
OPEN
CLOSE
PUSH
STOP
PUSH
OPEN
PHOTO
CLOSE
PHOTO
LD18
LD10
LD11
OPEN
LD12
CLOSE
LD15
STOP
LD14
LD16
LD17
LD13
TB1
COM
COM
OPEN CLOSE
FORCE
ADJUSTMENT
AC
AC
24V
COM
24V
U2
U4
ALT
RDO
OPN
CRO
FRE
OPN
CLO
MAX.
AUTO
RECLOSE
TIMER
OFF
POWER
STO
30
P3
LD1
U1
AUTO
RECLOSE
TIMER
TB2
COM
COM
COM
OPN
PHO
CLO
PHO
SHW
REV
12345
OPN
EDG
CLO
EDG
OFF MAX
MST
OPN
MST
P4
LD19
MID
LIMIT
LD2
REV
LOOP
LD3
OPN
EDGE
LD4
CLO
EDGE
LD5
RH OPN
LH CLO
LIMIT
LD6
RH CLO
LH OPN
LIMIT
LD8
MOTOR
OPEN
LD9
MOTOR
CLOSE
LD7
SHADOW
LOOP
COM
CLO
COM
COM
Location Of Auto Close
Timer Adjustment.
OFF MAX
Page 16
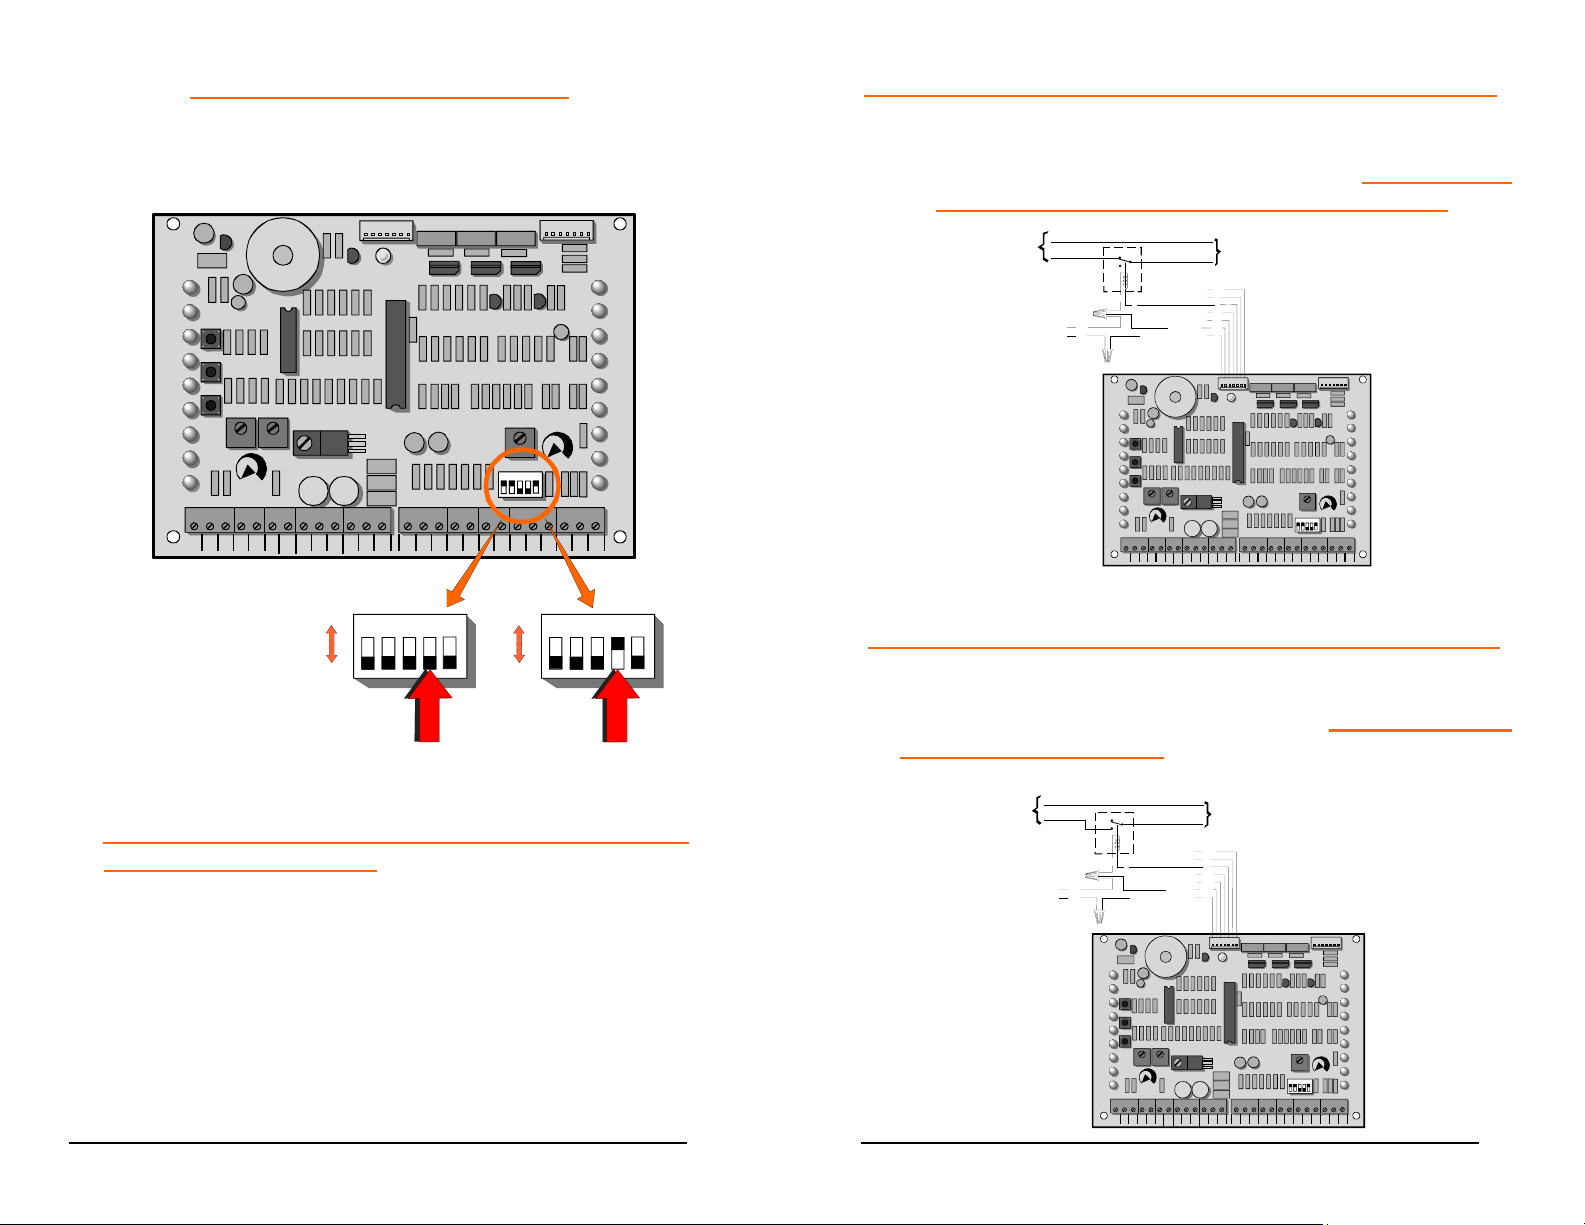
AUDIBLE PRE - MOVE WARNING
By moving Dipswitch #4 to the “ON” position the option of a
3 second Audible Warning, before gate movement, may be
selected.
LD18
OPEN
PUSH
LD10
FREE
EXT
LD11
OPEN
ALT
LD12
RADIO
CLOSE
OPN/
CLO
LD15
RADIO
OPEN
STOP
LD14
CLOSE
PUSH
LD16
STOP
PUSH
LD17
OPEN
PHOTO
LD13
CLOSE
PHOTO
TB1 TB2
COM
COM
OPEN CLOSE
FORCE
ADJUSTMENT
COM
24VAC24VACALT
U2
RDO
OPN
CRO
FRE
OPN
CLO
P3
LD1
POWER
U1
U4
COM
STO
COM
AUTO
RECLOSE
TIMER
CLO
SHW
COM
OPN
PHO
PHO
REV
12345
OPN
EDG
CLO
EDG
OFF MAX
MST
OPN
P4
LD19
MID
LIMIT
LD2
REV
LOOP
LD3
OPN
EDGE
LD4
CLO
EDGE
LD5
RH OPN
LH CLO
LIMIT
LD6
RH CLO
LH OPN
LIMIT
LD8
MOTOR
OPEN
LD9
MOTOR
CLOSE
LD7
SHADOW
LOOP
MST
CLO
COM
COM
COM
ON
Audible
Pre-move Warning
Option
OFF
1234
ON
5
1234
5
OFF
OFF ON
AUXILIARY CIRCUIT FOR USE WITH GATE LOCKS,
WARNING LIGHTS, ETC
An auxiliary 24 VAC power circuit, for use with a 24V
control relay, has been provided. This circuit will be
activated just prior to gate movement and will
continue to be active until the gate stops. It may be
used to control a gate lock, activate warning lights
and solenoid controlled devices or any other system
required during this time interval. Two control options
are available.
OPTION #1 – POWER REMOVED DURING GATE MOVEMENT
Below is a diagram showing the connection of a
device, such as a magnetic gate lock, requiring the
removal of power during the gate movement.
Power In
To Aux. Device
Transformer
Aux. Circuit Using
Normally Closed
Control Relay
OPTION #2 – POWER SUPPLIED DURING GATE MOVEMENT
The following diagram shows the connection of a device,
such as a solenoid operated gate lock, requiring power
during gate movement.
Power In
To Aux. Device
From
Transformer
Aux. Circuit Using
Normally Open
Contro l R e lay
Neutral
Power leg
From
Neutral
Power leg
Relay With
24 VAC Coil
N.C.
N.O.
WH
Y
WH
BR
LD18
OPEN
PUSH
LD10
FREE
EXT
LD11
OPEN
ALT
LD12
RADIO
CLOSE
OPN/
CLO
LD15
RADIO
OPEN
STOP
LD14
CLOSE
PUSH
LD16
STOP
PUSH
LD17
OPEN
PHOTO
LD13
CLOSE
PHOTO
TB1
COM
COM
Relay With
24 VAC Coil
N.C.
N.O.
WH
Y
WH
BR
GND (Common)
LD18
OPEN
PUSH
LD10
FREE
EXT
LD11
OPEN
ALT
LD12
RADIO
CLOSE
OPN/
CLO
LD15
RADIO
OPEN
STOP
LD14
CLOSE
OPEN CLOSE
PUSH
LD16
STOP
PUSH
LD17
OPEN
PHOTO
LD13
CLOSE
PHOTO
ADJUSTMENT
TB1 TB2
COM
COM
COM
24 VAC
GND (Common)
U2
OPEN CLOSE
FORCE
ADJUSTMENT
AC
ALT
COM
24VAC24V
RDO
OPN
CRO
24 VAC
U2
FORCE
AC
ALT
24VAC24V
RDO
OPN
CRO
FRE
To Gate Locks,
Warning L ig h ts , Ect .
WH
R
Y
GY
BK
WH
R
LD1
POWER
U1
U4
TB2
FRE
OPN
CLO
STO
COM
COM
To Gate Locks,
Warning Lights, Ect.
WH
R
Y
GY
BK
WH
R
P3
LD1
POWER
U1
U4
OPN
CLO
STO
COM
COM
COM
P3
AUTO
RECLOSE
TIMER
COM
OPN
PHO
CLO
PHO
SHW
REV
AUTO
RECLOSE
TIMER
12345
OPN
PHO
CLO
PHO
SHW
OPN
REV
P4
LD19
MID
LIMIT
LD2
REV
LOOP
LD3
OPN
EDGE
LD4
CLO
EDGE
LD5
RH OPN
LH CLO
LIMIT
LD6
RH CLO
LH OPN
LIMIT
LD8
MOTOR
OPEN
LD9
MOTOR
CLOSE
OFF MAX
LD7
5
1234
SHADOW
LOOP
OPN
EDG
CLO
EDG
MST
OPN
MST
CLO
COM
COM
COM
P4
LD19
MID
LIMIT
LD2
REV
LOOP
LD3
OPN
EDGE
LD4
CLO
EDGE
LD5
RH OPN
LH CLO
LIMIT
LD6
RH CLO
LH OPN
LIMIT
LD8
MOTOR
OPEN
LD9
MOTOR
CLOSE
OFF MAX
LD7
SHADOW
LOOP
EDG
CLO
EDG
MST
CLO
COM
COM
COM
MST
OPN
31
32
Page 17
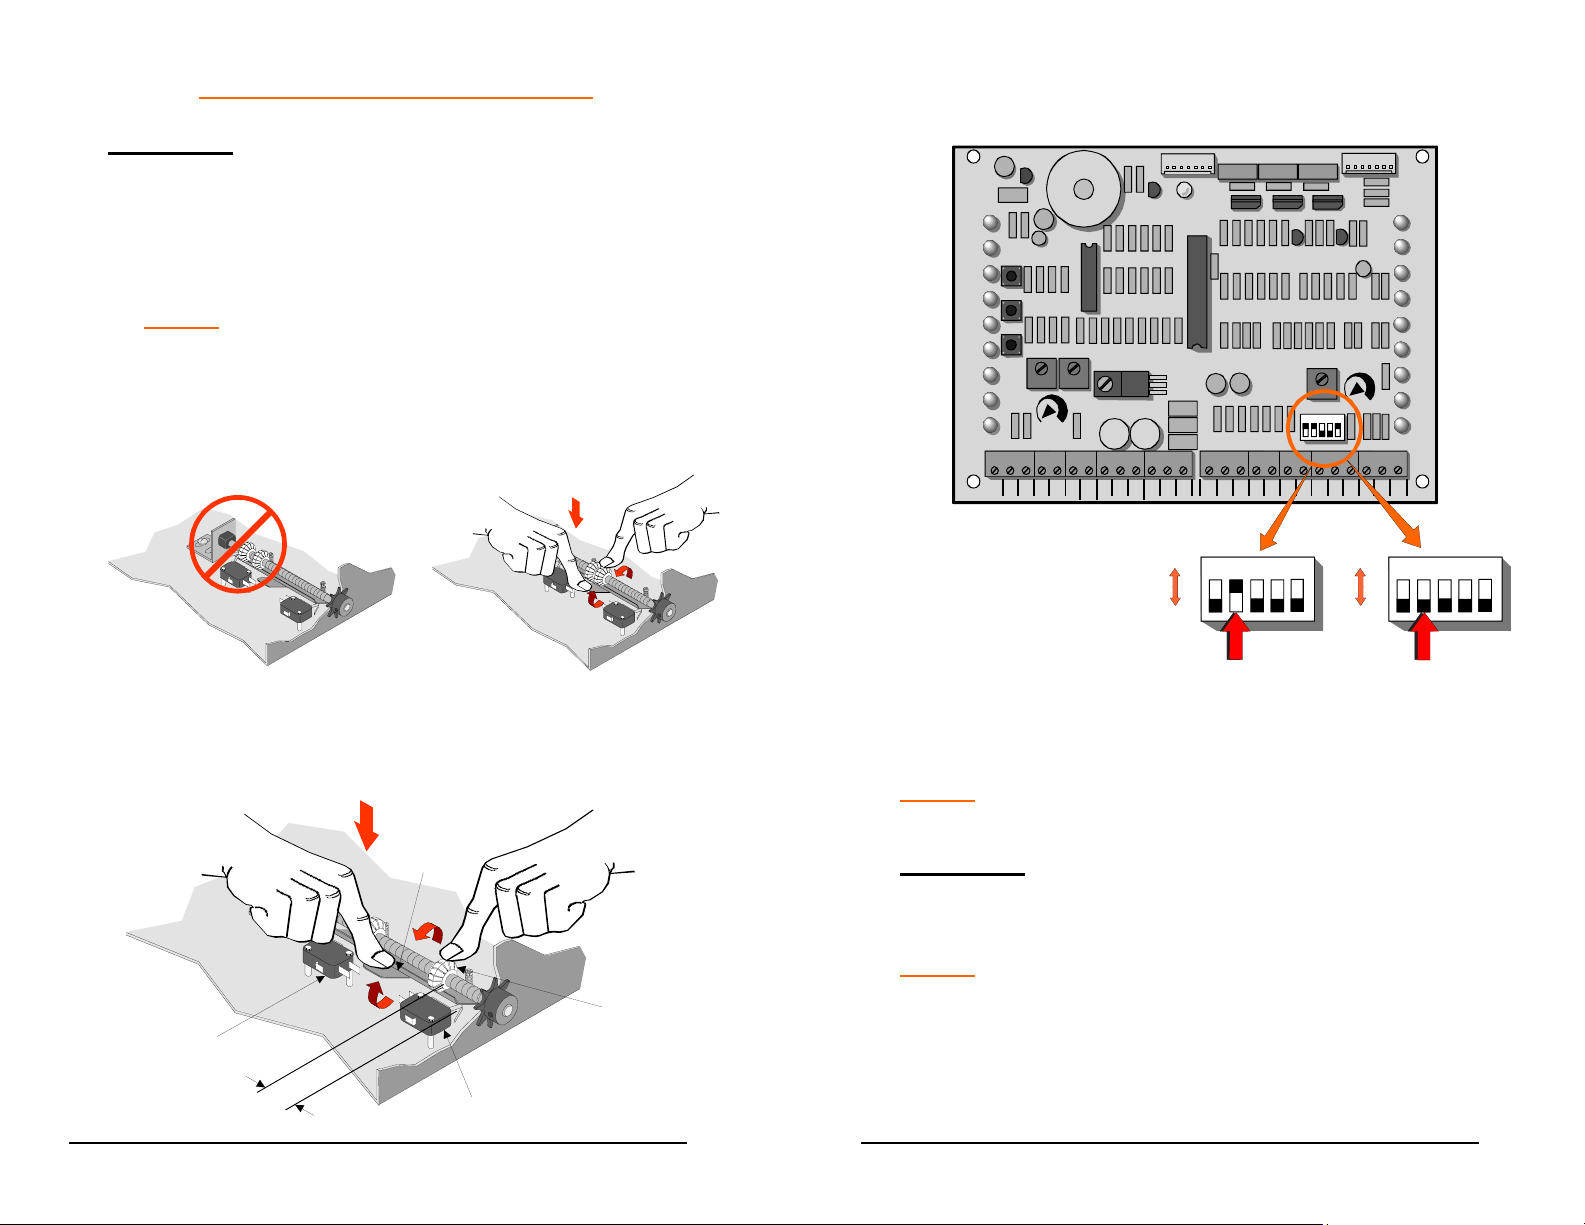
LIMIT ADJUSTMENT PROCEDURE
▲ WARNING: TURN OFF MAIN POWER BEFORE
MAKING ANY ADJUSTMENTS!
1. After the gate is mechanically installed, move the
gate to a midway position using the manual hand
crank or cordless drill.
NOTE: When moving the gate manually, the limit nuts
in the electric box can be driven past their normal
position. Reset the limit nuts as necessary, by
depressing the pressure plate and rotating the limit
nuts until they are both positioned near the center of
the limit shaft.
3. Check that Dipswitch #2 is in the correct position for
left or right hand operation as previously determined.
LD18
OPEN
PUSH
FREE
EXT
ALT
RADIO
OPN/
CLO
RADIO
OPEN
CLOSE
PUSH
STOP
PUSH
OPEN
PHOTO
CLOSE
PHOTO
LD10
OPEN
LD11
LD12
CLOSE
LD15
STOP
LD14
LD16
LD17
LD13
TB1
COM
COM
OPEN CLOSE
FORCE
ADJUSTMENT
COM
24VAC24VACALT
U2
U4
RDO
OPN
CRO
OPN
CLO
FRE
POWER
STO
P3
LD1
U1
TB2
COM
COM
AUTO
RECLOSE
TIMER
COM
OPN
PHO
CLO
PHO
SHW
REV
12345
OPN
EDG
CLO
EDG
OFF MAX
MST
OPN
P4
LD19
MID
LIMIT
LD2
REV
LOOP
LD3
OPN
EDGE
LD4
CLO
EDGE
LD5
RH OPN
LH CLO
LIMIT
LD6
RH CLO
LH OPN
LIMIT
LD8
MOTOR
OPEN
LD9
MOTOR
CLOSE
LD7
SHADOW
LOOP
MST
CLO
COM
COM
COM
2. With the gate at mid travel, depress the pressure
plate and set the grooved limit nuts
approximately 1 inch from the limit switches on
each side.
Pressure
Plate
Limit Nut
Open Limit
Switch
1"
33
Close Limit
Switch
Place Dipswitch #2
In "ON" Pos itio n Fo r Left
ON
1234
ON
5
1234
5
Hand O per at ion A nd
"OFF" Position For Right
OFF
OFF
Hand O per at ion .
Left Hand
Operation
Right Hand
Operation
4. Turn on power.
NOTE: Operator will not run if manual crank lever is
engaged.
▲ WARNING: STAY CLEAR OF ALL MOVING
PARTS AND ELECTRICAL COMPONENTS OF THE
OPERATOR WHILE TESTING!
NOTE: The first time the gate operator is run after the
power is turned on, a 3 second warning will sound before
the operator starts.
5. Open the gate electrically using the THREE BUTTON
control station mounted on the control board.
34
Page 18
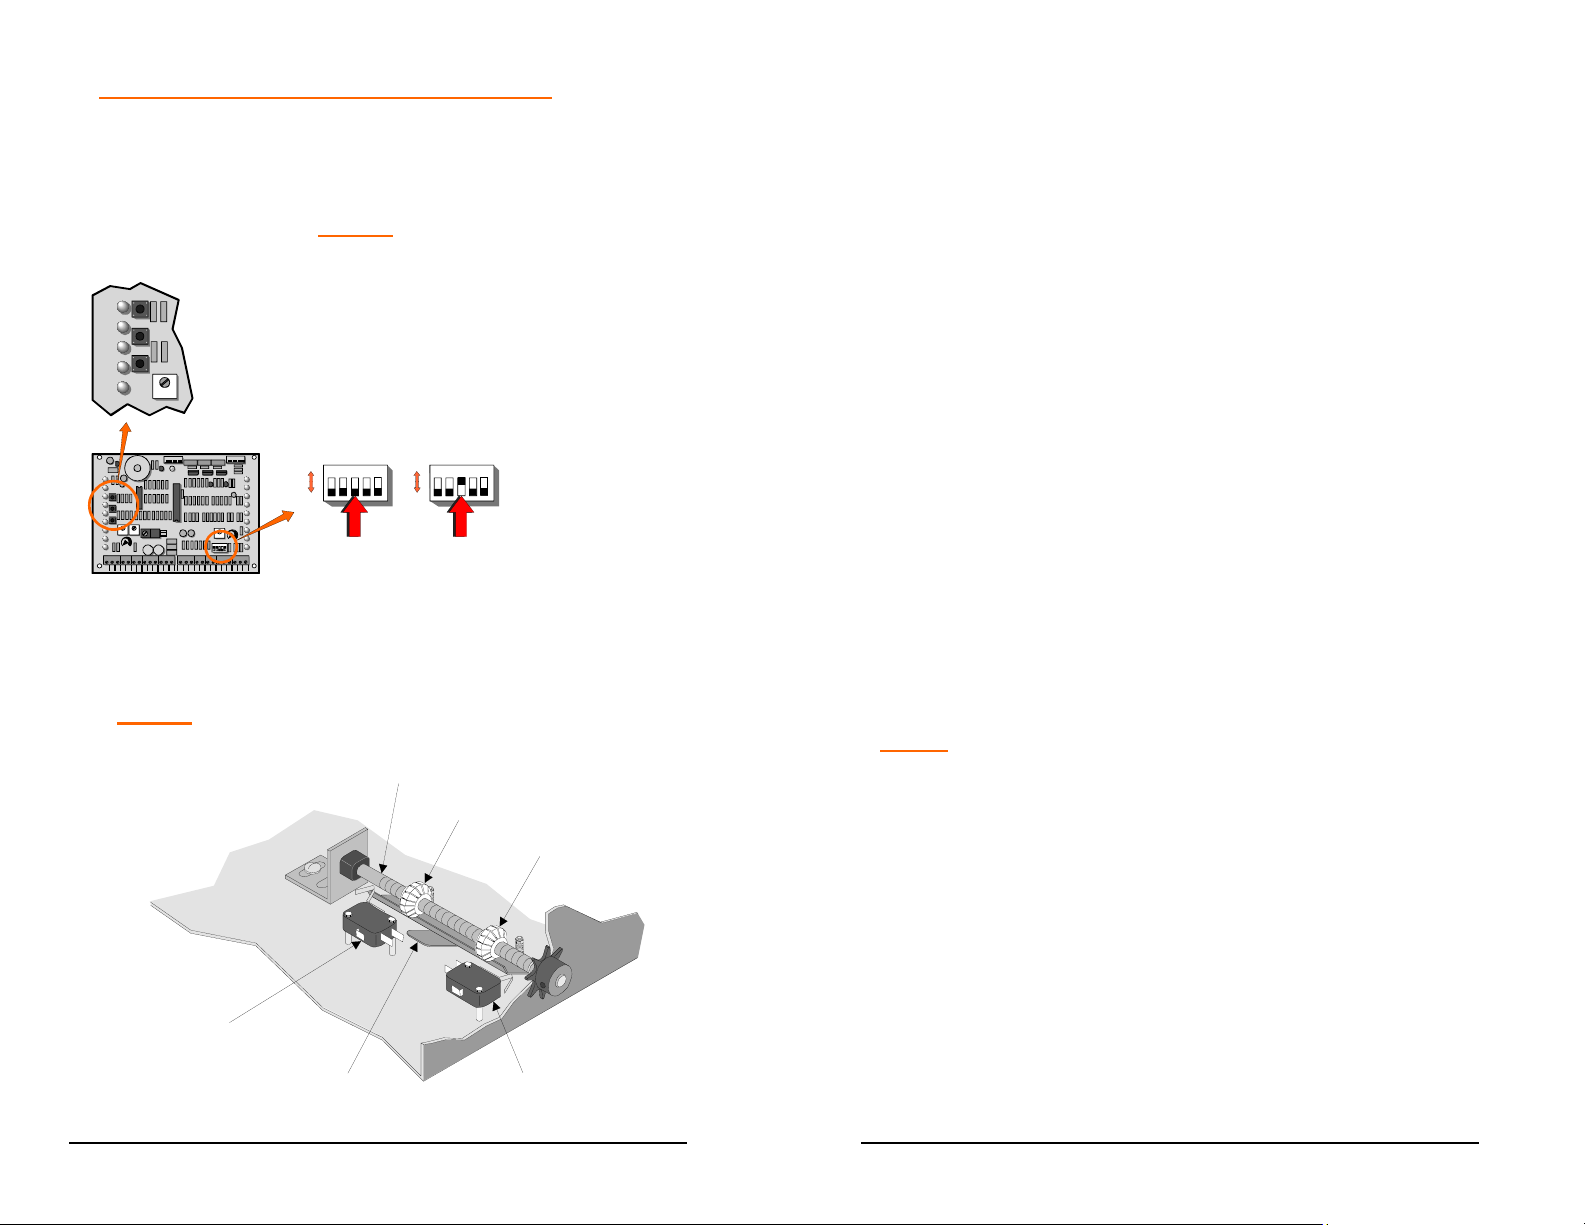
BOARD MOUNTED CONTROL STATION
If Dipswitch #3 is in the “OFF” position, the board mounted
three button station will function normally.
NOTE: If Dipswitch #3 is in the
OPEN
LD11
ALT
LD12
RADIO
CLOSE
OPN/
CLO
LD15
RADIO
OPEN
STOP
LD14
CLOSE
PUSH
LD16
STOP
PUSH
LD17
OPEN
“ON” position for use with a
NORMALLY CLOSED “STOP”
BUTTON, then the board mounted
“STOP” button must be held
depressed in order to use the open
and close buttons. Releasing the stop
button will then stop the operator.
LD18
OPEN
PUSH
LD10
U2
FREE
EXT
OPEN
LD11
ALT
LD12
RADIO
CLOSE
OPN/
CLO
LD15
RADIO
OPEN
STOP
LD14
CLOSE
OPEN CLOSE
PUSH
LD16
STOP
PUSH
LD17
OPEN
PHOTO
LD13
CLOSE
PHOTO
FORCE
ADJUSTMENT
TB1 TB2
AC
ALT
COM
COM
COM
24VAC24V
RDO
OPN
P3
LD1
POWER
U1
U4
CRO
FRE
OPN
CLO
STO
COM
COM
P4
ON
LD19
MID
LIMIT
LD2
REV
LOOP
LD3
OPN
EDGE
LD4
CLO
EDGE
LD5
RH OPN
LH CLO
LIMIT
LD6
RH CLO
LH OPN
LIMIT
LD8
MOTOR
AUTO
OPEN
RECLOSE
LD9
TIMER
MOTOR
CLOSE
OFF MAX
LD7
12345
SHADOW
LOOP
COM
OPN
PHO
CLO
PHO
SHW
REV
OPN
EDG
CLO
EDG
MST
OPN
MST
CLO
COM
COM
COM
12345
OFF
For Normally
Open Stop
Button
ON
12345
OFF
For Normally
Closed Stop
Button
6. If the gate travels in the correct direction and stops on
the open limit switch, proceed to step #10.
NOTE: Open and Close Limit Switches are Reversed
for Slide Left to Open Operation.
Limit Shaft
Limit Nut
Limit Nut
7. If the operator runs in the wrong direction proceed to
step #9.
8. If the limit nut depresses the open limit switch but does not
stop the gate, press the stop button or turn off the power
immediately, and consult factory. (1-800-243-4476).
9. Check position of dipswitch #2 to be sure it coincides with
the installation. (Left Hand or Right Hand) If this is correct
consult the factory. (1-800-243-4476).
10. If the operator functions properly, run the operator to
the open limit switch and turn off the power.
11. If there is still a distance before the gate is fully open,
turn off power, move the open limit nut away from the
open limit switch a few turns and turn on the power.
12. Press the OPEN button again to check how much
further the gate opened.
13. Continue this procedure until the OPEN limit is set.
NOTE: When making fine adjustments, turn the limit nut one
quarter turn at a time; reconnect power and test run the
gate.
14. Repeat procedure for the CLOSE limit adjustment.
15. After the desired open and close position of the gate
has been obtained, make certain that a groove in both
limit nuts are engaged by the pressure plate.
OPEN LIMIT SWITCH
for slide right to open
operation
Pressure
Plate
CLOSE LIMIT SWITCH
for slide right to open
35
operation
36
Page 19
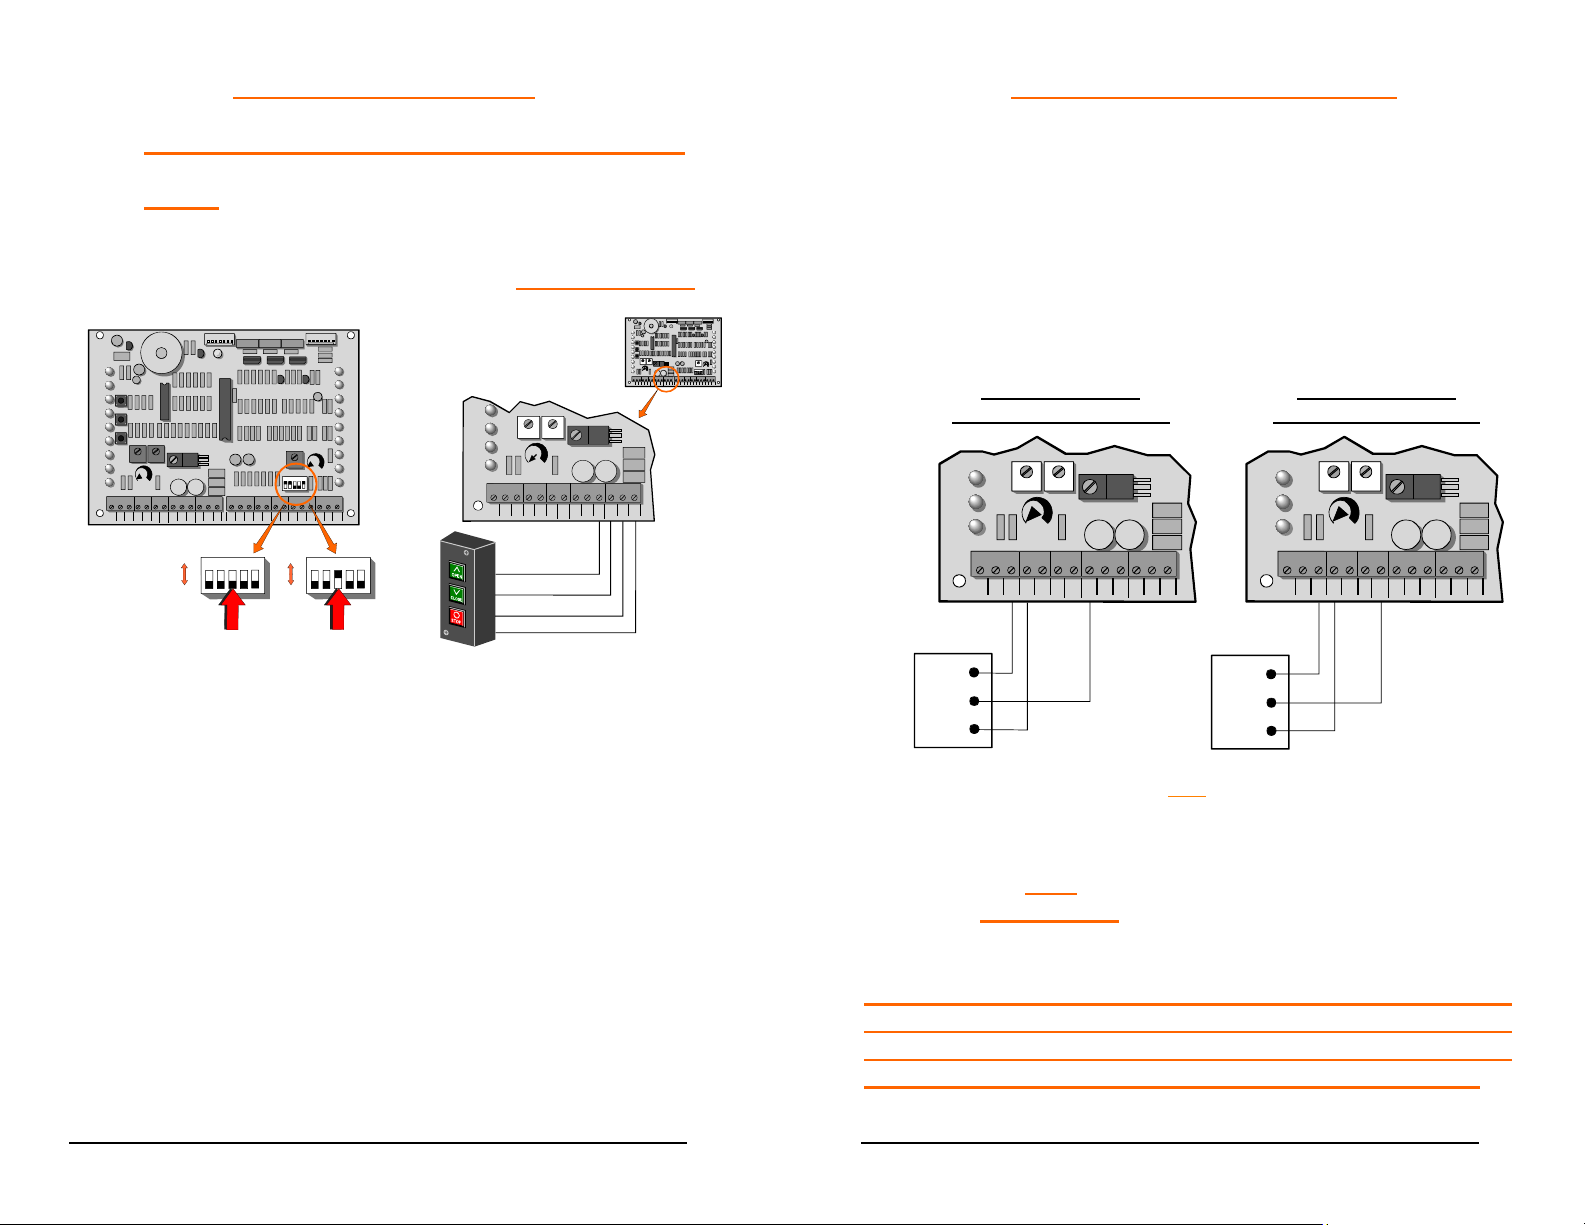
CONTROL CONNECTIONS
CONNECTION OF A THREE-BUTTON STATION:
NOTE: All control contacts must be NORMALLY
OPEN unless dipswitch #3 is placed to the “ON”
position, which will change the circuitry to accept a
NORMALLY CLOSED STOP BUTTON. Refer to Page 35.
LD18
OPEN
PUSH
LD10
FREE
EXT
ALT
RADIO
OPN/
CLO
RADIO
OPEN
CLOSE
PUSH
STOP
PUSH
OPEN
PHOTO
CLOSE
PHOTO
U2
OPEN
LD11
LD12
CLOSE
LD15
STOP
LD14
OPEN CLOSE
LD16
LD17
LD13
FORCE
ADJUSTMENT
TB1
AC
AC
24V
ALT
COM
COM
COM
24V
RDO
OPN
CRO
ON
OFF
FRE
U4
OPN
CLO
LD1
POWER
U1
TB2
COM
STO
COM
1234
for Normally
Open Stop
Button
P3
AUTO
RECLOSE
TIMER
COM
OPN
PHO
CLO
PHO
SHW
REV
5
OFF
ON
P4
LD19
MID
LIMIT
LD2
REV
LOOP
LD3
OPN
EDGE
LD4
CLO
EDGE
LD5
RH OPN
LH CLO
LIMIT
LD6
RH CLO
LH OPN
LIMIT
LD8
MOTOR
OPEN
LD9
MOTOR
CLOSE
OFF MAX
LD7
5
1234
SHADOW
LOOP
OPN
EDG
COM
CLO
EDG
MST
OPN
MST
CLO
COM
COM
5
1234
for Normally
Closed Stop
Button
CLOSE
OPEN CLOSE
PUSH
LD16
STOP
PUSH
LD17
OPEN
PHOTO
LD13
CLOSE
PHOTO
FORCE
ADJUSTMENT
TB1
AC
AC
24V
ALT
COM
COM
COM
24V
RDO
OPN
Open
Close
Stop
Common
LD18
OPEN
PUSH
LD10
U2
FREE
EXT
OPEN
LD11
ALT
LD12
RADIO
CLOSE
OPN/
CLO
LD15
RADIO
OPEN
STOP
LD14
CLOSE
OPEN CLOSE
PUSH
LD16
U4
STOP
PUSH
LD17
OPEN
PHOTO
LD13
CLOSE
PHOTO
FORCE
ADJUSTMENT
TB1 TB2
24VAC24VACALT
COM
COM
COM
RDO
OPN
CRO
FRE
OPN
CLO
U4
COM
CRO
FRE
OPN
CLO
STO
1. Connect a wire from the common connection of the
control station to any “COM” terminal on the control
board.
2. Connect a second wire from the “OPEN” button of the
control station to the “OPN” terminal on the control
board.
3. Connect a third wire from the “CLOSE” button of the
control station to the “CLO” terminal on the control
board.
4. Connect a fourth wire from the “STOP” button of the
control station to the “STO” terminal on the control
board.
RADIO CONTROL INSTALLATION
A Three or Four wire radio control receiver can be
installed on this operator. See the diagrams below for the
correct connections to match your installations equipment
and desired functions.
1. Choose one of the options below for connecting a
P3
P4
LD1
POWER
LD19
MID
LIMIT
LD2
REV
LOOP
LD3
OPN
EDGE
LD4
CLO
EDGE
LD5
RH OPN
LH CLO
LIMIT
LD6
RH CLO
LH OPN
LIMIT
U1
LD8
MOTOR
AUTO
OPEN
RECLOSE
LD9
TIMER
MOTOR
CLOSE
OFF MAX
LD7
12345
SHADOW
LOOP
COM
CLO
OPN
EDG
COM
STO
COM
COM
OPN
PHO
PHO
SHW
REV
CLO
EDG
MST
OPN
MST
CLO
COM
COM
three-wire radio control receiver to the control board
terminal strip.
CONNECTION FOR
OPEN/CLOSE OPERATOR
LD16
STOP
PUSH
LD17
OPEN
PHOTO
LD13
CLOSE
PHOTO
TB1
COM
COM
1
COM
2
SW.
3
24 VAC
Three Wire Radio Reciever
Wired For "OPEN/CLOSE"
FORCE
ADJUSTMENT
COM
24VAC24V
U4
AC
ALT
RDO
OPN
CRO
FRE
OPN
CLO
STO
COM
COM
24 VAC
Three Wire Radio Reciever
Wired For "OPEN" Only
NOTE: Must Be Used With
Timer to Close Option.
CONNECTION FOR
OPEN/ONLY OPERATOR
LD16
STOP
PUSH
LD17
OPEN
PHOTO
LD13
CLOSE
PHOTO
SW.
FORCE
ADJUSTMENT
TB1
AC
ALT
RDO
24VAC24V
OPN
COM
COM
COM
1
2
3
U4
CRO
FRE
OPN
CLO
STO
COM
2. Choose ONE of the options below for the connection
of a FOUR-WIRE radio control receiver to the control
board terminal strip.
NOTE: If your radio’s connecting wires are not color
coded as shown, see the radio’s installation manual to
determine which wires are for the normally open
contacts and which require the 24 VAC Power Supply.
37
38
Page 20
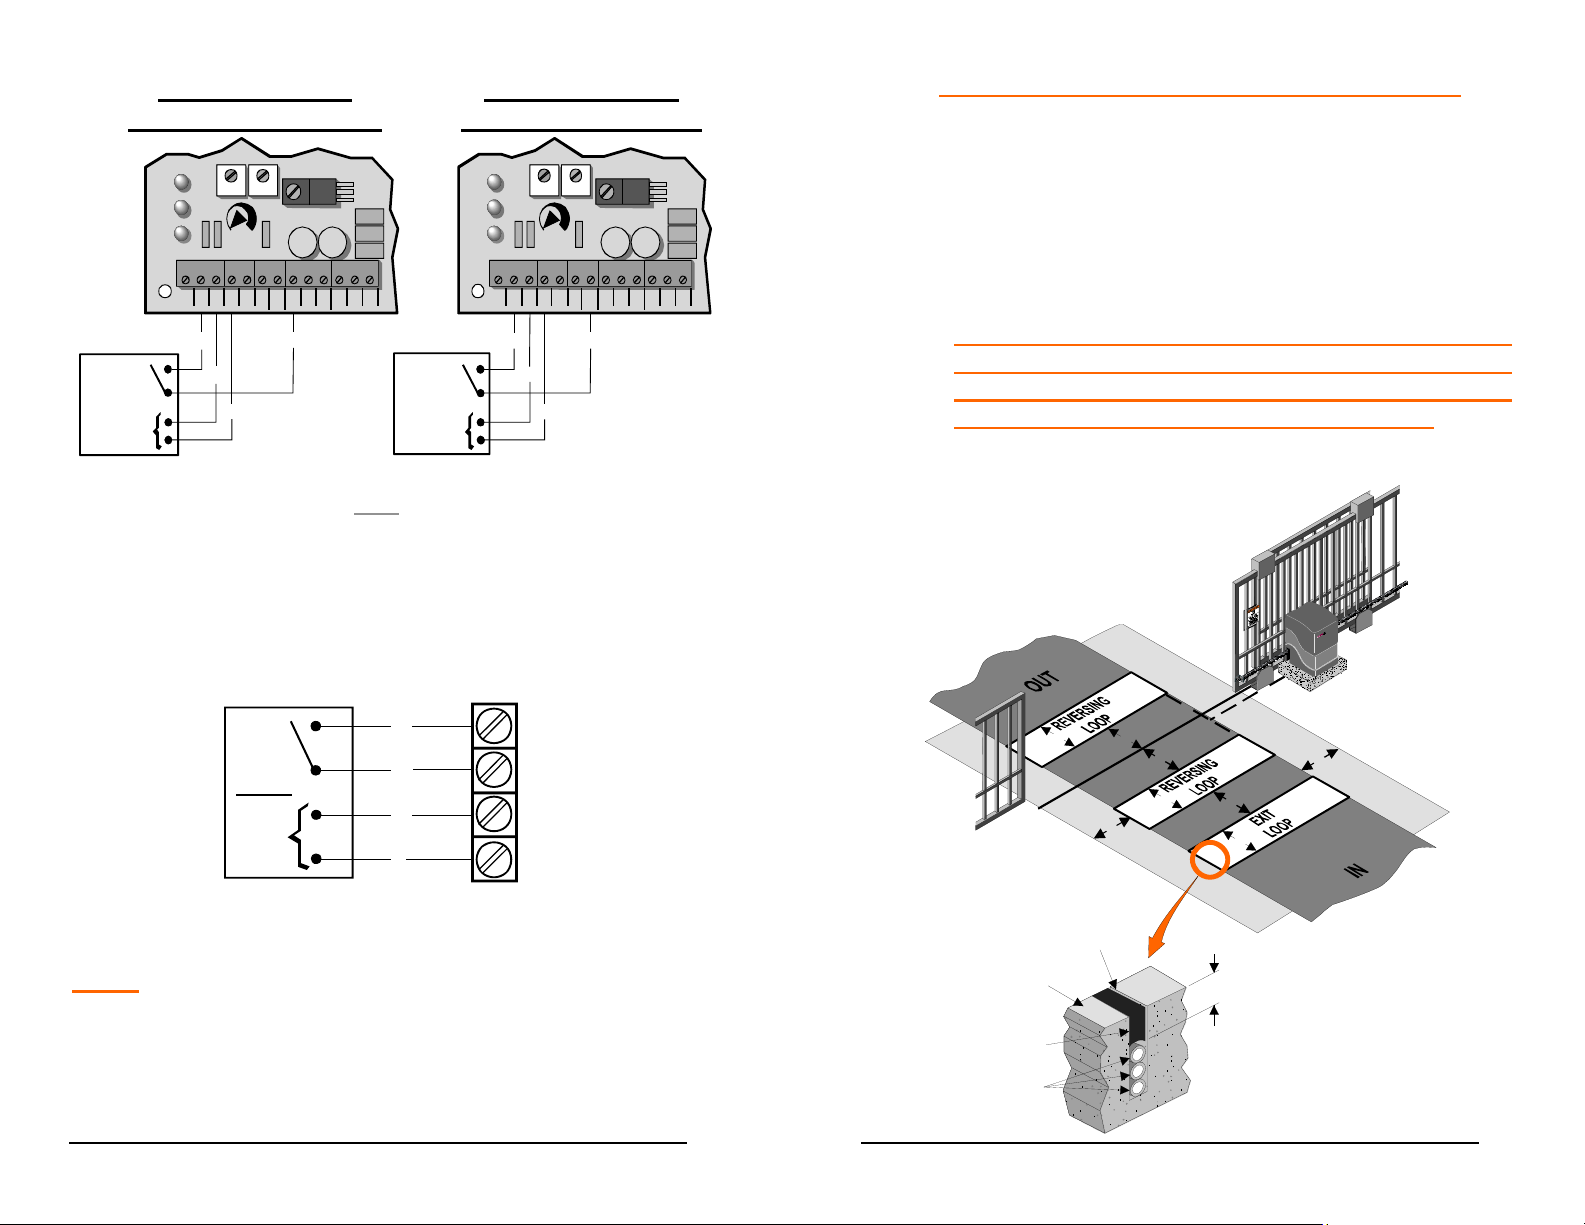
CONNECTIONS FOR
OPEN/CLOSE OPERATION
LD16
STOP
PUSH
LD17
OPEN
PHOTO
LD13
CLOSE
PHOTO
N.O.
CONTACT
24 VAC
Four Wire
Radio Reciever
Wired For
"OPEN/CLOSE"
FORCE
ADJUSTMENT
TB1
AC
COM
COM
ALT
COM
24VAC24V
GY
BK
R
U4
RDO
OPN
CRO
FRE
OPN
CLO
STO
COM
GY
CONTACT
24 VAC
Four Wire R adio Reciev er
Wired For " O P E N " O nly
NOTE: Must Be Used With
Timer to Close Option.
CONNECTIONS FOR
OPEN ONLY OPERATION
LD16
STOP
PUSH
LD17
OPEN
PHOTO
LD13
CLOSE
PHOTO
N.O.
FORCE
ADJUSTMENT
TB1
AC
ALT
RDO
OPN
CRO
COM
GY
COM
COM
24VAC24V
FRE
GY
BK
R
1. For electrical connections of a four-wire radio receiver
via the external terminal strip. See below.
N.O.
CONTACT
RADIO
24 VAC
GY
GY
BK
R
R1
R2
R3
R4
LOOP DETECTOR SYSTEMS AND INSTALLATION
The diagram below depicts the typical loop options for a
U4
Slide Gate installation.
1. The Exit Loop provides a signal to open the gate
when a vehicle enters the loop zone.
OPN
CLO
STO
COM
2. The Reversing Loops protect a vehicle in the
loop zone from being contacted with the gate by
overriding any close signal while the gate is
open, and by reversing the gate if closing.
4'
4'
4'
4'
4'
4'
4'
4'
NOTE
: Internal wiring for the radio control terminal strip is
RADIO CONTROL
TERMINAL
Road Surface
3/16" To 1/4"
Saw Slot
Min 1"
factory set-up for the OPEN ONLY option. For the
OPEN/CLOSE option, move the wire on the control board
Sealant
terminal strip from the “RDO OPN” terminal to the ‘CRO”
terminal.
39
Loop wires
40
Page 21
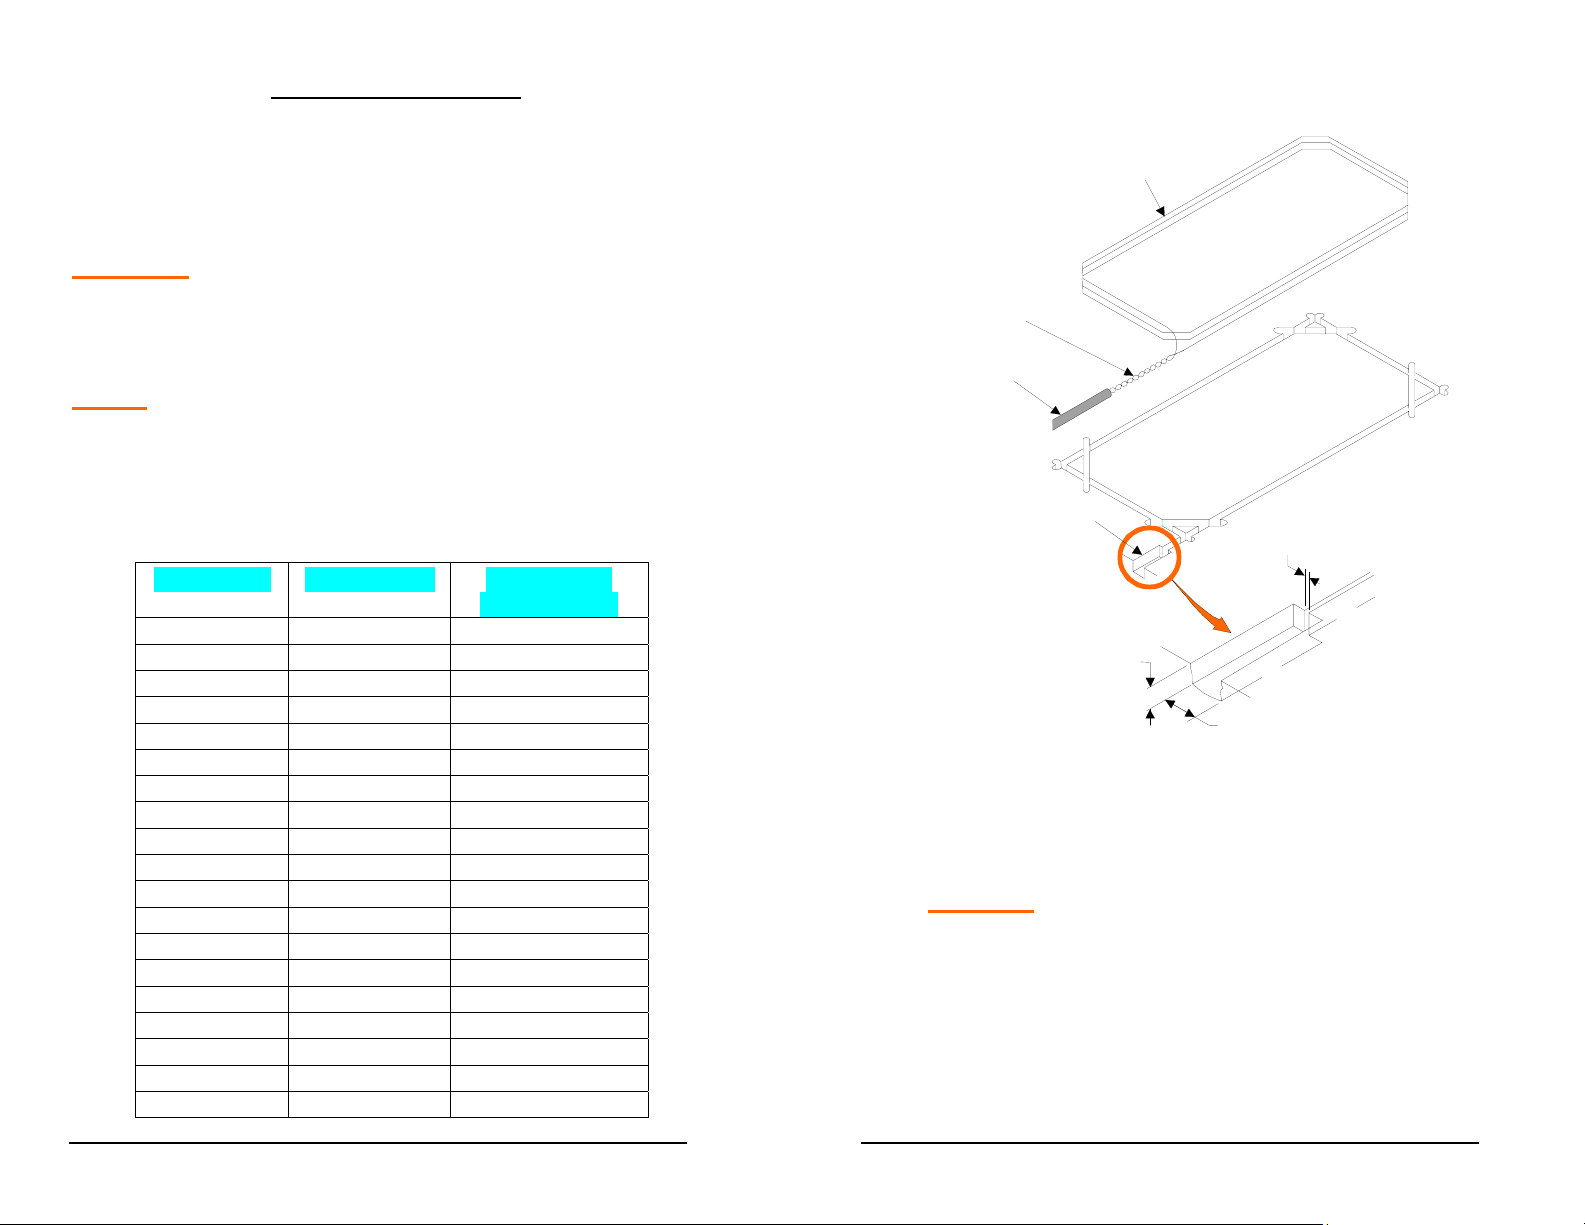
LOOP INSTALLATION
1. Layout the desired loop locations per the diagram.
The standard size chart below will give an
approximate length of wire required for various loop
dimensions and number of turns required.
CAUTION: The Loop wires and Lead-in w ires must be a
continuous piece of wire without splices. Only use wire
intended for this type of application. (Type XHHW
insulation 16AWG)
NOTE: Buried steel from drains or other systems may affect
functioning of the loop system. Check with the factory for
advice on any special installations. (1-800-243-4476).
STANDARD LOOP LAYOUTS
FOR APPROX 36” HEIGHT DETECTION
LOOP SIZE # OF TURNS LOOP WIRE
LENGTH (FT)
4’X4’ 4 64’
4’ X 6’ 4 80’
4’ X 8’ 3 72’
4’ X 10’ 3 84’
4’ X 12’ 3 96’
4’ X 14’ 3 108’
4’ X 16’ 3 120’
4’ X 18’ 3 132’
4’ X 20’ 3 144’
4’ X 22’ 3 156’
4’ X 24’ 3 168’
4’ X 26’ 3 180’
4’ X 28’ 3 192’
4’ X 30’ 2 136’
4’ X 32’ 2 144’
4’ X 34’ 2 152’
4’ X 36’ 2 160’
4’ X 38’ 2 168’
4’ X 40’ 2 176’
2. Cut the required groove as shown in the diagram below
at the locations laid out in Step #1.
Loop Wire
(See Chart)
Lead In Wire
(Twisted At 6
Turns Per Foot )
1/2" Conduit
Conduit Cut
3/16" To 1/4"
3. Leaving enough wire for the LEAD IN, insert the
specified number of turns of wire in the cut grooves.
(See chart).
CAUTION: Be careful not to damage the wire
insulation during installation.
4. After completing the required number of loop turns,
twist the ends together at the rate of 6 turns per foot to
form the LEAD-IN.
5. Seal the LEAD-IN wire in the conduit to prevent
moisture seepage into the conduit.
1" To 2"
1" To 2"
41
42
Page 22
6. Fill over the loop wires in the groove with a
recommended loop sealant. Contact your distributor
for available sealants.
7. Mount the loop detector in the operator and connect
the wire loop.
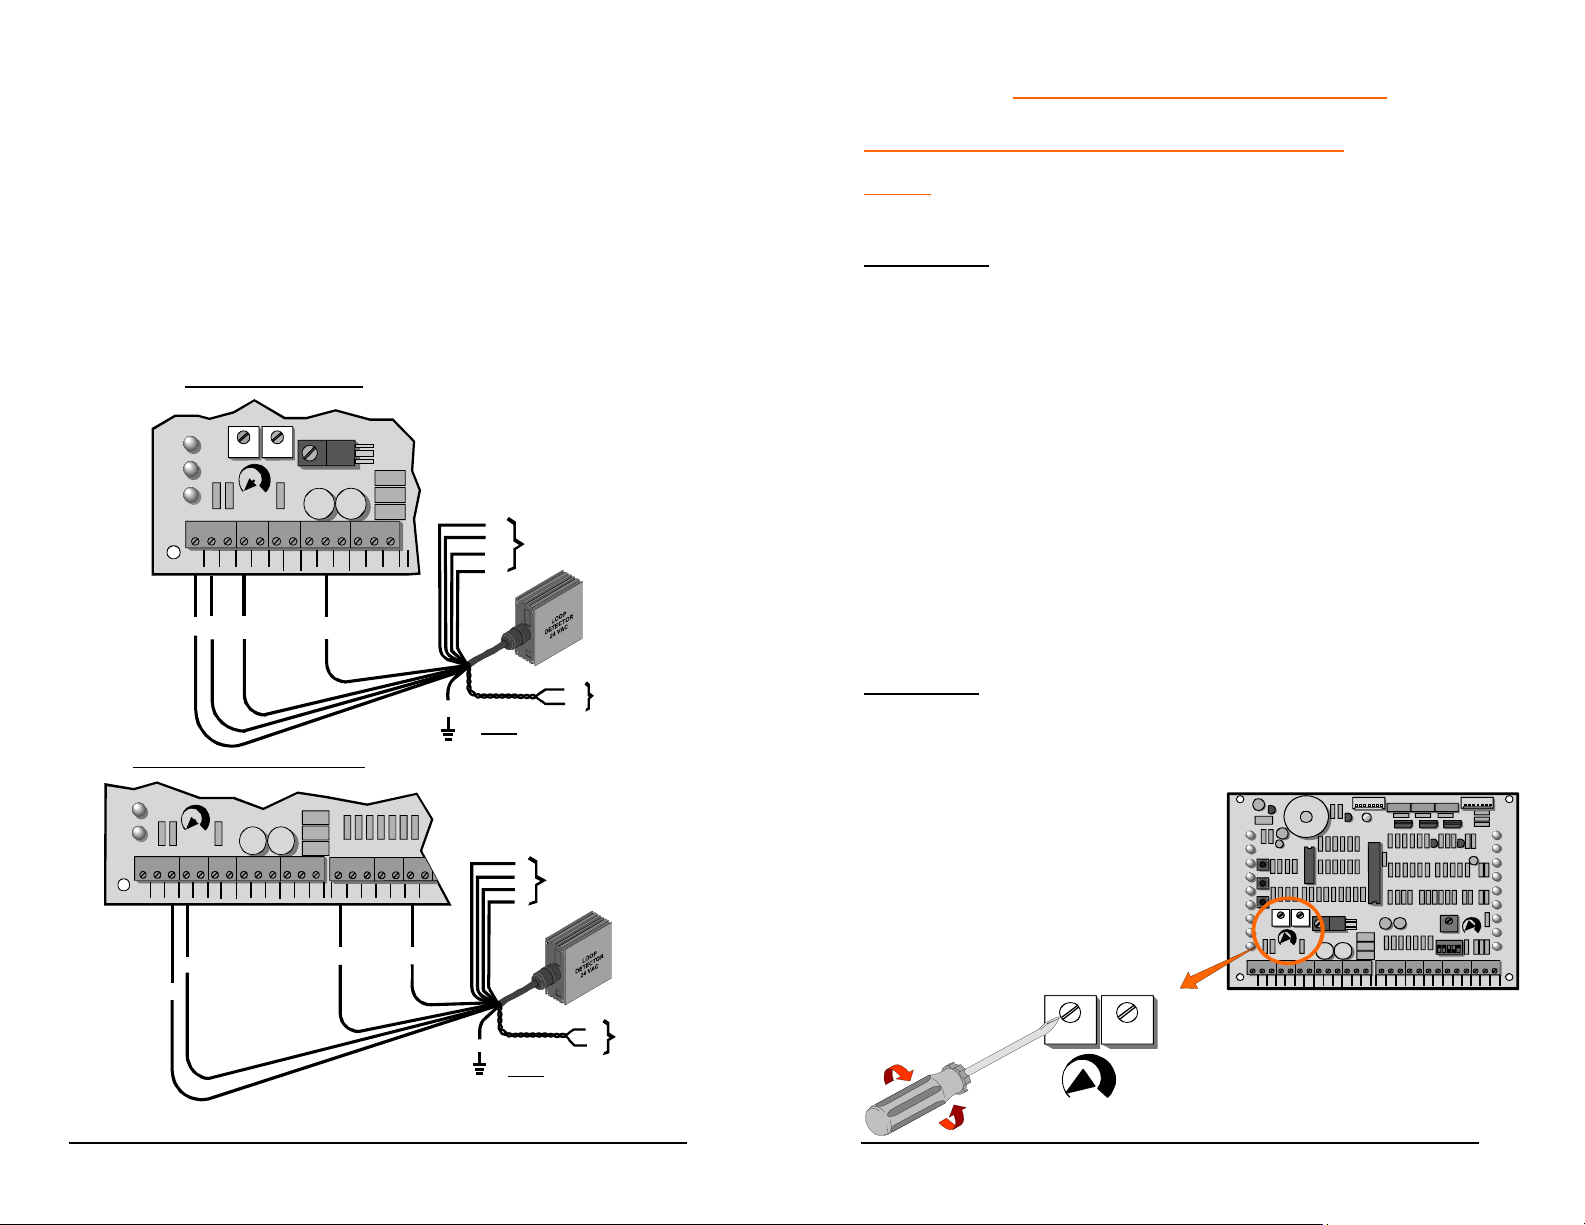
8. Connect loop detector to the control board as shown in
the following diagrams.
EXIT LOOP CONNECTION
LD16
STOP
PUSH
OPEN
PHOTO
CLOSE
PHOTO
LD17
LD13
FORCE
ADJUSTMENT
TB1
24VAC24VACALT
COM
COM
COM
RDO
OPN
U4
V
OR
Not Used
CRO
FRE
COM
OPN
CLO
STO
R
P
Y
BK
WH
BL
FORCE
ADJUSTMENT
REVERSING LOOP CONNECTION
LD17
OPEN
PHOTO
LD13
CLOSE
PHOTO
TB1
AC
ALT
RDO
OPN
CRO
FRE
OPN
COM
COM
COM
24VAC24V
CLO
GR
NOTE: TWIST LEADS APPOX.
6 TURNS PER FOOT.
TB2
STO
COM
COM
COM
OPN
PHO
CLO
PHO
SHW
OPN
EDG
REV
V
OR
R
P
BR
GY
Not Used
TO DRIVEWAY
LOOP
WH
BK
Y
BL
GR
NOTE: TWIST LEADS APPOX.
6 TURNS PER FOOT.
BR
GY
TO
DRIVEWAY
LOOP
43
SAFETY DEVICE CONNECTIONS
INHERENT OBSTRUCTION SENSING DEVICE:
NOTE: The gate MUST move smoothly and easily in manual
operation before attempting this adjustment.
WARNING: TURN OFF POWER TO OPERATOR WHEN
MAKING ANY ADJUSTMENTS.
This unit is supplied with a speed sensing system, which will
stop the gate when it encounters an obstruction and then
backs the gate off approximately 2 inches. If the gate is
started again and a second encounter occurs before hitting a
limit switch, the gate will stop and sound a warning signal. A
constant pressure control will then be needed to start the
gate. This sensing system has sensitivity adjustments
located on the printed circuit board. The force required to
activate the system may be adjusted in both OPEN and
CLOSE directions separately. Start at minimum and
increase force setting until it is just over what is required to
move the gate smoothly without any nuisance tripping.
WARNING:
NEVER INCREASE FORCE SETTING TO MAKE UP
FOR A GATE THAT IS NOT MAINTAINED PROPERLY. THIS
WILL DESENSITIZE THE OPERATION OF THE SAFETY
SYSTEM.
LD18
OPEN
Location Of
Drive Fo rce
Adjustment
OPEN CLOSE
PUSH
LD10
FREE
EXT
ALT
RADIO
OPN/
CLO
RADIO
OPEN
CLOSE
PUSH
STOP
PUSH
OPEN
PHOTO
CLOSE
PHOTO
U2
LD11
OPEN
LD12
CLOSE
LD15
STOP
LD14
OPEN CLOSE
LD16
LD17
LD13
FORCE
ADJUSTMENT
TB1 TB2
COM
COM
COM
24VAC24VACALT
RDO
OPN
CRO
P3
LD1
POWER
U1
U4
FRE
OPN
CLO
STO
AUTO
RECLOSE
TIMER
COM
COM
COM
OPN
PHO
CLO
PHO
SHW
REV
OPN
12345
EDG
CLO
P4
LD19
MID
LIMIT
LD2
REV
LOOP
LD3
OPN
EDGE
LD4
CLO
EDGE
LD5
RH OPN
LH CLO
LIMIT
LD6
RH CLO
LH OPN
LIMIT
LD8
MOTOR
OPEN
LD9
MOTOR
CLOSE
OFF MAX
LD7
SHADOW
LOOP
EDG
MST
OPN
MST
CLO
COM
COM
COM
MAX.
MIN. MAX.
FORCE
MIN.
ADJUSTMENT
44
Page 23
SECONDARY OBSTRUCTION SENSING DEVICES
Another sensing device (Either a contact or a non-contact
system) must be installed and connected to this unit to
increase protection against entrapment per U/L
requirements.
NOTE: All safety device contacts must be NORMALLY OPEN.
NOTE: 24 VAC power is available at marked terminals for
devices that may require it (
etc).
i.e., photo eyes, wireless edges,
CONTACT SENSOR INSTALLATION:
NOTE: Wireless sensors must be installed so there is no
signal interference.
NOTE: All hard wiring to safety edges must be installed so
there is no threat of mechanical damage to wiring between
components, when the gate is moving.
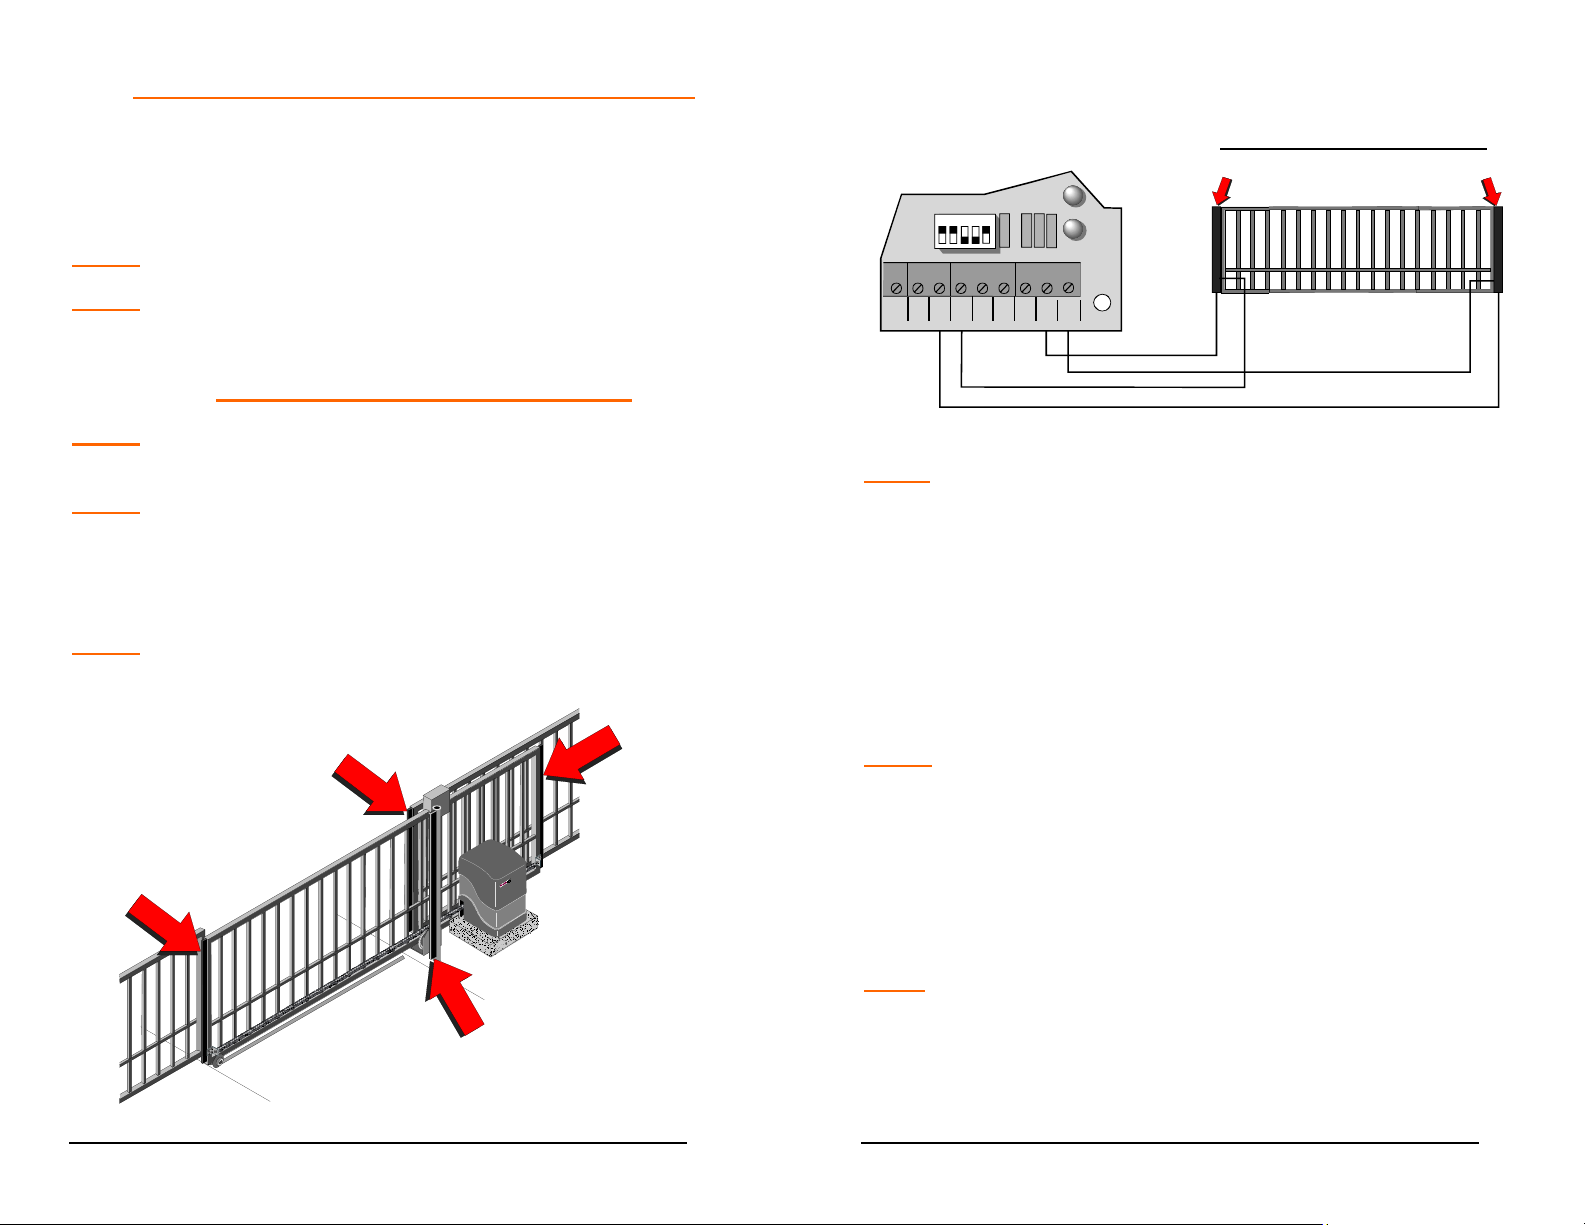
1. Install electric edge sensors in locations shown below.
NOTE: A separate pedestrian gate must be installed if there is
no other entry access but the vehicular gate.
Electric Edge
Mounted On Fence
Electric Edge
Mounted On Gate
Trailing Edge
Electric Edge
Mounted On Gate
Leading Edge
Electric Edge
Mounted On Post
45
2. Connect contact sensor edges to the control board as
shown in the illustration below.
CONTACT SENSOR CONNECTION
OFF MAX
12345
LD7
SHADOW
LOOP
Leading E dge
Trailing Edge
OPN
EDG
CLO
EDG
MST
REV
CLO
MST
OPN
COM
COM
COM
NOTE: Leading edge is connected to “CLO EDG” and “COM”
terminals. Trailing edge, Post Mounted edge and Fence Mounted
edge are connected to “OPN EDG” and “COM” terminals.
3. After sensors are mounted and electrically connected,
turn on the power.
4. Test the close obstruction sensing system for proper
operation, by depressing the leading edge sensing
strip while the operator is running closed.
NOTE: The operator should stop and reverse a short
distance and then stop.
5. Run the operator to the close limit.
6. Test the open obstruction sensing system by
depressing one of the other three edge sensors while
the gate is opening.
NOTE: The operator should repeat the STOP AND REVERSE
procedure.
7. Run operator to the close limit and repeat step #6 for
the other two edges.
46
Page 24
NOTE: If an edge is activated twice or a second edge is
activated before a limit is hit (full open or close) operator will
stop and sound a warning horn. To reactivate system turn
operator power switch off then on.
NON-CONTACT SENSOR INSTALLATION
1. Install photoelectric cell as close to inside of gate as
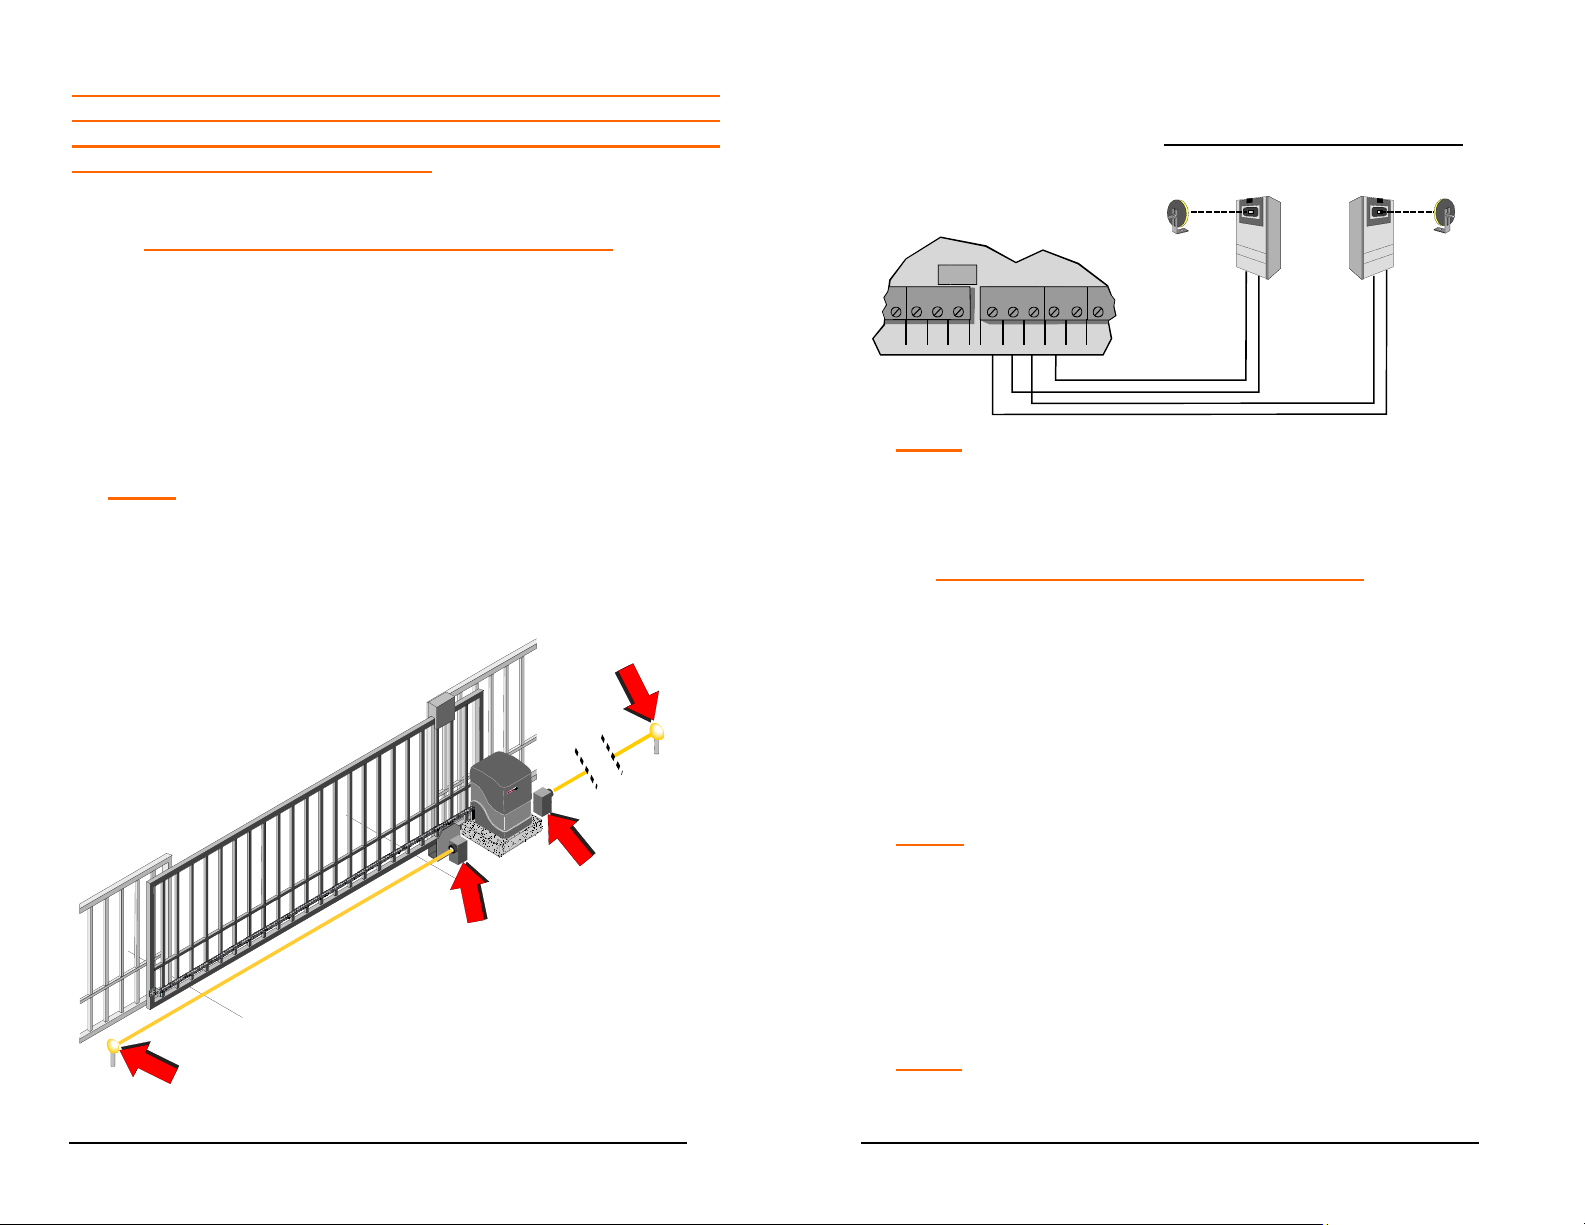
possible.
2. Photocells should be installed across the gate
opening and behind the gate (as shown below) at
least 10 inches above ground.
NOTE:
there is no other entry access but the vehicular gate.
A separate pedestrian gate must be installed if
Photo Electric Reflector
(Mount Past Gates Full
Open Positi o n)
Photo Electric Cell
( For Open Direction)
Photo Electric Cell
(For Close Direction)
Photo Electric Reflector
(Mount Past Gates Full
Close Position )
3. Connect NON-CONTACT sensors to the control board
as shown below.
TB2
OPN
COM
CLO
STO
NOTE: Close photocell is connected to “CLO PHO” and
“COM” terminals. Open photocell is connected to “OPN
PHO” and “COM” terminals.
CLO
COM
COM
OPN
PHO
PHO
SHW
NON CONTACT SENSOR CONNECTION
Reflector
Close Photo cel l
Sensor
Reflector
Open Photocell
Sensor
AFTER SENSORS ARE CONNECTED:
1. Turn on power.
2. Make sure the photo-beams are properly aligned per
the manufacturer’s specifications.
3. Test the CLOSE obstruction sensing system for proper
operation, by blocking the beam across the gate
opening while the gate is running closed.
NOTE: The gate should stop and reverse a short distance
and then stop.
4. Run operator to close limit.
5. Test the OPEN obstruction sensing system by
blocking the beam mounted at the back area of the
gate while the gate is running open.
NOTE: The operator will stop, wait approximately 5 seconds
and then continue running open.
47
48
Page 25
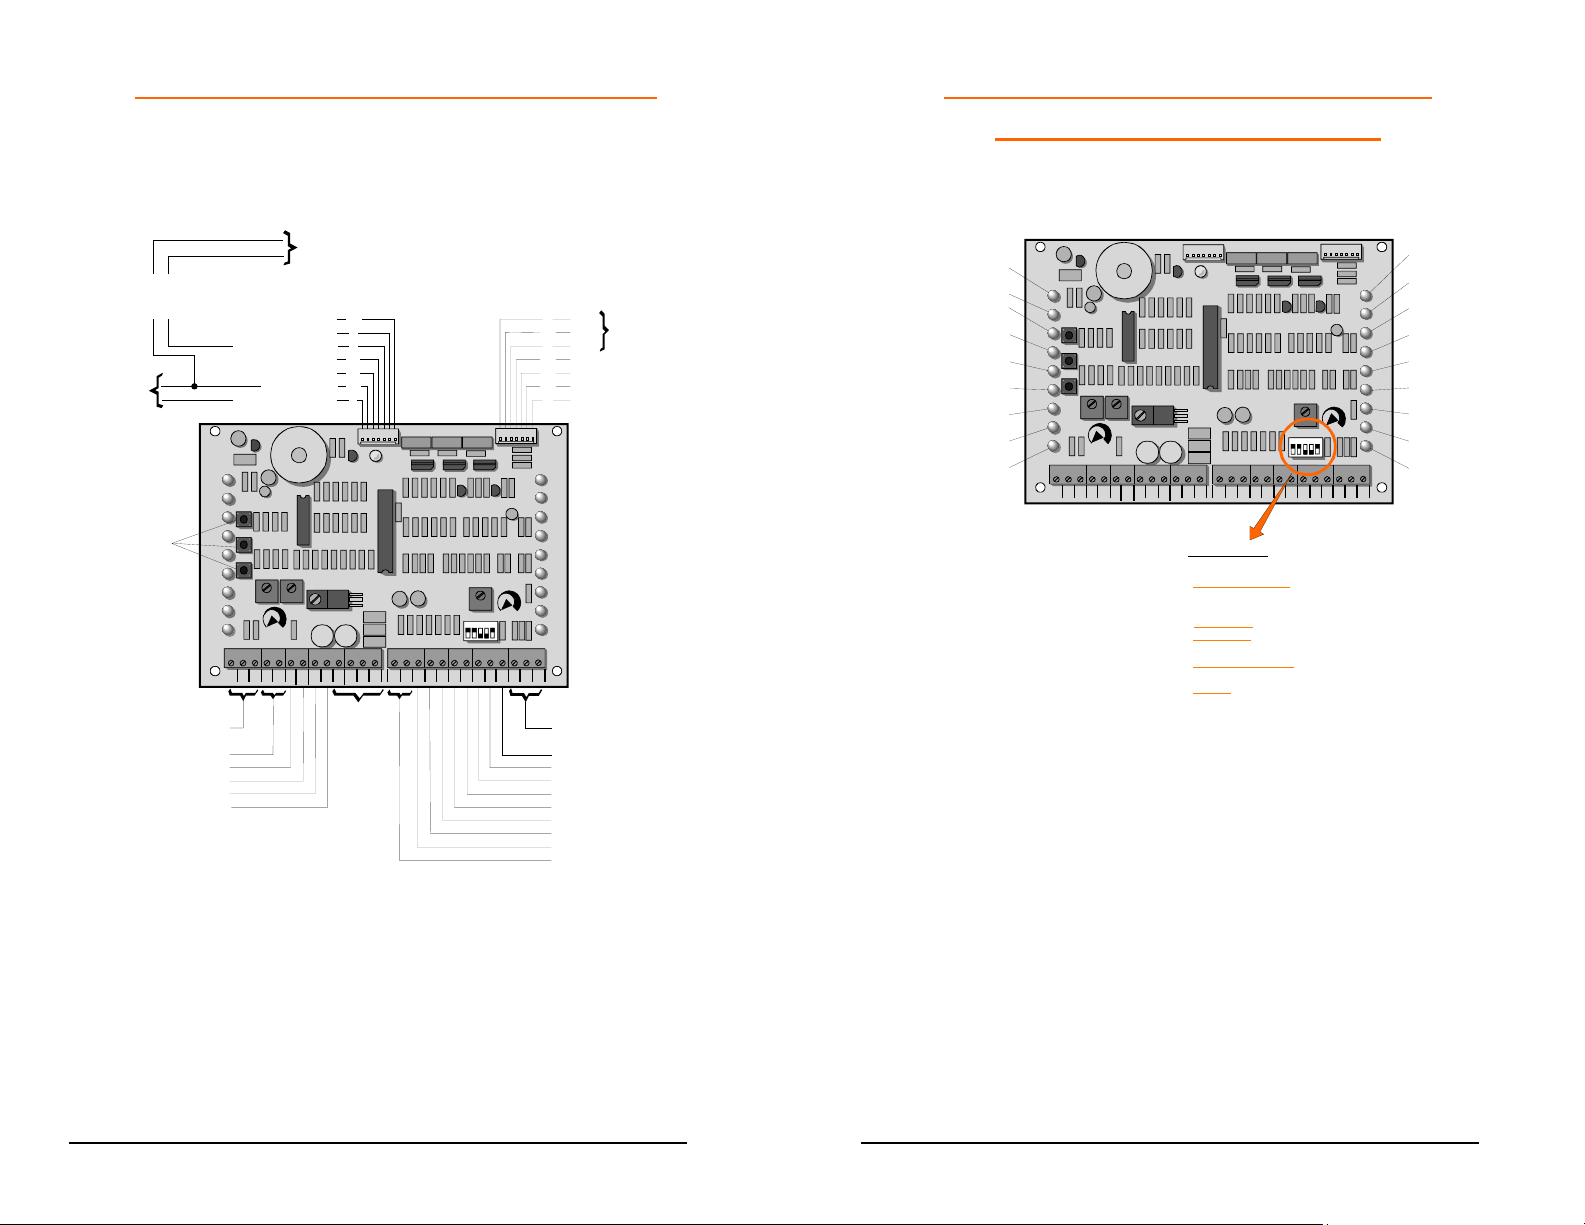
WIRING TO 2004 UMCB-01 CONTROL BOARD
Aux. Control Circuit
For Gate Lock,
Warning Lights, Etc.
24 VAC From
Transformer
BOARD
MOUNTED
3 BUTTON
STATION
Common For Control
24 VAC For AUX. Use
One Button Control
Radio "OPEN/CLOSE"
WH
BN
OPEN
PUSH
FREE
EXT
ALT
RADIO
OPN/
CLO
RADIO
OPEN
CLOSE
PUSH
STOP
PUSH
OPEN
PHOTO
CLOSE
PHOTO
And AUX. Use
Radio "OPEN"
Free Exit Loop
To Control Relay
To "OPEN" Coil
To "CLOSE" Coi
To Accessory Coil
24V To "OPEN" Coil
24V To "CLOSE" Coil
24V Power In
GND IN (Common)
LD18
LD10
LD11
OPEN
LD12
CLOSE
LD15
LD14
LD16
LD17
LD13
TB1
COM
STOP
COM
OPEN CLOSE
FORCE
ADJUSTMENT
24VAC24VACALT
COM
U2
RDO
OPN
CRO
FRE
OPN
Three
Button
Control
Station
LED AND DIP SWITCH INFORMATION FOR
Open Push button
Free Exit Loop Activated
Single Contact
Control Activated
Radio Control Open Only
Close Push Button
Stop Push Button
Open Photo-Eye
close Photo-Eye
5
MST
Y
GND
BK
S
R
+
GY
To Mid Stop Open Limit
WH
To "CLOSE" Limit
OR
To "OPEN" Limit
Y
To GND (Common)
P4
LD19
MID
LIMIT
LD2
REV
LOOP
LD3
OPN
EDGE
LD4
CLO
EDGE
LD5
RH OPN
LH CLO
LIMIT
LD6
RH CLO
LH OPN
LIMIT
LD8
MOTOR
OPEN
LD9
MOTOR
CLOSE
OFF MAX
LD7
SHADOW
LOOP
COM
OPN
MST
CLO
COM
COM
Common For AUX.
Equipment Use
Master To Slave "CLOSE"
Master To Slave "OPEN"
"CLOSE" Contact Sensor
"OPEN" Contact Sensor
Reverse Loo p
Shadow Loop
"CLOSE" Non-Contact Sensor
"OPEN" Non-Contact Sensor
Common For AUX.
Equipment Use
Magnetic
Sensor Input
Radio Control Open/Close
WH
R
Y
GY
BK
WH
R
P3
LD1
POWER
U1
U4
COM
CLO
STO
AUTO
RECLOSE
TIMER
1234
TB2
CLO
OPN
COM
COM
EDG
OPN
PHO
PHO
SHW
REV
CLO
EDG
2004 UMCB-01 CONTROL BOARD
Activated
activated
activated
Activated
Activated
Activated
Activated
LD18
OPEN
PUSH
LD10
FREE
EXT
LD11
ALT
LD12
RADIO
OPN/
CLO
LD15
RADIO
OPEN
LD14
CLOSE
PUSH
LD16
STOP
PUSH
LD17
OPEN
PHOTO
LD13
CLOSE
PHOTO
TB1 TB2
COM
OPEN
CLOSE
STOP
COM
U2
OPEN CLOSE
FORCE
ADJUSTMENT
COM
24VAC24VACALT
RDO
OPN
CRO
FRE
S1 - OFF = NORMAL OPEN/CLOSE PB
ON =
S2 - OFF = RIGHT HAND
ON = LEFT HAND
S3 - OFF =
ON =
S4 - OFF = NORMAL
ON =
S5 - OFF = SINGLE OR MASTER MODE
ON =
OPN
P3
LD1
POWER
U1
U4
COM
CLO
STO
AUTO
RECLOSE
TIMER
CLO
SHW
COM
COM
OPN
PHO
PHO
DIPSWITCHES
SAFETY/SECURE MODE
N.O. STOP
N.C. STOP
3 SEC. PRE-MOVE
SLAVE MODE
REV
12345
OPN
P4
Mid-Stop Limit
Switch Activated
Reversing Loop
LD19
MID
Activated
LIMIT
LD2
REV
Open Safety Edge
LOOP
Activated
LD3
OPN
EDGE
Close Safety Edge
LD4
CLO
Activated
EDGE
LD5
RH OPN
Limit Switch
LH CLO
LIMIT
Activated
LD6
RH CLO
LH OPN
Limit Switch
LIMIT
LD8
Activated
MOTOR
OPEN
Power to Open
LD9
MOTOR
CLOSE
LD7
COM
SHADOW
LOOP
COM
Contactor coil
Power to Close
Contactor coil
Shad ow Loop
Activated
OFF MAX
EDG
CLO
EDG
MST
CLO
COM
MST
OPN
49
50
Page 26

MAINTENANCE SUGGESTIONS
Lubricate the drive chain and idler rollers every 3 months
with 30-weight oil. The Reducer is completely sealed and
should not require lubrication. Periodically check all
hardware (nuts, bolts, screws, etc) for tightness.
Maintenance Log/Notes
______________________________________________
______________________________________________
______________________________________________
______________________________________________
______________________________________________
______________________________________________
______________________________________________
______________________________________________
______________________________________________
______________________________________________
______________________________________________
______________________________________________
______________________________________________
______________________________________________
______________________________________________
______________________________________________
______________________________________________
______________________________________________
______________________________________________
______________________________________________
______________________________________________
______________________________________________
______________________________________________
______________________________________________
______________________________________________
______________________________________________
51
Maintenance Log/Notes
______________________________________________
______________________________________________
______________________________________________
______________________________________________
______________________________________________
______________________________________________
______________________________________________
______________________________________________
______________________________________________
______________________________________________
______________________________________________
______________________________________________
______________________________________________
______________________________________________
______________________________________________
______________________________________________
______________________________________________
______________________________________________
______________________________________________
______________________________________________
______________________________________________
______________________________________________
______________________________________________
______________________________________________
______________________________________________
______________________________________________
______________________________________________
______________________________________________
______________________________________________
______________________________________________
______________________________________________
52
Page 27
Maintenance Log/Notes
obta
ce.
______________________________________________
______________________________________________
______________________________________________
______________________________________________
______________________________________________
______________________________________________
______________________________________________
______________________________________________
______________________________________________
______________________________________________
______________________________________________
______________________________________________
______________________________________________
______________________________________________
______________________________________________
______________________________________________
______________________________________________
______________________________________________
______________________________________________
______________________________________________
______________________________________________
______________________________________________
______________________________________________
______________________________________________
______________________________________________
______________________________________________
______________________________________________
______________________________________________
______________________________________________
PowerMaster
Limited 5 Year Warranty
PowerMaster warrants all gate operators to be free of defects in
materials and workmanship for a period of Five (5) years from date
of purchase. If any part is found to be defective during this period,
new parts will be furnished free of charge. Failure of this product
due to misuse, improper installation, alterations, vandalism, or lack
of maintenance is not covered under this warranty, and voids any
other implied warranties herein.
PowerMaster is not responsible for any labor charges incurred in
connection with the installation of warranted parts.
In order to activate this warranty, the registration form on
opposite page MUST be completed and returned within
THIRTY CALENDER DAYS FROM DATE OF PURCHASE
VIA CERTIFIED MAIL, fax (631-951-3934) or via email
PMTECH@optonline.net If registration is not activated, a one
year warranty will apply.
Model CSG
Date Installed____________
Serial # ________________
Installer’s Information
Company Name _____________________
Company Address ___________________
Company Address ___________________
Company Address ___________________
Company Telephone # ________________
The end user should
retain this information
for their records and to
in warranty servi
53
Company Contact ____________________
54
Page 28
Registration Information
Model CSG Location Installed
:
Date Installed____________ Address _______________
Serial # ________________ Address _______________
Address _______________
Installer’s Information
Company Name _____________________________
Company Address ___________________________
Company Address ___________________________
Company Address ___________________________
Company Telephone # ________________________
Company Contact ____________________________
55
56
 Loading...