


Quick Start Guide
Fixture Module Products
FMT, FMR
MODELS:
FMT-AC – Fixture Module Transmitter, 120V input
FMT-CC – Fixture Module Transmitter, Contact Closure
FMR-AC – Fixture Module Relay (Receiver), 20A Load
FUNCTION
SimpleWorx products are designed to provide simple
remote control for lighting and other electrical loads
without having to run any new wiring. They connect or
“link” to one another by communicating over the
existing electrical power wires.
One Transmitter can be linked to as many Receivers as
you like. Each Receiver can be linked to eight
Transmitters.
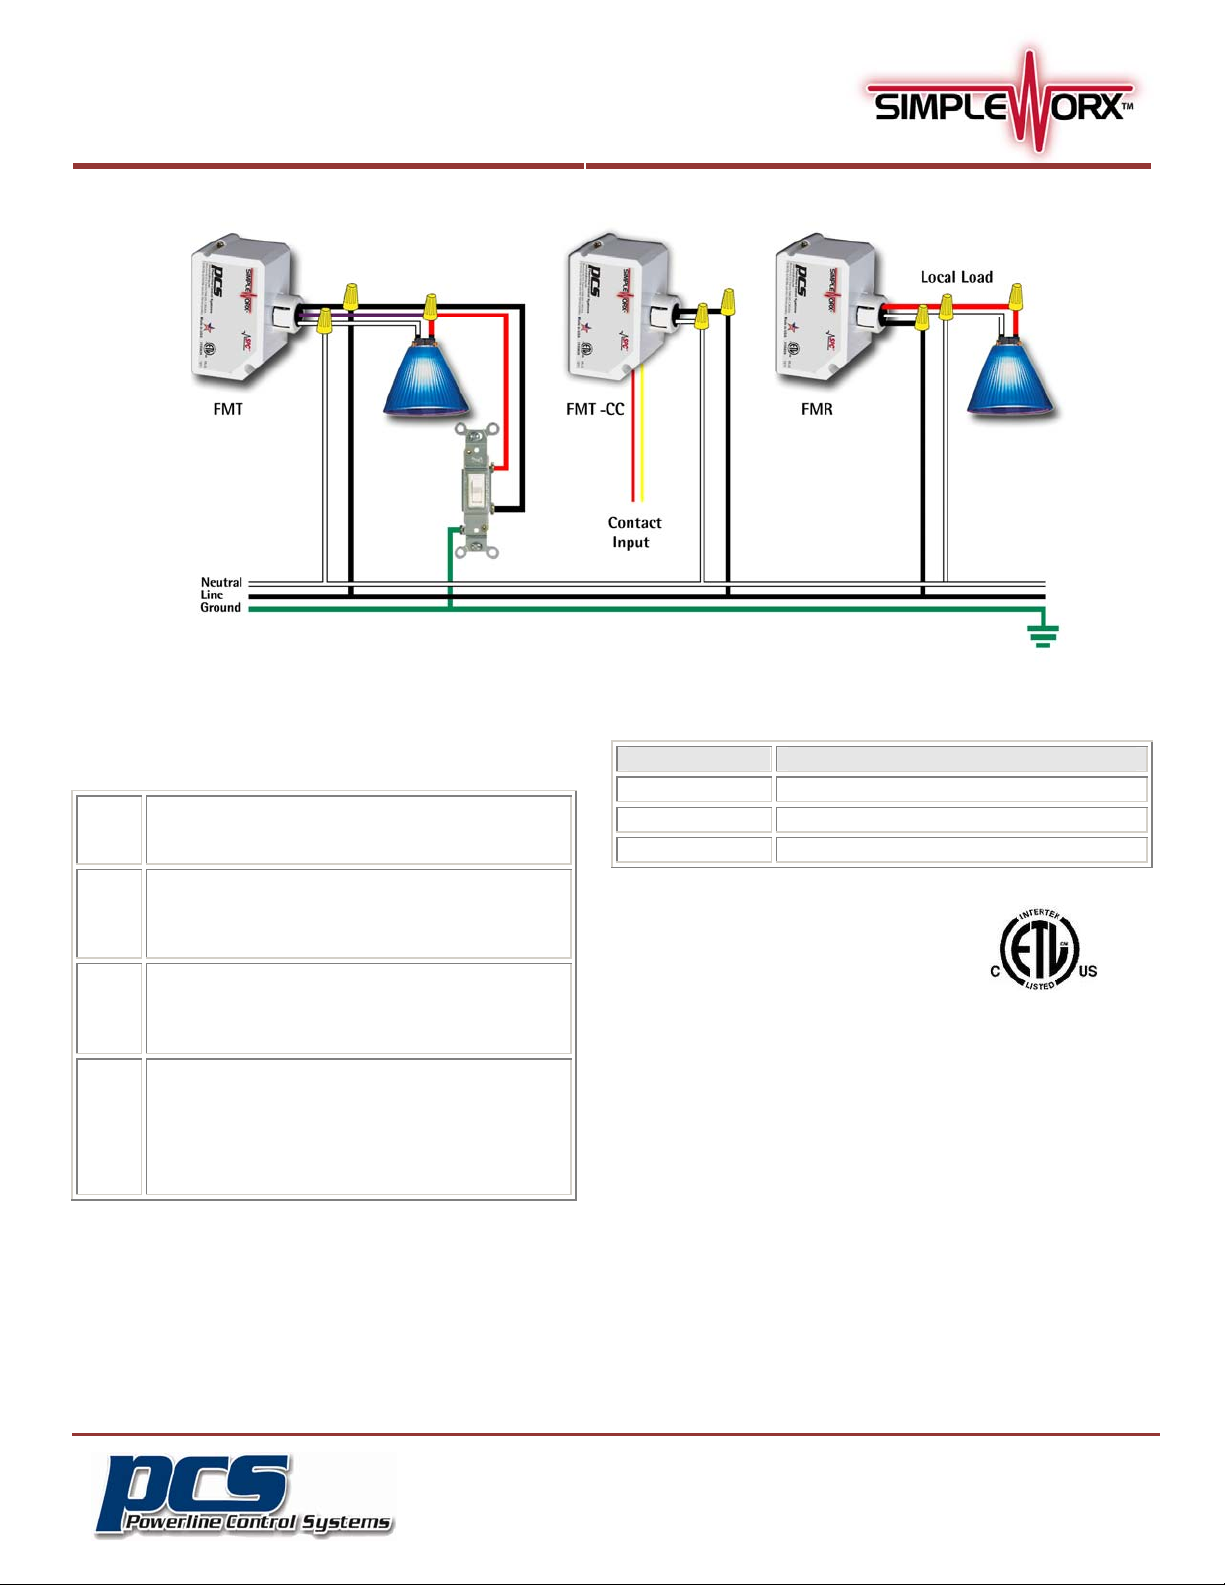
The FM Series Fixture Modules (Figure 1) allow for an
existing switch or contact closure to trigger a FMT
controller to remotely control the load of any
SimpleWorx receiving device (like a FMR, Fixture Module
Receiver). Once the FMT is “linked” to a load controlling
SimpleWorx receiver (refer to “Linking a Transmitter to a
Receiver”) it is capable of controlling the receiver’s load
just as if it were its own load.
The FMR load controller is capable of turning 120VAC
appliances and fluorescent lamps ON and OFF based on
digital commands received from a SimpleWorx
Transmitter.
IMPORTANT SAFETY INSTRUCTIONS
When using electrical products, basic safety precautions
should always be followed, including the following:
1. Do not use this product for other than its intended purpose.
2. Keep away from water. If the product comes in contact
with water or other liquid, turn off the circuit breaker and
remove the product immediately.
3. Never use products that have been dropped or damaged.
4. Do not use this product outdoors.
5. Do not cover this product with any material when in use.
INSTALLATION
Wiring Connections
BLACK – LINE
WHITE – NETURAL
PURPLE – 120VAC INPUT TRIGGER
RED – LOAD 20A MAX
YELLOW/RED – CONTACT INPUT TRIGGER
FMT-AC
FMT-CC
FMR-AC
Figure 1
Follow these instructions to install a Fixture Module:
1. Before installing the Fixture Module into a junction box or
attaching to an existing fixture, ensure that power to the
wall box has been disconnected by removing the fuse or
turning the circuit breaker off. Installing products while the
power is on may expose you to dangerous voltage and may
damage the product.
2. Remove any existing ceiling or wall fixture hardware for the
device
3. Disconnect the wires from the existing fixture. Identify the
“Line”, "Neutral", “Load" wires.
4. Wire the SimpleWorx Fixture Module connecting wires per
wiring diagram shown on next page.
5. Refer to instructions on OPERATION prior to placing the
fixture module in its final location, as it may be necessary to
have access to the Program button in order to Link it to a
Transmitter and test its operation. Temporarily restore power
in order to perform these functions. Disconnect power again
when finished.
6. Once proper operation is established, fit the module into the
outlet box, fitting the nipple into a ½” knockout or
otherwise secure it using wire ties.
7. Reinstall fixture hardware as needed and restore power to
the circuit.
©2012 Powerline Control Systems, Inc.
All Rights Reserved v2.01
19201 Parthenia St. Suite J
Northridge, CA 91324
P: 818.701.9831 F: 818.701.1506
pcssales@pcslighting.com
www.pcslighting.com
Quick Start Guide
Fixture Module Products
FMT, FMR
WIRING DIAGRAM
OPERATION
Linking a Transmitter to a Receiver
Any SimpleWorx transmitter can remotely control one (or more)
SimpleWorx Receiver(s) by following the steps below to “LINK”
the two together:
At the SimpleWorx Transmitter; Press and hold its
1
Link button for 6 seconds. The LED will then flash
GREEN and flash its load
At the SimpleWorx Receiver; Press and hold the
2
rocker switch or link button for 6 seconds. The LED
will flash GREEN and flash its load
connected)
The Receiver will indicate (within 30 seconds) the
3
two devices have automatically “LINKED” to one
another when the LED stops flashing and then
flashes its load once.
The Transmitter may be taken out of “LINK” mode by
4
tapping its rocker switch or link button once. The
LED will stop flashing and flashes its load
connected)
Note: The TX will automatically timeout after 5
minutes
.
(if a load is connected)
(if a load is
(if a load is
Status LED Indicator
The FMT and FMR are each equipped with a bi-color status LED
that is normally lit to red. This LED indicator will blink different
colors to indicate configuration status as outlined below:
LED Color Status
Solid RED Power applied to Fixture Module
Flashes RED Device is in LINK MODE
Solid GREEN Transmitting a SPC™ message
CERTIFICATION
This product has been thoroughly tested by
Intertek Testing Services, a nationally
recognized independent third-party
laboratory. The North American ETL Listed
mark signifies that the product has been tested to and has met the
requirements of a widely recognized consensus of US and Canadian
product safety standards, that the manufacturing site has been
audited, and that the manufacturer has agreed to a program of
quarterly factory follow-up inspections to verify continued
conformance.
LIMITED WARRANTY
Seller warrants this product, if used in accordance with all
applicable instructions, to be free from original defects in materials
and workmanship for a period of five years from the date of
purchase. Refer to the warranty information on the PCS website
(www.pcslighting.com) for exact details.
©2012 Powerline Control Systems, Inc.
All Rights Reserved v2.01
19201 Parthenia St. Suite J
Northridge, CA 91324
P: 818.701.9831 F: 818.701.1506
pcssales@pcslighting.com
www.pcslighting.com
 Loading...