


CarrierMate ™ MDT 7000 Electronic Logging Device (ELD)
Hours of Service (HOS) User guide
CarrierWeb LLC 1.0 - 2018352 Page 1 of 55

TABLE OF CONTENTS
Section Page
CarrierWeb System Overview……………………………………………….. 3
Logging in to the MDT………………………………………………………… 3
The Main Menu Screen………………………………………………………. 11
The ELD Button and Reviewing ELD functions……………………………. 11
Inspect and data transfer ……………………………………………………. 20
The ELD Info button ………………………………………………………… 26
Editing your log ………………………………………………………………. 29
Using the grid to edit your log……………………………………………….. 34
Accepting manager proposed edits ………………………………………... 38
Other hours of service information: ………………………………………… 39
Logging out of the MDT………………………………………………………. 40
Special Driving Conditions …………………………………………………... 43
Assuming ‘unidentified Records’ ……………………………………………. 45
Team Driver Operations ……………………………………………………… 48
ELD Malfunctions and Data Diagnostics errors……………………………. 53
CarrierWeb LLC 1.0 - 2018352 Page 2 of 55

CarrierWeb ELD System Overview
The CarrierWeb® CarrierMate™ ELD system consists of a Mobile Data Terminal (MDT) in the
vehicle that communicates via cellular communication to an internet based fleet management
system. The MDT serves both as a tool to maximize fleet operational efficiencies by linking the
driver and truck with back office transportation and fleet management systems as well as an
Electronic Logging Device (ELD) that meets new Federal ELD Mandate requirements. This user
manual is designed to guide drivers in the use of the CarrierMate™ ELD system in order to
automate their Hours of Service (HOS) driver logs as required under the mandate.
Logging in to the MDT
When you begin your day on the MDT, you will be presented with the green ‘Login’ screen that
includes the login and password entry fields. This green login screen lets you know that no other
driver is currently logged into this unit. Reminder: A supply of blank driver's records of duty status
graph-grids sufficient to record the driver's duty status and other related information for the duration
of the current trip is required to be in the vehicle at all times.
CarrierWeb LLC 1.0 - 2018352 Page 3 of 55
To log in, touch ‘Press Here’ next to Login ID (above) and enter the user-name provided to you by
your fleet manager. Press ‘OK’ to complete login ID entry.
Next touch ‘Press Here’ next to the ‘Password’ and enter the password provided by your fleet
manager.
Note that passwords are case sensitive. If your password includes lower case letters, click the ‘case
toggle’ button to change to lowercase. For security purposes, only the current letter entered of your
password will show on the screen, with previously entered letters/numbers showing as stars. Press
‘OK’ to complete your entry.
CarrierWeb LLC 1.0 - 2018352 Page 4 of 55

Once the login and password fields are filled in, press the ‘Login’ button at the bottom of the screen.
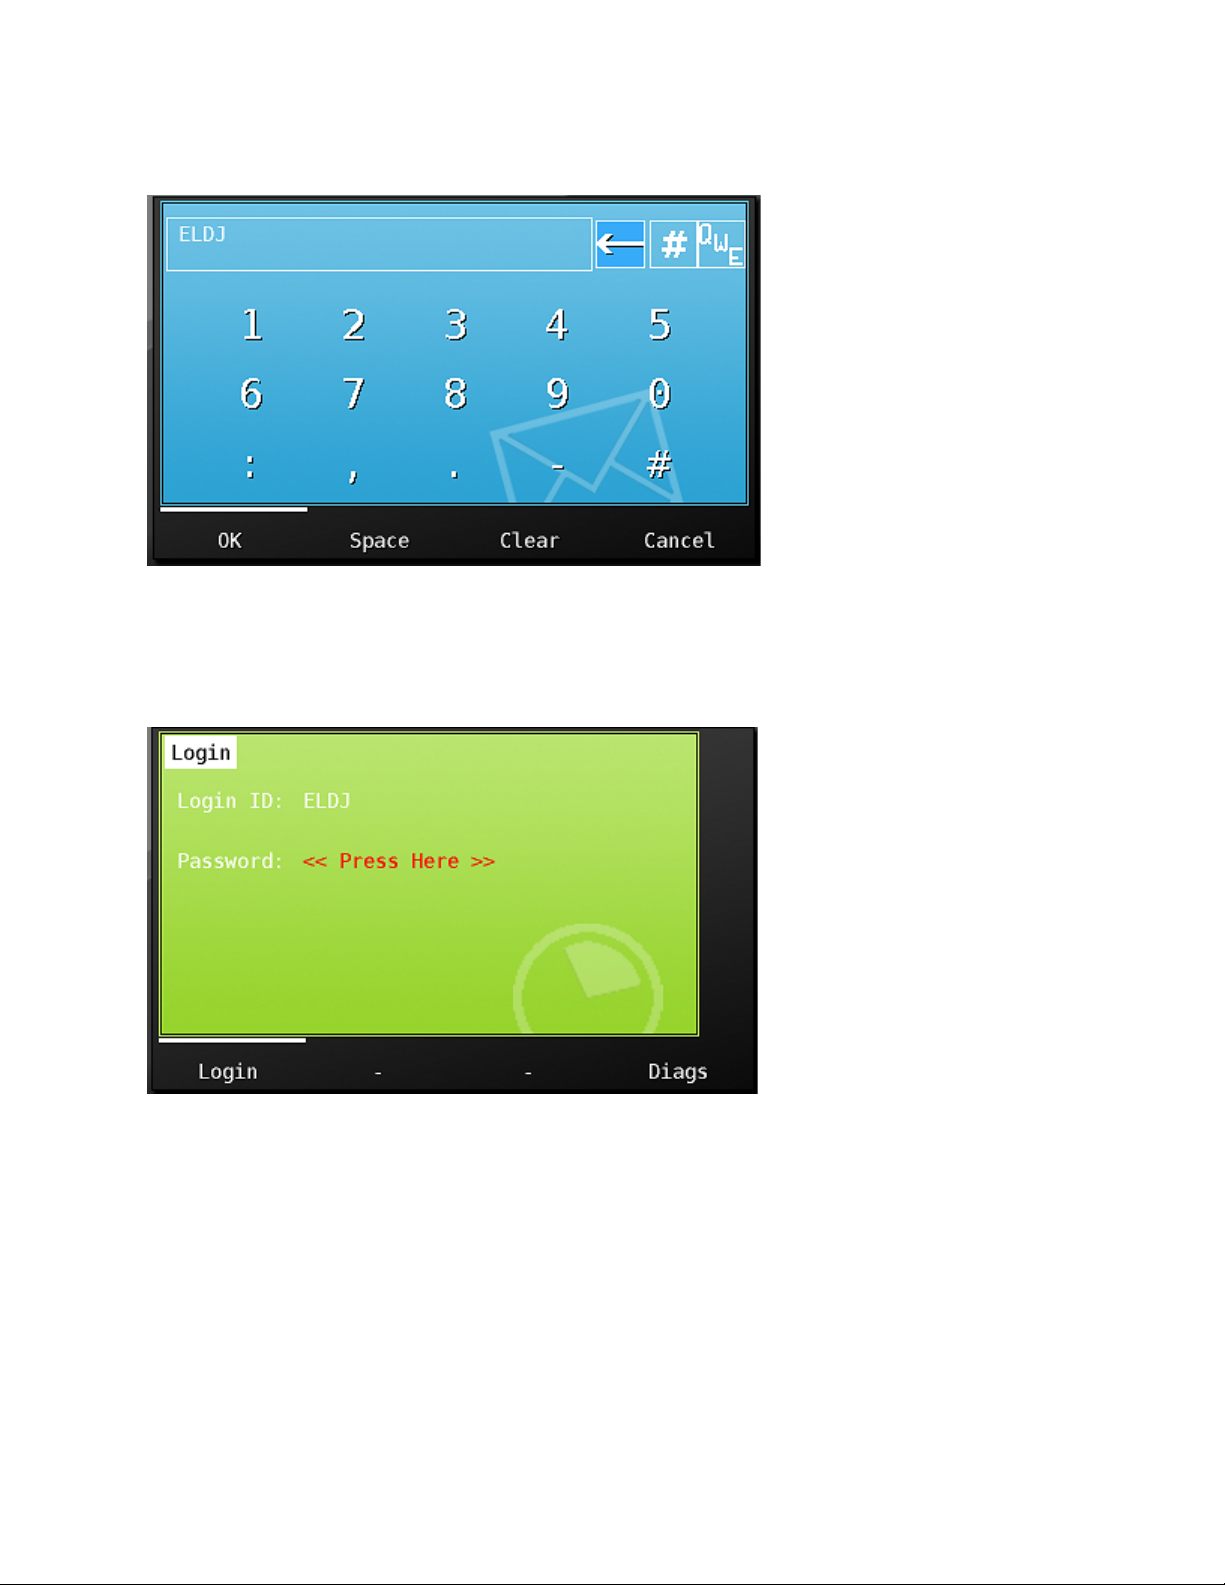
You will now be presented with the CarrierWeb Hours check screen. This is an opportunity for you
to review your remaining hours information stored on CarrierWeb.com and to confirm that you have
hours available to begin your shift. Information shown is:
1. Driver identification
2. Current activity status and time in that status
3. Driving and On Duty available hours
4. ELD Special driving conditions available for use. PC = Personal Conveyance. YM =
Yardmoves.
CarrierWeb LLC 1.0 - 2018352 Page 5 of 55
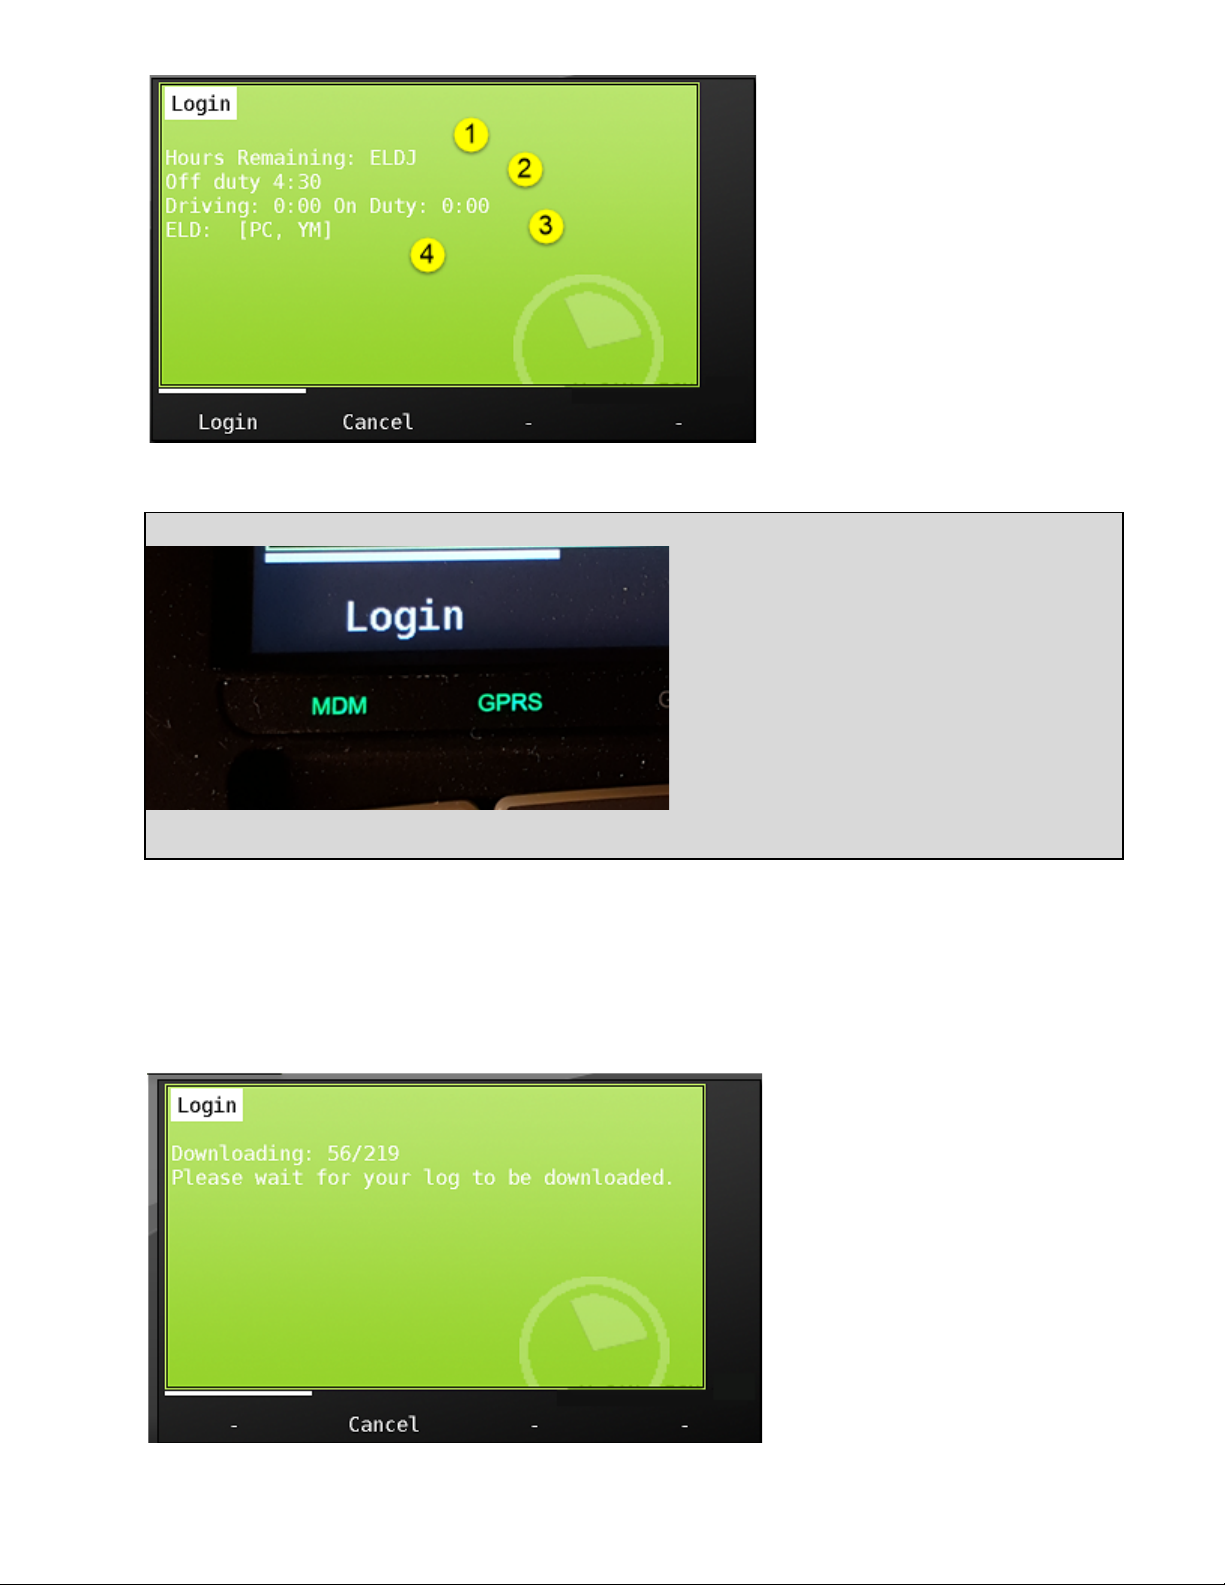
Note that if you do not receive your available
hours information, it may mean that your unit
cannot communicate with the CarrierWeb
website. View the MDM and GPRS lights on
the MDT and confirm that they are lighted (See
image below). If they are not, move the vehicle
to see if you can to get better reception. If your
unit is unable to communicate, you will not be
able to log in. Contact your manager for further
instructions.
Once you’ve reviewed your available hours, click the ‘Login’ button in the lower left hand corner of
the screen. The MDT will begin to download your ELD log history. The ‘Downloading’ counter
indicates progress.
CarrierWeb LLC 1.0 - 2018352 Page 6 of 55
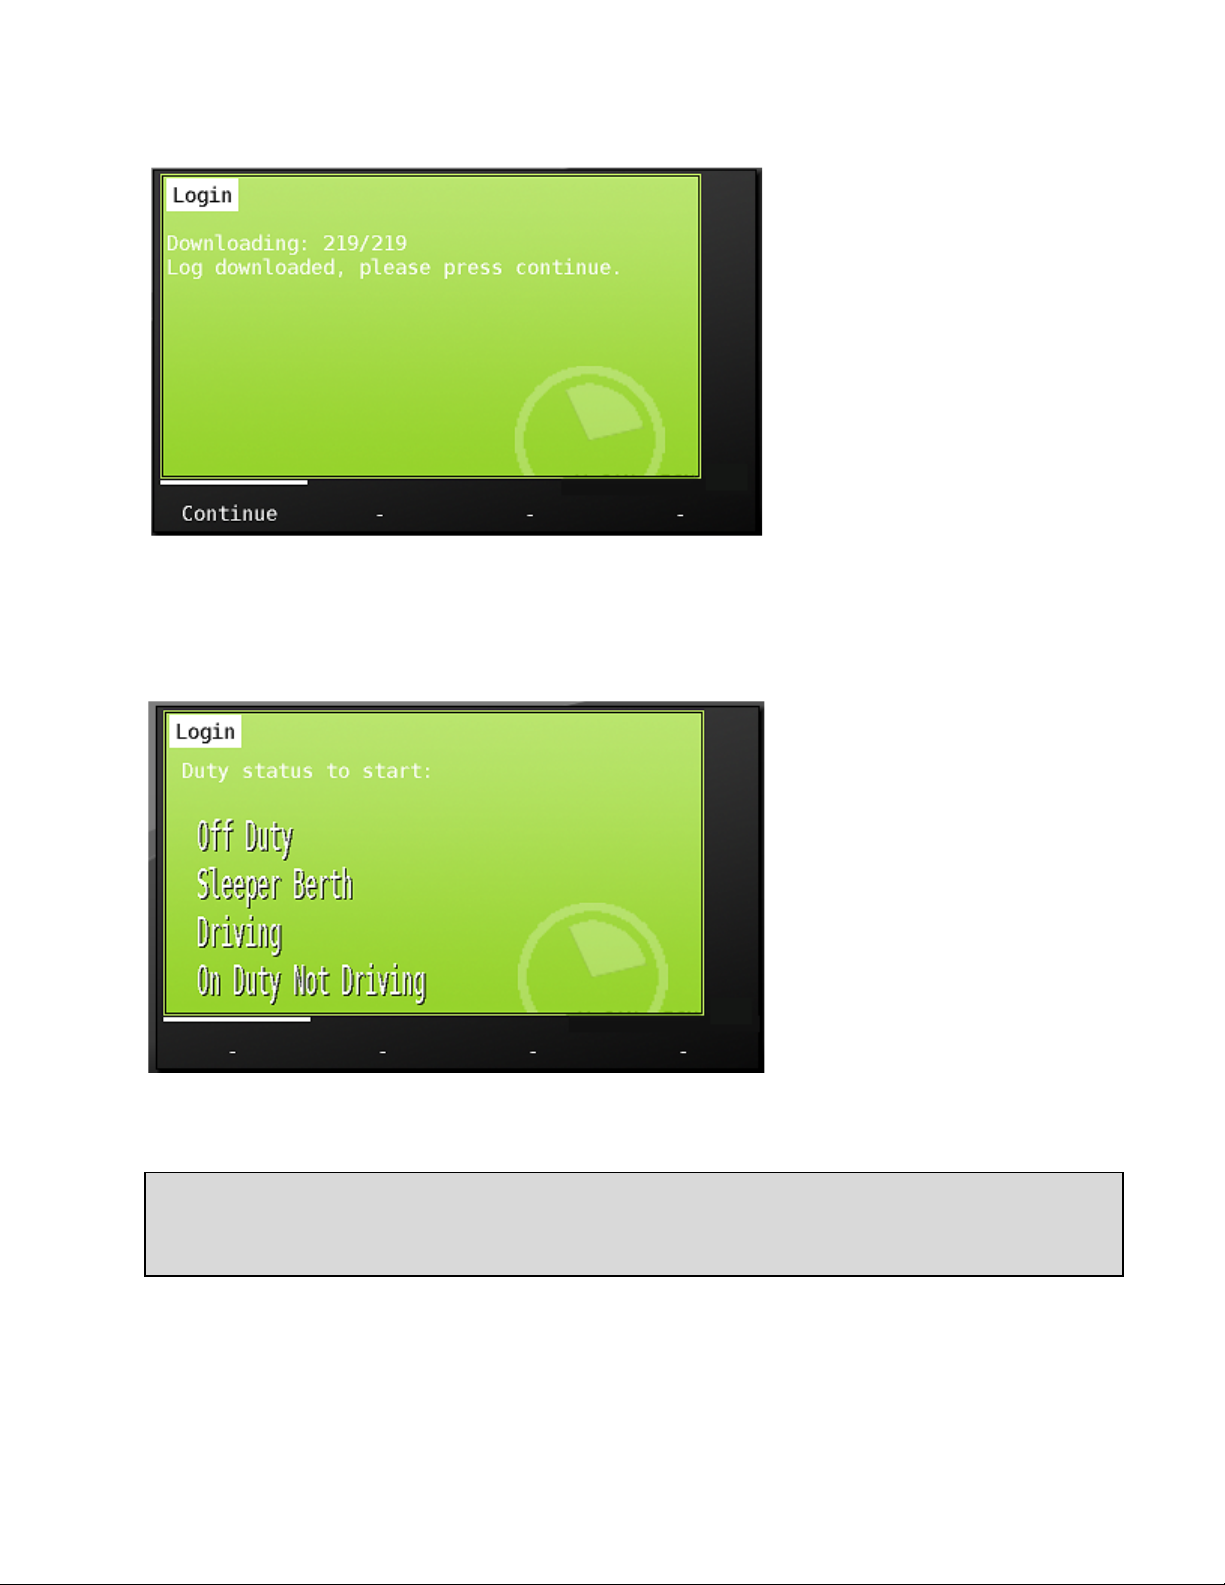
Once all of your ELD history is downloaded, you will be able to press ‘continue’ to continue the login
process.
You’ll now be prompted to choose your new Hours of Service category from the choice list below.
These are the FMCSA approved categories and are not editable.
Note that special driving conditions Yard Moves and Personal Conveyance can only be entered into from
approved categories - Yard Moves will only be available when you are in the On Duty category. Personal
Conveyance will only be available when you are in the Off Duty category.
CarrierWeb LLC 1.0 - 2018352 Page 7 of 55

When you make your choice, the MDT will display a screen that allows you to review the Hours of
Service category you are entering, and to confirm that your location is correct. Press ‘ok’ to
proceed. If this is not the category you want, then you can hit the ‘Back’ button and enter a different
choice.
If your company is capturing additional activity detail within the Hours of Service category, you will
next be presented with a list of activity options that are available within the chosen category. This list
IS customizable by customer.
CarrierWeb LLC 1.0 - 2018352 Page 8 of 55

If you have uncertified logs from previous days, they will now be displayed to you for your review.
You must certify each day that is presented. You will see the hours of service grid at the top of the
page.
You can use the scroll bar at the right to view each activity throughout the day. If you are ready to
certify your logs, choose the ‘Accept’ button.
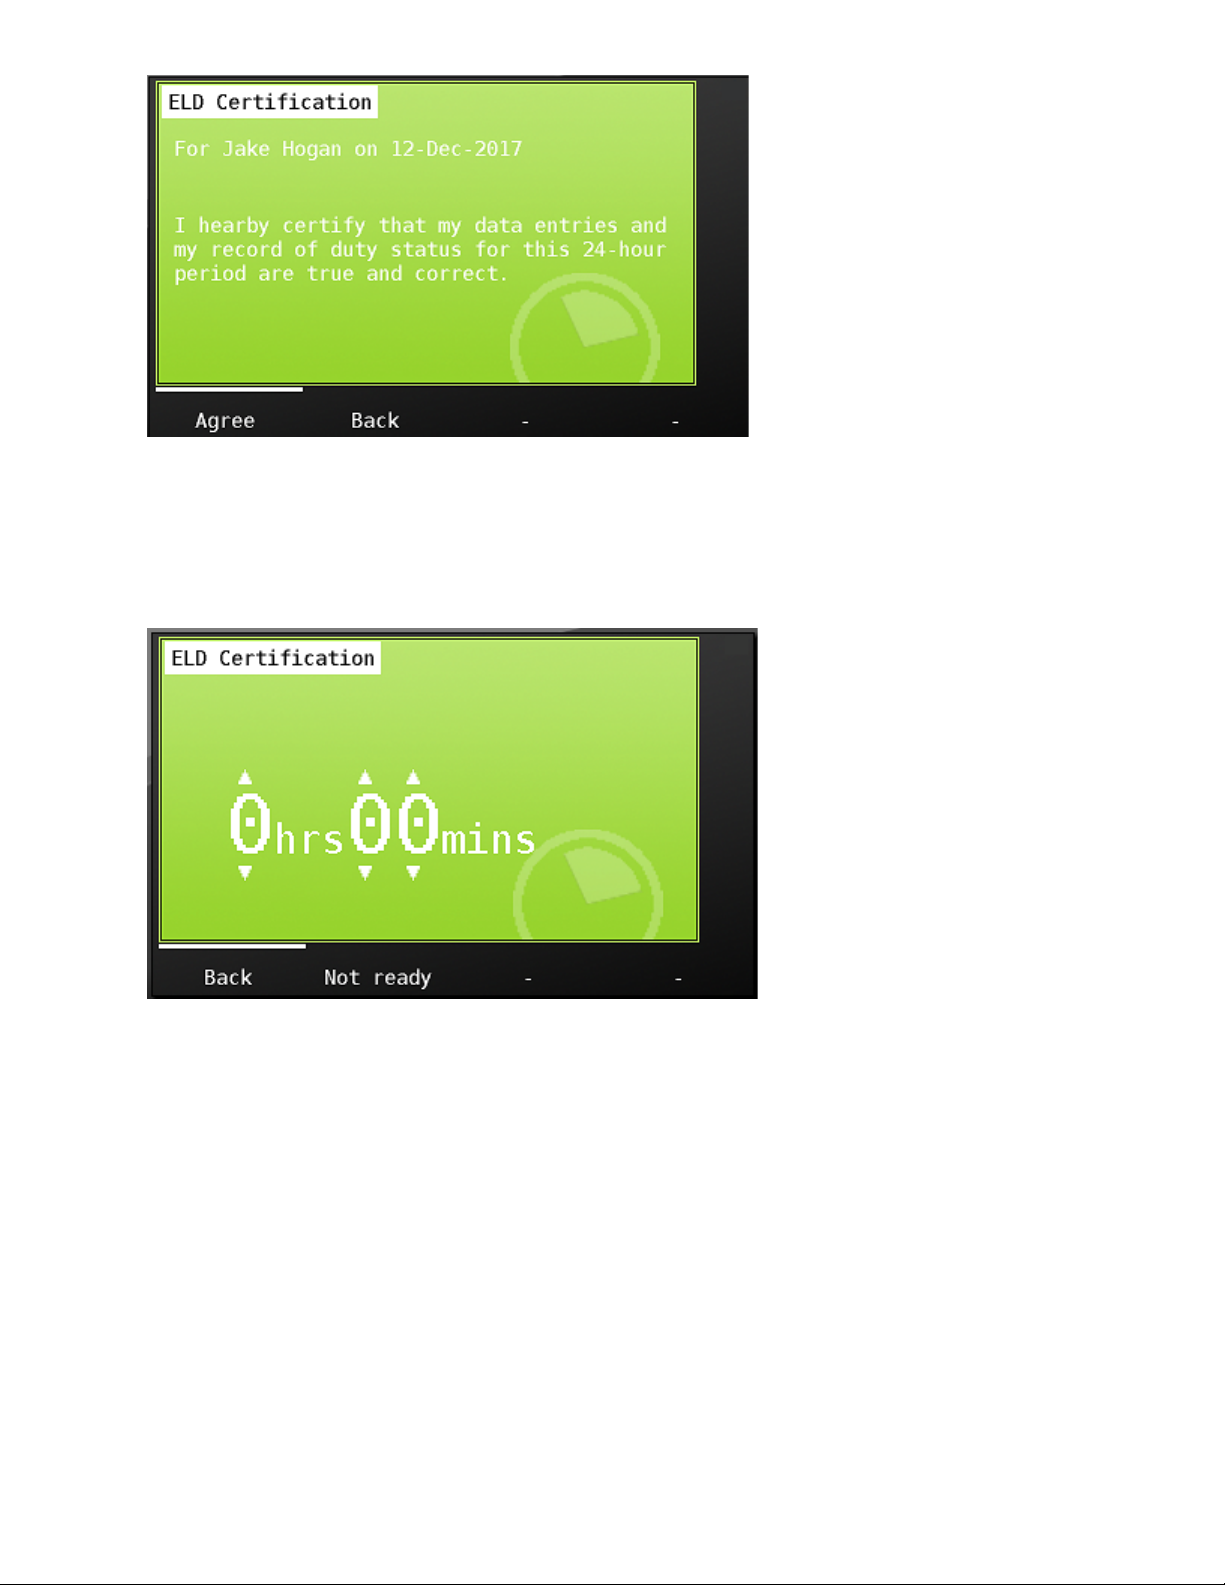
You will now be prompted to agree with the required FMCSA certification statement. Choosing
‘Agree’ will certify your log. If not ready, you can choose back to review or edit the day. See
Editing your log for more information. If there are additional days requiring certification, they will
display on the screen. Continue the process until log days have been certified.
CarrierWeb LLC 1.0 - 2018352 Page 9 of 55
If you are not ready to certify a log, choose the ‘Not ready’ button. A timer screen will display
allowing you to enter a delay time in minutes and hours. Once the delay time has been reached, the
log will be presented on screen again for certification when in an On Duty Not Driving status.
CarrierWeb LLC 1.0 - 2018352 Page 10 of 55

The Main Menu Screen
Once you have fully completed the login process, you will be at the main menu. From here, you can
send and receive messages, access navigation, view external canbus and ECM/Trip information,
MDT tools, Integrated jobs dispatch information and Hours of service.
The ELD Button and Reviewing HOS functions
The ELD button is where you will update your duty status,
review your hours of service information, make any required edits and transfer required Hours of
Service information to roadside inspection authorities.
Touch the green ELD button to call up the ELD menu. You will see three tabs across the top of the
screen - Hours, Remaining and ELD. Touching each will display additional information and
functionality.
CarrierWeb LLC 1.0 - 2018352 Page 11 of 55
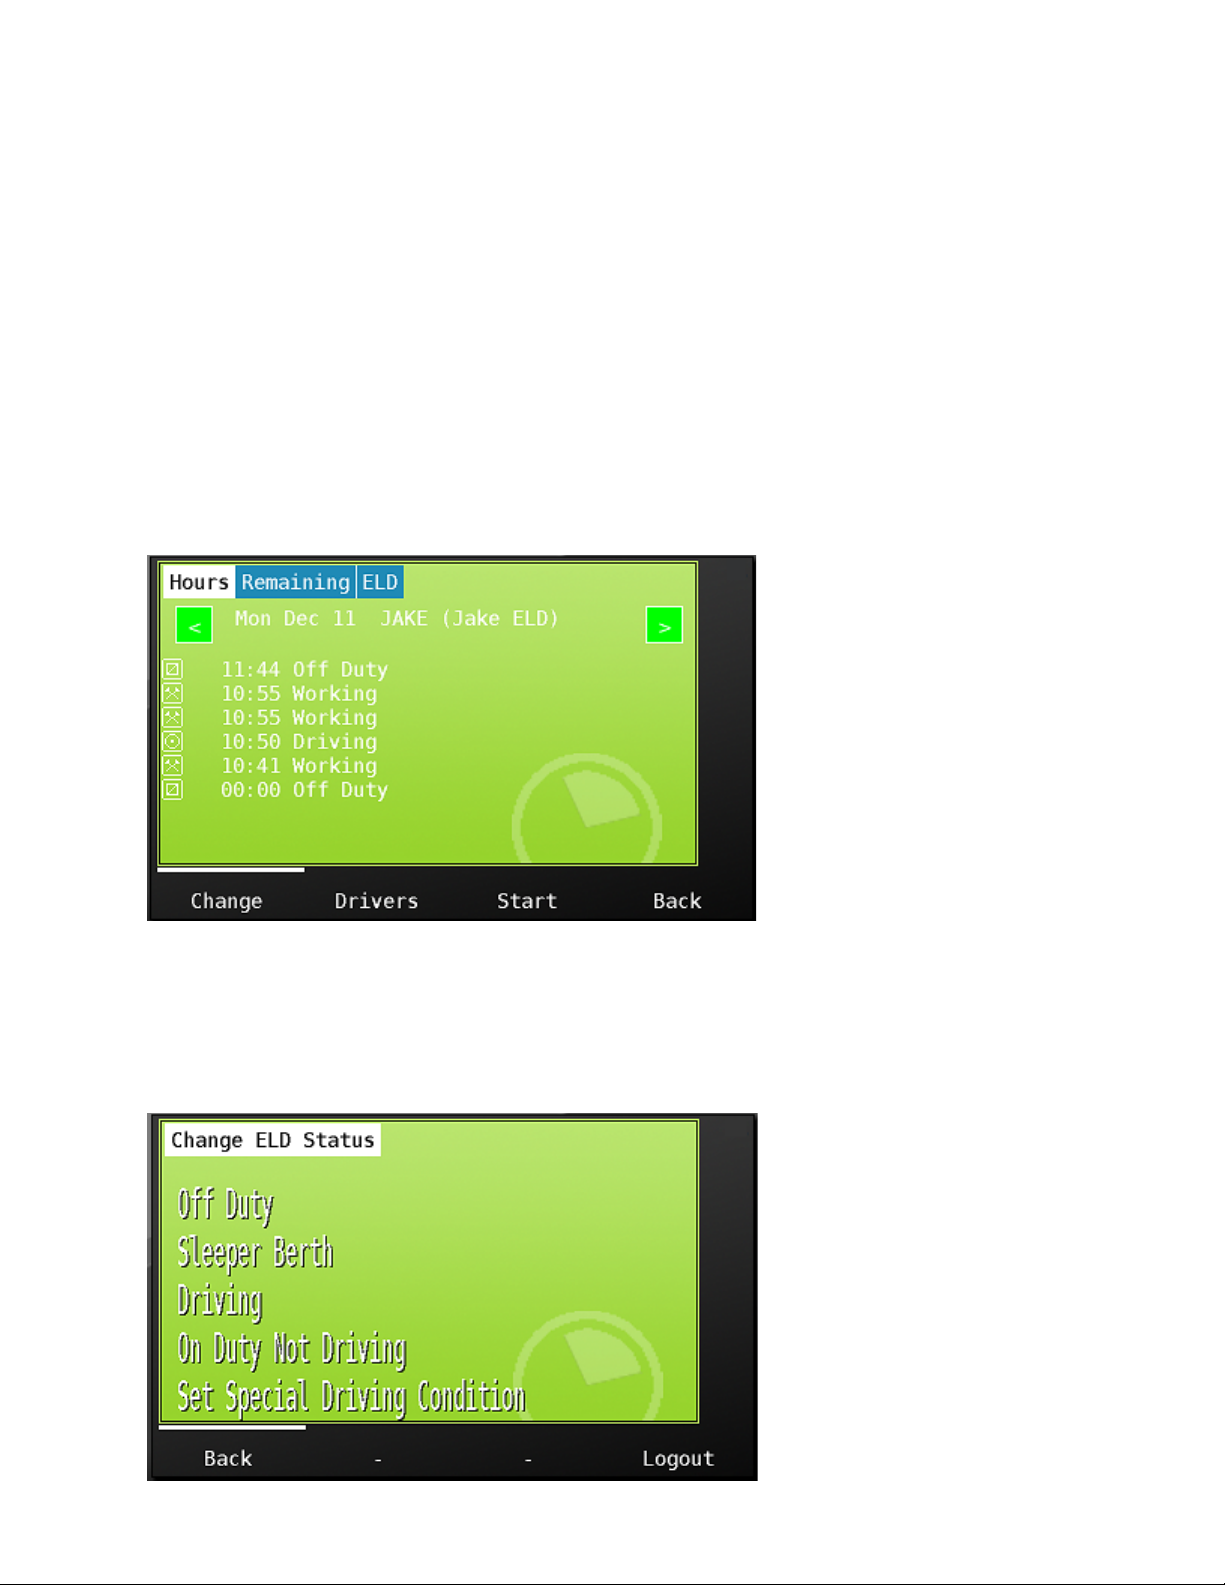
Hours Tab
The default tab highlighted when pressing the ELD button is ‘Hours’. This tab displays your hours of
service duty status changes. It will include status detail descriptions that are specific to your
company, such as ‘washing’ or ‘waiting’. The ELD category is automatically associated with these
statuses and is seen under the ‘ELD’ tab.
Pressing the green arrows to the right and left of the Date/Driver name line will change the day
viewed. At the bottom of this screen, see the following buttons:
- Change: Use this button to change your duty status.
- Drivers: Use this button to view, switch and logout drivers logged into the MDT
- Start: Use this button to begin your trip if your company does not integrate with a
Transportation Management System (TMS)
- Back: Brings you back to main menu
Change Button
Pressing the change button brings up the screen that allows you to choose the ELD category that
you are entering. Choose the category by touching it.
CarrierWeb LLC 1.0 - 2018352 Page 12 of 55
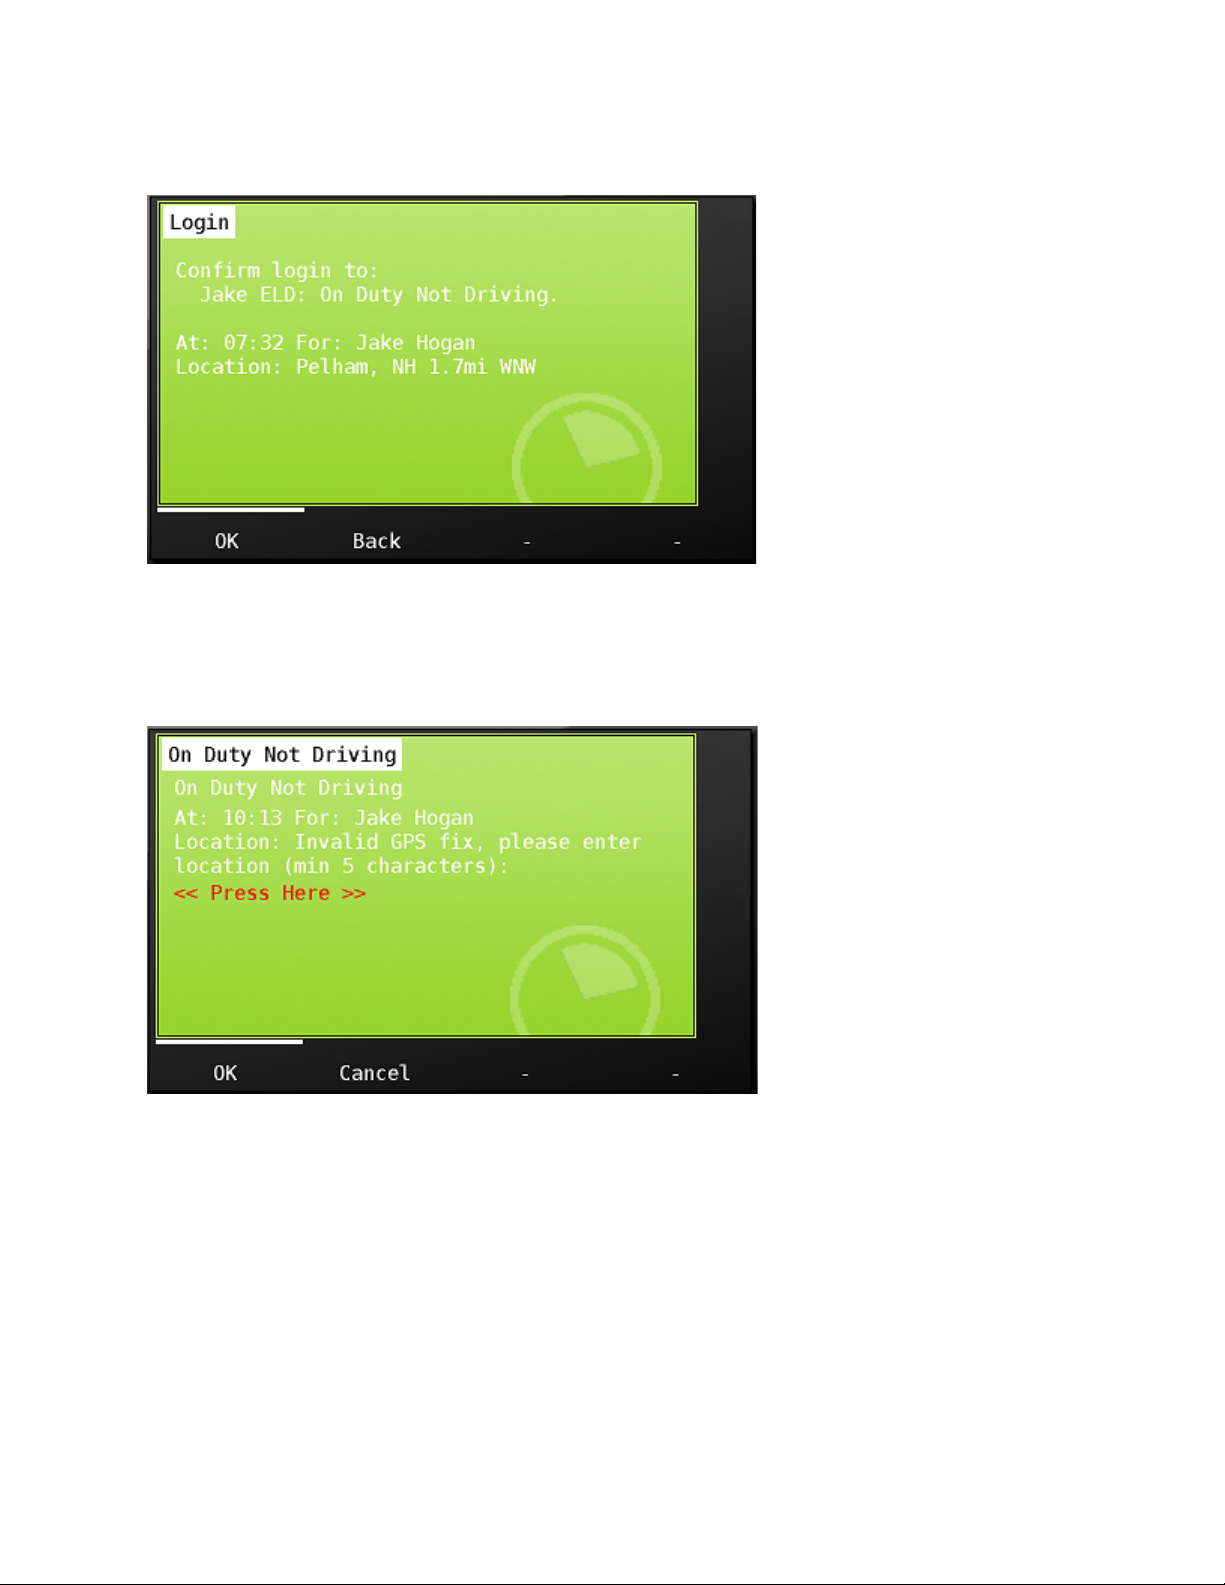
A confirmation screen will pop up that confirms the category you are entering and it confirms the
GPS determined location where the activity began.
If your MDT cannot determine its position via GPS at the time of your duty status change, you will
be prompted to enter your location manually. Enter your location identifier by touching ‘Press Here’
below. The identifier you use must be a minimum of 5 characters.
CarrierWeb LLC 1.0 - 2018352 Page 13 of 55

After confirming the ELD category and location, you will next be prompted to choose an additional
activity detail description within the Hours of Service category, if your company captures this detail.
Once chosen, the activity will show at the top of your status choice list in the hours tab.
CarrierWeb LLC 1.0 - 2018352 Page 14 of 55

Automated Drive
Note that it is never required to choose a driving status. The MDT is synchronized with the and will
automatically place the vehicle in drive status as soon as the vehicle reaches 5 MPH.
Drivers button
Press the Drivers button from the bottom of the Hours tab to view current drivers on the MDT. If your
company runs teams, you will see both the active and the inactive driver that are currently logged in
to the unit (see more on team drivers in Team Driving Operations) . When your shift is complete,
pressing logout will begin the logout process. See Logging out of the MDT for instructions on
logging out of the unit.
CarrierWeb LLC 1.0 - 2018352 Page 15 of 55
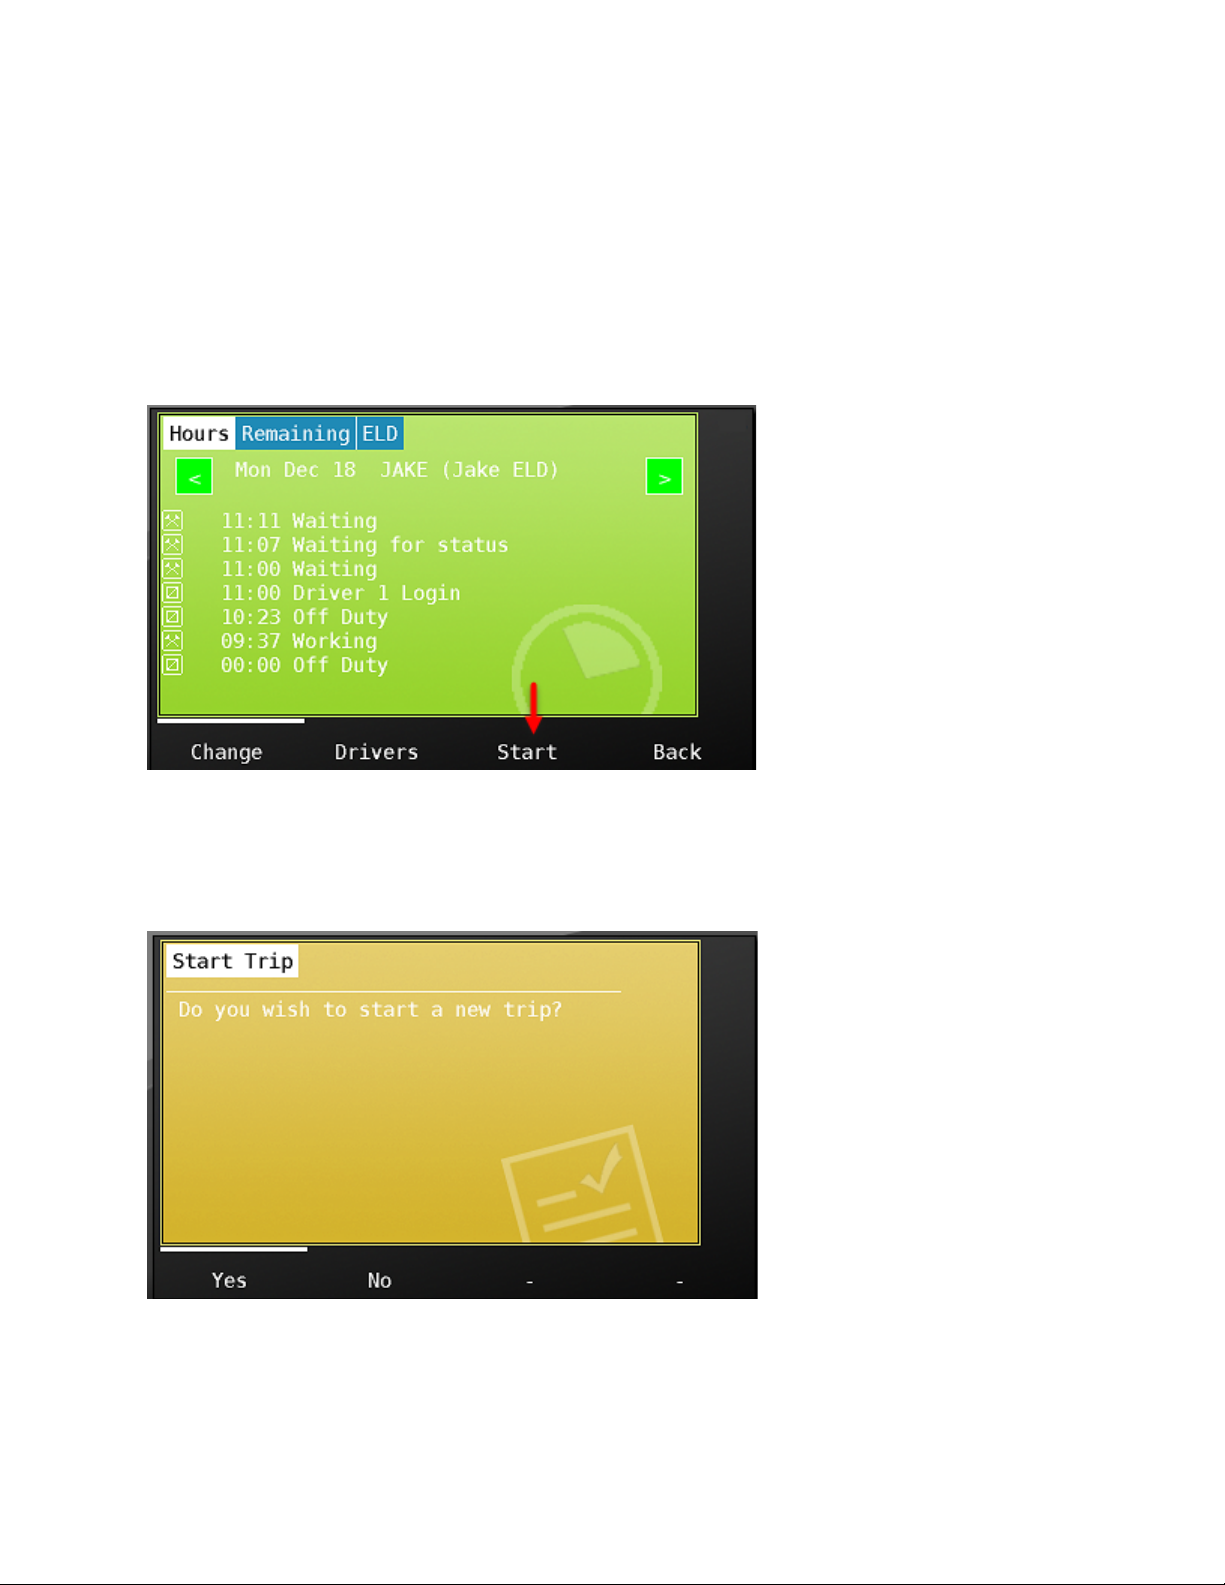
Start a trip
The CarrierMate™ MDT can be configured to stand alone as an ELD device or be integrated with a
Transportation Management System. If integrated with a TMS, then your trailer and shipping
document numbers will be presented to you for confirmation as a part of your normal workflow and
automatically affiliated with your ELD record. If your fleet does not use a TMS, you will use the
‘Start’ button to start a new trip and enter your trailer and shipping document numbers. Because the
CarrierMate™ is fixed to the truck, we automatically associate the vehicle identifier in your ELD
record. This vehicle identifier is editable by you should there be a reason to update the vehicle
identifier.
Press the Start button to begin a new trip. Touch ‘Yes’ to confirm that you would like to start a new
trip. Touching ‘No’ will bring you back to the previous screen.
Enter the shipping document number and trailer number for each line. Each time you start a new
trip, once you enter the required information, you will be prompted to enter a new status from the On
Duty category choice list as seen above.
CarrierWeb LLC 1.0 - 2018352 Page 16 of 55

The Remaining Tab
The Remaining tab shows your remaining hours available to you, as well as additional hours of
service details. When you touch the remaining hours tab, you will see:
- Driver ID
- Drive and On Duty remaining hours and time to next required 30 minute break
- The date/time of your current work shift
- The miles distance travelled today
Pressing the Details button in the screen above shows additional hours of service information
including:
- The HOS regulation that is being followed
- Hours remaining based on the 7 / 8 day rule
CarrierWeb LLC 1.0 - 2018352 Page 17 of 55
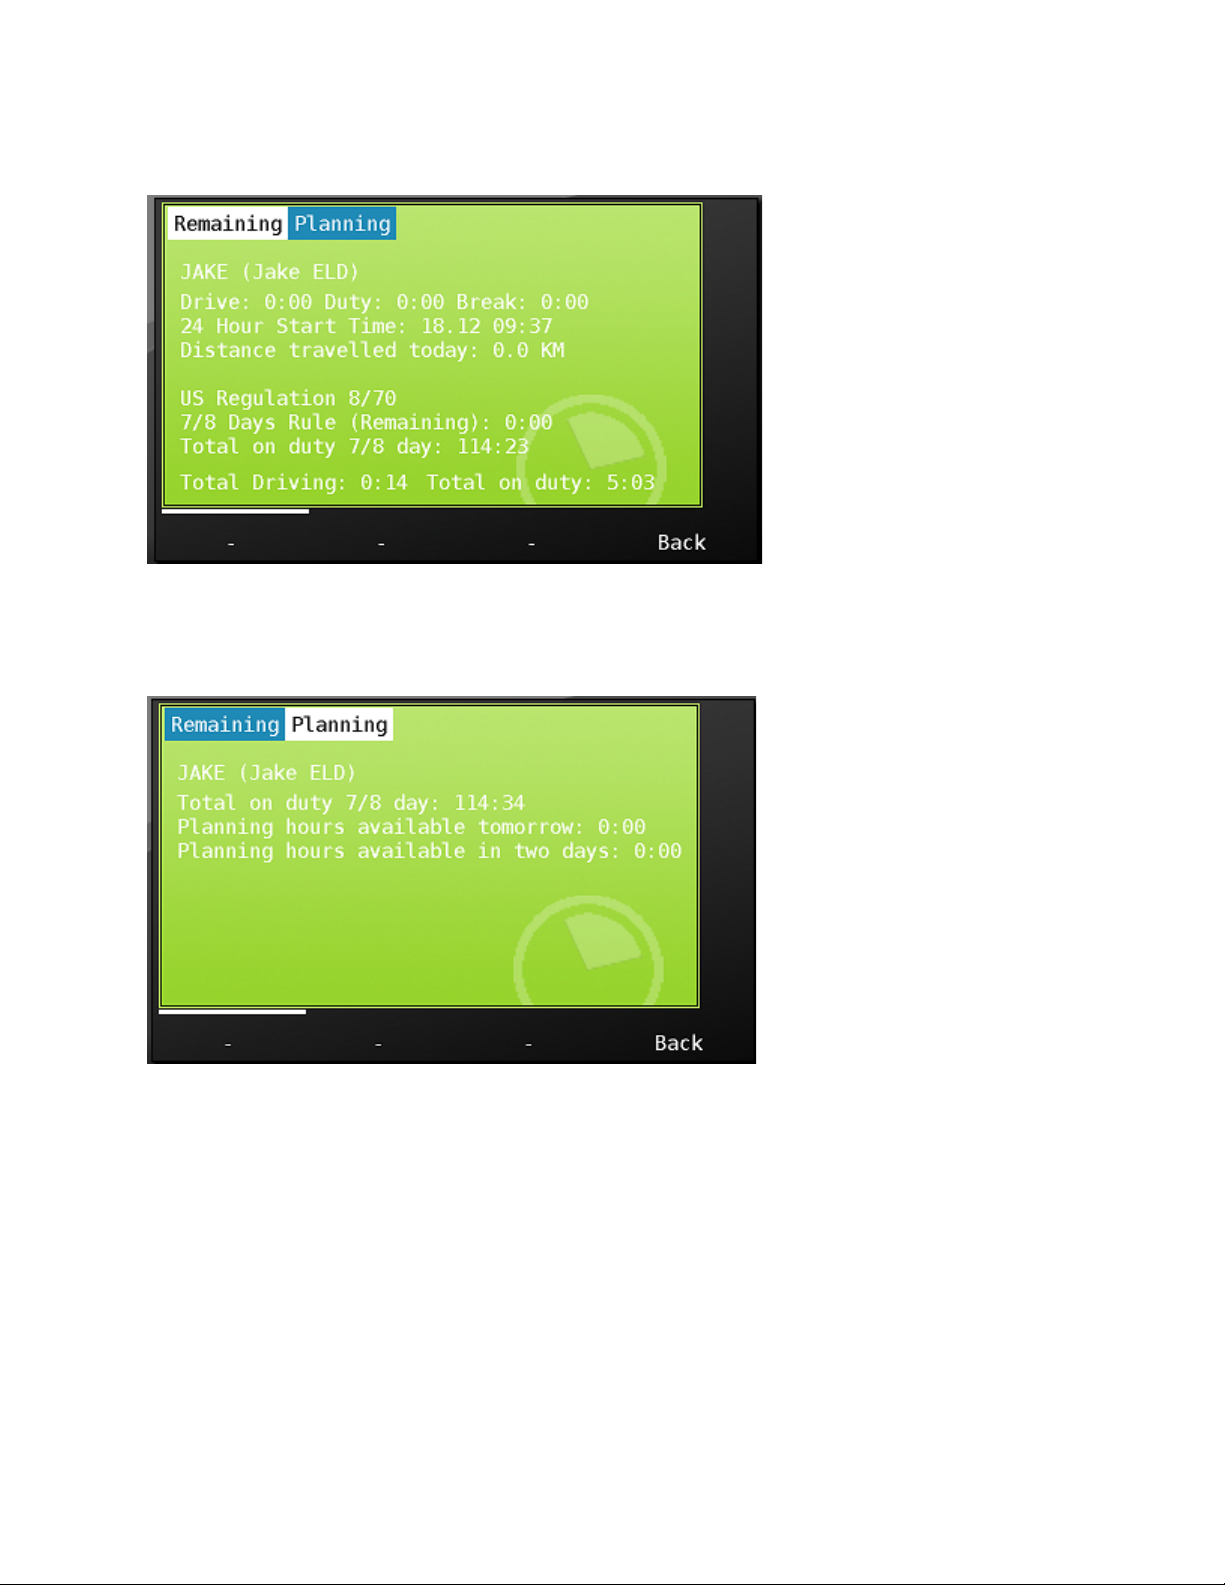
- Total on duty hours in the last 7 / 8 days
- Total driving and total on duty time today
Choosing the planning tab from above shows how many hours will be available tomorrow and in two
days.
The ELD Tab
The ELD Tab shows Hours of Service information required by the ELD mandate. At the top of the
page is your hours of service grid. As we discussed in the Hours tab section, pressing the green
arrow buttons will change the day viewed. Note that when you change the day in the ELD tab, it will
match the day in the Hours tab, and vice versa. The ELD tab day and the Hours tab day are always
synchronized.
The hours of service grid shows your ELD category changes graphically, as well as totals at the
bottom of the screen for total time spent in each. Note that Personal Conveyance and Yard Moves
will show as dotted lines and dashed lines respectively on the grid. Learn more in Special Operating
Statuses.
CarrierWeb LLC 1.0 - 2018352 Page 18 of 55

Pressing the down arrow on the scroll bar will show each duty status category change for daily
activities.
Touching an activity will show additional information associated with each record.
CarrierWeb LLC 1.0 - 2018352 Page 19 of 55
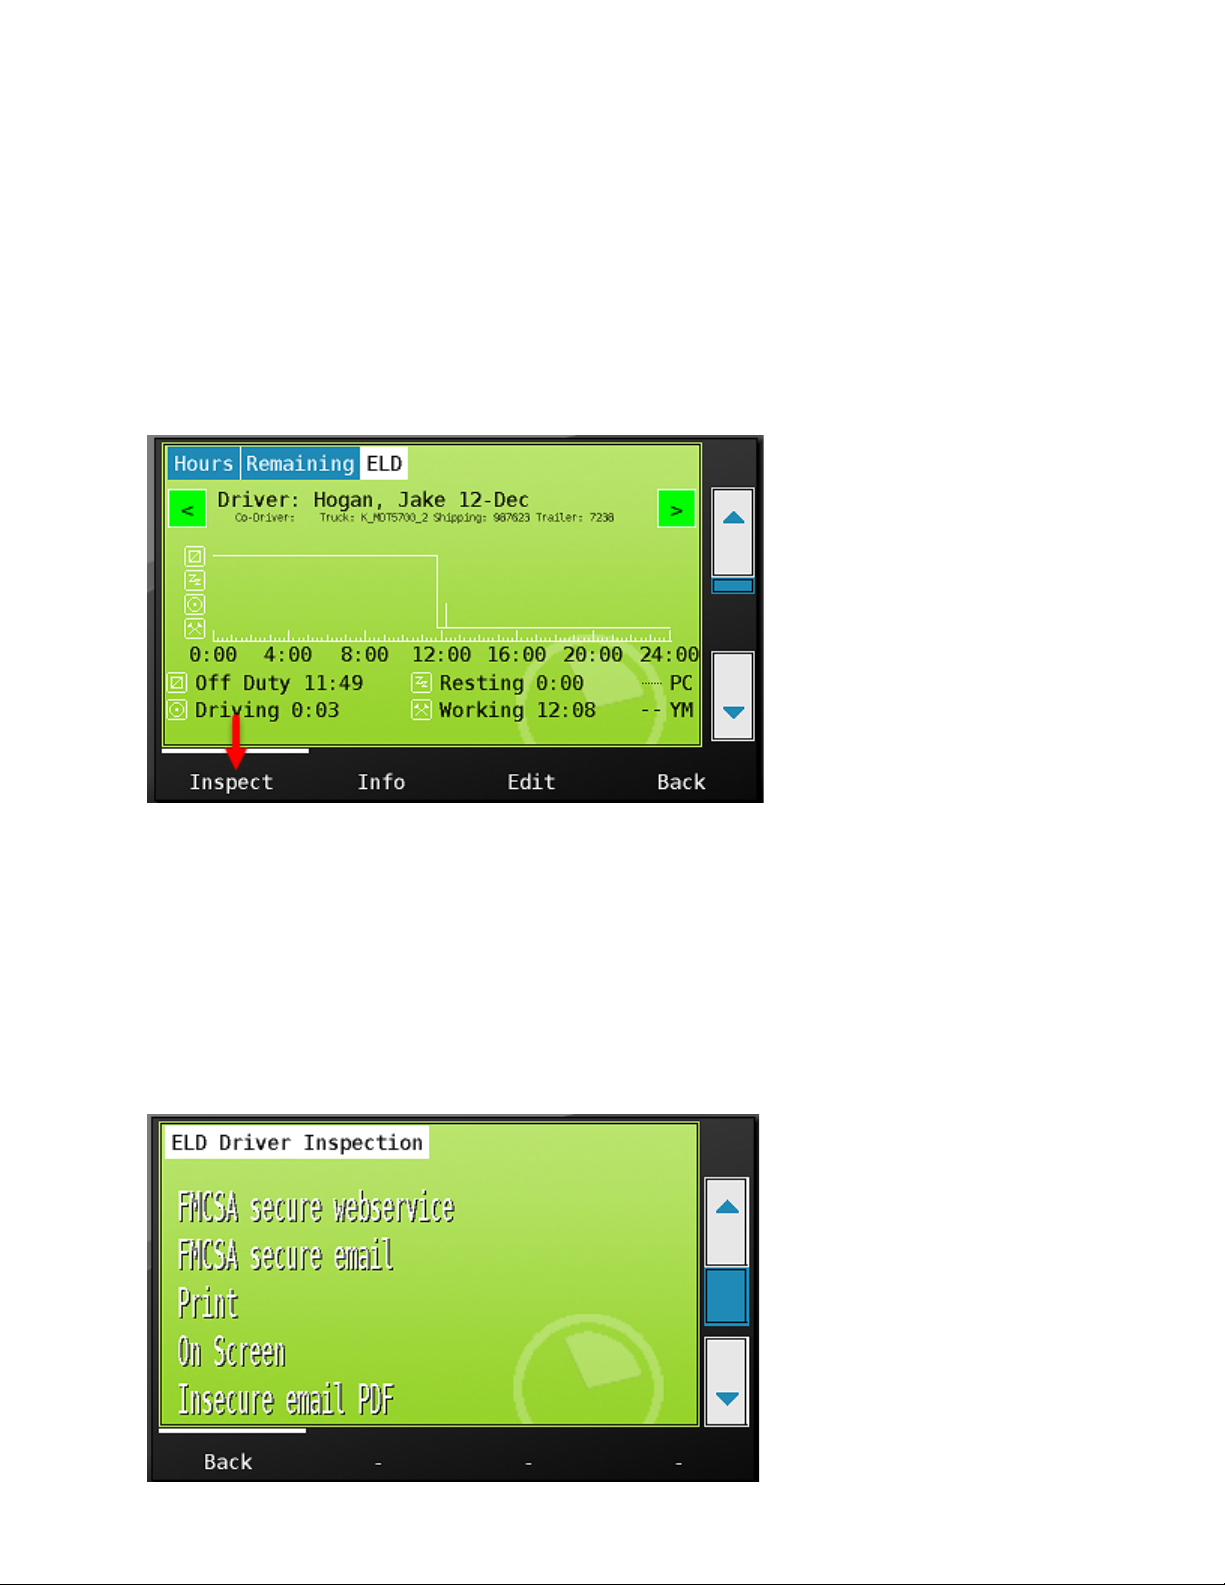
At the bottom of the ELD tab screen are 4 buttons, they are:
- Inspect - You’ll press this button when transferring or displaying your logs to an inspector.
- Info - this buttons provides additional information and ELD functionality
- Edit - You will use this button should you need to edit your logs.
- Back - the back button sends you back to the main menu.
Inspect and data transfer
The inspect button allows you to transfer or display logs to a roadside inspector.
When you press Inspect, you’ll see the following options for data transfer.
- FMCSA secure webservice
- FMCSA secure email
- Print
- On Screen
- Insecure email PDF
- Insecure FAX PDF (after clicking the scroll down button)
CarrierWeb LLC 1.0 - 2018352 Page 20 of 55

You will use the method of transfer designated by the inspector. Note that you’ll only use the print
option if your company is using that method to view logs outside the cab.
FMCSA secure webservice
To transfer log data via secure webservice, touch the option ‘FMCSA secure webservice’. You will
now be presented with the screen below requesting the ‘output file comment’. The Roadside
inspector will advise you what to enter here. Once you’ve entered the information as instructed,
press ‘send’.
After a moment, you will receive the status: ‘Transfer to FMCSA complete’ notification.
FMCSA secure email
Use this option if instructed by the inspector. The screens are the same as FMCSA secure
webservice.
Print
If your company relies on the printer as the ‘back up’ method for making logs viewable outside the
cab, choose this option. Follow the instructions that came with your printer to connect to the MDT
CarrierWeb LLC 1.0 - 2018352 Page 21 of 55

(plug the USB data cable into the right side of the MDT and plug the power cable into the auxiliary
power receptacle).
You will have the option of printing the ‘mini’ log that is an hours of service summary for your current
and previous 7 days of hours of service history. You may also print the full log detail that will print all
required data. Your inspector will tell you whether the summary log (preferred) is acceptable, or if
they require the detailed report.
On Screen
If your company has installed your MDT so that it may be passed outside the vehicle for review by
roadside officials, you may choose the ‘On Screen’ back up method of displaying your information.
Choose ‘ON Screen’ from the display options.
To review on screen, follow the instructions below after choosing the On Screen option.
CarrierWeb LLC 1.0 - 2018352 Page 22 of 55

Use the green left and right arrows to select the day to be reviewed,
choose the down and up scroll arrows on the right side of the MDT to view category status changes.
See HOS Category change for the day when scrolling down within a day.
CarrierWeb LLC 1.0 - 2018352 Page 23 of 55

To see required header information, touch ‘Click here to show full header’
Now required header information for the day chosen is displayed. Use the scroll arrows to view all
data.
Within the inspection screen, there is the option to review unidentified driver logs for each day as
well by pressing the ‘Unidentif’ button below.
Once all records have been reviewed, choose ‘Done’ to return to the ELD screen.
CarrierWeb LLC 1.0 - 2018352 Page 24 of 55

In addition to primary and backup methods of logs transmission and review at the roadside,
CarrierMate™ also provides the option for insecure email and fax transmission of a human readable
log for the inspector’s convenience.
To send an email, choose that option from the inspection screen, click ‘press here’ below...
CarrierWeb LLC 1.0 - 2018352 Page 25 of 55

enter the email address the inspector gives you, and click ‘send’
You’ll be notified that the email was sent successfully. Click OK to return to the ELD tab.
The ELD Info button
CarrierWeb LLC 1.0 - 2018352 Page 26 of 55

Choosing the Info button from the ELD tab displays the following additional tabs:
- ELD
- Driver
- Assoc
- Defered
- Unidentif
ELD - Displays active malfunctions and data diagnostic faults. See the Malfunctions and Data
Diagnostics faults section for more information on understanding these fault indicators.
The Driver tab shows the information about the driver including current duty status, available special
categories, and any data diagnostic errors current for this driver.
The Assoc (Association) tab provides a method of adding in shipment document number and trailer
number outside of the Start Trip functionality previously discussed. You may also edit these items as
a part of the editing function. See the Editing Your Log section for more information.
CarrierWeb LLC 1.0 - 2018352 Page 27 of 55

The deferred tab allows you to ‘un-defer’ any proposed edits or certifications that you have delayed.
Choosing either of these button will cause deferred proposed edits and certifications to display on
the screen immediately. Learn more about Proposed edits in the Editing Your Log section.
The unidentifi button displays unidentified driving events that are stored on this MDT. Learn more
about reviewing and accepting unidentified driving events in the section : Assuming ‘unidentified
Records’
CarrierWeb LLC 1.0 - 2018352 Page 28 of 55

Editing your log
The edit button in the ELD tab allows you to edit your non-driving duty statuses.
Move to the day that you need to make changes on and click the edit button from within the ELD tab.
You’ll then see ‘ELD Driver Edit’ in blue letters at the top of the screen.
Change a duty status
There are two ways to make edits to your recorded data. The first is to change a record from one
status to another. For instance, let’s say you chose the on duty status, when you in fact meant to go
off duty. In this case, I want to change the On Duty status at 12:19 to ‘off duty’. To change the
activity itself, scroll down until you see the record that you want to change and click on it.
CarrierWeb LLC 1.0 - 2018352 Page 29 of 55

The detail that is associated with the record will now be displayed. The data in black is for reference
and cannot be changed. The items in blue are driver editable data. I click on the Code: Status
Change: On-Duty not driving to call up the change screen.
After clicking the status change line, I am presented with the four ELD categories that I can choose.
Since I meant to go Off Duty - I choose that status on the list, and press OK.
CarrierWeb LLC 1.0 - 2018352 Page 30 of 55

The red color of the status change indicates that you have changed the original status. From here
you can edit additional fields, apply the change, cancel out of the change or add additional info.
Add additional info
After applying the change, the record will appear red beneath your grid.
CarrierWeb LLC 1.0 - 2018352 Page 31 of 55

Scrolling up to the grid, you will see the original status in a faint light blue line, and the new status
that will be saved as the dark blue line. The change is not recorded until you press the save button
to complete the edit.
When you press save, you will be prompted to enter a comment. This is a required field. Enter the
reason for your change and press save.
CarrierWeb LLC 1.0 - 2018352 Page 32 of 55

After saving your comment, you will immediately be prompted to certify your edited log that shows
your change.
You’ll also see that the system retains your original duty status information as required by the
FMCSA.
Once ready, accept and agree to the certification statement. As we saw earlier in this manual, you
can also defer certification until you are ready.
CarrierWeb LLC 1.0 - 2018352 Page 33 of 55

Using the grid to edit your log
The second way to edit your log is to use the grid controls. In this example, let’s say I had actually
come on duty at 8:05 AM on the 11th. To add that time in using the grid, I once again click on the
Edit button for the day I want to edit..
I again see that I am in the ELD Driver Edit screen. This time however, I’ll use the grid. To do so - I
touch anywhere on the screen to activate screen edits.
I now see the instructions at the bottom of the screen that tell me to touch the graph on the category
line near the time that I want to edit. Since I want to go on duty at 8:05 AM , I touch the graph on the
imaginary on duty line that runs horizontally on the screen at about the 8 AM mark. I’ll adjust this
time next.
CarrierWeb LLC 1.0 - 2018352 Page 34 of 55

When I touch the grid in my target area, I see a dark red line that appears on the on duty line from
0800 to 0900. This red line is that status that I will apply when I hit the ‘apply’ button. See that the
line is a light pink at the top of the edit window, showing what my current status is.
I can now adjust the edit time using the time controls. The duty status labels above the ‘From’ and
‘To’ times help show me where I am at on the grid. When an arrow points left and right on either
side of the status description, that indicates that the control is within a status. So <off duty> means
that the control is in the middle of the Off Duty period.
Since I was on duty up until my first On Duty status, I use the right arrow control, directly above the
To: label to move my on duty period to abutt my first on duty. I know that I have moved my edit
status to the beginning of my on duty event because the status label above the to control shows an
ODND>, the arrow to the right of the label and none on the left indicates I am at the beginning of the
next on duty status that begins at 10:41.
CarrierWeb LLC 1.0 - 2018352 Page 35 of 55
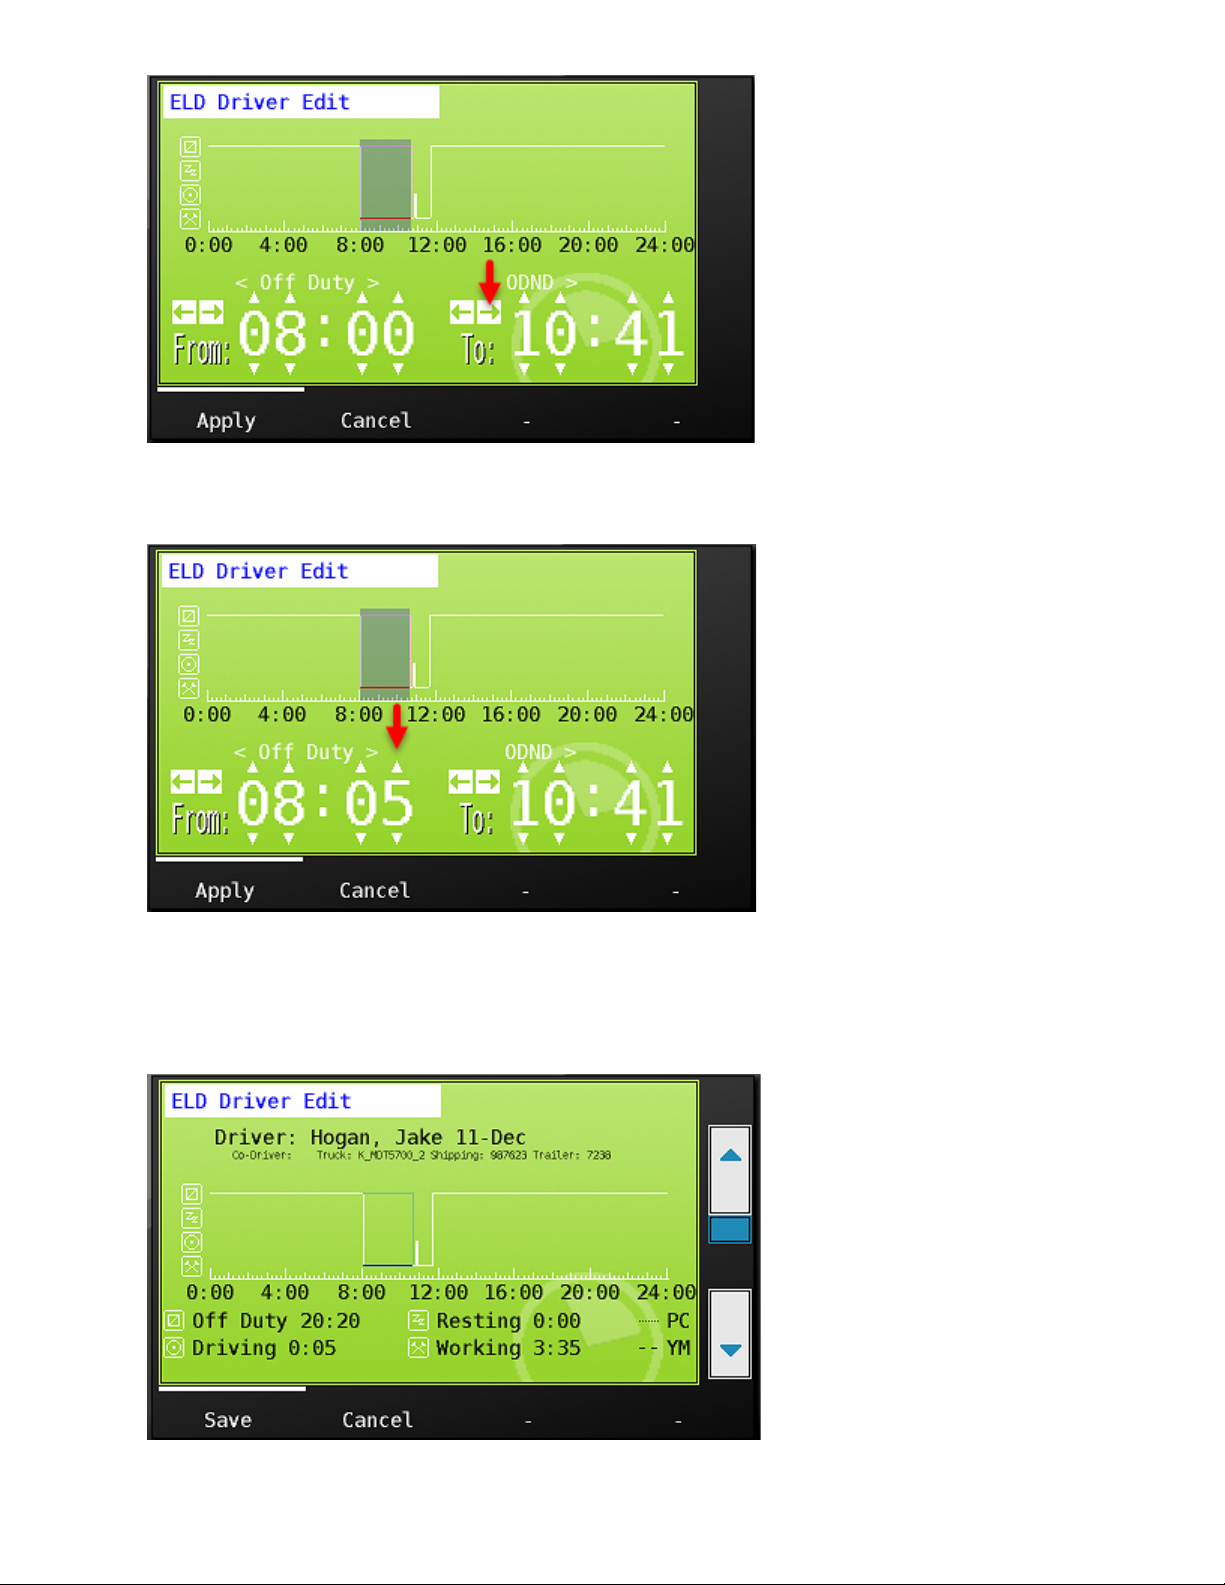
I can then use the small triangle above the from time minute to change the from time to 08:05.
I click the ‘Apply’ button, and once again see the light blue line indicating my original status, and the
dark blue line indicating the change that I have applied. I click ‘Save’ to make the change to my
Hours of Service record.
CarrierWeb LLC 1.0 - 2018352 Page 36 of 55

I enter my edit reason and choose ‘Save’.
I accept my certification
And agree to the required certification statement
CarrierWeb LLC 1.0 - 2018352 Page 37 of 55
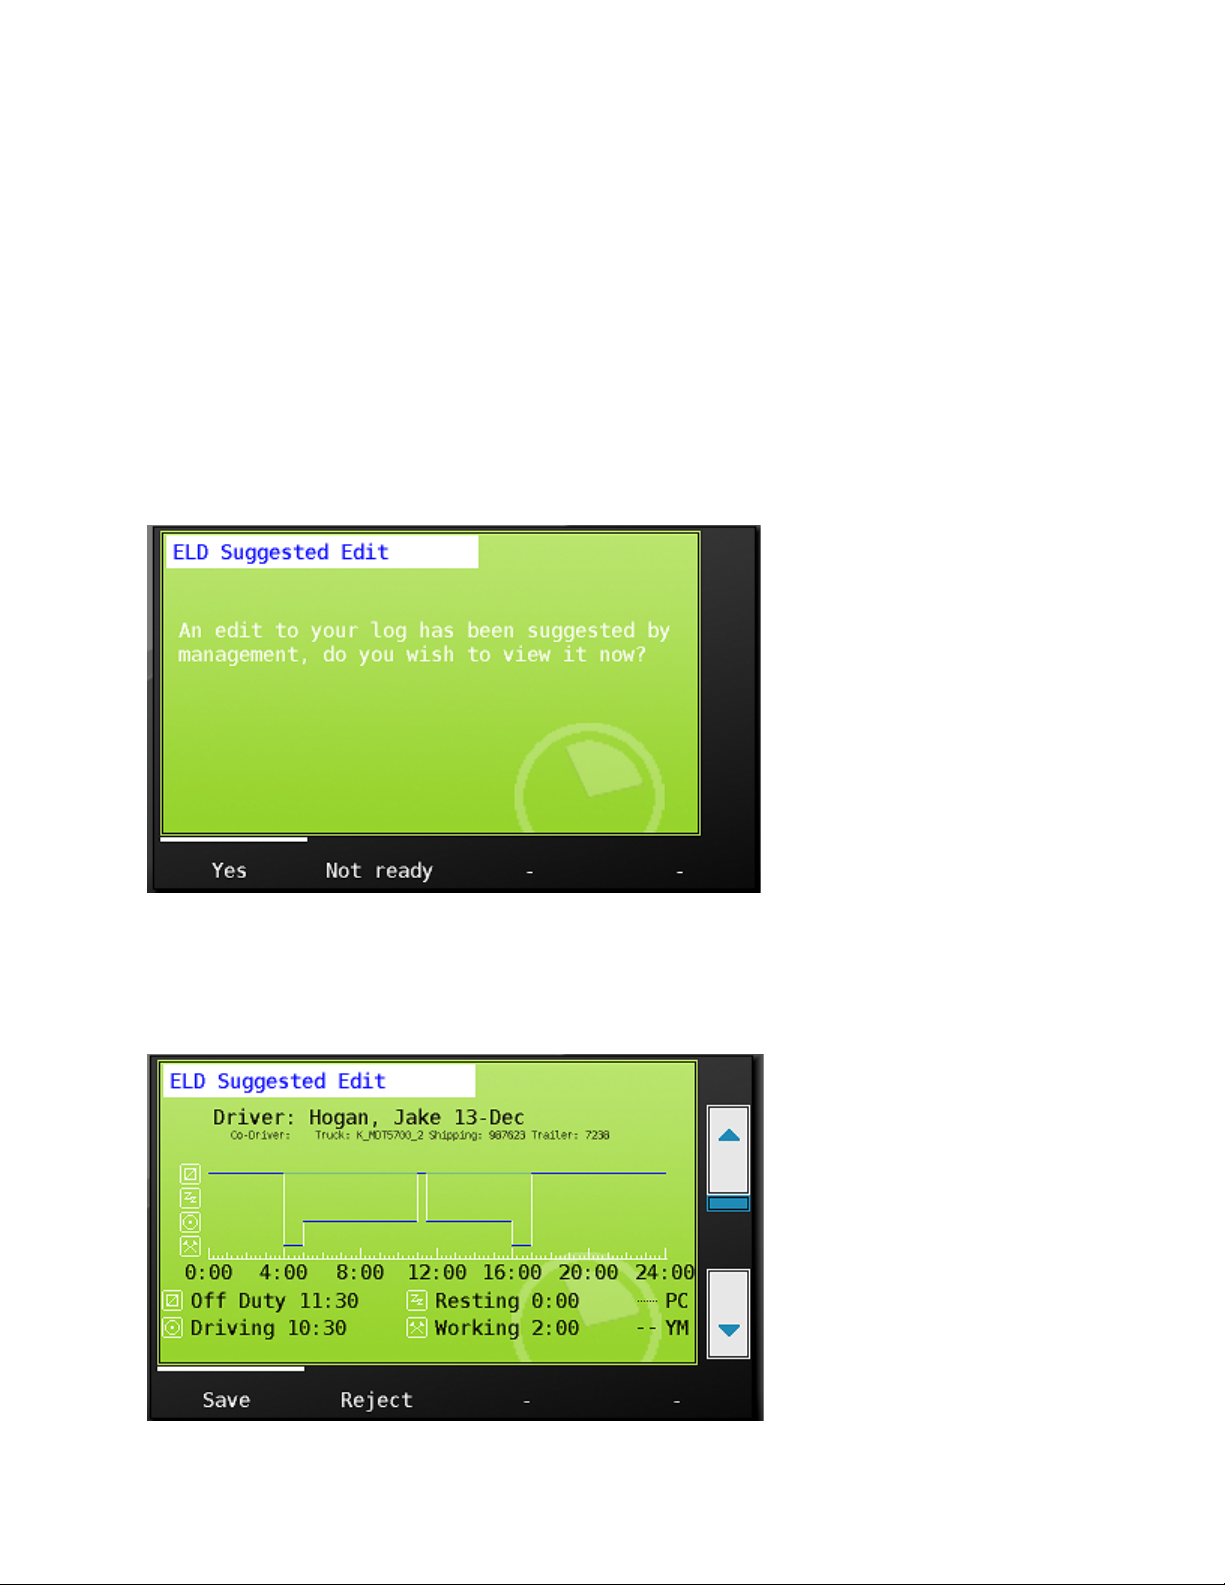
Accepting manager proposed edits
There is also one more way that edits can be made to your log. However, this time, the edit has
come from a manager, likely at your request.
When a manager makes an edit to your log on the website, you will receive the message that an edit
has been made for you. You will see this message during your next on duty not driving activity
following the edit.
If not ready to view the edits, you can choose ‘Not ready’ and defer accepting the edits in the same
way that we have already seen for log certifications. If you are ready to view the suggested edits,
go ahead and choose ‘Yes’.
You’ll now be presented with the suggested edits made by management. The light blue lines show
the original status and the dark blue lines show what will be saved to your record if you accept the
changes. You may either save or reject the changes.
CarrierWeb LLC 1.0 - 2018352 Page 38 of 55

Either choice will require you to enter a reason. We will save this change, enter the edit reason and
choose save. Once again, we will immediately be prompted to certify the new record.
Other hours of service information:
Remaining hours warnings
Management can enable hours of service alerts that will display on your MDT when you are
approaching out of hours situations. The alerts can be setup to provide a first warning an hour
before running out of Drive, On duty or time to next 30 minute break. A reminder period can also be
set to again warn of impending out of hours at multiple intervals in the time between the initial
warning and pending violation.
CarrierWeb LLC 1.0 - 2018352 Page 39 of 55

Motion Lock Screen
As soon as the wheels begin turning on your vehicle, the MDT screen will show the Motion Lock
screen. This screen shows the active driver in the upper left hand corner of the screen along with
their time in current duty status in green. The drivers available hours are also shown on the Motion
Lock screen.
As a single driver logged in, you will not be able to enter any information while the truck is in Motion
Lock. When a team is logged in, a codriver will be able to unlock the screen and enter data. Learn
more about team drivers in Team Driver Operations.
Logging out of the MDT
To log out of the MDT, choose ‘Drivers’ from the Hours tab
CarrierWeb LLC 1.0 - 2018352 Page 40 of 55

Then choose ‘Logout’
Next, review any existing malfunctions, and other driver related information and choose Yes teo
continue to logout. If you do not wish to logout, choose ‘Cancel’.
Next, choose the ELD status you want to remain in once you leave the vehicle. If going off duty then choose that status from the list.
CarrierWeb LLC 1.0 - 2018352 Page 41 of 55

You’ll then be asked to confirm that you are logging out and to remain in the status you have chosen.
Confirm the location and clicking ‘OK’
When you are returned to the green login, you know that you have successfully exited the vehicle.
CarrierWeb LLC 1.0 - 2018352 Page 42 of 55

Special Driving Conditions
If required for your operation, management can assign the special driving condition categories yard
moves and/ or personal conveyance to your driver ID. You will see the special driving categories
allowed under your id at login. You’ll also see allowed special category status under the driver tab in
ELD info.
To choose the special driving category ‘Yard Moves’ you must first be in an ‘On Duty’ status. To
choose Personal Conveyance, you must first be in an ‘Off Duty’ status.
In the below, the driver is in an on duty status, he chooses the ELD button from the main menu,
clicks ‘change’ at the bottom of the screen in the Hours tab, and clicks ‘Set Special Driving
Condition’ from the ELD status choice list.
CarrierWeb LLC 1.0 - 2018352 Page 43 of 55

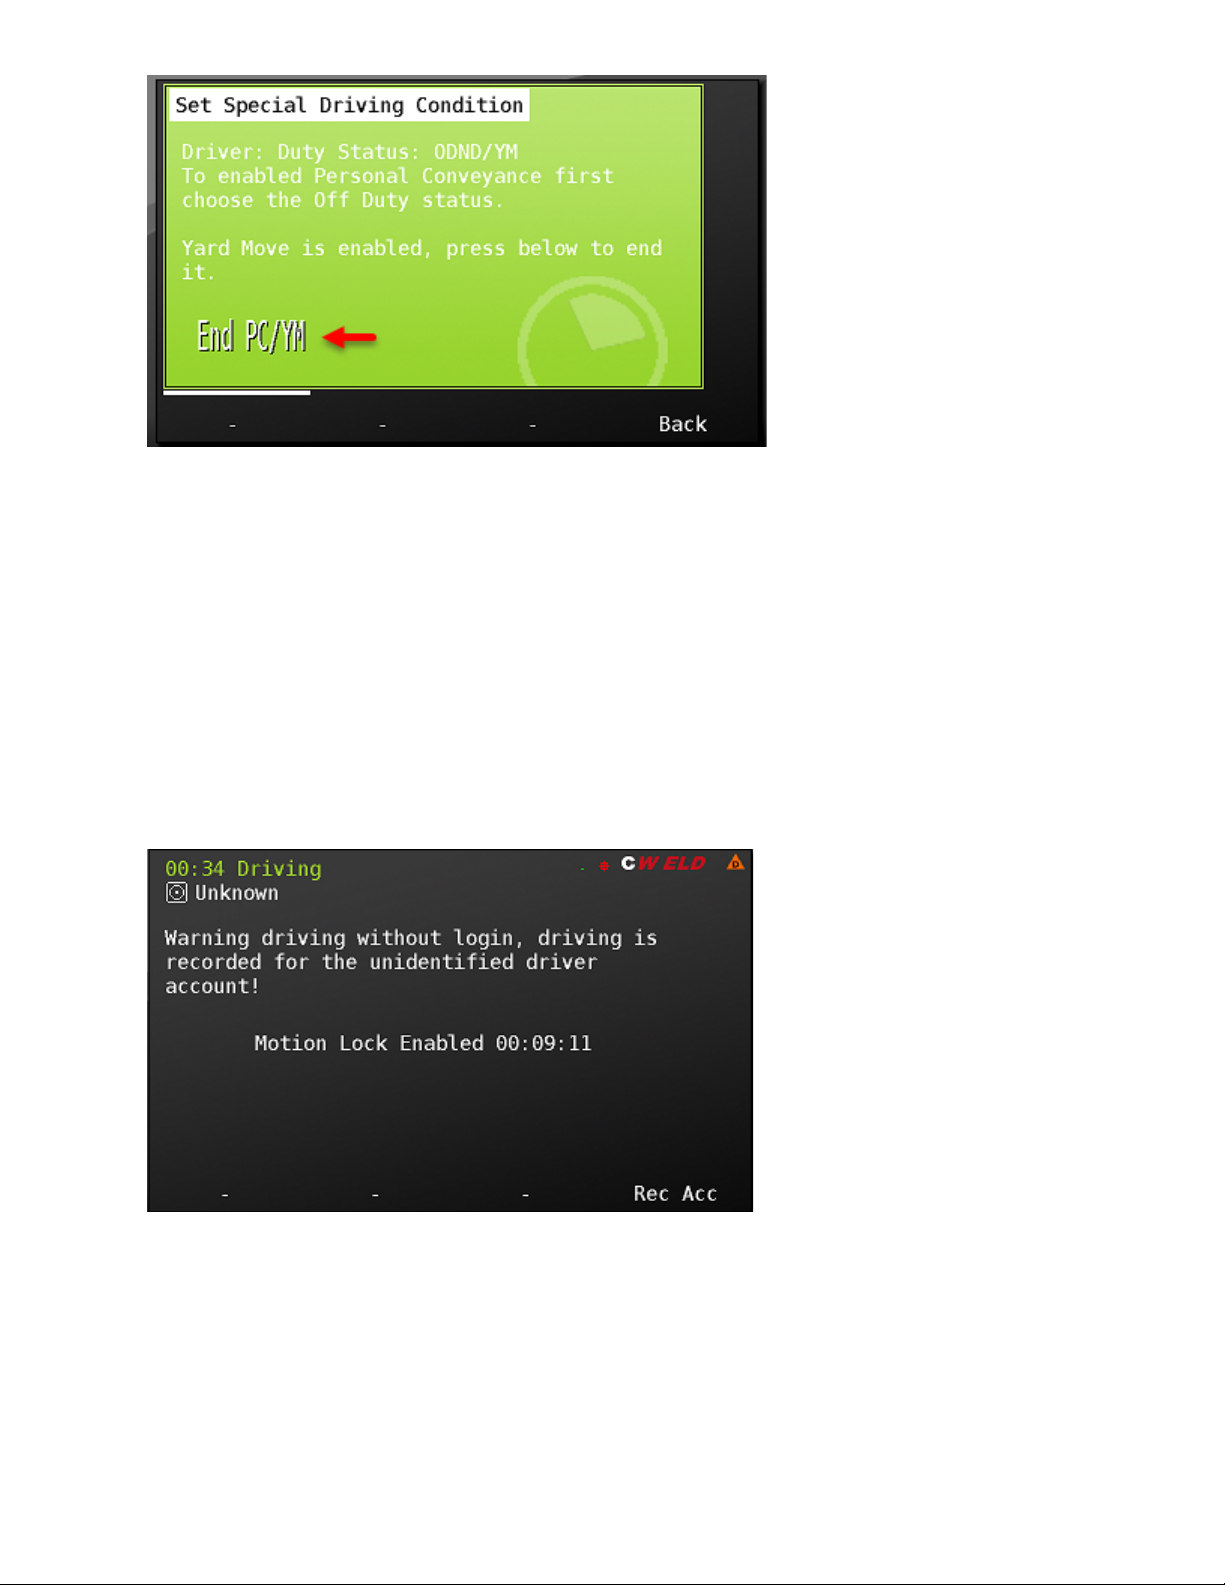
The driver then chooses the special driving category ‘Yard Move’.
He is prompted for a reason, and presses ‘OK’ to enter the status.
Once in Yard Moves, the driver will remain in that status until he either keys the ignition off and back
on, changes duty status or he ends the status. To end the status, he chooses the green ELD Button
from the main menu, chooses ‘Change’ from the ELD tab, chooses ‘Set Special Driving Condition’
and then chooses End PC/YM from the list. This will end the special driving condition.
You can enter Personal Conveyance in the same manner as described here for Yard Moves.
Remember however that you must first be in an ‘Off Duty’ status to be able to choose Personal
Conveyance.
It is also important to understand that you must end yard move and personal conveyance special
driving conditions when you are finished using them. Your truck will not automatically go into drive
status until these statuses have been ended.
CarrierWeb LLC 1.0 - 2018352 Page 44 of 55
Assuming ‘unidentified Records’
If the vehicle is driven without a valid driver logged in, the driving detail is associated with the
‘Unnassigned’ driver.
If driving in a vehicle when not logged in, the driver will see a visual warning on screen as well as an
audible alert, letting them know that a driver is not logged in to the system. Anyone who moves a
vehicle and exceeds the ELD mandated drive initiation speed of 5 MPH will generate unassigned
driving records, including yard personnel, mechanics, and drivers who forget to log in.
The ELD mandate requires that drivers logging in to the system be given an opportunity to accept
generated unassigned driving into their HOS records.
The next driver logging in to the MDT will be presented with the notification below that there are new
unidentified driving records on the MDT. He clicks ‘Next’ to see the records.
CarrierWeb LLC 1.0 - 2018352 Page 45 of 55

All new unidentified driving records will be presented to the driver on this screen. If there are
multiple instances, each event will be listed. Each driver who logs in to the MDT will be asked if they
want to accept the record(s). A driver will only be asked once for a specific event. After they have
rejected it, they will not be asked if they want to accept it again. In this screen, the driver can click
on an event to accept it - or he can Reject All on the screen.
To accept the unassigned event, he Clicks on the instance, and is presented with the Accept or
Reject screen. Again - if he rejects the record, he will not be asked about it the next time he logs in
to the unit. However, in this case, he did forget to log in and will accept the record, and chooses
‘Accept’ from the screen below.
CarrierWeb LLC 1.0 - 2018352 Page 46 of 55
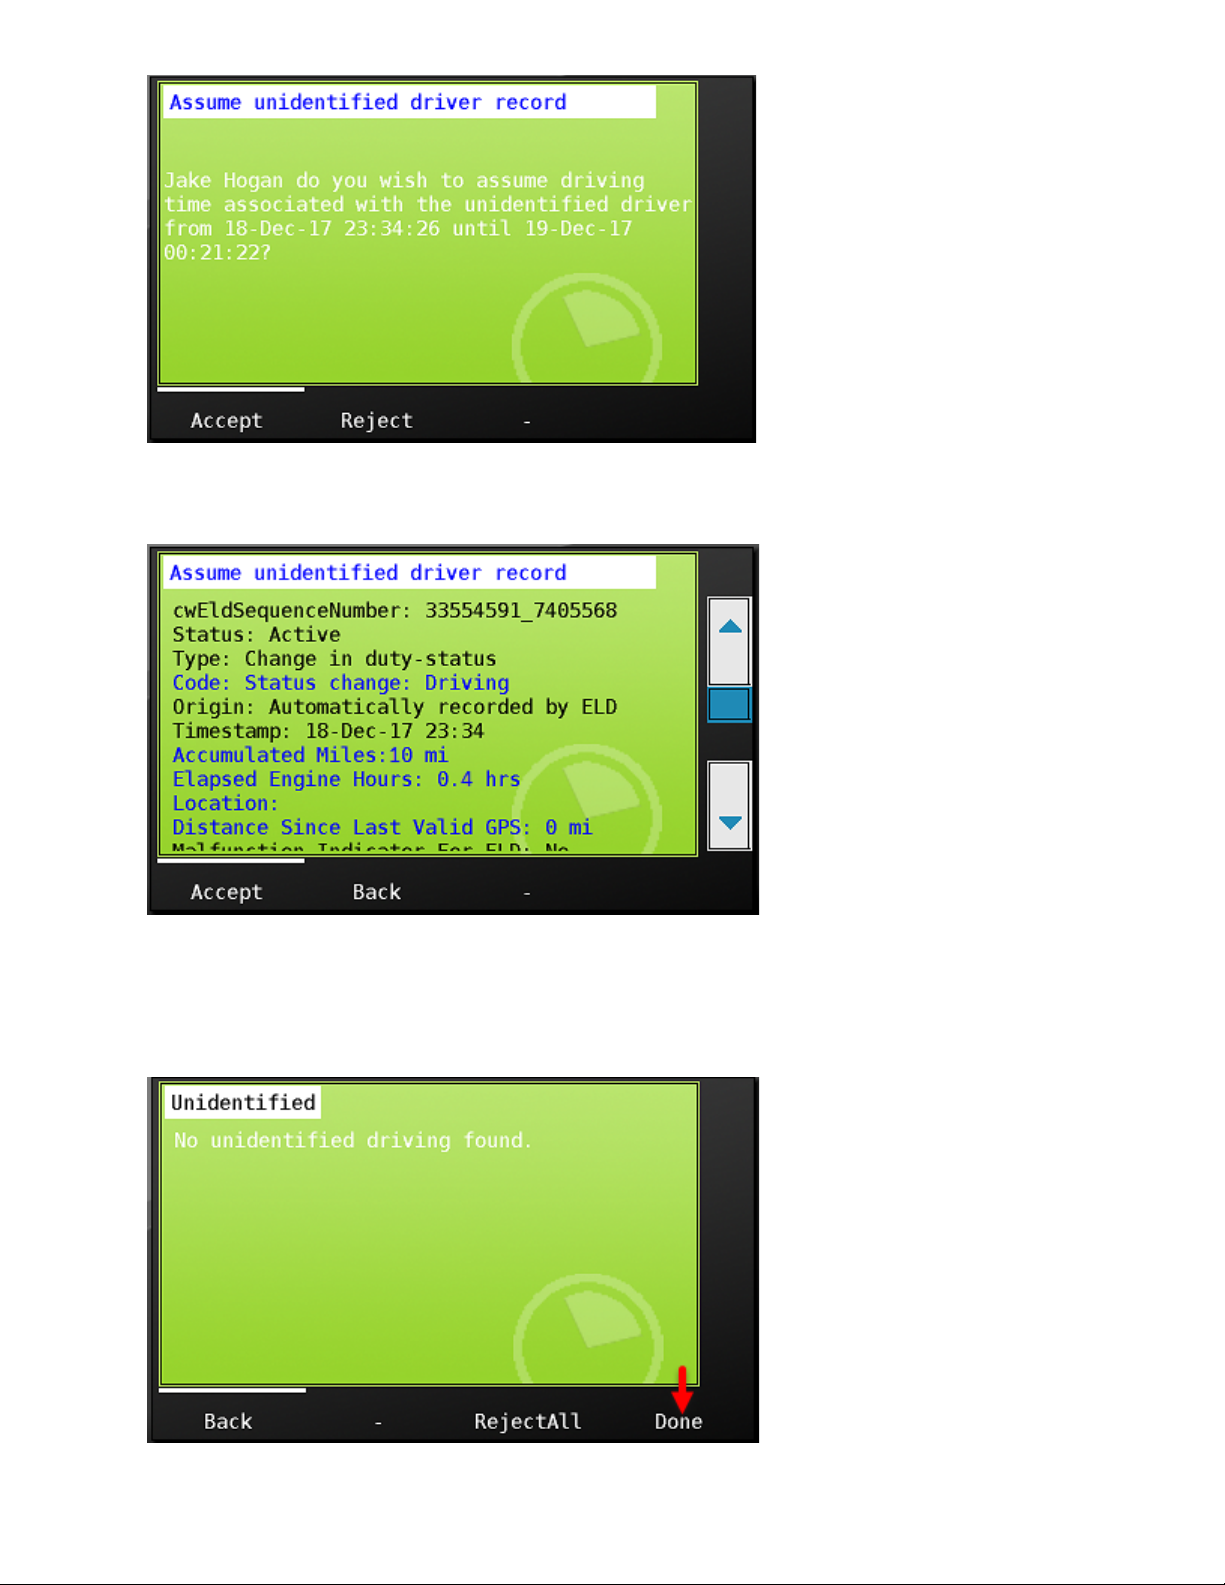
After clicking ‘Accept’ he sees the driving event as an edit to his record, and he chooses ‘accept’.
If there are no additional unassigned records, or if driver has rejected any other records associated
with the MDT, then he will press done. The driver may be prompted to certify his ELD record if
assuming a status for a previous day.
CarrierWeb LLC 1.0 - 2018352 Page 47 of 55

Team Driver Operations
If your company runs teams, then your MDT’s will be set up to accept a co driver. When a team logs
in to the MDT, the driver who will be driving first, or the ‘Active’ driver, will log in to the mdt, followed
by the co-driver.
The first or ‘Active’ driver enters his username and password in o the unit and confirms he has hours
available to begin. He then presses the ‘Login’ button.
After successfully downloading his HOS log data to the MDT and pressing continue, The active
driver chooses his ELD category of On Duty Not Driving.
CarrierWeb LLC 1.0 - 2018352 Page 48 of 55

He confirms his chosen status and location be clicking ‘ok’
The active driver then certifies any outstanding logs
After the first/active driver certifies all outstanding logs, the system now asks if there is a codriver.
CarrierWeb LLC 1.0 - 2018352 Page 49 of 55

He presses ‘Yes’ to confirm there is, and now the co-driver enters his information just as the active
driver has.
The second driver confirms he has hours available, and chooses the ‘login’ button.
After the codriver successfully receives his log history to the MDT, he then is prompted to choose his
duty status
CarrierWeb LLC 1.0 - 2018352 Page 50 of 55

The active driver is then prompted to enter his on duty status - and the team completes their login.
The main menu now displays the active driver on the upper left hand side of the screen, his user
name in white. The co-driver is on the upper right hand side of the screen in gray.
Pressing the green hours button now shows CoHRS and CoELD tabs. These tabs have the same
functionality as active drivers Hours and ELD tab reviewed previously in this manual.
CarrierWeb LLC 1.0 - 2018352 Page 51 of 55

The remaining tab now shows remaining hours for both team drivers. Choosing details tab produces
the same functionality as reviewed earlier in this manual.
To switch drivers, choose the Drivers button from the Hours or CoHRS tab.
Choose ‘switch’ to swap drivers
CarrierWeb LLC 1.0 - 2018352 Page 52 of 55

Once switched, the new active driver will be prompted for his status, and the new codriver will be
prompted for his status doing so as we’ve previously seen in this manual.
Choosing ‘Logout’ from the Drivers screen when there is a team will log both drivers out of the unit.
ELD Malfunctions and Data Diagnostics errors
ELD devices are required to log, and notify the user when there is an MDT compliance malfunction
or a Data Diagnostic function indicating a driver data issue. If an ELD malfunction is present, a red
triangle with an ‘M’ in the middle will display in the upper right corner of the MDT. If a data diagnostic
error occurs, an orange triangle with a ‘D’ in the middle will be visible
CarrierWeb LLC 1.0 - 2018352 Page 53 of 55

MDT Malfunctions
Code
Malfunction
Reason
Solution
P
Power Malfunction
The events in a 24 hour period. MDT
has detected that it has been driven for
30 minutes without creating driving
records.
Check the connection to the
Canbus (ECU), and check
that the MDT is always
powered before driving.
Contact your carrier and
revert to paper logs.
E
Engine Sync Malfunction
The MDT has detected that it has
missed data from the ECU for at least
30 minutes over a 24 hour period.
Check the connection to the
Canbus (ECU), and check
that the MDT is always
powered before driving.
Contact your carrier and
revert to paper logs.
T
Timing Sync Malfunction
The MDT has failed to sync the clock
with either the server, or GPS for too
long, and it is possible that the clock
may not be correct.
Check the connection to the
internet and GPS antenna the malfunction should clear
once a valid Fix is obtained.
Contact your carrier and
revert to paper logs.
L
Position Sync Malfunction
The MDT has been driven for too long
without a GPS Fix.
Check the GPS antenna the malfunction should clear
once a valid Fix is obtained.
Contact your carrier and
revert to paper logs.
R
Data Recording Malfunction
The MDT can not record any more
ELD Events.
An internal fault has
occurred in the MDT which
will need to be serviced.
Contact your carrier and
revert to paper logs.
S
Data Transfer Malfunction
The MDT has failed to contact the
FMCSA too many times to test the
remote roadside inspection connection.
Check the connection to the
internet. Contact your
carrier and revert to paper
logs.
O
Other ELD Malfunction
An ‘Other ‘ malfunction occurred.
Contact your carrier and
revert to paper logs.
CarrierWeb LLC 1.0 - 2018352 Page 54 of 55

Data Diagnostics
Code
Data Diagnostic
Reason
Solution
1
Power Event
The MDT has
detected that it has
been driven without
creating events.
Check the connection
to the Canbus (ECU),
and check that the
MDT is always
powered before
driving.
2
Engine Sync Event
The MDT has
detected that it is not
receiving the required
data from the vehicle
ECU.
Check the connection
to the Canbus (ECU),
and check that the
MDT is always
powered before
driving.
3
Missing Data Event
The MDT is missing
required data for one
or more events.
Check the connection
to the GPS antenna,
or edit the events and
add the missing data.
4
Data Transfer Event
The MDT has failed to
contact the FMCSA to
test the remote
roadside inspection
connection.
Check the connection
to the internet.
5
Unidentified Driving Event
The MDT has
recorded driving when
no driver was logged
in.
Always login before
driving. You should
also assuming the
unidentified driving
time if you are
responsible for it when
prompted after login.
6
Other
An ‘other’ diagnostic
event has occurred.
Notify carrier.
CarrierWeb LLC 1.0 - 2018352 Page 55 of 55
 Loading...