


Italiano ................................................................................................ 2
English ............................................................................................... 18
Deutsch .............................................................................................. 34
V 1.0

Powerfix PLS 10 A2
Indice
1. Utilizzo previsto...................................................................................... 3
2. Contenuto della confezione .................................................................... 4
3. Specifiche tecniche .................................................................................. 5
4. Istruzioni di sicurezza ............................................................................. 6
5. Copyright ............................................................................................... 9
6. Prima di iniziare… ................................................................................ 10
6.1. Installazione .................................................................................................................... 10
6.2. Caricare la batteria ........................................................................................................ 10
7. Introduzione ......................................................................................... 11
8. Cavo caricabatterie da auto a 12/24 V ................................................. 11
8.1. Sostituzione del fusibile .................................................................................................. 12
9. Manutenzione/Pulizia .......................................................................... 13
9.1. Assistenza ........................................................................................................................ 13
9.2. Pulizia .............................................................................................................................. 13
9.3. Conservazione del dispositivo inutilizzato .................................................................... 13
10. Risoluzione dei problemi .................................................................... 14
11. Normativa in materia ambientale e informazioni sullo smaltimento .. 14
11.1. Rimozione della batteria .............................................................................................. 14
12. Note di conformità ............................................................................. 15
13. Informazioni sull'assistenza e garanzia .............................................. 16
2 - Italiano

Powerfix PLS 10 A2
Congratulazioni!
Acquistando la lampada LED a batteria Powerfix PLS 10 A2, da qui in poi indicata come
lampada LED, avete scelto un prodotto di qualità.
Il manuale per l’utente è parte integrante del prodotto. Contiene importanti informazioni sulla
sicurezza, l'utilizzo e lo smaltimento del dispositivo. Prima di utilizzare il prodotto, leggere
attentamente le istruzioni operative e di sicurezza. Utilizzare il prodotto unicamente nel
modo e per gli scopi descritti. In caso di cessione o vendita del dispositivo, accertarsi di
consegnare con esso tutta la documentazione relativa.
1. Utilizzo previsto
La lampada LED a batteria è adatta ad ambienti sia chiusi, sia aperti. Questa lampada non
è destinata a un impiego commerciale. La lampada LED va utilizzata esclusivamente con il
supporto, non è permesso il montaggio a parete. Il dispositivo è conforme a tutte le norme e
gli standard in materia di Conformità CE. Ogni alterazione della lampada LED a batteria
diversa da quelle consigliate dal produttore può rendere nulla la conformità a queste
direttive.
Italiano - 3
Powerfix PLS 10 A2
2. Contenuto della confezione
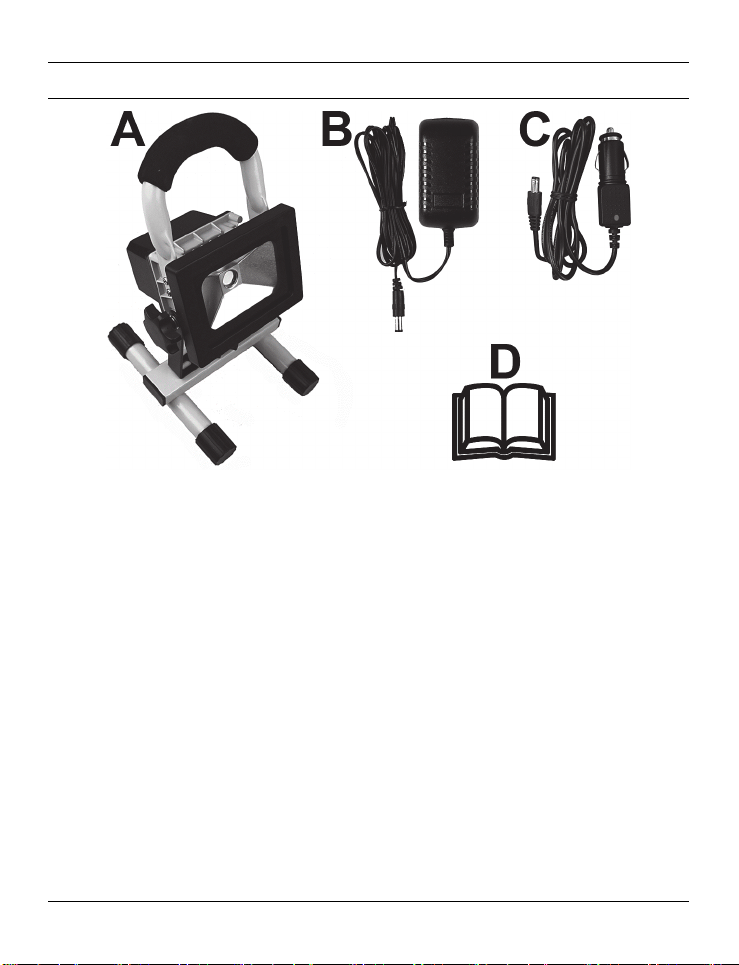
A Lampada LED a batteria da 10 W Powerfix PLS 10 A2
B Caricabatterie da parete
C Cavo caricabatterie da auto a 12/24 V
D Queste istruzioni operative (illustrazione grafica)
Queste istruzioni sono dotate di una parte pieghevole della copertina. In essa è illustrata la
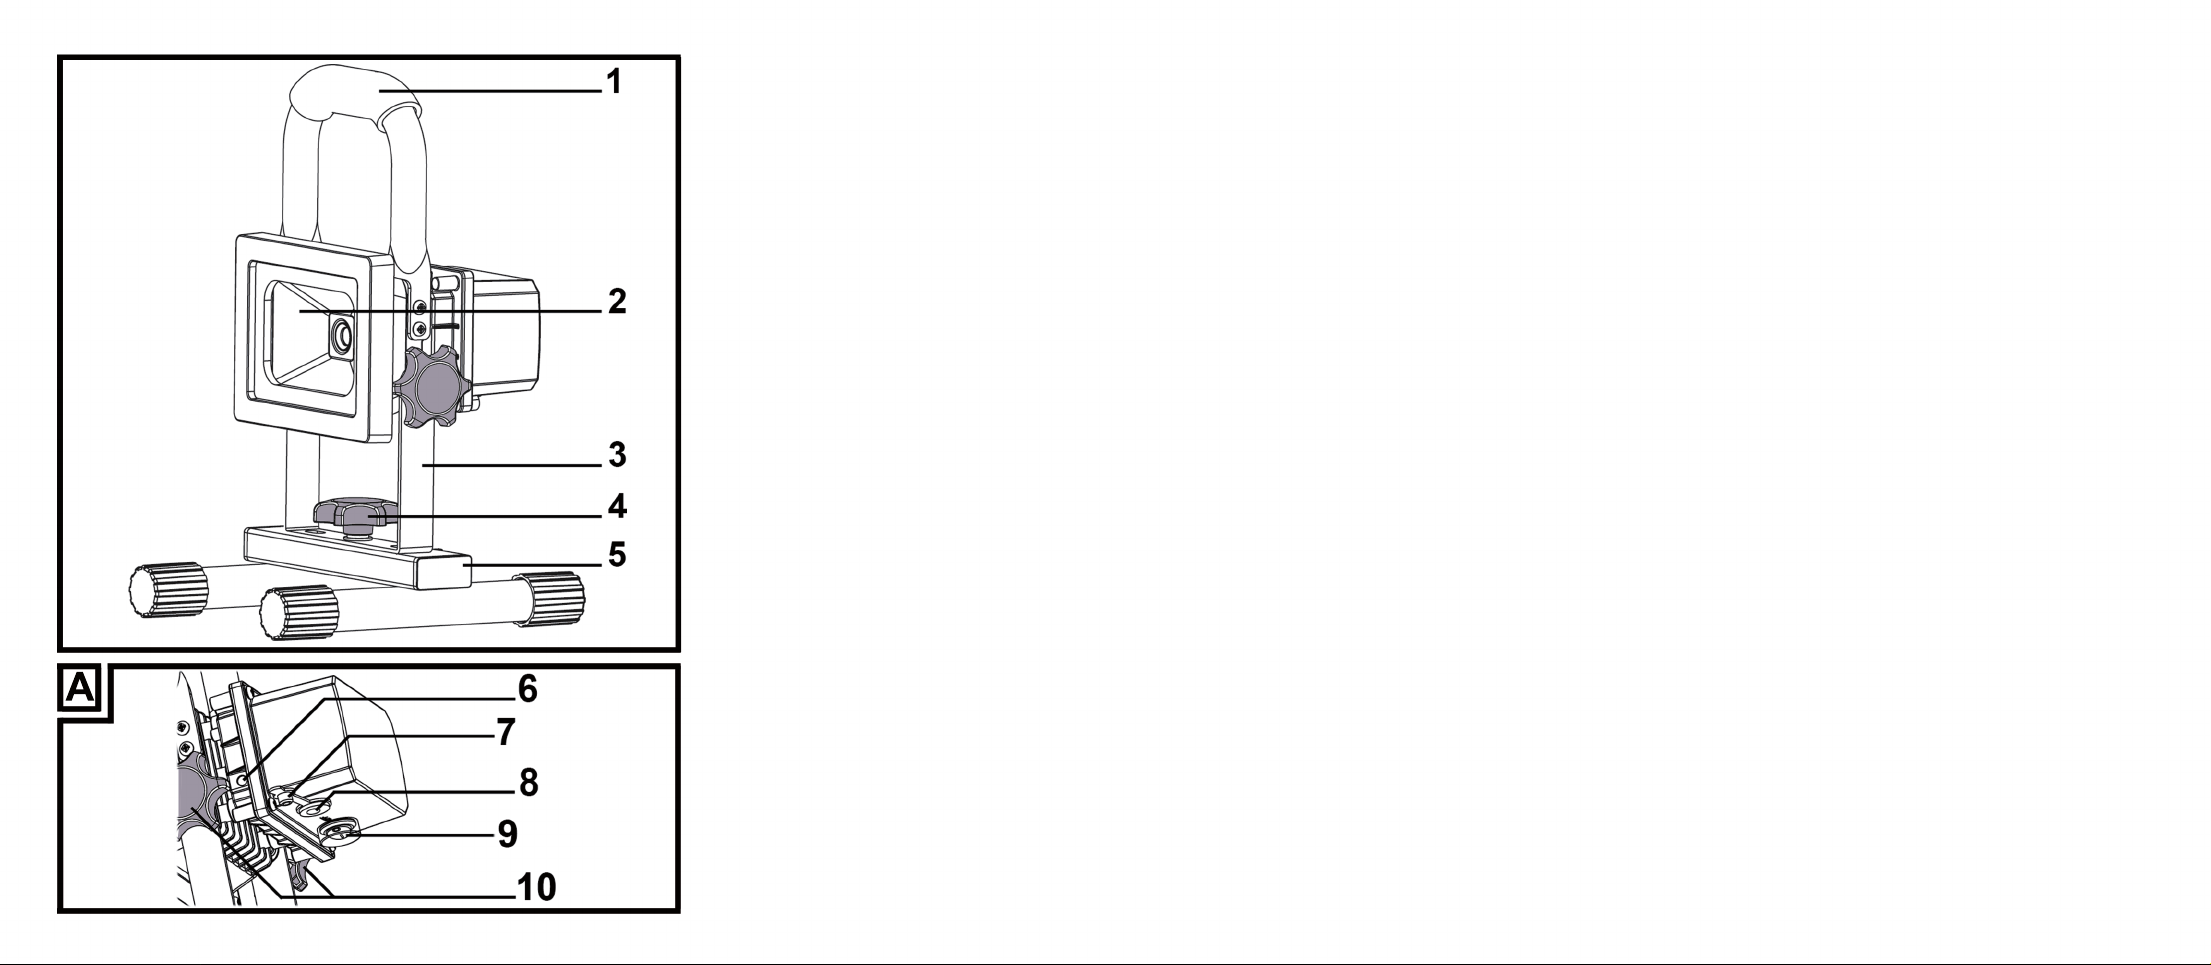
lampada LED a batteria con i numeri di riferimento. Il significato dei numeri è il seguente:
1 Maniglia
2 Lampada LED a batteria da 10 W
3 Staffa per il montaggio
4 Vite godronata
5 Supporto
6 Indicatore di carica LED
7 Coperchio in gomma per la presa d'ingresso CC (DC-IN)
8 Ingresso CC
9 Interruttore On/Off
10 Viti godronate
4 - Italiano

Powerfix PLS 10 A2
3. Specifiche tecniche
Lampada LED a batteria
Marca Powerfix
Nome del modello PLS 10 A2
Tensione di funzionamento 12 - 24 V (Corrente continua)
Batteria ricaricabile Batteria ricaricabile al litio da 7,4 V / 5200 mAh
Tempo di carica della batteria circa 6 ore
Durata con la batteria
completamente carica
Consumo conbatteria
completamente carica
Classe di sicurezza
Grado di protezione IP65 (protezione contro la polvere e i getti
Posizione operativa verticale - lampada in alto, supporto (5) in basso
Area massima di proiezione circa 10m² se montata a 3 m di distanza
Luminaire LED Citizen
Consumo elettrico LED circa 8,5 W
Flusso luminoso totale
Temperatura colore circa 5.000 K (bianco neutro)
Apertura del fascio luminoso circa 120°
Temperatura operativa da -10°C a +45°C
Dimensioni (L x H x P) circa 11,4 x 8,6 x 10,5 cm
Peso circa 1.040 g
circa 3 ore con flusso luminoso a circa l'80%
circa 10 W
III, (bassissima tensione - Extra Low Voltage,
ELV)
d'acqua)
700 lm +/-5% (con copertura/vetro)
Italiano - 5
Powerfix PLS 10 A2
Caricabatterie da parete
Produttore Aurolite Electrical (Panyu Guangzhou) Limited
Modello HV-T16VB-12100A
Tensione di ingresso 100 - 240 VCA, 50/60 Hz
Tensione di uscita
Classe di sicurezza
Cavo caricabatterie da auto
Produttore Powerfix
Modello PLS 10 A2
Tensione di ingresso 12 V/24 V (Corrente continua)
Tensione di uscita
Fusibile T 3.15 A H 250 V
Le specifiche tecniche e il design sono soggetti a modifiche senza preavviso.
12 V (Corrente continua), 1 A, Polarità
II,
12 V/24 V (Corrente continua), 1 A,
Polarità
4. Istruzioni di sicurezza
Prima di utilizzare questa lampada LED a batteria (A) per
la prima volta, leggere attentamente questi avvertimenti e
istruzioni anche se si ha familiarità con l’uso dei dispositivi
elettronici! Conservare queste istruzioni in un luogo sicuro
per un eventuale utilizzo futuro. In caso di vendita o
cessione del dispositivo, consegnare anche le istruzioni. Il
manuale dell’utente fa parte del prodotto.
6 - Italiano
Powerfix PLS 10 A2
PERICOLO! Questo simbolo e la parola
“Pericolo” indicano una situazione
potenzialmente pericolosa. Ignorarla può
comportare seri danni alle persone o,
addirittura, la morte.
ATTENZIONE! Questo simbolo e la parola
“Attenzione!” indicano informazioni
importanti per operare in sicurezza con il
prodotto e per la sicurezza dell’utente.
L'alimentatore può essere utilizzato solo in
ambienti asciutti e al chiuso.
Trasformatore con protezione dai cortocircuiti
e sigillatura di sicurezza
Tensione bassissima di sicurezza con
particolare protezione contro le scosse
elettriche
Dispositivo a funzionamento indipendente per
l'impiego di luci esterne senza ulteriore
copertura
Italiano - 7
Powerfix PLS 10 A2
AVVERTENZA! I dispositivi elettrici non sono adatti
ai bambini. Non lasciare i bambini giocare da soli
con i dispositivi elettronici. I bambini potrebbero non
comprendere gli eventuali rischi. Tenere il materiale
d’imballaggio fuori dalla portata dei bambini. Rischio
di soffocamento!
AVVERTENZA! Radiazioni LED! Evitare danni agli
occhi! Non guardare mai il raggio LED. In caso di
sospetti danni alla vista, rivolgersi immediatamente a
un medico.
AVVERTENZA! In presenza di fumo, rumori od
odori insoliti, spegnere immediatamente la lampada
LED a batteria. In tal caso, non utilizzare il dispositivo
e farlo controllare da un esperto. Non inalare mai il
fumo derivante da un possibile incendio del
dispositivo. In caso di inalazione accidentale,
consultare immediatamente un medico. Le inalazioni
di fumo possono risultare dannose.
AVVERTENZA! Non utilizzare mai dispositivi ottici,
come una lente d’ingrandimento, per guardare
direttamente nel raggio di luce. Ciò potrebbe causare
danni alla vista. In caso di sospetti danni alla vista,
rivolgersi immediatamente a un medico.
8 - Italiano
Powerfix PLS 10 A2
ATTENZIONE! Non appendere o collocare oggetti
sopra la lampada LED a batteria. Il corpo non è stato
progettato per sostenere pesi. Di conseguenza, ciò
potrebbe danneggiare il dispositivo (A).
ATTENZIONE! Utilizzare il caricabatterie da parete
incluso (B) e il cavo caricabatterie da auto a 12/24
V (C) solo per caricare la batteria incorporata della
lampada LED a batteria (A) e non per l'uso continuo
come con un alimentatore. Non collegare mai il
caricabatterie da parete (B) o il cavo caricabatterie
per auto da 12/24 V (C) ad altri dispositivi. Caricare
la batteria incorporata nella lampada LED a batteria
(A) con il caricabatterie da parete in dotazione (B) e
il cavo caricabatterie per auto da 12/24 V (C).
5. Copyright
Tutti i contenuti del presente manuale per l’utente sono coperti da copyright e vengono forniti
unicamente a scopo informativo. È rigorosamente vietato copiare qualsiasi dato o
informazione senza precedente autorizzazione scritta ed esplicita dell’autore. Questo si
applica anche a un qualsiasi uso commerciale dei contenuti e delle informazioni. Tutti i testi
e le illustrazioni sono aggiornati alla data di pubblicazione. Soggetto a cambiamenti senza
preavviso.
Italiano - 9
Powerfix PLS 10 A2
6. Prima di iniziare…
Estrarre la lampada LED a batteria (A) e gli accessori dall'imballaggio.
Ispezionare la lampada LED a batteria (A) e gli accessori cercando eventuali danni. In caso
di danni, non utilizzare la lampada LED a batteria (A).
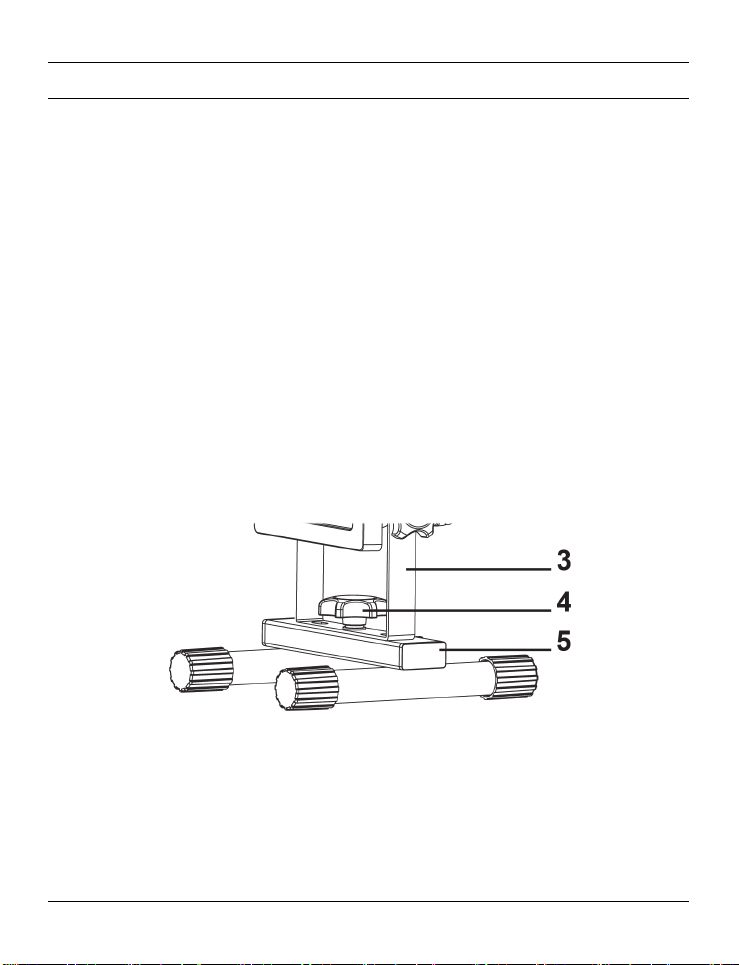
6.1. Installazione
Non sono necessari utensili per installare la lampada LED a batteria (A). La lampada (A)
viene fornita in due pezzi (lampada con maniglia e supporto). Per cominciare, assemblare i
pezzi. Ruotare in senso antiorario la vita godronata (4) che fissa il dispositivo durante il
trasporto ed è inserita sul supporto (5) e rimuoverla. Assicurarsi di non perdere la rondella e
l'anello fissante posizionati sul filetto della vite godronata (4). Successivamente, piegare
verso il basso la staffa di montaggio (3). Inserire quindi la vite godronata (4) attraverso il
foro centrale della staffa di montaggio (3) dall'alto verso la filettatura del supporto (5) e
ruotarla in senso orario (v. figura). Stringere la vite (4) in modo che la staffa rimanga fissa
sul supporto (5).
6.2. Caricare la batteria
La presa d'ingresso di alimentazione (8) è protetta dall'umidità grazie a un coperchio in
gomma (7). Per aprire il coperchio in gomma (7), tirare la chiusura rossa, quindi collegare il
connettore del caricabatterie da parete (B) alla presa di ingresso CC (8) della lampada LED
a batteria (A). Infine, collegare il caricabatterie (B) a una presa di corrente Prima di
10 - Italiano

Powerfix PLS 10 A2
utilizzare il dispositivo per la prima volta, caricare completamente la batteria al litio. Durante
l’operazione di carica, l’indicatore di carica (6) sarà illuminato in rosso. Caricata
completamente la batteria, l'indicatore (6) diventa di colore verde. Scollegare il
caricabatterie (B) dalla presa di corrente a muro e dalla presa di ingresso CC (8). Chiudere
il coperchio di gomma (7). Ora la lampada LED a batteria (A) è pronta all'uso.
Nota: Se l'indicatore di carica (6) lampeggia in rosso mentre si usa la lampada LED a
batteria (A), la batteria al litio è quasi scarica. In tal caso, ricaricarla.
7. Introduzione
È possibile utilizzare le due viti godronate (10) per regolare l'angolo verticale e quindi il
raggio della lampada LED a batteria (A). Allentare le viti (10) ruotandole di 360° in senso
antiorario. Regolare quindi l'angolo verticale della lampada LED a batteria (A) secondo
necessità. Stringere infine le due viti godronate (10).
Utilizzare l'interruttore On/Off (9) per accendere e spegnere la lampada LED a batteria (A).
L'interruttore On/Off (9) è protetto dall'umidità grazie a un coperchio in gomma (7). La
posizione dell'interruttore On/Off (9) si riconosce guardando il coperchio di gomma. Inoltre,
le posizioni (ON/OFF) sono indicate da delle apposite etichette.
8. Cavo caricabatterie da auto a 12/24 V
Oltre al caricabatterie da parete (B), la batteria al litio della lampada LED a batteria (A)
può essere ricaricata con il cavo caricabatterie da auto a 12/24 V (C) fornito in dotazione.
Per aprire il coperchio di gomma (7), tirare la chiusura rossa. Collegare quindi il cavo
caricabatterie da auto a 12/24 V (C) all'ingresso CC (8) della lampada LED a batteria (A)
e a una presa accendisigari da 12/24 V.. L'indicatore LED verde sul cavo caricabatterie da
auto (C) indica che è pronto per il funzionamento. Durante l’operazione di carica,
l’indicatore di carica (6) della lampada LED a batteria (A) sarà illuminato in rosso. Caricata
completamente la batteria, l'indicatore (6) diventa di colore verde. Scollegare il cavo (C)
dalla presa dell'accendisigari e quindi dalla presa di ingresso (8). Chiudere l’ingresso CC
(8) con il coperchio di gomma (7). Ora la lampada LED a batteria (A) è pronta all'uso.
Italiano - 11
Powerfix PLS 10 A2
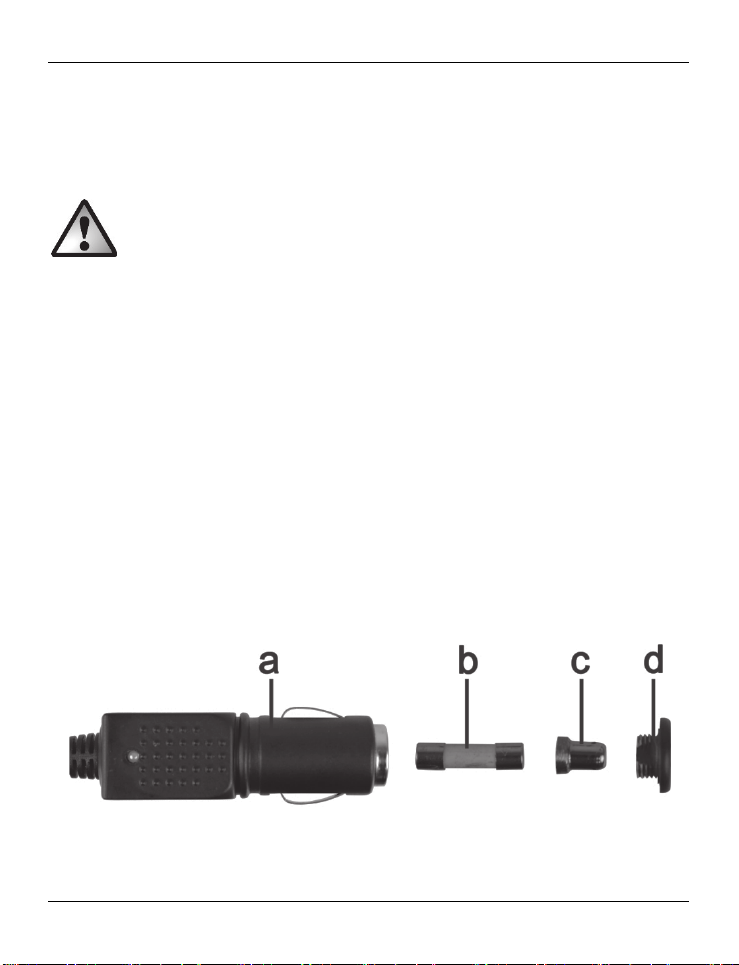
8.1. Sostituzione del fusibile
Se il cavo caricabatterie da auto a 12/14 V (C) è collegato ma l'indicatore LED non si
illumina, il fusibile potrebbe essere difettoso.
ATTENZIONE! Se è necessario sostituire il
fusibile, assicurarsi di utilizzarne uno dello stesso
tipo (v. specifiche tecniche).
Per sostituire il fusibile, procedere come segue:
Ruotare il tappo della vite (d) in senso antiorario e rimuoverlo dall'alloggiamento del
connettore dell'accendisigari (a). Se necessario, utilizzare delle pinze.
Sostituire il fusibile (b) la con uno nuovo, dello stesso tipo. Il fusibile è reperibile in
qualsiasi negozio di elettronica.
Inserire innanzitutto il fusibile (b) nell'alloggiamento del connettore dell'accendisigari
(a).
Inserire il contatto in metallo (c) nel tappo della vite (d).
Inserire quindi il tappo (d) con il contatto metallico inserito (c) nel fusibile (b), quindi
avvitare il tappo (d) in senso orario sull'alloggiamento del connettore dell'accendisigari
(a).
12 - Italiano

Powerfix PLS 10 A2
9. Manutenzione/Pulizia
9.1. Assistenza
La lampada LED a batteria (A) utilizza LED a lunga durata. Questi LED non possono essere
sostituiti e non richiedono manutenzione.
La batteria incorporata non è una batteria standard e non è disponibile in commercio.
Pertanto, non è previsto che il cliente possa sostituire la batteria.
9.2. Pulizia
Accertarsi che liquidi non siano penetrati all’interno in
quanto potrebbero danneggiare la lampada LED a
batteria (A).
Per pulire la lampada LED a batteria (A) utilizzare un panno morbido e asciutto. Non
impiegare mai solventi o detergenti che possano danneggiare il rivestimento in plastica. In
caso di sporco ostinato, utilizzare un panno leggermente inumidito.
9.3. Conservazione del dispositivo inutilizzato
Quando non si intende utilizzare la lampada LED (A) per un lungo periodo di tempo, riporlo
in un luogo pulito e asciutto. Per preservare le prestazioni della batteria, ricaricarla
regolarmente quando si lascia il dispositivo inutilizzato per lunghi periodi di tempo.
Italiano - 13
Powerfix PLS 10 A2
10. Risoluzione dei problemi
La lampada non si illumina
Verificare la posizione dell’interruttore On/Off (9).
La batteria incorporata potrebbe essere scarica. Ricaricarla.
La batteria non si carica
Il caricabatterie da parete (B) è difettoso. Tentare di caricare con il cavo caricabatterie da
auto a 12/24 V (C).
Il cavo caricabatterie da auto a 12/24 V (C) è difettoso. Verificare che l'indicatore LED
verde sul cavo caricabatterie da auto (C) si accenda dopo aver inserito il cavo in un
accendisigari alimentato. In caso contrario, sostituire il fusibile del cavo caricabatterie da
auto (C) come descritto in "Sostituzione del fusibile"
11. Normativa in materia ambientale e informazioni sullo
smaltimento
I dispositivi contrassegnati da questo simbolo sono soggetti alla Direttiva
europea 2012/19/EU. Tutti i dispositivi elettrici ed elettronici devono
essere smaltiti separatamente dai rifiuti domestici, presso i centri di
smaltimento ufficiali.
Evitare danni all’ambiente e pericoli per la salute delle persone
smaltendo il dispositivo in maniera appropriata. Per ulteriori informazioni
su uno smaltimento appropriato, contattare i locali enti di smaltimento, le
autorità competenti o il negozio dove è stato acquistato l’apparecchio.
Smaltire i materiali d’imballaggio in maniera eco-compatibile. I cartoni dell’imballaggio
possono essere portati ai cassonetti per la carta o nei punti di raccolta pubblica per essere
riciclati. Eventuali pellicole o plastiche contenute nell’imballaggio possono essere portate nei
punti di raccolta pubblica.
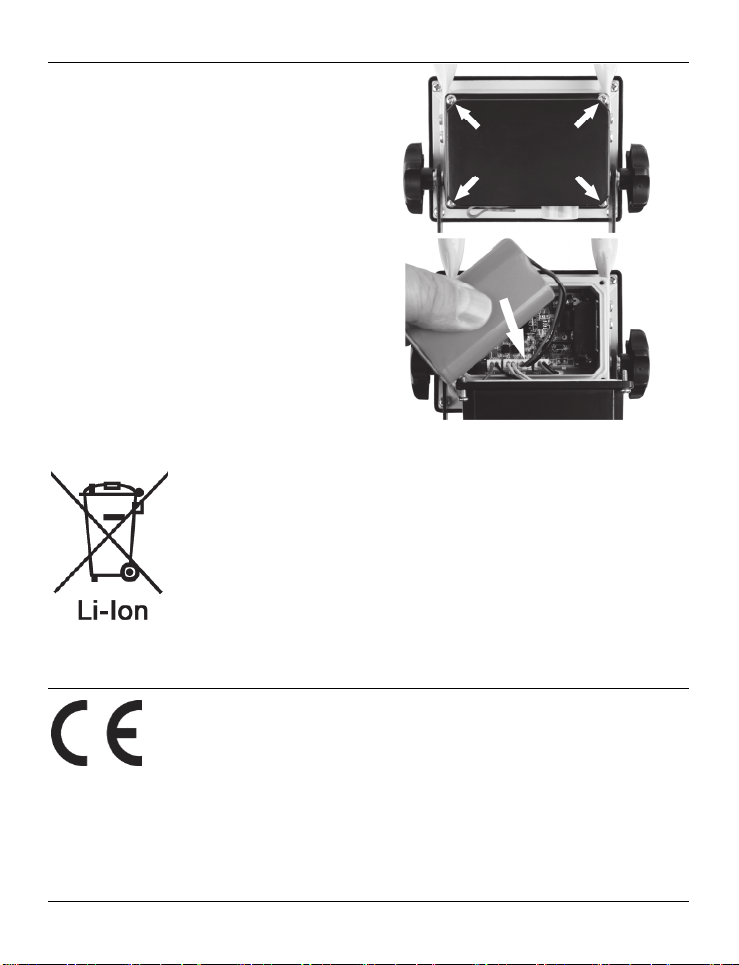
11.1. Rimozione della batteria
La lampada LED a batteria (A) contiene una batteria incorporata che va rimossa prima di
smaltire la lampada (A).
Per rimuoverla, procedere come segue:
14 - Italiano

1. Allentare le 4 viti Philips (frecce) sul
coperchio nero del pannello posteriore della
lampada LED a batteria (A).
2. Inclinare il coperchio.
3. Scollegare il connettore del cavo della
batteria (freccia) e rimuovere la batteria.
Smaltire la batteria e la lampada LED separatamente.
Rispettare l’ambiente. Non smaltire le batterie fra i rifiuti domestici.
Portarle in un apposito punto di raccolta. Attenzione! Le batterie devono
essere smaltite, totalmente scariche, negli appositi punti di raccolta
differenziata. Nel caso in cui si gettino batterie non completamente
scariche, prendere le necessarie precauzioni per prevenire cortocircuiti.
Coprire il cavo della batteria con nastro isolante per evitare cortocircuiti.
Powerfix PLS 10 A2
12. Note di conformità
Questa lampada LED a batteria è stata dichiarata conforme ai requisiti
base e ad altri relative alla Direttiva EMC 2014/30/EU, alla Direttiva
Bassa Tensione 2014/35/EU e a quella R&TTE 2009/125/EC.
È possibile ricevere la dichiarazione di conformità UE completa richiedendola presso:
ce@targa.de
Italiano - 15

Powerfix PLS 10 A2
13. Informazioni sull'assistenza e garanzia
Garanzia di TARGA GmbH
Gentile cliente,
con questo apparecchio riceve 3 anni di garanzia a partire dalla data di acquisto. Nel caso
in cui dovesse riscontrare difetti del presente prodotto, Lei gode di diritti legali nei confronti
del venditore del prodotto. Tali diritti non sono in alcun modo limitati dalla garanzia qui di
seguito riportata.
Condizioni di garanzia
Il periodo di validità della garanzia ha inizio con la data di acquisto. Conservare lo
scontrino fiscale originale come prova d'acquisto. Se entro tre anni dalla data di acquisto
dovessero essere riscontrati difetti di materiale o di fabbricazione, il prodotto sarà, a nostra
discrezione, riparato o sostituito gratuitamente.
Durata della garanzia e diritti per difetti
La durata della presente garanzia non viene prolungata dalla garanzia legale. Ciò vale
anche per i pezzi sostituiti e riparati. Eventuali danni e difetti già presenti al momento
dell'acquisto devono essere notificati immediatamente dopo l'apertura della confezione. Allo
scadere della garanzia le riparazioni saranno a carico del cliente.
Copertura della garanzia
L'apparecchio è stato accuratamente prodotto nel rispetto di elevati standard qualitativi e
controllato scrupolosamente prima della consegna. La garanzia è valida per difetti di
materiale o fabbricazione. Tale garanzia non si estende alle parti del prodotto esposte a
normale usura (i cosiddetti pezzi d'usura) o al danneggiamento di pezzi fragili, ad es.
interruttori, accumulatori o pezzi in vetro. La presente garanzia decade se il prodotto viene
danneggiato, non utilizzato correttamente o sottoposto a manutenzione. Per un corretto
utilizzo del prodotto, attenersi scrupolosamente alle istruzioni descritte nel manuale d'uso.
Evitare nel modo più assoluto utilizzi e azioni sconsigliate o segnalate come pericolose nelle
istruzioni d'uso. Il prodotto è destinato esclusivamente all'uso privato e non commerciale. In
caso di utilizzo improprio, scorretto o violento e in caso di interventi non eseguiti dal nostro
centro di assistenza autorizzato, la garanzia è da considerarsi nulla. La riparazione o
sostituzione del prodotto non comporta l’inizio di un nuovo periodo di garanzia.
16 - Italiano
Powerfix PLS 10 A2
Gestione in caso di garanzia
Per una rapida soddisfazione della Sua richiesta, si attenga alle seguenti istruzioni:
- Prima della messa in funzione del prodotto, leggere attentamente la
documentazione allegata. Se dovesse presentarsi un problema che non si riesce a
risolvere con i mezzi indicati, contattare la nostra assistenza clienti.
- Per ogni richiesta, si prega di custodire come prova d'acquisto lo scontrino fiscale
e il codice articolo oppure il numero di serie, se esistente.
- Nel caso in cui non sia possibile trovare una soluzione per via telefonica, tramite
la nostra assistenza clienti viene contattata una seconda assistenza, in base alla
causa del difetto.
Assistenza
E-Mail: service.IT@targa-online.com
E-Mail: service.CH@targa-online.com
E-Mail: service.MT@targa-online.com
IAN: 280181
Telefono: 0200 68 97 67
Telefono: 044 – 55 10 057
Telefono: 027 78 11 03
Produttore
Considerare che il seguente indirizzo non coincide con l'indirizzo dell'assistenza. Contattare
in primo luogo il centro di assistenza sopra indicato.
TARGA GmbH
Coesterweg 45
59494 SOEST
GERMANY
Italiano - 17

Powerfix PLS 10 A2
Contents
1. Intended use ......................................................................................... 19
2. Package contents ................................................................................. 20
3. Technical specifications ......................................................................... 21
4. Safety instructions ................................................................................ 22
5. Copyright ............................................................................................. 25
6. Before you start .................................................................................... 26
6.1. Mounting ......................................................................................................................... 26
6.2. Charging the battery ...................................................................................................... 26
7. Getting started ..................................................................................... 27
8. 12/24 V car charger cable .................................................................... 27
8.1. Replacing the fuse ........................................................................................................... 28
9. Maintenance / cleaning ........................................................................ 29
9.1. Servicing .......................................................................................................................... 29
9.2. Cleaning .......................................................................................................................... 29
9.3. Storage when not in use ................................................................................................. 29
10. Troubleshooting ................................................................................. 30
11. Environmental regulations and disposal inform ation .......................... 30
11.1. Removing the battery ................................................................................................... 30
12. Conformity notes ................................................................................ 31
13. Warranty and Service Information ..................................................... 32
18 - English

Powerfix PLS 10 A2
Congratulations!
By purchasing the Powerfix PLS 10 A2 battery LED emitter, hereinafter referred to as the
battery LED emitter, you have opted for a quality product.
The User’s Manual forms part of this product. It contains important information on safety,
usage and disposal. Before using the product, please familiarise yourself with all operating
and safety instructions. Only use the product as described and for the applications given. If
you pass the product on to someone else, make sure to give them all the relevant documents
with it.
1. Intended use
The battery LED emitter is suitable for domestic inside and outside use. The battery LED
emitter is not destined for commercial use. The battery LED emitter must be used with the
stand only; wall-mounting is not permitted. The device fulfils all relevant norms and standards
relating to CE conformity. Any modifications to the battery LED emitter other than
recommended changes by the manufacturer may result in these standards no longer being
met.
English - 19

Powerfix PLS 10 A2
2. Package contents
A 10 W Rechargeable Battery LED Working Light Powerfix PLS 10 A2
B Wall plug battery charger
C 12/24 V car charger cable
D These operating instructions (line-art illustration)
These operating instructions have a fold-out cover. On the inside of the cover is a diagram of
the battery LED emitter with the components numbered. The meanings of the numbers are as
follows:
1 Handle
2 10 W Rechargeable Battery LED Working Light
3 Mounting bracket
4 Knurled screw
5 Stand
6 LED charging indicator
7 Rubber cover (for DC-IN receptacle)
8 DC-IN receptacle
9 On/Off switch
10 Knurled screws
20 - English

Powerfix PLS 10 A2
3. Technical specifications
Battery LED emitter
Brand Powerfix
Model name PLS 10 A2
Operating voltage 12 – 24 V (Direct current)
Rechargeable battery Rechargeable Li-Ion battery 7.4 V / 5200 mAh
Battery charging time approx. 6 hours
Runtime with fully charged battery approx. 3 hours at around 80% of luminous flux
Power consumption
complete battery LED emitter
Safety class
Degree of protection IP65 (protection against dust and jets of water)
Operating position vertical - emitter at the top, stand (5) at the
Max. area projected approx. 10m² if set up at 3 metre distance
Luminaire Citizen LED
LED power consumption approx. 8.5 W
Total luminous flux
Colour temperature approx. 5000 K (neutral white)
Light beam aperture approx. 120°
Operating temperature -10°C to +45°C
Dimensions (W x H x D) approx. 11.4 x 8.6 x 10.5 cm
Weight approx. 1040 g
approx. 10 W
III, (Extra Low Voltage, ELV)
bottom
700 lm +/-5% (with cover / glass window)
English - 21

Powerfix PLS 10 A2
Wall plug battery charger
Manufacturer Aurolite Electrical (Panyu Guangzhou) Limited
Model HV-T16VB-12100A
Input voltage 100 - 240 VAC, 50/60 Hz
Output voltage
Safety class
Car charger cable
Manufacturer Powerfix
Model PLS 10 A2
Input voltage 12 V/24 V (Direct current)
Output voltage
Fuse T 3.15 A H 250 V
The technical specifications and design can be changed without prior notice.
12 V (Direct current), 1 A, Polarity
II,
12 V/24 V (Direct current), 1 A,
Polarity
4. Safety instructions
Before you use this battery LED emitter (A) for the first time,
please read and comply with these instructions and
warnings, even if you are familiar with handling electronic
devices! Keep these operating instructions in a safe place
for future reference. If you sell the device or give it away,
pass on the operating instructions at the same time. The
User Manual is part of the device.
22 - English

Powerfix PLS 10 A2
DANGER! This symbol and the word
“Danger” alert you to a potentially
dangerous situation. Ignoring it can lead to
severe injury or even death.
WARNING! This symbol and the word
“Warning” denote important information
required for the safe operation of the battery
LED emitter (A) and for the safety of its users.
The power adapter is only suitable for use in
dry inside spaces.
Short-circuit protected, sealed safety
transformer
Safety extra-low voltage with special
protection against electric shock
Independent operating device for use outside
lights without additional cover
CAUTION! Electrical devices are not suitable for
children. Do not allow children to play with electrical
devices when not under supervision. Children may not
English - 23

Powerfix PLS 10 A2
understand that they can be dangerous. Keep the
packaging materials out of the reach of children.
There is a risk of suffocation.
CAUTION! LED Radiation! Avoid damage to your
eyes! Never look into the LED beam. If you suspect
you have damaged your eyes, seek medical
attention.
CAUTION! If you notice any smoke, unusual noises
or strange smells, switch the battery LED emitter off
immediately. If this occurs, do not continue to use it
and have it checked out by an expert. Never inhale
smoke from a possible device fire. If you do
inadvertently inhale smoke, seek medical attention.
Smoke inhalation can be damaging to your health.
CAUTION! Never use optical instruments such as a
magnifying glass to look directly into the beam. This
could damage your eyes. If you suspect you have
damaged your eyes, seek medical attention.
24 - English

Powerfix PLS 10 A2
WARNING! Do not hang anything off the LED
emitter and do not place any objects on it. The casing
is not designed to support weights. This could
damage the battery LED emitter (A).
WARNING! Use the supplied wall plug battery
charger (B) and the supplied 12/24 V car charger
cable (C) to charge the buil-in battery of the battery
LED emitter (A) and never use it for continuous
operation like a power adapter. Never connect the
wall plug battery charger (B) or the 12/24 V car
charger cable (C) to other devices. Charge the built-in
battery of the battery LED emitter (A) with the
supplied wall plug battery charger (B) and the
supplied 12/24 V car charger
cable (C).
5. Copyright
All the contents of this user manual are protected by copyright and provided to the reader
for information only. Copying data and information without the prior explicit written consent
of the author is strictly forbidden. This also applies to any commercial use of the contents and
information. All texts and diagrams are up-to-date as of the date of printing. Subject to
change without notice.
English - 25

Powerfix PLS 10 A2
6. Before you start
Remove the battery LED emitter (A) and the accessories from the packaging.
Inspect the battery LED emitter (A) and the accessories for damage. If the battery LED emitter
(A) is damaged, do not use it.
6.1. Mounting
No tools are needed to mount the battery LED emitter (A). The battery LED emitter (A) is
delivered in two pieces (emitter with handle and stand). To start, you have to assemble them.
To do so, rotate the knurled screw (4) that secures the device for transport and is inserted on
the stand (5) counter-clockwise and remove it. Make sure not to lose the washer and the
retainer ring placed of the knurled screw (4) threaded pin. Next fold the mounting bracket
(3) downwards. Then insert the knurled screw (4) through the central bore hole of the
mounting bracket (3) from the top into the thread of the stand (5) and rotate it clockwise (see
the figure). Tighten the knurled screw (4) so the mounting bracket (3) firmly fixes to the
stand (5).
6.2. Charging the battery
The DC-IN socket (8) is protected against humidity with a rubber cover (7). To release this
rubber cover (7), pull the red latch. Then connect the wall plug battery charger (B) charging
plug to the battery LED emitter (A) DC-IN socket (8), and connect the wall plug battery
charger (B) to an easy-accessible mains outlet. Before using the device for the first time, fully
charge the built-in Li-Ion battery. During charging, the charge indicator (6) lights red. When
the built-in Li-Ion battery is fully charged, the charge indicator (6) changes to green. Unplug
26 - English

Powerfix PLS 10 A2
the wall plug battery charger (B) from the mains outlet and then disconnect the wall plug
battery charger (B) plug from the DC-IN socket (8). Close the DC-IN socket (8) with the
rubber cover (7). Now the battery LED emitter (A) is ready for use.
Note: If the charge indicator (6) flashes in red while using the battery LED emitter (A), the
built-in Li-Ion battery is almost empty. In this case, recharge the battery.
7. Getting started
You can use the two knurled screws (10) to adjust the vertical angle and therefore the beam
of the battery LED emitter (A). Release the knurled screws (10) by rotating them 360 degrees
counter-clockwise. Next adjust the vertical angle of the battery LED emitter (A) according to
your needs. Then tighten the two knurled screws (10).
Use the On/Off switch (9) to switch the battery LED emitter (A) on and off. The On/Off
switch (9) is protected against humidity with a rubber cover. You can recognize the position
of the On/Off switch (9) by looking at this rubber cover. In addition, the switch positions
(ON/OFF) are labelled.
8. 12/24 V car charger cable
In addition to the wall plug battery charger (B) you can also charge the built-in Li-Ion battery
of your battery LED emitter (A) using the 12/24 V car charger cable (C) supplied. To release
this rubber cover (7), pull the red latch. Then connect the wall 12/24 V car charger cable
(C) charging plug to the battery LED emitter (A) DC-IN socket (8) and connect the 12/24 V
car charger cable (C) to a suitable 12/24 V vehicle cigarette lighter. The green LED
indicator on the 12/24 V car charger cable (C) plug indicates that it is ready for operation.
During charging the charge indicator (6) of the battery LED emitter (A) lights red. When the
built-in Li-Ion battery is fully charged, the charge indicator (6) changes to green. Unplug the
12/24 V car charger cable (C) from the vehicle cigarette lighter and then disconnect the
plug from the 12/24 V car charger cable (C) from the DC-IN socket (8). Close the DC-IN
socket (8) with the rubber cover (7). Now the battery LED emitter (A) is ready for use.
English - 27

Powerfix PLS 10 A2
8.1. Replacing the fuse
If the 12/24 V car charger cable (C) is connected but the LED indicator of the 12/24 V car
charger cable (C) does not light, the fuse might be defective.
WARNING! If you need to replace the fuse,
make sure to use a fuse of the same type (see the
Technical Specifications).
To replace the fuse, proceed as follows:
Rotate the screw cap (d) counter-clockwise and remove it from the cigarette lighter plug
housing (a). If necessary, use a pliers.
Replace the fuse (b) with a new fuse of the same type. You can purchase a suitable fuse
from any electronics retail outlet.
First insert the fuse (b) into the cigarette lighter plug housing (a).
Insert the metal contact (c) into the screw cap (d).
Next insert the screw cap (d) with the inserted metal contact (c) over the fuse (b) and
then screw the cap (d) clockwise onto the cigarette lighter plug housing (a).
28 - English

Powerfix PLS 10 A2
9. Maintenance / cleaning
9.1. Servicing
The battery LED emitter (A) uses a long-life LED. This is not replaceable and requires no
maintenance.
The built-in battery pack is a non-standard battery and not available in retail stores. Therefore
it is not intended for the customer to replace the battery.
9.2. Cleaning
Make sure that no liquid gets into the housing. This
could damage the battery LED emitter (A).
To clean the battery LED emitter (A), use a soft, dry cloth. Never use any solvents or cleaners
that may damage the plastic housing. For more stubborn dirt, use a slightly damp cloth.
9.3. Storage when not in use
If the battery LED emitter (A) is not to be used for an extended period, store it in a clean and
dry place. To retain battery performance, recharge regularly if stored for extended periods.
English - 29

Powerfix PLS 10 A2
10. Troubleshooting
Battery LED emitter does not illuminate
Check the position of the On/Off switch (9).
The built-in battery may be discharged. Recharge it.
Battery does not charge
The wall plug battery charger (B) is defective. Check if you can charge it with the 12/24 V
car charger cable (C).
12/24 V car charger cable (C) defective. Verify if the green LED indicator on the 12/24 V
car charger cable (C) plug is on after inserting it into a powered cigarette lighter. If not,
replace the fuse of the 12/24 V car charger cable (C) as described in "Replacing the
fuse"
11. Environmental regulations and disposal information
Devices marked with this symbol are subject to the European Directive
2012/19/EU. All electrical and electronic devices must be disposed of
separately from household waste at official disposal centres.
Avoid damage to the environment and risks to your personal health by
disposing of the device properly. For further information about proper
disposal, contact your local government, disposal bodies or the shop
where you bought the device.
Dispose of all packaging in an environmentally-friendly manner.
Cardboard packaging can be taken to paper recycling centres or public collection points for
recycling. Any film or plastic contained in the packaging should be taken to your public
collection points for disposal.
11.1. Removing the battery
This battery LED emitter (A) contains a built-in battery pack. It must be removed before
disposing of the battery LED emitter (A).
To remove it, proceed as follows:
30 - English
1. Loosen the 4 Philips screws (arrows) on
the black cover on the battery LED emitter
(A) back panel.
2. Tilt the black cover over.
3. Disconnect the plug of the battery cable
(arrow) and remove the battery.
Dispose of the battery and the LED emitter separately.
Respect the environment. Old batteries must not be disposed of with
domestic waste. They must be handed in at a collection point for waste
batteries. Please note that batteries must be disposed of fully discharged
at appropriate collection points for old batteries. If disposing of batteries
that are not fully discharged, take precautions to prevent short circuits. To
prevent any short circuits, cover the battery cable plug with insulating
tape.
Powerfix PLS 10 A2
12. Conformity notes
This battery LED emitter has been approved for compliance with the basic
and other relevant requirements of the EMC Directive 2014/30/EU, the
Low-voltage Directive 2014/35/EU and the ERP Directive 2009/125/EC.
The complete EU Declaration of Conformity is available on request at:
ce@targa.de
English - 31

Powerfix PLS 10 A2
13. Warranty and Service Information
Warranty of TARGA GmbH
Dear Customer,
This device is sold with three years warranty from the date of purchase. In the event of
product defects, you have legal rights towards the seller. These statutory rights are not
restricted by our warranty as described below.
Warranty conditions
The warranty period commences upon the date of purchase. Please keep the original receipt
in a safe place as it is required as proof of purchase. If any material or manufacturing faults
occur within three years of purchase of this product, we will repair or replace the product
free of charge as we deem appropriate.
Warranty period and legal warranty rights
The warranty period is not extended in the event of a warranty claim. This also applies to
replaced and repaired parts. Any damage or defects discovered upon purchase must be
reported immediately when the product has been unpacked. Any repairs required after the
warranty period will be subject to charge.
Scope of warranty
The device was carefully manufactured in compliance with stringent quality guidelines and
subjected to thorough testing before it left the works. The warranty applies to material and
manufacturing faults. This warranty does not cover product components which are subject to
normal wear and which can therefore be regarded as wearing parts, or damage to fragile
components such as switches, rechargeable batteries or components made of glass. This
warranty is void if the product is damaged, incorrectly used or serviced. To ensure correct
use of the product, always comply fully with all instructions contained in the user manual. The
warnings and recommendations in the user manual regarding correct and incorrect use and
handling of the product must always be observed and complied with. The product is solely
designed for private use and is not suitable for commercial applications. The warranty is
rendered void in the event of incorrect handling and misuse, if it is subjected to force, and
also if any person other than our authorised service technicians interfere with the device. No
new warranty period commences if the product is repaired or replaced.
32 - English

Powerfix PLS 10 A2
Submitting warranty claims
To ensure speedy handling of your complaint, please note the following:
- Before using your product for the first time, please read the enclosed
documentation carefully. Should any problems arise which cannot be solved in
this way, please call our hotline.
- Always have your receipt, the product article number as well as the serial number
(if available) to hand as proof of purchase.
- If it is not possible to solve the problem on the phone, our hotline support staff will
E-Mail: service.GB@targa-online.com
E-Mail: service.IE@targa-online.com
E-Mail: service.MT@targa-online.com
initiate further servicing procedures depending on the fault.
Service
Phone: 020 – 70 49 04 03
Phone: 01 - 4370121
Phone: 027 78 11 03
Phone: 02 – 20 09 025
E-Mail: service.CY@targa-online.com
IAN: 280181
Manufacturer
Please note that the following address is not a service address. First contact the service point
stated above.
TARGA GmbH
Coesterweg 45
59494 SOEST
GERMANY
English - 33

Powerfix PLS 10 A2
Inhalt
1. Bestimmungsgemäße Verwendung ...................................................... 35
2. Lieferumfang ........................................................................................ 36
3. Technische Daten .................................................................................. 37
4. Sicherheitshinweise .............................................................................. 38
5. Urheberrecht ........................................................................................ 41
6. Vor der Inbetriebnahme ....................................................................... 42
6.1. Montage .......................................................................................................................... 42
6.2. Akku aufladen ................................................................................................................. 42
7. Inbetriebnahme .................................................................................... 43
8. 12 V/24 V Kfz-Ladekabel ..................................................................... 43
8.1. Sicherung auswechseln .................................................................................................. 44
9. Wartung/Reinigung .............................................................................. 45
9.1. Wartung .......................................................................................................................... 45
9.2. Reinigung ......................................................................................................................... 45
9.3. Lagerung bei Nichtbenutzung ....................................................................................... 45
10. Fehlerbehebung ................................................................................. 45
11. Umwelthinweise und Entsorgungsangaben ........................................ 46
11.1. Akku ausbauen ............................................................................................................. 46
12. Konformitätsvermerke ....................................................................... 47
13. Hinweise zu Garantie und Serviceabwicklung .................................... 48
34 - Deutsch

Powerfix PLS 10 A2
Herzlichen Glückwunsch!
Mit dem Kauf des Akku LED-Strahlers 10 Watt Powerfix PLS 10 A2, im Folgenden als Akku
LED-Strahler bezeichnet, haben sich für ein hochwertiges Produkt entschieden.
Die Bedienungsanleitung ist Bestandteil dieses Produkts. Sie enthält wichtige Hinweise für
Sicherheit, Gebrauch und Entsorgung. Machen Sie sich vor der Benutzung des Produkts mit
allen Bedien- und Sicherheitshinweisen vertraut. Benutzen Sie das Produkt nur wie
beschrieben und für die angegebenen Einsatzbereiche. Händigen Sie alle Unterlagen bei
Weitergabe des Produkts an Dritte mit aus.
1. Bestimmungsgemäße Verwendung
Der Akku LED-Strahler ist für den Betrieb im häuslichen Innen- und Außenbereich geeignet. Er
ist nicht für den gewerblichen Einsatz bestimmt. Der Akku LED-Strahler ist ausschließlich mit
Standfuß zu betreiben, eine Wandmontage ist nicht zulässig. Das Gerät erfüllt alle, im
Zusammenhang mit der CE-Konformität, relevanten Normen und Standards. Bei einer nicht
mit dem Hersteller abgestimmten Änderung des Akku LED-Strahlers ist die Einhaltung dieser
Normen nicht mehr gewährleistet.
Deutsch - 35

Powerfix PLS 10 A2
2. Lieferumfang
A Akku LED-Strahler 10 Watt Powerfix PLS 10 A2
B Steckerladegerät
C 12 V/24 V Kfz-Ladekabel
D Diese Bedienungsanleitung (Symbolbild)
Diese Bedienungsanleitung ist mit einem ausklappbaren Umschlag versehen. Auf der
Innenseite des Umschlags ist der Akku LED-Strahler mit einer Bezifferung abgebildet. Die
Ziffern haben folgende Bedeutung:
1 Tragegriff
2 Akku LED-Strahler 10 Watt
3 Montagebügel
4 Rändelschraube
5 Standfuß
6 Ladekontroll-LED
7 Gummiabdeckung (für DC-IN-Buchse)
8 DC-IN-Buchse
9 Ein-/Aus-Schalter
10 Rändelschrauben
36 - Deutsch

Powerfix PLS 10 A2
3. Technische Daten
Akku LED-Strahler
Marke Powerfix
Modellbezeichnung PLS 10 A2
Betriebsspannung 12 - 24 V (Gleichspannung)
Akku Li-Ionen-Akku 7,4 V / 5200 mAh
Akku-Ladezeit ca. 6 Stunden
Leuchtdauer mit vollgeladenem Akku ca. 3 Stunden bis ca. 80% Lichtstrom
Leistungsaufnahme
kompletter Akku LED-Strahler
Schutzklasse
Schutzart IP65 (staubdicht und Schutz gegen
Betriebslage senkrecht – Strahler oben, Standfuß (5) unten
max. projizierte Lichtfläche ca. 10m² bei Aufstellung in 3 Meter
Leuchtmittel Citizen LED
Leistungsaufnahme LED ca. 8,5 W
Gesamtlichtstrom
Farbtemperatur ca. 5000 K (Neutralweiß)
LED-Abstrahlwinkel ca. 120°
Betriebstemperatur -10°C bis +45°C
Abmessungen (B x H x T) ca. 11,4 x 8,6 x 10,5 cm
Gewicht ca. 1040 g
ca.10 W
III, (Schutzkleinspannung)
Strahlwasser)
Entfernung
700 lm +/-5% (mit Abdeckung/Glasscheibe)
Deutsch - 37

Powerfix PLS 10 A2
Steckerladegerät
Hersteller Aurolite Electrical (Panyu Guangzhou) Limited
Modell HV-T16VB-12100A
Eingangsspannung
Ausgangsspannung
Schutzklasse:
Kfz-Ladekabel
Hersteller Powerfix
Modell PLS 10 A2
Eingangsspannung 12 V/24 V (Gleichspannung)
Ausgangsspannung
Sicherung T 3.15 A H 250 V
Änderungen der technischen Daten sowie des Designs können ohne Ankündigung
erfolgen.
100 - 240 V~ , 50/60 Hz
12 V (Gleichspannung), 1 A ,
Polung
II,
12 V/24 V (Gleichspannung), 1 A ,
Polung
4. Sicherheitshinweise
Vor der ersten Verwendung des Akku LED-Strahlers (A)
lesen Sie bitte die folgenden Anweisungen genau durch
und beachten Sie alle Warnhinweise, selbst wenn Ihnen
der Umgang mit elektronischen Geräten vertraut ist.
Bewahren Sie diese Bedienungsanleitung sorgfältig als
zukünftige Referenz auf. Wenn Sie das Gerät verkaufen
38 - Deutsch

Powerfix PLS 10 A2
oder weitergeben, händigen Sie unbedingt auch diese
Bedienungsanleitung aus. Sie ist Bestandteil des Gerätes.
GEFAHR! Dieses Symbol in Verbindung mit dem
Hinweis „Gefahr“ kennzeichnet eine drohende
gefährliche Situation, die, wenn Sie nicht
verhindert wird, zu schweren Verletzungen oder
sogar zum Tod führen kann.
WARNUNG! Dieses Symbol in Verbindung mit
dem Hinweis „Warnung“ kennzeichnet wichtige
Hinweise für den sicheren Betrieb des Akku LEDStrahlers (A) und zum Schutz des Anwenders.
Das Netzteil ist nur für den Betrieb in trockenen
Innenräumen geeignet.
Kurzschlussfester, geschlossener
Sicherheitstransformator
Sicherheitskleinspannung mit besonderem Schutz
gegen elektrischen Schlag
Unabhängiges Betriebsgerät, zur Verwendung
außerhalb von Leuchten ohne zusätzliche
Abdeckung
GEFAHR! Elektrische Geräte gehören nicht in
Kinderhände. Lassen Sie Kinder niemals
Deutsch - 39
Powerfix PLS 10 A2
unbeaufsichtigt elektrische Geräte benutzen. Kinder
können mögliche Gefahren nicht immer richtig
erkennen. Halten Sie auch die Verpackungsfolien von
Kindern fern. Es besteht Erstickungsgefahr.
GEFAHR! LED-Strahlung! Vermeiden Sie
Augenschäden! Blicken Sie nicht in den LED-Strahl.
Bei dem Verdacht auf Augenschäden suchen Sie
einen Arzt auf.
GEFAHR! Falls Sie Rauchentwicklung,
ungewöhnliche Geräusche oder Gerüche feststellen,
schalten Sie den Akku LED-Strahler sofort aus. In
diesen Fällen darf dieser nicht weiter verwendet
werden, bevor eine Überprüfung durch einen
Fachmann durchgeführt wurde. Atmen Sie keinesfalls
Rauch aus einem möglichen Gerätebrand ein. Sollten
Sie dennoch Rauch eingeatmet haben, suchen Sie
einen Arzt auf. Das Einatmen von Rauch kann
gesundheitsschädlich sein.
GEFAHR! Benutzen Sie keinesfalls optische
Instrumente, wie zum Beispiel ein Vergrößerungsglas,
um direkt in den Lichtstrahl zu schauen. Dies kann zu
Augenschäden führen. Bei dem Verdacht auf
Augenschäden suchen Sie einen Arzt auf.
40 - Deutsch
Powerfix PLS 10 A2
WARNUNG! Es dürfen keine Gegenstände an den
LED-Strahler gehängt oder auf ihn gestellt werden.
Das Gehäuse ist nicht zum Tragen von Lasten
geeignet. Andernfalls könnte der Akku LED-Strahler
(A) beschädigt werden.
WARNUNG! Verwenden Sie das mitgelieferte
Steckerladegerät (B) und das mitgelieferte 12 V/24
V Kfz-Ladekabel (C) nur zum Aufladen des
eingebauten Akkus des Akku LED-Strahlers (A) und
nicht für einen Permanentbetrieb. Schließen Sie das
Steckerladegerät (B) oder das 12 V/24 V KfzLadekabel (C) niemals an andere Geräte an. Laden
Sie den eingebauten Akku des Akku LED-Strahlers (A)
ausschließlich mit dem mitgelieferten
Steckerladegerät (B) oder dem mitgelieferten 12
V/24 V Kfz-Ladekabel (C).
5. Urheberrecht
Alle Inhalte dieser Bedienungsanleitung unterliegen dem Urheberrecht und werden dem
Leser ausschließlich als Informationsquelle bereitgestellt. Jegliches Kopieren oder
Vervielfältigen von Daten und Informationen ist ohne ausdrückliche und schriftliche
Genehmigung durch den Autor verboten. Dies betrifft auch die gewerbliche Nutzung der
Inhalte und Daten. Text und Abbildungen entsprechen dem technischen Stand bei
Drucklegung. Änderungen vorbehalten.
Deutsch - 41

Powerfix PLS 10 A2
6. Vor der Inbetriebnahme
Entnehmen Sie den Akku LED-Strahler (A) und das mitgelieferte Zubehör aus der
Verpackung.
Prüfen Sie den Akku LED-Strahler (A) und das Zubehör auf Beschädigungen. Bei
Beschädigungen darf der Akku LED-Strahler (A) nicht in Betrieb genommen werden.
6.1. Montage
Zur Montage des Akku LED-Strahlers (A) wird kein Werkzeug benötigt. Der Akku LEDStrahler (A) wird in 2 Teilen (Strahler mit Tragegriff und Standfuß) geliefert. Diese müssen
zunächst verbunden werden. Schrauben Sie dazu die Rändelschraube (4), die zum
Transport von unten in den Standfuß (5) eingeschraubt ist, gegen den Uhrzeigersinn heraus.
Achten Sie darauf, dass die Unterlegscheibe und der Sicherungsring, die sich auf dem
Gewinde der Rändelschraube (4) befinden, nicht abhanden kommen. Klappen Sie nun den
Montagebügel (3) nach unten. Schrauben Sie anschließend die Rändelschraube (4) mit
Unterlegscheibe und Sicherungsring durch das mittlere Bohrloch des Montagebügels (3) im
Uhrzeigersinn von oben in das Gewinde des Standfußes (5), siehe Abbildung. Drehen Sie
die Rändelschraube (4) fest ein, so dass der Montagebügel (3) fest mit dem Standfuß (5)
verbunden ist.
6.2. Akku aufladen
Die DC-IN-Buchse (8) ist mit einer Gummiabdeckung (7) gegen eindringende Feuchtigkeit
geschützt. Lösen Sie diese Gummiabdeckung (7) durch Ziehen an der roten Lasche.
Verbinden Sie nun den Ladestecker des Steckerladegerätes (B) mit der DC-IN-Buchse (8) des
42 - Deutsch

Powerfix PLS 10 A2
Akku LED-Strahlers (A) und stecken Sie das Steckerladegerät (B) in eine leicht zugängliche
Steckdose. Laden Sie den eingebauten Li-Ionen-Akku vor der ersten Inbetriebnahme voll auf.
Während des Ladevorgangs leuchtet die Ladekontroll-LED (6) rot. Sobald der eingebaute LiIonen-Akku voll aufgeladen ist, leuchtet die Ladekontroll-LED (6) grün. Ziehen Sie das
Steckerladegerät (B) aus der Steckdose und ziehen Sie den Ladestecker des
Steckerladegerätes (B) aus der DC-IN-Buchse (8). Verschließen Sie die DC-IN-Buchse (8) mit
der Gummiabdeckung (7). Der Akku LED-Strahler ist nun betriebsbereit.
Hinweis: Wenn beim Betrieb des Akku LED-Strahlers (A) die Ladekontroll-LED (6) rot blinkt,
ist dieses ein Hinweis für Sie, dass der eingebaute Li-Ionen-Akku fast leer ist. Laden Sie in
diesem Fall den Akku erneut auf.
7. Inbetriebnahme
Mit den 2 Rändelschrauben (10) können Sie die vertikale Neigung und damit die
Abstrahlrichtung des Akku LED-Strahlers (A) verändern. Lösen Sie dazu beide
Rändelschrauben (10) um eine Umdrehung durch Drehen gegen den Uhrzeigersinn. Stellen
Sie nun die vertikale Neigung des Akku LED-Strahlers (A) nach Ihrem Wunsch ein. Drehen
Sie anschließend die beiden Rändelschrauben (10) wieder fest.
Mit dem Ein-/Aus-Schalter (9) können Sie den Akku LED-Strahler (A) ein- und ausschalten.
Der Ein-/Aus-Schalter (9) ist mit einer Gummikappe gegen eindringende Feuchtigkeit
geschützt. Durch diese Gummikappe ist die aktuelle Schalterstellung des Ein-/Aus-Schalters
(9) erkennbar. Zusätzlich sind neben der Gummikappe die Schaltzustände (ON/OFF)
aufgedruckt.
8. 12 V/24 V Kfz-Ladekabel
Alternativ zum Steckerladegerät (B) können Sie den integrierten Li-Ionen-Akku des Akku LEDStrahlers (A) auch mit dem mitgelieferten 12 V/24 V Kfz-Ladekabel (C) laden. Lösen Sie
diese Gummiabdeckung (7) durch Ziehen an der roten Lasche. Verbinden Sie nun den
Ladestecker des 12 V/24 V Kfz-Ladekabels (C) mit der DC-IN-Buchse (8) des Akku LEDStrahlers (A) und stecken Sie das 12 V/24 V Kfz-Ladekabel (C) in eine geeignete
12 V/24 V-Bordsteckdose. Die grüne LED im Stecker des 12 V/24 V Kfz-Ladekabels (C)
zeigt ihnen die Betriebsbereitschaft an. Während des Ladevorgangs leuchtet die
Deutsch - 43

Powerfix PLS 10 A2
Ladekontroll-LED (6) des Akku LED-Strahlers (A) rot. Sobald der eingebaute Li-Ionen-Akku voll
aufgeladen ist, leuchtet die Ladekontroll-LED (6) grün. Entfernen Sie das 12 V/24 V KfzLadekabel (C) aus der Bordsteckdose und ziehen Sie den Ladestecker des 12 V/24 V KfzLadekabels (C) aus der DC-IN-Buchse (8). Verschließen Sie die DC-IN-Buchse (8) mit der
Gummiabdeckung (7). Der Akku LED-Strahler (A) ist nun betriebsbereit.
8.1. Sicherung auswechseln
Wenn bei eingestecktem 12 V/24 V Kfz-Ladekabel (C) die LED des 12 V/24 V KfzLadekabels (C) nicht leuchtet, kann dieses auf eine defekte Sicherung hinweisen.
WARNUNG! Sollte es notwendig sein, die
Sicherung zu erneuern, ist unbedingt darauf zu
achten, dass nur eine Sicherung gleichen Typs
verwendet werden darf (siehe technische Daten).
Gehen Sie zum Austausch der Sicherung folgendermaßen vor:
Drehen Sie die Schraubkappe (d) gegen den Uhrzeigersinn vom
Zigarettenanzündersteckergehäuse (a) ab. Verwenden Sie dazu ggf. eine Zange.
Tauschen Sie die Sicherung (b) gegen eine neue Sicherung gleichen Typs aus. Eine
geeignete Sicherung können Sie in einem Elektrofachmarkt erwerben.
Stecken Sie zuerst die Sicherung (b) in das Zigarettenanzündersteckergehäuse (a).
Stecken Sie nun den Metallkontakt (c) in die Schraubkappe (d).
Schieben Sie nun die Schraubkappe (d) mit dem eingesteckten Metallkontakt (c) über
die Sicherung (b) und drehen Sie die Schraubkappe (d) im Uhrzeigersinn fest auf das
Zigarettenanzündersteckergehäuse (a).
44 - Deutsch

Powerfix PLS 10 A2
9. Wartung/Reinigung
9.1. Wartung
Das Leuchtmittel des Akku LED-Strahlers (A) besteht aus einer langlebigen LED. Diese ist nicht
auswechselbar und muss nicht gewartet werden.
Bei dem eingebauten Akku handelt es sich nicht um einen im Zubehör erhältlichen Standard
Akku. Daher ist es nicht vorgesehen, dass der Akku durch den Kunden ausgetauscht wird.
9.2. Reinigung
Stellen Sie sicher, dass keine Flüssigkeiten in das
Gehäuse eindringen können. Der Akku LED-Strahler (A)
könnte beschädigt werden.
Verwenden Sie zur Reinigung des Akku LED-Strahlers (A) ein weiches, trockenes Tuch und
keinesfalls Lösungsmittel oder Reiniger, die Kunststoff angreifen. Verwenden Sie bei stärkerer
Verschmutzung nur ein leicht angefeuchtetes Tuch.
9.3. Lagerung bei Nichtbenutzung
Wenn Sie den Akku LED-Strahler (A) nicht benutzen, bewahren Sie ihn an einem trockenen
und sauberen Ort auf. Um die Leistungsfähigkeit des Akkus zu erhalten, sollte dieser bei
längerer Lagerung regelmäßig nachgeladen werden.
10. Fehlerbehebung
Akku LED-Strahler leuchtet nicht
Überprüfen Sie die Stellung des Ein-/Aus-Schalters (9).
Der eingebaute Li-Ionen-Akku ist möglicherweise leer. Laden Sie ihn auf.
Akku wird nicht geladen
Steckerladegerät (B) defekt. Prüfen Sie, ob das Aufladen mit dem 12 V/24 V Kfz-
Ladekabel (C) funktioniert.
Deutsch - 45

Powerfix PLS 10 A2
12 V/24 V Kfz-Ladekabel (C) defekt. Prüfen Sie, ob die grüne LED im Stecker des 12
V/24 V Kfz-Ladekabels (C) leuchtet, wenn dieses in eine stromführende Bordsteckdose
eingesteckt ist. Falls nicht, wechseln Sie die Sicherung des 12 V/24 V Kfz-Ladekabels (C),
wie im Abschnitt „Sicherung auswechseln“ beschrieben.
11. Umwelthinweise und Entsorgungsangaben
Die mit diesem Symbol gekennzeichneten Geräte unterliegen der
europäischen Richtlinie 2012/19/EU. Alle Elektro- und ElektronikAltgeräte müssen getrennt vom Hausmüll über dafür staatlich
vorgesehene Stellen entsorgt werden.
Mit der ordnungsgemäßen Entsorgung des alten Geräts vermeiden Sie
Umweltschäden und eine Gefährdung Ihrer persönlichen Gesundheit.
Weitere Informationen zur vorschriftsgemäßen Entsorgung des alten
Gerätes erhalten Sie bei der Stadtverwaltung, beim Entsorgungsamt oder
in dem Geschäft, wo Sie das Gerät erworben haben.
Führen Sie auch die Verpackung einer umweltgerechten Entsorgung zu. Kartonagen können
bei Altpapiersammlungen oder an öffentlichen Sammelplätzen zur Wiederverwertung
abgegeben werden. Folien und Kunststoffe des Lieferumfangs werden über Ihr örtliches
Entsorgungsunternehmen eingesammelt und umweltgerecht entsorgt.
11.1. Akku ausbauen
Dieser Akku LED-Strahler (A) enthält einen fest eingebauten Akku. Entfernen Sie diesen,
bevor Sie den Akku LED-Strahler (A) entsorgen.
Gehen Sie zum Ausbau des Akkus folgendermaßen vor:
1. Lösen Sie die 4 Kreuzschlitzschrauben
(Pfeile) der schwarzen Abdeckung an der
Rückseite des Akku LED-Strahlers (A).
46 - Deutsch

Powerfix PLS 10 A2
2. Kippen Sie die schwarze Abdeckung
nach unten.
3. Ziehen Sie den Stecker der AkkuZuleitung (Pfeil) ab und entnehmen Sie den
Akku.
Geben Sie den Akku und den LED-Strahler getrennt zur geeigneten Entsorgung.
Denken Sie an den Umweltschutz. Verbrauchte Akkus gehören nicht in
den Hausmüll. Sie müssen bei einer Sammelstelle für Altbatterien
abgegeben werden. Bitte beachten Sie, dass Akkus nur im entladenen
Zustand in die Sammelbehälter für Geräte-Altbatterien gegeben werden
dürfen, bzw. bei nicht vollständig entladenen Akkus, Vorsorge gegen
Kurzschlüsse getroffen werden muss. Kleben Sie zur Vorsorge gegen
Kurzschlüsse den Stecker der Akku-Zuleitung mit Klebeband ab.
12. Konformitätsvermerke
Dieser Akku LED-Strahler (A) Gerät entspricht den grundlegenden
Anforderungen und den anderen relevanten Vorschriften der EMV-Richtlinie
2014/30/EU, der Richtlinie für Niederspannungsgeräte 2014/35/EU,
sowie der ERP-Richtlinie 2009/125/EC. Die vollständige EUKonformitätserklärung erhalten Sie auf Anfrage bei: ce@targa.de
Deutsch - 47

Powerfix PLS 10 A2
13. Hinweise zu Garantie und Serviceabwicklung
Garantie der TARGA GmbH
Sehr geehrte Kundin, sehr geehrter Kunde,
Sie erhalten auf dieses Gerät 3 Jahre Garantie ab Kaufdatum. Im Falle von Mängeln dieses
Produkts stehen Ihnen gegen den Verkäufer des Produkts gesetzliche Rechte zu. Diese
gesetzlichen Rechte werden durch unsere im Folgenden dargestellte Garantie nicht
eingeschränkt.
Garantiebedingungen
Die Garantiefrist beginnt mit dem Kaufdatum. Bitte bewahren Sie den originalen Kassenbon
gut auf. Diese Unterlage wird als Nachweis für den Kauf benötigt. Tritt innerhalb von drei
Jahren ab dem Kaufdatum dieses Produkts ein Material- oder Fabrikationsfehler auf, wird
das Produkt von uns – nach unserer Wahl – für Sie kostenlos repariert oder ersetzt.
Garantiezeit und gesetzliche Mängelansprüche
Die Garantiezeit wird durch die Gewährleistung nicht verlängert. Dies gilt auch für ersetzte
und reparierte Teile. Eventuell schon beim Kauf vorhandene Schäden und Mängel müssen
sofort nach dem Auspacken gemeldet werden. Nach Ablauf der Garantiezeit anfallende
Reparaturen sind kostenpflichtig.
Garantieumfang
Das Gerät wurde nach strengen Qualitätsrichtlinien sorgfältig produziert und vor
Auslieferung gewissenhaft geprüft. Die Garantieleistung gilt für Material- oder
Fabrikationsfehler. Diese Garantie erstreckt sich nicht auf Produktteile, die normaler
Abnutzung ausgesetzt sind und daher als Verschleißteile angesehen werden können oder für
Beschädigungen an zerbrechlichen Teilen, z. B. Schalter, Akkus oder die aus Glas gefertigt
sind. Diese Garantie verfällt, wenn das Produkt beschädigt, nicht sachgemäß benutzt oder
gewartet wurde. Für eine sachgemäße Benutzung des Produkts sind alle in der
Bedienungsanleitung aufgeführten Anweisungen genau einzuhalten. Verwendungszwecke
und Handlungen, von denen in der Bedienungsanleitung abgeraten oder vor denen gewarnt
wird, sind unbedingt zu vermeiden. Das Produkt ist nur für den privaten und nicht für den
gewerblichen Gebrauch bestimmt. Bei missbräuchlicher und unsachgemäßer Behandlung,
Gewaltanwendung und bei Eingriffen, die nicht von unserer autorisierten ServiceNiederlassung vorgenommen wurden, erlischt die Garantie. Mit Reparatur oder Austausch
des Produkts beginnt kein neuer Garantiezeitraum.
48 - Deutsch

Powerfix PLS 10 A2
Abwicklung im Garantiefall
Um eine schnelle Bearbeitung Ihres Anliegens zu gewährleisten, folgen Sie bitte den
folgenden Hinweisen:
- Bitte lesen Sie vor Inbetriebnahme Ihres Produktes sorgfältig die beigefügte
Dokumentation. Sollte es mal zu einem Problem kommen, welches auf diese
Weise nicht gelöst werden kann, wenden Sie sich bitte an unsere Hotline.
- Bitte halten Sie für alle Anfragen den Kassenbon und die Artikelnummer bzw.
wenn vorhanden die Seriennummer als Nachweis für den Kauf bereit.
- Für den Fall, dass eine telefonische Lösung nicht möglich ist, wird durch unsere
E-Mail: service.DE@targa-online.com
E-Mail: service.AT@targa-online.com
Hotline in Abhängigkeit der Fehlerursache ein weiterführender Service veranlasst.
Service
Telefon: 02921 - 89 13 000
Telefon: 01 – 26 76 195
Telefon: 044 – 55 10 057
E-Mail: service.CH@targa-online.com
IAN: 280181
Hersteller
Bitte beachten Sie, dass die folgende Anschrift keine Serviceanschrift ist. Kontaktieren Sie
zunächst die oben benannte Servicestelle.
TARGA GmbH
Coesterweg 45
59494 SOEST
DEUTSCHLAND / GERMANY
Deutsch - 49

 Loading...