

IAN 91218
UltrasOnIC DIstanCe Meter
Ul trasCHall-entfernUnGsMesser
Bedienungs- und Sicherheitshinweise
Ul trazvUčnI DaljInOMjer
Upute za posluživanje i za Vašu sigurnost
aparat De MăsUrat DIstanţa
CU UltrasUnete
Instrucţiuni de utilizare şi de siguranţă
УлтразвУков далекомер
Инструкции за обслужване и безопасност
Μετρητης αποςταςεων, υπερηχων
Υποδείξεις χειρισμού και ασφαλείας
UltrasOnIC DIstanCe Meter
Operation and Safety Notes

GB / CY Operation and Safety Notes Page 5
HR Upute za posluživanje i za Vašu sigurnost Stranica 19
RO Instrucţiuni de utilizare şi de siguranţă Pagina 33
BG Инструкции за обслужване и безопасност Страница 47
GR / CY Υποδείξεις χειρισμού και ασφαλείας Σελίδα 62
DE / AT / CH Bedienungs- und Sicherheitshinweise Seite 78
3
O
N
/
O
F
F
F
T
/
M
M
O
D
E
R
E
C
A
L
L
7
8
9
10
11
3
5
4
12
1
6
2
4
A
MIN. 0.6 m
Max. 16 m
O
N
/
O
F
F
F
T
/
M
M
O
D
E
R
E
C
A
L
L
A
B
B
7

5 GB/CY
Intended use .......................................... Page 6
Parts description ................................Page 6
Technical Data ......................................Page 6
Scope of delivery...............................Page 7
General safety
instructions .............................................. Page 7
Safety Instructions
for Batteries ............................................Page 8
Before using
Inserting / changing the battery ................... Page 9
Start-up
Measuring length .........................................Page 10
Avoiding measuring errors ...........................Page 11
Adding lengths together ...............................Page 12
Measuring surface area ...............................Page 13
Measuring volume ........................................Page 13
Adding surface areas or
volumes together ..........................................Page 14
Displaying the last measured values ........... Page 15
Temperature display .....................................Page 16
Changing the unit of measurement..............Page 16
Battery state display ..................................... Page 16
Switching off / Automatic shut-down ...........Page 16
Cleaning and Care ............................ Page 17
Disposal ......................................................Page 17
Warranty .................................................. Page 17
6 GB/CY
Ultrasonic Distance Meter
Intended use
This ultrasonic rangefinder is intended for measuring lengths and for calculating surface areas and
volumes. The device also has a temperature
measuring facility. This device is solely intended
for private use.
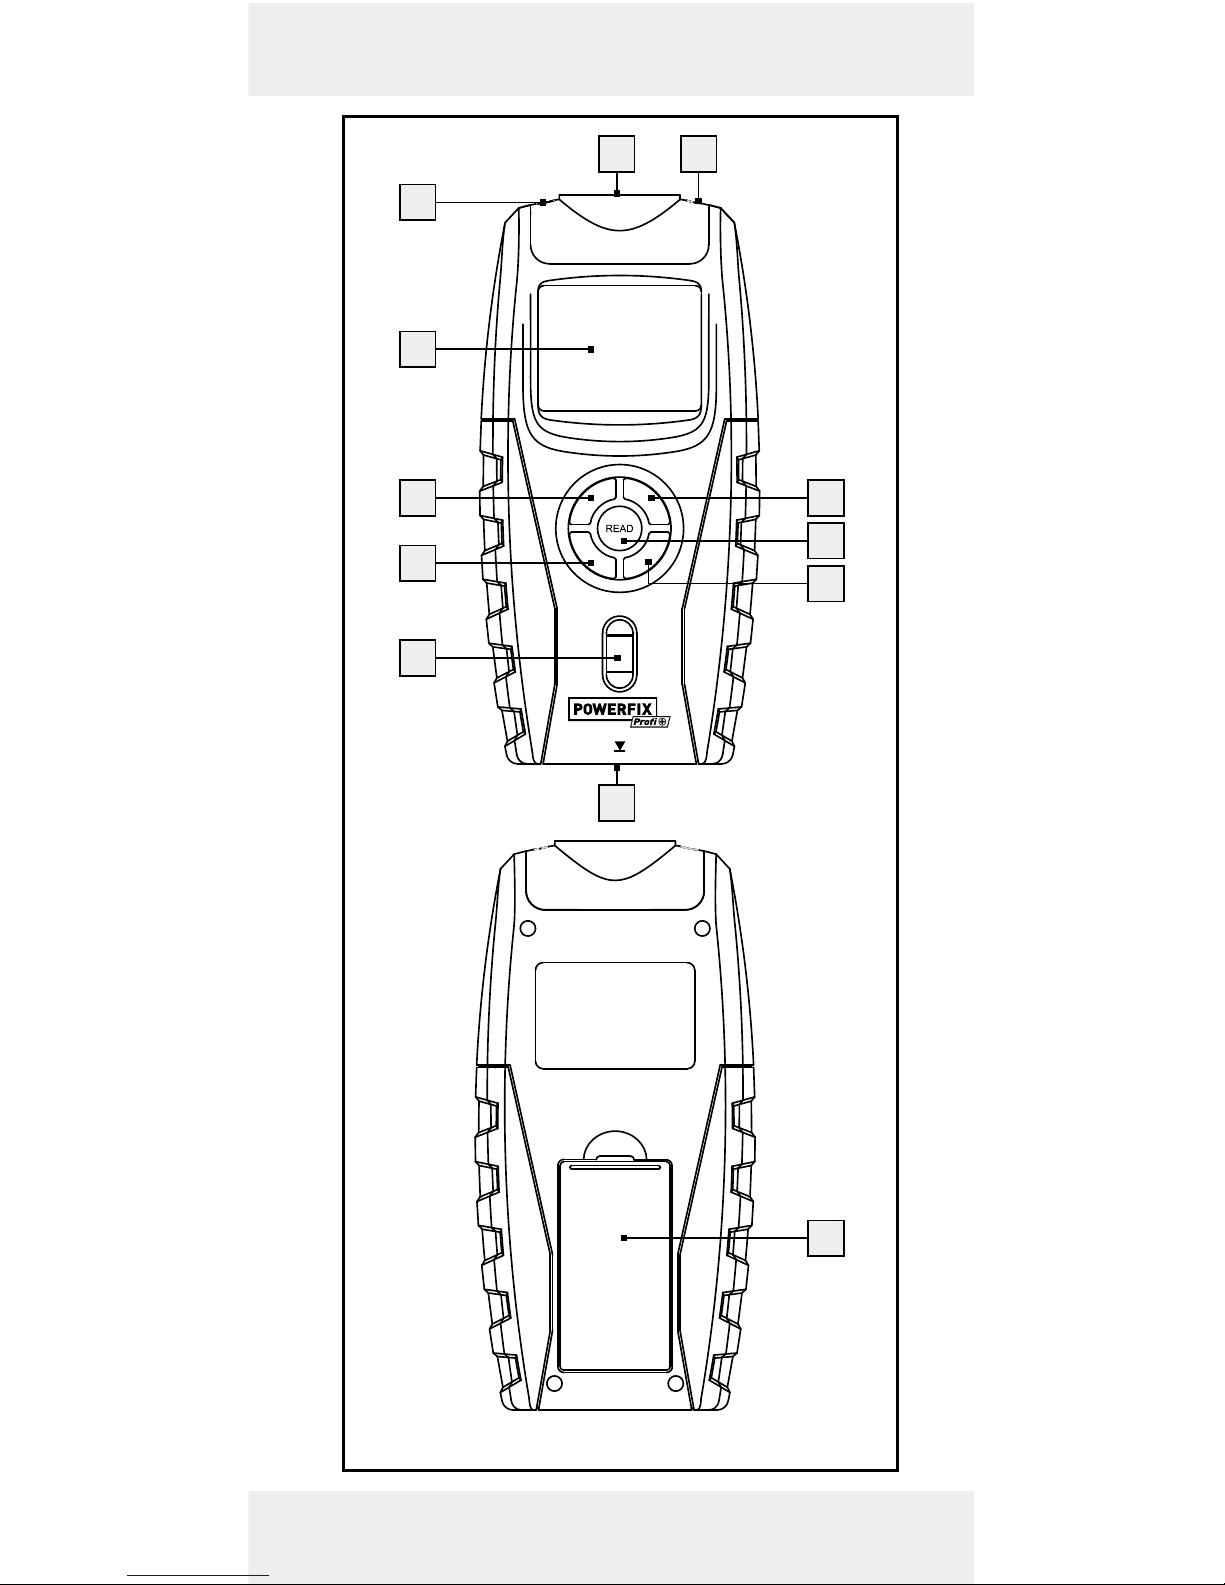
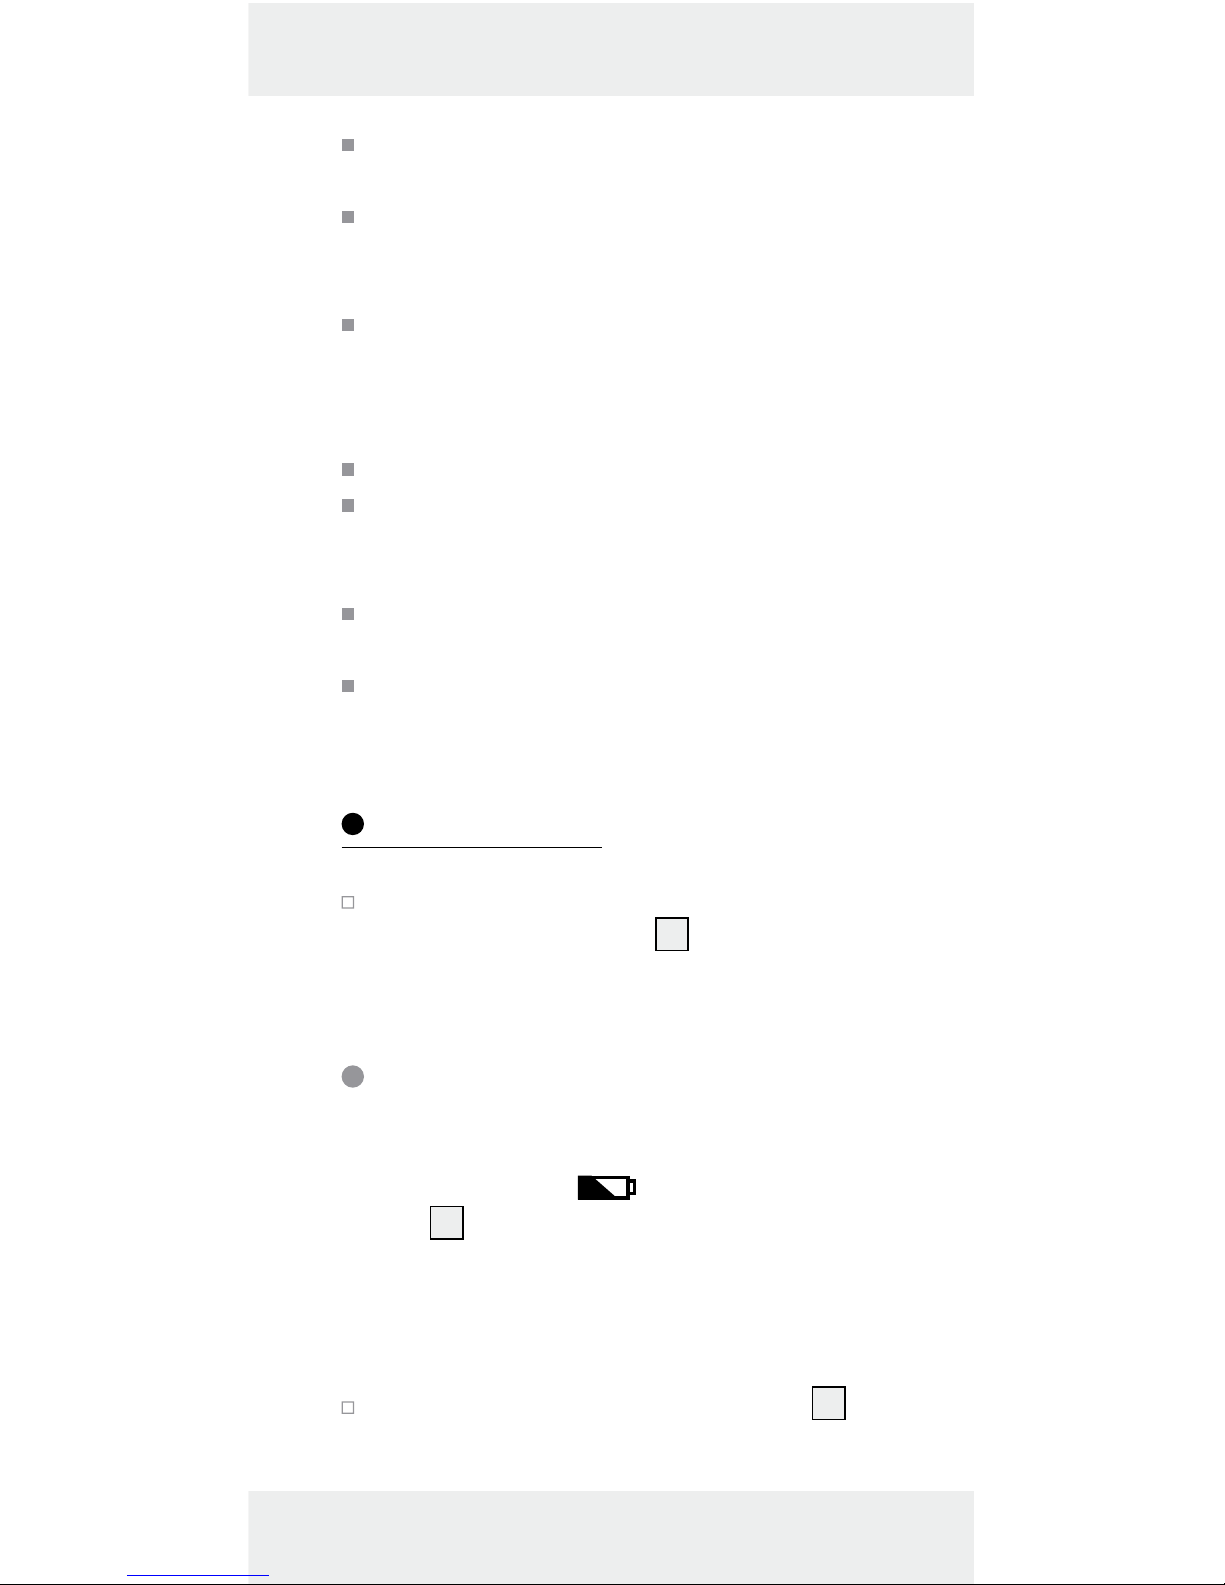
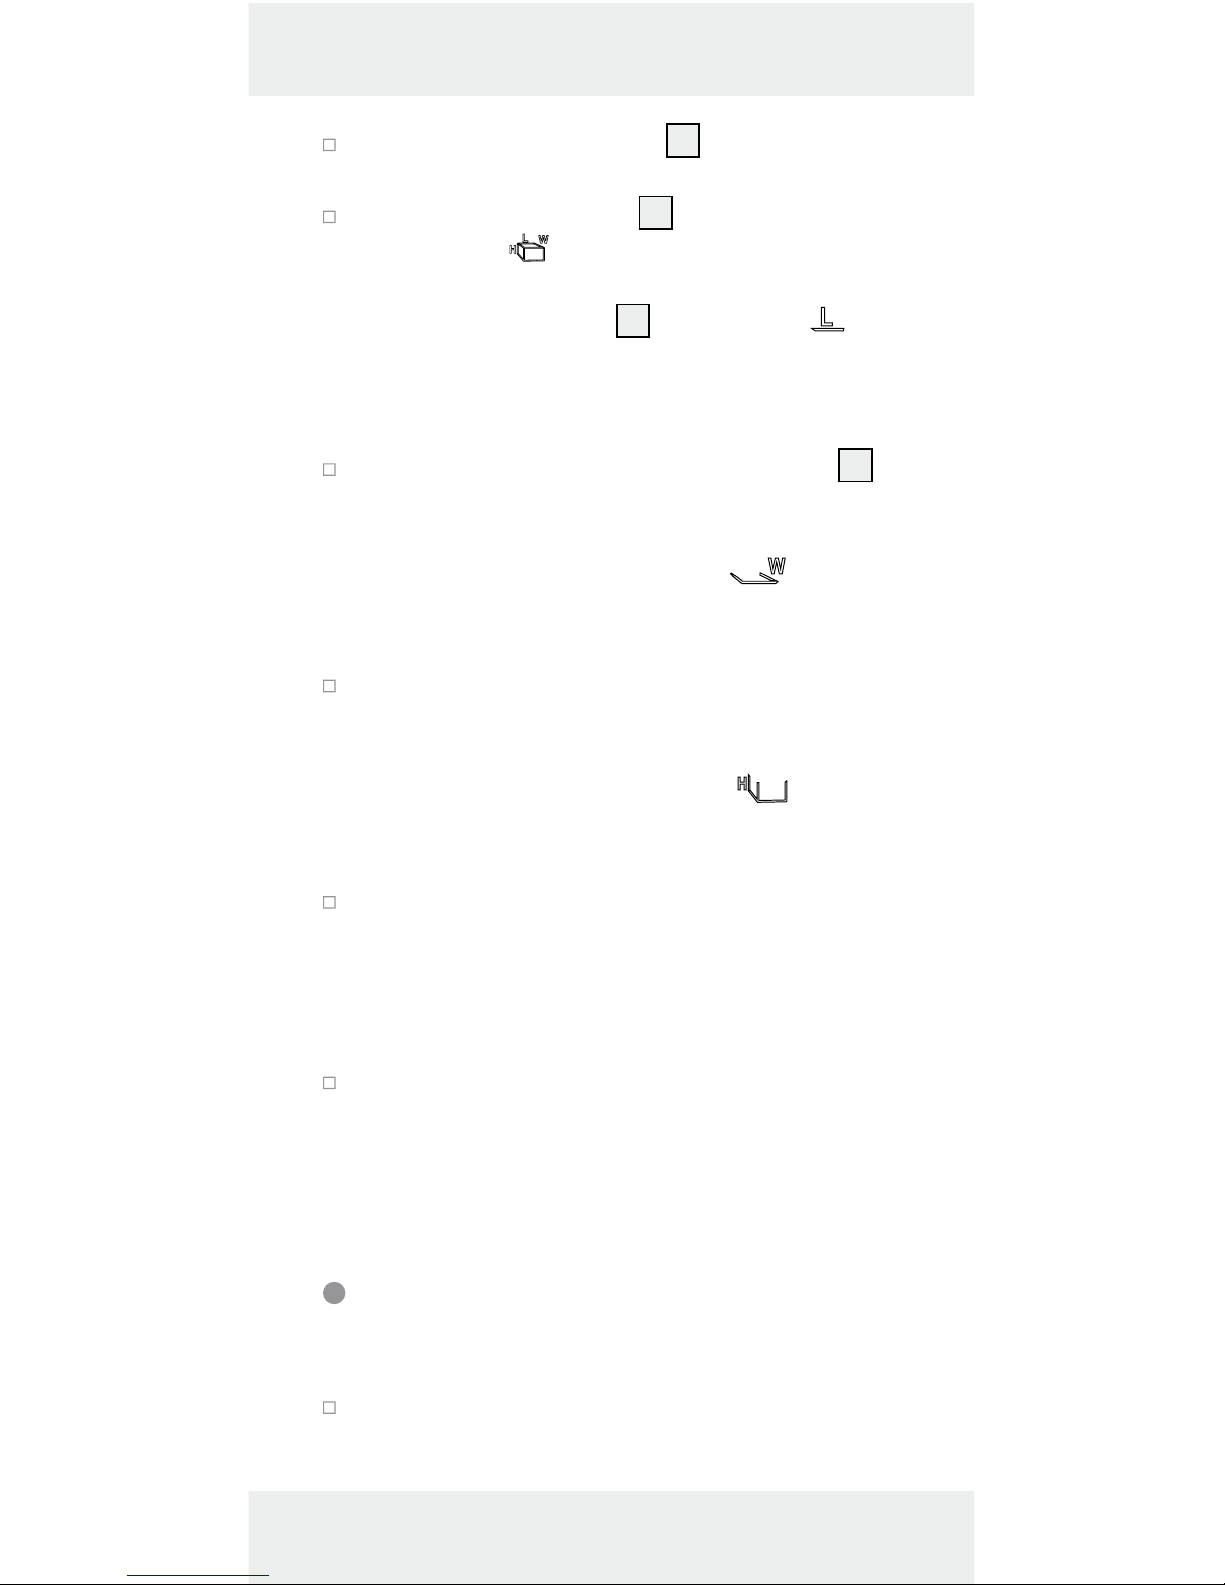
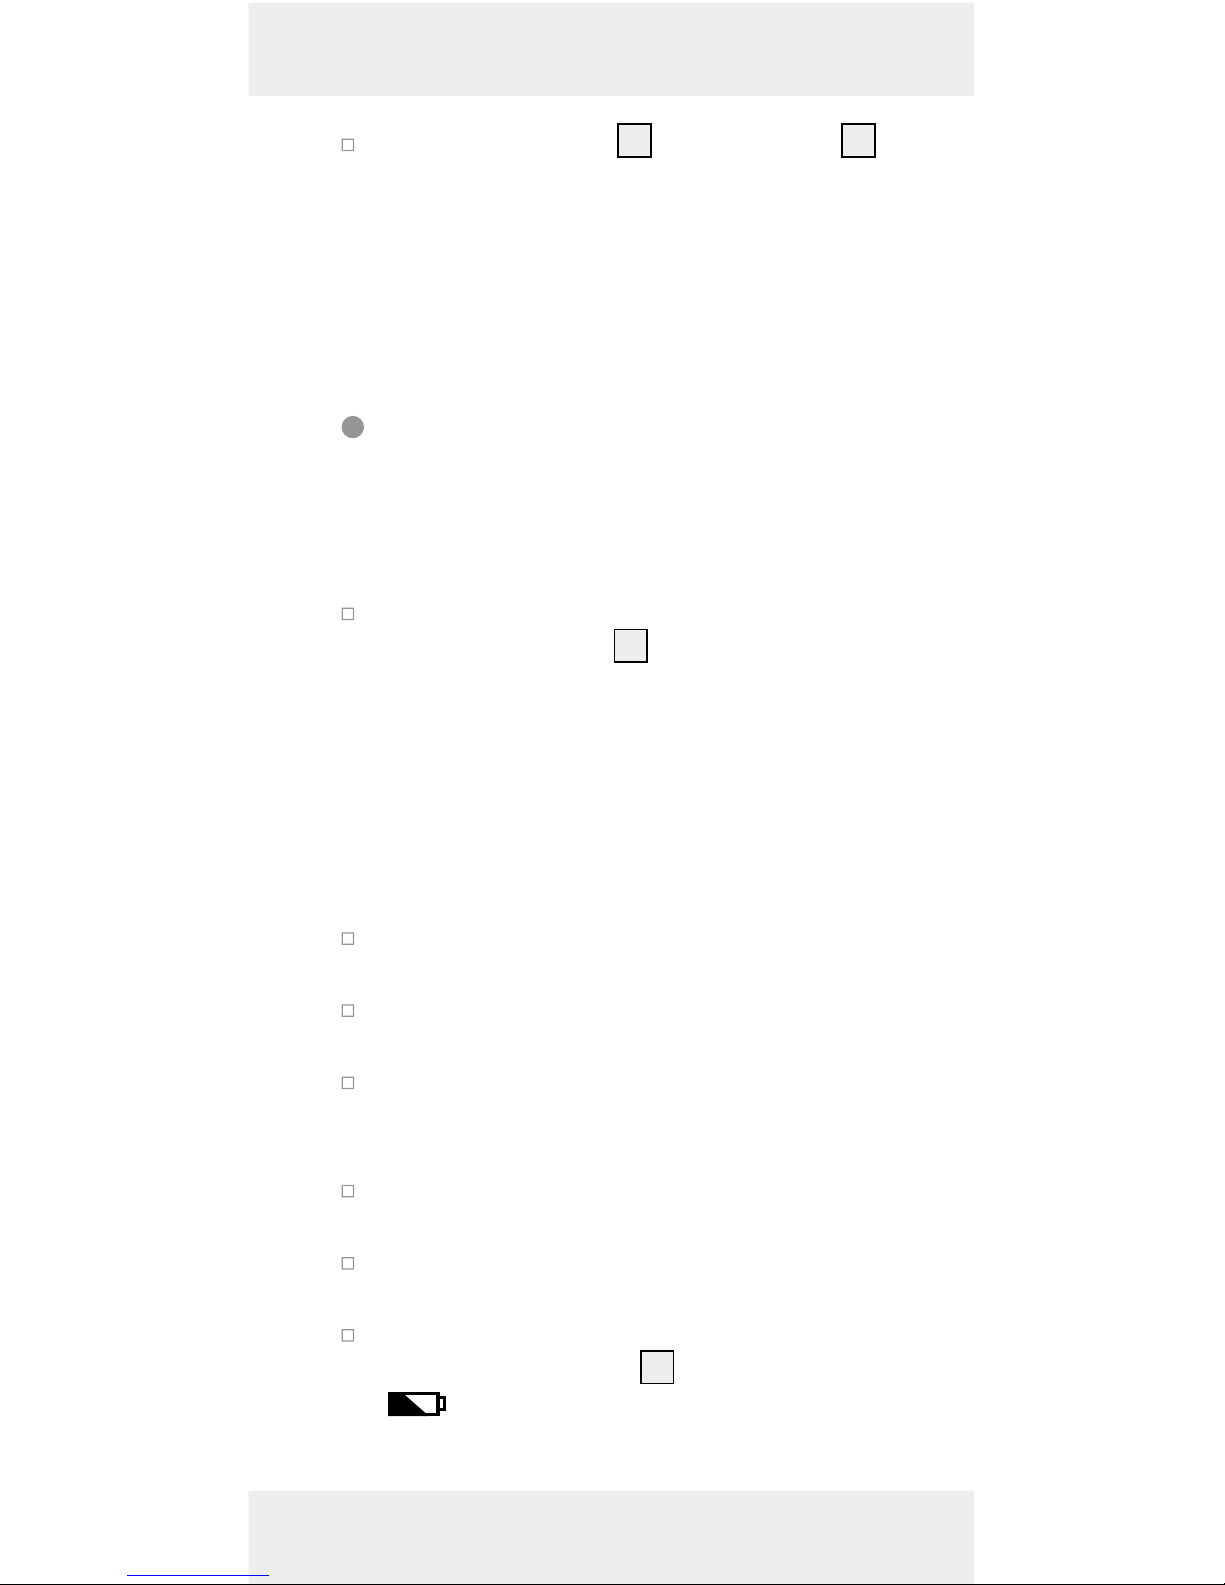
Parts description
1
Ultrasonic transmitter/receiver
2
Temperature sensor
3
FT/M button
4
READ button
5
RECALL button
6
Reference area
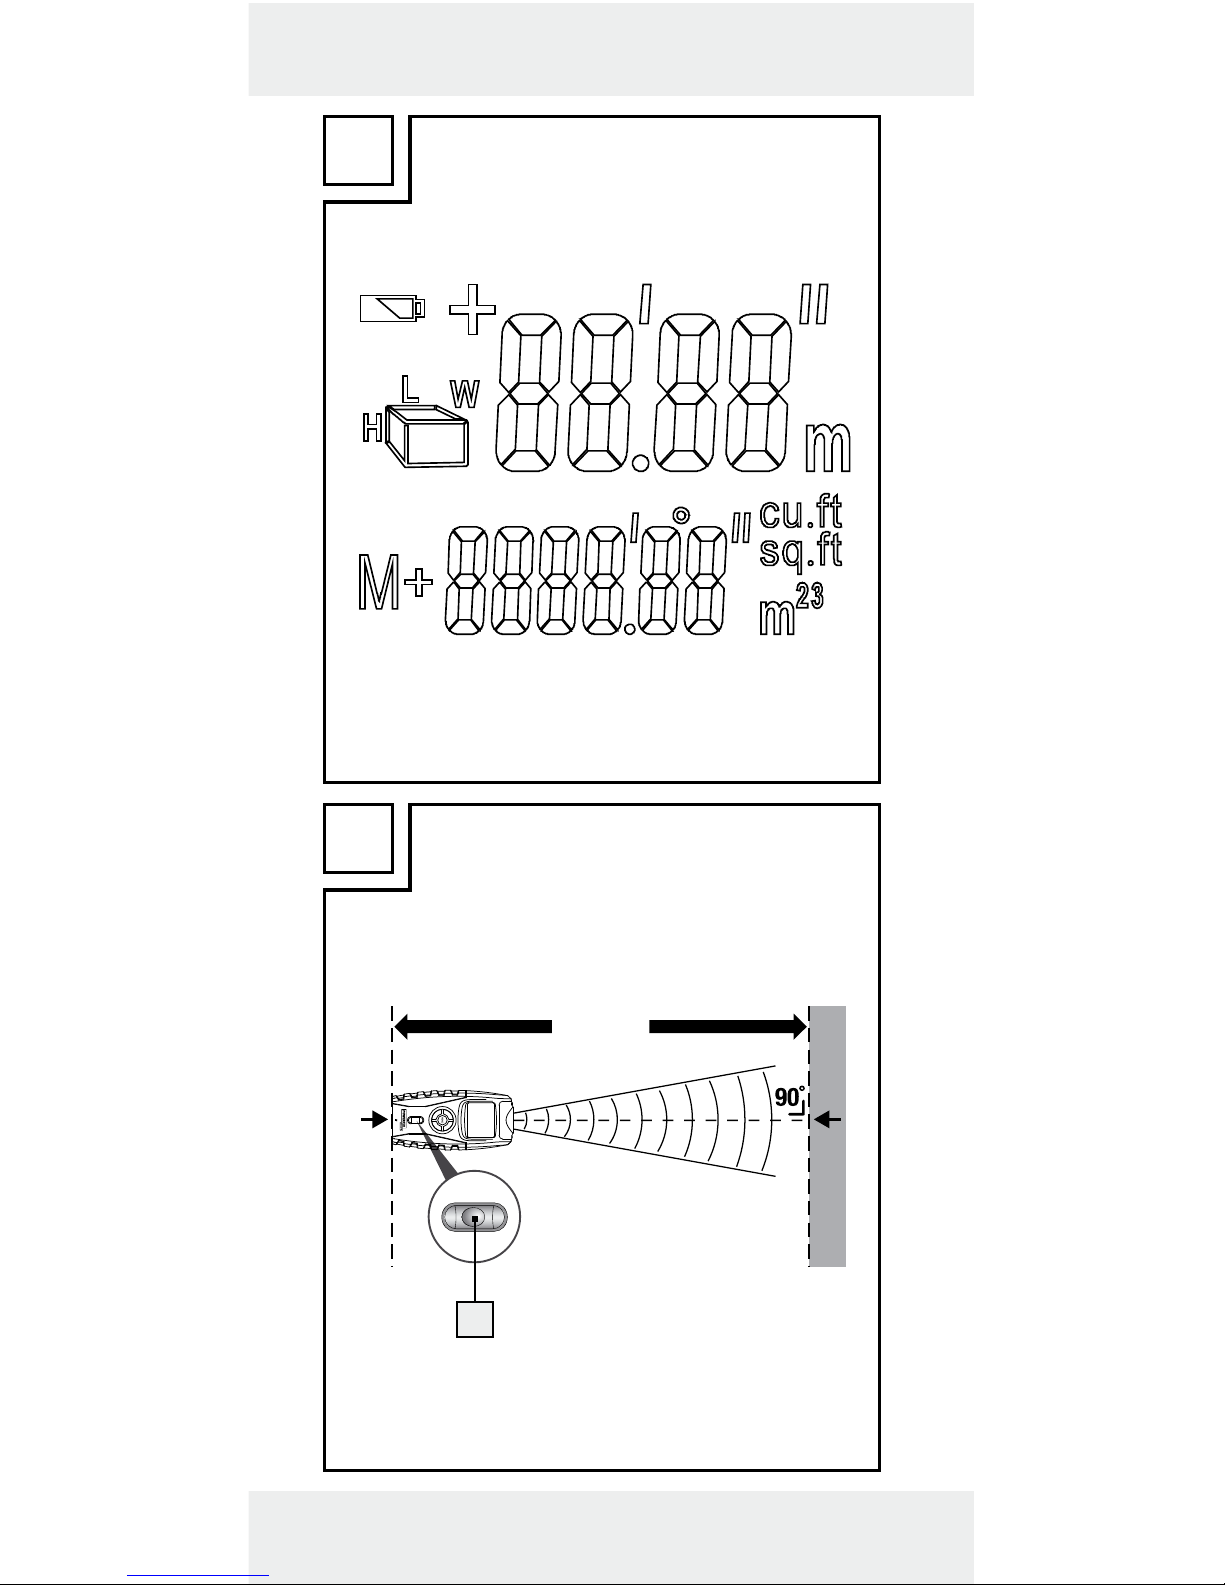
7
Level indicator
8
MODE button
9
ON / OFF button
10
Display
11
Laser diode
12
Battery compartment cover
Technical Data
Operating voltage: max. 9 V
Battery type: 6LR61 (9 V block)
Measuring range: 0.6 m – 16 m
Measuring accuracy: +/- 1%
Capacity display: up to 9999.99
Laser wave length: 635–660 nm, 1 mW
Laser class: 2

7 GB/CY
Ultrasonic frequency: 40kHz
Thermometer
measuring range: -10°C – +40°C
(14°F – 104°F)
Scope of delivery
1 Ultrasonic Distance Meter
1 9 V block battery
1 Set of operating instructions
General safety
instructions
Before using the product, please familiarise yourself with all of the safety information and instructions for use! When passing this product on to
others, please also include all the documents!
Check the product for damage before use!
Never use a damaged product!
Do not expose the device to moisture! This
may damage it.
This appliance can be used by children aged
from 8 years and above and persons with
reduced physical, sensory or mental capabilities or lack of experience and knowledge if
they have been given supervision or instruction concerning use of the appliance in a safe
way and understand the hazards involved.
Children shall not play with the appliance.
Cleaning and user maintenance shall not be
made by children without supervision.

8 GB/CY
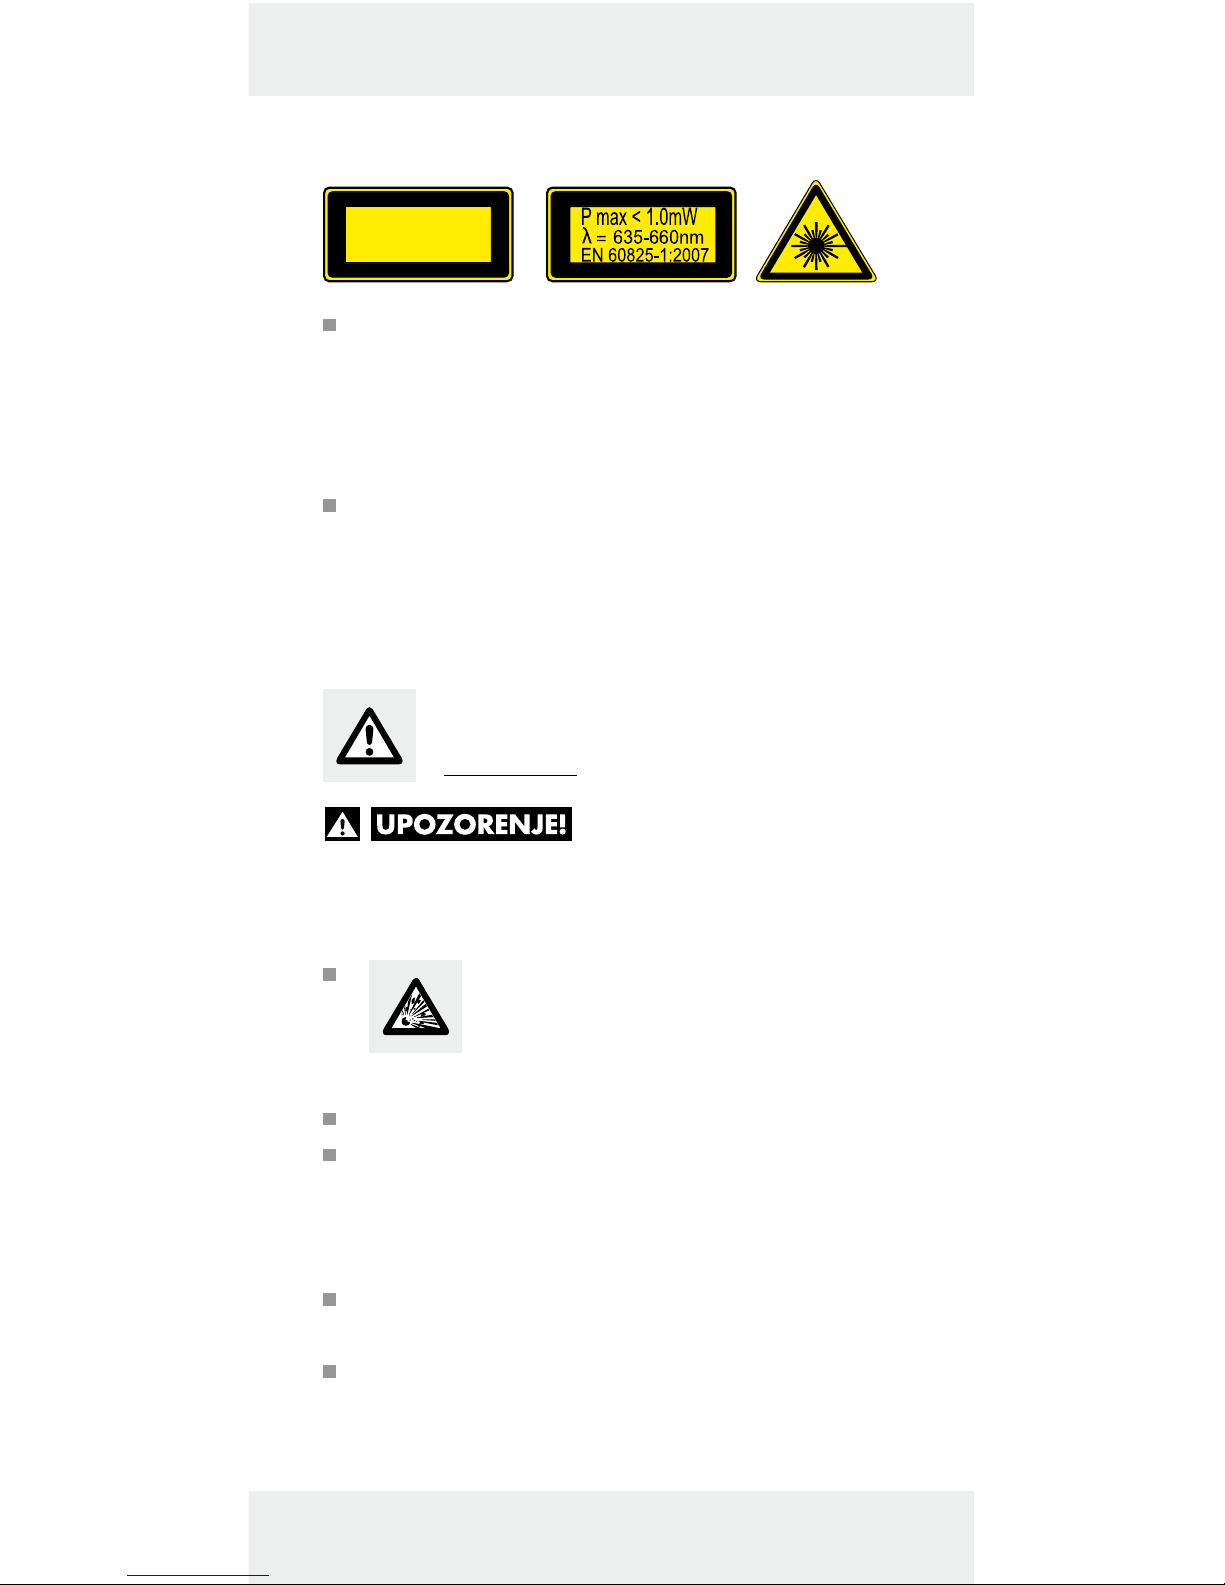
Danger from laser radiation
LASER RADIATION
DO NOT STARE INTO BEAM
CLASS 2 LASER PRODUCT
The device contains a Class 2 laser. Never
point the laser beam at persons or animals.
Never look directly into the beam. Even a
weak laser beam can cause eye damage.
Never point the laser beam at reflective sur-
faces or materials. Even a reflected laser
beam can cause eye damage.
Safety Instructions
for Batteries
DANGER TO LIFE! Batteries
are not intended for children. If accidentally
swallowed seek immediate medical attention!
CAUTION! EXPLOSION
HAZARD! Never recharge nonrechargeable batteries, do not
short-circuit and / or open batteries!
Never throw batteries into fire or water!
Do not subject batteries to any mechanical
load!
Risk of battery leakage
In the event of a battery leak, immediately
remove it from the device to prevent damage!
Avoid contact with the skin, eyes and mucous
membranes! In the event of contact with bat-
tery acid, thoroughly flush the affected area
with plenty of clean water and seek immediate
medical attention!
9 GB/CY
Only use the same type of batteries! Do not
mix used and new batteries!
Avoid extreme environmental conditions and
temperatures, which could affect batteries,
e.g. above radiators/in direct sunlight.
Remove the batteries from the device if they
have not been used for a long period!
Risk of equipment damage
Only use the specified battery type!
When inserting the battery ensure that it is
inserted the right way round! This is shown in
the battery compartment!
If necessary, clean the battery and device
contacts before inserting the battery!
Remove dead batteries from the device
immediately!
Before using
Before initial use, remove the protective film
from the device display
10
and insert the
enclosed battery.
Inserting / changing
the battery
If the battery symbol appears in the
display
10
, the inserted battery is almost drained
and must be replaced. Empty batteries can falsify
the measured result.
To insert the battery proceed as follows:
Open the battery compartment cover 12 on
the back of the device. You can remove the

10 GB/CY
used battery more easily with the aid of the
material strip, which is inside the battery
compartment. Just pull on the material strip.
Remove the used battery.
Plug the contacts of the 9 V block battery on
the contacts of the profiled plug. Make sure
you fit the batteries the right way round. This
is specified by the profiled shape of the contacts. Also ensure without fail that the material
strip is underneath the battery.
Insert the battery in the battery compartment
and close the cover again, so that it audibly
latches into place.
Start-up
Measuring length
Press the ON/OFF button 9 to switch the
device on. If you do not press any button for
60 s, the display
10
shuts down.
To switch the device off manually, hold the
ON/OFF button pressed down for 3 seconds, until the display goes out and a double
tone signal sounds.
Press the MODE button 8 repeatedly, until
the display shows the symbol for length measurement „
“ as well as the length designa-
tion 0.00m (or 0‘00“).
Hold the reference area 6 of the ultrasonic
rangefinder at the start point of your measurement. Hold the device in such a way, that
the reference area is aligned parallel to the
target area of the measurement.
If necessary use the level indicator 7 to
align the ultrasonic rangefinder horizontally.
11 GB/CY
The air bubble of the level indicator should
be between the two markings
if the
alignment is horizontal.
Press the READ button 4. The laser diode 11
projects a dot of light onto the end point of
the measurement. This dot of light will help you
to correctly align the ultrasonic rangefinder.
After successful measuring, the length will
appear in the display.
Avoiding measuring errors
In order to avoid measuring errors,
please note the following information:
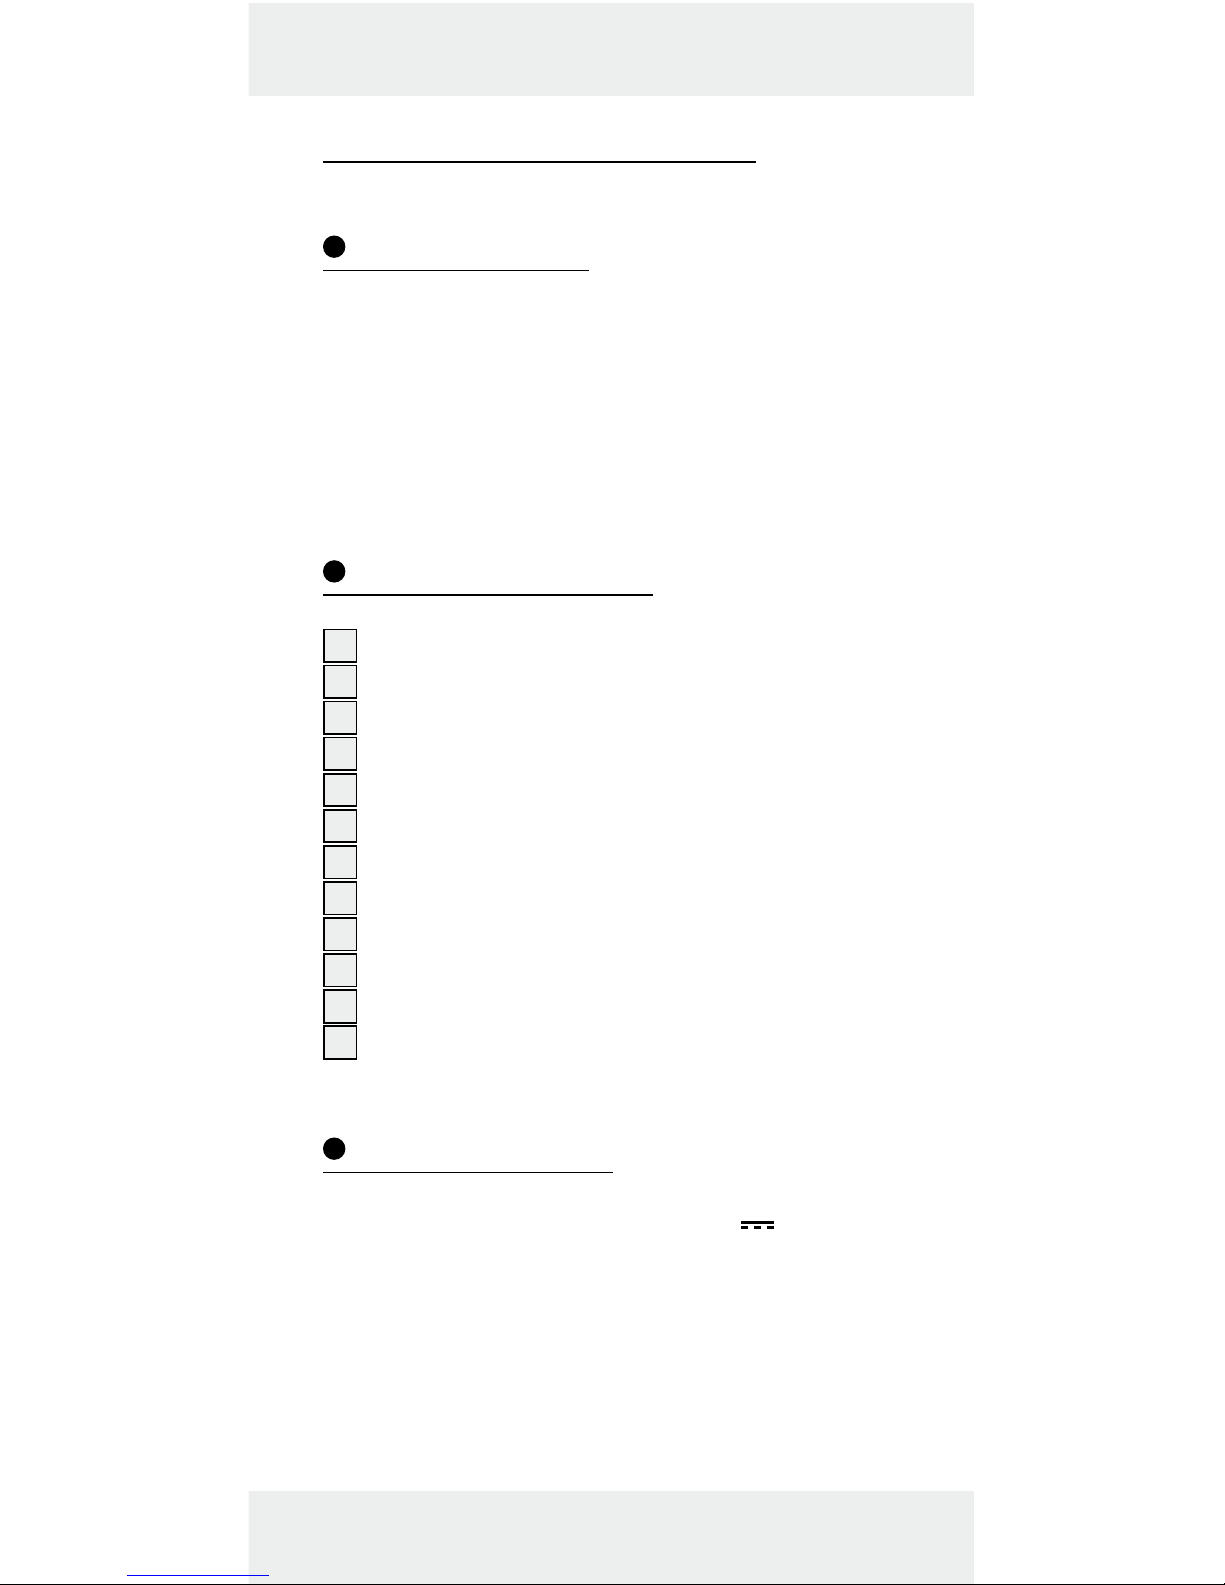
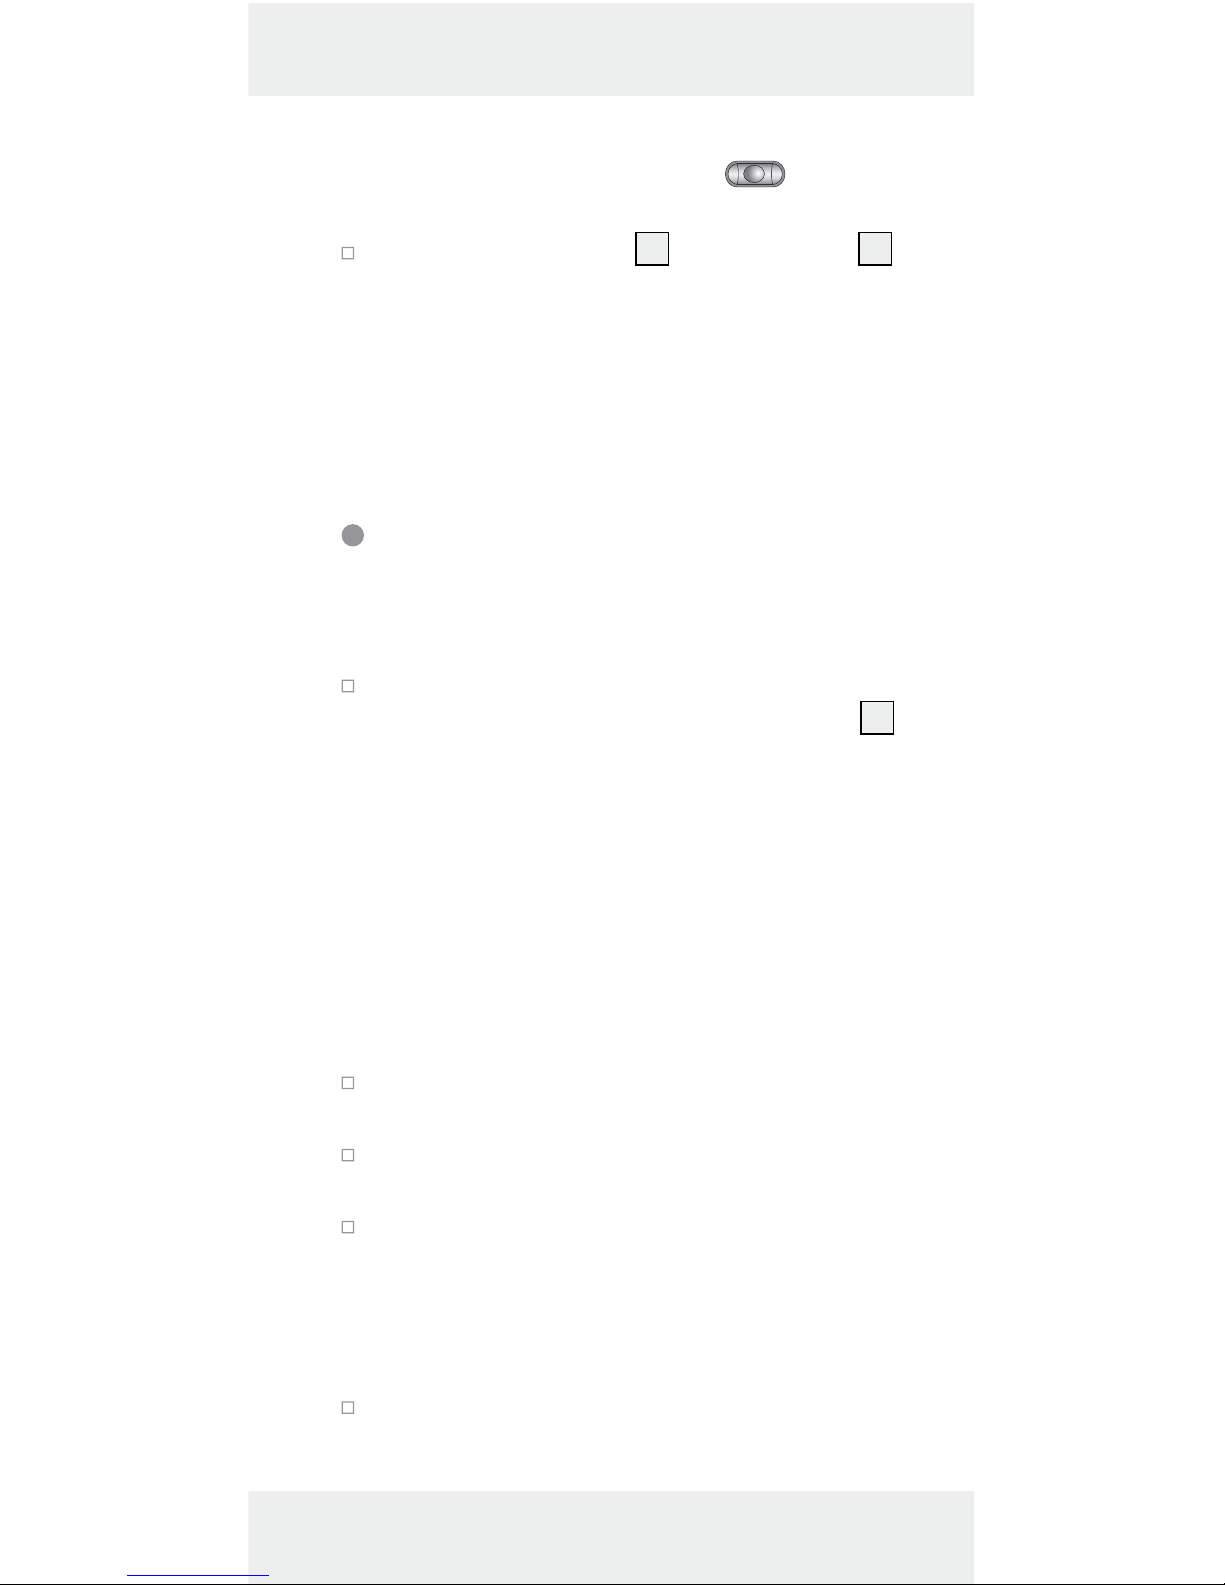
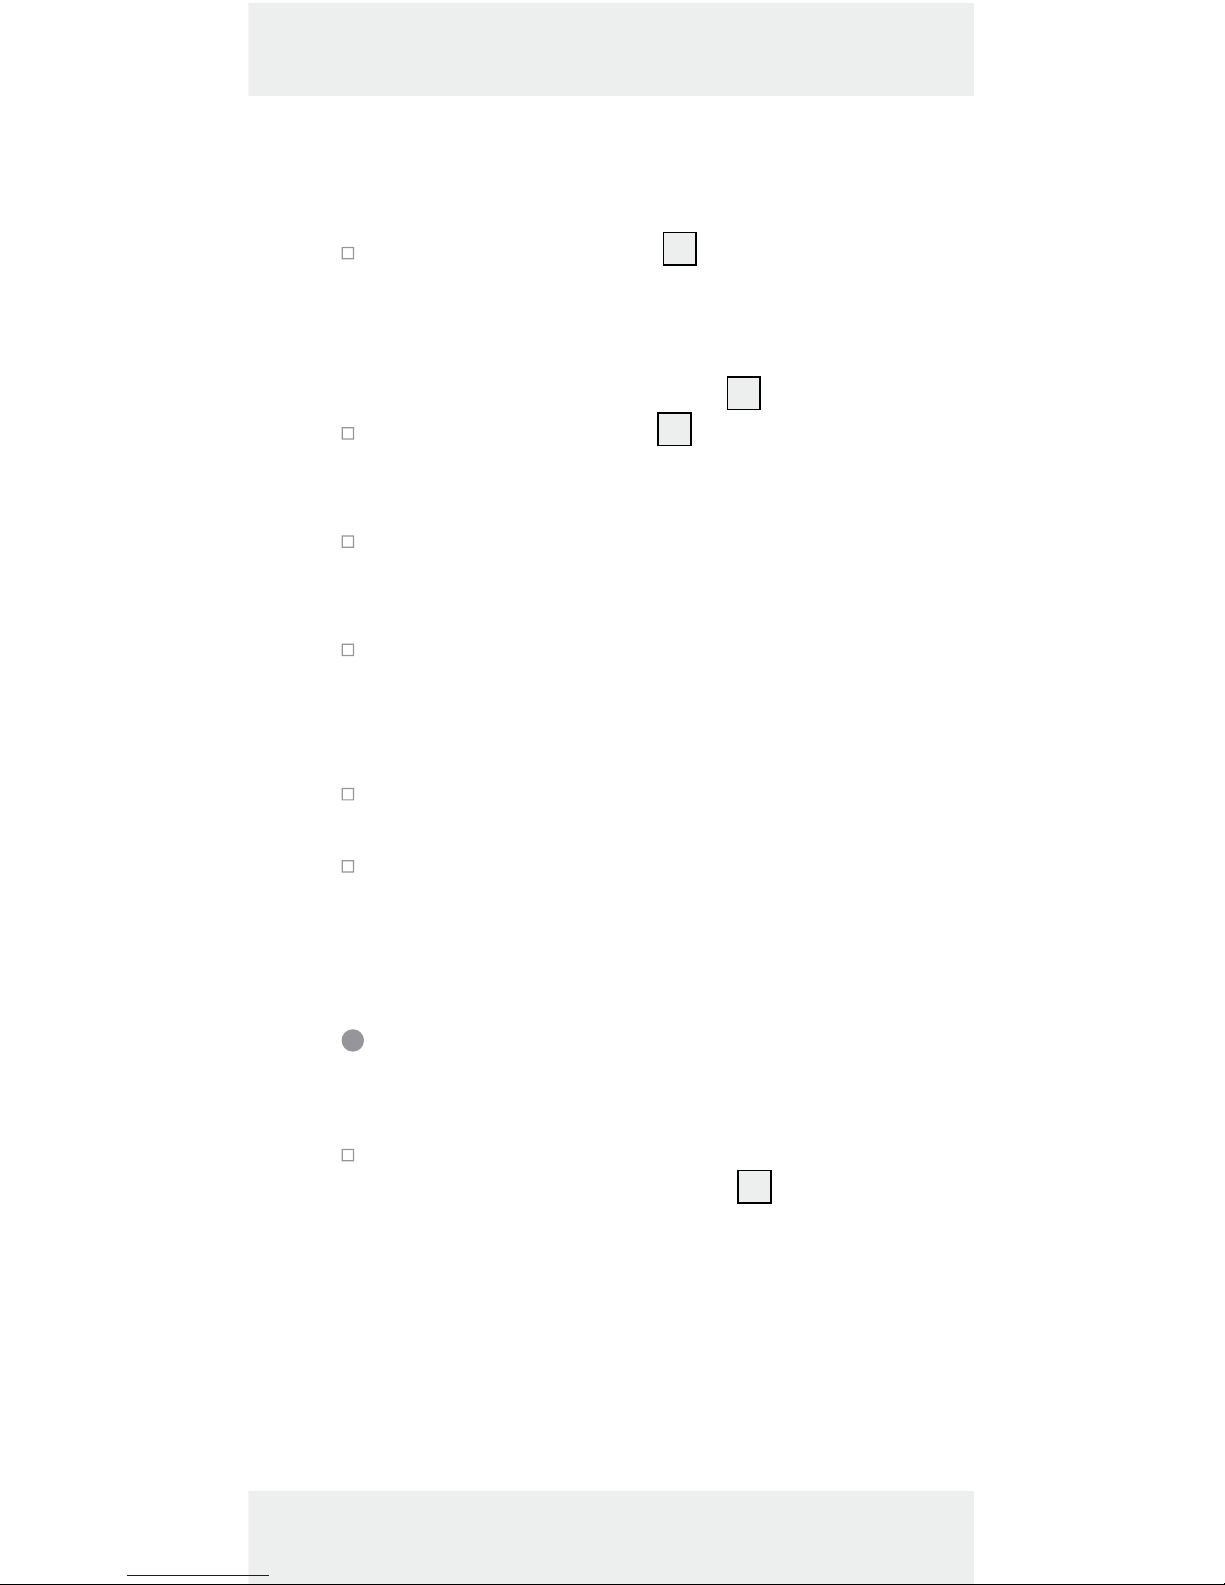
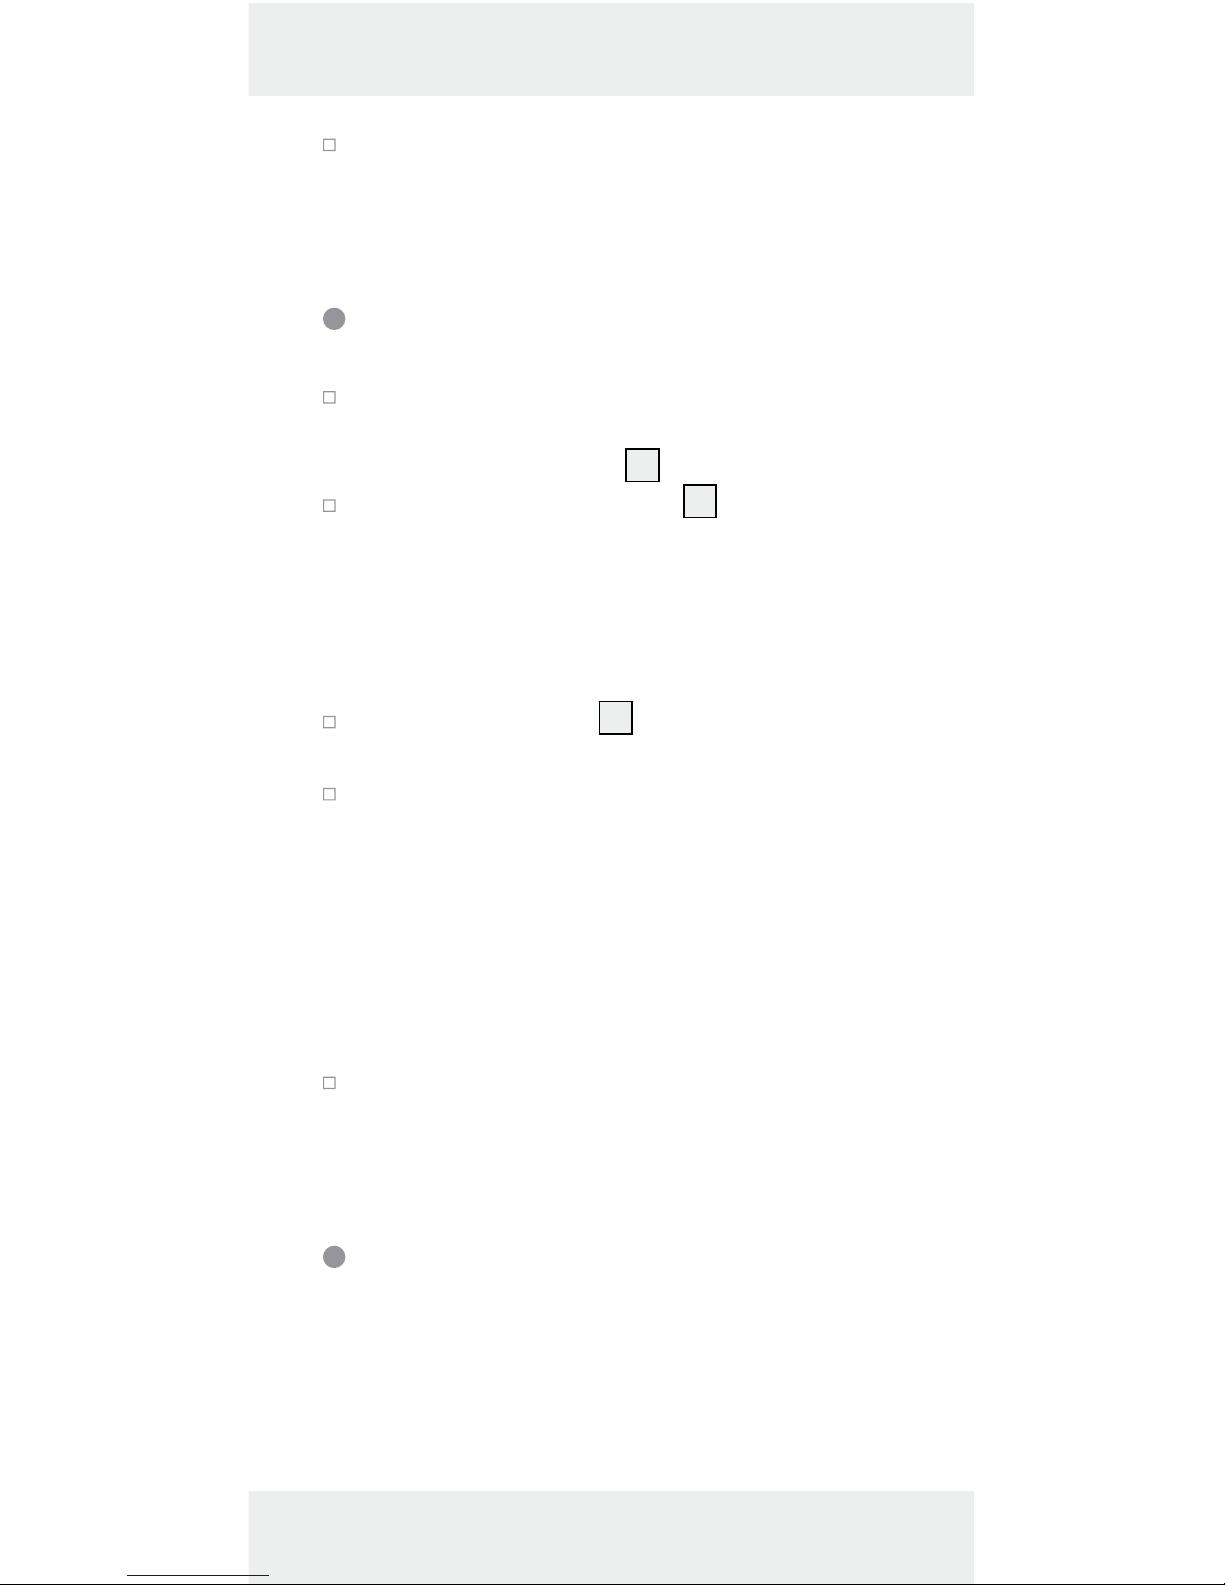
The measurement is performed by ultrasound,
which travels from the ultrasonic transmitter
1
in a conical manner. The ultrasound is reflected
from the target area and received by the ultrasonic receiver. The ultrasonic rangefinder
calculates the measured length (Fig. B) from
the travel time of the signal.
In order to guarantee an exact measurement, the following conditions must be
maintained (Fig. B):
The reference area (A) must be parallel to the
target area (B).
The distance to be measured must be be-
tween 0.6 m and 16 m long.
There must be no objects in the conical path
of the ultrasound, which could reflect the ultrasound prematurely. The conical path of the
ultrasound has a width of about 5 m at a
length of 16m.
The target area must have a smooth surface,
so that the ultrasound can be well reflected.
12 GB/CY
Transparent surfaces, such as glass, generally
reflect the ultrasound.
The battery must not be empty. An empty bat-
tery is shown in the display
10
by the battery
symbol
.
If a definitive measurement is not possible,
the display shows the „Err“ information. The
measurement must then be repeated.
Adding lengths together
Measure a length as described in the section
„Measuring length“. The length appears in
the top line of the display
10
.
Now press the RECALL button 5. The length is
transferred to the bottom line. This means that
it has been saved in the aggregate memory.
The character „+“ appears at the top of the
display. The device displays in this way, that it
is ready for a new length measurement.
Press the READ button 4. The length, which
has now been measured, appears at the top
of the display.
Press the RECALL button. The measured value
is then transferred to the aggregate memory,
and the aggregate of the two measured
lengths appears at the bottom of the display.
If the measurement is an incorrect measurement, do not press the RECALL button but
press the READ button again. The measured
value, which is displayed at the top, is overwritten. Press the RECALL button to adopt the
value into the aggregate memory.
You can repeat this procedure as often as
you wish, as long as the length of 9999.99 m
is not exceeded.
13 GB/CY
Measuring surface area
Note: In order to avoid errors in the measuring
method, please familiarize yourself first with the
information about measuring lengths.
Press the ON/OFF button 9 to switch the
device on.
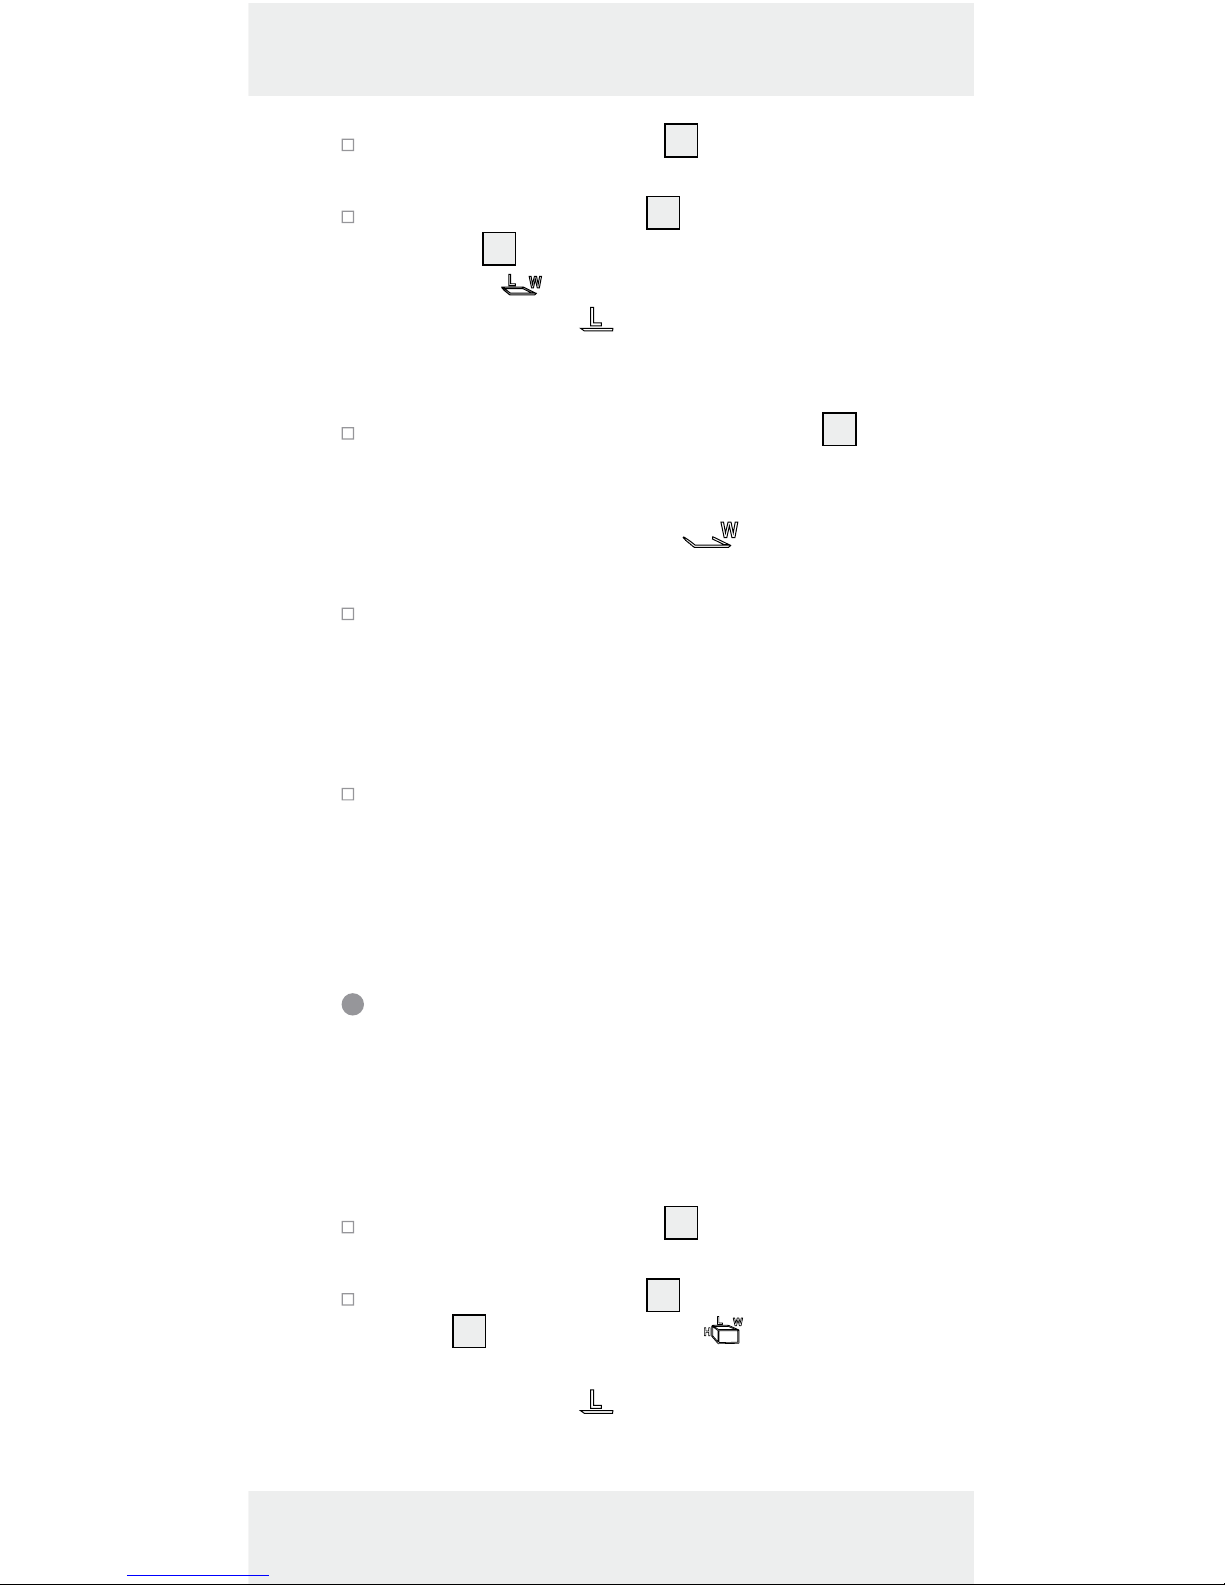
Press the MODE button 8 repeatedly until
the symbol for surface area measurement
„
“, as well as the designation 0.00 m
(or 0‘00“), appear in the display
10
. The
symbol „
“ for length measurement flashes.
The device displays in this way, that it is
ready for the first measurement.
Align the device and press the READ button
4
. If the measurement is successful, the
length will appear at the top of the display.
The symbol for width measurement „
“
also flashes. The device displays in this way,
that it is ready for the measurement of the width.
Align the device and press the READ button
again. If the measurement is successful, the
width appears at the top of the display, and
at the bottom appears the surface area in the
m
2
unit of measurement (or sq.ft = square feet).
Press the MODE button briefly, if a further
surface area measurement is required. The
figures in the display are reset, and the device
is ready for a new surface area measurement.
Measuring volume
Note: In order to avoid errors in the measuring
method, please familiarize yourself first with the
information about measuring lengths.
14 GB/CY
Press the ON/OFF button 9 to switch the
device on.
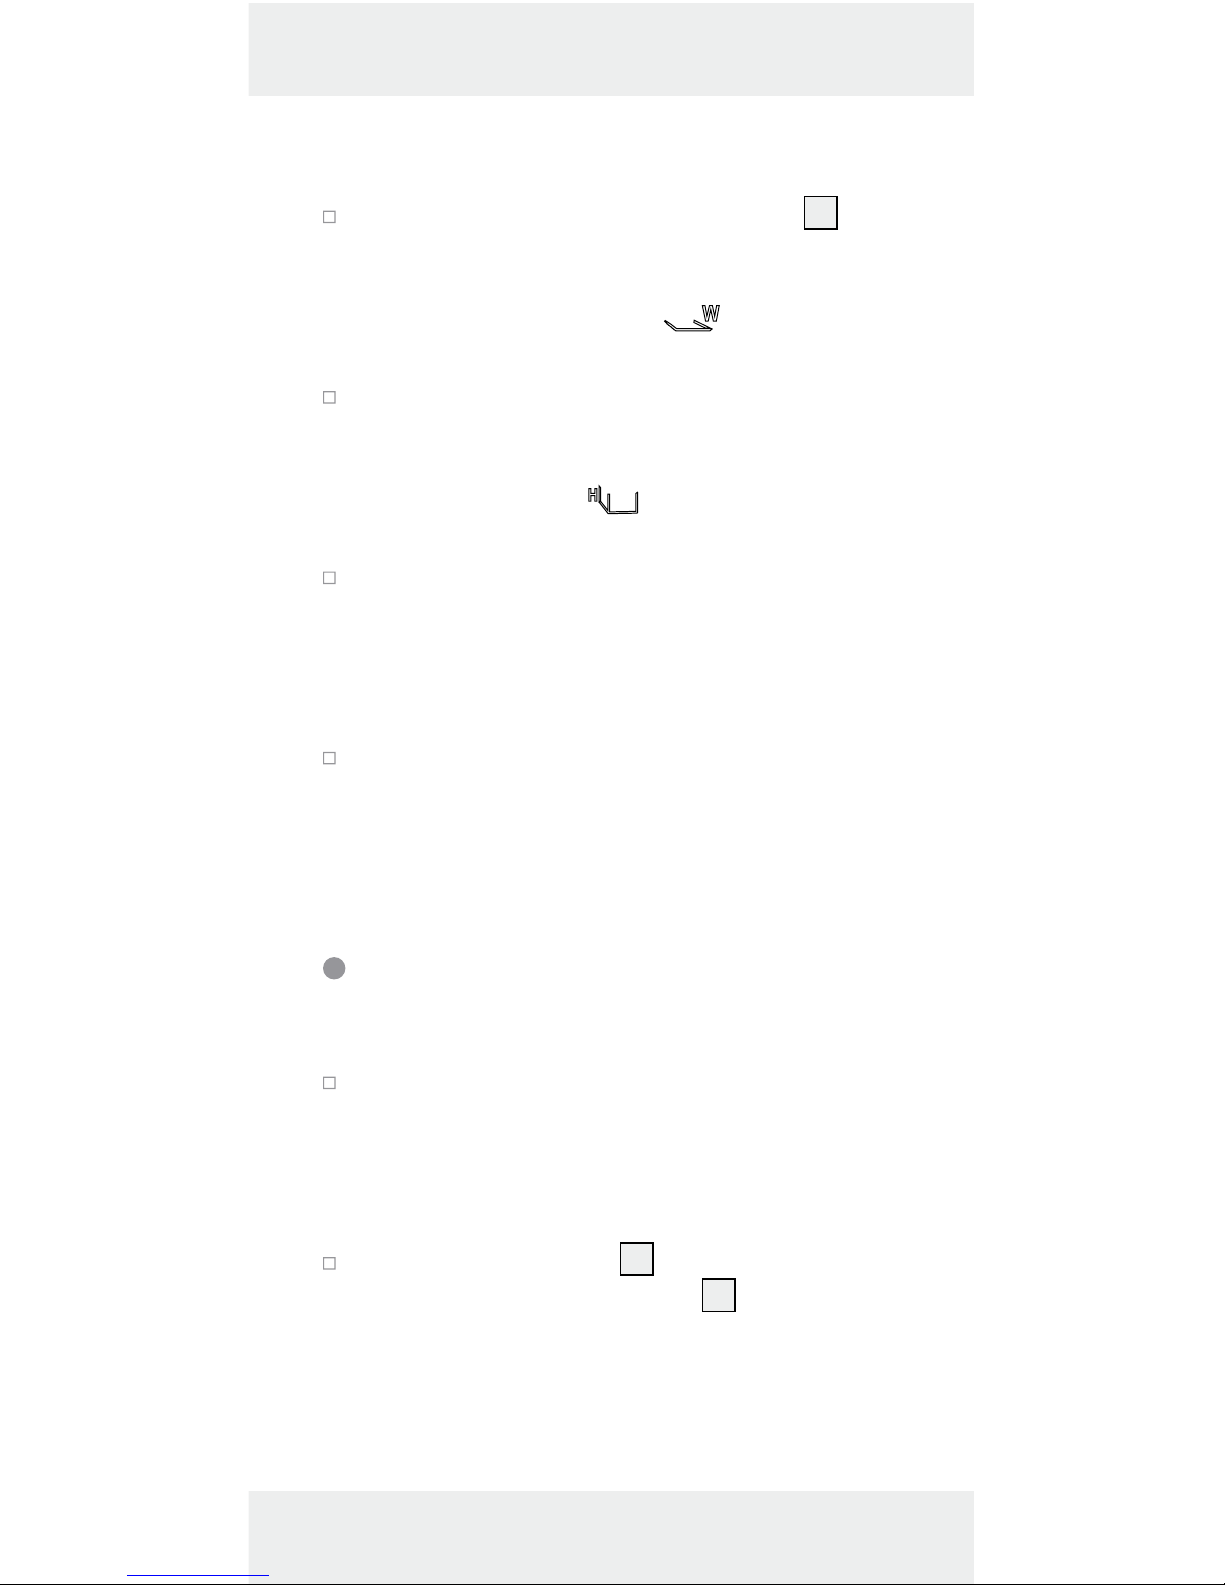
Press the MODE button 8 repeatedly until
the symbol „
“ for volume measurement, as
well as the designation 0.00m (or 0‘00“),
appear in the display
10
. The symbol „ “
for length measurement flashes. The device
displays in this way, that it is ready for the first
measurement.
Align the device and press the READ button 4.
If the measurement is successful, the length
will appear at the top of the display. The
symbol for width measurement „
“ also
flashes. The device displays in this way, that it
is ready for the measurement of the width.
Align the device and press the READ button.
If the measurement is successful, the width
will appear at the top of the display. The
symbol for height measurement „
“ also
flashes. The device displays in this way, that it
is ready for the measurement of the height.
Align the device and press the READ button
again. If the measurement is successful, the
height appears at the top of the display, and
at the bottom appears the volume in the m
3
unit of measurement (or cu.ft = cubic feet).
Press the MODE button briefly, if a further
volume measurement is required. The figures
in the display are reset, and the device is
ready for a new volume measurement.
Adding surface areas or
volumes together
Measure a surface area or volume as de-
scribed in the section „Measuring surface
15 GB/CY
area“ or „Measuring volume“. The surface
area/volume appears in the bottom line of
the display.
Press the RECALL button 5 to save the meas-
ured result. The symbol M+ appears in the
display and this indicates that the measured
result, which is shown at the bottom of the
display, is saved in the device
10
.
Press the MODE button 8 briefly. The de-
vice is now ready to measure the next surface
area or volume.
Measure the next surface area or volume in
the same way as you performed the first
measurement.
Now press the RECALL button again to adopt
the new result into the aggregate memory.
The result of the addition is shown in the
bottom line of the display.
If you would like to add further surface areas
or volumes, repeat steps 3 to 5.
Hold the MODE button pressed down for
3 seconds in order to leave the Addition
mode.
Displaying the last
measured values
After you have measured a surface area or a
volume, press the READ button
4
repeatedly
in order to display the individual values of the
measurement.
The symbol of the corresponding measured
value flashes, and the measured result is
shown in the top line of the display.
16 GB/CY
Temperature display
Hold the FT/M button 3 pressed down for
approx. 3 seconds. The current room temperature, in the official °C temperature unit, is
shown in the display
10
.
In order to switch over to the °F temperature
unit, press the FT/M button briefly.
Press the MODE button 8 briefly in order to
leave the temperature display mode.
Changing the unit of
measurement
Press the FT/M button 3 in order to switch
over from the official metric unit of measurement to the imperial unit of measurement
(display in feet‘ and inches“).
Battery state display
If the battery charge status is low, the battery
symbol
appears in the display 10. Replace
the battery as quickly as possible, if this symbol
appears. Empty batteries can falsify the measured
result. The battery change is described in the
section „Inserting/changing the battery“.
Switching off /
Automatic shut-down
Switch the device off by holding the ON/
OFF button
9
pressed down for 3 seconds.
17 GB/CY
Cleaning and Care
The device should only be cleaned on the
outside with a soft dry cloth.
Disposal
The packaging is made of environmentally friendly materials, which may
be disposed of through your local
recycling facilities.
Contact your local or municipal authority for information on how to dispose
of the device at the end of its operational life.
Pb
Never dispose of batteries in your
household waste. They may contain
toxic heavy metals and are subject to
hazardous waste regulations. The
chemical symbols of the heavy metals
are: Cd = cadmium, Hg = mercury, Pb
= lead. Therefore dispose of used batteries through your municipal collection
site.
Warranty
The device has been manufactured to strict quality
guidelines and meticulously examined before
delivery. In the event of product defects you have
legal rights against the retailer of this product.
Your legal rights are not limited in any way by our
warranty detailed below.
18 GB/CY
The warranty for this device is 3 years from the
date of purchase. Should this device show any
fault in materials or manufacture within three
years from the date of purchase, we will repair or
replace it - at our choice - free of charge to you.
The warranty period begins on the date of purchase. Please keep the original sales receipt in a
safe location. This document is required as your
proof of purchase. This warranty becomes void if
the device has been damaged or improperly
used or maintained.
The warranty applies to faults in material or manufacture. This warranty does not cover product
parts subject to normal wear, thus possibly considered consumables (e.g. batteries) or for damage
to fragile parts, e.g. switches, rechargeable
batteries or glass parts.
EMC

19 HR
Namjenska uporaba ................ Stranica 20
Opis dijelova ...................................Stranica 20
Tehnički podaci .............................. Stranica 20
Opseg isporuke ............................Stranica 21
Opće sigurnosne upute ..........Stranica 21
Sigurnosne upute
za baterije .......................................... Stranica 22
Prije puštanja u rad
Umetanje / zamjena baterije .................Stranica 23
Puštanje u rad
Mjerenje duljine ...................................... Stranica 24
Izbjegavanje mjernih pogrešaka ........... Stranica 25
Zbrajanje duljina ....................................Stranica 26
Mjerenje površine ................................... Stranica 26
Mjerenje zapremine ...............................Stranica 27
Zbrajanje površina odnosno
zapremina ............................................... Stranica 28
Prikaz zadnjih mjernih vrijednosti ..........Stranica 29
Prikaz temperature..................................Stranica 29
Promjena mjerne jedinice ....................... Stranica 30
Prikaz baterije ......................................... Stranica 30
Isključivanje / automatsko
isključivanje .............................................Stranica 30
Čišćenje i njega ..............................Stranica 30
Zbrinjavanje ....................................Stranica 30
Jamstvo ................................................ Stranica 31

20 HR
Ultrazvučni daljinomjer
Namjenska uporaba
Ovaj ultrazvučni mjerač udaljenosti predviđen je
za mjerenje duljina, kao i za izračun površina i
zapremina. Uređaj dodatno raspolaže mjerenjem
temperature. Uređaj je isključivo namijenjen za
uporabu u privatne svrhe.
Opis dijelova
1
Ultrazvučni odašiljač / prijamnik
2
Temperaturni senzor
3
Tipka FT/M
4
Tipka READ
5
Tipka RECALL
6
Referentna površina
7
Libela
8
Tipka MODE
9
Tipka ON / OFF
(UKLJUČIVANJE / ISKLJUČIVANJE)
10
Zaslon
11
Laserska dioda
12
Poklopac pretinca za baterije
Tehnički podaci
Radni napon: maks. 9 V
Tip baterije: 6LR61 (9 V blok)
Mjerno područje: 0,6 m – 16 m
Točnost mjerenja: +/- 1%
Prikaz kapaciteta: do 9999,99
Valna duljina lasera: 635–660 nm, 1 mW

21 HR
Klasa lasera: 2
Frekvencija ultrazvuka: 40kHz
Mjerno područje
termometra: –10 °C – +40 °C
(14 °F – 104 °F)
Opseg isporuke
1 Ultrazvučni daljinomjer
1 9 V blok baterija
1 Upute za uporabu
Opće sigurnosne upute
Prije prve uporabe proizvoda upoznajte se sa
svim sigurnosnim i uputama za uporabu! Ako
proizvod dajete nekoj drugoj osobi, predajte joj i
pripadajuću dokumentaciju!
Prije upotrebe proizvoda provjerite je li ošte-
ćen! Ne upotrebljavajte oštećen proizvod!
Uređaj ne izlažite vlazi! Na taj način može
se oštetiti.
Ovaj uređaj mogu koristiti djeca od 8godina
i starija djeca, kao i osobe s umenjenom
psihičkom, senzoričkom i mentalnom ili s umanjenim iskustvom ako se nadgledaju ili ako
su upoznati sa upotrebom uređaja i razumiju
opasnosti koje proizlaze iz upotrebe. Djeca
se ne smiju igrati uređajem. Čišćenje i
održavanje ne smiju vršiti djeca bez nadzora
odraslih.
22 HR
Opasnost od laserskih zraka
LASERSKE ZRAKE
NE GLEDAJTE Z LASERSKE ZRAKE
KLASA LASERA 2
Uređaj sadrži laser klase 2. Nikada ne usmje-
ravajte lasersku zraku u ljude ili životinje.
Nikada ne gledajte izravno u lasersku zraku.
Već i slaba laserska zraka može uzrokovati
oštećenje očiju.
Nikada ne usmjeravajte lasersku zraku na
reflektirajuće površine ili materijale. Čak i
reflektirajuća laserska zraka može izazvati
oštećenje očiju.
Sigurnosne upute za
baterije
OPASNOST PO
ŽIVOT! Baterije nisu namijenjene za djecu.
U slučaju gutanja odmah potražite liječničku
pomoć!
OPREZ! OPASNOST OD
EKSPLOZIJE! Nikada ne punite
nepunjive baterije, nemojte ih
kratko spajati i / ili otvarati!
Ne bacajte baterije nikada u vatru ili vodu!
Baterije ne izlažite mehaničkom opterećenju!
Opasnost od curenja baterije
U slučaju curenja baterije odmah je odstranite
iz uređaja, kako biste izbjegli oštećenja!
Izbjegavajte dodir s kožom, očima i sluznicom!
Isperite kod dodira s baterijskom kiselinom
23 HR
pogođena mjesta odmah s čistom vodom i
potražite liječničku pomoć!
Koristite isključivo baterije istog tipa! Ne
miješajte stare baterije sa novim!
Izbjegavajte ekstremne uvjete i temperature
koje mogu djelovati na baterije, npr. radijatore / izravno izlaganje suncu.
Izvadite baterije iz uređaja ako ih niste
upotrebljavali dulje vrijeme!
Opasnost od oštećenja uređaja
Upotrebljavajte isključivo navedeni tip bate-
rije!
Prilikom umetanja pripazite na pravilan pola-
ritet! On je prikazan na pretincu za baterije!
Po potrebi očistite kontakte baterije i uređaja
prije umetanja baterija!
Izvadite potrošene baterije odmah iz uređaja!
Prije puštanja u rad
Prije puštanja u rad skinite zaštitnu foliju sa
zaslona
10
uređaja i umetnite priloženu
bateriju.
Umetanje / zamjena baterije
Kada se na zaslonu 10 prikaže simbol baterije
umetnuta baterija gotovo je potrošena i
mora se zamijeniti. Prazne baterije mogu iskriviti
rezultat mjerenja.
Umetnite bateriju na sljedeći način:
Otvorite poklopac pretinca za bateriju 12 na
poleđini uređaja. Pomoću vrpce koja se
24 HR
nalazi u pretincu za baterije možete lakše
izvaditi staru bateriju. Za to samo povucite
vrpcu.
Izvadite po potrebi staru bateriju.
Utaknite kontakte 9 V blok baterije na kontakte
profilnog utikača. Pritom obratite pozornost
na ispravan polaritet. On je zadan oblikom
profila kontakata. Obvezno obratite pozornost da vrpca bude ispod baterije.
Bateriju stavite u pretinac za baterije, zatvorite
poklopac tako da se čuje kad uklopi.
Puštanje u rad
Mjerenje duljine
Pritisnite tipku ON/ OFF 9 za uključivanje
uređaja. Ako 60 sek. ne pritisnete nijednu
tipku, isključi se zaslon
10
.
Za ručno isključivanje uređaja, držite 3 sekunde
pritisnutu tipku ON / OFF, dok se zaslon ne
isključi i ne oglasi dvostruki zvučni signal.
Pritiskajte tipku MODE 8 sve dok se na
zaslonu ne prikaže simbol za mjerenje duljine
„
“ kao i podaci o duljini 0.00 m (odnosno
0‘00‘‘).
Držite referentnu površinu 6 ultrazvučnog
mjerača udaljenosti na početnoj točci mjerenja. Držite uređaj tako da referentna površina
bude paralelna s ciljnom površinom mjerenja.
Za vodoravno izravnavanje ultrazvučnog
mjerača udaljenosti koristite eventualno
libelu
7
. Mjehurić libele nalazi se između
dvije oznake
, ako je vodoravno izrav-
nata.
25 HR
Pritisnite tipku READ 4. Laserska dioda 11
projicira svjetlosnu točku na površinu krajnje
točke mjerenja. Ova svjetlosna točka pomaže
u ispravnom usmjeravanju ultrazvučnog mjerača udaljenosti. Nakon uspješnog mjerenja
izmjerena duljina prikaže se na zaslonu.
Izbjegavanje mjernih
pogrešaka
Radi sprječavanja mjernih pogrešaka
pridržavajte se sljedećih napomena:
Mjerenje se vrši ultrazvukom, koji se s ultra-
zvučnog odašiljača
1
kreće u obliku stošca.
Od ciljne površine zraka se odbija, a prima
je ultrazvučni prijamnik. Ultrazvučni mjerač
udaljenosti izračunava mjerenu dužinu (sl. B)
na temelju vremena trajanja signala.
Kako bi se zajamčilo točno mjerenje,
pridržavajte se sljedećih uvjeta (sl. B):
Referentna površina (A) mora biti paralelna s
ciljnom površinom (B).
Udaljenost koja se mjeri mora biti duga
između 0,6 m i 16 m.
U zvučnom valu ne smije biti predmeta koji
preuranjeno reflektiraju zvuk. Zvučni val je pri
duljini od 16 m otprilike 5m širok.
Ciljna površina mora imati glatku površinu,
kako bi se zvuk mogao dobro reflektirati.
Prozirne površine poput stakla u pravilu
reflektiraju zvuk.
Baterija ne smije biti prazna. Prazna baterija
prikaže se na zaslonu
10
simbolom baterije
.
26 HR
Ako nije moguće jasno mjerenje, zaslon po-
kaže podatak „Err“. Tada se mjerenje mora
ponoviti.
Zbrajanje duljina
Mjerite duljinu kako je opisano u poglavlju
„Mjerenje duljine“. Iznos duljine prikaže se u
gornjem retku zaslona
10
.
Pritisnite sada tipku RECALL 5. Iznos duljine
prenosi se u donji redak. To znači da je pohranjen u ukupnu memoriju.
Gore na zaslonu prikaže se znak „+“. Uređaj
tako pokazuje da je spreman za novo mjerenje duljine.
Pritisnite tipku READ 4. Iznos upravo izmje-
rene duljine prikaže se gore na zaslonu.
Pritisnite sada tipku RECALL. Mjerna vrijednost
se potom preuzima u ukupnu memoriju, a dolje se prikaže iznos dvaju izmjerenih duljina.
Ako je mjerenje pogrešno, nemojte pritisnuti
tipku RECALL, nego ponovno tipku READ.
Gore prikazana mjerna vrijednost se prepiše.
Pritisnite tipku RECALL za preuzimanje vrijednosti u ukupnu memoriju.
Ovaj postupak možete proizvoljno puta
ponavljati, sve dok se ne prekorači duljina od
9999,99 m.
Mjerenje površine
Napomena: Kako bi se izbjegle metodičke
mjerne pogreške, najprije se upoznajte s napomenama za mjerenje duljina.
27 HR
Pritisnite tipku ON/ OFF 9 za uključivanje
uređaja.
Pritiskajte tipku MODE 8 sve dok se na
zaslonu
10
ne prikaže simbol za mjerenje
površine „
“kao i prikaz 0.00 m (odnosno
0‘00‘‘). Simbol „
“ za mjerenje duljine treperi. Uređaj tako pokazuje da je spreman za
prvo mjerenje.
Usmjerite uređaj i pritisnite tipku READ 4.
Kod uspješnog mjerenja izmjerena duljina prikaže se gore na zaslonu. Osim toga treperi
simbol za mjerenje širine „
“. Uređaj tako
pokazuje da je spreman za mjerenje širine.
Usmjerite uređaj i ponovno pritisnite tipku
READ. Kod uspješnog mjerenja gore na
zaslonu prikaže se izmjerena širina, a dolje
površina u mjernoj jedinici m
2
(odnosno
sq.ft = četvorna stopa).
Za ponovno mjerenje površine kratko priti-
snite tipku MODE. Prikazi na zaslonu se
poništavaju, a uređaj je spreman za novo
mjerenje površine.
Mjerenje zapremine
Napomena: Kako bi se izbjegle metodičke
mjerne pogreške, najprije se upoznajte s napomenama za mjerenje duljina.
Pritisnite tipku ON/ OFF 9 za uključivanje
uređaja.
Pritiskajte tipku MODE 8 sve dok se na za-
slonu
10
ne prikaže simbol „ “ za mjerenje
zapremine kao i prikaz 0.00 m (odnosno
0‘00‘‘). Simbol „
“ za mjerenje duljine
28 HR
treperi. Uređaj tako pokazuje da je spreman
za prvo mjerenje.
Usmjerite uređaj i pritisnite tipku READ 4.
Kod uspješnog mjerenja izmjerena duljina prikaže se gore na zaslonu. Osim toga treperi
simbol za mjerenje širine „
“. Uređaj tako
pokazuje da je spreman za mjerenje širine.
Usmjerite uređaj i pritisnite tipku READ. Kod
uspješnog mjerenja izmjerena širina prikaže
se gore na zaslonu. Osim toga treperi simbol
za mjerenje visine „
“. Uređaj tako poka-
zuje da je spreman za mjerenje visine.
Usmjerite uređaj i ponovno pritisnite tipku
READ. Kod uspješnog mjerenja gore na
zaslonu prikaže se izmjerena visina, a dolje
zapremina u mjernoj jedinici m
3
(odnosno
cu.ft = kubična stopa).
Za ponovno mjerenje zapremine kratko
pritisnite tipku MODE. Prikazi na zaslonu se
poništavaju, a uređaj je spreman za novo
mjerenje zapremine.
Zbrajanje površina
odnosno zapremina
Izmjerite površinu odnosno zapreminu kako
je opisano u poglavlju „Mjerenje površine“
odnosno „Mjerenje zapremine“. Iznos površine / zapremine prikaže se u donjem retku
zaslona.
Pritisnite tipku RECALL 5 za memoriranje re-
zultata mjerenja. Na zaslonu
10
prikaže se
simbol M+ i pokazuje da je uređaj memorirao rezultat mjerenja prikazan dolje na zaslonu.

29 HR
Pritisnite kratko tipku MODE 8. Uređaj je
sada spreman za mjerenje sljedeće površine / sljedeće zapremine.
Sljedeću površinu / sljedeću zapreminu izmje-
rite na isti način kao i prethodnu.
Pritisnite sada ponovno tipku RECALL, kako
biste u ukupnu memoriju preuzeli i novi rezultat. Rezultat zbrajanja prikaže se u donjem
retku zaslona.
Ako želite dodati daljnje površine / zapre-
mine, ponovite korake 3 do 5.
Držite tipku MODE 3 sekunde pritisnutom za
napuštanje modusa zbrajanja.
Prikaz zadnjih mjernih
vrijednosti
Nakon mjerenja površine ili zapremine po-
novno pritisnite tipku READ
4
, za prikaziva-
nje pojedinačnih mjernih vrijednosti mjerenja.
Simbol odgovarajuće mjerne vrijednosti tre-
peri, a rezultat mjerenja prikaže se u gornjem
retku zaslona.
Prikaz temperature
Držite tipku FT / M 3 pribl. 3 sekunde priti-
snutom. Na zaslonu
10
prikaže se aktualna
sobna temperatura u službenoj jedinici za
temperaturu °C.
Pritisnite kratko tipku FT / M za prebacivanje
na jedinicu temperature °F.
Pritisnite kratko tipku MODE 8 za napušta-
nje modusa prikaza temperature.

30 HR
Promjena mjerne jedinice
Pritisnite tipku FT / M 3 za prebacivanje sa
službene mjerne jedinice metar na mjernu
jedinicu stopa (prikaz stopa col‘‘).
Prikaz baterije
Kod niske razine napunjenosti baterije na zaslonu
10
prikaže se simbol baterije . Kada se taj
simbol pojavi, zamijenite bateriju što prije. Prazne
baterije mogu iskriviti rezultat mjerenja. Zamjena
baterije opisana je u poglavlju „Umetanje / zamjena baterije“.
Isključivanje /
automatsko isključivanje
Isključite uređaj tako da tipku ON/OFF 9
držite 3 sekunde pritisnutom.
Čišćenje i njega
Čistite uređaj samo izvana mekom, suhom
krpom.
Zbrinjavanje
Ambalaža se sastoji od ekološki neškodljivih materijala koje možete zbrinuti na lokalnim mjestima za reciklažu.

31 HR
Mogućnosti za zbrinjavanje dotrajalog
proizvoda možete saznati u
općinskoj ili gradskoj upravi.
Pb
Baterije se ne smiju odlagati zajedno s
kućnim otpadom. One mogu sadržavati otrovne teške metale i podliježu
zbrinjavanju kao poseban otpad. Kemijski simboli teških metala su sljedeći:
Cd = kadmij, Hg = živa, Pb = olovo.
Istrošene baterije predajte komunalnoj
službi za skupljanje otpada.
Jamstvo
Uređaj se brižno izrađuje prema strogim smjernicama kvalitete i prije isporuke savjesno ispituje. U
slučaju nedostataka na ovom proizvodu, na raspolaganju imate zakonska prava protiv prodavača
tog uređaja. Vaša zakonska prava ovim našim
jamstvom koje je predstavljeno u nastavku, ostaju
netaknuta.
Na ovaj uređaj dobivate jamstvo u trajanju od
3 godine od datuma kupovine. Jamstveni rok
počinje s datumom kupovine. Molimo dobro
sačuvajte originalan račun s blagajne. To je
dokumentacija kao dokaz kupovine koji će se
zahtijevati.
Ako u razdoblju od tri godine od datuma kupovine ovog proizvoda nastane kakva greška na
materijalu ili tvornočka greška, proizvod ćemo –
prema našem izboru – besplatno popraviti ili
zamijeniti. Ovo jamstvo se poništava, kada se
proizvod ošteti, nestručno koristi ili ne održava.

32 HR
Jamstvo vrijedi za nedostatke na materijalu ili
tvorničke pogreške. Ovo jamstvo se ne proteže
na dijelove proizvoda, koji podliježu normalnom
trošenju i stoga se mogu smatrati kao normalni
potrošni dijelovi (npr. baterije) ili za oštećenja na
krhkim dijelovima, npr. prekidaču, punjivim baterijama ili takvi, koji su izrađeni od stakla.
Izjava o sukladnosti za ovaj proizvod dostupna je
na internet stranici www.lidl.hr.
EMC

33 RO
Utilizare conform
destinaţiei .............................................Pagina 34
Descrierea
componentelor ................................Pagina 34
Date tehnice........................................Pagina 34
Pachet de livrare ............................Pagina 35
Indicaţii generale
de siguranţă .......................................Pagina 35
Indicaţii de siguranţă
referitoare la baterii ...................Pagina 36
Anterior punerii
în funcţiune
Introducerea / schimbarea bateriei ........... Pagina 37
Punerea în funcţiune
Măsurarea lungimii .................................. Pagina 38
Evitarea erorilor de măsurare .................. Pagina 39
Adunarea lungimilor .................................Pagina 40
Măsurarea suprafeţei ...............................Pagina 41
Măsurarea volumului ...............................Pagina 42
Adunarea suprafeţelor
sau a volumelor ........................................ Pagina 43
Afişarea ultimelor valori măsurate ...........Pagina 43
Afişarea temperaturii ................................ Pagina 44
Schimbarea unităţii de măsură ................ Pagina 44
Simbolul de baterie .................................. Pagina 44
Oprire / oprirea automată ....................... Pagina 45
Curăţare şi întreţinere ............... Pagina 45
Eliminarea ca deşeu .................... Pagina 45
Garanţie ................................................Pagina 46

34 RO
Aparat de măsurat
distanţa cu ultrasunete
Utilizare conform destinaţiei
Acest telemetru cu ultrasunete este destinat măsurării lungimilor, precum şi calculării suprafeţelor şi
volumelor. Suplimentar, aparatul dispune de un
termometru. Aparatul este prevăzut numai pentru
uz privat.
Descrierea componentelor
1
Emiţător / receptor de ultrasunete
2
Senzor de temperatură
3
Tasta FT/M
4
Tasta READ
5
Tasta RECALL
6
Suprafaţă de referinţă
7
Nivelă
8
Tasta MODE
9
Tasta ON / OFF-Taste (PORNIT / OPRIT)
10
Ecran
11
Diodă cu laser
12
Capac compartiment baterii
Date tehnice
Tensiune de funcţionare: max. 9 V
Tip baterie: 6LR61 (bloc de 9 V)
Domeniu de măsurare: 0,6 m – 16 m
Precizia de măsurare: +/- 1 %
Capacitate de afişare: până la 9999,99
Lungimea undei laserului: 635–660 nm, 1 mW

35 RO
Clasa de laser: 2
Frecvenţă ultrasunete: 40 kHz
Domeniu de măsurare
termometru: –10 °C – +40 °C
(14 °F – 104 °F)
Pachet de livrare
1 aparat de măsurat distanţa cu ultrasunete
1 baterie bloc 9V
1 manual de utilizare
Indicaţii generale de
siguranţă
Înainte de prima utilizare familiarizaţi-vă cu produsul şi consultaţi toate instrucţiunile de utilizare şi
de siguranţă! Predaţi toate documentele aferente
în cazul în care înstrăinaţi acest produs!
Înainte de utilizare verificaţi produsul în
privinţa deteriorărilor! Nu puneţi în funcţiune
un produs deteriorat!
Nu expuneţi aparatul la umiditate! Se poate
deteriora.
Acest aparat poate fi utilizat de copii de peste
8 ani precum și de persoanele cu capacităţi
fizice, senzoriale sau mentale redusă sau
lipsă de experienţă și/sau cunoștinţe, doar
dacă aceștia sunt supravegheaţi sau au fost
instruiţi referitor la utilizarea sigură a aparatului și pericolele ce pot rezulta din acest lucru.
Copii nu au voie să se joace cu aparatul.
Curăţarea și mentenanţa nu trebuie realizate
de copii fără supraveghere.

36 RO
Pericol generat de razele laser
RAZE LASER
NU PRIVIŢI ÎN RAZELE LASER
CLASA DE RAZE LASER 2
Aparatul conţine raze laser din clasa 2. Nu
îndreptaţi niciodată razele laser spre persoane
sau animale. Nu priviţi niciodată direct în
razele laser. Chiar şi razele laser de slabă
intensitate pot produce leziuni oculare.
Nu îndreptaţi niciodată razele laser către su-
prafeţe sau materiale reflectorizante. Razele
laser pot produce leziuni oculare chiar şi
atunci când sunt reflectate.
Indicaţii de siguranţă
referitoare la baterii
PERICOL DE MOARTE!
Nu lăsaţi bateriile la îndemâna copiilor. Con-
sultaţi imediat un medic în cazul înghiţirii unei
baterii!
ATENŢIE! PERICOL DE EXPLO-
ZIE! Nu încărcaţi niciodată baterii
care nu sunt reîncărcabile, nu le
scurtcircuitaţi şi / sau nu le desfaceţi!
Nu aruncaţi niciodată bateriile în foc sau apă!
Nu supuneţi bateriile unei solicitări mecanice!
Pericol cauzat de scurgerea bateriilor
În cazul scurgerii bateriilor, scoateţi-le imediat
din aparat pentru a evita deteriorările!
Evitaţi contactul cu pielea, ochii şi mucoasele!
În cazul contactului cu acidul din baterie clă-
tiţi imediat locul respectiv cu apă curată şi
consultaţi neîntârziat un medic!

37 RO
Folosiţi numai baterii de acelaşi tip! Nu ames-
tecaţi bateriile vechi cu cele noi!
Nu expuneţi bateriile condiţiilor şi temperatu-
rilor extreme, de exemplu, aşezându-le pe
radiatoare/direct în soare.
Scoateţi bateriile din aparat dacă nu îl
utilizaţi timp îndelungat!
Pericolul de deteriorare a aparatului
Folosiţi numai tipul de baterii indicat!
La introducerea bateriilor aveţi grijă la polari-
tatea corectă! Aceasta este indicată în
compartimentul pentru baterii!
Dacă este necesar, curăţaţi bateriile şi con-
tactele aparatului înainte de a le introduce!
Scoateţi bateriile consumate din aparat!
Anterior punerii în funcţiune
Anterior punerii în funcţiune, îndepărtaţi folia
de protecţie de pe display-ul
10
aparatului şi
introduceţi bateria ataşată.
Introducerea /
schimbarea bateriei
Când apare pe ecran 10 simbolul de baterie ,
bateria introdusă este aproape goală şi trebuie
înlocuită. Bateriile goale pot denatura rezultatul
măsurătorii.
Pentru introducerea bateriei procedaţi
în felul următor:
Deschideţi capacul compartimentului pentru
baterii
12
de pe partea din spate a

38 RO
aparatului. Cu ajutorul benzii din interiorul
compartimentului pentru baterii puteţi scoate
mai uşor bateria veche. Trebuie să trageţi pur
şi simplu de bandă.
Dacă este cazul, scoateţi bateria veche.
Introduceţi contactele bateriei bloc de 9 V pe
contactele ştecărului profilat. Aveţi grijă la
polaritatea corectă. Aceasta este indicată de
forma profilului contactelor. Aveţi, de aseme-
nea, grijă ca banda să se afle sub baterie.
Introduceţi bateria în compartimentul pentru
baterii şi închideţi capacul apăsând până
când se aude un sunet de blocare.
Punerea în funcţiune
Măsurarea lungimii
Apăsaţi tasta ON / OFF 9 pentru a porni
aparatul. Dacă nu apăsaţi nicio tastă timp de
60 s, ecranul
10
se stinge.
Pentru a opri aparatul manual, ţineţi apăsată
tasta ON / OFF timp de 3 secunde până
când se stinge ecranul şi se aud două sem-
nale sonore.
Apăsaţi tasta MODE 8 în mod repetat
până când se afişează pe ecran simbolul
pentru măsurarea lungimii „
” şi valoarea
lungimii 0.00m (sau 0‘00‘‘).
Ţineţi suprafaţa de referinţă 6 a telemetrului
cu ultrasunete în locul unde doriţi să înceapă
măsurarea. Ţineţi aparatul în aşa fel încât
suprafaţa de referinţă să fie paralel cu supra-
faţa-ţintă a măsurătorii.
Dacă este cazul, folosiţi nivela 7 pentru
ajustarea orizontală a telemetrului cu

39 RO
ultrasunete. Bula de aer a nivelei se află între
cele două marcaje
când este poziţio-
nată orizontal.
Apăsaţi tasta READ 4. Dioda cu laser 11
proiectează un punct luminos pe suprafaţa
punctului-ţintă al măsurătorii. Acest punct luminos vă ajută să poziţionaţi corect telemetrul
cu ultrasunete. După măsurarea încheiată
cu succes, pe ecran se afişează lungimea
măsurată.
Evitarea erorilor de măsurare
Pentru a evita erorile de măsurare,
ţineţi cont de următoarele indicaţii:
Măsurarea se realizează cu ultrasunete, care
sunt emise sub formă conică de emiţătorul de
ultrasunete
1
. Ultrasunetele sunt reflectate
de suprafaţa-ţintă şi recepţionate de receptorul de ultrasunete. Din timpul de deplasare al
semnalului, telemetrul cu ultrasunete calculează lungimea de măsurat (fig. B).
Pentru a asigura o măsurare exactă,
trebuie respectate următoarele condiţii
(fig. B):
Suprafaţa de referinţă (A) trebuie să fie
orientată paralel faţă de suprafaţa-ţintă (B).
Distanţa de măsurat trebuie să aibă o
lungime cuprinsă între 0,6m şi 16m.
În conul de ultrasunete nu trebuie să se afle
obiecte care ar putea reflecta ultrasunetele.
La o lungime de 16 m, conul de ultrasunete
are o lăţime de aprox. 5 m.
Suprafaţa-ţintă trebuie să fie netedă pentru a
putea reflecta bine ultrasunetele.

40 RO
De regulă, suprafeţele transparente precum
sticla reflectă ultrasunetele.
Bateria nu trebuie să fie goală. O baterie
goală este indicată pe ecran
10
prin simbo-
lul de baterie
.
Dacă nu este posibilă măsurarea exactă, pe
ecran se afişează mesajul „Err”. În cazul
acesta trebuie repetată măsurătoarea.
Adunarea lungimilor
Măsuraţi o lungime conform descrierii din ca-
pitolul „Măsurarea lungimii”. Valoarea lungimii
se afişează în rândul de sus de pe ecran
10
.
Acum apăsaţi tasta RECALL 5. Valoarea
lungimii va fi mutată în rândul de jos. Acest
lucru înseamnă că a fost salvată în memoria
de adunare.
În partea de sus a ecranului apare simbolul
„+”. În felul acesta, aparatul vă arată că este
pregătit pentru o nouă măsurare a lungimii.
Apăsaţi tasta READ 4. Valoarea lungimii
măsurate acum apare pe ecran.
Apăsaţi tasta RECALL. Valoarea măsurată
este preluată în memoria de adunare, iar în
partea de jos apare suma celor două lungimi
măsurate. Dacă măsurarea este eronată, nu
apăsaţi tasta RECALL, ci tasta READ. Valoarea afişată sus va fi suprascrisă. Apăsaţi tasta
RECALL pentru a prelua valoarea în memoria
de adunare.
Puteţi repeta această operaţiune de câte ori
doriţi, cu condiţia ca lungimea de
9999,99m să nu fie depăşită.

41 RO
Măsurarea suprafeţei
Notă: Pentru a evita erorile metodice de măsu-
rare, consultaţi mai întâi indicaţiile referitoare la
măsurarea lungimilor.
Apăsaţi tasta ON / OFF 9 pentru a porni
aparatul.
Apăsaţi tasta MODE 8 în mod repetat
până când se afişează pe ecran
10
simbolul
pentru măsurarea suprafeţei „
” şi valoa-
rea 0.00 m (sau 0‘00‘‘). Simbolul „
” pentru măsurarea lungimii luminează intermitent.
În felul acesta, aparatul vă arată că este
pregătit pentru prima măsurare.
Orientaţi aparatul şi apăsaţi tasta READ 4.
Dacă măsurarea a fost încheiată cu succes,
pe ecran se afişează lungimea măsurată.
Suplimentar luminează intermitent simbolul
pentru măsurarea lăţimii „
”. În felul
acesta, aparatul vă arată că este pregătit
pentru măsurarea lăţimii.
Orientaţi aparatul şi apăsaţi din nou tasta
READ. Dacă măsurătoarea a fost realizată cu
succes, în partea de sus a ecranului se afişează lăţimea măsurată, iar în partea de jos
suprafaţa în m
2
(sau sq.ft = picior pătrat).
Pentru a măsura din nou suprafaţa, apăsaţi
scurt tasta MODE. Afişajele de pe ecran sunt
resetate şi aparatul este pregătit pentru o
nouă măsurare a suprafeţei.

42 RO
Măsurarea volumului
Notă: Pentru a evita erorile metodice de măsu-
rare, consultaţi mai întâi indicaţiile referitoare la
măsurarea lungimilor.
Apăsaţi tasta ON / OFF 9 pentru a porni
aparatul.
Apăsaţi tasta MODE 8 în mod repetat
până când se afişează pe ecran
10
simbolul
„
” pentru măsurarea volumului şi valoarea
0.00 m (sau 0‘00‘‘). Simbolul „
” pentru
măsurarea lungimii luminează intermitent. În
felul acesta, aparatul vă arată că este pregătit pentru prima măsurare.
Orientaţi aparatul şi apăsaţi tasta READ 4.
Dacă măsurarea a fost încheiată cu succes,
pe ecran se afişează lungimea măsurată.
Suplimentar luminează intermitent simbolul
pentru măsurarea lăţimii „
”. În felul
acesta, aparatul vă arată că este pregătit
pentru măsurarea lăţimii.
Orientaţi aparatul şi apăsaţi tasta READ.
Dacă măsurarea a fost încheiată cu succes,
pe ecran se afişează lăţimea măsurată. Suplimentar luminează intermitent simbolul pentru
măsurarea înălţimii „
”. În felul acesta,
aparatul vă arată că este pregătit pentru
măsurarea înălţimii.
Orientaţi aparatul şi apăsaţi din nou tasta
READ. Dacă măsurătoarea a fost realizată cu
succes, în partea de sus a ecranului se afişează înălţimea măsurată, iar în partea de
jos volumul în m
3
(sau cu.ft = picior cub).
Pentru a măsura din nou volumul, apăsaţi
scurt tasta MODE. Afişajele de pe ecran sunt

43 RO
resetate şi aparatul este pregătit pentru o
nouă măsurare a volumului.
Adunarea suprafeţelor sau a
volumelor
Măsuraţi o suprafaţă sau un volum conform
descrierii din capitolul „Măsurarea suprafeţei” sau „Măsurarea volumului”. Valoarea
suprafeţei / volumului se afişează în rândul de
jos de pe ecran.
Apăsaţi tasta RECALL 5 pentru a salva re-
zultatul măsurătorii. Pe ecran
10
se afişează
simbolul M+, care arată că rezultatul măsurătorii afişat în partea de jos a ecranului a fost
memorat în aparat.
Apăsaţi scurt tasta MODE 8. Aparatul este
pregătit acum pentru măsurarea următoarei
suprafeţe / următorului volum.
Măsuraţi următoarea suprafaţă / următorul
volum la fel ca şi la prima măsurare.
Apăsaţi din nou tasta RECALL pentru a prelua
şi noul rezultat în memoria de adunare. Rezultatul adunării se afişează în rândul de jos al
ecranului.
Dacă doriţi să adăugaţi alte suprafeţe / vo-
lume, repetaţi paşii 3 până la 5.
Ţineţi apăsată tasta MODE timp de 3 se-
cunde pentru a părăsi modul de adunare.
Afişarea ultimelor valori
măsurate
După măsurarea unei suprafeţe sau a unui
volum, apăsaţi în mod repetat tasta READ
4

44 RO
pentru a afişa valorile individuale ale măsurătorii.
Simbolul pentru valoarea respectivă lumi-
nează intermitent şi rezultatul măsurării se
afişează în rândul de sus al ecranului.
Afişarea temperaturii
Ţineţi apăsată tasta FT / M 3 timp de
aprox. 3 secunde. Pe ecran
10
se afişează
temperatura actuală a încăperii în unitatea
oficială pentru temperatură, °C.
Pentru a comuta la unitatea pentru tempera-
tură °F, apăsaţi scurt tasta FT / M.
Apăsaţi scurt tasta MODE 8 pentru a
părăsi modul de afişare a temperaturii.
Schimbarea unităţii
de măsură
Apăsaţi tasta FT / M 3 pentru a comuta de
la unitatea de măsură oficială metru la unitatea de măsură picior (afişare picior‘ ţol‘‘).
Simbolul de baterie
Când nivelul de încărcare al bateriei este scăzut,
pe ecran
10
se afişează simbolul de baterie .
Când apare acest simbol, schimbaţi cât mai repede bateriile. Bateriile goale pot denatura rezultatul măsurătorii. Modul de schimbare a bateriilor
este descris în capitolul „Introducerea / schimbarea bateriei”.

45 RO
Oprire/oprirea automată
Opriţi aparatul ţinând apăsată tasta
ON / OFF
9
timp de 3 secunde.
Curăţare şi întreţinere
Curăţaţi aparatul numai în exterior cu o
lavetă moale şi uscată.
Eliminarea ca deşeu
Ambalajul este produs din materiale
ecologice, care pot fi eliminate la
punctele locale de reciclare.
Informaţii cu privire la eliminarea
aparatului puteţi obţine de la administraţia locală.
Pb
Este interzisă eliminarea bateriilor la
gunoiul menajer. Ele pot conţine metale grele toxice şi se supun tratamentului deşeurilor periculoase. Simbolurile
chimice ale metalelor grele sunt următoarele: Cd = cadmiu, Hg = mercur,
Pb = plumb. Prin urmare, predaţi
bateriile consumate la un punct de
colectare local.

46 RO
Garanţie
Aparatul a fost produs cu atenţie conform unor
standarde stricte de calitate şi verificat înainte de
livrare. În cazul defectelor la nivelul acestui aparat aveţi drepturi legale faţă de vânzătorul aparatului. Aceste drepturi legale nu sunt limitate de
garanţia noastră prezentată în continuare.
Pentru acest aparat vă oferim o garanţie de 3 ani
începând cu data achiziţiei. Perioada garanţiei începe la data achiziţiei. Vă rugăm să păstraţi bonul de casă original. Acesta reprezintă dovada
achiziţiei.
Dacă în decurs de trei ani de la data achiziţiei
acestui produs se înregistrează un defect de material sau de fabricaţie, vă reparăm sau înlocuim
gratuit produsul – la alegerea noastră – aparatul. Dreptul de garanţie se stinge dacă produsul
este deteriorat, utilizat sau întreţinut în mod
necores punzător.
Garanţia se aplică numai pentru defecte de material şi de fabricaţie. Această garanţie nu acoperă
piesele componente ale produsului care prezintă
umre normale de uzură și care sunt văzute ca
piese de schimb sau deteriorările la nivelul pieselor casante, de exemplu întrerupătoare, acumulatori sau piese fabricate din sticlă.
EMC

47 BG
Употреба по
предназначение ....................Страница 48
Описание на частите ........Страница 48
Технически данни ............... Страница 48
Обем на доставката...........Страница 49
Общи указания
за безопасност ......................... Страница 49
Указания за
безопасност на
батериите .....................................Страница 50
Преди пускане
в експлоатация ....................... Страница 51
Поставяне / смяна на
батерията ..........................................Страница 52
Пускане в действие
Измерване на дължина ..................Страница 52
Избягване на грешки
при измерването .............................Страница 53
Добавяне на дължини .................... Страница 55
Измерване на площ ........................Страница 55
Измерване на обем ........................Страница 56
Добавяне на площи,
съотв. обеми ..................................... Страница 57
Показване на последните
измерени стойности ........................Страница 58
Показание за температура ...........Страница 58
Смяна на мерната единица ..........Страница 59
Показание за батерия .................... Страница 59
Изключване / Автоматично
спиране .............................................Страница 59
Почистване и
поддръжка ................................. Страница 60
Отстраняване
като отпадък ............................. Страница 60
Гаранция .......................................Страница 60

48 BG
Ултразвуков далекомер
Употреба по
предназначение
Този ултразвуков далекомер е предназначен
за измерване на дължини, както и за изчисление на площи и обеми. Уредът разполага
допълнително с измерване на температура.
Уредът е предназначен само за лична употреба.
Описание на частите
1
Ултразвуков предавател / приемник
2
Температурен сензор
3
FT / M-бутон
4
READ-бутон
5
RECALL-бутон
6
Референтна площ
7
Либела
8
Бутон MODE
9
Бутон ON / OFF (ВКЛ. / ИЗКЛ.)
10
Дисплей
11
Лазерен диод
12
Капак на гнездото за батерии
Технически данни
Работно напрежение: max. 9 V
Тип батерия: 6LR61 (9 V–блок)
Измервателен обхват: 0,6 m – 16 m
Точност на измерване: +/-1 %
Показание капацитет: до 9999,99

49 BG
Дължина на вълната
на лазера: 635–660 nm, 1 mW
Клас на лазера: 2
Ултразвукова честота: 40 kHz
Измервателен обхват
на термометъра: –10 °C – +40 °C
(14 °F – 104 °F)
Обем на доставката
1 ултразвуков далекомер
1 9 V-блок батерия
1 упътване за употреба
Общи указания за
безопасност
Преди първата употреба на продукта се запознайте с всички указания за обслужване и
безопасност! При предоставяне на продукта
на трети лица предавайте също цялата документация!
Преди употреба проверявайте продукта
за повреди! Не използвайте повреден
продукт!
Не излагайте уреда на влага! Той може
да се повреди от това.
Този уред може да се използва от деца
над 8 годишна възраст, както и от лица с
ограничени физически, сензорни и
умствени способности или без опит и
знания, ако са под надзор или са били
инструктирани за безопасната употреба
на уреда и са разбрали произтичащите от

50 BG
това опасности. Децата не бива да играят
с уреда. Почистването и поддръжката да
не се изпълняват от деца без надзор.
Опасност от лазерно лъчение
ЛАЗЕРНО ЛЪЧЕНИЕ
НЕ ГЛЕДАЙТЕ В ЛЪЧА
КЛАС НА ЛАЗЕРА 2
Уредът съдържа лазер клас 2. Никога не
насочвайте лазера към хора или животни.
Никога не гледайте директно в лъча. Дори
слаб лазерен лъч може да предизвика
увреждания на очите.
Никога не насочвайте лазерния лъч върху
рефлектиращи повърхности и материали.
Също и отразен лазерен лъч може да
доведе до увреждания на очите.
Указания за безопасност
на батериите
ОПАСНОСТ ЗА
ЖИВОТА! Батериите не бива да попадат
у деца. В случай на поглъщане незабавно
потърсете лекар!
ВНИМАНИЕ! ОПАСНОСТ
ОТ ЕКСПЛОЗИЯ! Никога не
презареждайте батерии за
еднократна употреба, не ги свързвайте
накъсо и / или не ги отваряйте!
Никога не хвърляйте батериите в огън или
вода!
Не излагайте батериите на механично
натоварване!

51 BG
Опасност от изтичане на батериите
В случай на изтичане незабавно извадете
батерията от уреда, за да предотвратите
повреди!
Избягвате контакт с кожата, очите и лига-
виците! При контакт с киселина от батерията веднага изплакнете засегнатите места
обилно с чиста вода и незабавно потърсете лекар!
Използвайте само батерии от същия тип!
Не смесвайте стари и нови батерии!
Избягвайте екстремни условия и темпера-
тури, които могат да повлияят на батериите, например отоплителни тела /
директно слънчево лъчение.
Извадете батериите от уреда, ако те не
са използвани по-продължително време!
Опасност от повреда на уреда
Използвайте само посочения тип батерии!
При поставяне съблюдавайте правилната
полярност! Тя е указана в гнездото за
батерии!
В случай на необходимост почистете
батериите и контакта на уреда преди
поставянето им!
Отстранявайте незабавно изтощените
батерии от уреда!
Преди пускане в
експлоатация
Преди първата употреба отстранете за-
щитното фолио от дисплея
10
на уреда и
поставете приложената батерия.

52 BG
Поставяне / смяна на
батерията
Когато на дисплея 10 се появи символът на
батерия
, поставената батерия е почти
изчерпана и трябва да бъде сменена. Празни
батерии могат да деформират резултата от
измерване.
За да поставите батерията, действайте
както следва:
Отворете капака на гнездото за батерии 12
на гърба на уреда. С помощта на лентата
плат, която се намира във вътрешността на
гнездото на батерията, можете по-лесно
да извадите старата батерия. За целта
само теглете лентата плат.
При необходимост извадете старата
батерия.
Пъхнете контактите на 9 V-блок батерията
върху контактите на профилния щепсел.
Обърнете внимание на правилната полярност. Тя е зададена чрез профилната
форма на контактите. Задължително обърнете внимание лентата плат да се намира
под батерията.
Поставете батерията в гнездото за бате-
рии и отново затворете капака, така че да
се чуе как той щраква.
Пускане в действие
Измерване на дължина
Натиснете бутона ON / OFF 9, за да
включите уреда. Ако в продължение на

53 BG
60 s не натиснете никакъв бутон, дисплеят
10
изключва.
За да изключите ръчно уреда, задръжте
бутона ON / OFF натиснат 3 секунди,
докато дисплеят угасне и прозвучи двоен
звуков сигнал.
Натискайте бутона MODE 8 дотогава,
докато дисплеят покаже символа за измерване на дължина „
“, както и данни
за дължина 0.00 m (съотв. 0‘00‘‘).
Дръжте референтната площ 6 на ултраз-
вуковия далекомер в началната точка на
вашето измерване. Дръжте уреда така, че
референтната площ да е насочена успоредно на площта на измерването.
При необходимост използвайте либелата
7
за хоризонтално подравняване на
ултразвуковия далекомер. Въздушното
балонче на либелата при хоризонтално
подравняване се намира между двете
маркировки
.
Натиснете бутон READ 4. Лазерният
диод
11
проектира светлинна точка върху
площта на крайната точка на измерването.
Тази светлинна точка ви помага коректно
да подравните ултразвуковия далекомер.
След извършено измерване, измерената
дължина се показва на дисплея.
Избягване на грешки при
измерването
За да избегнете грешки при измерването, вземете предвид следните
указания:

54 BG
Измерването се извършва с ултразвук,
който се движи конусообразно напред от
ултразвуковия предавател
1
. Звукът се
връща от целевата площ и се приема от
ултразвуковия приемник. От продължителността на сигнала ултразвуковият далекомер изчислява подлежащата на
измерване дължина (фиг. B).
За да се гарантира точно измерване,
трябва да се спазват следните условия
(фиг. B):
Референтната площ (A) трябва да бъде
успоредна на целевата площ (B).
Подлежащата на измерване отсечка
трябва да е в диапазона между 0,6 m и 16 m.
В конуса на звука не трябва да се нами-
рат предмети, които да отразяват грешно
звука. Конусът на звука при дължина 16 m
има ширина около 5 m.
Целевата площ трябва да има гладка по-
върхност, за да може звукът да се отрази
добре.
Прозрачни повърхности, като стъкло, по
правило отразяват звука.
Батерията не трябва да бъде празна.
Празна батерия се показва на дисплея
10
чрез символа за батерия
.
Когато не е възможно еднозначно измер-
ване, на дисплея се показва „Err“, грешка.
Тогава измерването трябва да се повтори.

55 BG
Добавяне на дължини
Измерете дадена дължина, както е опи-
сано в глава „Измерване на дължина“.
Сумата на дължината се появява в горния
ред на дисплея
10
.
Сега натиснете бутона RECALL 5. Сумата
на дължината се пренася на долния ред.
Това означава, че е запаметена в сумиращата памет.
Горе на дисплея се появява знакът „+“.
Така уредът показва, че е готов за ново
измерване на дължина.
Натиснете бутон READ 4. Сумата на сега
измерената дължина се появява горе на
дисплея.
Натиснете бутона RECALL. Измерената
стойност се записва в сумиращата памет
и долу се появява сумата на двете измерени дължини. Ако измерването е грешно
измерване, не натискайте бутона RECALL,
а отново бутона READ. Показваната горе
измерена стойност се презаписва. Натиснете бутона RECALL, за да запишете
стойността в сумиращата памет.
Можете да повтаряте произволно често
този процес, докато не бъде превишена
дължина 9999,99 m.
Измерване на площ
Указание: За да избегнете методически
грешки, моля първо се запознайте с указанията за измерване на дължини.

56 BG
Натиснете бутона ON / OFF 9, за да
включите уреда.
Натискайте бутона MODE 8 дотогава,
докато на дисплея
10
се появи символът
за измерване на площ „
“, както и показанието 0.00 m (съотв. 0‘00‘‘). Символът
„
“ за измерване на дължина мига. Така
уредът показва, че е готов за първото
измерване.
Насочете уреда и натиснете бутона
READ
4
. При успешно измерване горе на
дисплея се показва измерената дължина.
Освен това мига символът за измерване
на ширина „
“. Така уредът показва,
че е готов за измерването на ширината.
Насочете уреда и натиснете отново бутона
READ. При успешно измерване горе на
дисплея се появява измерената ширина,
а долу площта в мерна единица m
2
(съотв. sq.ft = квадратен фут).
За повторно измерване на площ нати-
снете кратко бутона MODE. Индикациите
на дисплея се нулират и уредът е готов за
ново измерване на площ.
Измерване на обем
Указание: За да избегнете методически
грешки, моля първо се запознайте с указанията за измерване на дължини.
Натиснете бутона ON / OFF 9, за да
включите уреда.
Натискайте бутона MODE 8 дотогава,
докато на дисплея
10
се появи символът
за измерване на обем „
“, както и

57 BG
показанието 0.00 m (съотв. 0‘00‘‘). Символът „
“ за измерване на дължина мига.
Така уредът показва, че е готов за първото
измерване.
Насочете уреда и натиснете бутона READ
4
. При успешно измерване горе на
дисплея се показва измерената дължина.
Освен това мига символът за измерване
на ширина „
“. Така уредът показва,
че е готов за измерването на ширината.
Насочете уреда и натиснете бутона READ.
При успешно измерване горе на дисплея
се показва измерената ширина. Освен
това мига символът за измерване на височина „
“. Така уредът показва, че е
готов за измерването на височината.
Насочете уреда и натиснете отново бу-
тона READ. При успешно измерване горе
на дисплея се появява измерената височина, а долу обемът в мерна единица m
3
(съотв. cu.ft = кубичен фут).
За ново измерване на обем натиснете
кратко бутона MODE. Индикациите на
дисплея се нулират и уредът е готов за
ново измерване на обем.
Добавяне на площи,
съотв. обеми
Измерете дадена площ, съотв. даден
обем, както е описано в глава „Измерване на площ“, съотв. „Измерване на
обем“. Сумата на площта/на обема се
появява в горния ред на дисплея.
Натиснете бутона RECALL 5, за да запа-
метите резултата от измерването. На

58 BG
дисплея 10 се появява символът M+ и
показва, че показваният долу на дисплея
резултат от измерването е запаметен в
уреда.
Натиснете кратко бутон MODE 8. Сега
уредът е готов за измерване на следващата площ / на следващия обем.
Измерете следващата площ / следващия
обем така, както извършихте първото
измерване.
Сега натиснете отново бутона RECALL, за
да запишете и новия резултат в сумиращата памет. Резултатът от добавянето се
показва в долния ред на дисплея.
Ако искате да добавите нови площи /
обеми, повторете стъпки 3 до 5.
Задръжте натиснат за 3 секунди бутона
MODE, за да напуснете режима на
добавяне.
Показване на последните
измерени стойности
След измерването на дадена площ или
даден обем натиснете повторно бутона
READ
4
, за да се покажат отделните
измерени стойности на измерването.
Символът на съответната измерена стой-
ност мига и резултатът от измерване се
показва в горния ред на дисплея.
Показание за температура
Задръжте натиснат около 3 секунди бу-
тона FT / M
3
. На дисплея 10 се показва

59 BG
текущата температура на помещението в
официалната температурна единица °C.
За да превключите в температурна еди-
ница °F, натиснете кратко бутона FT / M.
Натиснете кратко бутон MODE 8, за
да напуснете режима на показване на
температурата.
Смяна на мерната единица
Натиснете бутона FT / M 3, за да прев-
ключите от официалната мерна единица
метър в мерна единица фут (показание
feet‘ inches‘).
Показание за батерия
При ниско ниво на зареждане на батерията,
на дисплея
10
се появява символът на бате-
рия
. При поява на този символ сменете
възможно най-бързо батерията. Празни
батерии могат да деформират резултата от
измерване. Смяната на батерията се описва в
глава „Поставяне/смяна на батерия“.
Изключване /
Автоматично спиране
Изключете уреда, като държите натиснат
бутона ON/OFF
9
3 секунди.

60 BG
Почистване и поддръжка
Почиствайте уреда само външно с мека
суха кърпа.
Отстраняване като отпадък
Опаковката е изработена от екологични материали, които може да
предадете в местните пунктове за
рециклиране.
Ще научите възможностите за предаване като отпадък на излезлия от
употреба уред от вашата общинска
или градска администрация.
Pb
Батериите не бива да се изхвърлят с
домакинските отпадъци. Те могат да
съдържат отровни тежки метали и
подлежат на специална преработка. Химическите символи на
тежките метали са, както следва:
Cd = кадмий, Hg = живак,
Pb = олово. Затова предавайте
изтощените батерии в общински
събирателен пункт.
Гаранция
Уредът е произведен по строги правила за качество с необходимото внимание и е тестван
добросъвестно преди доставката му. В случай
на неизправност на този продукт Вие имате
законни права пред продавача. Тези
законни

61 BG
права не се ограничават от представената
по-долу гаранция.
За този уред Вие получавате 3 години гаранция от датата на закупуване. Гаранционният
срок започва да тече от датата на закупуване.
Моля, съхранявайте добре оригиналната касова бележка. Този документ е необходим
като доказателство за покупката.
Ако в рамките на три години, считано от датата на покупката на този продукт, възникне
материален
или фабричен дефект, ние ще го
ремонтираме или подменим - по наша преценка - безплатно
за Вас.
Настоящата гаранция става нищожна, ако уредът е повреден,
не е използван правилно или не е поддържан
правилно.
Гаранцията важи за дефекти на материала
или производствени дефекти. Тази гаранция
не се разпростира върху части на продукта,
които са изложени на нормално износване и
поради това се разглеждат като бързо износващи се части (напр. батерии) или върху
повреди на чупливи части, напр. превключватели, акумулаторни батерии или такива,
произведени от стъкло.
EMC

62 GR/CY
Προβλεπόμενη χρήση ............... Σελίδα 63
Περιγραφή μερών .......................... Σελίδα 63
Τεχνικά χαρακτηριστικά ......... Σελίδα 63
Περιεχόμενα παράδοσης ........ Σελίδα 64
Γενικές οδηγίες ασφαλείας .... Σελίδα 64
Οδηγίες ασφάλειας
σχετικά με τις μπαταρίες ........... Σελίδα 65
Πριν από την ενεργοποίηση
για πρώτη φορά
Εισαγωγή / αντικατάσταση μπαταρίας .... Σελίδα 67
Λειτουργία
Μέτρηση μήκους ...................................... Σελίδα 68
Αποφυγή σφαλμάτων μέτρησης .............. Σελίδα 69
Άθροισμα μετρήσεων μήκους .................. Σελίδα 70
Μέτρηση επιφάνειας ................................ Σελίδα 71
Μέτρηση όγκου ........................................ Σελίδα 72
Άθροισμα μετρήσεων επιφανειών
ή / και όγκων ............................................. Σελίδα 73
Εμφάνιση των τελευταίων τιμών
μέτρησης ................................................... Σελίδα 74
Ένδειξη θερμοκρασίας ............................ Σελίδα 74
Εναλλαγή μονάδων μέτρησης ................. Σελίδα 74
Ένδειξη μπαταρίας ................................... Σελίδα 75
Απενεργοποίηση / αυτόματη
απενεργοποίηση ....................................... Σελίδα 75
Καθαρισμός και φροντίδα .... Σελίδα 75
Απόρριψη ............................................. Σελίδα 75
Εγγύηση ................................................. Σελίδα 76

63 GR/CY
Μετρητής αποστάσεων, υπερήχων
Προβλεπόμενη χρήση
Αυτός ο μετρητής αποστάσεων υπερήχων έχει
σχεδιαστεί για τη μέτρηση μήκους, καθώς και για
τον υπολογισμό επιφανειών και όγκων. Παράλληλα, η συσκευή διαθέτει θερμόμετρο. Η συσκευή
προορίζεται αποκλειστικά για ιδιωτική χρήση.
Περιγραφή μερών
1
Πομπός/δέκτης υπερήχων
2
Αισθητήρας θερμοκρασίας
3
Πλήκτρο FT/M
4
Πλήκτρο READ
5
Πλήκτρο RECALL
6
Επιφάνεια αναφοράς
7
Αλφάδι
8
Πλήκτρο MODE
9
Πλήκτρο ΟΝ / OFF (ΕΝΕΝΕΡΓΟΠΟΙΗΣΗ/
ΑΠΕΝΕΡΓΟΠΟΙΗΣΗ)
10
Οθόνη
11
Δίοδος λέιζερ
12
Καπάκι θήκης μπαταρίας
Τεχνικά χαρακτηριστικά
Τάση λειτουργίας: μέγ. 9 V
Τύπος μπαταρίας: 6LR61 (πλακέ 9 V)
Εύρος μέτρησης: 0,6 m – 16 m
Ακρίβεια μέτρησης: +/- 1%
Δυνατότητα ένδειξης: έως 9999,99
Μήκος κύματος λέιζερ: 635–660 nm, 1 mW

64 GR/CY
Κατηγορία λέιζερ: 2
Συχνότητα υπερήχων: 40 kHz
Εύρος μέτρησης
θερμόμετρου: –10 °C – +40 °C
(14 °F – 104 °F)
Περιεχόμενα παράδοσης
1 Μετρητής αποστάσεων, υπερήχων
1 Πλακέ μπαταρία 9 V
1 Οδηγίες χρήσης
Γενικές οδηγίες
ασφαλείας
Εξοικειωθείτε με όλες τις οδηγίες χρήσης και
ασφαλείας πριν από τη χρήση του προϊόντος για
πρώτη φορά! Σε περίπτωση μεταβίβασης του
προϊόντος σε τρίτους, παραδώστε, επίσης, όλα
τα έγγραφα!
Ελέγξτε το προϊόν για τυχόν ζημιές πριν από
την ενεργοποίηση του προϊόντος! Μην ενεργοποιείτε το προϊόν σε περίπτωση που είναι
ελαττωματικό!
Η συσκευή δεν θα πρέπει να εκτίθεται σε
υγρασία! Ενδέχεται να υποστεί βλάβη.
Αυτή η συσκευή μπορεί να χρησιμοποιηθεί
από παιδιά άνω των 8 ετών καθώς και από
πρόσωπα με μειωμένες φυσικές, αισθητηριακές
ή πνευματικές ικανότητες ή με έλλειψη
εμπειρίας και/ή γνώσης, όταν επιβλέπονται ή
έχουν ενημερωθεί σχετικά με την ασφαλή
χρήση του στεγνωτήρα μαλλιών ταξιδιού και
έχουν καταλάβει τους κινδύνους που

65 GR/CY
προκύπτουν από αυτό. Τα παιδιά δεν
επιτρέπεται να παίζουν με την συσκευή.
Καθαρισμός και συντήρηση χρήστη
απαγορεύεται να εκτελούνται από παιδιά
χωρίς επίβλεψη.
Κίνδυνος λόγω ακτινοβολίας λέιζερ
ΔΕΣΜΗ ΛΕΙΖΕΡ
ΜΗΝ ΚΟΙΤΑΖΕΤΕ ΣΤΗΝ ΔΕΣΜΗ
ΛΕΙΖΕΡ ΚΑΤΗΓΟΡΙΑ 2
Η συσκευή διαθέτει διάταξη λέιζερ κατηγορίας
2. Μην στρέφετε ποτέ την ακτίνα λέιζερ σε
άτομα ή ζώα. Μην κοιτάτε ποτέ απευθείας
την ακτίνα. Ακόμη και μια αδύναμη ακτίνα
λέιζερ ενδέχεται να προκαλέσει βλάβες στα
μάτια.
Μην στρέφετε ποτέ την ακτίνα λέιζερ σε ανα-
κλαστικές επιφάνειες ή υλικά. Ακόμη και μια
ακτίνα λέιζερ που αντανακλάται ενδέχεται να
προκαλέσει βλάβες στα μάτια.
Οδηγίες ασφάλειας
σχετικά με τις μπαταρίες
ΚΙΝΔΥΝΟΣ
ΘΑΝΑΤΟΥ! Τα παιδιά δεν θα πρέπει να έρ-
χονται σε επαφή με μπαταρίες. Σε περίπτωση
κατάποσης, απευθυνθείτε αμέσως σε γιατρό!
ΠΡΟΣΟΧΗ! ΚΙΝΔΥΝΟΣ
ΕΚΡΗΞΗΣ! Μην φορτίζετε μη
επαναφορτιζόμενες μπαταρίες,
μην τις βραχυκυκλώνετε ή / και μην τις αποσυναρμολογείτε!
Μην πετάτε ποτέ μπαταρίες σε φωτιά ή νερό!

66 GR/CY
Οι μπαταρίες δεν θα πρέπει να δέχονται μη-
χανική καταπόνηση!
Κίνδυνος διαρροής των μπαταριών
Σε περίπτωση διαρροής των μπαταριών,
απομακρύνετε τις αμέσως από τη συσκευή
ώστε να αποφευχθούν τυχόν βλάβες!
Αποφεύγετε την επαφή με το δέρμα, τα μάτια
και τις βλεννογόνους! Σε περίπτωση επαφής
με οξύ μπαταριών, ξεπλύνετε το σημείο
άμεσα με καθαρό νερό και αναζητήστε αμέσως έναν γιατρό!
Χρησιμοποιείτε αποκλειστικά μπαταρίες του
ίδιου τύπου! Μην χρησιμοποιείτε παλιές
μπαταρίες μαζί με καινούργιες!
Αποφεύγετε τις ακραίες συνθήκες και θερμο-
κρασίες, που ενδέχεται να επηρεάσουν τις
μπαταρίες, π.χ. θερμαντικά σώματα / άμεση
ηλιακή ακτινοβολία.
Αφαιρείτε τις μπαταρίες από τη συσκευή σε
περίπτωση που δεν έχουν χρησιμοποιηθεί
για μεγάλο χρονικό διάστημα!
Κίνδυνος βλάβης της συσκευής
Χρησιμοποιείτε αποκλειστικά τον τύπο μπατα-
ριών που αναγράφεται!
Λαμβάνετε υπόψη τη σωστή πολικότητα κατά
την εισαγωγή! Αναγράφεται στη θήκη της
μπαταρίας!
Εφόσον απαιτείται, καθαρίστε τις επαφές της
μπαταρίας και της συσκευής πριν από την
εισαγωγή!
Απομακρύνετε τις αποφορτισμένες μπαταρίες
άμεσα από τη συσκευή!

67 GR/CY
Πριν από την ενεργοποίηση
για πρώτη φορά
Πριν από την ενεργοποίηση για πρώτη
φορά, απομακρύνετε την προστατευτική μεμβράνη από την οθόνη
10
της συσκευής και
εισαγάγετε την μπαταρία που παρέχεται.
Εισαγωγή / αντικατάσταση
μπαταρίας
Σε περίπτωση που εμφανίζεται το σύμβολο μπαταρίας
στην οθόνη 10, έχει αποφορτιστεί
σχεδόν πλήρως η μπαταρία και θα πρέπει να
αντικατασταθεί. Οι αποφορτισμένες μπαταρίες
ενδέχεται να επιφέρουν ανακριβή αποτελέσματα
μετρήσεων.
Για την εισαγωγή της μπαταρίας,
ακολουθήστε την εξής διαδικασία:
Ανοίξτε το καπάκι της θήκης μπαταρίας 12
στην πίσω πλευρά της συσκευής. Με την
υφασμάτινη ταινία, η οποία βρίσκεται στο
εσωτερικό της θήκης μπαταρίας, διευκολύνεται η αφαίρεση της παλιάς μπαταρίας.
Τραβήξτε την υφασμάτινη ταινία.
Εφόσον απαιτείται, αφαιρέστε την παλιά
μπαταρία.
Ενώστε τις επαφές της πλακέ μπαταρίας 9 V
με τις επαφές της υποδοχής. Λάβετε υπόψη
τη σωστή πολικότητα. Αναγράφεται στις επαφές. Η υφασμάτινη ταινία θα πρέπει να τοποθετείται οπωσδήποτε κάτω από την μπαταρία.
Εισαγάγετε την μπαταρία στη θήκη μπατα-
ρίας και κλείστε εκ νέου το καπάκι, ώστε να
ασφαλίσει με το χαρακτηριστικό ήχο.

68 GR/CY
Λειτουργία
Μέτρηση μήκους
Πατήστε το πλήκτρο ON / OFF 9 για να
ενεργοποιήσετε τη συσκευή. Εάν δεν πατήσετε
κάποιο πλήκτρο εντός 60 s, απενεργοποιείται η οθόνη
10
.
Για να απενεργοποιήσετε χειροκίνητα τη συ-
σκευή, πατήστε το πλήκτρο ON / OFF παρατεταμένα για 3 δευτερόλεπτα μέχρι να σβήσει
η οθόνη και να ακουστεί ένα διπλό ηχητικό
σήμα.
Πατήστε το πλήκτρο MODE 8 επανειλημ-
μένα, μέχρι να εμφανιστεί στην οθόνη το σύμβολο μέτρησης μήκους «
», καθώς και η
ένδειξη μήκους 0.00 m (εναλλακτικά 0‘00‘‘).
Κρατήστε την επιφάνεια αναφοράς 6 του
μετρητή αποστάσεων υπερήχων στο σημείο
εκκίνησης της μέτρησής σας. Κρατήστε τη
συσκευή κατά τέτοιο τρόπο, ώστε η επιφάνεια
αναφοράς να βρίσκεται παράλληλα ως προς
την επιφάνεια-στόχο της μέτρησης.
Εφόσον απαιτείται, χρησιμοποιήστε το αλ-
φάδι
7
για την οριζόντια ευθυγράμμιση του
μετρητή αποστάσεων υπερύθρων. Οριζόντια
ευθυγράμμιση επιτυγχάνεται σε περίπτωση
που η φυσαλίδα του αλφαδιού βρίσκεται
μεταξύ των δύο σημαδιών
.
Πατήστε το πλήκτρο READ 4. Η δίοδος
λέιζερ
11
προβάλει μια φωτεινή κουκίδα
στην επιφάνεια του τελικού σημείου της μέτρησης. Αυτή η φωτεινή κουκίδα σάς βοηθάει
στη σωστή ευθυγράμμιση του μετρητή αποστάσεων υπερήχων. Το μήκος εμφανίζεται
στην οθόνη μετά την ολοκλήρωση της
μέτρησης.

69 GR/CY
Αποφυγή σφαλμάτων
μέτρησης
Για την αποφυγή σφαλμάτων μέτρησης,
λάβετε υπόψη τις ακόλουθες οδηγίες:
Η μέτρηση πραγματοποιείται μέσω υπερήχων
που αποστέλλονται σε μορφή κώνου από τον
πομπό υπερήχων
1
. Οι υπέρηχοι αντανακλούνται από την επιφάνεια-στόχο και λαμβάνονται από το δέκτη υπερήχων. Ο μετρητής
αποστάσεων υπερήχων υπολογίζει το μήκος
βάσει της διάρκειας διαδρομής του σήματος
(εικ. B).
Για την εξασφάλιση ακριβών μετρήσεων,
θα πρέπει να τηρούνται οι ακόλουθες
προϋποθέσεις (εικ. B):
Η επιφάνεια αναφοράς (A) θα πρέπει να
βρίσκεται παράλληλα ως προς την επιφάνειαστόχο (B).
Το μήκος της απόστασης προς μέτρηση θα
πρέπει να βρίσκεται μεταξύ 0,6 m και 16 m.
Δεν θα πρέπει να παρεμβάλλονται αντικεί-
μενα που να αντανακλούν τους υπερήχους
σε διαφορετικά από το επιθυμητό σημείο. Το
πλάτος του κώνου υπερήχων σε μήκος 16 m
είναι περίπου 5 m.
Η επιφάνεια του στόχου θα πρέπει να είναι
λεία, ώστε να είναι δυνατή η σωστή αντανάκλαση των υπερήχων.
Κατά κανόνα, οι διάφανες επιφάνειες, όπως
το γυαλί, αντανακλούν τους υπερήχους.
Η μπαταρία δεν θα πρέπει να έχει αποφορτι-
στεί. Τυχόν αποφόρτιση της μπαταρίας εμφανίζεται στην οθόνη
10
με το σύμβολο
μπαταρίας
.

70 GR/CY
Σε περίπτωση που δεν είναι δυνατή η σαφή
μέτρηση, στην οθόνη εμφανίζεται η ένδειξη
«Err». Σε αυτήν την περίπτωση, πρέπει να
επαναληφθεί η μέτρηση.
Άθροισμα μετρήσεων μήκους
Μετρήστε ένα μήκος με τον τρόπο που περι-
γράφεται στο κεφάλαιο «Μέτρηση μήκους».
Το μήκος εμφανίζεται στην επάνω γραμμή
της οθόνης
10
.
Στη συνέχεια, πατήστε το πλήκτρο RECALL
5
. Η τιμή της μέτρησης μήκους μετακινείται
στην κάτω σειρά. Αυτό σημαίνει ότι αποθηκεύτηκε στη μνήμη.
Στο επάνω τμήμα της οθόνης εμφανίζεται το
σύμβολο «+». Η συσκευή σάς υποδεικνύει
ότι βρίσκεται σε ετοιμότητα για νέα μέτρηση
μήκους.
Πατήστε το πλήκτρο READ 4. Η τιμή της
νέας μέτρησης μήκους εμφανίζεται στο
επάνω τμήμα της οθόνης.
Πατήστε το πλήκτρο RECALL. Η τιμή μέτρη-
σης αποθηκεύεται στη μνήμη και στο κάτω
τμήμα της οθόνης εμφανίζεται το άθροισμα
των δύο μετρήσεων μήκους. Σε περίπτωση
λανθασμένης μέτρησης, μην πατάτε το
πλήκτρο RECALL, αλλά πατήστε εκ νέου το
πλήκτρο READ. Η τιμή μέτρησης, που εμφανίζεται επάνω, αντικαθίσταται. Πατήστε το πλήκτρο RECALL για να αποθηκευτεί η τιμή στη
μνήμη.
Μπορείτε να επαναλάβετε αυτήν τη διαδικα-
σία όσες φορές επιθυμείτε, εφόσον δεν
υπερβαίνετε το μήκος των 9999,99 m.

71 GR/CY
Μέτρηση επιφάνειας
Οδηγία: Για την αποφυγή σφαλμάτων μέτρησης
στα πλαίσια της μεθοδολογίας, εξοικειωθείτε
αρχικά με τις οδηγίες περί μέτρησης μήκους.
Πατήστε το πλήκτρο ON / OFF 9 για να
ενεργοποιήσετε τη συσκευή.
Πατήστε επανειλημμένα το πλήκτρο MODE
8
μέχρι να εμφανιστεί το σύμβολο μέτρησης
μήκους «
» στην οθόνη 10, καθώς και η
ένδειξη 0.00 m (εναλλακτικά 0‘00‘‘). Αναβοσβήνει το σύμβολο μέτρησης μήκους «
».
Η συσκευή σάς υποδεικνύει ότι βρίσκεται σε
ετοιμότητα για την πρώτη μέτρηση.
Ευθυγραμμίστε τη συσκευή και πατήστε το
πλήκτρο READ
4
. Σε περίπτωση που η μέτρηση ολοκληρώθηκε με επιτυχία, στην οθόνη
εμφανίζεται το μήκος που μετρήθηκε. Επίσης,
αναβοσβήνει το σύμβολο μέτρησης πλάτους
«
». Η συσκευή σάς υποδεικνύει ότι βρί-
σκεται σε ετοιμότητα για τη μέτρηση πλάτους.
Ευθυγραμμίστε τη συσκευή και πατήστε εκ
νέου το πλήκτρο READ. Σε περίπτωση που η
μέτρηση ολοκληρώθηκε με επιτυχία, στο
επάνω τμήμα της οθόνης εμφανίζεται το πλάτος που μετρήθηκε και στο κάτω τμήμα εμφανίζεται η επιφάνεια στη μονάδα μέτρησης m
2
(εναλλακτικά sq.ft = τετραγωνικά πόδια).
Για νέα μέτρηση επιφάνειας, πατήστε στιγμι-
αία το πλήκτρο MODE. Οι ενδείξεις στην
οθόνη μηδενίζονται και η συσκευή βρίσκεται
σε ετοιμότητα για νέα μέτρηση επιφάνειας.

72 GR/CY
Μέτρηση όγκου
Οδηγία: Για την αποφυγή σφαλμάτων μέτρησης
στα πλαίσια της μεθοδολογίας, εξοικειωθείτε αρχικά με τις οδηγίες περί μέτρησης μήκους.
Πατήστε το πλήκτρο ON / OFF 9 για να
ενεργοποιήσετε τη συσκευή.
Πατήστε επανειλημμένα το πλήκτρο MODE
8
μέχρι να εμφανιστεί το σύμβολο μέτρησης
όγκου «
» στην οθόνη 10, καθώς και η ένδειξη 0.00 m (εναλλακτικά 0‘00‘‘). Αναβοσβήνει το σύμβολο μέτρησης μήκους «
».
Η συσκευή σάς υποδεικνύει ότι βρίσκεται σε
ετοιμότητα για την πρώτη μέτρηση.
Ευθυγραμμίστε τη συσκευή και πατήστε το
πλήκτρο READ
4
. Σε περίπτωση που η μέτρηση ολοκληρώθηκε με επιτυχία, στην οθόνη
εμφανίζεται το μήκος που μετρήθηκε. Επίσης,
αναβοσβήνει το σύμβολο μέτρησης πλάτους
«
». Η συσκευή σάς υποδεικνύει ότι βρί-
σκεται σε ετοιμότητα για τη μέτρηση πλάτους.
Ευθυγραμμίστε τη συσκευή και πατήστε το
πλήκτρο READ. Σε περίπτωση που η μέτρηση
ολοκληρώθηκε με επιτυχία, στην οθόνη εμφανίζεται το πλάτος που μετρήθηκε. Επίσης,
αναβοσβήνει το σύμβολο μέτρησης ύψους
«
». Η συσκευή σάς υποδεικνύει ότι βρί-
σκεται σε ετοιμότητα για τη μέτρηση ύψους.
Ευθυγραμμίστε τη συσκευή και πατήστε εκ
νέου το πλήκτρο READ. Σε περίπτωση που η
μέτρηση ολοκληρώθηκε με επιτυχία, στο
επάνω τμήμα της οθόνης εμφανίζεται το
ύψος που μετρήθηκε και στο κάτω τμήμα εμφανίζεται ο όγκος στη μονάδα μέτρησης m
3
(εναλλακτικά cu.ft = κυβικά πόδια).

73 GR/CY
Για νέα μέτρηση όγκου, πατήστε στιγμιαία το
πλήκτρο MODE. Οι ενδείξεις στην οθόνη
μηδενίζονται και η συσκευή βρίσκεται σε
ετοιμότητα για νέα μέτρηση όγκου.
Άθροισμα μετρήσεων
επιφανειών ή/και όγκων
Μετρήστε μια επιφάνεια ή/και έναν όγκο με
τον τρόπο που περιγράφεται στο κεφάλαιο
«Μέτρηση επιφάνειας» ή/και «Μέτρηση
όγκου». Η μέτρηση της επιφάνειας/του
όγκου εμφανίζεται στην κάτω γραμμή της
οθόνης.
Πατήστε το πλήκτρο RECALL 5 για να απο-
θηκεύσετε το αποτέλεσμα της μέτρησης. Στην
οθόνη
10
εμφανίζεται το σύμβολο M+ και
σάς υποδεικνύει ότι το αποτέλεσμα της μέτρησης, που εμφανίζεται στο κάτω τμήμα της
οθόνης, έχει αποθηκευτεί στη συσκευή.
Πατήστε στιγμιαία το πλήκτρο MODE 8. Η
συσκευή βρίσκεται σε ετοιμότητα για μέτρηση
της επόμενης επιφάνειας/του επόμενου
όγκου.
Μετρήστε την επόμενη επιφάνεια/τον επόμενο
όγκο με τον ίδιο τρόπο που πραγματοποιήσατε την πρώτη μέτρηση.
Πατήστε εκ νέου το πλήκτρο RECALL για να
αποθηκευτεί και το νέο αποτέλεσμα στη
μνήμη. Στην κάτω γραμμή της οθόνης εμφανίζεται το αποτέλεσμα του αθροίσματος.
Σε περίπτωση που επιθυμείτε να προσθέσετε
και άλλες επιφάνειες/άλλους όγκους,
επαναλάβετε τα βήματα 3 έως 5.

74 GR/CY
Πατήστε παρατεταμένα το πλήκτρο MODE
για 3 δευτερόλεπτα για να εγκαταλείψετε τη
λειτουργία αθροίσματος.
Εμφάνιση των τελευταίων
τιμών μέτρησης
Μετά τη μέτρηση μιας επιφάνειας ή ενός
όγκου, πατήστε επανειλημμένα το πλήκτρο
READ
4
μέχρι να εμφανιστούν οι μεμονωμέ-
νες τιμές μέτρησης.
Το σύμβολο της αντίστοιχης τιμής μέτρησης
αναβοσβήνει και το αποτέλεσμα της μέτρησης
εμφανίζεται στην επάνω γραμμή της οθόνης.
Ένδειξη θερμοκρασίας
Πατήστε παρατεταμένα το πλήκτρο FT/M 3
για περ. 3 δευτερόλεπτα. Στην οθόνη
10
εμφανίζεται η τρέχουσα θερμοκρασία χώρου
στη μονάδα μέτρησης θερμοκρασίας °C.
Για εναλλαγή στη μονάδα μέτρησης θερμο-
κρασίας °F, πατήστε στιγμιαία το πλήκτρο
FT/M.
Πατήστε στιγμιαία το πλήκτρο MODE 8 για
να εγκαταλείψετε τη λειτουργία εμφάνισης
θερμοκρασίας.
Εναλλαγή μονάδων μέτρησης
Πατήστε το πλήκτρο FT/M 3 για εναλλαγή
από τη μονάδα μέτρησης μέτρα στη μονάδα
μέτρησης πόδια (ένδειξη πόδια‘ ίντσες‘‘).

75 GR/CY
Ένδειξη μπαταρίας
Σε περίπτωση που η στάθμη φόρτισης της μπαταρίας είναι χαμηλή, στην οθόνη
10
εμφανίζεται
το σύμβολο μπαταρίας
. Σε περίπτωση που
εμφανιστεί αυτό το σύμβολο, αντικαταστήστε την
μπαταρία το συντομότερο δυνατό. Οι αποφορτισμένες μπαταρίες ενδέχεται να επιφέρουν ανακριβή αποτελέσματα μετρήσεων. Περιγραφή της
διαδικασίας αντικατάστασης της μπαταρίας θα
βρείτε στο κεφάλαιο «Εισαγωγή/αντικατάσταση
μπαταρίας».
Απενεργοποίηση/αυτόματη
απενεργοποίηση
Απενεργοποιήστε τη συσκευή πατώντας το
πλήκτρο ON/OFF
9
παρατεταμένα για
3 δευτερόλεπτα.
Καθαρισμός και φροντίδα
Καθαρίζετε τη συσκευή μόνο εξωτερικά με
μαλακό και στεγνό πανί.
Απόρριψη
Η συσκευασία αποτελείται από φιλικά
προς το περιβάλλον υλικά που μπορείτε να απορρίψετε στους τοπικούς
χώρους ανακύκλωσης.

76 GR/CY
Για δυνατότητες απόρριψης του προϊόντος που δε χρησιμοποιείτε πλέον,
απευθυνθείτε στις αρμόδιες υπηρεσίες
της κοινότητας ή του δήμου σας.
Pb
Απαγορεύεται αυστηρά η απόρριψη
μπαταριών μαζί με τα οικιακά απορρίμματα. Ενδέχεται να περιέχουν
δηλητηριώδη βαρέα μέταλλα και συγκαταλέγονται στα απορρίμματα ειδικής επεξεργασίας. Τα χημικά σύμβολα
βαρέων μετάλλων είναι τα ακόλουθα:
Cd = Κάδμιο, Hg = Υδράργυρος,
Pb = Μόλυβδος. Συνεπώς, παραδίδετε τις αποφορτισμένες μπαταρίες σε
μια κοινοτική υπηρεσία συλλογής.
Εγγύηση
Η συσκευή κατασκευάστηκε προσεκτικά κάτω
από αυστηρές οδηγίες ποιότητας και ελέγχθηκε
επιμελώς πριν από την αποστολή. Σε περίπτωση
βλαβών στο προϊόν έχετε νομικά δικαιώματα
προς τον πωλητή του προϊόντος. Τα νομικά δικαιώματα δεν περιορίζονται από την εγγύηση
που παρατίθεται παρακάτω.
Αγαπητέ πελάτη, η παρούσα συσκευή συνοδεύεται από εγγύηση 3 ετών από την ημερομηνία
αγοράς. Η εγγύηση ισχύει από την ημερομηνία
αγοράς. Παρακαλείσθε να φυλάξετε με προσοχή
την ταμειακή απόδειξη. Το συγκεκριμένο έγγραφο
θα απαιτηθεί ως αποδεικτικό αγοράς.
Σε περίπτωση που εντός του διαστήματος των
τριών ετών από την ημερομηνία αγοράς αυτού
του προϊόντος προκύψει κάποιο σφάλμα υλικού
ή
κατασκευής, το προϊόν επισκευάζεται ή

77 GR/CY
αντικαθίσταται
από εμάς - κατόπιν επιλογής μας δωρεάν. Αυτή η εγγύηση παύει να ισχύει αν το
προϊόν πάθει βλάβη, χρησιμοποιηθεί ή συντηρηθεί εκτός των προδιαγραφών.
Η εγγύηση ισχύει για σφάλματα υλικού ή κατασκευής. Αυτή η εγγύηση δεν επεκτείνεται σε μέρη
προϊόντος, τα οποία εκτέθηκαν σε φυσιολογική
φθορά και για αυτό το λόγο μπορούν να θεωρηθούν ως φθαρτά μέρη (π.χ. μπαταρίες) ή για
βλάβες σε εύθραυστα μέρη, π.χ. διακόπτες,
επαναφορτιζόμενες μπαταρίες ή παρόμοια, τα
οποία είναι κατασκευασμένα από γυαλί.
EMC

78 DE/AT/CH
Bestimmungsgemäße
Verwendung ..........................................Seite 79
Teilebeschreibung ............................. Seite 79
Technische Daten ...............................Seite 79
Lieferumfang ......................................... Seite 80
Allgemeine
Sicherheitshinweise.........................Seite 80
Sicherheitshinweise
zu Batterien ............................................Seite 81
Vor der Inbetriebnahme ............. Seite 82
Batterie einlegen / wechseln ........................ Seite 83
Inbetriebnahme
Länge messen ...............................................Seite 83
Messfehler vermeiden .................................. Seite 84
Längen addieren...........................................Seite 85
Fläche messen ...............................................Seite 86
Volumen messen ........................................... Seite 87
Flächen bzw. Volumina addieren ................Seite 88
Die letzten Messwerte anzeigen ................. Seite 89
Temperaturanzeige ......................................Seite 89
Maßeinheit wechseln ................................... Seite 89
Batterieanzeige .............................................Seite 90
Ausschalten / Automatisches Abschalten .... Seite 90
Reinigung und Pflege ....................Seite 90
Entsorgung ..............................................Seite 90
Garantie ....................................................Seite 91

79 DE/AT/CH
Ultraschall-Entfernungsmesser
Bestimmungsgemäße
Verwendung
Dieser Ultraschall-Entfernungsmesser ist zur
Messung von Längen sowie zur Berechnung von
Flächen und Volumina vorgesehen. Zusätzlich
verfügt das Gerät über eine Temperaturmessung.
Das Gerät ist ausschließlich zur privaten Verwendung vorgesehen.
Teilebeschreibung
1
Ultraschallsender/ –empfänger
2
Temperatursensor
3
FT/M-Taste
4
READ-Taste
5
RECALL-Taste
6
Referenzfläche
7
Libelle
8
MODE-Taste
9
ON / OFF-Taste (EIN / AUS)
10
Display
11
Laserdiode
12
Batteriefachdeckel
Technische Daten
Betriebsspannung: max. 9 V
Batterietyp: 6LR61 (9 V–Block)
Messbereich: 0,6 m – 16 m
Messgenauigkeit: +/- 1%
Anzeige Kapazität: bis 9999,99

80 DE/AT/CH
Wellenlänge Laser: 635–660 nm, 1 mW
Laser-Klasse: 2
Ultraschall-Frequenz: 40 kHz
Messbereich Thermometer: –10 °C – +40 °C
(14 °F – 104 °F)
Lieferumfang
1 Ultraschall-Entfernungsmesser
1 9 V-Blockbatterie
1 Bedienungsanleitung
Allgemeine
Sicherheitshinweise
Machen Sie sich vor der ersten Benutzung des
Produkts mit allen Bedien- und Sicherheitshinweisen
vertraut! Händigen Sie alle Unterlagen bei Weitergabe des Produkts an Dritte ebenfalls mit aus!
Kontrollieren Sie das Produkt vor der Inbe-
triebnahme auf Beschädigungen! Nehmen
Sie ein beschädigtes Produkt nicht in Betrieb!
Setzen Sie das Gerät keiner Feuchtigkeit aus!
Es kann hierdurch beschädigt werden.
Dieses Gerät kann von Kindern ab 8 Jahren
und darüber sowie von Personen mit verringerten physischen, sensorischen oder mentalen
Fähigkeiten oder Mangel an Erfahrung und
Wissen benutzt werden, wenn sie beaufsichtigt
oder bezüglich des sicheren Gebrauchs des
Gerätes unterwiesen wurden und die daraus
resultierenden Gefahren verstehen. Kinder
dürfen nicht mit dem Gerät spielen. Reinigung
und Benutzerwartung dürfen nicht von

81 DE/AT/CH
Kindern ohne Beaufsichtigung durchgeführt
werden.
Gefahr durch Laserstrahlung
LASERSTRAHLUNG
NICHT IN DEN STRAHL BLICKEN
LASER KLASSE 2
Das Gerät enthält einen Klasse-2-Laser. Richten
Sie den Laserstrahl niemals auf Personen
oder Tiere. Blicken Sie nie direkt in den
Strahl. Bereits ein schwacher Laserstrahl kann
zu Augenschäden führen.
Richten Sie den Laserstrahl niemals auf reflek-
tierende Flächen oder Materialien. Auch ein
reflektierter Laserstrahl kann Augenschäden
hervorrufen.
Sicherheitshinweise zu
Batterien
LEBENSGEFAHR!
Batterien gehören nicht in Kinderhände.
Suchen Sie im Falle eines Verschluckens
sofort einen Arzt auf!
VORSICHT! EXPLOSIONSGE-
FAHR! Laden Sie nicht aufladbare
Batterien niemals wieder auf,
schließen Sie sie nicht kurz und / oder öffnen
Sie sie nicht!
Werfen Sie Batterien niemals in Feuer oder
Wasser!
Setzen Sie Batterien keiner mechanischen
Belastung aus!

82 DE/AT/CH
Gefahr des Auslaufens der Batterien
Im Falle eines Auslaufens der Batterien entfer-
nen Sie diese sofort aus dem Gerät, um
Beschädigungen zu vermeiden!
Vermeiden Sie den Kontakt mit Haut, Augen
und Schleimhäuten! Spülen Sie bei Kontakt
mit Batteriesäure die betroffenen Stellen
sofort mit klarem Wasser und suchen Sie
umgehend einen Arzt auf!
Verwenden Sie nur Batterien des gleichen
Typs! Alte Batterien nicht mit neuen mischen!
Vermeiden Sie extreme Bedingungen und
Temperaturen, die auf Batterien einwirken
können z. B. auf Heizkörpern / direkte Sonneneinstrahlung.
Entfernen Sie die Batterien, wenn sie längere
Zeit nicht verwendet worden sind, aus dem
Gerät!
Gefahr der Gerätebeschädigung
Ausschließlich den angegebenen Batterietyp
verwenden!
Achten Sie beim Einlegen auf die richtige Po-
larität! Diese wird im Batteriefach angezeigt!
Reinigen Sie Batterie- und Gerätekontakt vor
dem Einlegen falls erforderlich!
Entfernen Sie verbrauchte Batterien umge-
hend aus dem Gerät!
Vor der Inbetriebnahme
Entfernen Sie vor der Inbetriebnahme die
Schutzfolie vom Display
10
des Geräts und
legen Sie die beiliegende Batterie ein.

83 DE/AT/CH
Batterie einlegen / wechseln
Wenn im Display 10 das Batteriesymbol
erscheint, ist die eingelegte Batterie nahezu erschöpft und muss ausgetauscht werden. Leere
Batterien können das Messergebnis verfälschen.
Gehen Sie zum Einlegen der Batterie
wie folgt vor:
Öffnen Sie den Batteriefachdeckel 12 auf
der Rückseite des Geräts. Mit Hilfe des Stoffstreifens, der sich im Inneren des Batteriefachs
befindet, können Sie die alte Batterie leichter
herausnehmen. Ziehen Sie hierzu lediglich
am Stoffstreifen.
Entnehmen Sie ggf. die alte Batterie.
Stecken Sie die Kontakte der 9 V-Blockbatte-
rie auf die Kontakte des Profilsteckers. Achten
Sie hierbei auf die richtige Polarität. Diese ist
durch die Profilform der Kontakte vorgegeben. Achten Sie auch unbedingt darauf, dass
der Stoffstreifen sich unterhalb der Batterie
befindet.
Legen Sie die Batterie in das Batteriefach und
schließen Sie den Deckel wieder, so dass er
hörbar einrastet.
Inbetriebnahme
Länge messen
Drücken Sie die ON / OFF-Taste 9, um das
Gerät einzuschalten. Drücken Sie 60 s lang
keine Taste, schaltet sich das Display
10
ab.
Um das Gerät manuell auszuschalten, halten
Sie die ON / OFF-Taste 3 Sekunden lang

84 DE/AT/CH
gedrückt, bis das Display erlischt und ein
doppeltes Tonsignal ertönt.
Drücken Sie die MODE-Taste 8 so oft, bis
das Display das Symbol für Längenmessung
„
“ sowie die Längenangabe 0.00 m (bzw.
0‘00‘‘) zeigt.
Halten Sie die Referenzfläche 6 des Ultra-
schall-Entfernungsmessers an den Anfangspunkt
Ihrer Messung. Halten Sie das Gerät so, dass
die Referenzfläche parallel zur Zielfläche der
Messung ausgerichtet ist.
Verwenden Sie zur waagerechten Ausrichtung
des Ultraschall-Entfernungsmessers ggf. die
Libelle
7
. Die Luftblase der Libelle befindet
sich bei waagerechter Ausrichtung zwischen
den beiden Markierungen
.
Drücken Sie die READ-Taste 4. Die Laserdi-
ode
11
projiziert einen Leuchtpunkt auf die
Fläche des Endpunkts der Messung. Dieser
Leuchtpunkt hilft Ihnen, den Ultraschall-Entfernungsmesser korrekt auszurichten. Nach
erfolgreicher Messung wird die gemessene
Länge im Display angezeigt.
Messfehler vermeiden
Um Messfehler zu vermeiden, beachten
Sie die folgenden Hinweise:
Die Messung erfolgt mit Ultraschall, der sich
kegelförmig vom Ultraschallsender
1
fortbewegt. Von der Zielfläche wird der Schall zurückgeworfen und vom Ultraschallempfänger
empfangen. Aus der Laufzeit des Signals berechnet der Ultraschall-Entfernungsmesser die
zu messende Länge (Abb. B).

85 DE/AT/CH
Um eine genaue Messung zu gewährleisten, sind folgende Bedingungen
einzuhalten (Abb. B):
Die Referenzfläche (A) muss parallel zur
Zielfläche (B) sein.
Die zu messende Strecke muss zwischen
0,6 m und 16 m lang sein.
Im Schallkegel dürfen sich keine Gegenstände
befinden, die den Schall verfrüht reflektieren.
Der Schallkegel hat bei einer Länge von 16 m
eine Breite von etwa 5 m.
Die Zielfläche muss eine glatte Oberfläche
haben, damit der Schall gut reflektiert werden
kann.
Durchsichtige Flächen wie Glas reflektieren in
der Regel den Schall.
Die Batterie darf nicht leer sein. Eine leere
Batterie wird im Display
10
durch das Batte-
riesymbol
angezeigt.
Wenn eine eindeutige Messung nicht möglich
ist, zeigt das Display die Angabe „Err“. Die
Messung muss dann wiederholt werden.
Längen addieren
Messen Sie eine Länge wie im Kapitel „Länge
messen“ beschrieben. Der Betrag der Länge
erscheint in der oberen Zeile des Displays
10
.
Drücken Sie nun die RECALL-Taste 5. Der
Betrag der Länge wird auf die untere Zeile
übertragen. Das bedeutet, dass er im Summenspeicher abgelegt worden ist.
Oben im Display erscheint das Zeichen „+“.
Das Gerät zeigt so an, dass es für eine neue
Längenmessung bereit ist.

86 DE/AT/CH
Drücken Sie die READ-Taste 4. Der Betrag
der nun gemessenen Länge erscheint oben im
Display.
Drücken Sie die RECALL-Taste. Der Messwert
wird dann in den Summenspeicher übernommen und unten erscheint die Summe der beiden gemessenen Längen. Sollte die Messung
eine Fehlmessung sein, drücken Sie nicht die
RECALL-Taste, sondern erneut die READ-Taste.
Der oben angezeigte Messwert wird überschrieben. Drücken Sie die RECALL-Taste, um
den Wert in den Summenspeicher zu übernehmen.
Sie können diesen Vorgang beliebig oft wie-
derholen, solange die Länge von 9999,99 m
nicht überschritten wird.
Fläche messen
Hinweis: Um methodische Messfehler zu ver-
meiden, machen Sie sich bitte zunächst mit den
Hinweisen zur Messung von Längen vertraut.
Drücken Sie die ON / OFF-Taste 9, um das
Gerät einzuschalten.
Drücken Sie die MODE-Taste 8 so oft, bis
im Display
10
das Symbol für Flächenmes-
sung „
“sowie die Anzeige 0.00 m (bzw.
0‘00‘‘) erscheint. Das Symbol „
“ für Längenmessung blinkt. Das Gerät zeigt so an,
dass es für die erste Messung bereit ist.
Richten Sie das Gerät aus und drücken Sie
die READ-Taste
4
. Bei erfolgreicher Messung wird oben im Display die gemessene
Länge angezeigt. Außerdem blinkt das Symbol für Breitenmessung „
“. Das Gerät

87 DE/AT/CH
zeigt so an, dass es für die Messung der
Breite bereit ist.
Richten Sie das Gerät aus und drücken Sie
erneut die READ-Taste. Bei erfolgreicher Messung erscheint oben im Display die gemessene
Breite und unten die Fläche in der Maßeinheit
m
2
(bzw. sq.ft = Quadratfuß).
Für eine erneute Flächenmessung drücken Sie
kurz die MODE-Taste. Die Anzeigen im Display
werden zurückgesetzt und das Gerät ist bereit für eine neue Fächenmessung.
Volumen messen
Hinweis: Um methodische Messfehler zu ver-
meiden, machen Sie sich bitte zunächst mit den
Hinweisen zur Messung von Längen vertraut.
Drücken Sie die ON / OFF-Taste 9, um das
Gerät einzuschalten.
Drücken Sie die MODE-Taste 8 so oft, bis
im Diplay
10
das Symbol „ “ für Volumenmessung sowie die Anzeige 0.00 m
(bzw. 0‘00‘‘) erscheint. Das Symbol „
“ für
Längenmessung blinkt. Das Gerät zeigt so
an, dass es für die erste Messung bereit ist.
Richten Sie das Gerät aus und drücken Sie
die READ-Taste
4
. Bei erfolgreicher Messung
wird oben im Display die gemessene Länge
angezeigt. Außerdem blinkt das Symbol für
Breitenmessung „
“. Das Gerät zeigt so
an, dass es zur Messung der Breite bereit ist.
Richten Sie das Gerät aus und drücken Sie
die READ-Taste. Bei erfolgreicher Messung
wird oben im Display die gemessene Breite
angezeigt. Außerdem blinkt das Symbol für

88 DE/AT/CH
Höhenmessung „ “. Das Gerät zeigt so
an, dass es zur Messung der Höhe bereit ist.
Richten Sie das Gerät aus und drücken Sie
erneut die READ-Taste. Bei erfolgreicher
Messung erscheint oben im Display die
gemessene Höhe und unten das Volumen in
der Maßeinheit m
3
(bzw. cu.ft = Kubikfuß).
Für eine erneute Volumenmessung drücken
Sie kurz die MODE-Taste. Die Anzeigen im
Display werden zurückgesetzt und das Gerät
ist bereit für eine neue Volumenmessung.
Flächen bzw. Volumina
addieren
Messen Sie eine Fläche bzw. ein Volumen
wie im Kapitel „Fläche messen“ bzw. „Volumen messen“ beschrieben. Der Betrag der
Fläche / des Volumens erscheint in der unteren Zeile des Displays.
Drücken Sie die RECALL-Taste 5, um das
Messergebnis zu speichern. Im Display
10
erscheint das Symbol M+ und zeigt an, dass
das unten im Display angezeigte Messergebnis im Gerät gespeichert ist.
Drücken Sie kurz die MODE-Taste 8. Das
Gerät ist nun bereit zur Messung der nächsten Fläche / des nächsten Volumens.
Messen Sie die nächste Fläche / das nächste
Volumen so, wie Sie die erste Messung vorgenommen haben.
Drücken Sie nun erneut die RECALL-Taste, um
auch das neue Ergebnis in den Summenspeicher aufzunehmen. Das Ergebnis der Addition
wird in der unteren Zeile des Displays angezeigt.

89 DE/AT/CH
Wenn Sie weitere Flächen /Volumina
hinzufügen möchten, wiederholen Sie die
Schritte 3 bis 5.
Halten Sie die MODE-Taste 3 Sekunden ge-
drückt, um den Additionsmodus zu verlassen.
Die letzten Messwerte
anzeigen
Drücken Sie nach der Messung einer Fläche
oder eines Volumens wiederholt die READTaste
4
, um die einzelnen Messwerte der
Messung anzuzeigen.
Das Symbol des entsprechenden Messwertes
blinkt und das Messergebnis wird in der
oberen Zeile des Displays angezeigt.
Temperaturanzeige
Halten Sie die FT/M-Taste 3 für ca. 3 Se-
kunden gedrückt. Im Display
10
wird die aktuelle Raumtemperatur in der amtlichen
Temperatureinheit °C angezeigt.
Um in die Temperatureinheit °F umzuschal-
ten, drücken Sie kurz die FT/M-Taste.
Drücken Sie kurz die MODE-Taste 8, um
den Temperaturanzeigemodus zu verlassen.
Maßeinheit wechseln
Drücken Sie die FT/M-Taste 3, um von der
amtlichen Maßeinheit Meter auf die Maßeinheit Fuß (Anzeige Fuß‘ Zoll‘‘) umzuschalten.

90 DE/AT/CH
Batterieanzeige
Bei niedrigem Batterieladezustand erscheint im
Display
10
das Batteriesymbol . Tauschen
Sie bei Erscheinen dieses Symbols schnellstmöglich die Batterie aus. Leere Batterien können das
Messergebnis verfälschen. Der Batteriewechsel
wird im Kapitel „Batterie einlegen / wechseln“
beschrieben.
Ausschalten / Automatisches
Abschalten
Schalten Sie das Gerät aus, indem Sie die
ON/OFF-Taste
9
3 Sekunden lang
gedrückt halten.
Reinigung und Pflege
Reinigen Sie das Gerät nur äußerlich mit
einem weichen trockenen Tuch.
Entsorgung
Die Verpackung besteht aus umweltfreundlichen Materialien, die Sie über
die örtlichen Recyclingstellen entsorgen
können.
Möglichkeiten zur Entsorgung des ausgedienten Gerät erfahren Sie bei Ihrer
Gemeinde- oder Stadtverwaltung.

91 DE/AT/CH
Pb
Batterien dürfen nicht über den
Hausmüll entsorgt werden. Sie können
giftige Schwermetalle enthalten und
unterliegen der Sondermüllbehandlung.
Die chemischen Symbole der Schwermetalle sind wie folgt: Cd = Cadmium,
Hg = Quecksilber, Pb = Blei. Geben
Sie deshalb verbrauchte Batterien bei
einer kommunalen Sammelstelle ab.
Garantie
Das Produkt wurde nach strengen Qualitätsrichtlinien sorgfältig produziert und vor Anlieferung gewissenhaft geprüft. Im Falle von Mängeln dieses
Produkts stehen Ihnen gegen den Verkäufer des
Produkts gesetzliche Rechte zu. Diese gesetzlichen Rechte werden durch unsere im Folgenden
dargestellte Garantie nicht eingeschränkt.
Sie erhalten auf dieses Gerät 3 Jahre Garantie
ab Kaufdatum. Die Garantiefrist beginnt mit dem
Kaufdatum. Bitte bewahren Sie den Original
Kassenbon gut auf. Diese Unterlage wird als
Nachweis für den Kauf benötigt.
Tritt innerhalb von drei Jahren ab dem Kaufdatum
dieses Produkts ein Material- oder Fabrikationsfehler auf, wird das Produkt von uns – nach
unserer Wahl – für Sie kostenlos repariert oder
ersetzt. Diese Garantie verfällt, wenn das Produkt
beschädigt, nicht sachgemäß benutzt oder
gewartet wurde.
Die Garantieleistung gilt für Material- oder Fabrikationsfehler. Diese Garantie erstreckt sich nicht auf
Produktteile, die normaler Abnutzung ausgesetzt
sind (z. B. Batterien) und daher als Verschleißteile
angesehen werden können oder für Beschädigun-

92 DE/AT/CH
gen an zerbrechlichen Teilen, z. B. Schalter,
Akkus oder die aus Glas gefertigt sind.
EMC

IAN 91218
OWIM GmbH & Co. KG
Stiftsbergstraße 1
D-74167 Neckarsulm
Model-No.: Z31697A
Version: 09 / 2013
Last Information Update · Stanje
informacija · Versiunea informaţiilor
Актуалност на информацията
Έκδοση των πληροφοριών · Stand
der Informationen: 10 / 2013
Ident.-No.: Z31697A102013-7
7
 Loading...