

Powerfix Profi 315375 Assembly Instructions, Variation Possibilities

MULTI-PURPOSE TABLE SET
MULTI-PURPOSE TABLE SET
Assembly instructions, variation possibilities
MULTIFUNKTIONSBORD, SET
Monteringsanvisning, variationsmöjligheter
DAUGIAFUNKCIŲ STALŲ RINKINYS
Montavimo instrukcija, reguliavimo ir pastatymo
galimybės
IAN 315375
MONITOIMIPÖYTÄ
Asennusohje, asennusvaihtohdot
STÓŁ WIELOFUNKCYJNY KOMPLET
Instrukcja montażu, możliwe warianty
MULTIFUNKTIONSTISCH-SET
Montageanleitung, Variationsmöglichk eiten
GB Assembly instructions, variation possibilities Page 5
FI Asennusohje, asennusvaihtohdot Sivu 7
SE Monteringsanvisning, variationsmöjligheter Sidan 9
PL Instrukcja montażu, możliwe warianty Strona 11
LT Montavimo instrukcija, reguliavimo ir pastatymo galimybės Puslapis 13
DE / AT / CH Montageanleitung, Variationsmöglichkeiten Seite 15
A
Grafikübersicht
1 2
3
4
6
5
789
B
10

C
1.
2.
D
1
E
7 6
11
9
F
8
Multi-Purpose Table Set
Introduction
We congratulate you on the purchase of your
new product. You have chosen a high quality
product. Familiarise yourself with the product
before using it for the first time. In addition, please
carefully refer to the operating instructions and
the safety advice below. Only use the product
as instructed and only for the indicated field of
application. Keep these instructions in a safe
place. If you pass the product on to anyone else,
please ensure that you also pass on all the
documentation with it
Intended use
The multi-function table set has three table
elements to use individually or together. It further
has four different table heights. The multi-function
Tables are multifunctional, e.g. for wallpapering,
parties, etc. They are easy to transport and fold
for space-saving storage. This product is only intended for private household use, not for commercial purposes.
Parts description
After unpacking, verify the parts are complete
and check the condition of the product.
1
Spring bolt
2
Strut
3
Table top
4
Carrying handle
5
Table leg
6
Metal plate
7
Plastic end caps
8
Connection bracket
9
Nut
10
Locking clip
11
Locking plug
Technical data
Set-up dimensions
per section: approx. 100 x 60 cm
Table heights: 73 cm; 80 cm; 87 cm;
94 cm adjustment
Load capacity
per table: max. 35 kg
Safety notices
RISK OF
FATAL INJURY AND ACCIDENT HAZARD FOR TODD-
LERS AND SMALL CHILDREN! Never
leave children unsupervised with the packaging material. Suffocation hazard.
DANGER TO LIFE! Dur ing
installation keep children away from the
area in which you are working.
Make sure that the product is only assembled
by competent persons.
Be sure to place the product on a solid sur-
face at floor level.
CAUTION! Do not leave children unat-
tended! The product is not a climbing frame
or toy! Do not allow persons, particularly
children, to climb onto or lean against the
product. Otherwise the load on the product
may become unbalanced and cause it to
tip over. This may result in injury and / or
damage.
Store the product in a dry location, out of
the reach of children.
CAUTION! Do not lift or move the product
when weighed down in any way.
35 kg
and / or product damage.
Only use the product in areas protected
from rain.
Do not use the product as a work platform.
Only fold the tables at the lowest height
setting.
The load on the product must not
exceed 35 kg. Failure to observe
this advice may result in injury
5 GB
Verify the spring bolts are firmly in place
before every use.
Dispose of defective, no longer usable
tables according the local regulations.
Disposal
The packaging is made entirely of recyclable
materials, which you may dispose of at local
recycling facilities
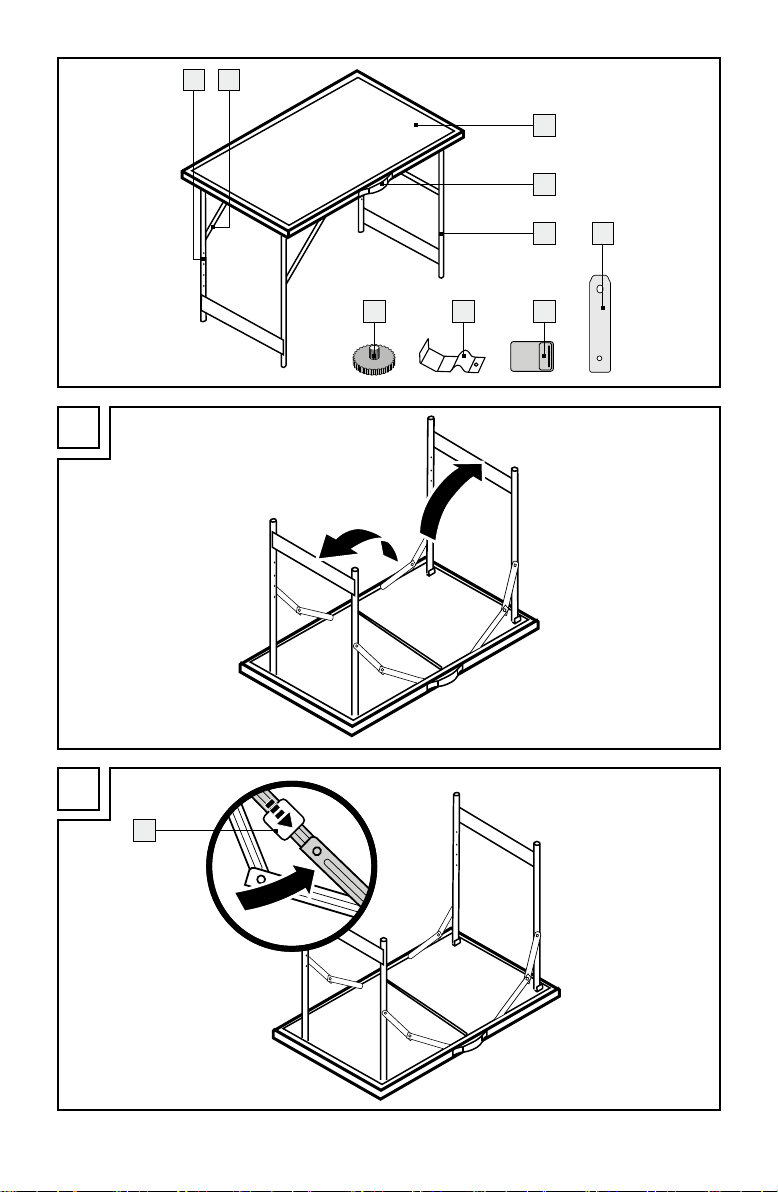
Installation (Fig. A‒F)
1. First unfold the table legs 5 in pairs (see
Fig. A).
2. Pull the hinges upwards until flat (see Fig. B).
Slide the locking clips
10
over the hinges to
ensure they are stable.
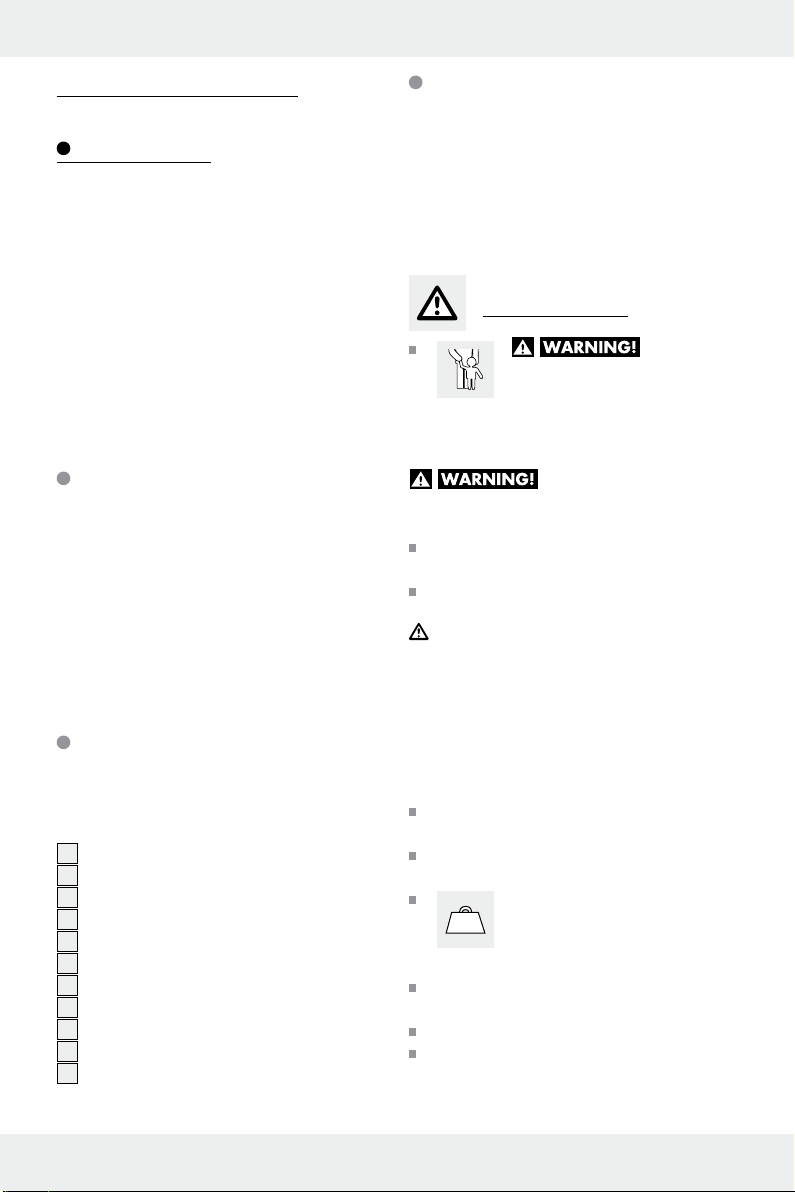
3. Select the desired table height and lock in
place with the spring bolts
1
(see Fig. C).
Connecting the tables
together
Arow of tables can be connexted with below
method (see Fig. F):
1. Remove the plastic end caps
nection side for the first table.
2. On the second table, remove the plastic end
7
caps
insert the metal plate 6 into the
slot and tighten with the nut
sert the other side of the metal plate
the first table.
3. Secure the connection by pressing the plastic
locking plug
11
into the hole.
4. Repeat above process if you want to connect
more tables.
7
at the con-
9
. And then in-
6
into
Contact your local refuse disposal authority for
more details of how to dispose of your worn-out
product.
Remark: Tables in different angle combination
can also be connected. The connection brackets
8
can be clipped under two tables (see Fig. F).
Remark: There are many possibilities to combine
the tables. Please note it may be not possible to
use the connection brackets
8
in some cases.
Cleaning and care
To remove more stubborn dirt, use a damp
cloth and, if necessary, a mild cleaning agent.
6 GB
 Loading...