

CHAIN HOIST 1000 KG
GB
CHAIN HOIST
Operating and Safety Instructions
Translation of Original Operating Manual
SI
VERIŽNI VITEL
Napotki za upravljanje in varnost
Prevod originalnih navodil za uporabo
SK
REŤAZOVÝ KLADKOSTROJ
Upozornenia k obsluhe a bezpečnostné
upozornenia
Preklad originálu návodu na obsluhu
IAN 306852
HU
LÁNCOS EMELŐCSIGA
Kezelési és biztonsági utasítások
Az eredeti üzemeltetési útmutató fordítása
CZ
ŘETĚZOVÝ KLADKOSTROJ
Pokyny k obsluze a bezpečnostní pokyny
Překlad originálního návodu k obsluze
DE AT CH
KETTENZUG
Bedienungs- und Sicherheitshinweise
Originalbetriebsanleitung
4
CHAIN HOIST 1000 KG
GB
HU
SI
CZ
SK
DE | AT | CH
Chain Hoist
Láncos emelőcsiga
Verižni vitel
Řetězový kladkostroj
Reťazový kladkostroj
Kettenzug
1
14
28
40
52
65

1
5
2
1
2 3
6
4 5
3
7
4
A B
6
C
E
7
K
D
D
GB
HU
SI
CZ
SK
DE AT CH
GB
HU
SI
CZ
SK
Read and follow the operating and safety instructions
before you start working with this power tool.
Üzembe helyezés előtt olvassa el és vegye figyelembe
a kezelési útmutatót és a biztonsági utasításokat!
Pred začetkom uporabe preberite priročnik
Peclive ctete navod k obsulze
Peclive ctete navod k obsulze
Vor Inbetriebnahme Bedienungsanleitung und Sicher-
heitshinweise lesen und beachten!
Only the operator is allowed in the work area of
the machine. Keep other people and animals at a
distance.
A gép munkaterületén kizárólag a kezelő tartózkodhat. Tartsa távol a munkában részt nem vevő
személyeket, valamint a házi- és haszonállatokat a
veszélyzónától.
V delovnem območju naprave je lahko samo
upravljavec. Drugim ljudem ter živalim ne dovolite v
bližino naprave.
Na pracovišti s přístrojem může být přítomen pouze
manipulant. Ostatní osoby a zvířata musí být v
bezpečné vzdálenosti.
Jedine operátor zariadenia sa môže pohybovať v
blízkosti prístroja. Ostatné osoby, ako aj domáce a
úžitkové zvieratá udržujte v bezpečnej vzdialenosti.
DE AT CH
GB
HU
SI
CZ
SK
DE AT CH
Nur der Bediener darf im Arbeitsbereich der Maschine stehen. Unbeteiligte Personen sowie Haus- und
Nutztiere aus dem Gefahrenbereich fernhalten.
Wear safety footwear
Viseljen munkavédelmi lábbelit
Nosite zaščitno obutev
Noste pevnou obuv
Noste pevnou obuv
Unfallsichere Schuhe benutzen

GB
Wear head protection
HU
Használjon fejvédőt
SI
Nosite čelado
CZ
Používejte bezpečnostní přilbu.
SK
Používajte ochrannú prilbu.
DE AT CH
GB
HU
SI
CZ
SK
DE AT CH
Kopfschutz benutzen
Do not step under swinging loads.
Ne lépjen a lengő terhek alá.
Ne zadržujte se pod dvignjenimi bremeni.
Nezdržujte se pod zvýšené zatížení.
Nezdržujte sa pod zvýšené zaťaženie.
Nicht unter schwebende lasten treten


Table of contents:
1. Introduction 2
2. Device description 3
3. Scope of delivery 3
4. Intended use 3
5. Safety information 4
6. Technical data 6
7. Before starting the equipment 6
8. Attachment and operation 7
9. Cleaning and maintenance 8
10. Storage 10
11. Transport 10
12. Disposal and recycling 10
13. Troubleshooting 11
14. Warranty certificate 12
Page:
1GB

1. Introduction
MANUFACTURER:
scheppach
Fabrikation von Holzbearbeitungsmaschinen GmbH
Günzburger Straße 69
D-89335 Ichenhausen
DEAR CUSTOMER,
we hope your new tool brings you much enjoyment and success.
NOTE:
According to the applicable product liability laws, the manufacturer of the device
does not assume liability for damages to the product or damages caused by the
product that occurs due to:
• Improper handling,
• Non-compliance of the operating instructions,
• Repairs by third parties, not by authorized service technicians,
• Installation and replacement of non-original spare parts,
• Application other than specified,
m We recommend:
When using equipment, a few safety precautions must be observed to avoid injuries and damage.
Read through the complete text in the operating instructions before installing and
commissioning the device.
If you give the equipment to any other person, give them these operating instructions as well.
The operating instructions are intended to help the user to become familiar with
the machine and take advantage of its application possibilities in accordance with
the recommendations. The operating instructions contain important information on
how to operate the machine safely, professionally and economically, how to avoid
danger, costly repairs, reduce downtimes and how to increase reliability and service life of the machine.
In addition to the safety regulations in the operating instructions, you have to meet
the applicable regulations that apply for the operation of the machine in your
country. Keep the operating instructions package with the machine at all times and
store it in a plastic cover to protect it from dirt and moisture. Read the instruction
manual each time before operating the machine and carefully follow its information.
2 GB

The machine can only be operated by persons who were instructed concerning the operation of the machine and who are informed about the associated dangers. The minimum age requirement must be complied with.
Besides the safety instructions included in this operating manual and the special
instructions of your country, the generally accepted technical rules for chain
hoists should be followed for the operation.
We cannot accept any liability for damage or accidents which arise due to a
failure to follow these instructions and the safety instructions.
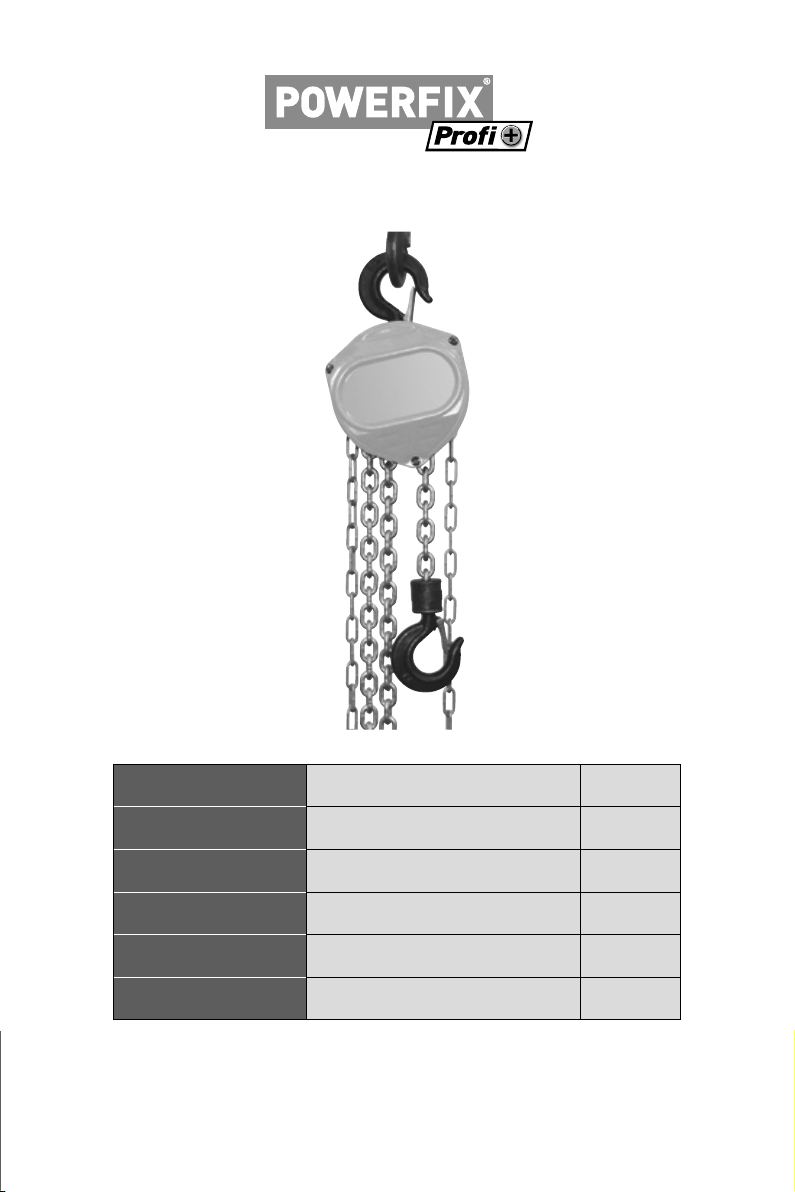
2. Device description (fig. 1-4)
1. Load chain
2. Hand chain
3. Fastening hook
4. Load hook
5. Chain pulley
6. Drive wheel
7. Latch lock
3. Scope of delivery
Chain hoist, manual
4. Intended use
The Chain Hoist is a device for vertical lifting and lowering of loads.
The chain hoist is provided for attachments (Attachment point - bottom) at altitudes
from 3.0 to 3.5 meters. Outside this height, the hand chain must be shortened /
extended accordingly.
The equipment is to be used only for its prescribed purpose. Any other use is
deemed to be a case of misuse. The user / operator and not the manufacturer
will be liable for any damage or injuries of any kind caused as a result of this.
Please note that our equipment has not been designed for use in commercial,
trade or industrial applications. Our warranty will be voided if the equipment is
used in commercial, trade or industrial businesses or for equivalent purposes.
3GB

5. Safety information
1 The rated load limit must not be exceeded, as overload can damage the chain
hoist or reduce the lifting capacity in the future.
2 Do not use electrical appliances to operate the chain hoist. The chain hoist
is designed for manual use only.
3 Do not try to repair the load chain. If it is damaged, the load chain should
only be replaced by an expert. The load chain must be replaced with a new
one of the same welded and hardened steel, in the same size and strength/
thickness.
4 The load chain should be greased before use.
5 The brake surfaces must not be greased. The brake must be kept dry
6 Make sure that the load chain has no knots. If there are knots in the load
chain, these must be removed before use.
7 Make sure the load chain is hung on the chain pulley before each use.
8 When pulling the hand chain, stand in the same position and angle as the
drive wheel. Do not pull at an oblique angle. A secure posture is necessary.
9 Do not lift the load so that it is above any persons. Do not allow any persons
to walk underneath the load. If you wish to lift a load, please warn anyone
in the surrounding area.
10 Do not lift any persons with the chain hoist.
11 The load must be held firmly in the hook. Try not to lift the load with the point
of the load hook.
12 Pull the hand chain evenly, to avoid thrusts or entanglements.
13 If the chain is barred or cannot be pulled further, please stop. Examine and
resolve the problem. Do not attempt to use force on the chain hoist. Do not
leave the load hanging in the air.
14 Please do not lower the load further than the usable length of the chain. If
the chain between the chain wheel and the chain pulley is pulled too taught,
this can cause damage.
15 Do not allow the load to come into contact with the chain hoist, otherwise
free rotation will be blocked, which could cause damage, knots in the chain
or barred wheels.
16 Regular checks and maintenance should be carried out. All damaged or faulty
parts must be exchanged by an expert.
17 The chain hoist functioning in both “with load” as well as “without load”
modes must be thoroughly and adequately checked.
18 Make sure the load weight is smaller than the stated weight of the chain hoist.
If in doubt, do not use the chain hoist.
19 Never overload the chain hoist.
4 GB

20 Safety procedures, examinations and greasing should be carried out before
and during operation. The chain hoist should only be used if it is in proper
working order.
21 Always make sure the chain is vertical and straight, and there are no knots.
22 Never pull the hand chain and the load chain at an oblique angle.
23 Do not use the chain block in an explosive environment or damp rooms.
24 Examine the load chain (1), hand chain (2), fastening hook (3), load hook
(4), load pin (5), drive wheel (6), and latch lock (7) for defects, especially
after longer periods of standstill.
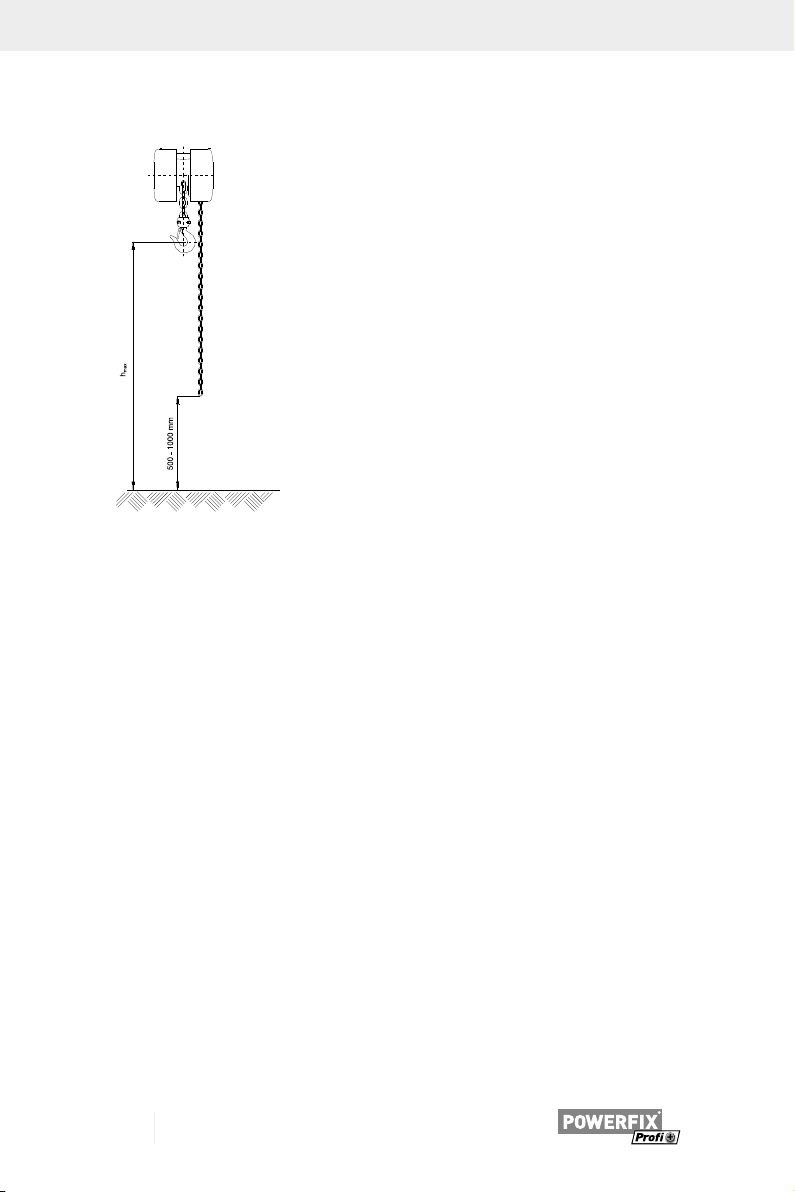
25 Adjust the hand chain (2) so that the point of chain reversal of the hand chain
(2) is at a height of between 500 and 1000 mm above the ground.
26 Pay attention to any defects which may have occurred during use. If there
are noticeable problems, immediately stop the chain block from operating.
27 The temperature of the surrounding atmosphere must be between -10°C and
+50°C in order to operate.
ADDITIONAL SAFETY INFORMATION
Workplace safety
1 Keep the work area orderly. Disorder in the work area can lead to accidents.
2 Provide adequate lighting at work..
3 Keep children and other persons away from the work area. Maintain a safe
distance from the work area.
4 Secure the work area by means of lockable latches, lockable main switch,
etc. against unauthorized access.
5 Wear proper clothing. Wearing loose clothing, gloves, scarves and jewelry
in the work area must be avoided, because they might get stuck in moving
parts and can thus lead to serious injury.
6 Wear shoes with non-slip soles.
7 Wear a certified helmet as head protection. Long hair is fully covered under
the head cover.
8 Wear safety goggles.
9 Provide a secure attachment of the chain hoist at the mounting point. The
load capacity of this compound must be higher than the specified maximum
load of the chain hoist.
10 Secure the chain hoist when leaving the work area.
5GB
m This appliance is not intended for use by persons (including children) with reduced physical, sensory or mental capabilities, or lack of experience and knowledge, unless they have been given supervision or instruction concerning use of
the appliance by a person responsible for their safety.
Children should be supervised to ensure that they do not play with the appliance.
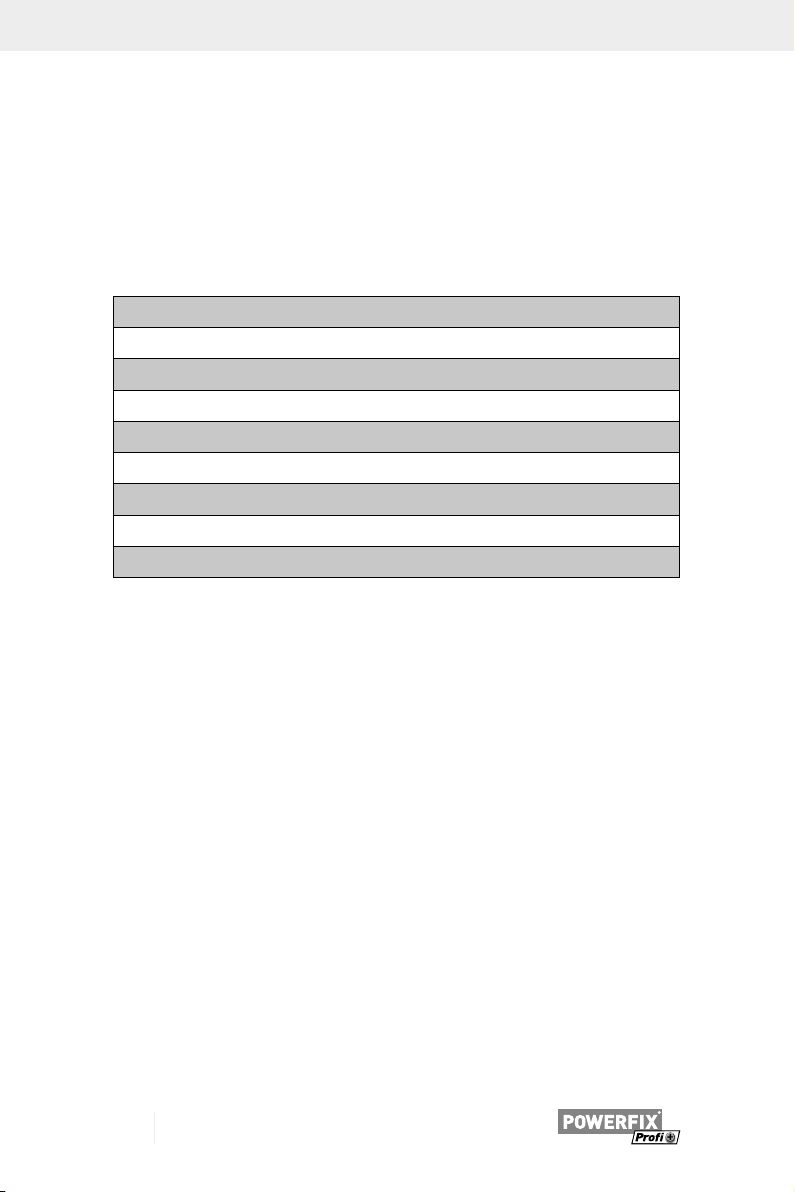
6. Technical data
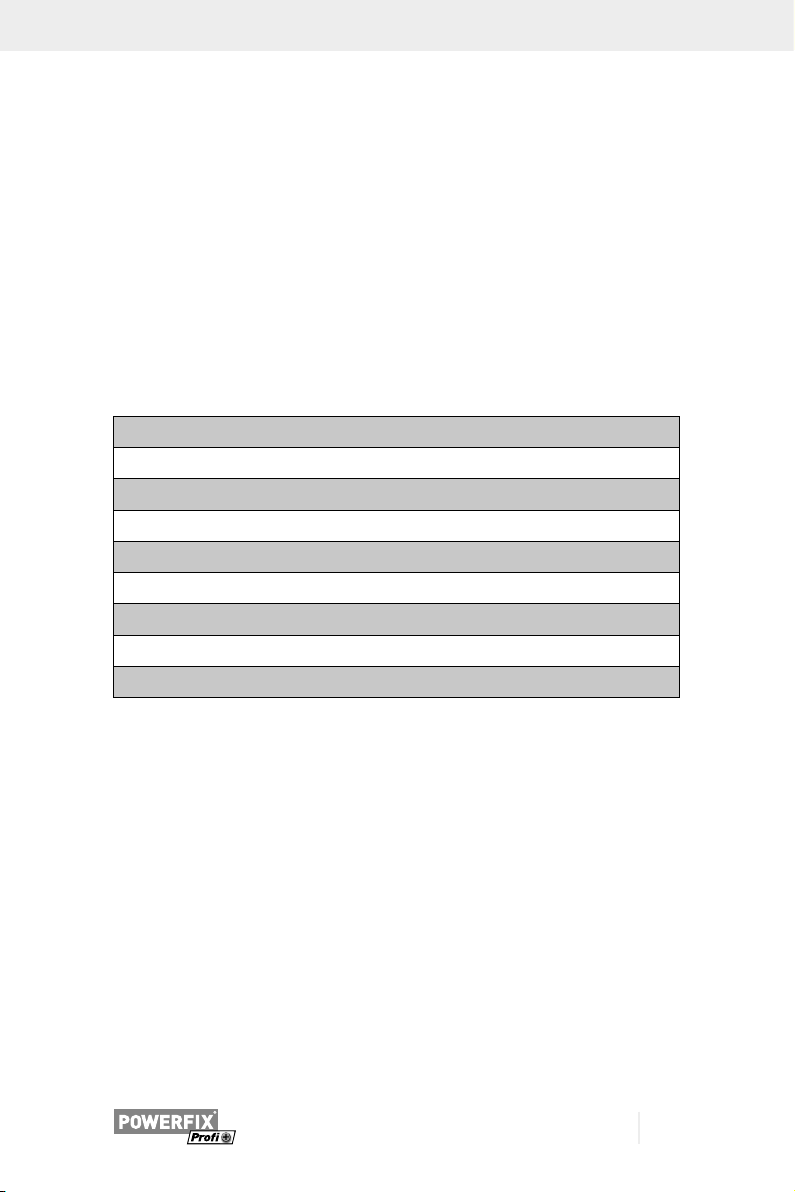
Max. holding diameter fastening hook mm
Max. holding diameter load hook mm
Nominal hoisting capacity kg
Max. stroke height m
Length chain m
Force required at full load Nm
Size of load hoisting chain mm
Dimensions LxBxH mm
Weight kg (approx.)
147x128x330
23
23
1000
3
3
340
6 x18
9,75
7. Before starting the equipment
• Open the packaging and remove the device carefully.
• Remove the packaging material as well as the packaging and transport bracing (if available).
• Check that the delivery is complete.
• Check the device and accessory parts for transport damage.
• If possible, store the packaging until the warranty period has expired.
m ATTENTION
The device and packaging materials are not toys! Children must
not be allowed to play with plastic bags, film and small parts!
There is a risk of swallowing and suffocation!
6 GB
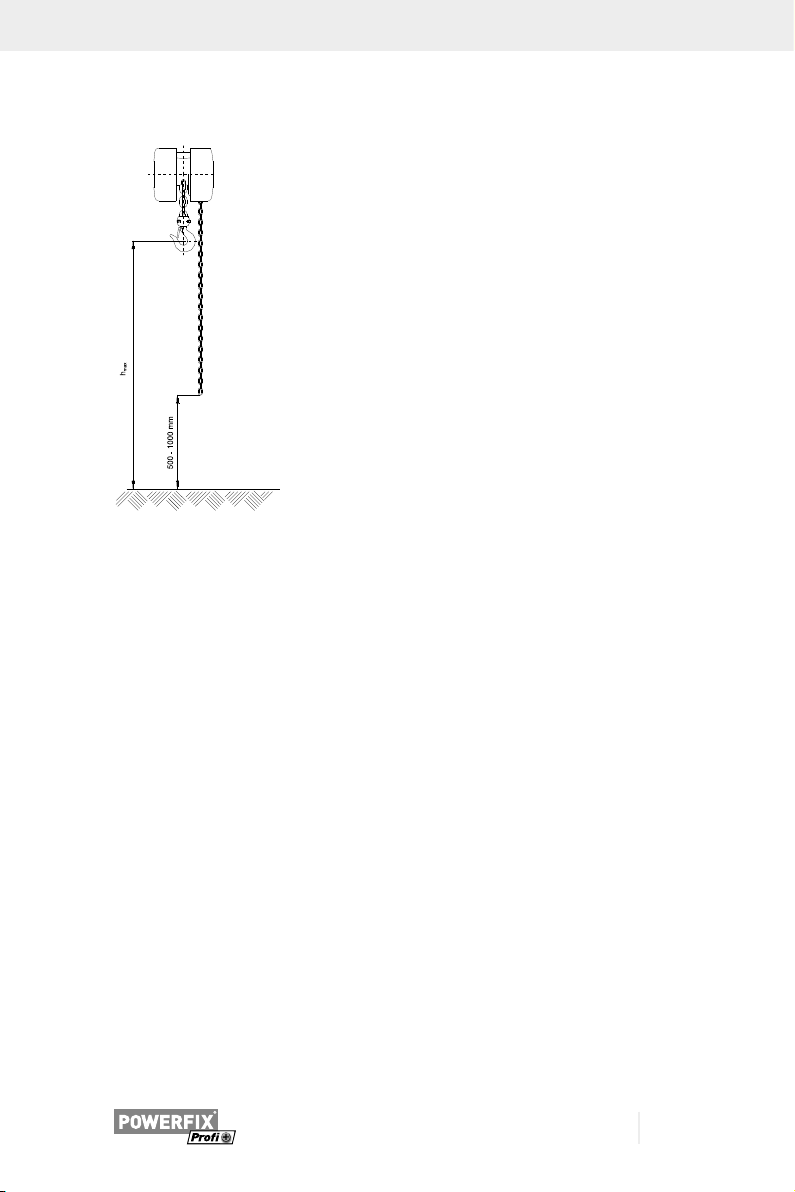
Adjustment of the hand chain
The chain hoist is supplied with a hand chain whose
length is proportional to the pass of the pulley. In case
of normal installation it satisfies the condition of proper adjustment of the chain end. In cases in which the
length of hand chain does not appeal the prescribed
conditions, it is necessary to shorten or lengthen the
chain.
m Modification of the machine only by a specialist
workshop.
1 Before you lift a load with the chain hoist, you should make yourself familiar
with the “without load” function of the chain hoist.
2 Brake control system
Test the brakes as follows:
• Hung the load
• Lift the load
• Lift and lower the load to various heights
• Check whether load holding in any position is ensured
8. Attachment and operation
1 Make sure the chain hoist is securely fastened. Be careful when choosing
fastening points. These points must be able to carry double the load. If you
are unsure as to whether the chosen point is the right one, please choose a
different one.
2 The chain hoist should be fastened so that it cannot change its position dur-
ing operation.
3 The latch locks which are attached to the fastening hook and the load hook
must always be closed during operation.
4 The maximum height of the anchor point must not be higher than 3.5 m.
7GB

Lifting the load (fig. 5)
On the front side of the chain block there is an engraved arrow pointing upwards,
labelled “U”. Pull the hand chain (2) on this side of the chain block in order to
lift the load. (fig. 5/B)
Lowering the load (fig. 5)
On the front side of the chain block there is an engraved arrow pointing downwards, labelled “D”. Pull the hand chain (2) on this side of the chain block in order to lower the load. (fig. 5/A)
m Attention
The braking system can become dangerously hot in exceptional cases (continuous and fast lowering). In these cases it is necessary to lower the load slowly
and intermittently.
9. Cleaning and maintenance
• In order to achieve the longest possible operating efficiency and reliability of
the chain hoist, remove dirt regularly from your chain hoist, grease the relevant
parts thoroughly after use and store the hoist in a dry place.
• Do not carry out any technical alterations or repairs to the chain hoist; have
these carried out by an expert instead.
• The chain hoist must be regularly examined for damage.
• The working order of the chain hoist is to be checked regularly.
Perform any servicing work after using and before storing the
equipment:
Clean the chain block thoroughly.
Lubricate the chain block properly at all times.
Lubricate the load hook chain and joint with oil.
Special attention must be paid to servicing when installing the chain block outdoors.
8 GB

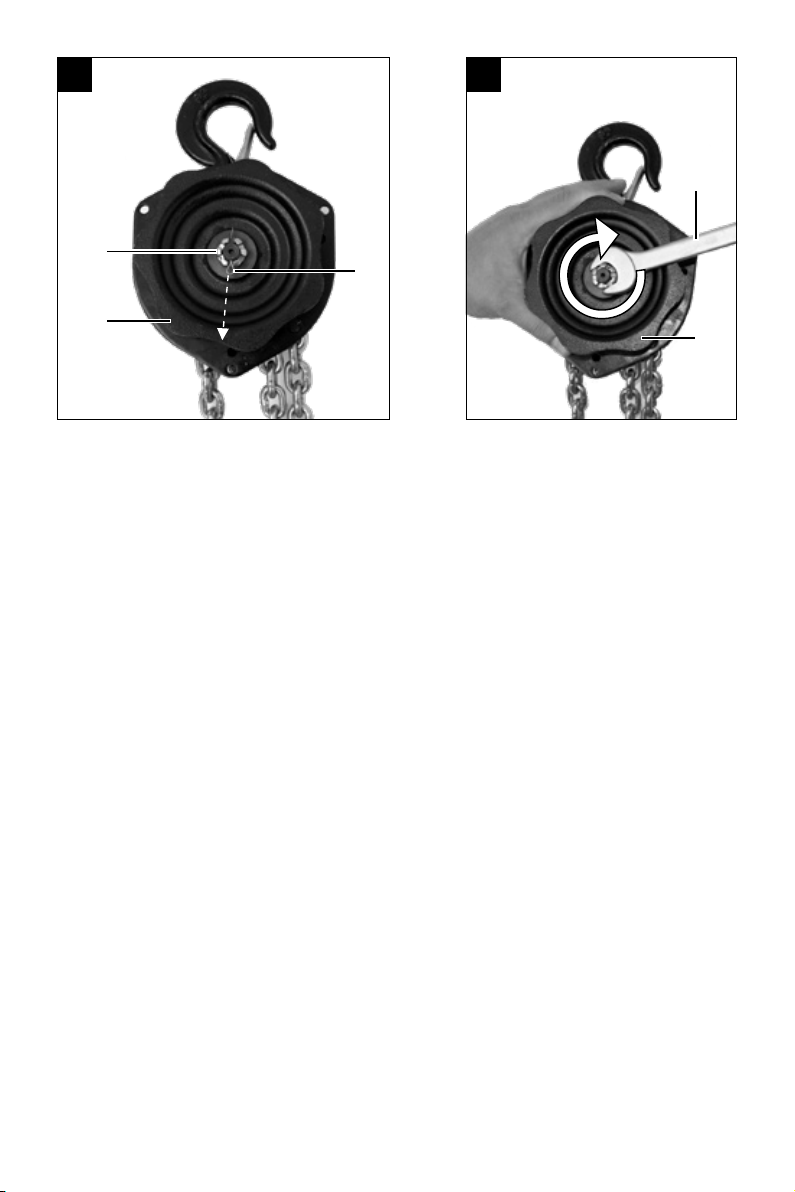
Adjusting the Brake (fig. 6 -7):
m Attention:
All settings and servicing at brake system let carried out only by
trained specialist personnel!
• Remove the housing cover by loosening the 3 screws on the back of the unit
• Remove the safety splint (fig. 6/E)
• Fix the wheel for guiding the chain (fig. 7/D) by hand
• Now turn the adjusting screw (fig. 6/C and fig. 7) in the desired direction
m Note:
The wheel for guiding the chain (fig. 7/D) must be able to rotate
counterclockwise and clockwise. Do not tighten the adjusting
screw (fig. 6/C) to strongly.
• Rotating the wrench (fig. 7/K 19mm) in a clockwise direction increases the
braking effect.
• Turn the wrench (fig. 7/K 19mm) anti-clockwise to reduce the braking effect.
• Insert the safety splint back on and secure it by prying..
m Note:
If the braking effect is losing return the unit to a specialist workshop for inspection. Let‘s check the thickness of the brake discs at
regular intervals by a specialist workshop.
Load chain
The chain life is sufficiently dimensioned. Nevertheless, the life is shortened due to
external influences. If a length of 21 chain links 400 mm is exceeded, the chain
must necessarily be replaced.
Length of 21 chain links
Load hook
The load hook gets deformed when handled unprofessionally or when overloaded.
The load hook must immediately be replaced if the g dimension reaches the limit
value of 26 mm. Safety will not be guaranteed if the above-mentioned provision
is not provided.
m Failure to observe the safety is no longer guaranteed.
9GB

G-NEW = 23 mm ±5%
G-Min. = 22 mm
G-Max. = 24 mm
G-Replacement necessary = 26 mm
10. Storage
Store the device and its accessories in a dark, dry and frost-proof place that is inaccessible to children. The optimum storage temperature is between 5 and 30˚C.
11. Transport
Transport the device in a suitable container. Pay attention to the security of all
chain parts.
12. Disposal and recycling
The equipment is supplied in packaging to prevent it from being damaged in transit. The raw materials in this packaging can be reused or recycled. The equipment
and its accessories are made of various types of material, such as metal and plastic. Defective components must be disposed of as special waste. Ask your dealer
or your local council.
The packaging is wholly composed of environmentally-friendly
materials that can be disposed of at a local recycling centre.
Contact your local refuse disposal authority for more details of
how to dispose of your worn out electrical devices.
10 GB
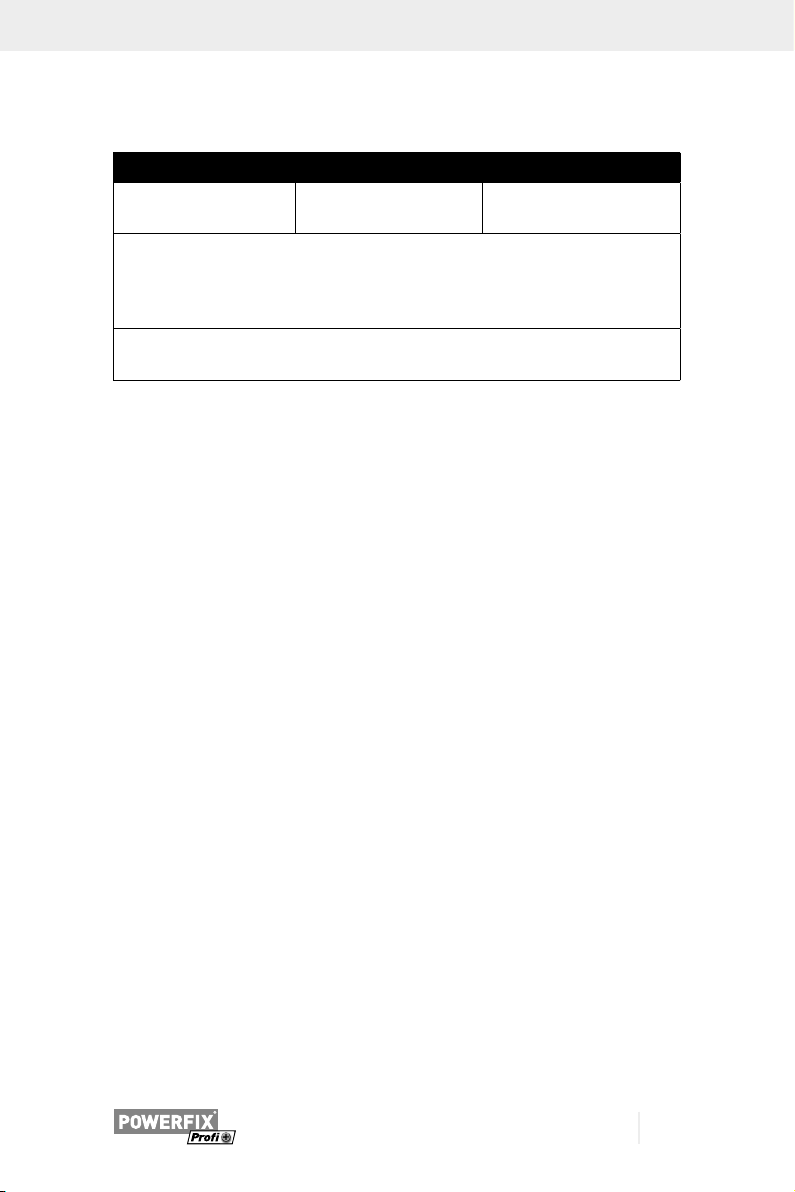
13. Troubleshooting
Fault Cause Corrective action
Load cannot be raised Load too heavy
Brake system defective
Repairs
Use only accessories and spare parts recommended by the manufacturer. If
the device fails in spite of our quality control and your maintenance, carry out
repairs only with the help of an authorised and qualified mechanic.
Waste disposal
When disposing of the machine, the local statutory provisions must be followed.
Customer service / service centre
11GB

14. Warranty certificate
Dear Customer,
All of our products undergo strict quality checks to ensure that they reach you in perfect condition. In the unlikely event that your device develops a fault, please contact
our service department at the address shown on this guarantee card. Of course, if
you would prefer to call us then we are also happy to offer our assistance under the
service number printed below. Please note the following terms under which guarantee claims can be made:
• These guarantee terms cover additional guarantee rights and do not affect your
statutory warranty rights. We do not charge you for this guarantee.
• Our guarantee only covers problems caused by material or manufacturing defects, and it is restricted to the rectification of these defects or replacement of the
device. Please note that our devices have not been designed for use in commercial, trade or industrial applications. Consequently, the guarantee is invalidated if
the equipment is used in commercial, trade or industrial applications or for other
equivalent activities. The following are also excluded from our guarantee: compensation for transport damage, damage caused by failure to comply with the installation/assembly instructions or damage caused by unprofessional installation,
failure to comply with the operating instructions (e.g. connection to the wrong
mains voltage or current type), misuse or inappropriate use (such as overloading
of the device or use of non-approved tools or accessories), failure to comply with
the maintenance and safety regulations, ingress of foreign bodies into the device
(e.g. sand, stones or dust), effects of force or external influences (e.g. damage
caused by the device being dropped) and normal wear resulting from proper
operation of the device.
The guarantee is rendered null and void if any attempt is made to tamper with the
device.
• The guarantee is valid for a period of 3 years starting from the purchase date of
the device. Guarantee claims should be submitted before the end of the guarantee period within two weeks of the defect being noticed. No guarantee claims
will be accepted after the end of the guarantee period. The original guarantee
period remains applicable to the device even if repairs are carried out or parts
are replaced. In such cases, the work performed or parts fitted will not result in
an extension of the guarantee period, and no new guarantee will become active
for the work performed or parts fitted. This also applies when an on-site service
is used.
12 GB

• In order to assert your guarantee claim, please send your defective device postage-free to the address shown below. Please enclose either the original or a copy
of your sales receipt or another dated proof of purchase. Please keep your sales
receipt in a safe place, as it is your proof of purchase. It would help us if you
could describe the nature of the problem in as much detail as possible. If the
defect is covered by our guarantee then your device will either be repaired immediately and returned to you, or we will send you a new device.
Of course, we are also happy offer a chargeable repair service for any defects
which are not covered by the scope of this guarantee or for units which are no
longer covered. To take advantage of this service, please send the device to our
service address.
Service-Hotline (GB):
+800 4003 4003
(0,00 EUR/Min.)
Service-Email (GB):
service.GB@scheppach.com
Service Address (GB):
GreatStar Europe
Unit 55 Romsey Industrial Estate,
Romsey Hampshire SO51 0HR
13GB

Tartalomjegyzék:
1. Bevezetés 15
2. A készülék leírása 16
3. Szállított elemek 16
4. Rendeltetésszerű használat 16
5. Biztonsági utasítások 17
6. Műszaki adatok 19
7. Az üzembe helyezés előtt 19
8. Felépítés és kezelés 20
9. Tisztítás és karbantartás 21
10. Tárolás 23
11. Szállítás 23
12. Ártalmatlanítás és újrahasznosítás 23
13. Hibakeresési útmutató 24
14. Jótállási tájékoztató 25
Oldal:
14 HU

1. Bevezetés
GYÁRTÓ:
scheppach
Fabrikation von Holzbearbeitungsmaschinen GmbH
Günzburger Straße 69
D-89335 Ichenhausen
KEDVES ÜGYFELÜNK!
Sok örömet és sikert kívánunk új készüléke használatához.
MEGJEGYZÉS:
E gép gyártója a hatályos termékfelelősségi törvény szerint nem felelős a gépen
esett vagy a gép által okozott károkért a következő esetekben:
• szakszerűtlen kezelés,
• a kezelési útmutató be nem tartása,
• harmadik fél által végzett illetéktelen javítás,
• nem eredeti pótalkatrészek beépítése és cseréje,
• nem rendeltetésszerű használat,
m Vegye figyelembe a következőket:
A készülékek használata során a sérülések és károk elkerülése érdekében be kell
tartani néhány óvintézkedést.
A szerelés és üzembe helyezés előtt olvassa el a kezelési útmutató teljes szövegét.
Amennyiben átadja a készüléket más személynek, akkor mellékelje a jelen kezelési útmutatót is.
Kezelési útmutatónkból megismerheti készülékét, és elsajátíthatja a rendeltetésszerű használatához szükséges ismereteket.
A kezelési útmutató fontos információkat tartalmaz arról, hogyan dolgozhat a
termékkel biztonságosan, szakszerűen és gazdaságosan, hogyan előzheti meg
a baleseteket, csökkentheti a javítási költségeket és az időkieséseket és növelheti
a gép megbízhatóságát és élettartamát.
A jelen kezelési útmutató biztonsági rendelkezésein túl feltétlenül tartsa be az
országában a termék üzemeltetésével kapcsolatosan érvényes előírásokat is.
A szennyeződés és nedvesség ellen műanyag tokba csomagolt kezelési útmutatót tartsa a készülék közelében. Munkába állás előtt minden kezelő olvassa el
és gondosan tartsa be előírásait.
A gépen csak olyan személyek dolgozhatnak, akiket betanítottak a készülék
használatára, és megismertettek az előforduló veszélyforrásokkal. Tartsa be a
kezelők minimális életkorára vonatkozó rendelkezést.
15HU

A jelen kezelési útmutató biztonsági rendelkezésein és országában a gép üzemeltetésére vonatkozó előírásokon túl feltétlenül tartsa be
a láncos emelőcsigák üzemeltetésére vonatkozó általánosan elismert műszaki
szabályokat is.
Nem vállalunk felelősséget az olyan balesetekért vagy károkért, amelyek azért
keletkeznek, mert nem vették figyelembe a jelen útmutatót és a biztonsági utasításokat.
2. A készülék leírása (1-4. ábra)
1. Teherlánc
2. Kézi lánc
3. Rögzítőkampó
4. Emelőkampó
5. Emelő csapszeg
6. Hajtókerék
7. Rugós zár
3. Szállított elemek
Láncos emelőcsiga, kezelési útmutató
4. Rendeltetésszerű használat
A láncos emelőcsigát terhek függőleges emelésére és süllyesztésére tervezték.
A láncos emelőcsigát 3,0 és 3,5 méter közötti emelési magassághoz (kötözési
pont és padló közötti távolság) tervezték. Ezen emelési magasságon kívül a kézi
láncot megfelelően rövidíteni, illetve hosszabbítani kell.
A gépet csak rendeltetésszerűen használja. Minden ettől eltérő használat nem
rendeltetésszerűnek minősül. Az ebből
fakadó minden kárért és sérülésért nem a gyártó, hanem a felhasználó/kezelő
viseli a felelősséget.
Kérjük, vegye figyelembe, hogy készülékeinket rendeltetésük szerint nem kisipari,
kéziipari vagy ipari használatra tervezték. Semmilyen felelősséget nem vállalunk,
ha a készüléket kisipari, kéziipari vagy ipari, valamint ezekkel egyenértékű tevékenységekhez használják.
16 HU

5. Biztonsági utasítások
1 A maximális névleges terhelést nem szabad túllépni, mert a túlterhelés káro-
síthatja a láncos emelőcsigát vagy csökkentheti a későbbi emelőképességet.
2 A láncos emelőcsiga kezeléséhez ne használjon elektromos berendezést. Ez
a láncos emelőcsiga csak kézzel történő kezelésre készült.
3 Ne próbálja meg megjavítani a teherláncot. Sérülés esetén a teherláncot
csak szakember cserélheti ki. A teherláncot csak azonos méretű és azonos
vastagságú, ugyanilyen hegesztett és edzett acélból készített új láncra szabad kicserélni.
4 Kérjük, használat előtt végezze el a teherlánc kenését.
5 A fékfelületeket nem szabad kenni. A féket szárazon kell tartani.
6 Gondoskodjon arról, hogy a teherláncon ne legyen csomó. Amennyiben a
teherláncon csomó található, akkor azt használat előtt ki kell bontani.
7 Gondoskodjon arról, hogy a teherlánc minden használat előtt be legyen
akasztva a teher végcsapszegbe.
8 A kézi lánc húzásakor a hajtókerékkel megegyező állásban és szögben áll-
jon. Kérjük, ne húzza ferde szögben. Álljon biztonságos helyzetben.
9 Ne emelje emberek fölé a terhet. Senkinek ne engedje, hogy a teher alá lép-
jen. Amikor meg szeretné emelni a terhet, akkor figyelmeztesse a közelben
tartózkodó személyeket.
10 Soha ne emeljen fel személyeket a láncos emelőcsigával.
11 A teher legyen rögzítve a kampóban. Ne próbálja az emelőkampó csúcsá-
val emelni a terhet.
12 A hirtelen lökések és az összegabalyodás elkerülése érdekében egyenlete-
sen húzza a kézi láncot.
13 Ha a lánc lezárt vagy nem lehet tovább húzni, akkor kérjük, ne húzza tovább.
Ellenőrizze és szüntesse meg a problémát. Ne próbálja erőszakkal kezelni
az láncos emelőcsigát. Ne hagyja a levegőben lógni a terhet.
14 A terhet csak annyira engedje le, amíg azt a lánc használható hossza lehe-
tővé teszi. Ha túl feszesen húzza meg a láncot a lánckerék és a teher végcsapszeg között, akkor az károsodást okozhat.
15 Ne hagyja, hogy a teher érintkezzen a láncos emelőcsigával, mert ellenke-
ző esetben blokkolódik a szabad forgás, és ez károsodást, a láncon csomót
vagy a kerék lezárást okozhatja.
16 Rendszeresen végezzen ellenőrzést és karbantartást. Minden sérült vagy
meghibásodott alkatrészt szakembernek kell kicserélni.
17 A használat előtt megfelelő alapossággal ellenőrizze a láncos emelőcsiga
működését „teherrel”, illetve a „teher nélkül”.
17HU

18 Győződjön meg arról, hogy a teher tömege kisebb, mint a láncos emelőcsi-
ga esetében megadott névleges tömeg. Kétség esetén kérjük, ne használja
a láncos emelőcsigát.
19 Soha ne terhelje túl a láncos emelőcsigát.
20 A kezelés előtt és közben végezzen biztonsági intézkedéseket, ellenőrzéseket
és kenést. A láncos emelőcsigát csak akkor szabad használni, ha szabályszerű állapotban van.
21 Mindig győződjön meg arról, hogy a láncok függőleges helyzetben vannak,
és nincsenek rajta csomók.
22 Soha ne húzza ferde szögben a kézi láncot és a teherláncot.
23 Ne használja robbanásveszélyes környezetben vagy nedves helyiségben a
láncos emelőcsigát.
24 Rendszeresen ellenőrizze, hogy nem észlelhető-e károsodás a teherláncon
(1), a kézi láncon (2), a rögzítőkampón (3), az emelőkampón (4), az emelő
csapszegen (5), a hajtókeréken (6) és a rugós záron (7), és hosszabb állásidő után végezzen fokozott ellenőrzést.
25 A (2) kézi láncot úgy állítsa be, hogy a (2) kézi lánc irányváltója 500–1000
mm-rel a padló felett legyen.
26 Ügyeljen a használat közben jelentkező bármely meghibásodásra. Amennyi-
ben használat közben bármilyen rendellenességet észlel, azonnal helyezze
üzemen kívül a láncos emelőcsigát.
27 Üzemelés közben a környezeti hőmérséklet –10 °C és +50 °C között legyen.
TOVÁBBI BIZTONSÁGI UTASÍTÁSOK
A munkahely biztonsága
1 A balesetek megelőzése érdekében tartsa akadálymenetesen a munkate-
rületet.
2 Gondoskodjon a munkahely elegendő megvilágításáról.
3 Tartsa távol a gyermekeket, illetve illetéktelen személyeket a munkaterülettől.
Ügyeljen a munkaterülettől tartandó biztos távolságra.
4 Zárható retesszel, lezárható főkapcsolóval stb. biztosítsa illetéktelen belépés
ellen a munkaterületet.
5 Viseljen megfelelő munkaruhát. A munkaterületen tilos a bő ruházat, kesztyű,
sál, valamint ékszerek viselése, mivel a mozgó alkatrészek elkaphatják ezeket,
és ezáltal súlyos sérülésekhez vezethetnek.
6 Csúszásgátló talppal rendelkező lábbelit viseljen.
7 Fejvédőként tanúsítvánnyal rendelkező védősisakot viseljen. Hosszú haját
teljesen rejtse a fejfedő alá.
8 Viseljen védőszemüveget.
18 HU
9 Gondoskodjon a láncos emelőcsiga biztonságos rögzítéséről a felszerelés
helyén. Ezen csatlakozás teherbírása legyen nagyobb a láncos emelőcsiga
megadott maximális teherbírásánál.
10 A munkaterület elhagyásakor biztosítsa a láncos emelőcsigát.
m Ez a készülék nem alkalmas arra, hogy korlátozott fizikai, érzékszervi vagy
szellemi képességekkel vagy hiányos tapasztalattal és/vagy tudással rendelkező
személyek (beleértve a gyermekeket is) használják, kivéve, ha egy, a biztonságukért felelős személy felügyeli őket, vagy utasításokkal látja el őket a készülék
használatára vonatkozóan. Felügyelje a gyermekeket, hogy ne játszhassanak
a készülékkel.
6. Műszaki adatok
Rögzítőkampó max. befogási átmérője (mm)
Emelőkampó max. befogási átmérője (mm)
Névleges emelt teher (kg)
Max. emelési magasság (m)
Lánc hossza (m)
Erőkifejtés teljes terhelésnél (Nm)
Teheremelő lánc mérete (mm)
Méretek, H x Sz x Ma (mm)
Tömeg, kb. (kg)
147x128x330
23
23
1000
3
3
340
6 x18
9,75
7. Az üzembe helyezés előtt
• Nyissa ki a csomagot, és óvatosan vegye ki a készüléket.
• Távolítsa el a csomagolóanyagot, valamint a csomagolási/szállítási biztosítékokat (ha vannak).
• Ellenőrizze, hogy hiánytalan-e a szállítmány.
• Ellenőrizze a készülék és a tartozékok szállításból eredő sérüléseit.
• Lehetőség szerint a jótállási idő leteltéig őrizze meg a csomagolást.
m FIGYELEM
A készülék és a csomagolóanyag nem játékszer! Ne engedje,
hogy a gyermekek a műanyag zacskókkal, fóliákkal és apró részekkel játsszanak! Lenyelés és fulladás veszélye áll fenn!
19HU
A kézi lánc beállítása
A láncos emelőcsigát egy kézi lánccal szállítjuk, amelynek hossza arányos a láncos emelőcsiga emelésével.
Normál telepítés esetén a kézi lánc megfelel a láncvég
helyes beállításához szükséges feltételeknek. Amenynyiben a kézi lánc hossza nem felel meg az előírt feltételeknek, a lánc rövidítésére vagy hosszabbítására
van szükség.
m A készülék módosításait kizárólag szakszervizzel
végeztesse el.
1 Mielőtt a láncos emelőcsigával terhet emel meg, először ismerkedjen meg a
láncos emelőcsiga „teher nélküli“ működésével.
2 A fékrendszer ellenőrzése
A fékrendszer tesztjeit a következőképpen végezze el:
• Akassza fel a terhet.
• Emelje meg a terhet.
• Emelje és süllyessze különböző magasságokra a terhet.
• Tesztelje, hogy minden pozícióban biztosított-e a teher megtartása.
8. Felépítés és kezelés
1 Ügyelni kell a láncos emelőcsiga biztonságos rögzítésére. A rögzítési pont
kiválasztásakor legyen nagyon kritikus, mert olyan rögzítési pontot kell kiválasztani, amely a terhelés kétszeresét is kibírja. Amennyiben nem biztos
abban, hogy a kiválasztott pont megfelelő, akkor kérjük, inkább válasszon
egy másik pontot.
2 A láncos emelőcsigát úgy kell rögzíteni, hogy használat közben ne változ-
tathassa meg a pozícióját.
3 A rögzítőkampón és az emelőkampón található rugós zárnak kezelés közben
mindig zárt állapotban kell lenni.
4 A kötözési pont maximális magassága nem lehet 3,5 m felett.
20 HU

Terhek emelése (5. ábra)
A láncos emelőcsiga elülső oldalán egy nyíl jelölés található „U“ felirattal. A
teher emeléséhez a láncos emelőcsiga ezen oldalán húzza meg a (2) kézi láncot. (5. ábra/B)
Terhek süllyesztése (5. ábra)
A láncos emelőcsiga elülső oldalán egy nyíl jelölés található „D“ felirattal. A
teher süllyesztéséhez a láncos emelőcsiga ezen oldalán húzza meg a (2) kézi
láncot. (5. ábra/A)
m Figyelem
A láncos emelőcsigáknál a terhek süllyesztése során kivételes esetekben (folyamatos és gyors süllyesztés) a fék veszélyes felmelegedésére kerülhet sor. Ilyen
esetekben lassan és megszakításokkal süllyessze a terhet.
9. Tisztítás és karbantartás
• Annak érdekében, hogy a láncos emelőcsiga a lehető legtovább maradjon
használható, tisztítsa meg rendszeresen a láncos emelőcsigát a szennyeződésektől, használat után gondosan zsírozza be az alkatrészeket és tárolja
száraz helyen.
• A láncos emelőcsigán semmilyen műszaki módosítást vagy javítást ne végezzen,
az ilyen munkálatokat szakembernek kell végezni.
• Rendszeresen ellenőrizni kell a láncos emelőcsiga esetleges sérüléseit.
• Rendszeresen ellenőrizni kell a láncos emelőcsiga szabályszerű működését.
Használat után és a készülékek raktározása előtt végezze el a
következő munkálatokat:
Alaposan tisztítsa meg a láncos emelőcsigát,
Jól kenje meg a láncos emelőcsigát,
Jól olajozza meg az emelőláncot és az emelőkampó láncát
A láncos emelőcsiga szabadban történő használata esetén rendszeres időközönként ellenőrizze a korrózió által okozott károkat.
21HU

A fék beállítása (6-7. ábra):
m Figyelem:
Lehetőség szerint a fékrendszer összes beállítását és szervizelési
munkálatát csak képzett szakszemélyzettel végeztesse el!
• A készülék hátoldalán található 3 csavar kioldásával távolítsa el a ház borítását
• Távolítsa el a rögzítőcsapot (6. ábra/E)
• Kézzel rögzítse a láncvezető kereket (7. ábra/D)
• Ekkor forgassa a kívánt irányba a beállító csavart (6. ábra/C és 7. ábra)
m Megjegyzés:
A láncvezető kerék (7. ábra/D) mind az óramutató járásának irányába, mind azzal ellentétesen legyen forgatható. Ne húzza meg
túl szorosan a beállító csavart (6. ábra/C).
• A kulcs (7. ábra/K 19mm) óramutató járásának irányába történő forgatása
növeli a fékhatást.
• A kulcs (7. ábra/K 19mm) óramutató járásával ellentétes forgatása csökkenti
a fékhatást.
• Helyezze vissza és mozdítsa felfelé a rögzítőcsapot.
m Megjegyzés:
A fékhatás megszűnése esetén felülvizsgálat céljából adja át
a készüléket egy szakszerviznek. Rendszeresen ellenőriztesse
szakszervizzel a féktárcsák vastagságát.
Emelőlánc
Az emelőláncokat megfelelő élettartamra tervezték. Azonban így is előfordulhat,
hogy külső hatások miatt csökken az élettartam. Ha a 21 lánctag hossza meghaladja a 400 mm-t, akkor feltétlenül végezze el az emelőlánc cseréjét.
21 lánctag hossza
Emelőkampó
Szakszerűtlen használat, például túlterhelés esetén torzul az emelőkampó. Ha a G
méret eléri a 26 mm-es határértéket, az emelőkampó azonnali cseréjére van szükség.
22 HU

m Ennek figyelmen kívül hagyása esetén nem garantálható a biz-
tonság.
G-ÚJ = 23 mm ±5%
G-Minimális = 22 mm
G-Maximális = 24 mm
G-Csere szükséges = 26 mm
10. Tárolás
Sötét, száraz és fagymentes, valamint gyermekek számára nem hozzáférhető helyen tárolja a készüléket és tartozékait. Az optimális tárolási hőmérséklet 5 ˚C és
30 ˚C között van.
11. Szállítás
Megfelelő tárolódobozban szállítsa a készüléket. Ügyeljen a lánc összes alkatrészének biztonságos tárolására.
12. Ártalmatlanítás és újrahasznosítás
A készülék olyan csomagolásban található, amely megakadályozza a sérüléseket szállítás közben. Ez a csomagolás nyersanyag, így újra felhasználható vagy
a nyersanyag-körforgásba visszaforgatható. A készülék és annak tartozékai különböző anyagokból állnak, pl. fémből és műanyagokból. A hibás alkatrészeket
juttassa el az újrahasznosító helyekre. Érdeklődjön a szakkereskedésben vagy a
közösségi önkormányzatnál!
A csomagolás környezetbarát anyagokból készült, amelyeket
a helyi szelektív hulladékgyűjtő pontokon ártalmatlaníthat.
Az elhasználódott készülék ártalmatlanítási lehetőségeiről a
helyi önkormányzatnál tájékozódhat.
23HU

13. Hibakeresési útmutató
Üzemzavar Ok Megoldás
Nem lehet felemelni a terhet
Javítás
Csak a gyártó által ajánlott tartozékokat és pótalkatrészeket használja. Ha a
berendezés a minőségellenőrzéseink és a rendszeres ápolás ellenére mégis
meghibásodik, javíttassa meg egy megbízott szakemberrel.
Ártalmatlanítás
A gépet a helyi törvényi előírások betartásával ártalmatlanítsa.
A teher túl nehéz
A fékrendszer hibás
Forduljon a vevőszolgálathoz/szervizközponthoz
24 HU

14. JÓTÁLLÁSI TÁJÉKOZTATÓ
A termék megnevezése:
Láncos emelőcsiga
A termék típusa:
1000kb.
A gyártó cégneve, címe és email címe:
scheppach
Fabrikation von Holzbearbeitungsmaschine GmbH
Günzburger Straße 69
DE-89335 Ichenhausen
E-mail cím: (HU):
service.HU@scheppach.com
Az importáló és forgalmazó cégneve és címe: Lidl Magyarország Kereskedelmi Bt.,
H-1037 Budapest, Rádl árok 6.
1. A jótállási idő a Magyarország területén, Lidl Magyarország Kereskedelmi Bt. üzletében történt vásárlás
napjától számított 1 év, amely jogvesztő. A jótállási idő a fogyasztó részére történő átadással, vagy
ha az üzembe helyezést a forgalmazó, vagy annak megbízottja végzi, az üzembe helyezés napjával
kezdődik.
2. A jótállási igény a jótállási jeggyel és/vagy a vásárlást igazoló blokkal érvényesíthető. A jótállási
jegy szabálytalan kiállítása, vagy átadásának elmaradása nem érinti a jótállási kötelezettség-vállalás
érvényességét. Kérjük, hogy a vásárlás tényének és időpontjának bizonyítására őrizze meg a pénztári
fizetésnél kapott jótállási jegyetés a vásárlást igazoló blokkot.
3. A vásárlástól számított három munkanapon belül érvényesített csereigény esetén a forgalmazó köteles a
terméket kicserélni, feltéve ha a hiba a rendeltetésszerű használatot akadályozza. A jótállási jogokat a
termék tulajdonosaként a fogyasztó érvényesítheti az áruházakban, valamint a jótállási tájékoztatóban
feltüntetett szervizekben. (A magyar Polgári Törvénykönyv alapján fogyasztónak minősül a szakmája,
önálló foglalkozása vagy üzleti tevékenysége körén kívül eljáró természetes személy.)
A jótállás ideje alatt a fogyasztó hibás teljesítés esetén kérheti a termék kijavítását, kicserélését, vagy ha
a termék nem javítható vagy cserélhető, vagy az a forgalmazónak aránytalan többletköltséggel járna,
illetve a fogyasztó kijavításhoz, kicseréléshez fűződő érdeke alapos ok miatt megszűnt,árleszállítást
kérhet, vagy elállhat a szerződéstől és visszakérheti a vételárat.
Gyártási szám:
306852
A termék azonosításra alkalmas részeinek
meghatározása:
A szerviz neve, címe és telefonszáma:
scheppach.kiss
Hösök utja 3
H - 5931 Nagyszenas
Szerviz forródrót:
+800 4003 4003
(0,00 Ft./perc)
25HU

A kijavítás során a termékbe csak új alkatrész kerülhet beépítésre.
4. A fogyasztó a hiba felfedezésé után a lehető legrövidebb időn belül köteles a hibát bejelenteni és a
terméket a jótállási jogok érvényesítése céljából átadni. A hiba felfedezésétől számított két hónapon
belül bejelentett jótállási igényt időben közöltnek kell tekinteni. A közlés elmaradásából eredő kárért
a fogyasztó felelős. A jótállási igény érvényesíthetőségének határideje a termék, vagy fődarabjának
kicserélése esetén a csere napján újraindul.
5. A rögzített bekötésű, illetve a 10 kg-nál súlyosabb, vagy tömegközlekedési eszközön nem szállítható
terméket az üzemeltetés helyén kell megjavítani. Abban az esetben, ha a javítás a helyszínen nem végezhető el, a termék ki- és visszaszereléséről, valamint szállításáról a forgalmazónak kell gondoskodnia.
6. A jótállás nem áll fenn, ha a hiba a nem rendeltetésszerű használatból, átalakításból, helytelen tárolásból, vagy a használati utasítástól eltérő kezelésből, vagy bármely a vásárlást követő behatásból fakad,
vagy elemi kár okozta, és azt a forgalmazó, vagy a szerviz bizonyítja. A jótállás nem vonatkozik a mozgó kopó alkatrészek (világítótestek, gumiabroncsok stb.) rendeltetésszerű elhasználódására. A szerviz
és a forgalmazó a kijavítás során nem felel a terméken a fogyasztó vagy harmadik személyek által tárolt
adatokért vagy beállításokért.
7. Fogyasztói jogvita esetén a fogyasztó a megyei (fővárosi) kereskedelmi és iparkamarák mellett működő
békéltető testület eljárását is kezdeményezheti.
A jótállás a fogyasztó törvényből eredő szavatossági jogait és azok érvényesíthetőségétnem érinti.
26 HU

Kijavítást ellenőrző szelvény:
A jótállási igény bejelentésének időpontja: A hiba oka:
Javításra átvétel időpontja: A hiba javításának módja:
A fogyasztó részére történő visszaadás
időpontja:
A szerviz bélyegzője, kelt és aláírás:
Kicserélést ellenőrző szelvény:
A jótállási igény bejelentésének időpontja:
Kicserélés időpontja:
A jótállási igény bejelentésének időpontja:
27HU

Kazalo:
1. Uvod 29
2. Opis naprave 30
3. Obseg dostave 30
4. Namenska uporaba 30
5. Varnostni napotki 30
6. Tehnični podatki 33
7. Pred zagonom 33
8. Zgradba in upravljanje 34
9. Čiščenje in vzdrževanje 35
10. Skladiščenje 37
11. Transport 37
12. Odstranjevanje in predelava 37
13. Pomoč pri motnjah 37
14. Garancijski list 38
Stran:
28 SI

1. Uvod
PROIZVAJALEC:
scheppach
Fabrikation von Holzbearbeitungsmaschinen GmbH
Günzburger Straße 69
D-89335 Ichenhausen
SPOŠTOVANI KUPEC,
želimo vam veliko veselja in uspeha pri delu z vašo novo napravo.
NAPOTEK:
Proizvajalec te naprave skladno z veljavnim zakonom o odgovornosti za izdelke
ne jamči za poškodbe na tej napravi ali poškodbe s to napravo, do katerih pride
pri:
• nepravilnem ravnanju,
• neupoštevanju navodil za uporabo,
• popravilih, ki jih izvedejo tretji, nepooblaščeni strokovnjaki,
• vgraditvi neoriginalnih nadomestnih delov in zamenjava z njimi,
• uporaba, ki ni v skladu z namenom uporabe,
m Upoštevajte:
Pri uporabi naprav morate upoštevati nekatere varnostne ukrepe, da preprečite
telesne poškodbe in materialno škodo.
Pred montažo in zagonom preberite celotno besedilo navodil za uporabo.
Če boste napravo predali drugim osebam, jim izročite tudi ta navodila za uporabo.
Ta navodila za uporabo vam olajšajo spoznati napravo in izkoristiti njene možnosti uporabe, ki so v skladu z določili.
Navodila za uporabo vsebujejo pomembne napotke o varnem, strokovnem in
ekonomičnem delu z izdelkom, o izogibanju nevarnostim, prihranku stroškov za
popravila, zmanjšanju časov izpada in povečanju zanesljivosti ter življenjske dobe
naprave.
Poleg varnostnih določil v teh navodilih za uporabo morate nujno upoštevati predpise svoje države, ki veljajo za uporabo izdelka.
Navodila za uporabo shranite poleg naprave, ovita v plastični ovitek, tako da
bodo zaščitena pred umazanijo in vlago. Pred sprejemom dela mora vsaka upravljalna oseba prebrati in skrbno upoštevati omenjena navodila. Na napravi lahko
delajo samo osebe, ki so poučene o uporabi naprave in o nevarnostih, ki so povezane s tem. Upoštevajte zahtevano najnižjo starost.
29SI

Poleg varnostnih napotkov iz teh navodil in posebnih predpisov vaše države morate pri uporabi verižnih vitlov upoštevati tudi splošno veljavna tehnična pravila.
Ne prevzemamo nikakršne odgovornosti za nezgode in poškodbe, nastale zaradi
neupoštevanja teh navodil in varnostnih napotkov.
2. Opis naprave (sl. 1-4)
1. Bremenska veriga
2. Ročna veriga
3. Pritrdilni kavlji
4. Bremenski kavelj
5. Bremenski zatič
6. Pogonsko kolo
7. Zaskočna ključavnica
3. Obseg dostave
Verižni vitel, navodila za uporabo
4. Namenska uporaba
Verižni vitel je naprava za navpično dvigovanje in spuščanje bremen.
Verižni vitel je predviden za višino pritrditve (razmik med pritrdilno točko in talno ploščo) od 3,0 do 3,5 metra. Izven te višine pritrditve je treba ročno verigo
ustrezno skrajšati oz. podaljšati.
Stroj je dovoljeno uporabljati samo v skladu z njegovim namenom. Vsaka druga
uporaba, ki presega to, ni v skladu z namenom. Za iz tega izhajajočo škodo
ali poškodbe vseh vrst je odgovoren uporabnik/upravljavec in ne proizvajalec.
Prosimo, upoštevajte, da naše naprave namensko niso konstruirane za gospodarsko, obrtno ali industrijsko uporabo. Ne prevzemamo nobene odgovornosti, če
napravo uporabljate v gospodarskih, obrtnih ali industrijskih obratih ter enakih
dejavnostih.
5. Varnostni napotki
1 Omejitve nazivne obremenitve ni dovoljeno prekoračiti, ker lahko preobreme-
nitev poškoduje verižni vitel ali v prihodnje zmanjša zmogljivost dvigovanja.
2 Za upravljanje verižnega vitla ne uporabljajte nobenih električnih naprav. Ta
verižni vitel je konstruiran samo za ročno upravljanje.
30 SI

3 Ne poskušajte popravljati bremenske verige. Pri poškodovanju bremenske
verige jo lahko zamenja samo strokovnjak. Bremensko verigo je treba zamenjati z verigo iz enako zavarjenega in kaljenega jekla enake velikosti in
enake debeline.
4 Pred uporabo namažite bremensko verigo.
5 Zavornih površin ni dovoljeno mazati. Zavora mora biti prosta.
6 Zagotovite, da bremenska veriga ni zavozlana. Če je bremenska veriga za-
vozlana, jo je treba razvozlati.
7 Zagotovite, da je bremenska veriga pred vsako uporabo pritrjena na končni
bremenski zatič.
8 Ko vlačite ročno verigo, stojte v enakem položaju in v enakem kotu kot po-
gonsko kolo. Ne vlačite pod poševnim kotom. Postavite se v varen položaj.
9 Ne dvigujte bremen nad osebami. Nikomur ne dovolite stopiti pod breme.
Ko želite dvigniti breme, opozorite osebe v okolici.
10 Ne dvigujte oseb z verižnim vitlom.
11 Breme mora biti trdno pritrjeno na kavelj. Bremena ne poskušajte dvigati s
konico bremenskega kavlja.
12 Ročno verigo vlecite enakomerno, da se izognete nenadnim sunkom ali za-
pletom.
13 Ko je veriga blokirana ali je ni mogoče vleči, prenehajte. Preverite in odpra-
vite težavo. Verižnega vitla ne poskušajte upravljati s silo. Bremena ne pustite viseti v zraku.
14 Prosimo, da bremena ne spuščate preko uporabne dolžine verige. Če verigo
vlečete med verižnikom in končnim bremenskim zatičem, lahko povzročite
poškodbe.
15 Ne dopustite, da breme pride v stik z verižnim vitlom, sicer se lahko blokira
prosto vrtenje in povzroči poškodbe, zavozlanje verige ali blokiranje kolesa.
16 Redno opravljajte preglede in vzdrževanje. Vse poškodovane dele ali dele
z napako mora zamenjati strokovnjak.
17 Pred upravljanjem je treba dovolj temeljito preveriti funkcijo verižnega vitla
pod »breme« in »brez bremena«.
18 Zagotovite, da je teža bremena manjša od nazivne teže verižnega vitla. V
primeru dvoma ne uporabljajte verižnega vitla.
19 Nikoli ne preobremenite verižnega vitla.
20 Pred in med upravljanjem izvajajte varnostne postopke, preverjanja in maza-
nja. Verižni vitel uporabljajte samo takrat, ko je v ustreznem stanju.
21 Vedno se prepričajte, da so verige v navpičnem ravnem položaju ter da ni-
so zavozlane.
22 Ročne verige in bremenske verige nikoli ne vlecite pod poševnim kotom.
23 Verižnega vitla ne uporabljajte v eksplozivni okolici ali vlažnih prostorih.
31SI

24 Redno preverjajte bremensko verigo (1), ročno verigo (2), pritrdilni kavelj (3),
bremenski kavelj (4), bremenski zatič (5), pogonsko kolo (6) in zaskočno ključavnico (7) glede poškodb, zlasti po daljšem mirovanju.
25 Ročno verigo (2) nastavite tako, da je preusmerno mesto ročne verige (2) na
višini med 500 – 1000 mm nad tlemi.
26 Bodite pozorni na vsako okvaro, ki nastane med uporabo. Če jih opazite med
uporabo, takoj prenehajte z delom z verižnim vitlom.
27 Temperatura okolice za delovanje mora biti med -10°C in +50°C.
DODATNI VARNOSTNI NAPOTKI
Varnost na delovnem mestu
1 Delovno območje mora biti neovirano, da se preprečijo nesreče.
2 Poskrbite za zadostno osvetlitev na delovnem mestu.
3 Otroci in ostale osebe se ne smejo približevati delovnemu območju. Poskrbite
za varno razdaljo od delovnega območja.
4 Delovno območje zavarujte z zapahom, ki ga je mogoče zakleniti, zaklepnim
glavnim stikalom itd. pred nepooblaščenim dostopom.
5 Nosite primerna delovna oblačila. V delovnem območju ne nosite ohlapnih
oblačil, rokavic, šalov ter nakita, ker se lahko zataknejo v premikajoče se
dele in s tem povzročijo težke poškodbe.
6 Nosite čevlje s podplati, ki so odporni proti drsenju.
7 Kot zaščito glave nosite certificirano zaščitno čelado. Dolge lase popolnoma
prekrijte s pokrivalom.
8 Nosite zaščitna očala.
9 Poskrbite za varno pritrditev verižnega vitla na mestu montaže. Nosilnost
tega spoja mora biti večja od podane največje nosilnosti verižnega vitla.
10 Ob zapustitvi delovnega območja zavarujte verižni vitel.
m Ta naprava ni namenjena temu, da jo uporabljajo osebe (vključno z otroci) z
omejenimi fizičnimi, senzoričnimi ali duševnimi sposobnostmi ali s pomanjkanjem
izkušenj in/ali znanja, razen, če jih nadzoruje oseba, zadolžena za njihovo varnost, ali so od nje dobile navodila, kako uporabljati napravo. Otroke je treba
nadzorovati, da zagotovite, da se ne igrajo z napravo.
32 SI

6. Tehnični podatki
Maks. ø sprejema pritrdilnega kavlja v mm
Maks. ø sprejema bremenskega kavlja v mm
Nazivno dvižno breme v kg
Maks. dvižna višina v m
Dolžina verige v m
Poraba moči pri polni obremenitvi v Nm
Velika dvižna bremenska veriga v mm
Dimenzije DxŠxV v mm
Teža kg
147x128x330
23
23
1000
3
3
340
6 x18
9,75
7. Pred zagonom
• Odprite embalažo in napravo previdno vzemite ven.
• Odstranite ovojnino ter ovojna in transportna varovala (če obstajajo).
• Preverite, ali je obseg dobave celovit.
• Preverite, če so se naprava in deli pribora poškodovali med transportom.
• Po možnosti embalažo shranite do preteka garancijskega časa.
m POZOR
Naprava in ovojnina niso otroške igrače! Otroci se ne smejo igrati
s plastičnimi vrečkami, folijami in majhnimi deli! Obstaja nevarnost da delce pogoltnejo in se zadušijo!
33SI

Nastavljanje ročne verige
Verižni vitel je dobavljen z ročno verigo, katere dolžina
ustreza hodu verižnega vitla. Pri običajni namestitvi izpolnjuje pogoj ustrezne nastavitve konca verige. V primerih, v katerih dolžina ročne verige ne ustreza predpisanim pogojem, je treba verigo skrajšati ali podaljšati.
m Spremembe na napravi lahko opravlja samo strokovna delavnica.
1 Preden boste z verižnim vitlom dvignili breme, se seznanite s funkcijo „brez
bremena“ na vašem verižnem vitlu.
2 Preverjanje zavornega sistema
Zavore preizkušajte na naslednji način:
• Pritrdite breme.
• Dvignite breme.
• Breme dvigujte in spuščajte na različne višine.
• Preverite, če je nošenje bremena zagotovljeno v vsakem položaju.
8. Zgradba in upravljanje
1 Poskrbite za varno pritrditev verižnega vitla. Pri izbiri pritrdilnega mesta bodi-
te zelo kritični, treba je izbrati takšno pritrdilno mesto, ki prenese dvojno obremenitev. Če niste sigurni, da je izbrano mesto ustrezno, izberite drugo mesto.
2 Verižni vitel je treba pritrditi tako, da se med uporabo ne more premakniti.
3 Zaskočni ključavnici na pritrdilnem kavlju ter na bremenskem kavlju morata
biti zmeraj zaprti.
4 Največja višina pritrdilnega mesta ne sme znašati več kot 3,5 m.
Dvigovanje bremen (sl. 5)
Na sprednji strani verižnega vitla se nahaja vtisnjena puščica z oznako „U“. Na
tem mestu verižnega vitla vlecite ročno verigo (2), da dvignete breme. (sl. 5/B)
34 SI

Spuščanje bremen (sl. 5)
Na sprednji strani verižnega vitla se nahaja vtisnjena puščica z oznako „D“. Na
tem mestu verižnega vitla vlecite ročno verigo (2), da spustite breme. (sl. 5/A)
m POZOR
Pri verižnih vitlih lahko pri spuščanju bremen v redkih primerih (neprekinjeno in
hitro spuščanje) pride do nevarnega segretja zavore. V teh primerih je treba breme spuščati počasi in s prekinitvami.
9. Čiščenje in vzdrževanje
• Da zagotovite čim daljšo delovanje verižnega vitla, redno čistite umazanijo
z vašega verižnega vitla, po uporabi skrbno namastite dele in jih shranite na
suhem mestu.
• Ne opravljajte lastnoročnih tehničnih sprememb ali popravil na vašem verižnem
vitlu, te mora opraviti strokovnjak.
• Redno preverjajte verižni vitel glede poškodb.
• Redno preverjajte ustrezno delovanje verižnega vitla.
Po uporabi in pred skladiščenjem naprav je treba izvesti naslednja dela:
Temeljito očistite verižni vitel,
Dobro namažite verižni vitel,
Dobro naoljite dvižno verigo in verigo z bremenskim kavljem
Pri uporabi verižnega vitla na prostem ga je treba v rednih razmikih preverjati
glede škode zaradi korozije.
Nastavljanje zavore (sl. 6-7)
m POZOR:
Po možnosti naj vse nastavitve in servisna dela na zavornem sistemu opravlja samo strokovno osebje!
• Odstranite pokrov ohišja, tako da odvijete 3 vijake na hrbtni strani enote
• Odstranite varovalno razcepko (sl. 6/E)
• Z roko fiksirajte vodilno kolo verige (sl. 7/D)
• Sedaj obrnite nastavitveni vijak (sl. 6/C & sl. 7) v želeno smer
35SI

m Napotek:
Vodilno kolo verige (sl. 7/D) se mora dati vrteti v smer urinega
kazalca in v nasprotno smer urinega kazalca. Nastavitvenega vijaka (sl. 6/C) ne zategujte preveč.
• Obračanje ključa (sl. 7/K 19mm) v smer urinega kazalca povečuje zavorni
učinek.
• Obračanje ključa (sl. 7/K 19mm) v nasprotno smer urinega kazalca zmanjšuje
zavorni učinek.
• Ponovno vstavite varovalno razcepko in jo privzdignite.
m Napotek:
Če ste izgubili zavorni učinek na vrnitev enoto za pregled v strokovni delavnici. Poglejmo debelino zavornih diskov v rednih časovnih presledkih, ki jih strokovni delavnici.
Dvižna veriga
Življenjska doba dvižnih verig je zadostno načrtovana. Kljub temu pa se lahko
zgodi, da se zaradi zunanjih vplivov življenjska doba zmanjša. Če je dolžina 21
členkov verige večja od 400 mm, je treba nujno zamenjati verigo.
Dolžina 21 členkov verige
Bremenski kavelj
Bremenski kavelj se pri nestrokovnem ravnanju deformira, npr. pri preobremenitvi.
Takojšnja zamenjava bremenskega kavlja je potrebna, ko mera G doseže mejno
vrednost 26 mm.
m Ob neupoštevanju varnost ni več zagotovljena.
G-nova = 23 mm ±5%
G-Min. = 22 mm
G-Max. = 24 mm
G-potrebna zamenjava = 26 mm
36 SI

10. Skladiščenje
Napravo in njen pribor skladiščite na temnem, suhem in nezmrznjenem ter za otroke nedostopnem mestu. Optimalna temperatura skladiščenja je med 5 in 30 ˚C.
11. Transport
Napravo transportirajte v primernem zaboju. Pazite na varno hranjenje vseh delov
verige.
12. Odstranjevanje in predelava
Naprava je zaradi preprečitve poškodb pri transportu v embalaži. Ta embalaža
je iz surovine in je zato ponovno uporabna ali jo lahko vrnete v surovinski cikel.
Naprava in njen pribor so iz različnih materialov, kot. npr. iz kovine in umetnih
snovi. Okvarjene sestavne dele zavrzite med posebne odpadke. Povprašajte v
specializirani trgovini ali v občinski upravi!
Embalaža sestoji iz naravi prijaznih materialov, ki jih lahko od-
vržete v lokalne zbiralnike za recikliranje odpadkov.
Vse o možnostih za odstranjevanje odsluženih naprav boste iz-
vedeli pri vaši občinski ali mestni upravi.
13. Pomoč pri motnjah
Motnja Vzrok Ukrep
Bremena ni mogoče
dvigniti
Popravila
Uporabljajte samo opremo in nadomestne dele, ki jih priporoča proizvajalec.
Če naprava kljub našim preverjanjem kakovosti in vaši negi preneha delovati,
naj popravila opravlja samo pooblaščen strokovnjak.
Odstranitev
Pri odstranitvi stroja je treba upoštevati krajevna zakonska določila.
Breme je pretežko
Zavorni sistem je
okvarjen
Služba za stranke/servisni
center
37SI

14. Garancijski list
Proizvajalec:
scheppach Fabrikation von Holzbearbeitungsmaschinen GmbH
Günzburger Straße 69
DE-89335 Ichenhausen
Naslov servisa:
Top Nova d.o.o.
Brodisce 22
SI - 1236 Trzin
Telefonska št. servisa:
+800 4003 4003
(0,00 €/Min.)
E-poštni naslov (SI):
service.SI@scheppach.com
1. S tem garancijskim listom scheppach Fabrikation von Holzbearbeitungsma-
schinen GmbH jamčimo, da bo izdelek v garancijskem roku ob normalni in
pravilni uporabi brezhibno deloval in se zavezujemo, da bomo ob izpolnjenih
spodaj navedenih pogojih odpravili morebitne pomanjkljivosti in okvare zaradi napak v materialu ali izdelavi oziroma po svoji presoji izdelek zamenjali
ali vrnili kupnino.
2. Garancija je veljavna na ozemlju Republike Slovenije.
3. Garancijski rok za proizvod je 3 od datuma izročitve blaga. Datum izročitve
blaga je razviden iz računa.
4. Kupec je dolžan okvaro javiti pooblaščenemu servisu oziroma se informirati o
nadaljnjih postopkih na zgoraj navedeni telefonski številki. Svetujemo vam, da
pred tem natančno preberete navodila o sestavi in uporabi izdelka.
5. Kupec je dolžan pooblaščenemu servisu predložiti garancijski list in račun, kot
potrdilo in dokazilo o nakupu ter dnevu izročitve blaga.
6. V primeru, da proizvod popravlja nepooblaščeni servis ali oseba, kupec ne
more uveljavljati zahtevkov iz te garancije.
7. Vzroki za okvaro oziroma nedelovanje izdelka morajo biti lastnosti stvari
same in ne vzroki, ki so zunaj proizvajalčeve oziroma prodajalčeve sfere.
Kupec ne more uveljavljati zahtevkov iz te garancije, če se ni držal priloženih
navodil za sestavo in uporabo izdelka ali če je izdelek kakorkoli spremenjen
ali nepravilno vzdrževan.
8. Jamčimo servis in rezervne dele še 3 leta po preteku garancijskega roka.
9. Obrabni deli oz. potrošni material so izvzeti iz garancije.
38 SI

10. Vsi potrebni podatki za uveljavljanje garancije se nahajajo na dveh ločenih
dokumentih (garancijski list, račun).
11. Ta garancija proizvajalca ne izključuje pravic potrošnika, ki izhajajo iz odgo-
vornosti prodajalca za napake na blagu.
Prodajalec:
Lidl d.o.o.k.d., Pod lipami 1, SI-1218 Komenda
39SI

Obsah:
1. Úvod 41
2. Popis zařízení 42
3. Rozsah dodávky 42
4. Použití v souladu s určením 42
5. Bezpečnostní pokyny 43
6. Technické údaje 45
7. Před uvedením do provozu 45
8. Montáž a obsluha 46
9. Čištění a údržba 47
10. Skladování 49
11. Přeprava 49
12. Likvidace a recyklace 49
13. Řešení problémů 49
14. Doklad o záruce 50
Strana:
40 CZ

1. Úvod
VÝROBCE:
scheppach
Fabrikation von Holzbearbeitungsmaschinen GmbH
Günzburger Straße 69
D-89335 Ichenhausen
VÁŽENÝ ZÁKAZNÍKU,
přejeme vám mnoho radosti a úspěchu při práci s novým zařízením.
UPOZORNĚNÍ:
Výrobce tohoto zařízení neručí podle platného zákona o odpovědnosti za vady
výrobku za škody, které vzniknou na tomto zařízení nebo jeho prostřednictvím v
případě:
• neodborné manipulace,
• nedodržování návodu k obsluze,
• oprav prostřednictvím třetích osob, neautorizovaných odborníků,
• montáže a výměny neoriginálních náhradních dílů,
• použití, které není v souladu s určením,
m Respektujte:
Při použití zařízení je nutné dodržovat jednotlivá bezpečnostní opatření, aby se
zabránilo zraněním a škodám.
Před montáží a zprovozněním si přečtěte celý text návodu k obsluze.
Pokud byste zařízení předali jiné osobě, přiložte k němu prosím i tento návod k
obsluze. Tento návod k obsluze vám má usnadnit seznámení se zařízením a jeho
používání v souladu s určením.
Návod k obsluze obsahuje důležité pokyny, jak s výrobkem pracovat bezpečně,
odborně a ekonomicky, abyste se vyhnuli rizikům, ušetřili náklady za opravy, omezili dobu nečinnosti a zvýšili spolehlivost a životnost zařízení.
Kromě bezpečnostních ustanovení tohoto návodu k obsluze musíte bezpodmínečně dodržovat předpisy své země, které platí pro provoz výrobku.
Uchovávejte návod k obsluze u zařízení v plastovém obalu, který jej bude chránit
před znečištěním a vlhkostí. Před započetím práce si jej musí každý pracovník
obsluhy přečíst a pečlivě jej dodržovat. Se zařízením smějí pracovat jen osoby,
které jsou poučeny o jeho použití a informovány o nebezpečích, která jsou s ním
spojena.
Dodržujte minimální požadovaný věk obsluhy.
41CZ

Vedle bezpečnostních pokynů, které jsou obsaženy v návodu k obsluze, a zvláštních předpisů vaší země je při provozu řetězových kladkostrojů zapotřebí
dodržovat všeobecně uznávaná technická pravidla.
Nepřebíráme žádnou záruku za nehody nebo škody způsobené nedodržením tohoto návodu a bezpečnostních pokynů.
2. Popis zařízení (obr. 1-4)
1. Nosný řetěz
2. Řetěz ručního pohonu
3. Upevňovací hák
4. Závěsný hák
5. Nosný čep
6. Hnací kolo
7. Zámek se západkou
3. Rozsah dodávky
Řetězový kladkostroj, návod k obsluze
4. Použití v souladu s určením
Řetězový kladkostroj je zařízení ke svislému zvedání a spouštění břemen.
Řetězový kladkostroj je určen pro výšku dorazu (vzdálenost bodu dorazu - podlahová deska) 3,0 - 3,5 metrů. Nad tuto výšku dorazu je nutné ruční řetěz odpovídajícím způsobem zkrátit, resp. prodloužit.
Stroj se smí používat pouze v souladu s určením. Jakékoliv jiné použití je v rozporu s určením.
Za škody nebo zranění všeho druhu, které vzniknou na základě použití v rozporu
s určením, zodpovídá uživatel/obsluhující osoba a ne výrobce.
Respektujte prosím, že naše zařízení v souladu s určením není konstruováno pro
komerční, řemeslné a průmyslové použití. Nepřebíráme zodpovědnost v případě,
když se zařízení použije v komerčních, řemeslných nebo průmyslových provozech,
a při srovnatelných činnostech.
42 CZ

5. Bezpečnostní pokyny
1 Omezení jmenovitého zatížení není možné překročit, protože přetížení mů-
že poškodit řetězový kladkostroj nebo v budoucnu snížit kapacitu zdvihu.
2 Pro obsluhu řetězového kladkostroje nepoužívejte žádná elektrická zařízení.
Tento řetězový kladkostroj je určen pouze pro ruční obsluhu.
3 Nezkoušejte opravit nosný řetěz. V případě poškození může nosný řetěz
měnit pouze odborník. Nosný řetěz je nutné vyměnit za nový ze stejné svařované a tvrzené oceli se stejnou velikostí a sílou.
4 Nosný řetěz před použitím namažte.
5 Povrchy brzdy se nesmí mazat. Brzdu je nutné udržovat v suchu.
6 Zajistěte, aby nosný řetěz neobsahoval žádné uzly. Pokud se na nosném
řetězu vyskytují uzly, je nutné je před použitím povolit.
7 Zajistěte, aby byl nosný řetěz před každým použitím zavěšen na nosný čep.
8 Stůjte ve stejné pozici a ve stejném úhlu jako hnací kolo, když taháte za ruč-
ní řetěz. Netahejte prosím zešikma. Je nutné zaujmout bezpečnou pozici.
9 Nezvedejte břemeno nad osoby. Nikomu nedovolte vstoupit pod břemeno.
Když chcete zvednou břemeno, varujte osoby, které se nacházejí v okolí.
10 Řetězovým kladkostrojem nezvedejte osoby.
11 Břemeno musí držet pevně v háku. Nezkoušejte zvedat břemeno špičkou
závěsného háku.
12 Ruční řetěz tahejte rovnoměrně, abyste se vyhnuli náhlým nárazům nebo
zamotání.
13 Je-li řetěz blokovaný nebo není možné ho táhnout dál, přestaňte. Proveďte
kontrolu a odstraňte problém. Nepokoušejte se obsluhovat řetězový kladkostroj násilím. Nenechte břemeno viset ve vzduchu.
14 Nesjíždějte břemenem níž, než je použitelná délka řetězu. Je-li řetěz mezi
řetězovým kolem a nosným čepem tahán příliš, může dojít ke vzniku škod.
15 Nedovolte, aby přišlo břemeno do styku s řetězovým kladkostrojem, jinak se
zablokuje volné otáčení a může dojít ke vzniku poškození, zauzlení řetězu
nebo zablokování kola.
16 Provádějte pravidelnou kontrolu a údržbu. Všechny poškozené nebo chybné
díly musí vyměnit odborník.
17 Funkci řetězového kladkostroje jak s „břemenem“, tak i „bez břemena“ musí
obsluha dostatečně kontrolovat.
18 Zajistěte, aby byla hmotnost břemena nižší než jmenovitá hmotnost řetězo-
vého kladkostroje. V případě pochybností řetězový kladkostroj nepoužívejte.
19 Nikdy řetězový kladkostroj nepřetěžujte.
20 Před obsluhou a během ní provádějte bezpečnostní postupy, kontroly a ma-
zání. Řetězový kladkostroj provozujte pouze tehdy, když je v řádném stavu.
43CZ

21 Zajistěte vždy, aby byly řetězy ve vertikální poloze, rovné a nezauzlované.
22 Ruční řetěz a nosný řetěz nikdy netahejte zešikma.
23 Řetězový kladkostroj nepoužívejte ve výbušném prostředí nebo vlhkých pro-
storách.
24 Pravidelně kontrolujte nosný řetěz (1), ruční řetěz (2), upevňovací hák (3),
závěsný hák (4), nosný čep (5), hnací kolo (6) a zámek se západkou (7),
zda se nevyskytují vady, zejména po delším prostoji.
25 Nastavte ruční řetěz (2) tak, aby se místo změny směru ručního řetězu (2)
nacházelo ve výšce mezi 500-1000 mm nad zemí.
26 Dávejte pozor na jakékoli vady, které se projeví během použití. V případě vý-
skytu jakýchkoli nápadností, ihned řetězový kladkostroj uveďte mimo provoz.
27 Okolní teplota pro provoz musí být mezi -10°C a +50°C.
DOPLŇUJÍCÍ BEZPEČNOSTNÍ POKYNY
Bezpečnost na pracovišti
1 Aby se zabránilo vzniku nehod, udržujte pracovní oblast bez překážek.
2 Zajistěte dostatečné osvětlení pracoviště.
3 Na pracovišti se nesmí zdržovat dětí a další osoby. Zajistěte dostatečnou
vzdálenost k pracovní oblasti.
4 Pracovní oblast je nutné zajistit pomocí uzamykatelných zástrček, uzamyka-
telných hlavních vypínačů atd. před vstupem nepovolaných.
5 Noste vhodný pracovní oděv. Je nutné se v pracovní oblasti vyhnout nošení
volného oděvu, rukavic, šátků na krk a šperků, protože může dojít k zachycení
do pohyblivých dílů, a tím ke vzniku těžkých zranění.
6 Noste obuv s protiskluzovou podrážkou.
7 Noste certifikovanou ochrannou helmu na ochranu hlavy. Dlouhé vlasy je
nutné kompletně schovat pod pokrývku hlavy.
8 Noste ochranné brýle.
9 Zajistěte bezpečné upevnění řetězového kladkostroje na místě montáže. Nos-
nost tohoto spojení musí být vyšší než uvedená maximální nosnost řetězového
kladkostroje.
10 Při opuštění pracovní oblasti řetězový kladkostroj zajistěte.
m Toto zařízení není určeno k tomu, aby ho používaly osoby (včetně dětí) se
sníženými fyzickými, senzorickými nebo duševními schopnostmi nebo s nedostatečnými zkušenostmi anebo znalostmi, ledaže by jejich bezpečnost zajistily kompetentní osoby svým dozorem nebo by zajistily instruktáž, jak se toto zařízení
obsluhuje. Je nutné hlídat děti, aby si se zařízením nehrály.
44 CZ

6. Technické údaje
Max. ø uchycení upevňovacího háku mm
Max. ø uchycení závěsného háku mm
Jmenovité zatížení kg
Max. výška zdvihu m
Délka řetězu m
Vynaložení sil při plném zatížení Nm
Velikost řetězu ke zvedání břemen mm
Rozměry DxŠxV mm
Hmotnost kg
147x128x330
23
23
1000
3
3
340
6 x18
9,75
7. Před uvedením do provozu
• Otevřete balení a opatrně vyjměte zařízení.
• Odstraňte materiál obalu a obalové a přepravní pojistky (pokud je jimi výrobek opatřen).
• Zkontrolujte, zda je obsah dodávky úplný.
• Zkontrolujte zařízení a díly příslušenství, zda se při přepravě nepoškodily.
• Uchovejte obal dle možností až do uplynutí záruční doby.
m POZOR
Zařízení a obalové materiály nejsou hračka! S plastovými sáčky,
fóliemi a drobným součástmi si nesmějí hrát děti! Hrozí nebezpečí
spolknutí těchto věcí a udušení!
45CZ

Nastavení ručního řetězu
Řetězový kladkostroj se dodává s ručním řetězem, jeho
délka odpovídá zdvihu řetězového kladkostroje. Při normální instalaci splňuje podmínku správného nastavení
konce řetězu. V případech, kdy délka ručního řetězu
nevyhovuje předepsaným podmínkám, je nutné řetěz
zkrátit nebo prodloužit.
m Změny na zařízení nechte provádět pouze odbornou dílnu.
1 Než začnete zvedat břemeno pomocí řetězového kladkostroje, měli byste se
seznámit s funkcí řetězového kladkostroje „bez břemena“.
2 Kontrola brzdového systému
Brzdy je nutné testovat následovně:
• Zavěste břemeno.
• Zvedněte břemeno.
• Břemeno zvedejte a spouštějte v různých výškách.
• Testujte, jestli se břemeno v každé pozici zastaví.
8. Montáž a obsluha
1 Je nutné zajistit bezpečné upevnění řetězového kladkostroje. Při výběru mís-
ta pro upevnění buďte velmi kritičtí, je nutné zvolit místo pro upevnění, které
vydrží dvojité zatížení. Pokud si nejste jistí, zda je zvolené místo vhodné,
zvolte prosím jiné místo.
2 Řetězový kladkostroj je nutné upevnit tak, aby se během používání nemohla
změnit jeho poloha.
3 Zámek se západkou na upevňovacím háku i na závěsném háku musí být při
obsluze vždy zavřený.
4 Maximální výška dorazového bodu nesmí být vyšší než 3,5 m.
46 CZ

Zvedání břemen (obr. 5)
Na přední straně řetězového kladkostroje je vyražená šipka s označením „U“.
Zatáhněte za ruční řetěz (2) na této straně řetězového kladkostroje, aby bylo
možné zvednout břemeno. (obr. 5/B)
Spuštění břemena (obr. 5)
Na přední straně řetězového kladkostroje je vyražená šipka s označením „D“.
Zatáhněte za ruční řetěz (2) na této straně řetězového kladkostroje, aby bylo
možné spustit břemeno. (obr. 5/A)
m Pozor
U řetězových kladkostrojů může při spouštění břemen dojít ve výjimečných případech (nepřerušované a rychlé spouštění) k nebezpečnému zahřání brzdy. V
těchto případech je nutné břemeno spouštět pomalu a přerušovaně.
9. Čištění a údržba
• Aby se zachovala co nejdelší životnost řetězového kladkostroje, odstraňujte
z něho pravidelně nečistoty, po použití pečlivě mažte díly a skladujte ho na
suchém místě.
• Sami na řetězovém kladkostroji neprovádějte žádné technické změny nebo
opravy, tyto musí provést odborník.
• Řetězový dopravník pravidelně kontrolujte, zda není poškozený.
• Je nutné pravidelně kontrolovat řádnou funkci řetězového kladkostroje.
Po použití a před uložením zařízení je nutné provést následující:
Důkladné vyčištění řetězového kladkostroje,
Důkladné namazání řetězového kladkostroje,
Důkladné naolejování zdvihového řetězu a řetězu závěsného háku
Při použití řetězového kladkostroje venku je nutné ho v pravidelných intervalech
kontrolovat, zda není poškozen korozí.
Nastavení brzdy (obr. 6-7):
m Pozor:
Podle možností nechte provádět veškerá nastavení a servisní práce na brzdové soustavě školený odborný personál!
• Sejměte kryt skříně uvolněním 3 šrouby na zadní straně přístroje
47CZ

• Odstraňte bezpečnostní závlačku (obr. 6/E)
• Zafixujte ručně vodicí kolečko řetězu (obr. 7/D)
• Nyní otáčejte stavěcím šroubem (obr. 6/C & obr. 7) požadovaným směrem
m Upozornění:
Vodicí kolečko řetězu (obr. 7/D) musí být možné otáčet ve směru
i proti směru hodinových ručiček. Nedotahujte silně stavěcí šroub
(obr. 6/C).
• Otáčení klíče (obr. 7/K 19mm) ve směru hodinových ručiček zvyšuje účinek brzd.
• Otáčení klíče (obr. 7/K 19mm) proti směru hodinových ručiček snižuje účinek brzd.
• Opět nasaďte bezpečnostní závlačku a rozevřete ji.
m Upozornění:
Pokud ztratíte brzdný účinek na vrácení jednotky ke kontrole v
odborném servisu. Pojďme zjistit tloušťku brzdových kotoučů v
pravidelných intervalech v odborném servisu.
Zdvihový řetěz
Životnost zdvihových řetězů je dostatečná. Přesto se může stát, že se z důvodu
vnějších vlivů životnost zkrátí. Pokud délka 21 článků řetězu překročí 400 mm, je
nutné provést výměnu zdvihového řetězu.
Délka 21 článků řetězu
Závěsný hák
Závěsný hák se při neodborné manipulaci např. při přetížení zdeformuje. Závěsný
hák je nutné okamžitě vyměnit, když rozměr G dosáhne mezní hodnotu 26 mm.
m Při nedodržení už nelze zajistit bezpečnost.
G-nový = 23 mm ±5%
G Min. = 22 mm
G-Max. = 24 mm
G-nutná výměna = 26 mm
48 CZ

10. Skladování
Skladujte zařízení a jeho příslušenství na tmavém suchém nezámrzném místě, kam
nemají přístup děti. Optimální skladovací teplota se pohybuje mezi 5 a 30 °C.
11. Přeprava
Zařízení přepravujte ve vhodném obalu. Dbejte na bezpečné skladování všech
dílů řetězu.
12. Likvidace a recyklace
Zařízení je v obalu, aby se zabránilo přepravním škodám. Tento obal je surovina
a lze ho tudíž recyklovat nebo vrátit do oběhu surovin.
Zařízení a jeho příslušenství se skládají z různých materiálů, jako např. kov a
plasty. Vadné součásti zlikvidujte jako speciální odpad. Zeptejte se ve specializovaném obchodě nebo na správě obce!
Obal se skládá z ekologicky vhodných materiálů, které můžete
zlikvidovat v místních recyklačních střediscích.
O možnostech ke zlikvidování vysloužilých přístrojů se dozvíte
ve správě Vaší obce či města.
13. Řešení problémů
Porucha Příčina Řešení
Nosnost nelze
navyšovat
Opravy
Používejte pouze pilové listy doporučené příslušenství a náhradní díly. Pokud by
došlo přes naše kontroly kvality a vaši péči k výpadku zařízení, nechte opravy
provést autorizovaným odborníkem.
Likvidace
Při likvidaci stroje je nutné dodržovat místní zákonné předpisy.
Nosnost je příliš velká
Brzdová soustava je vadná
Zákaznický servis /
servisní centrum
49CZ

14. Záruční list
Važena zakaznice, važeny zakazniku,
naše výrobky podléhají přísné kontrole kvality. Pokud i přesto tento přístroj
bezvadně nefunguje, velice toho litujeme a prosíme Vás, abyste se obrátili na
náš zákaznický servis, jehož adresa je uvedena na tomto záručním listu. Rádi
Vám budeme k dispozici také telefonicky na níže uvedeném servisním čísle. Pro
uplatňování nároků na záruku platí následující:
• Tyto záruční podmínky upravují dodatečný záruční servis. Vašich zákonných
nároků na záruku se tato záruka netýká. Náš záruční servis je pro Vás bezplatný.
• Záruční servis se vztahuje výhradně na nedostatky, které lze odvodit z vad
materiálu nebo výrobních vad a je také omezen pouze na odstranění těchto
nedostatků, resp. výměnu přístroje. Dbejte prosím na to, že naše přístroje
nebyly podle svého účelu určení konstruovány pro živnostenské, řemeslnické
nebo průmyslové použití. Záruční smlouva tak není realizována, pokud byl
přístroj používán v živnostenských, řemeslných nebo průmyslových podnicích
a při srovnatelných činnostech. Z naší záruky je dále vyloučeno poskytnutí
náhrady za dopravní škody, škody způsobené nedodržováním montážního
návodu nebo z důvodů neodborné instalace, nedodržování návodu k použití
(jako např. připojení na chybné síťové napětí nebo druh proudu), nedovoleného nebo neodborného používání (jako např. přetížení přístroje nebo použití
neschválených vložných nástrojů nebo příslušenství), nedodržování pokynů pro
údržbu a bezpečnostních pokynů, vniknutí cizích těles do přístroje (jako např.
písek, kameny nebo prach), použití násilí nebo poškození v důsledku cizích
vlivů (jako např. škody způsobené pádem), jakož také běžného opotřebení
způsobeného používáním.
Nárok na záruku zaniká, pokud bylo do přístroje již zasahováno
• Záruční doba činí 3 roky a začíná datem koupě přístroje. Nároky na záruku
před vypršením záruční doby je třeba uplatňovat během dvou týdnů od zjištění
defektu. Uplatňování nároků na záruku po vypršení záruční doby je vyloučeno.
Oprava nebo výměna přístroje nevede k prodloužení záruční doby, ani k zahájení nové záruční doby za provedený výkon pro přístroj nebo pro případné
zamontované náhradní díly. Toto platí také v případě servisu v místě Vašeho
bydliště.
50 CZ

• Při uplatňování Vašeho nároku na záruku zašlete prosím přístroj bez poštovného na níže uvedenou adresu. Přiložte originál prodejního dokladu nebo
jiného datovaného potvrzení o koupi. Pokladní lístek si proto dobře uložte jako
důkaz! Popište nám prosím pokud možno přesně důvod reklamace. Je-li defekt
přístroje v našem záručním servisu obsažen, obdržíte obratem opravený nebo
nový přístroj.
Samozřejmě rádi za úhradu nákladů odstraníme defekty na přístroji, které nespadají nebo již nespadají do rozsahu záruky. K tomu nám přístroj prosím zašlete na
naši servisní adresu.
Servisní horká linka (CZ):
+800 4003 4003
(0,00 €/Min.)
Adresa elektronické pošty (CZ):
service.CZ@scheppach.com
Adresa servisního střediska (CZ):
GARLAND distributor s.r.o.
Hradecká 1136
CZ - 50601 Jicín
51CZ

Obsah:
1. Úvod 53
2. Popis prístroja 54
3. Rozsah dodávky 54
4. Použitie v súlade s určením 54
5. Bezpečnostné pokyny 54
6. Technické údaje 57
7. Pred uvedením do prevádzky 57
8. Zloženie a obsluha 58
9. Čistenie a údržba 59
10. Skladovanie 61
11. Preprava 61
12. Likvidácia a opätovné zhodnotenie 61
13. Odstraňovanie porúch 62
14. Záručný list 63
Strana:
52 SK

1. Úvod
VÝROBCA:
scheppach
Fabrikation von Holzbearbeitungsmaschinen GmbH
Günzburger Straße 69
D-89335 Ichenhausen
VÁŽENÝ ZÁKAZNÍK!
Želáme Vám veľa zábavy a úspechov pri práci s Vaším novým prístrojom.
UPOZORNENIE:
Výrobca tohto prístroja neručí podľa platného zákona o ručení za výrobok za
škody, ktoré vzniknú na tomto prístroji alebo budú spôsobené týmto prístrojom pri:
• neodbornej manipulácii,
• nedodržiavaní návodu na obsluhu,
• opravách tretími osobami, neautorizovanými odborníkmi,
• montáži a výmene neoriginálnych náhradných dielov,
• použití v rozpore s určením,
m Dodržiavajte:
Pri použití prístrojov sa musí dodržiavať niekoľko bezpečnostných opatrení, aby
sa predišlo poraneniam a škodám.
Pred montážou a uvedením do prevádzky si prečítajte cely text návodu na obsluhu.
V prípade, že prístroj odovzdávate iným osobám, odovzdajte im aj tento návod
na obsluhu.
Návod na obsluhu vám má uľahčiť, aby ste sa oboznámili s prístrojom a používali
ho v súlade s jeho určenými možnosťami použitia.
Návod na obsluhu obsahuje dôležité pokyny, ako s výrobkom bezpečne, odborne a hospodárne pracovať a ako zabránite nebezpečenstvám, ušetríte náklady
na opravy, znížite časy prestojov a zvýšite spoľahlivosť a životnosť prístroja.
Okrem bezpečnostných ustanovení tohto návodu na obsluhu musíte bezpodmienečne dodržiavať predpisy svojej krajiny platné pre prevádzku výrobku. Návod
na obsluhu uschovajte pri prístroji a v plastovom obale, aby bol chránený pred špinou a vlhkosťou. Všetci obsluhujúci pracovníci si ho musia pred začiatkom práce
prečítať a starostlivo ho dodržiavať.
Na prístroji môžu pracovať len osoby, ktoré boli poučené o používaní prístroja a
boli informované o nebezpečenstvách, ktoré sú s tým spojené. Treba dodržiavať
požadovaný minimálny vek.
53SK

Okrem bezpečnostných upozornení obsiahnutých v tomto návode na obsluhu a
osobitných predpisov vašej krajiny treba rešpektovať všeobecne uznané technické
predpisy pre prevádzku reťazových kladkostrojov. Nepreberáme ručenie
za žiadne nehody alebo škody, ktoré vznikli nedodržaním tohto návodu a bezpečnostných upozornení.
2. Popis prístroja (obr. 1-4)
1. Záťažová reťaz
2. Ručná reťaz
3. Upevňovací hák
4. Záťažový hák
5. Záťažový kolík
6. Hnacie koleso
7. Zámka so západkou
3. Rozsah dodávky
Reťazový kladkostroj, návod na obsluhu
4. Použitie v súlade s určením
Reťazový kladkostroj je zariadenie na zvislé zdvíhanie a spúšťanie bremien.
Reťazový kladkostroj je určený pre dorazovú výšku (vzdialenosť bodu dorazu a
podlahovej dosky) 3,0 až 3,5 metra. Mimo tejto dorazovej výšky sa musí ručná
reťaz zodpovedajúcim spôsobom skrátiť alebo predĺžiť.
Stroj sa môže používať iba v súlade so svojím určením. Každé iné použitie presahujúce určenie je považované za používanie v rozpore s určením. Za
škody z neho vzniknuté alebo poranenia akéhokoľvek druhu ručí používateľ/
obsluha a nie výrobca.
Dbajte, prosím, na to, že naše prístroje neboli v súlade s určením skonštruované na komerčné, remeselné ani priemyselné použitie. Ak sa prístroj používa v
komerčných, remeselných alebo priemyselných podnikoch, ako aj na podobné
činnosti, nepreberáme žiadnu záruku.
5. Bezpečnostné pokyny
1 Obmedzenie menovitej záťaže sa nesmie prekračovať, pretože preťaženie
môže spôsobiť poškodenie reťazového kladkostroja alebo znížiť zdvíhaciu
kapacitu v budúcnosti.
54 SK

2 Na obsluhu reťazového kladkostroja nepoužívajte žiadne elektrické zariade-
nia. Tento reťazový kladkostroj je dimenzovaný iba pre manuálnu obsluhu.
3 Nepokúšajte sa opravovať záťažovú reťaz. V prípade poškodenia smie zá-
ťažovú reťaz vymeniť iba odborník. Záťažová reťaz sa smie nahradiť iba
reťazou z rovnakej zváranej a tvrdenej ocele s rovnakou pevnosťou.
4 Záťažovú reťaz pred použitím namažte.
5 Brzdné plochy sa nesmú mazať. Brzda sa musí udržiavať v suchom stave.
6 Uistite sa, že sa na reťazi nenachádzajú uzly. Ak sa na reťazi nachádzajú
uzly, tieto sa musia pred použitím uvoľniť.
7 Pred každým použitím sa uistite, že záťažová reťaz je zavesená na záťažo-
vom koncovom kolíku.
8 Pri ťahaní za ručnú reťaz stojte v rovnakej polohe a v rovnakom uhle, aké
má koleso pohonu. Reťaz neťahajte v šikmom uhle. Je potrebné zaujať bezpečný postoj.
9 Bremeno nedvíhajte nad osobami. Nikomu sa nesmie povoliť vstup pod
bremeno. Ak chcete dvíhať bremeno, upozornite osoby v okolitej oblasti.
10 S reťazovým kladkostrojom nedvíhať žiadne osoby.
11 Bremeno musí byť pevne uchytené v háku. Nepokúšajte sa bremeno dvíhať
pomocou špičky záťažového háku.
12 Ručnú reťaz ťahajte rovnomerne, aby ste predišli náhlym nárazom alebo
zamotaniu.
13 Ak je reťaz zablokovaná alebo ju nie je možné ďalej ťahať, prestaňte s ťaha-
ním. Skontrolujte a odstráňte problém. Nepokúšajte sa reťazový kladkostroj
používať prílišnou silou. Bremeno nenechávajte visieť vo vzduchu.
14 Bremeno nespúšťajte nižšie než je použiteľná dĺžka reťaze. Prílišné napnu-
tie reťaze medzi reťazovým kolesom a koncovým záťažovým kolíkom môže
mať za následok poškodenie.
15 Predchádzajte tomu, aby sa bremeno dostalo do kontaktu s telesom reťa-
zového kladkostroja, pretože v opačnom prípade dôjde k zablokovaniu
voľného otáčania a to môže mať za následok poškodenia, zauzlenú reťaz
alebo zablokované koleso.
16 Vykonávajte pravidelnú kontrolu a údržbu. Všetky poškodené alebo chybné
diely musí vymeniť odborník.
17 Funkčnosť reťazového kladkostroja sa musí pred použitím dostatočne dô-
kladne skontrolovať v stave s bremenom a bez bremena.
18 Uistite sa, že hmotnosť bremena je menšia ako menovitá nosnosť reťazové-
ho kladkostroja. V prípade pochybností reťazový kladkostroj nepoužívajte.
19 Reťazový kladkostroj nikdy nepreťažujte.
20 Bezpečnostné opatrenia, kontroly a mazania vykonávajte pred a počas ob-
sluhy. Reťazový kladkostroj obsluhujte iba vtedy, ak je v bezchybnom stave.
55SK

21 Vždy sa uistite, že sú reťaze vertikálne vyrovnané a nie sú zauzlené.
22 Ručnú reťaz a záťažovú reťaz neťahajte nikdy v šikmom uhle.
23 Reťazový kladkostroj nepoužívajte v prostredí s nebezpečenstvom výbuchu
alebo vo vlhkých priestoroch.
24 Záťažovú reťaz (1), ručnú reťaz (2), upevňovací hák (3), záťažový hák (4),
záťažový kolík (5), hnacie koleso (6) a zámku so západkou (7) pravidelne
kontrolujte, či nevykazujú chyby, predovšetkým, ak neboli dlhšie používané.
25 Ručnú reťaz (2) nastavte tak, aby sa miesto otáčania ručnej reťaze (2) na-
chádzalo vo výške medzi 500-1000 mm nad zemou.
26 Dávajte pozor na akékoľvek chyby, ktoré sa vyskytli počas použitia. V prí-
pade nezvyčajných zistení počas použitia okamžite reťazový kladkostroj
prestaňte používať.
27 Teplota okolia pre prevádzku musí byť v rozmedzí -10°C až +50°C.
DODATOČNÉ BEZPEČNOSTNÉ UPOZORNENIA
Bezpečnosť pracoviska
1 Za účelom prevencie nehôd udržiavajte pracovnú oblasť bez prekážok.
2 Zabezpečte dostatočné osvetlenie pracoviska.
3 Zamedzte vstupu detí ako aj iných osôb do pracovnej oblasti . Zaistite bez-
pečnú vzdialenosť od pracovnej oblasti.
4 Pracovnú oblasť zabezpečte proti nepovolenému vstupu prostredníctvom uza-
mykateľných závor, hlavných vypínačov, atď.
5 Noste správny pracovný odev. Je potrebné zamedziť noseniu voľného odevu,
rukavíc, šatiek a šperkov v pracovnej oblasti, pretože tieto sa môžu zachytiť
do pohyblivých dielov a spôsobiť vážne poranenia.
6 Noste topánky s protišmykovými podrážkami.
7 Na ochranu hlavy používajte certifikovanú ochrannú prilbu. Dlhé vlasy je
potrebné kompletne zakryť pokrývkou hlavy.
8 Noste ochranné okuliare.
9 Zaistite bezpečné upevnenie reťazového kladkostroja na mieste montáže.
Nosnosť tohto spoja musí byť väčšia než je uvedená maximálna nosnosť
reťazového kladkostroja.
10 Pred opustením pracovnej oblasti reťazový kladkostroj zabezpečte.
m Tento prístroj nie je určený na použitie osobami (vrátane detí) s obmedzenými
fyzickými, senzorickými alebo mentálnymi schopnosťami alebo osobami s nedostatkom skúseností a/alebo nedostatkom vedomostí, okrem prípadov, kedy sú pod
dozorom osoby zodpovednej za jej bezpečnosť alebo ak od nej dostali pokyny,
ako sa má prístroj používať. Je potrebné dozerať na deti, aby sa nehrali s prístrojom.
56 SK

6. Technické údaje
Max. ø uchytenia upevňovacieho háku mm
Max. ø uchytenia záťažového háku mm
Menovitá nosnosť kg
Max. výška zdvihu m
Dĺžka reťaze m
Sila potrebná pri plnej záťaži Nm
Veľkosť zdvíhacej reťaze bremena mm
Rozmery DxŠxV mm
Hmotnosť kg
147x128x330
23
23
1000
3
3
340
6 x18
9,75
7. Pred uvedením do prevádzky
• Otvorte obal a opatrne vyberte prístroj.
• Odstráňte obalový materiál, ako aj obalové a prepravné poistky (ak sú použité).
• Skontrolujte, či je rozsah dodávky kompletný.
• Prístroj a diely príslušenstva skontrolujte ohľadom poškodení spôsobených prepravou.
• Obal podľa možnosti uschovajte až do uplynutia záručnej doby.
m POZOR
Prístroj a obalové materiály nie sú hračkami pre deti! Deti sa nesmú hrať s plastovými vreckami, fóliami a malými dielmi! Existuje
nebezpečenstvo prehltnutia a zadusenia!
57SK

Nastavenie ručnej reťaze
Reťazový kladkostroj sa dodáva s ručnou reťazou, ktorej dĺžka zodpovedá zdvihu reťazového kladkostroja.
Pri normálnej inštalácii spĺňa podmienky pre správne
nastavenie konca reťaze. V prípadoch, kedy dĺžka ručnej reťaze nezodpovedá predpísaným podmienkam, je
potrebné reťaz skrátiť alebo predĺžiť.
m Zmeny na prístroji smie vykonávať iba odborný servis.
1 Pred zdvíhaním bremien pomocou reťazového kladkostroja by ste sa mali
oboznámiť s funkciou vášho reťazového kladkostroja v stave bez záťaže.
2 Kontrola brzdového systému
Testy bŕzd sa musia vykonať nasledovne:
• Zaveste bremeno.
• Nadvihnite bremeno.
• Bremeno zdvíhajte a spúšťajte na rôzne výšky.
• Skontrolujte, či je zabezpečené držanie bremena v každej polohe.
8. Zloženie a obsluha
1 Je potrebné dbať na bezpečné upevnenie reťazového kladkostroja. Pri výbere
miesta upevnenia buďte veľmi kritický, musí sa zvoliť miesto pre upevnenie,
ktoré vydrží dvojitú záťaž. Ak si nie ste istý, či je zvolené miesto správne,
vyberte prosím iné miesto.
2 Reťazový kladkostroj sa musí upevniť tak, aby počas použitia nemohol zme-
niť polohu.
3 Zámka so západkou na upevňovacom háku, ako ako aj na záťažovom háku,
musí byť pri obsluhe vždy zatvorená.
4 Maximálna výška závesného bodu nesmie presiahnuť 3,5 m.
58 SK

Zdvíhanie bremien (obr. 5)
Na prednej strane reťazového kladkostroja sa nachádza vyrazená šípka s označením „U“. Na tejto strane reťazového kladkostroja ťahajte ručnú reťaz (2) za
účelom zdvihnutia bremena. (obr. 5/B)
Spúšťanie bremien (obr. 5)
Na prednej strane reťazového kladkostroja sa nachádza vyrazená šípka s označením „D“. Na tejto strane reťazového kladkostroja ťahajte ručnú reťaz (2) za
účelom spustenia bremena. (obr. 5/A)
m POZOR
V prípade reťazových kladkostrojov môže vo výnimočných prípadoch pri spúšťaní
bremena (neprerušované a rýchle spúšťanie) dôjsť k nebezpečnému zohrievaniu
brzdy. V takom prípade je potrebné bremeno spúšťať pomaly a prerušovane.
9. Čistenie a údržba
• Pre zachovanie čo najdlhšej životnosti reťazového kladkostroja pravidelne
kladkostroj čistite od nečistôt, po použití dôkladne namažte diely a skladujte
ho na suchom mieste.
• Nevykonávajte sami žiadne technické zmeny alebo opravy na vašom reťazovom kladkostroji, tieto musí vykonať odborník.
• Reťazový kladkostroj sa musí pravidelne kontrolovať, či nevykazuje poškodenia.
• Pravidelne sa musí kontrolovať bezchybná funkčnosť reťazového kladkostroja.
Po použití a pred uskladnením prístrojov sa musia vykonať nasledovné pracovné kroky:
Dôkladne vyčistite reťazový kladkostroj,
Reťazový kladkostroj dobre namažte,
Zdvíhaciu reťaz a reťaz záťažového háku dostatočne naolejujte
Pri použití reťazového kladkostroja v exteriéri sa tento musí v pravidelných intervaloch kontrolovať, či nevykazuje škody spôsobené koróziou.
Nastavenie brzdy (obr. 6-7):
m Pozor:
Podľa možnosti poverte vykonaním všetkých nastavení a servisných prác na brzdovom systéme iba vyškolený odborný personál!
59SK

• Odoberte kryt uvoľnením 3 skrutky na zadnej strane prístroja
• Odoberte poistnú závlačku (obr. 6/E)
• Rukou zafixujte vodiacu kladku reťaze (obr. 7/D)
• Otáčajte nastavovacou skrutkou (obr. 6/C a obr. 7) v požadovanom smere
m Upozornenie:
Vodiaca kladka reťaze (obr. 7/D) sa musí dať otáčať v smere a
proti smeru hodinových ručičiek. Nastavovaciu skrutku (obr. 6/C)
neuťahujte príliš silno.
• Otáčanie kľúčom (obr. 7/K 19mm) v smere hodinových ručičiek zvyšuje brzdný
účinok.
• Otáčanie kľúčom (obr. 7/K 19mm) proti smeru hodinových ručičiek znižuje
brzdný účinok.
• Opäť vložte poistnú závlačku a vyhnite ju.
m Upozornenie:
Ak stratíte brzdný účinok na vrátenie jednotky ku kontrole v odbornom servise. Poďme zistiť hrúbku brzdových kotúčov v pravidelných intervaloch v odbornom servise.
Zdvíhacia reťaz
Životnosť zdvíhacích reťazí je dimenzovaná dostatočne. Aj napriek tomu môže
dôjsť k tomu, že sa vonkajšími vplyvmi životnosť skráti. V prípade, že dĺžka 21
segmentov reťaze prekročila 400 mm, musí sa bezpodmienečne vykonať výmena
zdvíhacej reťaze.
Dĺžka 21 segmentov reťaze
Záťažový hák
Záťažový hák sa deformuje pri neodbornej manipulácii napr. preťažení. Okamžitá výmena záťažového háku je potrebná, ak rozmer G prekročil 26 mm.
60 SK

m Pri nedodržaní nie je viac zaručená bezpečnosť.
G-nový hák = 23 mm ±5%
G-Min. = 22 mm
G-Max. = 24 mm
G-potrebná výmena = 26 mm
10. Skladovanie
Prístroj a príslušenstvo skladujte na tmavom, suchom mieste bez mrazu, ktoré je neprístupné pre deti. Optimálna skladovacia teplota sa nachádza medzi 5 a 30 ˚C.
11. Preprava
Prístroj prepravujte vo vhodnom obale. Dbajte na bezpečné uschovanie všetkých
reťazových dielov.
12. Likvidácia a opätovné zhodnotenie
Prístroj sa nachádza v obale, aby sa zabránilo prípadným škodám pri preprave. Tento obal je surovina, je teda opätovne použiteľný alebo možno vykonať
jeho recykláciu.
Prístroj a jeho príslušenstvo pozostávajú z rôznych materiálov, ako napr. kov a
plasty. Chybné súčiastky zlikvidujte so špeciálnym odpadom. Informácie si zistite
v špecializovanom obchode alebo od správy obce!
Obal pozostáva z ekologických materiálov, ktoré sa môžu dať
recyklovať ma miestnych recyklačných staniciach.
Informácie o možnostiach likvidácie starých prístrojov získate na
vašom obecnom alebo mestskom úrade.
61SK

13. Odstraňovanie porúch
Porucha Príčina Náprava
Bremeno nie je
možné zdvihnúť
Opravy
Používajte iba príslušenstvo a náhradné diely odporučené výrobcom. V prípade, že by sa na prístroj aj napriek našim kontrolám kvality a vašej starostlivosti
vyskytla porucha, vykonaním opravy poverte autorizovaného odborníka.
Likvidácia
Pri likvidácii stroja musia byť dodržané miestne zákonné nariadenia.
Bremeno je príliš ťažké
Brzdový systém je chybný
Zákaznícky servis /
servisné centrum
62 SK

14. Záručný list
Važena zakaznička, važeny zakaznik,
naše výrobky podliehajú prísnej kontrole kvality. V prípade, že nebude prístroj
napriek tomu bezchybne fungovať, je nám to veľmi ľúto a prosíme Vás, aby ste sa
obrátili na našu servisnú službu na adrese uvedenej na tomto záručnom liste. Radi
Vám budeme k dispozícii taktiež telefonicky na uvedenom servisnom telefónnom
čísle. Pri uplatňovaní nárokov na záručné plnenie platia nasledujúce podmienky:
• Tieto záručné podmienky upravujú dodatočné záručné plnenie. Vaše zákonné
nároky na záruku nie sú touto zárukou dotknuté. Naše záručné plnenie je pre
Vás zadarmo.
• Záručné plnenie sa vzťahuje výlučne len na nedostatky, ktoré sú spôsobené
chybami materiálu alebo výrobnými chybami, a je obmedzené na odstránenie
týchto nedostatkov resp. výmenu prístroja. Prosím, dbajte na to, že naše prístroje
neboli svojim určením konštruované na profesionálne, remeselnícke ani priemyselné použitie. Táto záručná zmluva sa preto neuzatvára, ak sa prístroj bude
používať v profesionálnych, remeselníckych alebo priemyselných prevádzkach
ako aj na činnosti rovnocenné s takýmto použitím. Z našej záruky sú okrem toho
vylúčené náhradné plnenie za škody pri transporte, škody spôsobené nedodržaním návodu na montáž alebo na základe neodbornej inštalácie, nedodržaním
návodu na použitie (ako napr. pripojením na nesprávne sieťové napätie alebo
druh prúdu), zneužívaním alebo nesprávnym používaním (ako napr. preťaženie
prístroja alebo použitie neprípustných pracovných nástrojov alebo príslušenstva), nedodržaním pokynov pre údržbu a bezpečnostných pokynov, vniknutím
cudzích telies do prístroja (ako napr. piesok, kamene alebo prach), použitím
násilia alebo cudzieho pôsobenia (napr. škody spôsobené pádom), a taktiež je
vylúčené bežné opotrebenie primerané použitiu.
Nárok na záruku zaniká, ak už boli na prístroji svojvoľne uskutočnené zásahy.
• Doba záruky je 3 roky a začína sa dátumom nákupu prístroja. Nároky na záruku sa musia uplatniť pred koncom uplynutia záručnej doby do dvoch týždňov od
zistenia nedostatku. Uplatnenie nárokov na záruku po uplynutí záručnej doby je
vylúčené. Oprava alebo výmena prístroja nevedie k predľženiu záručnej doby
ani nedochádza na základe tohto plnenia ku vzniku novej záručnej doby pre
prístroj ani pre akékoľvek inštalované náhradné diely. To platí taktiež pri nasadení miestneho servisu.
63SK

• Pre uplatnenie nároku na záruku nám prosím zašlite defektný prístroj oslobodený od poštovného na dole uvedenú adresu. Priložte predajný doklad v origináli
alebo iný doklad o zakúpení s dátumom. Prosím, starostlivo si preto uschovajte
pokladničný blok ako doklad o zakúpení! Prosím, popíšte nám čo najpresnejšie
dôvod reklamácie. Ak spadá defekt prístroja pod naše záručné plnenie, dostanete obratom naspäť opravený alebo nový prístroj.
Samozrejme Vám radi opravíme závady na prístroji na vaše náklady, ak tieto závady nespadajú alebo už nespadajú do rozsahu záruky. Prosím, pošlite nám v takom
prípade prístroj na našu servisnú adresu.
Priama linka servisu (SK):
+800 4003 4003
(0,00 €/Min.)
E-mailová adresa (SK):
service.SK@scheppach.com
Adresa servisu (SK):
GARLAND distributor, s.r.o.
Hradecká 1136
CZ - 50601 Jicín
64 SK

Inhaltsverzeichnis:
1. Einleitung 66
2. Gerätebeschreibung 67
3. Lieferumfang 67
4. Bestimmungsgemäße Verwendung 67
5. Sicherheitshinweise 68
6. Technische Daten 70
7. Vor Inbetriebnahme 70
8. Aufbau und Bedienung 71
9. Reinigung und Wartung 72
10. Lagerung 74
11. Transport 74
12. Entsorgung und Wiederverwertung 74
13. Störungsabhilfe 75
14. Garantieurkunde 76
Seite:
65DE/AT/CH

1. Einleitung
HERSTELLER:
scheppach
Fabrikation von Holzbearbeitungsmaschinen GmbH
Günzburger Straße 69
D-89335 Ichenhausen
VEREHRTER KUNDE,
Wir wünschen Ihnen viel Freude und Erfolg beim Arbeiten mit Ihrem neuen Gerät.
HINWEIS:
Der Hersteller dieses Gerätes haftet nach dem geltenden Produkthaftungsgesetz
nicht für Schäden, die an diesem Gerät oder durch dieses Gerät entstehen bei:
• unsachgemäßer Behandlung,
• Nichtbeachtung der Bedienungsanweisung,
• Reparaturen durch Dritte, nicht autorisierte Fach kräfte,
• Einbau und Austausch von nicht originalen Ersatz teilen,
• nicht bestimmungsgemäßer Verwendung,
m Beachten Sie:
Beim Benutzen von Geräten müssen einige Sicherheitsvorkehrungen eingehalten
werden, um Verletzungen und Schäden zu verhindern.
Lesen Sie vor der Montage und vor Inbetriebnahme den ge samten Text der Bedienungsanleitung durch.
Falls Sie das Gerät an andere Personen übergeben sollten, händigen Sie diese
Bedienungsanleitung bitte mit aus.
Diese Bedienungsanleitung soll es Ihnen erleichtern, Ihr Gerät kennenzulernen
und dessen bestimmungsgemäßen Einsatzmöglichkeiten zu nutzen.
Die Bedienungsanleitung enthält wichtige Hinweise, wie Sie mit dem Produkt sicher, fachgerecht und wirt schaft lich arbeiten, und wie Sie Gefahren vermeiden,
Reparaturkosten sparen, Ausfallzeiten verringern und die Zuverlässigkeit und Lebensdauer des Gerätes erhöhen.
Zusätzlich zu den Sicherheitsbestimmungen dieser Bedienungsanleitung müssen
Sie unbedingt die für den Be trieb des Produktes geltenden Vorschriften Ihres Landes beachten.
Bewahren Sie die Bedienungsanleitung, in einer Plas tik hülle geschützt vor Schmutz
und Feuchtigkeit, bei dem Gerät auf. Sie muss von jeder Bedienungsperson vor
Aufnahme der Arbeit gelesen und sorgfältig beachtet wer den.
66 DE/AT/CH

An dem Gerät dürfen nur Personen arbeiten, die im Gebrauch des Gerätes unterwiesen und über die damit verbundenen Gefahren unterrichtet sind. Das ge for derte Mindestalter ist einzuhalten.
Neben den in dieser Bedienungsanleitung enthaltenen Si cherheitshinweisen
und den besonderen Vorschriften Ih res Landes sind die für den Betrieb von
Kettenzügen allgemein anerkannten technischen Regeln zu beachten.
Wir übernehmen keine Haftung für Unfälle oder Schäden, die durch Nichtbeachten dieser Anleitung und den Sicherheitshinweisen entstehen.
2. Gerätebeschreibung (Abb. 1-4)
1. Lastkette
2. Handkette
3. Befestigungshaken
4. Lasthaken
5. Laststift
6. Antriebsrad
7. Schnappschloss
3. Lieferumfang
Kettenzug, Bedienungsanleitung
4. Bestimmungsgemäße Verwendung
Der Kettenzug ist eine Vorrichtung zum senkrechten Heben und Absenken von
Lasten.
Der Kettenzug ist für eine Anschlaghöhe (Abstand Anschlagpunkt-Bodenplatte)
von 3,0-3,5 Meter vorgesehen. Außerhalb dieser Anschlaghöhe muss die Handkette entsprechend verkürzt bzw. verlängert werden.
Die Maschine darf nur nach ihrer Bestimmung verwendet werden. Jede weitere
darüber hinausgehende Verwendung ist nicht bestimmungsgemäß. Für daraus
hervorgerufene Schäden oder Verletzungen aller Art haftet der Benutzer/Bediener und nicht der Hersteller.
Bitte beachten Sie, dass unsere Geräte bestimmungsgemäß nicht für den gewerblichen, handwerklichen oder industriellen Einsatz konstruiert wurden. Wir
übernehmen keine Gewährleistung, wenn das Gerät in Gewerbe-, Handwerksoder Industriebetrieben sowie bei gleichzusetzenden Tätigkeiten eingesetzt wird.
67DE/AT/CH

5. Sicherheitshinweise
1 Die Nennlastbegrenzung darf nicht überschritten werden, da eine Überlas-
tung den Kettenzug beschädigen oder die Hebekapazität in Zukunft reduzieren kann.
2 Verwenden Sie keine elektrischen Vorrichtungen, um den Kettenzug zu be-
dienen. Dieser Kettenzug ist nur für Handbedienung ausgelegt.
3 Versuchen Sie nicht die Lastkette zu reparieren. Bei Beschädigung darf die
Lastkette nur durch einen Fachmann gewechselt werden. Die Lastkette muss
mit einer neuen Kette des gleichen geschweißten und gehärteten Stahls mit
der gleichen Größe und gleichen Stärke ausgetauscht werden.
4 Die Lastkette bitte vor Gebrauch schmieren.
5 Die Bremsoberflächen dürfen nicht geschmiert werden. Die Bremse muss tro-
cken gehalten werden.
6 Sicherstellen, dass die Lastkette keine Knoten enthält. Befinden sich Knoten
in der Lastkette, müssen diese vor Gebrauch gelöst werden.
7 Sicherstellen, dass die Lastkette vor jedem Gebrauch an den Lastendstift
eingehängt ist.
8 Stehen Sie in derselben Stellung und mit demselben Winkel wie das Antriebs-
rad, wenn Sie die Handkette ziehen. Ziehen Sie bitte nicht mit einem schrägen
Winkel. Es ist eine sichere Stellung einzunehmen.
9 Die Last nicht über Personen heben. Niemand erlauben unter die Last zu
treten. Wenn Sie eine Last heben wollen, bitte Personen im umliegenden
Bereich warnen.
10 Keine Personen mit dem Kettenzug heben.
11 Die Last muss fest im Haken halten. Versuchen Sie nicht die Last mit der Spitze
des Lasthakens zu heben.
12 Die Handkette gleichmäßig ziehen, um plötzliche Stöße oder Verwicklungen
zu vermeiden.
13 Wenn die Kette versperrt ist oder nicht weiter gezogen werden kann, hören
Sie bitte auf. Kontrollieren und beseitigen Sie das Problem. Versuchen Sie
nicht, den Kettenzug mit Gewalt zu bedienen. Die Last nicht in der Luft hängen lassen.
14 Bitte nicht über die brauchbare Länge der Kette hinaus die Last herunterfah-
ren. Wenn die Kette zwischen dem Kettenrad und dem Lastendstift zu straff
gezogen wird, können Beschädigungen verursacht werden.
15 Erlauben Sie nicht , dass die Last mit dem Kettenzug in Berührung kommt,
sonst wird die freie Drehung blockiert und kann Beschädigungen, verknotete
Kette oder versperrtes Rad verursachen.
68 DE/AT/CH

16 Regelmäßige Kontrolle und Wartung durchführen. Alle beschädigten oder
fehlerhaften Teile müssen von einem Fachmann ausgetauscht werden.
17 Die Kettenzugfunktion unter sowohl „Last“ als auch „keine Last“ muss vor der
Bedienung ausreichend gründlich kontrolliert werden.
18 Sicherstellen, dass das Lastgewicht kleiner als das Nenngewicht des Ketten-
zuges ist. Im Zweifelsfällen, bitte den Kettenzug nicht benützen.
19 Den Kettenzug nie überlasten.
20 Sicherheitsverfahren, Überprüfungen und Schmierungen vor und während
der Bedienung durchführen. Den Kettenzug nur dann bedienen, wenn er in
ordnungsgemäßen Zustand ist.
21 Immer sicherstellen, dass die Ketten vertikal gerade, und nicht geknotet sind.
22 Die Handkette und die Lastkette nie in einem schrägen Winkel ziehen.
23 Benutzen Sie den Kettenzug nicht in explosiver Umgebung oder feuchten
Räumen.
24 Kontrollieren Sie die Lastkette (1), Handkette (2), Befestigungshaken (3), Last-
haken (4), Laststift (5), Antriebsrad (6) und Schnappschloss (7) regelmäßig
auf Defekte; speziell auch nach längerer Standzeit.
25 Stellen Sie die Handkette (2) so ein, dass die Umlenkstelle der Handkette (2)
auf einer Höhe zwischen 500-1000 mm über dem Boden liegt.
26 Achten Sie auf jegliche während der Verwendung auftretenden Defekte. Bei
Auffälligkeiten während der Benutzung Kettenzug sofort außer Betrieb nehmen.
27 Die Umgebungstemperatur für Betrieb muss zwischen -10°C und +50°C
liegen.
ZUSÄTZLICHE SICHERHEITSHINWEISE
Arbeitsplatzsicherheit
1 Zur Vermeidung von Unfällen halten Sie den Arbeitsbereich hindernisfrei.
2 Sorgen Sie für ausreichende Beleuchtung am Arbeitsplatz.
3 Halten Sie Kinder sowie weitere Personen vom Arbeitsbereich fern. Sorgen
Sie für einen sicheren Abstand zum Arbeitsbereich.
4 Den Arbeitsbereich mittels verschließbarer Riegel, absperrbarer Hauptschal-
ter etc. vor unbefugtem Betreten sichern.
5 Tragen Sie richtige Arbeitskleidung. Das Tragen loser Kleidung, Handschu-
he, Halstücher sowie Schmuck im Arbeitsbereich ist zu unterlassen, da sich
diese in bewegenden Teilen verfangen und somit zu schweren Verletzungen
führen können.
6 Schuhe mit rutschfesten Sohlen tragen.
69DE/AT/C H

7 Tragen Sie einen zertifizierten Schutzhelm als Kopfschutz. Lange Haare sind
vollständig unter der Kopfbedeckung abzudecken.
8 Tragen Sie eine Schutzbrille.
9 Sorgen Sie für eine sichere Befestigung des Kettenzuges an der Montage-
stelle. Die Tragkraft dieser Verbindung muss höher sein als die angegebene
maximale Traglast des Kettenzuges.
10 Sichern Sie den Kettenzug beim verlassen des Arbeitsbereiches.
m Dieses Gerät ist nicht dafür bestimmt, durch Personen (einschließlich Kinder)
mit eingeschränkten physischen, sensorischen oder geistigen Fähigkeiten oder
mangels Erfahrung und/oder mangels Wissen benutzt zu werden, es sei denn,
sie werden durch eine für ihre Sicherheit zuständige Person beaufsichtigt oder
erhielten von ihr Anweisungen, wie das Gerät zu benutzen ist. Kinder sollten
beaufsichtigt werden, um sicherzustellen, dass sie nicht mit dem Gerät spielen.
6. Technische Daten
Max. ø Aufnahme Befestigungshaken mm
Max. ø Aufnahme Lasthaken mm
Nennhebelast kg
Max. Hubhöhe m
Kettenlänge m
Kraftaufwand bei Volllast Nm
Größe Lasthebekette mm
Abmessung LxBxH mm
Gewicht kg (ca.)
147x128x330
23
23
1000
3
3
340
6 x18
9,75
7. Vor Inbetriebnahme
• Öffnen Sie die Verpackung und nehmen Sie das Gerät vorsichtig heraus.
• Entfernen Sie das Verpackungsmaterial sowie Verpackungs-/ und Transportsicherungen (falls vorhanden).
• Überprüfen Sie, ob der Lieferumfang vollständig ist.
• Kontrollieren Sie das Gerät und die Zubehörteile auf Transportschäden.
• Bewahren Sie die Verpackung nach Möglichkeit bis zum Ablauf der Garantiezeit auf.
70 DE/AT/C H

m ACHTUNG
Gerät und Verpackungsmaterialien sind kein Kinderspielzeug!
Kinder dürfen nicht mit Kunststoffbeuteln, Folien und Kleinteilen
spielen! Es besteht Verschluckungs- und Erstickungsgefahr!
Einstellung der Handkette
Der Kettenzug wird mit einer Handkette geliefert, deren
Länge verhältnismäßig zum Hub des Kettenzuges ist.
Bei normaler Installation erfüllt sie die Bedingung der
richtigen Einstellung des Kettenendes. In Fällen in denen
die Länge der Handkette nicht den vorgeschriebenen
Bedingungen zusagt, ist es nötig die Kette zu kürzen
oder verlängern.
m Änderungen am Gerät nur von einer Fachwerkstatt
durchführen lassen.
1 Bevor Sie mit dem Kettenzug eine Last heben, sollten Sie sich mit der Funktion
Ihres Kettenzuges „ohne Last“ vertraut machen.
2 Bremssystemkontrolle
Bremstests sind wie folgt durchzuführen:
• Last anhängen.
• Anheben der Last.
• Last auf verschiedenen Höhen heben und
senken.
• Testen, ob ein Halten der Last in jeder Position gewährleistet ist.
8. Aufbau und Bedienung
1 Es ist auf eine sichere Befestigung des Kettenzuges zu achten. Seien Sie bei
der Auswahl Ihrer Befestigungsstelle sehr kritisch, es muss eine Befestigungsstelle gewählt werden, welche der doppelten Belastung standhält. Wenn Sie
sich nicht sicher sind, ob die ausgewählte Stelle die richtige ist, so wählen
Sie bitte eine andere Stelle aus.
71DE/AT/CH

2 Der Kettenzug ist so zu befestigen, dass er während der Benutzung seine
Position nicht ändern kann.
3 Das Schnappschloss am Befestigungshaken, sowie am Lasthaken muss bei
der Bedienung immer geschlossen sein.
4 Die maximale Höhe des Anschlagpunktes darf nicht mehr als 3,5 m betragen.
Lasten anheben (Abb. 5)
An der Vorderseite des Kettenzuges befindet sich ein eingeprägter Pfeil mit der
Bezeichnung „U“. Ziehen Sie an dieser Seite des Kettenzuges an der Handkette
(2), um die Last zu heben. (Abb. 5/B)
Lasten absenken (Abb. 5)
An der Vorderseite des Kettenzuges befindet sich ein eingeprägter Pfeil mit der
Bezeichnung „D“. Ziehen Sie an dieser Seite des Kettenzuges an der Handkette
(2), um die Last zu senken. (Abb. 5/A)
m Achtung
Bei Kettenzügen kann es, bei dem Senken der Lasten in Ausnahmefällen (ununterbrochenes und schnelles Senken) zum gefährlichen Erhitzen der Bremse, kommen.
In diesen Fällen ist es nötig die Last langsam und mit Unterbrechungen zu senken.
9. Reinigung und Wartung
• Um einen möglichst langen Betrieb des Kettenzuges zu erhalten, beseitigen
Sie regelmäßig Schmutz von Ihrem Kettenzug, fetten Sie die Teile nach dem
Gebrauch sorgfältig ein und lagern Sie ihn an einem trockenen Ort.
• Nehmen Sie selbst keine technische Veränderung oder Reparaturen an Ihren
Kettenzug vor, dies muss durch einen Fachmann durchgeführt werden.
• Der Kettenzug ist regelmäßig auf Beschädigungen zu prüfen.
• Die ordnungsgemäße Funktion des Kettenzuges ist regelmäßig zu überprüfen.
Nach Gebrauch und vor Einlagerung der Geräte sind folgende
Arbeiten durchzuführen:
Gründliche Reinigung des Kettenzuges,
Kettenzug gut schmieren,
Hubkette und Lasthakenkette gut ölen
Bei Verwendung des Kettenzuges im Freien ist dieser in regelmäßigen Abständen
auf Schäden durch Korrosion zu prüfen.
72 DE/AT/CH

Einstellen der Bremse (Abb. 6-7):
m Achtung:
Lassen Sie nach Möglichkeit alle Einstellungen und Servicearbeiten am Bremssystem nur von geschultem Fachpersonal ausführen!
• Entfernen Sie die Gehäuseabdeckung durch lösen der 3 Schrauben auf der
Rückseite des Gerätes
• Entfernen Sie den Sicherungssplint (Abb. 6/E)
• Fixieren Sie das Kettenführungsrad (Abb. 7/D) mit der Hand
• Drehen Sie nun die Einstellschraube (Abb. 6/C & Abb. 7) in die gewünschte
Richtung
m Hinweis:
Das Kettenführungsrad (Abb. 7/D) muss sich im Uhrzeigersinn &
entgegen dem Uhrzeigersinn drehen lassen können. Ziehen Sie
die Einstellschraube (Abb. 6/C) nicht zu stark an.
• Drehen des Schlüssels (Abb. 7/K 19 mm) im Uhrzeigersinn vergrößert die
Bremswirkung.
• Drehen des Schlüssels (Abb. 7/K 19mm) entgegen dem Uhrzeigersinn verringert die Bremswirkung.
• Setzen Sie den Sicherungssplint wieder ein und hebeln Sie diesen auf.
m Hinweis:
Bei Verlust der Bremswirkung übergeben Sie das Gerät zur Inspektion an eine Fachwerkstatt. Lassen Sie die Stärke der Bremsscheiben in regelmäßigen Abständen von einer Fachwerkstatt
überprüfen.
Hubkette
Die Lebensdauer der Hubketten ist ausreichend dimensioniert. Dennoch kann es
vorkommen, dass durch äußere Einflüsse die Lebensdauer herabgesetzt wird. Sollte die Länge von 21 Kettengliedern 400 mm überschreiten, ist unbedingt ein Austausch der Hubkette vorzunehmen.
Länge von 21 Kettenglieder
73DE/AT/C H

Lasthaken
Der Lasthaken verformt sich bei unsachgemäßer Handhabung z.B. Überlast. Ein
sofortiger Austausch des Lasthakens ist erforderlich, wenn das Maß G den Grenzwert von 26 mm erreicht.
m Bei Nichtbeachtung ist die Sicherheit nicht mehr gewährleistet.
G-Neu = 23 mm ±5%
G-Min. = 22 mm
G-Max. = 24 mm
G-Ersatz nötig = 26 mm
10. Lagerung
Lagern Sie das Gerät und dessen Zubehör an einem dunklen, trockenen und frostfreiem sowie für Kinder unzugänglichem Ort. Die optimale Lagertemperatur liegt
zwischen 5 und 30°C.
11. Transport
Transportieren Sie das Gerät in einen geeigneten Behältnis. Achten Sie auf die
sichere Aufbewahrung aller Kettenteile.
12. Entsorgung und Wiederverwertung
Das Gerät befindet sich in einer Verpackung um Transportschäden zu verhindern.
Diese Verpackung ist Rohstoff und ist somit wieder verwendbar oder kann dem
Rohstoffkreislauf zurückgeführt werden.
Das Gerät und dessen Zubehör bestehen aus verschiedenen Materialien, wie z.B.
Metall und Kunststoffe. Führen Sie defekte Bauteile der Sondermüllentsorgung zu.
Fragen Sie im Fachgeschäft oder in der Gemeindeverwaltung nach!
74 DE/AT/CH

Die Verpackung besteht aus umweltfreundlichen Materialien,
die Sie über die örtlichen Recyclingstellen entsorgen können.
Möglichkeiten zur Entsorgung des ausgedienten Gerätes erfah-
ren Sie bei Ihrer Gemeinde- oder Stadtverwaltung.
13. Störungsabhilfe
Störung Ursache Abhilfe
Traglast kann nicht angehoben werden
Reparaturen
Verwenden Sie nur vom Hersteller empfohlene Zubehör- und Ersatzteile. Sollte
das Gerät trotz unserer Qualitätskontrollen und Ihrer Pflege einmal ausfallen,
lassen Sie Reparaturen nur von einem autorisierten Fachmann ausführen.
Entsorgung
Beim Entsorgen der Maschine müssen die örtlichen gesetzlichen Bestimmungen
eingehalten werden.
Traglast zu schwer
Bremssystem defekt
Kundendienst / Seviccenter
75DE/AT/CH

14. Garantieurkunde
Sehr geehrte Kundin, sehr geehrter Kunde,
unsere Produkte unterliegen einer strengen Qualitätskontrolle. Sollte dieses Gerät
dennoch einmal nicht einwandfrei funktionieren, bedauern wir dies sehr und
bitten Sie, sich an unseren Servicedienst unter der auf dieser Garantiekarte angegebenen Adresse zu wenden. Gern stehen wir Ihnen auch telefonisch über die
unten angegebene Servicerufnummer zur Verfügung. Für die Geltendmachung
von Garantieansprüchen gilt Folgendes:
• Diese Garantiebedingungen regeln zusätzliche Garantieleistungen. Ihre
gesetzlichen Gewährleistungsansprüche werden von dieser Garantie nicht
berührt. Unsere Garantieleistung ist für Sie kostenlos.
• Die Garantieleistung erstreckt sich ausschließlich auf Mängel, die auf Material- oder Herstellungsfehler zurückzuführen sind und ist auf die Behebung
dieser Mängel bzw. den Austausch des Gerätes beschränkt. Bitte beachten
Sie, dass unsere Geräte bestimmungsgemäß nicht für den gewerblichen,
handwerklichen oder industriellen Einsatz konstruiert wurden. Ein Garantievertrag kommt daher nicht zustande, wenn das Gerät in Gewerbe-, Handwerks- oder Industriebetrieben sowie bei gleichzusetzenden Tätigkeiten
eingesetzt wird. Von unserer Garantie sind ferner Ersatzleistungen für Transportschäden, Schäden durch Nichtbeachtung der Montageanleitung oder
aufgrund nicht fachgerechter Installation, Nichtbeachtung der Gebrauchsanleitung (wie durch z.B. Anschluss an eine falsche Netzspannung oder
Stromart), missbräuchliche oder unsachgemäße Anwendungen (wie z.B.
Überlastung des Gerätes oder Verwendung von nicht zugelassenen Einsatzwerkzeugen oder Zubehör), Nichtbeachtung der Wartungs- und Sicherheitsbestimmungen, Eindringen von Fremdkörpern in das Gerät (wie z.B. Sand,
Steine oder Staub), Gewaltanwendung oder Fremdeinwirkungen (wie z. B.
Schäden durch Herunterfallen) sowie durch verwendungsgemäßen, üblichen
Verschleiß ausgeschlossen.
Der Garantieanspruch erlischt, wenn an dem Gerät bereits Eingriffe vorgenommen wurden.
• Die Garantiezeit beträgt 3 Jahre und beginnt mit dem Kaufdatum des Gerätes. Garantieansprüche sind vor Ablauf der Garantiezeit innerhalb von zwei
Wochen, nachdem Sie den Defekt erkannt haben, geltend zu machen. Die
Geltendmachung von Garantieansprüchen nach Ablauf der Garantiezeit ist
ausgeschlossen.
76 DE/AT/CH

Die Reparatur oder der Austausch des Gerätes führt weder zu einer Verlängerung der Garantiezeit noch wird eine neue Garantiezeit durch diese Leistung für das Gerät oder für etwaige eingebaute Ersatzteile in Gang gesetzt.
Dies gilt auch bei Einsatz eines Vor-Ort-Services.
• Für die Geltendmachung Ihres Garantieanspruches übersenden Sie bitte das
defekte Gerät portofrei an die unten angegebene Adresse. Fügen Sie den
Verkaufsbeleg im Original oder einen sonstigen datierten Kaufnachweis bei.
Bitte bewahren Sie deshalb den Kassenbon als Nachweis gut auf! Beschreiben Sie uns bitte den Reklamationsgrund möglichst genau. Ist der Defekt des
Gerätes von unserer Garantieleistung erfasst, erhalten Sie umgehend ein
repariertes oder neues Gerät zurück.
Selbstverständlich beheben wir gegen Erstattung der Kosten auch gerne Defekte
am Gerät, die vom Garantieumfang nicht oder nicht mehr erfasst sind. Dazu
senden Sie das Gerät bitte an unsere Serviceadresse.
Service-Hotline (DE): Service-Hotline (AT):
+800 4003 4003 +800 4003 4003
(0,00 EUR/Min.) (0,00 EUR/Min.)
Service-Email (DE): Service-Email (AT):
service.DE@scheppach.com service.AT@scheppach.com
Service Adresse (DE): Service Adresse (AT):
scheppach Fabrikation von Gausch Hubert
Holzbearbeitungsmaschinen GmbH
Günzburger Str. 69 Bairisch Kölldorf 267
DE - 89335 Ichenhausen AT - 8344 Bad Gleichenberg
Service-Hotline (CH):
+800 4003 4003
(0,00 EUR/Min.)
Service-Email (CH):
service.CH@scheppach.com
Service Adresse (CH):
Green Clean Schweiz AG
Industriering 39
CH - 3250 Lyss
77DE/AT/CH

42
40
41
39
40
23
38
38
37
38
38
1
43
36
14
14
11
12
35
29
34
11
12
11
12
29
33
34
32
31
44
14
30
44
12
11
12
11
10
9
8
1
1
14
29
28
16
15
27
23
43
19
20
19
17
18
16
3
24
3
22
21
19
18
29
27
39
25
17
14
15
14
13
11
10
9
6
7
6
5
3
78
2
1
4
1
26

CE - Declaration of Conformity
Translation of the original EC declaration of conformity
scheppach Fabrikation von Holzbearbeitungsmaschinen GmbH, Günzburger Str. 69, D-89335 Ichenhausen
erklä rt folgend e Konformitä t gemäß EU- Richtlini e und Normen fü r den Artike l
DE
hereby declares the following conformity under the EU Directive and stand-
GB
ards for t he followin g article
déclare la conformité suivante selon la directive UE et les normes pour l’article
FR
dichia ra la seguent e conformit à se condo le diret tive e le norm ative UE per
IT
l‘articolo
decla ra la conform idad siguien te según la dire ctiva la UE y la s normas para
ES
el artículo
decla ra o seguinte co nformidad e com a Directi va da UE e as norma s para o
PT
seguinte artigo
erklærer hermed, at følgende produkt er i overensstemmelse med nedenståen-
DK
de EUdirektiver og standarder
verklaart hierbij dat het volgende artikel voldoet aan de daarop betrekking
NL
hebbende EG-richtlijnen en normen
vakuuttaa täten, että seuraava tuote täyttää ala esitetyt EU-direktiivit ja
FI
standardit
försäkrar härmed följande överensstämmelse enligt EU-direktiv och standar-
SE
der för följande artikeln
dekla ruje, ze produ kt jest zgodny z n astepujac ymi dyrekt ywami UE i nor mami
PL
Marke / Brand: Powerx
Art.-Bezeichnung / Article name: CHAIN HOIST 1.000 KG
Art.-Nr. / Art. no.: 3907404974-3907404980; 39074049915
Ident.-Nr. / Ident. no.: 01001 - 25654
pareiš kia, taip at itiktis pag al ES direkt yvos ir stand artai šį str aipsnį
LT
az EU- irányelv és a von atkozó szabvány ok szerinti köv etkezo megfe leloségi
HU
nyilatkozatot teszi a termékre
izjav lja sledeco s kladnost z EU -direkti vo in normami z a artikel
SI
prohlašuje následující shodu podle smernice EU a norem pro výrobek
CZ
prehlasuje nasledujúcu zhodu podla smernice EU a noriem pre výrobok
SK
ovime iz javljuje da p ostoji sukladn ost prema EU- smjernica i n ormama za
HR
sljedece artikle
potvrđuje sledeću usklađenost prema smernicama EZ i normama za artikal
RS
declară următoarea conformitate corespunzător directivelor şi normelor UE
RO
pentru articolul
дек ларира съ ответно то съотве тствие с ъгласно Д ирек-тива н а ЕС и норми
BG
за артикул
δηλώνε ι την ακόλουθη συμμ όρφωση σύμφων α με την Οδηγία ΕΚ και τα
GR
πρότυπα γ ια το προϊόν
2014/29/EU
2014/35/EU
2014/30/EU
X 2006/42/EC
Annex IV
Notied Body:
Notied Body No.:
Certicate No.:
2004/22/EC
2014/ 68 /EU
2011/65/EU*
89/68 6/EC_ 96/5 8/EC
90/396/EC
2000/14/EC_2005/88/EC
Annex V
Annex VI
Noise: measured L
P = xx KW; L/Ø = cm
Notied Body:
Notied Body No.:
2010/26/EC
Emission. No:
WA
= xx dB(A); guaranteed L
= xx dB(A)
WA
Standard references:
EN 13157
This declaration of conformity is issued under the sole responsibilit y of the manufacturer.
* The object of the declaration described above fulls the regulations of the directive 2011/65/EU of the European Parliament and Council
from 8th June 2011, on the restriction of the use of cer tain hazardous substances in electrical and electronic equipment.
Ichenhausen, den 12.07.2018 __________________________
First CE: 2016
Subject to change without notice
Unterschrift / Markus Bindhammer / Technical Director
Documents registar: Andreas Pecher
Günzburger Str. 69, D-89335 Ichen
hausen


scheppach Fabrikation von
Holzbearbeitungsmaschinen GmbH
Günzburger Str. 69
D-89335 Ichenhausen
Last Information · Az információk kelte · Stanje informacij ·
Stav informací · Stav informácií · Stand der Informationen
Update: 07 / 2018 · Ident.-No.: 306852_3907404977
IAN 306852
4
 Loading...