


ULTRASONIC DISTANCE METER
ULTRASONIC DISTANCE METER
Operation and Safety Notes
AFSTANDSMÅLER MED ULTRALYD
Brugs- og sikkerhedsanvisninger
TÉLÉMÈTRE À ULTRASONS
Instructions d‘utilisation et consignes de sécurité
ULTRASONE AFSTANDMETER
Bedienings- en veiligheidsinstructies
ULTRASCHALL-ENTFERNUNGSMESSER
Bedienungs- und Sicherheitshinweise
IAN 288019

GB / IE / NI Operation and Safety Notes Page 5
DK Brugs- og sikkerhedsanvisninger Side 22
FR / BE Instructions d‘utilisation et
NL / BE Bedienings- en veiligheidsinstructies Pagina 54
DE / AT / CH Bedienungs- und Sicherheitshinweise Seite 71
consignes de sécurité Page 37
162
11
10
9
8
7
13
14
3
4
5
12
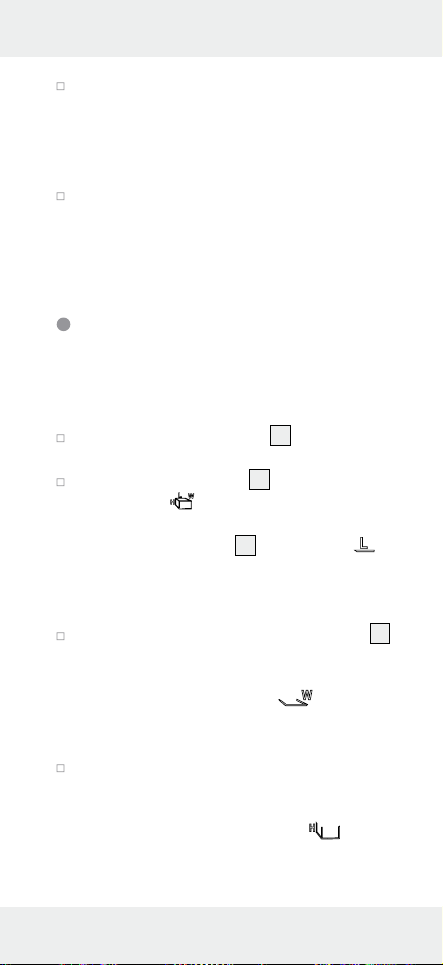
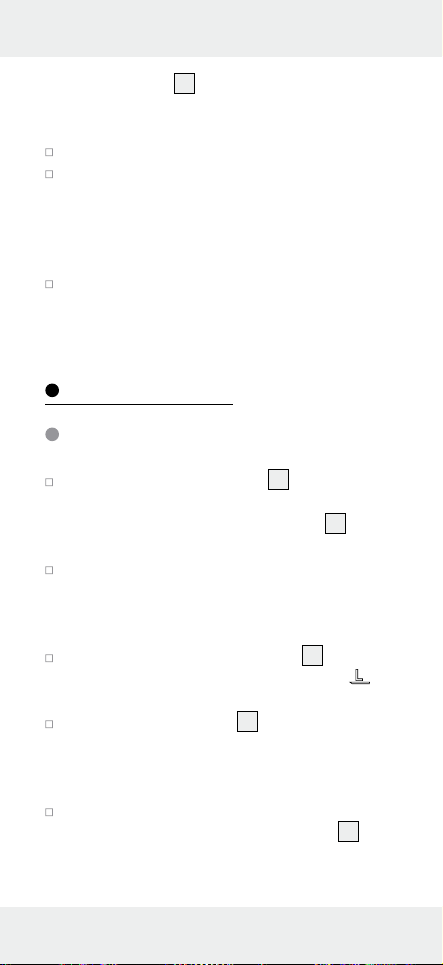
A
Min. 0.6m
Max. 16m
B
7

Introduction .....................................Page 6
Intended use ..........................................Page 6
Parts description ....................................Page 6
Technical Data ......................................Page 7
Scope of delivery ..................................Page 7
General safety
instructions .......................................Page 7
Safety instructions for batteries /
rechargeable batteries..........................Page 9
Before using ....................................Page 10
Inserting / changing the battery ...........Page 10
Start-up ...............................................Page 11
Measuring length ..................................Page 11
Avoiding measuring errors ...................Page 12
Adding lengths together .......................Page 13
Measuring surface area .......................Page 14
Measuring volume ................................Page 15
Adding surface areas or volumes
together ..................................................Page 16
Displaying the last measured values ....Page 17
Temperature display .............................Page 17
Changing the unit of measurement ......Page 17
Battery state display ..............................Page 18
Switching off / Automatic shut-down ....Page 18
Troubleshooting ..........................Page 18
Cleaning and Care .....................Page 18
Disposal ..............................................Page 19
Warranty ...........................................Page 20
5 GB/IE/NI
Ultrasonic Distance Meter
Introduction
We congratulate you on the purchase of your
new product. You have chosen a high quality
product. The instructions for use are part of the
product. They contain important information concerning safety, use and disposal. Before using the
product, please familiarise yourself with all of the
safety information and instructions for use. Only
use the unit as described and for the specified applications. If you pass the product on to anyone
else, please ensure that you also pass on all the
documentation with it.
Intended use
This product is intended for measuring lengths
and for calculating surface areas and volumes. The
product also has a temperature measuring facility.
This product is solely intended for private use.
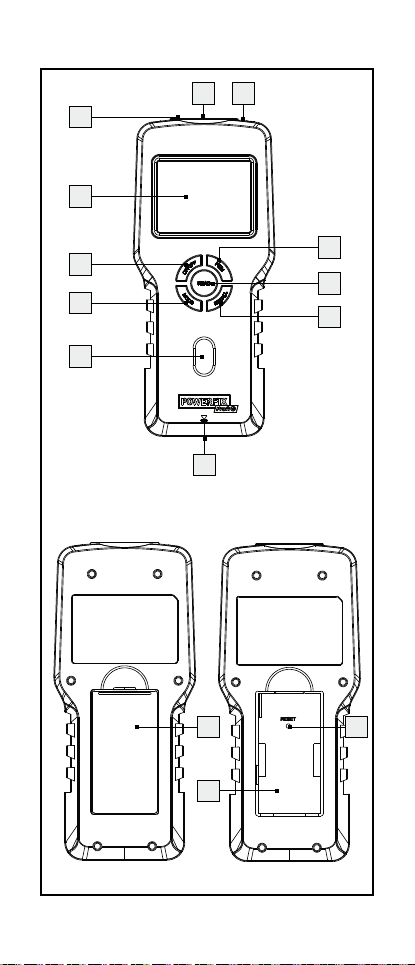
Parts description
1
Ultrasonic transmitter / receiver
2
Temperature sensor
3
FT/M button
4
READ button
5
RECALL button
6
Reference area
7
Level indicator
8
MODE button
9
ON / OFF button
6 GB/IE/NI
10
Display
11
Laser diode
12
Reset Key
13
Battery compartment cover
14
Battery compartment
Technical Data
Operating voltage: max. 9 V
(Direct current)
Battery type: 6LR61 (9V Block
battery)
Measuring range: 0.6 m–16 m
Measuring accuracy: +/- 1%
Capacity display: up to 9999.99
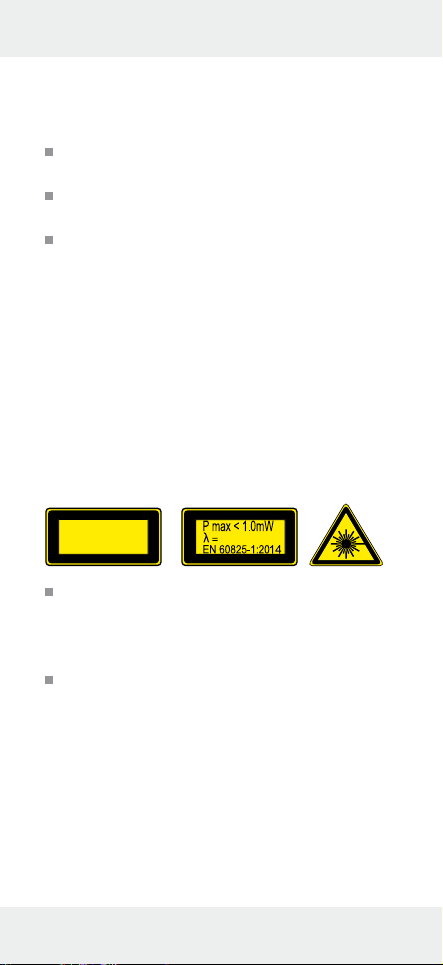
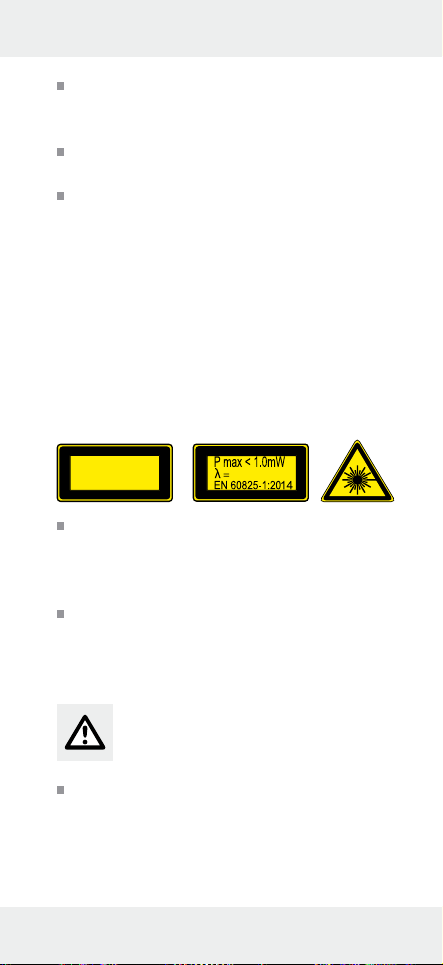
Laser wave length: 635–660 nm, 1 mW
Laser class: 2
Ultrasonic frequency: 40 kHz
Thermometer
measuring range: -10 °C–+40 °C
(14 °F– 104 °F)
Scope of delivery
1 Ultrasonic Distance Meter
1 9 V-blockbattery
1 Set of operating instructions
General safety
instructions
Before using the product, please familiarise yourself
with all of the safety information and instructions
7 GB/IE/NI
for use! When passing this product on to others,
please also include all the documents!
Check the product for damage before use!
Never use a damaged product!
Do not expose the product to moisture! This
may damage it.
This appliance can be used by children aged
from 8 years and above and persons with
reduced physical, sensory or mental capabilities or lack of experience and knowledge if
they have been given supervision or instruction
concerning use of the appliance in a safe way
and understand the hazards involved. Children
shall not play with the appliance. Cleaning
and user maintenance shall not be made by
children without supervision.
Danger from laser radiation
LASER RADIATION
DO NOT STARE INTO BEAM
CLASS 2 LASER PRODUCT
635–660 nm
The product contains a Class 2 laser. Never
point the laser beam at persons or animals.
Never look directly into the beam. Even a
weak laser beam can cause eye damage.
Never point the laser beam at reflective sur-
faces or materials. Even a reflected laser
beam can cause eye damage.
8 GB/IE/NI

Safety instructions for
batteries / rechargeable
batteries
DANGER TO LIFE! Keep batter ies / re-
chargeable batteries out of reach of children.
If accidentally swallowed seek immediate
medical attention.
DANGER OF EXPLOSION!
Never recharge non-rechargeable
batteries. Do not short-circuit batteries / rechargeable batteries and / or open
them. Overheating, fire or bursting can be the
result.
Never throw batteries / rechargeable batter-
ies into fire or water.
Do not exert mechanical loads to batteries /
rechargeable batteries.
Risk of leakage of batteries / rechargeable batteries
Avoid extreme environmental conditions and
temperatures, which could affect batteries /
rechargeable batteries, e.g. radiators / direct
sunlight.
Avoid contact with the skin, eyes and mucous
membranes. In the event of contact with battery acid, thoroughly flush the affected area
with plenty of clean water and seek immediate medical attention.
WEAR PROTECTIVE GLOVES!
Leaked or damaged batteries /
rechargeable batteries can cause
burns on contact with the skin. Wear suitable
protective gloves at all times if such an event
occurs.
9 GB/IE/NI

In the event of a leakage of batteries /
rechargeable batteries, immediately remove
them from the product to prevent damage.
Only use the same type of batteries /
rechargeable batteries. Do not mix used and
new batteries / rechargeable batteries.
Remove batteries / rechargeable batteries if
the product will not be used for a longer
period.
Risk of damage of the product
Only use the specified type of battery /
rechargeable battery!
Insert batteries / rechargeable batteries ac-
cording to polarity marks (+) and (-) on the
battery / rechargeable battery and the product.
Clean the contacts on the battery / recharge-
able battery and in the battery compartment
using a soft dry cloth before inserting!
Remove exhausted batteries / rechargeable
batteries from the product immediately.
Before using
Before initial use, remove the protective film
from the product display
10
and insert the
enclosed battery.
Inserting / changing
the battery
If the battery symbol appears in the
10
display
and must be replaced. Empty batteries can falsify
the measured result.
10 GB/IE/NI
, the inserted battery is almost drained

To insert the battery proceed as follows:
Open the battery compartment cover 13 on
the back of the product. You can remove the
used battery more easily with the aid of the
material strip, which is inside the battery
compartment
14
. Just pull on the material strip.
Remove the battery clip from the battery
Plug the contacts of the 9 V-blockbattery on
the contacts of the battery clip. Make sure
you fit the batteries the right way round. This
is specified by the profiled shape of the contacts. Also ensure without fail that the material
strip is underneath the battery.
Insert the battery in the battery compartment
and close the cover again, so that it audibly
latches into place.
Start-up
Measuring length
Press the ON/OFF button 9 to switch the
product on. If you do not press any button for
60 s, the display
10
shuts down.
To switch the product off manually, hold the
ON/OFF button pressed down for 3 seconds,
until the display goes out and a double tone
signal sounds.
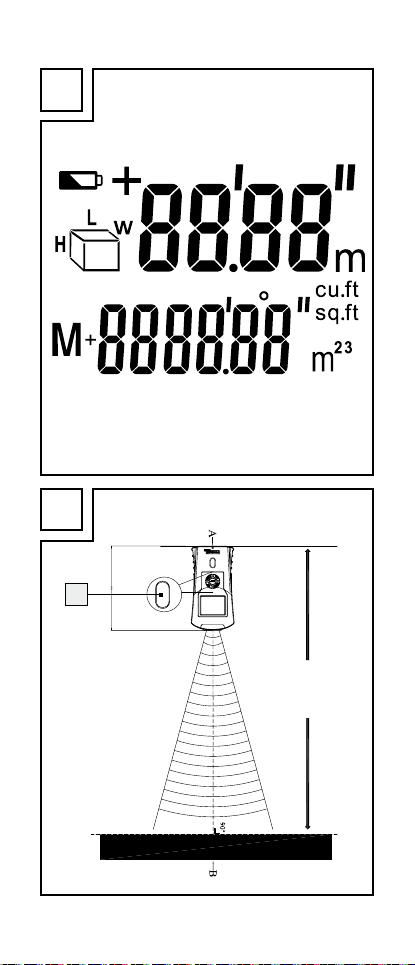
Press the MODE button 8 repeatedly, until
the display shows the symbol for length measurement “
“ as well as the length designa-
tion 0.00 m (or 0‘00“).
Hold the reference area 6 of the product at
the start point of your measurement. Hold the
product in such a way, that the reference
11 GB/IE/NI
area is aligned parallel to the target area of
the measurement.
If necessary use the level indicator 7 to
align the product horizontally. The air bubble
of the level indicator should be between the
two markings
if the alignment is hori-
zontal.
Press the READ button 4. The laser diode 11
projects a dot of light onto the end point of
the measurement. This dot of light will help you
to correctly align the product. After successful
measuring, the length will appear in the
display.
Avoiding measuring errors
In order to avoid measuring errors,
please note the following information:
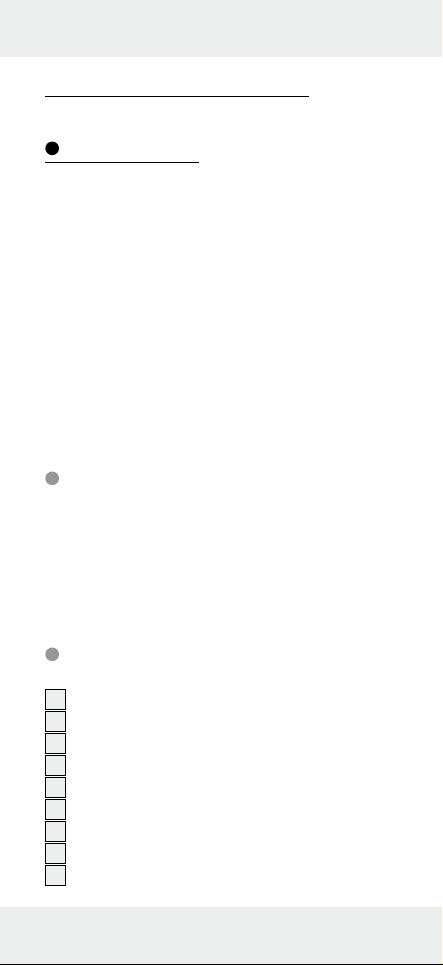
The measurement is performed by ultrasound,
which travels from the ultrasonic transmitter
in a conical manner. The ultrasound is reflected
from the target area and received by the ultrasonic receiver. The product calculates the
measured length (Fig. B) from the travel time
of the signal.
1
In order to guarantee an exact measurement, the following conditions must be
maintained (Fig. B):
The reference area (A) must be parallel to the
target area (B).
The distance to be measured must be between
0.6 m and 16 m long.
There must be no objects in the conical path
of the ultrasound, which could reflect the ultrasound prematurely. The conical path of the
12 GB/IE/NI
ultrasound has a width of about 6 m at a
length of 16 m.
The target area must have a smooth surface,
so that the ultrasound can be well reflected.
Transparent surfaces, such as glass, generally
reflect the ultrasound.
The battery must not be empty. An empty bat-
tery is shown in the display
symbol
.
10
by the battery
If a definitive measurement is not possible,
the display shows the “Err“ information. The
measurement must then be repeated.
If the display of the product hang-up or the
product doesn‘t work well, open the battery
cover, move the battery out of battery compartment, press the RESET button using a
sharp object. Then the product display will
restart and resume to normal.
Note: Do not disconnect the battery while
using RESET button.
Adding lengths together
Measure a length as described in the section
“Measuring length“. The length appears in
the top line of the display
10
.
Now press the RECALL button 5. The length is
transferred to the bottom line. This means that
it has been saved in the aggregate memory.
The character “+“ appears at the top of the
display. The product displays in this way, that
it is ready for a new length measurement.
Press the READ button 4. The length, which
has now been measured, appears at the top
of the display.
13 GB/IE/NI
Press the RECALL button. The measured value
is then transferred to the aggregate memory,
and the aggregate of the two measured
lengths appears at the bottom of the display.
If the measurement is an incorrect measurement, do not press the RECALL button but
press the READ button again. The measured
value, which is displayed at the top, is overwritten. Press the RECALL button to adopt the
value into the aggregate memory.
You can repeat this procedure as often as
you wish, as long as the length of 9999.99 m
is not exceeded.
Measuring surface area
Note: In order to avoid errors in the measuring
method, please familiarize yourself first with the
information about measuring lengths.
Press the ON/OFF button 9 to switch the
product on.
Press the MODE button 8 repeatedly until
the symbol for surface area measurement
“
“, as well as the designation 0.00 m
(or 0‘00“), appear in the display
symbol “
“ for length measurement flashes.
10
. The
The product displays in this way, that it is
ready for the first measurement.
Align the product and press the READ button 4.
If the measurement is successful, the length will
appear at the top of the display. The symbol
for width measurement “
“ also flashes.
The product displays in this way, that it is
ready for the measurement of the width.
14 GB/IE/NI
Align the product and press the READ button
again. If the measurement is successful, the
width appears at the top of the display, and
at the bottom appears the surface area in the
2
m
unit of measurement (or sq.ft = square feet).
Press the MODE button briefly, if a further
surface area measurement is required. The
figures in the display are reset, and the product
is ready for a new surface area measurement.
Measuring volume
Note: In order to avoid errors in the measuring
method, please familiarize yourself first with the
information about measuring lengths.
Press the ON / OFF button 9 to switch the
product on.
Press the MODE button 8 repeatedly until
the symbol “
“ for volume measurement, as
well as the designation 0.00m (or 0‘00“),
appear in the display
10
. The symbol “ “
for length measurement flashes. The product
displays in this way, that it is ready for the first
measurement.
Align the product and press the READ button 4.
If the measurement is successful, the length
will appear at the top of the display. The symbol for width measurement “
“ also
flashes. The product displays in this way, that
it is ready for the measurement of the width.
Align the product and press the READ button.
If the measurement is successful, the width
will appear at the top of the display. The
symbol for height measurement “
“ also
flashes. The product displays in this way, that
it is ready for the measurement of the height.
15 GB/IE/NI
Align the product and press the READ button
again. If the measurement is successful, the
height appears at the top of the display, and
at the bottom appears the volume in the m
3
unit of measurement (or cu.ft = cubic feet).
Press the MODE button briefly, if a further
volume measurement is required. The figures
in the display are reset, and the product is
ready for a new volume measurement.
Adding surface areas or
volumes together
Measure a surface area or volume as de-
scribed in the section “Measuring surface
area“ or “Measuring volume“. The surface
area / volume appears in the bottom line of
the display.
Press the RECALL button 5 to save the meas-
ured result. The symbol M+ appears in the
display and this indicates that the measured
result, which is shown at the bottom of the
display, is saved in the product
Press the MODE button 8 briefly. The prod-
uct is now ready to measure the next surface
area or volume.
Measure the next surface area or volume in
the same way as you performed the first
measurement.
Now press the RECALL button again to adopt
the new result into the aggregate memory.
The result of the addition is shown in the
bottom line of the display.
If you would like to add further surface areas
or volumes, repeat steps 3 to 5.
10
.
16 GB/IE/NI

Hold the MODE button pressed down for
3 seconds in order to leave the Addition mode.
Displaying the last
measured values
After you have measured a surface area or a
volume, press the READ button
in order to display the individual values of the
measurement.
The symbol of the corresponding measured
value flashes, and the measured result is
shown in the top line of the display.
Temperature display
Hold the FT/M button 3 pressed down for
approx. 3 seconds. The current room temperature, in the official °C temperature unit, is
shown in the display
In order to switch over to the °F temperature
unit, press the FT/M button briefly.
Press the MODE button 8 briefly in order to
leave the temperature display mode.
10
4
repeatedly
.
Changing the unit of
measurement
Press the FT/M button 3 in order to switch
over from the official metric unit of measurement to the imperial unit of measurement
(display in feet‘ and inches“).
17 GB/IE/NI
Battery state display
If the battery charge status is low, the battery
symbol
appears in the display 10. Replace
the battery as quickly as possible, if this symbol
appears. Empty batteries can falsify the measured
result. The battery change is described in the
section “Inserting / changing the battery“.
Switching off /
Automatic shut-down
Switch the product off by holding the ON/
OFF button
9
pressed down for 3 seconds.
Troubleshooting
Error Possible causes
and solutions
If the product does
not react, electrostatic discharge can
affect the function
of the product.
Open the battert compartment
RESET button
13
, press the
12
with a
pointed object.
Cleaning and Care
The product should only be cleaned on the
outside with a soft dry cloth.
18 GB/IE/NI
Disposal
The packaging is made entirely of recyclable materials, which you may dispose of at local recycling facilities. The
Green Dot is not valid for Germany.
Observe the marking of the packaging
b
materials for waste separation, which
a
are marked with abbreviations (a) and
numbers (b) with following meaning:
1–7: plastics / 20–22: paper and fibreboard / 80–98: composite materials.
The product and packaging materials
are recyclable, dispose of it separately
for better waste treatment. The Triman
logo is valid in France only.
Contact your local refuse disposal
authority for more details of how to
dispose of your worn-out product.
To help protect the environment,
please dispose of the product properly
when it has reached the end of its useful life and not in the household waste.
Information on collection points and
their opening hours can be obtained
from your local authority.
Faulty or used batteries / rechargeable batteries
must be recycled in accordance with Directive
2006/66/EC and its amendments. Please return
the batteries / rechargeable batteries and / or the
product to the available collection points.
19 GB/IE/NI
Environmental damage through
incorrect disposal of the batteries /
rechargeable batteries!
Batteries / rechargeable batteries may not be
disposed of with the usual domestic waste. They
may contain toxic heavy metals and are subject to
hazardous waste treatment rules and regulations.
The chemical symbols for heavy metals are as follows: Cd = cadmium, Hg = mercury, Pb = lead.
That is why you should dispose of used batteries /
rechargeable batteries at a local collection point.
Warranty
The product has been manufactured to strict quality guidelines and meticulously examined before
delivery. In the event of product defects you have
legal rights against the retailer of this product.
Your legal rights are not limited in any way by our
warranty detailed below.
The warranty for this product is 3 years from the
date of purchase. Should this product show any
fault in materials or manufacture within 3 years
from the date of purchase, we will repair or replace
it – at our choice – free of charge to you.
The warranty period begins on the date of purchase.
Please keep the original sales receipt in a safe location. This document is required as your proof of
purchase. This warranty becomes void if the product has been damaged, or used or maintained
improperly.
20 GB/IE/NI
The warranty applies to defects in material or manufacture. This warranty does not cover product
parts subject to normal wear, thus possibly considered consumables (e.g. batteries) or for damage
to fragile parts, e.g. switches, rechargeable batteries
or glass parts.
21 GB/IE/NI

Indledning ........................................ Side 23
Formålsbestemt anvendelse ................. Side 23
Beskrivelse af dele ................................ Side 23
Tekniske data......................................... Side 24
Leverede dele ........................................ Side 24
Generelle
sikkerhedsanvisninger .......... Side 24
Sikkerhedshenvisninger for batterier /
akkuer .................................................... Side 25
Før ibrugtagning ......................... Side 27
Indsætning / skift af batteri ................... Side 27
Ibrugtagning .................................. Side 28
Længdemåling ....................................... Side 28
Undgåelse af målefejl ........................... Side 28
Addering af længder ............................ Side 29
Måling af areal ..................................... Side 30
Måling af rumfang ................................ Side 31
Addering af areal eller rumfang .......... Side 32
Visning af de seneste måleværdier ...... Side 33
Temperaturvisning ................................. Side 33
Ændring af måleenhed ......................... Side 33
Batterivisning ......................................... Side 33
Slukning / automatisk slukning .............. Side 34
Fejlrettelse ........................................ Side 34
Rengøring og pleje ................... Side 34
Bortskaffelse .................................. Side 34
Garanti ................................................ Side 36
22 DK
Afstandsmåler med ultralyd
Indledning
Hjerteligt tillykke med købet af deres nye produkt.
Du har besluttet dig for et produkt af høj kvalitet.
Brugervejledningen er en del af dette produkt.
Den indeholder vigtige informationer om sikkerhed,
brug og bortskaffelse. Gør dig inden ibrugtagning
af produktet fortrolig med alle betjenings- og sikkerhedsanvisninger. Benyt kun produktet som beskrevet og til de oplyste formål. Videregiv alle
papirer, hvis du giver produktet videre til tredjemand.
Formålsbestemt anvendelse
Dette produkt er beregnet til måling af længder
og beregning af arealer og rumfang. Derudover
har produktet en temperaturmåling. Produktet er
udelukkende beregnet til privat anvendelse.
Beskrivelse af dele
1
Ultralydssender/ –modtager
2
Temperaturføler
3
FT/M-knap
4
READ-knap
5
RECALL-knap
6
Referenceflade
7
Libelle
8
MODE-knap
9
ON / OFF -knap (TÆND /SLUK)
10
Display
11
Laserdiode
23 DK
12
RESET-knap
13
Batterirumslåg
14
Batterirum
Tekniske data
Driftspænding: max. 9 V
(jævnstrøm)
Batteritype: 6LR61 (9 V blokbatteri)
Måleområde: 0,6 m – 16 m
Målenøjagtighed: +/- 1%
Kapacitetsvisning: indtil 9999,99
Bølgelængde laser: 635–660 nm, 1 mW
Laser-klasse: 2
Ultralydsfrekvens: 40 kHz
Måleområde termometer: –10 °C – +40 °C
(14 °F – 104 °F)
Leverede dele
1 ultralyds-afstandsmåler
1 9 V-blokbatteri
1 betjeningsvejledning
Generelle
sikkerhedsanvisninger
Gør dig fortrolig med alle betjenings- og sikkerhedsanvisninger, inden produktet anvendes første
gang! Hvis du giver produktet videre til tredjemand,
skal alle tilhørende dokumenter også følge med!
24 DK
Kontrollér produktet for skader inden ibrug-
tagningen! Tag ikke et beskadiget produkt i
brug!
Udsæt ikke produktet for fugt! Fugt kan be-
skadige apparatet.
Dette produkt kan benyttes af børn fra 8 år og
op, samt af personer med forringede fysiske,
følelsesmæssige eller mentale evner eller mangel på erfaring og viden, når de er under
opsyn eller er blevet vejledt med hensyn til
produktet og forstår de deraf resulterende
farer. Børn må ikke lege med produktet. Rengøring og brugervedligeholdelse må ikke gennemføres af børn uden at de er under opsyn.
Fare på grund af laserstråling
LASERSTRÅLING
KIG IKKE IND I STRÅLEN
LASER KLASSE 2
635–660 nm
Produktet indeholder en klasse-2-laser. Ret
aldrig laserstrålen mod personer eller dyr.
Kig aldrig direkte ind i strålen. Selv en svag
laserstråle kan forårsage øjenskader.
Ret aldrig laserstrålen mod reflekterende
overflader eller materialer. Reflekterede
laserstråler kan også forårsage øjenskader.
Sikkerhedshenvisninger
for batterier / akkuer
LIVSFARE! Hold batterier / akkuer udenfor
børns rækkevidde. Opsøg i tilfælde af slugning straks lægehjælp!
25 DK

EKSPLOSIONSFARE! Genoplad
aldrig ikkeopladelige batterier igen.
Kortslut ikke batterier / akkuer og /
eller åben disse ikke. Der kan opstå overophedning, brandfare eller eksplosion.
Smid batterier / akkuer aldrig i ild eller vand.
Udsæt batterier / akkuer ikke for mekanisk
belastning.
Risiko for udsivning fra batteriene /
akkuerne
Undgå ekstreme betingelser og temperaturer,
som kan påvirke batterier / akkuer, f.eks. varmelegemer / direkte sollys.
Undgå kontakt med hud, øjne og slimhinder!
Skyl ved kontakt med batterisyre de berørte
steder med det samme med klart vand og
opsøg omgående en læge!
BÆR BESKYTTELSESHAND-
SKER! Udløbne eller beskadigede
batterier / akkuer kan forårsage
ætsninger ved berøring med huden. Bær i dette
tilfælde derfor egnede beskyttelseshandsker.
I tilfælde af en lækage hos batterierne / akku-
erne, skal De fjerne disse med det samme fra
produktet for at undgå beskadigelser.
Anvend kun batterier / akkuer af samme type.
Bland ikke gamle batterier / akkuer med nye!
Fjern batterierne / akkuerne, når produktet
ikke anvendes i en længere periode.
Risiko for beskadigelse af produktet
Anvend udelukkende den angivne batteri- /
akkutype!
Indsæt batterier / akkuer iht. polaritetsmærk-
ningen (+) og (-) til batteri / akku og produktet.
26 DK
Rengør kontakter ved batteri / akku og i
batterirummet inden ilægningen!
Fjern brugte batterier / akkuer omgående fra
produktet.
Før ibrugtagning
Fjern beskyttelsesfolien fra produktets display
10
før ibrugtagningen og indsæt det medføl-
gende batteri.
Indsætning / skift af batteri
Når batterisymbolet kommer til syne på
displayet
10
, er det indsatte batteri næsten brugt
op og skal udskiftes. Tomme batterier kan forfalske
måleresultatet.
Batteriet indsættes på følgende måde:
Åbn batterirumslåget 13 på produktets bag-
side. Med stofstrimlen, der befinder sig i det
indre af batterirummet
14
, kan batteriet lettere
tages ud. Der skal blot trækkes i stofstrimlen.
Fjern batteriklemmen fra batteriet.
Tilslut kontakterne af 9 V-blokbatteriet til kon-
takterne ved batteriklemmen. Vær herved opmærksom på den rigtige polaritet. Polariteten
defineres ved kontakternes profilform. Sørg
derudover for, at stofstrimlen befinder sig
under batteriet.
Indsæt batteriet i batterirummet og luk låget
igen, så du hører, at det klikker på plads.
27 DK
Ibrugtagning
Længdemåling
Tryk på ON / OFF knappen 9 for at tænde
for produktet. Hvis der i løbet af 60 s ikke
trykkes på nogen knap, slukkes displayet
10
Produktet slukkes manuelt ved at holde ON /
OFF-knappen nede i 3 sekunder, indtil displayet slukker, og der lyder et dobbelt signal.
Tryk gentagne gange på MODE-knappen 8,
indtil displayet viser symbolet for længdemåling „
“ samt længdeangivelsen 0.00 m
(hhv. 0‘00‘‘).
Hold referencearealet 6 af produktet på
startpunktet af din måling. Hold produktet på
en sådan måde, at referencearealet ligger
parallelt med målingens målflade.
Anvend evt. libellen 7 til at positionere
produktet vandret. I vandret position befinder
luftboblen i libellen sig mellem de to markeringer
.
Tryk på READ-knappen 4. Laserdioden 11
viser et lyspunkt på arealet for målingens slutpunkt. Dette lyspunkt er en hjælp til at positionere produktet korrekt. Efter afsluttet måling
vises den målte længde i displayet.
.
Undgåelse af målefejl
Vær opmærksom på følgende
anvisninger til undgåelse af målefejl:
Målingen foretages med ultralyd, der bevæger
sig væk fra ultralydssenderen
1
i kegleform.
Lyden kastes tilbage fra målfladen og modtages af ultralydsmodtageren. På baggrund af
28 DK

signalets procestid beregner produktet længden, der skal måles (afbildning B).
Følgende betingelser skal overholdes
for at sikre en nøjagtig måling (fig. B):
Referencefladen (A) skal ligge parallelt med
målfladen (B).
Længden af afstanden, der skal måles, skal
være mellem 0,6 m og 16 m.
Der må ikke befinde sig genstande i lydkeglen,
der kan reflektere lyden for tidligt. Lydkeglen
skal ved en længde på 16 m have en bredde
på omtrent 6 m.
Målfladen skal have en glat overflade, der
således er egnet til reflektering af lyden.
Gennemsigtige overflader som f.eks. glas
reflekterer normalt lyden.
Batteriet må ikke være tomt. Et tomt batteri
vises på displayet
10
ved batterisymbolet .
Hvis en entydig måling ikke er mulig, vises
meldingen „Err“ på displayet. I dette tilfælde
skal målingen gentages.
Hvis displayet fryser eller produktet ikke fun-
gerer optimalt, åbn batterirumslåget og fjern
batteriet fra batterirummet. Tryk derefter på
RESET-knappen med en spids genstand.
Displayet genstartes og er igen driftsklar.
Obs: fjern ikke batteriet, mens du trykker på
RESET-knappen.
Addering af længder
Opmål en længde som beskrevet i kapitlet
„Måling af længde“. Værdien af længden
vises på den øverste linje på displayet
10
.
29 DK

Tryk nu på RECALL-knappen 5. Værdien af
længden overføres nu til den nederste linje.
Det betyder, at den er gemt i sumhukommelsen.
Øverst på displayet vises tegnet „+“. Dermed
viser produktet, at det er klar til en ny længdemåling.
Tryk på READ-knappen 4. Værdien af den
nu målte længde vises øverst på displayet.
Tryk på RECALL-knappen. Måleværdien over-
føres dermed til sumhukommelsen, og summen
af de to målte længder vises forneden. Hvis
målingen er en fejlmåling, skal der ikke trykkes
på RECALL-knappen men derimod på READknappen igen. Den ovenfor viste måleværdi
overskrives. Tryk på RECALL-knappen for at
overføre værdien til sumhukommelsen.
Denne proces kan gentages så mange gange
som ønsket, så længe længden på
9999,99 m ikke overskrides.
Måling af areal
Bemærk: For at undgå metodiske målefejl skal
du først sætte dig grundigt ind i anvisningerne til
måling af længder.
Tryk på ON / OFF knappen 9 for at tænde
for produktet.
Tryk gentagne gange på MODE-knappen 8,
indtil symbolet for arealmåling „
“ samt vis-
ningen 0.00 m (hhv. 0‘00‘‘) vises i displayet
10
. Symbolet „ “ for længdemåling blinker.
Dermed viser produktet, at det er klar til den
første måling.
Positionér produktet, og tryk på READ-knap-
4
pen
. Efter afsluttet måling vises den målte
30 DK

længde øverst i displayet. Desuden blinker
symbolet for breddemåling „
“. Dermed
viser produktet, at det er klar til målingen af
bredden.
Positionér produktet, og tryk igen på READ-
knappen. Efter afsluttet måling vises den
målte bredde øverst i displayet, og nederst vises arealet i måleenheden m
2
(hhv. sq.ft =
kvadratfod).
Ønskes der en ny arealmåling trykkes der kort
på MODE-knappen. Visningerne i displayet
nulstilles, og produktet er klar til en ny arealmåling.
Måling af rumfang
Bemærk: For at undgå metodiske målefejl skal
du først sætte dig grundigt ind i anvisningerne til
måling af længder.
Tryk på ON / OFF knappen 9 for at tænde
for produktet.
Tryk gentagne gange på MODE-knappen 8,
indtil symbolet „
“ for måling af rumfang
samt visningen 0.00 m (hhv. 0‘00‘‘) vises i
displayet
10
. Symbolet „ “ for længdemåling blinker. Dermed viser produktet, at det er
klar til den første måling.
Positionér produktet, og tryk på READ-knap-
4
pen
. Efter afsluttet måling vises den målte
længde øverst i displayet. Desuden blinker
symbolet for breddemåling „
“. Dermed
viser produktet, at det er klar til målingen af
bredden.
Positionér produktet, og tryk på READ-knappen.
Efter afsluttet måling vises den målte bredde
øverst i displayet. Desuden blinker symbolet
31 DK

for højdemåling „ “. Dermed viser produktet,
at det er klar til målingen af højden.
Positionér produktet, og tryk igen på READ-
knappen. Efter afsluttet måling vises den målte
højde øverst i displayet, og nederst vises rumfanget i måleenheden m
3
(hhv. cu.ft = kubikfod).
Ønskes der en ny rumfangsmåling, trykkes
der kort på MODE-knappen. Visningerne i
displayet nulstilles, og produktet er klar til en
ny rumfangsmåling.
Addering af areal
eller rumfang
Opmål et areal eller et rumfang som beskre-
vet i kapitlet „Måling af areal“ hhv. „Måling
af rumfang“. Værdien af arealet/ rumfanget
vises på den nederste linje på displayet.
Tryk på RECALL-knappen 5 for at gemme
måleresultatet. I displayet
M+, der angiver, at måleresultatet, der vises
nederst på displayet, er gemt i produktet.
Tryk kort på MODE-knappen 8. Produktet
er nu klar til måling af det næste areal/det
næste rumfang.
Opmål det næste areal/det næste rumfang
på samme måde som ved den første måling.
Tryk nu igen på RECALL-knappen for også at
gemme det nye resultat i sumhukommelsen.
Resultatet af adderingen vises på den nederste linje på displayet.
Hvis du vil tilføje yderligere arealer eller
rumfang, skal du gentage trin 3 til 5.
Hold MODE-knappen nede i 3 sekunder for
at forlade adderingsmodusen.
10
vises symbolet
32 DK

Visning af de seneste
måleværdier
Tryk efter måling af et areal eller et rumfang
gentagne gange på READ-knappen
vise de enkelte måleværdier i målingen.
Symbolet for den pågældende måleværdi
blinker, og måleresultatet vises på den øverste linje på displayet.
Temperaturvisning
Hold FT/M-knappen 3 nede i ca. 3 sekunder.
På displayet
10
vises den aktuelle rumtempe-
ratur i den officielle temperaturenhed °C.
For at skifte til temperaturenheden °F trykkes
der et øjeblik på FT/M-knappen.
Tryk et øjeblik på MODE-knappen 8 for at
forlade temperaturvisningsmodusen.
Ændring af måleenhed
Tryk på FT/M-knappen 3 for at skifte fra
den officielle måleenhed Meter til måleenheden Fod (visning fod‘ tommer‘‘).
4
for at
Batterivisning
Ved lav batteriladetilstand vises batterisymbolet
på displayet
10
. Når dette symbol kommer til syne,
skal batteriet skiftes så hurtigt som muligt. Tomme
batterier kan forfalske måleresultatet. Skift af batteri
er beskrevet i kapitlet „Indsætning / skift af batteri“.
33 DK
Slukning / automatisk
slukning
Produktet slukkes ved at holde ON / OFF-
knappen
9
nede i 3 sekunder.
Fejlrettelse
Fejl Mulig årsag og
løsning
Produktet reagerer
ikke. Elektrostatiske
afladninger kan føre
til funktionsforstyrrelser.
Rengøring og pleje
Åbn batterirummet 13 og
tryk på RESET-knappen
12
med en spids gen-
stand.
Rens produktet udelukkende udefra med en
blød og tør klud.
Bortskaffelse
Indpakningen består af miljøvenlige
materialer, som De kan bortskaffe over
de lokale genbrugssteder. Det grønne
miljømærke gælder ikke for Tyskland.
b
a
34 DK
Bemærk forpakningsmaterialernes
mærkning til affaldssorteringen, disse
er mærket med forkortelser (a) og
numre (b) med følgende betydning:
1–7: kunststoffer / 20–22: papir og
pap / 80–98: kompositmaterialer.

Produktet og indpakningsmaterialerne
kan genbruges; bortskaf disse særskilt
til en bedre affaldsbehandling. Trimanlogoet gælder kun for Frankrig.
De får oplyst muligheder til bortskaffelse af det udtjente produkt hos deres
lokale myndigheder eller bystyre.
For miljøets skyld, så må produktet
aldrig smides ud sammen med husholdningsaffaldet, når det er udtjent,
men skal afleveres til en fagmæssig
korrekt bortskaffelse. De kan informere
Dem vedrørende opsamlingssteder og
deres åbningstider hos deres ansvarlige forvaltning.
Defekte eller brugte batterier / akkuer skal genbruges iht. retningslinje 2006/66/EF og dennes
ændringer. Aflevér batterier / akkuer og / eller
produktet via et af de tilbudte indsamlingssteder.
Miljøskader gennem forkert
bortskaffelse af batterierne /
akkuerne!
Batterier / akkuer må ikke bortskaffes via husholdningsaffaldet. De kan indeholde giftige tungmetaller
og er underlagt behandlingen for særaffald. De
kemiske symboler for tungmetaller er følgende:
Cd = kadmium, Hg = kviksølv, Pb = bly. Aflverer
derfor brugte batterier / akkuer hos en kommunal
genbrugsstation.
35 DK

Garanti
Produktet blev produceret omhyggeligt efter de
strengeste kvalitetskrav og kontrolleret grundigt inden levering. Hvis der forekommer mangler ved
dette produkt, så har de juridiske rettigheder over
for sælgeren af dette produkt. Disse juridiske rettigheder indskrænkes ikke af vores garanti, der
beskrives i det følgende.
De får 3 års garanti fra købsdatoen på dette produkt. Garantifristen begynder med købsdatoen.
Opbevar den originale kassebon på et sikkert
sted. Denne kassebon behøves som dokumentation
for købet.
Hvis der inden for 3 år fra købsdatoen af for dette
produkt opstår en materiale- eller fabrikationsfejl,
bliver produktet repareret eller erstattet – efter
vores valg – af os uden omkostninger for dem.
Garantien bortfalder, hvis produktet bliver beskadiget eller ikke anvendes eller vedligeholdes korrekt.
Garantien gælder for materiale- eller fabrikationsfejl. Denne garanti dækker ikke produktdele, som
er udsat for normalt slid og derfor kan betragtes
som normale sliddele (f.eks. batterier) eller ved
skader på skrøbelige dele; f.eks. kontakter, akkumulatorer som er fremstillet af glas.
36 DK

Introduction .....................................Page 38
Utilisation conforme ..............................Page 38
Descriptif des pièces .............................Page 38
Caractéristiques techniques ..................Page 39
Contenu de la livraison .........................Page 39
Instructions générales
de sécurité ........................................Page 39
Consignes de sécurité relatives aux
piles / aux piles rechargeables ............Page 41
Avant la mise en service .......Page 42
Mise en place / remplacement de
la pile .....................................................Page 43
Mise en service .............................Page 43
Mesurer des longueurs .........................Page 43
Évitez les erreurs de mesure .................Page 44
Ajouter des longueurs ...........................Page 45
Mesurer des surfaces ............................Page 46
Mesurer des volumes ............................Page 47
Additionner des surfaces ou des
volumes ..................................................Page 48
Afficher la dernière valeur de mesure ...Page 49
Affichage de la température ................Page 50
Modifier l‘unité de mesure....................Page 50
Affichage de l‘usure de la batterie ......Page 50
Arrêt / Mise hors service automatique ...Page 50
Dépannage ......................................Page 51
Nettoyage et entretien ..........Page 51
Mise au rebut .................................Page 51
Garantie .............................................Page 53
37 FR/BE

Télémètre à ultrasons
Introduction
Nous vous félicitons pour l‘achat de votre nouveau
produit. Vous avez opté pour un produit de grande
qualité. Le mode d‘emploi fait partie intégrante
de ce produit. Il contient des indications importantes pour la sécurité, l’utilisation et la mise au
rebut. Veuillez lire consciencieusement toutes les
indications d‘utilisation et de sécurité du produit.
Ce produit doit uniquement être utilisé conformément aux instructions et dans les domaines
d‘application spécifiés. Lors d‘une cession à tiers,
veuillez également remettre tous les documents.
Utilisation conforme
Ce produit est conçu pour mesurer des longueurs
et pour calculer des surfaces et des volumes. En
outre, le produit dispose d‘un système de mesure
de la température. Le produit est exclusivement
conçu pour un usage privé.
Descriptif des pièces
1
Émetteur/récepteur d‘ultrasons
2
Capteur de température
3
Touche FT/M
4
Touche READ
5
Touche RECALL
6
Plan de référence
7
Niveau à bulles
8
Touche MODE
38 FR/BE

9
Touche ON/OFF (allumé/éteint)
10
Écran
11
Diode laser
12
Touche RESET
13
Couvercle du compartiment à piles
14
Compartiment à piles
Caractéristiques techniques
Tension de service: max. 9 V
(courant continu)
Type de pile: 6LR61 (pile 9 V)
Plage de mesure: 0,6 m–16 m
Précision de mesure: +/- 1%
Capacité d‘affichage: jusqu‘à 9999,99
Longueur d‘ondes du laser: 635–660 nm, 1 mW
Catégorie du laser: 2
Fréquence des ultrasons: 40 kHz
Plage de mesure
du thermomètre: –10 °C – +40 °C
(14 °F – 104 °F)
Contenu de la livraison
1télémètre à ultrasons
1pile 9 V
1mode d‘emploi
Instructions générales
de sécurité
Prenez connaissance de toutes les indications de
maniement et de sécurité avant d‘utiliser l‘appareil pour la première fois! Transmettez également
39 FR/BE

tous les documents en cas de transmission du
produit à une personne tierce!
Avant la mise en service, vérifiez si le produit
présente des dommages! Ne mettez pas un
appareil endommagé en service!
Tenez le produit à l‘abri de l‘humidité ! Il
risque d’être endommagé.
Ce produit peut être utilisé par des enfants
âgés de 8 ans et plus ainsi que par des personnes ayant des capacités physiques, sensorielles ou mentales réduites ou manquant
d‘expérience ou de connaissances, s‘ils sont
surveillés ou s‘ils ont été informés de l‘utilisation
sûre du produit et s‘ils comprennent les risques
liés à son utilisation. Les enfants ne doivent pas
jouer avec le produit. Le nettoyage et l‘entretien du produit ne doivent pas être effectués
par des enfants laissés sans surveillance.
Risque lié au rayon laser
RAYONNEMENT LASER
NE PAS REGARDER DANS LE FAISCEAU
APPAREIL A LASER DE CLASSE2
635–660 nm
Le produit contient un laser de classe 2. N‘orien-
tez jamais le laser sur des personnes ni des
animaux. Ne regardez jamais directement
dans le rayon. Un rayon laser de faible intensité peut suffire à provoquer des lésions oculaires.
N‘orientez jamais le laser sur des surfaces ou
métaux réfléchissants. Le reflet du rayon laser
peut également causer des lésions oculaires.
40 FR/BE

Consignes de sécurité
relatives aux piles / aux
piles rechargeables
DANGER DE MORT! Rangez les piles /
piles rechargeables hors de la portée des
enfants. En cas d’ingestion, consultez
immédiatement un médecin !
RISQUE D‘EXPLOSION ! Ne
rechargez jamais des piles non
rechargeables. Ne court-circuitez
pas les piles / piles rechargeables et / ou ne
les ouvrez pas ! Autrement, vous risquez de
provoquer une surchauffe, un incendie ou
une explosion.
Ne jetez jamais des piles / piles rechargeables
au feu ou dans l’eau.
Ne pas soumettre les piles / piles rechargea-
bles à une charge mécanique.
Risque de fuite des piles / piles rechargeables
Évitez d’exposer les piles / piles rechargeables
à des conditions et températures extrêmes
susceptibles de les endommager, par ex. sur
des radiateurs / exposition directe aux rayons
du soleil.
Évitez tout contact avec la peau, les yeux ou
les muqueuses! En cas de contact avec l’acide
d’une pile, rincez la zone touchée à l’eau claire
et consultez immédiatement un médecin !
PORTER DES GANTS DE PRO-
TECTION! Les piles / piles re-
chargeables endommagées ou
sujettes à des fuites peuvent provoquer des
brûlures au contact de la peau. Vous devez
41 FR/BE

donc porter des gants adéquats pour les
manipuler.
En cas de fuite des piles / piles rechargeables,
retirez-les aussitôt du produit pour éviter tout
endommagement.
Utilisez uniquement des piles / piles rechar-
geables du même type. Ne mélangez pas des
piles / piles rechargeables usées et neuves !
Retirez les piles / piles rechargeables, si vous
ne comptez pas utiliser le produit pendant
une période prolongée.
Risque d‘endommagement du produit
Exclusivement utiliser le type de pile / pile
rechargeable spécifié.
Insérez les piles / piles rechargeables confor-
mément à l‘indication de polarité (+) et (-) indiquée sur la pile / pile rechargeable et sur le
produit.
Nettoyez les contacts de la pile / pile rechar-
geable et du compartiment à pile avant
d‘insérer la pile !
Retirez immédiatement les piles / piles rechar-
geables usées du produit.
Avant la mise en service
Avant la mise en service, retirez le film de
protection de l‘écran
10
du produit et insérez
la pile fournie.
42 FR/BE

Mise en place /
remplacement de la pile
Si le symbole de la batterie s‘affiche à
10
l‘écran
vide et qu‘elle doit être remplacée. Les piles vides
risquent de fausser les résultats des mesures.
Pour le remplacement de la pile, veuillez procéder de la façon suivante:
Ouvrez le couvercle du compartiment à piles
Enlevez les bornes des piles.
Placez les contacts de la pile 9V sur les
Placez la pile dans le compartiment à piles et
, cela signifie que la pile est presque
13
situé au dos du produit. La bande en tissu
à l’intérieur du compartiment à piles
14
vous
permet de retirer plus facilement les piles
usées. Pour ce faire, tirez légèrement sur la
bande de tissu.
bornes. Vérifiez que la polarité est correcte.
Celle-ci dépend de la forme des contacts.
Veillez impérativement à ce que la bande de
tissu se trouve en dessous de la pile.
refermez le couvercle, jusqu’à ce qu’il s’enclenche de façon audible.
Mise en service
Mesurer des longueurs
Appuyez sur la touche ON / OFF 9 pour
allumer le produit. Si vous n‘appuyez sur
aucune touche pendant 60s, l‘écran
10
s‘éteint.
Pour éteindre le produit manuellement, main-
tenez la touche ON / OFF enfoncée pendant
43 FR/BE

3secondes, jusqu‘à ce que l‘écran s‘éteigne
et qu‘un signal sonore retentisse deux fois.
Appuyez sur la touche MODE 8 jusqu‘à ce
que le symbole de mesure des longueurs
«
» s‘affiche à l‘écran, ainsi que l‘indica-
tion de longueur 0.00 m (ou 0‘00‘‘).
Maintenez le plan de référence 6 du produit
au point de départ de votre mesure. Tenez le
produit de façon à ce que le plan de référence
soit orienté de façon parallèle à la surface
cible de la mesure.
Le cas échéant, utilisez la nivelle 7 pour ali-
gner le produit horizontalement. Si la surface
est bien alignée à l‘horizontale, la bulle d‘air
de la nivelle se trouve entre les deux marquages
.
Appuyez sur la touche READ 4. La diode la-
11
ser
projet un point lumineux sur la surface
du point final de la mesure. Ce point lumineux
vous aide à orienter correctement le produit.
Si la mesure est effectuée avec succès, la longueur mesurée s‘affiche dans la partie supérieure de l‘écran.
Évitez les erreurs de mesure
Afin d‘éviter les erreurs de mesure,
veuillez respecter les indications suivantes:
La mesure est effectuée par ultrasons, qui se
déplacent de façon conique à partir de
l‘émetteur d‘ultrasons
1
. L‘onde sonore est
répercutée par la surface cible et réceptionnée par le récepteur d‘ultrasons. À partir du
temps de parcours du signal, le produit calcule
la longueur à mesure (ill. B).
44 FR/BE

Afin de veiller à ce que les mesures
soient précises, les conditions suivantes
doivent être respectées (fig. B):
Le plan de référence (A) doit être parallèle à
la surface cible (B).
La distance à mesurer doit être comprise
entre 0,6 m et 16 m de long.
Il ne doit pas y avoir d‘objet susceptible de
réfléchir l‘onde sonore de façon prématurée
dans la zone d‘émission des ultrasons. La
zone d‘émission des ultrasons couvre une longueur de 16m et une largeur d‘environ 6m.
La surface cible doit présenter une surface
lisse, afin que l‘onde sonore puisse être réfléchie correctement.
Les surfaces transparentes comme le verre
reflètent généralement l‘onde sonore.
La pile ne doit pas être vide. Le symbole de
batterie
affiché à l‘écran 10 indique
que la pile est vide.
Si la mesure ne peut pas être effectuée de
façon indiscutable, l‘écran affiche le message
«Err». La mesure est ensuite renouvelée.
Si l‘écran gèle ou si le produit ne fonctionne pas
correctement, ouvrez le couvercle du compartiment à piles et retirez la pile du compartiment.
Ensuite, appuyez sur le bouton RESET avec
un objet pointu. L‘écran redémarre et reprend
son fonctionnement normal.
Remarque: Ne retirez pas la batterie tout
en appuyant sur le bouton RESET.
Ajouter des longueurs
Mesurez une longueur tel que décrit dans le
chapitre «Mesurer des longueurs». La valeur
45 FR/BE

de la longueur s‘affiche sur la ligne supérieure
de l‘écran
10
.
Appuyez alors sur la touche RECALL 5. La
valeur de la longueur est déplacée sur la
ligne inférieure. Cela signifie que la valeur a
été enregistrée dans la mémoire du compteur.
Le symbole «+» s‘affiche dans la partie supérieure de l‘écran. Le produit indique ainsi
qu‘il est prêt à effectuer une nouvelle mesure.
Appuyez sur la touche READ 4. La valeur
de la longueur mesurée alors s‘affiche dans
la partie supérieure de l‘écran.
Appuyez sur la touche RECALL. La valeur de
mesure est ensuite reprise dans la mémoire
du compteur et la somme des deux longueurs
mesurées s‘affiche dans la partie inférieure.
Si la mesure est erronée, n‘appuyez pas sur
la touche RECALL, mais à nouveau sur la
touche READ. La valeur de mesure affichée
dans la partie supérieure est écrasée. Appuyez sur la touche RECALL, pour reprendre
la valeur dans la mémoire du compteur.
Vous pouvez répéter cette opération tant que
la longueur ne dépasse pas 9999,99 m.
Mesurer des surfaces
Remarque: afin d‘éviter les erreurs de mesure
méthodiques, veuillez d‘abord prendre connaissance des indications concernant les mesures des
longueurs.
Appuyez sur la touche ON / OFF 9 pour
allumer le produit.
Appuyez sur la touche MODE 8 jusqu‘à ce
que le symbole de mesure des surfaces
46 FR/BE

« » s‘affiche à l‘écran 10 et que l‘indication
0.00m (ou 0‘00‘‘) apparaisse. Le symbole «
» de mesure des longueurs clignote. Le
produit indique ainsi qu‘il est prêt pour la
première mesure.
Alignez le produit et appuyez sur le bouton
READ 4. Si la mesure est effectuée avec succès
la longueur mesurée s‘affiche dans la partie
supérieure de l‘écran. En outre, le symbole de
mesure des largeurs «
» clignote. Le produit indique ainsi qu‘il est prêt pour mesurer
la largeur.
Alignez le produit et appuyez à nouveau sur
le bouton READ. Si la mesure est effectuée
avec succès, la largeur mesurée s‘affiche dans
la partie supérieure de l‘écran et la surface
est indiquée en m
²
(ou sq.ft. = mètres carré)
dans la partie inférieure.
Pour mesurer une nouvelle surface, appuyez
brièvement sur la touche MODE. L‘affichage
à l‘écran est réinitialisé et le produit est prêt
pour mesurer une nouvelle surface.
Mesurer des volumes
Remarque: afin d‘éviter les erreurs de mesure
méthodiques, veuillez d‘abord prendre connaissance des indications concernant les mesures des
longueurs.
Appuyez sur la touche ON / OFF 9 pour
allumer le produit.
Appuyez sur la touche MODE 8 jusqu‘à ce
que le symbole «
volumes s‘affiche à l‘écran
» pour la mesure des
10
et que l‘indication 0.00 m (ou 0‘00‘‘) apparaisse. Le symbole
«
» de mesure des longueurs clignote. Le
,
47 FR/BE

produit indique ainsi qu‘il est prêt pour la première mesure.
Alignez le produit et appuyez sur le bouton
4
READ
. Si la mesure est effectuée avec
succès, la longueur mesurée s‘affiche dans la
partie supérieure de l‘écran. En outre, le symbole de mesure des largeurs «
» clignote.
Le produit indique ainsi qu‘il est prêt pour
mesurer la largeur.
Alignez le produit et appuyez sur le bouton
READ. Si la mesure est effectuée avec succès,
la largeur mesurée s‘affiche dans la partie supérieure de l‘écran. En outre, le symbole de
mesure des hauteurs «
» clignote. Le produit indique ainsi qu‘il est prêt pour mesurer
la hauteur.
Alignez le produit et appuyez à nouveau sur
le bouton READ. Si la mesure est effectuée
avec succès, la hauteur mesurée s‘affiche dans
la partie supérieure de l‘écran et le volume
est indiqué en m
3
(ou cu.ft = mètres cube)
dans la partie inférieure.
Pour mesurer un nouveau volume, appuyez
brièvement sur la touche MODE. L‘affichage
à l‘écran est réinitialisé et le produit est prêt
pour mesurer un nouveau volume.
Additionner des surfaces
ou des volumes
Mesurez une surface ou un volume comme
décrit dans le chapitre «Mesurer des surfaces »
ou «Mesurer des volumes ». La valeur de la
surface / du volume s‘affiche sur la ligne
inférieure de l‘écran.
48 FR/BE

Appuyez sur la touche RECALL 5 pour enre-
gistrer le résultat de la mesure. Le symbole
M+ s‘affiche à l‘écran
10
, ce qui signale que
le résultat de mesure indiqué dans la partie
inférieure de l‘écran est enregistré dans le
produit.
Appuyez brièvement sur la touche MODE 8.
Le produit est alors prêt à mesurer la surface
suivante / le volume suivant.
Mesurez la surface suivante / le volume suivant,
de la même façon que vous avez effectué la
première mesure.
Appuyez ensuite à nouveau sur la touche
RECALL, afin de reprendre le nouveau résultat
dans la mémoire du compteur. Le résultat de
l‘addition est affiché sur la ligne inférieure de
l‘écran.
Si vous souhaitez ajouter d‘autres surfaces/
volumes, répétez les étapes 3 à 5.
Maintenez la touche MODE enfoncée
pendant 3secondes, pour quitter le mode
Addition.
Afficher la dernière
valeur de mesure
Après avoir mesuré une surface ou un
volume, appuyez à nouveau sur la touche
4
READ
pour afficher les valeurs de mesure
individuelles de la mesure.
Le symbole de la valeur de mesure corres-
pondante clignote et le résultat de la mesure
est affiché sur la ligne supérieure de l‘écran.
49 FR/BE

Affichage de la température
Maintenez la touche FT/M 3 enfoncée
pendant env. 3secondes. La température ambiante actuelle s‘affiche à l‘écran
10
en °C.
Pour passer l‘unité de température en °F,
appuyez brièvement sur la touche FT/M.
Appuyez brièvement sur la touche MODE 8,
pour quitter le mode Affichage de la température.
Modifier l‘unité de mesure
Appuyez sur la touche FT/M 3, pour passer
de l‘unité de mesure Mètre à l‘unité de
mesure Pied (Affichage pied‘ pouce‘‘).
Affichage de l‘usure
de la batterie
Si la batterie est faible, le symbole de batterie
s‘affiche à l‘écran
remplacez les piles dès que possible. Les piles
vides risquent de fausser les résultats des mesures.
La procédure de changement des piles est décrite
dans le chapitre «Mise en place/remplacement
de la pile».
10
. Si le symbole s‘affiche,
Arrêt/Mise hors service
automatique
Éteignez le produit en appuyant sur la touche
ON / OFF
50 FR/BE
9
pendant 3secondes.

Dépannage
Dysfonctionnement
Le produit ne réagit
pas. Les décharges
électrostatiques
peuvent occasionner
des dysfonctionne-
Cause possible et
solution
Ouvrez le compartiment
13
à piles
sur le bouton RESET
et appuyez
12
à l'aide d'un objet
pointu.
ments.
Nettoyage et entretien
Nettoyez uniquement l’extérieur du produit à
l’aide d’un chiffon doux et sec.
Mise au rebut
L’emballage se compose de matières
recyclables pouvant être mises au
rebut dans les déchetteries locales.
Le «point vert» n‘est pas valable en
Allemagne.
Veuillez respecter l‘identification des
b
matériaux d‘emballage pour le tri sé-
a
lectif, ils sont identifiés avec des abbréviations (a) et des chiffres (b) ayant la
signification suivante : 1–7 : plastiques /
20–22 : papiers et cartons / 80–98 :
matériaux composite.
51 FR/BE

Le produit et les matériaux d’emballage
sont recyclables, mettez-les au rebut séparément pour un meilleur traitement
des déchets. Le logo Triman n’est
valable qu’en France.
Votre mairie ou votre municipalité vous
renseigneront sur les possibilités de
mise au rebut des produits usagés.
Afin de contribuer à la protection de
l’environnement, veuillez ne pas jeter
votre produit usagé dans les ordures
ménagères, mais éliminez-le de manière
appropriée. Pour obtenir des renseignements concernant les points de collecte et leurs horaires d’ouverture, vous
pouvez contacter votre municipalité.
Les piles / piles rechargeables défectueuses ou
usagées doivent être recyclées conformément à
la directive 2006/66/CE et ses modifications.
Les piles et / ou piles rechargeables et / ou le produit doivent être retournés dans les centres de
collecte proposés.
Pollution de l’environnement
par la mise au rebut incorrecte
des piles / piles rechargeables !
Les piles / piles rechargeables ne doivent pas être
mises au rebut avec les ordures ménagères. Elles
peuvent contenir des métaux lourds toxiques et
doivent être considérées comme des déchets spéciaux. Les symboles chimiques des métaux lourds
sont les suivants : Cd = cadmium, Hg = mercure,
Pb = plomb. Pour cette raison, veuillez toujours
52 FR/BE

déposer les piles / piles rechargeables usagées
dans les conteneurs de recyclage communaux.
Garantie
Le produit a été fabriqué selon des critères de
qualité stricts et contrôlé consciencieusement avant
sa livraison. En cas de défaillance, vous êtes en
droit de retourner ce produit au vendeur. La présente garantie ne constitue pas une restriction de
vos droits légaux.
Ce produit bénéficie d‘une garantie de 3 ans à
compter de sa date d’achat. La durée de garantie
débute à la date d’achat. Veuillez conserver le
ticket de caisse original. Il fera office de preuve
d’achat.
Si un problème matériel ou de fabrication devait
survenir dans 3 ans suivant la date d‘achat de ce
produit, nous assurons à notre discrétion la réparation ou le remplacement du produit sans frais
supplémentaires. La garantie prend fin si le produit
est endommagé suite à une utilisation inappropriée
ou à un entretien défaillant.
La garantie couvre les vices matériels et de fabrication. Cette garantie ne s’étend ni aux pièces du
produit soumises à une usure normale (p. ex. des
piles) et qui, par conséquent, peuvent être considérées comme des pièces d’usure, ni aux dommages sur des composants fragiles, comme des
interrupteurs, des batteries ou des éléments fabriqués en verre.
53 FR/BE

Inleiding .........................................Pagina 55
Correct gebruik ................................. Pagina 55
Beschrijving van de onderdelen ....... Pagina 55
Technische gegevens ........................ Pagina 56
Omvang van de levering ..................Pagina 56
Algemene
veiligheidsinstructies ........... Pagina 56
Veiligheidsinstructies voor
batterijen / accu‘s .............................. Pagina 58
Vóór de ingebruikname ... Pagina 59
Batterij plaatsen / vervangen ............Pagina 59
Ingebruikname ........................Pagina 60
Lengte meten ..................................... Pagina 60
Meetfouten vermijden ....................... Pagina 61
Lengtes toevoegen ............................ Pagina 62
Oppervlakte meten ........................... Pagina 63
Volumes meten .................................. Pagina 64
Optellen van oppervlaktes resp.
volumes .............................................. Pagina 65
De laatste meetwaarden
weergeven ......................................... Pagina 66
Temperatuurweergave ...................... Pagina 66
Maateenheid wijzigen ...................... Pagina 66
Batterijweergave ............................... Pagina 66
Uitschakelen / automatisch
uitschakelen ....................................... Pagina 67
Storingen oplossen ............... Pagina 67
Reiniging en onderhoud ...Pagina 67
Afvoer .............................................. Pagina 67
Garantie ......................................... Pagina 69
54 NL/BE

Ultrasone afstandmeter
Inleiding
Hartelijk gefeliciteerd met de aankoop van uw
nieuwe product. U heeft voor een hoogwaardig
product gekozen. De gebruiksaanwijzing is een
deel van het product. Deze bevat belangrijke
aanwijzingen voor veiligheid, gebruik en verwijdering. Maakt U zich voor de ingebruikname van
het product met alle bedienings- en veiligheidsvoorschriften vertrouwd. Gebruik het apparaat
alleen zoals beschreven en voor de aangegeven
toepassingsgebieden. Overhandig alle documenten bij doorgifte van het product aan derden.
Correct gebruik
Dit product is bedoeld voor het meten van lengtes
en de berekening van oppervlaktes en volumes.
Bovendien beschikt het product over een temperatuurmeter. Het product is uitsluitend bestemd
voor privégebruik.
Beschrijving van de
onderdelen
1
Ultrasone zender / ontvanger
2
Temperatuursensor
3
FT/M-toets
4
READ-toets
5
RECALL-toets
6
Referentieoppervlakte
7
Libel
55 NL/BE

8
MODE-toets
9
ON / OFF -toets (AAN / UIT)
10
Display
11
Laserdiode
12
RESET-knop
13
Deksel voor batterijvak
14
Batterijvak
Technische gegevens
Voedingsspanning: max. 9 V
(gelijkstroom)
Batterij type: 6LR61 (9 V
blokbatterij)
Meetbereik: 0,6 m – 16 m
Meetnauwkeurigheid: +/- 1%
Weergave capaciteit: tot 9999,99
Golflengte laser: 635–660 nm, 1 mW
Laserklasse: 2
Ultrasone frequentie: 40 kHz
Meetbereik thermometer: –10 °C – +40 °C
(14 °F – 104 °F)
Omvang van de levering
1 Ultrasone afstandsmeter
1 9 V-Blokbatterij
1 Gebruiksaanwijzing
Algemene
veiligheidsinstructies
Maak u voor de ingebruikname van het product
vertrouwd met alle bedienings- en
56 NL/BE

veiligheidsvoorschriften! Geef alle documenten
mee wanneer u het product aan derden geeft!
Controleer het product voor de ingebruikname
op beschadigingen! Neem een beschadigd
product niet in gebruik!
Stel het product niet bloot aan vocht! Het kan
hierdoor worden beschadigd.
Dit product kan door kinderen vanaf 8 jaar
alsmede door personen met verminderde
fysieke, sensorische of mentale vaardigheden
of een gebrek aan ervaring en kennis worden
gebruikt, als zij onder toezicht staan of geïnstrueerd zijn met betrekking tot het veilige
gebruik van het product en zij de hieruit
voortvloeiende gevaren begrijpen. Kinderen
mogen niet met het product spelen. Reiniging
en onderhoud mogen niet door kinderen zonder toezicht worden uitgevoerd.
Gevaar door laserstraling
LASERSTRALING
NIET IN DE STRAAL KIJKEN
LASERKLASSE 2
635–660 nm
Het product bevat een klasse-2-laser. Richt de
laserstraal nooit op personen of dieren. Kijk
nooit direct in de straal. Een zwakke laserstraal
kan al tot oogletsel leiden.
Richt de laserstraal nooit op reflecterende
oppervlakken of materialen. Ook een gereflecteerde laserstraal kan zorgen voor schade
aan de ogen.
57 NL/BE

Veiligheidsinstructies
voor batterijen / accu‘s
LEVENSGEVAAR! Houd batter ijen / accu‘s
buiten het bereik van kinderen. Raadpleeg bij
inslikken onmiddellijk een arts!
EXPLOSIEGEVAAR! Laad niet
oplaadbare batterijen nooit op.
Sluit de batterijen / accu‘s niet kort
en / of open deze niet. Daardoor kan de
batterij oververhit raken, in brand vliegen of
exploderen.
Gooi batterijen / accu‘s nooit in het vuur of
water.
Stel batterijen / accu‘s nooit bloot aan
mechanische belastingen.
Risico dat de batterijen / accu’s lekken
Vermijd extreme omstandigheden en tempe-
raturen die invloed op de batterijen / accu‘s
zouden kunnen hebben bijv. radiatoren /
direct zonlicht.
Vermijd contact met huid, ogen en slijmvliezen!
Spoel in geval van contact met batterijzuur de
desbetreffende plekken direct af met voldoende
schoon water en raadpleeg onmiddellijk een
arts!
DRAAG VEILIGHEIDSHAND-
SCHOENEN! Lekkende of bescha-
digde batterijen / accu‘s kunnen in
geval van huidcontact chemische brandwonden veroorzaken. Draag daarom in dit geval
geschikte veiligheidshandschoenen.
Als de batterijen / accu‘s lekken, dient u deze
direct uit het product te halen om beschadigingen te vermijden.
58 NL/BE

Gebruik alleen batterijen / accu‘s van hetzelfde
type. Gebruik nooit nieuwe en oude batterijen /
accu‘s door elkaar!
Verwijder de batterijen / accu‘s, als u het
product gedurende een langere periode niet
gebruikt.
Risico op beschadiging van het product
Gebruik uitsluitend het aangegeven type
batterij / accu!
Plaats de batterijen / accu‘s volgens de weer-
gegeven polariteit (+) en (-) op batterij / accu
en op product.
Reinig de contacten van de batterij / accu en
die in het batterijvak, voordat u deze plaatst!
Verwijder verbruikte batterijen / accu‘s direct
uit het product.
Vóór de ingebruikname
Verwijder vóór de ingebruikname de bescherm-
folie van het display
10
van het product en
plaats de meegeleverde batterij.
Batterij plaatsen/vervangen
Als op het display 10 het batterijsymbool
verschijnt, is de geplaatste batterij bijna leeg en
moet deze worden vervangen. Lege batterijen
kunnen de meetresultaten negatief beïnvloeden.
Plaats de batterij op de volgende manier:
Open het deksel 13 van het batterijvak aan
de achterkant van het product. Met behulp
van de strip die zich aan de binnenkant van
59 NL/BE
het batterijvak 14 bevindt, kunt u de oude
batterij eenvoudiger uitnemen. Trek hiervoor
simpelweg aan de strip.
Verwijder de batterijclip van de batterij.
Plaats de contacten van de 9V-blokbatterij op
de batterijclip. Let hierbij op de juiste polariteit.
Deze wordt door de vorm van de contacten
bepaald. Let erop dat de stoffen strip zich
onder de batterij bevindt.
Plaats de batterij in het batterijvak en sluit het
deksel weer, zodanig dat deze hoorbaar
vastklikt.
Ingebruikname
Lengte meten
Druk op de ON- / OFF-toets 9 om het pro-
duct in te schakelen. Als u gedurende 60 sec.
geen toets indrukt, wordt het display
10
uit-
geschakeld.
Om het product handmatig uit te schakelen,
houdt u de ON- / OFF-toets 3 seconden lang
ingedrukt tot het display uit gaat en er een
dubbel geluidssignaal klinkt.
Druk zo vaak op de MODE-toets 8 tot het
display het symbool voor lengtemeting „
“
en de lengte 0.00 m (of 0‘00‘‘) weergeeft.
Houd het referentievlak 6 van het product
bij het beginpunt van uw meting. Houd het
product zodanig dat het referentievlak parallel loopt aan het te meten vlak.
Gebruik voor het horizontaal (waterpas) uitlij-
nen van het product eventueel de libel
7
.
De luchtbel van de libel bevindt zich bij het
60 NL/BE

waterpas uitlijnen tussen de beide markeringen.
.
Druk op de READ-toets 4. De laserdiode 11
projecteert een lichtpunt op het oppervlak
van het eindpunt van de meting. Dit lichtpunt
helpt u om het product correct uit te lijnen. Bij
een succesvolle meting wordt de gemeten
lengte in het display weergegeven.
Meetfouten vermijden
Om meetfouten te vermijden, moet u
letten op de volgende aanwijzingen:
De meting gebeurt door middel van ultrasoon
geluid dat conisch vanaf de ultrasone zender
1
beweegt. Vanaf de doelopervlakte wordt
het geluid teruggekaatst en door de ultrasone
ontvanger ontvangen. Op basis van de looptijd van het signaal berekent het product de
te meten lengte (afb. B).
Om een nauwkeurige meting te garanderen, moeten de volgende voorwaarden in acht worden genomen (afb. B).
De referentieoppervlakte (A) moet parallel
aan de doeloppervlakte (B) zijn.
De te meten afstand moet tussen de 0,6 m en
16 m lang zijn.
Binnen de geluidskegel mogen geen voor-
werpen liggen die het geluid vervroegd reflecteren. De geluidskegel heeft bij een lengte
van 16 m een breedte van ongeveer 6 m.
De doeloppervlakte moet glad zijn zodat het
geluid goed gereflecteerd kan worden.
Doorzichtige oppervlaktes zoals glas reflecte-
ren normaliter het geluid.
61 NL/BE

De batterij mag niet leeg zijn. Een lege
batterij wordt op het display
batterijsymbool
10
door het
weergegeven.
Als er geen duidelijke meting mogelijk is,
geeft het display de weergave ‚Err‘. De
meting moet dan worden herhaald.
Als het display vastloopt of het product niet
goed functioneert, opent u het deksel van het
batterijvak en haalt u de batterij uit het vak.
Druk dan op de RESET-knop met een puntig
voorwerp. Het display wordt opnieuw gestart
en functioneert weer normaal.
Opmerking: ontkoppel de batterij niet
terwijl u op de RESET-knop drukt.
Lengtes toevoegen
Meet een lengte zoals wordt beschreven in
het hoofdstuk ‚Lengte meten‘. De lengte verschijnt in de bovenste regel van het display
Druk nu op de RECALL-toets 5. De lengte
wordt nu overgedragen op de onderste regel.
Dat betekent dat deze is opgeslagen in de accumulator. Boven in het display verschijnt het
teken ‚+‘. Het product laat zo zien dat het
gereed is voor een nieuwe lengtemeting.
Druk op de READ-toets 4. De nu gemeten
lengte verschijnt boven in het display.
Druk op de RECALL-toets. De meetwaarden
wordt dan in de accumulator opgeslagen en
onderaan verschijnt de som van de beide gemeten lengtes. Mocht de meting een onjuiste
meting zijn, drukt dan niet op de RECALLtoets, maar opnieuw op de READ-toets. De
bovenaan weergegeven meetwaarde wordt
10
.
62 NL/BE

overschreven. Druk op de RECALL-toets om
de waarde in de accumulator over te nemen.
U kunt dit proces zo vaak herhalen als u wilt
zolang de lengte van 9999,99 m niet wordt
overschreden.
Oppervlakte meten
Opmerking: om methodische meetfouten te
vermijden, moet u ervoor zorgen dat u vertrouwd
raakt met de aanwijzingen voor de meting van
lengtes.
Druk op de ON- / OFF-toets 9 om het pro-
duct in te schakelen.
Druk zo vaak op de MODE-toets 8 tot op
het display
meting „
0‘00‘‘) verschijnt. Het symbool „
10
het symbool voor oppervlakte-
“ en de weergave 0.00 m (of
“ voor
lengtemeting knippert. Het product laat zo
zien dat het gereed is voor de eerste meting.
Richt het product en druk op de READ-toets
4
. Bij een succesvolle meting wordt bovenaan in het display de gemeten lengte weergegeven. Bovendien knippert het symbool
voor breedtemeting „
“. Het product laat
zo zien dat het gereed is voor het meten van
de breedte.
Richt het product en druk opnieuw op de
READ-toets. Bij een succesvolle meting verschijnt bovenaan in het display de gemeten
breedte en onderaan de oppervlakte in de
maateenheid m
2
(of sq.ft = vierkante voet).
Voor een nieuwe oppervlaktemeting drukt u
kort op de MODE-toets. De waardes op het
63 NL/BE

display worden gewist en het product is gereed voor een nieuwe oppervlaktemeting.
Volumes meten
Opmerking: om methodische meetfouten te
vermijden, kunt u zich het beste eerst vertrouwd
maken met de aanwijzingen voor het meten van
lengtes.
Druk op de ON- / OFF-toets 9 om het pro-
duct in te schakelen.
Druk zo vaak op de MODE-toets 8 tot op
het display
10
het symbool „ “ voor volumemeting en de weergave 0.00 m (of 0‘00‘‘)
verschijnt. Het symbool „
“ voor lengtemeting knippert. Het product laat zo zien dat het
gereed is voor de eerste meting.
Richt het product en druk op de READ-toets 4.
Bij een succesvolle meting wordt bovenaan in
het display de gemeten lengte weergegeven.
Bovendien knippert het symbool voor breedtemeting „
“. Het product laat zo zien dat
het gereed is voor het meten van de breedte.
Richt het product en druk op de READ-toets.
Bij een succesvolle meting wordt bovenaan in
het display de gemeten breedte weergegeven.
Bovendien knippert het symbool voor hoogtemeting „
“. Het product laat zo zien dat
het gereed is voor het meten van de hoogte.
Richt het product en druk opnieuw op de
READ-toets. Bij een succesvolle meting verschijnt bovenaan in het display de gemeten
hoogte en onderaan het volume in de maateenheid m
3
(of cu.ft = kubieke voet).
Voor een nieuwe volumemeting drukt u kort
op de MODE-toets. De waardes op het
64 NL/BE

display worden gewist en het product is gereed voor een nieuwe volumemeting.
Optellen van oppervlaktes
resp. volumes
Meet een oppervlakte resp. een volume
zoals wordt beschreven in het hoofdstuk
‚Oppervlakte meten‘ resp. ‚Volume meten‘.
De oppervlakte/het volume verschijnt in de
onderste regel van het display.
Druk op de RECALL-toets 5 om de gemeten
waarde op te slaan. Op het display
schijnt het symbool M+ wat aangeeft dat het
onderaan in het display weergegeven
meetresultaat is opgeslagen in het product.
Druk kort op de MODE-toets 8. Het product
is nu gereed voor het meten van de volgende
oppervlaktes / volumes.
Meet de volgende oppervlakte / het volgende
volume zoals u dit bij de eerste meting hebt
gedaan.
Druk opnieuw op de RECALL-toets om ook
het nieuwe resultaat over te nemen in de
accumulator. Het resultaat van de toevoeging
wordt weergegeven in de onderste regel van
het display.
Als u verdere oppervlaktes/volumes wilt
toevoegen, herhaalt u stap 3 tot 5.
Houd de MODE-toets gedurende drie secon-
den ingedrukt om de optelmodus te verlaten.
10
ver-
65 NL/BE

De laatste meetwaarden
weergeven
Druk na de meting van een oppervlakte of
een volume nogmaals op de READ-toets
om de aparte meetwaarden van de meting
weer te geven.
Het symbool van de desbetreffende meetwaarde
knippert en het meetresultaat wordt weergegeven in de bovenste regel op het display.
Temperatuurweergave
Houd de FT/M-toets 3 gedurende ca. drie
seconden ingedrukt. Op het display
wordt de huidige kamertemperatuur in de officiële temperatuureenheid °C weergegeven.
Om over te schakelen naar de tempera-
tuureenheid °F drukt u kort op de FT/M-toets.
Druk kort op de MODE-toets 8 om de
temperatuurweergavemodus te verlaten.
Maateenheid wijzigen
Druk op de FT/M-toets 3 om van de officiële
maateenheid meter over te schakelen naar
de maateenheid voet (weergave voet ‚inch‘).
10
4
Batterijweergave
Bij een zwakke batterijtoestand verschijnt in het
10
display
het batterijsymbool . Vervang de
batterij bij het verschijnen van dit symbool zo snel
mogelijk. Lege batterijen kunnen het meetresultaat
66 NL/BE

negatief beïnvloeden. Het vervangen van de batterij wordt beschreven in het hoofdstuk ‚Batterij
plaatsen/vervangen‘.
Uitschakelen / automatisch
uitschakelen
Schakel het product uit door 3 seconden lang
op de ON- / OFF-toets
9
te drukken.
Storingen oplossen
Storing Mogelijke oorzaak
en oplossing
Het product reageert
niet. Elektrostatische
ontladingen kunnen
tot functionele storingen leiden.
Reiniging en onderhoud
Reinig het product alleen aan de buitenzijde
met een zachte, droge doek.
Open het batterijvak
en druk op de RESET-
12
knop
met een puntig
voorwerp.
13
Afvoer
De verpakking bestaat uit milieuvriendelijke grondstoffen die u via de
plaatselijke recyclingcontainers kunt
afvoeren. De Grüne Punkt geldt niet
voor Duitsland.
67 NL/BE

Neem de aanduiding van de verpak-
b
kingsmaterialen voor de afvalscheiding
a
in acht. Deze zijn gemarkeerd met de
afkortingen (a) en een cijfers (b) met
de volgende betekenis: 1–7: kunststoffen / 20–22: papier en vezelplaten /
80–98: composietmaterialen.
Het product en de verpakkingsmaterialen
zijn recyclebaar; verwijder deze afzonderlijk voor een betere afvalbehandeling. Het Triman-logo geldt alleen voor
Frankrijk.
Informatie over de mogelijkheden om
het uitgediende product na gebruik te
verwijderen, verstrekt uw gemeentelijke
overheid.
Gooi het afgedankte product omwille
van het milieu niet weg via het huisvuil,
maar geef het af bij het daarvoor bestemde depot of het gemeentelijke milieupark. Over afgifteplaatsen en hun
openingstijden kunt u zich bij uw aangewezen instantie informeren.
Defecte of verbruikte batterijen / accu‘s moeten
volgens de richtlijn 2006/66/EG en veranderingen daarop worden gerecycled. Geef batterijen /
accu‘s en / of het product af bij de daarvoor bestemde verzamelstations.
Milieuschade door foutieve
verwijdering van de batterijen /
accu‘s!
68 NL/BE

Batterijen / accu‘s mogen niet via het huisvuil
worden weggegooid. Ze kunnen giftige zware
metalen bevatten en vallen onder het chemisch
afval. De chemische symbolen van de zware metalen zijn: Cd = cadmium, Hg = kwik, Pb = lood.
Geef verbruikte batterijen / accu‘s daarom af bij
een gemeentelijk inzamelpunt.
Garantie
Het product wordt volgens strenge kwaliteitsrichtlijnen zorgvuldig geproduceerd en voor levering
grondig getest. In geval van schade aan het product kunt u rechtmatig beroep doen op de verkoper
van het product. Deze wettelijke rechten worden
door onze hierna vermelde garantie niet beperkt.
Op dit product verlenen wij 3 jaar garantie vanaf
aankoopdatum. De garantieperiode start op de
dag van aankoop. Bewaar de originele kassabon
alstublieft. Dit document is nodig als bewijs voor
aankoop.
Wanneer binnen 3 jaar na de aankoopdatum
van dit product een materiaal- of productiefout
optreedt, dan wordt het product door ons – naar
onze keuze – gratis voor u gerepareerd of vervangen. Deze garantie komt te vervallen als het
product beschadigd wordt, niet correct gebruikt
of onderhouden wordt.
De garantie geldt voor materiaal- en productiefouten. Deze garantie is niet van toepassing op
productonderdelen, die onderhevig zijn aan normale slijtage en hierdoor als aan slijtage onderhevige onderdelen gelden (bijv. batterijen) of
69 NL/BE

voor beschadigingen aan breekbare onderdelen,
zoals bijv. schakelaars, accu’s of dergelijke onderdelen, die gemaakt zijn van glas.
70 NL/BE

Einleitung ...........................................Seite 72
Bestimmungsgemäße Verwendung ......Seite 72
Teilebeschreibung .................................Seite 72
Technische Daten ..................................Seite 73
Lieferumfang ..........................................Seite 73
Allgemeine
Sicherheitshinweise ..................Seite 73
Sicherheitshinweise für Batterien /
Akkus......................................................Seite 75
Vor der Inbetriebnahme ......Seite 76
Batterie einlegen / wechseln .................Seite 76
Inbetriebnahme ...........................Seite 77
Länge messen ........................................Seite 77
Messfehler vermeiden ...........................Seite 78
Längen addieren ...................................Seite 79
Fläche messen .......................................Seite 80
Volumen messen....................................Seite 81
Flächen bzw. Volumina addieren ........Seite 82
Die letzten Messwerte anzeigen ..........Seite 83
Temperaturanzeige ...............................Seite 83
Maßeinheit wechseln ............................Seite 83
Batterieanzeige .....................................Seite 84
Ausschalten / Automatisches
Abschalten .............................................Seite 84
Fehlerbehebung ..........................Seite 84
Reinigung und Pflege ..............Seite 84
Entsorgung .......................................Seite 85
Garantie .............................................Seite 86
71 DE/AT/CH

Ultraschall-Entfernungsmesser
Einleitung
Wir beglückwünschen Sie zum Kauf Ihres neuen
Produkts. Sie haben sich damit für ein hochwertiges
Produkt entschieden. Die Bedienungsanleitung ist
Teil dieses Produkts. Sie enthält wichtige Hinweise
für Sicherheit, Gebrauch und Entsorgung. Machen
Sie sich vor der Benutzung des Produkts mit allen
Bedien- und Sicherheitshinweisen vertraut. Benutzen
Sie das Produkt nur wie beschrieben und für die
angegebenen Einsatzbereiche. Händigen Sie alle
Unterlagen bei Weitergabe des Produkts an Dritte
mit aus.
Bestimmungsgemäße
Verwendung
Dieses Produkt ist zur Messung von Längen sowie
zur Berechnung von Flächen und Volumina vorgesehen. Zusätzlich verfügt das Produkt über eine
Temperaturmessung. Das Produkt ist ausschließlich
zur privaten Verwendung vorgesehen.
Teilebeschreibung
1
Ultraschallsender / –empfänger
2
Temperatursensor
3
FT/M-Taste
4
READ-Taste
5
RECALL-Taste
6
Referenzfläche
7
Libelle
72 DE/AT/CH

8
MODE-Taste
9
ON / OFF -Taste (EIN / AUS)
10
Display
11
Laserdiode
12
RESET-Taste
13
Batteriefachdeckel
14
Batteriefach
Technische Daten
Betriebsspannung: max. 9 V
(Gleichstrom)
Batterietyp: 6LR61
(9 V Blockbatterie)
Messbereich: 0,6 m–16 m
Messgenauigkeit: +/- 1%
Anzeige Kapazität: bis 9999,99
Wellenlänge Laser: 635–660 nm, 1 mW
Laser-Klasse: 2
Ultraschall-Frequenz: 40 kHz
Messbereich Thermometer: –10 °C–+40 °C
(14 °F–104 °F)
Lieferumfang
1 Ultraschall-Entfernungsmesser
1 9 V-Blockbatterie
1 Bedienungsanleitung
Allgemeine
Sicherheitshinweise
Machen Sie sich vor der ersten Benutzung des
Produkts mit allen Bedien- und Sicherheitshinweisen
73 DE/AT/CH
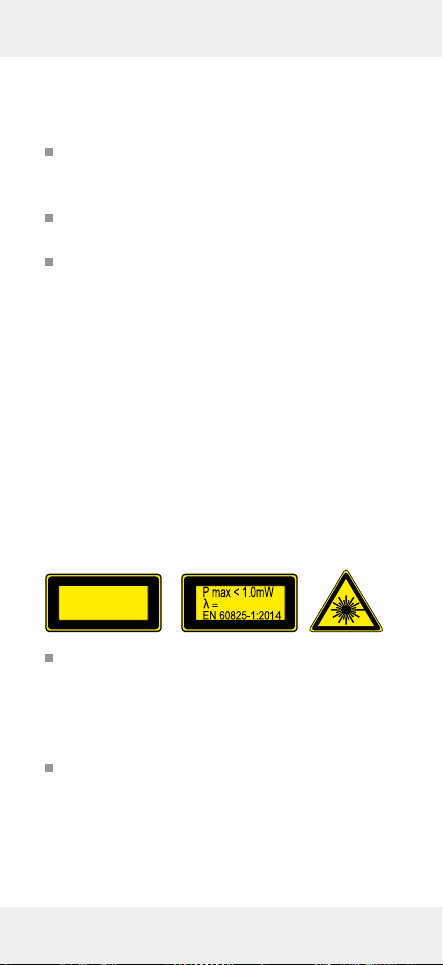
vertraut! Händigen Sie alle Unterlagen bei Weitergabe des Produkts an Dritte ebenfalls mit aus!
Kontrollieren Sie das Produkt vor der Inbe-
triebnahme auf Beschädigungen! Nehmen
Sie ein beschädigtes Produkt nicht in Betrieb!
Setzen Sie das Produkt keiner Feuchtigkeit
aus! Es kann hierdurch beschädigt werden.
Dieses Produkt kann von Kindern ab 8 Jahren
und darüber sowie von Personen mit verringerten physischen, sensorischen oder mentalen
Fähigkeiten oder Mangel an Erfahrung und
Wissen benutzt werden, wenn sie beaufsichtigt
oder bezüglich des sicheren Gebrauchs des
Produkts unterwiesen wurden und die daraus
resultierenden Gefahren verstehen. Kinder
dürfen nicht mit dem Produkt spielen. Reinigung und Benutzerwartung dürfen nicht von
Kindern ohne Beaufsichtigung durchgeführt
werden.
Gefahr durch Laserstrahlung
LASERSTRAHLUNG
NICHT IN DEN STRAHL BLICKEN
LASER KLASSE 2
635–660 nm
Das Produkt enthält einen Klasse-2-Laser. Rich-
ten Sie den Laserstrahl niemals auf Personen
oder Tiere. Blicken Sie nie direkt in den Strahl.
Bereits ein schwacher Laserstrahl kann zu Augenschäden führen.
Richten Sie den Laserstrahl niemals auf reflek-
tierende Flächen oder Materialien. Auch ein
reflektierter Laserstrahl kann Augenschäden
hervorrufen.
74 DE/AT/CH

Sicherheitshinweise für
Batterien / Akkus
LEBENSGEFAHR! Halten Sie Batterien /
Akkus außer Reichweite von Kindern. Suchen
Sie im Falle eines Verschluckens sofort einen
Arzt auf!
EXPLOSIONSGEFAHR! Laden
Sie nicht aufladbare Batterien nie-
mals wieder auf. Schließen Sie
Batterien / Akkus nicht kurz und / oder öffnen
Sie diese nicht. Überhitzung, Brandgefahr
oder Platzen können die Folge sein.
Werfen Sie Batterien / Akkus niemals in Feuer
oder Wasser.
Setzen Sie Batterien / Akkus keiner mecha-
nischen Belastung aus.
Risiko des Auslaufens von Batterien /
Akkus
Vermeiden Sie extreme Bedingungen und
Temperaturen, die auf Batterien / Akkus einwirken können, z. B. auf Heizkörpern / direkte
Sonneneinstrahlung.
Vermeiden Sie den Kontakt mit Haut, Augen
und Schleimhäuten! Spülen Sie bei Kontakt
mit Batteriesäure die betroffenen Stellen
sofort mit klarem Wasser und suchen Sie
umgehend einen Arzt auf!
SCHUTZHANDSCHUHE
TRAGEN! Ausgelaufene oder be-
schädigte Batterien / Akkus können
bei Berührung mit der Haut Verätzungen verursachen. Tragen Sie deshalb in diesem Fall
geeignete Schutzhandschuhe.
75 DE/AT/CH

Im Falle eines Auslaufens der Batterien /
Akkus entfernen Sie diese sofort aus dem
Produkt, um Beschädigungen zu vermeiden.
Verwenden Sie nur Batterien / Akkus des
gleichen Typs. Mischen Sie nicht alte Batterien / Akkus mit neuen!
Entfernen Sie die Batterien / Akkus, wenn das
Produkt längere Zeit nicht verwendet wird.
Risiko der Beschädigung des Produkts
Verwenden Sie ausschließlich den angege-
benen Batterietyp / Akkutyp!
Setzen Sie Batterien / Akkus gemäß der
Polaritätskennzeichnung (+) und (-) an
Batterie / Akku und des Produkts ein.
Reinigen Sie Kontakte an Batterie / Akku und
im Batteriefach vor dem Einlegen mit einem
weichen Tuch!
Entfernen Sie erschöpfte Batterien / Akkus
umgehend aus dem Produkt.
Vor der Inbetriebnahme
Entfernen Sie vor der Inbetriebnahme die
Schutzfolie vom Display
10
des Produkts und
legen Sie die beiliegende Batterie ein.
Batterie einlegen / wechseln
Wenn im Display 10 das Batteriesymbol
erscheint, ist die eingelegte Batterie nahezu erschöpft und muss ausgetauscht werden. Leere
Batterien können das Messergebnis verfälschen.
76 DE/AT/CH

Gehen Sie zum Einlegen der Batterie
wie folgt vor:
Öffnen Sie den Batteriefachdeckel 13 auf der
Rückseite des Produkts. Mit Hilfe des Stoffstreifens, der sich im Inneren des Batteriefachs
befindet, können Sie die alte Batterie leichter
herausnehmen. Ziehen Sie hierzu lediglich
am Stoffstreifen.
Entfernen Sie die Batterieklemme von der
Batterie.
Stecken Sie die Kontakte der 9 V-Blockbatterie
auf die Batterieklemme. Achten Sie hierbei
auf die richtige Polarität. Diese ist durch die
Profilform der Kontakte vorgegeben. Achten
Sie unbedingt auch darauf, dass der Stoffstreifen sich unterhalb der Batterie befindet.
Legen Sie die Batterie in das Batteriefach und
schließen Sie den Deckel wieder, so dass er
hörbar einrastet.
Inbetriebnahme
Länge messen
Drücken Sie die ON / OFF-Taste 9, um das
Produkt einzuschalten. Drücken Sie 60 s lang
keine Taste, schaltet sich das Display
10
ab.
Um das Produkt manuell auszuschalten, hal-
ten Sie die ON / OFF-Taste 3 Sekunden lang
gedrückt, bis das Display erlischt und ein
doppeltes Tonsignal ertönt.
Drücken Sie die MODE-Taste 8 so oft, bis
das Display das Symbol für Längenmessung
„
“ sowie die Längenangabe 0.00 m (bzw.
0‘00‘‘) zeigt.
14
77 DE/AT/CH

Halten Sie die Referenzfläche 6 des Produkts
an den Anfangspunkt Ihrer Messung. Halten
Sie das Produkt so, dass die Referenzfläche
parallel zur Zielfläche der Messung ausgerichtet ist.
Verwenden Sie zur waagerechten Ausrichtung
des Produkts ggf. die Libelle
7
. Die Luftblase
der Libelle befindet sich bei waagerechter Ausrichtung zwischen den beiden Markierungen
.
Drücken Sie die READ-Taste 4. Die Laserdi-
11
ode
projiziert einen Leuchtpunkt auf die
Fläche des Endpunkts der Messung. Dieser
Leuchtpunkt hilft Ihnen, das Produkt korrekt
auszurichten. Nach erfolgreicher Messung wird
die gemessene Länge im Display angezeigt.
Messfehler vermeiden
Um Messfehler zu vermeiden, beachten
Sie die folgenden Hinweise:
Die Messung erfolgt mit Ultraschall, der sich
kegelförmig vom Ultraschallsender
1
fortbewegt. Von der Zielfläche wird der Schall zurückgeworfen und vom Ultraschallempfänger
empfangen. Aus der Laufzeit des Signals berechnet das Produkt die zu messende Länge
(Abb. B).
Um eine genaue Messung zu gewährleisten, sind folgende Bedingungen
einzuhalten (Abb. B):
Die Referenzfläche (A) muss parallel zur
Zielfläche (B) sein.
Die zu messende Strecke muss zwischen
0,6 m und 16 m lang sein.
78 DE/AT/CH

Im Schallkegel dürfen sich keine Gegenstände
befinden, die den Schall verfrüht reflektieren.
Der Schallkegel hat bei einer Länge von 16 m
eine Breite von etwa 6 m.
Die Zielfläche muss eine glatte Oberfläche
haben, damit der Schall gut reflektiert werden
kann.
Durchsichtige Flächen wie Glas reflektieren in
der Regel den Schall.
Die Batterie darf nicht leer sein. Eine leere
Batterie wird im Display
riesymbol
angezeigt.
10
durch das Batte-
Wenn eine eindeutige Messung nicht möglich
ist, zeigt das Display die Angabe „Err“. Die
Messung muss dann wiederholt werden.
Wenn das Display einfriert oder das Produkt
nicht richtig funktioniert, öffnen Sie den Batteriefachdeckel und entnehmen Sie die Batterie
aus dem Batteriefach. Drücken Sie dann die
RESET-Taste mit einem spitzen Gegenstand.
Das Display wird neu gestartet und nimmt
wieder den normalen Betrieb auf.
Hinweis: Entehmen Sie die Batterie nicht,
während Sie die RESET-Taste drücken.
Längen addieren
Messen Sie eine Länge wie im Kapitel „Länge
messen“ beschrieben. Der Betrag der Länge
erscheint in der oberen Zeile des Displays
10
Drücken Sie nun die RECALL-Taste 5. Der
Betrag der Länge wird auf die untere Zeile
übertragen. Das bedeutet, dass er im Summenspeicher abgelegt worden ist.
Oben im Display erscheint das Zeichen „+“.
79 DE/AT/CH
.

Das Produkt zeigt so an, dass es für eine
neue Längenmessung bereit ist.
Drücken Sie die READ-Taste 4. Der Betrag
der nun gemessenen Länge erscheint oben im
Display.
Drücken Sie die RECALL-Taste. Der Messwert
wird dann in den Summenspeicher übernommen und unten erscheint die Summe der beiden gemessenen Längen. Sollte die Messung
eine Fehlmessung sein, drücken Sie nicht die
RECALL-Taste, sondern erneut die READ-Taste.
Der oben angezeigte Messwert wird überschrieben. Drücken Sie die RECALL-Taste, um
den Wert in den Summenspeicher zu übernehmen.
Sie können diesen Vorgang beliebig oft wie-
derholen, solange die Länge von 9999,99 m
nicht überschritten wird.
Fläche messen
Hinweis: Um methodische Messfehler zu ver-
meiden, machen Sie sich bitte zunächst mit den
Hinweisen zur Messung von Längen vertraut.
Drücken Sie die ON / OFF-Taste 9, um das
Produkt einzuschalten.
Drücken Sie die MODE-Taste 8 so oft, bis
im Display
sung „
0‘00‘‘) erscheint. Das Symbol „
10
das Symbol für Flächenmes-
“sowie die Anzeige 0.00 m (bzw.
“ für Längenmessung blinkt. Das Produkt zeigt so an,
dass es für die erste Messung bereit ist.
Richten Sie das Produkt aus und drücken Sie
die READ-Taste
4
. Bei erfolgreicher Messung
wird oben im Display die gemessene Länge
80 DE/AT/CH

angezeigt. Außerdem blinkt das Symbol für
Breitenmessung „
“. Das Produkt zeigt so
an, dass es für die Messung der Breite bereit ist.
Richten Sie das Produkt aus und drücken Sie
erneut die READ-Taste. Bei erfolgreicher Messung erscheint oben im Display die gemessene
Breite und unten die Fläche in der Maßeinheit
2
m
(bzw. sq.ft = Quadratfuß).
Für eine erneute Flächenmessung drücken Sie
kurz die MODE-Taste. Die Anzeigen im Display
werden zurückgesetzt und das Produkt ist bereit für eine neue Fächenmessung.
Volumen messen
Hinweis: Um methodische Messfehler zu ver-
meiden, machen Sie sich bitte zunächst mit den
Hinweisen zur Messung von Längen vertraut.
Drücken Sie die ON / OFF-Taste 9, um das
Produkt einzuschalten.
Drücken Sie die MODE-Taste 8 so oft, bis
im Display
10
das Symbol „ “ für Volumenmessung sowie die Anzeige 0.00 m (bzw.
0‘00‘‘) erscheint. Das Symbol „
“ für Längenmessung blinkt. Das Produkt zeigt so an,
dass es für die erste Messung bereit ist.
Richten Sie das Produkt aus und drücken Sie
die READ-Taste
4
. Bei erfolgreicher Messung
wird oben im Display die gemessene Länge
angezeigt. Außerdem blinkt das Symbol für
Breitenmessung „
“. Das Produkt zeigt so
an, dass es zur Messung der Breite bereit ist.
Richten Sie das Produkt aus und drücken Sie
die READ-Taste. Bei erfolgreicher Messung
wird oben im Display die gemessene Breite
angezeigt. Außerdem blinkt das Symbol für
81 DE/AT/CH

Höhenmessung „ “. Das Produkt zeigt so
an, dass es zur Messung der Höhe bereit ist.
Richten Sie das Produkt aus und drücken Sie
erneut die READ-Taste. Bei erfolgreicher
Messung erscheint oben im Display die
gemessene Höhe und unten das Volumen in
der Maßeinheit m
3
(bzw. cu.ft = Kubikfuß).
Für eine erneute Volumenmessung drücken
Sie kurz die MODE-Taste. Die Anzeigen im
Display werden zurückgesetzt und das Produkt
ist bereit für eine neue Volumenmessung.
Flächen bzw. Volumina
addieren
Messen Sie eine Fläche bzw. ein Volumen wie
im Kapitel „Fläche messen“ bzw. „Volumen
messen“ beschrieben. Der Betrag der Fläche /
des Volumens erscheint in der unteren Zeile
des Displays.
Drücken Sie die RECALL-Taste 5, um das
Messergebnis zu speichern. Im Display
erscheint das Symbol M+ und zeigt an, dass
das unten im Display angezeigte Messergebnis im Produkt gespeichert ist.
Drücken Sie kurz die MODE-Taste 8. Das
Produkt ist nun bereit zur Messung der nächsten Fläche / des nächsten Volumens.
Messen Sie die nächste Fläche / das nächste
Volumen so, wie Sie die erste Messung vorgenommen haben.
Drücken Sie nun erneut die RECALL-Taste, um
auch das neue Ergebnis in den Summenspeicher aufzunehmen. Das Ergebnis der Addition
wird in der unteren Zeile des Displays angezeigt.
10
82 DE/AT/CH

Wenn Sie weitere Flächen /Volumina hinzufü-
gen möchten, wiederholen Sie die Schritte 3
bis 5.
Halten Sie die MODE-Taste 3 Sekunden ge-
drückt, um den Additionsmodus zu verlassen.
Die letzten Messwerte
anzeigen
Drücken Sie nach der Messung einer Fläche
oder eines Volumens wiederholt die READ-
4
Taste
, um die einzelnen Messwerte der
Messung anzuzeigen.
Das Symbol des entsprechenden Messwertes
blinkt und das Messergebnis wird in der
oberen Zeile des Displays angezeigt.
Temperaturanzeige
Halten Sie die FT/M-Taste 3 für ca. 3 Sekun-
den gedrückt. Im Display
Raumtemperatur in der amtlichen Temperatureinheit °C angezeigt.
Um in die Temperatureinheit °F umzuschalten,
drücken Sie kurz die FT/M-Taste.
Drücken Sie kurz die MODE-Taste 8, um
den Temperaturanzeigemodus zu verlassen.
10
wird die aktuelle
Maßeinheit wechseln
Drücken Sie die FT/M-Taste 3, um von der
amtlichen Maßeinheit Meter auf die Maßeinheit Fuß (Anzeige Fuß‘ Zoll‘‘) umzuschalten.
83 DE/AT/CH

Batterieanzeige
Bei niedrigem Batterieladezustand erscheint im
10
Display
das Batteriesymbol . Tauschen
Sie bei Erscheinen dieses Symbols schnellstmöglich die Batterie aus. Leere Batterien können das
Messergebnis verfälschen. Der Batteriewechsel
wird im Kapitel „Batterie einlegen / wechseln“
beschrieben.
Ausschalten / Automatisches
Abschalten
Schalten Sie das Produkt aus, indem Sie die
ON/OFF-Taste
9
3 Sekunden lang
gedrückt halten.
Fehlerbehebung
Fehler Mögliche Ursache
und Lösung
Das Produkt reagiert
nicht. Elektrostatische
Entladungen können
zu Funktionsstörungen führen.
Öffnen Sie das Batterie-
13
fach
, Und drücken
Sie die RESET-Taste
12
mit einem spitzen Gegenstand.
Reinigung und Pflege
Reinigen Sie das Produkt nur äußerlich mit
einem weichen trockenen Tuch.
84 DE/AT/CH

Entsorgung
Die Verpackung besteht aus umweltfreundlichen Materialien, die Sie über
die örtlichen Recyclingstellen entsorgen können. Der Grüne Punkt gilt nicht
für Deutschland.
Beachten Sie die Kennzeichnung der
b
Verpackungsmaterialien bei der Abfall-
a
trennung, diese sind gekennzeichnet
mit Abkürzungen (a) und Nummern
(b) mit folgender Bedeutung: 1–7:
Kunststoffe / 20–22: Papier und
Pappe / 80–98: Verbundstoffe.
Das Produkt und die Verpackungsmaterialien sind recycelbar, entsorgen Sie
diese getrennt für eine bessere Abfallbehandlung. Das Triman-Logo gilt nur
für Frankreich.
Möglichkeiten zur Entsorgung des ausg
edienten Produkts erfahren Sie bei Ihre
Gemeinde- oder Stadtverwaltung.
Werfen Sie Ihr Produkt, wenn es ausgedient hat, im Interesse des Umweltschutzes nicht in den Hausmüll, sondern
führen Sie es einer fachgerechten Entsorgung zu. Über Sammelstellen und
deren Öffnungszeiten können Sie sich
bei Ihrer zuständigen Verwaltung informieren.
r
85 DE/AT/CH

Defekte oder verbrauchte Batterien / Akkus müssen
gemäß Richtlinie 2006/66/EG und deren Änderungen recycelt werden. Geben Sie Batterien /
Akkus und / oder das Produkt über die angebotenen
Sammeleinrichtungen zurück.
Umweltschäden durch falsche
Entsorgung der Batterien / Akkus!
Batterien / Akkus dürfen nicht über den Hausmüll
entsorgt werden. Sie können giftige Schwermetalle
enthalten und unterliegen der Sondermüllbehandlung. Die chemischen Symbole der Schwermetalle
sind wie folgt: Cd = Cadmium, Hg = Quecksilber,
Pb = Blei. Geben Sie deshalb verbrauchte Batterien /
Akkus bei einer kommunalen Sammelstelle ab.
Garantie
Das Produkt wurde nach strengen Qualitätsrichtlinien
sorgfältig produziert und vor Anlieferung gewissenhaft geprüft. Im Falle von Mängeln dieses Produkts
stehen Ihnen gegen den Verkäufer des Produkts
gesetzliche Rechte zu. Diese gesetzlichen Rechte
werden durch unsere im Folgenden dargestellte
Garantie nicht eingeschränkt.
Sie erhalten auf dieses Produkt 3 Jahre Garantie
ab Kaufdatum. Die Garantiefrist beginnt mit dem
Kaufdatum. Bitte bewahren Sie den Original-Kassenbon gut auf. Diese Unterlage wird als Nachweis
für den Kauf benötigt.
Tritt innerhalb von 3 Jahren ab dem Kaufdatum
dieses Produkts ein Material- oder Fabrikationsfehler auf, wird das Produkt von uns – nach
86 DE/AT/CH

unserer Wahl – für Sie kostenlos repariert oder
ersetzt. Diese Garantie verfällt, wenn das Produkt
beschädigt, nicht sachgemäß benutzt oder gewartet
wurde.
Die Garantieleistung gilt für Material- oder Fabrikationsfehler. Diese Garantie erstreckt sich nicht auf
Produktteile, die normaler Abnutzung ausgesetzt
sind (z. B. Batterien) und daher als Verschleißteile
angesehen werden können, oder für Beschädigungen an zerbrechlichen Teilen, z. B. Schalter,
Akkus oder die aus Glas gefertigt sind.
87 DE/AT/CH

OWIM GmbH & Co. KG
Stiftsbergstraße 1
DE-74167 Neckarsulm
GERMANY
Model-No.: HG03064A
Version: 09 / 2017
Last Information Update · Tilstand af
information · Version des informations
Stand van de informatie · Stand
der Informationen: 09 / 2017
Ident.-No.: HG03064A092017-6
IAN 288019
 Loading...