

DIGITAL CALLIPER
DIGITAL CALLIPER
Operation and Safety Notes
DIGITALNO POMIČNO MJERILO
Upute za posluživanje i za Vašu sigurnost
ŞUBLER CU AFIȘAJ DIGITAL
Instrucţiuni de utilizare şi de siguranţă
ДИГИТАЛЕН ШУБЛЕР
Инструкции за обслужване и безопасност
ΨΗΦΙΑΚΌ ΠΑΧΎΜΕΤΡΌ
Υποδείξεις χειρισμού και ασφαλείας
DIGITALER MESSSCHIEBER
Bedienungs- und Sicherheitshinweise
IAN 280231
GB / CY Operation and Safety Notes Page 5
HR Upute za posluživanje i za Vašu sigurnost Stranica 14
RO Instrucţiuni de utilizare şi de siguranţă Pagina 23
BG Инструкции за обслужване и безопасност страница 32
GR / CY Υποδείξεις χειρισμού και ασφαλείας Σελίδα 42
DE / AT / CH Bedienungs- und Sicherheitshinweise Seite 52
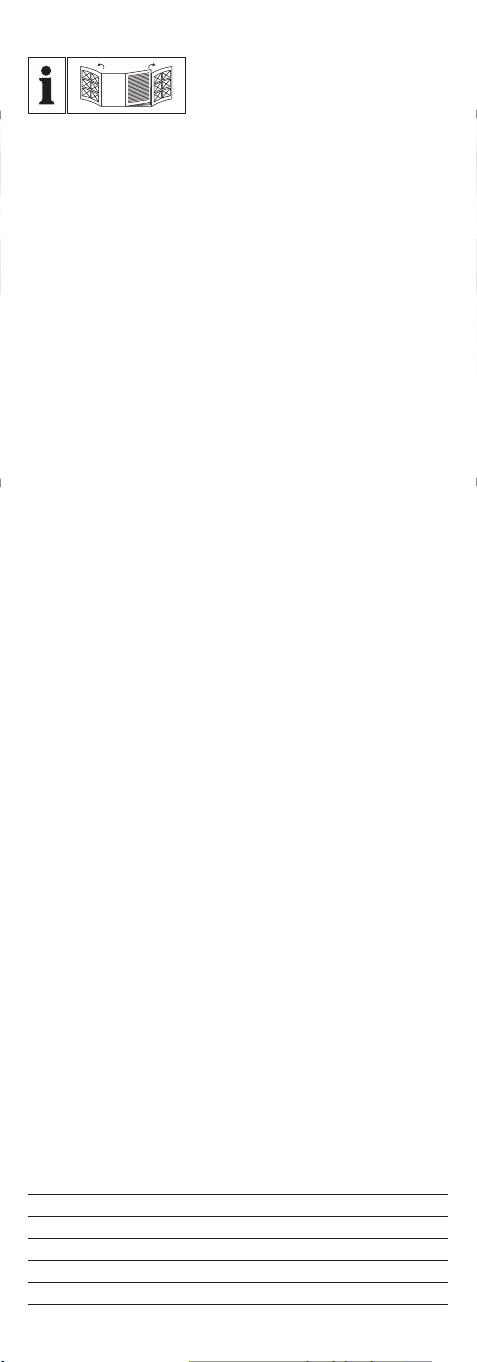
A
2
11 10 9 837
41
B
5
6
C
D
E
F

Introduction
Intended use ................................................................Page 6
Scope of delivery .......................................................Page 6
Description of parts ....................................................Page 6
Technical data .............................................................Page 6
Safety instructions .......................................... Page 7
Safety instructions for batteries .................................Page 8
Before start of operation
Insert / replace battery ...............................................Page 9
Preparing the calliper ................................................. Page 9
Starting up the device
Using the calliper ........................................................Page 9
Examples of use ..........................................................Page 10
Troubleshooting ..........................................................Pa ge 11
Cleaning and maintenance ..................... Page 12
Disposal ....................................................................Page 12
Warranty ................................................................Page 13
GB/CY
5
DIGITAL CALLIPER
Q
Introduction
We congratulate you on the purchase of your new
product. You have chosen a high quality product. The
instructions for use are part of the product. They
contain important information concerning safety, use and
disposal. Before using the product, please familiarise yourself
with all of the safety information and instructions for use. Only
use the unit as described and for the specified applications. If
you pass the product on to anyone else, please ensure that you
also pass on all the documentation with it.
Q
Intended use
Only for private use.
Not for commercial use.
Q
Scope of delivery
1 x digital calliper
1 x battery
1 x storage box
1 x instruction for use
Q
Description of parts
1
measuring surfaces
2
internal measuring jaws
3
Inch / mm key
4
locking screw
5
LCD display
6
depth-measuring blade
7
handwheel for measuring jaws
8
battery compartment lid
9
key for zero setting (ZERO)
10
ON / OFF key ( ON / OFF)
11
external measuring jaws
Q
Technical data
Measurement unit: mm / inch
Measuring range: 0 -150 mm / 0-6”
Resolution: 0.01 mm / 0.0005”
Accuracy
(Length measurement): 0-100 mm ± 0.02 mm /
100-150 mm ± 0.03 mm /
0.001”
0.001”
GB/CY
6
(Depth measurement): 0-100 mm ± 0.04 mm / 0.002”
100-150 mm ± 0.05 mm /
0.002”
Maximum measuring speed: 1.5 m/s, 60”/s
Measuring system: Liner capacitive measuring system
Display: LCD display
Operating temperature: +5 °C - +40 °C
Influence of humidity: within a range from 0 % to 80 %
relative humidity irrelevant
Battery: 3 V
CR2032 (included)
Safety instructions
BEFORE USING THIS DEVICE, PLEASE
READ THE DIRECTIONS FOR USE!
PLEASE KEEP THE DIRECTIONS FOR USE
IN A SAFE PLACE!
CAUTION! RISK OF INJURY!
J KEEP THE PRODUCT OUT
OF THE REACH OF
CHILDREN. THIS PRODUCT
IS NOT A TOY! This product should
never be used by children unsupervised.
DANGER TO LIFE AND RISK OF
ACCIDENT FOR TODDLERS AND
CHILDREN! Never leave children alone
and unsupervised with the packaging
material.
J There is a risk of suffocation from the
packaging material. Children often
underestimate risks. Always keep children
away from the product.
DANGER TO LIFE! Batteries could be
swallowed and pose a lethal hazard.
Consult a doctor immediately if anyone
swallows a battery.
J This appliance can be used by children
aged from 8 years and above and
persons with reduced physical, sensory
or mental capabilities or lack of
experience and knowledge if they have
been given supervision or instruction
concerning use of the appliance in a safe
way and understand the hazards
involved. Children shall not play with the
appliance.
GB/CY
7
Cleaning and user maintenance shall not
be made by children without supervision.
J Never expose the product to high
temperatures, water or moisture as this
may damage the product.
J Do not put the calliper under any strain.
This may damage the chip in the calliper.
J Keep the calliper clean and dry. Fluids
could damage the calliper.
Safety instructions for
batteries
J CAUTION! RISK OF
EXPLOSION! Never recharge
the batteries!
J Batteries must not be short-circuited. This
could result in over-heating and risk of
fire or explosion.
J Remove a depleted battery from the
product immediately; otherwise there is
an increased risk of leakage!
J Keep batteries out of the reach of
children; do not throw them into fire; do
not short-circuit them; and do not take
them apart.
J Ensure polarity is correct (+ and -).
J Only use the recommended battery.
J If these instructions are not complied
with, the battery may be discharged
beyond its cut-off voltage. There is then a
risk of leakage. If the battery has leaked
into your device, please remove it
immediately in order to prevent any
damage to the product!
J Wear protective gloves! If they
come into contact with skin, leaked or
damaged batteries could cause chemical
burns; you should therefore wear suitable
protective gloves at all times if such an
event occurs.
J Avoid contact with skin, eyes, and
mucous membranes. If you come into
contact with battery acid, rinse the
affected spot with plenty of water
and / or consult a doctor immediately!
J
WARNING!
Switch the product OFF
before inserting the battery (LCD display
5
is off.)
GB/CY
8
J Remove the battery from the device if it is
not in use for a long period of time.
J Do not, on any account, short-circuit the
terminals.
Q
Before start of operation
Q
Insert / replace battery
Tip: Flashing numbers indicate a discharged / flat battery.
Tip: When changing the battery, the LCD display
experience faults. Remove the battery and insert it again after
waiting more then 30 seconds.
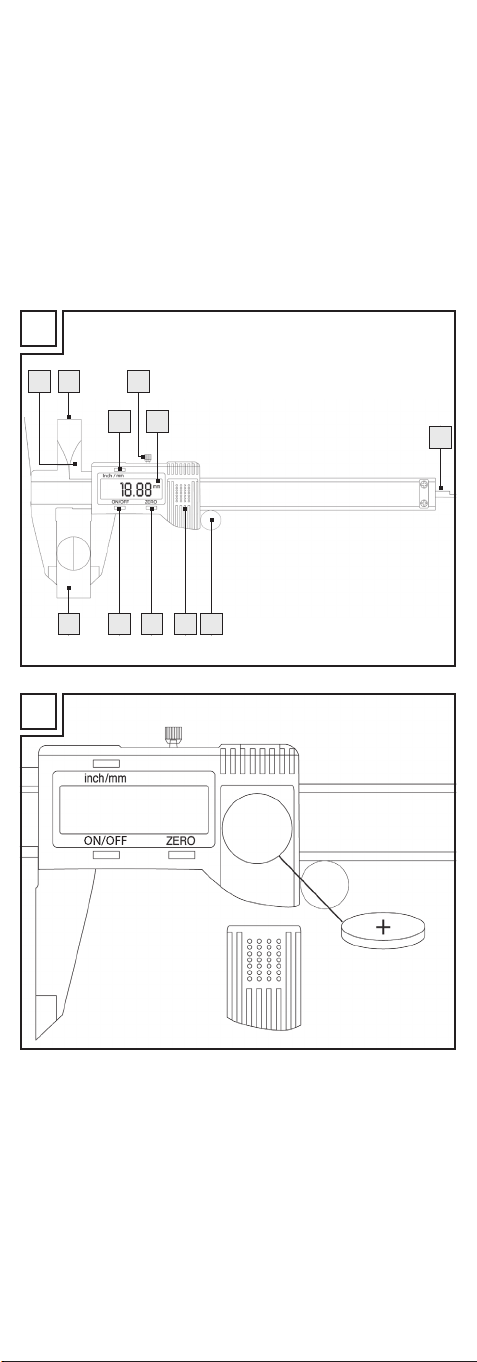
j
Push open the lid to the battery compartment 8 (see Fig. B).
j
Remove the old battery.
j
Insert the new battery into the battery compartment and
ensure correct polarity (+ and -). Make sure that the plus
terminal points outwards.
j
Push the lid to the battery compartment 8 shut again (see
Fig. B).
Q
Preparing the calliper
5
may
j
Loosen the locking screw 4 so that you can move the
calliper.
j
Clean all measuring surfaces and the calliper rod with a dry
cloth. Otherwise, faulty measuring results may occur due to,
for example, humidity.
j
Check that all keys, switches and the LCD display 5 work
correctly.
Q
Starting up the device
Q
Using the calliper
j
Loosen the locking screw 4 by turning it anti-clockwise.
j
Push the external measuring jaws 11 and the internal
measuring jaws
j
Switch the LCD display 5 on by pressing the ON / OFF key 10.
j
Press the inch / mm key 3 to set the unit of measurement
2
together.
(inch or mm) you wish to use. Either “mm” or “inch” will
appear to the right of the figures in the LCD display
j
Press the key to obtain the zero setting (ZERO) 9 in order
to reset the LCD display
5
to zero.
Measuring an object from the outside:
j
Move the external measuring jaws 11 apart by turning the
handwheel
measuring jaws
7
outwards anti-clockwise. Place the external
11
against the object to be measured.
5
.
GB/CY
9
j
Turn the handwheel 7 inwards clockwise. Move the
external measuring jaws
11
together until they touch both
sides of the object you want to measure. Please ensure that
you do not damage the object you want to measure by
subjecting it to too much pressure.
Measuring an object from the inside:
j
Place the internal measuring jaws 2 against the object
you want to measure.
j
Turn the handwheel 7 outwards anti-clockwise. Move the
internal measuring jaws
2
apart until they touch the object
on both its inner sides. Please ensure that you do not
damage the object you want to measure by subjecting it to
too much pressure.
Measuring the depth of an object:
j
Move the depth-measuring blade 6 out of the calliper.
j
Put the depth-measuring blade 6 in position until it touches
the surface (e.g. inside a hole).
j
Slide the body of the calliper downward until you feel
resistance.
j
Ensure that you do not damage the depth-measuring blade
6
or the object you want to measure by exerting too much
pressure on them.
j
The LCD display 5 now displays the dimensions.
j
After carrying out the measurement, move the external
measuring jaws
again by turning the handwheel
j
Switch the LCD display 5 off again by pressing the
ON / OFF key
Tip: The LCD display
11
/ internal measuring jaws 2 together
10
.
5
7
inwards clockwise.
automatically switches itself off
after approx. 5 minutes.
j
Tighten the locking screw
4
again by turning it clockwise
until you feel some resistance.
Q
Examples of use
Tip: When measuring, always proceed as described in the
chapter on using the calliper.
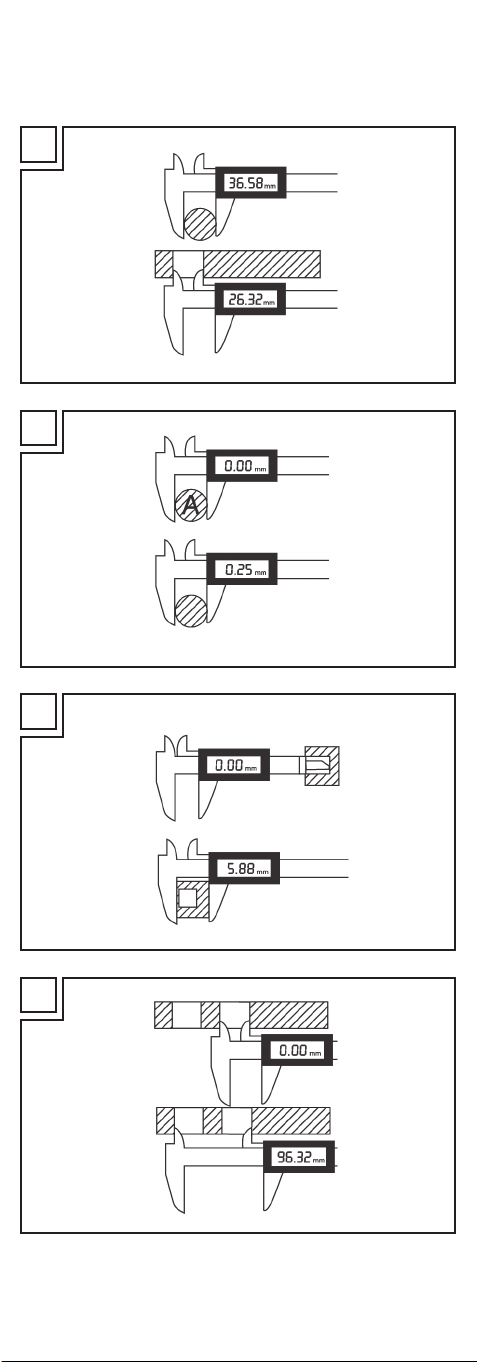
Comparison of plug and socket (see fig. C):
j
First measure the dimensions of the plug.
j
You may wish to make a note of the measurement.
j
Then measure the socket.
Deviation from a reference value (see fig. D):
j
Measure a reference object (in this case A).
j
Leave the measuring jaws
the key to obtain the zero setting (ZERO)
GB/CY
10
2
/ 11 in this position and press
9
.
j
Then measure the second object. The LCD display 5 now
shows the deviation of the measurement of the second object
to that of the reference object (A).
Measuring the thickness of the floor of an object
(see fig. E):
j
First measure the depth of the object.
j
Leave the depth blade 6 in this position and press the key
to obtain the zero position (ZERO)
j
Now measure the entire object. The LCD display 5 now
9
.
shows the thickness of the floor of the object.
Measuring the distance between two identical
holes (see fig. F):
j
First measure one of the two, equally sized holes.
j
Leave the measuring jaws
the key to obtain the zero position (ZERO)
j
Now measure the total dimension. The LCD display 5 now
2
/ 11 in this position and press
9
.
shows the average distance.
Characteristics of metric ISO screw threads:
Nominal diameter:
[mm]
Increase:
-1
[mm
]
Core diameter:
[mm]
Drill
diameter:
[mm]
3 0.5 2.46 2.5
4 0.7 3.24 3.3
5 0.8 4.13 4.2
6 1 4.92 5
8 1.25 6.65 6.8
10 1.5 8.38 8.5
12 1.75 10.11 10.2
16 2 13.84 14
20 2.5 17.29 17.5
Q
Troubleshooting
The device contains sensitive electronic components. That is why
it experiences interference when in close proximity to radio
transmission devices. If any indication errors appear in the
display, remove such devices out of the proximity of the calliper.
Electrostatic discharge could result in malfunctions.
j
When such malfunctions occur, remove the battery for a
short while and re-insert.
Failure Cause Solution
Five digits flash
simultaneously
every second.
The battery voltage
is lower than 2.7 V.
Replace the battery
in line with the chapter on “Inserting /
replacing battery”.
GB/CY
11
Failure Cause Solution
The LCD dis-
5
play
does
not continue to
Faulty wiring or
circuit
Remove battery
and re-insert after
30 seconds.
count.
Nothing is dis-
played on the
LCD display
1. LCD display is
switched off.
5
.
2. Battery is the wrong
way round or the
battery contact is
poor.
3. The battery voltage
is lower than 2.1 V.
1. Switch the LCD
display on by
pressing the ON /
OFF key
2. Remove the battery and insert /
replace it in line
with the terminals
and the chapter
“Inserting / replacing the battery”
so that it touches
all contacts.
3. Replace the battery in line with
the chapter “Inserting / replacing the battery”.
Q
Cleaning and maintenance
10
.
j
Clean the calliper before and after using it with a dry cloth;
never use petrol, solvents or cleaning agents.
j
Do not immerse the calliper into water. Liquids can damage
the calliper.
j
Always switch the LCD display off when not using the calliper.
This will extend the life of the battery.
j
Keep away from electrical current and electrically charged
pens to prevent damage to the chip.
Q
Disposal
The packaging is made entirely of recyclable
materials, which you may dispose of at local
recycling facilities.
Contact your local refuse disposal authority for more details of
how to dispose of your worn-out product.
To help protect the environment, please dispose of the
product properly when it has reached the end of its
useful life and not in the household waste. Information
on collection points and their opening hours can be
obtained from your local authority.
GB/CY
12
Faulty or used batteries must be recycled in accordance with
Directive 2006 / 66 / EC and its amendments. Return the
battery and / or the device through the appropriate collection
facilities.
Environmental damage through incorrect
disposal of the batteries!
Batteries may not be disposed of with the usual domestic waste.
They may contain toxic heavy metals and are subject to
hazardous waste treatment rules and regulations. The chemical
symbols for heavy metals are as follows: Cd = cadmium,
Hg= mercury, Pb = lead. That is why you should dispose of
used batteries at a local collection point.
Q
Warranty
The device has been manufactured to strict quality guidelines
and meticulously examined before delivery. In the event of
product defects you have legal rights against the retailer of this
product. Your legal rights are not limited in any way by our
warranty detailed below.
The warranty for this device is 3 years from the date of
purchase. Should this device show any fault in materials or
manufacture within 3 years from the date of purchase, we will
repair or replace it – at our choice – free of charge to you.
The warranty period begins on the date of purchase. Please
keep the original sales receipt in a safe location. This document
is required as your proof of purchase. This warranty becomes
void if the device has been damaged or improperly used or
maintained.
The warranty applies to faults in material or manufacture. This
warranty does not cover product parts subject to normal wear,
thus possibly considered consumables (e.g. batteries) or for
damage to fragile parts, e.g. switches, rechargeable batteries
or glass parts.
GB/CY
13

Uvod
Namjena ............................................................. Stranica 15
Opseg isporuke .................................................. Stranica 15
Opis dijelova .......................................................Stranica 15
Tehnički podaci ................................................... Stranica 15
Sigurnosne upute ....................................Stranica 16
Sigurnosne upute za bateriju ............................. Stranica 17
Prije uključivanja
Umetanje / zamjena baterije ............................. Stranica 18
Priprema pomičnog mjerila ................................Stranica 18
Uključivanje
Upotreba pomičnog mjerila .............................. Stranica 18
Primjeri korištenja ................................................ Stranica 19
Uklanjanje smetnji............................................... Stranica 20
Održavanje i čišćenje ........................... Stranica 21
Zbrinjavanje otpada ............................Stranica 21
Jamstvo ............................................................ Stranica 22
HR14
DIGITALNO POMIČNO MJERILO
Q
Uvod
Čestitamo vam na kupnji novog proizvoda. Ovom
kupnjom odlučili ste se za visokokvalitetan proizvod.
Uputa za uporabu je sastavni dio ovog proizvoda.
Ona sadrži važne upute o sigurnosti, uporabi i uklanjanju
otpada. Prije upotrebe proizvoda upoznajte se sa svim
njegovim uputama za korištenje i sigurnosnim uputama. Koristite
ovaj proizvod u skladu s navedenim uputama te u navedene
svrhe. Ukoliko proizvod dajete nekoj drugoj osobi, predajte toj
osobi također i sve upute.
Q
Namjena
Dozvoljeno korištenje samo u privatne svrhe.
Nije za profesionalnu upotrebu.
Q
Opseg isporuke
1 x digitalno pomično mjerilo
1 x baterija
1 x kutija za spremanje
1 x upute za korištenje
Q
Opis dijelova
1
Mjerne površine
2
Unutarnje mjerne čeljusti
3
tipka inch/mm
4
Sigurnosni vijak
5
LCD zaslon
6
Dubinomjer
7
Kotačić za pomicanje čeljusti
8
Poklopac ležišta baterije
9
Tipka za namještanje na nulu (ZERO)
10
Tipka za UKLJUČIVANJE / ISKLJUČIVANJE (ON / OFF)
11
Vanjske mjerne čeljusti
Q
Tehnički podaci
Jedinica mjerne veličine: mm / inch
Mjerno područje: 0 - 150 mm / 0-6”
Rezolucija: 0,01 mm / 0,0005”
Preciznost
Dimenzije (Duljina): 0-100 mm ± 0,02 mm /
0,001”
100-150 mm ± 0,03 mm / 0,001”
Dimenzije (Dubina): 0-100 mm ± 0,04 mm / 0,002”
100-150 mm ± 0,05 mm / 0,002”
HR 15
Maksimalno
Brzina mjerenja: 1,5 m / s, 60” / s
Mjerni sustav: linearni, beskontaktni
CAP mjerni sustav
Zaslon: LCD zaslon
Radna temperatura: +5 °C - +40 °C
Utjecaj vlažnosti zraka: u rasponu od 0 % do 80 %
relativna vlažnost zraka je irelevantna
Baterija: 3 V
CR2032 (nije uključena u
paketu)
Sigurnosne upute
PRIJE UPOTREBE PROČITAJTE UPUTE ZA
KORIŠTENJE! PAŽLJIVO SAČUVAJTE
UPUTE ZA KORIŠTENJE!
OPREZ! OPASNOST OD OZLJEDE!
J PROIZVOD NE SMIJU
KORISTITI DJECA. OVAJ
PROIZVOD NIJE IGRAČKA!
Djeca ne smiju koristiti ovaj proizvod bez
nadzora.
OPASNOST OD OZLJEDA I
OPASNO ZA ŽIVOT ZA MALE
BEBE I DJECU! Nikada ne ostavljajte
ambalažu u blizini djece bez nadzora.
J Postoji opasnost od gušenja ambalažom.
Djeca često podcijene opasnost. Ne
puštajte djecu nikada u blizinu proizvoda.
OPASNO ZA ŽIVOT! Baterije se mogu
progutati što može biti opasno za život.
Ako je baterija progutana odmah
potražite liječničku pomoć.
J Ovaj uređaj mogu koristiti djeca od
8godina i starija djeca, kao i osobe s
umenjenom psihičkom, senzoričkom i
mentalnom ili s umanjenim iskustvom ako
se nadgledaju ili ako su upoznati sa
upotrebom uređaja i razumiju opasnosti
koje proizlaze iz upotrebe. Djeca se ne
smiju igrati uređajem. Čišćenje i
održavanje ne smiju vršiti djeca bez
nadzora odraslih.
J Nikada ne izlažite proizvod visokim
temperaturama i vlazi jer bi se mogao
oštetiti.
J Ne stavljajte pomično mjerilo pod
napon. U protivnom bi se čip u
pomičnom mjerilu mogao oštetiti.
HR16

J Održavajte pomično mjerilo čistim i
suhim. Tekućina može oštetiti pomično
mjerilo.
Sigurnosne upute za bateriju
J OPREZ! OPASNOST OD
EKSPLOZIJE! Nikada ne punite
baterije!
J Baterije se ne smiju staviti u kratki spoj. U
protivnom se mogu pregrijati, zapaliti ili
eksplodirati.
J Praznu bateriju odmah izvadite iz
proizvoda. Postoji povećana opasnost da
baterija isteće!
J Bateriju držite podalje od dohvata djece,
ne bacajte ju u vatru, ne stavljajte u kratki
spoj i ne rastavljajte ju.
J Pazite da polovi budu stavljeni ispravno
(+ i -).
J Upotrebljavajte isključivo navedenu vrstu
baterije.
J U slučaju ne pridržavanja uputa baterija
bi se mogla isprazniti ispod donje
granice napona. Tada se javlja opasnost
da baterija isteće. Ako je baterija istekla
u uređaju odmah je izvadite kako biste
spriječili oštećenja na proizvodu!
J Koristite zaštitne rukavice! U
slučaju istjecanja ili oštećenja baterije
može doći do nadražaja u dodiru s
kožom; stoga u tom slučaju obavezno
nosite odgovarajuće zaštitne rukavice.
J Izbjegavajte kontakt s kožom, očima i
sluznicom. U slučaju doticaja s kiselinom
iz baterije isperite mjesto na koje je
dospjela kiselina s puno vode i / ili se
obratite liječniku!
J
UPOZORENJE!
ISKLJUČITE proizvod
prije nego što umetnete bateriju (LCD
zaslon 5 mora biti isključen).
J Ako ne koristite uređaj duže vrijeme
izvadite bateriju.
J Nikada nemojte kratko spajati polove
baterije.
HR 17
Q
Prije uključivanja
Q
Umetanje / zamjena bateri je
Napomena: Trepereće brojke ukazuju na ispražnjenu /
praznu bateriju.
Napomena: Kod izmjene baterije može doći do smetnji
5
na LCD zaslonu Izvadite bateriju i stavite je ponovno nakon više
od 30 sekundi.
j Otvorite poklopac ležišta baterija
j
Izvadite staru bateriju.
j
Umetnite novu bateriju u ležište pazeći pritom na ispravno
8
(pogledaj sliku B).
stavljene polove (+ i -). Plus pol mora biti s vanjske strane.
j Zatvorite opet poklopac ležišta
Q
Priprema pomičnog mjerila
j
Otpustite sigurnosni vijak 4 kako biste mogli pomicati
8
baterija (pogledaj sliku B).
pomično mjerilo.
j
Očistite sve mjerne površine i šipku čeljusti suhom krpom. U
suprotnom može doći do pogrešnih rezultata mjerenja uslijed
primjerice vlage.
j
Provjerite dali su sve tipke, sklopka i LCD zaslon 5 potpuno
ispravni.
Q
Uključivanje
Q
Upotreba pomičnog mjerila
j
Otpustite sigurnosni vijak 4, tako da ga okrećete u smjeru
suprotnom od kazaljke na satu.
j
Stisnite vanjske čeljusti
11
/ unutarnje čeljusti 2 jednu
prema drugoj.
j
Uključite LCD zaslon 5 tako da pritisnete tipku za 10
UKLJUČIVANJE / ISKLJUČIVANJE.
j
Pritisnite tipku inch/mm 3, kako bi odredili jedinicu mjere
(inch ili mm), koju želite koristiti. Na LCD pokazivaču
pojavit će se ili „mm“ ili „inch“.
j
Pritisnite tipku za namještanje na nulu (ZERO) 9, kako
biste vratili LCD zaslon
5
natrag na nulu.
5
Mjerenje predmeta izvana:
j
Razmaknite vanjske čeljusti 11 tako da okrećete kotačić za
pomicanje
prema van. Stavite vanjske čeljusti
7
u smjeru suprotnom od kazaljke na satu,
11
na predmet koji želite
izmjeriti.
j
Okrećite kotačić za pomicanje 7 u smjeru kazaljke na
satu prema unutra. Gurajte vanjske čeljusti
11
jednu prema
drugoj, tako da s obje strane dodiruju predmet koji želite
izmjeriti. Pazite da ne pritisnete previše, kako ne biste oštetili
predmet mjerenja.
HR18
Mjerenje predmeta iznutra:
j
Stavite unutarnje čeljusti
2
iznutra na predmet koji želite
izmjeriti.
j
Okrećite kotačić za pomicanje 7 u smjeru suprotnom od
kazaljke na satu prema van. Razmaknite unutarnje čeljusti
tako da dodiruju obje unutrašnje strane predmeta. Pazite da
ne pritisnete previše kako ne biste oštetili predmet mjerenja.
Mjerenje dubine predmeta:
j
Izvucite dubinomjer 6 s pomičnog mjerila.
j
Stavite dubinomjer 6 na predmet koji želite izmjeritttako
da dodiruje površinu (npr. unutar otvora).
j
Gurajte tijelo pomičnog mjerila prema dolje dok ne osjetite
otpor.
j
Pazite da ne pritisnete previše kako ne biste
6
oštetili
dubinomjer ili predmet mjerenja.
j
LCD zaslon 5 tada prikazuje mjere.
j
Nakon mjerenja ponovno spojite vanjske čeljusti
11
/ unutarnje čeljusti 2 tako, da okrećete kotačić za
pomicanje
j
Isključite LCD zaslon 5 ponovno, tako da pritisnete tipku
za UKLJUČIVANJE / ISKLJUČIVANJE
7
u smjeru kazaljke na satu prema unutra.
10
.
Napomena: Nakon otprilike 5 minute LCD zaslon se
automatski isključuje.
j
Pritegnite opet čvrsto sigurnosni vijak,
4
tako da okrećete
u smjeru kazaljke na satu, dok ne osjetite otpor.
2
5
Q
Primjeri korištenja
Napomena: Pri mjerenju uvijek postupajte u skladu s
poglavljem “Upotreba pomičnog mjerila“.
Usporedba između utičnice i otvora (pogledaj sliku
C):
j
Najprije izmjerite utičnicu.
j
Zabilježite izmjerene vrijednosti.
j
Nakon toga izmjerite dimenzije otvora.
Odstupanje referentne vrijednosti (pogledaj sliku
D):
j
Izmjerite neki referentni predmet (ovdje A).
j
Ostavite čeljusti
namještanje na nulu (ZERO)
j
Nakon toga izmjerite drugi predmet. LCD-zaslon 5 sada
2
/ 11 u tom položaju i pritisnite tipku za
9
.
pokazuje odstupanje mjera drugog predmeta od mjera
referentnog predmeta (A).
Mjerenje debljine dna predmeta (pogledaj sliku E):
j
Najprije izmjerite dubinu predmeta.
j
Ostavite dubinomjer 6 u tom položaju i pritisnite tipku za
namještanje na nulu (ZERO)
j
Nakon toga izmjerite cijeli predmet. LCD-zaslon 5 sada
9
.
pokazuje debljinu dna predmeta.
HR 19

Mjerenje razmaka između dvije identične rupe
(vidite prik. F):
j
Najprije izmjerite jedan od dviju jednakih otvora.
j
Ostavite čeljusti 2 / 11 u tom položaju i pritisnite tipku za
namještanje na nulu (ZERO)
j
Nakon toga izmjerite ukupne dimenzije. LCD-zaslon 5
9
.
sada pokazuje mjere srednjeg razmaka.
Karakteristike metričkih ISO-navoja:
Nominalni
promjer:
[mm]
Nagib:
-1
[mm
Unutarnji
]
promjer:
[mm]
Promjer
bušenja:
[mm]
3 0,5 2,46 2,5
4 0,7 3,24 3,3
5 0,8 4,13 4,2
6 1 4,92 5
8 1,25 6,65 6,8
10 1,5 8,38 8,5
12 1,75 10,11 10,2
16 2 13,84 14
20 2,5 17,29 17,5
Q
Uklanjanje smetnji
Uređaj je sastavljen od osjetljivih elektronskih dijelova. Stoga se
mogu pojaviti smetnje zbog radio-uređaja, koji se nalate u blizini.
Ako se na zaslonu pojave pogrešni podaci, uklonite takve
uređaje iz blizine pomičnog mjerila.
Elektrostatsko pražnjenje može izazvati smetnje.
j
U slučaju takvih smetnji na kratko izvadite bateriju te je
ponovno umetnite.
Pogreška Uzrok Pomoć
Pet znamenki titra
istovremeno jedanput u sekundi.
Napon baterije je
manji od 2,7 V.
Promijenite bateriju
kako je navedeno u
poglavlju “Umetanje /
zamjena baterije“.
LCD-zaslon
broji dalje.
5
ne
Pogrešno spajanje. Izvadite bateriju i stavi-
te je ponovno nakon
30 sekundi.
HR20

Pogreška Uzrok Pomoć
Nema prikaza na
LCD-zaslonu
5
.
1. LCD-zaslon je
isključen.
2. Baterija nema
i
spravan konta
ili je pogrešno
umetnuta.
3. Napon baterije je manji od
2,1 V.
1. Uključite LCD-zaslon
tako da pritisnete
10
tipku za
ČIVANJE /
kt
ISKLJUČIVANJE.
2. Izvadite bateriju i
stavite polove kako
je navedeno u poglavlju “Umetanje /
zamjena baterije“,
tako da ima sve
kontakte.
3. Zamijenite bateriju
kako je navedeno
u poglavlju “Umetanje / zamjena baterije“.
Q
Održavanje i čišćenje
j
Očistite čeljust prije i nakon uporabe suhom krpom. Nikada
ne rabite benzin, otapala ili sredstva za čišćenje.
j
Ne uranjajte pomično mjerilo u vodu. Tekućina može oštetiti
pomično mjerilo.
j
Uvijek isključujte LCD-zaslon, kada ne koristite pomično
mjerilo. Na taj način produžujete trajanje baterije.
j Ne stavljajte pomično mjerilo pod napon i držite ga
podalje od električnih zatikača. U protivnom bi se čip u
pomičnom mjerilu mogao oštetiti.
UKLJU-
Q
Zbrinjavanje otpada
Omot se sastoji od materijala koji ne ugrožavaju
okoliš i koje možete otkloniti preko lokalnih mjesta za
reciklažu.
O mogućnostima zbrinjavanja dotrajalog proizvoda vg
komunalnog poduzeća.
U interesu zaštite okoliša ne bacajte proizvod dok se
istroši u kućni otpad, već ga dovodite do stručnog
zbrinjavanja. O sabirnim mjestima i njenim
vremenima za otvaranje možete se informirati kod
Vaše nadležne uprave.
Oštećene ili istrošene baterije se moraju reciklirati u skladu s
Direktivom 2006 / 66 / EZ i njenim promjenama. Vratite
akumulatore i / ili uređaj preko ponuđenih sabirnih ustanova.
HR 21

Ugrožavanje okoliša kroz pogrešno
uklanjanje baterija!
Baterije se ne smije uklanjati zajedno s kućnim otpadom. Iste
mogu sadržavati otrovne teške metale i obvezno ih je uklanjati
sukladno odredbama za poseban otpad. Kemički znakovi
teških metala su slijedeći: Cd = kadmij, Hg = živa, Pb = olovo.
Stoga predajte istrošene baterije na komunalno mjesto za
sabiranje otpada.
Q
Jamstvo
Uređaj se brižno izrađuje prema strogim smjernicama kvalitete i
prije isporuke savjesno ispituje. U slučaju nedostataka na ovom
proizvodu, na raspolaganju imate zakonska prava protiv
prodavača tog uređaja. Vaša zakonska prava ovim našim
jamstvom koje je predstavljeno u nastavku, ostaju netaknuta.
Na ovaj uređaj dobivate jamstvo u trajanju od 3 godine od
datuma kupovine. Jamstveni rok počinje s datumom kupovine.
Molimo dobro sačuvajte originalan račun s blagajne. To je
dokumentacija kao dokaz kupovine koji će se zahtijevati.
Ako u razdoblju od 3 godine od datuma kupovine ovog
proizvoda nastane kakva greška na materijalu ili tvornočka
greška, proizvod ćemo – prema našem izboru – besplatno
popraviti ili zamijeniti. Ovo jamstvo se poništava, kada se
proizvod ošteti, nestručno koristi ili ne održava.
Jamstvo vrijedi za nedostatke na materijalu ili tvorničke
pogreške. Ovo jamstvo se ne proteže na dijelove proizvoda,
koji podliježu normalnom trošenju i stoga se mogu smatrati kao
normalni potrošni dijelovi (npr. baterije) ili za oštećenja na
krhkim dijelovima, npr. prekidaču, punjivim baterijama ili takvi,
koji su izrađeni od stakla.
Izjava o sukladnosti za ovaj proizvod dostupna je na internet
stranici www.lidl.hr.
HR22

Introducere
Utilizare corespunzătoare scopului ....................... Pagina 24
Pachet de livrare ...................................................... Pagina 24
Descrierea componentelor ..................................... Pagina 24
Specificaţii tehnice ...................................................Pagina 24
Indicaţii de siguranţă ................................ Pagina 25
Indicaţii de siguranţă referitoare la baterii ............ Pagina 26
Înainte de punerea în funcţiune
Introducerea /schimbarea bateriilor ......................Pagina 27
Pregătirea şublerului ................................................ Pagina 27
Punere în funcţiune
Utilizarea şublerului .................................................Pagina 27
Exemple de utilizare ................................................ Pagina 28
Remedierea defecţiunilor ........................................ Pagina 29
Curăţare şi întreţinere .............................. Pagina 30
Înlăturare ............................................................ Pagina 30
Garanţie................................................................Pagina 31
RO 23

ȘUBLER CU AFIȘAJ DIGITAL
Q
Introducere
Vă felicităm pentru achiziionarea noului
dumneavoastră produs. Aţi ales un produs de înaltă
calitate. Manualul de utilizare reprezintă o parte
integrantă a acestui produs. Acesta conţine informaţii
importante referitoare la siguranţă, la utilizare și la eliminarea
ca deșeu. Înainte de utilizarea acestui produs, familiarizaţi-vă
mai întâi cu instrucţiunile de utilizare și de siguranţă. Folosiţi
produsul numai în modul descris și numai în domeniile de
utilizare indicate. Predaţi toate documentele aferente în cazul în
care înstrăinaţi produsul.
Q
Utilizare corespunzătoare scopului
Numai pentru utilizarea privată.
Nu este destinat utilizării comerciale.
Q
Pachet de livrare
1 x Șubler digital
1 x Baterie
1 x Cutie de păstrare
1 x Manual de utilizare
Q
Descrierea componentelor
1
Suprafeţe de măsurare
2
Ciocuri interioare de măsurare
3
Tastă inch / mm
4
Șurub de siguranţă
5
Afișaj LCD
6
Tije de măsurare în adâncime
7
Roată de reglare pentru ciocurile de măsurare
8
Capac compartiment baterii
9
Tastă de setare pe zero (ZERO)
10
Tastă PORNIT- / OPRIT (ON / OFF)
11
Ciocuri exterioare de măsurare
Q
Specificaţii tehnice
Unitate de măsurare: mm / inch
Domeniu de măsurare: 0 - 150 mm / 0-6”
Rezoluţie: 0,01 mm / 0,0005”
Precizie
Dimensiuni (Lungime): 0-100 mm ± 0,02 mm /
0,001”
100-150 mm ± 0,03 mm /
0,001”
Dimensiuni (Adâncime): 0-100 mm ± 0,04 mm / 0,002”
100-150 mm ± 0,05 mm /
0,002”
RO24

Viteză maximă de măsurare: 1,5 m / s, 60 ” / s
Sistem de măsurare: sistem de măsurare linear, fără
contact, CAP
Afișaj: Afișaj LCD
Temperatură de funcţionare: +5 °C - +40 °C
Influenţa umidităţii aerului: în cadru a 0 % până la 80 %
umiditatea relativă a aerului
irelevantă
Baterie: 3 V
CR2032 (cuprins în
pachetul de livrare)
Indicaţii de siguranţă
ÎNAINTE DE UTILIZARE CITIŢI
MANUALUL DE UTILIZARE!
PĂSTRAŢI BINE MANUALUL DE
UTILIZARE!
ATENŢIE! PERICOL DE
ACCIDENTARE!
J ACEST PRODUS NU ARE
VOIE SĂ AJUNGĂ PE
MÂNA COPIILOR. ACEST
PRODUS NU ESTE O JUCĂRIE!
Acest produs nu are voie să fie folosit de
către copii în mod nesupravegheat.
PERICOL DE MOARTE ȘI DE
ACCIDENTARE PENTRU SUGARI ȘI
COPII! Nu lăsaţi niciodată copii
nesupravegheaţi în apropierea
materialului de ambalaj.
J
Există pericol de asfixiere datorită
materialului de ambalaj. Deseori copii
subapreciază pericolul. Nu păstraţi
produsul la îndemâna copiilor.
PERICOL DE MOARTE! Bateriile pot fi
înghiţite, ceea ce poate reprezenta un
pericol de moarte. Solicitaţi imediat
ajutorul medicului atunci când, a fost
înghiţită o baterie.
J
Acest aparat poate fi utilizat de copii de
peste 8 ani precum și de persoanele cu
capacităi fizice, senzoriale sau mentale
redusă sau lipsă de experienă și/sau
cunoștine, doar dacă aceștia sunt
supravegheai sau au fost instruii referitor
la utilizarea sigură a aparatului și
pericolele ce pot rezulta din acest lucru.
Copii nu au voie să se joace cu aparatul.
Curăarea și mentenana nu trebuie
realizate de copii fără supraveghere.
RO 25

J
Nu expuneţi niciodată produsul
temperaturilor mari și umidităţii, în caz
contrar produsul se poate deteriora.
J
Nu supuneţi șublerul tensiunii. În caz
contrar cipul din șubler poate fi
deteriorat.
J
Păstraţi șublerul curat și uscat. Lichidul
poate deteriora șublerul.
Indicaţii de siguranţă
referitoare la baterii
J
ATENŢIE! PERICOL DE
EXPLOZIE! Nu încărcaţi
niciodată bateriile!
J
Bateriile nu au voie să fie supuse unui
scurt circuit. Urmarea pot fi
supraîncălzirea, pericol de incendiu sau
spargerea.
J
Scoateţi imediat bateriile goale din
produs. Există pericol mărit de scurgere!
J
Bateriile nu se ţin la îndemâna copiilor,
nu se aruncă în foc, nu se supun unui
scurt circuit și nu se demontează.
J
La introducerea bateriilor aveţi grijă la
polaritatea corectă (+ și -).
J
Folosiţi exclusiv tipul indicat de baterie.
J
În caz de nerespectarea indicaţiilor,
bateriile se pot descărca în afara
tensiunii lor finale. Atunci apare pericolul
scurgerii. Dacă bateria s-au scurs în
aparatul dvs., scoateţi-o imediat pentru a
împiedica deteriorarea produsului!
J
Purtaţi mănuși de protecţie!
Bateriile scurse sau deteriorate pot cauza
în contactul cu pielea arsuri. De aceea,
purtaţi neapărat mănuși de protecţie.
J
Evitaţi contactul cu pielea, ochii și
mucoasele. În cazul unui contact cu
acidul din baterie clătiţi locul respectiv cu
multă apă și / sau apelaţi la un medic!
J
AVERTISMENT!
Produsul înainte de a
introduce bateria (afișajul LCD
5
este
stins).
J
În caz că, nu folosiţi pentru mai mult timp
aparatul, scoateţi bateria din acesta.
J
În niciun caz nu supuneţi unui scurt circuit
polurile de conectare.
RO26

Q
Înainte de punerea în funcţiune
Q
Introducerea /schimbarea bateriilor
Indicaţie: Cifrele, care pâlpâie, indică o baterie descărcată /
goală.
Indicaţie: La schimbarea bateriei pot apărea defecţiuni la
afișajul LCD
5
. Scoateţi bateria și introduceţi-o după mai mult
decât 30 de secunde.
j
Deschideţi capacul compartimentului de baterii 8 (vezi fig. B).
j
Scoateţi bateria veche.
j
Introduceţi bateria nouă respectând polaritatea (+ și -) în
compartimentul de baterii. Aveţi grijă ca polul plus să
indice în exterior.
j
Închideţi din nou capacul compartimentului de baterii 8
(vezi fig. B).
Q
Pregătirea șublerului
j
Deșurubaţi șurubul de siguranţă 4, pentru a putea mișca
șublerul.
j
Curăţaţi toate suprafeţele de măsurare și bara de măsurare a
șublerului cu o cârpă uscată. In caz contrar pot apărea
rezultate greșite de măsurare datorită, de exemplu, umidităţii.
j
Verificaţi toate tastele, întrerupătoarele și afișajul LCD 5 cu
privire la funcţionarea ireproșabilă.
Q
Punere în funcţiune
Q
Utilizarea șublerului
j
Deșurubaţi șurubul de siguranţă 4, prin rotirea acestuia
contrar sensului acelor de ceasornic.
j
Împingeţi ciocurile exterioare 11 / interioare 2 unul către
celălalt.
j
Porniţi afișajul LCD 5, prin apăsarea tastei PORNIT- / OPRIT 10.
j
Apăsaţi tasta inch / mm 3, pentru a seta unitatea de
măsurare (inch sau mm), pe care doriţi să o folosiţi. Apare
„mm“ sau „inch“ pe afișajul LCD
j
Apăsaţi tasta pentru setarea pe zero (ZERO) 9, pentru a
reseta afișajul LCD
5
pe zero.
5
.
Măsurarea unui obiect din exterior:
j
Desfaceţi ciocurile exterioare de măsurare 11, prin
întoarcerea în exterior a roţii de reglare
7
contrar sensului
acelor de ceasornic. Puneţi ciocurile exterioare de măsurare
11
pe obiectul de măsurat.
j
Întoarceţi roata de reglare 7 în interior, în sensul acelor de
ceasornic. Împingeţi ciocurile exterioare de măsurare
unul către celălalt până când, ating obiectul de măsurat pe
ambele părţi. Aveţi grijă să nu deterioraţi obiectul de
măsurat exercitând o presiune prea mare.
11
RO 27

Măsurarea unui obiect din interior:
j
Puneţi ciocurile interioare de măsurat 2 din interior pe
obiectul de măsurat.
j
Întoarceţi roata de reglare 7 în exterior, contrar sensului
acelor de ceasornic. Desfaceţi ciocurile interioare de
măsurare
2
până când, ating obiectul de măsurat pe
ambele părţi. Aveţi grijă să nu deterioraţi obiectul de
măsurat exercitând o presiune prea mare.
Măsurarea adâncimii unui obiect:
j
Împingeţi tijele de măsurare a adâncimii 6 din șubler.
j
Puneţi tijele de măsurare a adâncimii 6 pe obiectul de
măsurat până când, ating suprafaţa (de ex.: în cadrul unei
găuri).
j
Împingeţi corpul șublerului în jos până când, simţiţi o
rezistenţă.
j
Aveţi grijă să nu deterioraţi tijele de măsurare a adâncimii 6
sau obiectul de măsurat exercitând o presiune prea mare.
j
Afișajul LCD 5 indică acum adâncimea.
j
După efectuarea măsurării împingeţi ciocurile exterioare de
măsurare
întoarcerea roţii de reglare
11
/ interioare 2 din nou unul către celălalt prin
7
în interior, în sensul acelor
de ceasornic.
j
Opriţi din nou afișajul LCD 5, prin apăsarea tastei
PORNIT- / OPRIT
Indicaţie: După cca. 5 min. afișajul LCD
10
.
5
se stinge
automat.
j
Strângeţi din nou șurubul de siguranţă 4 prin întoarcerea
lui în sensul acelor de ceasornic până când simţiţi o
rezistenţă.
Q
Exemple de utilizare
Indicaţie: Pentru măsurare procedaţi întotdeauna ca în
capitolul „Utilizarea șublerului”.
Comparaţie între fișă de conectare și priză pentru
fișă (vezi fig.C):
j
Măsuraţi mai întâi fișa de conectare.
j
La nevoie notaţi-vă valoarea.
j
Apoi măsuraţi priza pentru fișa de conectare.
Abateri unei măsuri de referinţă (vezi fig. D):
j
Măsuraţi un obiect de referinţă (aici A).
j
Lăsaţi ciocurile de măsurare 2 / 11 în această poziţie și
apăsaţi tasta pentru setarea pe zero (ZERO)
j
Măsuraţi apoi cel de al doilea obiect. Afișajul LCD 5 indică
9
.
acum diferenţa de măsurare a celui de al doilea obiect faţă
de dimensiunea obiectului de referinţă (A).
RO28

Măsurarea grosimii fundului unui obiect
(vezi fig. E):
j
Măsuraţi mai întâi adâncimea unui obiect.
j
Lăsaţi tijele de măsurare a adâncimii 6 în această poziţie
și apăsaţi tasta de setare pe zero (ZERO)
j
Măsuraţi acum obiectul întreg. Afișajul LCD 5 indică acum
9
.
grosimea fundului obiectului.
Măsurarea distanţei între două orificii identice
(vezi fig. F):
j
Măsuraţi mai întâi una din cavităţile identice.
j
Lăsaţi ciocurile de măsurare 2 / 11 în această poziţie și
apăsaţi tasta pentru setarea pe zero (ZERO)
j
Apoi luaţi măsura completă. Afișajul LCD 5 indică acum
9
.
măsura distanţei medii.
Caracteristici filete metrice ISO:
Diametru
nominal
Înclinaţie
-1
[mm
]
Diametru
nucleu: [mm]
Diametru de
găurire: [mm]
[mm]
3 0,5 2,46 2,5
4 0,7 3,24 3,3
5 0,8 4,13 4,2
6 1 4,92 5
8 1,25 6,65 6,8
10 1,5 8,38 8,5
12 1,75 10,11 10,2
16 2 13,84 14
20 2,5 17,29 17,5
Q
Remedierea defecţiunilor
Aparatul este compus din subansambluri electronice sensibile.
De aceea, este posibil să fie deranjat de aparate de transmisie
din imediata apropiere. Dacă apar afișaje eronate pe display,
înlăturaţi asemenea aparate din apropierea produsului.
Descărcările electrostatice pot cauza defecţiuni de funcţionare.
j
În caz de asemenea defecţiuni, scoateţi pentru scurt timp
bateria din aparat și introduceţi-o din nou.
Eroare Cauză Remediere
Cinci cifre apar
concomitent o
dată pe secundă.
Tensiunea bateriei este sub 2,7 V.
Schimbaţi bateria conform capitolului „Introducerea/schimbarea
bateriei“.
Afișajul LCD
nu numără mai
departe.
5
Comutare eronată.
Scoateţi bateria și
introduceţi-o din nou
după 30 de secunde.
RO 29

Niciun afișaj pe
afișajul LCD
5
1. Afișajul LCD
.
este oprit.
2. Bateria nu are
niciun contact
corect sau este
introdusă invers.
3. Tensiunea
bateriei este
sub 2,1 V.
1. Porniţi afișajul LCD,
prin apăsarea tastei
PORNIT- / OPRIT 10.
2. Scoateţi bateria și
introduceţi-o din nou
conform polarităţii
și capitolului „Introducerea/ schimbarea bateriei“ astfel
încât, să atingă toate contactele.
3. Schimbaţi bateria
conform capitolului
„Introducere/schimbare baterie“.
Q
Curăţare și întreţinere
j
Curăai șublerul înainte și după ce îl folosii, cu o cârpă
uscată; nu folosii niciodată benzină, solveni sau substane
de curăare.
j
Nu introduceţi șublerul în apă. Lichidul poate deteriora
șublerul.
j
Opriţi întotdeauna afișajul LCD atunci când, nu folosiţi
șublerul. Astfel se prelungește durata de funcţionare a
bateriei.
j
Nu supuneţi șublerul tensiunii și protejaţi-l contra creioanelor
de tensiune. În caz contrar cipul din șubler poate fi deteriorat.
Q
Înlăturare
Ambalajul este confecţionat din materiale ecologice.
Înlăturaţi-l în recipientele locale de reciclare.
Posibilităţile de eliminare a produsului uzat se pot afla de la
administraţia comunală sau municipală.
Pentru a proteja mediul înconjurător nu aruncaţi
produsul dvs. la gunoiul menajer atunci când nu mai
poate fi folosit, ci duceţi-l la punct corespunzător de
salubrizare. Vă puteţi informa cu privire la punctele
de colectare și orarul acestora la administraţia
responsabilă de ceasta.
Bateriile defecte sau consumate trebuie reciclate conform
Directivei 2006 / 66 / CE și a modificărilor ei. Predaţi
acumulatorul și / sau produsul la punctele de colectare
indicate.
RO30

Dăunarea mediului înconjurător prin
înlăturarea necorespunzătoare a bateriilor!
Bateriile nu au voie să fie aruncate în gunoiul menajer. Ele pot
conţine metale grele toxice și se supun de aceea tratamentului
deșeurilor speciale. Simbolurile chimice ale metalelor grele sunt
cele care urmează: Cd = Cadmiu, Hg = Mercur, Pb = Plumb.
De aceea, predaţi bateriile consumate la un punct de colectare
comunal.
Q
Garanţie
Aparatul a fost produs cu atenţie conform unor standarde stricte
de calitate și verificat înainte de livrare. În cazul defectelor la
nivelul acestui aparat aveţi drepturi legale faţă de vânzătorul
aparatului. Aceste drepturi legale nu sunt limitate de garanţia
noastră prezentată în continuare.
Pentru acest aparat vă oferim o garanţie de 3 ani începând cu
data achiziţiei. Perioada garanţiei începe la data achiziţiei. Vă
rugăm să păstraţi bonul de casă original. Acesta reprezintă
dovada achiziţiei.
Dacă în decurs de 3 ani de la data achiziţiei acestui produs se
înregistrează un defect de material sau de fabricaţie, vă
reparăm sau înlocuim gratuit produsul – la alegerea noastră –
aparatul. Dreptul de garanţie se stinge dacă produsul este
deteriorat, utilizat sau întreţinut în mod necores punzător.
Garanţia se aplică numai pentru defecte de material și de
fabricaţie. Această garanţie nu acoperă piesele componente
ale produsului care prezintă umre normale de uzură și care sunt
văzute ca piese de schimb sau deteriorările la nivelul pieselor
casante, de exemplu întrerupătoare, acumulatori sau piese
fabricate din sticlă.
RO 31

Увод
Правилна употреба .......................................Страница 33
Обем на доставка .......................................... Страница 33
Описание на частите ..................................... Страница 33
Технически данни ............................................Страница 33
Инструкции за безопасност .......Страница 34
Инструкции за безопасност
относно батериите .........................................Страница 35
Преди пуска
Поставяне / смяна на батерията .................Страница 36
Подготовка на шублера ...............................Страница 36
Пуск
Употреба на шублера ...................................Страница 36
Примери за употреба....................................Страница 38
Отстраняване на неизправности ................ Страница 39
Поддръжка и почистване .............Страница 39
Изхвърляне ...............................................Страница 40
Гаранция .......................................................Страница 40
BG32

ДИГИТАЛЕН ШУБЛЕР
Q
Увод
Поздравяваме Ви с покупката на този нов
продукт. Вие избрахте висококачествен продукт.
Ръководството за експлоатация е част от този
продукт. То съдържа важни указания за безопас¬ност,
употреба и изхвърляне. Преди употребата на продукта се
запознайте с всички инструкции за обслужване и
безопасност. Използвайте продукта само съгласно
описанието и за посочените области на употреба. Когато
предавате продукта на трети лица, предавайте заедно с
него и всички документи.
Q
Правилна употреба
Само за частна употреба.
Не е за промишлена употреба.
Q
Обем на доставка
1 x цифров шублер
1 x батерия
1 x кутия за съхранение
1 x упътване за обслужване
Q
Описание на частите
1
измервателни деления
2
вътрешна измерваща човка
3
копче за Inch / mm
4
фиксиращ винт
5
LCD-дисплей
6
измервател на дълбочината
7
регулиращо колелце за измерващата човка
8
капаче на мястото за батерии
9
копче за нулиране (ZERO)
10
копче ВКЛ / ИЗКЛ ( ON / OFF)
11
външна измерваща човка
Q
Технически данни
Мерна единица: mm / инчове
Граници на измерване: 0 - 150 mm / 0-6”
Разделителна
способност: 0,01 mm / 0,0005”
Точност
Размери (Дължина): 0-100 mm ± 0,02 mm /
0,001”
100-150 mm ± 0,03 mm / 0,001”
Размери (дълбочина): 0-100 mm ± 0,04 mm / 0,002”
100-150 mm ± 0,05 mm / 0,002”
BG 33

Максимална скорост
на измерване: 1,5 m / s, 60”/s
Измервателна система: линейна, безконтактна
измервателна система CAP
Индикация: LCD-дисплей
Работна температура: +5 °C - +40 °C
Повлияване от
влажността на въздуха: в рамките на 0 % до 80 %
влажност на въздуха неопределена
Батерия: 3 V
CR2032 (съдържа се в
обема на доставка)
Инструкции за безопасност
ПРЕДИ УПОТРЕБА ПОЧЕТЕТЕ
УПЪТВАНЕТО ЗА ОБСЛУЖВАНЕ!
СЪХРАНЯВАЙТЕ ВНИМАТЕЛНО
УПЪТВАНЕТО ЗА ОБСЛУЖВАНЕ!
ВНИМАНИЕ! ОПАСНОСТ ОТ
НАРАНЯВАНЕ!
J ПРОДУКТЪТ НЕ БИВА ДА
ПОПАДА В РЪЦЕТЕ НА
ДЕЦА. ПРОДУКТЪТ НЕ Е
ИГРАЧКА! Продуктът не бива да се
използва от деца без контрол.
ОПАСНОСТ ЗА ЖИВОТА И
ОПАСНОСТ ОТ ЗЛОПОЛУКИ ЗА
МАЛКИ ДЕЦА! Никога не оставяйте
децата без контрол с опаковъчния
материал.
J
Има опасност от задушаване с
опаковъчния материал. Децата често
подценяват опасностите. Винаги
дръжте децата далече от продукта.
ОПАСНОСТ ЗА ЖИВОТА!
Батериите може да бъдат глътнати,
което може да е опасно за живота.
Веднага потърсете лекарска помощ,
ако бъде погълната батерия.
J
Този уред може да се използва от деца
над 8 годишна възраст, както и от лица
с ограничени физически, сензорни и
умствени способности или без опит и
знания, ако са под надзор или са били
инструктирани за безопасната
употреба на уреда и са разбрали
произтичащите от това опасности.
Децата не бива да играят с уреда.
Почистването и поддръжката да не се
BG34

изпълняват от деца без надзор.
J
Никога не излагайте продукта на
високи температури и влага, тъй като в
противен случай продуктът може да се
повреди.
J
Не подлагайте шублера на
напрежение. В противен случай чипът
в шублера може да се повреди.
J
Поддържайте шублера чист и сух.
Течностите може да повредят
шублера.
Инструкции за безопасност
относно батериите
J
ВНИМАНИЕ!
ВЗРИВООПАСНОСТ!
Никога не презареждайте
батериите!
J
Батериите не бива да се свързват
накъсо. Може да последват
прегряване, опасност от пожар или
пръскане.
J
Незабавно извадете изхабената
батерия от продукта. Има повишена
опасност от изтичане!
J
Дръжте батерията далече от деца, не я
хвърляйте в огън, не я свързвайте
накъсо и не я разглобявайте.
J
Внимавайте за правилното
разположение на полюсите (+ и -).
J
Използвайте само батерии от
посочения тип.
J
При неспазване на инструкциите
батерията може да се разреди отвъд
крайното й напрежение. Има опасност
от изтичане. Ако батерията във вашия
уред е изтекла, я извадете веднага, за
да предотвратите повреждане на
продукта!
J
Носете защитни ръкавици!
Изтеклите или повредени батерии
могат да причинят кожни
раздразнения при контакт с кожата;
затова в този случай задължително
носете подходящи защитни ръкавици.
BG 35

J
Избягвайте контакт с кожата, очите и
лигавиците. При контакт с киселината
на батерията измийте засегнатото
място обилно с вода и / или потърсете
лекар!
J
ПРЕДУПРЕЖДЕНИЕ!
ИЗКЛючете
продукта преди да поставите
батерията (LCD-дисплеят
5
е
изгаснал).
J
Извадете батерията, когато не
използвате уреда по-продължително
време.
J
В никакъв случай не свързвайте
полюсите накъсо.
Q
Преди пуска
Q
Поставяне / смяна на батерията
Забележка: Мигащите цифри показват, че батерията е
рзредена / празна.
Забележка: При смяна на батерията може да се появят
смущения на LCD-дисплея
повече от 30 секунди я поставете отново.
5
. Извадете батерията и след
j
Отворете капачето на мястото за батерията 8 (виж фиг. B).
j
Извадете старата батерия.
j
Поставете в мястото за батерията нова батерия, като
внимавате за разположението на полюсите (+ и -).
Внимавайте положителният полюс да сочи навън.
j
Отново затворете капачето на мястото за батерията 8
(виж фиг. B).
Q
Подготовка на шублера
j
Развийте фиксиращия винт 4, за да можете да движите
шублера.
j
Почистете всички измервателни повърхности и пръчката
за измерване на дълбочината със суха кърпа. В противен
случай може да се получат грешни резултати от
измерването, напр. поради влажност.
j
Проверете безупречните реакции на всички бутони,
копчета и LCD-дисплея
Q
Пуск
Q
Употреба на шублера
5
.
j
Развийте фиксиращия винт 4, като го завъртите в
посока, обратна на часовниковата стрелка.
BG36

j
Доближете външната измерваща човка 11 / вътрешната
измерваща човка
j
Включете LCD-дисплея 5, като натиснете бутона
ВКЛ / ИЗКЛ
j
Натиснете бутона inch / mm 3, за да определите мерната
2
.
10
.
единица (inch или mm), която желаете да използвате. На
LCD-дисплея
j
Натиснете бутона за нулиране (ZERO) 9, за да нулирате
LCD-дисплея
5
се появява „mm“ или „inch“.
5
.
Измерване на предмета отвън:
j
Раздалечете външните измерващи човки 11, като
завъртите регулиращото колелце
7
в посока, обратна
на часовниковата стрелка навън. Поставете външните
измерващи човки
j
Завъртете регулиращото колелце 7 в посока на
11
на предмета за измерване.
часовниковата стрелка навън. Съберете външните
измерващи човки
11
, така че да се допрат от двете
страни до предмета за измерване. Внимавайте да не
натискате твърде много и така да повредите предмета за
измерване.
Измерване на предмета отвътре:
j
Доближете вътрешните измерващи човки 2 отвътре на
предмета за измерване.
j
Завъртете регулиращото колелце 7 в посока, обратна
на часовниковата стрелка навън. Раздалечете външните
измерващи човки
2
, така че да се допрат до двете
вътрешни стени на предмета за измерване. Внимавайте
да не натискате твърде много и така да повредите
предмета за измерване.
Измерване на дълбочината на предмета:
j
Извадете измерващата човка за дълбочината 6 от
шублера.
j
Доближете измерващата човка за дълбочината 6 до
предмета за измерване, така че да се доближи до
повърхността (например в рамките на отвор).
j
Преместете тялото на шублера надолу, докато усетите
съпротивление.
j
Внимавайте да не натискате прекалено много и така за
повредите измерващата човка за дълбочината
предмета за измерване.
j
Сега размерите се показват на LCD-дисплея 5.
j
След извършване на измерването отново приближете
външните измерващи човки
2
човки
, като завъртите регулиращото колелце 7 по
11
/ вътрешните измерващи
посока на часовниковата стрелка навътре.
j
Отново изключете LCD-дисплея 5, като натиснете
бутона за ВКЛ / ИЗКЛ
10
.
Забележка: След около 5 минути LCD-дисплеят
изключва автоматично.
6
или
5
BG 37
се

j
Отново затегнете фиксиращия винт 4, като го завъртите
в посока на часовниковата стрелка, докато усетите
съпротивление.
Q
Примери за употреба
Забележка: За измерване винаги процедирайте
съгласно главата „Употреба на шублера“.
Сравнение между щекер и отвор (виж фиг. C):
j
Първо измерете размерите на щекера.
j
Евентуално запишете измерената стойност.
j
След това измерете размерите на отвора.
Отклонение от референтния размер (виж фиг. D):
j
Измерете размерите на референтен предмет (тук A).
j
Оставете измерващата човка 2 / 11 в това положение
и натиснете бутона за нулиране (ZERO)
j
След това измерете размерите на втори предмет. Сега
на LCD-дисплея
5
се показва отклонението на
9
.
размерите на втория предмет спрямо размерите на
референтния предмет (A).
Измерване на дебелината на дъното на предмета
(виж фиг. E):
j
Първо измерете дълбочината на предмета.
j
Оставете измерващата човка за дълбочината 6 в това
положение и натиснете бутона за нулиране (ZERO)
j
Сега измерете размерите на целия предмет. Сега на LCDдисплея
5
се показва дебелината на дъното на предмета.
9
.
Измерване на средното между два идентични
отвора (виж фиг. F):
j
Първо измерете размерите на единия от двата отвора с
еднаква големина.
j
Оставете измерващите човки 2 / 11 в това положение
и натиснете бутона за нулиране (ZERO)
j
След това измерете общите размери. Сега на LCDдисплея
5
се показват размерите на средното
9
.
разстояние.
Параметри на метричните резби по ISO:
Номинален
радиус:[mm]
Наклон:
-1
[mm
]
Вътрешен
диаметър:
[mm]
Диаметър на
пробиване:
[mm]
3 0,5 2,46 2,5
4 0,7 3,24 3,3
5 0,8 4,13 4,2
6 1 4,92 5
8 1,25 6,65 6,8
10 1,5 8,38 8,5
BG38

Номинален
радиус:[mm]
Наклон:
-1
[mm
]
Вътрешен
диаметър:
[mm]
Диаметър на
пробиване:
[mm]
12 1,75 10,11 10,2
16 2 13,84 14
20 2,5 17,29 17,5
Q
Отстраняване на неизправности
Уредът съдържа чувствителни електронни компоненти.
Затова е възможно той да се смущава от радиопредавателни
уреди в непосредствена близост. Ако на дисплея се появят
грешни индикации, махнете тези уреди от обкръжението на
уреда.
Електростатичното разтоварване може да причини
функционални смущения.
j
При такива функционални смущения махнете за малко
батерията и я поставете отново.
Неизправност Причина Помощ за отстраня-
ване
Петте знака
мигат едновременно веднъж в
секунда.
LCD-дисплеят
не отчита.
Напрежението
на батерията е
спаднало под
2,7 V.
5
Грешно
свързване.
Сменете батерията
съгласно главата
„Поставяне / смяна
на батерията“.
Извадете батерията
и я поставете отново
след 30 секунди.
На LCD-дисплея
5
няма показа-
ние.
1. LCD-дисплеят
е изключен.
2. Батерията
няма добър
контакт или е
поставена
неправилно.
3.
Напрежението
на батерията
е под 2,1 V.
1. Включете LCD-дисплея, като натиснете бутона за
ВКЛ / ИЗКЛ
10
.
2. Извадете батерията и я поставете,
като внимавате за
полюсите, и съгласно главата „Поставяне / смяна на
батерията“, така
че да опира във
всички контакти.
3. Сменете батерията
съгласно главата
„Поставяне / смяна на батерията“.
Q
Поддръжка и почистване
j
Почиствайте шублера преди и след употреба със суха
кърпа; никога не използвайте бензин, разтворители или
почистващи препарати.
j
Не потапяйте шублера във вода. Течността може да
повреди шублера.
BG 39

j
Изключвайте LCD-дисплея, винаги когато шублерът не се
използва. Така ще удължите дълготрайността на батерията.
j
не поставяйте шублера под напрежение и го дръжте
далече от електричество. В противен случай чипът в
шублера може да се повреди.
Q
Изхвърляне
Опаковката е изработена от еколо-гични
материали. Изхвърлете ги в контейнерите за
рециклиране на място.
За възможностите за изхвърляне на използвания продукт
ще се информирате в общинската или градската управа.
Когато продуктът Ви вече е вън от употреба, не го
изхвърляйте заедно с битовите отпадъци в
интерес на околната среда, а го отделете за
специализирано сметосъбиране. Можете да
получите необходимата информация за
съответните пунктове от местната управа.
Дефектните или изтощени батерии подлежат на рециклиране
съгласно Директива 2006 / 66 / EО и нейните изменения.
Върнете батериите и / или уреда чрез предложените
събирателни пунктове.
ди за околната среда в резултат на
неправилно изхвърляне на батериите!
Батериите не бива да се изхвърлят в битовите отпадъци.
Те може да съдържат отровни тежки метали и трябва да се
третират като специални отпадъци. Химическите символи на
тежките метали са следните: Cd = кадмий, Hg = живак,
Pb = олово. Затова предавайте изхабените батерии на
комуналните пунктове за събиране на отпадъци.
Q
Гаранция
Уредът е произведен по строги правила за качество с
необходимото внимание и е тестван добросъвестно преди
доставката му. В случай на неизправност на този продукт
Вие имате законни права пред продавача. Тези законни
права не се ограничават от представената по-долу
гаранция.
За този уред Вие получавате 3 години гаранция от датата
на закупуване. Гаранционният срок започва да тече от
датата на закупуване. Моля, съхранявайте добре
оригиналната касова бележка.
BG40

Този документ е необходим като доказателство за
покупката.
Ако в рамките на 3 години, считано от датата на покупката
на този продукт, възникне материален или фабричен
дефект, ние ще го ремонтираме или подменим – по наша
преценка – безплатно за Вас. Настоящата гаранция става
нищожна, ако уредът е повреден, не е използван правилно
или не е поддържан правилно.
Гаранцията важи за дефекти на материала или
производствени дефекти. Тази гаранция не се разпростира
върху части на продукта, които са изложени на нормално
износване и поради това се разглеждат като бързо
износващи се части (напр. батерии) или върху повреди на
чупливи части, напр. превключватели, акумулаторни
батерии или такива, произведени от стъкло.
BG 41

Εισαγωγή
Χρήση σύμφωνα με τις προδιαγραφές .................. Σελίδα 43
Συσκευασία ............................................................... Σελίδα 43
Περιγραφή τμημάτων............................................... Σελίδα 43
Τεχνικά στοιχεία ........................................................ Σελίδα 43
Συμβουλές ασφαλείας ................................ Σελίδα 44
Συμβουλές ασφαλείας για τις μπαταρίες ............... Σελίδα 45
Πριν την ενεργοποίηση
Εισαγωγή / α λλαγή μπα ταρίας ................................. Σελίδα 46
Προετοιμασία παχύμετρου ..................................... Σελίδα 46
Ενεργοποίηση
Χρησιμοποιώντας το παχύμετρο ............................ Σελίδα 47
Παραδείγματα χρήσης.............................................Σελίδα 48
Διόρθωση λάθους .................................................... Σελίδα 49
Συντήρηση και καθαρισμός .................. Σελίδα 50
Απόρριψη ............................................................. Σελίδα 50
Εγγύηση .................................................................. Σελίδα 51
GR/CY42

ΨΗΦΙΑΚΌ ΠΑΧΎΜΕΤΡΟ
Q
Εισαγωγή
Σας συγχαίρουμε για την αγορά του νέου σας
προϊόντος. Επιλέξατε ένα προϊόν υψηλών
προδια¬γραφών. Οι οδηγίες χρήσης είναι μέρος
αυτού του προϊόντος. Περιέχουν σημαντικές πληροφορίες
σχετικά με την ασφάλεια, το χειρισμό και την απόρριψη. Πριν
τη χρήση του προϊόντος εξοικειωθείτε με όλες τις οδηγίες
χρήσης και ασφαλείας. Χρησιμοποιείτε το προϊόν μόνο με τον
τρόπο που περιγράφεται και για τον τομέα εφαρμογής που
αναφέρεται. Σε περίπτωση μεταβίβασης του προϊόντος σε
τρίτους παραδώστε μαζί και όλα τα έγγραφα.
Q
Χρήση σύμφωνα με τις προδιαγραφές
Μόνο για προσωπική χρήση.
Όχι για επαγγελματική χρήση.
Q
Συσκευασία
1 x Ψηφιακό παχύμετρο
1 x Μπαταρία
1 x Κουτί αποθήκευσης
1 x Οδηγίες χρήσεως
Q
Περιγραφή τμημάτων
1
Επιφάνειες μέτρησης βημάτων
2
Εσωτερικό έμβολο μέτρησης
3
Πλήκτρο Inc h / mm
4
Βίδα ασφάλισης
5
Οθόνη ενδείξεων υγρών κρυστάλλων
6
Λεπίδα μέτρησης βάθους
7
Τροχός ρύθμισης για έμβολα μέτρησης
8
Καπάκι θήκης μπαταριών
9
Πλήκτρο επαναφοράς (ZERO)
10
Πλήκτρο ON / OFF
11
Εξωτερικό έμβολο μέτρησης
Q
Τεχνικά στοιχεία
Μονάδα μεγέθους μέτρησης: mm / inch
Εύρος μέτρησης: 0 - 150 χιλ / 0-6”
Ανάλυση: 0,01 χιλ / 0,0005”
Ακρίβεια
Διαστάσεις (Μήκος): 0-100 χιλ ± 0,02 χιλ /
100-150
χιλ
± 0,03
0,001”
χιλ
/ 0,001”
Διαστάσεις (Βάθος): 0-100 χιλ ± 0,04 χιλ / 0,002”
100-150 χιλ ± 0,05 χιλ /
0,002”
Μέγιστη ταχύτητα μέτρησης: 1,5 μ / δευτ., 60”/δευτ.
GR/CY 43

Σύστημα μέτρησης: γραμμικό, χωρίς επαφή
Σύστημα μέτρησης CAP
Ένδειξη: Οθόνη ενδείξεων υγρών
κρυστάλλων
Θερμοκρασία λειτουργίας: +5 °C - +40 °C
Επίδραση από
ατμοσφαιρική υγρασία: εντός του 0 % έως 80 %
σχετική ατμοσφαιρική υγρασία
ασήμαντη
Μπαταρία: 3 V
CR2032
(περιλαμβάνονται στην συσκευασία)
Συμβουλές ασφαλείας
ΠΡΙΝ ΤΗΝ ΧΡΗΣΗ ΠΑΡΑΚΑΛΟΥΜΕ
ΔΙΑΒΑΣΤΕ ΤΙΣ ΟΔΗΓΙΕΣ ΧΡΗΣΕΩΣ!
ΠΑΡΑΚΑΛΟΥΜΕ ΔΙΑΤΗΡΗΣΤΕ
ΠΡΟΣΕΚΤΙΚΑ ΤΙΣ ΟΔΗΓΙΕΣ ΧΡΗΣΕΩΣ!
ΠΡΟΣΟΧΗ! ΚΙΝΔΥΝΟΣ
ΤΡΑΥΜΑΤΙΣΜΟΥ!
J ΤΟ ΠΡΟΪΟΝ ΔΕΝ ΑΝΗΚΕΙ
ΣΕ ΧΕΡΙΑ ΠΑΙΔΙΩΝ. ΑΥΤΟ
ΤΟ ΠΡΟΪΟΝ ΔΕΝ ΕΙΝΑΙ
ΠΑΙΧΝΙΔΙ! Αυτό το προϊόν πρέπει να
μην χρησιμοποιείται ποτέ από παιδιά
χωρίς επίβλεψη.
ΘΑΝΑΤΗΦΟΡΟΣ ΚΙΝΔΥΝΟΣ ΚΑΙ
ΚΙΝΔΥΝΟΣ ΑΤΥΧΗΜΑΤΟΣ ΓΙΑ
ΝΗΠΙΑ ΚΑΙ ΠΑΙΔΙΑ! Μην αφήνετε
ποτέ παιδιά με την συσκευασία χωρίς
επίβλεψη.
J Υφίσταται κίνδυνος ασφυξίας μέσω του
υλικού συσκευασίας. Τα παιδιά υποτιμούν
συχνά τους κίνδυνους. Κρατήστε τα
παιδιά πάντοτε μακριά από το προϊόν.
ΘΑΝΑΣΙΜΟΣ ΚΙΝΔΥΝΟΣ! Οι
μπαταρίες μπορούν να καταπωθούν,κάτι
που μπορεί να είναι θανάσιμα
επικίνδυνο. Λάβετε άμεσα ιατρική
βοήθεια, όταν μια μπαταρία καταπωθεί.
J
Αυτή η συσκευή μπορεί να χρησιμοποιηθεί
από παιδιά άνω των 8 ετών καθώς και
από πρόσωπα με μειωμένες φυσικές,
αισθητηριακές ή πνευματικές ικανότητες ή
με έλλειψη εμπειρίας και/ή γνώσης, όταν
επιβλέπονται ή έχουν ενημερωθεί σχετικά
με την ασφαλή χρήση του στεγνωτήρα
μαλλιών ταξιδιού και έχουν καταλάβει τους
κινδύνους που προκύπτουν από αυτό.
GR/CY44

Τα παιδιά δεν επιτρέπεται να παίζουν με
την συσκευή. Καθαρισμός και συντήρηση
χρήστη απαγορεύεται να εκτελούνται
από παιδιά χωρίς επίβλεψη.
J Μην εκθέτετε ποτέ το προϊόν σε υψηλές
θερμοκρασίες και υγρασία, γιατί αλλιώς
μπορεί το προϊόν να δεχθεί φθορές.
J Μην βάζετε το παχύμετρο σε τάση. Σε
άλλη περίπτωση μπορεί να πάθει βλάβη
το τσιπ του παχυμέτρου.
J Κρατήστε το παχύμετρο καθαρό και
στεγνό. Υγρό μπορεί να βλάψει το
παχύμετρο.
Συμβουλές ασφαλείας
για τις μπαταρίες
J
ΠΡΟΣΟΧΗ! Κίνδυνος
έκρηξης! Μην φορτίζετε ποτέ
τις μπαταρίες!
J Οι μπαταρίες δεν επιτρέπεται να
βραχυκυκλωθούν. Υπερθέρμανση,
κίνδυνος πυρκαγιάς ή θραύση μπορεί να
είναι οι συνέπειες.
J Αφαιρέστε άμεσα μια εξαντλημένη
μπαταρία από το προϊόν. Υφίσταται
αυξημένος κίνδυνος διαρροής!
J Κρατήστε τις μπαταρίες μακριά από
παιδιά, μην τις πετάτε σε φωτιά, μην τις
βραχυκυκλώνετε και μην τις
αποσυναρμολογείτε.
J Προσέχετε την σωστή πολικότητα (+ και
-).
J Χρησιμοποιείτε αποκλειστικά τον
παρεχόμενο τύπο μπαταρίας.
J Σε παράλειψη των συμβουλών μπορεί η
μπαταρία να αποφορτιστεί πλήρως μέσω
του πόλου της. Υφίσταται τότε κίνδυνος
διαρροής. Σε περίπτωση που η μπαταρία
στην συσκευή σας αποφορτιστεί,
αφαιρέστε την άμεσα, για να αποφύγετε
βλάβες στο προϊόν!
J Φοράτε γάντια προστασίας!
Αποφορτισμένες ή φθαρμένες μπαταρίες
μπορούν να προκαλέσουν σε επαφή με
το δέρμα χημικά εγκαύματα: φοράτε για
αυτό σε αυτή την περίπτωση
απαραιτήτως τα κατάλληλα γάντια
προστασίας.
GR/CY 45

J Αποφεύγετε την επαφή με το δέρμα, τα
μάτια και τα βλεννώδη. Σε επαφή με υγρά
μπαταρίας καθαρίστε την προσβληθείσα
περιοχή με άφθονο νερό και / ή
προστρέξτε σε έναν γιατρό!
J
ΠΡΟΕΙΔΟΠΟΙΗΣΗ!
ΑΠ-ενεργοποιήστε
το προϊόν, πριν εισάγετε την μπαταρία
(η οθόνη ενδείξεων υγρών κρυστάλλων
5
είναι κλειστή).
J Αφαιρέστε την μπαταρία από το προϊόν
σε μακροχρόνια μη-χρήση.
J Μην βραχυκυκλώνετε σε καμία
περίπτωση τους πόλους σύνδεσης.
Q
Πριν την ενεργοποίηση
Q
Εισαγωγή / αλλαγή μπαταρίας
Οδηγία: Ψηφία που αναβοσβήνουν υποδεικνύουν για
αποφορτισμένη / άδεια μπαταρία.
Οδηγία: Κατά την αλλαγή της μπαταρίας μπορεί να προκύψει
δυσλειτουργία της οθόνης ενδείξεων υγρών κρυστάλλων
Αφαιρέστε την μπαταρία και εισάγετε την ξανά μετά από
περισσότερο από 30 δευτερόλεπτα.
5
.
j
Σπρώξτε το καπάκι θήκης μπαταρίας 8 (δες εικ. B).
j
Αφαιρέστε την παλιά μπαταρία.
j
Εισάγετε μια νέα μπαταρία στην θήκη μπαταρίας,
προσέχοντας την πολικότητα (+ και -). Προσέξτε, ώστε ο
θετικός πόλος να δείχνει προς τα έξω.
j
Σπρώξτε το καπάκι θήκης μπαταρίας 8 ξανά πίσω (δες
εικ. B).
Q
Προετοιμασία παχύμετρου
j
Ξεσφίξτε την βίδα ασφάλισης 4 για να μπορέσετε να
κινήσετε το παχύμετρο.
j
Καθαρίστε όλες τις επιφάνειες μέτρησης και τη λίστα
παχυμέτρου με μια στεγνή πετσέτα. Σε διαφορετική
περίπτωση, μπορεί παραδείγματος χάριν μέσω της
ατμοσφαιρικής υγρασίας, να προκύψουν εσφαλμένες
ενδείξεις μέτρησης.
j
Ελέγξτε όλα τα πλήκτρα, διακόπτες και οθόνη ενδείξεων
υγρών κρυστάλλων
5
για αντιδράσεις χωρίς σφάλματα.
GR/CY46

Q
Ενεργοποίηση
Q
Χρησιμοποιώντας το παχύμετρο
j
Ξεσφίξτε την βίδα ασφάλισης 4, με το να την
περιστρέψετε αριστερόστροφα.
j
Σύρετε μαζί τα εξωτερικά έμβολα μέτρησης
έμβολα μέτρησης
j
Ενεργοποιήστε την οθόνη ενδείξεων υγρών κρυστάλλων 5,
2
.
με το να πιέσετε το πλήκτρο EIN- / AUS
j
Πατήστε το πλήκτρο inch / mm 3, για να ορίσετε τη
10
.
11
/ εσωτερικά
μονάδα μέτρησης (inch (ίντσες) ή mm (χιλιοστά)), την οποία
επιθυμείτε να χρησιμοποιείτε. Στην ένδειξη LCD
5
εμφανίζεται είτε „mm“ ή „inch“.
j
Πιέστε το πλήκτρο επαναφοράς (ZERO) 9, για να 5
επαναφέρετε την οθόνη ενδείξεων υγρών κρυστάλλων στο
μηδέν.
Μετρώντας ένα αντικείμενο από έξω:
j
Σύρετε μαζί τα εξωτερικά έμβολα μέτρησης 11 χωρίζοντας
το ένα από το άλλο, με το να περιστρέψετε τον τροχό
ρύθμισης
τα εξωτερικά έμβολα μέτρησης
7
αριστερόστροφα προς τα έξω. Τοποθετήστε
11
στο αντικείμενο προς
μέτρηση.
j
Περιστρέψτε τον τροχό ρύθμισης 7 δεξιόστροφα προς τα
μέσα. Σύρετε μαζί τα εξωτερικά έμβολα μέτρησης
μακριά μεταξύ τους, μέχρι να αγγίζουν το αντικείμενο προς
μέτρηση στις δυο πλευρές του. Προσέξτε, ώστε να μην
βλάψετε το προς μέτρηση αντικείμενο με πολύ πίεση.
11
τόσο
Μετρώντας ένα αντικείμενο από μέσα:
j
Τοποθετήστε τα εσωτερικά έμβολα μέτρησης
2
από μέσα
στο αντικείμενο προς μέτρηση.
j
Περιστρέψτε τον τροχό ρύθμισης 7 αριστερόστροφα
προς τα έξω. Σύρετε μαζί τα εξωτερικά έμβολα μέτρησης
2
τόσο μακριά μεταξύ τους, μέχρι να αγγίζουν το
αντικείμενο προς μέτρηση στις δυο πλευρές του. Προσέξτε,
ώστε να μην βλάψετε το προς μέτρηση αντικείμενο με πολύ
πίεση.
Μετρώντας το βάθος ενός αντικειμένου:
j
Σύρετε την λεπίδα μέτρησης βάθους 6 έξω από το
παχύμετρο.
j
Τοποθετήστε την λεπίδα μέτρησης βάθους 6 στο προς
μέτρηση αντικείμενο, μέχρι να αγγίζει την επιφάνεια (π.χ.
εντός μιας οπής).
j
Σπρώξτε το στέλεχος του παχύμετρου προς τα κάτω, μέχρι
να αισθανθείτε αντίσταση.
j
Προσέξτε, ώστε να μην βλάψετε την λεπίδα μέτρησης
βάθους
6
ή το αντικείμενο προς μέτρηση μέσω πολύς
πίεσης.
j
Η οθόνη ενδείξεων υγρών κρυστάλλων 5 εμφανίζει τώρα
το μέγεθος.
GR/CY 47

j
Σύρετε μετά την ολοκλήρωση της μέτρησης τα εξωτερικά
έμβολα μέτρησης
11
/ εσωτερικά έμβολα μέτρησης 2.
ξανά μαζί, με το να περιστρέψετε τον τροχό ρύθμισης
δεξιόστροφα προς τα μέσα.
j
Απενεργοποιήστε την οθόνη ενδείξεων υγρών κρυστάλλων
5
ξανά, με το να πιέσετε το πλήκτρο ON / OFF 10.
Οδηγία: Μετά από περ. 5 λεπτά απενεργοποιείται η
οθόνη ενδείξεων υγρών κρυστάλλων
j
Σφίξτε την βίδα ασφάλισης
4
5
αυτόματα.
ξανά, με το να την
περιστρέψετε δεξιόστροφα, μέχρι να αισθανθείτε
αντίσταση.
Q
Παραδείγματα χρήσης
Οδηγία: Προχωρήστε σε μέτρηση πάντα σύμφωνα με το
κεφάλαιο „χρησιμοποιώντας το παχύμετρο“.
Σύγκριση μεταξύ βύσματος και οπής (δες εικ. C):
j
Πάρτε πρώτα το μέγεθος του βύσματος.
j
Σημειώστε αν χρειάζεται το αποτέλεσμα.
j
Πάρτε στο τέλος το μέγεθος της οπής.
Απόκλιση ενός μεγέθους αναφοράς (δες εικ. D):
j
Πάρτε το μέγεθος ενός αντικειμένου αναφοράς (εδώ Α).
j
Αφήστε τα έμβολα μέτρησης
πιέστε το πλήκτρο για επαναφορά (ZERO)
j
Πάρτε στο τέλος το μέγεθος του δεύτερου αντικειμένου. Η
οθόνη ενδείξεων υγρών κρυστάλλων
2
/ 11 σε αυτή την θέση και
9
.
5
εμφανίζει τώρα
την απόκλιση του μεγέθους του δεύτερου αντικειμένου
προς το μέγεθος του αντικειμένου αναφοράς (Α).
7
Μετρώντας το πάχος του πάτου ενός αντικείμενου
(δες εικ. E):
j
Μετρήστε πρώτα το βάθος του αντικείμενου.
j
Αφήστε τη λεπίδα μέτρησης βάθους 6 σε αυτή την θέση
και πιέστε το πλήκτρο για επαναφορά (ZERO)
j
Πάρτε τώρα το μέγεθος ολόκληρου του αντικείμενου. Η
οθόνη ενδείξεων υγρών κρυστάλλων
5
9
.
εμφανίζει τώρα το
πάχος του πάτου του αντικείμενου.
Μέτρηση απόστασης μεταξύ δύο ιδίων τρυπών
(βλέπε Εικ. F):
j
Πάρτε πρώτα το μέγεθος ενός εκ των δύο ισομεγεθών
οπών.
j
Αφήστε τα έμβολα μέτρησης 2 / 11 σε αυτή την θέση και
πιέστε το πλήκτρο για επαναφορά (ZERO)
j
Πάρτε στο τέλος το συνολικό μέγεθος. Η οθόνη ενδείξεων
υγρών κρυστάλλων
5
εμφανίζει τώρα το μέγεθος της
9
.
μέσης απόστασης.
GR/CY48

Χαρακτηριστικά από μετρικά σπειρώματα ISO:
Ονομαστική
διάμετρος:
[χιλ]
Κλίση:
-1
[χιλ
Διάμετρος
]
πυρήνα:
[χιλ]
Διάμετρος
διάτρησης:
[χιλ]
3 0,5 2,46 2,5
4 0,7 3,24 3,3
5 0,8 4,13 4,2
6 1 4,92 5
8 1,25 6,65 6,8
10 1,5 8,38 8,5
12 1,75 10,11 10,2
16 2 13,84 14
20 2,5 17,29 17,5
Q
Διόρθωση λάθους
Η συσκευή περιέχει ευπαθή ηλεκτρονικά στοιχεία. Για αυτό
είναι δυνατό, ότι μπορεί να δυσλειτουργήσει σε άμεση επαφή
με συσκευές μετάδοσης ήχου. Αν εμφανίζονται λανθασμένες
ενδείξεις στην οθόνη, απομακρύνετε τέτοιες συσκευές από το
περιβάλλον της συσκευής.
Ηλεκτροστατικές εκκενώσεις μπορεί να οδηγήσουν σε
δυσλειτουργίες.
j
Αφαιρέστε σε τέτοιες δυσλειτουργίες την μπαταρία για
μικρό χρονικό διάστημα και εισάγετε την εκ νέου.
Λάθος Αιτία Βοήθεια
Πέντε θέσεις πε-
τάγονται ταυτόχρονα μια φορά
ανά
Η τάση μπαταρίας βρίσκεται κάτω
από τα 2,7 V.
Αλλάξτε την μπαταρία
σύμφωνα με το κεφάλαιο „Εισαγωγή μπαταρίας / αλλαγή“.
δευτερόλεπτο.
Η οθόνη ενδείξε-
ων υγρών κρυστάλλων
5
μετράει περισσό-
δεν
Λανθασμένο
κύκλωμα.
Αφαιρέστε την μπαταρία και εισάγετέ την
ξανά μετά από 30
δευτερόλεπτα.
τερο.
GR/CY 49

Καμία ένδειξη
στην οθόνη ενδείξεων υγρών κρυ-
5
στάλλων
.
1.
Η οθόνη ενδεί-
ξεων υγρών
κρυστάλλων είναι
απενεργο-
ποιημένη.
2. Η μπαταρία
δ
εν έχει σωστή
επαφή ή είναι
λάθος εισαγμένη.
3. Η τάση
μπαταρίας
βρίσκεται κάτω
από τα 2,1 V.
1. Ενεργοποιήστε την
οθόνη ενδείξεων
υγρών κρυστάλλων,
με το να πιέσετε το
πλήκτρο ON / OFF.
10
2. Αφαιρέστε την μπαταρία και εισάγετε
την σύμφωνα με
την πολικότητα και
το κεφάλαιο „Εισαγωγή μπαταρίας /
αντικατάσταση“
έτσι, ώστε να αγγίζει όλες τις επαφές.
3. Αλλάξτε την μπαταρία σύμφωνα με
το κεφάλαιο „Εισαγωγή μπαταρίας /
αντικατάσταση“.
Q
Συντήρηση και καθαρισμός
j
Καθαρίζετε το παχύμετρο πριν και μετά από κάθε χρήση με
στεγνή πετσέτα. Μη χρησιμοποιείτε ποτέ βενζίνη, διαλυτικά
ή καθαριστικά.
j
Μην βυθίζετε το παχύμετρο στο νερό. Υγρό μπορεί να
βλάψει το παχύμετρο.
j
Απενεργοποιείτε την οθόνη ενδείξεων υγρών κρυστάλλων
πάντα, όταν δεν χρησιμοποιείτε το παχύμετρο. Έτσι
επιμηκύνετε την διάρκεια λειτουργίας της μπαταρίας.
j Μην τοποθετείτε το παχύμετρο σε τάση και κρατήστε το
μακριά από ηλεκτρικές ακίδες. Σε άλλη περίπτωση μπορεί
να πάθει βλάβη το τσιπ του παχυμέτρου.
Q
Απόρριψη
Η συσκευασία αποτελείται αποκλειστικά από υλικά
που σέβονται το περιβάλλον. Αποσύρετέ τη με τη
βοήθεια των κατά τόπους υπηρεσιών ανακύκλωσης.
Δυνατότητες για απόρριψη του αχρηστεμένου προ-ϊόντος
μπορείτε να πληροφορηθείτε στην διοίκηση του δήμου ή της
κοινότητάς σας.
Για την προστασία του περιβάλλοντος μην
αποσύρετε το άχρηστο πλέον προϊόν στα οικιακά
απορρίμματα, αλλά αποσύρετέ το σύμφωνα με τους
κανονισμούς. Η αρμόδια διοίκηση της κοινότητας
σας ενημερώνει σχετικά με τα σημεία συλλογής και
τις ώρες λειτουργίας αυτών.
GR/CY50

Οι ελαττωματικές ή άχρηστες μπαταρίες πρέπει να
ανακυκλώνονται σύμφωνα με την οδηγία 2006 / 66 / EΚ και τις
αλλαγές της. Επιστρέφετε τους συσσωρευτές ή / και τη
συσκευή στις προσφερόμενες υπηρεσίες συλλογής.
Περιβαλλοντικές βλάβες λόγω εσφαλμένης
απόρριψης μπαταριών!
Απαγορεύεται η απόρριψη μπαταριών στα οικιακά απορρίμματα.
Ίσως περιέχουν δηλητηριώδη βαριά μέταλλα και συγκαταλέγονται
στην επεξεργασία ειδικών απορριμμάτων. Τα χημικά σύμβολα
βαρέων μετάλλων είναι τα εξής: Cd = Κάδμιο, Hg = Υδράργυρος,
Pb = Μόλυβδος. Συνεπώς παραδώστε τις εξαντλημένες
μπαταρίες σε κοινοτική υπηρεσία συλλογής.
Q
Εγγύηση
Η συσκευή κατασκευάστηκε προσεκτικά κάτω από αυστηρές
οδηγίες ποιότητας και ελέγχθηκε επιμελώς πριν από την
αποστολή. Σε περίπτωση βλαβών στο προϊόν έχετε νομικά
δικαιώματα προς τον πωλητή του προϊόντος. Τα νομικά
δικαιώματα δεν περιορίζονται από την εγγύηση που
παρατίθεται παρακάτω.
Αγαπητέ πελάτη, η παρούσα συσκευή συνοδεύεται από
εγγύηση 3 ετών από την ημερομηνία αγοράς. Η εγγύηση ισχύει
από την ημερομηνία αγοράς. Παρακαλείσθε να φυλάξετε με
προσοχή την ταμειακή απόδειξη. Το συγκεκριμένο έγγραφο θα
απαιτηθεί ως αποδεικτικό αγοράς.
Σε περίπτωση που εντός του διαστήματος των 3 ετών από την
ημερομηνία αγοράς αυτού του προϊόντος προκύψει κάποιο
σφάλμα υλικού ή κατασκευής, το προϊόν επισκευάζεται ή
αντικαθίσταται από εμάς – κατόπιν επιλογής μας – δωρεάν.
Αυτή η εγγύηση παύει να ισχύει αν το προϊόν πάθει βλάβη,
χρησιμοποιηθεί ή συντηρηθεί εκτός των προδιαγραφών.
Η εγγύηση ισχύει για σφάλματα υλικού ή κατασκευής. Αυτή η
εγγύηση δεν επεκτείνεται σε μέρη προϊόντος, τα οποία
εκτέθηκαν σε φυσιολογική φθορά και για αυτό το λόγο
μπορούν να θεωρηθούν ως φθαρτά μέρη (π.χ. μπαταρίες) ή
για βλάβες σε εύθραυστα μέρη, π.χ. διακόπτες,
επαναφορτιζόμενες μπαταρίες ή παρόμοια, τα οποία είναι
κατασκευασμένα από γυαλί.
Με την αντικατάσταση της συσκευής, σύμφωνα με το ΝΟΜOΣ
2251/1994, ξεκινάει εκ νέου ο χρόνος εγγύησης.
GR/CY 51

Einleitung
Bestimmungsgemäße Verwendung ...........................Seite 53
Lieferumfang ...............................................................Seite 53
Teilebeschreibung .......................................................Seite 53
Technische Daten ........................................................Seite 53
Sicherheitshinweise .......................................Seite 54
Sicherheitshinweise zu Batterien ...............................Seite 55
Vor der Inbetriebnahme
Batterie einsetzen / austauschen ...............................Seite 56
Messschieber vorbereiten ..........................................Seite 56
Inbetriebnahme
Messschieber verwenden ..........................................Seite 57
Anwendungsbeispiele ................................................Seite 58
Fehler beheben ...........................................................Seite 59
Wartung und Reinigung ............................Seite 60
Entsorgung ............................................................Seite 60
Garantie...................................................................S e i te 61
DE/AT/CH52

DIGITALER MESSSCHIEBER
Q
Einleitung
Wir beglückwünschen Sie zum Kauf Ihres neuen
Gerätes. Sie haben sich damit für ein hochwertiges
Produkt entschieden. Die Bedienungsanleitung ist Teil
dieses Produkts. Sie enthält wichtige Hinweise für
Sicherheit, Gebrauch und Entsorgung. Machen Sie sich vor der
Benutzung des Produkts mit allen Bedien- und
Sicherheitshinweisen vertraut. Benutzen Sie das Produkt nur wie
beschrieben und für die angegebenen Einsatzbereiche.
Händigen Sie alle Unterlagen bei Weitergabe des Produkts an
Dritte mit aus.
Q
Bestimmungsgemäße Verwendung
Nur zur privaten Nutzung.
Nicht für den gewerblichen Einsatz.
Q
Lieferumfang
1 x Digitaler Messschieber
1 x Batterie
1 x Aufbewahrungsbox
1 x Bedienungsanleitung
Q
Teilebeschreibung
1
Schrittmessflächen
2
Innere Messschnäbel
3
Inch / mm-Taste
4
Sicherungsschraube
5
LCD-Anzeige
6
Tiefenmessschaufel
7
Stellrad für Messschnäbel
8
Batteriefachdeckel
9
Taste für Nullstellung (ZERO)
10
EIN- / AUS-Taste (ON / OFF)
11
Äußere Messschnäbel
Q
Technische Daten
Messgrößeneinheit: mm / inch
Messbereich: 0 - 150 mm / 0-6”
Auflösung: 0,01 mm / 0,0005”
Genauigkeit
Abmessung (Länge): 0-100 mm ± 0,02 mm /
100-150 mm ± 0,03 mm /
0,001”
0,001”
DE/AT/CH 53

Abmessung (Tiefe): 0-100 mm ± 0,04 mm / 0,002”
100-150 mm ± 0,05 mm /
0,002”
Maximale
Messgeschwindigkeit: 1,5 m / s, 60”/s
Messsystem: lineares, kontaktloses
CAP-Messsystem
Anzeige: LCD-Anzeige
Betriebstemperatur: +5 °C - +40 °C
Einfluss durch Luftfeuchtigkeit: innerhalb von 0 % bis 80 %
relative Luftfeuchtigkeit unerheblich
Batterie: 3 V
CR2032 (im
Lieferumfang enthalten)
Sicherheitshinweise
VOR GEBRAUCH BITTE DIE
BEDIENUNGSANLEITUNG LESEN!
BEDIENUNGSANLEITUNG BITTE
SORGFÄLTIG AUFBEWAHREN!
VORSICHT! VERLETZUNGSGEFAHR!
J DAS PRODUKT GEHÖRT
NICHT IN KINDERHÄNDE.
DIESES PRODUKT IST KEIN
SPIELZEUG! Dieses Produkt sollte von
Kindern nicht ohne Aufsicht benutzt
werden.
LEBENS- UND UNFALLGEFAHR FÜR
KLEINKINDER UND KINDER!
Lassen Sie Kinder niemals unbeaufsichtigt
mit dem Verpackungsmaterial.
J
Es besteht Erstickungsgefahr durch
Verpackungsmaterial. Kinder
unterschätzen häufig die Gefahren.
Halten Sie Kinder stets vom Produkt fern.
LEBENSGEFAHR! Batterien können
verschluckt werden, was lebensgefährlich
sein kann. Nehmen Sie sofort ärztliche
Hilfe in Anspruch, wenn eine Batterie
verschluckt wurde.
DE/AT/CH54

J
Dieses Gerät kann von Kindern ab 8
Jahren und darüber sowie von Personen
mit verringerten physischen, sensorischen
oder mentalen Fähigkeiten oder Mangel
an Erfahrung und Wissen benutzt
werden, wenn sie beaufsichtigt oder
bezüglich des sicheren Gebrauchs des
Gerätes unterwiesen wurden und die
daraus resultierenden Gefahren
verstehen. Kinder dürfen nicht mit dem
Gerät spielen. Reinigung und
Benutzerwartung dürfen nicht von
Kindern ohne Beaufsichtigung
durchgeführt werden.
J
Setzen Sie das Produkt niemals hohen
Temperaturen und Feuchtigkeit aus, da
sonst das Produkt Schaden nehmen kann.
J
Setzen Sie den Messschieber nicht unter
Spannung. Andernfalls kann der Chip im
Messschieber beschädigt werden.
J
Halten Sie den Messschieber sauber und
trocken. Flüssigkeit kann den
Messschieber beschädigen.
Sicherheitshinweise zu
Batterien
J
VORSICHT!
EXPLOSIONSGEFAHR!
Laden Sie Batterien niemals
wieder auf!
J
Batterien dürfen nicht kurzgeschlossen
werden. Überhitzung, Brandgefahr oder
Platzen können die Folge sein.
J
Entfernen Sie eine erschöpfte Batterie
umgehend aus dem Produkt. Es besteht
erhöhte Auslaufgefahr!
J
Halten Sie die Batterie von Kindern fern,
werfen Sie sie nicht ins Feuer, schließen
Sie sie nicht kurz und nehmen Sie sie
nicht auseinander.
J
Achten Sie auf die richtige Polarität
(+ und -).
J
Verwenden Sie ausschließlich den
angegebenen Batterietyp.
J
Bei Nichtbeachtung der Hinweise kann
die Batterie über ihre Endspannung
hinaus entladen werden. Es besteht dann
die Gefahr des Auslaufens. Falls die
DE/AT/CH 55

Batterie in Ihrem Gerät ausgelaufen sein
sollte, entnehmen Sie diese sofort, um
Schäden am Produkt vorzubeugen!
J
Schutzhandschuhe tragen!
Ausgelaufene oder beschädigte
Batterien können bei Berührung mit der
Haut Verätzungen verursachen; tragen
Sie deshalb in diesem Fall unbedingt
geeignete Schutzhandschuhe.
J
Vermeiden Sie den Kontakt mit Haut,
Augen und Schleimhäuten. Bei Kontakt
mit Batteriesäure spülen Sie die
betroffene Stelle mit reichlich Wasser ab
und / oder suchen Sie einen Arzt auf!
J
WARNUNG!
Schalten Sie das Produkt
AUS, bevor Sie die Batterie einlegen
(LCD-Anzeige
J
Entnehmen Sie die Batterie bei längerer
5
ist aus).
Nichtbenutzung aus dem Gerät.
J
Schließen Sie die Anschlusspole auf
keinen Fall kurz.
Q
Vor der Inbetriebnahme
Q
Batterie einsetzen / aus tauschen
Hinweis: Blinkende Ziffern weisen auf eine entladene / leere
Batterie hin.
Hinweis: Beim Wechseln der Batterie kann es zu Störungen
der LCD-Anzeige
setzen Sie sie nach mehr als 30 Sekunden wieder ein.
j
Schieben Sie den Batteriefachdeckel 8 auf (siehe Abb. B).
j
Entnehmen Sie die alte Batterie.
j
Setzen Sie eine neue Batterie unter Beachtung der Polarität
(+ und -) in das Batteriefach ein. Achten Sie darauf, dass
der Pluspol nach außen zeigt.
j
Schieben Sie den Batteriefachdeckel 8 wieder zu (siehe
Abb. B).
Q
Messschieber vorbereiten
j
Lösen Sie die Sicherungsschraube
Messschieber bewegen können.
j
Reinigen Sie alle Messflächen und die Messschieberleiste mit
einem trockenen Tuch. Andernfalls kann es, beispielsweise
durch Luftfeuchtigkeit, zu fehlerhaften Messergebnissen
kommen.
j
Prüfen Sie alle Tasten, Schalter und die LCD-Anzeige 5
auf einwandfreie Reaktionen.
5
kommen. Entnehmen Sie die Batterie und
4
damit Sie den
,
DE/AT/CH56

Q
Inbetriebnahme
Q
Messschieber verwenden
j
Lösen Sie die Sicherungsschraube 4, indem Sie sie gegen
den Uhrzeigersinn drehen.
j
Schieben Sie die äußeren Messschnäbel
Messschnäbel
j
Schalten Sie die LCD-Anzeige 5 ein, indem Sie die
EIN- / AUS-Taste
j
Drücken Sie die inch / mm-Taste 3, um die Maßeinheit
2
zusammen.
10
drücken.
11
/ inneren
(inch oder mm) festzulegen, die Sie nutzen möchten. Es
erscheint entweder „mm“ oder „inch“ in der LCD-Anzeige
5
.
j
Drücken Sie die Taste zur Nullstellung (ZERO) 9, um die
LCD-Anzeige
5
auf Null zurückzusetzen.
Gegenstand von außen messen:
j
Schieben Sie die äußeren Messschnäbel 11 auseinander,
indem Sie das Stellrad
7
gegen den Uhrzeigersinn nach
außen drehen. Setzen Sie die äußeren Messschnäbel
an den zu messenden Gegenstand an.
j
Drehen Sie das Stellrad 7 im Uhrzeigersinn nach innen.
Schieben Sie so die äußeren Messschnäbel
11
so weit
zusammen, bis sie den zu messenden Gegenstand an
beiden Seiten berühren. Achten Sie darauf, dass Sie den zu
messenden Gegenstand nicht durch zu viel Druck
beschädigen.
11
Gegenstand von innen messen:
j
Setzen Sie die inneren Messschnäbel
2
von innen an den
zu messenden Gegenstand an.
j
Drehen Sie das Stellrad 7 gegen den Uhrzeigersinn nach
außen. Schieben Sie so die inneren Messschnäbel
weit auseinander, bis sie den Gegenstand an beiden inneren
Seiten berühren. Achten Sie darauf, dass Sie den zu
messenden Gegenstand nicht durch zu viel Druck
beschädigen.
Tiefe eines Gegenstandes messen:
j
Schieben Sie die Tiefenmessschaufel 6 aus dem Messschieber.
j
Setzen Sie die Tiefenmessschaufel 6 an den zu messenden
Gegenstand an, bis sie die Oberfläche berührt (z.B. innerhalb
eines Loches).
j
Schieben Sie den Körper des Messschiebers herunter, bis
Sie einen Widerstand spüren.
j
Achten Sie darauf, dass Sie die Tiefenmessschaufel
6
oder den
zu messenden Gegenstand nicht durch zu viel Druck beschädigen.
j
Die LCD-Anzeige 5 zeigt nun die Maße an.
j
Schieben Sie nach der Durchführung der Messung die äußeren
Messschnäbel
zusammen, indem Sie das Stellrad
nach innen drehen
11
/ inneren Messschnäbel 2 wieder
7
im Uhrzeigersinn
.
2
so
DE/AT/CH 57

j
Schalten Sie die LCD-Anzeige 5 wieder aus, indem Sie
die EIN- / AUS-Taste
10
drücken.
Hinweis: Nach ca. 5 Minuten schaltet sich die LCD-Anzeige
5
automatisch ab.
j
Drehen Sie die Sicherungsschraube
4
wieder fest, indem Sie
sie im Uhrzeigersinn drehen, bis Sie einen Widerstand spüren.
Q
Anwendungsbeispiele
Hinweis: Gehen Sie zum Messen immer gemäß dem Kapitel
„Messschieber verwenden“ vor.
Vergleich zwischen Stecker und Loch
(siehe Abb. C):
j
Nehmen Sie zunächst die Maße des Steckers.
j
Notieren Sie sich ggf. den Messwert.
j
Nehmen Sie anschließend die Maße des Lochs.
Abweichung einer Referenzgröße (siehe Abb. D):
j
Nehmen Sie die Maße eines Referenzgegenstandes (hier A).
j
Belassen Sie die Messschnäbel
und drücken Sie die Taste zur Nullstellung (ZERO)
j
Nehmen Sie anschließend die Maße des zweiten
Gegenstandes. Die LCD-Anzeige
2
/ 11 in dieser Position
5
zeigt nun die
9
.
Abweichung der Maße des zweiten Gegenstandes zu der
Maße des Referenzgegenstandes (A) an.
Messen der Dicke des Bodens eines Gegenstandes
(siehe Abb. E):
j
Messen Sie zunächst die Tiefe des Gegenstandes.
j
Belassen Sie die Tiefenschaufel 6 in dieser Position und
drücken Sie die Taste zur Nullstellung (ZERO)
j
Nehmen Sie nun die Maße des gesamten Gegenstandes.
Die LCD-Anzeige
5
zeigt nun die Dicke des Bodens des
9
.
Gegenstandes.
Messen des Abstandes zwischen zwei identischen
Löchern (siehe Abb. F):
j
Nehmen Sie zunächst die Maße eines der beiden
gleichgroßen Löcher.
j
Belassen Sie die Messschnäbel 2 / 11 in dieser Position
und drücken Sie die Taste zur Nullstellung (ZERO)
j
Nehmen Sie anschließend die Gesamtmaße.
Die LCD-Anzeige
5
zeigt nun die Maße des mittleren
9
.
Abstandes an.
Kenndaten von metrischen-ISO-Gewinden:
Nenndurchmesser:
[mm]
Steigung:
-1
[mm
]
Kerndurchmesser:
[mm]
Bohrdurchmesser:
[mm]
3 0,5 2,46 2,5
4 0,7 3,24 3,3
DE/AT/CH58

Nenndurchmesser:
[mm]
Steigung:
-1
[mm
]
Kerndurchmesser:
[mm]
Bohrdurch-
messer:
[mm]
5 0,8 4,13 4,2
6 1 4,92 5
8 1,25 6,65 6,8
10 1,5 8,38 8,5
12 1,75 10,11 10,2
16 2 13,84 14
20 2,5 17,29 17,5
Q
Fehler beheben
Das Gerät enthält empfindliche elektronische Bauteile. Daher ist es
möglich, dass es durch Funkübertragungsgeräte in unmittelbarer
Nähe gestört wird. Treten Fehlanzeigen im Display auf, entfernen
Sie solche Geräte aus der Umgebung des Gerätes.
Elektrostatische Entladungen können zu Funktionsstörungen führen.
j
Entfernen Sie bei solchen Funktionsstörungen kurzzeitig die
Batterie und setzen Sie sie erneut ein.
Fehler Ursache Abhilfe
Fünf Stellen sprin-
gen gleichzeitig
einmal pro
Sekunde um.
Die LCD-Anzeige
5
zählt nicht
weiter.
Keine Anzeige
auf der LCD-An-
5
zeige
.
Die Batteriespannung liegt unter
2,7 V.
Fehlerhafte Schaltung.
LCD-Anzeige ist
1.
ausgeschaltet.
2. Batterie hat k
nen richtigen
Kontakt oder
ist falsch herum
eingesetzt.
3. Die Batterie-
spannung liegt
unter 2,1 V.
Tauschen Sie die Batterie gemäß Kapitel
„Batterie einsetzen /
austauschen“ aus.
Batterie herausnehmen
und nach 30 Sekunden wieder einsetzen.
1. Schalten Sie die
LCD-Anzeige ein,
indem Sie die
ei-
EIN- / AUS-Taste
drücken.
2. Entnehmen Sie die
Batterie und setzen
Sie sie gemäß
Polung und Kapitel
„Batterie einsetzen /
austauschen“ so
ein, dass sie alle
Kontakte berührt.
3. Tauschen Sie die
Batterie gemäß
Kapitel „Batterie
einsetzen / austauschen“ aus.
10
DE/AT/CH 59

Q
Wartung und Reinigung
j
Reinigen Sie den Messschieber vor und nach dem
Gebrauch mit einem trockenen Lappen. Verwenden Sie
niemals Benzin, Lösungsmittel oder andere Reiniger.
j
Tauchen Sie den Messschieber nicht ins Wasser. Flüssigkeit
kann den Messschieber beschädigen.
j
Schalten Sie die LCD-Anzeige immer aus, wenn der
Messschieber nicht verwendet wird. So verlängern Sie die
Betriebsdauer der Batterie.
j
Setzen Sie den Messschieber nicht unter Spannung und
halten Sie ihn von elektrischen Stiften fern. Andernfalls kann
der Chip im Messschieber beschädigt werden.
Q
Entsorgung
Die Verpackung besteht aus umweltfreundlichen
Materialien, die Sie über die örtlichen
Recyclingstellen entsorgen können.
Möglichkeiten zur Entsorgung des ausgedienten Produkts
erfahren Sie bei Ihrer Gemeinde- oder Stadtverwaltung.
Werfen Sie Ihr Produkt, wenn es ausgedient hat, im
Interesse des Umweltschutzes nicht in den Hausmüll,
sondern führen Sie es einer fachgerechten
Entsorgung zu. Über Sammelstellen und deren
Öffnungszeiten können Sie sich bei Ihrer
zuständigen Verwaltung informieren.
Defekte oder verbrauchte Batterien müssen gemäß Richtlinie
2006 / 66 / EG und deren Änderungen recycelt werden.
Geben Sie Batterien und / oder das Gerät über die
angebotenen Sammeleinrichtungen zurück.
Umweltschäden durch falsche
Entsorgung der Batterien!
Batterien dürfen nicht über den Hausmüll entsorgt werden. Sie
können giftige Schwermetalle enthalten und unterliegen der
Sondermüllbehandlung. Die chemischen Symbole der
Schwermetalle sind wie folgt: Cd = Cadmium,
Hg = Quecksilber, Pb = Blei. Geben Sie deshalb verbrauchte
Batterien bei einer kommunalen Sammelstelle ab.
DE/AT/CH60

Q
Garantie
Das Produkt wurde nach strengen Qualitätsrichtlinien sorgfältig
produziert und vor Anlieferung gewissenhaft geprüft. Im Falle
von Mängeln dieses Produkts stehen Ihnen gegen den
Verkäufer des Produkts gesetzliche Rechte zu. Diese
gesetzlichen Rechte werden durch unsere im Folgenden
dargestellte Garantie nicht eingeschränkt.
Sie erhalten auf dieses Gerät 3 Jahre Garantie ab Kaufdatum.
Die Garantiefrist beginnt mit dem Kaufdatum. Bitte bewahren
Sie den Original-Kassenbon gut auf. Diese Unterlage wird als
Nachweis für den Kauf benötigt.
Tritt innerhalb von 3 Jahren ab dem Kaufdatum dieses Produkts
ein Material- oder Fabrikationsfehler auf, wird das Produkt von
uns – nach unserer Wahl – für Sie kostenlos repariert oder
ersetzt. Diese Garantie verfällt, wenn das Produkt beschädigt,
nicht sachgemäß benutzt oder gewartet wurde.
Die Garantieleistung gilt für Material- oder Fabrikationsfehler.
Diese Garantie erstreckt sich nicht auf Produktteile, die normaler
Abnutzung ausgesetzt sind (z. B. Batterien) und daher als
Verschleißteile angesehen werden können oder für
Beschädigungen an zerbrechlichen Teilen, z. B. Schalter, Akkus
oder die aus Glas gefertigt sind.
DE/AT/CH 61

OWIM GmbH & Co. KG
Stiftsbergstraße 1
DE-74167 Neckarsulm
GERMANY
Model No.: HG00962A
Version: 10/2016
IAN 280231
7
 Loading...