

User Manual
8416521V 2.9
Please read and understand all instructions before use.Retain this manual for future reference.
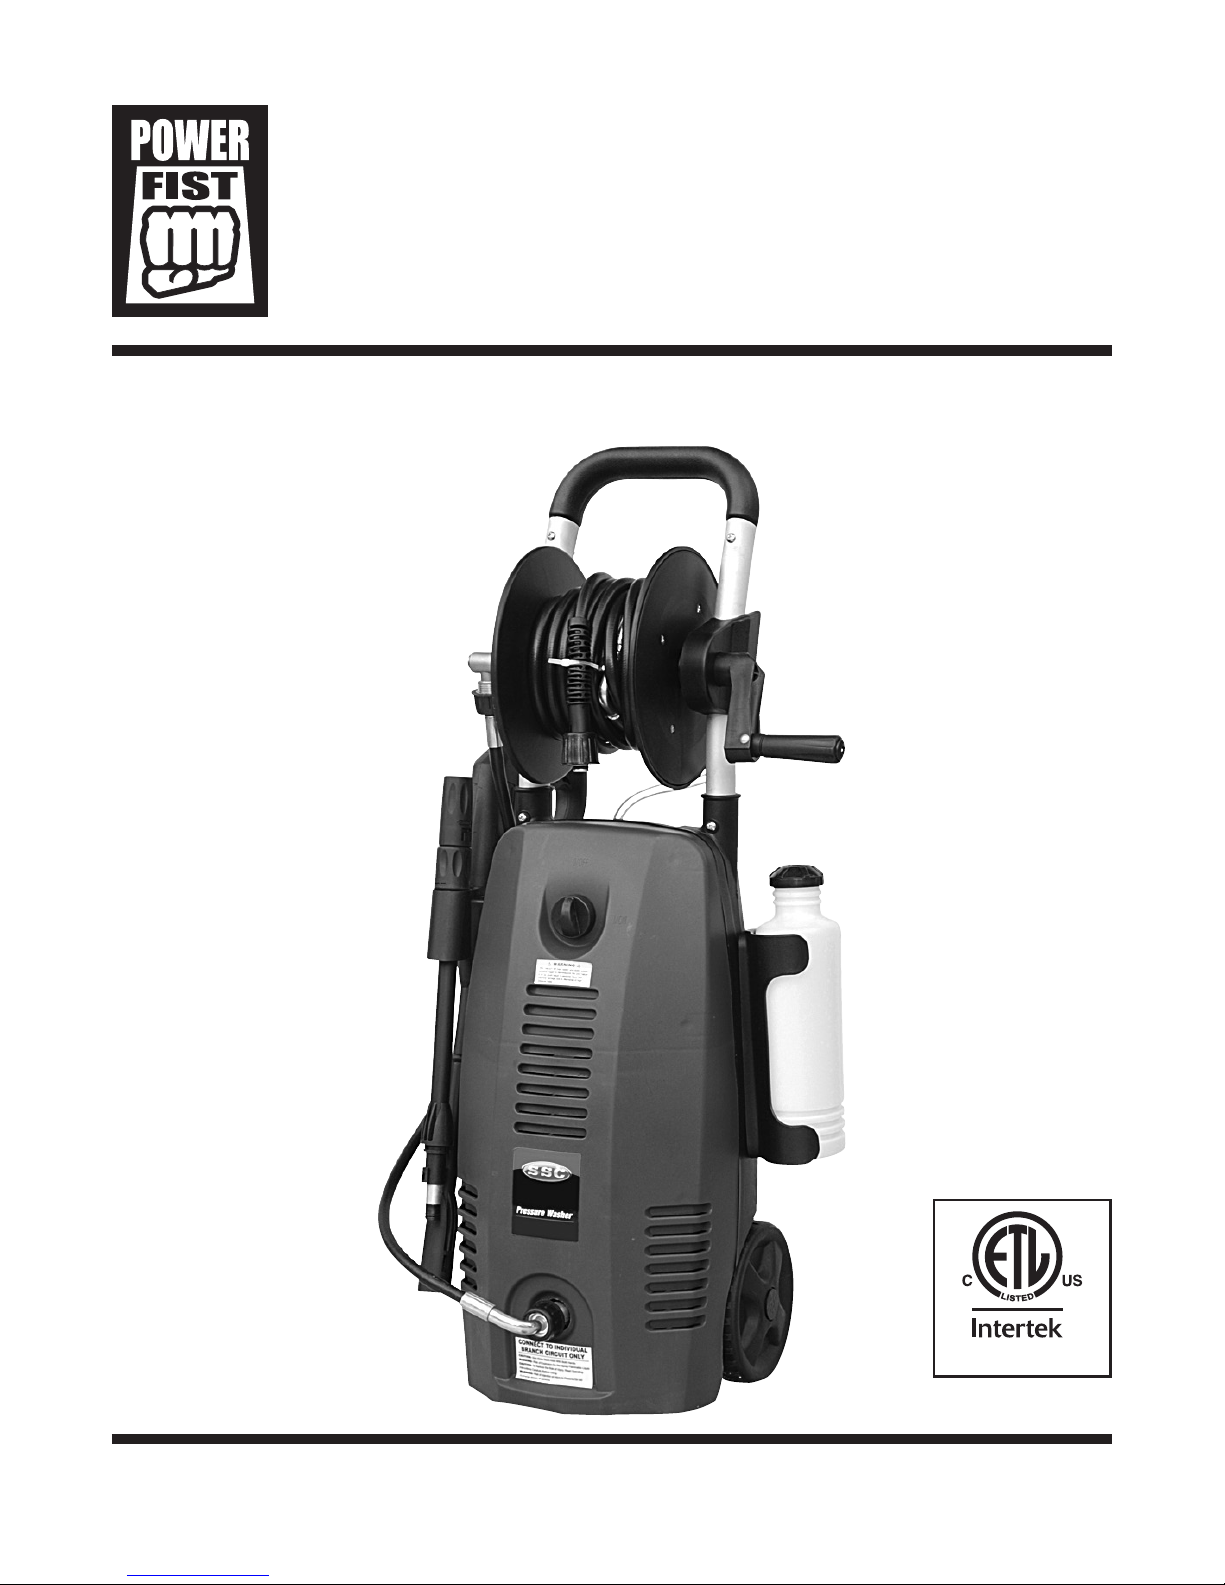
1.6 GPM @ 1,300 PSI
Electric Pressure Washer
4002910

2
Visit www.princessauto.com for more information
8416521V 2.9
1.6 GPM @ 1,300 PSI
Electric Pressure Washer
SPECIFICATIONS
Capacity 1.6 GPM
Pressure Rating 1,300 PSI
Max. Pressure 2,000 PSI
Power Rating 1,560W
Current Rating 13A
Voltage Rating 120V
Pump Type Electric cam
SAFETY
WARNING! Read and understand all instructions before using this tool. The operator must follow basic
precautions to reduce the risk of personal injury and/or damage to the equipment.
NOTE: Keep this manual for safety warnings, precautions, operating or inspection and
maintenance instructions.
WORK AREA
1. Operate in a safe work environment. Keep your work area clean, well lit and free of distractions.
2. Keep anyone not wearing appropriate safety equipment away from the work area.
3. Store tools properly in a safe and dry location. Keep tools out of the reach of children.
4. Do not install or use in the presence of flammable gases or liquids.

1.6 GPM @ 1,300 PSI Electric Pressure Washer
3
Visit www.princessauto.com for more information
8416521 V 2.9
PERSONAL SAFETY
CAUTION! Wear personal protective equipment approved by the Canadian Standards Association
(CSA) or American National Standards Institute (ANSI).
Personal Protective Equipment
1. Always wear impact safety goggles that provide front and side protection for the eyes. Wear a
full-face shield if your work creates metal filings or wood chips.
2. Wear gloves that provide protection based on the work materials or to reduce the effects
of tool vibration.
3. Non-skid footwear is recommended to maintain footing and balance in the work environment.
4. Wear protective clothing designed for the work environment.
Personal Precautions
Control the tool, personal movement and the work environment to avoid personal injury or
damage to tool.
1. Do not operate any tool when tired or under the influence of drugs, alcohol or medications.
2. Do not overreach when operating a tool. Proper footing and balance enables better control in
unexpected situations.
3. Securely hold this tool using both hands. Using a tool with only one hand can result in
loss of control.
SPECIFIC SAFETY PRECAUTIONS
1. High pressure sprays can cause serious bodily injury. Do not aim the spray gun at people,
animals or plants.
2. Do not spray flammable or toxic liquids.
3. Do not spray near a power source.
4. Do not leave the spray gun unattended while the unit is running.
5. Do not lock the spray gun in open position.
6. Only use a spray gun that has a trigger lock or trigger guard in place and in working order.
7. Using a pressure washer can create puddles and slippery surfaces. The work area should have
adequate slopes and drainage to reduce the possibility of falling due to slips.
8. Be careful when squeezing the trigger, as recoil from the spray gun can cause the
operator to fall.
9. Always operate the pressure washer from a stable surface. Avoid using the pressure washer
from precarious locations such as ladders or scaffolding.
10. Do not attempt to repair damaged or defective high-pressure hoses. Always replace them.
11. Do not repair leaking connections with sealant of any kind. Replace the O-ring or seal.
12. Do not disconnect the high-pressure hose from the pump and spray gun while the
system is pressurized.
13. Always ensure that the spray gun, nozzles, and accessories are correctly attached.
14. Do not use other electrical appliances on the same fuse/breaker box switch as the pressure
washer. This may cause the circuit breaker to trip and cut off power.
15. Do not use an extension cord with this unit; use a longer high-pressure discharge hose instead.
16. Do not plug this pressure water into a hot water supply. This pressure washer is designed for
cold water use only.
17. To minimize the amount of water getting into the pressure washer, the unit should be placed as
far as possible from the cleaning site during operation.

1.6 GPM @ 1,300 PSI Electric Pressure Washer
4
For technical questions call: 1-800-665-8685
8416521V 2.9
18. Prior to starting the pressure washer in cold weather, be sure ice has not formed in any part of
the equipment.
19. Ensure the pressure washer is not covered during operation to avoid overheating the motor.
20. This pressure washer is capable of producing pressures up to 2,000 PSI. To avoid property
damage and personal injury, do not operate the pump with components rated for less than
2,000 PSI working pressure.
21. If connecting the pressure washer to a portable water system, ensure the water system is
protected against backflow.
GENERAL SAFETY PRECAUTIONS
Electrical Safety
WARNING! To reduce risk of electric shock, be certain that the plug is connected to a properly
grounded receptacle.
1. Disconnect tool from power source before cleaning, servicing, changing parts/accessories or
when not in use.
2. Protect yourself against electric shocks when working on electrical equipment. Avoid body
contact with grounded surfaces such as pipes, radiators, cooking stoves and refrigerators.
There is an increased chance of electrical shock if your body is grounded.
3. Do not disconnect the power cord in place of using the ON/OFF switch on the tool. This will
prevent an accidental startup when the power cord is plugged into the power supply.
4. Do not alter any parts of the tool or accessories. All parts and accessories are designed with
built-in safety features that may be compromised if altered.
5. Make certain that power source conforms to
requirements of your equipment.
6. When wiring an electrically driven device, follow all electrical and safety codes, as well as the
most recent Canadian Electrical Code (CE) and
Canadian Centre for Occupational Health and
Safety
(CCOHS).
CAUTION! All wiring should be performed by a qualified electrician.
Polarized Plug
Double insulated tools eliminate the need for a 3-wire grounded power cord and grounded power supply
system. The tool is equipped instead with a polarized plug that requires a polarized outlet/power supply.
1. A polarized plug has two blades of different widths, allowing only one way to insert the plug
into the outlet.
2. Reverse the plug if it does not fully fit into the outlet.
3. If the outlet does not accept a polarized plug, contact a qualified electrician to install a
polarized outlet.
4. Do not alter the plug as this may compromise the built-in safety feature.
CAUTION! All wiring should be performed by a qualified electrician.

1.6 GPM @ 1,300 PSI Electric Pressure Washer
5
Visit www.princessauto.com for more information
8416521 V 2.9
Power Cord
1. Insert the power cord plug directly to the power supply. Do not use extension cords or
surge protectors.
2. Do not operate this tool if the power cord is frayed or damaged as an electric shock may occur,
resulting in personal injury or property damage.
a. Inspect the tool’s power cord for cracks, fraying or other faults in the insulation or
plug before each use.
b. Discontinue use if a power cord feels more than comfortably warm while
operating the tool.
c. Have the power cord replaced by a qualified service technician
3. Keep all connections dry and off the ground to reduce the risk of electric shock. Do not touch
plug with wet hands.
4. Prevent damage to the power cord by observing the following:
a. Never use the cord to carry the tool.
b. Do not pull on the cord to disconnect the plug from an outlet.
c. Keep the power cord clear of the tool and the tool’s work path while in operation. The cord
should always stay behind the tool.
d. Keep cord away from heat, oil, sharp edges or moving parts.
e. Do not allow people, mobile equipment or vehicles to pass over unprotected power cords.
i. Position power cords away from traffic areas.
ii. Place cords in reinforced conduits.
iii. Place planks on either side of the power cord to create a protective trench.
USE AND CARE OF TOOL
1. Use the correct tool for the job. This tool was designed for a specific function. Do not modify
or alter this tool or use it for an unintended purpose.
2. Do not carry the tool with fingers near or on the trigger/switch.
3. Avoid unintentional starts. Be sure that the ignition switch/trigger is in the neutral or OFF
position when not in use or before connecting it to any power source.
1.6 GPM @ 1,300 PSI Electric Pressure Washer
6
For technical questions call: 1-800-665-8685
8416521V 2.9
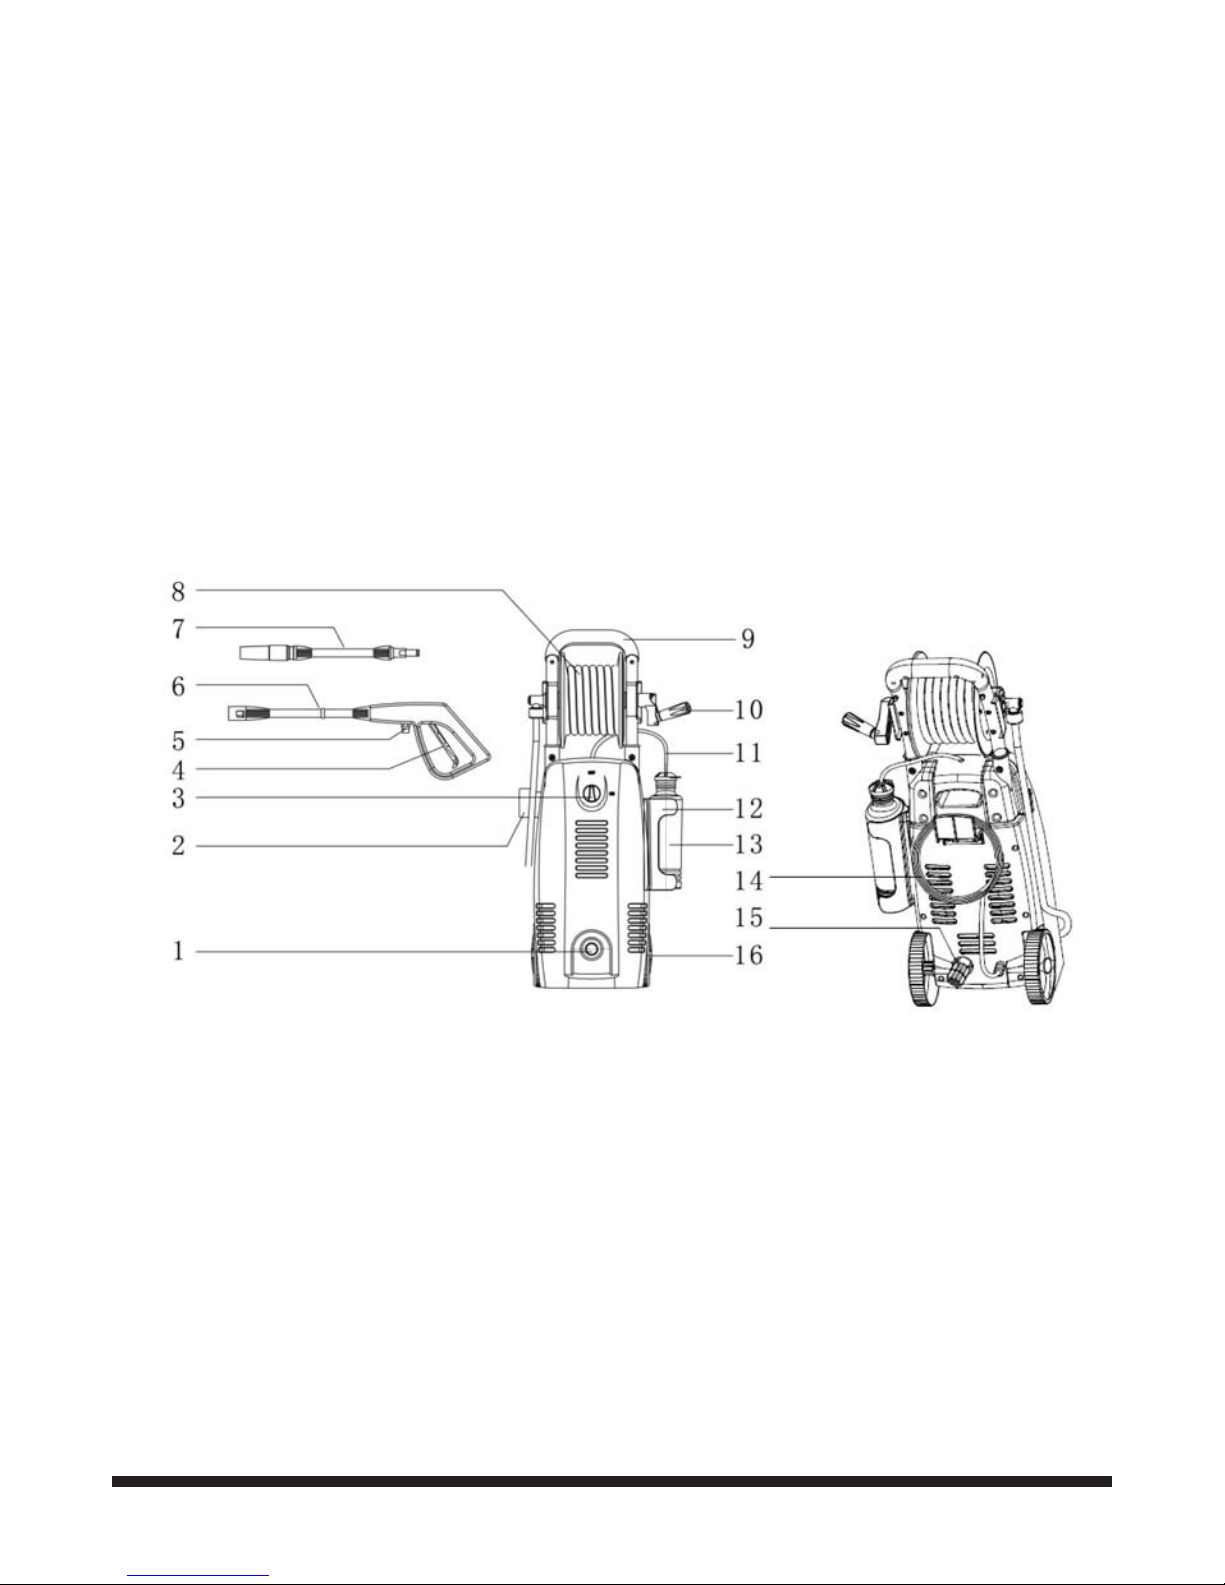
PARTS IDENTIFICATION
Remove the parts and accessories from the packaging and inspect for damage. Make sure that all items in
the parts list are included.
WARNING! Do not operate the tool if any part is missing. Replace the missing part before operating.
Failure to do so could result in a malfunction and personal injury.
Contents:
1. Pump outlet
2. Spray gun holder
3. ON/OFF switch
4. High-pressure hose connector
5. Trigger lock
6. Spray gun
7. Spray wand
8. High pressure hose
9. Transport handle
10. Hose reel crank
11. Detergent suction tube
12. Detergent bottle holder
13. Detergent bottle
14. Power cord with Ground Fault Circuit Interrupter (GFCI)
15. Water inlet with garden hose connector
16. Wheels
Fig. 1
1.6 GPM @ 1,300 PSI Electric Pressure Washer
7
Visit www.princessauto.com for more information
8416521 V 2.9
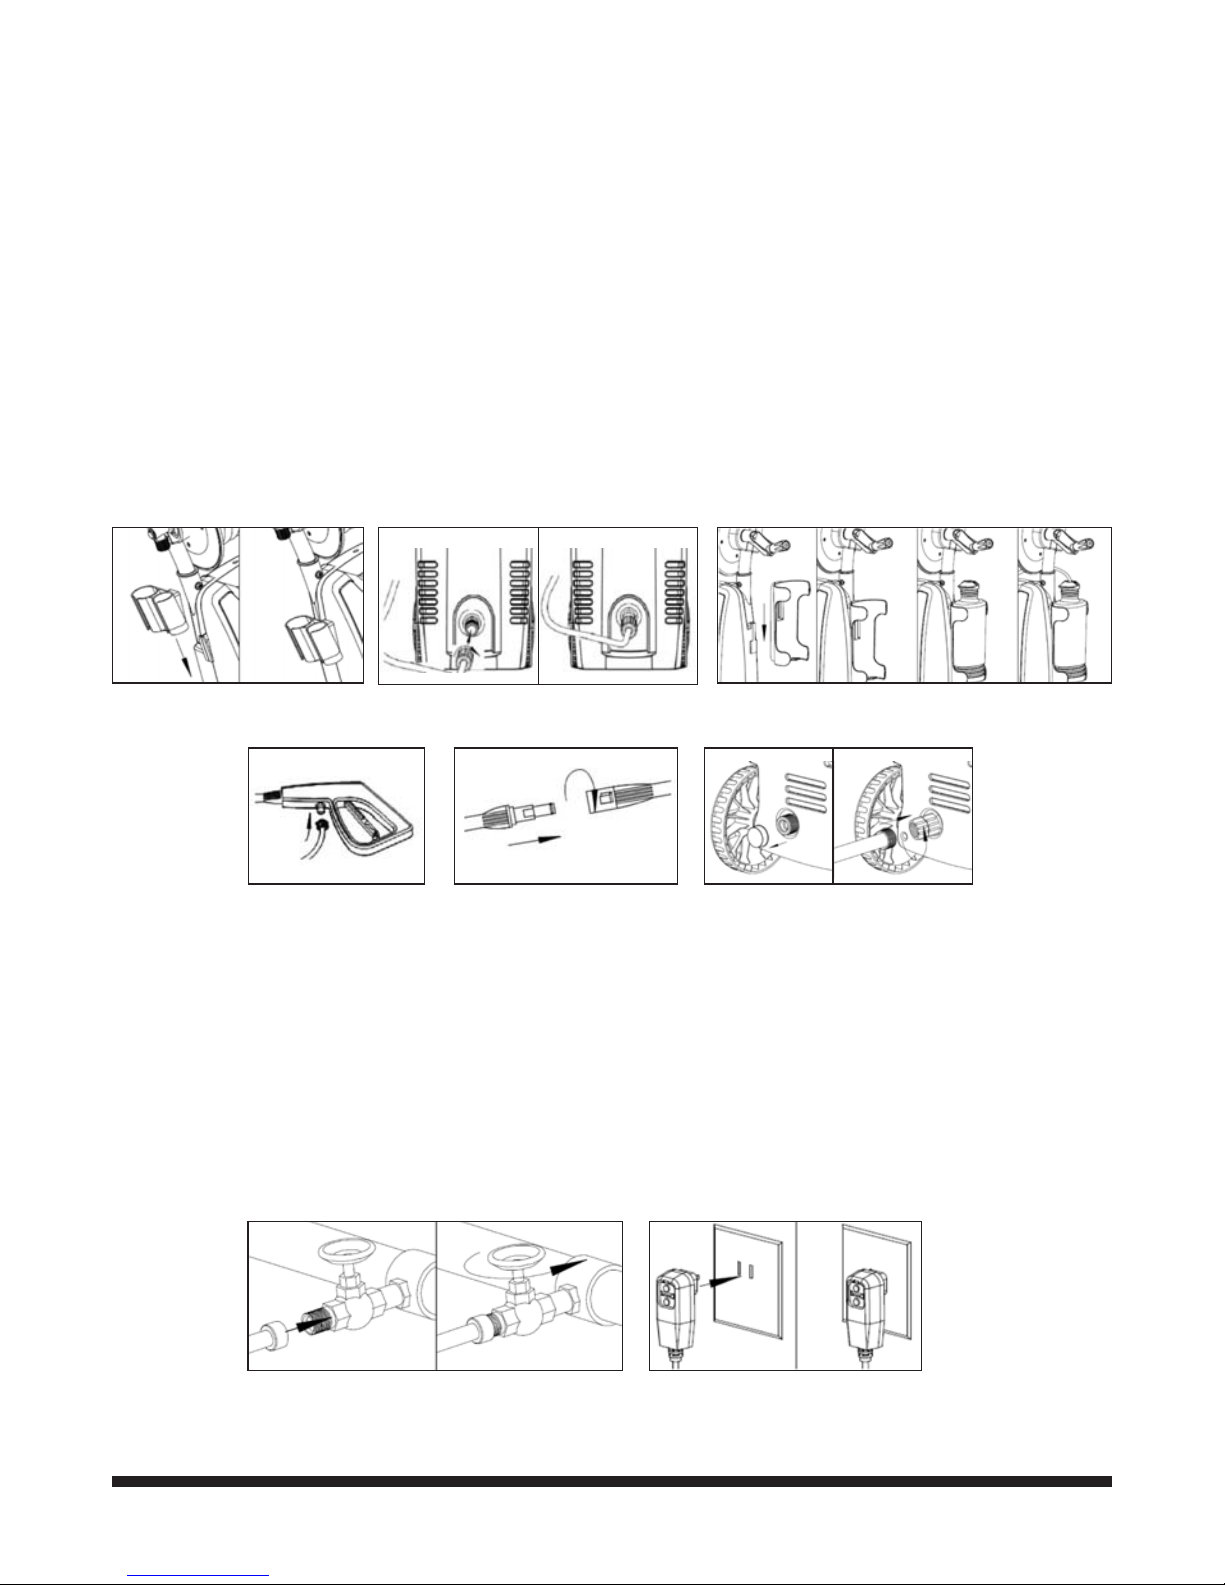
ASSEMBLY
NOTE: When this manual refers to a part number, it refers to the included Parts Identification section.
1. Ensure the ON/OFF switch (#3) is in the OFF/0 position.
2. Slide spray gun holder (#2) onto unit. (Fig. 2)
3. Connect the high pressure hose (#8) to the pump outlet (#1). (Fig. 3)
4. Slide detergent bottle holder (#12) onto unit. (Fig. 4) Place detergent bottle (#13) in holder. Put
detergent suction tube (#11) into the detergent bottle.
5. Connect high pressure hose to the high-pressure hose connector (#4) on the
spray gun (#6). (Fig. 5)
6. Insert spray wand (#7) into spray gun. Press in against the spring tension and twist clockwise
into locked position. (Fig. 6)
7. Connect garden hose to unit’s water inlet (#15). (Fig. 7)
Fig. 2 Fig. 3
Fig. 4
Fig. 5
Fig. 6
Fig. 7
Fig. 8 Fig. 9
NOTE: The water hose must be at least 1/2 in. in diameter. Flow rate of water supply must not
fall below 2 GPM. The water supply temperature must not exceed 40°C (104°F).
8. Connect garden hose to the cold water source and turn water on completely. (Fig. 8)
9. Plug the power cord (#14) into an outlet. (Fig. 9)
10. Press the RESET button; the indicator should read ON. Press the TEST button; the indicator
should now read OFF. Press the RESET button for use. We recommend testing the GFCI each
time you use your pressure washer.
WARNING: Do not use the unit if the above test fails.
1.6 GPM @ 1,300 PSI Electric Pressure Washer
8
For technical questions call: 1-800-665-8685
8416521V 2.9
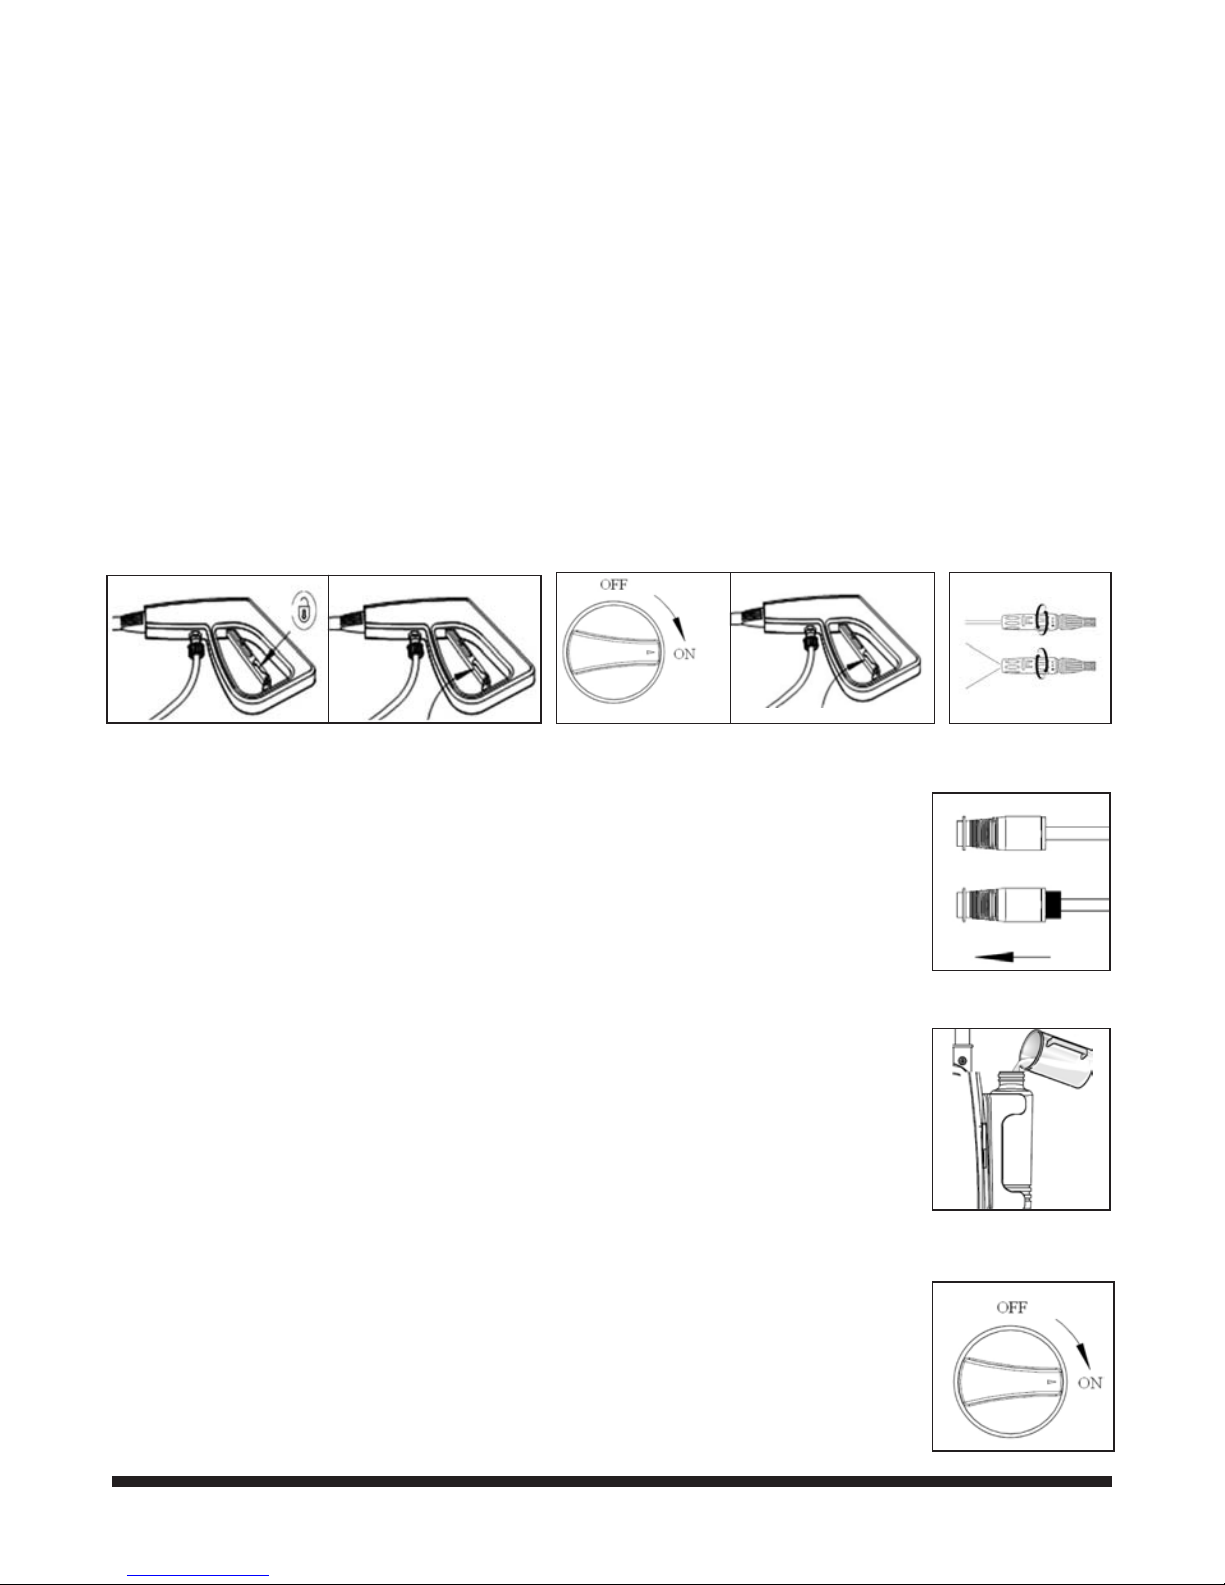
OPERATION
1. Prepare the work area for cleaning, including ensuring all doors and windows are closed tight.
2. Before turning the unit ON, move the trigger lock (#5) out of the way and squeeze the trigger to
bleed any trapped air out of the pump and hose. (Fig. 10) Wait for a steady stream of water to
emerge from the spray wand, then release trigger.
3. Start the pressure washer by turning the ON/OFF switch (#3) to the ON/1 position. (Fig. 11)
4. Move the trigger lock out of the way and begin spraying by squeezing the trigger.
NOTE: The trigger lock prevents the trigger from accidentally being engaged. This safety feature
does not lock trigger in the “ON” position.
5. The nozzle of the spray wand (#7) can be adjusted from 0 to 60° spray pattern. (Fig. 12)
CAUTION: The 0° spray setting is very aggressive. Do not adjust while spraying. We recommend that
for most cleaning applications, a 20° spray angle should be used to avoid damage to the surface
being sprayed.
Fig. 10
Fig. 13
Fig. 14
Fig. 15
Fig. 11 Fig. 12
USING DETERGENT
To enhance the efficiency of the pressure washer, sometimes it is necessary to use
detergents to help loosen tough dirt and grime.
1. Ensuring the ON/OFF switch (#3) in the OFF/0 position, pull the head of the
spray wand (#7) as shown. (Fig. 13)
2. Fill the detergent bottle (#13) with the selected detergent. (Fig. 14)
3. Turn the ON/OFF switch to the ON/1 position and squeeze trigger. (Fig. 15)
Liquid detergent will be automatically drawn into the unit and mixed
with water.
4. Apply detergent to work area. Do not allow detergent to dry on surface.
5. To rinse, release the trigger and push head of the spray wand back into its
original position. Squeeze the trigger and rinse the surface in a
sweeping motion.
CAUTION: This unit has been designed for use with pressure washer
detergents only. The use of other detergents or chemicals may
damage the unit.
6. When detergent is no longer needed, insert the detergent suction tube
into a container of fresh water.
7. Set the nozzle to the low-pressure setting.
8. Squeeze and hold the trigger for 20 to 30 seconds, allowing fresh water to
rinse through the detergent injection system.
1.6 GPM @ 1,300 PSI Electric Pressure Washer
9
Visit www.princessauto.com for more information
8416521 V 2.9
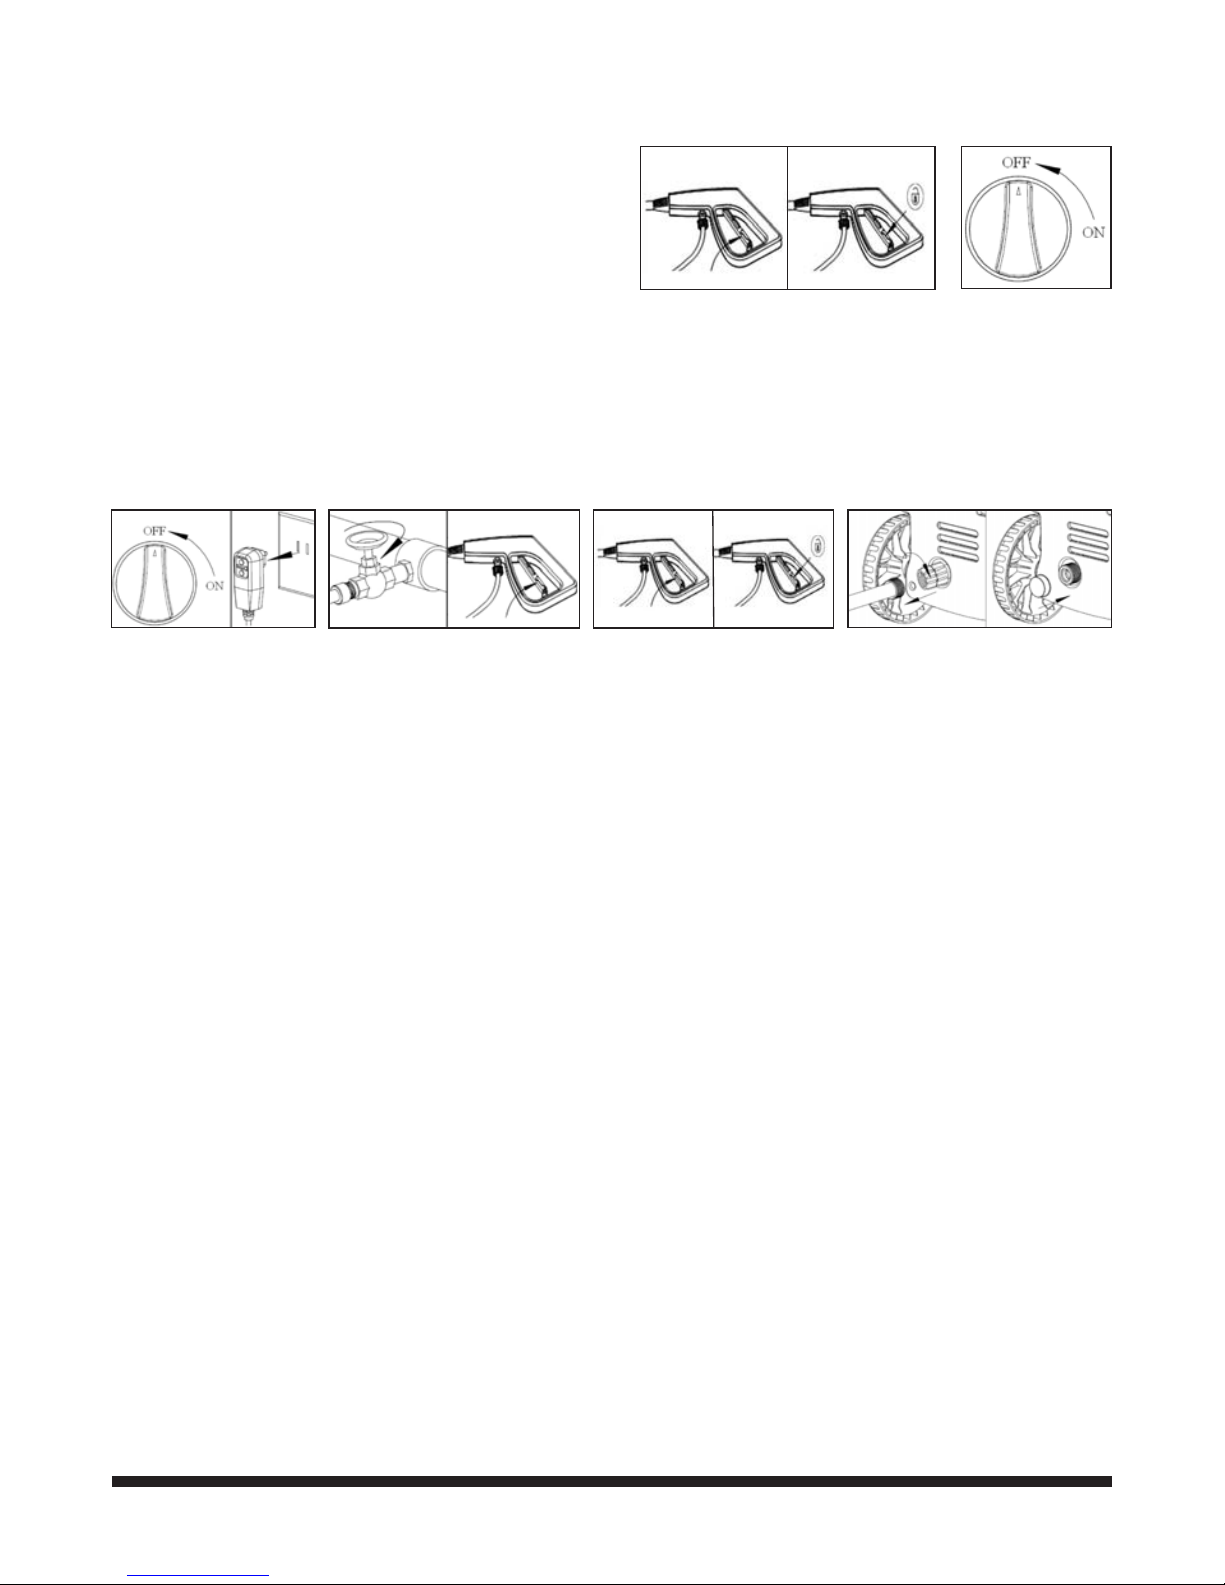
TAKING A BREAK
1. Engage trigger lock (#5). (Fig. 16)
2. Turn ON/OFF switch (#3) to
OFF/0 position. (Fig. 17)
SHUTTING DOWN
1. Turn the ON/OFF switch (#3) to OFF/0
position and unplug cord (#14) from outlet. (Fig. 18)
2. Turn off the water supply. (Fig. 19)
3. Squeeze trigger for 20-30 seconds to de-pressurize the system.
4. Release trigger and engage trigger lock (#5). (Fig. 20).
5. Disconnect the garden hose from the water inlet on the unit. (Fig. 21)
Fig. 16
Fig. 17
Fig. 18 Fig. 19 Fig. 20 Fig. 21
WASHING BEST PRACTICES
1. Before cleaning any surface, start with an inconspicuous area to test spray pattern and distance
for maximum cleaning results.
2. Pre-rinse cleaning surface with fresh water.
3. If using detergent or degreaser, apply to surface at low pressure. Allow detergent to remain on
surface 1 to 3 minutes.
4. Do not allow detergent to dry on surface. If surface appears to be drying, simply wet down
surface with fresh water.
5. Always apply detergent from bottom to top.
6. Rinse at high pressure in a sweeping motion, keeping the spray nozzle approximately 3 to 6
inches from the cleaning surface.
7. Always rinse from top to bottom and from left to right.
8. For best results on decks, cement patios, brick and stone, limit your work area to smaller
sections of approximately 25 square feet. When moving on to a new section of the cleaning
surface, be sure to overlap the previous section to eliminate stop marks and to ensure a more
even cleaning result.
9. For best results on house siding, limit your work area to sections of approximately 6 feet. When
rinsing, keep the spray nozzle approximately 6 inches from the cleaning surface.
10. For best results on cars, boats & motorcycles, clean one side of vehicle at a time. Keep the
spray nozzle approximately 6 to 8 inches from the cleaning surface. Increase distance when
rinsing pin-striping or other sensitive surfaces. Wipe surface dry with a chamois or
soft dry cloth.
11. For best results on barbecue grills, outdoor power equipment & gardening tools, it may be
necessary to move the spray nozzle even closer to the surface for greater dirt-cutting action.

1.6 GPM @ 1,300 PSI Electric Pressure Washer
10
For technical questions call: 1-800-665-8685
8416521V 2.9
MAINTENANCE
1. Maintain the tool with care. A tool in good condition is efficient, easier to control and will have
fewer problems.
2. Inspect the tool components periodically. Repair or replace damaged or worn components.
3. Follow instructions for lubricating and changing accessories.
4. Keep the tool handles clean, dry and free from oil/grease at all times.
CAUTION! Only qualified service personnel should repair the tool.
PRESSURE WASHER MAINTENANCE
CAUTION! Ensure the pressure washer is disconnected from power
source and water supply and that the system is depressurized before
doing any of the following maintenance.
Cleaning the Water Inlet Filter
1. Remove cover from the water inlet (#15). (Fig. 22)
2. Remove water inlet filter using flat nose pliers.
3. Rinse out water inlet filter in warm water. (Fig. 23)
4. Reinsert water inlet filter and cover.
Cleaning Nozzles
If the nozzle becomes clogged, pressure can build inside the pump
and cause the unit to surge. Clean the nozzle by carefully inserting a thin, sharp instrument, such as a
paperclip, into the tip to rid it of deposits.
STORAGE
If you must store your pressure washer in a place where temperature is below 5°C (41°F), you need to
apply winterizing procedure to protect it. Failure to do so may permanently damage the pump.
Optimum Winterizing Procedure
NOTE: Using pump saver, available at Princess Auto, will keep the internal parts lubricated, protected from
rust and prevents the pump from freezing.
1. Disconnect pressure washer from power source and water supply.
2. Connect the pump saver hose to water inlet (#15).
3. Depress button on pump saver container.
4. Continue until fluid exits the pump outlet (#1).
5. Remove the hose from pump inlet.
Alternative Procedure
If you cannot perform the optimum winterizing procedure, you can still protect your pressure washer
from winter damage:
1. Disconnect all water connections.
2. Turn on the unit for a few seconds. Squeeze trigger to bleed any remaining water in the pump.
Tum off immediately.
3. Remove the gun (#6) and hose (#8) from the pressure washer. Drain any excess water. Roll
hose carefully and do not allow it to become kinked.
4. Store the unit and accessories in a room that does not reach freezing temperatures. Do not
store near furnace or other heat sources of heat as it may dry out the pump seals.
Fig. 22
Fig. 23

1.6 GPM @ 1,300 PSI Electric Pressure Washer
11
Visit www.princessauto.com for more information
8416521 V 2.9
DISPOSAL
Recycle a tool damaged beyond repair at the appropriate facility.
TROUBLESHOOTING
Contact Princess Auto Ltd. for a solution if the tool does not function properly or parts are missing. If
unable to do so, have a qualified technician service the tool.
Problem(s) Possible cause(s) Suggested solution(s)
Motor will not start ON/OFF switch is in OFF position Turn switch to ON position
Power cord is not plugged in Plug in power cord
Electrical outlet does not supply
adequate power
Try a different outlet
Tripped GFCI plug Press RESET button on GFCI plug
Tripped circuit breaker Turn off pressure washer. Verify that only the
pressure washer is running on this circuit
Unit does not reach
high pressure
Diameter of garden hose is too small Replace with 5/8 in. garden
hose or larger
Water supply is restricted Check garden hose for kinks,
leaks and blockage
Not enough inlet water supply Turn water on full force
Water inlet filter is clogged Remove filter and rinse
out in warm water
Nozzle is in low pressure position Push in head of spray wand to
high-pressure position
Output pressure varies
high and low
Not enough inlet water supply Turn water on full force. Check garden hose
for kinks, leaks or blockage.
Pump is sucking air Ensure hose and fittings are airtight. Turn off
unit and purge pump by squeezing trigger
until a steady flow of water emerges through
the nozzle.
Water inlet filter is clogged Remove filter and rinse
out in warm water
Discharge nozzle is obstructed Blow out or remove debris
with thin, sharp instrument
Calcium deposits in gun,
hose, or wand
Run distilled vinegar through
detergent suction tube

1.6 GPM @ 1,300 PSI Electric Pressure Washer
12
For technical questions call: 1-800-665-8685
8416521V 2.9
Problem(s) Possible cause(s) Suggested solution(s)
No detergent Detergent container is empty Add more detergent
Detergent bottle or suction tube not
properly connected
Check connections
Detergent is too thick Dilute detergent
Filter on detergent suction
tube is clogged
Run warm water through filter to remove
debris
Damaged or clogged detergent suction
tube
Remove obstruction or replace detergent
suction tube
Nozzle is in high-pressure position Pull out head of spray wand to low-pressure
position
Discharge nozzle is obstructed Blow out or remove debris with thin, sharp
instrument
Garden hose
connection leaks
Loose fittings Tighten fittings
Spray wand or
extension or
nozzle leaks
Spray nozzle not properly attached Insert the spray nozzle into the gun assembly.
Carefully press against the spring tension and
twist into the
locked position.
Broken o-ring or plastic insert Bring to Princess Auto Ltd. or a
qualified technician
Pump makes excessive
noise
Pump is sucking air Ensure hose and fittings are airtight. Turn off
unit and purge pump by squeezing trigger
until a steady flow of water emerges through
the nozzle.
Water leaks from pump
(up to 10 drops per
minute
is normal)
Loose fittings Tighten fittings
Water seals are damaged or worn Bring to Princess Auto Ltd. or a
qualified technician
Oil drip Oil seals are damaged or worn Bring to Princess Auto Ltd. or a
qualified technician

1.6 GPM @ 1,300 PSI Electric Pressure Washer
13
Visit www.princessauto.com for more information
8416521 V 2.9
PARTS BREAKDOWN

1.6 GPM @ 1,300 PSI Electric Pressure Washer
14
For technical questions call: 1-800-665-8685
8416521V 2.9
PARTS LIST
# DESCRIPTION QTY.
1. Motor Cover B 1
2. Support Ring 6
3. Motor Cover A 1
4. Mesh 1
5. Case B 1
6. Pump 1
7. Case A 1
8. Switch Knob 1
9. Sleeve 1
10. Motor 1
11. Hex Bolt M6 x 25 4
12. Screw ST3x20 4
13. Switch Housing A 1
14. Lever 1
15. Switch Housing B 1
16. Switch 1
17. Nylon Ribbon 2
18. Spray Gun Holder 1
19. Screw ST4x25 20
20. Support A 1
21. Support B 1
22. Power Cord Holder 1
23. Suction Tube 1
24. Detergent Bottle Cap 1
25. Detergent Bottle 1
26. Screw ST4x14 2
27. Detergent Bottle Holder 1
28. GFCI 1
# DESCRIPTION QTY.
29. Spray Gun 1
30. Spray Wand 1
31. Bolt M5 x 45 2
32. Nut M5 2
33. Support Plate A 1
34. Screw ST3.9x15 3
35. Jumper Hose 1
36. Tee Connection 1
37. Stainless Steel Case 1
38. Bolt M5 x 42 2
39. Gasket 2
40. Nut M5 2
41. Hose Reel Handle 2
42. Countersunk Head Screw
ST3.9x15
8
43. Hose Reel Cover 2
44. Hose Reel 2
45. High-Pressure Hose 1
46. Support Plate B 1
47. Crank 1
48. Crank Handle 1
49. Crank Handle Cover 1
50. Screw ST3x15 1
51. Outer Hose 1
52. Transport Handle A 1
53. Screw ST4x20 4
54. Transport Handle B 1


Vous devez lire et comprendre toutes les instructions avant d'utiliser l'appareil. Conservez ce manuel
afin de pouvoir le consulter plus tard.
Manuel d'utilisateur
8416521V 2,9
Laveuse à pression
électrique de 1,6 gal/min
à 1 300 lb/po carré
4002910

2 Visitez www.princessauto.com pour plus d'informations
8416521V 2,9
Laveuse à pression
électrique de 1,6 gal/min
à 1 300 lb/po carré
SPÉCIFICATIONS
Capacité 1,6 gal/min
Pression nominale 1 300 lb/po carré
Pression maximale 2 000 lb/po carré
Puissance nominale 1 560 W
Courant nominal 13 A
Tension nominale 120 V
Type de pompe Électrique à came
SÉCURITÉ
AVERTISSEMENT ! Veuillez lire et comprendre toutes les instructions avant d’utiliser ce cric.
L’utilisateur doit respecter les précautions de base lorsqu’il utilise cet outil afin de réduire le risque
de blessure ou de dommage à l’équipement.
REMARQUE : Conservez ce manuel qui contient les avertissements de sécurité, les précautions, les
instructions de fonctionnement ou d’inspection et d’entretien.
AIRE DE TRAVAIL
1. Travaillez dans un environnement de travail sécuritaire. Gardez votre aire de travail propre, bien
éclairée et exempte de toute distraction.
2. Assurez-vous que les personnes qui ne portent pas l’équipement de sécurité approprié ne se
trouvent pas à proximité de l’aire de travail.
3. Rangez les outils correctement dans un lieu sécurisé et sec. Gardez les outils hors de la portée
des enfants.
4. N’utilisez pas d’outils électriques en présence de gaz ou de liquides inflammables.

Laveuse à pression électrique de 1,6 gal/min à 1 300 lb/po carré
3
Visitez www.princessauto.com pour plus d'informations
8416521 V 2,9
SÉCURITÉ PERSONNELLE
ATTENTION ! Portez de l’équipement de protection personnelle homologué par l’Association
canadienne de normalisation (CSA) ou l’American National Standards Institute (ANSI).
Équipement de protection personnel
1. Portez toujours des lunettes antiprojections qui offrent une protection frontale et latérale
pour les yeux. Portez un écran facial panoramique si votre travail produit des limailles ou des
copeaux de bois.
2. Portez des gants qui protègent en fonction des matériaux de travail et pour réduire les effets
des vibrations de l’outil.
3. Les chaussures antidérapantes sont recommandées pour maintenir la stabilité et l’équilibre au
sein de l’environnement de travail.
4. Portez des vêtements de protection conçus pour l’environnement de travail.
Précautions personnelles
Gardez le contrôle de l’outil, de vos mouvements et de l’environnement de travail pour éviter les blessures
ou le bris de l’outil.
1. N’utilisez pas d’outils si vous êtes fatigué ou sous l’effet de drogues, d’alcool ou de
médicaments.
2. N’utilisez pas l’outil si vous devez étirer les bras pour vous en servir. Une stabilité et un équilibre
appropriés sont nécessaires afin d’avoir un meilleur contrôle en cas de situations inattendues.
3. Tenez cet outil solidement des deux mains. L’utilisation de l’outil d’une seule main peut causer
une perte de maîtrise.
CONSIGNES DE SÉCURITÉ SPÉCIFIQUES
1. Un liquide pulvérisé à haute pression peut entraîner des blessures corporelles graves. Ne
dirigez pas le jet du pistolet pulvérisateur vers les gens, des animaux ou des plantes.
2. Ne pulvérisez pas de liquides inflammables ou toxiques.
3. Ne vaporisez pas près d’une source d’énergie.
4. Ne laissez pas le pistolet pulvérisateur sans surveillance pendant le fonctionnement
de l’appareil.
5. Ne verrouillez pas le pistolet pulvérisateur en position ouverte.
6. N'utilisez qu'un pistolet pulvérisateur qui est muni d'un verrou de gâchette ou d'un protecteur
de gâchette en bon état de marche.
7. L’utilisation d’une laveuse à pression peut créer des flaques d’eau et des surfaces glissantes.
L’aire de travail doit présenter des inclinaisons adéquates et un système de drainage afin de
réduire les risques de chute en cas de dérapage.
8. Procédez avec soin en appuyant sur la gâchette, puisque le rappel du pistolet pulvérisateur peut
faire tomber l’utilisateur.
9. Utilisez toujours la laveuse à pression à partir d’une surface stable. Évitez d’utiliser la laveuse à
pression à partir d’endroits précaires, comme une échelle ou un échafaud.
10. N’essayez pas de réparer les tuyaux à haute pression endommagés ou défectueux. Remplacezles toujours.
11. Ne réparez pas les raccords fuyants avec un produit d’étanchéité quel qu’il soit. Remplacez le
joint torique ou le joint ordinaire.
12. Ne débranchez pas le tuyau à haute pression de la pompe et du pistolet pulvérisateur alors que
le système est sous pression.

Laveuse à pression électrique de 1,6 gal/min à 1 300 lb/po carré
4
En cas de questions techniques, appelez le 1-800-665-8685
8416521
V 2,9
13. Assurez-vous toujours que le pistolet pulvérisateur, les buses et les accessoires sont
correctement raccordés.
14. N’utilisez pas d’autres appareils électriques reliés au même commutateur de la boîte à fusibles/
disjoncteurs que la laveuse à pression. Le disjoncteur pourrait se déclencher, coupant
ainsi le courant.
15. N’utilisez pas un câble de rallonge avec cet appareil; utilisez plutôt un tuyau de refoulement à
haute pression plus long.
16. Ne branchez pas cette laveuse à pression à une source d’eau chaude. Cette laveuse à pression a
été conçue pour s’utiliser avec l’eau froide seulement.
17. Pour réduire la quantité d’eau utilisée dans la laveuse à pression, placez l’appareil le plus loin
possible du lieu de nettoyage au cours de son utilisation.
18. Avant de démarrer la laveuse à pression par temps froid, assurez-vous qu’aucune glace ne s’est
formée dans quelque partie que ce soit de l’équipement.
19. Assurez-vous que la laveuse à pression n’est pas recouverte lorsqu’elle est utilisée afin d’éviter
de surchauffer le moteur.
20. Cette laveuse à pression est capable de produire des pressions pouvant atteindre 2 000 lb/
po carré. Pour éviter les dommages à la propriété et les blessures corporelles, n’utilisez pas la
pompe avec des composants dont la pression de travail nominale est inférieure à
2 000 lb/po carré.
21. Si vous branchez la laveuse à pression à un système d’eau portatif, assurez-vous que celui-ci
est muni d’un système de protection contre les refoulements d’eau.
CONSIGNES DE SÉCURITÉ GÉNÉRALES
Sécurité en électricité
AVERTISSEMENT ! Pour réduire les risques de choc électrique, assurez-vous que la fiche est branché
dans une prise de courant correctement mise à la masse.
1. Déconnectez l’outil de la source d’énergie avant le nettoyage, l’entretien, le remplacement de
pièces ou d’accessoires ou lorsqu’il n’est pas utilisé.
2. Protégez-vous contre les chocs électriques lorsque vous travaillez en présence d’équipement
électrique. Évitez le contact entre votre corps et les surfaces reliées à la terre comme les tuyaux,
radiateurs, cuisinières et réfrigérateurs. Il y a un risque plus élevé de choc électrique si votre
corps est mis à la terre.
3. Ne débranchez pas le cordon d’alimentation au lieu d’utiliser le commutateur de MARCHE/
ARRÊT sur l’outil. Ceci permet d’éviter une mise en marche involontaire lorsque vous branchez
le cordon d’alimentation dans la source d’énergie.
4. Ne modifiez aucune partie de l’outil ou des accessoires. Toutes les pièces et tous les
accessoires sont conçus avec des dispositifs de sécurité intégrés qui seront compromis s’ils
sont modifiés.
5. Assurez-vous que la source d’énergie est conforme aux exigences de votre équipement.
6. Au moment de câbler un appareil électrique, respectez tous les codes en matière d’électricité et
de sécurité, ainsi que les versions les plus récentes du Code canadien de l’électricité (CE) et du
code du Centre canadien d’hygiène et de sécurité au travail (CCHST).
ATTENTION ! Tout le câblage doit être installé par un électricien qualifié.

Laveuse à pression électrique de 1,6 gal/min à 1 300 lb/po carré
5
Visitez www.princessauto.com pour plus d'informations
8416521 V 2,9
Fiche polarisée
La double isolation des outils élimine le besoin d’un cordon d’alimentation à 3 fils mis à la terre et
d’une source d’énergie mis à la terre. Au lieu de cela, l’outil est équipé d’une fiche polarisée qui doit être
branchée sur une prise électrique/source d’énergie polarisée.
1. La fiche polarisée comporte deux lames de largeurs différentes, ce qui ne permet l’insertion de
la fiche dans la prise que d’une seule façon.
2. Si la fiche ne s’insère pas complètement dans la prise, tournez-la.
3. Si la prise n’accepte pas la fiche polarisée, contactez un électricien qualifié pour faire installer
une prise polarisée.
4. Ne modifiez la fiche d’aucune façon car cela compromettrait les dispositifs de sécurité intégrés.
ATTENTION ! Tout le câblage doit être installé par un électricien qualifié.
Cordon d’alimentation
1. Autant que possible, insérez la fiche du cordon d’alimentation directement dans la source
d’énergie. N’utilisez des rallonges ou des limiteurs de surtension que lorsque le cordon
d’alimentation de l’outil est trop court pour atteindre la source d’énergie depuis l’aire de travail.
2. N’utilisez pas cet outil si le cordon d’alimentation est effilé ou endommagé, car un choc
électrique peut se produire, ce qui pourrait causer des blessures ou des dommages
à la propriété.
a. Avant chaque utilisation, inspectez le cordon d’alimentation de l’outil; vérifiez qu’il n’est ni
fissuré, ni effiloché et que l’isolant et la fiche ne sont pas endommagés.
b. Arrêtez d’utiliser l’outil si le cordon d’alimentation est trop chaud au toucher.
c. Faites remplacer le cordon d’alimentation par un technicien de service compétent.
3. Pour réduire le risque de choc électrique, assurez-vous que toutes les connexions sont sèches
et qu’elles ne présentent aucun contact avec le sol. Ne touchez pas la fiche avec les
mains humides.
4. Pour éviter tout dommage au cordon d’alimentation, observez les précautions suivantes :
a. N’utilisez jamais le cordon d’alimentation pour transporter l’outil.
b. Ne tirez jamais sur le cordon d’alimentation pour déconnecter la fiche de la prise.
c. Maintenez le cordon d’alimentation à l’écart de l’outil et de la zone de travail de l’outil
pendant son utilisation. Le cordon doit toujours se trouver derrière l’outil.
d. Tenez le cordon à l’écart de la chaleur, de l’huile, des rebords coupants ou des
pièces mobiles.
e. Veillez à ce que personne, ni aucun matériel mobile ni des véhicules n’écrasent les cordons
d’alimentation non protégés.
i. Disposez les cordons d’alimentation loin des zones de passage.
ii. Placez les cordons d’alimentation à l’intérieur de conduits renforcés.
iii. Placez des planches de chaque côté du cordon d’alimentation pour créer un
couloir protecteur.

Laveuse à pression électrique de 1,6 gal/min à 1 300 lb/po carré
6
En cas de questions techniques, appelez le 1-800-665-8685
8416521
V 2,9
UTILISATION ET ENTRETIEN DE L’OUTIL
1. Utilisez le bon outil pour la tâche à effectuer. Cet outil a été conçu pour une utilisation
spécifique. Évitez de modifier ou d’altérer cet outil ou de l’utiliser à une fin autre que celle pour
laquelle il a été conçu.
2. Ne transportez pas l’outil avec les doigts sur la gâchette/le commutateur, ni à proximité
de ceux-ci.
3. Évitez les mises en marche involontaires. Assurez-vous que le commutateur d’allumage/la
gâchette soit en position neutre ou OFF (arrêt) lorsque l’outil n’est pas utilisé et avant de le
brancher sur une source d’énergie.
IDENTIFICATION DES PIÈCES
Retirez les pièces et les accessoires de l’emballage et vérifiez s’il y a des dommages. Assurez-vous que
tous les articles sur la liste de pièces sont compris.
AVERTISSEMENT ! Ne faites pas fonctionner l’outil si des pièces sont manquantes. Remplacez
les pièces manquantes avant l’utilisation. Le non-respect de cet avertissement peut entraîner une
défectuosité et des blessures graves.
Contenu :
1. Sortie de la pompe
2. Support à pistolet pulvérisateur
3. Interrupteur de MARCHE/ARRÊT
4. Raccord de tuyau à haute pression
5. Verrou de gâchette
6. Pistolet pulvérisateur
7. Lance de pulvérisation
8. Tuyau à haute pression
9. Poignée de transport
10. Manivelle d’enrouleur pour tuyau
11. Tube d’aspiration de détergent
12. Support de bouteille de détergent
13. Bouteille de détergent
14. Cordon d’alimentation avec un disjoncteur de
fuite à la terre (GFCI)
15. Entrée d’eau avec raccord de tuyau d’arrosage
16. Roues
Fig. 1

Laveuse à pression électrique de 1,6 gal/min à 1 300 lb/po carré
7
Visitez www.princessauto.com pour plus d'informations
8416521 V 2,9
ASSEMBLAGE
REMARQUE : Lorsque ce manuel fait référence à un numéro de pièce, il fait référence à la section de
l’identification de pièces comprises.
1. Assurez-vous que l’interrupteur de MARCHE/ARRÊT (no 3) est en position OFF/0 (arrêt).
2. Glissez le support à pistolet pulvérisateur (no 2) sur l’appareil. (Fig. 2)
3. Raccordez le tuyau à haute pression (no 8) à la sortie de la pompe (no 1). (Fig. 3)
4. Glissez le support de bouteille de détergent (no 12) sur l’appareil. (Fig. 4) Placez la bouteille
de détergent (no 13) dans le support. Placez le tube d’aspiration de détergent (no 11) dans la
bouteille de détergent.
5. Raccordez le tuyau à haute pression au raccord de tuyau à haute pression (no 4) sur le pistolet
pulvérisateur (no 6). (Fig. 5)
6. Insérez la lance de pulvérisation (no 7) dans le pistolet pulvérisateur. Exercez une pression
contre la tension du ressort et tournez dans le sens horaire à la position de verrouillage. (Fig. 6)
7. Raccordez le tuyau d’arrosage à l’entrée d’eau (no 15) de l’appareil. (Fig. 7)
REMARQUE : Le tuyau d’eau doit avoir un diamètre d’au moins 1/2 po. Le débit d’alimentation en eau ne
doit pas chuter en-dessous de 2 gal/min. La température d’alimentation en eau ne doit pas dépasser
40 °C (104 °F).
Fig. 2 Fig. 3
Fig. 4
Fig. 5
Fig. 6
Fig. 7
Fig. 8 Fig. 9
8. Branchez le tuyau d’arrosage à la source d’eau froide et ouvrez complètement l’eau. (Fig. 8)
9. Branchez le cordon d’alimentation (no 14) dans une prise. (Fig. 9)
10. Appuyez sur le bouton RESET (réinitialisation); la mention ON (marche) devrait maintenant
apparaître sur l’indicateur. Appuyez sur le bouton TEST (vérification); la mention OFF (arrêt)
devrait maintenant apparaître sur l’indicateur. Appuyez sur le bouton RESET (réinitialisation)
pour utilisation. Nous recommandons de vérifier le disjoncteur de fuite à la terre chaque fois
que vous utilisez la laveuse à pression.
AVERTISSEMENT : N’utilisez pas l’appareil si la vérification décrite ci-dessus échoue.

Laveuse à pression électrique de 1,6 gal/min à 1 300 lb/po carré
8
En cas de questions techniques, appelez le 1-800-665-8685
8416521
V 2,9
UTILISATION
1. Préparez l’aire de travail en vue du nettoyage, incluant vous assurer que toutes les portes et les
fenêtres sont bien fermées.
2. Avant de mettre l’appareil en marche, déplacez le verrou de gâchette (no 5) et comprimez la
gâchette afin d’évacuer tout l’air emprisonné dans la pompe et le tuyau. (Fig. 10) Attendez qu’un
jet d’eau constant soit produit par la lance, puis relâchez la gâchette.
3. Mettez la laveuse à pression en marche en tournant l’interrupteur de MARCHE/ARRÊT (no 3) à
la position ON/1 (marche). (Fig. 11)
4. Déplacez le verrou de gâchette et commencez à vaporiser en comprimant la gâchette.
REMARQUE : Le verrou de gâchette empêche d’engager cette dernière accidentellement. Ce
dispositif de sécurité n’a pas pour effet de verrouiller la gâchette à la position ON (marche).
5. La buse de la lance de pulvérisation (no 7) peut s’ajuster de manière à produire un jet de 0 à
60°. (Fig. 12)
ATTENTION : Le réglage à 0° du jet vaporisé est très puissant. Ne réglez pas celui-ci durant la
vaporisation. Lors de la plupart des applications de nettoyage, nous recommandons d’utiliser un
angle de vaporisation de 20° pour ne pas endommager la surface vaporisée.
Fig. 10 Fig. 11 Fig. 12

Laveuse à pression électrique de 1,6 gal/min à 1 300 lb/po carré
9
Visitez www.princessauto.com pour plus d'informations
8416521 V 2,9
UTILISATION DE DÉTERGENT
Pour accroître l’efficacité de la laveuse à pression, il est parfois nécessaire de faire
appel à des détergents afin de déloger la saleté et l’encrassement tenaces.
1. En vous assurant que le commutateur de MARCHE/ARRÊT (no 3) est en
position OFF/0 (arrêt), tirez sur la tête de la lance de pulvérisation (no 7) tel
qu’indiqué. (Fig. 13)
2. Remplissez la bouteille de détergent (no 13) avec le type de détergent
choisi. (Fig. 14)
3. Mettez l’interrupteur de MARCHE/ARRÊT à la position ON/1 (marche) et
comprimez la gâchette. (Fig. 15) Le détergent liquide sera automatiquement
tiré dans l’appareil et combiné à l’eau.
4. Appliquez le détergent sur l’aire de travail. Évitez que le détergent ne sèche
sur la surface.
5. Pour rincer, relâchez la gâchette et ramenez la tête de la lance de
pulvérisation dans sa position originale. Appuyez sur la gâchette et rincez
la surface d’un mouvement de balayage.
ATTENTION : Cet appareil a été conçu pour utilisation avec les détergents
destinés aux laveuses à pression seulement. L’utilisation d’autres types
de détergents ou de produits chimiques peut endommager l’appareil.
6. Lorsque le détergent n’est plus nécessaire, insérez le tube d’aspiration de
détergent dans un contenant d’eau douce.
7. Réglez la buse à la position de basse pression.
8. Comprimez la gâchette et maintenez-la enfoncée pendant 20 à 30 secondes
pour permettre à l’eau douce de rincer le système d’injection de détergent.
PRENDRE UNE PAUSE
1. Engagez le verrou de gâchette (no 5).
(Fig. 16)
2. Placez le commutateur de MARCHE/ARRÊT
(no 3) à la position OFF/0 (arrêt). (Fig. 17)
Fig. 13
Fig. 14
Fig. 15
Fig. 16
Fig. 17

Laveuse à pression électrique de 1,6 gal/min à 1 300 lb/po carré
10
En cas de questions techniques, appelez le 1-800-665-8685
8416521
V 2,9
MISE À L’ARRÊT
1. Placez le commutateur de MARCHE/ARRÊT (no 3) à la position OFF/0 (arrêt) et débranchez le
cordon (no 14) de la prise. (Fig. 18)
2. Coupez l’alimentation en eau. (Fig. 19)
3. Comprimez la gâchette pendant 20 à 30 secondes pour dépressuriser le système.
4. Relâchez la gâchette et engagez le verrou de gâchette (no 5). (Fig. 20)
5. Débranchez le tuyau d’arrosage de l’entrée d’eau sur l’appareil. (Fig. 21)
Fig. 19
Fig. 18
Fig. 20 Fig. 21
PRATIQUES EXEMPLAIRES EN MATIÈRE DE LAVAGE
1. Avant de nettoyer une surface, choisissez une surface cachée afin de déterminer le type de
vaporisation et la distance afin de produire un nettoyage optimum.
2. Prérincez la surface à être nettoyée avec de l’eau douce.
3. Si vous utilisez un détergent ou un produit de dégraissage, appliquez-le sur la surface à basse
pression. Laissez le détergent reposer sur la surface pendant 1 à 3 minutes.
4. Évitez que le détergent ne sèche sur la surface. Si la surface semble se sécher, humectez-la
simplement avec de l’eau douce.
5. Appliquez toujours le détergent de bas en haut.
6. Rincez à haute pression d’un mouvement de balayage en maintenant la buse de pulvérisation à
une distance d’environ 3 à 6 po de la surface à nettoyer.
7. Rincez toujours du haut vers le bas et de gauche à droite.
8. Pour de meilleurs résultats sur les plates-formes, les patios de ciment, la brique et la pierre,
limitez votre aire de travail à des sections plus petites mesurant environ 25 pi carrés. Lorsque
vous passez sur une nouvelle section de la surface à nettoyer, assurez-vous de chevaucher
la section précédente afin d’éliminer les marques d’arrêt et pour vous assurer d’un nettoyage
encore plus uniforme.
9. Pour de meilleurs résultats sur le parement de votre maison, limitez votre aire de travail à
environ 6 pi. Lors du rinçage, maintenez la buse de pulvérisation à une distance d’environ 6 po
de la surface à nettoyer.
10. Pour de meilleurs résultats sur les voitures, les bateaux et les motocyclettes, nettoyez un côté
du véhicule à la fois. Maintenez la buse de pulvérisation à une distance d’environ 6 à 8 po de
la surface à nettoyer. Augmentez la distance lorsque vous rincez des rayures fines ou d’autres
surfaces sensibles. Séchez la surface en l’essuyant au moyen d’un chamois ou d’un chiffon
doux et sec.
11. Pour de meilleurs résultats sur les grilles de barbecue, l’équipement électrique extérieur et les
outils de jardinage, il peut être nécessaire de placer la buse de pulvérisation encore plus près de
la surface afin de mieux déloger la saleté.

Laveuse à pression électrique de 1,6 gal/min à 1 300 lb/po carré
11
Visitez www.princessauto.com pour plus d'informations
8416521 V 2,9
ENTRETIEN
1. Entretenez l’outil avec soin. Un outil en bon état sera efficace, plus facile à contrôler et
préviendra les problèmes de fonctionnement.
2. Inspectez les composants de l’outil régulièrement. Réparez ou remplacez les composants
endommagés ou usés.
3. Suivez les instructions pour lubrifier et remplacer les accessoires.
4. Gardez les poignées de l’outil propres, sèches et exemptes d’huile ou de graisse en tout temps.
ATTENTION ! Seul un personnel d’entretien qualifié doit effectuer la réparation de l’outil.
ENTRETIEN DE LA LAVEUSE À PRESSION
ATTENTION ! Assurez-vous d’avoir débranché la laveuse à pression de la source d’énergie et de la
source d’eau et que le système soit dépressurisé avant de procéder aux étapes d’entretien suivants.
Nettoyez le filtre d’entrée d’eau
1. Retirez le couvercle de l’entrée d’eau (no 15). (Fig. 22)
2. Retirez le filtre d’entrée d’eau au moyen de pinces à bec plat.
3. Rincez le filtre d’entrée d’eau à l’eau tiède. (Fig. 23)
4. Réinsérez le filtre d’entrée d’eau et le couvercle.
Nettoyage des buses
Si la buse devient obstruée, elle peut entraîner une accumulation de
pression à l’intérieur de la pompe et causer une poussée soudaine.
Nettoyez la buse en insérant un instrument mince et effilé, comme un
trombone, dans l’embout afin d’enlever les dépôts.
Fig. 22
Fig. 23

Laveuse à pression électrique de 1,6 gal/min à 1 300 lb/po carré
12
En cas de questions techniques, appelez le 1-800-665-8685
8416521
V 2,9
ENTREPOSAGE
Si vous devez ranger votre laveuse à pression dans un lieu où la température se situe sous 5 °C (41 °F),
vous devez hivériser celle-ci afin de la protéger. Autrement, la pompe pourrait subir des
dommages permanents.
Méthode d’hivérisation optimale
REMARQUE : Le produit de protection pour pompe, que vous pouvez vous procurer chez Princess Auto,
assurera la lubrification continue des pièces internes, en plus de les protéger de la rouille et d’empêcher la
pompe de geler.
1. Débranchez la laveuse à pression de la source d’énergie et de l’alimentation en eau.
2. Reliez le tuyau du produit de protection pour pompe à l’admission d’eau (no 15).
3. Enfoncez le bouton sur le contenant de produit de protection pour la pompe.
4. Continuez tant et aussi longtemps que le liquide s’écoule par la sortie de la pompe (no 1).
5. Retirez le tuyau de l’admission de la pompe.
Méthode alternative
Si vous ne pouvez effectuer l’opération d’hivérisation optimale, vous pouvez quand même protéger votre
laveuse à pression contre les dommages pouvant survenir en hiver :
1. Débranchez tous les raccords d’eau.
2. Actionnez l’appareil pendant quelques secondes. Appuyez sur la gâchette afin d’évacuer toute
l’eau qui reste à l’intérieur de la pompe. Arrêtez immédiatement l’appareil.
3. Retirez le pistolet (#6) et le tuyau (#8) de la laveuse à pression. Vidangez tout excès d’eau.
Enroulez soigneusement le tuyau en évitant de l’entortiller.
4. Rangez l’appareil et les accessoires dans une pièce où la température n’atteint pas le point de
congélation. Ne rangez pas celui-ci près d’une fournaise ou d’une autre source de chaleur.
MISE AU REBUT
Recyclez tout outil endommagé et impossible à réparer dans une installation prévue à cet effet.

Laveuse à pression électrique de 1,6 gal/min à 1 300 lb/po carré
13
Visitez www.princessauto.com pour plus d'informations
8416521 V 2,9
DÉPANNAGE
Si l’outil ne fonctionne pas correctement ou si des pièces sont manquantes, veuillez contacter Princess
Auto Ltd. afin de trouver une solution. Si ce n’est pas possible, demandez à un technicien qualifié de
réparer l’outil.
Problème(s) Cause(s) possible(s) Solution(s) proposée(s)
Le moteur ne
démarre pas.
Le commutateur de MARCHE/ARRÊT
est en position ARRÊT.
Tournez le commutateur à la position MARCHE.
Le cordon d’alimentation
n’est pas branché.
Branchez le cordon d’alimentation.
La prise électrique ne fournit pas un
courant suffisant.
Essayez une autre prise.
Bouchon avec disjoncteur de fuite à
la terre déclenché
Appuyez sur le bouton RESET (réinitialisation) sur
la fiche avec disjoncteur de fuite à la terre.
Disjoncteur déclenché Arrêtez la laveuse à pression. Vérifiez si seule la
laveuse à pression est reliée à ce circuit.
L’appareil n’atteint
pas la haute
pression.
Le diamètre du tuyau d’arrosage
est trop petit.
Remplacez-le par un tuyau d’arrosage
de 5/8 po ou plus.
L’alimentation en eau est restreinte. Vérifiez si le tuyau d’arrosage est entortillé, s’il
présente des fuites ou s’il est obstrué.
Quantité insuffisante d’eau au point
d’alimentation
Ouvrez le robinet au maximum.
Le filtre d’admission d’eau
est obstrué.
Enlevez le filtre et rincez-le à l’eau tiède.
La buse est réglée à la position de
basse pression.
Poussez sur la tête de la lance de pulvérisation à la
position de pression élevée.
La pression de sortie
est parfois haute et
parfois basse.
Quantité insuffisante d’eau au point
d’alimentation
Ouvrez le robinet au maximum. Vérifiez si le tuyau
d’arrosage est entortillé, s’il présente des fuites ou
s’il est obstrué.
La pompe aspire de l’air. Assurez-vous que le tuyau et les raccords sont
étanches. Fermez l’appareil et purgez la pompe
en appuyant sur la gâchette jusqu’à ce qu’un
écoulement d’eau stable provienne de la buse.
Le filtre d’admission
d’eau est obstrué.
Enlevez le filtre et rincez-le à l’eau tiède.
La buse de sortie est obstruée. Insérez un jet d’air dans la buse ou éliminez les
débris au moyen d’un instrument mince et effilé.
Dépôts de calcium dans le pistolet, le
tuyau ou la lance
Injectez du vinaigre distillé dans le tube
d’aspiration de détergent.

Laveuse à pression électrique de 1,6 gal/min à 1 300 lb/po carré
14
En cas de questions techniques, appelez le 1-800-665-8685
8416521
V 2,9
Problème(s) Cause(s) possible(s) Solution(s) proposée(s)
Aucun détergent Le contenant de détergent est vide. Ajoutez du détergent supplémentaire.
La bouteille de détergent ou le tube
d’aspiration n’est pas bien branché.
Vérifiez les connexions.
Le détergent est trop épais. Diluez le détergent.
Le filtre installé sur le tube
d’aspiration de détergent est bouché.
Injectez de l’eau chaude dans le filtre pour
enlever les débris.
Tube d’aspiration de détergent
endommagé ou colmaté
Éliminez toute obstruction ou remplacez le tube
d’aspiration de détergent
La buse est réglée à la position de
pression élevée.
Tirez sur la tête de la lance de pulvérisation à la
position de basse pression.
La buse de sortie est obstruée. Insérez un jet d’air dans la buse ou éliminez les
débris au moyen d’un instrument mince et effilé.
Fuites au niveau du
raccord du tuyau
d’arrosage
Raccords desserrés Serrez les raccords.
Fuites au niveau
de la lance de
pulvérisation, de la
rallonge ou de
la buse
La buse de pulvérisation n’est pas
bien fixée.
Insérez la buse de pulvérisation dans le pistolet.
Exercez doucement une pression contre la tension
du ressort et tournez à la position de verrouillage.
Joint torique ou pièce rapportée de
plastique brisé
Apportez chez Princess Auto Ltd. ou chez un
technicien qualifié.
La pompe est
trop bruyante.
La pompe aspire de l’air. Assurez-vous que le tuyau et les raccords sont
étanches. Fermez l’appareil et purgez la pompe
en appuyant sur la gâchette jusqu’à ce qu’un
écoulement d’eau stable provienne de la buse.
Fuites d’eau
provenant de la
pompe (une fuite ne
dépassant pas 10
gouttes par minute
est normale)
Raccords desserrés Serrez les raccords.
Les joints hydrauliques sont
endommagés ou usés.
Apportez chez Princess Auto Ltd. ou chez un
technicien qualifié.
Égouttement d’huile Les joints d’huile sont
endommagés ou usés.
Apportez chez Princess Auto Ltd. ou chez un
technicien qualifié.

Laveuse à pression électrique de 1,6 gal/min à 1 300 lb/po carré
15
Visitez www.princessauto.com pour plus d'informations
8416521 V 2,9
RÉPARTITION DES PIÈCES

Laveuse à pression électrique de 1,6 gal/min à 1 300 lb/po carré
16
En cas de questions techniques, appelez le 1-800-665-8685
8416521
V 2,9
LISTE DES PIÈCES
No DESCRIPTION QTÉ
1. Couvercle de moteur B 1
2. Anneau de support 6
3. Couvercle de moteur A 1
4. Maillage 1
5. Étui B 1
6. Pompe 1
7. Étui A 1
8. Bouton de l’interrupteur 1
9. Manchon 4
10. Moteur 1
11. Boulon hexagonal M6 x 25 1
12. Vis ST3 x 20 1
13. Boîtier d’interrupteur A 1
14. Levier 1
15. Boîtier d’interrupteur B 4
16. Interrupteur 4
17. Ruban en nylon 1
18. Support à pistolet pulvérisateur 1
19. Vis ST4 x 25 1
20. Support A 1
21. Support B 1
22. Support de cordon d'alimentation 20
23. Tube d'aspiration 1
24. Capuchon de bouteille de détergent 1
25. Bouteille de détergent 1
26. Vis ST4 x 14 1
27. Support de bouteille de détergent 1
28. Disjoncteur de fuite à la terre 1
No DESCRIPTION QTÉ
29. Pistolet pulvérisateur 1
30. Lance de pulvérisation 1
31. Boulon M5 x 45 1
32. Écrou M5 1
33. Plaque de support A 1
34. Vis S73,9 x 15 2
35. Tuyau de contournement 2
36. Plaque de support A 1
37. Étui en acier inoxydable 3
38. Boulon M5 x 42 1
39. Joint 1
40. Écrou M5 1
41. Poignée d'enrouleur pour tuyau 2
40. Écrou M5 2
41. Poignée d’enrouleur pour tuyau 2
42. Vis à tête fraisée ST3,9 x 15 8
43. Couvercle d’enrouleur pour tuyau 2
44. Enrouleur pour tuyau 2
45. Tuyau à haute pression 1
46. Plaque de support B 1
47. Manivelle 1
48. Poignée de manivelle 1
49. Housse de poignée de manivelle 1
50. Vis ST3 x 15 1
51. Tuyau extérieur 1
52. Poignée de transport A 1
53. Vis ST4 x 20 4
54. Poignée de transport B 1
 Loading...