

Page 1
PDX100 Single Top CD/USB/SD/MP3 player
Ref. nr.: 172.719
INSTRUCTION MANUAL
GEBRUIKSAANWIJZING
GEBRAUCHSANLEITUNG
Page 2

UK
TO REDUCE THE RISK OF ELECTRIC SHOCK, DO NOT REMOVE THE COVER
(OR BACK) THERE ARE NO SERVICEABLE PARTS INSIDE. REFER SERVICING
TO QUALIFIED SERVICE PERSONNEL.
The lighting flash with arrowhead symbol,within an equilateral triangle,is intended to alert the user to the presence
of uninsulated ”dangerous voltage” within the products enclosure that may be of sufficient magnitude to constitute a
risk of electric shock to persons.
The exclamation point within an equilateral triangle is intended to alert the user to the presence of important
operating and maintenance (serviving) instructions in the literature accompanying the appliance.
WARNING:
1. Placing a disc with excessive downward force may damage the loader,invalidating the warranty.
2. To reduce the risk of fire or electrical shock,do not expose this appliance to rain or
moisture.Electrical equipment should NEVER be kept or stored in damp Environments.
DANGER:
Invisible laser radiation when open and interlock failed or defeated void direct exposure to beam.
CAUTION:
This product utilizes a laser. Use of controls or adjustments other than those specified
here in may result in hazardous radiation exposure.
CAUTIONS REGARDING HANDLING
Location
Install the player in a well-ventilated location where it will not be exposed to high temperatures or humidity.
Do not install the player in a location which is exposed to direct sunlight, or near stoves or radiators. Excessive heat
can adversely affect the cabinet and internal components. Installation of the
player in a damp or dusty environment may aiso result in a malfunction and
can be hazardous. Avoid installation near cookers etc., where the player may
be exposed to oily smoke, steam or heat.
Installation Guidelines
- Placing and using the compact disc player for long periods on heat-generating sources such as amplifiers
or near spotlights, etc. will affect product performance. Avoid placing the player on heatgenerating sources.
- Install this compact disc player as far as possible away from tuners and TV sets. A compact disc player
installed in close proximity to such equipment may cause noise or degradation of the picture.
- Noise may be noticeable when an indoor antenna is used. In such cases, make use of an outdoor antenna
or turn off power to the compact disc player.
- When the unit is used in a loud-sound environment, e.g., near a speaker, sound skip may occur. Install the
unit away from the speaker or reduce the listening volume.
- Place this unit on a level surface and a stable platform.
- Be sure the player, including its audio and power supply cords, does not touch vibrating materials. Any
cause of vibration other than the insulators may cause the disc to skip. Take special care when using the
player while it is installed in a carrying case.
When this unit is brought into a warm room from previously cold surroundings or when the room temperature rises
sharply, condensation may form inside the unit and impair its performance. In such cases, allow the unit to stand
for about an hour or raise the room temperature gradually.
About discs created on computers
Depending on the application settings and the computer’s environmental settings, it may not be possible to play
certain discs. Record the disc in a format supported on this unit. For details, contact your application’s retailer.
If the recording quality is poor due to the disc’s properties, scratches or dirt on the disc or dirt on the recording lens,
it may not be possible to play the disc.
Creating backup discs
When CD-R/-RW discs are paused or left in the pause mode at cue points for long periods
of time, it may become difficult to play the disc at that point, due to the properties of the disc.
Also, when a specific point is looped repeatedly an extremely large number of times, it may become difficult to play
that point. When playing valuable discs, we recommend making backup discs.
Page 3

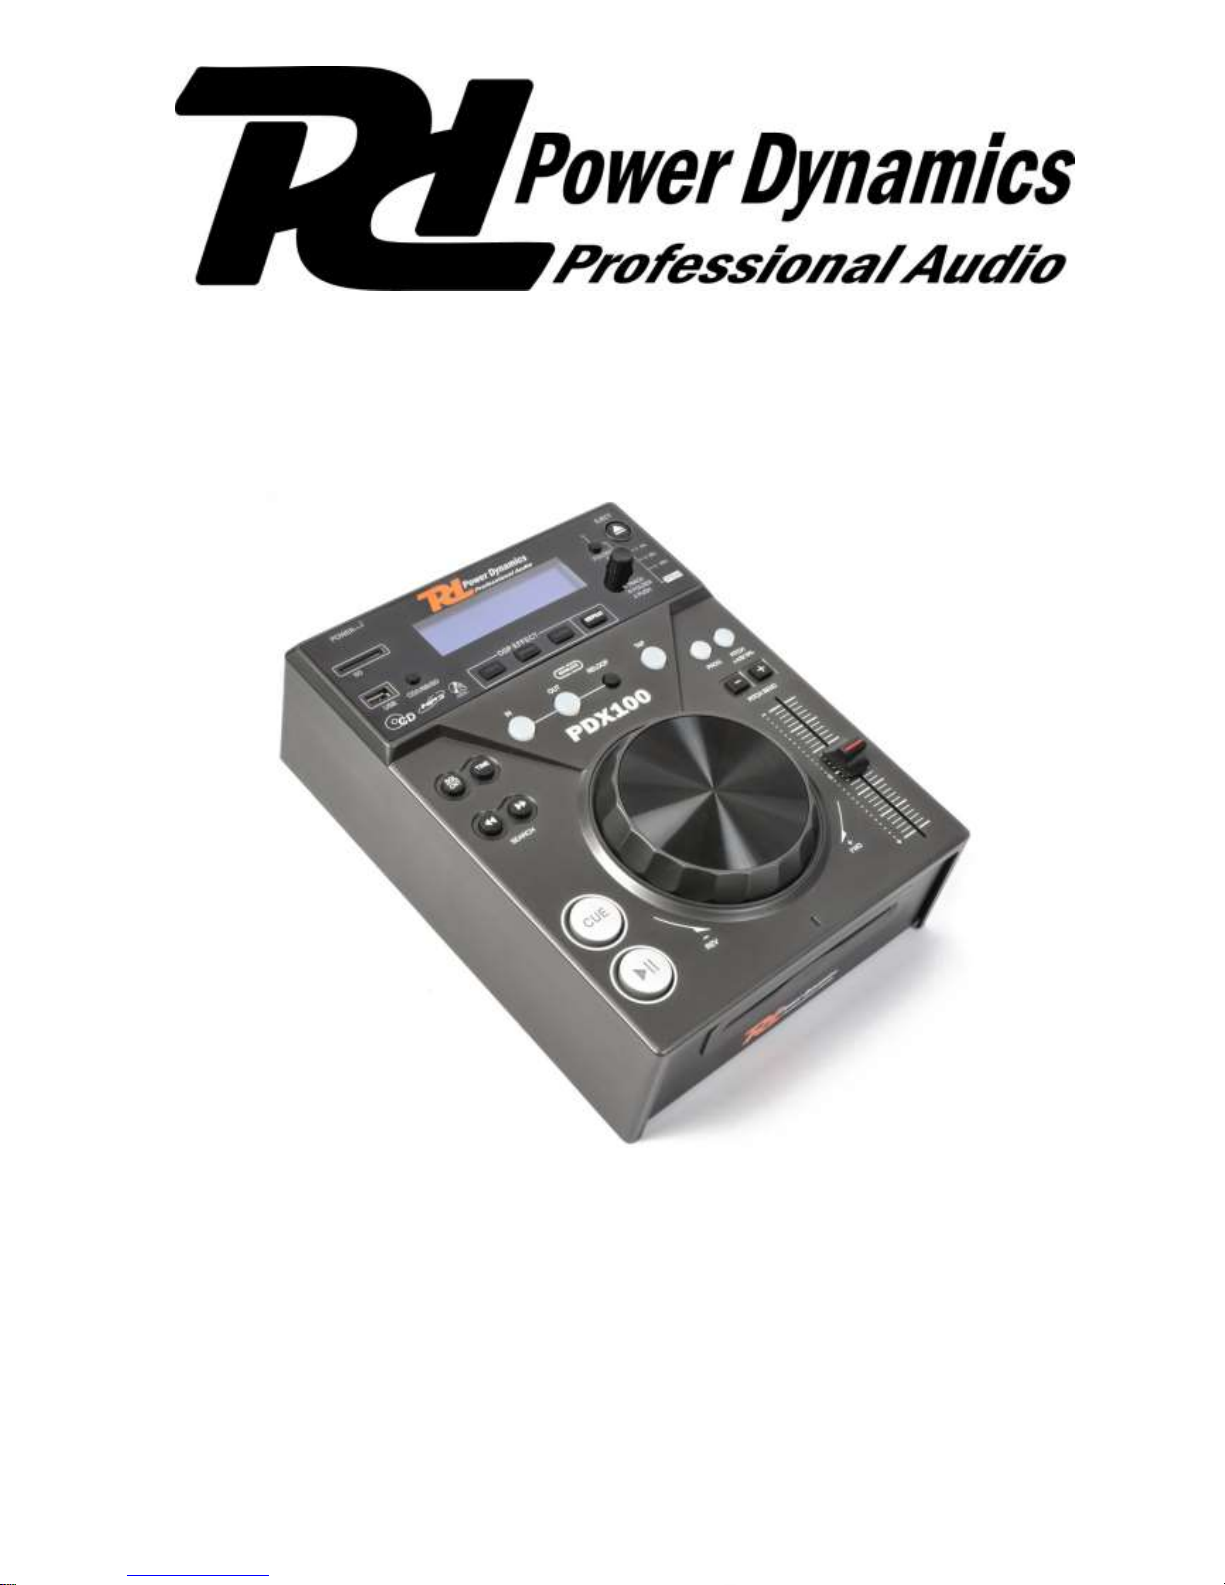
FUNCTIONS :
IMPORTANT
Use of controls or adjustments or performance of procedures other than those specified herein may result in
hazardous radiation exposure.
Cd Player Function
1. Power switch-Turn the machine on and off. (Turn it on before amplifier)
2. Power plug connector- Plug the supplied power cord in here
3. Audio OUT connectors- Connect your CD player to your mixer from this line level output.
4. Fader Start- The DJ mixer can be used to control the CD player for fader start; use accessory cord.
5. CD Drawer- Place your CD in here. Use commercially CDs or burning CDs at the minimum speed possible
Page 4

6. EJECT BUTTON
Press to load or eject disk. Each press will open or close the disk tray.
NOTE: Disc holder will not open unless stop or pause button has been pushed first.
7. SD CARD SLOT
8. USB PORT
Support USB playing
9. CD/USB/SD BUTTON
By pressing this button repeatedly, you can select the playback sourceCDdrive/USB interface/SD card
reader
10. Rotary dial
As track selection function, choosing one scale clockwise will play the next track while selecting one scale
counterclockwise will play the last track. It will affect only by pressing the encoder within 3 seconds otherwise
the previous operation will be cancelled.
11. FOLDER BUTTON
Allows you to navigate through folders similarly in either USB or CD mode. The LED lights will be on
12. PLAY / PAUSE BUTTON
Each time you press the PLAY/PAUSE button, the operation changes from play to pause or from pause to
play. When paused, pressing play will only set a new cue point if the jogwheel has been moved.
13. CUE BUTTON
Pressing the CUE button during play provides a return to the position at which play was started and will
pause the track. Holding down CUE will start playback from this point and releasing CUE will cause it to
return to that point. So if the track is paused you can use the JOGWHEEL to locate a new cue point.
14. JOG WHEEL
The jog wheel allows you to create scratch effects, to fast-forward or rewind within a track and to mokify the
playback speed. If you have already pressed the VINYL(16) button (button is lit up in blue), you can create
scratch effects in pause and playback mode by moving the jog wheel forwards and backwards. Turn the jog
wheel clockwise to fast-forward within the track. Turn the jog wheel anti-clockwise to rewind within the track.
The faster you turn the jog wheel, the faster the track will skip forwards/backwards. If the MINYL button is not
activated (button is not lit up), you can use the jog wheel in pause mode to fast-forward or rewind the track. In
playback mode you can modify the playback speed. Rotate the jog wheel clockwise to increase the speed.
Rotate the jog wheel anti-clockwise to decrease the speed.
15. DISPLAY LCD Display lndicate the Track/Numbers/Time/Remain/Pitch/Continue/Single.
16. VINYL Button
Press this button in order to activate the scratch function of the jogwheel(14). The button is lit up in blue.
17. BRAKE
In play mode, push the brake button at first, starts the track at a speed that is slower than normal play back.
When you stop the track, the track slows down before playback is stopped completely.
18. REVERSE
Push the reverse button to play your track in reverse, push the reverse button again to cancel this feature.
19. REPEAT BUTTON
Use this button to repeat one track or all the track of the CD.
20. LOOP IN BUTTON
You may set the beginning point of the loop system and indicate on the display.
21. LOOP OUT BUTTON
When you press this button, you set the end point of the seamless loop and you start the loop. To finish the
loop, press again this button.
22. RELOOP BUTTON
This button is used to start the last saved loop. To finish the loop, press the re-loop button again.
23. SINGLE / CONT BUTTON
Press this button to switch between the SINGLE and CONTINUOUS play mode. The selected mode is
indicated on the LCD (15). In SINGLE mode, after each track, the unit stops the reading. In CONTINUOUS
mode, the unit reads all tracks and stops.
24. TIME BUTTON
Use this knob to choose the time mode: elapsed time, remaining time or total remaining time. With MP3 files
the total remaining time of the CD is not displayed.
25. SEARCH BUTTON
You may forward and backward to navigation through one track. Constantly pressing will start up double
quick
Page 5

26. PITCH SLIDE CONTROL
Use this fader to increase or decrease the speed of the track. The percentage is displayed. First of all
push button 28.
27. PITCH BEND –/+ BUTTON
The pitch will drop while the - button is pressed and return to the original pitch when it released. The pitch
will automatically rise when the + button is pressed and return to the original pitch when it is released.
28. PITCH BUTTON
If you push this button, the adjustement of the pitch potentiometer is available.
29. LED PITCH
It is used to indicate different pitch ranges
30. TAP BUTTON
Press this button in the rhythm of the music. The display (15) shows the beats per minute (BPM)
31. PROG BUTTON
In STOP mode, you can program several tracks ( 20 tracks max ) :
Press the STOP button to enter in the stop mode
Press the PROG button to enter in the program mode
Use the skip track buttons to choose the track you want to listen then press the PROG button to enter your
choice. Use one more time the skip track buttons to choose the track you want to listen then press the PROG
button to enter your choice Repeat the operation to select all the track you want to listen Press the
PLAY/PAUSE button to start the playback.
USABLE DISCS AND USB DEVICES PLAYABLE MUSIC FILE FORMATS
This unit supports USB mass storage class USB devices (external hard disks, portable flash memory devices,
digital audio players, etc.). When there are many folders or files, some time may be required for loading.
Folders and files exceeding the limits cannot be displayed.
USB devices that cannot be used
• Optical disk type devices such as external DVD / CD drives, etc., are not supported.
• USB hubs cannot be used.
Cautions on using USB devices
• Some USB devices may not operate properly. Please note that distributor will accept no responsibility whatsoever
for loss of data recorded on USB devices.
• It may happen that, when a current above the allowable level is detected in this unit’s USB port, the [USB STOP]
indicator flashes, the power supply to the USB device is cut off and communications with the USB device are
interrupted. To restore normal operation, disconnect the USB device from this unit. Avoid reusing USB
devices for which an excess current has been detected. If normal operation is not restored (if communications
cannot be established) after the above procedure is performed, try turning off this unit’s power then turning it back
on.
• If multiple partitions are set for the USB device, the device may not be recognized.
• USB devices equipped with flash card readers may not operate.
• Depending on the USB device you are using, the desired performance may not be achieved.
About USB devices
This unit supports music files in the formats shown here. 32 kHz, 44.1 kHz, CBR, VBR 48 kHz 32 kbps to MP3
.mp3 MPEG-1 16 bit 320 kbps
Type File extension Compatible
fAbout MP3 files
MP3 files can have a constant bit rate (CBR) or a variable bit rate (VBR). Both types of files can be played on the
CD players, but the search and super fast search functions are slower with VBR files. If your priority is operability,
we recommend recording MP3 files in CBR.
SPECIFICATIONS
Anti-Shock buffer memory: 20 seconds
Range of adjustments: +/-4%, 8% ,16%
Power supply: AC 100-240V~50/60Hz
Power consumption: 20W max.
Admissible media: CD, CD-R, MP3-CD, USB, SD, SDHC
Output voltage: 1 VRMS/10 kOhm
Frequency response: 20-20000 Hz
Dimensions: L290XW226XH300mm
Weight.: 2 Kgs
Page 6

Lees deze handleiding eerst door alvorens het product te gebruiken. Volg de
instructies op anders zou de garantie kunnen vervallen. Neem ook altijd alle
veiligheidsmaatregelen om brand en/of een elektrische schok te voorkomen. Tevens
is het ook raadzaam om reparaties / modificaties e.d. over te laten aan
gekwalificeerd personeel om een elektrische schok te voorkomen. Bewaar deze
handleiding ook voor toekomstig gebruik !
NL
Hartelijk dank voor de aanschaf van deze CD/USB speler. Neemt U a.u.b. een paar momenten de tijd om deze
handleiding zorgvuldig te lezen, aangezien wij graag willen dat u onze producten snel en volledig gebruikt.
WAARSCHUWING :
- Bewaar de verpakking zodat u indien het apparaat defect is, dit in de originele verpakking kunt opsturen
om beschadigingen te voorkomen.
- Voordat het apparaat in werking wordt gesteld, altijd eerst een deskundige raadplegen.
- In het apparaat bevinden zich onder spanning staande onderdelen; open daarom NOOIT dit apparaat.
- Bij het verwijderen van de stekker uit het stopcontact nooit aan het netsnoer trekken.
- Verwijder of plaats een stekker nooit met natte handen resp. uit en in het stopcontact.
- Indien zowel de stekker en/of netsnoer als snoeringang in het apparaat beschadigd zijn dient dit door een
vakman hersteld te worden.
- Indien het apparaat zo beschadigd is dat inwendige (onder)delen zichtbaar zijn mag de stekker NOOIT in
het stopcontact worden geplaatst én het apparaat NOOIT worden ingeschakeld. Neem in dit geval contact
op met de dealer. Sluit het apparaat nooit op een dimmer aan.
- Reparatie aan het apparaat dient te geschieden door een vakman of een deskundige.
- Sluit het apparaat alléén aan op een 230VAC / 50Hz (geaard) stopcontact, verbonden met een 10-16A
meterkastgroep.
- Toestel niet opstellen in de buurt van warmtebronnen zoals radiatoren etc. en niet op een vibrerende- maar
stabiele ondergrond plaatsen. Dek ventilatie-openingen nooit af.
- Bij onweer altijd de stekker uit het stopcontact halen, zo ook wanneer het apparaat een langere tijd niet
gebruikt wordt. Stelregel: Bij geen gebruik stekker verwijderen.
- Als u het apparaat een tijd niet gebruikt heeft en het weer wil gebruiken kan er condens ontstaan; laat het
apparaat eerst op kamertemperatuur komen alvorens het weer in werking te stellen ; apparaat nooit in
vochtige ruimten en buiten gebruiken. Plaats geen metalen voorwerpen, vloeistoffen (in bekers etc.) op
het product, deze kunnen onherstelbare schade of een elektrische schok veroorzaken!! wanneer ze het
apparaat binnendringen.
- Om ongevallen in bedrijven te voorkomen moét rekening worden gehouden met de daarvoor geldende
richtlijnen en moeten de aanwijzingen/waarschuwingen worden gevolgd.
- Wanneer het apparaat aan de muur bevestigd moet worden dient eerst zorgvuldig berekend te worden of
het plateau en/of muurbeugels deze wel kunnnen dragen. Kunt u het niet berekenen schakel dan
vakbekwaam personeel in. Het apparaat mag alleen bevestigd worden op de manier die de fabrikant
/expert aanbeveelt.
- Laat ruimte vrij voor een deugdelijke ventilatie.
- Het apparaat buiten bereik van kinderen houden. Bovendien mag het apparaat nooit onbeheerd gelaten
worden.
- Gebruik geen schoonmaakspray om de schakelaars te reinigen. Restanten van deze spray zorgen ervoor
dat smeer en stof ophopen. Raadpleeg bij storing te allen tijde een deskundige.
- Zorg dat uw handen schoon zijn tijdens het gebruik.
- Gebruik geen overmatige kracht bij het bedienen van het apparaat.
- Bij een ongeval met deze cd/usb speler altijd eerst een deskundige raadplegen alvorens opnieuw te
gebruiken.
- Zet eerst de Aan/Uit schakelaar op Uit en de volumeregelaar(s) op minimaal bij het aansluiten van de
installatie, na alle snoeren aangesloten te hebben schakel dan pas Aan. Zorg er ook voor dat de cd/usb
speler eerst Uit geschakeld wordt alvorens het netsnoer uit het stopcontact te verwijderen.
Tracht het apparaat niet schoon te maken met chemische oplossingen. Dit kan de lak beschadigen. Gebruik een
droge doek om schoon te maken en doe dit frequent, b.v. maandelijks (afhankelijk van de plaats waar de cd/usb
speler gebruikt wordt ). Blijf uit de buurt van elektrische/elektronische apparatuur, elektriciteitskabels etc., deze
veroorzaken bromstoringen. Bij reparatie dienen altijd originele onderdelen te worden gebruikt om onherstelbare
beschadigingen en/of ontoelaatbare straling te voorkomen. Verwijder netsnoer en aansluitsnoeren voordat u dit
product gaat verplaatsen.
Page 7

Vervoer de cd/usb speler eventueel trillingsvrij. Zorg ervoor dat het netsnoer niet beschadigd/defect kan raken
wanneer mensen erover heen lopen. Het netsnoer vóór ieder gebruik controleren op breuken/defecten! !
In Nederland/Belgie is de netspanning 230Vac/50Hz. Indien u reist (en u neemt het apparaat mee) informeer dan
naar de netspanning in het land waar u verblijft.
Deze markering wordt weergegeven om u erop attent te maken dat een levensgevaarlijke spanning in het
product aanwezig is en dat bij aanraking van deze delen een elektrische schok wordt verkregen.
Deze instructiemarkering wordt weergegeven om u erop te wijzen dat de instructie zeer belangrijk is om te
lezen en/of op te volgen.
Belangrijke Veiligheidsinformatie
WAARSCHUWING: OM BRAND OF ELEKTRISCHE SCHOKKEN TE VOORKOMEN, DIENT U DIT APPARAAT
NIET BLOOT TE STELLEN AAN REGEN OF VOCHT.
LET OP:
Wees voorzichtig met het netsnoer en beschadig deze niet. Als het snoer kapot of beschadigd is, kan dit leiden
tot electrische schokken of defecten. Als u de stekker uit het stopcontact wilt nemen, trek dan niet aan het snoer,
maar aan de stekker.
Open de behuizing nooit, dit om elektrische schokken te voorkomen. Als er problemen zijn, neem dan contact op
met uw dealer.
Plaats geen metalen objecten en mors geen vloeistof in de speler, dit kan leiden tot elektrische schokken of
defecten.
OPMERKING:
De CD-Speler maakt gebruik van een laser. Kijk nooit in de laser !!
Om zeker te zijn van correct afspelen, dient u dit apparaat in een ruimte te gebruiken waar de temperatuur tussen
de 5°C/41°F en 35°C/95°F ligt.
SPECIFICATIES
Anti-Shock buffer geheugen: 20 seconden
Pitch snelheid percentages: +/-4%, 8% ,16%
Aansluitspanning: AC 100-240V~50/60Hz
Opgenomen vermogen: 20W max.
Ondersteunt media: CD, CD-R, MP3-CD, USB, SD, SDHC
Uitgangsniveau: 1 VRMS/10 kOhm
Frequentiebereik: 20-20000 Hz
Afmetingen: L290XB226XH300mm
Gewicht.: 2 Kg
Page 8

FUNCTIES :
BELANGRIJK!
Wanneer op een andere manier gebruik wordt gemaakt van dit apparaat als hier in deze handleiding is beschreven
kan dit leiden tot gevaarlijke straling !!!
Cd speler Functie
1. Schakelaar- Het Aan/Uit zetten van de speler. (Schakel deze eerst aan voordat de versterker wordt
ingeschakeld)
Page 9

2. Netsnoer entree
3. Audio UIT – Sluit hier de CD speler aan op een mixer (lijnniveau).
4. Fader Start- De DJ mixer kan gebruikt worden om de CD player te starten m.b.v. de fader start. Sluit eerst
het bijgeleverde snoer aan.
5. CD lade- Plaats de CD hier. Gebruik de commerciele CDs of gebrande CDs op een zo laag mogelijke
snelheid.
6. EJECT TOETS
Druk om de CD in te laden/te verwijderen. Elke druk op de toets zal de lade openen of sluiten.
7. SD CARD SLOT
8. USB POORT
9. CD/USB/SD BUTTON
Door steeds op deze toets te drukken, kunt u het volgende selecteren: CDdrive/USB interface/SD kaart
reader
10. Draairegelaar
Draait u met deze regelaar naar rechts, dan wordt de volgende track afgespeeld. Wanneer u naar links
draait wordt de laatste track afgespeeld. Dit werkt als u de encoder binnen 3 seconden activeert anders
werkt alleen de voorgaande bediening.
11. FOLDER TOETS
Stelt u in staat om door de folders te navigeren m.b.v. de draairegelaar ( zie voor functie punt 10), of in
USB of in CD mode. De LED’s gaan aan.
12. PLAY / PAUSE TOETS
Iedere keer als u op PLAY/PAUSE drukt, gaat de speler van play naar pauze en vice versa. In pauze
mode, wanneer u op play drukt, wordt een nieuw cue point ingesteld m.b.v. het jogwheel.
13. CUE TOETS
Als u op de CUE toets drukt tijdens play mode gaat de speler terug naar de positie tijdens het starten en
gaat in pauze mode. Bij het ingedrukt houden van CUE gaat de speler vanaf dit punt afspelen; wanneer de
CUE toets wordt losgelaten gaat de speler terug naar het beginpunt. Dus in pauze mode kunt u het
JOGWHEEL gebruiken om een nieuw cue punt in te stellen.
14. JOG WHEEL
M.b.v. het jog wheel kunt u scratch effecten creëren door snel voorwaarts en terug te spoelen in een track
en u kunt ook de playback snelheid te veranderen. Als u op de VINYL(16) toets hebt gedrukt (toets licht
blauw op), kunt u scratch effecten creëren in pauze- en playback mode door het jog wheel heen en weer te
draaien. Hoe sneller u aan het jog wheel draait, deste sneller wordt in de track heen – en terug gegaan. Als
de VINYL toets niet geactiveerd wordt kunt u het jog wheel in pauze mode gebruiken om snel de tracks
door te gaan. In playback mode kunt u de afspeelsnelheid veranderen door het jogwheel heen en weer te
draaien.
15. DISPLAY
Geeft de Track/Nummers/Time/Remain/Pitch/Continue/Single weer.
16. VINYL TOETS
Druk deze toets om de scratch functie te activeren met het jogwheel(14).
17. BRAKE
In play mode, wanneer u eerst op de brake toets drukt, wordt de track gestart met een snelheid dat
langzameris dan bij normaal afspelen. Wanneer u het afspelen van de track stopt, zal de afspeelsnelheid
minder worden voordat het afspelen helemaal stopt.
18. REVERSE
Druk deze toets om de track omgekeerd aftespelen, druk nog een keer om deze functie uit te schakelen.
19. REPEAT TOETS
Gebruik deze toets om een track of alle tracks van de CD te herhalen.
20. LOOP-IN TOETS
Druk deze toets om een seamless (naadloze) loop in te stellen en gebruik hiervoor toetsen 20-21-22.
21. LOOP-OUT TOETS
Gebruik deze toets om het eindpunt van de seamless loop in te stellen en u start de loop. Om de loop te
beëindigen drukt u nogmaals op de toets.
22. RELOOP TOETS
Druk deze toets om de laatste opgeslagen loop af te spelen. Om uit de loop te gaan drukt u nogmaals de
toets.
Page 10

23. SINGLE / CONT TOETS
Druk deze toets om tussen SINGLE en CONTINUOUS afspeelmode te schakelen. De geselecteerde mode
is weergegeven op de LCD (15). In SINGLE mode, stopt de unit na het afspelen van een track. In
CONTINUOUS mode speelt de unit alle tracks af en stopt.
24. TIME TOETS
Gebruik deze toets om te kunnen selecteren tussen tijdsinstellingen: verstreken tijd, nog te spelen tijd of
totaal te spelen tijd. Bij MP3 files wordt de totale te spelen tijd van de CD niet weergegeven.
25. SEARCH TOETS
Om door een track te kunnen navigeren. Als de toets wordt vastgehouden wordt de snelheid verdubbeld.
26. PITCH SLIDE CONTROL
Gebruik deze fader om de afspeelsnelheid van de track te veranderen. Het percentage wordt
weergegeven. Druk eerst toets 28.
27. PITCH BEND –/+ TOETS
De afspeelsnelheid gaat omlaag als de – toets wordt gedrukt en gaat terug naar de originele snelheid
wanneer de toets wordt losgelaten en vice versa voor de + toets.
28. PITCH TOETS
Pas als u deze toets indrukt kunt u gebruik maken van de pitch potentiometer.
29. LED PITCH
Geeft verschillende pitch percentages weer.
30. TAP TOETS
Druk deze toets in het ritme van de muziek. De display (15) laat de beats per minuut zien (BPM)
31. PROG TOETS
In STOP mode kunt u diversel tracks programmeren ( 20 tracks max ) :
Druk de STOP toets om in de stop mode te komen
Druk de PROG toets om in de programmeer mode te komen.
Gebruik de skip track toetsen om de track te kiezen waarnaar u wilt luisteren, druk dan de PROG toets.
Herhaal dit totdat alle gewenste tracks zijn gekozen. Druk de PLAY/PAUSE toets om het afspelen te
starten.
TE GEBRUIKEN DISKETTES EN USB APPARATUUR
Deze unit ondersteunt USB (external hard disks, portable flash memory devices, digital audio players, etc.). Bij de
aanwezigheid van veel folders of files zal het laden enige tijd in beslag nemen. Bij folders en files dient de max
capaciteit in acht worden genomen.
USB apparaten die niet kunnen worden gebruikt:
• Optische diskette typen zoals externe DVD / CD drives, etc.
• USB hubs
Cautions on using USB devices
• Sommige USB apparaten werken niet correct. Tronios BV kan niet verantwoordelijk worden gehouden voor
dataverlies, opgenomen op USB apparatuur.
• Het kan voorkomen dat, wanneer stroom/spannings pieken worden gedetecteerd in de USB poort, de [USB
STOP] indicator knippert, de stroom naar het USB apparaat wordt onderbroken en communicatie met het USB
apparaat wordt verbroken. Om weer normaal te kunnen gebruiken, koppel dan dit USB apparaat los van de unit.
Vermijd het gebruik van dit soort USB apparaten.
Als de loskoppeling heeft plaatsgevonden en het euvel is dan nog niet verholpen schakel dan de unit uit en na een
poosje opnieuw weer in.
• Het apparaat kan ook sommige USB apparaten niet herkennen.
• USB apparaten met flash card readers kunnen niet werken.
• De prestaties van verschillende USB apparaten zijn anders.
USB apparaten
Deze unit ondersteunt muziek files in de formaten 32 kHz, 44.1 kHz, CBR, VBR 48 kHz 32 kbps tot MP3 .mp3
MPEG-1 16 bit 320 kbps
Type File extension Compatible
MP3 files
MP3 files kunnen een constante bit rate (CBR) hebben of een variabele bit rate (VBR). Beide typen kunnen worden
afgespeeld op CD spelers, maar de zoekfunctie en supersnelle zoekfunctie is langzamer bij VBR files. Wij bevelen
MP3 files in de CBR rate aan.
Page 11

Vor Inbetriebnahme des Geräts bitte erst die Anleitung durchlesen. Bitte alle Anweisungen
befolgen, um den Garantieanspruch nicht zu verlieren. Bitte alle Vorsichtsmassnahmen
treffen, um Feuer und Stromschlag zu vermeiden. Reparaturen und Wartungsarbeiten nur
von qualifiziertem Fachpersonal ausführen lassen. Diese Anleitung für spätere
Bezugnahme aufbewahren !
DE:
- Originalverpackung für eventuellen späteren Transport aufbewahren.
- Vor Inbetriebnahme des Geräts erst einen Fachmann zu Rate ziehen
- Das Gerät enthält spannungsführende Teile. Darum das Gehäuse NICHT öffnen.
- Beim Abziehen des Steckers aus der Steckdose niemals an der Netzschnur ziehen.
- Den Netzstecker nie mit nassen Händen einstecken oder abziehen.
- Wenn Stecker und/oder Netzschnur, sowie der Netzschnureinritt am Gerät beschädigt sind, müssen sie
von einem Fachmann repariert werden.
- Wenn das Gerät so beschädigt ist, dass Innenteile sichtbar sind, darf das Gerät auf KEINEN FALL ans
Netz angeschlossen oder eingeschaltet werden. Nehmen Sie in diesem Fall mit dem Fachhändler Kontakt
auf.
- Reparaturen dürfen nur von einem Fachmann vorgenommen werden.
- Das Gerät nur an eine 230VAC / 50Hz Netzsteckdose mit Sicherung anschließen.
- Das Gerät nicht in der Nähe von Wärmequellen wie Heizkörpern usw., noch auf einer vibrierenden
Unterlage aufstellen. Nur auf einer festen, stabilen Fläche aufstellen.
- Bei Gewitter oder längerem Nichtgebrauch den Netzstecker abziehen.
- Nach längerem Nichtgebrauch kann Kondenswasser entstehen. Das Gerät erst auf Zimmertemperatur
kommen lassen, bevor Sie es einschalten. Das Gerät niemals in feuchten Räumen oder draußen
benutzen.
- Um Unfälle in Betrieben zu verhindern, müssen die geltenden Sicherheitsvorschriften unbedingt
eingehalten werden.
- Das Gerät für Kinder unzugänglich aufstellen.
- Keine Reinigungssprays verwenden. Die Rückstände dieser Sprays verursachen Fett- und
Staubansammlungen. Im Problemfall einen Fachmann zu Rate ziehen.
- Keine Flüssigkeiten in der Nähe der Anlage abstellen und keine Metallgegenstände in die
Lüftungsöffnungen stecken. Diese können zu Stromschlag führen.
- Das Gerät nur mit sauberen Händen anfassen.
- Die Schalter und Knöpfe nicht mit Gewalt betätigen.
- Bei Wandbefestigung darauf achten, dass der Wandhalter die Last tragen kann. Im Zweifelsfall
Fachpersonal zu Rate ziehen.
- Wand- und Deckenbefestigung – Das Gerät nur auf die vom Hersteller empfohlene Weise befestigen.
Das Gerät nicht mit chemischen Lösungsmitteln reinigen. Diese können den Lack beschädigen. Das Gerät nur mit
einem trockenen Tuch abwischen. Nicht in der Nähe von elektronischen Geräten aufstellen, die Brummgeräusche
verursachen können.
Bei Reparaturen nur Originalersatzteile verwenden, um Schäden und/oder gefährliche Strahlungen zu vermeiden.
Erst das Gerät ausschalten, bevor Sie den Netzstecker abziehen. Netzschnur und Anschlusskabel entfernen, bevor
Sie das Gerät umstellen. Sorgen Sie dafür, dass beim Betreten die Netzkabel nicht beschädigt werden können. In
Deutschland beträgt die Netzspannung 230Vac/50Hz.
Dieses Zeichen macht den Benutzer auf lebensgefährliche Spannungen innerhalb des Geräts aufmerksam,
die einen Stromschlag verursachen können.
Dieses Zeichen macht den Benutzer auf wichtige Hinweise in der Bedienungsanleitung aufmerksam.
Der CD-Spieler ist ein Lasergerät. Niemals in den Laserstrahl schauen!
Um sicher zu sein daß der Spieler richtig abspielt, müß das Gerät in einem Raum, wo die
Temperatur zwischen 5 °C /41 ° F und 35 °C /95 ° F liegt, gebraucht werden.
Page 12

BEDIENFELD :
WICHTIG!
Wenn Sie dieses Gerät verwenden in einer anderen Art und Weise wie in diesem Handbuch beschrieben, kann
dies zu gefährlicher Strahlung führen!
1. Schalter- Ein/Aus schalten des Spielers. (Schalten Sie zuesrt den Spieler ein bevor Sie den Verstärker
einschalten)
2. Netzschnur Eingang
Page 13

3. Audio Aus – Verbinden Sie hier den CD Spieler mit einem Mischpult (Linepegel).
4. Fader Start- Das DJ Mischpult kann verwendet werden um den CD Spieler zu starten m.H.v. dem
Faderstart. Schließen Sie zuerst die mitgelieferte Schnur an.
5. CD Fach- Legen Sie die CD ein. Verwenden Sie die kommerzielle CDs oder gebrennte CDs bei einer so
gering wie mögliche Geschwindigkeit.
6. EJECT TASTE
Drücken Sie die Taste um die CD ein zu legen/heraus zu nehmen.
7. SD KARTE SLOT
8. USB PORT
9. CD/USB/SD TASTE
Beim wiederholt drücken dieser Taste können Sie wählen aus: CDdrive/USB interface/SD chart reader
10. Drehegler
Drehen Sie den Regler im Uhrzeigersinn, dann wird den nächsten Track abgespielt. Drehen Sie den Regler
nach links wird den letzten Track abgespielt. Es funktioniert nur wenn Sie den Encoder innerhalb von 3
Sekunden aktivieren, sonst funktioniert nur die vorherige Bedienung.
11. FOLDER TASTE
Hier können Sie durch die Ordner navigieren ( Siehe Drehregler Punkt 10), in USB oder in CD Modus. Die
LED’s leuchten jetzt.
12. PLAY / PAUSE TASTE
Jedes Mal, wenn Sie die PLAY / PAUSE-Taste drücken wird der Spieler abspielen oder pauzieren. Im
Pause-Modus, wenn Sie die Wiedergabe-Taste drücken, wird ein neuer Cue-Punkt eingestellt mit dem Jog Rad.
13. CUE TASTE
Durch Drücken der CUE-Taste im Wiedergabemodus, kehrt der Spieler auf die Start-Position zurück und
geht in den Pause-Modus. Beim festhalten der CUE Taste, wird der Spieler von diesem Punkt aus
abspielen; Wenn die CUE-Taste losgelassen wird, kehrt der Player zurück an den Ausgangspunkt. Also im
Pause-Modus können Sie das Jog-Rad verwenden um einen neuen Cue-Punkt einzustellen.
14. JOG WHEEL
Mit Hilfe des Jog-Rads können Sie Scratch-Effekte erzeugen durch schnelles Vor- und Rückspulen eines
Tracks, und Sie können auch die Wiedergabegeschwindigkeit ändern. Wenn Sie Taste Vinyl (16) gedrückt
haben (Taste leuchtet blau) können Sie Scratch-Effekte erzeugen in Pause- und Wiedergabemodus durch
das Jog-Rad hin und her zu bewegen. Je schneller Sie den Jog-Rad drehen, desto schneller den Track
abgespielt wird. Wenn die VINYL-Taste nicht aktiviert ist, können Sie das Jog-Rad im Pause-Modus
verwenden um schnell durch die Tracks zu gehen. Im Wiedergabemodus können Sie die
Wiedergabegeschwindigkeit ändern durch das Jog-Rad wieder hin und her zu drehen.
15. DISPLAY
Zeigt die Track/Nummer/Time/Remain/Pitch/Continue/Single an.
16. VINYL TASTE
Drücken Sie diese Taste um die Scratch Funktion zu aktivieren des Jog-Rads(14).
17. BRAKE
Im Wiedergabemodus, wenn Sie zuerst die Brake Taste drücken wird den Track gestartet mit einer
Geschwindigkeit die langzamer ist als bei der normalen Wiedergabe. Wenn Sie das Abspielen stoppen,
wird die Wiedergabegeschwindigkeit verringern, bis die Wiedergabe vollständig stoppt.
18. REVERSE
Drücken Sie diese Taste um den Track umgekehrt abzuspielen, beim erneut drücken wird diese Funktion
ausgeschaltet.
19. REPEAT TASTE
Verwenden Sie diese Taste um das abspielen eines Tracks oder allen Tracks der CD zu wiederholen.
20. LOOP-IN TASTE
Verwenden Sie diese Taste um eine seamless (nahtlose) Loop/Schleife ein zu stellen und verwenden Sie
Tasten 20-21 und 22.
21. LOOP-OUT TASTE
Verwenden Sie diese Taste um den Endpunkt der seamless loop ein zu stellen und starten Sie die Loop.
Um die Loop/Schleife zu beenden, drücken Sie die Taste erneut.
22. RELOOP TASTE
Verwenden Sie diese Taste um die zuletzt gespeicherte Schleife abzuspielen. Um die Schleife zu beenden,
drücken Sie die Taste erneut.
Page 14

23. SINGLE / CONT TASTE
Verwenden Sie diese Taste um zwischen SINGLE und CONTINUOUS zu schalten. Der gewählte Modus
wird im LCD (15) angezeigt. In SINGLE Modus, stoppt die Einheit nach der Wiedergabe eines Tracks. In
CONTINUOUS Modus spielt die Einheit allen Tracks ab und stoppt.
24. TIME TASTE
Verwenden Sie diese Taste um die Zeiteinstellungen wählen zu können: abgelaufene Zeit, verbleibende
oder totale Spieldauer. Bei MP3-Dateien wird die Gesamtzeit der CD-Wiedergabe nicht angezeigt.
25. SEARCH TASTE
Um durch einen Titel navigieren zu können. Wird die Taste gedrückt gehalten wird die Geschwindigkeit
verdoppelt.
26. PITCH SLIDE CONTROL
Verwenden Sie diesen Fader um die Wiedergabegeschwindigkeit des Titels zu ändern. Der Prozentsatz
wird angezeigt. Drücken Sie zuerst Taste 28.
27. PITCH BEND –/+ TASTE
Die Wiedergabegeschwindigkeit sinkt, wenn die - Taste gedrückt wird und kehrt zurück zur ursprünglichen
Geschwindigkeit wenn die Taste losgelassen wird ( und umgekehrt für die +-Taste).
28. PITCH TASTE
Nur wenn Sie zuerst diese Taste drücken können Sie den Pitch Schieberegler verwenden.
29. LED PITCH
Zeigt verschiedene Pitch Prozentsätze.
30. TAP TASTE
Drücken Sie diese Taste im Rythmus der Musik. Die Display (15) zeigt die Beats pro Minute (BPM)
31. PROG TASTE
Im STOP-Modus, können Sie verschiedene Titel (20 Titel max) programmieren:
Drücken Sie die STOP Taste um in Stop-Modus zu gelangen.
Drücken Sie die PROG Taste, um in Programmiermodus zu galangen
Verwenden Sie die Skip Track Tasten, um einen gewünschten Track wählen zu können, drücken Sie
danach die PROG Taste. Bitte wiederholen Sie, bis alle gewünschten Tracks ausgewählt sind. Drücken Sie
die PLAY / PAUSE-Taste, um die Wiedergabe zu starten.
TECHNISCHE DATEN:
Anti-Shock Speicher: 20 Sekunden
Pitch Geschw. Prozentsatz: +/-4%, 8% ,16%
Stromversorgung: AC 100-240V~50/60Hz
Leistung: 20W max.
Unterstützt Media: CD, CD-R, MP3-CD, USB, SD, SDHC
Ausgangspegel: 1 VRMS/10 kOhm
Frequenzbereich: 20-20000 Hz
Abmessungen: L290XB226XH300mm
Gewicht.: 2 Kg
Page 15

Electric products must not be put into household waste. Please bring them to a recycling centre. Ask
your local authorities or your dealer about the way to proceed. The specifications are typical. The actual
values can slightly change from one unit to the other. Specifications can be changed without prior notice.
For all service enquiries, refer to your local distributor, as he is best able to help you.
ES
Las especificaciones y el diseño están sujetas a cambios sin previo aviso.
PROTECCIÓN DEL MEDIO AMBIEN
Al fin de la vida útil del conjunto, tenga en cuenta que ontiene materiales que pueden ser reciclados/ procesados.
No deseche el conjunto a un contenedor normal de basura, sino llévelo a un depósito para pequeños desperdicios
químicos. Esto aplica también a las baterías.
NL
Afgedankte artikelen !!
Raadpleeg eventueel www.wecycle.nl en/of www.vrom.nl v.w.b. het afdanken van elektronische
apparaten in het kader van de WEEE-regeling. Vele artikelen kunnen worden gerecycled, gooi ze
daarom niet bij het huisvuil maar lever ze in bij een gemeentelijk depot of uw dealer. Lever ook
afgedankte batterijen in bij uw gemeentelijk depot of bij de dealer, zie www.stibat.nl .
Alle (defecte) artikelen dienen gedurende de garantieperiode altijd retour te worden gezonden in de originele
verpakking.
* Onder voorbehoud :
Specificaties zijn specifiek, toestel kan hiervan afwijken. Specificaties kunnen veranderd worden zonder
kennisgeving.
Voer zelf geen reparaties uit aan het toestel; in élk geval vervalt de totale garantie.
Ook mag het toestel niet eigenmachtig worden gemodificeerd, ook in dit geval vervalt de totale garantie.
Ook vervalt de garantie bij ongevallen en beschadigingen in élke vorm t.g.v. onoordeelkundig gebruik en het niet in
achtnemen van het gestelde in deze gebruiksaanwijzing. Tevens aanvaardt Tronios geen enkele aansprakelijkheid
in geval van persoonlijke ongelukken als gevolg van het niet naleven van veiligheidsinstructies en waarschuwingen
. Dit geldt ook voor gevolgschade in wélke vorm dan ook.
DE
Tronios BV Registrierungsnummer : DE51181017 (ElektroG).
Dieses Produkt darf am Ende seiner Lebensdauer nicht über den normalen Haushaltsabfall entsorgt werden,
sondern muss an einem sammelpunkt für das Recycling abgegeben werden. Hiermit leisten Sie einen wichtigen
Beitrag zum Schutze unserer Umwelt.
Tronios BV Registrierungsnummer : 21003000 (BatterieG).Lithiumbatterien und Akkupacks sollten nur im
entladenen Zustand in die Altbatteriesammelgefäße bei Handel und bei öffentlich-rechtlichen Entsorgungsträgern
gegeben werden. Bei nicht vollständig entladenen Batterien Vorsorge gegen Kurzschlüß treffen durch Isolieren der
Pole mit Klebestreifen. Der Endnutzer ist zur Rückgabe von Altbatterien gesetzlich verpflichtet.
Die Spezifikationen sind typisch. Die Werte können leicht von einem Gerät zum anderen ändern. Spezifikationen
können ohne vorherige Ankündigung geändert werden. Alle (fehlerhafte) Ware bitte immer in der
Originalverpackung an den Fachhändler senden.
*Änderungen und Druckfehler vorbehalten.
Do not attempt to make any repairs yourself. This would invalid your warranty. Do not make any changes to the unit. This would also
invalid your warranty. The warranty is not applicable in case of accidents or damages caused by inappropriate use or disrespect of the
warnings contained in this manual. Tronios cannot be held responsible for personal injuries caused by a disrespect of the safety
recommendations and warnings. This is also applicable to all damages in whatever form.
Page 16

CE – Declaration of Conformity
Importer: TRONIOS BV
Bedrijvenpark Twente 415
7602 KM - ALMELO
Tel : 0031546589299
Fax : 0031546589298
The Netherlands
Product number: 172.719
Product Description: PDX 100 Single Top CD/USB/SD/MP3 Player
Regulatory Requirement: EN 60065: 2002
EN 55020: 2007
EN 55013: 2001
EN 61000-3-2: 2006
EN 61000-3-3: 2008
The product meets the requirements stated in Directives 2006/95 and 2004/108/EC and
conforms to the above mentioned Declarations.
ALMELO,
19-12-2013
Signed: P. Feldman
 Loading...