

Page 1
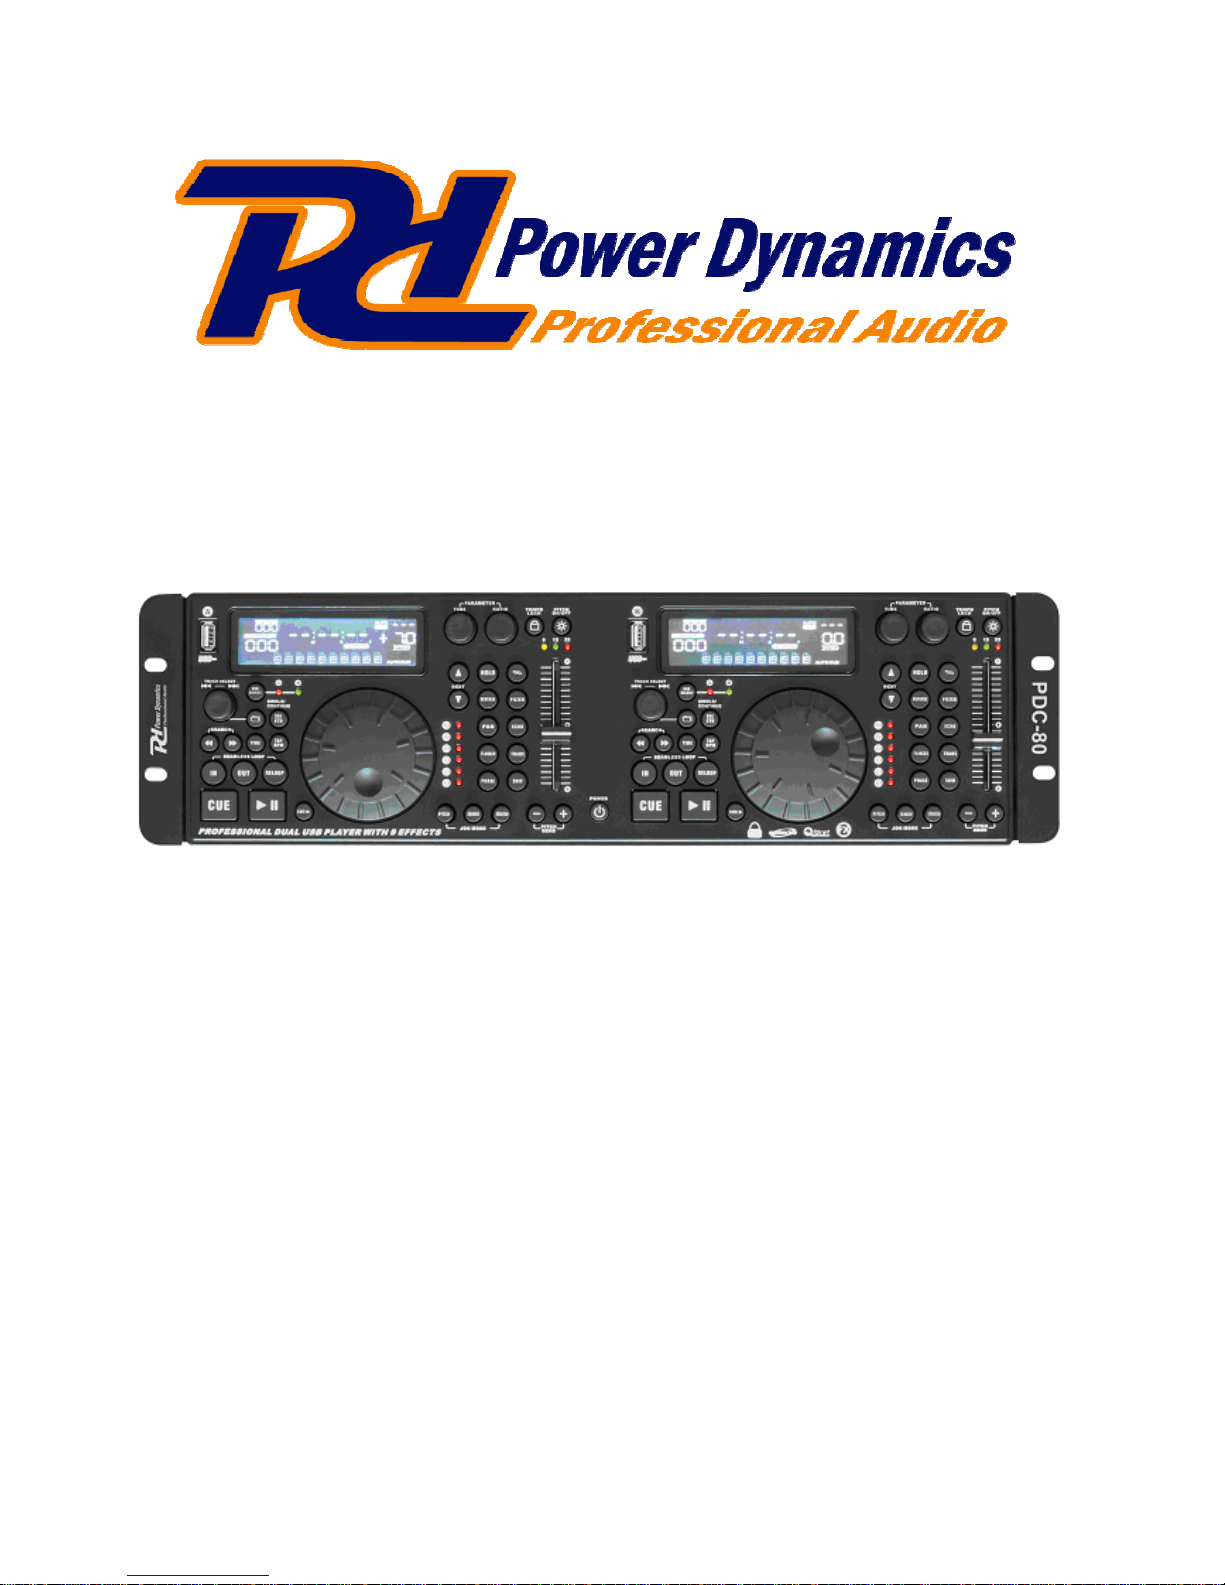
PDC-80
172.710 3U Professional Mediaplayer
USERS MANUAL
GEBRAUCHSANWEISUNG
HANDLEIDING
Page 2
GB
IMPORTANT SAFETY INSTRUCTIONS
1. Read these instructions.
2. Keep these instructions.
3. Read all warnings.
4. Follow all instructions.
5. Do not use the apparatus near water.
6. Clean only with dry cloth.
7. Do not block any ventilation openings, install in accordance with the manufacturer’s instructions.
8. Do not install near any heat sources such as radiators, heat registers, stoves, or other apparatus (including amplifiers) that produce heat.
9. Do not defeat the safety purpose of the polarized or grounding –type plug. A polarized plug has two blades with one wider than the
other. A grounding-type plug has two blades and a third grounding prong. The wide blade or the third prong is provided for your safely
.If the provided plug does not fit into your outlet, consult an electrician for replacement of the obsolete outlet.
10. Protect the power cord from being walked on or pinched particularly at plugs, convenience receptacles, and the point where they exit
from the apparatus.
11. Only use attachments/ accessories specified by the manufacturer.
12. Use only with a cart, stand, tripod, bracket or table specified by the manufacturer, or sold with the apparatus, When a cart is used, use
caution when moving the cart/apparatus combination to avoid injury from tip-over.
13. Unplug this apparatus during lighting storms or when unused for long periods of time.
14. Refer all servicing to qualified service personnel. Servicing is required when the apparatus has been damaged in any way, such as
power-supply cord or plug is damaged, liquid has been spilled or objects have fallen into the apparatus, the apparatus has been
exposed to rain or moisture, does not operate normally, or has been dropped.
15. The main plug is used as the disconnect device, the disconnect device shall be readily operable.
CAUTION: To reduce the risk of electric shock, do not remove any cover, No user-serviceable parts inside, Refer servicing to qualified
service personnel only.
The lighting flash with arrowhead symbol within the equilateral triangle is intended to alert the use to the presence of uninsulated “dangerous voltage” within the product’s enclosure that may be of sufficient magnitude to constitute a risk of electric
shock.
The exclamation point within the equilateral triangle is intended to alert the user to the presence of important operation and
maintenance (servicing) instructions in the literature accompanying this appliance.
CAUTION
To prevent electric shock, do not use this polarized plug with an extension cord, receptacle or other outlet unless the blades can be fully
inserted to prevent blade exposure.
MAIN FEATURES
*Auto cue *Auto BPM
*Pitch Control *Folder search
*Real time cue *Scratch Function
*Digital Sound Effects *Instant Start
*Fast Track Search *Music Master tempo
*1/75
th
second frame search *Mp3 Track Listings, ID3 Tags
*Big LCD Display *Jog Wheel Pitch Bend +/-100%
*Selectable Single or Continuous Play *Supports memory device hot plug–and–play
*Seamless Loop *Full Function Playback
*Compatible with USB 2.0/1.1/1.0 mass storage devices
*Adjustable Pitch Percentages: +/-6%,+/-12%, +/-25%
*USB Port (For direct connectivity to supported USB mass storage device)
*Full Functional MP3 Playback, supports both CBR and VBR bit rate modes
*Instant Start within 10 ms (sound is produced immediately when the PLAY button is pressed)
WARNING
To reduce the risk of fire or electric shock, do not expose this apparatus to rain or moisture, The
apparatus shall not be exposed to dripping or splashing and that no objects filled with liquids, such as
vases, shall be placed on the apparatus.
Page 3
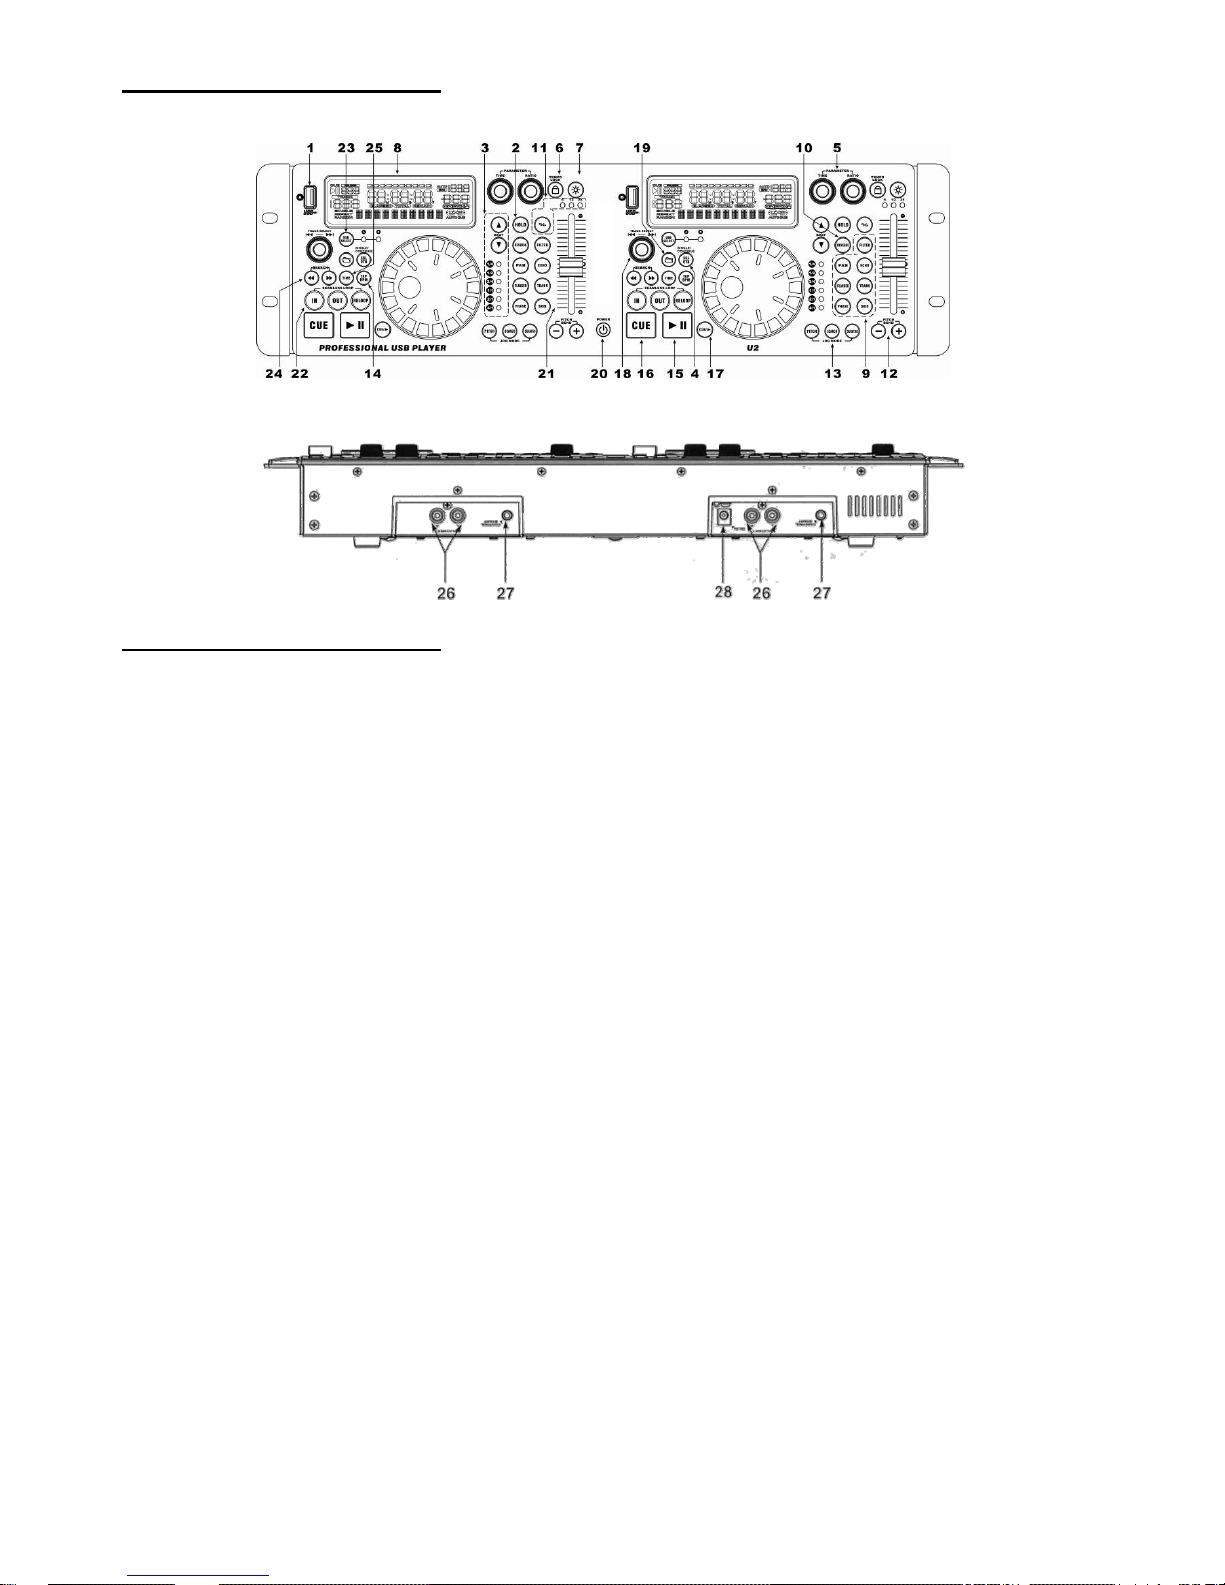
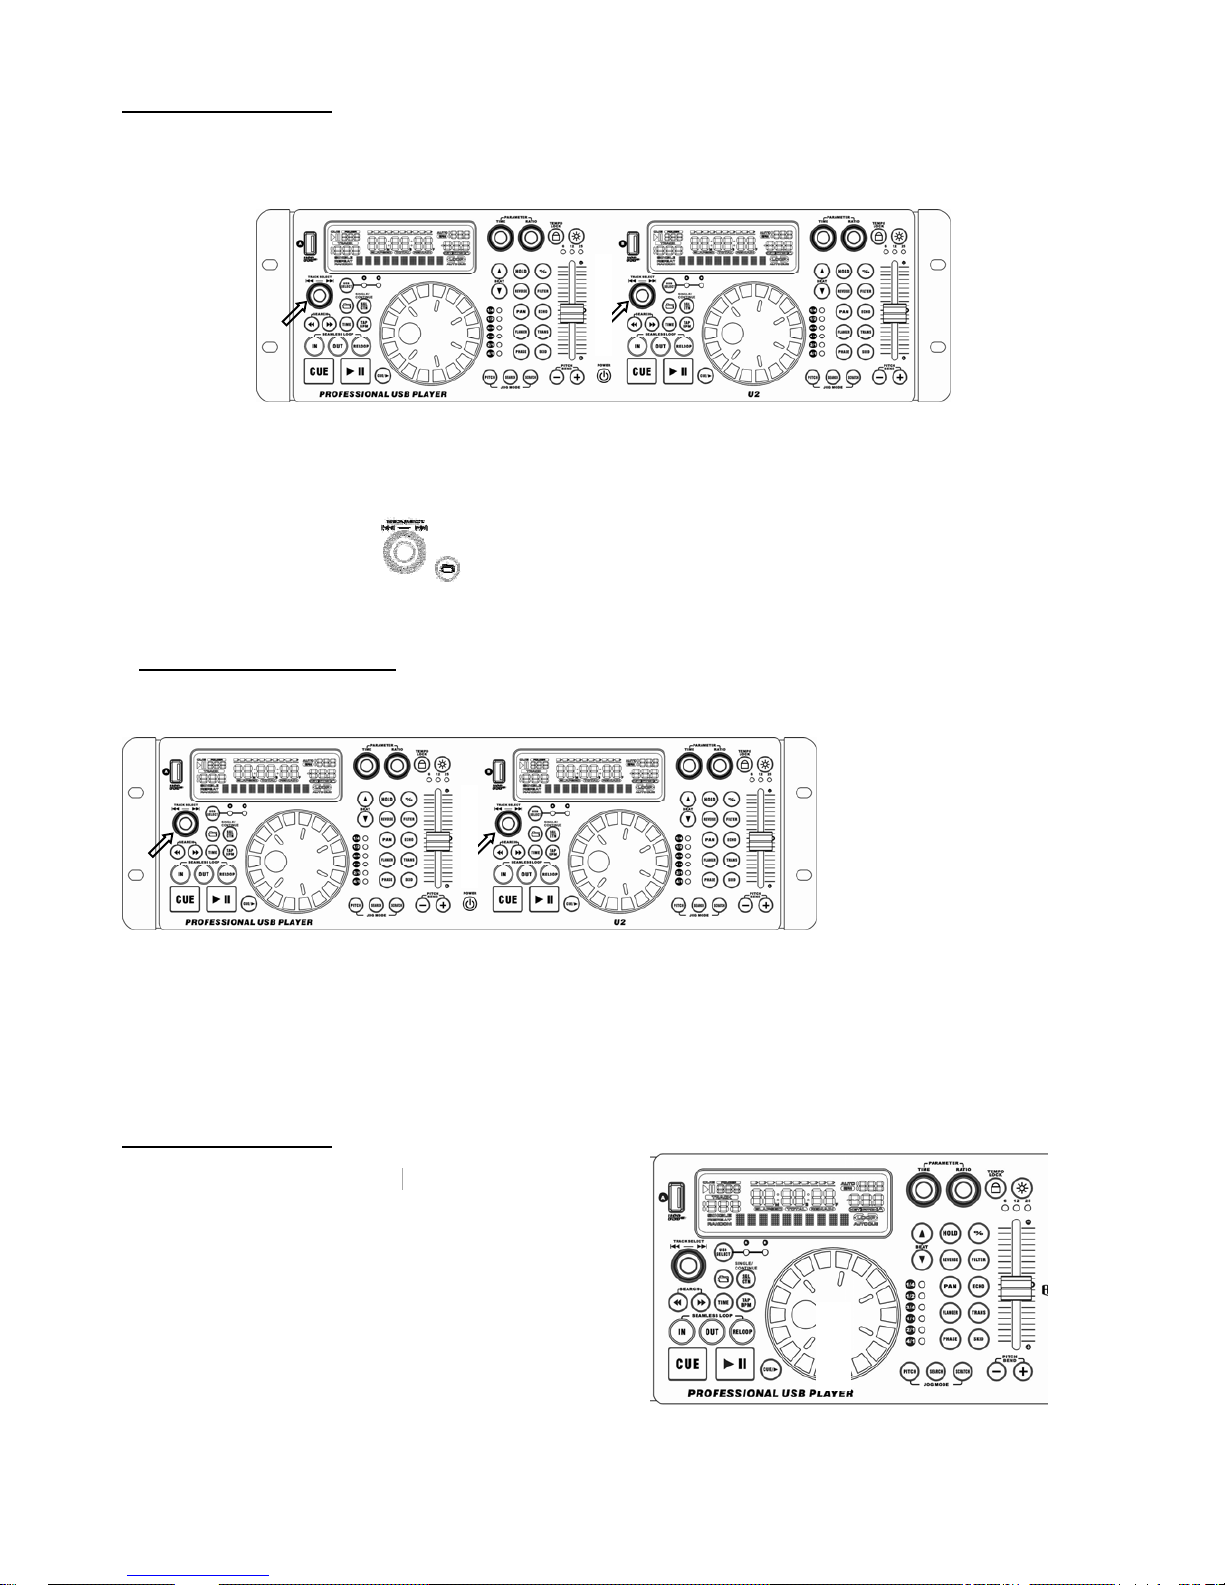
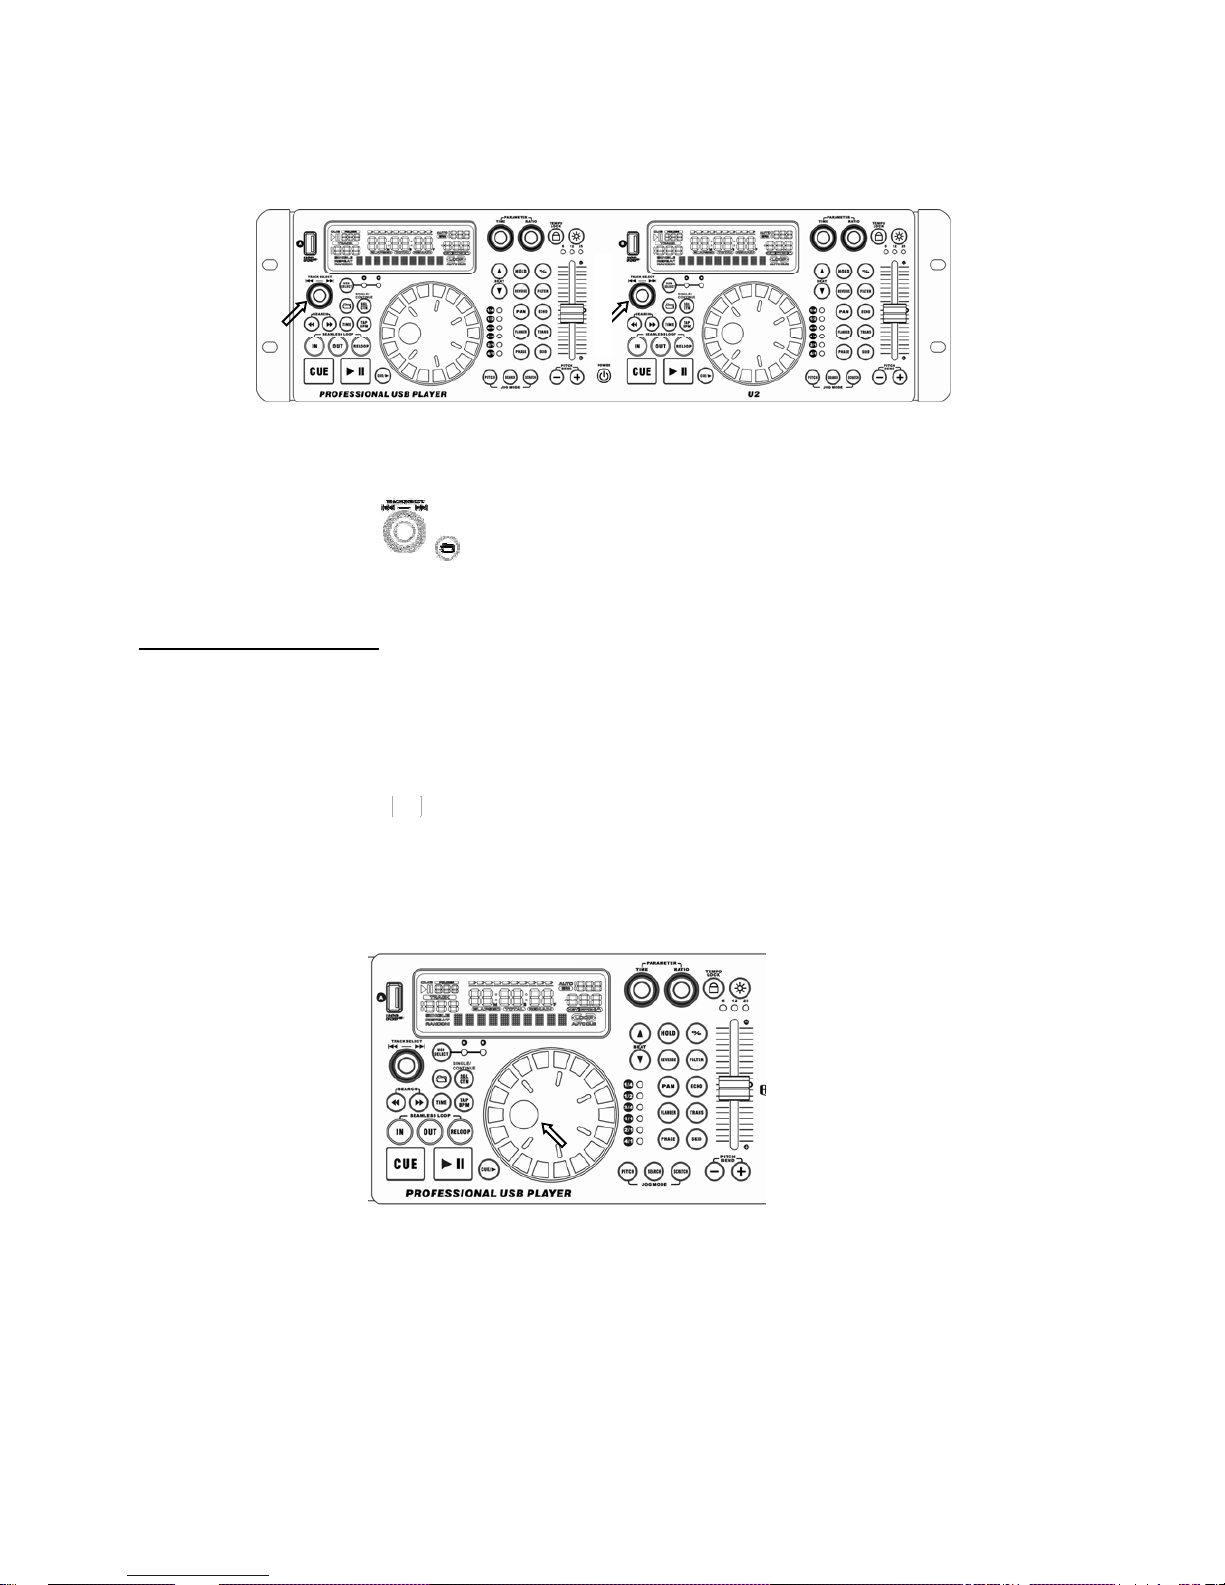
CONTROLS AND FUNCTIONS
CONTROLS AND FUNCTIONS
1. USB PORT – This is the USB port where you insert your USB mass storage device for playing Mp3 files.
2. HOLD BUTTON – This button allows you to set and lock any new parameters you set to the effect. This button will glow when the hold
function is activated. If the hold function is not selected any changes to the effect parameters will be momentary.
3. BEAT–SYNC SELECT BUTTONS – There are six-effect sync. Sets for 1/4, 1/2, 3/4, 1/1, 2/1, 4/1 BPM, depends on which BEAT LED
is on, press buttons at the same time to off beat sync.
4. SGL/CTN BUTTON – You can choose between “single track mode” and “continuous play”.
* Continuous play: all the tracks in the USB stick will be played in order without interruption.
* Single track: player stops at the end of each track and waits at the beginning of the next track. Push the SGL/ CTN button for more than
1 second to switch between normal and “auto cue” mode. In “auto cue” mode the player waits at the first music note of each track.
5. PARAMETER
TIME KNOB ( X parameter knob) – Turn the TIME to adjust the parameter time value. It is used to adjust the value of the X parameter
(time) of the effectors. “Push and rotate” is fast mode.
RATIO KNOB (Y parameter knob) – Turn the RATIO knob to adjust the parameter ratio value. It is used to adjust the value of the Y
parameter (mix ratio or resonance or feedback) of the effectors.
6. TEMPO LOCK BUTTON – Enables the TEMPO lock function, which allows the tempo of the music to be altered without affecting
the key. This button is illuminated when enabled.
7. PITCH ON/OFF BUTTON – This button is used to turn the PITCH SLIDER function on and off. The pitch percentage can be changed
between 6%, 12% and 25%. 6% will allow the least amount of pitch manipulation and 25%will allow the most amount of pitch
manipulation.
8. LCD DISPL AY – This high quality LCD display indicates all the functions, as they are occurring. This display is viewable at several
comfortable angles.
9. EFFECT FUNCTIONS
Besides the REVERSE effect, the unit has build in 7 different digital effects. You can press any effect button to activate your desi red
effect, and you can alter the effect’s value by assigning the beat buttons or rotating the TIME parameter knob. You can adjust the
designated effect’s intensity by rotating the RATIO parameter knob. See below for more exact description.
- Make sure to set HOLD to active before adjusting the designated effect’s value and intensity.
* FILTER BUTTON – This buttons is used to activate and deactivate the FILTER effect. This effect is alternately filters high and low
frequencies by the adjustment of TIME/RATIO value. In its simplest form, a filter is designed to pass some frequency regions through
unattenuated while significantly attenuating others.
* ECHO BUTTON – This buttons is used to activate and deactivate the ECHO effect. This effect continuously repeats the signal in a
certain interval. Repeats a sound several times. You can set the echo sound to your desired tempo.
* TRANS BUTTON – This buttons is used to activate and deactivate the TRANS effect. This effect creates the signal’s chopping by
fading in and out and it is similar to fast cutting with the crossfader. This effect simulates a real-time mixer transformer effect.
* SKID BUTTON
– This buttons is used to activate and deactivate the SKID effect. This effect emulates the sudden platter stop of a
turntable, similar to pressing the stop button on a truntable and then releasing it. You can rotate the TIME knob to set the start time
value (ST) and rotate the RATIO knob to set the break time value (BT).
* PHASE BUTTON – This buttons is used to activate and deactivate the PHASE effect. This effect tweaks the original sound and adds
different tonal definitions, similar in a way to the FILTER effect.
* FLANGER BUTTON – This buttons is used to activate and deactivate the FLANGER effect. This effect doubles the signal and shifts
it by a marginal value. Flanging is a time-based effect that occurs when two identical signals are mixed together but yet one signal is
Page 4

time-delayed by a small and gradually changing amount, usually smaller than 20 ms (milliseconds).
* PAN BUTTON – This buttons is used to activate and deactivate the PAN ef fect. This effect produces the signal’s continuous fading of
the signal from the left to the right channel and back again. Pans stereo signal by alternating attenuating signals in the left and right
channels.
10. REVERSE BUTTON – This buttons is activates reverse play mode. This function will play your track or loop in reverse.
11. PITCH RANGE SELECT BUTTON – Press the button in order to change pitch percentage of 6%, 12%, 25%.
12. PITCH BEND BUTTONS – The speed rises while the “+ button” is pressed and returns to the original pitch when the button is
released. The speed drops when the “- button” is pressed and returns to the original pitch when the button is released. These buttons can
be used to synchronize the beats of 2 tracks.
13. JOG WHEEL – This wheel has 3 functions:
In the PITCH mode
* The wheel works as a pitch bend during playback. Turning the wheel clockwise can increase the pitch percentage up to 100%, and
turning the wheel in the counterclockwise direction can decrease the pitch percentage down to -100%. the pitch bend will be
determined on how long you turn the jog wheel continuously.
* The jog wheel acts as a low frame search (1/75 sec) control when the music is not playing but either paused or set to a cue point. To
set a new cue point, spin the wheel then press PLAY or IN when you have determined the proper position. Press CUE to return to
the “CUE POINT”.
In the SEARCH mode
* When the SEARCH function is activated you can use the jog Wheel to search fast backward or forward through the current track
whether in play mode or not..
* Press this knob to toggle the search function of the jog wheel and LED is lit. The search function has 4 forward and 4 reverse speed
allowing you to quickly scan through tracks. The more you trun the wheel in either direction the faster you search.
In the SCRATCH mode
Press the button to activate the scratch function. You can scratch the track while in Play mode with the Jog Wheel like a vinyl record,
by moving it forward and backward and holding it. Press the Scratch button a second time to deactivate the Scratch effect. This
effect emulates real time turntable scratching on a vinyl record player.
14. TAP BPM BUTTON – This button is used to override and manually set a track BPM. Occasionally the built-in BPM meter may not
function as desired. This button allows you to override the internal beat clock and manually set a track BPMs. To manually set the
BPMS; tap this button a few times to a tracks heavy down beat, the unit will automatically calculate your tapping and translate it into a
tracks BPMs. The BPM readout is then displayed in the LCD. To return to the automatic BPM counter, press and hold down the TAP
BUTTON for at least 2 seconds and then release.
15. PLAY/PAUSE BUTTON – Each press of the PLAY/PAUSE BUTTON causes the operation to change from play to pause or from
pause to play. While in play mode the PLAY/PAUSE LED will glow, And while in pause mode the PLAY/PAUSE LED will flash.
16. CUE BUTTON – Pressing the CUE button during playback immediately pauses play back a nd returns the track to the la st set cue poi nt.
The CUE indicator in the LCD will glow when the unit is in cue mode and the indicator will also flash every time a new CUE POINT
is set. The CUE button can be held down to momentarily play the music. When you release the CUE button it instantly returns to the
CUE POINT.
17. CUE/ BUTTON
– Pressing the button will activate the CUE PLAY function and the music will play instantly from the last cue
point. You can also repeat to tap the CUE / button to create a STUTTER EFFECT.
18. TRACK KNOB – Use this knob to select track or folder, depending on these two different modes as below.
* In TRACK mode, use to select a track. Turning track knob will navigate between tracks. Holding down and turning track knob will
rapidly forward / back skip through the tracks by 10 tracks per click.
* In FOLDER mode, turning track knob will forward / back skip between folders.
- You can also switch between displaying Folder Name/FILE NAME/TITLE/ ARTIST/GENRE/BITRATE for easy searching by each
pressing the TRACK button. Release the TRACK button when you see the information you want to keep on the display. You can find
more information in basic operation paragraph.
19. FOLDER BUTTON – This button has two functions:
* Use to switch between FOLDER and TRACK search modes:
When the LED of FOLDER button is lit, the player is in the FOLER search mode, otherwise it is in TRACK search mode.
- File name is the first display when select a track and folder name is the first display when select a folder.
* Use to switch between REPEAT function on/off:
Push the FOLDER button for more than 2 second to switch between REPEAT function on/off.
- REPEAT function ON: All the tracks in the current folder will play track by track until the repeat function is deactivated.
20. POWER SWITCH butto n – It is used to switch the power on/off. To power off the unit, press and hold the button for more than 3
seconds.
21. PITCH SLIDER – This slider is used to adjust the playback pitch percentage. The slider is a set adjustment and will remain set until
the pitch slider is move or the pitch function has been turned off. This adjustment can be made with or without a music source device
(USB 1 or USB 2) in the player. The pitch adjustment will remain even if a music source device (USB 1 or USB 2) has been removed
and will reflect on any other music source device inserted into the player. That is to say, if you set a +6% pitch on one music-source
device, remove that device and insert another, that music source device too will have a +6% pitch. The amount of pitch being applied
will be displayed in the LCD.
22. SEAMLESS LOOP
* IN BUTTON-This function allows you to set a CUE POINT without music interruption. This button also sets the starting point of a
seamless loop.
* OUT BUTTON-This button is used to set the ending point of a loop. A loop starting point is set by pressing the IN BUTTON.
Pressing the OUT BUTTON set the loop ending point. The loop will continue to play until the OUT BUTTON is pressed once again.
* RELOOP BUTTON – If a SEAMLESS LOOP has been made, but the Player is not actively in SEAMLESS LOOP mode (a loop is
not playing), LOOP and RELOOP will appear in the LCD DISPLAY when the RELOOP function is available. Pressing the RELOOP
BUTTON will instantly reactivate the SEAMLESS LOOP mode. To exit loop, press the OUT BUTTON,
- The display is showing like that: When in reloop, “LOOP” is blinking and “RELOOP” is on. When not in reloop, but reloop is available,
Page 5
“LOOP” and “RELOOP” are on.
23. USB SELECT BUTTON – This button lets you toggle between USB Port 1 and 2. In other words, you can select which USB port will
be activated and the relational LED will be lit. The function can only be selected under pause mode.
24. SEARCH BUTTONS – These buttons allows you to search fast backward or forward through the current track whether in play mode
or not.
* This search button allows you to quickly scan backwards through a track.
* This search button allows you to quickly scan forwards through a track.
25. TIME BUTTON – You can select different time display by pressing the TIME button to switch between ela p sed and remaining time.
26. AUDIO OUTPUTS – The music-signal of these sockets is analogue. Connect the output to the respective input of your mixer.
27. CONTROL START SOCKET – If you are using a mixer with fader start function, connect the player with the fader start of the mixer.
Please note that these sockets must never be connected with any voltage.
28. POWER CONNECTOR – Plug in power adapter here. Please use the power adaptor included.
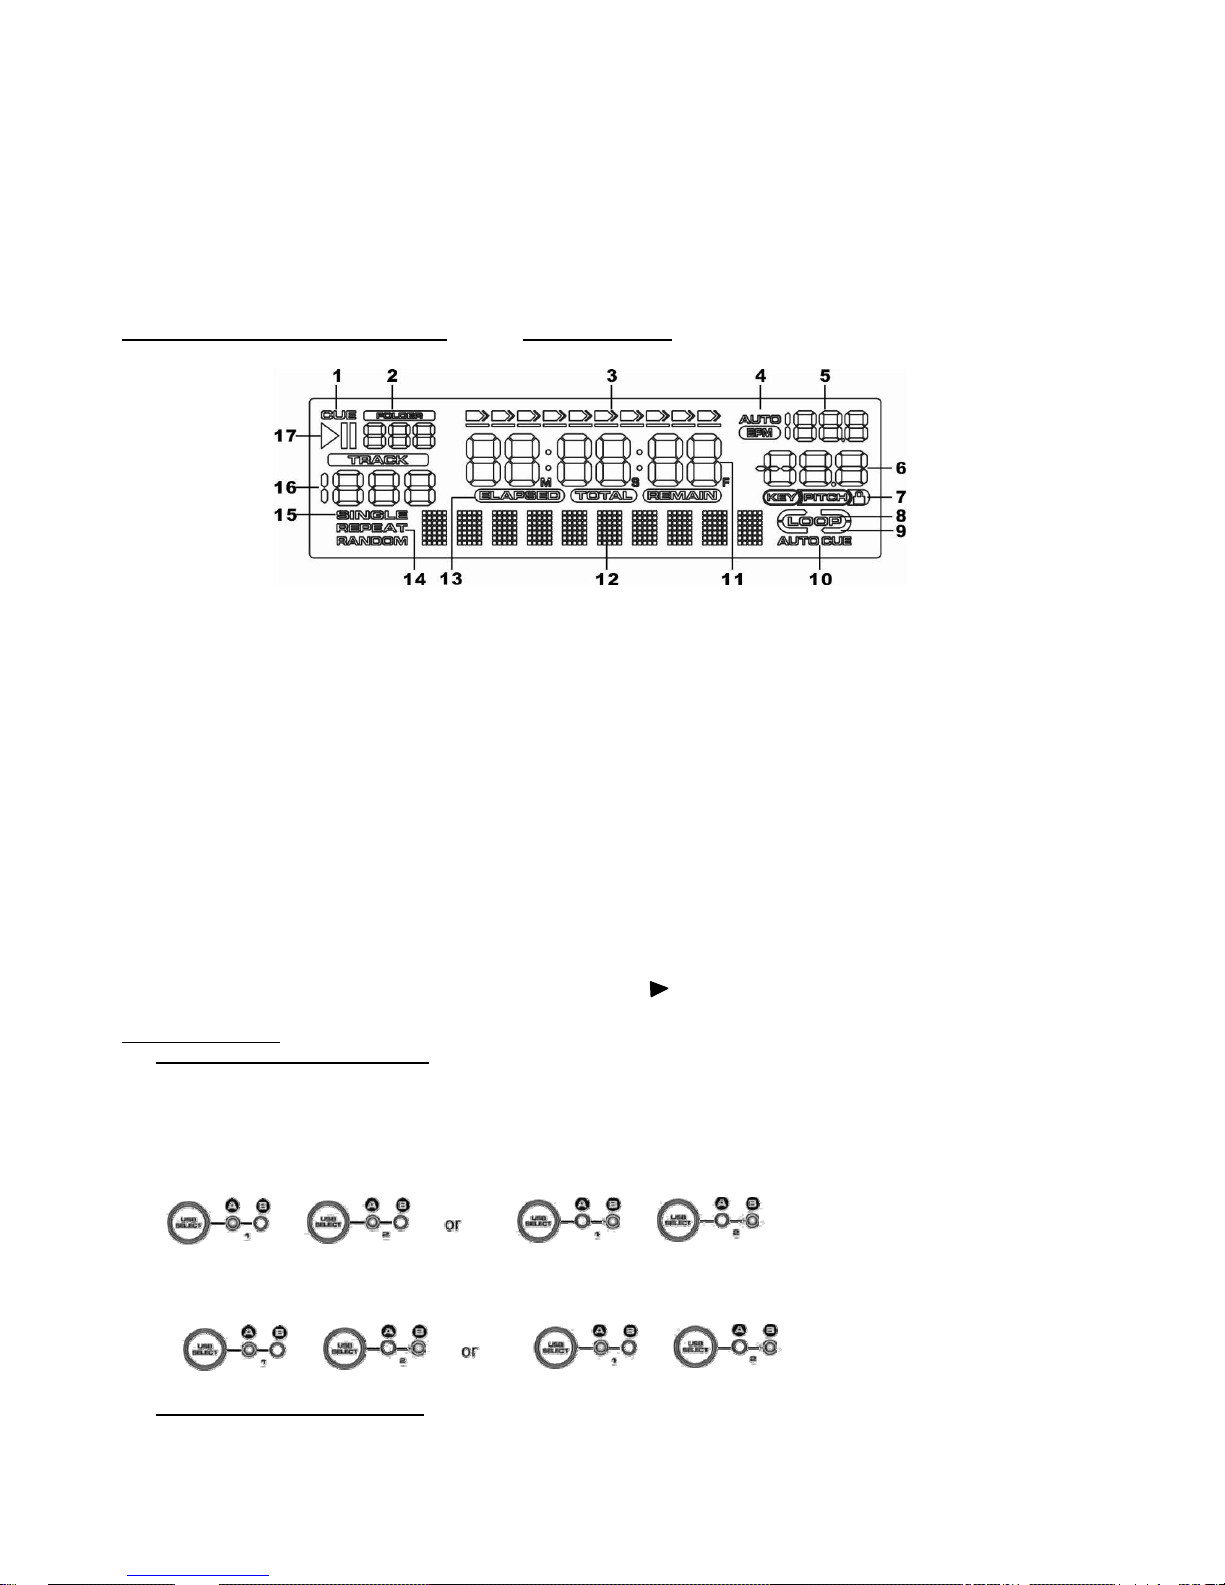
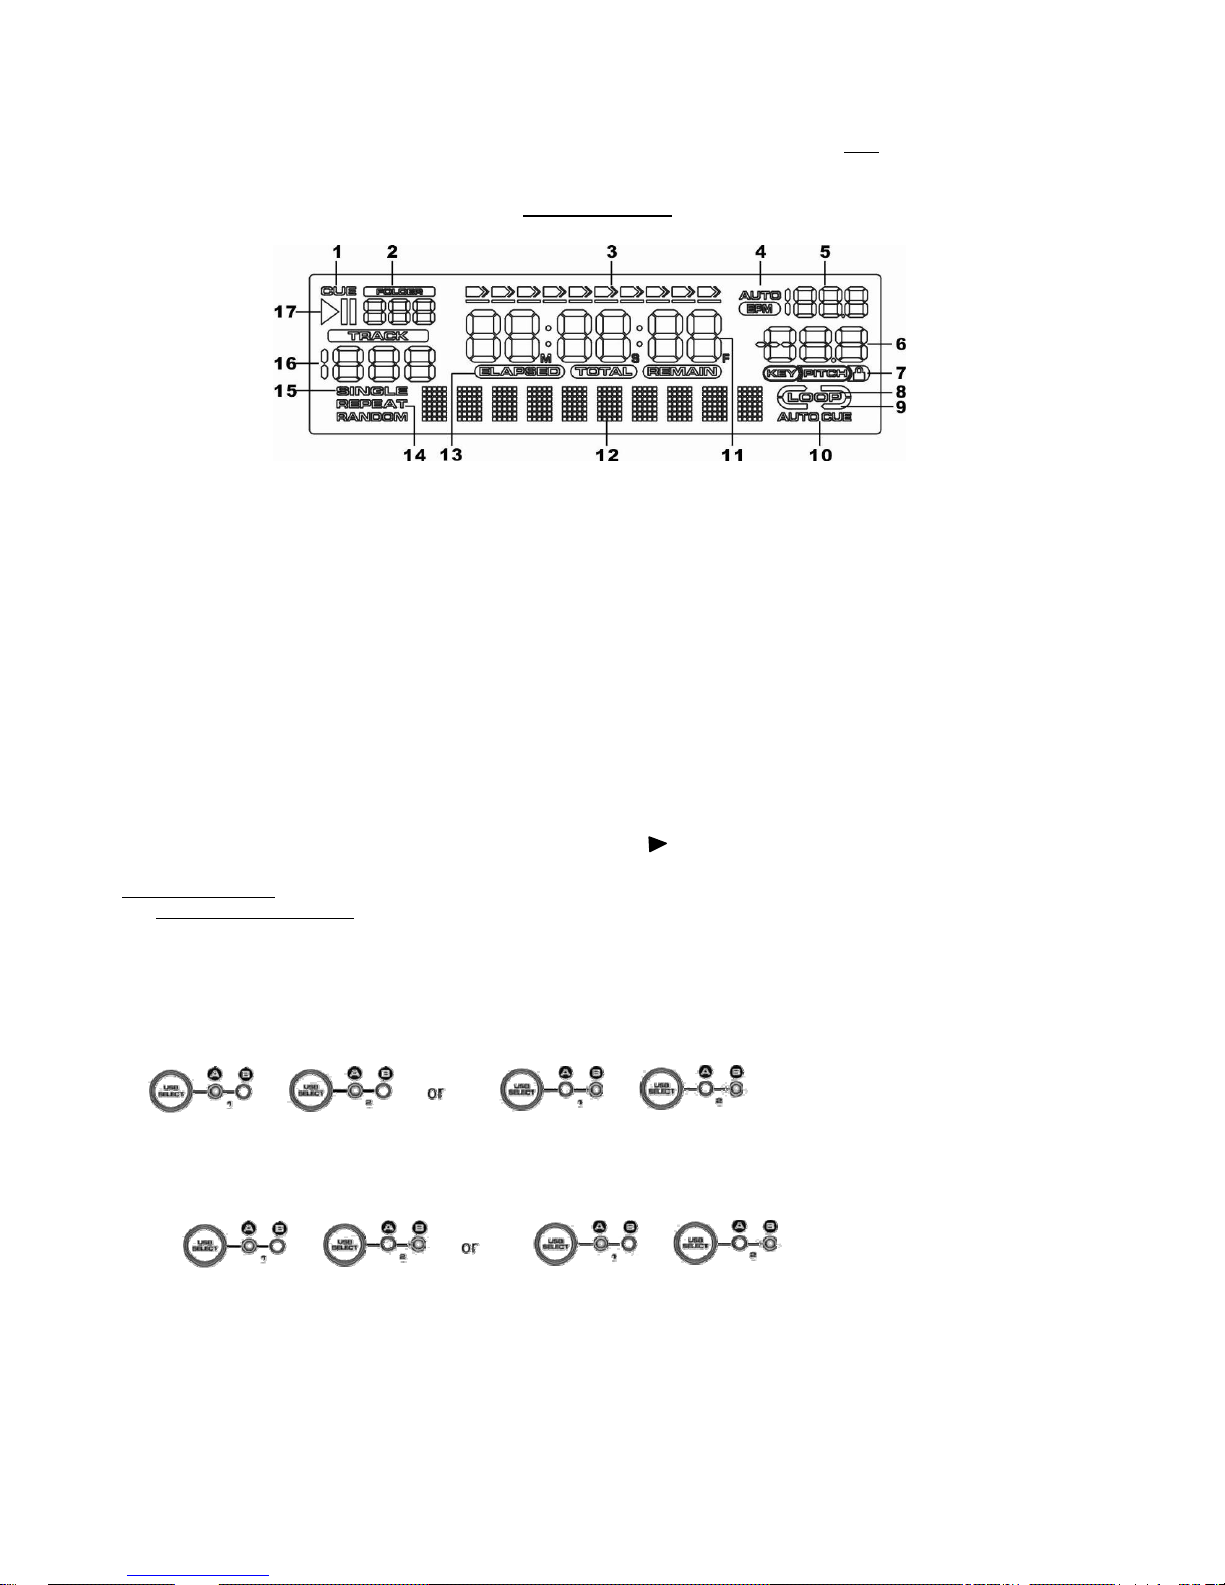
CONTROLS AND FUNCTIONS LCD DISPLAY
1. CUE INDICATOR —This indicator will glow when the device is in CUE mode and will flash every time a new CUE POINT is set.
2. FOLDER INDICATOR —indicates the number of the currently playing folder.
3. TIME BAR INDICATOR —Shows either time remaining or elapsed depending on the setting of the SETUP MODE. This bar will
begin to flash shortly before the end of a track.. The flashing bar is a great visual reminder a track is about to end regardless of which
time mode the unit is.
4. BPM STATUS —This will indicate that the AUTO BPM counter is active
5. BPM METER —Indicates the BPM value of the currently playing track.
6. PITCH METER —Indicates the percentage of a track’s pitch
7. TEMPO LOCK —Indicates if the tempo lock is activated (lock symbol)
8. LOOP INDICATOR —The indicator will blink if LOOP function is activated, the indicator will remain if a loop has been set.
9. RELOOP INDICATOR —Indicates if a loop has been set which can be activated with the Reloop function
10. AUTO CUE STATUS —Indicates if Auto Cue is activated
11. TIME DISPLAY —Indicates the time of the chosen Time mode in minutes, seconds and frames.
12. ALPHANUMERIC DISPLAY —Indicates the current name of the track, of the folder and the sampling rate. For VBR recorded MP3
tracks the display only show “VBR”. All kinds of other interactive information is also shown
13. TIME MODE —Indicates the elapsed time of a track (“ELAPSED”) or the remaining time of a track (“REMAIN”).
14. REPEAT INDICATOR —Indicates whether the unit is in REPEATED mode
15. SINGLE INDICATOR —
Indicates whether the play mode is set to single (“SINGLE”) or continuous mode (no display)
16. TRACK INDICATOR —Indicates the number of the currently playing track.
17. PLAY/PAUSE INDICATOR —Indicates the device is in play mode (: :). Or the player is in pause mode (“Ⅱ”).
BASIC OPERATION
1. MUSIC SOURCE DEVICE SELECT
There is a USB SELECT BUTTON to select the music source playback in each PLAYER by your desires.
You have two different choices as below:
(a) THE SAME USB PLAYBACK
To play the same USB in both player A and player B, insert the USB device into either USB 1 or USB 2 port. Press the USB SELECT
button and both USB 1 LEDs glow when USB device is in USB 1 port; either does when USB device is in USB 2 port.
(b) TWO USB devices PLAYBACK
Each USB port inserts a USB device to play. And each player select different USB port to play.
Note: To disconnect a USB drive, stop playback and “pull out” the USB connection.
2. HANGE MUSIC SOURCE DEVICE
It must be in the pause mode, to press the USB SELECT BUTTON you can select the other USB port, it will be no function when in
the play mode.
Page 6
BASIC OPERATION
TRACKS KNOB has three functions as below:
1. TRACK SEARCH
When FOLDER LED is off, left turning the TRACK knob to backward search and forward search on the right turn. You can select the
desired up to 999 tracks in a folder.
* Turning the track knob counterclockwise will take you to the previous track.
* Turning the track knob clockwise will take you to the next track.
2. FOLDER SEARCH
When FOLDER LED is on, to select folder number by turning the TRACK knob. You can select the desired up to 999 folders.
* Turning the track knob counterclockwise will take you to the previous folder.
* Turning the track knob clockwise will take you to the next folder.
3. VIEW THE CONTENT OF TITLE
You can view the title content of Folder NAME/FILE NAME/TITLE
NAME/ARTIST/GENRE/BITRATE by each pressing the TRACK knob.
Displayed” Folder Name” is for folder contents.
Displayed” FILE NAME” is for file contents.
Displayed” TITLE NAME” is for title contents.
Displayed”ARTIST” is for artist contents.
Displayed”GENRE” is for genre contents.
Displayed bitrate contents directly.
Note: Each display for 20 sec. It will auto return to “TITLE NAME” when no action more than 20 sec.
BASIC OPERATION
FRAME SEARCH
This feature allows you to scroll through
a track frame by frame, allowing you to find and set a starting cue or loop
point. To use the scroll function you must first be in Pause Mode or Cue
Mode. Once you are in Pause or Cue mode, turn the JOG WHEEL in
PITCH mode to scroll through the track. Turning the wheel in a clockwise
direction will advance the frame search and turning the wheel in a counterclockwise direction rewinds the frame search. When you use the JOG
WHEEL the monitor function allows you to hear what you are scrolling
through. Once you reach your desired starting point you can set a cue
(starting) point by pressing the PLAY/PAUSE BUTTON. Pressing the
CUE BUTTON will now return you to the point you just set.
Page 7

AUTO CUE
Push the SGL/CTN button for more than 1 second to switch between normal and “auto cue” mode. This function will automatically set
a cue point to the first music note of each track.. If a new track is selected, a new CUE POLNT will be set to reflect the new starting point.
SETTING A CUE POINT
A cue point is the exact point playback will begin when the PLAY/PAUSE BUTTON is pressed. A cue point may be created anywhere on a
music source device or in a track.You may press the IN BUTTON while the music is playing. This will set a CUE Point without music
interruption.
Pressing the CUE BUTTON will now return you to thesame point that you pressed the IN BUTTON. Pressing the CUE BUTTON will
now return you to this exact point.
(2)
You may also use the jog Wheel to set a cue point. While music is PAUSE or CUE mode and JOG WHEEL is in PITCH mode,
use the jog wheel to scroll through a track and find your desired starting point. Once you have found your desired CUE point press
the play Button to set your cue point. Pressing the cue Button will now return you to this exact point.
SEAMLLESS LOOP
1. CREATING AND PLAYING A SEAMLESS LOOP
A seamless loop is a sound loop that play s continuously without sound interruption. You can use this loop to create dramatic effect in
your mixing. This loop has no time limit and you could actually loop the entire length of the current folder. You can create a seamless
loop between two continuous points as below.
(1) Press PLAY/PAUSE BUTTON to activate playback mode.
(2) Press the IN BUTTON. This will set the starting point of the SEAMLESS LOOP. The IN BUTTON LED will glow
(3) Press the OUT BUTTON to set the ending point for your SEAMLESS LOOP. The IN BUTTON and OUT BUTTON LEDs will
immediately begin to flash rapidly, indicating the
SEAMLESS LOOP mode has been activated.
2. EXITING A LOOP
To exit a SEAMLESS LOOP, press the OUT BUTTON. The IN BUTTON and OUT BUTTON LEDs will remain on, but will stop
flashing. Music playback will resume normal play. The IN BUTTON, OUT BUTTON LEDs and RELOOP/LOOP indicator in the
LCD will remain on to remind you that a loop is stored in memory.
3. REPLAY LOOP
The RELOOP function allows you to return to your stored loop at any time. The IN BUTTON and OUT BUTTON LEDs will indicate
a loop is stored in memory, and may be played at any time. To replay the loop, press the RELOOP BUTTON. The IN BUTTON and
OUT BUTTON LEDs will again begin to flash indicating SEAMLESS LOOP mode has been activated and your stored loop will
immediately begin to play.
- When you use the Track Encoder to change songs, the previous CUE and LOOP memories will be erased, new CUE is set at the
beginning of the selected song.
- When you wait for the current song (song A) to finish, and play the next song (song B), the previous CUE and LOOP memories (of
Song A) are still kept, and when y ou press the CUE or RELOOP, it can go back to the CUE or LOOP of Song A. But, when play to
the next folder, the previous CUE and LOOP memories will be erased too.
4. EDITING A LOOP
You can edit your seamless loop, but you must first have created a seamless loop to edit. If you haven’t created a SEAMLESS
LOOP, follow the instructions in step 1 to create a loop.
There are three methods as below:
(1) Edit a seamless loop’s ending point
You can edit the end point of the loop to make your loop shorter or longer. Make sure the loop that you want to edit is not in RELOOP
mode. Pause in PITCH mode; turn the JOG WHEEL to make the loop shorter /longer. Press the OUT button to set the new ending point
of your loop and then press the RELOOP button to make the loop active.
(2) Edit a seamless loop’s starting point
You can edit the staring point of the loop to make your loop shorter without interrupting. Under the RELOOP mode, turn the JOG
WHEEL clockwise in PITCH mode to make the loop shorter. Please make sure the new starting point must before the ending point.
Press the IN button to set the new starting point of your loop.
(3) Reset a loop
You can reset a new loop under the play or pause mode, Whenever you find a more desired starting point press the IN button, the LED
of OUT button will go out, Find a new ending point and press the OUT button to set the ending point of your new loop.
Page 8

STUTTER EFFECT
You can use your loop to create a stutter effect and it will add extra creativity to your performance.
Every time the RELOOP button is pressed, whether the loop is playing or not, it will restart the pre-programmed loop at once. You can
press RELOOP BUTTON repeatedly to create the stutter effect.
You can also repeat to tap the CUE/ button to create the stutter effect.
TAP BPM
AUTO BPM is the default mode when power on. You can switch Manual/Auto BPM by pressing the “TAP BPM” button.
Notice:
Switch manual BPM on just need one touch the button.
Switch Auto BPM on by pressing the “TAP BPM” button more than 2 sec. and then the LCD will display “AUTO BPM”.
There are two modes for BPM count as below:
1. Manual BPM: following the music tempo and press the “TAP BPM” button to count BPM value; from the auto BPM to manual
mode, the value won’t change until the correct BPM value is counted.
2. Auto BPM: counting BPM value automatically without pressing” TAP BPM” button.
SYSTEM SETTING
SETUP MODE:
Press the TIME button for more than 2 seconds to enter system setting mode. At this time, LCD display “PRESET” and the SETUP LED
will lit.
Note: System setting will be closed automatically when more than 10 seconds no function.
Turn the TRACK knob to scroll through the different submenus, you can adjust the setting by stopping on the desired submenu and pushing
the TRACK knob.
To exit the sy stem settings, you can turn the TRACK knob counterclockwise to PRESET submenu and then press the TRACK knob.
Once enter the SETUP mode you can browse the items by turning TRACK knob, and pressing TRACK knob to on or off item selection, see
more details of the different submenus and options as below:
PLAY MODE: This function allows you to choose single-track play or
Continuous track play (all tracks in order).
- The default setting is CONTINUOUS play.
AUTO CUE: This will indicate if the Auto Cue is on or off.
- The default setting is AUTO CUE on.
RELAY: Press the TRACK knob to switch the RELAY on and off.
RELAY: OFF-The left and right players will automatically be in the continuous play mode.
RELAY: ON-The left and right players will automatically be in the single play mode.
- The default setting is RELAY OFF.
Reset all: in the “Reset all?” section, this will reset all your programmed menus and restore the unit to its default settings. Press the
FOLDER knob will return all function setting to default setting automatically and then “reset OK” will display in the LCD.
Page 9

SPECIFICATION
MODEL: Professional DUAL USB with 9 Effects
(Compatible with USB mass storage device 1.0/1.1/2.0)
DIMENSIONS: 482(W) x 132(D) x 71.6(H) mm
POWER SOURCE: DC 6V, 3A
GENERAL:
Display LCD
Pitch control range within +/-6%, +/-12%, +/-25%
Pitch Bend +/-6%, +/-12%, +/-25%
Pitch accuracy +/-0.15%
AUDIO CHARACTERISTICS
(TEST SIGNAL FORMAT: MP3, 128K bps, load=100K ohm)
ITEM TYPICAL LIMIT CONDITION
(1) OUTPUT LEVEL 1.4V +/-0.5dB 1.4V +/-1dB
1KHz, 0dB (TCD-782
TRK.2)
(2) CHANNEL BALANCE: WITHIN 0.2dB WITHIN 1dB 1KHz, 0dB(TCD-782 TRK.2)
(3) FREGUENCY
RESPONSE
17-16KHz +/-
0.3dB
17-16KHz
+/-1dB
0dB (TCD-781 TRK.1,4&16)
(4) CHANNEL
SEPARATION(*2)
92dB 85dB
1KHz 0dB(TCD-782 TRK.9,
11)
(5) THD+N (*1): 0.0065% 0.01% 1KHz 0dB(TCD-782 TRK.2)
(6) S/N (*2): 92dB 85dB
1KHz 0dB(TCD-782
TRK.2&8)
NOTES:
1. With 20KHz LOW PASS FILTER
2. With 20KHz LOW PASS FILTER, “IHF-A” WEIGHTED
MP3 FORMAT
Applicable file extensions mp3 MP3 mP3 Mp3
Max. number of Folders 999
Disc format
Max number of files max. 999 files
MPEG 1 Layer 3 standard (ISO/IEC
11172-3), which provides for single
channel (‘mono’) and two – channel
(‘stereo’) coding at sampling rates of
32, 44. 1 and 48khz
32/40/48/56/80/96/112/128/160/192/
224/256/320kbps
Xing/VBRI VBR
MPEG 2 layer 3 standard(
ISO/IEC13818-3), which provides for
similar coding at sampling rates of 16,
22.05 and 24 kHz.
32/40/48/56/64/80/96/112/144/160
Kbps
MP3
Format
MPEG 2.5 layer 3 standard, which
provides for similar coding at sampling
rates of 8, 11.025 and 12 kHz.
32/40/48/56/64/80/96/112/144/160
Kbps
Electric products must not be put into household waste. Please bring them to a recycling centre. Ask your local authorities or your dealer
about the way to proceed.
The specifications are typical. The actual values can slightly change from one unit to the other. Specifications can be changed without prior
notice.
Page 10
NL
Hartelijk dank voor de aanschaf van deze USB Media speler. Neemt U a.u.b. een paar momenten de tijd om deze handleiding zorgvuldig te
lezen, aangezien wij graag willen dat u onze producten snel en volledig gebruikt.
WAARSCHUWING :
- Bewaar de verpakking zodat u indien het apparaat defect is, dit in de originele verpakking kunt opsturen om beschadigingen te
voorkomen.
- Voordat het apparaat in werking wordt gesteld, altijd eerst een deskundige raadplegen.
- In het apparaat bevinden zich onder spanning staande onderdelen; open daarom NOOIT dit apparaat.
- Bij het verwijderen van de adapter uit het stopcontact nooit aan het snoer trekken.
- Verwijder of plaats een stekker nooit met natte handen resp. uit en in het stopcontact.
- Indien zowel de adapter en/of snoer in het apparaat beschadigd zijn dient dit door een vakman hersteld te worden.
- Indien het apparaat zo beschadigd is dat inwendige (onder)delen zichtbaar zijn mag de adapter NOOIT in het stopcontact worden
geplaatst én het apparaat NOOIT worden ingeschakeld. Neem in dit geval contact op met de dealer. Sluit het apparaat nooit op
een dimmer aan.
- Reparatie aan het apparaat dient te geschieden door een vakman of een deskundige.
- Sluit het apparaat alléén aan op een 220-240VAC / 50Hz stopcontact, verbonden met een 10-16A meterkastgroep.
- Toestel niet opstellen in de buurt van warmtebronnen zoals radiatoren etc. en niet op een vibrerende- maar stabiele ondergrond
plaatsen. Dek ventilatie-openingen nooit af.
- Bij onweer altijd de adapter uit het stopcontact halen, zo ook wanneer het apparaat een langere tijd niet gebruikt wordt. Stelregel: Bij
geen gebruik adapter verwijderen.
- Als u het apparaat een tijd niet gebruikt heeft en het weer wil gebruiken kan er condens ontstaan; laat het apparaat eerst op
kamertemperatuur komen alvorens het weer in werking te stellen ; apparaat nooit in vochtige ruimten en buiten gebruiken. Plaats
geen metalen voorwerpen, vloeistoffen (in bekers etc.) op het product, deze kunnen onherstelbare schade of een elektrische
schok veroorzaken!! wanneer ze het apparaat binnendringen.
- Om ongevallen in bedrijven te voorkomen moét rekening worden gehouden met de daarvoor geldende richtlijnen en moeten de
aanwijzingen/waarschuwingen worden gevolgd.
- Wanneer het apparaat aan de muur bevestigd moet worden dient eerst zorgvuldig berekend te worden of het plateau en/of
muurbeugels deze wel kunnnen dragen. Kunt u het niet berekenen schakel dan vakbekwaam personeel in. Het apparaat mag
alleen bevestigd worden op de manier die de fabrikant /expert aanbeveelt.
- Laat ruimte vrij voor een deugdelijke ventilatie.
- Het apparaat buiten bereik van kinderen houden. Bovendien mag het apparaat nooit onbeheerd gelaten worden.
-
Gebruik geen schoonmaakspray om de schakelaars te reinigen. Restanten van deze spray zorgen ervoor dat smeer en stof ophopen.
Raadpleeg bij storing te allen tijde een deskundige.
- Zorg dat uw handen schoon zijn tijdens het gebruik.
- Gebruik geen overmatige kracht bij het bedienen van het apparaat.
- Bij een ongeval met deze speler altijd eerst een deskundige raadplegen alvorens opnieuw te gebruiken.
- Zet eerst de Aan/Uit schakelaar op Uit
en de volumeregelaar(s) op minimaal bij het aansluiten van de installatie, na alle snoeren
aangesloten te hebben schakel dan pas Aan
. Zorg er ook voor dat de speler eerst Uit geschakeld wordt alvorens de adapter uit het
stopcontact te verwijderen.
Tracht het apparaat niet schoon te maken met chemische oplossingen. Dit kan de lak beschadigen. Gebruik een droge doek om schoon te
maken en doe dit frequent, b.v. maandelijks (afhankelijk van de plaats waar de speler gebruikt wordt ).
Blijf uit de buurt van elektrische/elektronische apparatuur, elektriciteitskabels etc., deze veroorzaken bromstoringen.
Bij reparatie dienen altijd originele onderdelen te worden gebruikt om onherstelbare beschadigingen en/of ontoelaatbare straling te
voorkomen.
Verwijder aansluitsnoeren voordat u dit product gaat verplaatsen. Vervoer de speler eventueel trillingsvrij.
Zorg ervoor dat het adaptersnoer niet beschadigd/defect kan raken wanneer mensen erover heen lopen. Het netsnoer vóór ieder gebruik
controleren op breuken/defecten! !
In Nederland/Belgie is de netspanning 220-240Vac/50Hz. Indien u reist (en u neemt het apparaat mee) informeer dan naar de netspanning
in het land waar u verblijft.
Deze markering wordt weergegeven om u erop attent te maken dat een levensgevaarlijke spanning in het product aanwezig kan
zijn en dat bij aanraking van deze delen een elektrische schok wordt verkregen.
Deze instructiemarkering wordt weergegeven om u erop te wijzen dat de instructie zeer belangrijk is om te lezen en/of op te
volgen.
Lees deze handleiding eerst door alvorens het product te gebruiken. Volg de instructies op anders zou de garantie wel eens kunnen
vervallen. Neem ook altijd alle veiligheids maatregelen om brand en/of een elektrische schok te voorkomen. Tevens is het ook
raadzaam om reparaties / modificaties e.d. over te laten aan gekwalificeerd personeel om een elektrische schok te voorkomen.
Bewaar deze handleiding ook voor toekomstig gebruik.
Page 11
BEDIENING EN FUNCTIES
1. USB PORT - Dit is de USB-poort waar u uw USB-stick aansluit voor het afspelen van MP3-bestanden.
2. HOLD BUTTON - Met deze knop kunt u eventuele nieuwe parameters instellen en vergrendelen. Deze knop licht op wanneer de HOLD
functie is geactiveerd. Als de hold-functie niet is geselecteerd zijn de eventuele wijzigingen in de effect parameters van korte duur.
3. BEAT-SYNC- keuze toetsen - Er zijn zes-synchronisatie instellingen, n.l. voor 1/4, 1/2, 3/4, 1/1, 2/1, 4/1 BPM's, afhankelijk van welke
BEAT LED brandt, druk de toetsen tegelijkertijd om de synchronisatie uit te schakelen.
4. SGL / CTN toets - U kunt kiezen tussen "single track mode" en "continuous play".
* Doorlopende weergave: alle tracks in de USB-stick worden afgespeeld zonder onderbreking.
* Single track: de speler stopt aan het einde van elk nummer en wacht aan het begin van de volgende track. Houd de SGL / CTN toets
langer dan 1 seconde ingedrukt om te schakelen tussen normale en "auto cue" mode. In "auto cue"-mode van de speler wacht deze op de
eerste muzieknoot van elk nummer.
5. PARAMETER
TIME Toets ( X parameter Toets) - Draai aan de TIME knop om de parameter-tijd aan te passen. Het wordt gebruikt om de waarde van de
parameter X (tijd) van de effectoren aantepassen. "toets en draai" is de snelle mode-versie.
RATIO Knop (Y parameter knop) - Draai de RATIO knop om de parameter verhouding tussen waarden aan te passen. Het wordt gebruikt
om de waarde van de parameter Y (mengverhouding of resonantie of feedback) van de effectoren aan te passen.
6. TEMPO LOCK Toets - M.b.v. de TEMPO-lock functie, waarmee het tempo van de muziek vast kan worden gezet. Deze knop licht op
wanneer ingeschakeld.
7. PITCH AAN / UIT-KNOP - Deze knop wordt gebruikt om de PITCH SLIDER functie aan en uit te schakelen. Het pitch percentage kan
worden gewijzigd tussen 6%, 12% en 25%. Bij 6% zal de kleinste pitch instelling behoeven te worden gedaan en bij 25% de meeste.
8. LCD DISPL AY – This high quality LCD display indicates all the functions, as they are occurring. This display is viewable at several
comfortable angles.
9. EFFECT-functies
Naast het REVERSE effect, zijn er 7 verschillende digitale effecten. U kunt op elke effect-toets drukken om het gewenste effect te
activeren, en u kunt de waarde van het effect wijzigen door toewijzing van de beat toetsen of de TIME parameter knop te verdraaien.
U kunt de intensiteit van het aangewezen effect instellen door het verdraaien van de RATIO-parameter knop. Zie hieronder voor een
exacte beschrijving.
- Zorg ervoor dat u HOLD hebt ingesteld (actief) alvorens de aangewezen effect-waarde en intensiteit in te stellen.
* FILTER Knop - Deze toets wordt gebruikt voor het activeren en deactiveren van het FILTER effect. Dit effect filtert afwisselend hoge en
lage frequenties door de aanpassing van de TIME / RATIO waarde. Simplistisch is een filter ontworpen om een aantal
frequentiegebieden onverzwakt door te laten terwijl anderen juist verzwakt worden.
* ECHO Knop - Deze toets wordt gebruikt voor het activeren en deactiveren van het Echo-effect. Dit effect herhaalt continu het signaal in
een zekere interval. U kunt de echo instellen voor het gewenste tempo.
* TRANS Knop - Deze toets wordt gebruikt voor het activeren en deactiveren van het TRANS-effect. Dit effect zorgt voor het aansnijden
van het signaal door heen en weer te faden m.b.v. de crossfader; het is vergelijkbaar met het snel aan-en uit schakelen van (een)
signaal/muziek.
* SKID Toets - Deze toets wordt gebruikt voor het activeren en deactiveren van het SKID effect. Dit effect bootst een plotselinge stop van
een draaitafel na, vergelijkbaar met het indrukken van de stopknop op een platenspeler en deze dan los te laten. U kunt de TIME knop
verdraaien om de starttijd (ST) in te stellen en de RATIO knop te verdraaien om de breaktime tijdswaarde (BT) in te stellen.
* FASE Toets - Deze toets wordt gebruikt voor het activeren en deactiveren van het fase-effect. Dit effect past het originele geluid aan en
voegt verschillende karakters van het geluid toe, vergelijkbaar met het FILTER effect.
* FLANGER Toets - Deze toets wordt gebruikt voor het activeren en deactiveren van het Flanger effect. Dit effect verdubbelt het signaal
Page 12

en verschuift het marginaal. Flanging is een tijd-effect dat optreedt wanneer twee identieke signalen worden gemengd, maar toch één
signaal vertraagd wordt, gewoonlijk minder dan 20 ms (milliseconden).
* PAN Toets - Deze toets wordt gebruikt voor het activeren en deactiveren van het PAN-effect. Dit effect zorgt voor voortdurende fading
van het linker signaal naar het rechter kanaal en weer terug. Pans stereo signaal door een afwisseling van verzwakte signalen in het linker
en rechter kanaal.
10. REVERSE Toets - Deze toets activeert de play mode en speelt een track in omgekeerde richting af.
11. PITCH RANGE SELECT - Druk op de knop om het pitch percentage van 6%, 12%, 25% te wijzigen.
12. PITCH BEND toetsen - De snelheid neemt toe, terwijl de "+ knop" wordt gedrukt en keert terug naar de oorspronkelijke instelling
wanneer de knop wordt losgelaten. De snelheid daalt als de "- knop" wordt gedrukt en keert terug naar de oorspronkelijke instelling
wanneer de knop wordt losgelaten. Deze knoppen kunnen worden gebruikt om de beats van 2 tracks te synchroniseren.
13. JOG WHEEL – Dit wiel heeft 3 functies:
In PITCH mode
* Het wiel werkt als een pitch bend tijdens het afspelen. Draai het wiel met de klok mee en het pitch percentage kan oplopen tot 100%,
en het draaien van het wiel tegen de klok in kan het pitch percentage verlagen tot -100%. De pitch bend wordt bepaald door hoe lang je
continu aan het jog wiel draait.
* Het jog wiel werkt als een langzame framezoek-methode (1/75 sec) wanneer de muziek niet wordt afgespeeld, dus tijdens Pauze of
op een Cue punt is gezet. Om een nieuw cue punt in te stellen, draai dan aan het wiel en toets PLAY of IN wanneer de gewenste
positie is bepaald. Druk op CUE om terug te keren naar de "CUE PUNT".
In SEARCH mode
* Wanneer de SEARCH functie is ingeschakeld kunt u gebruik maken van het jogwiel om snel vooruit of achteruit te zoeken door de
huidige track (tijdens afspeelmodus of niet).
* Druk op deze knop om naar de zoekfunctie m.b.v. het jog-wiel te schakelen en de LED brandt. De zoekfunctie heeft 4 voorwaartse
en 4 achteruit snelheden zodat u snel door tracks kunt zoeken. Hoe sneller het wiel wordt gedraaid in beide richtingen deste sneller
wordt gezocht.
In SCRATCH mode
Druk op de knop om de scratch-functie te activeren. U kunt de track scratchen in de afspeelmodus met het Jogwiel zoals op een vinyl
plaat, door hem naar voren en naar achteren te bewegen en vast te houden. Druk voor de tweede keer op de scratch-knop om het
Scratch effect uit te schakelen. Dit effect simuleert real time vinylplaat-scratchen op een platenspeler.
14. TAP BPM Toets – Deze knop wordt gebruikt om handmatig een track BPM te overschrijven en in te stellen. Af en toe kan de
ingebouwde BPM meter niet naar wens functioneren. Met deze knop kunt u de interne beatklok overschrijven en handmatig een track
BPM instellen. Om handmatig in te stellen raak deze knop een paar keer aan op de maat van de muziek, en de speler zal automatisch uw
tikken vertalen naar een track BPM. De BPM uitlezing wordt dan weergegeven in het LCD-scherm. Om terug te keren naar de
automatische BPM-teller houdt u deze toets ten minste 2 seconden vast en laat vervolgens weer los.
15. PLAY/PAUSE Toets – Bij iedere druk op de toets zal de speler afwisselend in Play- of in Pauze mode gaan.
16. CUE Toets – Bij het drukken van de CUE toets tijdens het afspelen gaat de speler in pauze mode en keert terug naar het laatst
opgeslagen cue punt. De CUE indicator in de LCD brandt in cue mode en de indicator gaat knipperen elke keer als een nieuw CUE
PUNT is ingesteld. De CUE toets kan worden vastgehouden om tijdelijk muziek af te spelen. Als u deze loslaat gaat de speler terug
naar het CUE PUNT.
17. CUE/ Toets – Als deze toets wordt gedrukt wordt de CUE PLAY functie geactiveerd en de speler gaat vanaf het laatste cue punt
spelen. U kunt het drukken op de CUE / toets herhalen om een STOTTER EFFECT te creëren.
18. TRACK KNOB – Gebruik deze toets om een track of folder te selecteren :
* In TRACK mode. Bij het verdraaien van deze knop kan tussen tracks worden genavigeerd. Bij het vasthouden en draaien van deze knop
kunt u snel voorwaarts / terug springen tussen de tracks (10 tracks per klik).
* In FOLDER mode: Bij het draaien aan de track knop kunt u voorwaarts / terug springen tussen folders/mappen.
- U kunt ook schakelen tussen de weergave van Folder Naam/FILE Naam/TITEL/ ARTIEST/GENRE/BITRATE en zoeken. Houd hiertoe
de TRACK Toets vast. Laat de toets los als u de informatie ziet die de display moet weergeven.
19. FOLDER T oets – Deze toets heeft twee functies:
* Om naar FOLDER- of TRACK zoekmodi te gaan:
Als de FOLDER/TRACK toets oplicht, staat de player in FOLDER/TRACK zoekmode.
* Om te schakelen tussen REPEAT functie on en off:
Druk hiertoe op de FOLDER toets voor meer dan 2 seconden .
- REPEAT functie ON: Alle tracks in deze folder zullen track voor track worden afgespeeld totdat de functie wordt uitgezet.
20. POWER SWITCH Toets – Om de speler aan te zetten, houd deze toets meer dan 3 seconden vast om uit te schakelen.
21. PITCH SLIDER – Deze schuifregelaar wordt gebruikt om het toonhoogte-percentage aan te passen. De instelling zal van kracht
blijven totdat de pitch-functie wordt uitgeschakeld. Deze aanpassing kan worden gemaakt met of zonder een audiobron (USB 1 of USB
2) in de speler. De toonhoogte instelling is blijvend, zelfs als de muziekbron (USB 1 of USB 2) is verwijderd of een andere muziekbron
wordt aangesloten op de speler. De hoeveelheid pitch die wordt toegepast zal worden weergegeven in het LCD-scherm.
22. SEAMLESS LOOP
* IN –Toets –Deze functie stelt u in staat een CUE PUNT in te stellen. Hiermee kunt u ook het start-punt van een “seamless loop”
instellen.
* OUT –Toets –Om een eind-punt van een loop in te stellen. Een loop start-punt wordt ingesteld met de IN BUTTON. Druk de OUT
Toets om het loop eind-punt in te stellen. De loop blijft spelen totdat de OUT Toets opnieuw wordt gedrukt.
* RELOOP BUTTON – Als een SEAMLESS LOOP is gemaakt, en de Loop wordt niet afgespeeld, zullen LOOP en RELOOP
verschijnen in de LCD DISPLAY als de RELOOP functie beschikbaar is. Een druk op de RELOOP Toets zal de SEAMLESS LOOP
mode activeren. Om uit de Loop te gaan, moet de OUT Toets worden gedrukt,
- In reloop, “LOOP” knippert en “RELOOP” staat aan. Indien niet in reloop, en reloop is beschikbaar, “LOOP” en “RELOOP” staan naan.
23. USB SELECT Toets – Hiermee kunt u schakelen tussen USB Port 1 en 2. De desbetreffende LED licht op. Deze functie werkt alleen in
pauze mode.
24. SEARCH T oetsen – Hiermee kunt u snel terug- of verder zoeken in de af te spelen track ook als de speler niet in Play mode staat.
Page 13
25. TIME Toets – Om de verstreken en resterende tijd weer te geven.
26. AUDIO Uitgangen – Analoge uitgangen van audiosignalen om op uw mixer aan te sluiten.
27. CONTROL START SOCKET – Om aan te aansluiten op een mixer met fader start functie, sluit hier nooit
een adapter op aan!!
28. POWER CONNECTOR – Adapter aansluiting.
LCD DISPLAY
1. CUE INDICATOR —Deze brandt als de speler in CUE mode is en knippert als een nieuw CUE POINT wordt ingesteld.
2. FOLDER INDICATOR —Deze geeft het nummer weer van de huidige folder.
3. TIME BAR INDICATOR —Om de verstreken en resterende tijd weer te geven in SETUP MODE. Deze bar knippert kort voordat
het eind van track wordt bereikt als herinnering hieraan
4. BPM STATUS —Indicatie dat de AUTO BPM counter actief is
5. BPM METER —Geeft de BPM waarde va n de huidige track weer.
6. PITCH METER —Geeft het percentage v an een track’s pitch weer
7. TEMPO LOCK —Geeft aan of tempo lock is geactiveerd (lock symbool)
8. LOOP INDICATOR —De indicator knippert als de LOOP functie is geactiveerd, de indicator geeft aan of een loop is ingesteld.
9. RELOOP INDICATOR —De indicator geeft aan of een loop is ingesteld die met de Reloop functie kan worden geactiveerd.
10. AUTO CUE STATUS —De indicator geeft aan of Auto Cue is geactiveerd
11. TIME DISPLAY —De indicator geeft de Time mode in minuten, secondsen en frames weer.
12. ALPHANUMERIC DISPLAY —De indicator geeft de huidige naam van een track, folder en de sampling rate weer. Voor VBR
opgenomen MP3 tracks geeft de display alleen“VBR” weer. Alle interactive informatie word took weergegeven.
13. TIME MODE —Om de verstreken en resterende tijd weer te geven (“ELAPSED”) (“REMAIN”).
14. REPEAT INDICATOR —Geeft weer of de speler in REPEATED mode staat
15. SINGLE INDICATOR
—Geeft weer of de speler in play mode is ingesteld op (“SINGLE”) of continuous mode (geen display)
16. TRACK INDICATOR —Geeft het huidige tracknummer weer.
17. PLAY/PAUSE INDICATOR —Geeft weer of de speler in play mode (: :). staat of in pauze mode (“Ⅱ”).
BASIC BEDIENING
1. SELECTIE AUDIOBRON
Met de USB SELECT Toets selecteert u de gewenste aansluiting.
U heeft 2 keuzes:
(a) DEZELFDE USB STICK AFSPELEN
Om dezelfde USB stick in zowel speler A als speler B af te spelen, plaatst u de USB stick of in de USB 1 of USB 2 poort. Toets de
USB SELECT toets en USB 1 LED brandt bij gebruik USB 1 en LED 2 brandt bij gebruik USB 2.
(b) Afspelen van 2 USB Sticks
Plaats beide sticks en selecteer welke speler moet worden gebruikt.
Let op: Om een USB stick te verwijderen dient u eerst het afspelen van de speler te stoppen.
2. Omschakelen naar het afspelen van een andere USB stick
Dit dient te geschieden in de pauze mode, druk de USB SELECT Toets om naar de andere USB poort over te schakelen; in play mode
werkt het niet.
Page 14
De 3 Functies van de TRACK KNOP
1. TRACK ZOEKEN
Als de FOLDER LED uit is, draai de TRACK knop naar links om terug te zoeken en naar rechts om verder te zoeken. U kunt 999 tracks in
een folder selecteren.
2. FOLDER ZOEKEN
Als de FOLDER LED aan is, kunt u m.b.v. de TRACK knop een folder selecteren. U kunt 999 folders selecteren.
* Door te draaien kunt u de tracks en folders selecteren.
3. DE INHOUD VAN EEN TRACK
U kunt de inhoud van een Folder zoals NAAM/FILE NAAM/TITEL bekijken.
NAAM/ARTIEST/GENRE/BITRATE kunt u bekijken door op de TRACK knop te drukken.
Let op: Iedere weergave duurt 20 sec. en gaat automatisch terug naar “TITEL NAAM”.
FRAME ZOEKEN
Hiermee kunt u frame voor frame door een track scrollen om een start cue- of loop punt te zoeken. Deze functie is te gebruiken in Pauze
Mode of Cue Mode . Draai dan aan het the JOGWIEL in PITCH mode om door de track te scrollen. Bij het verdraaien van het wiel scrollt u
verder of terug door de frames. Als u het JOG WIEL verdraait stelt de monitor functie u in staat te horen wat u doet. Wanneer u het
gewenste start punt heeft opgezocht kunt u een cue (start) punt instellen door op de PLAY/PAUSE toets te drukken. Een druk op de CUE
Toets brengt u terug naar het punt dat u zojuist heeft ingesteld.
Page 15

AUTO CUE
Houd de SGL/CTN toets meer dan 1 seconde vast om tussen normal en “auto cue” mode te schakelen. Deze functie stelt automatisch een
cue punt in bij de eerste muzieknoot van een track. Als een nieuwe track is geselecteerd, wordt een nieuw CUE PUNT ingesteld om een
nieuw start punt weer te geven.
INSTELLEN VAN EEN CUE PUNT
(1)Een cue punt is een exact punt waar het afspelen begint als PLAY/PAUSE wordt gedrukt. Dit punt kan overal worden ingesteld in een
track. Druk de IN toets tijdens het afspelen. Op dit punt wordt het Cue punt ingesteld terwijl de track verder wordt afgespeeld.
Als nu de CUE toets wordt gedrukt gaat de speler terug naar het punt waar u op de IN toets hebt gedrukt en speelt de track verder af.
Bij het opnieuw drukken van de CUE toets gaat de speler weer terug naar het door u ingestelde punt.
(2)
U kunt ook het jogwiel gebruiken om een cue punt in te stellen als de speler in PAUSE mode of CUE mode staat én het JOGWIEL in
PITCH mode staat. Gebruik het jogwiel om door een track te scrollen en het gewenste start punt te vinden. Als u deze heeft gevonden
druk dan de play toets om uw cue punt in te stellen. Een druk op de cue toets zorgt ervoor dat de speler teruggaat naar dit exacte punt.
SEAMLLESS LOOP
1. CREËREN EN AFSPELEN VAN EEN SEAMLESS LOOP
Een seamless loop is een oneindige sound loop zonder onderbrekingen. U kunt deze loop creëren voor o.a. dramatische effecten in uw
mix. Deze loop kent geen tijdslimiet en dus “eeuwig” te gebruiken.
Uitleg:
(1) Druk PLAY/PAUSE.
(2) Druk de IN toets. Hiermee stelt u het start punt van de SEAMLESS LOOP in. De LED van de IN toets brandt.
(3) Druk de OUT toets om het eind punt in te stellen voor uw SEAMLESS LOOP. De LED’s van de IN- en OUT toets
gaan nu snel
knipperen, ten teken dat de SEAMLESS LOOP mode is geactiveerd.
2. LOOP INSTELLEN
Om de SEAMLESS LOOP te beeindigen drukt u op de OUT toets. De LEDs van de IN en OUT toets blijven aan maar knipperen
niet meer. De track wordt nu in gewone playmode afgespeeld. De LEDs van de IN - en OUT toets én RELOOP/LOOP indicator in
de LCD blijven branden om u eraan te herinneren dat een loop in het geheugen is opgeslagen.
3. HERHALEN VAN EEN LOOP
De RELOOP functie stelt u in staat om, zovaak als u wilt, terug te gaan naar uw opgeslagen loop. De LEDs van de IN - en OUT toets
geven aan dat een loop is opgeslagen in het geheugen en die dan altijd kan worden afgespeeld. Om de loop te herhalen, druk
RELOOP. De LEDs van de IN - en OUT toets zullen opnieuw gaan knipperen ten teken dat de SEAMLESS LOOP mode is
geactiveerd en uw opgeslagen loop wordt onmiddellijk afgespeeld.
- Als u de Track Encoder gebruikt om va n tracks te veranderen, zal het vooraf ingestelde CUE- en LOOP geheugen worden gewist,
een nieuwe CUE moet worden ingesteld.
- Als u wacht totdat track A is afgelopen en het afspelen van track B begint, wordt het vooraf ingestelde CUE - en LOOP geheugen
van track A behouden, als u op CUE of RELOOP drukt, gaat de speler terug naar de CUE of LOOP instelling van track A. Als u
echter een andere folder afspeelt wordt het vooraf ingestelde CUE- en LOOP geheugen gewist.
4. BEWERKEN VAN EEN LOOP
U kunt uw vooraf ingestelde seamless loop ergens toevoegen. Als u deze nog niet gemaakt hebt, creëer deze dan eerst, zie stap 1.
Er zijn 3 methoden :
(1) Seamless loop eind punt creëren
U kunt een nieuw eind punt creëren van een loop om deze korter of langer te maken. Kijk eerst of de loop zich niet in RELOOP mode
bevindt. Pauzeer in PITCH mode; verdraai het JOGWIEL om de loop korter /langer te maken. Druk de OUT toets om een nieuw eind
punt van de loop te maken; druk op RELOOP om de loop actief te maken.
(2) Seamless loop start punt creëren
U kunt een nieuw start punt creëren van een loop om deze korter te maken. In RELOOP mode verdraai het JOGWIEL rechtsom in
PITCH mode om de loop korter te maken. Let wel dat het start punt vóór het eind punt moet liggen. Druk de IN toets om het nieuwe
start punt van uw loop te maken.
(3) Een loop resetten
U kunt een nieuwe loop resetten in play of pauze mode, Wanneer u een gewenst start punt vindt om een nieuwe loop te maken drukt u
op de IN toets, de LED van de OUT toets gaat uit; zoek een nieuw eind punt en druk op de OUT toets om deze te bevestigen en de loop
is gemaakt.
Page 16

STOTTER EFFECT
U kunt de gemaakte loop gebruiken om een stotter effect te creëren en deze kan worden gebruikt om iets extra’s aan uw prestatie toe te
voegen.
Iedere keer als u op de RELOOP toets drukt, of de loop wordt afgespeeld of niet, zal het de vooraf geprogrammeerde loop onmiddellijk
herstarten. U kunt de RELOOP toets herhaaldelijk drukken om het stotter effect te creëren.
Ook kan het stotter effect worden gecreëerd door herhaaldelijk op de CUE/ toets te drukken .
TAP BPM
AUTO BPM is de standaard mode als de speler wordt ingeschakeld. U kunt naar Manual/Auto BPM gaan door op “TAP BPM” te drukken.
Let op:
Schakel Manual BPM in door één druk op de knop.
Schakel Auto BPM in door “TAP BPM” meer dan 2 sec. in te drukken, de LCD geeft “AUTO BPM” weer.
Er zijn 2 modes voor de BPM counter/teller:
3. Manual BPM: aan de hand van het muziek tempo op de "TAP BPM" knop drukken om de BPM waarde te bepalen.
4. Auto BPM: de BPM waarde wordt automatisch bepaald zonder op de ” TAP BPM” toets te drukken.
SYSTEEM SETTING
SETUP MODE:
Houd de TIME toets meer dan 2 seconden vast om in de systeem-setting-mode te komen; de LCD geeft “PRESET” weer en de SETUP
LED gaat aan.
Let op: De Systeem-setting wordt automatisch beeindigd wanneer 10 seconden geen actie plaatsvindt.
Verdraai de TRACK knop om door verschillende submenus te scrollen, stop bij het gewenste submenu en druk op de TRACK knop.
Om de systeem-settings te beeindigen, verdraai de TRACK knop linksom om het submenu in te stellen en druk dan de TRACK knop.
In de SETUP mode kunt u browsen door aan de TRACK knop te draaien, druk de TRACK knop om een item in- of uit te schakelen. Zie
hieronder voor meer details over de submenus :
PLAY MODE: Met deze functie kunt u kiezen uit single-track afspelen of
Continu(ous) track afspelen (alle tracks na elkaar).
- Standaard staat de speler op CONTINU(OUS) spelen.
AUTO CUE: Geeft weer of de Auto Cue aan of uit is.
- Standaard staat de speler op AUTO CUE aan.
RELAY: Druk op de TRACK knop om RELAY aan en uit te schakelen.
RELAY: OFF-De linkse –e n rechter speler staan automatisch in continu(ous) afspeel mode.
RELAY: ON- De linkse –e n rechter speler staan automatisch in single afspeel mode.
- Standaard is RELAY OFF/UIT.
Reset all: Deze functie zal alle voorgeprogrammeerde menus resetten en de unit gaat terug naar z’n standaard instellingen door op de
FOLDER knop te drukken en “reset OK” wordt weergegeven in de LCD.
Page 17

SPECIFICATIE
MODEL: Professioneel DUAL USB met 9 Effecten
(Compatibel met USB mass storage Device 1.0/1.1/2.0)
AFMETINGEN: 482(W) x 132(D) x 71.6(H) mm
VOEDING: DC 6V, 3A
ALGEMEEN:
Display LCD
Pitch control +/-6%, +/-12%, +/-25%
Pitch Bend +/-6%, +/-12%, +/-25%
Pitch accuracy +/-0.15%
AUDIO KARAKTERISTIEK
(TEST SIGNAAL FORMAAT: MP3, 128K bps, load=100K ohm)
ITEM TYPICAL LIMIET CONDITIE
(1) UITGANGSNIVEAU 1.4V +/-0.5dB 1.4V +/-1dB
1KHz, 0dB (TCD-782
TRK.2)
(2) KANAALBALANS: WITHIN 0.2dB WITHIN 1dB 1KHz, 0dB(TCD-782 TRK.2)
(3) FREGUENTIE BEREIK
17-16KHz +/-
0.3dB
17-16KHz
+/-1dB
0dB (TCD-781 TRK.1,4&16)
(4)
KANAALSCHEIDING(*2)
92dB 85dB
1KHz 0dB(TCD-782 TRK.9,
11)
(5) THD+N (*1): 0.0065% 0.01% 1KHz 0dB(TCD-782 TRK.2)
(6) S/N (*2): 92dB 85dB
1KHz 0dB(TCD-782
TRK.2&8)
1. Met 20KHz LOW PASS FILTER
2. Met 20KHz LOW PASS FILTER, “IHF-A” WEIGHTED
MP3 FORMAAT
Applicable file extensions mp3 MP3 mP3 Mp3
Max. aantal Folders 999
Disc
formaat
Max. aantal Files max. 999 files
MPEG 1 Layer 3 standaard (ISO/IEC
11172-3), voor (‘mono’) en (‘stereo’)
coding sampling rates 32, 44. 1 en
48khz
32/40/48/56/80/96/112/128/160/192/
224/256/320kbps
Xing/VBRI VBR
MPEG 2 layer 3 standaard
(ISO/IEC13818-3), voor gelijke coding
sampling rates16, 22.05 en 24 kHz.
32/40/48/56/64/80/96/112/144/160
Kbps
MP3
Formaat
MPEG 2.5 layer 3 standaard, which
provides voor gelijke coding sampling
rates of 8, 11.025 and 12 kHz.
32/40/48/56/64/80/96/112/144/160
Kbps
Afgedankte artikelen !!
Raadpleeg eventueel www.wecycle.nl en/of www.vrom.nl
v.w.b. het afdanken van elektronische apparaten in het kader van
de WEEE-regeling. Vele artikelen kunnen worden gerecycled, gooi ze daarom niet bij het huisvuil maar lever ze in bij een
gemeentelijk depot of uw dealer. Lever ook afgedankte batterijen in bij uw gemeentelijk depot of bij de dealer, zie
www.stibat.nl
.
Alle (defecte) artikelen dienen gedurende de garantieperiode altijd retour te worden gezonden in de originele verpakking.
* Onder voorbehoud :
Specificaties zijn specifiek, toestel kan hiervan afwijken. Specificaties kunnen veranderd worden zonder kennisgeving.
Page 18

D
Herzlichen Glückwunsch zum Kauf dieser USB Mediaspieler.
Bitte lesen Sie diese Anleitung sorgfältig vor der Inbetriebnahme durch.
Sicherheitsvorschriften:
- Bedienungsanleitung vor Inbetriebnahme sorgfältig durchlesen.
- Für spätere Bezugnahme aufbewahren.
- Originalverpackung für späteren Transport aufbewahren.
- Nur für Innengebrauch.
- Niemals das Gehäuse öffnen; Reparaturen nur von einem Fachmann ausführen lassen.
- Beim Abziehen des Netzteils niemals an der Netzschnur ziehen.
- Netzteil niemals mit nassen Händen anfassen.
- Sollten Netzteil und/oder Schnur, zum Gerät beschädigt sein, müssen diese durch einen Fachmann
ersetzt werden.
- Wenn das Gerät sichtbare Schäden aufweist, darf es NICHT an eine Steckdose angeschlossen und
NICHT eingeschaltet werden. Benachrichtigen sie in diesem Fall den Fachhändler.
- Das Gerät nur an eine 220-240Vac/50Hz Netzsteckdose mit 10-16A Leistung anschließen.
- Vor Regen schützen.
- Nicht in der Nähe von Wärmequellen aufstellen.
- Bei Unwetter sowie Nichtgebrauch, das Netzgerät aus der Steckdose ziehen.
- Nach längerem Nichtgebrauch kann sich Kondenswasser im Gehäuse gebildet haben. Lassen Sie das
Gerät erst auf Raumtemperatur kommen.
- Unzugänglich aufbewahren und fernhalten von Kindern.
- Vor dem Einschalten alle Kanalschieberegler, sowie den Master Lautstärkeregler ganz herunterfahren.
- Die Schieberegler vorsichtig behandeln. Eine zu schnelle Veränderung kann die Lautsprecher
beschädigen, weil der Verstärker überfordert ist.
- Den Verstärker nicht überfordern (Clipping). Wenn die Clip LEDS am Verstärker aufleuchten, ist die
Lautstärke zu hoch eingestellt. Sofort die Lautstärke auf einen niedrigern Pegel einstellen.
- Den Verstärker immer zuletzt einschalten und zuerst ausschalten.
- Keine Rei nigungssprays für die Schieberegler verwenden. Die Rückstände verursachen Schmier- und
Staubansammlungen in den Reglern. Im Problemfall einen Fachmann fragen.
- Legen Sie keine Gegens tände (Metall) oder Flüssigkei ten (in Tassen usw.) in der Nähe des Produkts
(kann zu irreparablen Schäden oder Stromschlag führen beim eindringen).
Page 19

BEDIENUNG UND FUNKTIONEN
1. USB-Anschluss - Hier können Sie Ihr USB-Gerät für die Wiedergabe von MP3-Dateien anschließen.
2. HOLD TASTE - Mit dieser Taste können Sie neue Parameter einstellen. Diese Taste leuchtet, wenn die HOLD-Funktion aktiviert ist.
Wenn die Hold-Funktion nicht aktiviert ist, sind alle Änderungen in den Effekt Parametern von kurzer Dauer.
3. BEAT SYNC Wahl Tasten - Es gibt sechs Sy nc-Einstellungen, und zwar für 1/4, 1/2, 3/4, 1/1, 1.2, 1.4 BPM, je nachdem welche BEAT-
LED leuchtet; drücken Sie die Tasten zur gleichen Zeit um die Synchronisation auszuschalten.
4. SGL / CTN Taste - Sie können wählen zwischen "Single Track-Modus" und "kontinuierliche Wiedergabe".
* Kontinuierliche Wiedergabe: alle Titel auf den USB-Stick werden ohne Unterbrechung abgespielt.
* Single-Track: Spieler stoppt am Ende jedes Tracks und wartet am Anfang des nächsten Titels. Halten Sie die SGL / CTN Taste länger
als 1 Sekunde, um zwischen Normal- und "Auto Cue"-Modus zu wechseln. Im "Auto Cue"-Modus des Players stoppt den Spieler auf
die ersten musikalischen Note jedes Lied.
5. PARAMETER
Taste TIME (X Parameter Geschmack) - Drehen Sie die TIME-Taste um die Parameter Zeit anzupassen. Es wird verwendet, um den Wert
des Parameters X (Zeit) der Effektoren anzupassen. "Drucken und Drehen" ist die Schnelle-Version.
RATIO-Taste (Y-Taste Parameter) - Drehen Sie diesen Knopf um das Ratio-Parameter-Verhältnis zu ändern. Es wird verwendet, um den
Wert des Parameters Y (Mischungsverhältnis, oder Feedback oder Resonanz) der Effektoren einzustellen.
6. TEMPO LOCK Taste - Eine Funktion, die das Tempo der Musik fixieren kann. Diese Taste leuchtet, wenn aktiviert.
7. PITCH EIN / AUS-KNOPF - Diese Taste wird verwendet um die Pitch-Slider-Funktion ein-und aus zu schalten. Das Pitch-Tempo kann
zwischen 6%, 12% und 25% geändert werden. Auf 6%, muß die kleinste Anpassung gemacht werden und auf 25% die größste.
8. LCD DISPLAY
9. EFFEKT-Funktionen
Neben den Reverse-Effekt gibt es noch 7 verschiedene digitale Effekte. Sie können auf jede Effekt-Taste drücken, um den gewünschten
Effekt zu aktivieren, und Sie können den Wert des Effekts ändern durch die Zuordnung des Beat Tasten oder durch Drehung des TIME
Parameter-Reglers. Sie können die Intensität des zugewiesenen Effekts einstellen, indem Sie den Parameter-Regler RATIO drehen.
Weiter unten finden Sie eine genaue Beschreibung.
- Achten Sie darauf, daß Sie "HOLD" aktiviert haben bevor Sie die vorgesehenen Effekt-Werte und Intensität einstellen.
* FILTER Taste - Diese Taste wird verwendet zum Aktivieren und Deaktivieren des FILTER-Effekts. Dieser Effekt filtert abwechselnd
hohe und niedrige Frequenzen durch Anpassung der TIME / Ratio-werte.
* ECHO Taste - Diese Taste wird verwendet zum Aktivieren und Deaktivieren des Echo-effekts. Sie können den Echo-Effekt einstellen für
das gewünschte Tempo.
* TRANS Taste - Diese Taste wird verwendet zum Aktivieren und Deaktivieren des TRANS-Effekts. Dieser Effekt ist zum überblenden des
Signals in dem Sie den Crossfader hin und her bewegen (ähnlich wie schnell Ein-und Ausschalten eines Signals).
* SKID Taste - Diese Taste wird verwendet zum Aktivieren und Deaktivieren des SKID Effekts. Dieser Effekt simuliert einen plötzlichen
Stopp eines Plattenspielers, ähnlich wie das Drucken auf einer Stopp-Taste eines Plattenspielers und dann diese Taste wieder loslassen.
Sie können die TIME-Taste drehen um die Startzeit (ST) einzustellen und die RATIO-Taste drehen um die Zeit der Pausen Zeitwert
(Breaktime=BT) einzustellen.
* FASE Taste - Diese Taste wird verwendet zum Aktivieren und Deaktivieren des FASE-Effekts. Dieser Effekt passt den Original-Sound an
und fügt mehrere Zeichen des Sounds zu, ähnlich wie die Filterwirkung.
* FLANGER Taste - Diese Taste wird verwendet zum Aktivieren und Deaktivieren des Flanger-Effekts. Dieser Effekt verdoppelt das
Signal und verschiebt es marginal. Flanging ist ein Zeit-Effekt, der auftritt wenn zwei identische Signale gemischt werden und éin
Signal verzögert wird, in der Regel weniger als 20 ms (Millisekunden).
* PAN Taste - Diese Taste wird verwendet zum Aktivieren und Deaktivieren des PAN-Effekts. Dieser Effekt ermöglicht eine ständige
überblendung des linken Signals auf den rechten Kanal und wieder zurück. PANs Stereosignal durch abwechselnde Dämpfung von
Signalen in den linken und rechten Kanal.
10. REVERSE Taste - Diese Taste aktiviert die Wiedergabe-Modus und spielt einen Track in umgekehrter Richtung ab.
Page 20

11. PITCH RANGE SELEKT – Drucken Sie diese Taste um das Pitch-Tempo mit 6%, 12%, 25% zu ándern.
12. PITCH BEND Taseen - De snelheid neemt toe, terwijl de "+ knop" wordt gedrukt en keert terug naar de oorspronkelijke instelling
wanneer de knop wordt losgelaten. Das Tempo sinkt (steigt), wenn die "- (+) Taste" gedrückt wird und kommt wieder auf die ursprüngliche
Einstellung wenn die Taste losgelassen wird. Diese Tasten können verwendet werden um die Beats von 2 Spuren zu synchronisieren.
13. JOGRAD – Das Rad hat 3 Funktionen:
In PITCH Modus
* Das Rad wirkt wie ein Pitch-Bend während der Wiedergabe. Drehen Sie das Rad im Uhrzeigersinn und die Steigung kann auf 100%
erhöht werden. Das Rad drehen gegen den Uhrzeigersinn bedeutet eine Senkung bis zu -100%. Der Pitch-Bend ist abhängig von wie
lange Sie weiterhin das JogRad drehen.
* Das JogRad wirkt wie eine Frame-Such-Methode (1/75 sec) wenn die Titel nicht abgespielt werden, also während Pause oder bei
Einstellung eines Cue-Punkts. Um einen neuen Cue-Punkt zu erstellen, drehen Sie das Rad und drucken Sie PLAY oder IN wenn die
gewünschte Position erreicht wird. Drücken Sie CUE, um zum "CUE PUNKT" zurückzukehren.
In SEARCH Modus
* Wenn die SEARCH-Funktion aktiviert ist können Sie das Jog-Rad benutzen um schnell vorwärts oder rückwärts durch den aktuellen
Track zu suchen (während Wiedergabe-Modus oder nicht).
* Drücken Sie diese Taste, um nach dem Such-Modus, mit Hilfe des Jog-Rads, zu wechseln und die LED leuchtet. Die Suche hat 4
Vorwärts und 4 Rückwärts Tempi sodaß Sie schnell durch die Titel suchen können. Je schneller das Rad in jeder Richtung gedreht
wird desto schneller gesucht wird.
In SCRATCH Modus
Drücken Sie die Taste, um den Scratch-Funktion zu aktivieren. Sie können den Titel Scratchen/Kratzen, während der Wiedergabe, mit
dem Jog Rad wie auf einer Schallplatte, durch das Rad vorwärts und rückwärts zu bewegen und fest zu halten. Drücken Sie ein zweites
Mal auf der Scratch-Taste, um die Wirkung aus zu schalten. Dieser Effekt simuliert Real-Time-Vinyl-Kratzen an einer Drehscheibe.
14. TA P B P M Tas t e – Diese Taste wird verwendet, um manuell einen Titel- BPM (Beats pro minute) zu überschreiben und einzustellen.
Gelegentlich kann der integrierte BPM-Zähler nicht wie gewünscht funktionieren. Mit dieser Taste können Sie den internen Beat-zähler
überschreiben und manuell einen Titel- BPM einstellen. Um manuell einzustellen drücken Sie die Taste ein paar Mal zum Takt der
Musik, und der Spieler wird automatisch Ihre Tippen interpretieren auf einem Titel- BPM. Die BPM-Anzeige wird auf dem LCDBildschirm angezeigt. Um zum automatischen BPM-Zähler zurückzukehren halten Sie diese Taste mindestens 2 Sekunden fest um
anschließend wieder loszulassen.
15. PLAY/PAUSE Taste – Bei jedem Drücken der Taste, wird der Spieler abwechselnd in Play-oder Pause-Modus gehen..
16. CUE Taste – Beim Drücken der CUE-Taste während der Wiedergabe, geht der Spieler in Pause-Modus und kehrt in den zuletzt
gespeicherten Cue-Punkt zurück. Die CUE-Anzeige in der LCD leuchtet im Cue-Modus und die Anzeige blinkt jedes Mal wenn einen
neuen Cue Punkt gesetzt wird. Die CUE Taste kann kurzfristig gehalten werden, um Musik ab zu spielen. Wenn Sie loslassen, kehrt
der Player zum Cue-Punkt zurück.
17. CUE/ Taste – Wenn diese Taste gedrückt wird, wird der CUE PLAY-Funktion aktiviert und der Player spielt ab von dem letzten
Cue-Punkt. Sie können das Drucken der Taste CUE / immer wiederholen um einen Stotter-Effekt zu erzeugen.
18. TRACK T aste – Um einen Titel oder Folder zu wählen :
* In TRACK Modus. Drehen Sie diesen Regler um zwischen den Titeln zu navigieren. Beim Halten und Drehen dieser Taste, können Sie
schnell vorwärts / rückwärts springen zwischen den Tracks (10 Tracks pro Klick).
* In FOLDER Modus: Wenn Sie den Regler drehen können Sie vorwärts / zurück springen zwischen Ordner / Verzeichnisse.
- Sie können auch wechseln zwischen die Anzeige von Ordnername / Dateiname / Titel / Interpret / Genre / Bitrate und Suchen. Halten
Sie die TRACK-Taste. Lassen Sie die Taste los, wenn Sie die Information sehen, die gewünscht wird.
19. FOLDER T aste – Diese Taste hat 2 Funktionen:
* Um nach Ordner- oder TRACK Such-Modi zu gehen:
Wenn die Ordner / Track-Taste leuchtet, ist der Spieler im Ordner / Track Suchmodus.
* Um zwischen REPEAT-Funktion ein-und aus zuschalten:
Da zu drücken Sie die FOLDER-Taste länger als 2 Sekunden.
Wiederholungsfunktion eingeschaltet: Alle Titel in diesem Ordner werden "track by track" abgespielt, bis die Funktion ausgeschaltet
wird.
20. POWER SWITCH Taste – Um den Spieler einzuschalten; halten Sie diese Taste länger als 3 Sekunden um auszuschalten.
21. PITCH SLIDER – Dieser Schieberegler wird verwendet um die Tonhöhe (Pitch) prozentual anzupassen. Die Einstellung wird in Kraft
bleiben, bis die Pitch-Funktion wird ausgeschaltet. Diese Einstellung kann mit oder ohne Audio-Quelle (USB 1 oder USB 2) in der
Spieler gemacht werden. Die Einstellung bleibt, auch wenn die Musikquelle (USB 1 oder USB 2) entfernt wird oder eine andere
Musikquelle an den Player angeschlossen wird. Die Höhe der Pitch (Tonhöhe), die angewandt wird, wird auf dem LCD angezeigt.
22. SEAMLESS LOOP (Schleife)
* IN –Taste –Diese Funktion ermöglicht es einen CUE PUNKT ein zu stellen. Hiermit können Sie auch den Start-punkt einer
"Seamless-Schleife" einstellen.
* OUT –Taste –
Um einen Endpunkt einer Schleife zu setzen. Ein Schleife-Startpunkt wird gesetzt mit der IN-Taste. Drücken Sie die
OUT-Taste, um einen Schleife End-Punkt zu setzen. Die Schleife wird so lange spielen, bis die OUT Taste erneut gedrückt wird.
* RELOOP TASTE – Wenn eine nahtlose Schleife gemacht wird, und die Schleife wird nicht abgespielt, wird Loop und Reloop auf dem
LCD-Display gezeigt, wenn die Reloop-Funktion zur Verfügung steht. Drücken Sie einfach die RELOOP Taste um den nahtlosen
LOOP-Modus zu aktivieren. Um aus der Schleife zu gehen, wird die OUT-Taste gedrückt.
- In Reloop, "LOOP" blinkt und "RELOOP"- leuchtet auf.
23. USB SELEKT Taste – Hiermit wechseln Sie zwischen USB Port 1 und 2. Die entsprechende LED leuchtet auf. Diese Funktion wirkt
nur im Pause-Modus.
24. SEARCH T asten – Schnellsuch-Funktion auch wenn der Spieler nicht in Play-Modus ist.
Page 21

25. TIME T aste – Um die abgelaufene und die verbleibende Zeit anzuzeigen.
26. AUDIO Ausgänge – Analoge Audio-Ausgänge um an ein Mischpult anzuschließen.
27. CONTROL START BUCHSE – Um anzuschließen an ein Mischpult mit Faderstart Funktion. Hier niemals
ein Netzteil anschließen!!
28. POWER CONNECTOR – Netzteil Anschluß
LCD DISPLAY
1. CUE ANZEIGE —Diese Anzeige leuchtet, wenn der Player im Cue-Modus ist und blinkt, wenn ein neuer Cue Punkt gesetzt ist.
2. FOLDER ANZEIGE —Dies zeigt die Nummer des aktuellen Ordners.
3. TIME BAR ANZEIGE —Um die abgelaufene und die verbleibende Zeit anzuzeigen im SETUP-Modus. Der Balken blinkt kurz vor
dem Ende der Titel als Erinnerung.
4. BPM STATUS —AUTO BPM zähler ist aktiv
5. BPM METER —Anzeige der BPM Werte der Titel.
6. PITCH METER —Prozentuale Anzeige der Tonhöhe (Pitch).
7. TEMPO LOCK —Tempo lock ist aktiv (lock symbol Anzeige)
8. LOOP ANZEIGE —Die Anzeige blinkt wenn die Schleife-Funktion aktiv ist.
9. RELOOP ANZEIGE —Anzeige ob eine Schleife gesetzt würde die mit der Reloop Funktion aktiv gemacht werden kann.
10. AUTO CUE STATUS —Anzeige ob Auto Cue aktiv ist.
11. TIME DISPLAY —Anzeige des Time Modus in Minuten, Sekunden und Frames.
12. ALPHANUMERISCHE DISPLAY —Anzeige des Names einer Titel, Ordner und Sampling Rate. Bei VBR aufgenomme MP3-
Tracks, ist die Anzeige "VBR". Alle interaktiven Informationen werden auch angezeigt.
13. TIME MODUS —Um die abgelaufene und die verbleibende Zeit anzuzeigen (“ELAPSED”) (TOTAL) (“REMAIN”).
14. REPEAT ANZEIGE —Anzeige ob der Spie ler in REPEAT Modus ist.
15. SINGLE ANZEIGE —Spieler ist in (“SINGLE”) oder CONTINU(ous) Modus.
16. TRACK ANZEIGE —Zeigt die aktuelle Titelnummer.
17. PLA Y/P AUSE ANZEIGE —Der Spieler ist im Play modus (: :) oder im Pause modus (“Ⅱ”).
BASIC BEDIENUNG
3. AUDIOQUELLE SELEKTIEREN
Mit der USB-SELECT-Taste wählen Sie die gewünschte Verbindung.
Wählen Sie:
(a) EIN USB STICK abspielen:
Um den gleichen USB-Stick in beiden Spieler A und Spieler B abzuspielen, stecken Sie den USB-Stick in den USB 1 oder USB 2Port. Drücken Sie die SELECT-Taste und USB1-LED leuchtet bei der Verwendung von USB-1 und LED 2 leuchtet bei Verwendung
von USB-2.
(b) 2 USB Sticks abspielen:
Stecken Sie beide Sticks und wählen Sie welche Spieler verwendet werden sollte.
Hinweis: Um einen USB-Stick zu entfernen, müssen Sie zuerst das abspielen des Spielers beenden .
4. Ein weiterer USB stick abspielen:
Dies sollte im Pause-Modus getan werden, drücken Sie die Taste SELECT um nach einem anderen USB-Port zu wechseln; im PlayModus funktioniert es nicht.
Page 22

3 TRACK-Taste Funktionen:
1. TITEL SUCHEN
Wenn die Ordnerliste LED ausgeschaltet ist, drehen Sie die TRACK-Taste nach links oder rechts, um rückwärts und vorwärts zu suchen.
Sie können 999 Titel in einem Ordner selektieren.
2. FOLDER/ORDNER SUCHEN
Wenn die Ordner/Folder- LED eingeschaltet ist, können Sie mittels die TRACK-Taste einen Ordner wählen . Sie können 999 Ordner
wählen.
* Durch Drehen der Track Select Taste können Sie Dateien und Verzeichnisse wählen.
3. INHALTSVERZEICHNIS EINES TRACKS
Sie können den Inhalt eines Ordners wie Name / Datei-Name / Titel finden.
NAME / Interpret / Genre / Bitrate kann durch Drücken der Taste TRACK eingesehen werden.
Hinweis: Jede Anzeige dauert 20 Sekunden und kehrt automatisch zurück nach "Titelname".
FRAME SUCHEN
Hiermit können Sie Frame für Frame durchsuchen um einen Start-Cue-oder Schleife-Punkt zu suchen. Diese Funktion ist nützlich im
Pause-oder Cue-Modus. Drehen Sie den JogRad im Pitch Modus, um durch die Titel zu scrollen. Bei Drehung des Rades blättern Sie
vorwärts oder rückwärts. Durch Drehung des JogRads ermöglicht die Monitor-Funktion es, zu hören was Sie tun. Wenn Sie den
gewünschten Startpunkt gefunden haben, können Sie einen Cue (Start) Punkt einstellen durch Drücken der PLAY / PAUSE Taste. Drücken
der CUE-Taste bringt Sie zurück zu dem Punkt der Sie gerade eingestellt haben.
Page 23

AUTO CUE
Halten Sie die SGL / CTN Taste länger als 1 Sekunde, um zwischen Normal- und "Auto Cue"-Modus zu wechseln. Diese Funktion stellt
automatisch einen Cue-Punkt ein an dem Punkt wo die erste Musiknote einer Titel klingt. Wenn eine neue Titel gewählt ist, wird ein neuer
Cue-Punkt eingestellt um einen neuen Startpunkt zu zeigen.
CUE-PUNKT EINSTELLUNG
(1) Ein Cue-Punkt ist ein präziser Punkt, wo das abspielen beginnt wenn die PLAY / PAUSE -Taste gedrückt wird. Dieser Punkt kann
irgendwo in einer Titel eingestellt werden. Drücken Sie die IN-Taste während der Wiedergabe. An diesem Punkt wird der Cue-Punkt
eingestellt während der Titel noch weiter abspielt wird. Wenn nun die CUE-Taste gedrückt wird, wird der Spieler zurück kehren zu dem
Punkt, wo Sie die Taste IN-Taste gedrückt haben und spielt den Track weiter ab. Beim erneut Drücken der CUE-Taste, wird der Spieler
zurückkehren zu dem Punkt der Sie gesetzt haben.
(2) Sie können auch mit dem JogRad einen Cue-Punkt setzten, wenn der Player im Pause-oder Cue-Modus und das JogRad im Pitch-Modus
ist. Drehen Sie das JogRad um durch eine Titel zu blättern und um den gewünschten Startpunkt zu finden. Wenn Sie den Punkt gefunden
haben drücken Sie die Play-Taste um Ihren Cue-Punkt einzustellen. Drücken Sie die Cue-Taste um auf diesem Cue-Punkt zurückzukehren.
SEAMLLESS LOOP (Nahtlose Schleife)
1. Erstellen und Abspielen einer nahtlosen Schleife
Eine nahtlose Schleife ist eine unendliche Schleife ohne Unterbrechung. Sie können diese Schleife erstellen für u.a. dramatische
Effekte in Ihrem Mix. Diese Schleife ist zeitlich nicht begrenzt.
Erklärung:
(1) Drücken Sie PLAY / PAUSE.
(2) Drücken Sie die IN-Taste. Hiermit stellen Sie den Startpunkt der SEAMLESS LOOP ein. Die LED der IN-Taste leuchtet.
(3) Drücken Sie die OUT-Taste, um den Endpunkt für Ihre SEAMLESS LOOP zu setzten. Die LEDs der IN-und OUT-Tasten blinken
schnell, was darauf hinweist, dass der SEAMLESS LOOP Modus aktiviert ist.
2. LOOP EINSTELLUNG
Um die SEAMLESS LOOP zu beenden drücken Sie die OUT-Taste. Die LEDs der IN-und OUT-Tasten leuchten, aber blinken nicht
mehr. Der Track wird jetzt im Normalen Wiedergabemodus abgespielt. Die LEDs der IN - und OUT-Tasten únd die RELOOP / LOOPAnzeige auf dem LCD leuchten um Sie daran zu erinnern, dass eine Schleife gespeichert ist.
3. WIEDERHOLUNG EINES LOOPS
Die Reloop-Funktion ermöglicht es Ihnen, so oft wie Sie wollen, um nach Ihrer gespeicherten Schleife zurückzukehren. Die LEDs in
der IN - OUT Taste zeigen, dass eine Schleife gespeichert ist und immer abgespielt werden kann. Um die Schleife zu wiederholen,
drücken Sie RELOOP. Die LEDs der IN - und OUT-Tasten fängen an erneut zu blinken, um anzuzeigen, dass die Seamless-LoopModus aktiviert ist und Ihre gespeicherte Schleife wird sofort wieder abgespielt.
- Wenn Sie den Encoder verwenden, um Titel veränderungen zu verfolgen , wird der voreingestellte Cue-und Loop-Speicher gelöscht
werden. Die CUE Einstellung mus erneut gesetzt werden.
- Wenn Sie warten bis das abspielen der Titel A beendet ist und das abspielen der Titel B beginnt, wird der bereits eingestellte CUE -
und LOOP Speicher behalten. Wenn Sie die CUE- oder RELOOP-Taste drücken, kehrt der Player zurück an die Cue-oder LoopEinstellung von Titel A. Allerdings, wenn Sie einen anderen Ordner abspielen, wird der voreingestellte Cue-und Loop-Speicher
gelöscht.
4. LOOP BEARBEITUNG
Sie können Ihre voreingestellte nahtlose Schleife irgendwo hinzufügen. Wenn Sie diese noch nicht gemacht haben, erstellen Sie die
zuerst, siehe Schritt 1.
Es gibt 3 Methoden :
(1) Seamless Loop End-Punkt erstellen
Sie können einen neuen Endpunkt einer Schleife erstellen um Die kürzer oder länger zu machen . Prüfen Sie zunächst, ob die Schleife sich
nicht in RELOOP-Modus befindet. Pausieren Sie in Pitch-Betriebsart, drehen Sie das JogRad um die Schleife kürzer / länger zu machen.
Drücken Sie die OUT Taste um einen neuen Endpunkt der Schleife zu machen, drücken Sie RELOOP um die Schleife zu aktivieren.
(2) Seamless Loop Start-Punkt erstellen
Sie können einen neuen Startpunkt einer Schleife erstellen um Die kürzer zu machen. Drehen Sie in RELOOP-Modus das JogRad im
Uhrzeigersinn in PITCH Modus um die Schleife kürzer zu machen. Beachten Sie, dass der Start-Punkt vor dem Endpunkt liegen muß.
Drücken Sie die IN-Taste, um den neuen Startpunkt Ihrer Schleife zu erstellen.
(3) Eine Schleife zurücksetzen
Sie können eine neue Schleife zurücksetzen in der Wiedergabe- oder Pause-Modus. Wenn Sie einen gewünschten Start-Punkt gefunden
haben drücken Sie die IN-Taste, die LED der OUT-Taste erlischt; Suchen Sie einen neuen Endpunkt und drücken Sie die OUT-Taste zur
Bestätigung und die Schleife ist erstellt.
Page 24

STOTTER-EFFEKT
Sie können die erstellte Schleife verwenden um einen Stotter Effekt zu erzeugen und diese Schleife kann gebraucht werden um Ihre
Leistung zu verbessern. Jedes Mal wenn Sie die RELOOP-Taste drücken, ob die Schleife abgespielt wird oder nicht, wird es erneut die
vorprogrammierte Schleife starten. Sie können die RELOOP-Taste wiederholt drücken um den Stottereffekt zu erstellen.
Außerdem kann den Stotter Effekt durch Drücken der CUE / Taste erstellt werden.
TAP BPM
AUTO BPM ist der Standardmodus, wenn der Strom eingeschaltet wird. Sie können auf Manuell / Auto BPM gehen, indem Sie auf "TAP
BPM" drücken .
Hinweis:
Wechseln Sie zu Manuell BPM durch Drücken der Taste.
Wechseln Sie zu Auto BPM indem Sie "TAP BPM" länger als 2 Sekunden halten. Das LCD zeigt "Auto BPM" .
Es gibt 2 Modi betr. BPM Counter/Zähler:
1. Manual BPM: auf Grund des Musik-Tempos drücken Sie die "TAP BPM" Taste um den BPM-Wert festzustellen.
2. Auto BPM: der BPM-Wert wird automatisch bestimmt ohne die "TAP BPM" Taste zu drücken.
SYSTEM SETTING
SETUP MODUS:
Halten Sie die TIME-Taste länger als 2 Sekunden, um in "System Einstellmodus" zu gelangen, "PRESET" wird gezeigt und die Setup LED
leuchtet.
Hinweis: Die System-Einstellung wird automatisch beendet, wenn 10 Sekunden lang keine Aktion durchgeführt wird.
Drehen Sie die TRACK-Taste um durch die verschiedenen Untermenüs zu blättern, halten Sie an das gewünschte Untermenü und drücken
Sie die TRACK-Taste.
Um die System-Einstellungen zu beenden, drehen Sie den TRACK-Knopf gegen den Uhrzeigersinn um das Untermenü einzustellen und
drücken Sie die TRACK-Taste.
Im SETUP-Modus können Sie blättern indem Sie den TRACK Knopf drehen, drücken Sie die TRACK-Taste um eine Einstellung ein oder
aus auszuschalten. Siehe unten für weitere Einzelheiten zu den Untermenüs:
PLAY MODUS: Mit Hilfe dieser Funktion können Sie aus Single-Track-Wiedergabe oder Kontinuierliche Wiedergabe wählen (alle
Tracks nacheinander).
- Standardmäßig wird der Spieler in CONTINU(OUS)-Modus abspielen.
AUTO CUE: Zeigt Auto-Cue EIN oder AUS an.
- Standardmäßig AUTO CUE=EIN (ON)
RELAY: Drucken Sie den TRACK Knopf um RELAY ein- oder auszuschalten.
RELAY: OFF-Die beiden Spieler sind automatisch in Continu(ous) Wiedergabe-Modus.
RELAY: ON- Die beiden Spieler sind automatisch in Single Wiedergabe-Modus.
- Standardmäßig ist RELAY OFF/(Aus).
Reset all: Diese Funktion wird alle vorprogrammierten Menüs zurücksetzen und das Gerät kehrt auf die Standardeinstellungen zurück
indem Sie die FOLDER-Taste drücken und "Reset OK" wird auf dem LCD angezeigt.
Page 25

TECHNISCHE DATEN
MODELL: Professionelle DUAL USB mit 9 Effekten
(Kompatibel mit USB mass storage Device 1.0/1.1/2.0)
ABMESSUNGEN: 482(W) x 132(D) x 71.6(H) mm
VERSORGUNG: DC 6V, 3A
ALLGEMEIN:
Display LCD
Pitch control +/-6%, +/-12%, +/-25%
Pitch Bend +/-6%, +/-12%, +/-25%
Pitch accuracy +/-0.15%
AUDIO CHARAKTERISTIK
(TEST SIGNAL FORMAT: MP3, 128K bps, load=100K ohm)
EINHEIT CHARAKTERISTIK
GRENZWERT KONDITION
(1) AUSGANGSPEGEL 1.4V +/-0.5dB 1.4V +/-1dB
1KHz, 0dB (TCD-782
TRK.2)
(2) KANALBALANCE: WITHIN 0.2dB WITHIN 1dB 1KHz, 0dB(TCD-782 TRK.2)
(3) FREQUENZ BEREICH
17-16KHz +/-0.3dB 17-16KHz +/-
1dB
0dB (TCD-781 TRK.1,4&16)
(4)
KANALTRENNUNG(*2) 92dB 85dB
1KHz 0dB(TCD-782 TRK.9,
11)
(5) THD+N (*1): 0.0065% 0.01% 1KHz 0dB(TCD-782 TRK.2)
(6) S/N (*2): 92dB 85dB
1KHz 0dB(TCD-782
TRK.2&8)
1. Mit 20KHz LOW PASS FILTER
2. Mit 20KHz LOW PASS FILTER, “IHF-A”
MP3 FORMAT
Anwendbare Dateiendungen mp3 MP3 mP3 Mp3
Max. Folder/Ordner 999
Format
Max. Dateien max. 999 files
MPEG 1 Layer 3 Standard (ISO/IEC
11172-3), für (‘mono’) und (‘stereo’)
coding sampling rates 32, 44. 1 und
48khz
32/40/48/56/80/96/112/128/160/192/
224/256/320kbps
Xing/VBRI VBR
MPEG 2 layer 3 Standard
(ISO/IEC13818-3), Codierung für
gleichwertige sampling rates16, 22.05
und 24 kHz.
32/40/48/56/64/80/96/112/144/160
Kbps
MP3
Format
MPEG 2.5 layer 3 Standard, bietet
Codierung für gleichwertige sampling
rates 8, 11.025 und 12 kHz.
32/40/48/56/64/80/96/112/144/160
Kbps
Tronios BV Registrierungsnummer : DE51181017 (ElektroG).
Dieses Produkt darf am Ende seiner Lebensdauer nicht über den normalen Haushaltsabfall entsorgt werden, sondern muss an
einem sammelpunkt für das Recycling abgegeben werden. Hiermit leisten Sie einen wichtigen Beitrag zum Schutze unserer Umwelt.
Die Spezifikationen sind typisch. Die Werte können leicht von einem Gerät zum anderen ändern. Spezifikationen können ohne vorherige
Ankündigung geändert werden.
Page 26

 Loading...