

Page 1
PDC-40 DAB+ Tuner / USB / Bluetooth
Ref. nr.: 172.707
INSTRUCTION MANUAL
GEBRUIKSAANWIJZING
BEDIENUNGSANLEITUNG
MANUAL DE INSTRUCCIONES
MANUEL D'INSTRUCTIONS
INSTRUKCJA OBSŁUGI
V1.0
Page 2
2
ENGLISH
Congratulations to the purchase of this Power Dynamics product. Please read this manual thoroughly prior to using the unit in
order to benefit fully from all features.
Read the manual prior to using the unit. Follow the instructions in order not to invalidate the warranty. Take all precautions to
avoid fire and/or electrical shock. Repairs must only be carried out by a qualified technician in order to avoid electrical shock.
Keep the manual for future reference.
- Prior to using the unit, please ask advice from a
specialist. When the unit is switched on for the first time,
some smell may occur. This is normal and will disappear
after a while.
- The unit contains voltage carrying parts. Therefore do
NOT open the housing.
- Do not place metal objects or pour liquids into the unit
This may cause electrical shock and malfunction.
- Do not place the unit near heat sources such as
radiators, etc. Do not place the unit on a vibrating
surface. Do not cover the ventilation holes.
- The unit is not suitable for continuous use.
- Be careful with the mains lead and do not damage it. A
faulty or damaged mains lead can cause electrical shock
and malfunction.
- When unplugging the unit from a mains outlet, always
pull the plug, never the lead.
- Do not plug or unplug the unit with wet hands.
- If the plug and/or the mains lead are damaged, they
need to be replaced by a qualified technician.
- If the unit is damaged to such an extent that internal
parts are visible, do NOT plug the unit into a mains outlet
and DO NOT switch the unit on. Contact your dealer.
- Do NOT connect the unit to a rheostat or dimmer.
- To avoid fire and shock hazard, do not expose the unit to
rain and moisture.
- All repairs should be carried out by a qualified technician
only.
- Connect the unit to an earthed mains outlet (220240Vac/50Hz) protected by a 10-16A fuse.
- During a thunderstorm or if the unit will not be used for a
longer period of time, unplug it from the mains. The rule
is: Unplug it from the mains when not in use.
- If the unit has not been used for a longer period of time,
condensation may occur. Let the unit reach room
temperature before you switch it on.
- Never use the unit in humid rooms or outdoors.
- To prevent accidents in companies, you must follow the
applicable guide lines and follow the instructions.
- Do not repeatedly switch the fixture on and off. This
shortens the life time.
- Keep the unit out of the reach of children. Do not leave
the unit unattended.
- Do not use cleaning sprays to clean switches. The
residues of these sprays cause deposits of dust and
grease. In case of malfunction, always seek advice from
a specialist.
- Do not force the controls.
- This unit is with speaker inside which can cause
magnetic field. Keep this unit at least 60cm away from
computer or TV.
- If this product have a built-in lead-acid rechargeable
battery. Please recharge the battery every 3 months if
you are not going to use the product for a long period of
time. Otherwise the battery may be permanently
damaged.
- If the battery is damaged please replace with same
specifications battery. And dispose the damaged battery
environment friendly.
- If the unit has fallen, always have it checked by a
qualified technician before you switch the unit on again.
- Do not use chemicals to clean the unit. They damage the
varnish. Only clean the unit with a dry cloth.
- Keep away from electronic equipment that may cause
interference.
- Only use original spares for repairs, otherwise serious
damage and/or dangerous radiation may occur.
- Switch the unit off prior to unplugging it from the mains
and/or other equipment. Unplug all leads and cables
prior to moving the unit.
- Make sure that the mains lead cannot be damaged when
people walk on it. Check the mains lead before every use
for damages and faults!
- The mains voltage is 220-240Vac/50Hz. Check if power
outlet match. If you travel, make sure that the mains
voltage of the country is suitable for this unit.
- Keep the original packing material so that you can
transport the unit in safe conditions.
This mark attracts the attention of the user to high voltages that are present inside the housing and that are of sufficient
magnitude to cause a shock hazard.
This mark attracts the attention of the user to important instructions that are contained in the manual and that he should
read and adhere to.
The unit has been certified CE. It is prohibited to make any changes to the unit. They would invalidate the CE certificate and
their guarantee!
NOTE: To make sure that the unit will function normally, it must be used in rooms with a temperature between 5°C/41°F and
35°C/95°F.
Electric products must not be put into household waste. Please bring them to a recycling centre. Ask your local authorities or your
dealer about the way to proceed. The specifications are typical. The actual values can slightly change from one unit to the other.
Specifications can be changed without prior notice.
Do not attempt to make any repairs yourself. This would invalid your warranty. Do not make any changes to the unit. This would also invalid
your warranty. The warranty is not applicable in case of accidents or damages caused by inappropriate use or disrespect of the warnings
contained in this manual. Power Dynamics cannot be held responsible for personal injuries caused by a disrespect of the safety
recommendations and warnings. This is also applicable to all damages in whatever form.
Page 3

3
UNPACKING INSTRUCTION
CAUTION! Immediately upon receiving the product, carefully unpack the carton, check the contents to ensure that all parts are
present, and have been received in good condition. Notify the shipper immediately and retain packing material for inspection if
any parts appear damage from shipping or the package itself shows signs of mishandling. Save the package and all packing
materials. In the event that the product must be returned to the factory, it is important that the product be returned in the original
factory box and packing.
If the device has been exposed to drastic temperature fluctuation (e.g. after transportation), do not switch it on immediately. The
arising condensation water might damage your device. Leave the device switched off until it has reached room temperature.
POWERSUPPLY
On the label on the backside of the product is indicated on this type of power supply must be connected. Check that the mains
voltage corresponds to this, all other voltages than specified, the light effect can be irreparably damaged. The product must also
be directly connected to the mains and may be used. No dimmer or adjustable power supply.
Always connect the device to a protected circuit (circuit breaker or fuse). Make sure the device has an appropriate
electrical ground to avoid the risk of electrocution or fire.
CONNECTING WITH BT-DEVICE
1. Activate the BT-function on your device (Mobile phone, tablet etc.) from which you want to play the
music. See the operating instructions for that device.
2. Press the “MODE” button and activate BT-function.
3. Select “PDC40” on your BT-device and make the BT-connection
If password is required, you can enter "0000".
Attention: The BT distance is approx. 10 meter without any barrier.
CONTROLS AND CONNECTIONS
Front View:
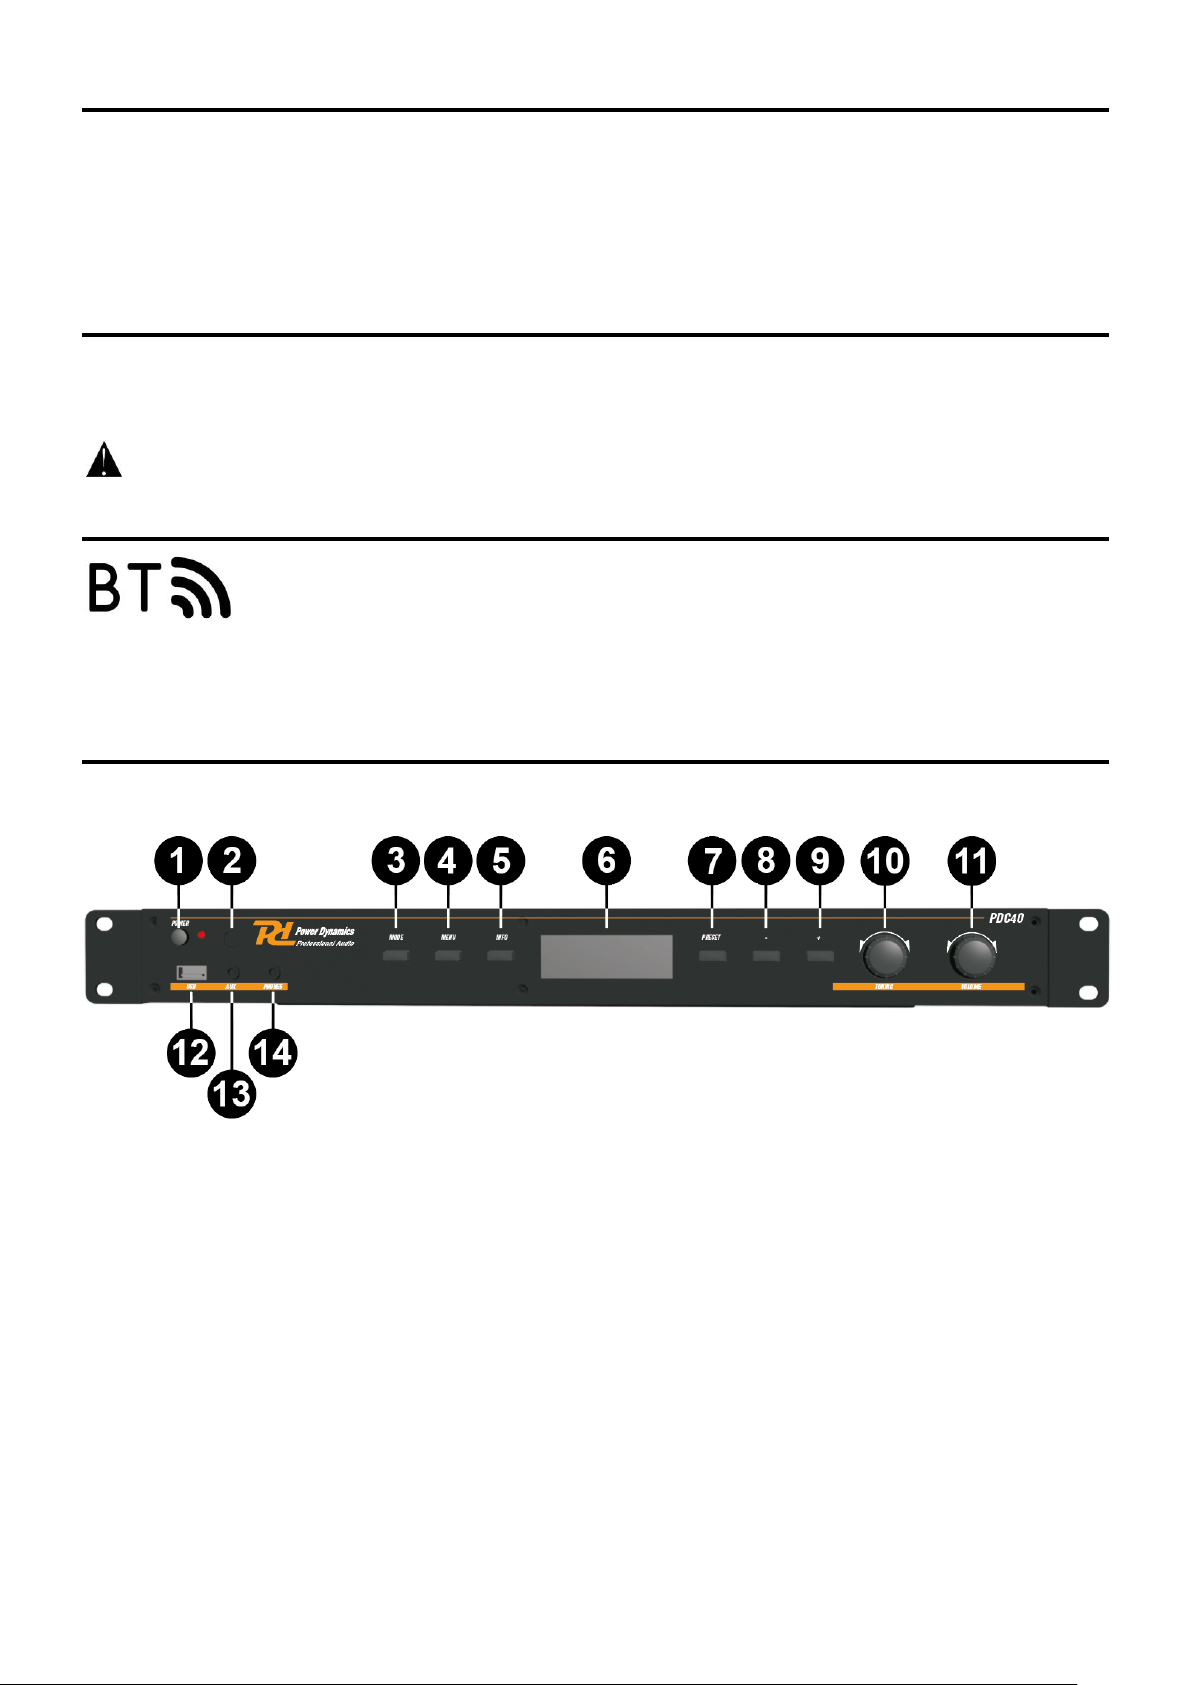
1. STAND-BY BUTTON
Use this switch to put the unit into or out of standby mode.
2. REMOTE SENSOR
This sensor receives the infrared information from the remote control. Don’t place any object or sticker in front of the sensor.
3. MODE BUTTON
Press to change modes between playing USB stick, auxiliary input, Bluetooth, DAB+ and FM.
4. MENU BUTTON
Press to enter FM / DAB+ menu mode. If the user does not select any item by pressing ENTER knob, it will return to FM /
DAB+ playing after several seconds.
FM menus consist of “Audio setting” and “System”.
“Audio setting”
a. Forced mono: As a stereo signal becomes weaker the audio signal will become poorer. It may be preferable to force the
radio to play the station in mono in order to reduce the level of audio noise.
b. Stereo allowed: “St” indicator on LCD display means that the current station is played as stereo.
Page 4

4
“System”
a. Time setup: There are 4 sub-items in time setup menu,
Set clock: While the digit flashing, use “-”,”+” or TUNING knob to set hour and minute. Press ENTER to confirm.
Set date: While the digit flashing, use “-”,”+” or TUNING knob to set date, day and year. Press ENTER to confirm.
Auto update: Press ENTER to update the firmware automatically.
Set 12/24 hours: enter to switch between the 12-hour and 24-hour formats.
b. Factory reset: If you select “Yes”, a full reset will be performed. The station list and presets will be erased.
c. SW version: If you select the item, it shows the software version for several seconds.
DAB+ menus consist of “Station scan” and “System”.
“Station scan”
a. Full scan: It scans all of the frequencies in BAND-III.
b. Manual tune: use “-”,”+” and “ENTER” button to select a frequency.
“System”
a. Time setup: There are 4 sub-items in time setup menu
Set clock: While the digit flashing, use “-”,”+” or TUNING knob to set hour and minute. Press ENTER to confirm.
Set date: While the digit flashing, use “-”,”+” or TUNING knob to set date, day and year. Press ENTER to confirm.
Auto update: Press ENTER to update the firmware automatically.
Set 12/24 hours: enter to switch between the 12-hour and 24-hour formats.
b. Factory reset: If you select “Yes”, a full reset will be performed. The station list and presets will be erased.
c. SW version: If you select the item, it shows the software version for several seconds.
5. INFO BUTTON
Switch to show different type of displaying information for the current playing channel.
FM mode
Radio text: It makes Radio text displayed on the LCD display.
Program type: It makes the program type of the current station/channel displayed on the LCD display.
Signal strength: It makes the signal strength of the current service displayed on the LCD display.
Time and Date: It makes the time and date information displayed on the LCD display.
DAB+ mode
DLS: It makes DLS text displayed on the LCD display.
Program type: It makes the program type of the current station/channel displayed on the LCD display.
Ensemble: It makes the current ensemble name displayed on the LCD display.
Time and Date: It makes the time and date information displayed on the LCD display.
Transfer rate: It makes the bit rate information displayed on the LCD display.
Signal strength: It makes the signal strength of the current service displayed on the LCD display.
6. LCD DISPLAY
This displays FM/DAB frequency station, menu, time / date and USB information etc.
7. PRESET BUTTON
During playing DAB or FM, press the PRESET button and navigate the preset number and hold and press ENTER knob until
the display shows “stored”. If you want to play a preset station/channel during playing DAB or FM press the PRESET button,
navigate through the preset numbers and press the ENTER knob to confirm choice. “P#” indicator in display means that the
preset number saved.
8. ‒ BUTTON
Press, during playing DAB or FM, to seek for a lower frequency by 50KHZ step or navigate previous item in the sub-menu or
move to previous station. During playing from USB stick, press and hold this button for fast backward searching, press once
to skip backwards. During playing Bluetooth, press to skip backwards.
9. + BUTTON
Press, during playing DAB or FM, to seek for a higher frequency by 50KHZ step or navigate next item in the sub-menu or
move to next station. During playing from USB stick, press and hold this button for fast forward searching, press once to
skip forwards. During playing Bluetooth, press to skip forwards.
10. TUNING / ENTER KNOB
Turn, during playing DAB or FM, to navigate to the previous or next service on the list. Press to select the displayed service
on the list. Hold and press to auto scan FM/DAB+ stations. During playing from USB stick, turn to go to the previous or next
track. Press to start and pause the playback. During playing Bluetooth, short press for pairing with the last paired device,
hold and press to disconnect the current device and enter pairing mode.
11. VOLUME KNOB
Use to adjust the sound level. Turn clockwise to raise the sound level, turn counter clockwise to reduce the sound level.
12. USB PORT
Supports playing USB flash drive up to 32GB, FAT16/32, USB versions: 1.0, 1.1, 2.0.
13. AUX PORT
Connect your music device to this socket by 3.5mm jack cable.
14. HEADPHONE JACK
Socket for connecting headphones.
Page 5
5
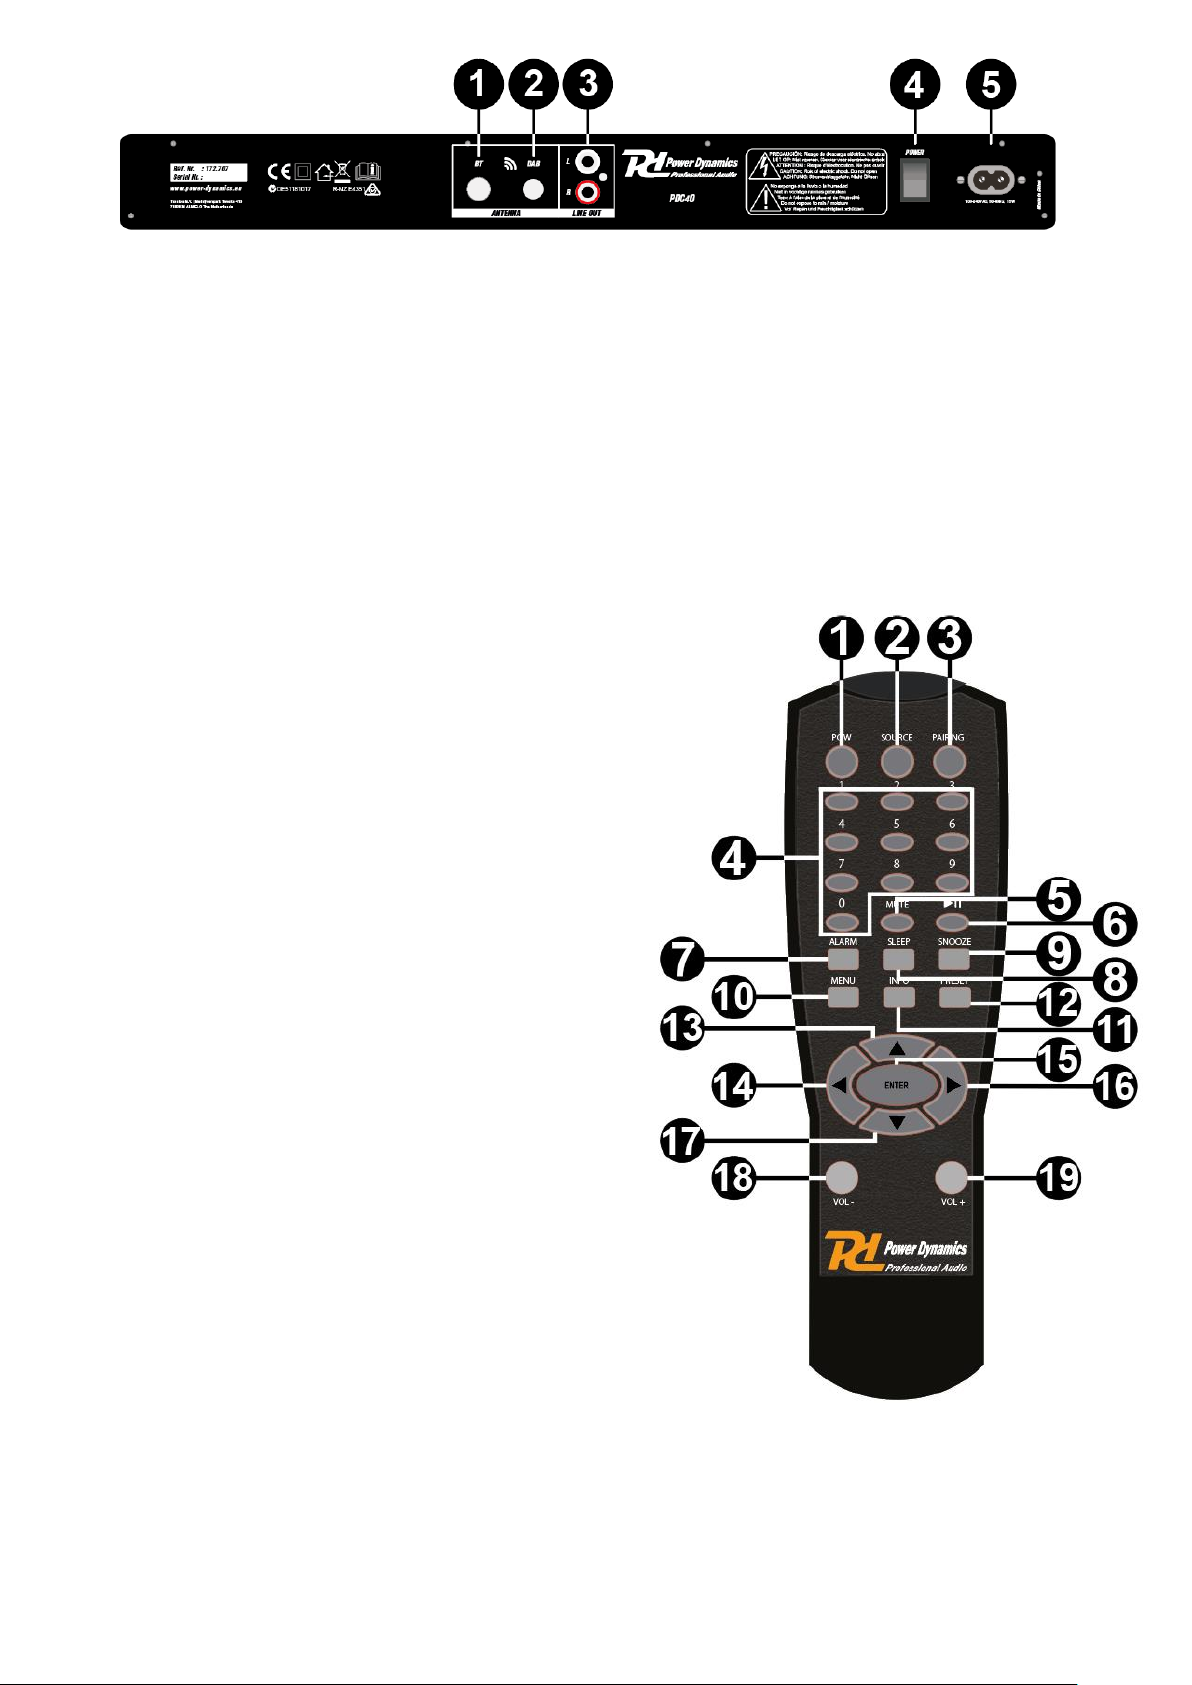
Rear View:
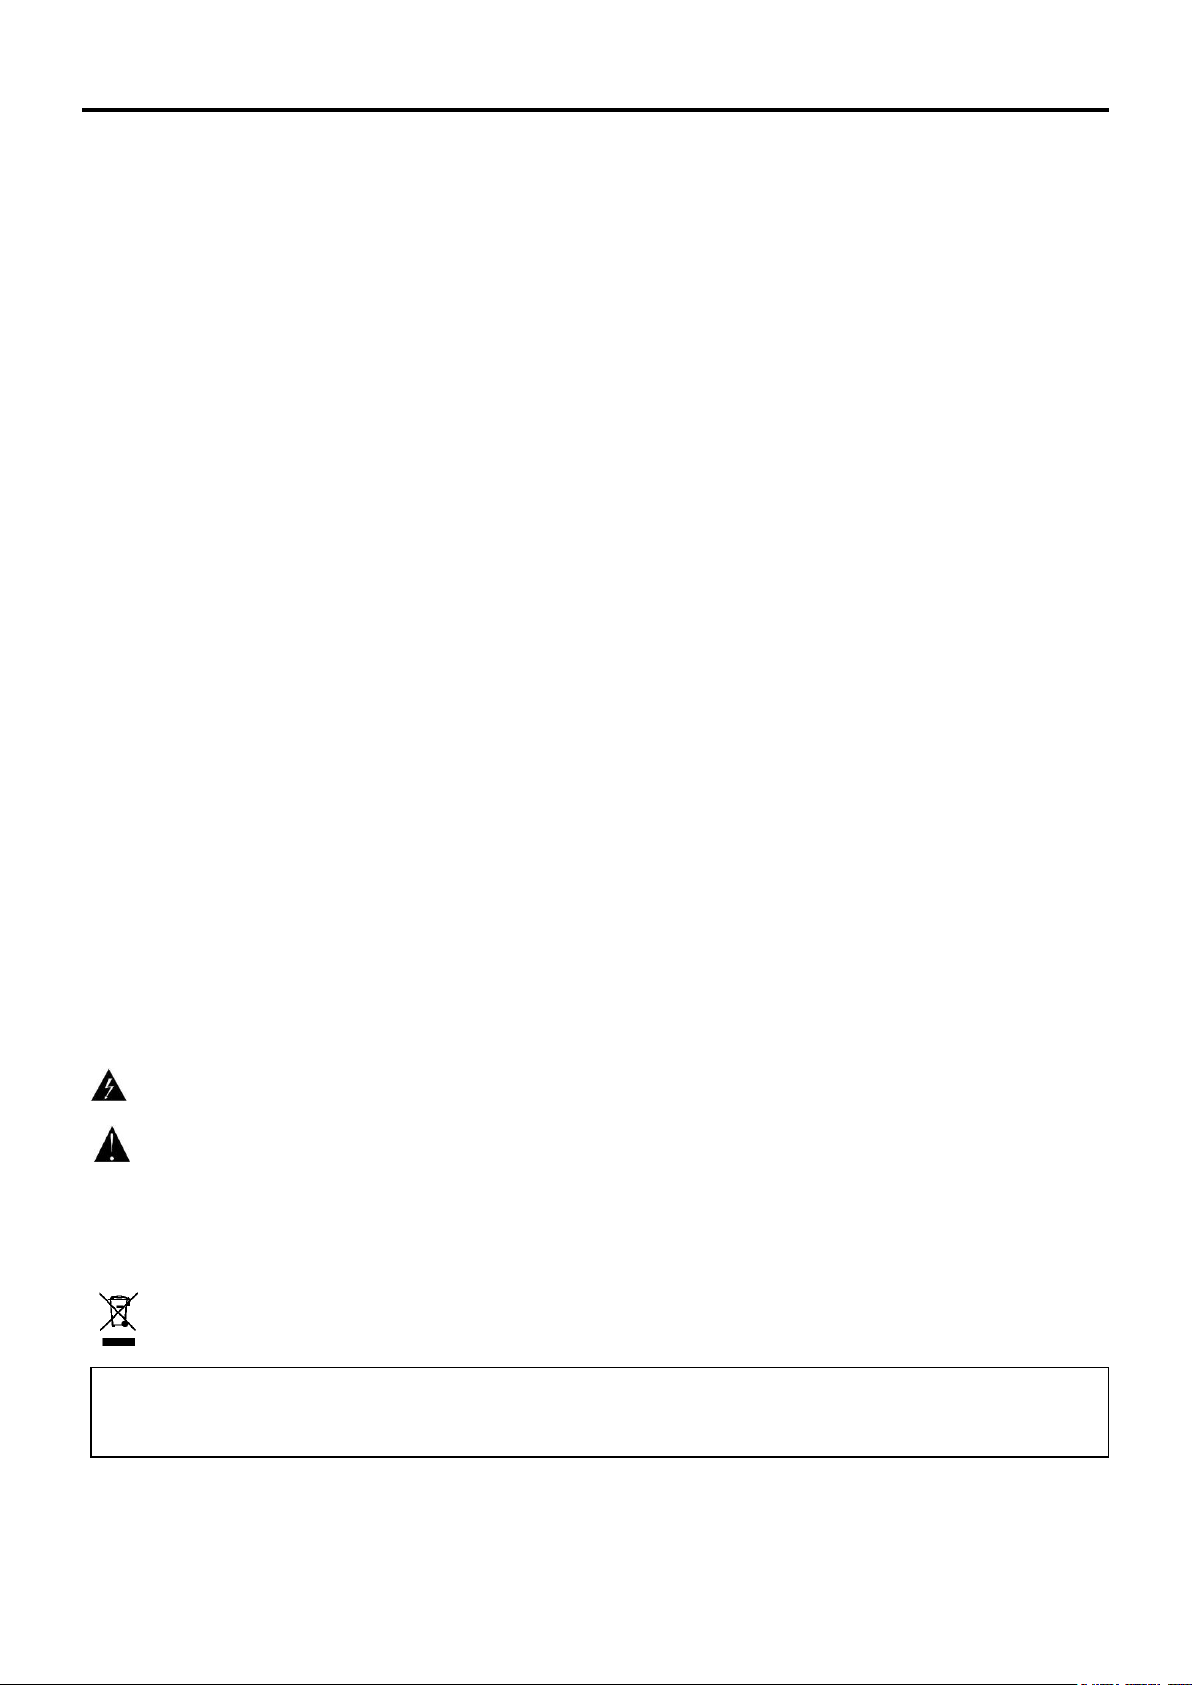
1. BLUETOOTH ANTENNA
Insert the supplied BT antenna in to this port.
2. FM/DAB+ ANTENNA
Insert the supplied radio antenna in to this port.
3. LINE OUT
Output terminal.
4. POWER SWITCH
Use this switch to turn the unit ON/OFF.
5. AC IN
Insert power cord to this port.
Remote control:
1. STAND-BY BUTTON
Use this switch to put the unit into or out of standby mode
2. SOURCE BUTTON
Press to switch input channel
3. PAIRING BUTTON
Press to make a Bluetooth connection with your BT-device possible
4. NUM PAD
Numeric keyboard for selecting presets
5. MUTE BUTTON
Press to mute the device
6. PLAY / PAUSE
Press this button to start or pause play
7. ALARM BUTTON
Press this button to set an alarm
8. SLEEP BUTTON
Press button to set a sleep timer
9. SNOOZE BUTTON
Press this button to set a snooze alarm interval
10. MENU BUTTON
Press this button to open the menu
11. INFO BUTTON
Button to show different type of displaying information for the
current playing activities
12. PRESET BUTTON
Press this button to save a channel/station (preset)
13. UP
Directional button up
14. LEFT
Directional button left
15. ENTER BUTTON
Press this button to confirm your inputs
16. RIGHT
Directional button right
17. DOWN
Directional button down
18. VOL –
Press to lower the sound level
19. VOL +
Press to raise the sound level
Page 6
6
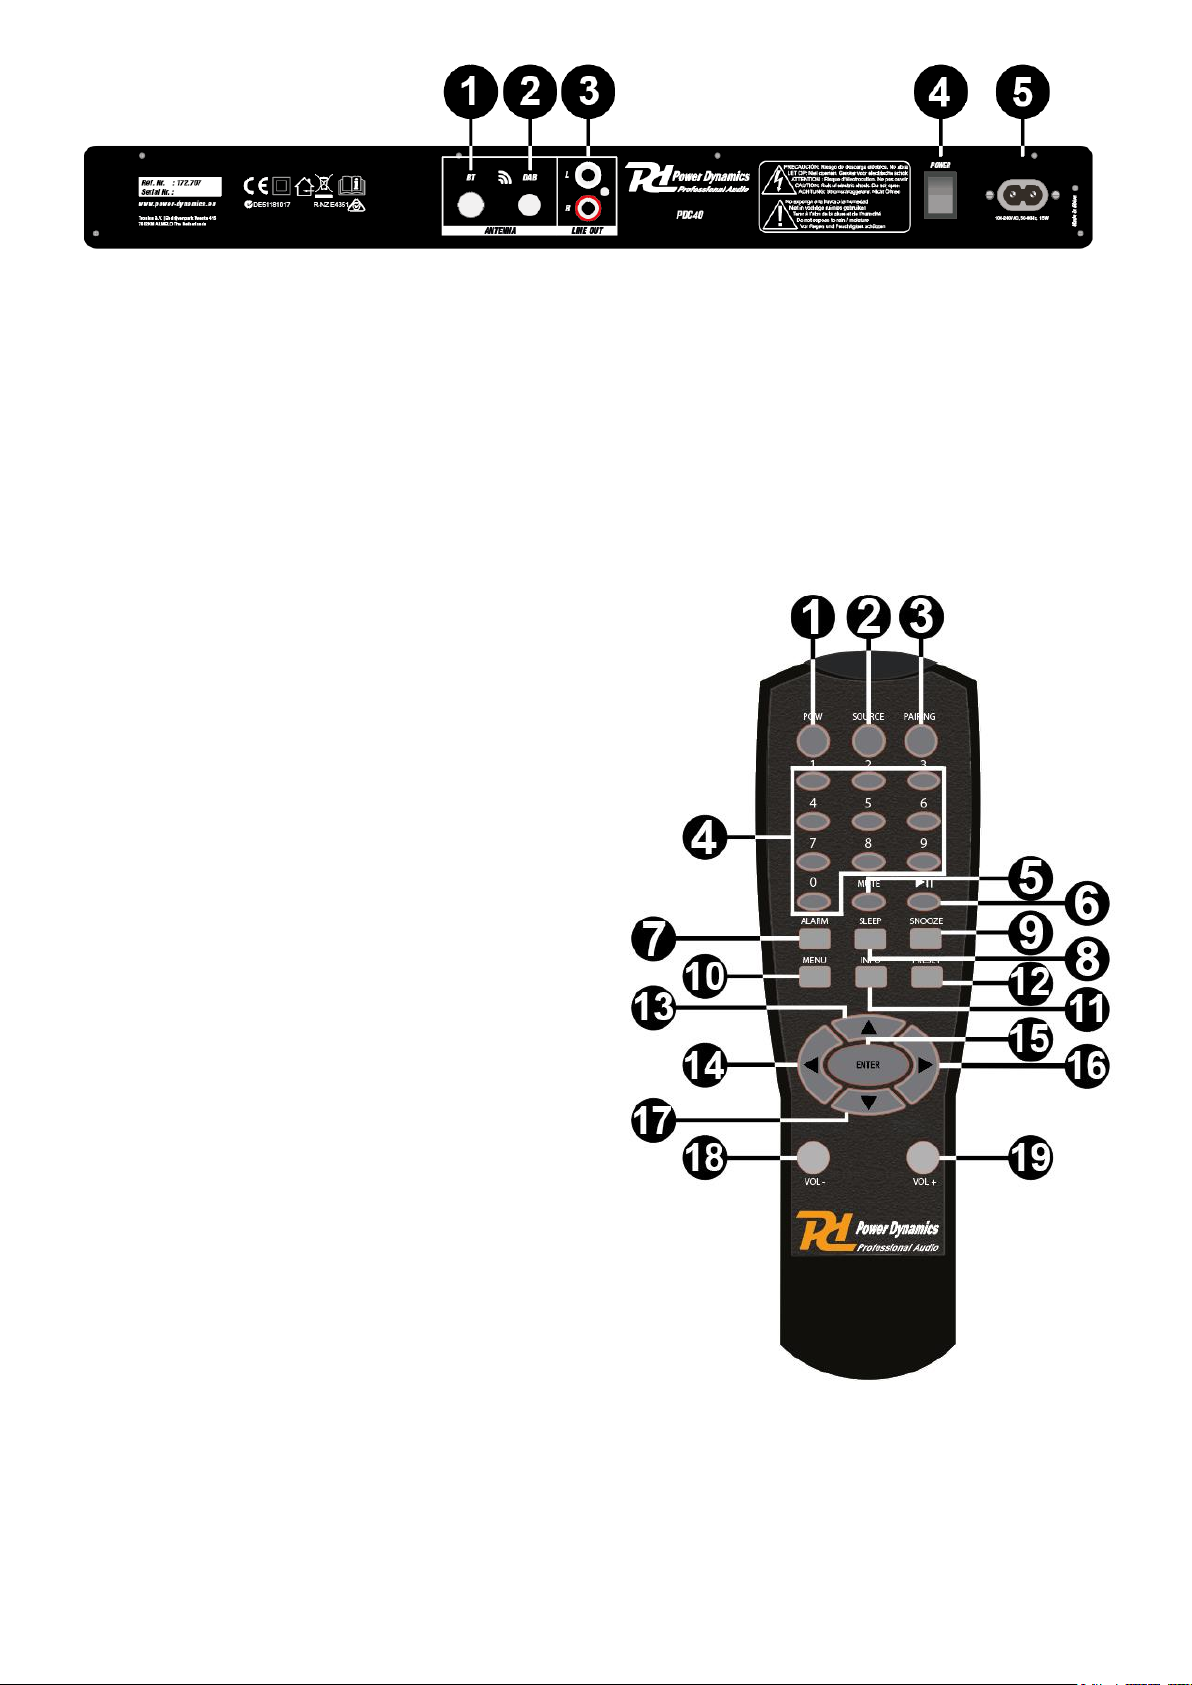
Instructions for remote control
1. Open the battery compartment.
2. Insert the batteries AAA(UM-4). Make sure to match + and – markings of the batteries to the marks in the battery
compartment.
3. Close the battery cover.
NOTE: Improper use of the batteries may cause battery leakage and corrosion. To operate the remote control correctly, follow
the instructions below:
• Do not insert batteries into the remote control in the wrong direction.
• Do not charge, heat, open or short-circuit batteries. Do not throw batteries into a fire.
• Do not leave dead or exhausted batteries in the remote control.
• Do not use different types of batteries together or mix old and new batteries.
• If you do not use the remote control for a long period of time, remove the batteries to avoid possible damage from
battery corrosion.
• If the remote control does not function correctly or the operating range becomes reduced, replace all batteries with new
ones.
• If battery leakage occurs, wipe the battery liquid from the battery compartment, then insert new batteries.
The batteries can be used for one year in normal condition.
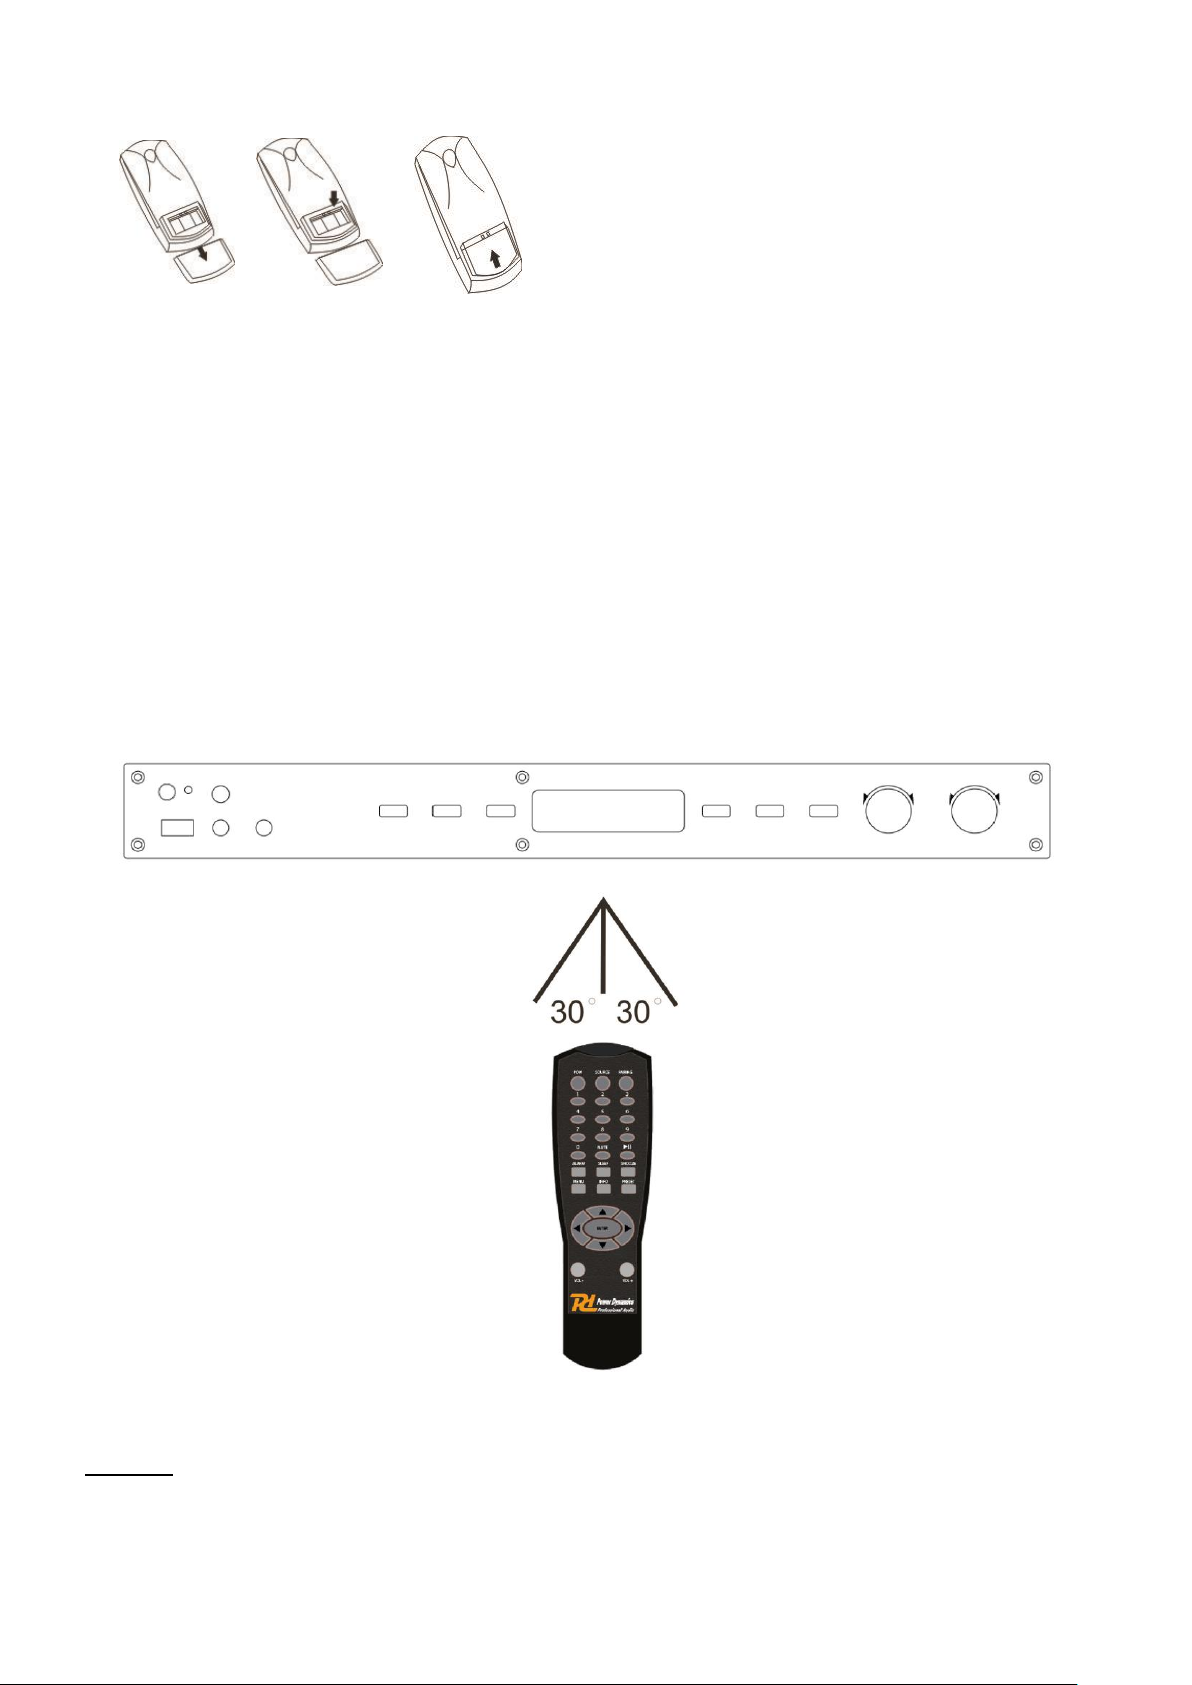
OPERATION OF THE REMOTE CONTROL
Distance: within 7m from the front of the remote control sensor.
Angle: within 300 each direction of the front of the remote sensor.
CAUTION:
● Do not drop or shock the remote control.
● Do not put heavy objects on top of the remote control.
● Do not spill water or other liquids on the remote control.
● Do not open the remote control.
1 2 3
Page 7
7
NEDERLANDS
Hartelijk dank voor de aanschaf van dit Power Dynamics product. Neemt U a.u.b. een paar momenten de tijd om deze
handleiding zorgvuldig te lezen, aangezien wij graag willen dat u onze producten snel en volledig gebruikt.
Lees deze handleiding eerst door alvorens het product te gebruiken. Volg de instructies op anders zou de garantie wel eens
kunnen vervallen. Neem ook altijd alle veiligheidsmaatregelen om brand en/of een elektrische schok te voorkomen. Tevens is
het ook raadzaam om reparaties / modificaties e.d. over te laten aan gekwalificeerd personeel om een elektrische schok te
voorkomen. Bewaar deze handleiding ook voor toekomstig gebruik.
- Bewaar de verpakking zodat u indien het apparaat defect is,
dit in de originele verpakking kunt opsturen om
beschadigingen te voorkomen.
- Voordat het apparaat in werking wordt gesteld, altijd eerst
een deskundige raadplegen. Bij het voor de eerste keer
inschakelen kan een bepaalde reuk optreden. Dit is normaal
en verdwijnt na een poos.
- In het apparaat bevinden zich onder spanning staande
onderdelen; open daarom NOOIT dit apparaat.
- Plaats geen metalen objecten en mors geen vloeistof in het
effect. Dit kan leiden tot elektrische schokken of defecten.
- Toestel niet opstellen in de buurt van warmtebronnen zoals
radiatoren etc. en niet op een vibrerende onder- grond
plaatsen. Dek ventilatieopeningen nooit af.
- Het apparaat is niet geschikt voor continu gebruik.
- Wees voorzichtig met het netsnoer en beschadig deze niet.
Als het snoer kapot of beschadigd is, kan dit leiden tot
elektrische schokken of defecten.
- Als u de stekker uit het stopcontact neemt, trek dan niet aan
het snoer, maar aan de stekker.
- Om brand of elektrische schok te voorkomen, dient u dit
apparaat niet bloot te stellen aan regen of vocht.
- Verwijder of plaats een stekker nooit met natte handen resp.
uit en in het stopcontact.
- Indien zowel de stekker en/of netsnoer als snoeringang in het
apparaat beschadigd zijn dient dit door een vakman hersteld
te worden.
- Indien het apparaat zo beschadigd is dat inwendige
(onder)delen zichtbaar zijn mag de stekker NOOIT in het
stopcontact worden geplaatst en het apparaat NOOIT
worden ingeschakeld. Neem in dit geval contact op met de
dealer.
- Sluit het apparaat nooit op een dimmer aan.
- Reparatie aan het apparaat dient te geschieden door een
vakman of een deskundige.
- Sluit het apparaat alleen aan op een 220-240VAC / 50Hz
(geaard) stopcontact, verbonden met een 10-16A
meterkastgroep.
- Bij onweer altijd de stekker uit het stopcontact halen, zo ook
wanneer het apparaat voor een langere tijd niet gebruikt
wordt. Stelregel: Bij geen gebruik stekker verwijderen.
- Als u het apparaat lang niet gebruikt heeft en het weer wil
gebruiken kan er condens ontstaan; laat het apparaat eerst
op kamertemperatuur komen alvorens het weer in werking
te stellen.
- Apparaat nooit in vochtige ruimten en buiten gebruiken.
- Om ongevallen in bedrijven te voorkomen moet rekening
worden gehouden met de daarvoor geldende richtlijnen en
moeten de aanwijzingen/waarschuwingen worden gevolgd.
- Het apparaat buiten bereik van kinderen houden.
Bovendien mag het apparaat nooit onbeheerd gelaten
worden.
- Gebruik geen schoonmaakspray om de schakelaars te
reinigen. Restanten van deze spray zorgen ervoor dat
smeer en stof ophopen. Raadpleeg bij storing te allen tijde
een deskundige.
- Gebruik geen overmatige kracht bij het bedienen van het
apparaat.
- Dit apparaat kan magnetisch veld veroorzaken. Houd dit
apparaat ten minste 60 cm afstand van de computer of tv.
- Indien dit apparaat beschikt over een loodaccu, dient deze
tenminste elke 3 maanden opgeladen te worden indien
deze voor een langere periode niet wordt gebruikt anders
bestaat de kans dat de accu permanent beschadigd.
- Bij een ongeval met dit product altijd eerst een deskundige raadplegen alvorens opnieuw te gebruiken.
- Tracht het apparaat niet schoon te maken met chemische
oplossingen. Dit kan de lak beschadigen. Gebruik een
droge doek om schoon te maken.
- Blijf uit de buurt van elektronische apparatuur die
bromstoringen zouden kunnen veroorzaken.
- Bij reparatie dienen altijd originele onderdelen te worden
gebruikt om onherstelbare beschadigingen en/of
ontoelaatbare straling te voorkomen.
- Schakel eerst het toestel uit voordat u het netsnoer
verwijdert. Verwijder netsnoer en aansluitsnoeren voordat u
dit product gaat verplaatsen.
- Zorg ervoor dat het netsnoer niet beschadigd/defect kan
raken wanneer mensen erover heen lopen. Het netsnoer
vóór ieder gebruik controleren op breuken/defecten!
- In Nederland/België is de netspanning 220-240Vac/50Hz.
Indien u reist (en u neemt het apparaat mee) informeer dan
naar de netspanning in het land waar u verblijft.
Deze markering wordt weergegeven om u erop attent te maken dat een levensgevaarlijke spanning in het product
aanwezig is en dat bij aanraking van deze delen een elektrische schok wordt verkregen.
Deze markering wordt weergegeven om u erop te wijzen dat de instructie zeer belangrijk is om te lezen en/of op te
volgen.
OPMERKING: Om zeker te zijn van een correcte werking, dient u dit apparaat in een ruimte te gebruiken waar de temperatuur
tussen de 5°C/41°F en 35°C/95°F ligt.
Raadpleeg eventueel www.wecycle.nl en/of www.vrom.nl v.w.b. het afdanken van elektronische apparaten in het kader van de
WEEE-regeling. Vele artikelen kunnen worden gerecycled, gooi ze daarom niet bij het huisvuil maar lever ze in bij een gemeentelijk
depot of uw dealer. Lever ook afgedankte batterijen in bij uw gemeentelijk depot of bij de dealer, zie www.stibat.nl
Alle (defecte) artikelen dienen gedurende de garantieperiode altijd retour te worden gezonden in de originele verpakking. Voer zelf geen
reparaties uit aan het toestel; in élk geval vervalt de totale garantie. Ook mag het toestel niet eigenmachtig worden gemodificeerd, ook in dit
geval vervalt de totale garantie. Ook vervalt de garantie bij ongevallen en beschadigingen in élke vorm t.g.v. onoordeelkundig gebruik en
het niet in achtnemen van het gestelde in deze gebruiksaanwijzing. Tevens aanvaardt Power Dynamics geen enkele aansprakelijkheid in
geval van persoonlijke ongelukken als gevolg van het niet naleven van veiligheidsinstructies en waarschuwingen . Dit geldt ook voor
gevolgschade in wélke vorm dan ook.
Page 8
8
UITPAKKEN
LET OP! Onmiddellijk na ontvangst, zorgvuldig uitpakken van de doos, controleer de inhoud om ervoor te zorgen dat alle
onderdelen aanwezig zijn en zijn in goede staat zijn ontvangen. Bij transportschade of ontbreken van onderdelen onmiddellijk
de verkopende partij inlichten. Bewaar de verpakking en het verpakkingsmateriaal. Indien het product moet worden
teruggestuurd, is het belangrijk dat het product in originele verpakking wordt geretourneerd.
Als het apparaat is blootgesteld aan drastische temperatuurverschillen (bv. na het transport), schakel het apparaat niet
onmiddellijk in. De ontstane condensatie kan het apparaat beschadigen. Zorg ervoor dat het apparaat op kamertemperatuur
komt en steek vervolgens de voeding stekker in het stopcontact/wandcontactdoos.
AANSLUITSPANNING
Op het label aan de achterzijde van het product staat aangegeven op welke netspanning deze moet worden aangesloten.
Controleer of de netspanning hiermee overeenkomt, bij alle andere netspanningen dan aangegeven kan het apparaat
onherstelbaar worden beschadigd. Tevens moet het apparaat direct op de netspanning worden aangesloten en mag géén
dimmer of regelbare voeding worden gebruikt.
Sluit het apparaat altijd aan op een beschermd circuit (aardlekschakelaar of zekering). Zorg ervoor dat het apparaat
voldoende elektrisch is geaard om het risico op elektrocutie of brand te vermijden.
AANSLUITEN OP BT
1. Activeer de BT-functie op uw apparaat (Mobiele telefoon, tablet etc.) waarvan u muziek wilt
afspelen. Zie de gebruiksaanwijzing van dat apparaat.
2. Druk op de “MODE”-toets en activeer de BT-functie.
3. Selecteer “PDC40” op uw BT-apparaat en maak de verbinding.
Indien er om een wachtwoord wordt gevraagd, voer "0000" in.
Opmerking: De BT heeft een bereik van ongeveer 10 meter zonder enkele barrière.
BEDIENELEMENTEN EN AANSLUITINGEN
Voorzijde:
1. STAND-BY SCHAKELAAR
Gebruik deze schakelaar om het apparaat in stand-by-modus te zetten of uit stand-by-modus te halen.
2. AFSTANDSBEDIENINGSENSOR
Deze sensor ontvangt de infrarood informatie van de afstandsbediening. Plaats geen voorwerpen of stickers voor de sensor.
3. MODE TOETS
Druk om te wisselen tussen het afspelen van USB, aux., Bluetooth, DAB+ en FM.
4. MENU TOETS
Druk op deze toets om het FM/DAB+ menu te betreden. Uw keuze dient, doormiddel van het drukken op de ENTER knop,
bevestigd te worden.
FM-menu's bestaan uit "Audio-instelling" en "Systeem".
"Audio-instelling”
a. Forced mono: Naarmate een stereosignaal zwakker wordt, wordt het audiosignaal slechter. Het verdient wellicht de
voorkeur om de radio te dwingen de zender in mono af te spelen om het niveau van de geluidsruis te verminderen.
b. Stereo toegestaan: "St" op het display betekent dat de huidige zenders als stereo worden afgespeeld.
Page 9

9
"Systeem”
a. Tijdinstelling. Er zijn 4 subitems in het menu Tijdinstelling:
Stel de klok in terwijl het cijfer knippert, gebruik "-", "+" of de TUNING knop om de uren en minuten in te stellen: druk op
ENTER om te bevestigen. Datum instellen: Terwijl het cijfer knippert, gebruikt u de knop "-", "+" of TUNING om datum, dag
en jaar in te stellen en drukt u op ENTER om te bevestigen.
Auto update: Druk op ENTER om de firmware automatisch bij te werken.
12/24 uur instellen: druk op ENTER om te schakelen tussen de 12-uurs- en 24-uursnotaties.
b. Fabrieksreset: Als u "Ja" selecteert, wordt een volledige reset uitgevoerd. De zenderlijst en presets worden gewist.
c. SW-versie: Als u het item selecteert, wordt de softwareversie gedurende enkele seconden weergegeven.
DAB+ menu's bestaan uit "Station scan" en "System".
"Station scan"
a. Volledige scan: Het scant alle frequenties in BAND-III.
b. Handmatig afstemmen: gebruik de knoppen "-", "+" en "ENTER" om een frequentie te selecteren.
"Systeem”
a. Tijdinstelling. Er zijn 4 subitems in het menu Tijdinstelling:
Stel de klok in terwijl het cijfer knippert, gebruik "-", "+" of TUNING knop om de uren en minuten in te stellen, druk op ENTER
om te bevestigen. Datum instellen: Terwijl het cijfer knippert, gebruikt u de knop "-", "+" of TUNING om datum, dag en jaar in
te stellen en drukt u op ENTER om te bevestigen.
Auto update: Druk op ENTER om de firmware automatisch bij te werken.
12/24 uur instellen: druk op ENTER om te schakelen tussen de 12-uurs- en 24-uursnotaties.
b. Fabrieksreset: Als u "Ja" selecteert, wordt een volledige reset uitgevoerd. De zenderlijst en presets worden gewist.
c. SW-versie: Als u het item selecteert, wordt de softwareversie gedurende enkele seconden weergegeven.
5. INFO KNOP
Functieknop om verschillende soorten informatie weer te geven voor de huidige afspeelzender.
FM-modus
Radio text: Geeft radiotekst weer op het LCD display.
Programma type: Geeft op het LCD display het programmatype weer van het huidige station.
Signaalsterkte: Geeft op het LCD display de signaalsterkte van de huidige dienst weer.
Tijd en datum: Maakt de tijd en datum zichtbaar op het LCD display.
DAB+-modus
DLS: Geeft DLS tekst weer op het LCD display.
Overdrachtssnelheid: Geeft bitsnelheidsinformatie weer op het LCD display
Programma type: Geeft op het LCD display het programmatype weer van het huidige station.
Signaalsterkte: Geeft op het LCD display de signaalsterkte van de huidige dienst weer.
Tijd en datum: Maakt de tijd en datum zichtbaar op het LCD display.
6. LCD WEERGAVE
Hierop worden FM / DAB+ frequentie, station, menu, tijd / datum en USB informatie e.d. weergegeven.
7. PRESET TOETS
Druk tijdens het afspelen van DAB of FM op de PRESET-knop, navigeer vervolgens door het preselectienummer en houd
de ENTER-knop ingedrukt totdat op het display "stored" verschijnt. Als u een preselectienummer wilt afspelen tijdens het
afspelen van DAB of FM drukt u op de PRESET-knop, navigeer dan door de opgeslagen nummers en bevestig door op de
ENTER-knop te drukken. "P#" geeft in het display het gekozen nummer weer.
8. ‒ TOETS
Druk tijdens het afspelen van DAB of FM op deze toets om naar lagere frequenties te zoeken met 50KHZ frequentiestap,
navigeer naar het vorige item in het submenu of ga naar het vorige station. Het tijdens het afspelen vanaf een USB-stick
ingedrukt houden van deze knop laat het apparaat snel terugspoelen. Een enkele druk op deze toets zorgt ervoor dat u een
nummer terug gaat. Tijdens het afspelen vanaf een Bluetooth-apparaat, dient deze toets alleen om een nummer terug te
gaan.
9. + TOETS
Druk tijdens het afspelen van DAB of FM op deze toets om naar hogere frequenties te zoeken met 50KHZ frequentiestap,
navigeer naar het volgende item in het submenu of ga naar het volgende station. Het tijdens het afspelen vanaf een USBstick ingedrukt houden van deze knop laat het apparaat vooruitspoelen. Een enkele druk op deze toets zorgt ervoor dat u
naar het volgende nummer gaat. Tijdens het afspelen vanaf een Bluetooth-apparaat, dient deze toets alleen om het
volgende nummer te kiezen.
10. TUNING / ENTER KNOP
Draai tijdens het afspelen van DAB of FM om naar de vorige of volgende service in de lijst te gaan. Druk hierop om de
weergegeven service te selecteren op de lijst. Ingedrukt houden om automatisch FM/DAB+ zenders te zoeken. Tijdens het
afspelen vanaf een USB-stick kunt u naar het vorige of volgende nummer gaan. Kortstondig drukken om het afspelen te
starten en te pauzeren. Druk tijdens het afspelen van Bluetooth kortstondig op deze knop om te koppelen met het laatst
gekoppelde apparaat, ingedrukt houden om het huidige apparaat los te koppelen en naar de koppelingsmodus te gaan.
11. VOLUME KNOP
Hiermee kunt u het geluidsniveau aanpassen. Draai met de klok mee om het geluidsniveau te verhogen, draai tegen de klok
in om het geluidsniveau te verlagen.
12. USB POORT
Ondersteunt het afspelen van USB-opslagapparaten tot 32GB, FAT16/32, USB-versies: 1.0, 1.1, 2.0.
13. AUX INGANG
Koppel uw afspeelapparaat aan deze ingang via een 3.5mm jack kabel.
14. AANSLUITING HOOFDTELEFOON
Sluit hier uw hoofdtelefoon aan.
Page 10
10
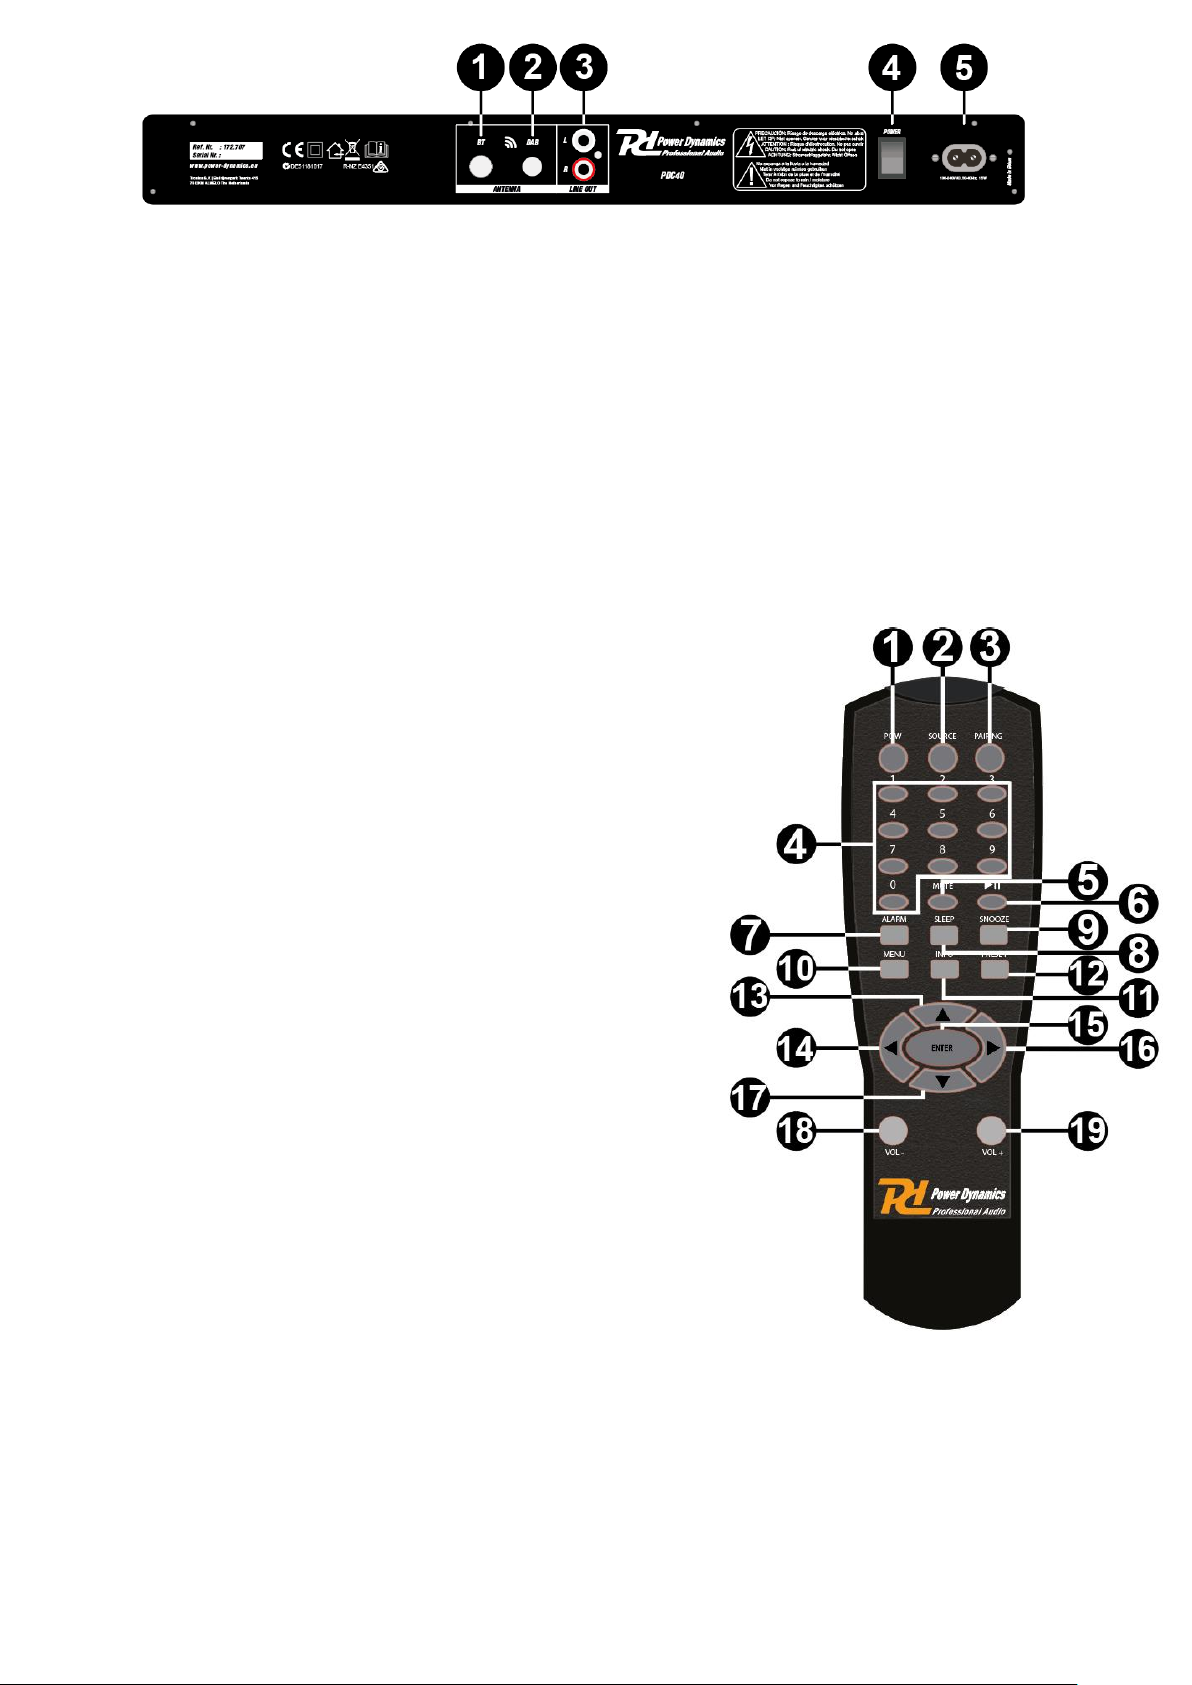
Achterzijde:
1. BLUETOOTH ANTENNE
Plaats de meegeleverde BT antenne in deze poort.
2. FM/DAB+ ANTENNE
Plaats de meegeleverde radio antenne in deze poort.
3. LIJN UITGANG
Uitgangsaansluiting.
4. NETSCHAKELAAR
Gebruik deze schakelaar om het apparaat aan en uit te zetten.
5. NETENTREE
Sluit hier het geleverde netsnoer aan.
Afstandsbediening:
1. STAND-BY KNOP
Gebruik deze schakelaar om het apparaat in stand-by-modus te zetten
of uit stand-by-modus te halen
2. SOURCE KNOP
Druk op deze knop om van ingangskanaal te wisselen
3. PAIRING KNOP
Druk hierop om een Bluetooth-verbinding met uw BT-apparaat mogelijk te maken
4. NUMERIEKE TOETSEN
Numeriek toetsenbord voor het selecteren van presets
5. MUTE KNOP
Druk op deze knop om het geluidsniveau tot 0-niveau te dempen
6. PLAY / PAUSE
Druk op deze knop om het afspelen te starten of te pauzeren
7. ALARM KNOP
Druk op deze knop om een alarm in te stellen
8. SLEEP KNOP
Druk op de knop om een slaaptimer in te stellen
9. SNOOZE KNOP
Druk op deze knop om een snooze-alarminterval in te stellen
10. MENU KNOP
Druk op deze knop om het menu te openen
11. INFO KNOP
Knop om verschillende soorten informatie weer te geven
van de huidige afspeelactiviteiten
12. PRESET KNOP
Druk op deze knop om een kanaal/station op te slaan (preset)
13. BOVEN
Richtingsknop omhoog
14. LINKS
Richtingsknop naar links
15. ENTER KNOP
Druk op deze knop om uw invoer te bevestigen
16. RECHTS
Richtingsknop naar rechts
17. ONDER
Richtingsknop omlaag
18. VOL –
Druk hierop om het geluidsniveau te verlagen
19. VOL +
Druk hierop om het geluidsniveau te verhogen
Page 11

11
Instructies voor de afstandsbediening
1. Open het batterijvak.
2. Plaats de batterijen AAA(UM-4), zorg ervoor dat de + en – polen van de batterijen overkomen met de markeringen in het
batterijvak.
3. Sluit het batterijvak door het klepje terug te plaatsen.
LET OP: Onjuist gebruik van de batterijen kan leiden tot batterijlekkage en corrosie. Om de afstandsbediening correct te
bedienen, volgt u de onderstaande instructies:
• Plaats de batterijen niet in de verkeerde richting in de afstandsbediening.
• Batterijen niet opladen, verwarmen, openen of kortsluiten. Gooi de batterijen niet in een vuur.
• Laat geen lege batterijen in de afstandsbediening achter.
• Gebruik geen verschillende soorten batterijen en combineer geen oude en nieuwe batterijen.
• Als u de afstandsbediening gedurende langere tijd niet gebruikt, verwijder de batterijen dan om mogelijke schade door
batterijcorrosie te voorkomen.
• Als de afstandsbediening niet goed werkt of als het werkbereik kleiner wordt, vervang dan alle batterijen door nieuwe.
Als de batterij lekt, veeg dan de batterijvloeistof uit het batterijvak en plaats vervolgens nieuwe batterijen.
De batterijen gaan bij normaal gebruik een jaar mee.
GEBRUIK VAN DE AFSTANDSBEDIENING
Afstand: binnen 7m van de voorkant van de infraroodsensor.
Hoek: binnen 300 in elke richting van de voorkant van de infraroodsensor.
LET OP:
● Laat de afstandsbediening niet vallen en houdt de afstandsbediening schokvrij.
● Plaats geen zware voorwerpen op de afstandsbediening.
● Mors geen water of andere vloeistoffen op de afstandsbediening.
● Open de afstandsbediening niet.
1 2 3
Page 12

12
DEUTSCH
Vielen Dank für den Kauf dieses Power Dynamics gerat. Nehmen Sie sich einen Augenblick Zeit, um diese Anleitung sorgfältig
durchzulesen, damit sie die Möglichkeiten, die unser Produkt bietet, sofort voll ausnutzen können.
Lesen Sie erst die Anleitung vollständig vor der ersten Inbetriebnahme durch. Befolgen Sie die Anweisung, da sonst jeglicher
Garantieanspruch verfällt. Treffen Sie stets alle Sicherheits-vorkehrungen um Feuer und/oder Stromschlag zu vermeiden.
Reparaturen dürfen nur von qualifiziertem Fachpersonal ausgeführt werden, um Stromschlag zu vermeiden. Bewahren Sie
diese Anleitung für spätere Bezugnahme auf.
- Bewahren Sie die Verpackung auf, um das Gerät im
Bedarfsfall sicher transportieren zu können.
- Bevor das Gerät in Betrieb genommen wird, muss es erst
von einem Fachmann überprüft werden. Bei der ersten
Benutzung kann etwas Geruch auftreten. Das ist normal und
verschwindet nach einer Weile
- Das Gerät enthält unter Spannung stehende Teile. Daher
NIEMALS das Gehäuse öffnen.
- Keine Metallgegenstände oder Flüssigkeiten ins Gerät
dringen lassen. Sie können zu Stromschlag und Defekten
führen.
- Gerät nicht in der Nähe von Wärmequellen wie Heizkörpern
aufstellen. Nicht auf eine vibrierende Oberfläche stellen.
Niemals die Belüftungsschlitze abdecken.
- Das Gerät ist nicht für Dauerbetrieb geeignet.
- Gehen Sie vorsichtig mit dem Netzkabel um und
beschädigen Sie es nicht. Eine beschädigte Netzschnur kann
zu Stromschlag und Defekten führen.
- Wenn Sie das Gerät vom Netz trennen, immer am Stecker
ziehen, niemals an der Schnur.
- Um Feuer und Stromschlag zu vermeiden, das Gerät vor
Regen und Feuchtigkeit schützen.
- Den Stecker nie mit nassen Händen in eine Netzsteckdose
stecken oder abziehen.
- Wenn sowohl der Stecker und/oder die Netzschnur bzw. der
Kabeleintritt ins Gerät beschädigt sind, müssen sie von
einem Fachmann repariert werden.
- Wenn das Gerät so beschädigt ist, dass Innenteile sichtbar
sind, darf der Stecker NICHT in eine Steckdose gesteckt
werden und das Gerät darf NICHT eingeschaltet werden.
Wenden Sie sich in dem Fall an Ihren Fachhändler.
- Das Gerät darf nicht an einen Dimmer angeschlossen
werden.
- Reparaturen dürfen nur von einem Fachmann oder
Sachverständigen ausgeführt werden.
- Das Gerät nur an eine geerdete 10-16A Netzsteckdose mit
220-240V AC/50Hz Spannung anschließen.
- Bei Gewitter oder längerem Nichtgebrauch den Netzstecker
abziehen. Die Regel gilt: Bei Nichtgebrauch Netzstecker
abziehen.
- Wenn das Gerät längere Zeit nicht benutzt wurde, kann sich
Kondenswasser gebildet haben. Lassen Sie das Gerät erst
auf Zimmertemperatur kommen, bevor Sie es einschalten.
- Das Gerät nicht in feuchten Räumen oder im Freien
benutzen.
- Um Unfällen in der Öffentlichkeit vorzubeugen, müssen die
geltenden Richtlinien beachtet und die
Anweisungen/Warnungen befolgt werden.
- Niemals das Gerät kurz hintereinander ein- und
ausschalten. Dadurch verkürzt sich die Lebensdauer
erheblich.
- Das Gerät außerhalb der Reichweite von Kindern halten.
Das Gerät niemals unbeaufsichtigt lassen.
- Die Regler nicht mit Reinigungssprays reinigen. Diese
hinterlassen Rückstände, die zu Staub- und
Fettansammlungen führen. Bei Störungen immer einen
Fachmann um Rat fragen.
- Das Gerät nur mit sauberen Händen bedienen.
- Das Gerät nicht mit Gewalt bedienen.
- Wenn dieses Gerät eine Blei-Säure-Batterie hat, soll dies
jede 3 Monate zumindest wieder aufgeladen werden, wenn
es nicht für eine längere Zeit nicht benutzt wird, sonst ist es
möglich, dass die Batterie dauerhaft beschädigt.
- Nach einem Unfall mit dem Gerät immer erst einen
Fachmann um Rat fragen, bevor Sie es wieder einschalten.
- Keine chemischen Reinigungsmittel benutzen, die den
Lack beschädigen. Das Gerät nur mit einem trockenen
Tuch abwischen.
- Nicht in der Nähe von elektronischen Geräten benutzen,
die Brummstörungen verursachen können.
- Bei Reparaturen nur die Original-Ersatzteile verwenden,
um starke Schäden und/oder gefährliche Strahlungen zu
vermeiden.
- Bevor Sie das Netz- und/oder Anschlusskabel abziehen,
erst das Gerät ausschalten. Netz- und Anschlusskabel
abziehen, bevor Sie das Gerät umstellen.
- Sorgen Sie dafür, dass das Netzkabel nicht beschädigt
werden kann, wenn Menschen darüber laufen. Das
Netzkabel vor jedem Einsatz auf Brüche/Schadstellen
überprüfen.
- In Deutschland beträgt die Netzspannung 220-240V AC /
50Hz. Wenn Sie das Gerät auf Reisen mitnehmen, prüfen
Sie, ob die örtliche Netzspannung den Anforderungen des
Geräts entspricht.
Dieses Zeichen weist den Benutzer darauf hin, dass lebensgefährliche Spannungen im Gerät anliegen, die bei
Berührung einen Stromschlag verursachen.
Dieses Zeichen lenkt die Aufmerksamkeit des Benutzers auf wichtige Hinweise in der Anleitung hin, die unbedingt
eingehalten werden müssen.
HINWEIS: Um einen einwandfreien Betrieb zu gewährleisten, muss die Raumtemperatur zwischen 5° und 35°C.
liegen.
Tronios BV Registrierungsnummer : DE51181017 (ElektroG).
Dieses Produkt darf am Ende seiner Lebensdauer nicht über den normalen Haushaltsabfall entsorgt werden, sondern muss an einem
Sammelpunkt für das Recycling abgegeben werden. Hiermit leisten Sie einen wichtigen Beitrag zum Schutze unserer Umwelt.
Tronios BV Registrierungsnummer : 21003000 (BatterieG).
Lithiumbatterien und Akkupacks sollten nur im entladenen Zustand in die Altbatteriesammelgefäße bei Handel und bei öffentlich-rechtlichen
Entsorgungsträgern gegeben werden. Bei nicht vollständig entladenen Batterien Vorsorge gegen Kurzschlüß treffen durch Isolieren der Pole mit
Klebestreifen. Der Endnutzer ist zur Rückgabe von Altbatterien gesetzlich verpflichtet.
Reparieren Sie das Gerät niemals selbst und nehmen Sie niemals eigenmächtig Veränderungen am Gerät vor. Sie verlieren dadurch den
Garantieanspruch. Der Garantieanspruch verfällt ebenfalls bei Unfällen und Schäden in jeglicher Form, die durch unsachgemäßen
Gebrauch und Nichtbeachtung der Warnungen und Sicherheitshinweise in dieser Anleitung entstanden sind. Power Dynamics ist in
keinem Fall verantwortlich für persönliche Schäden in Folge von Nichtbeachtung der Sicherheitsvorschriften und Warnungen. Dies gilt
auch für Folgeschäden jeglicher Form.
Page 13

13
AUSPACKEN
Packen Sie das Gerät sofort nach Empfang aus und prüfen Sie den Inhalt. Wenn Teile fehlen oder beschädigt sind,
benachrichtigen Sie sofort den Spediteur und bewahren Sie die Verpackung auf. Falls ein Gerät ins Werk zurückgeschickt
werden muss, ist es wichtig, dass es in der Originalverpackung versandt wird.
Das Gerät darf nicht in Betrieb genommen werden, nachdem es von einem kalten in einen warmen Raum gebracht wurde. Das
dabei entstehende Kondenswasser kann unter Umständen Ihr Gerät zerstören. Lassen Sie das Gerät solange ausgeschaltet,
bis es Zimmertemperatur erreicht hat!
NETZANSCHLUSS
Die benötigte Versorgungsspannung steht auf dem Typenschild auf der Rückseite des Geräts. Die angegebenen Stromwerte
entsprechen einem Durchschnittswert bei normalem Betrieb. Alle Geräte müssen direkt ans Netz angeschlossen werden und
dürfen nicht über Dimmerpacks geschaltet werden. Bevor Sie eine Spannung anlegen, prüfen Sie, ob der Wert der zulässigen
Spannung entspricht.
Verbinden Sie immer das Gerät an einem geschützten Schaltkreis (Leistungsschalter oder Sicherung). Stellen Sie sicher,
das Gerät ist elektrisch geerdet, um das Risiko eines Stromschlags oder Feuer zu vermeiden.
ANSCHLUSS AN BT
1. Aktivieren Sie die BT-Funktion auf Ihrem Gerät (Mobiltelefon, Tablet etc.), die Sie abspielen
möchten. Siehe Bedienungsanleitung für dieses Gerät.
2. Drücken Sie die Taste "MODE" und aktivieren Sie die BT-Funktion.
3. Suchen Sie auf Ihrem BT-Gerät nach "PDC40" und stellen Sie die Verbindung her.
Wenn Sie nach einem Passwort gefragt werden, geben Sie "0000" ein.
Hinweis: Das BT hat eine Reichweite von etwa 10 Metern ohne jede Barriere.
ÜBERBLICK
Vorderseite:
1. STAND-BY SCHALTER
Verwenden Sie diesen Schalter, um das Gerät in oder aus dem Standby-Modus zu schalten.
2. FERN SENSOR
Dieser Sensor empfängt die Infrarot-Informationen von der Fernbedienung. Platzieren Sie keinen Objekt oder Aufkleber vor
dem Sensor.
3. MODE TASTE
Drücken Sie diese Taste, um zwischen USB, Aux, Bluetooth, DAB+ und FM-Wiedergabe umzuschalten.
4. MENU TASTE
Drücken Sie diese Taste um den FM/DAB+ -Menümodus zu betreten. Wenn der Benutzer kein Objekt auswählt (durch
Drücken der ENTER Taste), kehrt das Gerät nach einigen Sekunden zur Wiedergabe von FM/DAB+ zurück.
FM Menüs bestehen aus “Audio setting” und “System”.
“Audio setting”
a. Forced mono: Wenn ein Stereosignal schwächer wird, wird das Audiosignal schlechter. Es kann sinnvoll sein das Radio
zu zwingen, den Sender in Mono wiederzugeben um den Pegel des Audio-Rauschens zu reduzieren.
b. Stereo allowed: Die Anzeige "St" im Display bedeutet, dass der aktuelle Sender als Stereoanlage wiedergegeben wird.
"System”
a. Zeiteinstellung: Es gibt 4 Unterpunkte im Zeit-Setup-Menü:
Uhr einstellen: Während die Ziffer blinkt, verwenden Sie den "-", "+" oder TUNING-Knopf um Stunden und Minuten
einzustellen. Drücken Sie zur Bestätigung auf ENTER.
Datum einstellen: Während die Ziffer blinkt, verwenden Sie "-", "+" oder den TUNING-Knopf um Datum, Tag und Jahr
einzustellen. Drücken Sie zur Bestätigung auf ENTER.
Automatisches Update: Drücken Sie ENTER, um die Firmware automatisch zu aktualisieren.
Page 14

14
12/24 Stunden einstellen: betreten um zwischen dem 12-Stunden- und dem 24-Stunden-Format zu wechseln.
b. Werkseinstellung: Wenn Sie den Punkt "Ja" auswählen, wird ein vollständiger reset durchgeführt. Die Senderliste und die
Voreinstellungen werden gelöscht.
c. SW Version: Wenn Sie das Element auswählen, wird die Softwareversion für einige Sekunden angezeigt.
DAB+ Menüs bestehen aus “Station scan” und “System”.
“Station scan”
a. Vollständiger Scan: Es scannt alle Frequenzen in BAND-III.
b. Manuelle Einstellung: Verwenden Sie die Tasten "-", "+" und "ENTER", um eine Frequenz auszuwählen.
“System”
a. Zeiteinstellung: Es gibt 4 Unterpunkte im Zeit-Setup-Menü:
Uhr einstellen: Während die Ziffer blinkt, verwenden Sie den "-", "+" oder TUNING-Knopf um Stunden und Minuten
einzustellen. Drücken Sie zur Bestätigung auf ENTER.
Datum einstellen: Während die Ziffer blinkt, verwenden Sie "-", "+" oder den TUNING-Knopf um Datum, Tag und Jahr
einzustellen. Drücken Sie zur Bestätigung auf ENTER.
Automatisches Update: Drücken Sie ENTER, um die Firmware automatisch zu aktualisieren.
12/24 Stunden einstellen: betreten um zwischen dem 12-Stunden- und dem 24-Stunden-Format zu wechseln.
b. Werkseinstellung: Wenn Sie den Punkt "Ja" auswählen, wird ein vollständiger reset durchgeführt. Die Senderliste und die
Voreinstellungen werden gelöscht.
c. SW Version: Wenn Sie das Element auswählen, wird die Softwareversion für einige Sekunden angezeigt.
5. INFO TASTE
Taste um verschiedene Arten von Anzeigeinformationen für die aktuelle Abspielstation anzuzeigen.
FM Modus
Radiotext: Zeigt den Radiotext im LCD-Display an.
Programmtyp: Zeigt den Programmtyp des aktuellen Senders auf der LCD-Anzeige an.
Signalstärke: Zeigt die Signalstärke des aktuellen Dienstes auf der LCD-Anzeige an.
Uhrzeit und Datum: Macht die Uhrzeit und das Datum auf dem LCD-Display sichtbar.
DAB+ Modus
DLS: DLS: Zeigt DLS-Text auf der LCD-Anzeige an.
Übertragungsrate: Zeigt Bitrateninformationen auf dem LCD-Display an.
Programmtyp: Zeigt den Programmtyp des aktuellen Senders auf der LCD-Anzeige an.
Signalstärke: Zeigt die Signalstärke des aktuellen Dienstes auf der LCD-Anzeige an.
Uhrzeit und Datum: Macht die Uhrzeit und das Datum auf dem LCD-Display sichtbar.
6. LCD ANZEIGE
Hier werden FM / DAB+ Frequenz, Sender, Menü, Uhrzeit / Datum und USB-Informationen usw. angezeigt.
7. PRESET TASTE
Drücken Sie während das Abspielen von DAB oder FM die PRESET-Taste, navigieren Sie dann durch die Preset-Nummer
und halten Sie die ENTER Taste gedrückt bis auf dem Display "stored" erscheint. Wenn Sie einen Preset-Sender während
der Wiedergabe von DAB oder FM Abspielen möchten, drücken Sie die PRESET-Taste, navigieren Sie dann die PresetNummer und drücken Sie die ENTER-Taste. "P#" bedeutet im Display, dass die Presetnummer gespeichert ist.
8. ‒ TASTE
Drücken Sie während der DAB- oder FM-Wiedergabe, um nach niedrigeren Frequenzen mit 50 kHz Frequenzschritt zu
suchen, navigieren Sie zum vorherigen Punkt im Untermenü oder gehen Sie zum vorherigen Sender. Wenn Sie diese Taste
während der Wiedergabe von einem USB-Speicherstick gedrückt halten, kann das Gerät schnell zurückspulen. Ein einziger
Druck auf diese Taste bringt Sie zu einen Track zurück. Während der Wiedergabe von einem Bluetooth-Gerät wird diese
Taste nur verwendet, um einen Track zurückzugehen.
9. + TASTE
Drücken Sie während der DAB- oder FM-Wiedergabe diese Taste, um nach höheren Frequenzen mit 50 kHz
Frequenzschritt zu suchen, zum nächsten Punkt im Untermenü zu navigieren oder zum nächsten Sender zu springen. Wenn
Sie diese Taste während der Wiedergabe eines USB-Sticks gedrückt halten, wird schnell vorwärts gespult. Ein einziger
Druck auf diese Taste führt Sie zur nächsten Track. Während der Wiedergabe von einem Bluetooth-Gerät wird diese Taste
nur verwendet, um den nächsten Track auszuwählen.
10. TUNING / ENTER DREHKNOPF
Drehen Sie dieser Knopf während der DAB- oder FM-Wiedergabe, um zum vorherigen oder nächsten Dienst in der Liste zu
springen. Drücken Sie diese Taste, um den angezeigten Dienst aus der Liste auszuwählen. Halten Sie diese Taste
gedrückt, um automatisch nach FM/DAB+ Sendern zu suchen. Während der Wiedergabe von einem USB-Stick können Sie
zum vorherigen oder nächsten Track springen. Drücken Sie kurz, um die Wiedergabe zu starten und zu unterbrechen.
Halten Sie diese Taste während der Bluetooth-Wiedergabe kurz gedrückt, um sich mit dem zuletzt gekoppelten Gerät zu
verbinden, um die Verbindung zum aktuellen Gerät zu trennen und in den Kopplungsmodus zu wechseln.
11. LAUTSTÄRKEREGLER
Ermöglicht es Ihnen den Schallpegel einzustellen. Drehen im Uhrzeigersinn zur Erhöhung des Schallpegels, Drehen gegen
den Uhrzeigersinn zur Verringerung des Schallpegels.
12. USB-ANSCHLUSS
Ermöglicht die Wiedergabe von USB-Speichermedien bis zu 32 GB, FAT16/32, USB-Versionen: 1.0, 1.1, 2.0.
13. AUX EINGANG
Verbinden Sie Ihr Wiedergabegerät über ein 3,5-mm-kabel mit diesem Eingang.
14. KOPFHÖRER_ANSCHLUSS
Schließen Sie Ihre Kopfhörer hier an.
Page 15
15
RÜCKSEITE:
1. BLUETOOTH-ANTENNE
Stecken Sie die mitgelieferte BT-Antenne in diesen Anschluss.
2. FM/DAB+ ANTENNE
Stecken Sie die mitgelieferte Funkantenne in diesen Anschluss.
3. LINIENAUSGANG
Ausgangsterminal.
4. POWER SCHALTER
Drücken Sie den Netzschalter, um das Gerät einzuschalten. Um die Stromversorgung auszuschalten, drücken Sie den
Netzschalter erneut.
5. AC IN
Stecken Sie das mitgelieferte Netzkabel in diesen Anschluss.
Funktionen der Fernbedienung:
1. STAND-BY TASTE
Verwenden Sie diesen Schalter, um das Gerät in oder aus dem
Standby-Modus zu schalten
2. SOURCE TASTE
Drücken Sie diese Taste, um den Eingangskanal zu ändern
3. PAIRING TASTE
Drücken Sie diese Taste um die Bluetooth-Verbindung zu Ihrem BT-Gerät zu ermöglichen
4. NUMERISCHE TASTEN
Numerische Tastatur zur Auswahl von Presets
5. MUTE TASTE
Drücken Sie diese Taste, um den Schallpegel auf 0 Pegel zu reduzieren
6. PLAY / PAUSE
Drücken Sie diese Taste, um die Wiedergabe zu starten oder zu
unterbrechen
7. ALARM TASTE
Drücken Sie diese Taste, um einen Alarm einzustellen
8. SLEEP TASTE
Drücken Sie diese Taste um einen Sleep-Timer einzustellen
9. SNOOZE TASTE
Drücken Sie diese Taste um ein Schlummeralarmintervall einzustellen
10. MENU TASTE
Drücken Sie diese Taste um in das Menü zu wechseln
11. INFO TASTE
Taste zum Anzeigen Arten von Informationen der aktuellen Wiedergabeaktivitäten
12. PRESET TASTE
Drücken Sie diese Taste, um einen Kanal/Sender zu speichern (preset)
13. OBEN
Richtungstaste nach oben
14. LINKS
Richtungstaste nach links
15. ENTER TASTE
Drücken Sie diese Taste, um Ihre Eingabe zu bestätigen
16. RECHTS
Richtungstaste nach rechts
17. ONDER
Richtungstaste nach unten
18. VOL –
Drücken Sie diese Taste um den Schallpegel zu verringern
19. VOL +
Drücken Sie diese Taste um den Schallpegel zu erhöhen
Page 16

16
Anleitung für die Fernbedienung
1. Öffnen Sie das Batteriefach.
2. Legen Sie die AAA(UM-4)-Batterien ein und achten Sie darauf, dass die + und - Anschlüsse der Batterien mit den
Markierungen im Batteriefach übereinstimmen.
3. Setzen Sie die Abdeckung wieder ein, um das Batteriefach zu schließen.
VORSICHT: Unsachgemäße Verwendung der Batterien kann zu Batterieauslauf und Korrosion führen. Um die Fernbedienung
korrekt zu bedienen, befolgen Sie die folgenden Anweisungen:
• Legen Sie die Batterien nicht in die falsche Richtung in die Fernbedienung ein.
• Laden, erwärmen, öffnen oder kurzschließen Sie die Batterien nicht. Werfen Sie Batterien nicht ins Feuer.
• Lassen Sie keine leeren Batterien in der Fernbedienung stecken.
• Verwenden Sie keine verschiedenen Batterietypen oder Kombinationen aus alten und neuen Batterien.
• Wenn Sie die Fernbedienung über einen längeren Zeitraum nicht benutzen, entfernen Sie die Batterien, um mögliche
Schäden durch Batteriekorrosion zu vermeiden.
Wenn die Fernbedienung nicht richtig funktioniert oder der Arbeitsbereich kürzer wird, ersetzen Sie alle Batterien durch
neue. Wenn der Akku ausläuft, wischen Sie die Batterieflüssigkeit aus dem Batteriefach und legen Sie neue Batterien
ein. Die Batterien halten bei normalem Gebrauch ein Jahr.
VERWENDUNG DER FERNBEDIENUNG
Entfernung: innerhalb von 7m zur Vorderseite des Infrarotsensors.
Winkel: innerhalb von 30° in jede Richtung von der Vorderseite des Infrarotsensors aus.
ACHTUNG!:
● Lassen Sie die Fernbedienung nicht fallen und halten Sie sie schockfrei.
● Stellen Sie keine schweren Objekte auf die Fernbedienung.
● Verschütten Sie kein Wasser oder andere Flüssigkeiten auf der Fernbedienung.
● Öffnen Sie die Fernbedienung nicht.
1 2 3
Page 17

17
ESPAÑOL
Felicitaciones a la compra de este producto Power Dynamics. Por favor lea atentamente este manual antes de usar el aparato
para disfrutar al completo de sus prestaciones.
Seguir las instrucciones le permite no invalidar la garantía. Tome todas las precauciones para evitar que se produzca fuego o
una descarga eléctrica. Las reparaciones solo deben llevarse a cabo por técnicos cualificados para evitar descargas eléctricas.
Guarde el manual para futuras consultas.
Antes de usar el aparato, por favor pida consejo a un profesional. Cuando el aparato se enciende por primera vez, suele
sentirse cierto olor. Esto es normal y desaparece al poco tiempo.
- Este aparato contiene piezas que llevan voltaje. Por lo
tanto NO abra la carcasa.
- No coloque objetos metálicos o vierta líquidos dentro del
aparato Podría producir descargas eléctricas y fallos en
el funcionamiento.
- No coloque el aparato cerca de fuentes de calor tipo
radiadores, etc. No coloque el aparato en superficies
vibratorias. No tape los agujeros de ventilación.
- Este aparato no está preparado para un uso continuado.
- Tenga cuidado con el cable de alimentación y no lo
dañe. Un daño o defecto en el cable de alimentación
puede producir una descarga eléctrica o fallo en el
funcionamiento.
- Cuando desconecte el aparato de la toma de corriente,
siempre tire de la clavija, nunca del cable.
- No enchufe o desenchufe el aparato con las manos
mojadas.
- Si la clavija y/o el cable de alimentación están dañados,
necesitan reemplazarse por un técnico cualificado.
- Si el aparato está dañado de modo que puedan verse
sus partes internas, NO conecte el aparato a la toma de
corriente y NO lo encienda. Contacte con su distribuidor.
- NO conecte el aparato a un reostato o dimmer.
- Para evitar un fuego o peligro de descarga, no exponga
el aparato a la lluvia y a la humedad.
- Todas las reparaciones deben llevarse a cabo
exclusivamente por técnicos cualificados.
- Conecte el aparato a una toma de corriente con toma de
tierra (220-240Vca/50Hz) protegida por un fusible de 1016A.
- Durante una tormenta o si el aparato no va a usarse
durante un periodo largo de tiempo, desconéctelo de la
toma de corriente. La regla es: Desconéctelo si no lo va
a usar.
- Si el aparato no se ha usado en mucho tiempo puede
producirse condensación. Deje el aparato a temperatura
ambiente antes de encenderlo. Nunca utilice el aparato
en ambientes húmedos o en el exterior.
- Para prevenir accidentes en las empresas, debe seguir
las directrices aplicables y seguir las instrucciones.
- No lo apague y encienda repetidamente. Esto acorta su
tiempo de vida.
- Mantenga el aparato fuera del alcance de los niños. No
deje el aparato sin vigilancia.
- No utilice sprays limpiadores para limpiar los
interruptores. Los residuos de estos sprays producen
depósitos de polvo y grasa. En caso de mal
funcionamiento, siempre consulte a un profesional.
- No fuerce los controles.
- Si el aparato se ha caído, siempre haga que lo verifique
un técnico cualificado antes de encenderlo otra vez.
- NO utilice productos químicos para limpiar el aparato.
Dañan el barniz. Tan solo límpielo con un trapo seco.
- Manténgalo lejos de equipos electrónicos ya que pueden
producir interferencias.
- Si este producto incorpora una batería recargable con
base ácida, por favor recarge bateria cada 3 meses si no
va a usar la unidad por un tiempo prolongado. En caso
contrario la batería podría dañarse.
- Solo utilice recambios originales para las reparaciones,
de otro modo pueden producirse daños serios y/o
radiaciones peligrosas.
- Apague el aparato antes de desconectarlo de la toma de
corriente y/o de otros equipos. Desconecte todos los
cables y conexiones antes de mover el aparato.
- Asegúrese de que el cable de alimentación no puede
dañarse cuando la gente lo pise. Compruebe el cable de
alimentación antes de cada uso por si hay daños o
defectos.
- El voltaje de funcionamiento es 220-240Vca/50Hz.
Compruebe que la toma de corriente coincide. Si tiene
que viajar, asegúrese de que el voltaje del país es el
adecuado para este aparato.
- Guarde el embalaje original para poder transportar el
aparato en condiciones seguras.
Esta señal advierte al usuario de la presencia de alto voltaje en el interior de la carcasa y que es de la suficiente
magnitud como para producir una descarga eléctrica.
Esta señal advierte al usuario de que el manual contiene instrucciones importantes que han de leerse y seguirse al pie
de la letra.
NOTA: Para asegurarse de que el aparato funcione correctamente, debe usarse en ambientes a una temperatura de entre
5°C/41°F y 35°C/95°F.
Los productos electrónicos no pueden tirarse a la basura normal. Por favor lleve este producto a un centro de reciclaje. Pregunte a la
autoridad local en caso de duda. Las especificaciones son generales. Los valores actuales pueden variar de una unidad a otra. Las
especificaciones pueden variar sin previo aviso.
Nunca intente reparar usted mismo este equipo. Esta manipulación anulará la garantía. No realice cambios en la unidad. Esta
manipulación anulará la garantía. Esta garantía no es aplicable en caso de accidente o daños ocasionados por uso indebido del aparato
o mal uso del mismo. Power Dynamics no se hace responsable de daños personales causados por el no seguimiento de las normas e
instrucciones de este manual. Esto es aplicable también a los daños de cualquier tipo.
Page 18

18
INSTRUCCIONES DE DESEMBALAJE
ATENCIÓN! Inmediatamente después de recibir un dispositivo, desempaque cuidadosamente la caja de cartón, compruebe el
contenido para asegurarse de que todas las partes están presentes, y se han recibido en buenas condiciones. Notifique
inmediatamente al transportista y conserve el material de embalaje para la inspección por si aparecen daños causados por el
transporte o el propio envase muestra signos de mal manejo. Guarde el paquete y todos los materiales de embalaje. En el caso
de que deba ser devuelto a la fábrica, es importante que el aparato sea devuelto en la caja de la fábrica y embalaje originales.
Si el aparato ha estado expuesto a grandes cambios de temperatura (tras el transporte), no lo enchufe inmediatamente. La
condensación de agua producida podría dañar su aparato. Deje el dispositivo apagado hasta que se haya alcanzado la
temperatura ambiente.
FUENTE DE ALIMENTACIÓN
En la etiqueta de la parte trasera del controlador se indica el tipo de fuente de alimentación que debe ser conectado.
Compruebe que la tensión de red corresponda a esto, todos los otros voltajes a la especificada, puede causar efectos
irreparable. El producto también debe estar conectado directamente a la red para ser utilizado. No en ninguna fuente de
alimentación o dimmer ajustable.
Conecte siempre el producto a un circuito protegido (disyuntor o fusible). Asegúrese de que el producto tiene una toma
de tierra adecuada para evitar el riesgo de electrocución o incendio.
CONECTAR A BLUETOOTH
1. Active la función BT en su dispositivo (teléfono móvil, tableta, etc.) a la que desee reproducir la música.
Consulte las instrucciones de funcionamiento de ese dispositivo.
2. Presione el botón "MODE" y active la función BT.
3. Seleccione "PDC40" en su dispositivo BT y realice la conexión BT.
Si se requiere contraseña, puede ingresar "0000".
Atención: La distancia BT es de aprox. 10 metros sin barrera.
CONTROLES Y CONEXIONES
Vista Frontal:
1. BOTÓN STAND-BY
Use este interruptor para cambiar entre encendido y modo de espera.
2. SENSOR REMOTO
Este sensor recibe la información infrarroja del control remoto. No coloque ningún objeto o adhesivo frente al sensor.
3. BOTÓN MODE
Presione con este botón para cambiar de un modo de reproducción a otro: Lápiz USB, entrada auxiliar, Bluetooth, DAB+ y
FM.
4. BOTÓN MENU
Presione para ingresar al modo de menú FM / DAB +. Si el usuario no selecciona ningún elemento presionando el botón
ENTER, volverá a la reproducción de FM / DAB + después de varios segundos.
Los menús de FM consisten en "Configuración de audio" y "Sistema".
"Configuracion de audio”
a. Mono forzado: a medida que la señal estéreo se debilita, la señal de audio empeorará. Puede ser preferible forzar a la
radio a reproducir la estación en mono para reducir el nivel de ruido de audio..
b.Estéreo permitido: el indicador "St" en la pantalla LCD significa que la estación actual se reproduce como estéreo.
“Sistema”
a. Time setup: hay 4 subelementos en el menú de configuración de la hora,
Programar reloj: mientras el dígito parpadea, use el botón “-”, ”+” o la tecla TUNING para ajustar la hora y los minutos.
Presione ENTER para confirmar.
Establecer fecha: mientras el dígito parpadea, use la perilla “-”, ”+” o TUNING para ajustar la fecha, el día y el año. Presione
ENTER para confirmar.
Page 19

19
Actualización automática: presione ENTER para actualizar el firmware automáticamente.
Establecer 12/24 horas: ingrese para cambiar entre los formatos de 12 horas y 24 horas.
b. Factory reset: si selecciona “Sí”, se realizará un restablecimiento completo. La lista de emisoras y los preajustes se
borrarán.
c. SW Version: si selecciona, muestra la versión de software durante varios segundos.
Los menús DAB + constan de "Exploración de estación" y "Sistema".
“Exploración de la estación”
a. Full scan: explora todas las frecuencias en BAND-III.
b. Manual tune: use los botones “-”, ”+” y “ENTER” para seleccionar una frecuencia.
“Sistema”
a. Time setup: hay 4 subelementos en el menú de configuración de la hora
Programar reloj: mientras el dígito parpadea, use el botón “-”, ”+” o la tecla TUNING para ajustar la hora y los minutos.
Presione ENTER para confirmar.
Establecer fecha: mientras el dígito parpadea, use la perilla “-”, ”+” o TUNING para ajustar la fecha, el día y el año. Presione
ENTER para confirmar.
Actualización automática: presione ENTER para actualizar el firmware automáticamente.
Establecer 12/24 horas: ingrese para cambiar entre los formatos de 12 horas y 24 horas..
b. Factory reset: si selecciona “Sí”, se realizará un restablecimiento completo. La lista de emisoras y los preajustes se
borrarán.
c. SW Version: si selecciona el elemento, muestra la versión de software durante varios segundos.
5. BOTÓN INFO
Cambia para mostrar diferentes tipos de información de visualización para el canal de reproducción actual.
FM mode
Texto de radio: hace que el texto de radio aparezca en la pantalla LCD.
Tipo de programa: hace que el tipo de programa de la estación / canal actual se muestre en la pantalla LCD.
Intensidad de la señal: hace que la intensidad de la señal del servicio actual se muestre en la pantalla LCD.
Fecha y hora: hace que la información de la fecha y la hora se muestre en la pantalla LCD.
DAB+ mode
DLS: hace que el texto DLS se muestre en la pantalla LCD.
Tipo de programa: hace que el tipo de programa de la estación / canal actual se muestre en la pantalla LCD.
Conjunto: hace que el nombre del conjunto actual se muestre en la pantalla LCD.
Fecha y hora: hace que la información de la fecha y la hora se muestre en la pantalla LCD.
Velocidad de transferencia: hace que la información de la velocidad de bits se muestre en la pantalla LCD.
Intensidad de la señal: hace que la intensidad de la señal del servicio actual se muestre en la pantalla LCD.
6. PANTALLA LCD
Esto muestra la emisora de frecuencia FM / DAB, el menú y la información de hora / fecha y USB información, etc.
7. BOTÓN PRESET
Durante la reproducción de DAB o FM, presione el botón PRESET y navegue por el número de preset, mantenga
presionado y presione el botón ENTER hasta que la pantalla muestre "almacenado". Si desea reproducir una estación /
canal predefinido durante la reproducción de DAB o FM, presione el botón PRESET, navegue a través de los números
predefinidos y presione el botón ENTER para confirmar la selección. El indicador “P #” en la pantalla significa que el número
de preset guardado.
8. BOTÓN ‒
Presione, durante la reproducción de DAB o FM, para buscar una frecuencia más baja o navegue en el submenú para
mover a la emisora anterior. Durante la reproducción desde una memoria USB, mantenga presionado este botón para una
rápida búsqueda hacia atrás, presione una vez para saltar hacia atrás. Durante la reproducción de Bluetooth, presione para
saltar hacia atrás.
9. BOTÓN +
Presione, durante la reproducción de DAB o FM, para buscar una frecuencia más alta o navegue en el submenú para
mover a la siguiente emisora. Durante la reproducción desde una memoria USB, mantenga presionado este botón para una
rápida búsqueda hacia adelante, presione una vez para saltar hacia adelante. Durante la reproducción de Bluetooth,
presione para saltar hacia adelante.
10. SELECTOR TUNING / ENTER
Gire, durante la reproducción de DAB o FM para navegar a la emisora anterior o a la siguiente en la lista. Presione para
seleccionar. Al mostrarse la emisora, mantenga presionado para escanear automáticamente las emisoras FM / DAB +.
Durante la reproducción desde una memoria USB,gire para ir a la pista anterior o siguiente. Presione para iniciar y pausar la
reproducción. Durante la reproducción de Bluetooth, pulsación corta para vincularse con el último dispositivo vinculado,
mantenga presionado para desconectar el dispositivo actual e ingresar al emparejamiento.
11. VOLUMEN
Use para ajustar el nivel de sonido. Gire en el sentido de las agujas del reloj para aumentar el nivel de sonido, gire en el
sentido contrario a las agujas del reloj para reducir el nivel de sonido.
12. PUERTO USB
Admite la reproducción de una unidad flash USB de hasta 32 GB, FAT16/32, USB: 1.0, 1.1, 2.0.
13. PUERTO AUX
Conecte su dispositivo de música a esta entrada con un cable de 3,5 mm.
14. HEADPHONE JACK
Entrada para conectar jack de los auriculares.
Page 20

20
Vista Posterior:
1. BLUETOOTH ANTENA
Inserte la antena BT a este puerto.
2. FM/DAB+ ANTENA
Inserte la antena suministrada a este puerto.
3. SALIDA DE LÍNEA
Terminal de salida.
4. BOTÓN POWER
Use este interruptor para encender la unidad. Vuelva a utilizar el interruptor para apagar el dispositivo.
5. AC IN
Inserte el cable de alimentación suministrado en este puerto.
Control Remoto:
1. BOTÓN STAND-BY
Use este interruptor para cambiar entre encendido y modo de espera
2. BOTÓN SOURCE
Presione para cambiar el canal de entrada
3. BOTÓN PAIRING
Presione para hacer posible una conexión Bluetooth con su dispositivo BT
4. NUM PAD
Teclado numérico para seleccionar presets
5. BOTÓN MUTE
Pulse para silenciar el dispositivo.
6. BOTÓN PLAY / PAUSE
Presiona este botón para iniciar o pausar la reproducción
7. BOTÓN ALARM
Presiona este botón para programar una alarma
8. BOTÓN SLEEP
Pulse el botón para configurar un temporizador de apagado
9. BOTÓN SNOOZE
Presione este botón para establecer un intervalo de alarma
de despertador
10. BOTÓN MENU
Presiona este botón para abrir el menú
11. BOTÓN INFO
Botón para mostrar diferentes tipos de información de
visualización para la reproducción actual
12. BOTÓN PRESET
Presione este botón para guardar un canal / estación (predefinido)
13. UP
Botón direccional arriba
14. LEFT
Botón direccional izquierda
15. BOTÓN ENTER
Presiona este botón para confirmar tus entradas
16. RIGHT
Botón direccional derecha
17. DOWN
Botón direccional abajo
18. VOL –
Presiona para bajar el nivel de sonido
19. VOL +
Presiona para aumentar el nivel de sonido
Page 21

21
Instrucciones para control remoto
1. Abre el compartimento de la batería.
2. Inserte las pilas AAA (UM-4). Asegúrese de hacer coincidir las marcas + y - de las baterías con las marcas en el
compartimiento de las baterías.
3. Cierre la tapa de la batería.
NOTA: El uso incorrecto de las baterías puede causar fugas y corrosión. Para operar correctamente el control remoto, siga las
instrucciones a continuación:
• No inserte las pilas en el control remoto en la dirección incorrecta.
• No cargue, caliente, abra o cortocircuite las baterías. No arroje las pilas al fuego.
• No deje pilas agotadas o agotadas en el control remoto.
• No use diferentes tipos de baterías juntas o mezcle baterías viejas y nuevas.
• Si no usa el control remoto durante un largo período de tiempo, retire las baterías para evitar posibles daños por
corrosión de la batería.
• Si el control remoto no funciona correctamente o el rango de operación se reduce, reemplace todas las baterías por
otras nuevas.
Si se produce una fuga de la batería, limpie el líquido de la batería del compartimiento de la batería e inserte baterías
nuevas.
OPERACIÓN DEL CONTROL REMOTO
Distancia: a 7 m desde la parte frontal del sensor de control remoto.
Angulo: dentro de 300º cada dirección de la parte frontal del sensor remoto.
CAUTION:
● No deje caer ni golpee el mando a distancia.
● No coloque objetos pesados encima del control remoto.
● No derrame agua u otros líquidos en el control remoto.
● No abra el mando a distancia.
1 2 3
Page 22

22
FRANÇAIS
Nous vous remercions d’avoir acheté un produit Power Dynamics. Veuillez lire la présente notice avant l’utilisation afin de
pouvoir en profiter pleinement.
Veuillez lire la notice avant toute utilisation. Respectez impérativement les instructions afin de continuer à bénéficier de la
garantie. Prenez toutes les précautions nécessaires pour éviter tout incendie ou décharge électrique. Seul un technicien
spécialisé peut effectuer les réparations. Nous vous conseillons de conserver la présente notice pour pouvoir vous y reporter
ultérieurement.
- Avant d’utiliser l’appareil, prenez conseil auprès d’un
spécialiste. Lors de la première mise sous tension, il est
possible qu’une odeur soit perceptible. C’est normal,
l’odeur disparaîtra peu de temps après.
- L’appareil contient des composants porteurs de tension.
N’OUVREZ JAMAIS le boîtier.
- Ne placez pas des objets métalliques ou du liquide sur
l’appareil, cela pourrait causer des décharges électriques
et dysfonctionnements..
- Ne placez pas l’appareil à proximité de sources de
chaleur, par exemple radiateur. Ne positionnez pas
l’appareil sur une surface vibrante. N’obturez pas les
ouïes de ventilation.
- L’appareil n’est pas conçu pour une utilisation en
continu.
- Faites attention au cordon secteur, il ne doit pas être
endommagé.
- Lorsque vous débranchez l’appareil de la prise secteur,
tenez-le par la prise, ne tirez jamais sur le cordon.
- Ne branchez pas et ne débranchez pas l’appareil avec
les mains mouillées.
- Seul un technicien spécialisé peut remplacer la fiche
secteur et / ou le cordon secteur.
- Si l’appareil est endommagé et donc les éléments
internes sont visibles, ne branchez pas l’appareil, NE
L’ALLUMEZ PAS. Contactez votre revendeur.
- NE BRANCHEZ PAS l’appareil à un rhéostat ou un
dimmer.
- Pour éviter tout risque d’incendie ou de décharge
électrique, n’exposez pas l’appareil à la pluie ou à
l’humidité.
- Seul un technicien habilité et spécialisé peut effectuer les
réparations
- Branchez l’appareil à une prise secteur 220-240 Vac/50
Hz avec terre, avec un fusible 10-16 A.
- Pendant un orage ou en cas de non utilisation prolongée
de l’appareil, débranchez l’appareil du secteur.
- En cas de non utilisation prolongée de l’appareil, de la
condensation peut être créée. Avant de l’allumer, laissez
l’appareil atteindre la température ambiante. Ne l’utilisez
jamais dans des pièces humides ou en extérieur.
- Afin d’éviter tout accident en entreprise, vous devez
respecter les conseils et instructions.
- N’allumez pas et n’éteignez pas l’appareil de manière
répétée. Cela réduit sa durée de vie.
- Conservez l’appareil hors de la portée des enfants. Ne
laissez pas l’appareil sans surveillance.
- N’utilisez pas d’aérosols pour nettoyer les interrupteurs.
Les résidus créent des dépôts et de la graisse. En cas
de dysfonctionnement, demandez conseil à un
spécialiste.
- Ne forcez pas les réglages.
- L’appareil contient un haut-parleur pouvant engendrer
des champs magnétiques. Tenez cet appareil à 60 cm
au moins d’un téléviseur ou ordinateur.
- Si le produit comprend un accumulateur intégré plombacide, rechargez l'accumulateur tous les 3 mois en cas
de non utilisation prolongée de l'appareil. Sinon,
l'accumulateur pourrait être endommagé de manière
permanente.
- Si l’accumulateur est endommagé, remplacez-le par un
accumulateur de même type et déposez l’ancien
accumulateur dans un container de recyclage adapté.
- Si l’appareil est tombé, faites-le toujours vérifier par un
technicien avant de le rallumer.
- Pour nettoyer l’appareil, n’utilisez pas de produits
chimiques qui abîment le revêtement, utilisez
uniquement un tissu sec.
- Tenez toujours l’appareil éloigné de tout équipement
électrique pouvant causer des interférences.
- Pour toute réparation, il faut impérativement utiliser des
pièces d’origine, sinon il y a risque de dommages graves
et / ou de radiations dangereuses.
- Eteignez toujours l’appareil avant de le débrancher du
secteur et de tout autre appareil. Débranchez tous les
cordons avant de déplacer l’appareil.
- Assurez-vous que le cordon secteur n’est pas abîmé si
des personnes viennent à marcher dessus. Avant toute
utilisation, vérifiez son état.
- La tension d’alimentation est de 220-240Vac/50 Hz.
Vérifiez la compatibilité. Si vous voyagez, vérifiez que la
tension d’alimentation du pays est compatible avec
l’appareil.
- Conservez l’emballage d’origine pour pouvoir transporter
l’appareil en toute sécurité.
Ce symbole doit attirer l’attention de l’utilisateur sur les tensions élevées présentes dans le boîtier de l’appareil, pouvant
engendrer une décharge électrique.
Ce symbole doit attirer l’attention de l’utilisateur sur des instructions importantes détaillées dans la notice, elles doivent
être lues et respectées.
Cet appareil porte le symbole CE. Il est interdit d’effectuer toute modification sur l’appareil. La certification CE et la garantie
deviendraient caduques !
NOTE: Pour un fonctionnement normal de l’appareil, il doit être utilisé en intérieur avec une plage de température maximale
autorisée entre 5°C/41°F et 35°C/95°F.
Ne jetez pas les produits électriques dans la poubelle domestique. Déposez-les dans une décharge. Demandez conseil aux autorisés
ou à votre revendeur. Données techniques réservées. Les valeurs actuelles peuvent varier d’un produit à l’autre. Tout droit de
modification réservé sans notification préalable.
N’essayez pas de réparer l’appareil vous-même. Vous perdriez tout droit à la garantie. Ne faites aucune modification sur l’appareil. Vous
perdriez tout droit à la garantie La garantie deviendrait également caduque en cas d’accidents ou dommages causes par une utilisation
inappropriée de l’appareil ou un non respect des consignes présentes dans cette notice. Power Dynamics ne pourrait être tenu
responsable en cas de dommages matériels ou corporels causés par un non respect des consignes de sécurité et avertissements. Cela est
également valable pour tous les dommages quelle que soit la forme.
Page 23

23
DÉBALLAGE
ATTENTION ! Immédiatement après réception, vérifiez le contenu du carton et assurez-vous que tous les éléments sont bien
présents et en bon état. Si besoin, faites les réserves nécessaires si le matériel ou les cartons sont endommagés. SI l’appareil
doit être retourné, faites-le dans l’emballage d’origine.
Si l’appareil a été exposé à des fluctuations importantes de températures (par exemple après le transport), ne l’allumez pas
immédiatement. De la condensation peut survenir. Laissez l’appareil éteint le temps qu’il atteigne la température ambiante.
ALIMENTATION
Vous trouvez sur l’étiquette à l’arrière de l’appareil, le type d’alimentation à utiliser. Vérifiez que la tension d’alimentation
corresponde à celle mentionnée. Toute autre alimentation peut endommager l’appareil. Reliez l’appareil au secteur, il est prêt à
être utilisé. En aucun cas, vous ne devez utiliser de dimmer ou d’alimentation réglable.
Connectez toujours l'appareil à un circuit protégé (disjoncteur ou fusible). Assurezvous que l'appareil soit correctement
relié à la terre afin d'éviter tout risque d'électrocution ou d'incendie
CONNEXION AVEC BT
1. Activez la fonction BT sur votre appareil (téléphone mobile, tablette...) qui doit lire la musique.
Reportez-vous aux instructions d'utilisation de l'appareil.
2. Appuyez sur la touche “MODE” et activez la fonction BT.
3. Sélectionnez “PDC40” sur votre appareil BT et établissez la connexion.
Si un mot de passe est demandé, vous pouvez saisir "0000".
Attention: la distance BT est de 10 mètres environ sans obstacle.
REGLAGES ET BRANCHEMENTS
Vue de face:
1. TOUCHE STAND-BY
Utilisez ce bouton pour mettre l'appareil en mode veille ou hors veille.
2. CAPTEUR TÉLÉCOMMANDE
Ce capteur reçoit les informations de la télécommande. Ne placez pas d’objets ou d’étiquette devant le capteur.
3. TOUCHE MODE
Appuyez pour commuter les modes entre lecture clé USB, entrée auxiliaire, Bluetooth, DAB+ et FM.
4. TOUCHE MENU
Appuyez sur la touche pour accéder au menu FM/DAB+. Si vous ne sélectionnez pas de point en appuyant sur la touche
ENTER, l’appareil revient au mode FM/DAB+ après quelques secondes.
Les menus FM se composent de “Audio setting” et “System”.
“Audio setting” – réglage audio
a. Mono forcé: quand un signal stéréo devient plus faible, le signal audio devient plus pauvre. Il peut être intéressant de
forcer la radio à lire la station en mode mono pour diminuer le niveau du bruit.
b. Stereo allowed – stéréo autorisé : l’indication “St” sur l’affichage LCD indique que la station en cours est lue en mode
stéréo.
Page 24

24
“System” - Système
a. Réglage heure: il existe quatre sous-menus :
Set clock – réglage horloge: lorsque le chiffre clignote, utilisez “-”,”+” ou le bouton TUNING pour sélectionner les heures et
minutes. Appuyez sur ENTER pour confirmer.
Set date – réglage date: lorsque le chiffre clignote, utilisez “-”,”+” ou le bouton TUNING pour régler date, jour et année.
Appuyez sur ENTER pour confirmer.
Auto update: mise à jour automatique : appuyez sur ENTER pour confirmer la mise à jour automatique du firmware.
Set 12/24 hours – réglage 12/24 heures: pour commuter le format des heures entre 12 heures et 24 heures.
b. Réinitialisation usine: si vous sélectionnez “Yes”, l’appareil est totalement réinitialisé. La liste des stations et les Presets
sont effacés.
c. Version SW: Si vous sélectionnez ce point, la version du software est affichée pendant quelques secondes.
Les menus DAB+ se composent de “Station scan” et “System”.
“Station scan” – Recherche de stations
a. Full scan: l’appareil scanne toutes les fréquences dans la BAND-III.
b. Réglage manuel: utilisez les touches “-“, “+“ et “ENTER“ pour sélectionner une fréquence.
“System” - Système
a. Réglage heure: il existe quatre sous-menus :
Set clock – réglage horloge: lorsque le chiffre clignote, utilisez “-”,”+” ou le bouton TUNING pour sélectionner les heures et
minutes. Appuyez sur ENTER pour confirmer.
Set date – réglage date: lorsque le chiffre clignote, utilisez “-”,”+” ou le bouton TUNING pour régler date, jour et année.
Appuyez sur ENTER pour confirmer.
Auto update: mise à jour automatique : appuyez sur ENTER pour confirmer la mise à jour automatique du firmware.
Set 12/24 hours – réglage 12/24 heures: pour commuter le format des heures entre 12 heures et 24 heures.
b. Réinitialisation usine: si vous sélectionnez “Yes”, l’appareil est totalement réinitialisé. La liste des stations et les Presets
sont effacés.
c. Version SW: Si vous sélectionnez ce point, la version du software est affichée pendant quelques secondes.
5. TOUCHE INFO
Pour afficher différentes informations sur le canal de lecture en cours.
Mode FM
Texte radio: s’affiche sur l’écran LCD.
Type programme: le type de programme de la station / canal est indiqué sur l’affichage LCD.
Puissance signal: la puissance du signal est affichée sur l’écran LCD.
Durée / heure et date: les données s’affichent sur l’écran LCD.
Mode DAB+
DLS: le texte DLS est affiché sur l’écran LCD.
Type programme: le type de programme de la station / canal est indiqué sur l’affichage LCD.
Ensemble: Le nom de l’ensemble est indiqué sur l’affichage LCD.
Durée / heure et date: les données s’affichent sur l’écran LCD.
Taux de transfert: le nombre de bits est indiqué sur l’affichage LCD.
Puissance signal: la puissance du signal est affichée sur l’écran LCD.
6. AFFICHAGE LCD
Affichage indiquant la fréquence de la station FM/DAB, le menu, les informations d’heure/date et information d’USB etc.
7. TOUCHE PRESET
En mode lecteur DAB ou FM, appuyez sur la touche PRESET, allez au numéro du Preset et maintenez le bouton ENTER
enfoncé jusqu’à ce que l’affichage indique “stored“. Si vous souhaitez lire une station / canal mémorisée, appuyez sur le
bouton PRESET, naviguez et appuyez sur ENTER pour confirmer votre choix. “P#“ sur l’affichage indique que le numéro du
preset est sauvegardé.
8. TOUCHE ‒
Pendant la lecture en mode DAB ou FM, appuyez pour rechercher une fréquence inférieure par palier de 50 kHz ou pour
naviguer dans le point précédent du sous-menu ou pour aller à la station précédente. Pendant la lecture depuis une clé
USB, appuyez et maintenez la touche enfoncée pour une recherche arrière rapide, appuyez une fois pour reculer. En mode
lecture Bluetooth, appuyez pour revenir en arrière.
9. TOUCHE +
Pendant la lecture en mode DAB ou FM, appuyez pour rechercher une fréquence supérieure par palier de 50 kHz ou pour
naviguer dans le point suivant du sous-menu ou pour aller à la station suivante. Pendant la lecture depuis une clé USB,
appuyez et maintenez la touche enfoncée pour une avance rapide, appuyez une fois pour avancer. En mode lecture
Bluetooth appuyez pour advancer.
10. TOUCHE TUNING / ENTER
Pendant la lecture en mode DAB ou FM, tournez pour naviguer au point suivant ou précédent dans la liste. Appuyez pour
sélectionner le point affiché dans la liste. Maintenez la touche enfoncée pour une recherche automatique de stations
FM/DAB+. Pendant la lecture depuis une clé USB, tournez pour aller à la voie précédente ou suivante. Appuyez pour
démarrer la lecture ou passer en Pause. Pendant la lecture en mode Bluetooth, appuyez brièvement pour appairer avec le
dernier appareil appairé ; maintenez la touche enfoncée pour déconnecter l’appareil actuel et passer en mode d’appairage.
11. TOUCHE DE VOLUME
Permet de régler le niveau sonore. Tournez dans le sens des aiguilles d'une montre pour augmenter le niveau sonore,
tournez dans le sens inverse pour réduire le niveau sonore.
12. PORT USB
Supporte la lecture de clés USB jusqu'à 32GB, FAT16/32, versions USB : 1.0, 1.1, 2.0.
13. PORT AUX
Connectez votre appareil musical à cette prise au moyen d'un câble jack de 3,5 mm.
14. PORT CASQUE D’ÉCOUTE
Prise pour le branchement d'un casque d'écoute.
Page 25

25
Vue Arrière:
1. ANTENNE BLUETOOTH
Prise de branchement de l’antenne Bluetooth livré.
2. ANTENNE FM/DAB+
Prise de branchement de l’antenne FM-DAB+ livré.
3. LINE OUT
Borne de sortie.
4. TOUCHE POWER
Interrupteur Marche / Arrêt de l’appareil.
5. AC IN
Prise secteur pour brancher le cordon secteur livré.
Télécommande:
1. TOUCHE STAND-BY
Utilisez ce bouton pour mettre l'appareil en mode veille ou hors veille
2. TOUCHE SOURCE
Appuyez sur cette touche pour changer de canal d'entrée
3. TOUCHE PAIRING
Appuyez sur pour rendre possible une connexion Bluetooth avec
votre appareil BT
4. NUM PAD
Clavier numérique pour la sélection des préréglages
5. TOUCHE MUTE
Appuyez sur ce touche pour couper le son de l'appareil
6. PLAY / PAUSE
Appuyez sur cette touche pour démarrer ou interrompre la lecture
7. TOUCHE ALARM
Appuyez sur cette touche pour régler une alarme
8. TOUCHE SLEEP
Appuyez sur le touche pour régler une minuterie de mise en veille
9. TOUCHE SNOOZE
Appuyez sur ce touche pour régler un intervalle d'alarme
de répétition de réveil
10. TOUCHE MENU
Appuyez sur cette touche pour ouvrir le menu
11. TOUCHE INFO
Appuyez sur ce bouton pour afficher différents types
d'informations sur les activités en cours de lecture
12. TOUCHE PRESET
Touche pour sauvegarder un canal / station (preset).
13. EN HAUT
Touche directionnelle vers le haut
14. A GAUCHE
Touche directionnelle gauche
15. TOUCHE ENTER
Appuyez sur cette touche pour confirmer vos entrées
16. A DROIT
Touche directionnelle droite
17. EN BAS
Touche directionnelle vers le bas
18. VOL –
Appuyez pour baisser le niveau sonore
19. VOL +
Appuyez pour augmenter le niveau sonore
Page 26
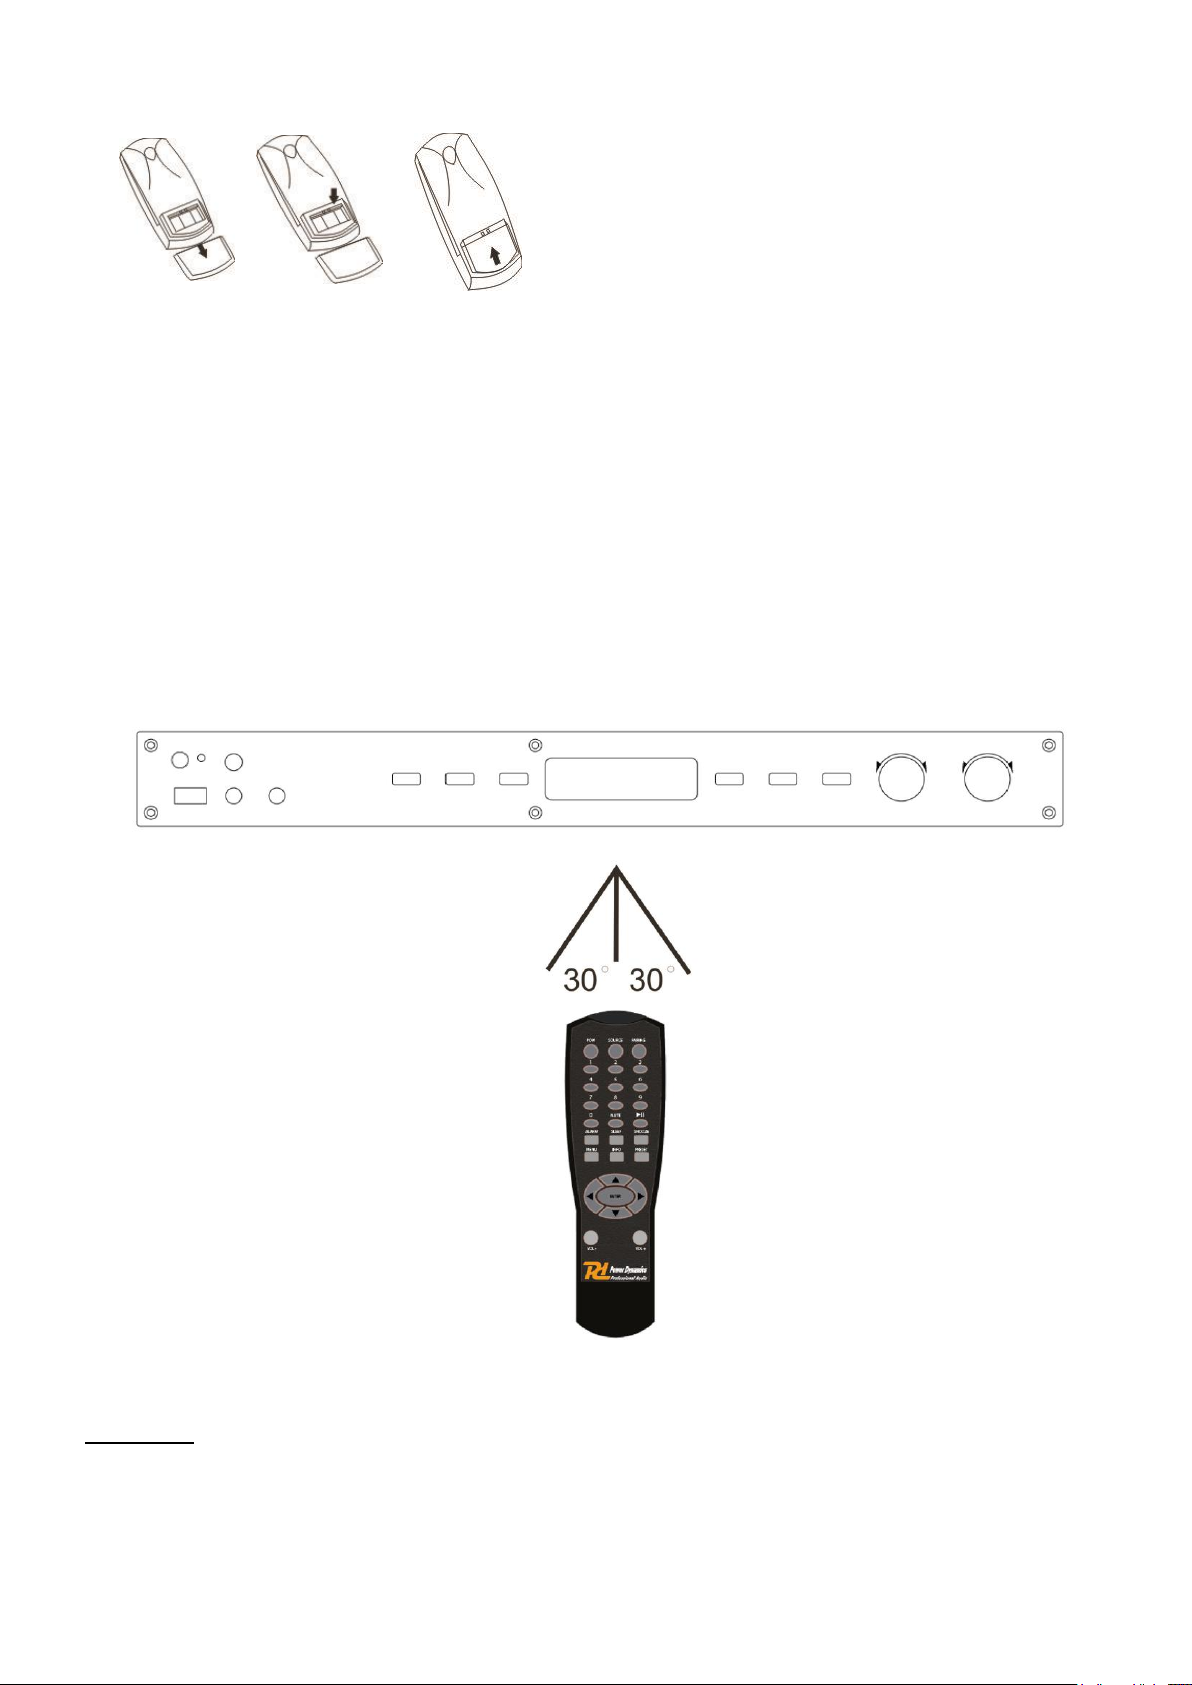
26
Instructions pour la télécommande
1. Ouvrez le compartiment batteries.
2. Insérez les batteries de type R03 en respectant la polarité indiquée par les repères dans le compartiment batterie.
3. Refermez le couvercle du compartiment.
NOTE: Une utilisation incorrecte des batteries peut engendrer de la corrosion ou les piles peuvent couler.
Pour faire fonctionner correctement la télécommande, respectez les instructions ci-dessous:
• N’insérez pas de batteries dans le mauvais sens.
• Ne chargez pas, ne chauffez pas, n’ouvrez pas ou ne court-circuitez pas les batteries. Ne les jetez pas dans le feu..
• Ne laissez pas de batteries mortes ou vides dans la télécommande.
• N’utilisez pas différents types de batteries ensemble, ne mélangez pas batteries neuves et anciennes.
• En cas de non utilisation prolongée de la télécommande, retirez les batteries pour éviter qu’elles ne coulent et
n’endommagent la télécommande .
• Si la télécommande ne fonctionne pas correctement ou si la portée d’utilisation diminue, remplacez l’ensemble des
batteries par des batteries neuves.
Si une batterie venait à couler, essuyez le liquide dans le compartiment, insérez des batteries neuves. En condition
normale, les batteries peuvent être utilisées pendant un an.
FONCTIONNEMENT DE LA TÉLÉCOMMANDE
Distance : 7 m depuis le capteur sur l’avant de la télécommande.
Angle : 300 dans chaque direction depuis le capteur sur l’avant de la télécommande.
ATTENTION:
● Ne jetez pas la télécommande, ne la cognez pas.
● Ne posez pas d’objets jours sur le dessus de la télécommande.
● Ne faites pas tomber d’eau ou de liquide sur la télécommande.
● N’ouvrez pas la télécommande.
1 2 3
Page 27

27
POLSKI
Gratulujemy zakupu urządzenia marki Power Dynamics. Proszę o przeczytanie instrukcji przed użyciem urządzenia, aby jak
najlepiej móc wykorzystać jego możliwości.
Przeczytaj tę instrukcję przed pierwszym użyciem urządzenia. Postępuj zgodnie z instrukcją, aby nie utracić gwarancji. Zwróć
uwagę na wszystkie ostrzeżenia, aby uniknąć pożaru lub/oraz porażenia prądem. Naprawy mogą być przeprowadzane jedynie
przez autoryzowany serwis. Zatrzymaj tę instrukcję na wypadek potrzeby w przyszłości.
- Przed rozpoczęciem użytkowania urządzenia należy
zasięgnąć porady specjalisty. Przy pierwszym włączeniu
urządzenia może pojawić się nieprzyjemny zapach. Jest
to normalne i po chwili zniknie.
- Urządzenie zawiera części przewodzące napięcie.
Dlatego NIE należy otwierać obudowy.
- Nie należy umieszczać metalowych przedmiotów ani
wlewać płynów do urządzenia. Może to spowodować
porażenie prądem elektrycznym i nieprawidłowe
działanie.
- Nie należy umieszczać urządzenia w pobliżu źródeł
ciepła, takich jak grzejniki itp. Nie umieszczać
urządzenia na wibrującej powierzchni. Nie zakrywać
otworów wentylacyjnych.
- Urządzenie nie nadaje się do pracy ciągłej.
- Należy zachować ostrożność z przewodem zasilającym i
nie wolno go uszkodzić. Wadliwy lub uszkodzony
przewód sieciowy może spowodować porażenie prądem
elektrycznym i wadliwe działanie.
- Podczas odłączania urządzenia od gniazdka sieciowego
należy zawsze wyciągać wtyczkę, a nie przewód.
- Nie należy podłączać ani odłączać urządzenia mokrymi
rękami.
- Jeśli wtyczka i/lub przewód sieciowy są uszkodzone,
należy je wymienić przez wykwalifikowanego technika.
- Jeśli urządzenie jest uszkodzone w takim stopniu, że
widoczne są części wewnętrzne, NIE podłączać
urządzenia do gniazdka sieciowego i NIE włączać
urządzenia. Skontaktować się ze sprzedawcą.
- NIE podłączać urządzenia do reostatu lub ściemniacza.
- Aby uniknąć zagrożenia pożarem i porażeniem prądem,
nie wystawiać urządzenia na działanie deszczu i wilgoci.
- Wszystkie naprawy powinny być wykonywane wyłącznie
przez wykwalifikowanego technika.
- Podłączyć urządzenie do uziemionego gniazdka
sieciowego (220-240Vac/50Hz) zabezpieczonego
bezpiecznikiem 10-16A.
- Podczas burzy z piorunami lub jeśli urządzenie nie
będzie używane przez dłuższy okres czasu, należy
odłączyć je od sieci elektrycznej. Zasada jest taka sama:
Gdy urządzenie nie jest używane, należy je odłączyć od
sieci zasilającej.
- Jeśli urządzenie nie było używane przez dłuższy okres
czasu, może dojść do kondensacji pary wodnej. Przed
włączeniem urządzenie powinno osiągnąć temperaturę
pokojową.
- Nigdy nie używać urządzenia w wilgotnych
pomieszczeniach lub na zewnątrz.
- Aby zapobiec wypadkom w firmach, należy postępować
zgodnie z obowiązującymi wytycznymi i instrukcjami.
- Nie należy wielokrotnie włączać i wyłączać urządzenia.
Skraca to żywotność urządzenia.
- Przechowywać urządzenie w miejscu niedostępnym dla
dzieci. Nie pozostawiać urządzenia bez nadzoru.
- Do czyszczenia przełączników nie używać sprayów
czyszczących. Pozostałości tych sprayów powodują
osadzanie się kurzu i smaru. W przypadku awarii należy
zawsze zasięgnąć porady specjalisty.
- Nie wolno wymuszać używania elementów sterujących.
- Wewnątrz urządzenia znajduje się głośnik, który może
powodować pole magnetyczne. Urządzenie należy
trzymać w odległości co najmniej 60 cm od komputera
lub telewizora.
- Jeśli ten produkt ma wbudowany akumulator kwasowo-
ołowiowy. Jeśli nie zamierzasz używać produktu przez
dłuższy okres czasu, ładuj go co 3 miesiące. W
przeciwnym razie bateria może ulec trwałemu
uszkodzeniu.
- Jeśli bateria jest uszkodzona, należy wymienić ją na
baterię o tej samej specyfikacji. Uszkodzoną baterię
należy utylizować w sposób przyjazny dla środowiska.
- Jeśli urządzenie upadło, przed ponownym włączeniem
należy je sprawdzić przez wykwalifikowanego technika.
- Do czyszczenia urządzenia nie należy używać środków
chemicznych. Uszkodzą one lakier. Urządzenie należy
czyścić wyłącznie suchą ściereczką.
- Trzymać z dala od sprzętu elektronicznego, który może
powodować zakłócenia.
- Do napraw należy używać wyłącznie oryginalnych części
zamiennych, w przeciwnym razie może dojść do
poważnych uszkodzeń i/lub niebezpiecznego
promieniowania.
- Przed odłączeniem urządzenia od sieci elektrycznej i/lub
innych urządzeń należy je wyłączyć. Przed
przeniesieniem urządzenia należy odłączyć wszystkie
przewody i kable.
- Upewnić się, że przewód zasilający nie może zostać
uszkodzony, gdy ludzie chodzą po nim. Przed każdym
użyciem należy sprawdzić przewód sieciowy pod kątem
uszkodzeń i usterek!
- Napięcie sieciowe wynosi 220-240Vac/50Hz. Sprawdź,
czy gniazdo zasilania pasuje. W przypadku podróży
należy upewnić się, że napięcie sieciowe w danym kraju
jest odpowiednie dla tego urządzenia.
- Należy zachować oryginalne opakowanie, aby umożliwić
bezpieczny transport urządzenia.
- Przetłumaczono przy pomocy.
Ten znak zwraca uwagę użytkownika na wysokie napięcie, które jest obecne w środku obudowy urządzenia. Napięcie
jest wystarczające, aby porazić użytkownika.
Ten znak zwraca uwagę użytkownika do ważnych informacji, które znajdują się w instrukcji. Informacje te powinny być
przeczytane oraz uwzględnione w codziennym użytkowaniu
Urządzenie posiada certyfikat CE. Nie wolno wprowadzać żadnych zmian w urządzeniu. Każda modyfikacja sprzętu spowoduje
utratę certyfikatu CE oraz gwarancji!
UWAGA: Urządzenie może funkcjonować w pomieszczeniach o temperaturze pomiędzy 5°C/41°F oraz 35°C/95°F.
WAŻNA INFORMACJA: Urządzenia elektryczne muszą być składowane w miejscach do tego przeznaczonych.
Sprawdź, gdzie w Twojej okolicy znajduje się najbliższe centrum recyklingu. Specyfikacja techniczna poszczególnych
urządzeniach może się nieznacznie różnić. Specyfikacja może ulec zmian bez powiadomień.
Nie próbuj dokonywać żadnych napraw samodzielnie, to spowoduje unieważnienie gwarancji. Gwarancja nie dotyczy uszkodzeń
spowodowanych niewłaściwym użytkowaniem sprzętu, niezgodnie z instrukcją. Power Dynamics nie jest odpowiedzialny za
uszczerbek na zdrowiu oraz kontuzje spowodowane niestosowaniem się do zaleceń bezpieczeństwa. Dotyczy to wszelakich
Page 28

28
INSTRUKCJA ROZPAKOWYWANIA
OSTRZEŻENIE! Natychmiast po odbiorze urządzenia, ostrożnie otwórz karton ochronny, oraz sprawdź zawartość i stan
techniczny przedmiotu. Niezwłocznie powiadom kuriera oraz zachowaj opakowanie zewnętrzne do kontroli, jeśli jakikolwiek
element zawartości wygląda na zniszczony w transporcie lub nosi objawy złego traktowania paczki. W takim wypadku należy
niezwłocznie odesłać sprzęt do producenta. Sprzęt należy wysłać w oryginalnym opakowaniu.
Jeśli urządzenie było wystawione na działanie niskich temperatur (np. podczas transportu), nie uruchamiaj go od razu.
Powstające zjawisko kondensacji widy może uszkodzić urządzenie. Pozostaw urządzenie wyłączone, dopóki nie osiągnie
temperatury pokojowej.
ZASILANIE
Na naklejce z tyłu urządzenia znajduje się oznaczenie dotyczące rodzaju zasilania. Sprawdź, czy napięcie w gniazdku zgadza
się z wymaganym przez producenta. Złe napięcie może spowodować nienaprawialne uszkodzenie urządzenia.
Zawsze podłączaj urządzenie do zabezpieczonego obwodu elektrycznego (za pomocą bezpiecznika lub wyłącznika
instalacyjnego). Upewnij się, że urządzenie jest uziemione, aby uniknąć pożaru lub śmiertelnego porażenia prądem.
POŁACZENIE ZA POMOCĄ BLUETOOTH
1. Uruchom funkcję Bluetooth na urządzeniu, z którego chcesz odtwarzać muzykę (telefon/tablet
itp.). Jeśli nie wiesz jak to zrobić, zajrzyj do instrukcji obsługi dołączonej przez producenta.
2. Naciśnij przycisk "MODE", oraz wybierz funkcję BT.
3. Odśwież listę wyszukanych urządzeń Bluetooth oraz wybierz "PDC40", aby sparowaćurządzenia.
Jeśli wymagane jest hasło, wprowadź "0000".
Uwaga! Maksymalny zasięg pracy bezprzewodowej wynosi ok 10m (w otwartej przestrzeni).
STEROWANIE
Widok z przodu:
1. PRZYCISK STAND-BY
Użyj tego przełącznika, aby włączyć lub wyłączyć urządzenie w trybie gotowości.
2. ZDALNY CZUJNIK
Ten czujnik odbiera informacje podczerwieni z pilota zdalnego sterowania. Nie umieszczaj żadnych przedmiotów ani
naklejek przed czujnikiem.
3. PRZYCISK MODE
Naciśnij, aby zmienić tryby między odtwarzaniem pamięci USB, wejściem pomocniczym, Bluetooth, DAB + i FM.
4. PRZYCISK MENU
Naciśnij, aby przejść do trybu menu fm / dab +. Jeśli użytkownik nie wybierze żadnego elementu, naciskając przycisk enter,
powróci do odtwarzania fm / dab + po kilku sekundach.
Menu FM składa się z "Ustawień audio" i "Systemu".
"Ustawień audio"
za. forced mono: Gdy sygnał stereo słabnie, sygnał audio stanie się gorszy. może być pożądane zmusić radio do
odtwarzania stacji w trybie mono w celu zmniejszenia poziomu szumu akustycznego.
b. stereo dozwolone: Wskaźnik "st" na wyświetlaczu lcd oznacza, że aktualna stacja jest odtwarzana jako stereo.
Page 29

29
“Systemu”
za. Ustawienia czasu: w menu konfiguracji czasu znajduje się 4 pod-pozycji.
Ustaw zegar: Gdy cyfra miga, użyj przycisków "-", "+" lub tuning, aby ustawić godzinę i minutę. Naciśnij enter, aby
potwierdzić.
Ustaw datę: Podczas gdy cyfra miga, użyj przycisków "-", "+" lub tuning, aby ustawić datę, dzień i rok. naciśnij enter, aby
potwierdzić.
Automatyczna aktualizacja: Naciśnij przycisk enter, aby automatycznie zaktualizować oprogramowanie układowe.
Ustaw 12/24 godziny: Enter, aby przełączać pomiędzy formatami 12-godzinnymi i 24-godzinnymi.
b. Ustawienia fabryczne: Jeśli wybierzesz "tak", zostanie wykonany pełny reset. Lista stacji i ustawienia zostaną usunięte.
do. Wersja sw: Jeśli wybierzesz pozycję, pokazuje wersję oprogramowania przez kilka sekund.
Menu DAB+ składa się z "Skanowania stacji" i "Systemu".
“Skanowania stacji”
za. Pełne skanowanie: Skanuje wszystkie częstotliwości w band-III.
b. Ręczne dostrajanie: Użyj przycisków "-", "+" i "ENTER", aby wybrać częstotliwość.
“Systemu”
za. Ustawienia czasu: Dostępne są 4 pod-pozycje w menu ustawień czasu.
Ustaw zegar: Gdy cyfra miga, użyj przycisków "-", "+" lub tuning, aby ustawić godzinę i minutę. naciśnij ENTER, aby
potwierdzić.
Ustaw datę: Podczas gdy cyfra miga, użyj przycisków "-", "+" lub tuning, aby ustawić datę, dzień i rok. naciśnij ENTER, aby
potwierdzić.
Automatyczna aktualizacja: Naciśnij przycisk enter, aby automatycznie zaktualizować oprogramowanie układowe.
Ustaw 12/24 godziny: Enter, aby przełączać pomiędzy formatami 12-godzinnymi i 24-godzinnymi.
b. Ustawienia fabryczne: Jeśli wybierzesz "tak", zostanie wykonany pełny reset. Lista stacji i ustawienia zostaną usunięte.
do. Wersja sw: Jeśli wybierzesz pozycję, pokazuje wersję oprogramowania przez kilka sekund.
5. PRZYCISK INFO
Przełącz, aby wyświetlić inny typ informacji o wyświetlaniu bieżącego kanału odtwarzania.
Tryb FM
Tekst radiowy: Powoduje wyświetlenie tekstu radiowego na wyświetlaczu lcd.
Typ programu: Ustawia rodzaj programu dla aktualnie wyświetlanej stacji / kanału na wyświetlaczu lcd.
Siła sygnału: Ustawia siłę sygnału bieżącej usługi wyświetlaną na wyświetlaczu lcd.
Dodzina i Data: Wyświetla informacje o czasie i dacie wyświetlane na wyświetlaczu lcd.
Tryb DAB+
DLS: Wyświetla tekst DLS wyświetlany na wyświetlaczu lcd.
Typ programu: Ustawia rodzaj programu dla aktualnie wyświetlanej stacji / kanału na wyświetlaczu lcd.
Ensemble: Powoduje wyświetlenie aktualnej nazwy zespołu na wyświetlaczu lcd.
Godzina i Data: Wyświetla informacje o czasie i dacie wyświetlane na wyświetlaczu lcd.
Transferu: Powoduje wyświetlenie informacji o przepływności na wyświetlaczu lcd.
Siła sygnału: Ustawia siłę sygnału bieżącej usługi wyświetlaną na wyświetlaczu lcd.
6. WYŚWIETLACZ LCD
Wyświetla stację FM/DAB, menu, czas / datę, informacje USB itp.
7. PRZYCISK PRESET
Podczas odtwarzania dab lub fm, naciśnij przycisk preset i poruszaj się po ustawionym numerze, a następnie przytrzymaj i
naciskaj przycisk enter, aż na wyświetlaczu pojawi się "zapisany". Jeśli chcesz odtwarzać zaprogramowaną stację / kanał
podczas odtwarzania dab lub fm, naciśnij przycisk preset, poruszaj się po zaprogramowanych numerach i naciśnij przycisk
enter, aby potwierdzić wybór. Wskaźnik "p #" na wyświetlaczu oznacza zapisanie zaprogramowanego numeru.
8. PRZYCISK ‒
Naciśnij, podczas odtwarzania DAB lub FM, aby wyszukać niższą częstotliwość o 50KHZ lub przejdź do poprzedniego
elementu w podmenu lub przejdź do poprzedniej stacji. Podczas odtwarzania z pamięci USB naciśnij i przytrzymaj ten
przycisk, aby szybko wyszukać wstecz, naciśnij raz, aby przejść do tyłu. Podczas odtwarzania Bluetooth naciśnij, aby
przejść do tyłu.
9. PRZYCISK +
Naciśnij, podczas odtwarzania DAB lub FM, aby wyszukać wyższą częstotliwość o 50KHZ lub przejdź do następnego
elementu w podmenu lub przejdź do następnej stacji. Podczas odtwarzania z pamięci USB naciśnij i przytrzymaj ten
przycisk, aby szybko przewinąć do przodu, naciśnij jeden raz, aby przejść do przodu. Podczas odtwarzania Bluetooth
naciśnij, aby przejść do przodu.
10. POKRĘTŁO TUNING / ENTER
Włącz, podczas odtwarzania DAB lub FM, aby przejść do poprzedniej lub następnej usługi na liście. Naciśnij, aby wybrać
wyświetlaną usługę z listy. Przytrzymaj i naciśnij, aby automatycznie skanować stacje FM / DAB +. Podczas odtwarzania z
pamięci USB, skręć, aby przejść do poprzedniego lub następnego utworu. Naciśnij, aby rozpocząć i wstrzymać odtwarzanie.
Podczas odtwarzania Bluetooth krótko naciśnij, aby sparować z ostatnim sparowanym urządzeniem, przytrzymaj i naciśnij,
aby odłączyć bieżące urządzenie i przejść do trybu parowania.
11. POKRĘTŁO GŁOŚNOŚCI
Użyj, aby wyregulować poziom dźwięku. Obróć w kierunku zgodnym z ruchem wskazówek zegara, aby podnieść poziom
dźwięku, obróć w lewo, aby zmniejszyć poziom głośności.
12. WEJŚCIE USB
Obsługuje odtwarzanie dysków flash USB do 32 GB, FAT16 / 32, wersje USB: 1.0, 1.1, 2.0.
13. WEJŚCIE AUX
Podłącz urządzenie muzyczne do tego gniazda za pomocą kabla jack 3,5 mm.
14. WEJŚCIE SŁUCHAWKOWE JACK
Gniazdo do podłączenia słuchawek.
Page 30

30
Widok z tyłu:
1. ANTENA BLUETOOTH
Włóż dostarczoną antenę do tego portu.
2. ANTENA FM / DAB +
Włóż dostarczoną antenę do tego portu.
3. LINE OUT
Zacisk wyjściowy.
4. PRZYCISK ZASILANIA
Użyj tego przełącznika, aby włączyć urządzenie. Użyj wyłącznika ponownie, aby wyłączyć urządzenie.
5. AC IN
Włóż dostarczony przewód zasilający do tego portu.
Funkcje pilota:
1. PRZYCISK STAND-BY
Użyj tego przełącznika, aby włączyć lub wyłączyć urządzenie w trybie gotowości
2. PRZYCISK SOURCE (ŹRÓDŁO)
Naciśnij, aby przełączyć kanał wejściowy
3. PRZYCISK PAIRING
Naciśnij, aby umożliwić połączenie Bluetooth z twoim urządzeniem BT
4. NUM PAD
Klawiatura numeryczna do wybierania ustawień wstępnych
5. PRZYCISK MUTE (WYCISZENIA)
Naciśnij, aby wyciszyć urządzenie
6. PLAY / PAUSE
Naciśnij ten przycisk, aby rozpocząć lub wstrzymać odtwarzanie
7. PRZYCISK ALARMU
Naciśnij ten przycisk, aby ustawić alarm
8. PRZYCISK SLEEP
Naciśnij przycisk, aby ustawić wyłącznik czasowy
9. PRZYCISK SNOOZE (DRZEMKI)
Naciśnij ten przycisk, aby ustawić interwał alarmu drzemki
10. MENU
Naciśnij ten przycisk, aby otworzyć menu
11. PRZYCISK INFO
Przycisk, aby wyświetlić inny typ wyświetlania informacji dla
obecnej aktywności
12. PRZYCISK PRESET (USTAWIENIA)
Naciśnij ten przycisk, aby zapisać kanał / stację (preset)
13. UP (GÓRA)
Przycisk kierunkowy w górę
14. LEFT (LEWO)
Przycisk kierunkowy w lewo
15. PRZYCISK ENTER
Naciśnij ten przycisk, aby potwierdzić wprowadzone dane
16. RIGHT (PRAWO)
Przycisk kierunkowy w prawo
17. DOWN (DÓŁ)
Przycisk kierunkowy w dół
18. VOL - (GŁOŚNOŚĆ -)
Naciśnij, aby obniżyć poziom dźwięku
19. VOL + (GŁOŚNOŚĆ +)
Naciśnij, aby podnieść poziom dźwięku
Page 31
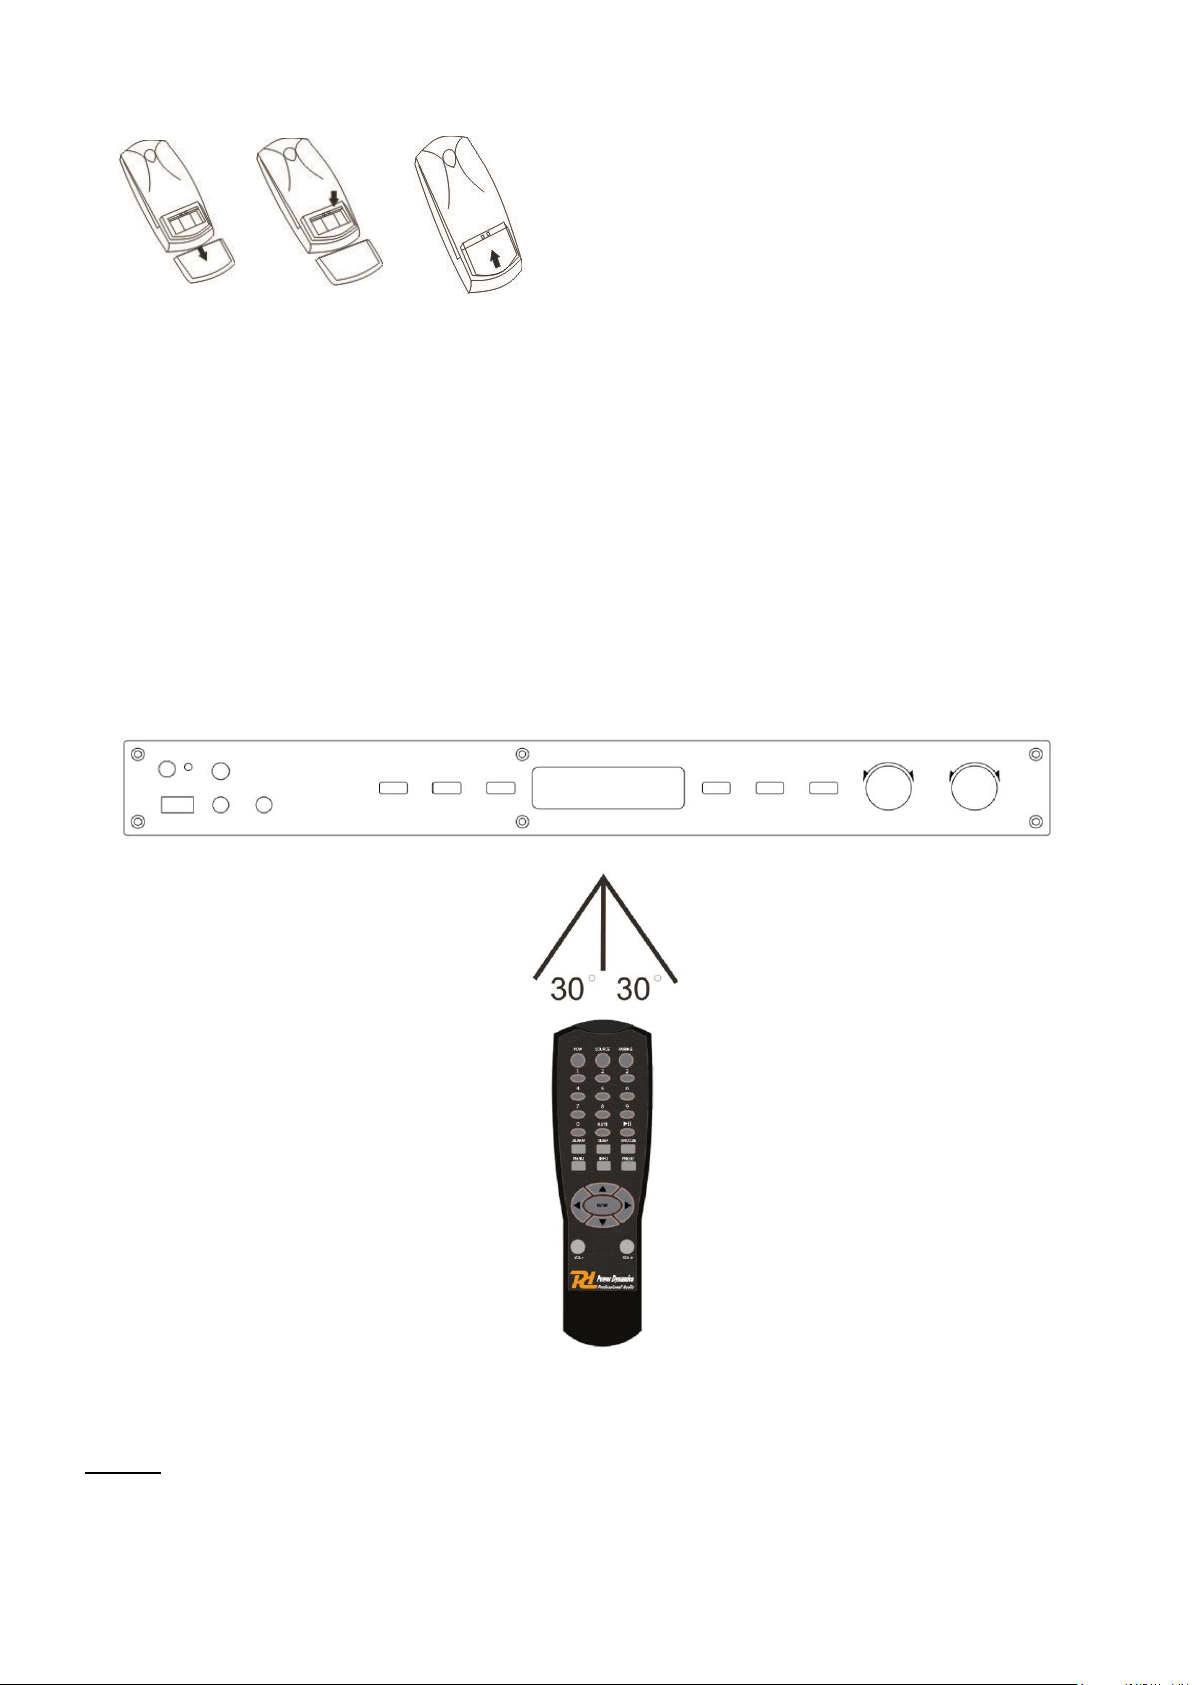
31
Instrukcje do zdalnego sterowania
1. Otwórz komorę baterii
2. Włóż baterie AAA (UM-4). Upewnij się, że pasują do oznaczeń + i - baterii do oznaczeń w komorze baterii.
3. Zamknij pokrywę baterii..
UWAGA: Nieprawidłowe użycie baterii może spowodować wyciek z baterii i korozję. Aby prawidłowo obsługiwać pilota,
postępuj zgodnie z poniższymi instrukcjami:
• Nie wkładaj baterii do pilota zdalnego sterowania w złym kierunku.
• Nie ładuj, nie podgrzewaj, nie otwieraj ani nie zwieraj akumulatorów. Nie wrzucaj baterii do ognia.
• Nie pozostawiaj martwych lub wyczerpanych baterii w pilocie.
• Nie używaj razem różnych typów baterii ani nie mieszaj starych i nowych baterii.
• Jeśli nie korzystasz z pilota przez dłuższy czas, wyjmij baterie, aby uniknąć możliwego uszkodzenia spowodowanego
korozją akumulatora.
• Jeśli pilot zdalnego sterowania nie działa poprawnie lub zakres roboczy się zmniejsza, wymień wszystkie baterie na
nowe.
• Jeśli dojdzie do wycieku baterii, wytrzyj akumulator z komory baterii, a następnie włóż nowe baterie.
Baterie mogą być używane przez rok w normalnych warunkach.
DZIAŁANIE PILOTA
Odległość: w odległości 7 m od przedniej części czujnika zdalnego sterowania.
Kąt: w obrębie 300 w każdym kierunku z przodu czujnika zdalnego.
UWAGA:
● Nie należy upuszczać ani szokować pilota zdalnego sterowania.
● Nie kładź ciężkich przedmiotów na pilocie.
● Nie rozlewaj wody ani innych płynów na pilocie.
● Nie otwieraj pilota zdalnego sterowania.
1 2 3
Page 32

32
TECHNICAL SPECIFICATION / TECHNISCHE SPECIFICATIE / TECHNISCHE
DATEN / ESPECIFICACIONES TÉCNICAS / SPÉCIFICATIONS TECHNIQUES /
SPECYFIKACJA TECHNICZNA
Input: 3.5 mm jack
Power supply: 220-240VAC 50Hz
Dimensions : 290 x 485 x 45mm
Weight: 2.40kg
The specifications are typical. The actual values can slightly change from one unit to the other. Specifications can
be changed without prior notice.
The products referred to in this manual conform to the European Community Directives to which they are subject:
• Low Voltage (LVD) 2014/35/EU
• Electromagnetic Compatibility (EMC) 2014/30/EU
• Restriction of Hazardous Substances (RoHS) 2011/65/E
Specifications and design are subject to change without prior notice.
www.tronios.com
Copyright © 2018 by Tronios The Netherlands
Page 33

 Loading...