

Page 1
USB MIDI Controller with Sound Card
Ref. nr.:172.820
INSTRUCTION MANUAL
GEBRUIKSAANWIJZING
BEDIENUNGSANLEITUNG
MANUAL DE INSTRUCCIONES
MANUEL D'INSTRUCTIONS
INSTRUKCJA OBSŁUGI
V1.0
Page 2
2
ENGLISH
Congratulations to the purchase of this Power Dynamics product. Please read this manual thoroughly prior to using the unit in
order to benefit fully from all features.
Read the manual prior to using the unit. Follow the instructions in order not to invalidate the warranty. Take all precautions to
avoid fire and/or electrical shock. Repairs must only be carried out by a qualified technician in order to avoid electrical shock.
Keep the manual for future reference.
- Prior to using the unit, please ask advice from a
specialist. When the unit is switched on for the first time,
some smell may occur. This is normal and will disappear
after a while.
- The unit contains voltage carrying parts. Therefore do
NOT open the housing.
- Do not place metal objects or pour liquids into the unit
This may cause electrical shock and malfunction.
- Do not place the unit near heat sources such as
radiators, etc. Do not place the unit on a vibrating
surface. Do not cover the ventilation holes.
- The unit is not suitable for continuous use.
- Be careful with the mains lead and do not damage it. A
faulty or damaged mains lead can cause electrical shock
and malfunction.
- When unplugging the unit from a mains outlet, always
pull the plug, never the lead.
- Do not plug or unplug the unit with wet hands.
- If the plug and/or the mains lead are damaged, they
need to be replaced by a qualified technician.
- If the unit is damaged to such an extent that internal
parts are visible, do NOT plug the unit into a mains outlet
and DO NOT switch the unit on. Contact your dealer. Do
NOT connect the unit to a rheostat or dimmer.
- To avoid fire and shock hazard, do not expose the unit to
rain and moisture.
- All repairs should be carried out by a qualified technician
only.
- Connect the unit to an earthed mains outlet (220240Vac/50Hz) protected by a 10-16A fuse.
- During a thunderstorm or if the unit will not be used for a
longer period of time, unplug it from the mains. The rule
is: Unplug it from the mains when not in use.
- If the unit has not been used for a longer period of time,
condensation may occur. Let the unit reach room
temperature before you switch it on. Never use the unit in
humid rooms or outdoors.
- To prevent accidents in companies, you must follow the
applicable guide lines and follow the instructions.
- Do not repeatedly switch the fixture on and off. This
shortens the life time.
- Keep the unit out of the reach of children. Do not leave
the unit unattended.
- Do not use cleaning sprays to clean switches. The
residues of these sprays cause deposits of dust and
grease. In case of malfunction, always seek advice from
a specialist.
- Do not force the controls.
- This unit is with speaker inside which can cause
magnetic field. Keep this unit at least 60cm away from
computer or TV.
- This unit is with built-in lead-acid rechargeable battery.
Please recharge the battery every 3 months if you are
not going to use the unit for a long period of time. Or the
battery may be damaged.
- If the battery is damaged please replace with same
specifications battery. And dispose the damaged battery
environment friendly.
- If the unit has fallen, always have it checked by a
qualified technician before you switch the unit on again.
- Do not use chemicals to clean the unit. They damage the
varnish. Only clean the unit with a dry cloth.
- Keep away from electronic equipment that may cause
interference.
- Only use original spares for repairs, otherwise serious
damage and/or dangerous radiation may occur.
- Switch the unit off prior to unplugging it from the mains
and/or other equipment. Unplug all leads and cables
prior to moving the unit.
- Make sure that the mains lead cannot be damaged when
people walk on it. Check the mains lead before every use
for damages and faults!
- The mains voltage is 220-240Vac/50Hz. Check if power
outlet match. If you travel, make sure that the mains
voltage of the country is suitable for this unit.
- Keep the original packing material so that you can
transport the unit in safe conditions.
This mark attracts the attention of the user to high voltages that are present inside the housing and that are of sufficient
magnitude to cause a shock hazard.
This mark attracts the attention of the user to important instructions that are contained in the manual and that he should
read and adhere to.
The unit has been certified CE. It is prohibited to make any changes to the unit. They would invalidate the CE certificate and
their guarantee!
NOTE: To make sure that the unit will function normally, it must be used in rooms with a temperature between 5°C/41°F and
35°C/95°F.
Electric products must not be put into household waste. Please bring them to a recycling centre. Ask your local authorities or your
dealer about the way to proceed. The specifications are typical. The actual values can slightly change from one unit to the other.
Specifications can be changed without prior notice
Do not attempt to make any repairs yourself. This would invalid your warranty. Do not make any changes to the unit. This would also invalid
your warranty. The warranty is not applicable in case of accidents or damages caused by inappropriate use or disrespect of the warnings
contained in this manual. Power Dynamics cannot be held responsible for personal injuries caused by a disrespect of the safety
recommendations and warnings. This is also applicable to all damages in whatever form.
Page 3
3
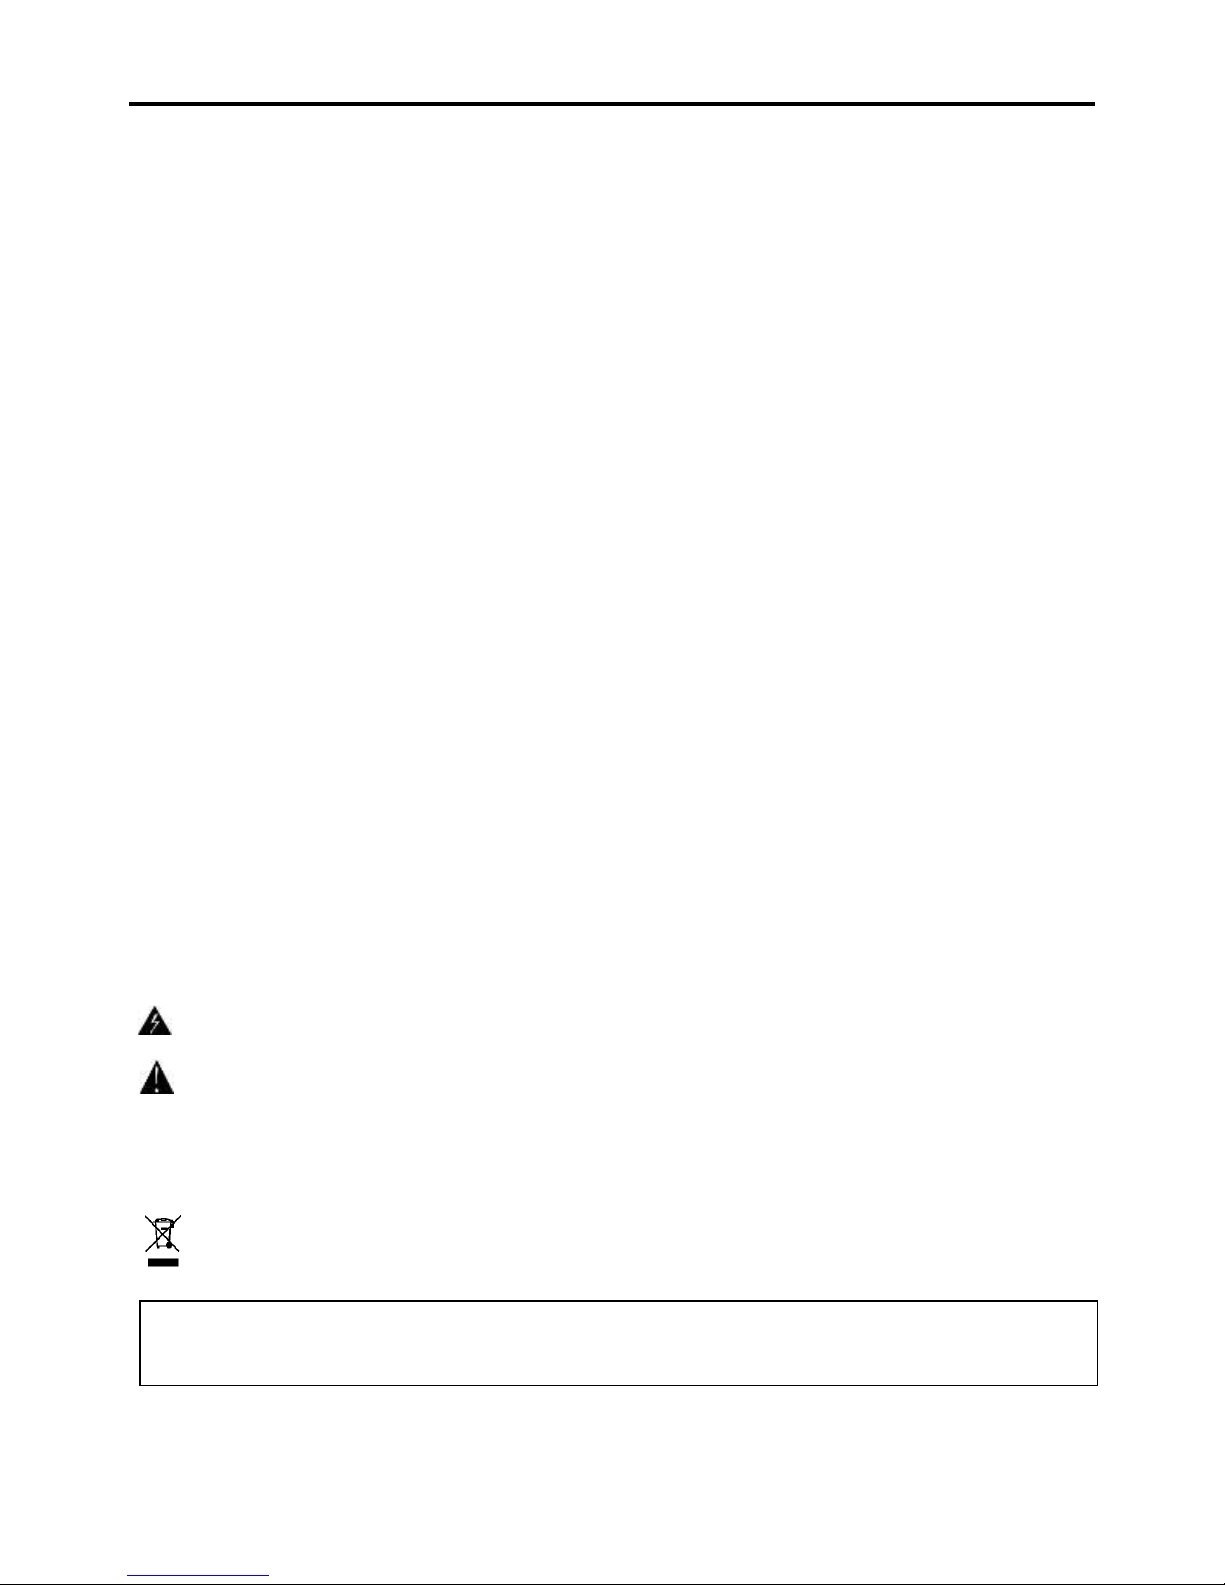
CONTROLPANEL
The functions of the control elements described below apply when using the PDC-07 with the
supplied DJ software Virtual DJ LE which is designed to integrate seamlessly with the controller.
1. Button effect selector
For selecting an effect.
2. Button effect on
Switches the selected effect on and off.
3. Button sync
To synchronize the beats per minute to
the other deck.
4. Button sampler play
To restart the sample selected last.
5. Button load A
To load the title selected in the browser
section into Deck A.
6. Button folder select
To activate the browser section and to jump
back to the main directory.
7. Track encoder
Turn the control to browse the drives and
folders
of the computers. Press the control to select
subdirectories.
8. Control again
Adjust the input amplification.
9. Treble tone equalizer
Adjust the treble tone of the music of the
deck.
10. Middle tone equalizer
Adjust the middle tone of the music of the
deck.
11. Bass tone equalizer
Adjust the bass tone of the music of the
deck.
12. Loop shift button (shorten)
Half the loop length- the minimum length of a
loop is one computer beat grid (CBG).
13. “Loop inn” button
Mark the start point of a loop.
14. “Loop out” button
Mark the end point of a loop and start
looping. Press it again to quit the loop.
Page 4

4
15. Loop shift button (lengthen)
Double the loop length-the maximum length of a loop is 32 CBG.
16. Pitch button
The pitch button allows you to change the adjustable pitch range from +-6% to +-100%
17. Button master tempo
For constant pitch when the speed has been changed with the pitch slide control
18. Pitch slide control
Sets the speed (if the button MASTER TEMPO lights up, the tonal pitch will not be changed). Slide the
control up to decrease the pitch, slide it down to increase it..
19. Buttons hot cue 1-3
To store and to call up to three cue points per title.
20. Buttons pitch “bend +”and “bend”
The function pitch bend creates a temporary changes of speed. As long as the buttons are pressed, the
pressed, the title is played slower or faster.
21. PC/LINE toggle
Toggles between the LINE input or PC signal for playback and control
22. Play Button
To start playback and for stutter effects.
23. Touch jog wheel
The touch jog wheel is used for scratching or searching.
24. Pause Button
To switch to pause and to jump to cue points.
25. Cue Button
For return to the beginning of the little or a cue point defined before.
26. Channel fader
Adjusts the channel level
27. Power indicator
Lights up when the DJ controller is on
28. Crossfader
For crossfading between Deck A and Deck B. In mid position both decks can be heard at the same volume.
29. Control booth volume
Level control for the output booth
30. Effect parameter 1 adjustment knob
Adjust the first parameter (if any) of the selected effect.
31. Effect parameter 2 adjustment knob
Adjust the second parameter (if any) of the selected effect.
32. Control sample selector
For selecting and playing samples.
33. Control sampler level
For adjusting sample level
34. LED level meter L/R
6-digi LED meter of the stereo master signal within the range of -13dB to +3dB.
35. Search button
Press to turn on/off the searching function of the touch jog wheel. With the search function, you can go to a
specific point in the music on the deck easily by turning the touch jog wheel.
36. Scratch button
Press to turn on/off the scratch function of the touch jog wheel. Noted that the touch jog wheel cannot be
used for scratching and searching at same time.
37. Touch jog wheel sensor LED
Lights when the touch jog wheel is touched.
38. BPM Button
Sets the number of beats per minute (BPM) of a title manually. For this press the button several times to
the beat of the music.
Page 5
5
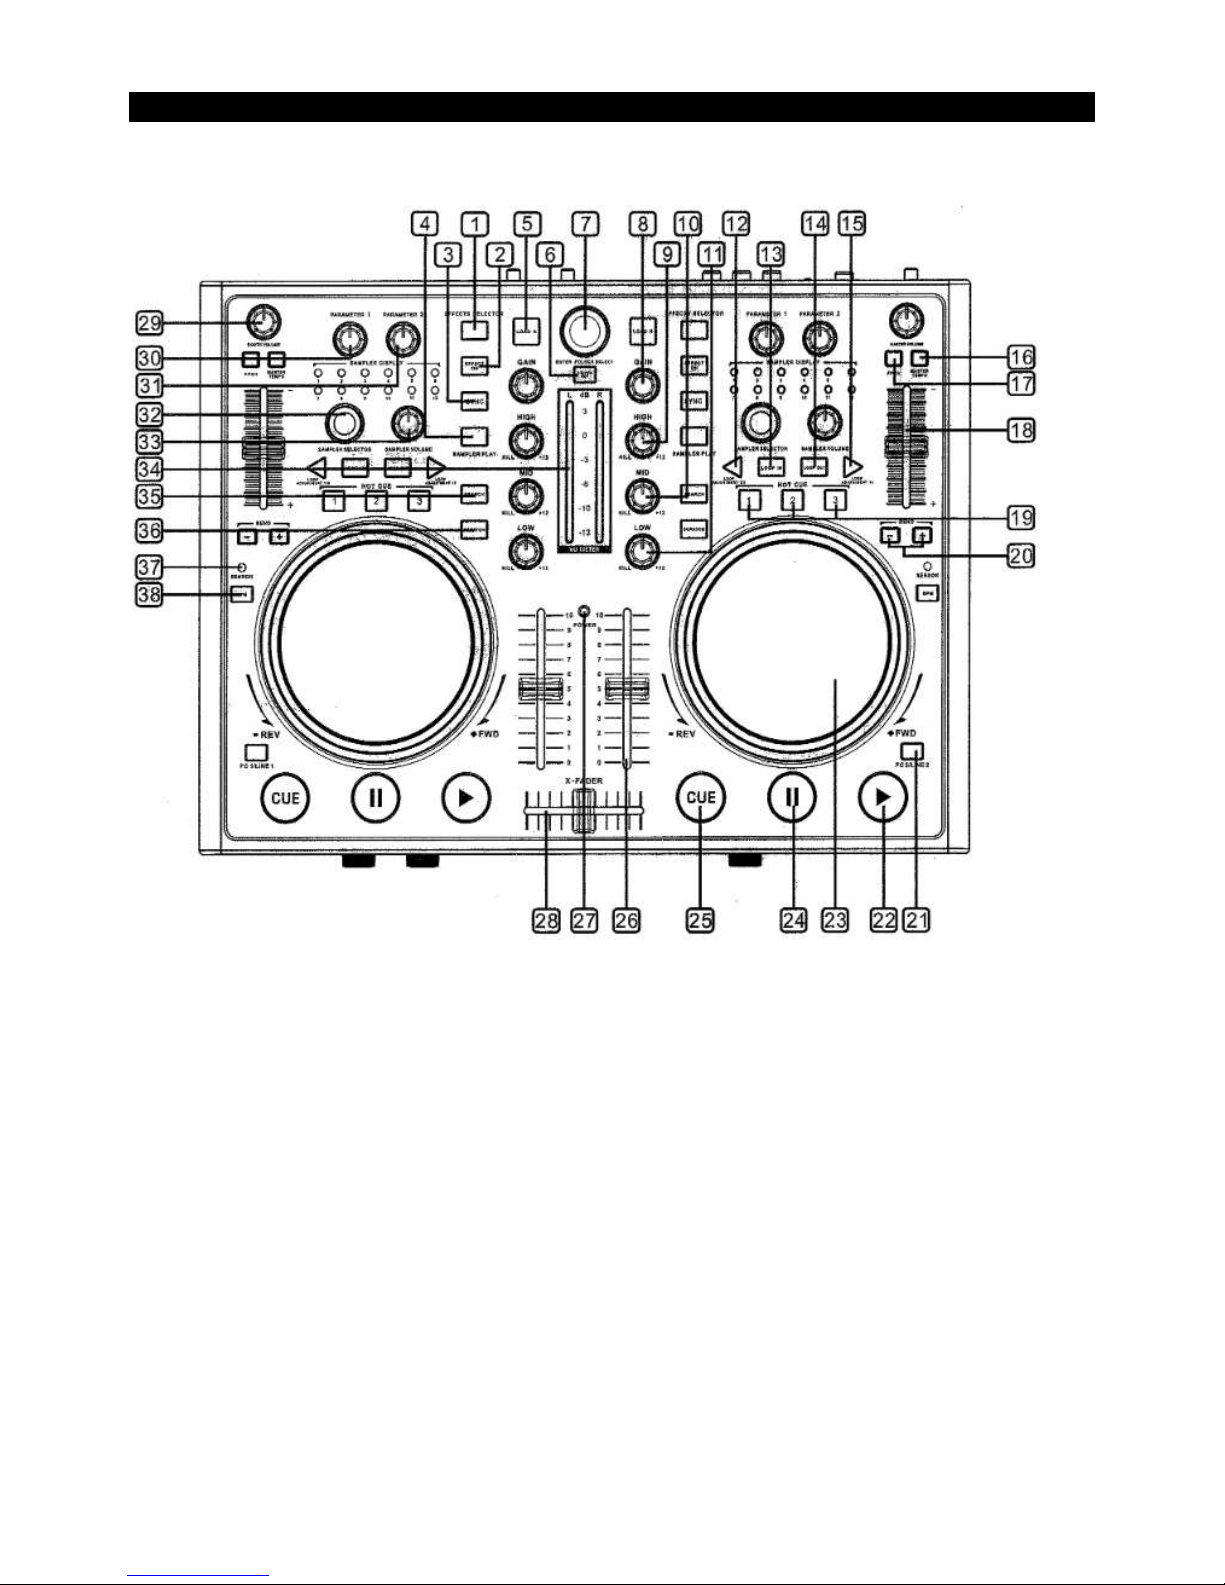
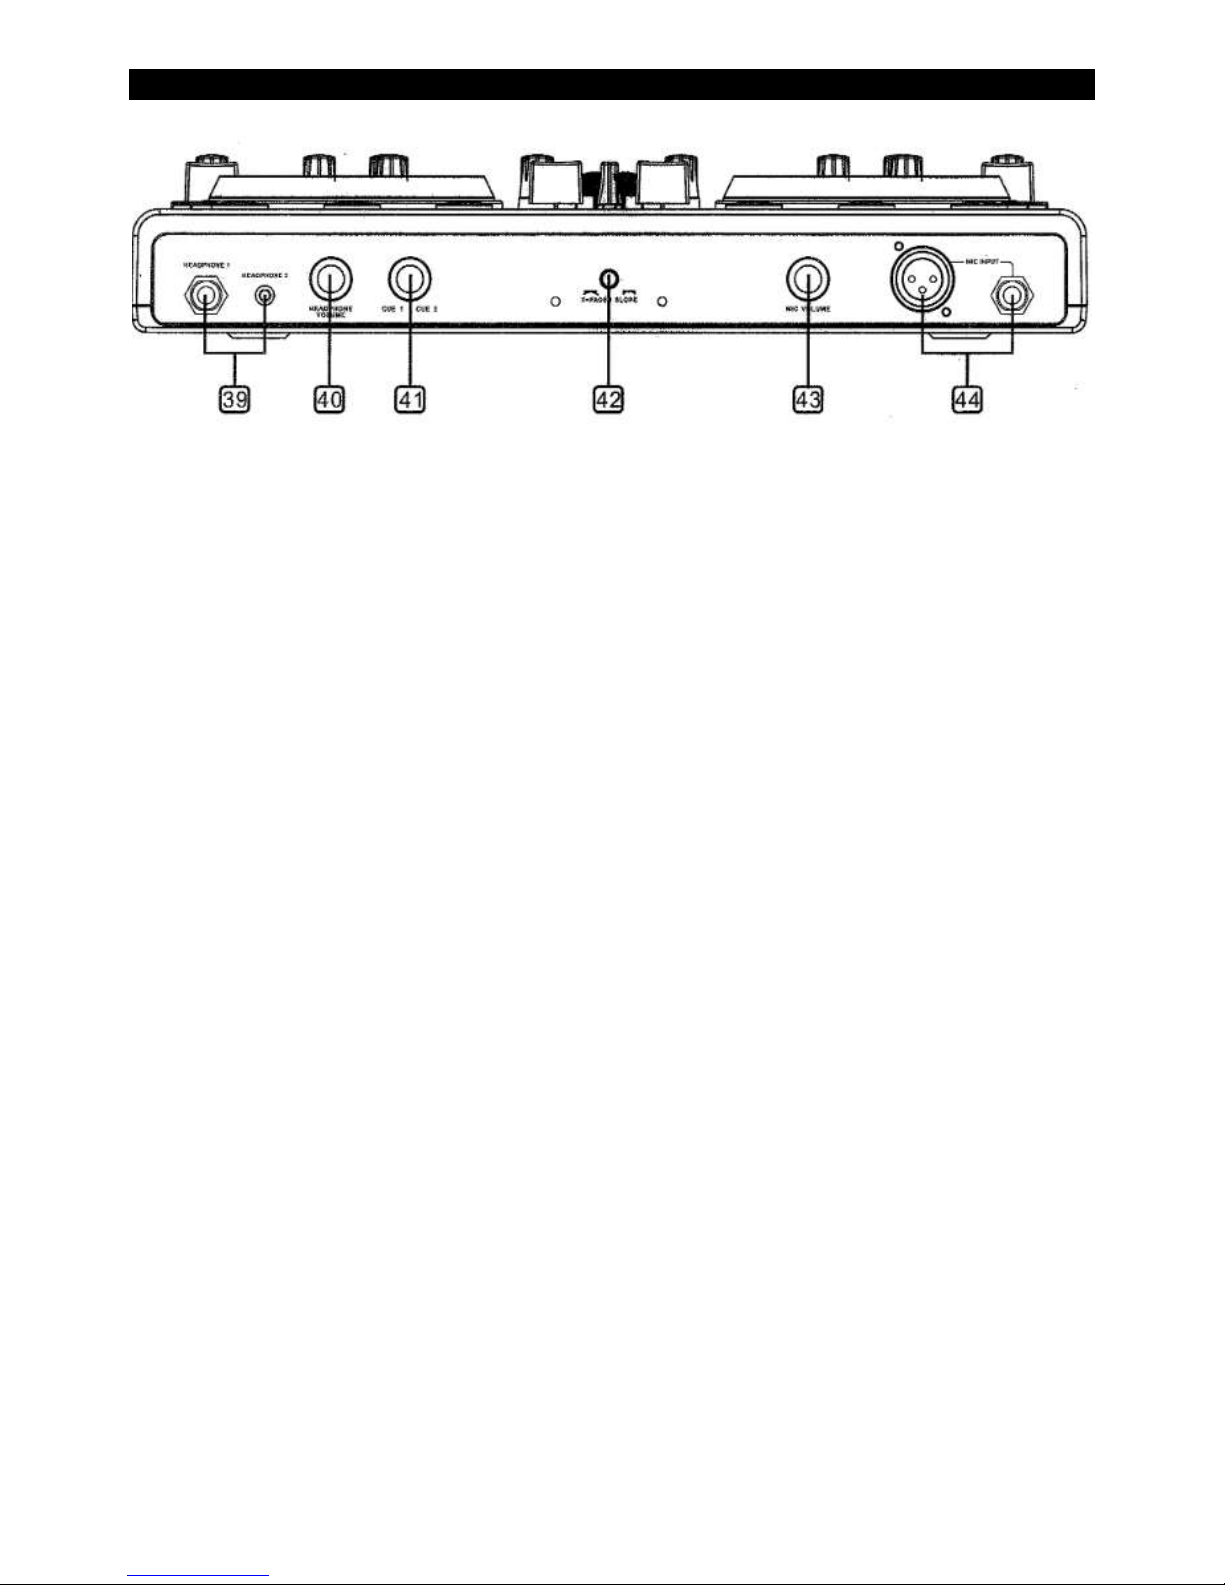
FRONTPANEL
39. Headphones inputs
6.3mm and 3.5 mm jacks headphone 1 and 2 for connecting stereo headphones (impedance >8Ω).
40. Control cue level
Level control for headphones connected to the jacks headphone 1 and 2.
41. Control CUE
For selecting and crossfading the monitoring signal for the headphones depending on the cue mode
selector switch: Mode cue: The pre-fader level of Deck A and Deck B is monitored. Mode split: The prefader level and the master signal is monitored.
42. Control x-fader curve
Adjust the characteristic of the crossfader: Left position: smooth crossfading (gradual transition) e.g. for
lone mixes. Right position: sharp crossfading (abrupt transition) e.g. scratching and cutting.
43. Control mic level
Level control for DJ microphones connected to the jacks MIDI MIC.
44. Microphone inputs midi mic
Input jacks for connecting DJ microphones via XLR or a 6.3 mm plugs.
Page 6

6
REARPANEL
45. Grounding screw
If you intend to use a turntable, you will need to ground the RCA cable(s) by screwing in the grounding
fork(s) to the grounding screw located on the rear panel of the mixer.
46. Convertible line/phone RCA input
The unit has a convertible line/phone RCA input that accepts a standard dual L&R RCA connection.
47. Phone/Line switch
This small switch allow you to convert the RCA input connection between a phone (turntable) input or a
Line Level (MP3, CD, cassette deck, etc.)input The unit has a convertible Line/phone RCA.
48. Recording output REC
Stereo output (RCA) for connecting a recording unit. The recording level is independent of the output
controls: master control, master level and booth volume.
49. Master output, unbalanced
Un-balanced stereo output (RCA) for connecting an amplifier or other units with line level inputs. The
output supplies an audio signal coming from the computer or the signal of an external source at the line
input depending on the position of the selector switch PC/Line.
50. Output booth
Stereo output (RCA) for connecting a further amplifier, e.g. for the monitoring system or PO application in a
secondary root. The output supplies an audio signal coming from the computer or the signal of an external
source at the line input depending on the position of the selector switch PC/Line.
51. Power input
For connecting the unit alternatively to power supply via the adapter connection (power adapter not
included).
52. Power selector switch
Position adaptor: power supply is via the included power unit position off: controller is power off position
USD: power supply is via the USB connection
53. Power input
For connecting the unit to power supply via the USB connection.
54. Master output, balanced
Independently adjustable balanced stereo output (XLR) of the master signal for connecting an amplifier or
other units with line level inputs. The output supplies an audio signal coming from the computer or the
signal of an external source at the line input-depending on the position of the selector switch PC/Line.
Page 7
7
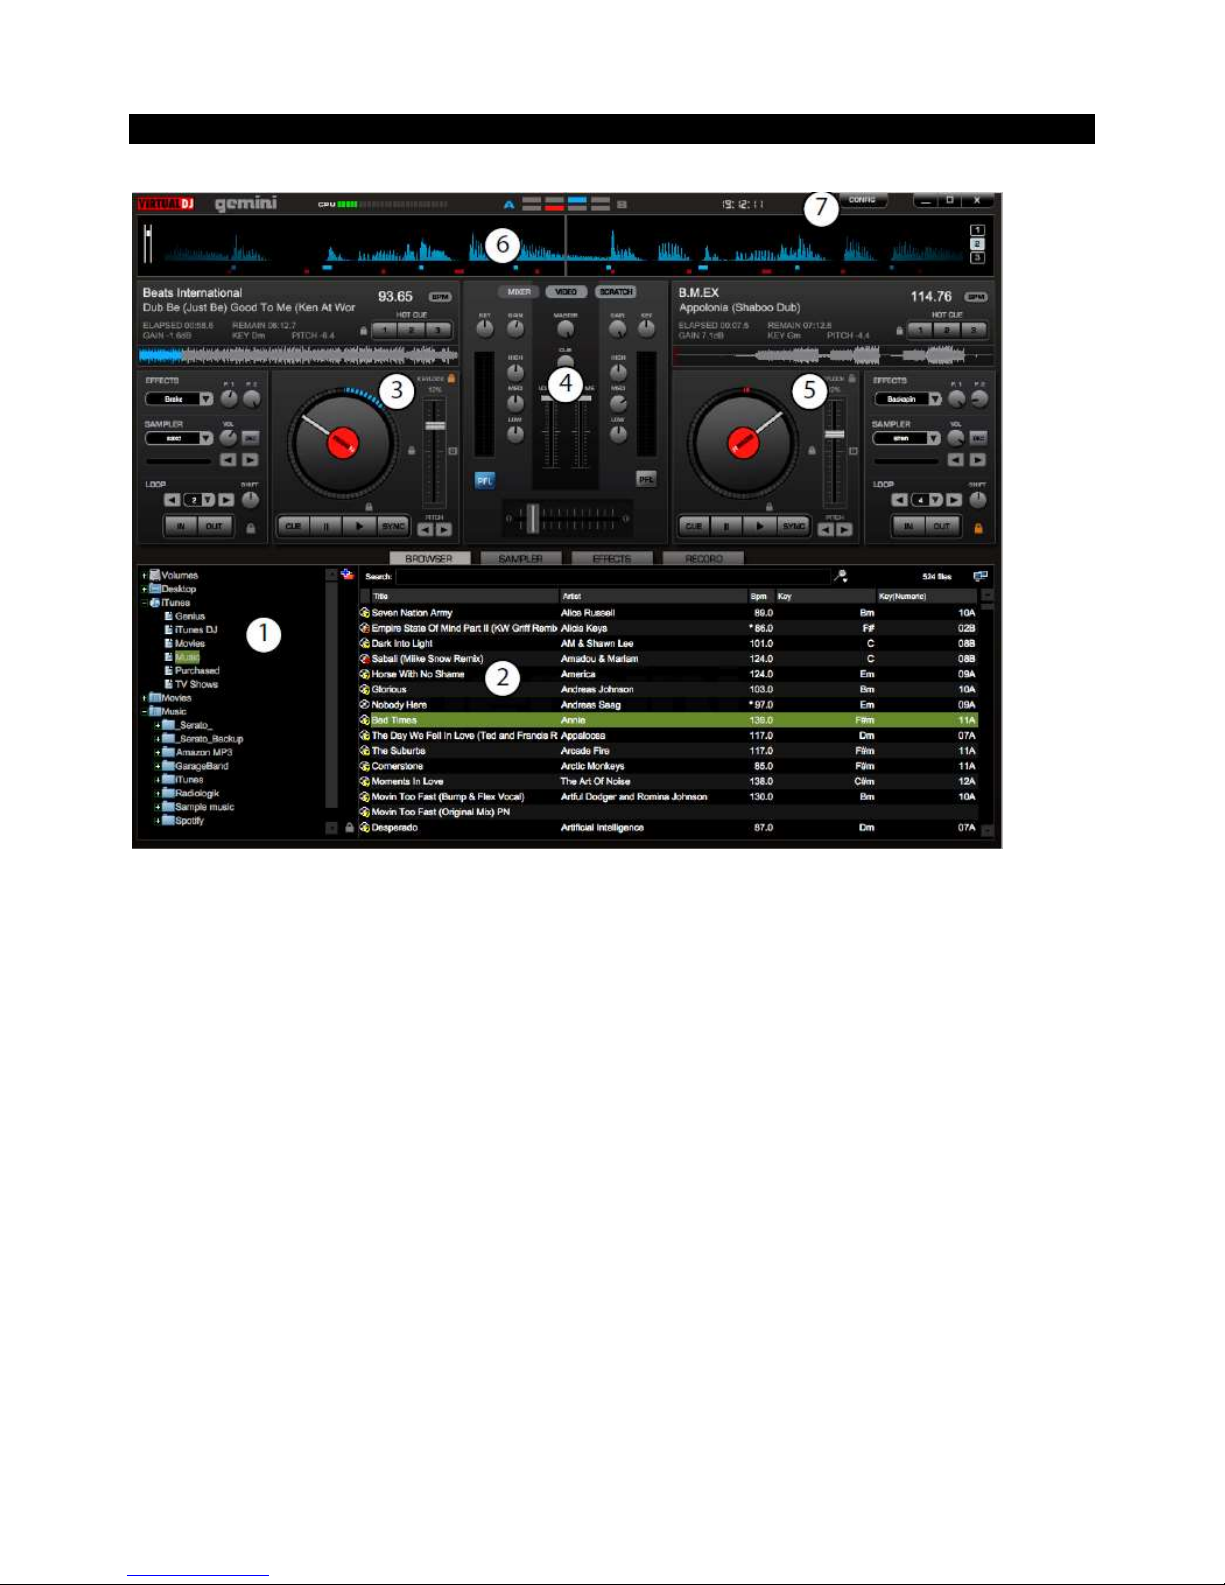
VIRTUAL DJ LE
1. Browser section
Lists all compatible drives and folders of the computer in a tree structure.
2. Search field
For searching titles in the data base of the computer. Several criteria can be selected.
3. Control panel Deck A
4. Mixer section
Switchable to video or scratch mode.
5. Control panel Deck B
6. Rhythm window
7. Button CONFIG
For calling the configuration menu
Page 8
8
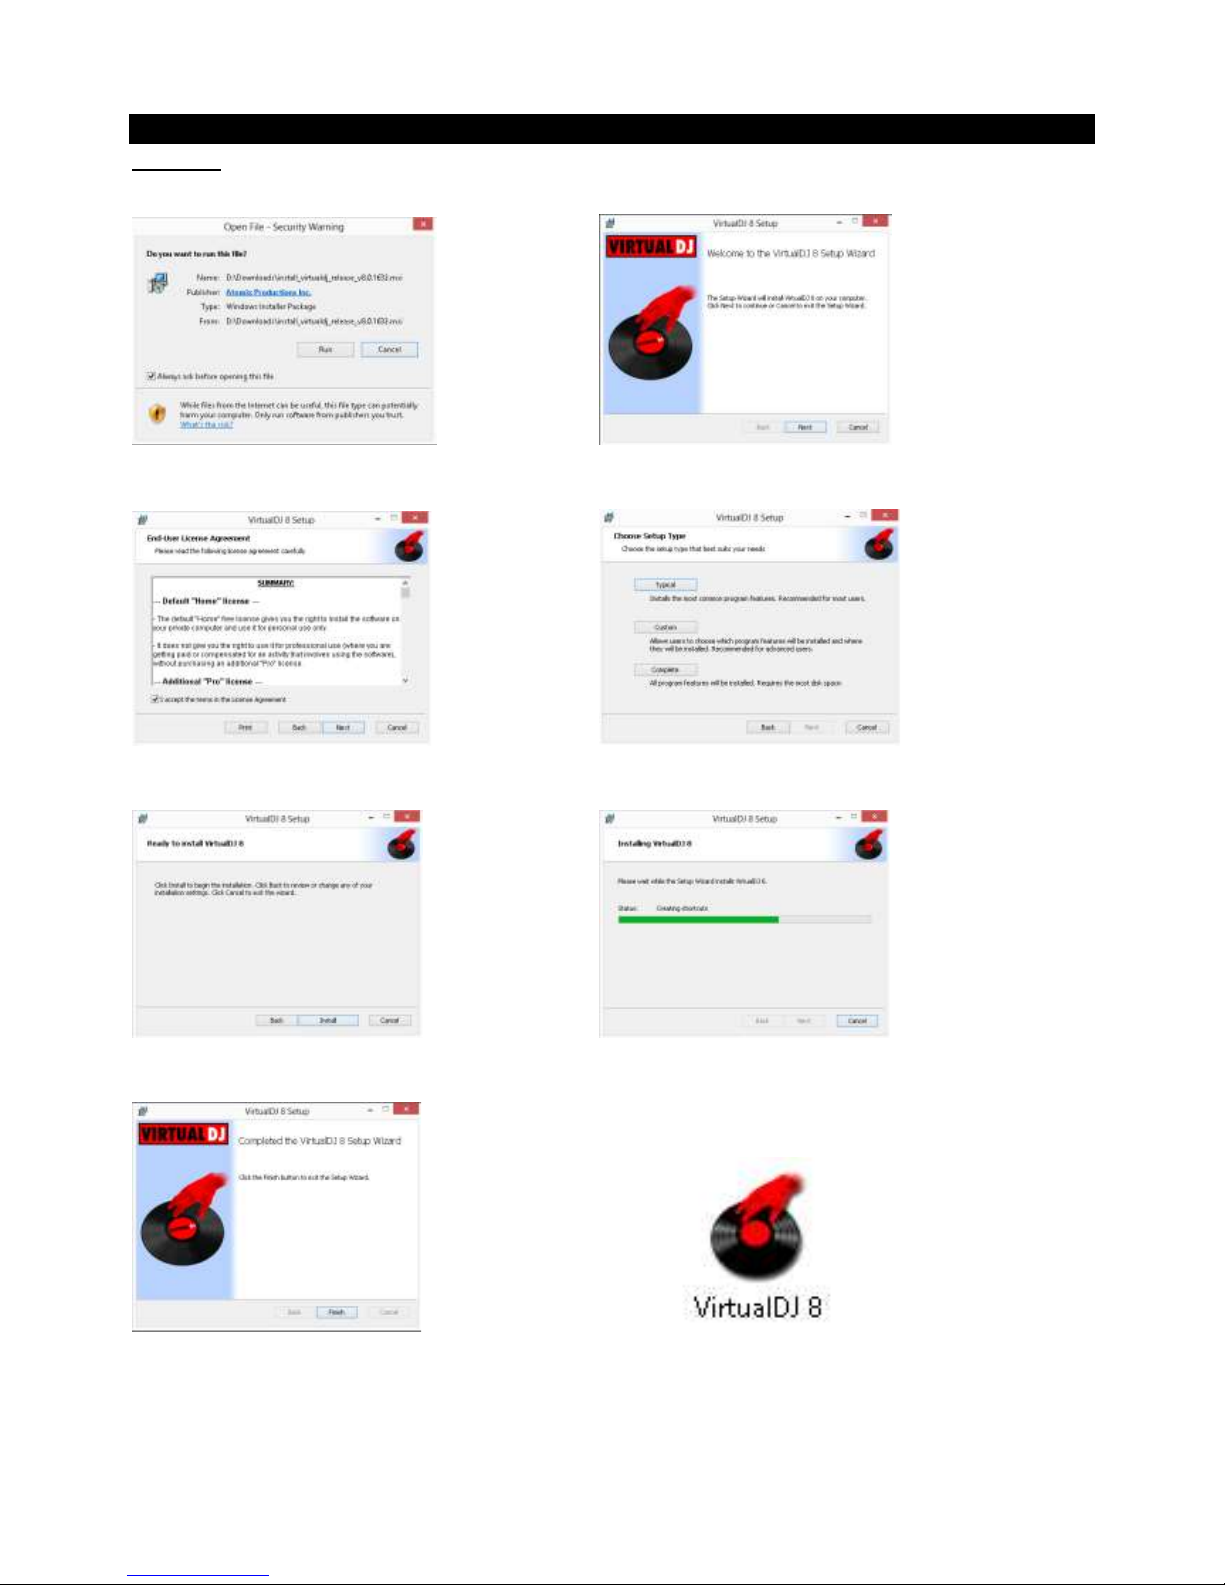
INSTALLING THE SOFTWARE VIRTUAL DJ (LE) AND SEVERAL VERSIONS
Windows:
1. Allow the installation to run. 2. Welcome screen…Next.
3. Accept User License Agreement. 4. Choose setup type (typical).
5. Ready to install….Install. 6. Copying files…
7. Finish Installation…Finish. 8. Installation complete, icon on desktop.
Page 9

9
Mac:
1. Click continue to begin install. 2. Click continue if agree with License
3. Click agree to accept License Agreement 4. Select installation drive…Continue
5. Ready to install…Install. 6. Enter password for installing applications.
7. Validating package.. 8. Configuring
Page 10

10
9. Once ready click close to finish 10. Installation complete, icon on desktop
ACTIVATING THE SOFTWARE
1. After opening the following screen will appaer, just login or create account.:
2. When you don’t have an account see steps below:
Page 11

11
3. Finish activating and start having fun!
UPGRADE
With the included limited edition of the DJ software Virtual DJ you have the benefit of purchasing the extensive pro
version at a discount price. Current conditions regarding the price can be found under virtualdj.com. The pro
version can be tested for 20 days. For this call the configuration menu/info with button CONFIG.
USING THE CONTROLLER WITH OTHER APPLICATIONS
Each rotary control, button, wheel or fader of the PDC-07 is assigned with its own unique MIDI note (Note no.) or
Continuous Controller (CC) number (cc no.) and MIDI channel. Each time you turn a control, push a button, turn a
wheel or move a fader, the PDC-07 send out MIDI data that is received and interpreted by your music software. To
control your music software with the PDC-07 make sure the program is configured to receive MIDI data generated
by the PDC-07. Configuration varies from software to software. Refer to your program’s documentation to learn
how to do this. Most audio applications now have a MIDI learn function which allows you to quickly assign the
control elements of the PDC-07 to control specific parameters within the software. If your software does not have
this functionality, it may still be possible to manually assign the program’s features to be controlled by the specific
MIDI CC data generated by the control elements of the PDC-07. Refer to your program’s user documentation to
find out how to do this.
Page 12

12
USING THE CONTROLLER WITH OTHER APPLICATIONS
1. Set up the controller on a plane, flat surface
2. You can connect a DJ microphone (balanced or unbalanced optionally via an XLR plug or a 6.3 mm plug to
the respective microphone input MIDI MIC on the front panel. Balanced cables provide +6 dB more output
and guarantee a better protection against interference in case of long cable runs. The microphone signal is
directly mixed to the signal sum.
3. For pre-fader listening to both decks of for monitoring the sum signal ahead of the output controls MASTER
CONTROL and BOOTH VOLUME, it is possible to connect stereo headphones optionally via a 6.3mm plug
to input HEADPHONE 1 or a 3.5mm plug to input HEADPHONE 2 on the front panel.
4. For connecting amplifiers, several stereo outputs with individual level controls are available:
- Connect the main amplifiers to the unbalanced RCA output MASTER and/or to the balanced XLR output
BAL OUT.
Page 13

13
- If a monitoring system is available, connect the amplifier of the monitoring system to the RCA output
BOOTH.
5. For analogue sound recordings, connect a recording unit to the output REC. The recording level is
independent of the position of the outputs controls MASTER CONTROL, MASTER LEVEL and BOOTH
VOLUME.
6. Instead of the audio signal coming from the computer, the master outputs and the booth output can also
supply the signal of an external signal source with line level output (e.g. CD player). Use the stereo RCA
jacks LINE INPUT for connecting the unit.
7. By operating the controller with a computer and units grounded via the mains cable (e.g. amplifier), noise
interference may occur due to ground loops. To eliminate this interference, a ground isolator.
CONNECTING A COMPUTER
1. Set the power selector switch to the position USB for power supply via the USB connection of the
computer.
2. Use the supplied USB cable to connect the controller to an available USB port on your computer. As soon
as the controller is connected to a computer, it will be recognized as a generic USB audio device and the
required drivers are installed. The power indicator lights up red to indicate that the controller is receiving
power from the USB bus. The controller can be used in conjunction with your computer’s soundcard
without causing conflicts. You may connect and disconnect the controller at any time.
3. The controller is supplied with power via the USB connection of the computer. However, if the connection
should not supply sufficient power (e.g. when connected to a non-powered USD hub), use a 5V power unit
(not included): Connect the cable of the power unit to the power input DC in 5V/1A and the power unit to a
power outlet. Set the power selector switch to the position ADAPTOR. Use the unit only with a 5V/1A
adapter. Always disconnect the mains connector when you wish to change connections, move the unit to a
different place or if it is not used for a longer period.
4. After connecting, start the DJ software Virtual DJ LE. If the program has already been started prior to the
connection, it must be terminated and restarted, otherwise the controller cannot be operated.
CONFUGURATION OF THE CONTROLLER
Page 14

14
1. Call the software configuration menu with the button CONFIG and configure the program for operation with
the PDC-07 in the tab Sound Setup.
2. In control panel Sound card, select the settings HEADPHONES. The two output channels master and
headphones will be available for the connector. If required, you can switch the output channels in the
adjacent control panel.
3. In control panel Sound card, select the setting 2 CARDS and in the adjacent panel the settings USB
AUDIO MAIN(=master channel) and USB AUDIO PHONE(=headphones channel).
4. Leave control panel input at NONE and confirm your settings with Apply.
LOADING TITLES FROM THE COMPUTER’S DATABASE
1. On the lower left side of the screen is the browser section of the software, which lists all compatible drives
and folders of the computer in a tree structure. From here you can access your music and video files. With
Virtual DJ PRO it is possible to create further navigation tools such as virtual folders, play and waiting lists,
and filters. With the function NetSearch you can search for titles and videos on the internet.
2. Shortly press the button ENTER/FOLDER SELECT to activate the browser section. Then turn the track
encoder to select a directory. Press the encoder to select subdirectories. With the button ENTER/FOLDER
SELECT you can jump back to the main directory. The search results window lists the titles with various
information: title, artist and beats per minute. Virtual DJ PRO displays further data of ID3 tags and MP4 and
MOV tags, e.g. with cover flow.
3. To search titles in the database of the computer enter the search term in the search field. Via the selector
button, several search criteria can be selected. The results will be shown below in the search result
window.
4. Select the desired title with the track encoder and press the button LOAD to load the tittle into Deck A or
press the button LOAD B to load it into Deck B. After loading, the display of the deck shows the name of
the artist and the title as well as the beats per minute, the elapsed and remain time, the gain level the key
and the pitch percentage.
Page 15

15
PLAYING A TITLE
Virtual DJ PDC-07
1. Press the button PLAY (>) to start playback from starting point of the title (time index 00:00) or click the
right mouse button over the button PAUSE (||) to start the titlefrom the first detected bass beat.
2. Pressing the button PLAY (>) several times in play mode, will restart the title from the current position,
creating a sutter effect.
3. Press the button PAUSE (||) to interrupt playback. Pressing the button several times will cycle trough the
strating point of the title and all cue points.
4. The unit stops at the end of the title. Howaever, the title remains in the deck until another title will be
loaded.
BASIC ADJUSTMENT OF THE MIXER
Virtual DJ PDC-07
1. For basic adjustment set the master controls MASTER CONTROL and MASTER LEVEL, the crossfader
and in both channels the controls GAIN and the equalizers to mid-position.
2. Advance the two channel faders approx. to 2/3 of the maximum for sufficient way for fading in and out.
3. Play a title with Deck A and control is obtained if level values in the 0 dB range are shown at average
volume. If the red LEDs of the output meter light up, there is an overload of the channel. Stop the playback
on Deck A and adjust Deck B at the same way.
Page 16

16
4. Adjust the desired sound with the tone controls of the channel. By adjusting the three tone controls, the
high frequencies (control HIGH), the midrange frequencies (control MID), and the low frequencies (control
LOW) can be boosted or substantially attenuated. With the controls in mid-position, the frequency response
is not affected. Sound adjustments affect the level. Readjust the channel level with the gain control, if
necessary.
5. Adjust the low frequencies for the output signal at the balanced master output with the control BASS
LEVEL.
6. Adjust the definite level of the output signal at the master outputs with the controls MASTER CONTROL
and MASTER LEVEL.
7. Adjust the desired signal level for the output BOOTH with the control BOOTH VOLUME.
8. The recording signal at the recording output REC is taken off ahead of the output controls, i.e. it is not
affected by the controls MASTER CONTROL, MASTER LEVEL and BOOTH VOLUME.
CROSSFADING BETWEEN THE DECKS
1. The crossfader allows crossfading between both decks:
- crossfader moved to the left: fade-in Deck A and fade-out Deck B
- crossfader moved to the right: fade-in of Deck B and fade-out Deck A
- for hearing the signals of the two Decks at the same level, set the crossfader to mid-position
2. The characteristic of the crossfader can be adjusted with the control X-FADER CURVE:
- left position: smooth crossfading (gradual transition) e.g. for long mixes
- right position: sharp crossfading (abrupt transition) e.g. for scratching and cutting.
ANNOUNCEMENTS VIA THE DJ MICROPHONE
Announcements via the DJ microphone are directly mixed to the master signal. Use the control MIC LEVEL to
adjust the desired volume.
PREFADER LISTENING TO THE CHANNELS
The cue function allows monitoring each of the decks via headphones even if the corresponding channel is faded
out. Thus, it is possible, e.g. play the beginning of a title, to set a cue point, or to adjust a continuous loop without
the audience listening in. Alternatively it is possible to monitor the current music program ahead of the controls
MASTER CONTROL and BOOTH VOLUME.
1. Use the cue mode selector switch to select the cue mode for the headphones:
- position CUE: The pre-fader level of Deck A is on one side and the pre-fader level of Deck B is on the
other side of the headphones.
- position SPLIT: The pre-fader level (mono) is on one side and the master signal (mono) is on the other
side of the headphones.
2. Use the control cue to select and crossfader the monitoring signal for the headphones:
- mode CUE: Turn the control to the left to monitor Deck A, turn the control to the right to monitor Deck B.
in mid-position, both decks can be heard at the same time.
- mode SPLIT: Turn the control to the left to monitor the pre-fader level, turn the control to the right to
monitor the master signal. In mid-position, both signals can be heard at the same volume.
3. Adjust the desired headphones volume with the control CUE LEVEL.
FAST FORWARD AND REVERSE
For fast forward and reverse first activate the search function for the jogdail by shortly pressing the button SEARCH
(orange LED lights up). Then turn the jogdail in the corresponding direction. In order to quickly jump to a certain
spot in the title, click on the corresponding position in the signal diagram or in the position ring around the turntable
platter.
RETURN TO THE STARTING POINT OF THE TITLE OR TO A DENIED SPOT
To quickly jump to a defined spot, three starting point can be stored permanently for the buttons HOT CUE 1 to 3.
The cue points well be kept even after closing the program and can be overwritten at any time. With the button Cue
Page 17

17
you can return to the beginning of the title or a cue point defined before, and momentarily play the title.
Button CUE
1. To jump to the starting point of a title, press the button CUE in pause or play mode. Now the unit is in
pause mode at the starting point of the title (LED of the button CUE lights up red).
2. After jumping to the cue point, playback can be started with the button PLAY. Alternatively, you can keep
the button CUE pressed and momentarily play the title. As soon as you release the button the unit instantly
returns to the cue point and is in pause mode
3. If cue points have been stored with the buttons HOT CUE 1 to 3, pressing the button CUE will not return
you to the starting point of a title but to the cue point stored last.
Button HOT CUE
1. To set a cue point while playing a title, either press one of the buttons HOT CUE 1 to 3 when the desired
spot is reached (fly cue) or set the unit to pause at the desired spot with the button PAUSE precisely select
the desired spot with jogdail, and then press one of the buttons HOT CUE 1 to 3.
2. It is now possible to jump to the corresponding cue points with the buttons HOT CUE 1 to 3. The title is
played from the cue point.
3. Pressing the buttons HOT CUEA 1 to 3 several times will restart the title from the cue point, creating a
stutter effect.
4. To overwrite a cue point, first press the button CUE and then press the desired button HOT CUE 1 to 3.
PITCH ADJUSTMENT
The playback speed can be adjusted variably up to +-100% with the pitch slide control.
1. The adjusting range for the speeds is pre-set to +-25%. Each push of the button PITCH switches between
+-100%, +-6%, +-12% and back to +-25%.
2. Then slide up the pitch control to decrease the pitch and slide it down to increase it. The display shows the
percentage deviation from the standard speed. The number of beats changes accordingly.
3. The control lock into place in mid-position. In this position a title is played at standard speed.
ACTIVATING THE MASTER TEMPO FUNCTION
With the change of speed, the tonal pitch is also changed proportionally. However, with the function Master Tempo
activated, it will remain constant. For this press the button MASTER TEMPO (LED lights up). The key lock symbol
is lights up orange in the display.
MATCHING THE BEAT BETWEEN DECK A AND DECK B
The speed and the beats of two titles on Deck a and B can precisely be synchronized. Thus the rhythm will not be
interrupted while crossfading from one deck to other. As visual aid, the speed/rhythm of both decks is displayed in
waveform in the rhythm window above the decks. The peaks represent beats. The squares below represent the
position of measures in 4/4 times of the CBG (Computer Beat Grid). The large squares mark the beginning of a
measure 4/4 time. The CBG is particularly useful, e.g., when mixing a title at the time of an intro where the beat is
not yet present. Two titles are precisely synchronized when the peaks of both waveforms and the CBG squares at
the same time.
1. To synchronize, the title to crossfade to should be monitored via headphones.
2. Start the playback and press the button SYNC of the deck to which crossfading is desired. Thus the speeds
and the beats of the title are precisely matched to the title on the other deck.
3. In order to synchronized the beginnings of the 4/4 measure the large squares of the CBG must overlap. For
this use the jogdail with activated scratch mode: shortly before the large squares overlap, let go of the
jogdail. Then press the button S?YNC for a slight correction.
4. It is also possible to use the buttons PITCH BEND to charge the speed for beat synchronizations. As long
as one of the buttons PITCH BEND + or – is kept pressed, the title is played faster or slower.
PLAYING A CONTINUOUS LOOP SYNCHRONIZED WITH THE BEAT
A section within a title can be repeated as a seamless continuous loop as many times as desired. These loops are
synchronized with the beat of the title trough the smart loop function of the software (key symbol lights orange).
Page 18

18
1. In play mode, shortly actuate the button LOOP IN when the desired starting point of the loop is reached.
2. Shortly actuate the button LOOP OUT when the desired end point of the loop is reached. The section
between the starting point and the end point of the loop is continuously repeated.
3. Press the arrow buttons LOOP ADJ to adjust the loop exactly 1, 2, 4, 8, 18 or 32 beats. Via the software’s
rotary control SHIFT, the loop length can be adjusted by half-length or double length increments.
4. To exit the loop and to continue the title, press the button LOOP OUT.
5. To program another loop, redefine the starting and the end point with the buttons LOOP IN and LOOP
OUT.
EFFECT FUNCTIONS
Switching on effects:
1. Select the desired effect by pressing the button EFFECT SELECTOR repeatedly. The display of the deck
shows the selected effect.
Effect:
Backspin
Flanger
Beat Grid
Flippin Double
Brake
Key Changer
Echo
Vocals+
Filter
2. Press the button EFFECT ON (LED lights up) to switch on the selected effect. Ion the display, the selector
panel is highlighted red. To switch off the effect press the button once again (LED extinguishes).
3. Adjust the parameters of the effects as desired with the control PARAMETER 1 and 2.
Playing samples:
There are six pre-set samples available which can be combined as desired. The software allows you to record your
own samples and assign them to the other six storages places. For this click button REC and adjust the desired
length with the arrow buttons.
1. Turn the control SAMPLE SELECTOR to select the desired sample. The corresponding LED lights up red.
No:
Sample:
1
Siren
2
Saxophone
3
Put your hands up
4
Push
5
Pump it up
6
This this this
7-12
Freely assignable
2. Press the control to play the sample. In the display, the selector panel is highlighted green. The sample is
played until you press the control once again. If required, further samples can be activated and played in
the same way.
3. Adjust the level of the sampler unit with the control SAMPLER VOLUME. Via the software’s arrow buttons,
the sample length can be adjusted by half-length or double length increments.
4. The button SAMPLER PLAY can be used for stutter effects. By shortly pressing the button several times,
the sample selected last is restarted creating stutter effects.
Scratch effects:
Press the button SCRATCH (LED lights up) to switch on the scratch function for the jogdail. Turn the jogdail back
and forth to create scratch effects. To switch off the function press the button SCRATCH one again (LED
extinguishes).
Page 19

19
Droning effects:
The jogdail can also be used for droning effects. The scratch function, the fast search and the master tempo
function must not be activated. Turn the jogdail back and forth to increase or reduce the playing speeds, generating
a droning effect.
Stutter effects:
The cue points stored with the buttons HOT CUE 1 to 3 as well as the BUTTON PLAY (>) can be used for creating
stutter effects. Shortly press one of the buttons to create a stutter effect.
ESPAÑOL
Felicitaciones a la compra de este producto Power Dynamics. Por favor lea atentamente este manual antes de usar el aparato
para disfrutar al completo de sus prestaciones.
Seguir las instrucciones le permite no invalidar la garantía. Tome todas las precauciones para evitar que se produzca fuego o
una descarga eléctrica. Las reparaciones solo deben llevarse a cabo por técnicos cualificados para evitar descargas eléctricas.
Guarde el manual para futuras consultas.
Antes de usar el aparato, por favor pida consejo a un profesional. Cuando el aparato se enciende por primera vez, suele
sentirse cierto olor. Esto es normal y desaparece al poco tiempo.
- Este aparato contiene piezas que llevan voltaje. Por lo
tanto NO abra la carcasa.
- No coloque objetos metálicos o vierta líquidos dentro del
aparato Podría producir descargas eléctricas y fallos en
el funcionamiento.
- No coloque el aparato cerca de fuentes de calor tipo
radiadores, etc. No coloque el aparato en superficies
vibratorias. No tape los agujeros de ventilación.
- Este aparato no está preparado para un uso continuado.
- Tenga cuidado con el cable de alimentación y no lo
dañe. Un daño o defecto en el cable de alimentación
puede producir una descarga eléctrica o fallo en el
funcionamiento.
- Cuando desconecte el aparato de la toma de corriente,
siempre tire de la clavija, nunca del cable.
- No enchufe o desenchufe el aparato con las manos
mojadas.
- Si la clavija y/o el cable de alimentación están dañados,
necesitan reemplazarse por un técnico cualificado.
- Si el aparato está dañado de modo que puedan verse
sus partes internas, NO conecte el aparato a la toma de
corriente y NO lo encienda. Contacte con su distribuidor.
NO conecte el aparato a un reostato o dimmer.
- Para evitar un fuego o peligro de descarga, no exponga
el aparato a la lluvia y a la humedad.
- Todas las reparaciones deben llevarse a cabo
exclusivamente por técnicos cualificados.
- Conecte el aparato a una toma de corriente con toma de
tierra (220-240Vca/50Hz) protegida por un fusible de 1016A.
- Durante una tormenta o si el aparato no va a usarse
durante un periodo largo de tiempo, desconéctelo de la
toma de corriente. La regla es: Desconéctelo si no lo va
a usar.
- Si el aparato no se ha usado en mucho tiempo puede
producirse condensación. Deje el aparato a temperatura
ambiente antes de encenderlo. Nunca utilice el aparato
en ambientes húmedos o en el exterior.
- Para prevenir accidentes en las empresas, debe seguir
las directrices aplicables y seguir las instrucciones.
- No lo apague y encienda repetidamente. Esto acorta su
tiempo de vida.
Page 20

20
- Mantenga el aparato fuera del alcance de los niños. No
deje el aparato sin vigilancia.
- No utilice sprays limpiadores para limpiar los
interruptores. Los residuos de estos sprays producen
depósitos de polvo y grasa. En caso de mal
funcionamiento, siempre consulte a un profesional.
- No fuerce los controles.
- Si el aparato se ha caído, siempre haga que lo verifique
un técnico cualificado antes de encenderlo otra vez.
- NO utilice productos químicos para limpiar el aparato.
Dañan el barniz. Tan solo límpielo con un trapo seco.
- Manténgalo lejos de equipos electrónicos ya que pueden
producir interferencias.
- Solo utilice recambios originales para las reparaciones,
de otro modo pueden producirse daños serios y/o
radiaciones peligrosas.
- Apague el aparato antes de desconectarlo de la toma de
corriente y/o de otros equipos. Desconecte todos los
cables y conexiones antes de mover el aparato.
- Asegúrese de que el cable de alimentación no puede
dañarse cuando la gente lo pise. Compruebe el cable de
alimentación antes de cada uso por si hay daños o
defectos.
- El voltaje de funcionamiento es 220-240Vca/50Hz.
Compruebe que la toma de corriente coincide. Si tiene
que viajar, asegúrese de que el voltaje del país es el
adecuado para este aparato.
- Guarde el embalaje original para poder transportar el
aparato en condiciones seguras.
Esta señal advierte al usuario de la presencia de alto voltaje en el interior de la carcasa y que es de la suficiente
magnitud como para producir una descarga eléctrica.
Esta señal advierte al usuario de que el manual contiene instrucciones importantes que han de leerse y seguirse al pie
de la letra.
NOTA: Para asegurarse de que el aparato funcione correctamente, debe usarse en ambientes a una temperatura de entre
5°C/41°F y 35°C/95°F.
Los productos electrónicos no pueden tirarse a la basura normal. Por favor lleve este producto a un centro de reciclaje. Pregunte a la
autoridad local en caso de duda. Las especificaciones son generales. Los valores actuales pueden variar de una unidad a otra. Las
especificaciones pueden variar sin previo aviso.
FRANÇAIS
Nous vous remercions d’avoir acheté un produit Power Dynamics. Veuillez lire la présente notice avant l’utilisation afin de
pouvoir en profiter pleinement.
Veuillez lire la notice avant toute utilisation. Respectez impérativement les instructions afin de continuer à bénéficier de la
garantie. Prenez toutes les précautions nécessaires pour éviter tout incendie ou décharge électrique. Seul un technicien
spécialisé peut effectuer les réparations. Nous vous conseillons de conserver la présente notice pour pouvoir vous y reporter
ultérieurement.
- Avant d’utiliser l’appareil, prenez conseil auprès d’un
spécialiste. Lors de la première mise sous tension, il est
possible qu’une odeur soit perceptible. C’est normal,
l’odeur disparaîtra peu de temps après.
- L’appareil contient des composants porteurs de tension.
N’OUVREZ JAMAIS le boîtier.
- Ne placez pas des objets métalliques ou du liquide sur
l’appareil, cela pourrait causer des décharges électriques
et dysfonctionnements..
- Ne placez pas l’appareil à proximité de sources de
chaleur, par exemple radiateur. Ne positionnez pas
l’appareil sur une surface vibrante. N’obturez pas les
ouïes de ventilation.
- L’appareil n’est pas conçu pour une utilisation en
continu.
- Faites attention au cordon secteur, il ne doit pas être
endommagé.
- Lorsque vous débranchez l’appareil de la prise secteur,
tenez-le par la prise, ne tirez jamais sur le cordon.
- Ne branchez pas et ne débranchez pas l’appareil avec
les mains mouillées.
- Seul un technicien spécialisé peut remplacer la fiche
secteur et / ou le cordon secteur.
- Si l’appareil est endommagé et donc les éléments
internes sont visibles, ne branchez pas l’appareil, NE
L’ALLUMEZ PAS. Contactez votre revendeur. NE
BRANCHEZ PAS l’appareil à un rhéostat ou un dimmer.
- Pour éviter tout risque d’incendie ou de décharge
électrique, n’exposez pas l’appareil à la pluie ou à
l’humidité.
- Seul un technicien habilité et spécialisé peut effectuer les
réparations
- Branchez l’appareil à une prise secteur 220-240 Vac/50
Hz avec terre, avec un fusible 10-16 A.
- Pendant un orage ou en cas de non utilisation prolongée
de l’appareil, débranchez l’appareil du secteur.
- En cas de non utilisation prolongée de l’appareil, de la
condensation peut être créée. Avant de l’allumer, laissez
l’appareil atteindre la température ambiante. Ne l’utilisez
jamais dans des pièces humides ou en extérieur.
- Afin d’éviter tout accident en entreprise, vous devez
respecter les conseils et instructions.
Nunca intente reparar usted mismo este equipo. Esta manipulación anulará la garantía. No realice cambios en la unidad. Esta
manipulación anulará la garantía. Esta garantía no es aplicable en caso de accidente o daños ocasionados por uso indebido del aparato
o mal uso del mismo. Power Dynamics no se hace responsable de daños personales causados por el no seguimiento de las normas e
instrucciones de este manual. Esto es aplicable también a los daños de cualquier tipo.
Page 21

21
- N’allumez pas et n’éteignez pas l’appareil de manière
répétée. Cela réduit sa durée de vie.
- Conservez l’appareil hors de la portée des enfants. Ne
laissez pas l’appareil sans surveillance.
- N’utilisez pas d’aérosols pour nettoyer les interrupteurs.
Les résidus créent des dépôts et de la graisse. En cas
de dysfonctionnement, demandez conseil à un
spécialiste.
- Ne forcez pas les réglages.
- L’appareil contient un haut-parleur pouvant engendrer
des champs magnétiques. Tenez cet appareil à 60 cm
au moins d’un téléviseur ou ordinateur.
- Cet appareil contient un accumulateur rechargeable au
plomb. Rechargez-le tous les trois mois en cas de non
utilisation prolongée de l’appareil sinon l’accumulateur
pourrait être endommagé.
- Si l’accumulateur est endommagé, remplacez-le par un
accumulateur de même type et déposez l’ancien
accumulateur dans un container de recyclage adapté.
- Si l’appareil est tombé, faites-le toujours vérifier par un
technicien avant de le rallumer.
- Pour nettoyer l’appareil, n’utilisez pas de produits
chimiques qui abîment le revêtement, utilisez
uniquement un tissu sec.
- Tenez toujours l’appareil éloigné de tout équipement
électrique pouvant causer des interférences.
- Pour toute réparation, il faut impérativement utiliser des
pièces d’origine, sinon il y a risque de dommages graves
et / ou de radiations dangereuses.
- Eteignez toujours l’appareil avant de le débrancher du
secteur et de tout autre appareil. Débranchez tous les
cordons avant de déplacer l’appareil.
- Assurez-vous que le cordon secteur n’est pas abîmé si
des personnes viennent à marcher dessus. Avant toute
utilisation, vérifiez son état.
- La tension d’alimentation est de 220-240Vac/50 Hz.
Vérifiez la compatibilité. Si vous voyagez, vérifiez que la
tension d’alimentation du pays est compatible avec
l’appareil.
- Conservez l’emballage d’origine pour pouvoir transporter
l’appareil en toute sécurité.
Ce symbole doit attirer l’attention de l’utilisateur sur les tensions élevées présentes dans le boîtier de l’appareil, pouvant
engendrer une décharge électrique.
Ce symbole doit attirer l’attention de l’utilisateur sur des instructions importantes détaillées dans la notice, elles doivent
être lues et respectées.
Cet appareil porte le symbole CE. Il est interdit d’effectuer toute modification sur l’appareil. La certification CE et la garantie
deviendraient caduques !
NOTE: Pour un fonctionnement normal de l’appareil, il doit être utilisé en intérieur avec une plage de température maximale
autorisée entre 5°C/41°F et 35°C/95°F.
Ne jetez pas les produits électriques dans la poubelle domestique. Déposez-les dans une décharge. Demandez conseil aux autorisés
ou à votre revendeur. Données techniques réservées. Les valeurs actuelles peuvent varier d’un produit à l’autre. Tout droit de
modification réservé sans notification préalable.
N’essayez pas de réparer l’appareil vous-même. Vous perdriez tout droit à la garantie. Ne faites aucune modification sur l’appareil. Vous perdriez tout droit à la
garantie La garantie deviendrait également caduque en cas d’accidents ou dommages causes par une utilisation inappropriée de l’appareil ou un non respect
des consignes présentes dans cette notice. Power Dynamics ne pourrait être tenu responsable en cas de dommages matériels ou corporels causés par un
non respect des consignes de sécurité et avertissements. Cela est également valable pour tous les dommages quelle que soit la forme.
Page 22

22
Page 23

Declaration of Conformity
Manufacturer: TRONIOS BV
Bedrijvenpark Twente 415
7602 KM – ALMELO
+31(0)546589299
+31(0)546589298
The Netherlands
Product number: ……………………
Product Description: …………………….
Trade Name: POWER DYNAMICS
Regulatory Requirement: EN …………………………….
The product meets the requirements stated in Directives 2014/35/EU and 2014/30/EU and
conforms to the above mentioned Declarations.
Almelo,
16-06-2015
Name : B. Kosters
Controller regulations
Signature :
Page 24

Specifications and design are subject to change without prior notice..
www.tronios.com
Copyright © 2016 by TRONIOS the Netherlands
 Loading...