

Page 1

B
E
-SERI
171.193
171.194
PDA-B1500 2x 750W
PDA-B2000 2x 1000W
Page 2

2 - 32
Page 3
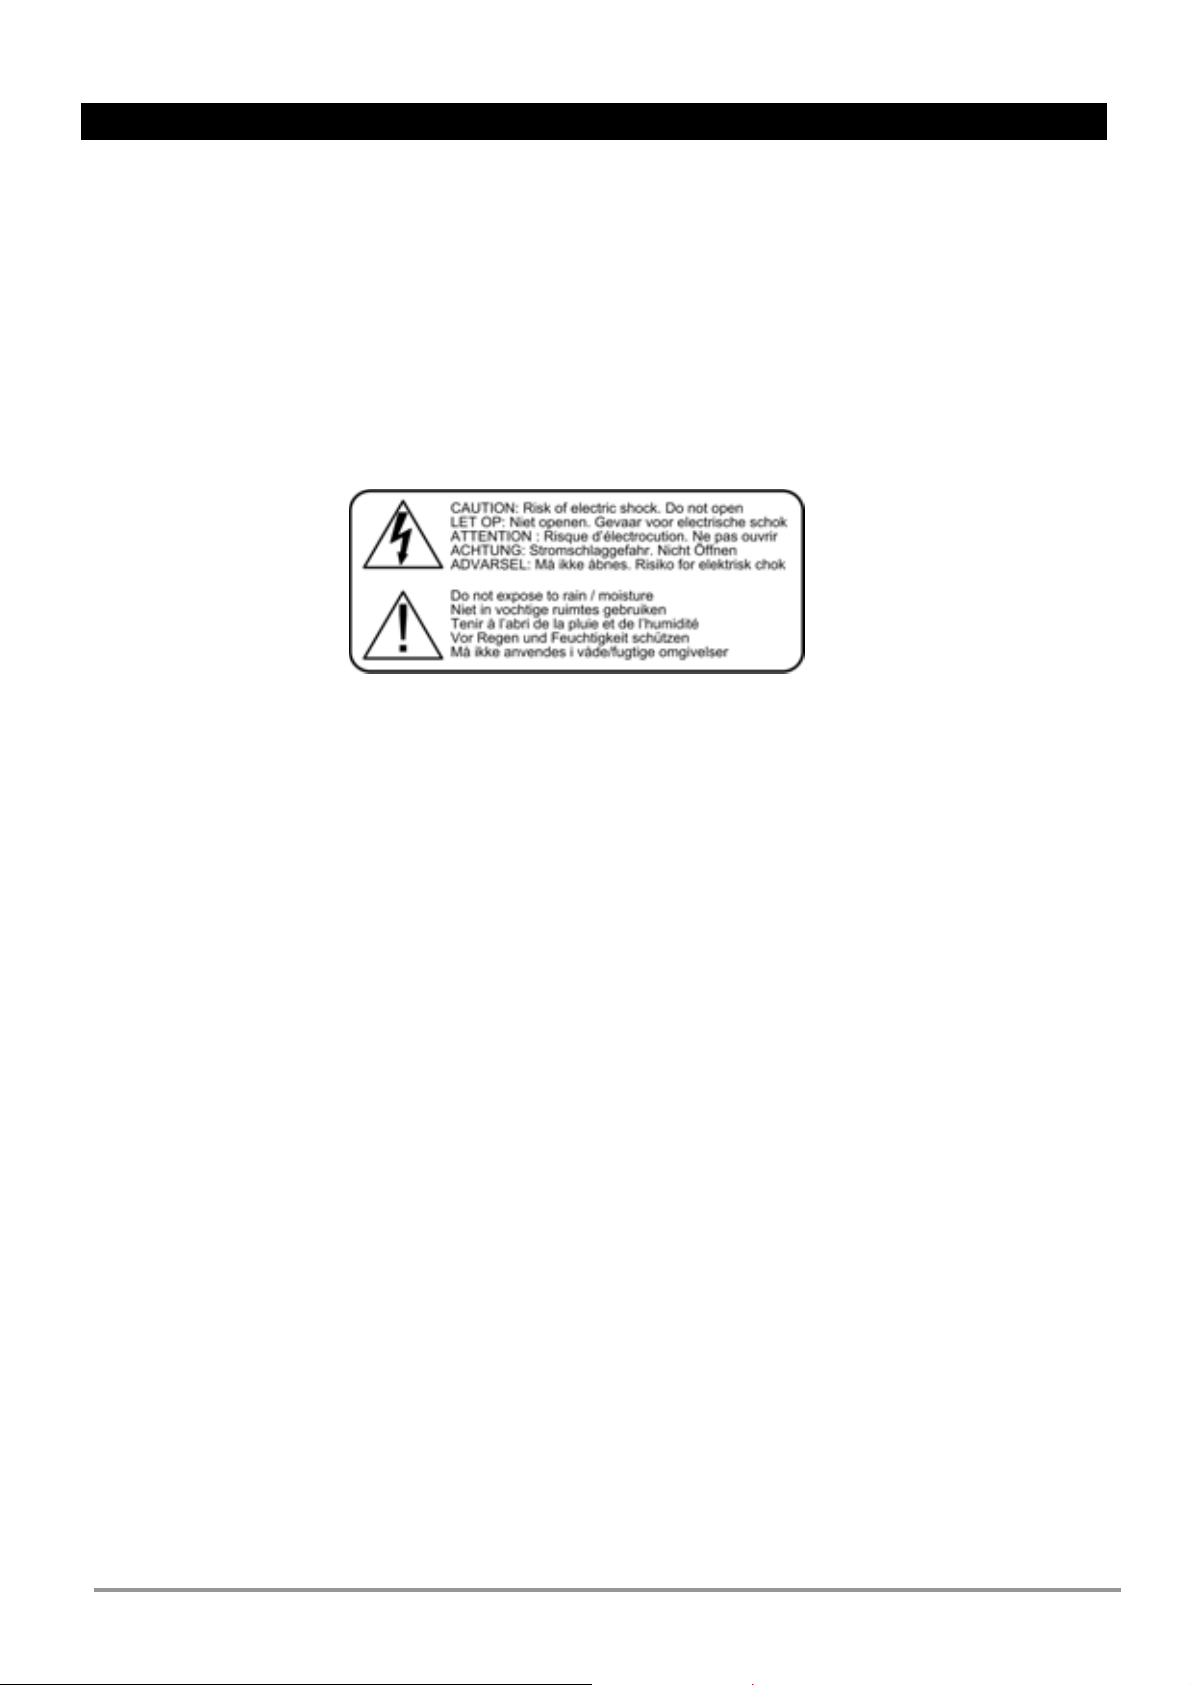
Important Safety Information
WARNING:
TO PREVENT FIRE OR SHOCK HAZARD, DO
NOT EXPOSE THIS APPLIANCE TO RAIN OR
MOISTURE.
CAUTION:
1. Handle the power supply cord carefully
Do not damage or deform the power supply cord.
If it is damaged or deformed, it may cause
electric shock or malfunction when used. When
removing from wall outlet, be sure to remove by
holding the plug attachment and not by pulling
the cord.
2. In order to prevent electric shock, do not open
the top cover. If a problem occurs, contact your
dealer.
3. Do not place metal objects or spill liquid
inside the unit. Electric shock or malfunction
may result.
USE OF CONTROLS OR ADJUSTMENTS OR
REFORMANCE OF PROCEDURES OTHER
THAN THOSE SPECIFIED HEREIN MAY
RESULT IN HAZARDOUS RADIATION
EXPOSURE. THE UNIT SHOULD NOT BE
ADJUSTED OR REPAIRED BY ANYONE
EXCEPT PROPERLY QUALIFIED SERVICE
PERSONNEL DOUBLE INSULATED. WHEN
SERVICING, USE ONLY IDENTICAL
REPLACEMENT PARTS.
CAUTION: TO REDUCE THE NOTE:
RISK OF ELECTRIC SHOCK, DO NOT REMOVE THE COVER (OR BACK ) . THERE ARE NO
SERVICEABLE PARTS INSIDE. REFER SERVICING TO QUALIFIED SERVICE PERSONNEL.
The lightning flash with arrowhead symbol, within an equilateral triangle, is intended to alert
the user to the presence of un insulated
"dangerous voltage" within the product's enclosure that may be of sufficient magnitude to constitute a
risk of electric shock to persons.
The exclamation point within an equilateral triangle is intended to alert the user to the
presence of important operating and maintenance (servicing) instructions in the literature
accompanying the appliance.
NOTE:
This unit may cause interference to radio and television reception
3 - 32
Page 4

Important Safety Instructions
1. Read Instructions – All the safety and operating
instructions should be read before this product is
operated.
2. Retain Instructions - The safety and operating
instructions should be retained for future reference.
3. Heed Warnings - All warnings on the appliance
and in
the operating instructions should be adhered to.
4. Follow Instructions - All operating and use
instructions should be followed.
5. Improper installaction can cause serious damage to
people and property.
6. Water and Moisture - The appliance should not be
used near water - for example, near a bathtub,
washbowl, kitchen sink, laundry tub, in a wet
basement, or near a swimming pool, and the like.
7. Carts and Stands - The appliance should be used
only with a cart or stand that is recommended by the
manufacturer. An appliance and cart
combination should be moved with
care.
Quick stops, excessive force, and
uneven surfaces may cause the
appliance and cart combination to overturn.
8. Wall or Ceiling Mounting - The product should be
mounted to a wall or ceiling only as recommended by
the manufacturer.
9. Heat - The appliance should be situated away
from heat sources such as radiators, heat registers,
stoves, or other appliances (including amplifiers) that
produce heat.
10. Power Sources – This product should be operated
only from the type of power source indicated on the
making label. If you are not sure of the type of power
supply to your home, consult your product dealer or
local power company. For products intended to
operate from battery power, or other sources, refer
the operating instructions.
11. Power-Cord Protection-Power-supply cords
should be routed so that they are not likely to be
walked on or pinched by items placed upon or against
them, paying particular attention to the cord in
correspondence of plugs, convenience receptacles,
and the point where they exit from the appliance.
12. Cleaning - The appliance should be cleaned only
as recommended by the manufacturer. Clean by
wiping with a cloth slightly damp with water. Avoid
getting water inside the appliance.
13. Non-use Periods-The power cord of the
appliance should be unplugged from the outlet when
left unused for a long period of time.
14. Object and Liquid Entry -Care should be taken
so that objects do not fall and liquids are not spilled
into the enclosure through openings.
15. Damage Requiring Service-The appliance should
be serviced by qualified service personnel when:
A. The power-supply cord or the plug has been
damaged; or
B. Objects have fallen, or liquid has been spilled into
the appliance; or
C. The appliance has been exposed to rain; or
D. The appliance does not appear to operate normally
or exhibits a marked change in performance; or
E. The appliance has been dropped, or the enclosure
damaged.
16. Servicing-The user should not attempt any service
to the appliance beyond that described in the operating
instructions. All other servicing should be referred to
qualified service personnel.
17. Ventilation – Slots and openings in the cabinet are
provided for ventilation and to ensure reliable operation
of the product and to protect it from overheating, and
these openings must not be blocked or covered. The
openings should never be blocked by placing the
product on a bed, sofa, rug, or other similar surface.
This product should not be placed in a built-in
installation such as a bookcase or rack unless proper
ventilation is the manufacturer’s instructions have been
adhered to.
18. Attachments – do not use attachments not
recommended by the product manufacturer as they
may cause hazards.
19. Accessories – Do not place this product on an
unstable cart, stand, tripod, bracket, or table. The
product may fall, causing serious injury to a child or
adult, and serious damage to the product. Use only
with a cart, stand, tripod, bracket, or table
recommended by the manufacturer, or sold with the
product. Any mounting of the product should follow the
manufacturer’s instructions, and should use a mounting
accessory recommended by the manufacturer.
20. Lightning – For added protection for this product
during a lightning storm, or when it is left unattended
and unused for long periods of time, unplug it from the
wall outlet and disconnect the antenna or cable system.
This will prevent damage to the product due to lightning
and power-line surges.
21. Replacement Parts – When replacement parts are
required, be sure the service technician has used
replacement parts specified by the manufacturer or
have the same characteristics as the original part.
Unauthorized substitutions may result in fire, electric
shock, or other hazards.
22. Safety Check – Upon completion of any service or
repairs to this product, ask the service technician to
perform safety checks to determine that the product is
in proper operating condition.
4 - 32
Page 5
Features
Power Dynamics Professional stereo audio amplifier featuring high output power and excellent value
for money. The CPA range of amplifiers are ideal for the starting DJ, smaller fixed installations in
pubs, clubs canteens etc. or as a complement in larger disco installations.
• Blue LCD display for temperature,
operating mode, output power, protection
and audio level indication.
• Active crossover, highpass or lowpass.
• Outstanding sound quality
• Protection against high temperatures
• Stereo and bridge mode
• Signal, Clip & Protect indication for each
channel
• Inputs via XLR & 6.3mm jack
• Speaker NL4 & binding post outputs
Temperature controlled cooling fans
•
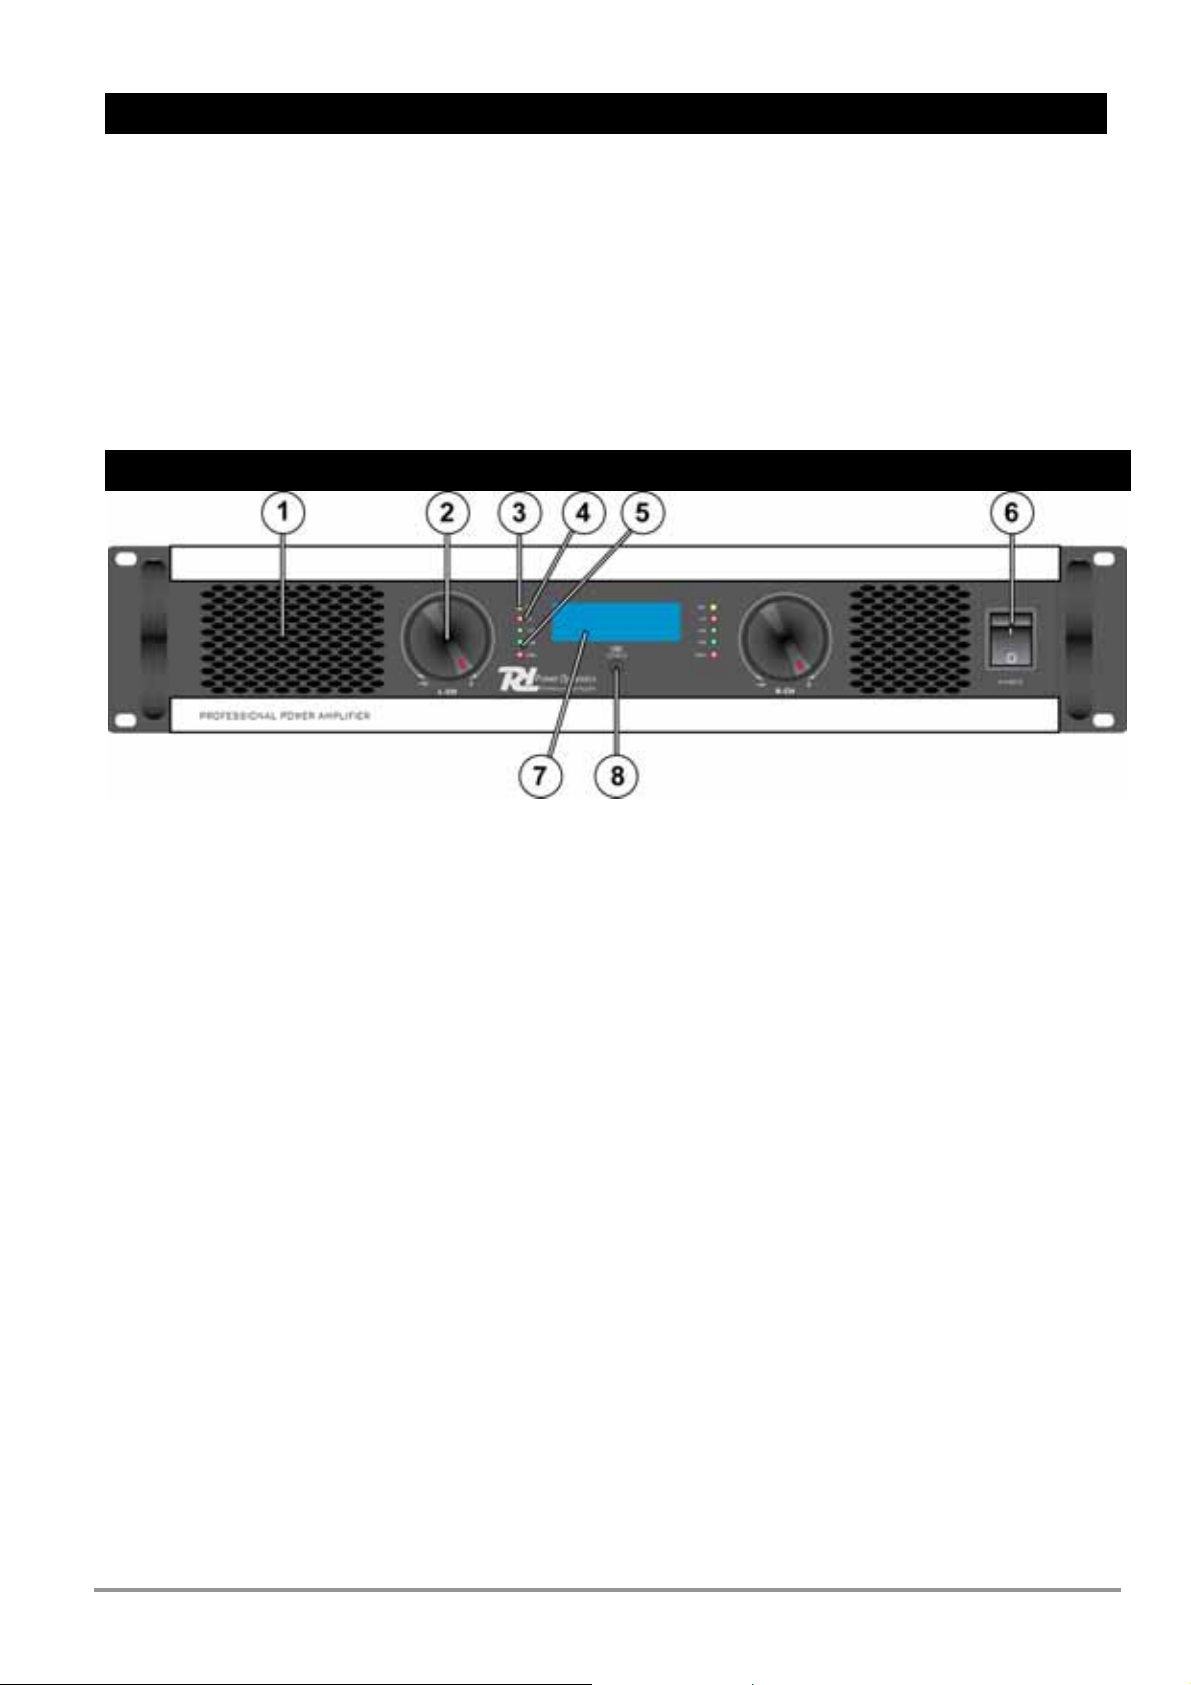
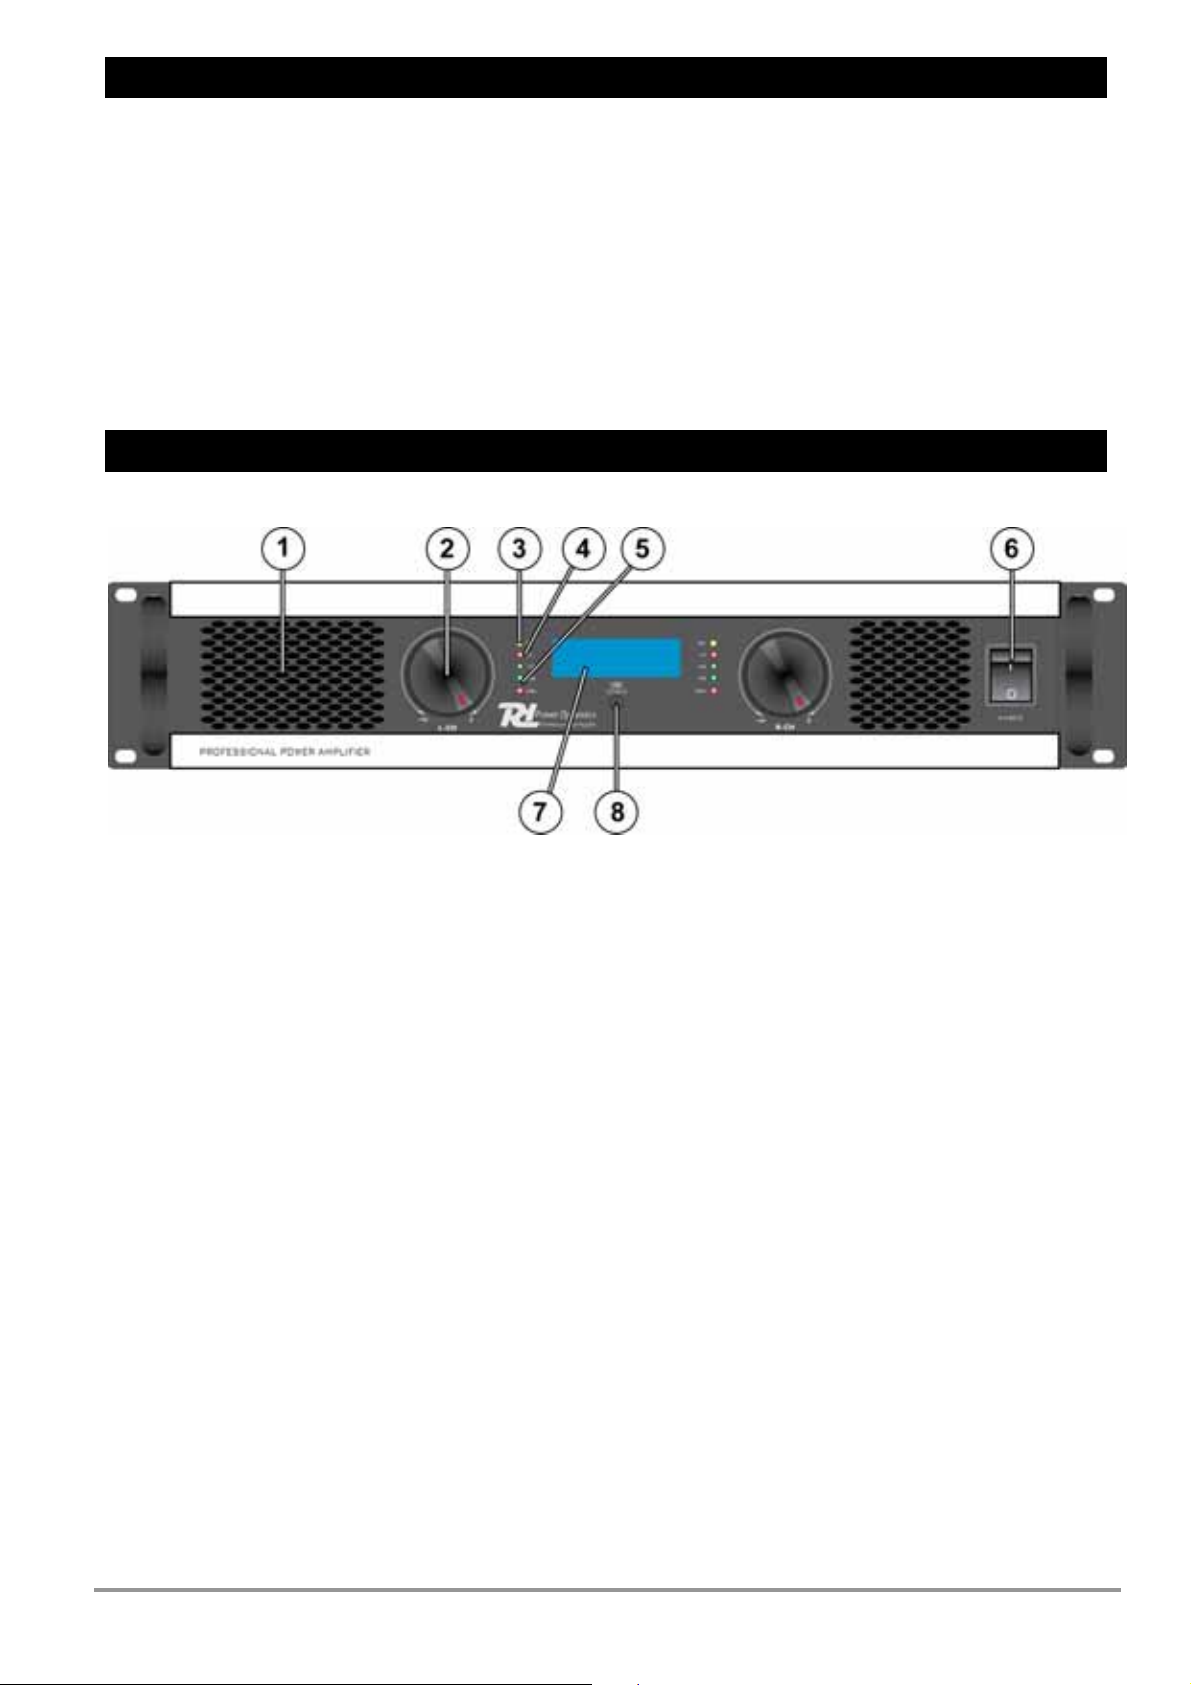
Front Panel Features
1. Cooling Vents.
Front to rear forced airflow.
2. Volume Controls.
These controls adjust the volume level of both channels. Turn slightly to the left when the clip
indicators (4) light up.
3. Protect Indication.
When on any given point, something damaging might occur to your amplifier, it will switch in protect
mode. The amplifier will disconnect the point where the damage is about to occur and switch on the
protection led to indicate to you that something is wrong. Reasons might be: Bad ventilation,
A low impedance (< 4 Ohm), Defect fan(s), A short circuit in cables.
4. Clip Iindication.
These LEDs will light up when one or both channels are on max power. It can occur that these LEDs
will lit up now and then, this is not a problem. But if it lights up continually you need to adjust the
volume down, otherwise permanent damage to equipment might occur
5. Signal indicators.
Three green LEDs indicate the amplifiers output signal levels.
6. On/Off Switch.
For switching the amplifier on and off. Always adjust the volume down to its minimum before switching
this amplifier on.
7. Blue LCD display
Information of the operation mode and parameters.
8. LOAD 2/4/8 Ohm
Select the speaker load for the correct calculation of the output power.
5 - 32
Page 6
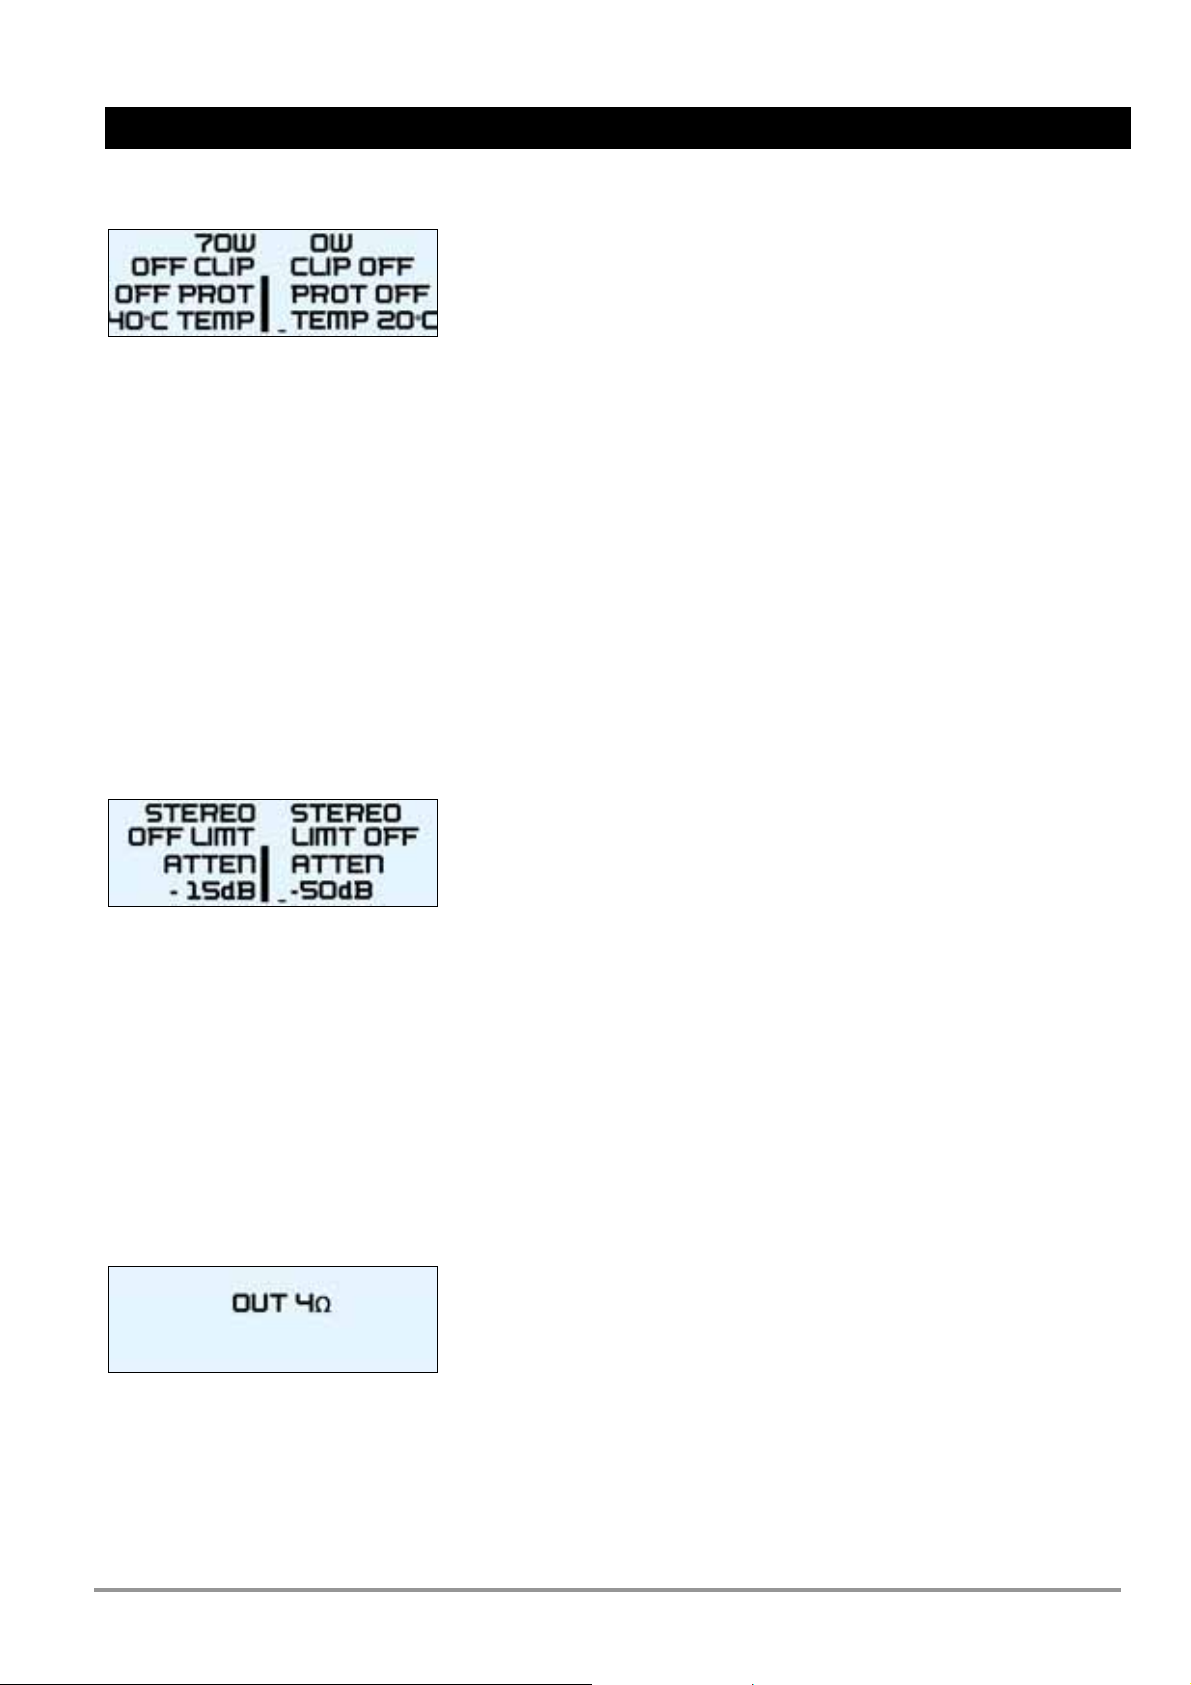
DISPLAY
Standard indication:
Line-1: Output power of both output channels. Amplifier calculated the output power.
NOTE: Select the correct load impedance (button 8)
Calculation not 100% correct in bridge operatio
Line-2: If CLIP ON the amplifier input/output is overloaded. Reduce in that case the input level.
Line-3: Protection information.
Line-4: Tempeture of the output stage of both channels
Bargraph: Vertical bargraph in the middle of LCD display indication the output signal level of both
channels
Indication for a few seconds after actuating a volume controller:
Line-1: Operation mode STEREO, BRIDGE or PARALL
Line-2: Limiter ON or OFF
Line-3 & 4: ATTEN, attenuation of the input signals, line 4 shows the level.
Bargraph: Vertical bargraph in the middle of LCD display indication the output signal level of both
channels
Indication for a few seconds after selection the output impedance button (8):
Selected the correct output load for the calculation of the output power.
6 - 32
Page 7
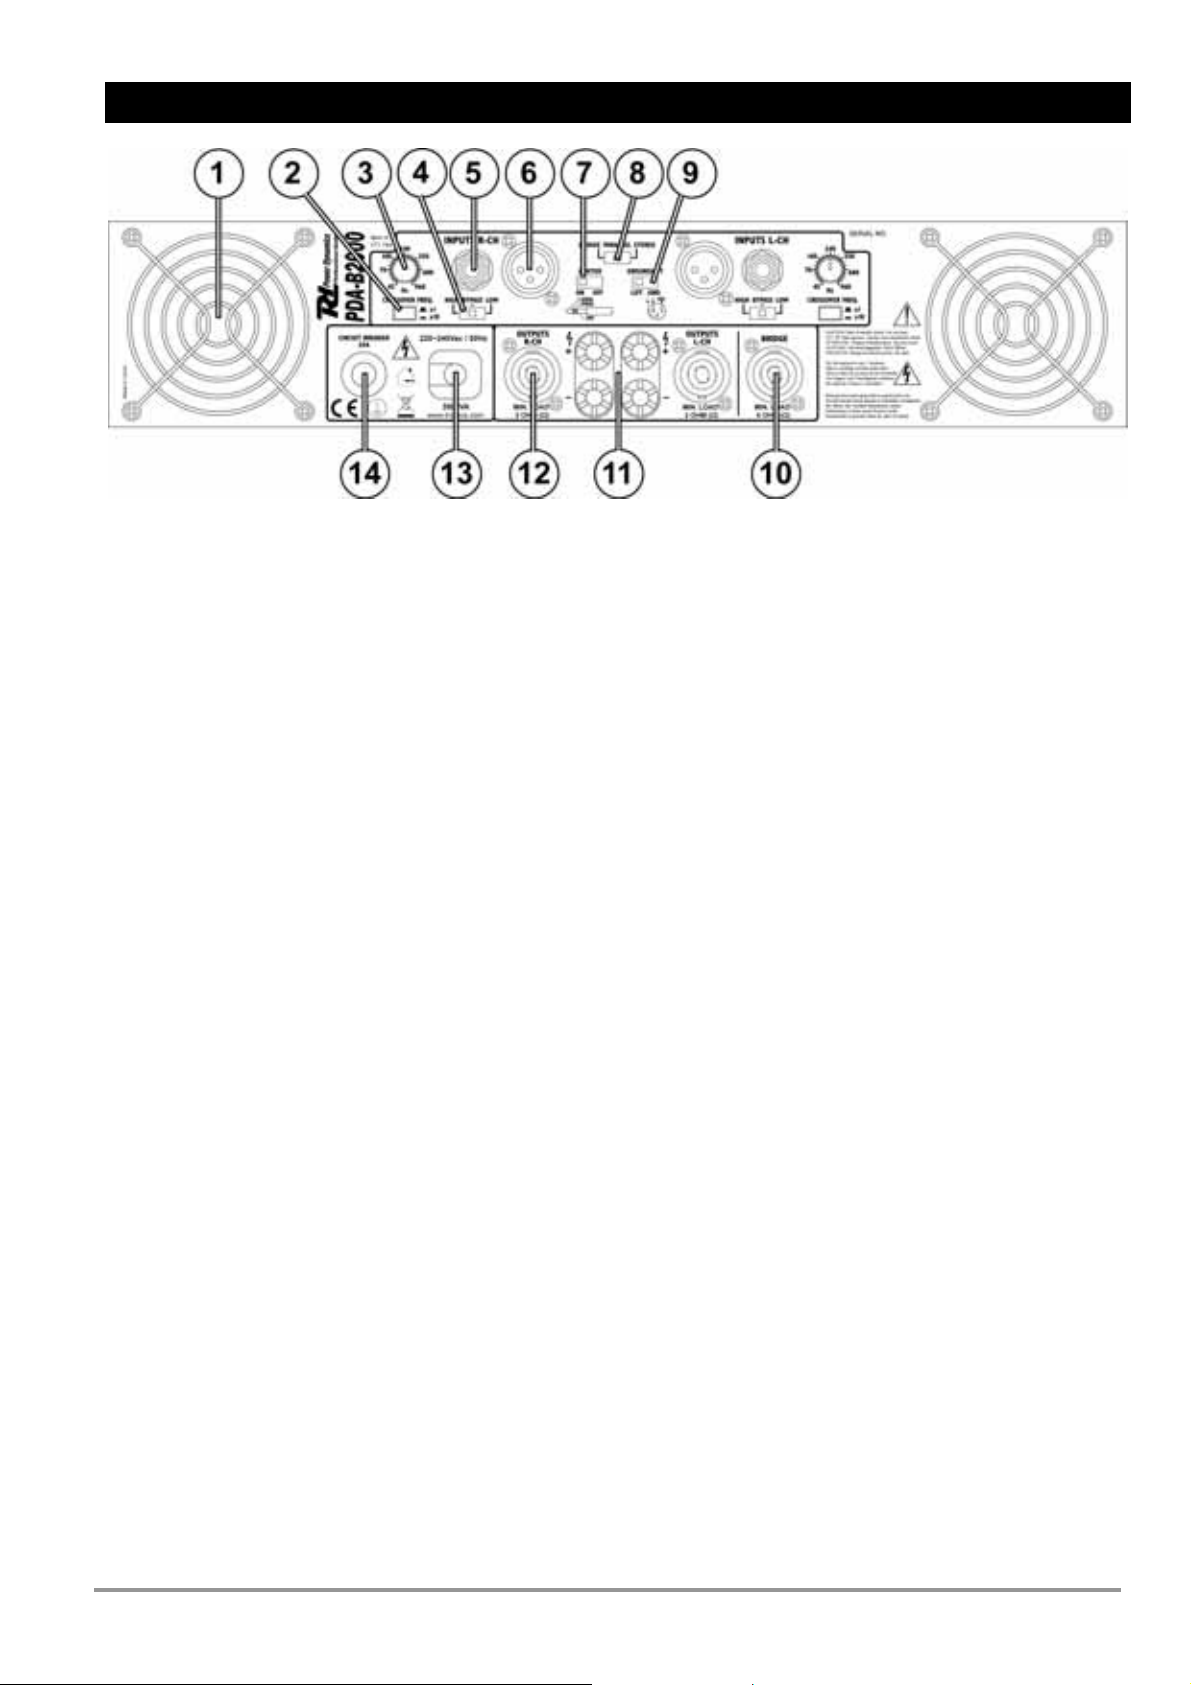
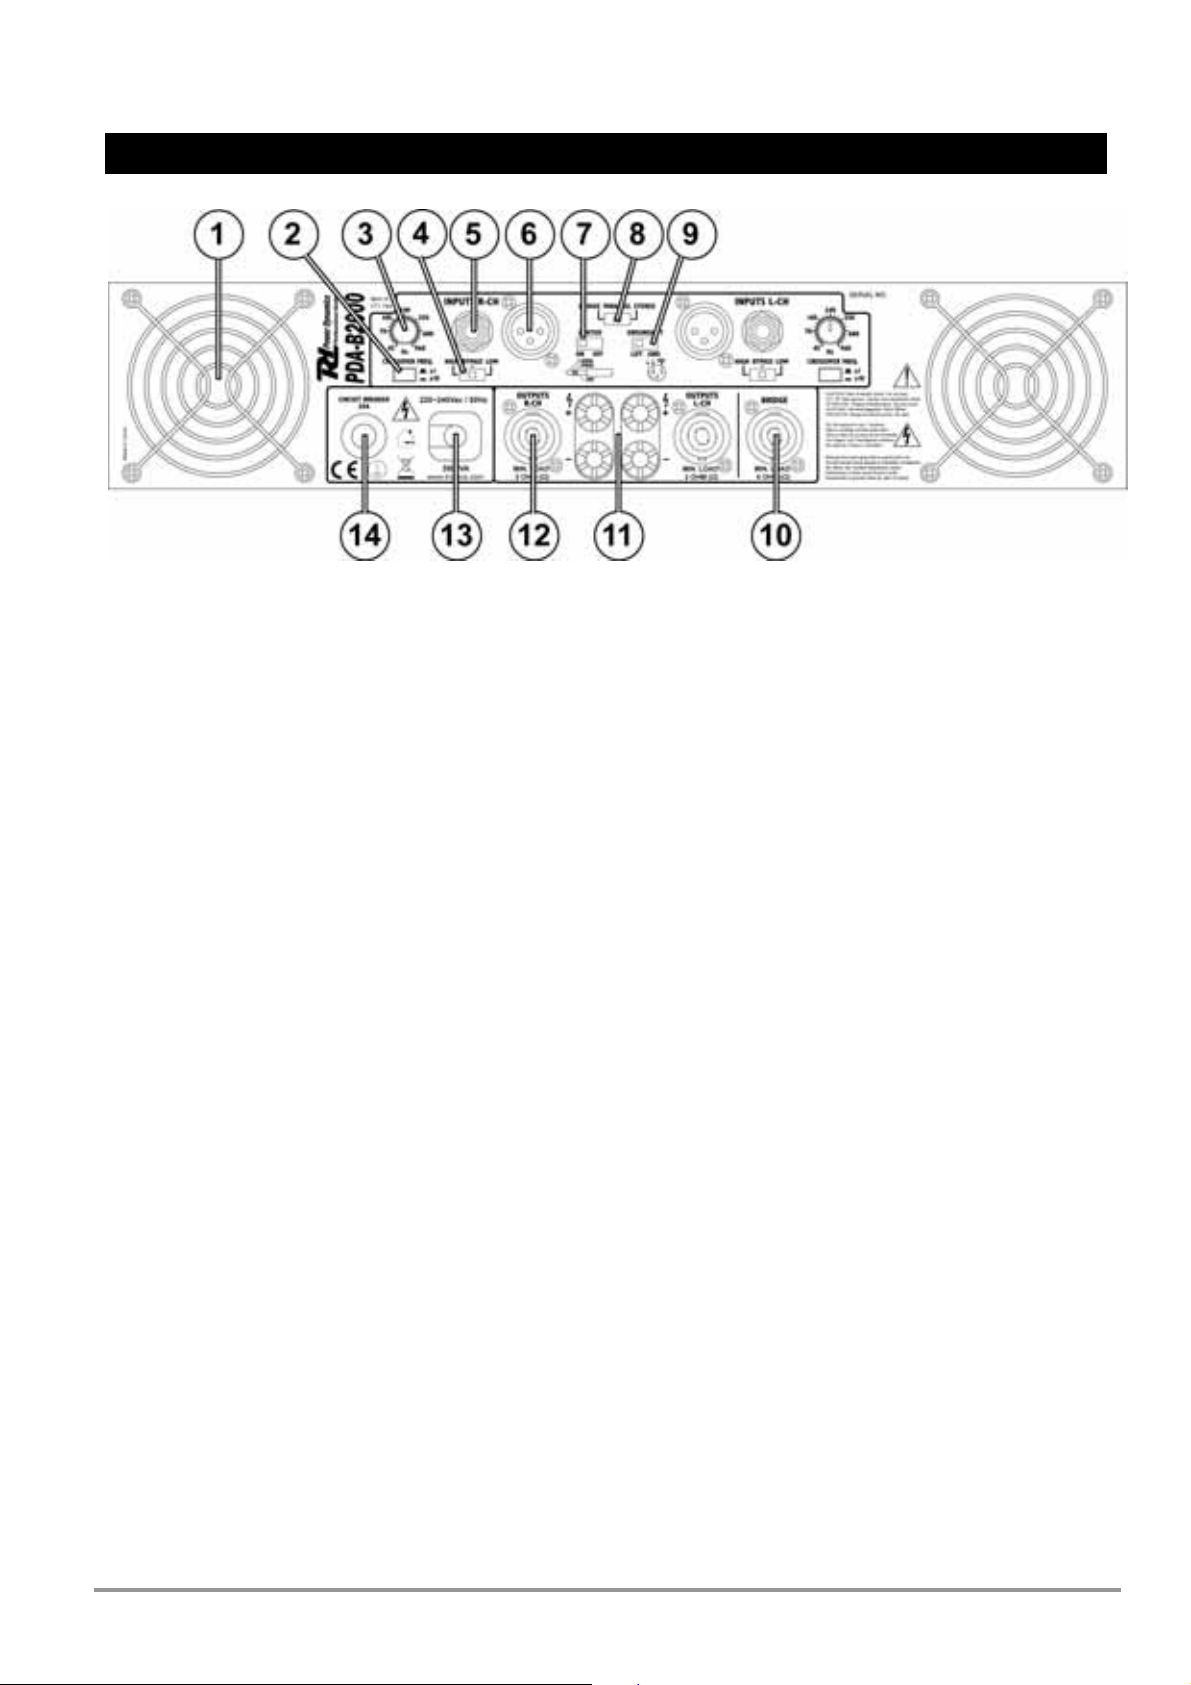
Rear Panel Features
1. Cooling Vents.
Front to rear forced airflow.
Do not distruct air vents.
WARNING! Do not use switch 2 or 4
during operation. Only switch them
when amplifier is switch off!
2. Crossover Frequency Range
Selector to select the range of the filter
frequency.
x1 = 45-960Hz, x10 = 450-9600Hz
3. Crossover Frequency
Adjust the crossover frequency.
4. Filter Selection Switch
HIGH= High pass filter
LOW= Low pass filter
BYPASS= No filter, full range
5. Unbalanced 6.3mm Stereo Jack inputs.
Two 6.3mm jack female input connector
for connecting a signal source (mixer etc.).
6. Balanced XLR inputs.
Two 3-pin female XLR input connector for
connecting a signal source (mixer etc.).
7. Limiter Switch
Limiter for the automatic level limitation.
8. Mode Switch.
The amplifier can use 3 different modes:
stereo, bridge & parallel (mono). Choose
one of these functions:
Stereo mode: Standard left/right stereo
mode.
Bridge mode: This mode combines both
amps on one channel which results in
double power on this channel. Connects
the signal to the left input channel and the
output level can now be adjusted with the
left volume control.
9. Ground Lift Switch.
Allows circuit and chassis grounds to be
separated in case of problems with earth
loops (hum).
10. Bridge Speaker Outputs NL4.
Minium load in bridge mode 4 Ohm. Pin
+1 & +2 = + output, Pin -1 & -2 = - output
11. Binding Post Output Jacks.
Minium load in stereo mode 2 Ohm per
channel. Minium load in bridge mode 4
Ohm.
12. Stereo Speaker Outputs NL4.
Minium load in stereo mode 2 Ohm. Pin
+1 & +2 = + output, Pin -1 & -2 = - output.
13. Mains Power Cable
To connect to a mean power socket (220240Vac / 16A)
14. Circuit Breaker
This main fuse secures the amplifier and
wires against defects. To reset the
breaker press down the button with the
unit switched off.
7 - 32
Page 8

Installation
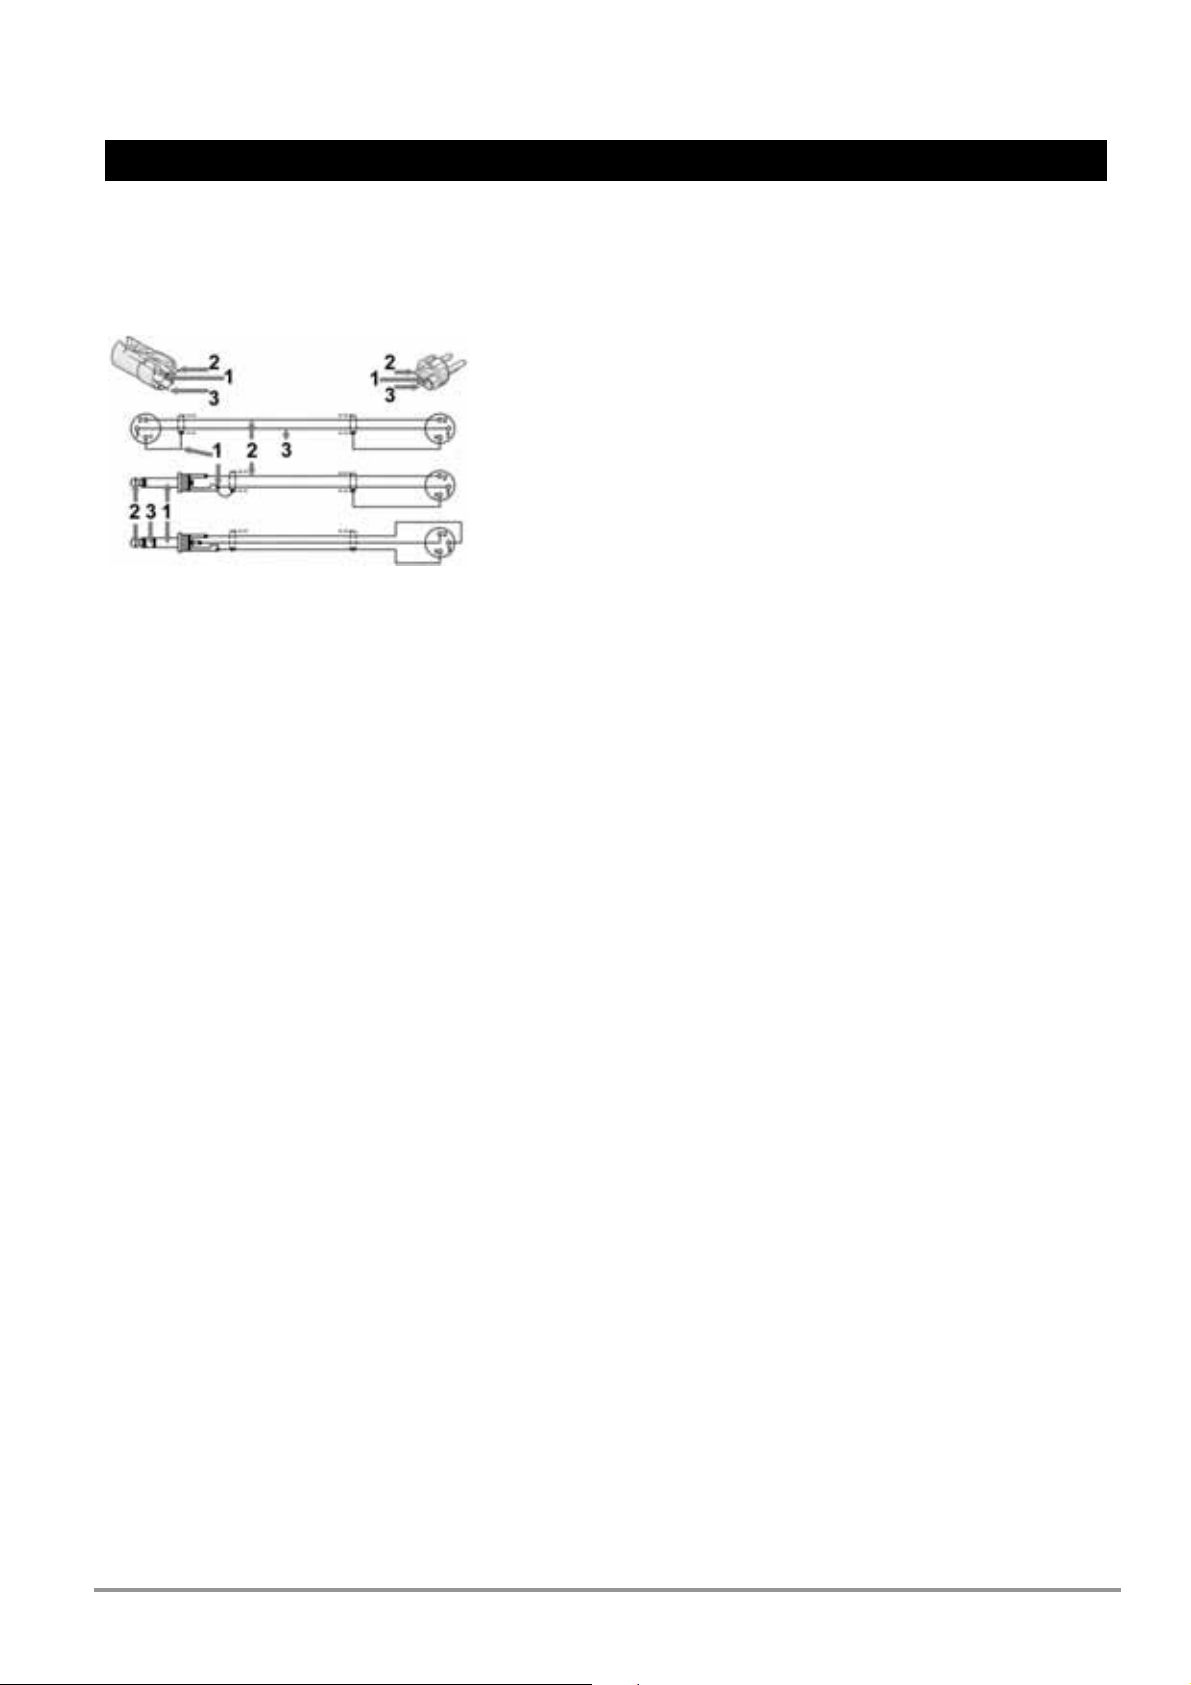
Connecting Input
Both inputs are balanced. If a balanced output is unavailable, you can also use a unbalanced one,
connect pin 3 – with pin1 mass (see below). Unbalanced line may result in noise over long cable runs.
1= earth / mass, 2=signal +, 3=signal –
Connecting Output
Make sure the amplifier is turned off before you wire the system. Speakers can be connected using
speaker NL4 plugs or bare wire for your binding post output connectors. Using the guidelines below
select the appropriate size of wire bases on the disctance between the amplifier and speaker.
Distance Wire Size
<10m 1.5mm2
>10m <20m 2.5mm2
>20m <30m 4.0mm2
NOTE: Never connect a hot (+) output to ground or (-) output and never connect the hot (+) to
other hot outputs!
Connect to mains power
Before plugging the unit in always make sure that the power supply matches the product specification
voltage. First connect the IEC end of the cordset to the IEC connector on the amplifier then plug the
other end of the cordset to the AC mains.
Please read instructions below for reliable and problem free use:
Be sure all connections made are made in the correct way.
•
• Check if the connected speakers are compatible with the amplifier.
• Ensure there is adequate ventilation.
• Prevent exposure to moisture.
• Never plug speakers in/or out while in use, this can result in serious damage.
8 - 32
Page 9

Specifications
Specification PDA-B1500 PDA-B2000
Ref. No. 171.193 171.194
4 Ohm Stereo Power (RMS) 2x 750W 2x 1000W
8 Ohm Stereo Power (RMS) 2x 500W 2x 600W
2 Ohm Stereo Power (RMS) 2x 1000W 2x 1500W
8 Ohm Bridge Power (RMS) 1500W 2000W
4 Ohm Bridge Power (RMS) 2000W 2800W
Frequency Response 10Hz – 50kHz (±1.5dB)
Input Sensitivity 770mV
Maximum Input Level 21dBv/9v
Input Impedance 20kOhm
Signal/Noise Ratio A-weighted RMS >95dB
Crosstalk @
Rated Output Power 8 Ohm / 1kHz
>105dB
Damping Factor @ 8 Ohm / 1kHz >500
Slew Rate Internal 60V/µS
Protection
Short Circuit, Current Limited, DC Fault, AC Line Fuse,
Thermal Cut Off, Power Up/Down, Slow Start
Power Supply 220-240Vac, 50Hz
Dimensions (bxhxd) 482 x 380 x 88mm (19” x 2U)
Weight 23kg 24kg
Note: Specifications and design are subject to change without notice for purpose of improvement.
Electric products must not be put into household waste. Please bring them to a recycling centre. Ask your
local authorities or your dealer about the way to proceed.
WARRANTY CONDITIONS
The date the product leaves the importer is considered to be the date the warranty begins. The law obliges the
retailer to offer a two year quarantee to the enduser.
Only companies approved by Tronios are allowed to work on the equipment.
During warranty period (defective) equipment must be returned to the dealer by pre-paid mail in the original box.
Potentiometers have a limited lifetime and are not covered by the manufacturer for more than normal use. For all
service enquiries,refer to your local distributor,as he is best able to help you.
9 - 32
Page 10
Veiligheidsinformatie
WAARSCHUWING:
OM BRAND OF ELEKTRISCHE SCHOKKEN TE VOORKOMEN, DIENT U DIT APPARAAT NIET BLOOT TE
STELLEN AAN REGEN OF VOCHT.
LET OP:
1. Wees voorzichtig met het netsnoer en beschadig deze niet. Als het snoer kapot of beschadigd is, kan dit leiden
tot electrische schokken of defecten. Als u de stekker uit het stopcontact neemt, trek dan niet aan het snoer, maar
aan de stekker.
2. Open de behuizing nooit, dit om elektrische schokken te voorkomen. Als er problemen zijn, neem dan contact op
met uw dealer.
3. Plaats geen metalen objecten en mors geen vloeistof in het product. Dit kan leiden tot elektrische schokken of
defecten.
Belangrijke Veiligheidsinstructies
• Lees de instructies – Alle veiligheids- en gebruikersinstructies moeten doorgelezen wo rden vóór gebruik.
• Bewaar de instructies – Bewaar de veiligheids- en gebruikersinstructies voor toekomstig gebruik.
• Lees de waarschuwingen aandachtig door – Houd u aan de voorschriften en waarschuwingen.
• Volg de instructies op – De gebruiker dient zich aan alle gebrui kersinstructies te houden.
• Water en vocht – Het product mag niet gebruikt worden in de buurt van water – bv. bij een bad, wasmachin e,
wastafel, in een natte kelder, bij een zwembad, vochtige ruimtes, etc.
• Vervoer en standaards – Gebruik voor dit product alleen vervoermiddelen en standaards die door de fabrikant
worden aanbevolen. Verplaats dit product met grote zorg; snel stoppen, teveel kracht en niet vlakke ondergrond
kunnen er voor zorgen dat het product en het vervoermiddel gaan kantelen, wees dus voorzichtig!
• Hitte – Het product mag niet gebruikt worden in de buurt van hittebronnen zoals radiatoren, fornuizen, boilers of
andere apparaten (ook versterkers) die hitte produceren.
• Spanning – dit product mag alleen van die spanning worden voorzien zoals is aangegeven op het label aan de
achterzijde. Bent u niet zeker , neem dan contact op met uw dealer of lokaal energiebedrijf. Sluit het product
alléén aan op een 220-240VAC / 50Hz (geaard) stopcontact, verbonden m et een 10-16A meterkastgroep.
• Netsnoer – Deze dient op een zodanige manier te worden geplaatst dat er niet overheen kan worden gelopen en
deze niet wordt bekneld door andere apparaten. Verwijder of plaats een stekker nooit met natte handen resp. uit
en in het stopcontact.
• Reinigen – Het product mag alleen schoongemaakt worden op de manier die de fabrikant u aanbeveelt : Neem
het af met een licht vochtige doek. Tracht het product niet schoon te maken met chemische oplossingen
Voorkom dat er water/vloeistof in het product lekt.
• Het netsnoer moet zijn losgekoppeld van het stopcontact wanneer het product voor e en lange tijd niet gebruikt
(gaat) wordt(en).
• Voorwerpen en vochtinname – Er moet met grote zorgvuldigheid op worden gelet dat er geen water of kleine
voorwerpen door de openingen van de behuizing van het product vallen. Dit kan leiden tot serieuze schade aan
het product. Ook kan men een electrische schok krijgen. Dit is levensgevaarlijk!!
• Reparaties – Het product dient door gekwalificeerde personen te worden gerepareerd als o.a.:
A. Het netsnoer kapot of beschadigd is; of
B. Er objecten of vocht in het product zijn gekomen; of
C. Het product is blootgesteld aan regen; of
D. Het product niet meer normaal functioneert, of de prestaties slecht zijn; of
E. Het product is gevallen of de behuizing beschadigd is.
10 - 32
Page 11

• Onderhoud – De gebruiker mag niet meer onderhoud verrichten dan dat er in de veiligheid sin structies staat.
Verder onderhoud moet worden verricht door gekwalificeerd personeel.
• Ventilatie – Gaten en openingen in de behuizing zijn aangebracht voor ventilatie van het product. Dit vanwege
het garanderen van goede resultaten en het tegengaan van overhitting. Blokkeer deze openingen nooit door ze
op een bed, tapijt, bank etc. te plaatsen. Plaats dit product nooit in een kast of rek, tenzij er goede ventilatie is en
de voorschriften worden nageleefd.
• Bij sommige modellen is de stekker voorzien van een overspanningsbeveiliging ; bij vervanging een identieke
stekker monteren.
• Accessoires – Plaats dit product niet op een onstabiele ondergrond, standaard, beugel, tafel of driepoot. Het
product kan dan vallen en erge verwondingen veroorzaken aan personen, én het product kan zwaar worden
beschadigd. Gebruik alleen accessoires die worden aangeraden door de fabrikant of worden verkocht in
combinatie met het product. Monteren moet gebeuren m.b.v. instructies van de fabrikant en met de door de
fabrikant aangeraden bevestigingsmaterialen.
• Blikseminslag – Als het product een lange tijd niet gebruikt wordt, trek dan de stekker uit het stopcontact. evt.
ook antenne of kabelsystemen. Dit zal voorkomen dat er schade wordt veroorzaakt bij blikseminslagen en
piekspanningen op het elektriciteitsnet.
• Vervanging van onderdelen – Als er vervangende onderdelen nodig zijn, wees er dan zeker van dat de
reparateur originele reserve onderdelen installeert, of onderdelen met dezelfde karakteristieken. Verkeerde
verwisselingen kunnen resulteren in brand, elektrische schokken , ongewenste straling of andere gevaren.
• Veiligheidscontrole – Na een reparatie of onderhoud van dit product door derden dient u de leverancier te
vragen of deze het product wil gaan testen op veiligheid. Dit om vast te stellen dat het product in een goede
staat verkeert en goed functioneert.
• Indien het product zo beschadigd is dat inwendige (onder)delen zichtbaar zijn mag de stekker NOOIT in het
stopcontact worden geplaatst én het product NOOIT worden ingeschakeld. Neem in dit geval contact op met de
dealer.
• Als u het product een tijd lang niet gebruikt heeft en het weer wil gebruiken kan er condens ontstaan; laat het
product eerst op kamertemperatuur komen alvorens het weer in werking te stellen.
• Om ongevallen in bedrijven te voorkomen moét rekening worden gehouden met de daarvoor geldende ri chtlijnen
en moeten de aanwijzingen/waarschuwingen worden gevolgd.
• Het product buiten bereik van kinderen houden.
• Gebruik geen overmatige kracht bij het bedienen van de schakelaars en knoppen.
• Indien zowel de stekker en/of netsnoer als snoeringang in het product beschadig d zijn dient dit door een vakman
hersteld te worden.
• In het product bevinden zich onder spanning staande onderdelen; open daarom NOOIT dit product.
• Wanneer het product aan de muur bevestigd moet worden dient eerst zorgvuldig berekend te worden of het
plateau en muurbeugels deze wel kunnnen dragen. Kunt u het niet berekenen scha kel dan vakbekwaam
personeel in.
Kenmerken
Power Dynamics Professionele stereo audio-versterkers hebben de volgende kenmerken :
• Blauw LCD Display
• Hoog uitgangsvermogen
• Buitengewone geluidskwaliteit
• Temperatuurbeveiliging
• Stereo en Bridge Mode
• Signaal, Clip & Protect -indicator voor elk kanaal
• XLR & 6.3mm jack ingangen
• Luidspreker NL4 & schroefaansluitingen
• Temperatuur afhankelijke ventilatoren
11 - 32
Page 12

VOORZIJDE
1. Koeling.
Rooster voor geforceerde koeling van de
luchtstroom.
2. Volume-regelaars.
Regelaars voor beide kanalen. Wanneer de
clip indicatoren (4) branden dienen de
regelaars linksom te worden gedraaid.
3. Protect-indicator.
Wanneer er iets defect raakt in de
versterker zal deze in protect mode gaan
en zullen de LED(s) gaan branden.
Oorzaak kan zijn: Slechte ventilatie, een
lagere impedantie dan 4 Ohm, defecte
ventilator(en), kortsluiting (ook in de
bekabeling).
4. Clip-indicator.
Deze LEDs gaan branden wanneer de
versterker aan het maximum van z’n
vermogen zit, de versterker gaat dan
vervormen. De volume regelaars dienen
dan onmiddellijk lager (minimum) gedraaid
te worden. Soms gaan deze LEDs aan en
uit, dit kan nóg geen probleem zijn.
5. Signaal-indicatoren.
Deze LEDs geven aan wanneer er
audiosignalen aanwezig zijn..
6. Netschakelaar.
Voor het inschakelen van de versterker.
Altijd de volume regelaars op minimum
zetten alvorens de versterker in te
schakelen.
7. Blauw LCD Display
8. Belasting 2/4/8 Ohm.
Selecteer de belasting die overeenkomt
met de impedantie van de luidsprekers.
12 - 32
Page 13

DISPLAY
Standaard indicatie:
Lijn-1: Hier staat het uitgangsvermogen van beide kanalen door de versterker berekent.
NB: Selecteer de juiste impedantie (toets 8 aan voorzijde)
Lijn-2: Als hier staat “CLIP ON” is het kanaal overbelast. Zet volumeregelaar(s) op een lager
niveau.
Lijn-3: Als hier staat “PROT ON” is het kanaal in protectie.
Lijn-4: Hier is de temperatuur van beide kanalen weergegeven.
Bargraph: Het niveau (verticale balk) van het uitgangssignaal van beide kanalen wordt in het midden
van de LCD display weergegeven.
Weergave gedurende een paar seconden indien aan de volumeregelaar wordt gedraaid:
Lijn-1: Mode STEREO of BRIDGE wordt hi er weergegeven.
Lijn-2: Limiter (begrenzer) ON (Aan) of OFF (Uit).
Lijn-3 & 4: ATTEN = het ingangsniveau van beide kanalen, deze worden in lijn 4 weergegeven.
Bargraph: Het niveau (verticale balk) van het uitgangssignaal van beide kanalen wordt in het midden
van de LCD display weergegeven.
Gedurende een paar seconden wordt de uitgangsimpedantie weergegeven die met
toets 8 wordt ingesteld:
De versterker heeft deze instelling nodig om het uitgangsvermogen te berekenen.
13 - 32
Page 14

ACHTERZIJDE
1. Ventilator-opening.
Ventilator-opening voor het geforceerd koelen van de luchtstroom.
2. Cross-over schakelaar.
x1=45-960Hz, x10=450-9600Hz
3. Instellen cross-over frequentie.
4. Filter selectieschakelaar.
5. Ongebalanceerde 6.3mm Stereo Jack -ingangen.
Twee 6.3mm stereo jack -ingangen om een audiobron op aan te sluiten (mixer etc.).
6. Gebalanceerde XLR -ingangen.
Twee 3-pin XLR -ingangen om een audiobron op aan te sluiten (mixer etc.).
7. Limiter Schakelaar
Schakelaar voor automatische begrenzing van het signaal.
8. Mode Schakelaar.
De versterker kent 3 verschillende modes: stereo, bridge & parallel (mono) :
Stereo mode: Standaard Links / Rechts stereo mode.
Bridge mode: Deze mode combineert beide versterkers met één uitgang, hetgeen resulteert in
een dubbel uitgangs-vermogen op die uitgang. Het vermogen kan worden geregeld met de linker
volume-regelaar.
9. Ground Lift Schakelaar.
Om massa van het chassis te scheiden in geval van een aardlus (hum).
10. Bridge NL4 uitgang.
In bridge mode is de uitgangs-impedantie 4 Ohm per kanaal.
Pin +1 & +2 = + uitgang, Pin -1 & -2 = - uitgang
11. Schroefaansluitingen.
Luidspreker-uitgangen : 4 Ohm per kanaal. In bridge mode 8 Ohm.
12. Stereo NL4 uitgang.
In stereo mode is de uitgangs-impedantie 2 Ohm per kanaal.
Pin +1 & +2 = + uitgang, Pin -1 & -2 = - uitgang
13. Netentree.
Netsnoer ingang
14. 20A Automatische zekering
14 - 32
Page 15

Installatie
Ingangen
Beide ingangen zijn gebalanceerd. Als een gebalanceerde uitgang niet beschikbaar is, kan ook een
ongebalanceerde gebruikt worden, verbind pin 3 – met pin1 massa (zie hieronder). Ongebalanceerde
kabels/snoeren kunnen noise veroorzaken over lange afstand.
1= aarde / massa, 2=signaal +, 3=signaal –
Aansluiten van de uitgang
Zorg er voor dat de versterker uitgeschakeld is tijdens de bekabeling van de installatie. Luidsprekers
kunnen worden aangesloten m.b.v. NL4 connectoren of via schroefaansluitingen. Gebruik
onderstaande informatie voor het bepalen van de dikte van de aansluitsnoeren:
Afstand(m) Dikte(mm2)
<10m 1.5mm2
>10m <20m 2.5mm2
>20m <30m 4.0mm2
Sluit de luidsprekers aan op de positieve (+) uitgangen van beide uitgangen en nooit op de (-) of
massa. Gebruik de ( –) negatieve uitgangen nooit in Bridge Mode.
Netaansluiting
Zorg er voor dat de aangegeven netspanning op de achterkant van de versterker overeenkomt met de
aangeboden netspanning. Sluit het netsnoer eerst aan op de versterker, zet alle volume-regelaars op
minimum, zet de netschakelaar van de versterker in de Uit-stand en steek dan pas de stekker in de
wandcontactdoos (stopcontact). Zet de versterker aan.
Lees eerst onderstaande informatie:
• Zorg er voor dat de bekabeling juist is aangesloten!
• Zijn de luidsprekers geschikt voor deze versterker?
• Nooit ventilatiegaten afdekken!
• Voorkom blootstelling aan regen en/of vocht!
• Verwijder nooit de luidsprekersnoeren tijdens gebruik!
15 - 32
Page 16

Specificaties
Specification PDA-B1500 PDA-B2000
Ref. No. 171.193 171.194
4 Ohm Stereo Power (RMS) 2x 750W 2x 1000W
8 Ohm Stereo Power (RMS) 2x 500W 2x 600W
2 Ohm Stereo Power (RMS) 2x 1000W 2x 1500W
8 Ohm Bridge Power (RMS) 1500W 2000W
4 Ohm Bridge Power (RMS) 2000W 2800W
Frequentie bereik 10Hz – 50kHz (±1.5dB)
Ingangsgevoeligheid 770mV
Maximum ingangsniveau 21dBv/9v
Ingangs Impedantie 20kOhm
Signal/Noise Ratio >95dB
Crosstalk @ 8 Ohm / 1kHz >105dB
Damping Factor @ 8 Ohm / 1kHz >500
Slew Rate Intern 60V/µS
Protectie
Short Circuit, Current Limited, DC Fault, AC Line Fuse,
Thermal Cut Off, Power Up/Down, Slow Start
Aansluitspanning 220-240Vac, 50Hz
Afmetingen (bxhxd) 482 x 380 x 88mm (19” x 2U)
Gewicht 23kg 24kg
N.B. Veranderingen en modificaties kunnen door de fabrikant worden doorgevoerd zonder
u er van in kennis te stellen.
Afgedankte artikelen !!
Raadpleeg eventueel www.wecycle.nl en/of www.vrom.nl
elektronische apparaten in het kader van de WEEE-regeling. Vele artikelen kunnen worden
gerecycled, gooi ze daarom niet bij het huisvuil maar lever ze in bij een gemeentelijk depot of
v.w.b. het afdanken van
uw dealer. Lever ook afgedankte batterijen in bij uw gemeentelijk depot of bij de dealer, zie
www.stibat.nl
Garantie is niet van toepassing indien ongelukken of beschadigingen plaatsvinden veroorzaakt door onjuist gebruik
of het niet opvolgen van het gestelde (o.a waarschuwingen) in deze handleiding.
Tronios BV kan niet verantwoordelijk worden gehouden voor schade in welke vorm dan ook, indien het gestelde in
de handleiding (o.a waarschuwingen) niet wordt gerespecteerd.
Alle (defecte) artikelen dienen gedurende de garantieperiode altijd retour te worde n gezonden in de originele
verpakking.
.
16 - 32
Page 17

Sicherheitshinweise
WARNUNG: UM FEUER- UND STROMSCHLAG GEFAHR ZU VERMEIDEN, DAS GERÄT VOR REGEN UND
FEUCHTIGKEIT SCHÜTZEN.
VORSICHT:
1. Behandeln Sie die Netzschnur mit Sorgfalt und beschädigen oder verformen Sie sie nicht. Eine beschädigte
oder verformte Netzschnur kann Stromschlag und Defekte verursachen. Beim Abziehen des Steckers aus der
Steckdose immer am Stecker anfassen, nie an der Schnur ziehen.
2. Niemals das Gehäuse öffnen, um Stromschlag zu vermeiden. Im Problemfall wenden Sie sich an Ihren
Fachhändler.
3. Keine Metallgegenstände oder Flüssigkeiten ins Gehäuse dringen lassen. Sie können zu Stromschlag und
Störungen führen.
Wichtige Sicherheitshinweise
Das Gerät niemals auf einen unsicheren Wagen, Ständer, Stativ oder Tisch stellen. Das Gerät kann herunterfallen
und Menschen verletzen. Nur mit einem vom Hersteller zugelassenen oder mit dem Gerät zusammen verkauften
Wagen, Stativ, Ständer oder Tisch benutzen
Beim Anbringen des Geräts an der Decke oder Wand die Anweisungen des Herstellers befolgen und die vom
Hersteller empfohlenen Montagematerialien benutzen.
Wenn das Gerät auf einem Gestell steht, das Ganze vorsichtig bewegen. Plötzliches Bremsen, große
Kraftanwendung und unebene Flächen können zum Umkipp en führen.
Bitte lesen Sie diese Anleitung sorgfältig vor der Inbetriebnahme durch. Anleitung für spätere Bezugnahme
aufbewahren.
Alle Warnhinweise auf dem Gerät und in der Anleitung genau befolgen.
Das Gerät nicht in der Nähe von Wasser benutzen z.B. neben einer Badewanne, Spüle, Waschmaschine, in einem
nassen Keller oder in der Nähe eines Swimming Pools.
Das Gerät muss so installiert sein, dass die Belüftung nicht behindert wird. Es darf nicht auf ein Sofa, ein Bett,
einen Sessel oder ähnliche Unterlagen gestellt werde n, die die Belüftungsöffnungen blockieren können. Nicht in
ein geschlossenes Gehäuse wie einen Schrank einbauen, wo die Hitze nicht abgeführt werden kann.
Das Gerät nicht in der Nähe von Wärmequellen wie Heizkörpern, Öfen und ähnlichen Geräten, die Wärme
abgeben (Verstärker inbegriffen) aufstellen.
Das Gerät nur an eine Netzsteckdose anschließen, deren Spannung und Frequenz der auf der Rückseite des
Geräts angegebenen entspricht.
Das Netzkabel muss so verlegt werden, dass es nicht betreten oder gequetscht werden kann, besonders in der
Nähe der Steckdose und am Geräteaustritt.
Vor dem Reinigen den Netzstecker abziehen.
Das Gerät niemals mit Benzin, Verdünnungsmitteln und anderen Lösungsmitteln reinigen. Nur ein weiches,
feuchtes Tuch benutzen.
Bei längerem Nichtgebrauch den Netzstecker abziehen.
Das Gerät muss von einem Techniker überprüft werden, wenn:
" das Netzkabel oder die –schnur beschädigt sind;
" das Gerät Regen oder anderen Flüssigkeiten ausgesetzt war;
" das Gerät nicht richtig funktioniert oder eine beachtliche Leistungsänderung aufweist;
" das Gerät gefallen oder das Gehäuse beschädigt ist.
VERSUCHEN SIE NIE, DAS GERÄT SELBST ZU REPARIEREN. REPARATUREN DÜRFEN NUR VON
QUALIFIZIERTEM FACHPERSONAL AUSGEFÜHRT WERDEN.
Nach Durchführung von Wartungs- und Reparaturarbeiten holen Sie sich von dem Reparaturbetrieb die
Versicherung ein, dass nur vom Hersteller empfohlene Ersatzteile verwendet wurden, die genau dieselben
technischen Daten aufweisen wie die Originalteile, und dass alle Routineüberprüfungen durchgeführt wurden, um
die Sicherheit des Geräts zu gewährleisten.
DER GEBRAUCH UNGEEIGNETER ERSATZTEILE KANN FEUER AUSLÖSEN
17 - 32
Page 18
Merkmale
Professionelle Audio Stereo-Verstärker von Power Dynamics zeichnen sich durch hohe Ausgang sleistung und
ein ausgezeichnetes Preis-/Leistungsverhältnis aus. Die CPA Serie ist ideal für den Einsteiger-DJ, kleine
Festanlagen in Pubs, Clubs, Kantinen usw. oder als Ergänzung in grössere n Disco Anlagen
• Blaue LCD Anzeige
• Hohe Ausgangsleistung
• Ausgezeichnete Klangqualität
• Hitzeschutz
• Stereo und Brückenbetrieb
• Signal, Clip & Schutzanzeige für jeden Kanal
• XLR & 6.3mm Klinkeneingänge
• NL4 Lautsprecherbuchsen &
Schraubanschlüsse
• Temperaturgeregelte Ventilatoren
FRONTSEITE
1. Belüftungsgitter
Forcierte Kühlung von vorne nach hinten.
2. Lautstärkeregler
Sie reglen die Lautstärke jedes Kanals. Leicht nach links drehen, wenn die Clip Anzeiger (4)
aufleuchten.
3. Schutzanzeige
Wenn ein Problem auftritt, dass den Verstärker beschädigen könnte, schaltet er in Schutzbetrieb und
die ‘Protect’ LED leuchtet auf. Der Grund kann sein: unzulängliche Belüftung, niedrige Impedanz (<4
Ohm), defekte Ventilatoren, Kurzschluss in den Kabeln.
4. Clip Anzeige
Diese LEDs leuchten auf, wenn einer oder beide Kanäle auf Höchstleistung eingestellt sind. Es kann
vorkommen, dass diese LEDs zeitweilig aufleuchten. Das ist kein Problem. Wenn sie aber ständig
aufleuchten, müssen Sie die Lautstärke reduzieren, sonst kann der Verstärker dauerhaften Schaden
nehmen kann.
5. Signal Anzeige
Diese LEDs zeigen an, wenn ein Audiosignal anliegt.
6. Netzschalter
Zum Ein- und Ausschalten des Verstärkers. Drehen Sie immer die Lautstärke herunter, bevor Sie den
Verstärker einschalten.
7. Blaue LCD Display
8. Impedanz Schalter 2/4/8 Ohm
Kontrolieren Sie ob die Impedanz des Lautsprechers 2,4 oder 8 Ohm ist und schalten Sie mit Schalter
8 auf 2/4/8 Ohm.
18 - 32
Page 19

DISPLAY
Standard Indikation:
Zeile-1: Hier wird die Ausgangsleistung angezeigt der beiden Kanäle, vom Verstärker berechnet.
Hinweis: Selektieren Sie 4 oder 8 Ohm Impedanz (Frontseite taste 8)
Zeile-2: Bei Überlastung eines Kanals lautet die Anzeige “CLIP ON” . Drehen Sie die
Lautstärkeregler auf Minimum.
Zeile-3: Wenn die Anzeige lautet “PROT ON” tritt den Überlastschutz in Kraft.
Zeile-4: Hier wird die Temperatur von beiden Kanälen angezeigt.
Balkendiagramm: Das Niveau (vertikaler Strich) der Ausgang der beiden Kanäle wird in der Mitte des
LCD-Displays angezeigt.
Indikation (für ein paar Sekunden) wenn der Lautstärkeregler gedreht wird:
Zeile-1: STEREO oder BRIDGE-Modus wird hier gezeigt.
Zeile-2: Limiter ist ON (Ein) oder OFF (Aus).
Zeile-3 & 4: ATTEN = Eingangspegel der beide Kanäle wird hier gezeigt.
Balkendiagramm: Das Niveau (vertikaler Strich) der Ausgang der beiden Kanäle wird in der Mitte des
LCD-Displays angezeigt.
Für ein paar Sekunden wird der Ausgangsimpedanz gezeigt (mit Taste 8 gewählt):
Der Verstärker benötigt die Einstellung um die Ausgangsleistung zu berechnen.
19 - 32
Page 20
RÜCKSEITE
1. Belüftungsgitter
Ventilatoröffnung zur Kühlung des Verstärkers.
2. Cross-over Schalter
X1=45-960Hz , x10=450-9600Hz
3. Einstellung Cross-over Frequenz
4. Filter wahlschalter
5. Asymmetrische 6.3mm Stereo
Klinkeneingänge
Zwei 6,3mm Stereo Klinkenbuchsen zum
Anschluss einer Signalquelle (Mischpult usw.).
6. Symmetrische XLR Eingänge.
Zwei 3-pol. XLR Eingangsbuchsen zum
Anschluss einer Signalquelle (Mischpult usw.)
7. Limiter Schalter
8. Mode Schalter
Der Verstärker kann in 3 Betriebsarten
funktionieren: Stereo, Mono und gebrückt .
Wählen Sie eine dieser Betriebsarten:
Stereo Betrieb: Standard Links / Rechts
Stereo Betrieb.
Brückenbetrieb: Diese Betriebsart vereinigt
beide Kanäle auf einem Kanal, wodurch sich
die Leistung dieses Kanals verdoppelt.
Schliessen Sie das Signal an den linken
Eingangskanal an und der Ausgangspegel
kann nun mit dem linken Lautstärkeregler
eingestellt werden.
9. Ground Lift Schalter
Trennt die Schaltungen von der Masse, falls
Probleme mit Erdschleifen auftauchen
(Brummgeräusche).
10. Brückenbetrieb NL4 Ausgang.
Im Brücken Betrieb beträgt die Lastimepdanz
4 Ohm pro Kanal.
Pin +1 & +2 = + Ausgang, Pin -1 & -2 = Ausgang
11. Schraubanschlüsse
Lautsprecherausgänge: 4 Ohm pro Kanal. Im
Brückenbetrieb 8 Ohm.
12. Stereo NL4 Ausgang.
Im Brücken Betrieb beträgt die Lastimepdanz
2 Ohm pro Kanal.
Pin +1 & +2 = + Ausgang, Pin -1 & -2 = Ausgang
13. Netzkabeleingang
14. 20 Amp Auto-Sicherung
20 - 32
Page 21
Aufbau
Eingänge
Beide Eingänge sind symmetrisch. Wenn kein symmetrischer Ausgang zur Verfügung steht, können
Sie auch einen asymmetrischen Ausgang benutzen. Schliessen Sie Pin 3 mit Pin 1 Masse (s.u.)
zusammen. Bei einer asymmetrischen Verbindung können bei längeren Kabelwegen Störungen
auftreten.
1= Erde/Masse, 2=Signal +, 3=Signal –
Anschluss des Ausgangs
Während der Anschlüsse muss der Verstärker ausgeschaltet sein. Die Lautsprecher können über die
NL4 Buchsen oder über Drähte an die Schraubklemmen angeschlossen werden. Wählen Sie in der
nachstehenden Tabelle die geeignete Drahtstärke, die der Entfernung zwischen Verstärker und
Lautsprecher entspricht.
Abstand(m) Stärke(mm²)
<10m 1.5mm²
>10m <20m 2.5mm²
>20m <30m 4.0mm²
Schliessen Sie die Lautsprecher an die positiven (+) Ausgänge beider Ausgänge an und nicht an die
den (-) Ausgang oder die Masse. Die negativen Ausgänge dürfen im Brückenbetrieb NICHT benutzt
werden.
Netzanschluss
Bevor Sie den Verstärker ans Netz anschliessen, vergewissern Sie sich, dass die Netzspannung der
Versorgungsspannung des Verstärkers entspricht. Schliessen Sie erst das IEC Ende ans Gerät an
und dann den Netzstecker.
Lesen Sie bitte nachstehende Anweisungen, um einen zuverlässigen und
problemlosen Betrieb zu gewährleisten:
• Achten Sie darauf, dass alle Kabel richtig angeschlossen sind!
• Prüfen Sie, ob die Lautsprecher für diesen Verstärker geeignet sind!
• Niemals die Belüftungsgitter abdecken!
• Vor Regen und Feuchtigkeit schützen!
• Lautsprecherkabel nicht während des Betriebs einstecken oder abziehen!
21 - 32
Page 22

Technische Daten
Specification PDA-B1500 PDA-B2000
Ref. No. 171.193 171.194
4 Ohm Stereo Power (RMS) 2x 750W 2x 1000W
8 Ohm Stereo Power (RMS) 2x 500W 2x 600W
2 Ohm Stereo Power (RMS) 2x 1000W 2x 1500W
8 Ohm Bridge Power (RMS) 1500W 2000W
4 Ohm Bridge Power (RMS) 2000W 2800W
Frequenz Bereich 10Hz – 50kHz (±1.5dB)
Eingangs Empfindlichkeit 770mV
Maximum Eingangspegel 21dBv/9v
Eingangs Impedanz 20kOhm
Signal/Noise Ratio >95dB
Crosstalk @ 8 Ohm / 1kHz >105dB
Damping Faktor @ 8 Ohm / 1kHz >500
Slew Rate Intern 60V/µS
Protektion
Short Circuit, Current Limited, DC Fault, AC Line Fuse,
Thermal Cut Off, Power Up/Down, Slow Start
Stromversorgung 220-240Vac, 50Hz
Abmessungen (bxhxd) 482 x 380 x 88mm (19” x 2U)
Gewicht 23kg 24kg
Tronios BV Registrierungsnummer : DE51181017 (ElektroG).
Dieses Produkt darf am Ende seiner Lebensdauer nicht über den normalen Haushaltsabfall entsorgt werden,
sondern muss an einem sammelpunkt für das Recycling abgegeben werden. Die Werkstoffe sind gemäß
ihrer Kennzeichnung wieder verwertbar. Hiermit leisten Sie einen wichtigen Beitrag zum Schutze unserer
Umwelt.
Tronios BV Registrierungsnummer : 21003000 (BatterieG).
Lithiumbatterien und Akkupacks sollten nur im entladenen Zustand in die Altbatteriesammelgefäße bei Handel und
bei öffentlich-rechtlichen Entsorgungsträgern gegeben werde n. Bei nicht vollstän dig entladenen Batterien Vorsorge
gegen Kurzschlüß treffen durch Isolieren der Pole mit Klebestreifen.
Der Entnutzer ist zur Rückgabe von Altbatterien gesetzlich verpflichtet.
Die Spezifikationen sind typisch. Die Werte können leicht von einem Gerät zum anderen ändern. Spezifikationen
können ohne vorherige Ankündigung geändert werden.
Garantie gilt nicht, wenn Unfälle oder Schäden, durch unsachgemäße Handhabung oder Nichtbeachtung der
vorgeschriebenen (einschließlich Warnungen) in diesem Handbuch, entstehen.
Tronios BV haftet nicht für Schäden in jeglicher Form, wenn die Vorschriften im Handbuch (zB Warnungen) nicht
eingehalten werden.
Alle (fehlerhafte) Ware werden während der Garantiezeit immer in der Originalverpackung an den Fachhändler
gesendet.
22 - 32
Page 23

Información Importante de Seguridad
ADVERTENCIA:
PARA PREVENIR INCENDIOS O DESCARGAS
ELÉCTRICAS, NO EXPONGA ESTE APARATO
A LA LLUVIA O A LA HUMEDAD.
PRECAUCIÓN:
1. Trate con cuidado el cable de la fuente de
alimentación. No lo dañe o deforme. Si se daña
o deforma, puede causar descargas eléctricas o
fallos cuando se utilice. Cuando lo desconecte
de la toma de corriente, asegúrese de hacerlo
sujetando la clavija, no estirando del cable.
2. Para prevenir descargas eléctricas, no abra la
tapa superior. Si hay algún problema, contacte
con su distribuidor.
3. No coloque objetos metálicos o derrame
líquido dentro del aparato. Puede resultar en
descarga eléctrica o mal funcionamiento.
EL USO DE OTROS CONTROLES,
AJUSTES O REFORMAS DE
PROCEDIMIENTOS QUE NO SE
ESPECIFICAN AQUÍ PUEDEN
RESULTAR EN LA EXPOSICIÓN DE
RADIACIÓN PELIGROSA. EL
APARATO NO DEBERÍA AJUSTARSE
O REPARARSE POR CUALQUIERA
QUE NO SEA PERSONAL
DEBIDAMENTE CUALIFICADO CON
EL AISLAMIENTO ADECUADO.
CUANDO SE REPARE, UTILICE
SOLAMENTE PIEZAS DE RECAMBIO
IDÉNTICAS.
PRECAUCIÓN: PARA PREVENIR:
RIESGOS DE DESCARGAS ELÉCTRICAS, NO ABRA LA TAPA SUPERIOR (O LA TRASERA). NO
HAY PIEZAS REPARABLES DENTRO. DEJE LAS REPARACIONES PARA UN SERVICIO
TÉCNICO CUALIFICADO.
El símbolo del rayo acabado en flecha, dentro de un triángulo equilátero, se utiliza para
alertar al usuario de la presencia de “voltaje peligroso” sin aislamiento dentro del recinto del producto,
que puede ser de suficiente magnitud como para constituir un riesgo de descargas eléctricas a
personas.
El símbolo de exclamación dentro de un triángulo equilátero, se utiliza para alertar al
usuario de la presencia de instrucciones importantes de funcionamiento y mantenimiento (reparación)
en el manual que acompaña al aparato.
NOTA:
Este aparato puede provocar interferencias en la recepción de su radio y televisión.
23 - 32
Page 24

Instrucciones Importantes de Seguridad
1. Lea las instrucciones – Todas las instrucciones de
funcionamiento y de seguridad deberían leerse antes de
utilizar el producto.
2. Guarde las instrucciones - Las instrucciones de
funcionamiento y de seguridad deberían guardarse para
futuras consultas.
3. Preste atención a las advertencias - Todas las
advertencias en el producto y en el manual de
instrucciones deben seguirse al pie de la letra
4. Siga las instrucciones - Deberían seguirse todas las
instrucciones de utilización y funcionamiento.
5. La instalación inapropiada puede provocar daños
serios a personas y propiedades.
6. Agua y humedad - El aparato no debería usarse
cerca del agua - por ejemplo, cerca de una bañera,
lavabo, fregadero, lavadero, en un suelo mojado, o
cerca de una piscina, o parecido.
7. Carretillas y soportes - El aparato debería utilizarse
únicamente con carretillas o soportes que se
recomienden por el fabricante. El aparato
colocado en una carretilla debería
moverse con cuidado.
Las paradas bruscas, la fuerza excesiva,
y las superficies irregulares pueden hacer
que la carretilla y el aparato vuelquen.
8. Montaje en techo o pared - El producto debería
montarse en techo o paredes según las
recomendaciones del fabricante.
9. Calor - El aparato debería colocarse fuera del
alcance de fuentes de calor tales como radiadores,
registros de calor, estufas, u otros aparatos (incluyendo
amplificadores) que desprendan calor.
10. Fuentes de alimentación – Este producto debería
funcionar solo con el tipo de alimentación que indica en
la etiqueta. Si no está seguro de la corriente que se
suministra en su hogar, consulte con su distribuidor o a
la compañía eléctrica. Para los productos previstos para
que funciones con baterías, u otras fuentes, consulte las
instrucciones de funcionamiento.
11. Protección del cable de alimentación-Los cables de
alimentación deberían colocarse de manera que no
puedan ser pisados o pinchados por productos
colocados encima o apoyados en ellos, prestando
especial atención a la parte del cable donde está
situada la clavija, las bases de enchufe, y los puntos
desde donde sale el cable del aparato.
12. Limpieza – El aparato debería limpiarse según las
instrucciones del fabricante. Límpielo pasándole un
trapo ligeramente humedecido con agua. Evite que le
entre agua al aparato.
13. Periodos sin utilización-El cable de alimentación
debería estar desenchufado cuando se deje de utilizar el
aparato por un largo periodo de tiempo.
14. Entrada de objetos y líquido -Debería cuidar de
que no cayeran objetos o se derramara líquido dentro
del aparato a través de los orificios.
15. Daños que requieran reparación-El aparato
debería repararse por un servicio técnico cualificado
cuando:
A. El cable de alimentación o la clavija están dañados; o
B. Objetos han caído, o se derrame líquido en el
aparato; o
C. El aparato haya estado expuesto a la lluvia; o
D. El aparato parece que no funciona correctamente
o muestra un cambio notable en el funcionamiento;
o
E. Se ha caído el aparato, o la carcasa de ha
dañado.
16. Reparaciones-El usuario no debería intentar
hacer ninguna reparación al aparato fuera de las
descritas en el manual de funcionamiento. Todas las
otras reparaciones deben dejarse en manos de un
servicio técnico cualificado.
17. Ventilación – Las ranuras y orificios en el chasis
están provistos para la ventilación y para asegurar
el funcionamiento confiable del producto y la
protección de sobrecalentamiento, y estos orificios
no deben bloquearse ni taparse. Los orificios no
deberían bloquearse al colocar el producto en una
cama, sofá, alfombra, u otra superficie similar. Este
producto no debería colocarse en lugares cerrados
como librerías o racks sin ventilación apropiada
según las instrucciones del fabricante que han de
cumplirse.
18. Acoplamientos – no use acoplamientos que no
haya recomendado el fabricante del producto ya que
pudiera producir daños.
19. Accesorios – No coloque el producto en
carretillas, soportes, trípodes, soportes de pared o
tablas inestables. El producto podría caer, causando
daños serios a niños o a adultos, y dañar
seriamente el producto. Use solamente carretillas,
soportes, trípodes, soportes de pared, o tablas
recomendadas por el fabricante, o vendidas con el
producto. Cualquier montaje del producto debe
seguir las instrucciones del fabricante, y deberían
utilizarse accesorios recomendados por el.
20. Rayos – Para proteger este producto durante
una tormenta, o cuando no va a utilizarse durante
un largo periodo de tiempo, desenchúfelo de la toma
de corriente y desconecte la antena o sistema de
cables. Esto evitará posibles daños en el producto
debido a subidas de tensión producidas por un rayo
o por la compañía eléctrica.
21. Recambios – Cuando se necesite cambiar una
pieza, asegúrese de que el servicio técnico ha
utilizado piezas de recambio especificadas por el
fabricante o que poseen las mismas características
que la pieza original. Los repuestos no autorizados
pueden provocar incendios, descargas eléctricas, u
otros daños.
22. Comprobaciones de seguridad – Una vez
terminada cualquier servicio o reparación de este
producto, pida al servicio técnico que efectúe
comprobaciones de seguridad para determinar si el
producto funciona correctamente.
24 - 32
Page 25

CARACTERÍSTICAS
El amplificador de audio estéreo Power Dynamics Professional proporciona una alta potencia de
salida por poco dinero. El gama de amplificadores CPA son ideales para los DJs amateurs,
instalaciones fijas de menor tamaño en pubs, casinos, etc. o como complemento en grandes
instalaciones de disco.
• LCD azul que indica temperatura, modo operativo, potencia de salida, protección y nivel de audio.
• Excelente calidad acústica
• Protección contra altas temperaturas
• Modo estéreo y puenteable
• Indicación de Señal, Clip & Protección para cada canal
• Entradas mediante XLR & jack 6.3mm
• Salidas de altavoz por NL4 & bornes
Refrigeración por ventiladores
•
Panel Frontal
1. Ventilación.
Flujo de aire de delante hacia atrás.
2. Controles de volumen.
Estos controles ajustan el nivel del volumen de ambos canales. Gírelo ligeramente a la izquierda
cuando se enciendan los indicadores de clip (4).
3. Indicación de protección.
Cuando en algún punto determinado, se produce una avería en su amplificador, se conmutará al
modo protección. El amplificador desconectará el punto donde se ha producido la avería y
encenderá el led de protección para indicarle que hay algo que está mal. Las razones pueden
ser: Mala ventilación, Baja impedancia (< 4 Ohm), Ventiladores defectuosos, Un cortocircuito en
los cables.
4. Indicación de Clip.
Estos LEDs se encenderán cuando uno o ambos canales están en la máxima potencia. Puede
ocurrir que estos LEDs se enciendan de vez en cuando, esto no es un problema. Pero si se
enciende continuamente es necesario que disminuya el volumen, de otro modo podría provocar
un daño irreparable al equipo.
5. Indicadores de señal.
Estos LEDs naranjas indican los niveles de señal de salida de los amplificadores.
6. Interruptor On/Off.
Para encender o apagar el amplificador. Siempre reduzca el volumen al mínimo antes de
encender este amplificador.
7. Display azul LCD.
Informa de los parámetros de trabajo y operativa actual.
8. Carga 2/4/8 Ohms.
Selecciona la carga de altavoces para el calculo correcto de la potencia de salida.
25 - 32
Page 26

DISPLAY
Indicaciones estandar:
Linea-1: Potencia de salida de ambos canals calculado por el amplificador.
NOTA: Selecione la carga correcta (boton 8)
El calculo no es 100% correcto en modo bridge
Linea-2: Si CLIP ON el amplificador esta sobrecargado. Reduzca el nivel de entrada.
Linea-3: Informacion sobre proteccion.
Linea-4: Temperatura de la salida (finales) de ambos canales
Grafico: Grafico de barras vertical en el centro del display indicando el nivel de salida de ambos
canales
Indicaciones unos segundos despues de modificar el volumen:
Linea-1: Modo operacion STEREO o BRIDGE
Linea-2: Limitador ON o OFF
Linea-3 & 4: ATTEN, atenuacion de señal de entrada, linea 4 muestra el nivel.
Grafico: Grafico de barras vertical en el centro del display indicando el nivel de salida de ambos
canales
Indicaciones unos segundos despues de modificar la impedancia (8):
Seleccione la correcta impedancia o carga para el calculo de potencia
26 - 32
Page 27

Panel trasero
1. Ventilador.
Ventilación forzada de delante hacia atrás.
2. Conmutador de Crossover.
x1=45-960Hz ; x10=450-9600Hz
3. Frecuencia Crossover
Ajuste de la frecuencia Crossover
4. Filtro interruptor de selección
High=Filtro High Pass
Low=Filtro Low Pass
Bypass=Sin Filtro
5. Entradas estéreo por Jack 6.3mm.
Dos entradas con conector hembra jack de
6.3mm para conectar una fuente de señal
(mezclador etc.).
6. Entradas XLR balanceadas.
Dos entradas con conector hembra XLR de
3-pin para conectar una fuente de señal
(mezclador etc.).
7. Interruptor limitador
Limitador para controlar la potencia de
salida automaticamente.
8. Conmutador de modo.
El amplificador puede trabajar en 3 modos
diferentes: estéreo, puente & paralelo
(mono). Escoja una de estas funciones:
Modo estéreo: Modo estéreo estándar
izquierdo/derecho.
Modo puente: Este modo combina ambos
amplificadores en un solo canal lo que
proporciona el doble de potencia en este
canal. Conecta la señal del canal de entrada
izquierdo y el nivel de salida ya se puede
ajustar con el control de volumen izquierdo.
9. Conmutador de masa.
Permite separar la masa de los circuitos y
del chasis en caso de problemas zumbidos
típicos de masa.
10. Salidas de altavoz NL4.
Máxima carga en modo puente 4 Ohm por
canal.
Pin +1 & +2 = + salida, Pin -1 & -2 = - salida
11. Salidas de altavoz por bananas.
Máxima carga en modo estéreo/mono 4
Ohm por canal. Máxima carga en modo
puente 8 Ohm.
12. Salidas de altavoz NL4.
Máxima carga en modo estéreo 2 Ohm por
canal.
Pin +1 & +2 = + salida, Pin -1 & -2 = - salida
13. Base de alimentación.
220-240Vac / 50Hz
14. Fusible 20A
27 - 32
Page 28

Instalación
Conectar entradas
Ambas entradas son balanceadas. Si no dispone de una salida balanceada, también puede usar una
no balanceada, puentee el pin 3 – con el pin1 (masa) (véase debajo). Las líneas no balanceadas
pueden generar ruidos si las distancias son muy largas.
1= tierra / masa, 2=señal +, 3=señal –
Conectar salidas
Asegúrese de que el amplificador está apagado antes de hacer las conexiones. Los altavoces pueden
conectarse usando conectores NL4 o cable pelado para los bornes. Utilizando la guía que damos a
continuación seleccione la sección apropiada del cable según la distancia entre el amplificador y el
altavoz.
Distancia Sección del cable
<10m 1.5mm2
>10m <20m 2.5mm2
>20m <30m 4.0mm2
NOTA: ¡Nunca conecte la salida (+) a masa o a la salida (-) y nunca conecte la salida (+) a otras
salidas!
Conecte la alimentación
Antes de enchufar el aparato siempre asegúrese de que la fuente de alimentación se ajusta al voltaje
especificado. Primero conecte extremo del cable con el conector IEC a la base IEC en el amplificador
y luego conecte el otro extremo del cable a la toma de corriente.
Por favor lea las siguientes instrucciones para un funcionamiento fiable y sin
problemas:
• Asegúrese de que todas las conexiones se hayan hecho correctamente.
• Compruebe si los altavoces conectados son compatibles con el amplificador.
• Asegúrese de que haya la ventilación adecuada.
• Evite exponerlo a la humedad.
• Nunca conecte o desconecte los altavoces mientras esté en funcionamiento, ya que puede
resultar en serios daños.
28 - 32
Page 29

Especificaciones
Specification PDA-B1500 PDA-B2000
Modelo Ref. No. 171.193 171.194
4 Ohm Stereo Potencia (RMS) 2x 750W 2x 1000W
8 Ohm Stereo Potencia (RMS) 2x 500W 2x 600W
2 Ohm Stereo Potencia (RMS) 2x 1000W 2x 1500W
8 Ohm Bridge Potencia (RMS) 1500W 2000W
4 Ohm Bridge Potencia (RMS) 2000W 2800W
Respuesta en Frecuencia 10Hz – 50kHz (±1.5dB)
Sensibilidad de Entrada 770mV
Maximo nivel de entrada 21dBv/9v
Impedancia de entrada 20kOhm
Nivel señal/ruido medido A-RMS >95dB
Cruce entre canales @
Salida 8 Ohm / 1kHz
Factor Damping @ 8 Ohm / 1kHz >500
Slew Rate Interno 60V/µS
Proteccion
Alimentacion 220-240Vac, 50Hz
Dimenciones (an x a lx pr) 482 x 380 x 88mm (19” x 2U)
Peso 23kg 24kg
Short Circuit, Current Limited, DC Fault, AC Line Fuse,
Thermal Cut Off, Power Up/Down, Slow Start
>105dB
Nota: Las especificaciones diseño están sujetos a cambios sin previo aviso con el propósito
de mejorar.
Este producto cumple los requisitos de las normas EMC y LVD.
29 - 32
Page 30

30 - 32
Page 31

CE Declaration of Conformity
Importer: TRONIOS BV
Bedrijvenpark Twente 415
7602 KM - ALMELO
Tel : 0031546589299
Fax : 0031546589298
The Netherlands
Product number: 171.193 / 171.194
Product Description: PowerDynamics PDA-B1500 Professional Amplifier
PowerDynamics PDA-B2000 Professional Amplifier
Regulatory Requirement: EN 60065
EN 55013
EN 55020
EN 61000-3-2/-3-3
The product met the requirements stated in the above mentioned Declaration(s).
ALMELO,
17-02-2011
Signature :
31 - 32
Page 32

www.tronios.com
Copyright © 2011 by TRONIOS the Netherlands
 Loading...