

POWER DOG AMBUSH Owner's Manual
Pnwer
llary*
Owner's
Agricultural
/ Commercial
Manual
Industrial
/
lUllil$
10101
W
P0Wffi
Shively
Fat- F-
Road,
a ararrt
t0UlPilltlll.
(C.R.
/ -n
46)
ar
' t
-
Nappanee,
a\t\ r^ Fn
F at'a 6F
uc
tN 40550
INDEX
FORWARD.
SAFETY PRECAUTIONS
A.
General.
B.
Related
C. When
SAFETY
SPEC|F|CAT|ONS..........
OPERATING INSTRUCTIONS
DECALS
A.
Controls.
1. Fuel
2. EngineThroftle...
3. Recoil
4. Blade
5. Operator Presence
6. Free
B. InitialAdjustments.
C. Break-ln
to Fuel . .
Mowing.
Shutoff
Starter. .
Clutch
Wheel
and Operation
.
Valve. . . .
. . .
Levers
. . .
FOREWORD
The
Power
professional,
many
use. The
operating
cy. lf
free
safety features
list of
and
properly
service.
Although
and configuration
cern,
nance
prudence,
and storage
Dog Commercial,
agricultural,
safety
maintenance
commercial
that
should be
precautions
instructions
operated and maintained, your
hazard
control
and
of the equipment,
proper
and
of
the equipment.
training of
2 MAINTENANCE.....
3
3
3
3
4
4
5-6
5
5
5 TROUBLESHOOTING
5
5
5 WARRANTY
5
5-6"
Walk-Behind,
and
industrial
studied
should
by all
receive
necessary
Power
accident
these
the
prevention
factors
personnel
A.
General Maintenance
B.
Daily Maintenance
C. Maintenance
D. Engine
E. Mower
1. To
Change
2. To Sharpen
3. To
Change the Blade
4, To
Change Spindle
SUGGESTEDREPLACEMENTPARTS-mower
MAINTENANCERECORD
Brush
Mowers
have been
trained individuals.
operators and
particular
to keep
Dog
you
mower will
partially
are also
dependent
involved
maintenance
attention.
Power Dog
are dependent
in
the operation,
Every 40
Maintenance.
Maintenance
a Blade. .
a Blade.
GUIDE. .
The machines
This
give
dependable and
upon the
. _ .
. . . . . . . .
After
Mowing . . . .
Hours.......
. . . . . .
. . . .
Drive Belt
Bearings......
developed
. . . . . . .
...,.....
for use
incorporate
personnel
manual
mower
upon the
at
before
presents
peak
design
awareness,
transport, mainte-
. 6
.. 7
. . . . 7
the
efficienhouble-
con-
6-8
6-7
7
7
7
7
7
8
I
9
10
by
cAUTloN:
erated
serious
All
operators
The Power
Dog commercial,
and maintained
injury
to anyone who
and maintenance
their safety.
wARNING:
State of California
The
engine
to cause cancer,
by thoroughly
misuses
personnel
exhaust
from
birth
walk-Behind,
Brush Mower
trained individuals.
them
this
or does not
are urged
product
defects or
to read
contains
other reproductive
should
The
machines
understand
this entire
chemicals
only be
could cause
their
operation.
manual for
known to
harm,
op-
the
SAFETY
A.
GENERAL
1.
Read
this Operator's
tion.
2.
Do not
operate
Always have
4.
Do not
or
5.
Always
loose-fitting
6.
Never run
7.
To
has
8.
When looking
penetrate
allow
remove
does not function,
wear
avoid
been
PRECAUTIONS
anyone to
this machine.
your
any shields,
safety
clothing.
the engine
serious
shut off.
for
the
skin.) Never
Manual
feet
repair
glasses,
indoors without
burns, do not
oil leaks, never
before
operate
and hands
or maintain
guards,
or replace it
long
touch the
tighten
starting
clear
decals or
pants
adequate ventilation.
your
run
or adjust hydraulic
the mower.
this machine
of the cutter
safety
before
and
operatlng
safety shoes
engine or
hand
over hydraulic
mufflerwhile
Study
who
has not read
deck when
devices- lf
the mower.
when
Exhaust
hoses, Iines
hoses
or fittings
the controls
the
starting
a shieid,
operating
the engine
the engine.
guard,
or maintaining
fumes
or fitting. (High-pressure
while the
and learn
are deadly.
is running
the
manual. Never
decal
or safety device
or until it has
system iJunder
proper
this mower.
sequence
permit
cooled after it
pressure.
of opera-
children
is damaged
Do not wear
oil can
easily
to
B. RELATED
l.
Gasoline is
2.
Do not smoke
3. Always
4. Always
5. lf the fuel
6. When filling
sion. Do
7. Wipe
C. WHEN
1 . Keep
2.
Mow only
3. Always check
4. Watch
5. Reduce
6. Always
in wet
Always
7.
Never
8.
Be
careful when
stop rotating.
Never
10.
the ignition switch
I t-
Always
you
lf
wire and inspect
bolts are tight
Do not
13.
Never raise
14.
Never
15.
person
er
16. Always
nance on
17. Keep
chance
18. The operator
operation.
TO FUEL:
highly flammable.
use approved
shut
off the engine
container
the fuel
not overtill.
up any spilled
MOWING:
adults,
weeds.
hit a solid
walk or
the mower
children
in daylight.
for holes, rocks,
speed when
proper
have
keep both hands
engage the
leave the mower
park
the mower
mow excessively
the mower
approaches
disconnect
this mower.
fire
of
presence
lf the blade
permit
or
the area
crossing
object while
for damage.
before restarting
stand on the
and especially the
and to
others
containers
and
spout will not
tank, stop when
gasoline.
pets
and
to be mowed
posts,
and other
making sharp
footing
blade clutch when
and
the
permit proper
on slopes
on
the handles.
gravel
unaftended
closing the fuel
and start
mowing,
Repair
steep
slopes. Mow
deck while
discharge side
you
while
plug
spark
control levers located
clutch is engaged,
Respect it.
to smoke while
gasoline.
for
permit
away from
the engine.
it
to cool
fit inside
turns.
paths
without
the engine
the blades
are operating
wire to
engine/pump
cooling.
the fuel
gasoline
the
the
and remove
hidden hazards.
and hillsides
Always walk,
the
engine is running
or roadways.
disengaging
shutoff valve.
on a level
disengage
any damage
across
are
of a mower
prevent
at each
releasing
handling
before removing
area to
the blade
a mower.
gasotine.
tank opening,
reaches
debris
and never
and make
rotatino.
the
area clean
one inch
be mowed.
and other objects
never run.
unless
Always
the slope, not
engine from
handle
both handles
disengage
the
blade clutch,
surface with
clutch and stop
wlth the engine
and free
are designed for
the cap of the fuel
use a funnel.
from
the top. This
prior
operate when
you
are in
the blade clutch
shutting off the
the blade clutch
the engine.
sure the
blades are in
up and down
running.
accidentally
grease,
of
will shut
off the engine.
tank.
space must
to mowing.
conditions
area that
the slooe.
Disengage
starting before
grass
your
are slippery.
you
and wait
disengaged.
Diiconnect the
good
and leaves to reduce
safety. Do
be left for exoan-
Be very
intend
engine, taking
condition
the blade clutch
mow.
to
until the blades
spark
and the blade
performing
not try to defeat
careful
the key from
plug
if anoth-
any
mainte-
the
their

Keep
over
safety decals
or can no longer
clean.
be read.
Replace
any
Replacement
safety decal
safety decals
that is
damaged,
are
available
destroyed,
through
missing,
your
painted
dealer.
Located
Front
on Control
cover, Rear
KEEP HAI{DS
R-d .nd
opa6lo/!
udnethl!ntchln.
Do nd opaEta
gurda
pl!oo.
undfrlrnd
n[nual
yrlttout
lnd .hlCd!
bdorg
In
Panel,
cover
and FEET AWAY
Located
Control
Panel
Located
Conkol
on
on
Panel
HIGH
a
T
H
R
o
T
T
L
E
SPECIFICATIONS
AHgusq
Enqine:
lransmission:
Blade Drive:
Enoaoement:
Cuttinq Width: 26"
Blade:
Deck!
fire Size:
Ground
Forward/Reverce:
Operator Present
Engine
Lenqth:
Width:
Heiqht:
Weisht:
Warranty:
Speed: Variable,
Safety: Yes
Start Recoil
300#
6 mo. commercial
Honda 390V
Hvdro Transaxle dETC
V-belt
Manual Clutch
Dual
sided
quaoe
l0
4.80/4.00-8
Instant
70"
29'
41"
tself adi.)
steel
max. 4
*
m.p,h.
OPERATING
I NSTRUCTIONS
A. CONTROLS
1. Fuel
Located
grees.
mower
the fuel shutoff
2, Engine
Located
from
from slow
halfway
3. Recoil
Located on top
out choke
and fast
the
come compression,
gine.
way
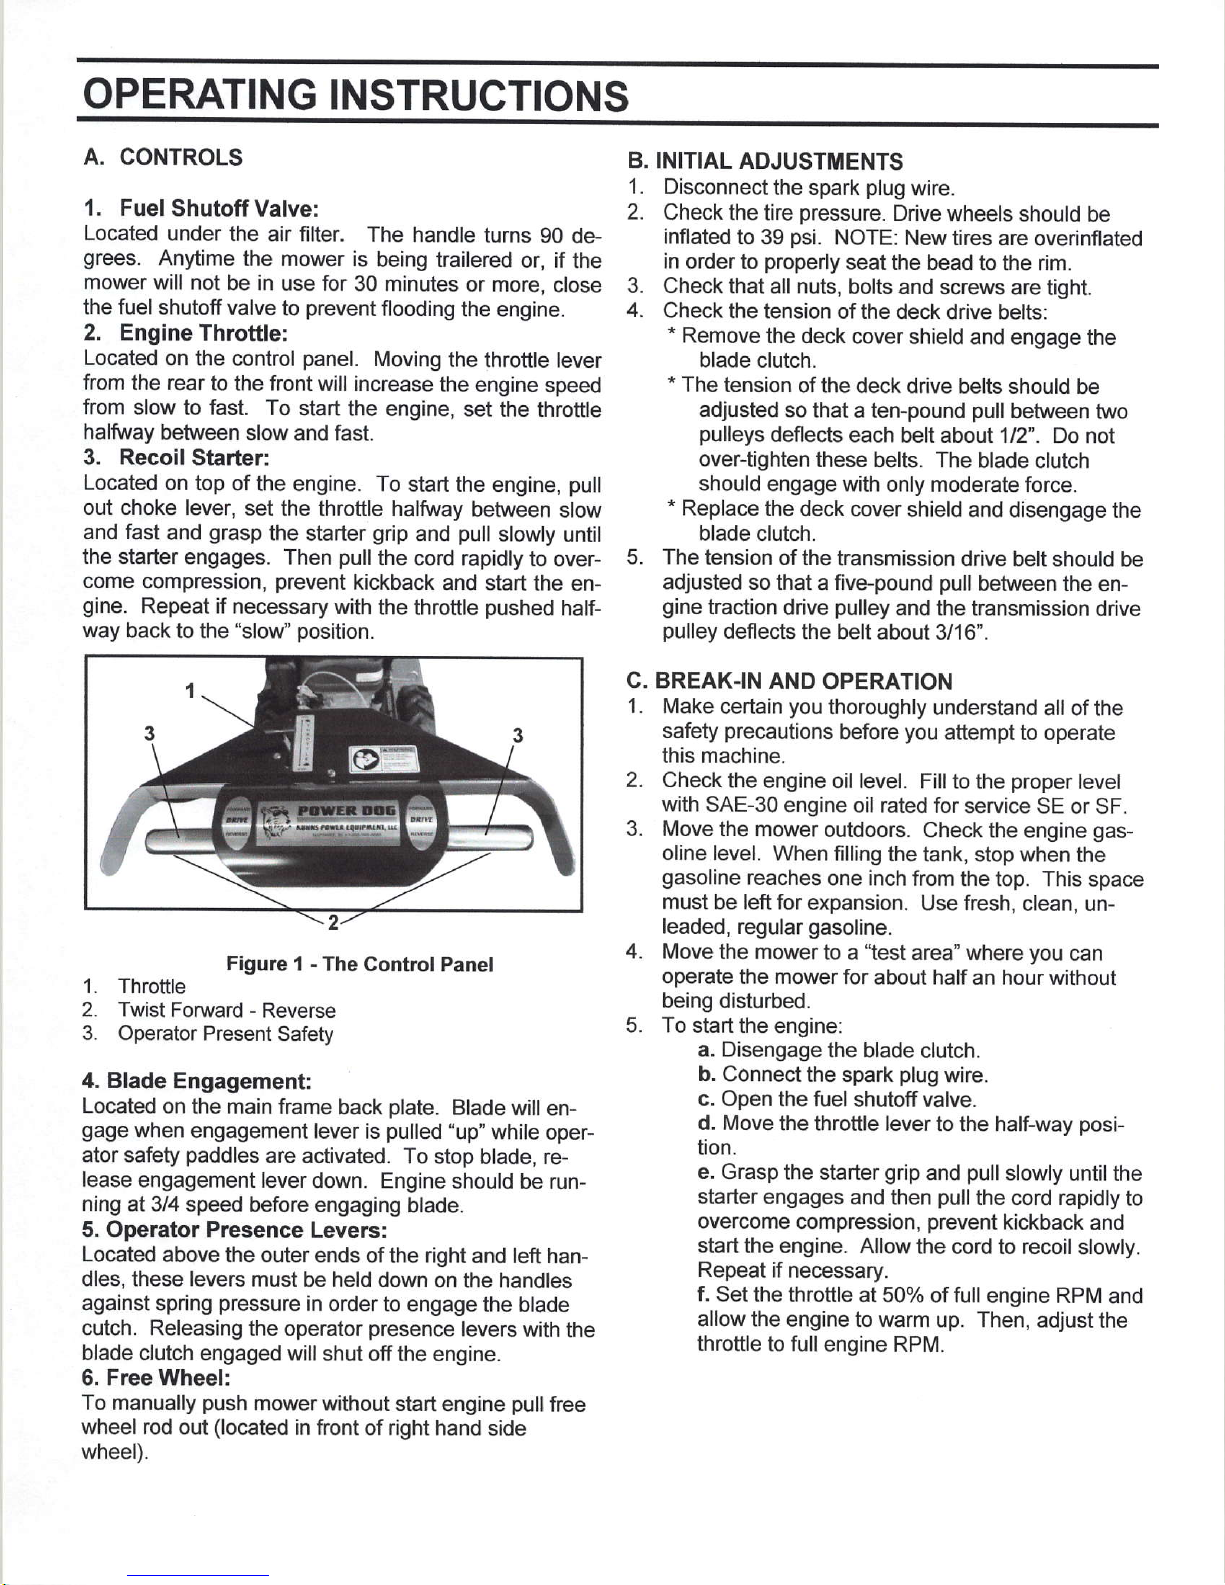
1. Throttle
2. Twist Forward
3. Operator
4. Blade
Located on
gage
ator safety
lease
ning at 3/4
5. Operator Presence
Located
dles, these levers must
against
cutch. Releasing
blade
6. Free Wheel:
To
wheel rod
wheel).
Shutoff Valve:
under the
Anytime
will not
air filter. The
the mower is
be in use for
valve
to
Throftle:
on the
the rear
control
to the front will increase
to fast. To start
between
slow and fast.
Starter:
of the engine. To
lever, set
grasp
and
the throttle halfi^/ay
the starter
starter engages. Then
prevent
Repeat if
back to the
when
engagement lever
above
spring
clutch engaged will
manually
necessary with
"slow' position.
Figure
-
Reverse
Present Safety
Engagement:
the main frame back
engagement
paddles
speed before engaging
push
out
are activated-
the outer ends of
pressure
the operator
mower
(located
handle turns
being trailered
30 minutes or
prevent
panel.
flooding
Moving
the engine.
the throttle
the
the engine,
engine speed
set the throttle
start the engine,
between
grip
pull
the
kickback
pull
and
cord rapidly
and start the
the throttle
I - The Control
lever is
down. Engine should
Levers:
be held down
in
order to engage the
presence
shut off the engine.
without start engine
in front
of right hand
Panel
plate.
pulled "up"
the
Blade
To stop blade, re-
blade.
right
and left han-
on the handles
levers
g0
de-
or, if
the
more, close
lever
pull
slow
slowly
until
to over-
en-
pushed
while
side
half-
will en-
oper-
be run-
blade
with
pull
free
the
B. INITIAL
1.
Disconnect
2.
Check the
inflated
in
Check
4.
Check the
*
*
*
ADJUSTMENTS
the spark
pressure.
tire
psi.
to 39
order to
properly
that all nuts,
tension of the
Remove
the deck
blade clutch.
The tension
adjusted
pulleys
of the deck
so that
deflects
over-tighten
should engage
Replace
the deck
plug
NOTE:
seat the bead
bolts and screws
cover shield
a ten-pound
each belt about 1/2".
these belts. The
with only moderate force.
cover shield and
blade clutch.
5. The
tension of the
transmission
adjusted so that a five-pound
gine
traction
pulley
C. BREAK-IN
1.
Make
safety
deflects
AND
certain
precautions
pulley
drive
the belt about
OPERATION
you
thoroughly
before
this machine.
2. Check
with
3. Move the mower
oline
gasoline
must
leaded, regular
4. Move
the engine
SAE-30 engine
level.
oil
oil rated for service
outdoors.
level. When filling
reaches
be left for
one inch from
expansion.
gasoline.
the mower
to a
"test
operate the mower for
being disturbed.
5. To start the
a. Disengage
b.
c. ODen the fuel
d. Move
engine:
the
blade clutch.
Connect the spark
shutoff valve.
the throftle lever
tion.
e. Grasp
starter
the starter
engages and
overcome compression,
start
the engine. Allow
Repeat
f. Set the
if necessary.
throttle at 50%
allow the engine to warm
throttle to full
engine RPM.
wire.
Drive
wheels should
New tires are
overinflated
to the rim.
are tight.
deck drive belts:
and engage the
drive belts should
pull
between
Do not
blade
clutch
disengage the
drive belt should be
pull
between the en-
and the transmission
3/16".
understand all
you
attempt
Fill to
to operate
proper
the
SE or
Check the engine
the tank,
stop when the
the top. This space
fresh,
Use
area" where
about half
plug
wire.
an
hour
clean, un-
you
without
to the half-way
grip
then
pull
and
pull
prevent
slowly until
the cord rapidly
kickback
the cord to recoil
of full engine RPM
up. Then, adjust
be
be
two
drive
ofthe
level
SF.
gas-
can
posi-
the
to
and
slowly.
and
the
OPERATING
INSTRUCTIONS
C. BREAK.IN
6. After the engine
tion
and check
Disengage
Restart
8.
Pull
the blade
the
cutter blades
9. Slowly
will
move
10. To
1 1. For reverse,
stop the
dle bar
and
the
handle
AND
OPERATION
has warmed
the operation
the
blade clutch
the engine.
clutch lever
start rotating.
twist the handle
ahead in a straight
moweds fonllrard
backward.
slowly
mower
bar foMard
twist the handle
will
move back. To
until the mower
con'd
up,
of the
up until it engages
bar fonlrrard
line.
motion,
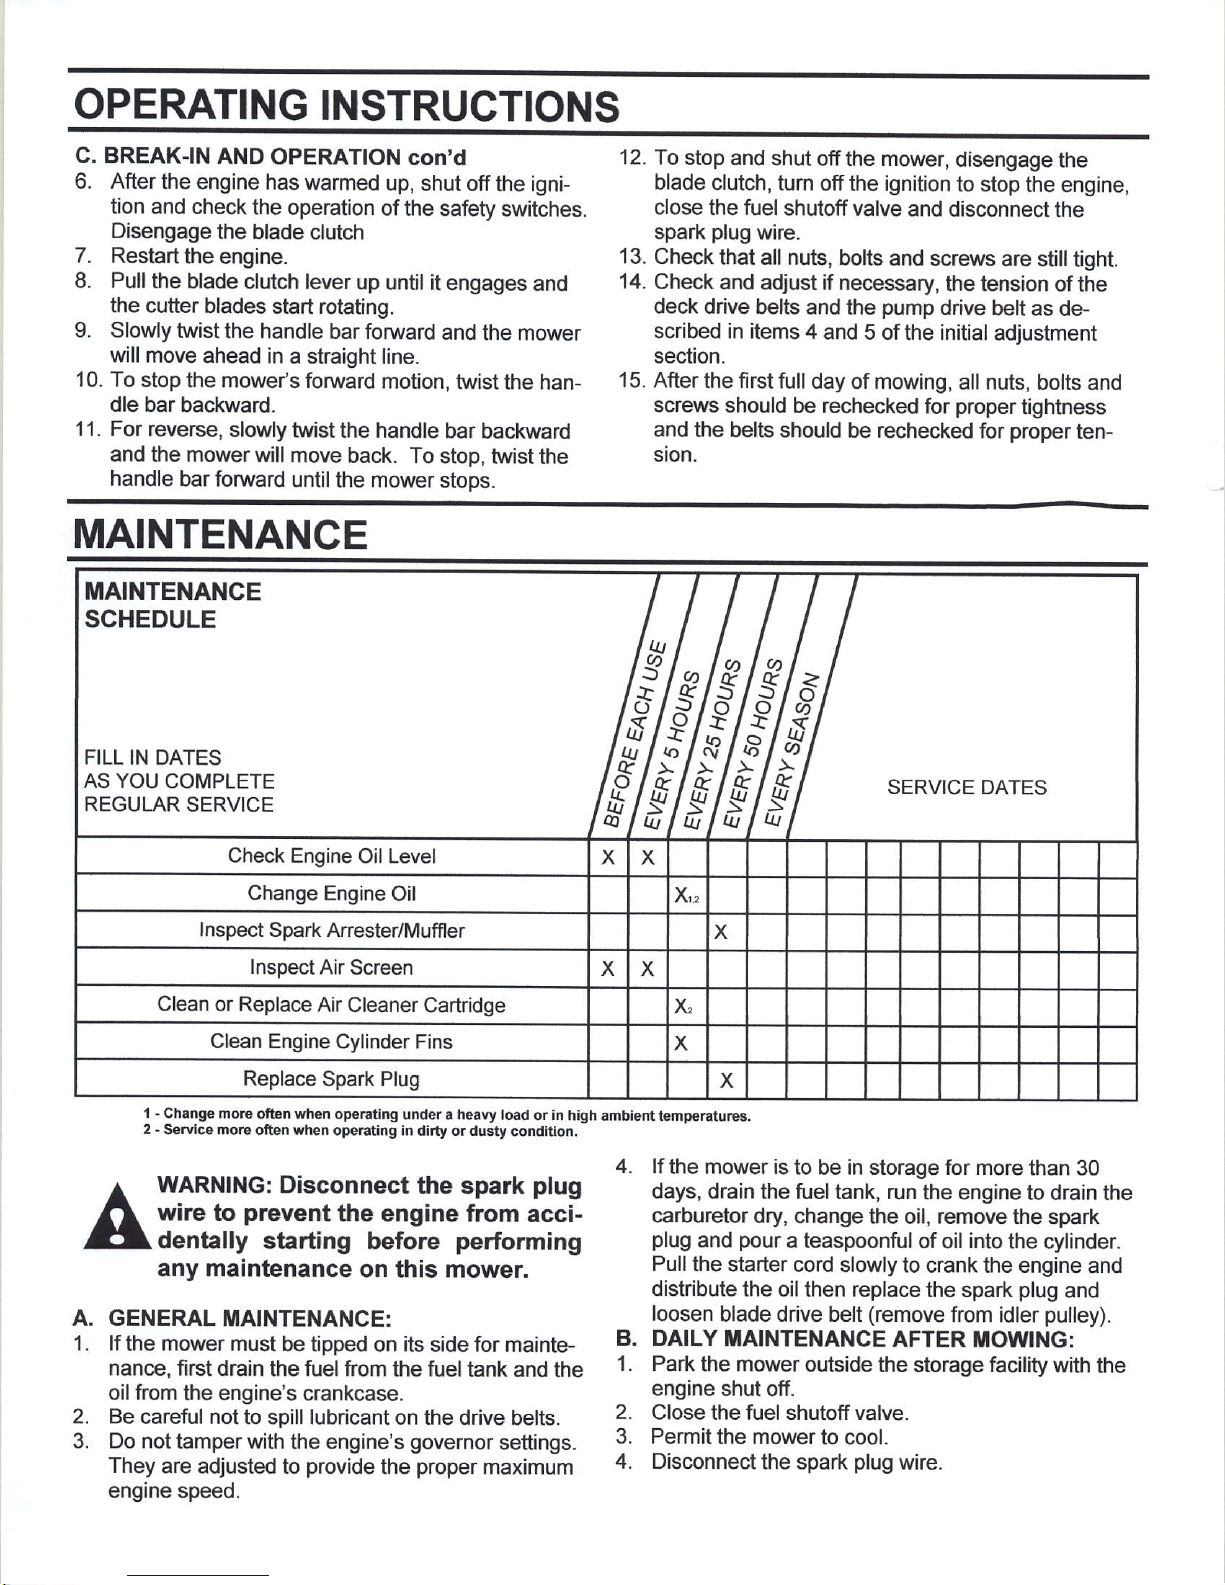
MAINTENANCE
MAINTENANCE
SCHEDULE
shut off the igni-
safety switches.
and
and
the mower
twist the han-
bar backward
stop,
twist the
stoDs.
12. To
stop and shut
blade
clutch, turn off
close the fuel
plug
spark
13.
14.
Check
Check
that all nuts,
and adjust if necessary,
deck drive
scribed
section.
15.
After the first
screws should
and the belts
sion.
offthe mower,
the ignition
shutoff valve
wire.
bolts and
belts and the
in items 4
full day
pump
and 5 of
mowing,
of
be rechecked
should be rechecked
disengage
to stop the engine,
and disconnect
the
screws are still
the tension of the
drive belt
initial
the
for
all nuts,
proper
as de-
adjustment
bolts and
tightness
proper
for
the
tight.
ten-
FILL IN DATES
AS YOU
REGULAR
A.
1.
COMPLETE
SERVICE
Check Engine
Change Engine
lnspect Spark Anester/Muffl
Inspect
Clean or Replace
Clean
Replace
-
I
Change more
-
2
Servlce
often when op€.ating
morc
often when
WARNING:
wire to
prevent
dentally
maintenance
any
Air Screen
Air Cleaner
Engine Cylinder Fins
Spark Plug
Disconnect
starting
GENERAL MAINTENANCE:
lf the mower
nance, first drain
from
oil
Be careful not to
Do not tamper with
They
are adjusted to
must be tipped
the fuel ftom the fuel
the engine's
crankcase.
spill lubricant on
the engine's
provide
engine speed.
Oil Level
Oil
er
Cartridoe
opedting in dirty or dGty
undera heavy load or in
the spark
the engine from
before
perfonning
on this mower.
on its side for mainte-
tank and the
the drive belts.
governor
proper
the
settings.
maximum
condition.
plug
acci-
/f#/f/f/sr
X
X
X,,
X
X X
)C
SERVICE DATES
x
X
high ambi€nt
temp€ratures.
lf
4.
the mower is
days, drain
to be in storage for more
the fuel tank, run
carburetor dry, change
plug
Pull the
distribute the oil
loosen
DAILY
B.
Park
1.
engine shut
2.
Close the fuel shutoff valve.
J.
Permit the mower
Disconnect
4.
pour
and
a teaspoonful of oil into
starter cord slowly
then
blade drive belt
MAINTENANCE AFTER
the mower
outside the storage facility
off.
to cool.
the spark
the engine to drain the
the oil, remove the
to crank the engine
replace
the spark
(remove
from
IIOWING:
plug
wire.
than 30
spark
the cylinder.
and
plug
and
pulley).
idler
with the
MAINTENANCE
5. Wash
7.
L
9. Clean
1o.After
1 1. Place
c.
MAINTENANCE
1.
2.
4.
5.
the mower
grass
out
clippings
also under the
before
storing.
Check that
off with water.
from under
deck cover. Allow
the blade mounting
Check that the blades
mow
with dull
Check
the
the fuel level,
cooling-air intake
the air cleaner
the first
(Change
oil.
blades.
5 hours of
the oil
every 40 hours thereafter.)
the engine
(the
elements
the mower in locked
tampering
or use
by an untrained
EVERY 40
Change
more frequently
Check
Check
Clean the
Check
the engine oil.
under sever
that all nuts,
the condition
spark
bolts and screws are
and tension of
plug
and
condition and operation
are
sharo. NOTE: Never
rotating
use, change the
storage to
(Change
check the spark
es.
D. ENGINE MAINTENANGE:
For detailed maintenance
your
with
mower,
your
see the separate
mower.
instructions
engine manual
Be sure
the cutter
the mower
bolts
oil
to clean
deck and
are tight.
level
and clean
to dry
screen).
(foam
and
paper).
engine
avoid
operator.
HOURS;
the engine
oil
operating conditions.)
tight.
all belts.
plug
gap.
of all safety
for the
switch-
engine on
packed
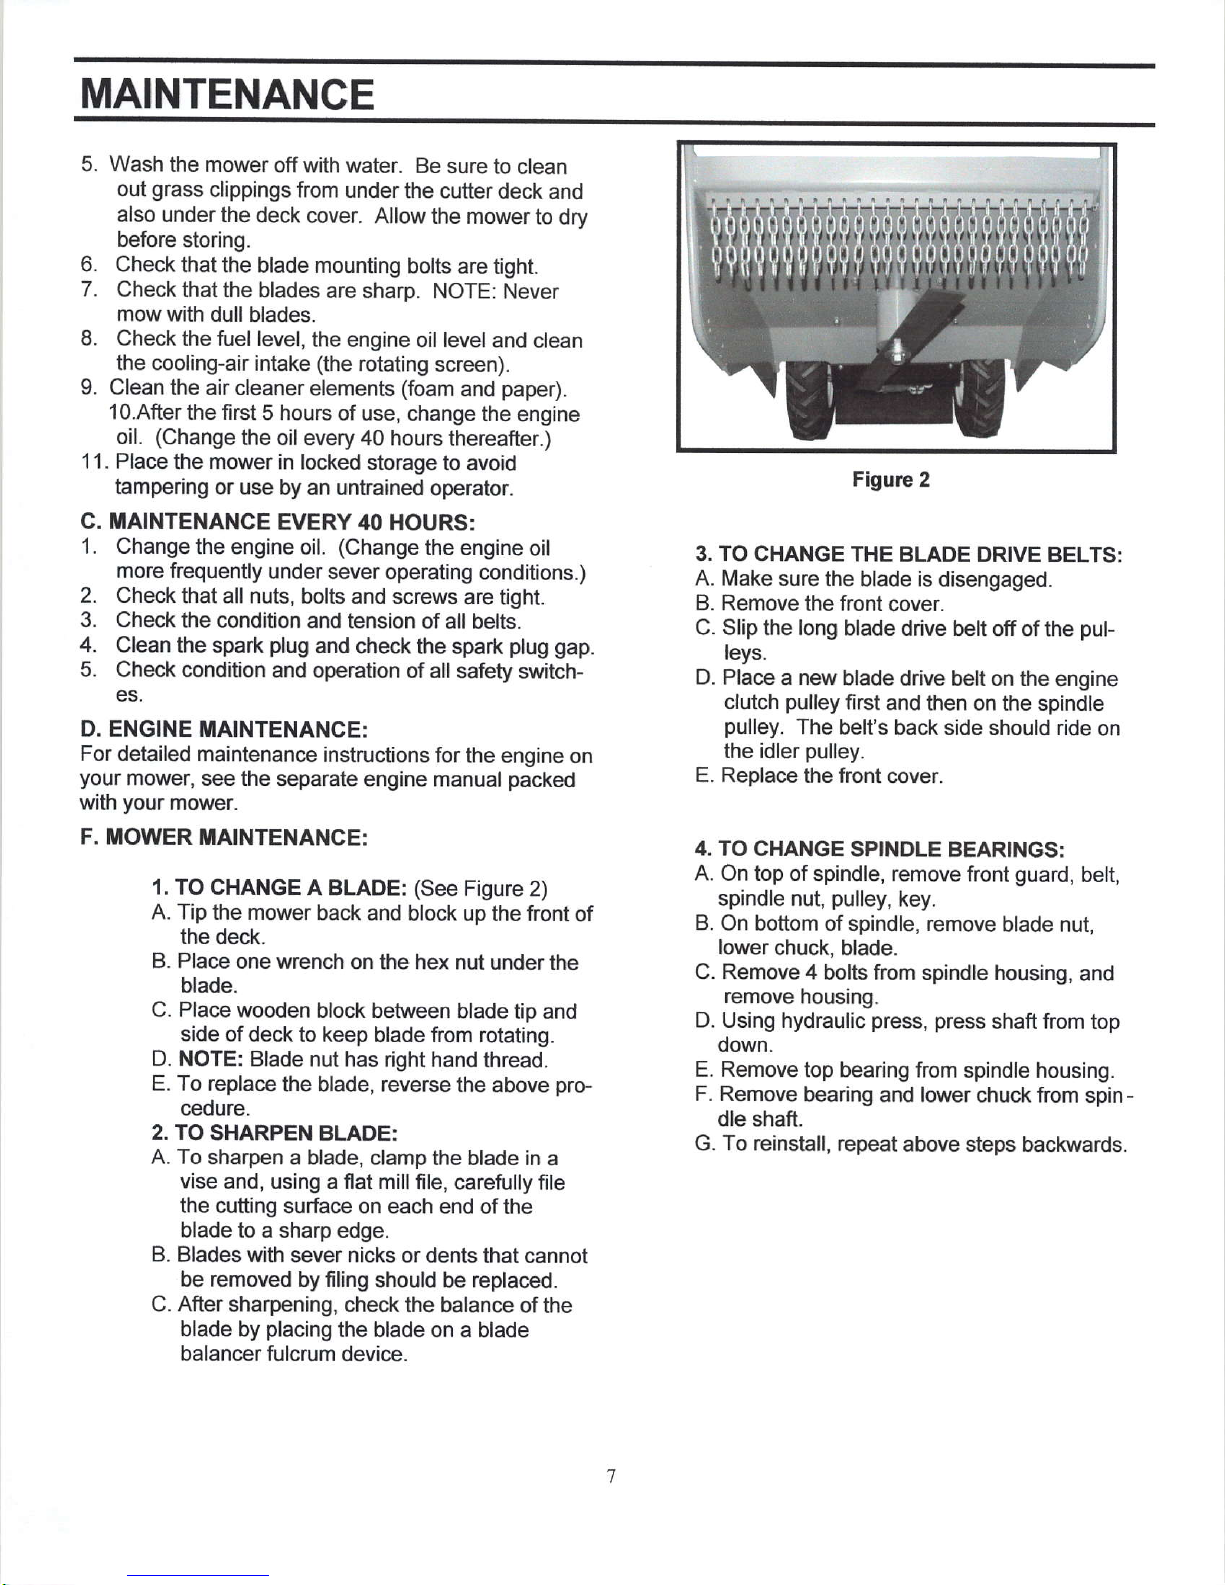
3. TO
CHANGE THE
A. Make
B. Remove
sure the
the front cover.
C. Slip the long
leys.
D. Place a new
clutch
the idler
E. Replace
pulley
pulley.
The belt's
pulley.
the front
Figure 2
BLADE DRIVE BELTS:
blade is disengaged.
blade drive
blade drive
first and
belt off of the
belt on the engine
then on the spindle
back side should ride
cover.
pul-
on
F. MOWER MAINTENANCE:
L TO
CHANGE A BLADE:
A.
Tip the mower
the deck.
B. Place
C. Place
D. NOTE:
E. To
2. TO
A. To
B. Blades with
C. After
one wrench
blade.
wooden block between
side of deck
Blade nut has right
replace
cedure.
SHARPEN BLADE:
sharDen a blade. clamD
vise
and, using a flat mill file,
the cutting
blade
to a sharp edge.
removed
be
sharpening, check the balance
blade
by
balancer fulcrum device.
back and
on the hex nut
to keep blade from rotating.
the blade, reverse the
surface on each end
sever nicks or dents
by filing
placing
the
(See
Figure
block up the front
blade
hand thread.
the blade in a
carefully file
should be replaced.
blade on a blade
2)
under the
tio and
above
of the
that cannot
of the
of
pro-
4.
TO CHANGE
A. On top of
spindle nut,
B. On
bottom of spindle, remove
lower
chuck, blade.
Remove
C.
remove
D. Using hydraulic
SPINDLE BEARINGS:
spindle, remove front
pulley,
4
bolts from spindle housing,
housing.
press,
oown.
E. Remove
F. Remove
top bearing from
bearing and lower
dle shaft.
To
G.
reinstall, repeat
guard,
belt,
key.
blade nut,
and
press
shaft
from
top
spindle housing.
chuck from spin
-
above steps backwards.

PROBLEM
Will not
Hard
Loss of
Engine overheats
Engine runs but mowet
won't
Engine runs but labors
when mowing
Blade will not
Blade
start
to start
power l.
move
rotate
tums to the dght
TROUBLESHOOTING
CAUSE
t.
Out of fuel.
Engine
2.
Engine
3.
Dirty
4.
Water
5.
Clogged fuel
Loose
7.
8. Bad spark
9. Carburetor
10.
Engine oil
11. Clutch
Throttle
1.
Dirty
2.
Bad
3.
4.
Stale
Locse
5.
o.
Carburetor
Dirty air cleaner.
2. Low
3. Faulty
4.
Oil in fuel.
5. Stale or dirty fuel.
6. Water
7. Clogged
8. Spark
9. Dirty
10. Dirty/clogged
'l1.
CarburEtor
12. Poor
'13.
Transmission
1. Low oil level/dirty
2. Dirty
3. Dirty
4. Partially
5. lmpropercarburetoradiustsnent.
Freewheel
1.
Clogged
2.
Belt
3.
4-
Control rod
Park brake is
5.
l. Mowing too
2. Throttle control not
3. Carburetor
Engagement
1.
Belt off of
2.
1. Blade drive
not
"CHOKED"
flooded.
air cleaner.
in tuel.
tank.
plug
spark
plug
or improper
out
of adjusknent.
low.
to
engaged.
control not
air cleaner.
plug
spark
or dirty fuel.
spark
level/dirty
oil
spark
in fuel.
plug
engine air screen.
compression.
engine air
engine.
off of
or improper
plug
out of
plug.
fueltank.
wir€ loose.
muffler.
out of adiustment.
belt loose.
screen
plugged
is engaged.
oil filter.
pulley.
disconnected.
engaged.
fast.
out of adjustment.
disconnected.
oulley.
is
belt
properly.
wire.
propedy.
set
wire.
adjustrnent.
oil.
oil.
muftler.
properly
twisted
gap.
gap.
adjusted.
CORRECTION
'1.
Fill fuel
2.
See
3. Wait
4.
Clean or replace
5. Empty fuel
with fresh
6. Remove
7. Make
plu9.
8. Replace
9, Make necessary
10. Add
1l -
Make sure
1.
Place throtde
2. Clean
3. Replace
4. Empty fuel
gasoline.
5. llake surc
plug.
6.
Make necessarv
1. Clean
2. Check
3.
Clean and regap
4. Empty and
carburetor.
5- Empty fuel
gasoline.
6. Empty
with fresh
7. Remove
8. Connect
9. Clean
10.
Clean/r€place muffler.
11. Make
12, Contact
13. Loosen
to tighten belt retighten
'1.
Check oil level/change
2. Clean
3. Clean
4.
Remove and
5. Adiust carburetor
l. Disengagefreewheel.
2. Replace
3. Replace
4. Reconnect
5. Disenqaqe
l-
Slow
2. Check
3. Make necessarv adiustrnenls.
1.
Connect all connections.
2. Reolace belt.
1.
POINTS
tank.
START ENGINE"
"TO
several minutes
tank and
gasoline.
fuel tank
sure
spark
spark
engine oil.
cluteh is tully
control in
replace
or
spark
tank and refill
spark
replace
or
oil level/change
clean fuel
tank and refill fuel
fuel tank
gasoline.
fuel tank
and tighten spark
engine
necessary
engine air screen.
cylinder fins,
your
air screen.
an authorized
engine
clean muffler.
oilfilter.
belt-
control rod-
Dark brake.
drive speed.
throttle
before attempting
air cleaner
carburetor, and refill
and clean.
plug
wire is
plug
or adjGt
adjustments.
air cleaner
plug
or adjust
plug
wit€ is
adiustments.
air cleaner
or change spark
tank and refill, and clean
and carburetor, and refill
and clean.
adjustrnents.
plate
bolt and slide engine
air screen, and muffler
to richer Dosition.
control setting.
in Operation
cartridge.
sealed
gap.
disengaged.
"FAST"
cartridge.
gap.
tank with fresh,
seated
cartridge.
oil.
tank with fr€sh
plug
wire.
service center department,
engine
oil.
plate
section.
properly
position.
properly
plug.
bolts.
to start.
tank
on
clean
on
tank
back
area.
'1.
Blade
Plsgejg
Belt frays
pulley
in
or rolls over
1. Pulley
drive belt is twisted wrong
groove
ken in
too tightly and
is nicked or
broke the
belt
way. t.
was
bro-
cords.
1. Replace
bell
 Loading...