

PowerBoss Admiral 28, Admiral 32 User Manual

User Manual
Admiral 28/32 Rider Scrubber

2
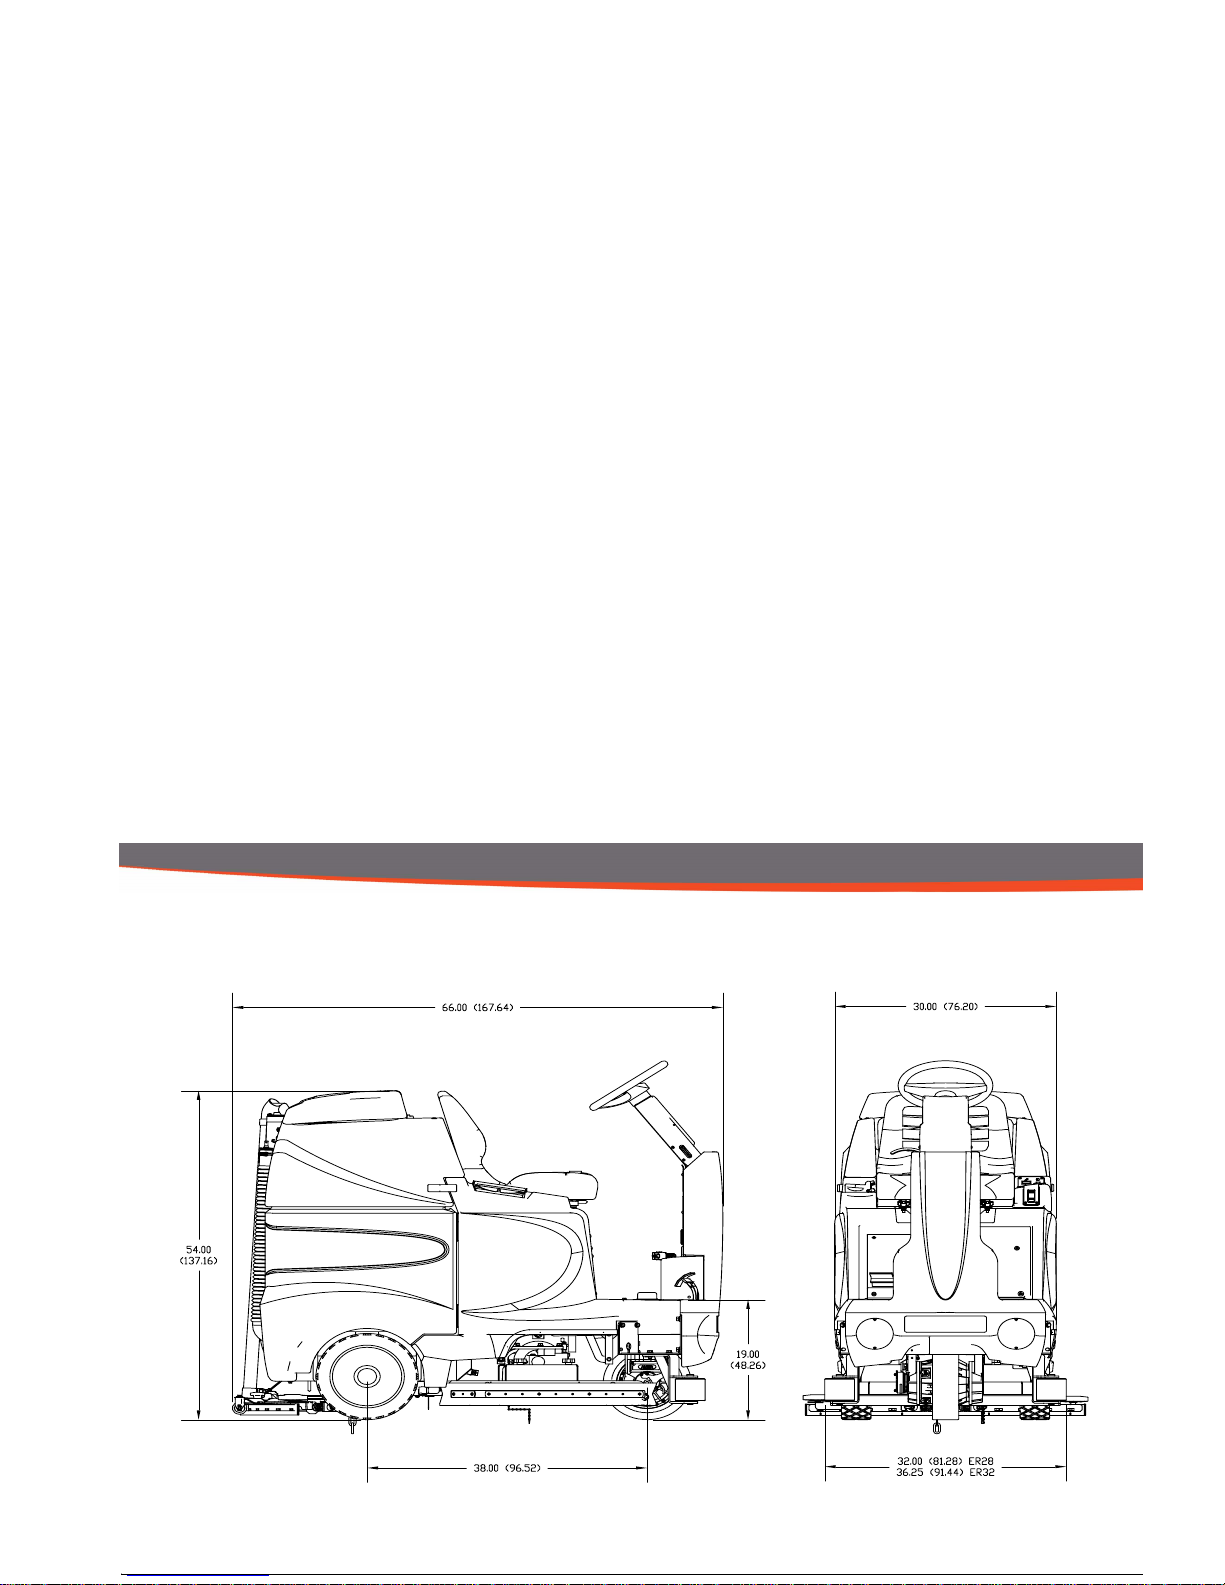
Technical Specifications
This manual is furnished with each new POWERBOSS Admiral 28/32. This provides the necesa ry operating and preventive
maintenance instructions. Operators must read and understand this manua l before op erating or servicing this machine.
This machine was designed to give you excellent performance and efficiency. For best results and minimal cost, please follow
the general guidelines below:
- Operate the machine with reasonable care.
- Follow the manufacturers suggested maintenance instructions as provided in this manual.
- Use original Minuteman supplied parts.
Model Admiral
TM
28/32
Model No. ADMER28C, ADMER28CPLUS, ADMER28CQP, ADMER28D,
ADMER28DPLUS, ADMER28DQP, ADMER32C, ADMER32CPLUS,
ADMER32CQP, ADMER32D, ADMER32DPLUS, ADMER32DQP
Current 60 Amps
Voltage, Batteries 36 volts, 6-6volt
Battery Capacity 235 Ah (Optional 395 Ah batteries available)
Sound Level 75 dB
Dimensions (LxWxH) 66" x 31" x 54" (167.64cm x 78.74cm x 137cm)
Gross Weight 1,243 lbs (564 kg) with batteries
847 lbs (384 kg) without batteries
Working Grade Transport 10% (7°)
Wheel to Floor Pressure 64 PSI Front, 69 PSI Rear
3

4
Preface
Dear customer, Thank you for purchasing the PowerBoss® Admiral. The outstanding operational characteristics of
the Admiral should justify the confidence you demonstrated in making this
purchase.
The Admiral is a commercial gradAdmiralr Scrubber machine. It is battery operated and is intended by PowerBoss to
be used in accordance with this manual, the labels on the machine itself, as
well as applicable federal, state, and local safety and environmental statutes,
regulations, and ordinances (collectively the "governmental regulations"), applicable commercial standards, and
common sense. .
The user's own safety, as well as the
safety of others, depends to a great extent on how the Admiral is operated,
handled, and maintained. Therefore, as
a starting point, this manual must be
read and understood thoroughly prior to
the machine being switched on for the
first time. When operating or maintaining the Admiral, THINK SAFETY
FIRST!
This manual provides vital information
concerning the safe operation, use,
maintenance, and service of the Admiral.
The various safety alert symbols, signal
words, and safety messages contained
herein are intended to be read in conjunction with each other, as well as with
Admiral labels, instruction plates, and
applicable governmental regulations.
To the extent that any governmental
regulations conflict with the provisions
of this instruction manual, such governmental regulations would govern.
Your authorized PowerBoss dealer
would be happy to answer any questions you may have concerning the operation or maintenance of the Admiral
or information contained in this manual.
If repair or maintenance work is performed on the Admiral, PowerBoss recommends that only genuine
replacement parts be used and that
such work be performed by qualified individuals.
Proper use
The Admiral is a floor scrubing machine. Its intended scope of application
is for wet cleaning of level, hard-surfaced floors in accordance with the provisions of this instruction manual,
applicable governmental regulations,
manufacturer specifications, and machine labels (collectively, "proper use").
Using the Admiral beyond its proper
use will be deemed improper use by
PowerBoss. PowerBoss disclaims any
liability for any personal injury, property,
or other damages of any nature whatsoever, whether special, indirect, consequential, or compensatory, directly or
indirectly resulting from the improper
use of the Admiral, or uses beyond or
inconsistent with the Admiral’s intended
scope of application. This disclaimer of
liability also extends to modifications to
the Admiral made without PowerBoss's
prior written consent.
The Admiral should only be operated,
handled, and maintained by persons
who are familiar with the machine and
who have been instructed of the potential hazards associated with such operation, handling, and maintenance.
Introduction

5
Disclaimer:
PowerBoss disclaims liability for any
personal injury, property, or other damages of any nature whatsoever, whether special, indirect, consequential, or
compensatory, directly or indirectly resulting from the publication, use of, application, or reliance on this document
or, except as expressly set forth in the
sales contract for the machine, the operation or maintenance of the Admiral.
EXCEPT AS EXPRESSLY SET
FORTH IN SUCH SALES CONTRACT,
PowerBoss MAKES NO WARRANTIES, EXPRESS OR IMPLIED, AND
SPECIFICALLY DISCLAIMS ANY
WARRANTY OF MERCHANTABILITY
OR FITNESS FOR A PARTICULAR
PURPOSE.
PowerBoss disclaims and makes no
guaranty or warranty, express or implied, as to the accuracy or completeness of any information published
herein, and disclaims and makes no
warranty that the information in this instruction manual will fulfill any parties'
particular purposes or needs. While
PowerBoss believes that the information in this manual is accurate, in the
event that technical or typographical er-
rors exist in this manual, PowerBoss reserves the right to make changes to
subsequent editions of this manual
without prior notice to the recipients of
this edition. The reader should notify
PowerBoss if any errors in this manual
are suspected. PowerBoss does not
undertake to guarantee the performance of any individual manufacturer
or seller's products or services by virtue
of this instruction manual.
In publishing and making this manual
available, PowerBoss is not undertaking to render professional or other services for or on behalf of any person or
entity, nor is PowerBoss undertaking to
perform any duty owed by any person
or entity to someone else. Anyone using this manual should rely on his or her
own independent judgment or, as appropriate, seek the advise of a competent professional in determining the
exercise of reasonable care in any given circumstances.
Valid as of: September 2010
PowerBoss Inc.
175 Anderson Street
Aberdeen, NC 28315
U.S.A.
Introduction

6
Notes on warranty
The terms of the sales contract apply in
regard to any product warranties. PowerBoss expressly disclaims all other
warranties, either express or implied, of
any kind. It should be noted, however,
that failure to maintain and service your
Admiral in accordance with its proper
use may void the warranty. In this regard, any maintenance work must be
performed by an authorized PowerBoss
service representative and confirmed in
the "Maintenance Certificate" - the warranty document. By way of example,
the following items are excluded from
the Admiral warranty: fuses; normal
wear and tear; improper machine handling; damages caused by overloads;
unauthorized machine modifications;
non-compliance with maintenance instructions or specifications; or improperly fitting parts or accessories.
Acceptance of the machine
Upon arrival, check machine for possible damages in transit. Follow unpacking instructions on shipping pallet. Each
unit has been tested and throughly inspected before shipment. Any damage
is the responsibility of the delivery carrier who should be notified immediately.
PowerBoss Inc.
175 Anderson Street
Aberdeen, NC 28315
U.S.A.

7
The Admiral 28/32
This machine was designed with total opera-
tor comfort and ease of use in mind. All machine components have been designed as a
total system to efficiently clean dirty floors.
The Admiral has four available scrub head
types and sizes to fit specific applications.
Please contact your PowerBoss representative for specific recommendations for the
correct scrub head type, size, and brush type
and chemical applications.
Before using the machine, always perform
the following steps to ensure proper machine
operation.
•Check under the machine for leaks.
•Check the rear and side squeegees for
wear and damage.
•Check the steering for proper operation.
•Check the solution and recovery tanks.
After using the machine, always perform the
following steps:
•Check the battery charge level. Charge batteries if necessary. When charging batteries,
extra precaution is required:
Battery acid can cause burns.
When working on or around batteries, al-
ways wear protective clothing and safety
glasses.
Remove metal jewelry. Do not lay tools or
metal objects on top of the batteries.
Charging batteries generate explosive gasses.
DO NOT CHARGE BATTERIES WHEN
OPEN FLAMES OR SPARKS ARE
PRESENT. DO NOT SMOKE.
Make sure the charger is turned off before
disconnecting it from the batteries.
Charge the batteries in a well-ventilated area.
Fluid levels should be checked before and
after charging and maintained at the proper
levels. If low, add water until the metal plates
are covered.
If the machine is not used for an extended
period of time, batteries should be kept fully
charged with a boost charge once a week.
•Check for wire, string, or twine wrapped
around the scrub brushes.
•Check the squeegees for wear and damage.
•Check the rear squeegee suction hose and
off-aisle wand hose for obstructions.
•Empty and clean the debris box (cylindrical
systems only).
•Drain and clean the recovery tank.
•Check under the machine for leaks.
•Check the service records to determine
maintenance requirements.
WARNING!
•Be sure you understand the machine
controls and their functions.
•While on ramps or inclines, avoid sudden stops when tanks are filled.
•Avoid abrupt sharp turns. Slow down
driving speed when going downhill.
•Always drive up when cleaning ramps.

8

9
Table of Contents
Technical Specifications . . . . . . . . . . . . . . . . .2
Introduction. . . . . . . . . . . . . . . . . . . . . . . . . . . . 4
Notes on Warranty. . . . . . . . . . . . . . . . . . . . . . 6
Acceptance of the machine . . . . . . . . . . . . . . . 6
The Admiral 28/32. . . . . . . . . . . . . . . . . . . . . . .7
Important Safety Instructions . . . . . . . . . . . . . .10
Unpacking Instructions. . . . . . . . . . . . . . . . . . .11
1 Machine Overview . . . . . . . . . . . . . . . . . . . . .12
1.1 Machine Overview - Front . . . . . . . . . . . . . . . .12
1.2 Machine Overview - Rear. . . . . . . . . . . . . . . . .13
1.3 Operator Compartment . . . . . . . . . . . . . . . . . .14
1.4 Control Console . . . . . . . . . . . . . . . . . . . . . . . .16
1.5 Operation Modes . . . . . . . . . . . . . . . . . . . . . . .18
1.6 Fault/Diagnostic Codes . . . . . . . . . . . . . . . . . .20
1.7 Steering Wheel. . . . . . . . . . . . . . . . . . . . . . . . .21
1.8 Accelerator Pedal. . . . . . . . . . . . . . . . . . . . . . .21
1.9 Seat . . . . . . . . . . . . . . . . . . . . . . . . . . . . . . . . .21
1.10 Directional Switch. . . . . . . . . . . . . . . . . . . . . . .21
1.11 Parking Brake. . . . . . . . . . . . . . . . . . . . . . . . . .21
1.12 Circuit Breakers . . . . . . . . . . . . . . . . . . . . . . . .22
1.13 Battery Compartment. . . . . . . . . . . . . . . . . . . .22
Battery Connection Diagram . . . . . . . . . . . . . .23
1.14 Scrub Decks. . . . . . . . . . . . . . . . . . . . . . . . . . .24
1.15 Scrub Deck Installation. . . . . . . . . . . . . . . . . . .26
1.16 Side Squeegees. . . . . . . . . . . . . . . . . . . . . . . .28
1.17 Rear Squeegee . . . . . . . . . . . . . . . . . . . . . . . .30
2 First Operation . . . . . . . . . . . . . . . . . . . . . . . .32
2.1 Instruction. . . . . . . . . . . . . . . . . . . . . . . . . . . . .32
2.2 Initial charging procedure. . . . . . . . . . . . . . . . .32
2.3 Before Putting into Operation. . . . . . . . . . . . . .32
2.4 Start Machine. . . . . . . . . . . . . . . . . . . . . . . . . .32
2.5 Operation . . . . . . . . . . . . . . . . . . . . . . . . . . . . .33
2.6 Stop Machine. . . . . . . . . . . . . . . . . . . . . . . . . .34
2.7 After Work . . . . . . . . . . . . . . . . . . . . . . . . . . . .34
2.8 Transporting the machine . . . . . . . . . . . . . . . .35
2.9 Tie-down points . . . . . . . . . . . . . . . . . . . . . . . .35
3 Maintenance and Care. . . . . . . . . . . . . . . . . .36
3.1 PowerBoss System
Maintenance. . . . . . . . . . . . . . . . . . . . . . . . . . .36
3.2 Maintenance Document. . . . . . . . . . . . . . . . . .37
3.3 Maintenance Schedule. . . . . . . . . . . . . . . . . . .38
4 Troubleshooting. . . . . . . . . . . . . . . . . . . . . . .44
5 Warranty . . . . . . . . . . . . . . . . . . . . . . . . . . . . .50

10
IMPORTANT SAFETY INSTRUCTIONS
Operators must read and understand this manual before operating or maintaining this machine.
Do not operate this machine in flammable or explosive areas.
This machine is designed solely for scrubbing dirt and dust in an
indoor environment. PowerBoss does not recommend using this
machine in any other capacity.
The following information below may cause a potential hazard to the
operator and equipment. Read this manual carefully and be aware
when these conditions can exist. Take necessary steps to locate all
safety devices on the machine and train the personnel operating the
machine. Report any machine damage or faulty operation immediately. Do not use machine if it is not in proper operating condi-
tion.
FOR SAFETY DURING OPERATION
Keep hands and feet clear of moving parts while machine is in operation.
Make sure all safety devices are in place and operate properly. All
covers, doors and latches must be closed and fastened before use.
During operation, attention should be paid to other persons in the
work area and especially if small children are present.
Electric motors and components can cause an explosion when operated near explosive materials or vapor. Do not operate this machine
near flammable materials such as solvents, thinners, fuels, grain
dust, etc.
Store or park this machine on a level surface only, with the key
switch in the off position. To prevent unauthorized use, machine
should be stored or parked with the key removed.
This machine is designed for level operation only. Do not operate
on ramps or inclines.
This machine is not suitable for picking up hazardous dusts.
Use caution when moving this machine into areas that are below
freezing temperatures. Any water in the tanks or hoses can cause
damage to the machine.
FOR SAFETY WHEN SERVICING OR MAINTAINING MACHINE
Stop on level surface and turn off machine.
Disconnect the power to the machine by pressing the Red Emergency Disconnect Button when charging batteries or during installation or removal of brushes.

11
Avoid moving parts. Do not wear loose jackets, shirts, or sleeves
when working on machine.
Avoid contact with battery acid. Battery acid can cause burns. When
working on or around batteries, wear protective clothing and safety
glasses. Remove metal jewelry.
Do not lay tools or metal objects on top of batteries.
Charging batteries generates explosive gasses. Do not charge bat-
teries when open flames or sparks are present. Do not smoke.
Make sure the charger is turned off before disconnecting it from the
machine. Charge the batteries in a well-ventilated area with the battery cover removed completely.
Do not clean machine with a pressure washer.
Authorized personnel must perform repairs and maintenance. Use
PowerBoss supplied replacement parts.
UNPACKING INSTRUCTIONS
Carefully unpack and inspect your Admiral Scrubber for shipping
damage. Follow unpacking instructions on shipping pallet. Each unit
has been tested and thoroughly inspected before shipment. Any
damage is the responsibility of the delivery carrier who should be
notified immediately.
This machine is battery operated and designed to operate on 36
Volts DC (6) 6-volt batteries.
The recommended batteries are rated 235Ah (PowerBoss P.N.
956740).
We do not recommend mixing Amp Hour capacities. Any alternate
battery sets can be used if they are of equal physical size and
capacity.
Read this manual carefully before operating this machine.
The operator is responsible for taking care of the daily maintenance
and check ups of the machine to keep it in good working condition.
The operator must inform the service mechanic or supervisor when
scheduled maintenance is required as stated in the MAINTENANCE
section of this manual.
Before starting, familiarize yourself with the machine and its controls
(see “Machine Overview, Front”, “Machine Overview, Rear”, “Operator Compartment”, & “Control Console” diagrams).
SAVE THESE INSTRUCTIONS
12
Machine Overview
1 Machine Overview
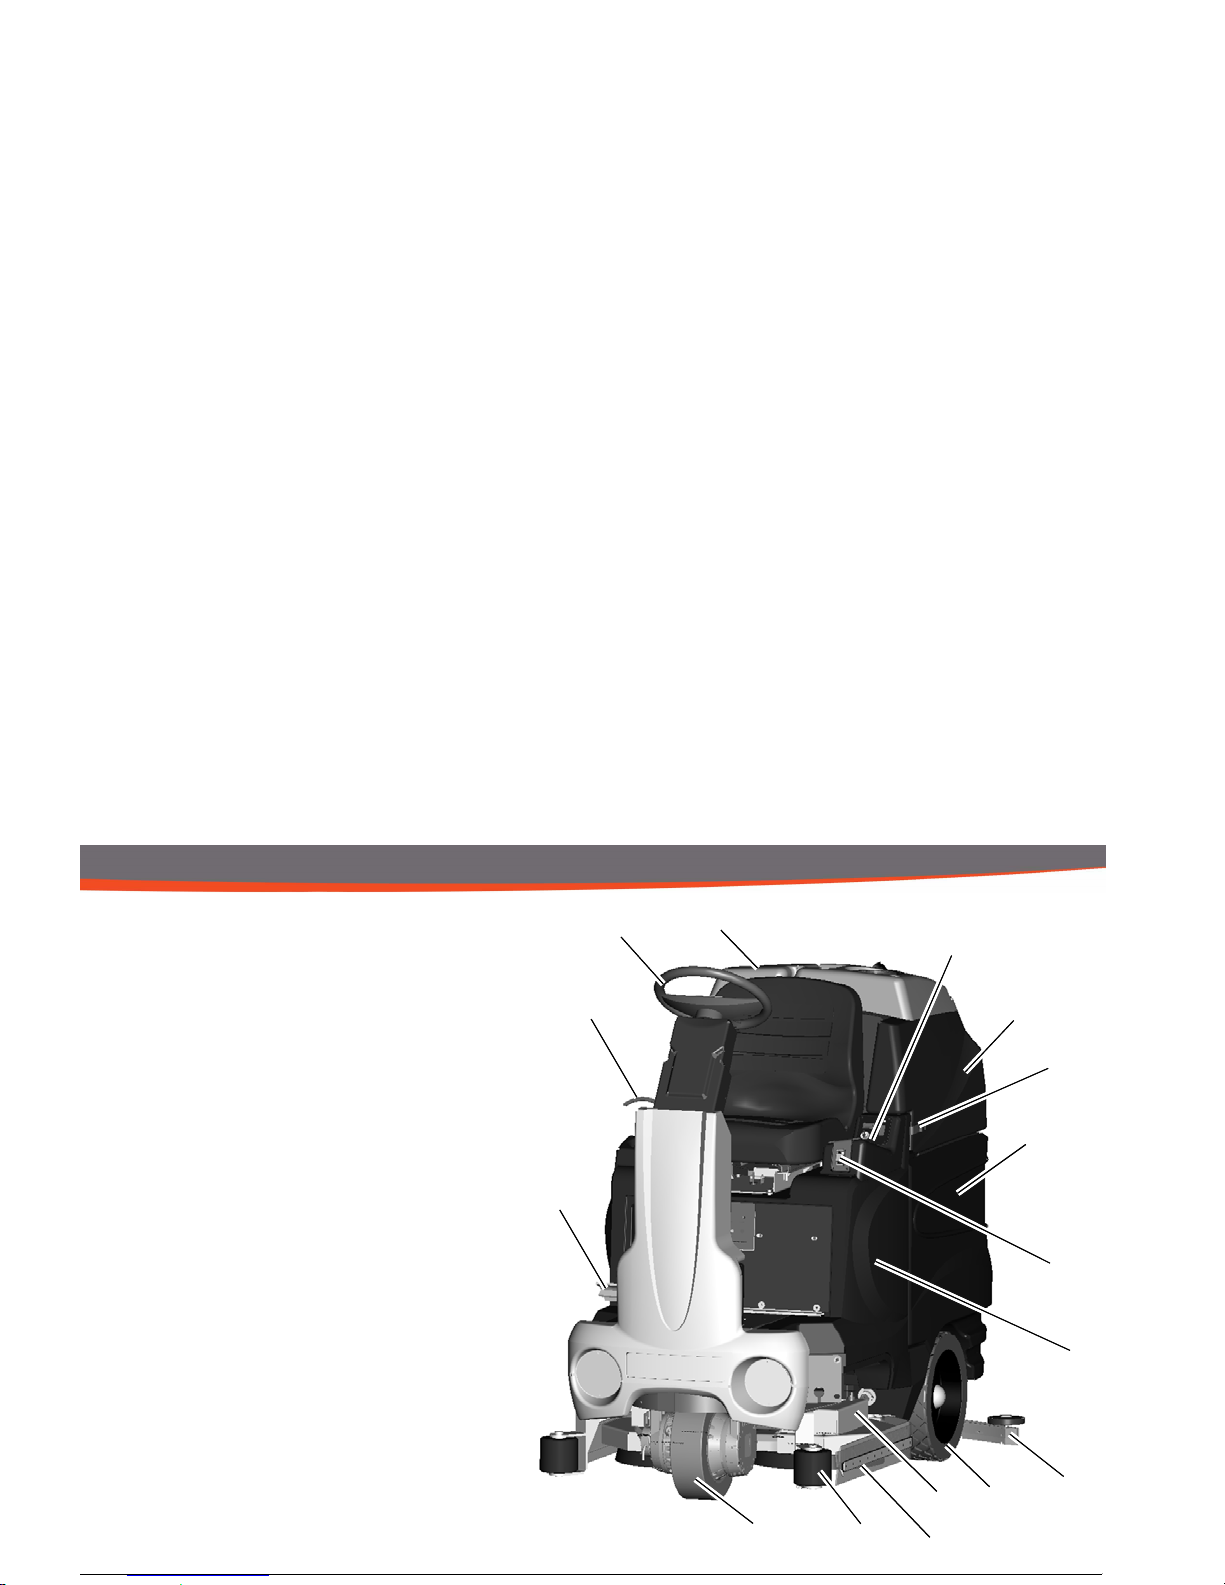
1.1 Machine Overview - Front
1 Front Drive Wheel
2 Side Squeegee
3 Accelerator Pedal
4 Steering Tilt Lever
5 Steering Wheel
6 Operator’s Seat
7 Recovery Tank Lid
8 Recovery Tank
9 Control Console
10Directional Switch
1 1Recovery Tank Safety Latch
12Battery Compartm ent
13Solution Tank
14Electrical Panel
15Rear Squeegee
16Rear Wheel
17Scrubdeck
18Roller Bumper
Fig.1
1
2
6
3
10
4
5
7
9
8
12
11
13
14
16
15
17
18
13
Machine Overview
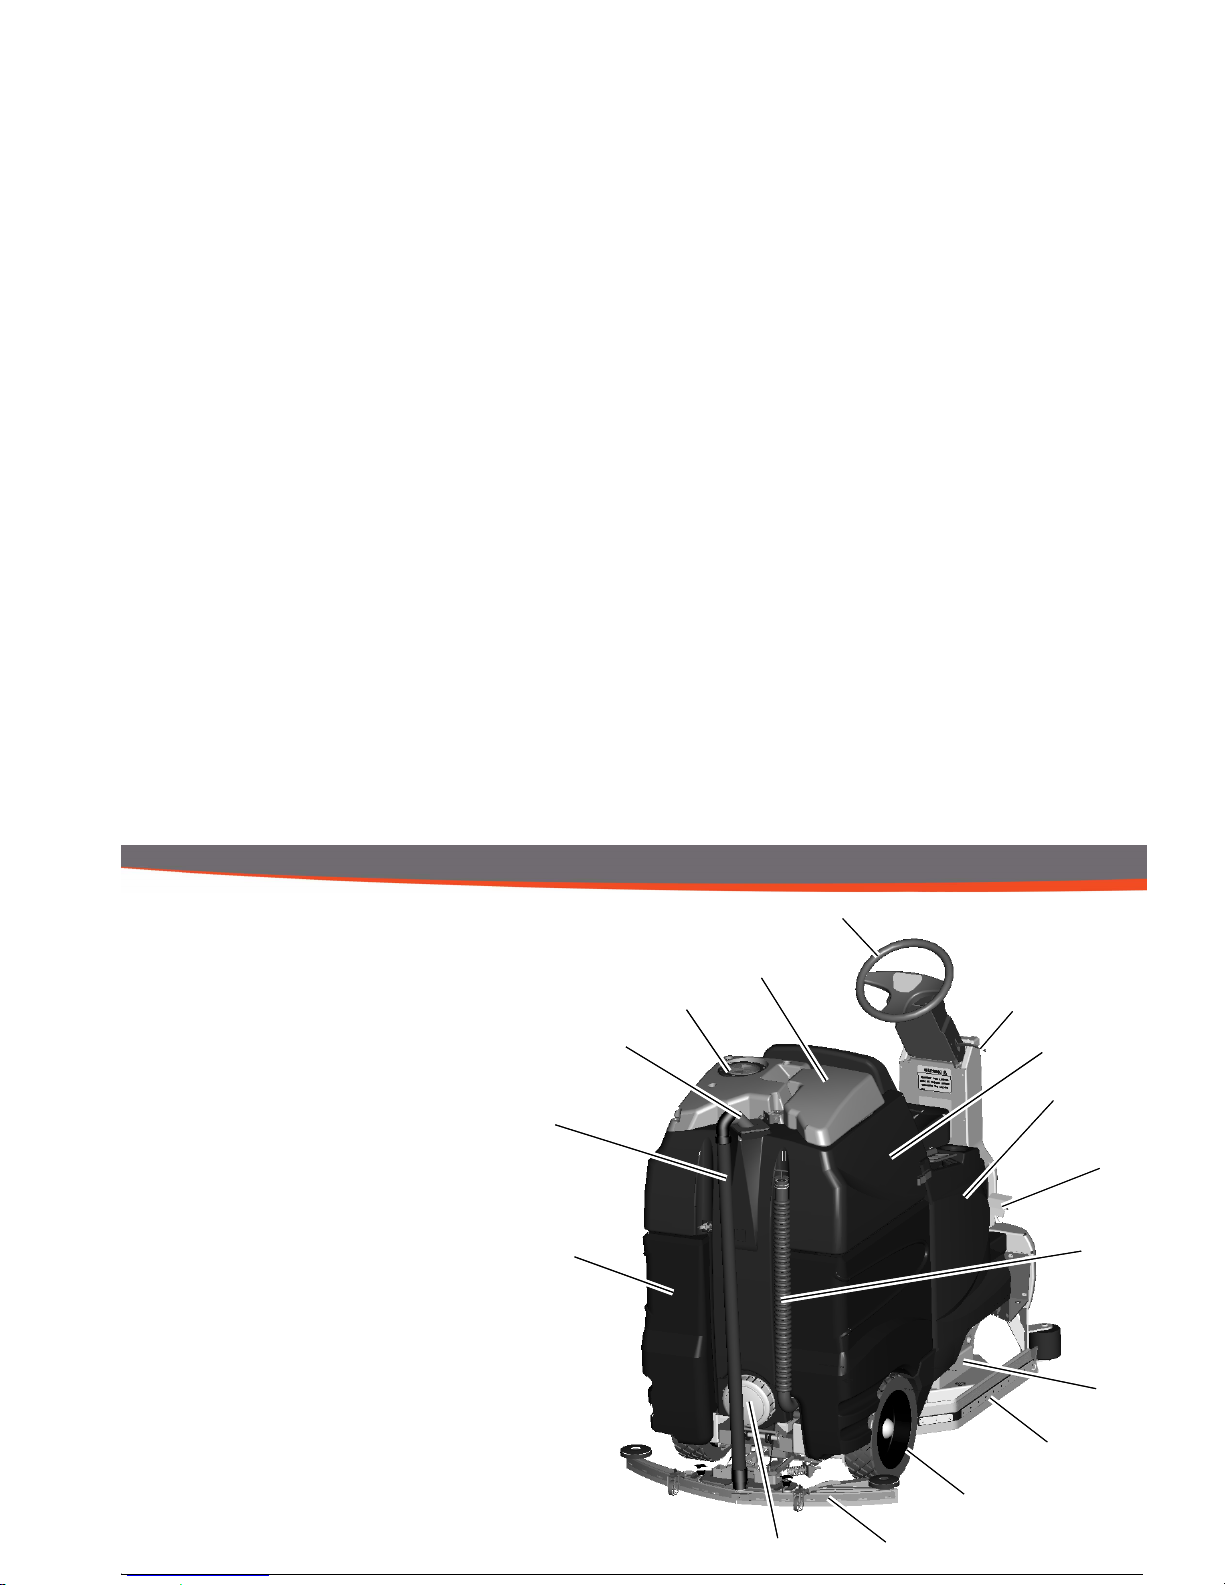
1.2 Machine Overview - Rear
19Rear Squeegee
20Rear Wheel
21Side Squeegee
22Accelerator Pedal
23Solution Tank
24Steering Tilt Lever
25Steering Wheel
26Recovery Tank Lid
27Vacuum Filter Access
28Vacuum Inlet Assembly
29Recovery Tank
30Battery Compartment
31Clean-Out Cap
32Recovery Drain Hose
33Recovery Vacuum Hose
34Scrubdeck
Fig.2
19
20
21
22
23
24
25
26
27
29
33
31
32
30
34
28

14
Machine Overview
1.3 Operator Compartment
A Operator’s Seat
B Solution Tank Lid
C Cup Holder
D Solution tank
E Accelerator Pedal
F Steering Wheel
G Directional Switch
H Control Panel
I Recovery Tank Safety Latch

15
Machine Overview
16
Machine Overview
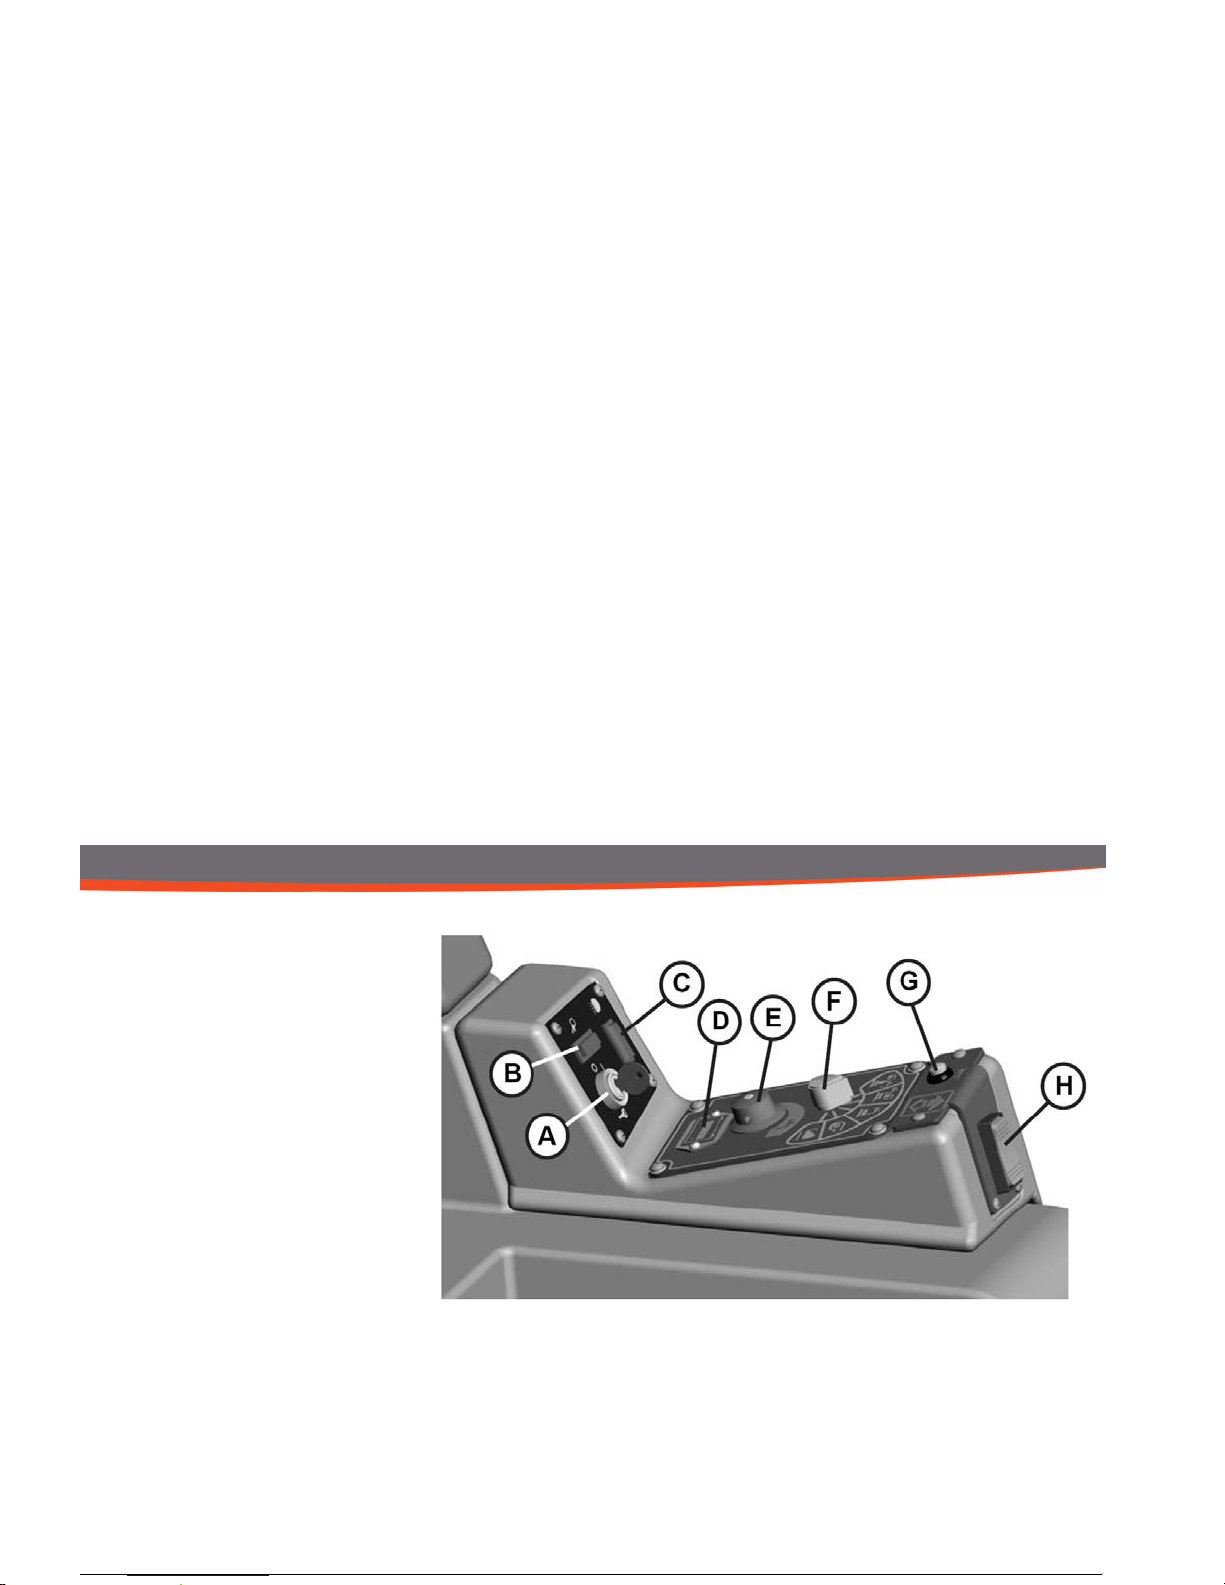
1.4 Control Console
For operator ergonomics, the control
console houses all the primary function
controls in a central area. The key
switch and optional headlight and offaisle wand switches are clustered in
the back portion of the console. The
directional switch (forward/reverse) is
located at the front of the console for
easy fingertip operation. The horn button, function selectors, and battery
gauge are located in the central part of
the console.
Key Switch (A) - S2
Controls the machine’s power (ON/
OFF) with a key for safety. All operational settings are retained even when
the power is turned off and on. This
also serves as a reset switch when
errors or faults occur.
Off Aisle Wand Switch (OPTIONAL)
(B) - S7 (281900 OPTION)
ON/OFF control for the water supply to
the wand and vacuum motor for the
optional Off-Aisle Wand.
Headlight Switch (OPTIONAL) (C) S10 (281990 OPTOION)
ON/OFF control for the optional headlights.
Battery Gauge (D) - BD1
Displays the level of charge remaining
in the machine’s batteries. The gauge
consists of 10 LEDs. (3 Green, 4
Amber, 3 Red) If the battery life is low,
the battery gauge bar icon will be flashing to inform the operator that the
machine is almost out of power. Once
 Loading...