

PowerBass XL-2200M, XL-4160M, POWERSPORT XL-4160M Owner's Manual

XL-2200M
XL-4160M
XL POWERSPORT FULL RANGE AMPLIFIER
Owners Manual
Please read through this manual to familiarize yourself with your new amplifi er. Should your PowerBass
Xtreme mobile amplifi er ever require service, you will need to have the original dated receipt.
version B


Thank you and Congratulations
Thank you for your decision to purchase a PowerBass USA Xtreme mobile amplifier! Our new mini amplifiers
are the result of extensive engineering, testing, and bullet proof construction. Their versatility enables compat-
ibility with optional signal and audio processors. These high quality MOSFET amplifiers may be configured to
allow maximum flexibility in designing different types of speaker systems.
FULL RANGE CLASS D MINI AMPLIFIERS
The PowerBass XL Series are high quality MOSFET amplifiers that are capable of running a system full range,
or they may be selected only to power subwoofers. It is important that you closely follow the wiring instructions
contained in this Owners Manual so that you get the most from your PowerBass Xtreme mobile amplifier.
∆ Caution ∆
High powered audio systems in a vehicle are capable of generating higher than “Live Concert” levels of sound pressure. Continued exposure
to excessively high volume sound levels could cause hearing loss or damage. Also, operation of a motor vehicle while listening to audio
equipment at high volume levels may impair your ability to hear external sounds such as horns, warning signals, or emergency vehicles—thus
creating a potential traffic hazard. In the interest of safety, PowerBass USA highly recommends listening at lower volume levels when driving.
AMPLIFIERS
3

TECHNICAL FEATURES
• FRD (Full Range Class-D) Multi-Channel Technology
• International Rectifier Chip Set
• Conformal Coated PC Board to Resist Moisture, Dust and Extreme Heat
• AUX Input Accepts MP3, iPod® or Portable Source Device
• Wrap-around Aluminum Heatsink Shell
• Ultra Low Current Draw
• High Damping Control Circuit
• High Efficiency SMD Circuit Technology
• Double Sided Copper Plated PCB
• Digital Sound Optimization Circuitry
• Quiet Switching
• Bass EQ Circuitry Centered at 45Hz (XL-4160M only)
• High Current Voltage Ripple Rejection Circuitry
• Virtual Silence Turn On/Off Mute Circuit
• Advanced Protection Circuitry
*iPod® is a registered trademark of Apple
FRD-FULL RANGE CLASS D TECHNOLOGY
This amplifier represents the very latest in Class D technology. The XL Series uses the new IR® (International
Rectifier) platform which has been under development for the past several years. IR®, a leader in PWM circuit
design, has worked in conjunction with PowerBass engineers to produce more stable power output, minimal
RF interference and improved sound quality.
The benefits of this cooperative effort are many and include improved temperature, frequency, voltage regulation
and drive capability to name a few.
The PC board features a conformal coating that resists moisture, dust and extreme heat. Combine that plus
their small size and these amplifiers are perfect for many Powersport applications including UTV, golf cart and
motorcycle and Watersport vessels.
The result to the user is a all around improved product that will provide years of listening enjoyment.
IR® is a registered trademark of International Rectifier Corporation.

INSTALLATION EXPERIENCE
Installation of PowerBass mobile amplifiers requires detailed knowledge of electronics wiring and proper
speaker impedance. We strongly recommend installation by an authorized PowerBass dealer. This Owners
Manual only provides general installation and operation instructions. If you have any reservations about
your installation skills, please contact your local PowerBass dealer for assistance.
IMPORTANT : This amplifier is designed for operation in vehicles with 12-volt Negative ground
electrical systems only.
PREPARING FOR INSTALLATION
NOTE: The tools listed below may be required for basic installation
• An electric drill with bits
• Philips head and standard screwdrivers
• Wire strippers
• Crimping tool
• VOM (electronic volt ohm meter)
• Heat shrink tubing and heat gun
• Soldering iron
• Electronic (Rosen not Acid Core) Solder
INSTALLATION PRECAUTIONS
NOTE: Proceed only if you are a qualified installer, otherwise; see your Authorized PowerBass
Dealer to professionally install this amplifier. Always wear protective eyewear when using
tools.
• Turn off all stereo and other electrical devices before you begin.
• Disconnect the negative (-) lead from your vehicles battery.
• Locate all fuel lines, brake lines, oil lines, and electrical cables when planning the install.
• Make sure there is at least 2-inches (5 cm) around the air vents on the amplifier.
• When connecting ground points, make sure all paint is carefully scrapped away from the auto body
and contact is made with bare metal.
• Use a utility knife to trim away fabric from hole locations before drilling or cutting.
• When running power cables through sheet metal, be sure to use grommets to properly insulate the
metal edges from the wire insulation.
• If possible, use tubing through grommets.
WARNING: Check your vehicle’s owner’s manual before disconnecting the battery. Disconnecting
the battery on some vehicles may require an anti-theft code when reconnecting the battery and
require the on-board computer to be reset at the dealership. Check with your local dealer if you
are uncertain.
5
To keep your PowerBass Xtreme amplifier running at top performance, choosing the proper location is of
utmost importance. Both Thermal and Overload protection are built in.
In the event of overheating, the amplifier will turn off and only restart when cooled. For this reason the
amplifier should be mounted in a location which will allow air to circulate freely. The compact size of the
PowerBass XL Series amplifier allows greater flexibility in mounting.
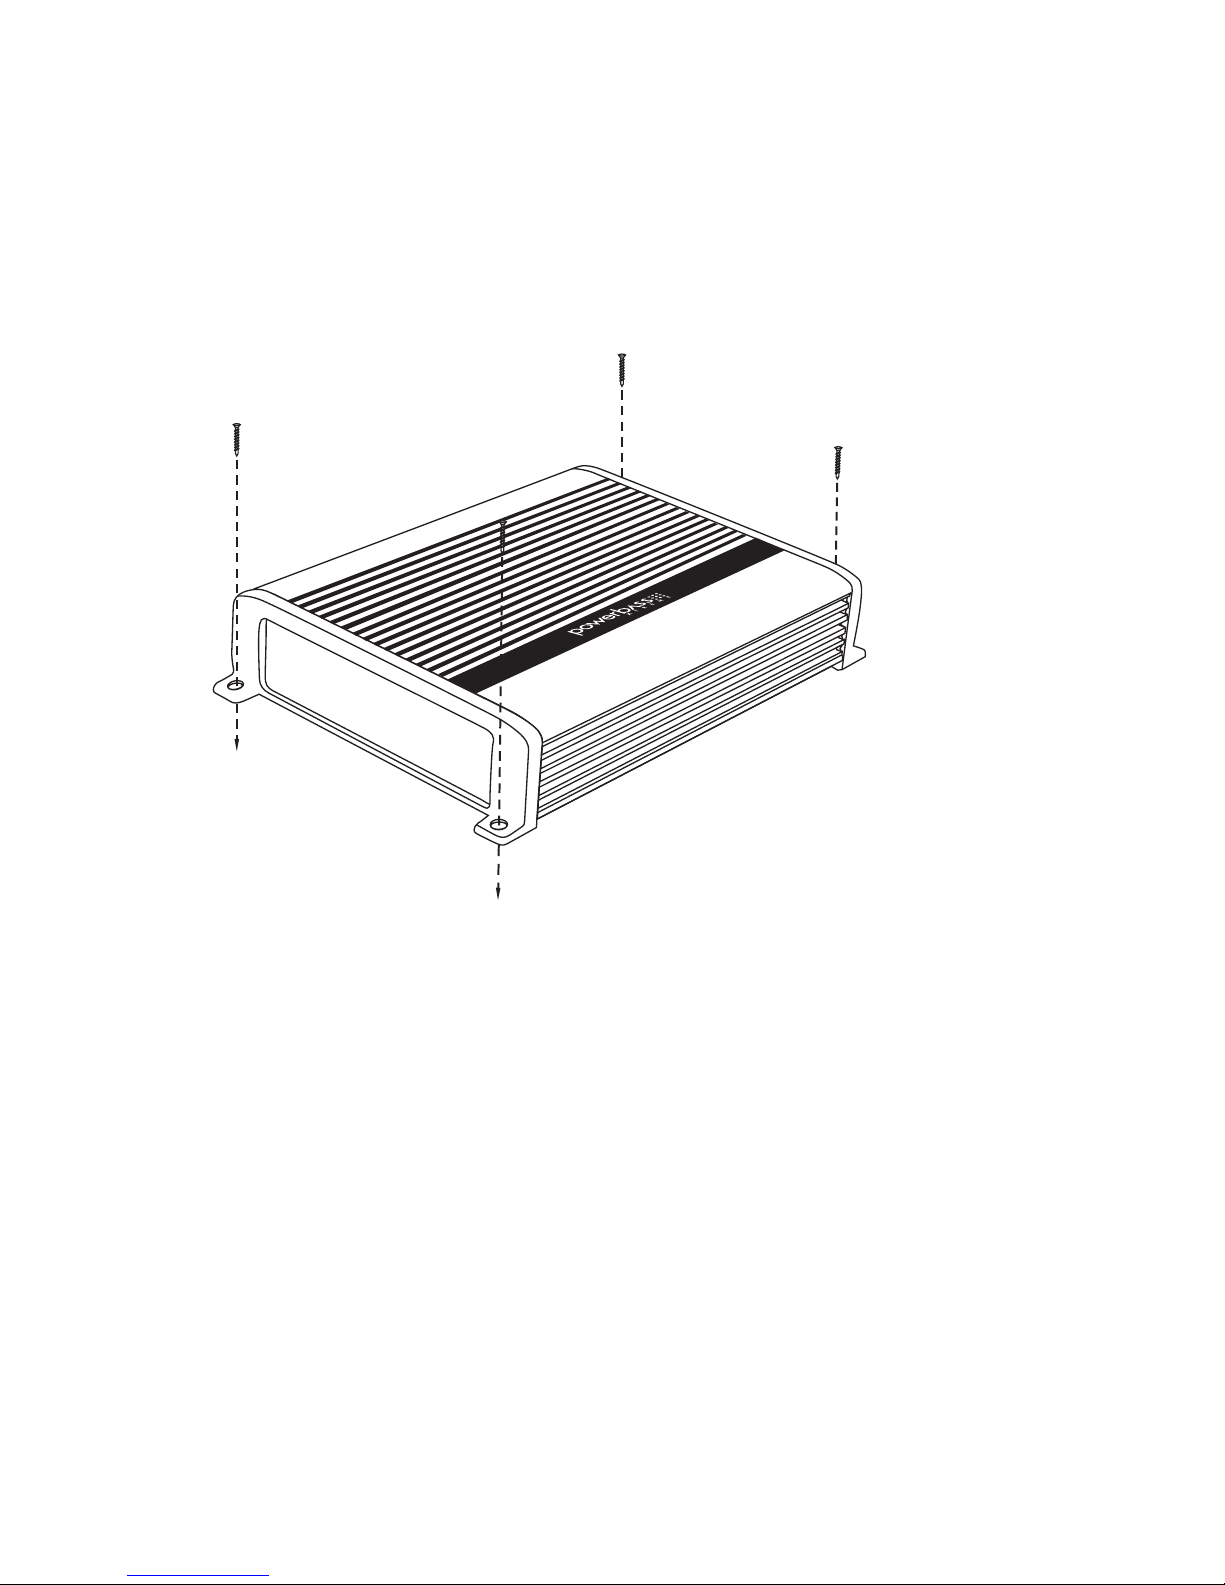
Fig.1 Mounting Amplifier
MOUNTING THE AMPLIFIER

MOUNTING LOCATION
The XL Series amplifiers have a conformal coating applied to the PC board. This coating makes them resistant
to water and dust—however they are not waterproof. Therefore, care should still be taken to protect the amplifier from water and find a mounting location that is not likely to get wet. Take care not to mount in a vehicle/
vessel where it can cause interference with the factory installed electronic devices.
The unique wrap around outer shell (heatsink) allows the XL Series amplifiers to be mounted in spaces with
minimal air flow. It is important that whatever location is selected the amplifier must be mounted securely in a
manner keeps the unit intact even during rough jolts that can occur to the vehicle/vessel.
You may use the amplifier as a template and mark the four screw locations with a felt tip pen. Set the amplifier
aside before drilling. Use caution to make sure there are no objects behind the installation surface that may
become damaged during drilling.
If mounting under a seat, make sure there is at least 1-inch (2.5 cm) of space above the amplifier’s heatsink
to permit proper cooling.
The best places to mount your amplifier are: The floor of the trunk, under a seat, on the back of the rear seat or
a storage compartment will air can circulate. For alternate installation locations, please consult your authorized
PowerBass Dealer.
NOTE: Do not use a drill with driver bit to mount the amplifier. Excessive force could cause
the plastic mounting feet to crack.
7
*** WARNING ***
• Do not install in a place where it could injure the driver or passengers if the vehicle
stops suddenly.
• Try to avoid mounting the amplifier on a subwoofer enclosure, as extended exposure
to vibration may cause malfunction of the amplifier.
• Don’t mount the amplifier so that the wire connections are unprotected or are subject to pinching or damage from nearby objects.
• The DC power wire must be fused at the battery positive (+) terminal connection.
Before making or breaking power connections at the amplifier power terminals,
disconnect the DC power wire at the battery end.
• The battery of the car audio system must be disconnected until the entire wiring and
installation is completed.
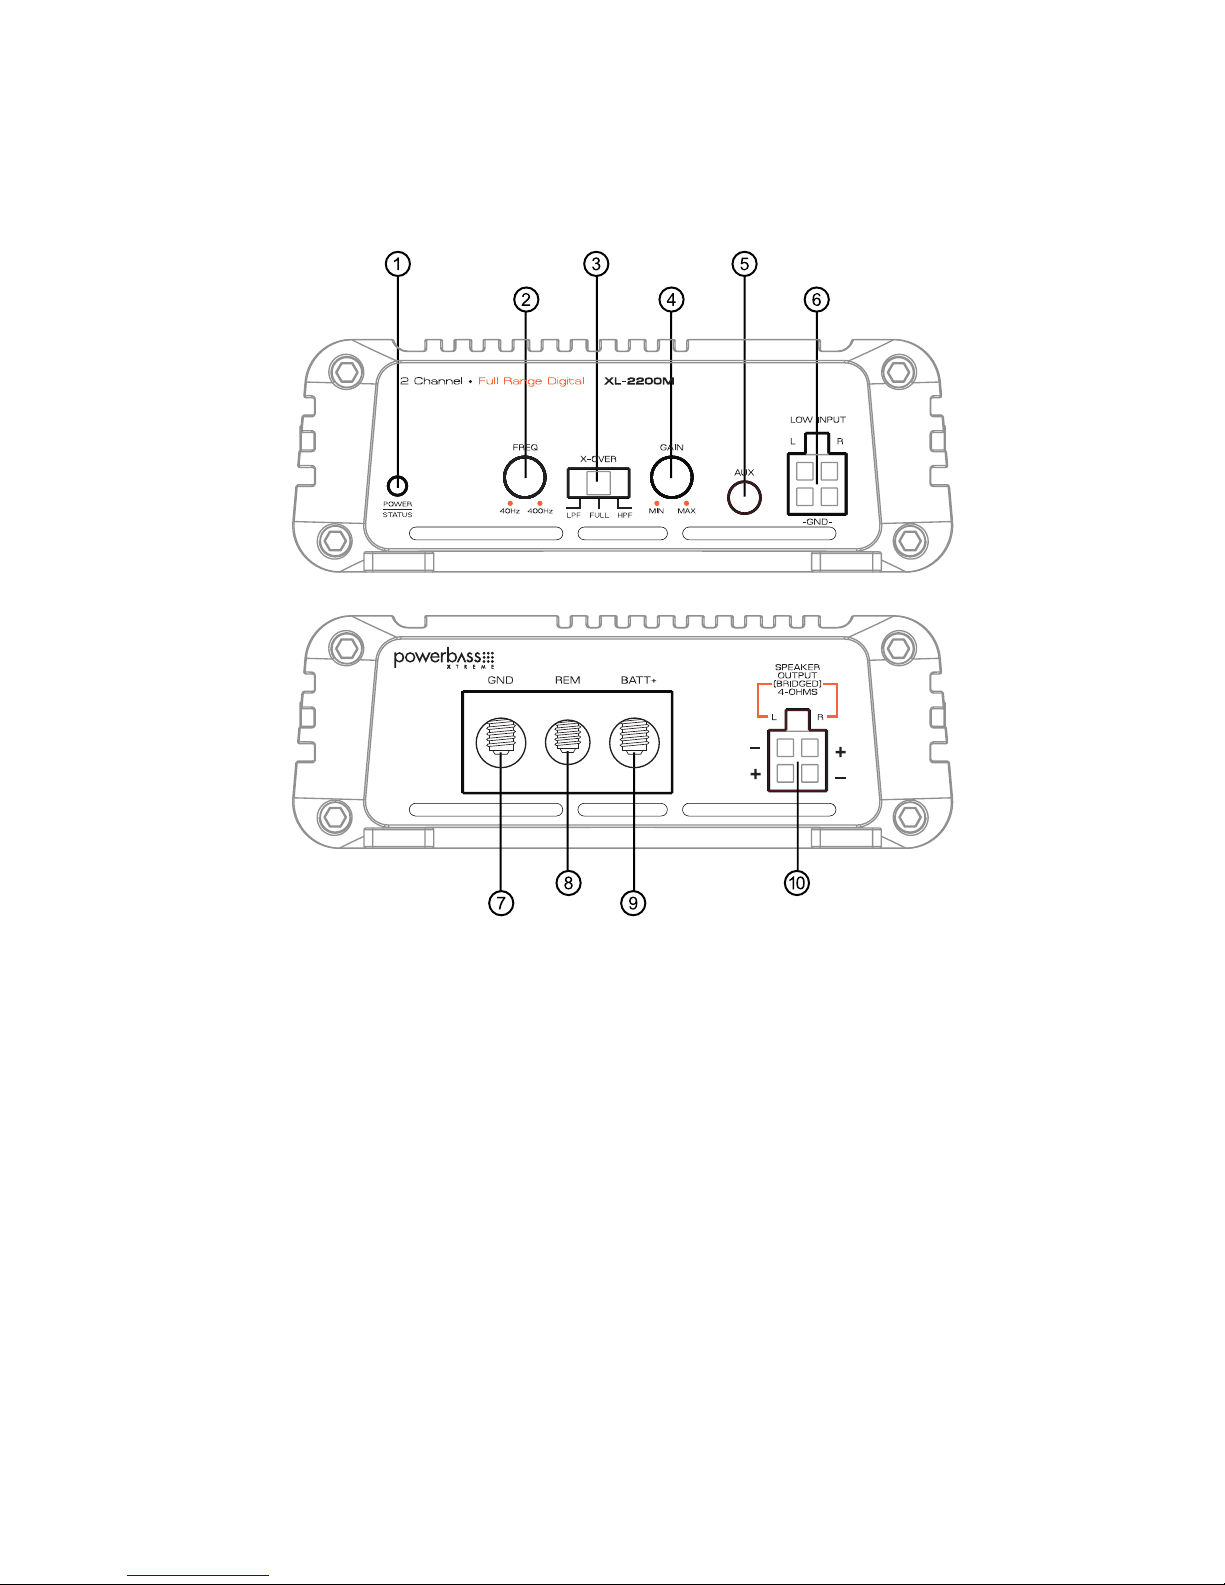
CONTROL PANEL LAYOUT
NOTE: Panel Layout and Controls may differ by model.
1. POWER/STATUS Indicator
This clear LED lights Blue when the power is on—or turns Red constantly when the built-in protection circuitry
is activated. Red indicates a problem with the system in relation to the amplifier (See Troubleshooting Tips).
2. FREQ Control
This control is continuously adjustable from 40Hz to 400Hz at 12dB per octave when the X-OVER switch is set
to LPF (Low Pass Filter) or HPF (High Pass Filter). NOTE: The XL-4160M has separate controls for HPF and LPF.
3. X-OVER Switch for LPF/FULL/HPF
Activates the built-in electronic crossover network. Works in conjunction with the LPF and HPF adjustable
control. When set to FULL the amplifier runs Full Range and the electronic crossover circuitry is bypassed.
Fig.2 Panel Layout
 Loading...