

Page 1
AUTOSOUND L2 SERIES COMPONENT
Application Guide
Please read through this manual to familiarize yourself with your new speakers. Should your PowerBass
Autosound speaker components ever require service, you will need to have the original dated receipt.
L2-6C
Page 2

Thank you and Congratulation
Congratulations on your purchase of Powerbass Autosound speakers. You now own a speaker of uncompromising design and engineering from a factory that truly believes in the relentless pursuit of perfection.
Incorporating the highest quality parts and state-of-the-art materials, these speakers display the ultimate
balance between high fidelity, performance and long-lasting reliability.
At PowerBass USA, Inc. we are confident you will have many years of outstanding enjoyment from this
great SPEAKER investment. For maximum performance we recommend that you have your new PowerBass Autosound product installed by an Authorized PowerBass Autosound Dealer.
To learn more about PowerBass, please visit us on the World Wide Web at
http://www.powerbassusa.com
∆ Warning ∆
Continuous exposure to sound pressure levels in excess of 100 dB can cause permanent hearing loss. PowerBass Autosound Speakers
are capable of producing sound pressure levels well over 170 dB. Please observe all local sound ordinances while listening to your
PowerBass Autosound system. PowerBass USA, Inc. accepts no liability for hearing loss, bodily injury, or property damage due to the
result of use or misuse of this product.
Page 3

POWERBASS AUTOSOUND L2 COMPONENT FEATURES
Advanced Injection Molded Cone: An injection molded PP cone with carbon fiber was developed for
better bass performance while minimizing distortion. This ultra lightweight cone is resistant to elements
of the environment while giving the listener impeccable listening experience over the factory speakers.
Non-resonant Basket Treatment: Each steel speaker basket has been treated with a proprietary resonant
damping material making the speaker platform acoustically “dead.”
High Damping Butyl Rubber Surround: Butyl rubber was chosen to ensure linear travel throughout the
entire frequency range resulting in more bass output and higher efficiency while reducing distortion.
Aluminum Hard Dome Tweeter: Ferrofluid enhanced aluminum dome tweeters deliver sharp clarity and
crisp treble reproduction.
High Power 2-ohm Price Voice Coil: These highly efficient 2-ohm coils were designed for greater efficiency
and are compatible with most premium factory sound systems to make your vehicle sound better than ever.
Deluxe Computer Optimized Crossover Network: The asymmetrical crossovers included were
designed using a sophisticated computer program known as LEAP and provide a smooth, flat frequency
transition between the midrange and tweeter. Each 12db 2-way crossover features high quality air and
iron core inductors plus parallel stacked high stability metal film capacitors to insure audiophile sound
separation.
Tweeter Mounting Kit: Flush, surface and angle-mounting cups allows multiple mounting options for
custom tailored high frequency dispersion.
Additional Features: Acoustically transparent speaker grills, professional mounting hardware and splice-in speaker
wiring harnesses add further value to your speaker investment.
3
Page 4
SPECIFICATIONS FOR POWERBASS L2 COMPONENTS
(Due to Constant Improvements, Specifi cations and Parameters are subject to change without notice.)
Model Size Nominal
Impedance
Frequency
Response
Sensitivity
1W/1M
Magnet Size Mounting
Depth
Power RMS/
Peak
L2-6C 6.5” 2-ohm 58Hz-21kHz 90dB 8.6oz. 2.13”
(54mm)
75W/225W
Before beginning your installation, thoroughly read this guide and keep it as a reference. It
will give you tips on proper placement, wiring, and installation as well as how to obtain the
best sound from the PowerBass speakers you have selected.
INSTALLATION EXPERIENCE
Installation of PowerBass Autosound Speakers requires experience with a variety of mechanical and electrical procedures. This manual only provides general installation and operation instructions. If you have any
reservations about your installation skills or lack of the proper tools, please contact your local PowerBass
Autosound dealer for assistance.
L2-SERIES COMPONENT ALUMINUM TWEETER SPECIFICATIONS
DOME
SIZE
MOUNTING
(DIAMETER)
NOMINAL
IMPEDANCE
FREQUENCY
RESPONE
SENSITIVITY
(1M / 1M)
MOUNTING
(DEPTH)
POWER
(RMS/PEAK)
1.0” 1 7/8” 3Ω 3K-21Khz 91 dB 7/8” 45/90
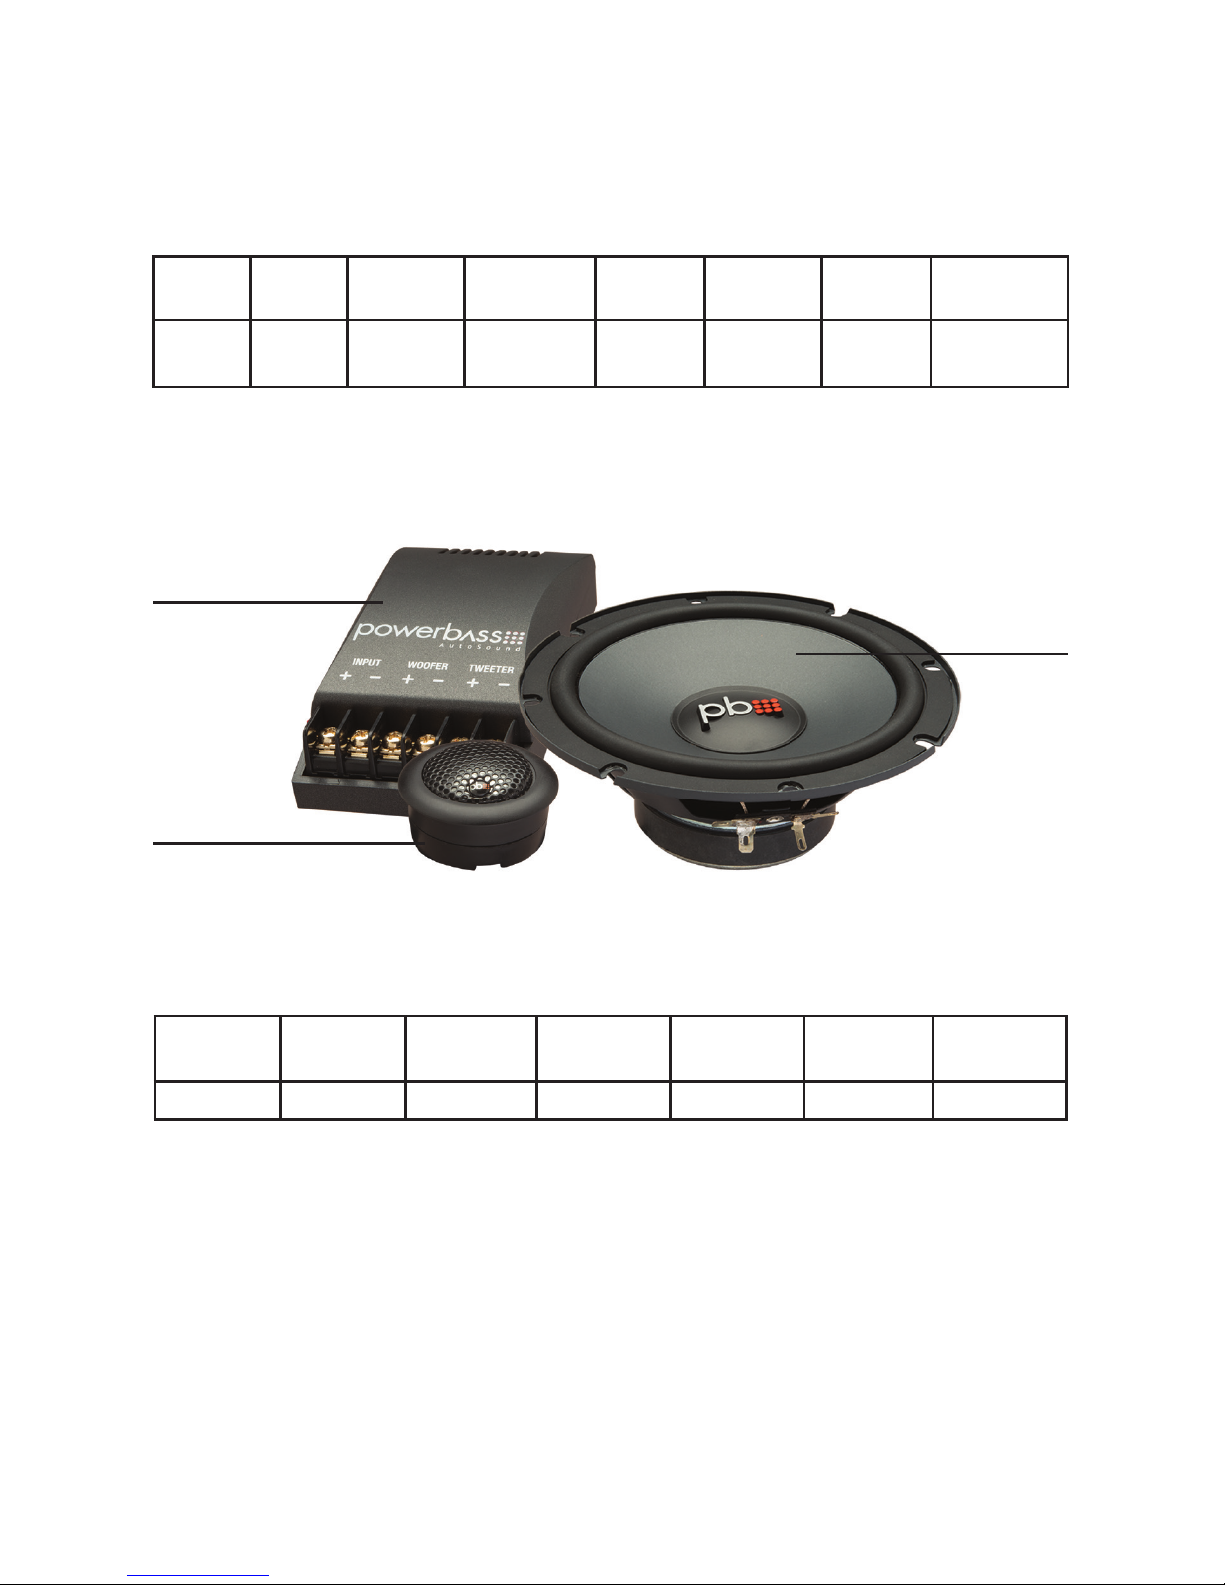
Crossover Network
Tweeter
Woofer
(Midrange)
Page 5

TIPS TO GET THE MOST OUT
OF YOUR POWERBASS SYSTEM
Your PowerBass Autosound speakers have been meticulous engineered and designed to handle high
power musical reproduction. Despite their rugged construction, it is possible to damage your speaker if
they are improperly used. In general, you will hear distortion as a so-called warning before any damage
occurs. If you hear distortion in your system, immediately reduce the musical level to the point where
the sound retains its clarity.
1. Be sure you supply the speakers with enough unclipped amplifier power to drive them properly. (More
damage can be done to a speaker by under-powering and clipping your amplifier than any
other way!)
2. Where possible, a separate amplifier just for your speaker should be used with an electronic crossover to set the frequency range. One amplifier with passive crossovers will work (Tri-Way Setup), but the
system will do more with less stress on the amplifier by using two amps.
3. To avoid any possible sound cancellation from the front of the speaker to that of the rear of the speaker, cut a panel of Masonite or MDF to firmly mount the speaker if the vehicle’s original cutout is too big.
4. When connecting speaker wires from the amplifier or head unit to that of the speaker itself, pay attention to the polarity of the connection. This will insure optimum sound reproduction and performance.
5. For maximum dynamic performance use weather stripping to insure a tight seal.
6. Do not mount any speakers or external crossovers where they will get wet.
7. Remember the Golden Rule “Measure twice…cut once.”
PREPARING FOR INSTALLATION
NOTE: The tools listed below may be required for proper installation.
• An electric drill with drill bits
• Phillips-head and standard screwdrivers
• Wire strippers
• Crimping tool and needle-nose pliers
• Silicone sealant or closed cell weather-stripping
• Metal file
• Hole saw
5
Page 6

INSTALLATION PRECAUTIONS
NOTE: Proceed only if you are a qualified installer otherwise; let your dealer do it.
• Always wear protective eyewear when using tools.
• Turn off all stereo and other electrical devices before you begin.
• Disconnect the (-) negative lead from your vehicle’s battery.
• Keep the speakers in the package until nal installation.
• Locate all fuel lines, brake lines, oil lines, and electrical cables when planning your installation.
• Check to see if there is enough clearance behind the mounting surface before installing the speakers.
• When running speaker wires through sheet metal, be sure to use grommets to properly insulate the
wires from metal edges.
INSTALLATION PROCEDURES
• Since these speakers utilize a unique low prole tweeter housing that has minimal tweeter protrusion,
original factory mounting cutouts can still be used with the factory grills in many cases.
• These PowerBass Autosound speakers can be used above or below the mounting hole. Typically, your
vehicle factory’s speaker cutouts will accommodate these new speakers without any modifications. When
the speaker has been correctly installed, there should be no air leaks between the front and back of the
speaker.
• For door installations, check the clearance of the windows throughout the entire range of the window’s
travel.
• Mount your speakers securely! If the speaker has four or more mounting holes, it is best to use all of
them.
• Check the available mounting depth before installing the speaker. Use care when removing factory
grills, door panels and factory speakers.
Page 7

COMPONENT SYSTEM INSTALLATION
Component Midrange
The proper installation procedure for mounting these high performance mid-range speakers is to secure
the speaker to the vehicle’s speaker mounting hole. Once the speaker is in place, determine if the supplied grill needs to be installed. If so, place the grill in place over the speaker and screw the speaker into
the mounting hole.
Component Tweeter
These high quality tweeters come complete with several mounting housings for installation versatility.
Once you have chosen the housing that is to be used, gently press the tweeter into the proper mounting
cup. Experiment with the tweeter positioned in several locations to determine the best imaging result
before cutting out any panel. Typically tweeters should be mounted on axis and as close to ear level as
possible. If the tweeter has to be removed from the mounting cup, insert a small screwdriver in the back
of the tweeter and carefully push the tweeter from the mounting cup.
7
Page 8

INSTALLATION PROCEDURES
By mounting the tweeter separately from the woofer (or mid-range driver) the installer can choose the best
location for sound quality and imaging. Three mounting types are possible allowing more versatility for the
tweeter location. These are flush mount, surface mount, and angle mount.
Flush Mounting (Type A)
The best location for the tweeter is usually high up on the door and as far forward as possible without
interference from the dashboard. If the desired location is flat and space behind the door panel allows the
use of the flush mount housing, follow the drawing as shown below:
After checking for clearance, cut the mounting hole in the door panel (see Tweeter Specifications for hole
size). Mount the Flat Base from the outside with the mounting clip on the inside of the door panel. Secure
the mounting clip to the Flat Base with the long silver screw provided.
Surface/Angle Mounting (Type B and C)
If mounting the tweeter on the surface works out best, refer to the following drawing to see how to best
mount the tweeter. Black sheet metal screws have been provided to attach the surface base to the door
panel.
Page 9

AUTOSOUND COMPONENT TWEETERS
These high quality tweeters come complete with several mounting housings for installation versatility.
Typically tweeters should be mounted on axis and as close to ear level as possible. After you have chosen
the housing to be used, gently press the tweeter in the proper mounting base. Once the tweeter base is
mounted, push and “twist” the housing until it locks to the base. Below are exploded views showing the
possible types of tweeter mounting.
9
Page 10

CROSSOVER NETWORK INSTALLATION AND WIRING
Your PowerBass Autosound Component system contains two separate 2-way crossover networks. When
choosing a location to mount the crossovers, keep in mind they contain electronic parts which can be
damaged by moisture and dirt.
Correct wiring of the crossover is critical to avoid damage to the speakers and ensure true high fi delity
sound. Pay close attention to the markings on the crossover to be certain the correct speakers are in the
correct outlets as follows:
1) Connect the amplifi er or head unit output to the crossover’s INPUT terminals.
2) Connect the terminals labeled WOOFER to the component midrange speaker.
3) Connect the terminals labeled TWEETER to the component tweeter set.
CAUTION: Care must be taken when adjusting the screws on the input terminals that fasten the speaker
wires to the crossover network. Make sure each connection is secure without over tightening. Use of
power tools to tighten these screws is not recommended as they can strip the screws and permanently
damage the input terminals.
NOTE: BE SURE TO OBSERVE PROPER POLARITY WHEN CONNECTING SPEAKER WIRES TO THE
CROSSOVER NETWORK TERMINALS.
This manual is the exclusive property of PowerBass USA, Inc. Any reproduction of this manual, or use other than its intentions is
strictly prohibited without the express consent of PowerBass USA, Inc. Copyright 2013 PowerBass USA, Inc.
Page 11

POWERBASS AUTOSOUND LIMITED WARRANTY POLICY
PowerBass USA, Inc. offers limited warranty on PowerBass products under normal use on the following terms:
PowerBass Autosound Speakers are to be free of defects in material and workmanship for a
period of one (1) year.
This warranty applies only to PowerBass products sold to consumers by Authorized PowerBass Dealers in the United States
of America. Products purchased by consumers from a PowerBass dealer in another country are covered only by that country’s Distributor and not by PowerBass USA.
This warranty covers only the original purchaser of PowerBass product. In order to receive service, the purchaser must
provide PowerBass with the receipt stating the consumer name, dealer, product and date of purchase.
Products found to be defective during the warranty period will be repaired or replaced (with a product deemed to be equivalent) at PowerBass’s discretion and will not be liable for incidental or consequential damages. PowerBass will not warranty
this product under the following situations:
• Speakers received with bent frames or water damage
• Abuse such as holes in the cone, surround or ripped spider
• Voice coil damage due to amplier clipping or distortion
• Product that has not been installed according to this owners manual
Any implied warranties including warranties of fitness for use and merchantability are limited in duration to the period of
the express warranty set forth above. Some states do not allow limitations on the length of an implied warranty, so this
limitation may not apply. No person is authorized to assume for PowerBass any other liability in connection with the sale
of this product.
Please call (909) 923-3868 for PowerBass Customer Service. You must obtain an RA# (Return Authorization Number)
to return any product to PowerBass. The RA number must be prominently marked on the outside of the shipping
carton or the delivery will be refused. Please pack your return carefully; we are not responsible for items damaged in
shipping. Return the defective product along with a copy of the original dated retail sales receipt, plus $12.00 for handling
and diagnostic evaluation to:
PowerBass USA, Inc.,
Attn: Returns (RA#__________)
2133 S. Green Privado, Ontario, CA 91761
Residents of HI, AK and US territories will be charged for return shipping. All inquires regarding service and warranty should
be sent to the above address.
Removed or altered serial numbers will void this warranty
11
Page 12

PowerBass Autosound – A division of PowerBass USA, Inc.
2133 S. Green Privado – Ontario, CA 91761
Tel. (909) 923-3868 – Fax (909) 923-8048
www.powerbassusa.com
 Loading...