

Page 1
AUTOSOUND EQUALIZER/ PREAMP
Owners Manual
Please read through this manual to familiarize yourself with your new equalizer. Should your PowerBass
equalizer ever require service, you will need to have the original dated receipt.
AEQ-4XOA
Page 2

Thank you and Congratulations
This installation manual contains valuable information on how to get the most out of your new PowerBass
AEQ-4XOA Equalizer. Virtually any car stereo system will benefit from the addition of this unique and versatile
product.
To learn more about PowerBass Autosound, please visit us on the World Wide Web at
http://www.powerbassusa.com
∆ Warning ∆
To prevent injury and damage to the unit, please read and follow the instructions in this manual. If you feel unsure about installing this
system yourself, have it installed by an Authorized PowerBass dealer or technician. Before attempting installation always disconnect
the negative (-) battery terminal.
Thank you for your decision to purchase a PowerBass USA In-dash Equalizer with Subwoofer Output, commonly called an EQ. This equalizer is a high fidelity audio control that allows you graphically view and individually control a number of different frequency bands in a stereophonic system. Your PowerBass EQ has been
designed and engineered using the latest in signal processing technology and will afford you years of listening
pleasure.
Page 3

3
FEATURES
Graphic Stereo Equalization: Four independent frequency controls turn your dashboard into a mini-mixing
board. Each one controls a specific range or “band” allowing the user to boost or cut frequencies and fine
tune the systems performance.
Bi-polar Power Supply: Regulated high speed DC power supply reduces switching loss and results in a
cleaner sine wave signal.
Master Volume Control: This one knob allows the user to raise the volume on your source units to their
maximum level, eliminating the need to adjust multiple controls.
Sub Volume Control: If you are using a dedicated amplifier for your subwoofer, this control will allow the user
to independently adjust the output level of the woofer.
Sub Frequency Selector: Switchable to either 80Hz or 120Hz as the center frequency for the subwoofer.
Auxiliary Input Selector: The SOURCE switch on the front of the equalizer allows the user to switch back and
forth between two sources: the Radio Input or the AUX Input on the rear panel.
Front Panel Aux Input: The front panel AUX Input is a convenient and easy way to hook-up a portable MP3
player or IPod®* to your system.
Fader Control: Allows easy balancing between the front and rear speakers when used with separate amplifiers for the front and rear channels.
Night Illumination: When the EQ is powered-on the control knobs are back lit with red illumination for easier
adjustment at night.
INSTALLATION EXPERIENCE
Installation of your PowerBass mobile equalizer requires detailed knowledge of electronics wiring and proper installation skills. We strongly recommend installation by an authorized PowerBass dealer. This Owners
Manual only provides general installation and operation instructions. If you have any reservations about your
installation skills, please contact your local PowerBass dealer for assistance.
*iPod® is a registered trademark of Apple Inc
Page 4
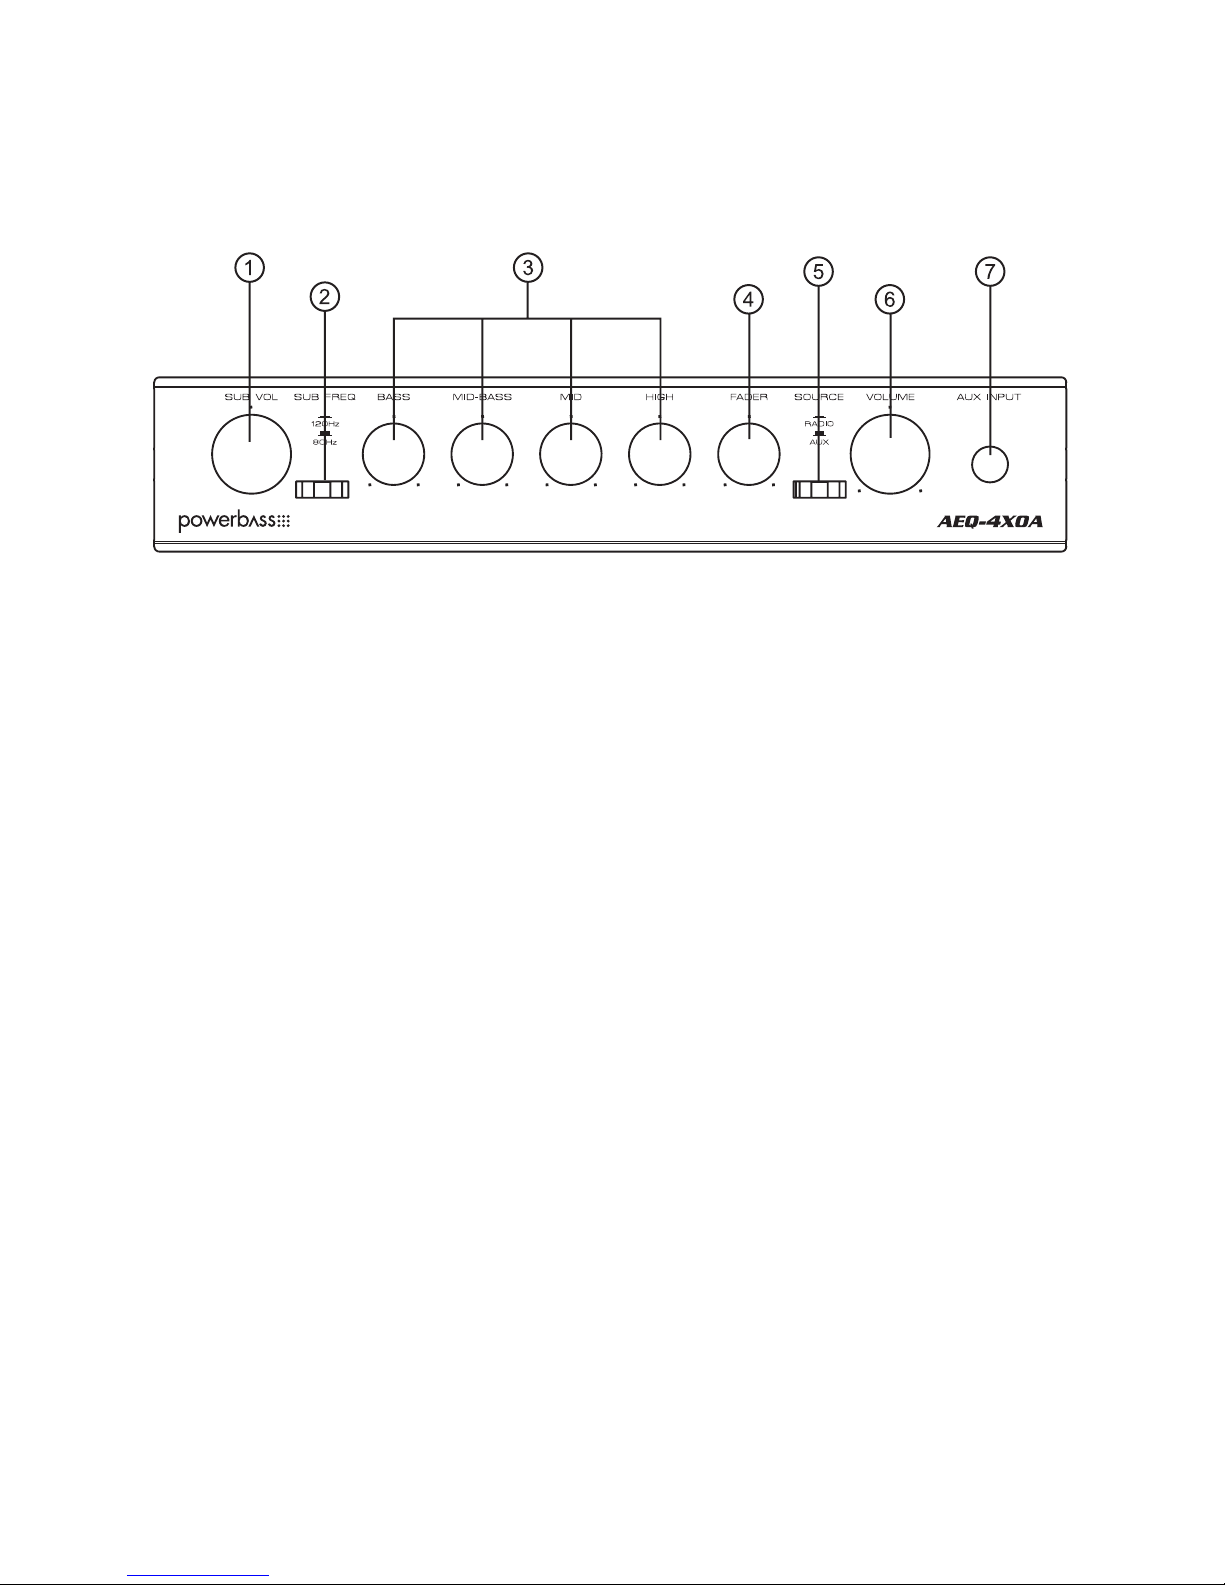
CONTROL PANEL LAYOUT
1. SUB VOL Control
The Subwoofer Volume control independently adjusts the output level of the woofer to a level you enjoy
(requires use of a dedicated woofer or bass amplifier connected to the rear RCA style inputs).
2. SUB FREQ Button
This switch selects the Subwoofer Center Frequency to either 80Hz or 120Hz and is used in conjunction with
the SUB VOL control.
3. EQUALIZER CONTROLS
These four rotary knobs control the frequency response by “boosting” or “cutting” the BASS, MID-BASS, MID,
and HIGH signals by 18dB. Centered at 70Hz, 250Hz, 3kHz, 15kHz respectively, these controls can be used
to fine tune your system to suit your taste and listening environment.
4. FADER CONTROL
This control adjusts the volume between the front and rear amplifier channels as desired. Front and rear
fading is now possible even with source units that have only two-channel outputs.
5. SOURCE Button
This faceplate switch selects the equalizer input source: RADIO (Head unit) input or the AUX, both on the rear
of the chassis.
6. VOLUME CONTROL
This control adjusts the output level of the system.
7. AUX FRONT INPUT 3.5mm Jack
This front panel input makes it easy to add MP3 or iPod®* as a music source. When a device is plugged in
to this input, it overrides both rear inputs.
Page 5

5
INSTALLATION PRECAUTIONS
NOTE: Proceed only if you are a qualified installer, otherwise; see your authorized Powerbass
Dealer to professionally install this equalizer. Always wear protective eyewear when using tools.
• Turn off all stereo and other electrical devices before you begin.
• Disconnect the negative (-) lead from your vehicles battery.
• Locate all fuel lines, brake lines, oil lines, and electrical cables when planning the install.
• Check the mounting depth to make sure there is sufficient room around the equalizer.
• When connecting ground points, make sure all paint is carefully scrapped away from the auto body and
contact is made with bare metal.
• Use a utility knife to trim away fabric from hole locations before drilling or cutting.
• When running power cables through sheet metal, be sure to use grommets to properly insulate the metal
edges from the wire insulation.
• If possible, use tubing through grommets.
MOUNTING THE EQUALIZER
There are two basic mounting options for your PowerBass equalizer. One is to mount the unit under the dash
with the supplied brackets as shown below:
The other option is to cut a hole through a suitable panel in the dash for a built-in look. If you choose the indash mounting method, be careful to cut the right size hole for the best appearance. Also take care not to let
your EQ and/or its cables interfere with other in-dash components.
Some dash kit manufacturers make a special kit for some vehicle models that will allow the installation of the
EQ with a DIN sized head unit. Check with your local PowerBass dealer for additional information.
4.0 Ø WASHER
4.0 Ø SPRING WASHER
4.0 X 15 TAPPING
SCREW
3.0 Ø WASHER
3.0 Ø SPRING WASHER
M 3.0 X 10 MACHINE
SCREW
Page 6

REAR PANEL HOOK UP
1) Power Wires: Connect the three pigtail wires from the rear of the EQ as follows
Red to +12VDC
Black to Ground (-)
Orange to the Remote Turn-on lead of the head unit
2) Input Jacks: The EQ has two sets of RCA style input jacks marked RADIO INPUT and AUX. The SOURCE
button on the front panel controls which input is used. The front panel AUX Input acts as a third input source
and can accommodate most MP3 players via a 3.5mm cable.
3) Output Jacks: Next to the inputs are the output RCA style jacks which should be connected to the front and
rear amplifiers, if applicable.
4) Sub Output Jacks: The sub out RCA jacks should be connected to a dedicated subwoofer (bass) mono
amplifier, if applicable.
RCA INTERCONNECTS
Choose the correct length and style of RCA interconnects for your needs (not included).
Run all of the RCA cables from the amplifiers to the location of the PowerBass AEQ-4XOA. Make sure all the
RCA cables are run on the opposite side of the vehicle from where you ran the power cables to the amplifiers.
Hiss, engine noise, and fan noise can easily be picked up through the RCA cables if run incorrectly.
Attach the RCA cables from the amplifiers to the corresponding Output jacks on the rear panel of the EQ; the
Subwoofer Output to the subwoofer amplifier, the Rear Output to the rear amplifier, and the Front Output to
the front amplifier.
Next attach the RCA cable from the output of the source to the Radio Input on the rear of the equalizer.
NOTE: Always take care not to cross power wires with the RCA cables.
Page 7

7
WIRING CONFIGURATIONS
As you may have already guessed, there are numerous ways to configure your PowerBass EQ into your audio
system. Spending a little time planning out your system will yield the most satisfying results. The following
diagrams are just a few of the possibilities:
ONE SOURCE/ONE AMPLIFIER
The PowerBass AEQ-4XOA goes in the signal chain between the main head unit (or AUX) and the system’s
amplifiers. The most basic configuration will be with one source unit and one amplifier:
Connect the Radio/CD source unit to the Radio Input jacks. Make sure the Source input selector switch on
the AEQ-4XOA front panel is in the correct position. Likewise, if only one set of RCA cables are run to your
amplifier(s), make sure the Fader control is turned to the direction that gives you output to the jacks being used
(clockwise for rear, counter-clockwise for front).
NOTE: If you are using a source unit that does not have RCA output (low level) jacks, a optional
Line Level (High/Low) Converter must be connected between the speaker output (high level) leads
and the AEQ-4XOA. Direct connection of high level (speaker) outputs to the AEQ-4XOA will dam-
age the source unit.
Page 8

Using FRONT and REAR Outputs
When used in systems with separate amplifier channels for the front and rear speakers, run two sets of RCA
cables from the AEQ-4XOA to the amplifiers. The following wiring configuration will allow for the use of the
built-in fader:
Using FRONT, REAR & SUB Outputs
If you are using a dedicated subwoofer (bass) mono amplifier run RCA cables to that amplifier as shown (this
will allow use of the Subwoofer Volume contro):
Page 9

9
TURNING ON THE POWER
The AEQ-4XOA has internal ON/OFF circuitry which responds to turning ON or OFF the head unit (radio) of
your car audio system. This requires that your head unit have a remote turn on lead available on the rear
panel (which most aftermarket radios have).
With this convenient remote turn-on/off feature, you never have to worry about turning off the power to the
equalizer when you shut off the audio system.
EQUALIZATION ADJUSTMENT
There are no strict rules to adhere to when setting the main equalizer controls. Common sense says to use
your PowerBass EQ to make your system sound its best. However, don’t try to push your system too hard by
overdriving the amplifiers and speakers resulting in damage to some of the components.
The four stereo controls are centered at 70Hz, 250Hz, 3kHz, 15kHz with 18dB of cut or boost.
CONNECTING AN MP3 PLAYER
Plug the MP3 player into the 1/8” (3.5mm) mini jack AUX INPUT on the front panel. After adjusting the VOLUME control to a normal listening level, press the play button on the MP3 player, iPOD® or other auxiliary
source.
To return to the original source unplug the mp3 player (or whatever device is connected to the front panel
AUX input).
Note: A front panel AUX INPUT is available for use with portable MP3 players or an iPod®*. Use
of this input will override (defeat) all other inputs.
Page 10

TROUBLESHOOTING TIPS
Problem Solution
No Sound
1. Check “Power” and remote turn-on for the proper
voltage.
2. Center the Fader Control
3. Turn up the “Input Gain” controls
4. Check the Ground connections
5. Push the “Source” button
Hiss
1. Turn down the amplifier gains
2. Faulty RCA interconnect cables
Distorting Speakers
1. Adjust the equalization levels
2. Lower the volume of the Source unit
3. See your Dealer
SPECIFICATIONS
Frequency Response: 20Hz-40,000Hz
Pre Graphic Frequency: 70Hz, 250Hz, 3kHz, 15kHz
Total Harmonic Distortion (THD): 0.05%
Signal to Noise Ratio: >100dB
Rear Inputs (RCA style): switchable to Radio or AUX
Front Input (3.5 mm): AUX
Equalization Boost/Cut: -/+ 18dB
Subwoofer Crossover Frequency: selectable 80Hz or 120Hz
Channel Separation: 75dB
Maximum Output Voltage: 10Vrms
Power Supply: 11-15V DC negative ground
Fuse: 1Amp (AGC type)
Dimensions: Chassis 6.8”W x 1.3”H x 4.2”D
(173mm x 33mm x 107mm)
Mounting Depth: 4.5”D (115mm) (including RCA jacks)
(Due to continuing improvement, features and specifications are subject to change without notice)
This manual is the exclusive property of PowerBass USA, Inc. Any reproduction of this manual, or use other than its intentions
is strictly prohibited without the express consent of PowerBass USA, Inc. ©Copyright 2013 PowerBass USA, Inc.
Page 11

11
POWERBASS AUTOSOUND LIMITED WARRANTY POLICY
PowerBass USA, Inc. offers limited warranty on PowerBass products under normal use on the following terms:
PowerBass Autosound Electronics are to be free of defects in material and workmanship for a
period of one (1) year.
This warranty applies only to PowerBass products sold to consumers by Authorized PowerBass Dealers in the United States
of America. Products purchased by consumers from a PowerBass dealer in another country are covered only by that country’s Distributor and not by PowerBass USA.
This warranty covers only the original purchaser of PowerBass product. In order to receive service, the purchaser must
provide PowerBass with the receipt stating the consumer name, dealer, product and date of purchase.
Products found to be defective during the warranty period will be repaired or replaced (with a product deemed to be equivalent) at PowerBass’s discretion and will not be liable for incidental or consequential damages. PowerBass will not warranty
this product under the following situations:
•Electronics received with apparent rust or corrosion
•Anyevidenceofliquiddamageorexposuretoexcessiveheat
•Attemptedrepairsoralterationsofanynature
•Productthathasnotbeeninstalledaccordingtothisownersmanual
Any implied warranties including warranties of fitness for use and merchantability are limited in duration to the period of
the express warranty set forth above. Some states do not allow limitations on the length of an implied warranty, so this
limitation may not apply. No person is authorized to assume for PowerBass any other liability in connection with the sale
of this product.
Please call (909) 923-3868 for PowerBass Customer Service. You must obtain an RA# (Return Authorization Number)
to return any product to PowerBass. The RA number must be prominently marked on the outside of the shipping
carton or the delivery will be refused. Please pack your return carefully; we are not responsible for items damaged in
shipping. Return the defective product along with a copy of the original dated retail sales receipt, plus $12.00 for handling
and diagnostic evaluation to:
PowerBass USA, Inc.,
Attn: Returns (RA#__________)
2133 S. Green Privado, Ontario, CA 91761
Residents of HI, AK and US territories will be charged for return shipping. All inquires regarding service and warranty should
be sent to the above address.
Removed or altered serial numbers will void this warranty
Page 12

PowerBass Autosound – A division of PowerBass USA, Inc.
2133 S. Green Privado, Ontario, CA 91761
Tel. (909) 923-3868 – Fax (909) 923-8048
www.powerbassusa.com
 Loading...