


Installaon instrucons
PA 8000
PAMIO

Power Automation GmbH
CNC-Automatisierungstechnik
Gottlieb-Daimler-Str. 17/2
74385 Pleidelsheim
Germany
Telephone: +49-7144-899-0
Fax: +49-7144-899-299
E-mail: info@powerautomation.com
Internet: www.powerautomation.com
Original installation instructions
Version 2.0
© 2015 Power Automation GmbH
2 12.01.2017

PA 8000 PAMIO
Table of contents
Table of contents
1 General information............................................................. 7
1.1 Information on this manual.......................................... 7
1.2 Explanation of symbols................................................ 7
1.3 Limitation of liability...................................................... 9
1.4 Copyright..................................................................... 9
1.5 Warranty terms............................................................ 9
1.6 Customer service....................................................... 10
1.7 Glossary..................................................................... 10
2 Safety.................................................................................. 11
2.1 Customer's responsibility........................................... 11
2.2 Personnel requirements............................................. 12
2.2.1 Qualifications........................................................... 12
2.2.2 Unauthorized persons............................................. 12
2.3 Intended use.............................................................. 13
2.4 Unintended use.......................................................... 14
2.5 Personal protective gear............................................ 14
2.6 Specific dangers........................................................ 15
2.7 PAMIO safety devices ............................................... 16
2.8 Machine Safety.......................................................... 17
2.8.1 'CNC ready' signal - Emergency stop interlocking.. 17
2.8.2 'Power ok' signal..................................................... 18
2.8.3 Control Units and associated PAMIO 4ENC4A....... 18
2.9 Conduct in a dangerous situation and in case of
accidents.................................................................... 19
2.10 Environmental protection........................................... 19
2.11 Labels........................................................................ 20
3 Overview............................................................................. 23
4 PAMIO Components.......................................................... 25
4.1 Generality.................................................................. 25
4.1.1 General specifications............................................. 25
4.1.2 Maximum Number of PAMIO Modules.................... 25
4.1.3 PAMIO Boxes and PAMIO Modules........................ 27
4.1.4 Connection to the control unit and interconnection. 29
4.1.5 Bus termination....................................................... 30
4.2 Mechanical Installation.............................................. 30
4.2.1 Dimensions............................................................. 30
12.01.2017 | 3

PA 8000 PAMIO
Table of contents
4.2.1.1 PAMIO models 2416 / 4ENC4A / PWM................ 30
4.2.1.2 PAMIO Modell 2ENC4A........................................ 32
4.2.2 DIN rail installation.................................................. 33
4.2.3 Mechanical assembly.............................................. 35
4.2.4 Stopping brackets................................................... 36
4.2.5 Ventilation................................................................ 38
4.2.6 Termination plug...................................................... 39
4.2.7 Superbus cables..................................................... 41
4.2.8 Changing PAMIO modules...................................... 45
4.3 Electrical Installation.................................................. 46
4.3.1 Connection to the CNC........................................... 46
4.3.2 PAMIO On-Board Logic Power Supply................... 47
4.3.3 Protective Grounding.............................................. 50
4.3.4 Ambient Conditions................................................. 51
4.4 PAMIO 2416.............................................................. 52
4.4.1 Technical Data......................................................... 52
4.4.2 Design and Functions............................................. 53
4.4.2.1 Digital Inputs......................................................... 54
4.4.2.2 Digital Outputs...................................................... 57
4.4.2.3 Power Supply....................................................... 62
4.4.2.4 Status LEDs.......................................................... 64
4.5 PAMIO 4ENC4A........................................................ 64
4.5.1 Technical Data......................................................... 64
4.5.2 Design and Functions............................................. 65
4.5.3 Axis Measurement Inputs (RMS)............................ 66
4.5.4 RMS Power Supply................................................. 72
4.5.5 Axes Analog Outputs.............................................. 73
4.5.6 Analog Inputs.......................................................... 77
4.5.7 Power Supply.......................................................... 79
4.5.8 Safety Function....................................................... 81
4.5.9 Status LEDs............................................................ 85
4.6 PAMIO PWM.............................................................. 85
4.6.1 Technical Data......................................................... 85
4.6.2 Design and Functions............................................. 86
4.6.2.1 Digital Outputs...................................................... 87
4.6.2.2 5V to 24V signal converter................................... 90
4.6.2.3 Power Supply....................................................... 94
12.01.2017 | 4

PA 8000 PAMIO
Table of contents
4.6.2.4 Wiring Example.................................................... 96
4.6.2.5 Status LEDs.......................................................... 96
4.7 PAMIO 2ENC4A........................................................ 97
4.7.1 Technical Data......................................................... 97
4.7.2 Design and Functions............................................. 98
4.7.3 Axis Measurement Inputs (RMS)............................ 99
4.7.4 RMS Power Supply............................................... 106
4.7.5 Axes Analog Outputs............................................ 107
4.7.6 Analog Inputs........................................................ 110
4.7.7 Power Supply........................................................ 113
4.7.8 Status LEDs.......................................................... 115
5 Troubleshooting............................................................... 117
5.1 Safety notes............................................................. 117
5.2 Malfunction indicators.............................................. 118
5.2.1 PAMIO 2416 LEDs................................................ 119
5.2.2 PAMIO 4ENC4A LEDs.......................................... 121
5.2.3 PAMIO PWM LEDs............................................... 124
5.2.4 PAMIO 2ENC4A LEDs.......................................... 126
6 Service and return process............................................. 129
6.1 Service..................................................................... 129
6.1.1 Service addresses................................................. 130
6.2 Spare parts.............................................................. 131
6.3 Return policy and procedure.................................... 132
6.4 Training.................................................................... 134
7 Proof of Change............................................................... 135
8 Index.................................................................................. 137
12.01.2017 | 5

PA 8000 PAMIO
Table of contents
12.01.2017 | 6

PA 8000 PAMIO
General informaon
1 General information
1.1 Information on this manual
General Information
Warnings
This installation manual provides important information on how to
work with the control unit safely and efficiently.
The installation manual is part of the control unit, must always be
kept in the control unit's direct proximity and should be available for
the personnel at any time. All personnel working with the control
unit are obliged to have read and understood this installation
manual before starting any work. Strict compliance with all specified safety notes and instructions is a basic requirement for safety
at work.
Moreover, the accident prevention guidelines and general safety
regulations applicable at the place of use of the control unit must
also be complied with.
Illustrations in this installation manual are intended to facilitate
basic understanding, and may differ from the actual design of the
control unit.
The enclosed manuals for the installed components apply together
with this installation manual.
1.2 Explanation of symbols
Warnings are identified by pictures. These warnings are introduced
by signal words, which express the severity of a danger.
Pay attention to these warnings and act cautiously in order to avoid
accidents, personal injuries and damage to property.
DANGER!
… indicates an imminently hazardous situation
which, if unavoidable, will result in death or serious
injury.
WARNING!
… indicates a potentially hazardous situation
which, if unavoidable, could result in death or
serious injury.
CAUTION!
… indicates a potentially hazardous situation
which, if unavoidable, may result in minor or moderate injury.
12.01.2017 | 7
PA 8000 PAMIO
NOTICE!
… indicates a potentially hazardous situation
which, if unavoidable, may result in property
damage.
… emphasizes useful hints and recommendations
as well as information for efficient and trouble-free
operation.
General informaon
Special Safety Notes
Additional symbols and highlighting
The following symbols are used in connection with the safety notes
to highlight particular dangers:
DANGER!
… highlights hazards caused by electric current.
There is a danger of serious injury or death if the
safety notes are not complied with.
The following symbols and highlights are used to distinguish
instructions, descriptions of results, cross-references and other elements inside this manual.
.. Highlights a step as part of a procedure of instructions.
.. Highlights a state or an automatic process as a result of
ð
an instruction.
n .. Highlights single or unordered instructions and lists.
Ä
“Additional symbols and highlighting” on page 8.. Highlights
cross-references to chapters or sections of this manual.
[Key].. Highlights captions of buttons, fields and other elements of
the software's graphical user interface.
“Menu è Submenu è ”.. Highlights a path to access a menu or
submenu in the software's graphical user interface.
Example/Extract.. Highlights verbatim examples and extracts
from configuration files.
12.01.2017 | 8

PA 8000 PAMIO
1.3 Limitation of liability
General informaon
Liability
All information and notes in this installation manual were compiled
under due consideration of valid standards and regulations, the
present status of technology and our years of knowledge and
experience.
Power Automation can not be held liable for damage resulting
from:
n disregarding this installation manual
n unintended use
n employment of untrained personnel
n unauthorized conversions
n unauthorized modifications to the software
n technical modifications
n use of unapproved spare parts
n use in conjunction with machines not deemed compatible by
Power Automation
In case of customized versions the actual scope of delivery can
vary from the explanations and representations in this installation
manual, because of the utilization of additional options or due to
the latest technical changes.
Apart from this, the obligations agreed upon in the delivery contract, the general terms and conditions, and the delivery conditions
of Power Automation and the legal regulations valid at the time of
contract apply.
We reserve the right to make technical modifications in order to
improve usability.
Copyright
Material Warranty
1.4 Copyright
This installation manual is protected by copyright law.
Passing this installation manual on to third parties, duplication of
any kind – even in form of excerpts – as well as the use and/or disclosure of the contents without the written consent of Power Automation is not permitted.
Violations oblige to compensation. The right for further claims
remains reserved.
1.5 Warranty terms
The material warranty terms are provided in Power Automation's
terms and conditions as well as inside the sales documents.
12.01.2017 | 9

PA 8000 PAMIO
1.6 Customer service
General informaon
Service
Our Customer Service is always available for technical information.
For information on whom to contact by phone, fax, e-mail or via the
internet, see Power Automation's address on page 2.
Additionally, Power Automation staff is always interested in
receiving new information and experiences resulting from the use
of our products, which could be of great value for future improvements.
1.7 Glossary
CMOS - Complementary metal-oxide-semiconductor
CNC - Computerized Numerical Control
DDU - Delivered Duty Unpaid
HMI - Human Machine Interface
The graphical user interface provided by the PA software.
IPC - Insulating Piercing Connector
MDI - Manual Data Input
MTBP - Machine Tool Builder's Panel
Panel including the basic requirements for a machine
tool operator: emergency stop push button, cycle start
and stop push buttons, jog plus and minus push buttons, feed rate and spindle speed override pots and a
number of auxiliary push buttons.
NC-Start - Numerical Control Start Button
NC-Stop - Numerical Control Stop Button
PA - Power Automation
PAMIO - Power Automation Modular Input Output
Extendable Superbus based interface allowing
connection of additional I/O modules.
PASIO - Power Automation Slot Input Output
Extendable EtherCATâ based interface allowing
connection of additional I/O modules.
PC - Personal Computer
PCI - Peripheral Component Interconnect
Personal computer extension for periphery devices
connected to the motherboard.
PLC - Programmable Logic Controller
POU - Program Organization Unit PLC functions, function
blocks and programs are POUs
RMS - Rotating Measuring Systems (Encoder)
12.01.2017 | 10

PA 8000 PAMIO
Safety
2 Safety
2.1 Customer's responsibility
The control unit is used for commercial purposes. The operating
company is thus subject to the legal obligations concerning industrial safety.
The safety, accident prevention and environmental protection regulations applicable for the area of application of the machine must
be complied with, along with the safety notes specified in this
installation manual. The following applies in particular:
n The customer must become familiar with the industrial safety
regulations and identify additional dangers which may arise
due to the specific working conditions at the place of use of the
control unit, by means of a risk analysis. These must be converted into operating instructions for operation of the control
unit.
n Throughout the time of use of the control unit the customer
must check whether the operating instructions created by him
correspond to the current status of regulations and standards.
Whenever changes in regulations and standards occur, instructions must be adapted accordingly.
n The customer must clearly specify the responsibilities for
installation, operation, maintenance, and cleaning.
n The customer must make sure that all employees who have to
work with the control unit have read and understood these
operating instructions.
In addition, the customer must train and inform his personnel
about potential dangers at regular intervals.
Moreover, the customer is also responsible for keeping the control
unit in technically good condition, and therefore the following
applies:
n The customer must make sure that the maintenance intervals
specified in these operating instructions are complied with.
n The customer must regularly check all safety features for func-
tion and completeness.
n The customer must supply his personnel with the necessary
protective equipment.
12.01.2017 | 11

PA 8000 PAMIO
Safety
2.2 Personnel requirements
2.2.1 Qualifications
WARNING!
Danger of injury in case of insufficient qualifi-
cation!
Improper operation can lead to severe personal
injuries and/or material damage.
– Only those persons who have been specified in
the corresponding chapters of this installation
manual should be entrusted with the listed
types of work.
– Employ certified experts, if in doubt.
The following qualifications are specified for different areas of
activity listed in the installation manual.
Qualified personnel
are able to carry out assigned work and to recognize possible dangers due to professional training, knowledge, and experience as
well as profound knowledge of applicable regulations.
Skilled electrician
A skilled electrician is able to carry out assigned work and to
recognize and avoid possible dangers due to professional training,
knowledge, and experience as well as profound knowledge of
applicable regulations.
The skilled electrician has been trained specially for his working
environment and he has profound knowledge of relevant standards
and regulations.
2.2.2 Unauthorized persons
WARNING!
Danger for unauthorized persons!
Unauthorized persons, who do not meet the
requirements described in this installation manual,
are not aware of the dangers in the working area.
– Keep unauthorized persons away from the
working area.
– If in doubt, address such persons and ask
them to leave the working area.
– Interrupt your work as long as unauthorized
persons are in the working area.
Only persons who are expected to perform their tasks reliably are
permitted as personnel. Persons whose reaction capability is
impaired, e.g. through drugs, alcohol or medication are not permitted.
12.01.2017 | 12

PA 8000 PAMIO
Safety
n When selecting personnel, ensure that the personnel can work
with the control unit in terms of technical and content aspects.
2.3 Intended use
Intended Use
Dangers
The control unit is exclusively intended and built for the use
described in this installation manual.
The control unit is to be used exclusively to control CNC machines
of a supported number of axes which are in accordance with the
types cleared by Power Automation. Prerequisite for the intended
use of the control unit is proper configuration as described in the
installation manuals provided by Power Automation.
WARNING!
Beware of unintended use!
Any use exceeding the scope of intended use
and/or different application of the control unit can
result in hazardous situations.
– Operate the control unit as intended only.
– Observe all instructions in this installation
manual.
– Observe the permissible ambient conditions
and electromagnetic compatibility mentioned in
the technical data.
Claims of any kind for damage resulting from unintended use are
void.
The operator is solely responsible for all damage resulting from
unintended use.
12.01.2017 | 13

Unintended Use
PA 8000 PAMIO
Safety
2.4 Unintended use
WARNING!
Beware of unintended use!
– In particular, avoid using the control unit for the
following purposes as these are regarded as
not intended:
– Operation using software not approved by
Power Automation.
– Operation connected to machines/drives
not deemed compatible by
Power Automation.
– Operation using wrong number of axes
– Wrong or missing execution of the mainte-
nance intervals
– Operation by not instructed personnel
2.5 Personal protective gear
Wearing of personal protective gear is required to minimize health
hazards and damage when working with the control unit.
n Always wear the protective equipment that is necessary for the
respective task when working.
n Follow the instructions on personal protective equipment that
are listed in this installation manual and other installation manuals provided by Power Automation.
n The environment in which the control unit is installed may
require users to wear additional personal protective gear.
Observe the instructions on personal protective gear provided
by the operating company.
Antistatic gloves
for protection of the hands during the work. Wear the antistatic
gloves always until the work is finished.
ESD clothing
for protection of components susceptible to electrostatic discharge.
Wear the ESD clothing during the work on electrostatic components.
ESD safety pad
for protection of components susceptible to electrostatic discharge.
Put the ESD safety pad on the floor before starting to work.
ESD safety shoes
for protection of components susceptible to electrostatic discharge.
Wear the ESD safety shoes to protect electrostatic-discharge-sensitive devices due to inadequate derivative electrostatic energy.
12.01.2017 | 14

PA 8000 PAMIO
Safety
Ear protection
for protection of the ears during the work. Wear the ear protection
always until the work is finished.
Ground strap
for protection of components susceptible to electrostatic discharge.
Wear the ground strap on your wrist and connect it to a suitable
equipotential bonding.
Protective glasses
for protection of the eyes during the work. Always wear the protective glasses until the work is finished.
2.6 Specific dangers
The following section lists the residual risks.
n Observe the safety instructions listed here, and the warnings in
subsequent chapters of this installation manual, to reduce
health hazards and to avoid dangerous situations.
DANGER!
Danger to life caused by electric current!
Touching conductive parts causes a direct danger
to life. Damage to insulations or individual components can cause danger to life.
n In the event of damage to insulation, switch off the power
supply immediately and have the defective parts repaired.
n Work on the electric system must be carried out only by skilled
electricians.
n Before maintenance, cleaning or repair work, switch off the
power supply and secure it against being switched on again.
n Do not bridge fuses or make them ineffective. When changing
fuses make sure you use the correct amperage.
n Keep moisture away from conductive parts. This can cause
short-circuits.
n De-energize the machine for all work on the electrical system.
WARNING!
Risk of injury due to improper handling of bat-
teries!
Batteries must be handled with special care.
12.01.2017 | 15

Safety
PA 8000 PAMIO
Safety
n Do not throw batteries into fire or expose to high temperature.
Explosion hazard!
n Do not charge batteries. Explosion hazard!
n Battery fluid leaking due to wrong usage may cause skin irrita-
tion. Avoid contact with the battery fluid. In case of contact,
flush the battery fluid with large amounts of water. If the battery
fluid enters the eyes, flush immediately with water for 10 min.
and consult a physician without delay.
2.7 PAMIO safety devices
DANGER!
Malfunctioning safety devices may pose a fatal
risk!
Safety devices must be intact and properly integrated into the control unit and the PAMIO components configuration in order to guarantee safety.
Hardware
n Before initial commissioning of the machine, ensure that all
safety devices are fully functional and correctly installed.
n Ensure that safety related inputs/outputs of the PAMIO compo-
nents and the CNC control unit are fully functional and perform
as intended.
n Never disable safety devices.
n Heed regulations concerning hardwiring of safety circuits.
External CNC machine
For information on required connections between
the PA PAMIO components and safety devices
integrated into the CNC machine see the documentation provided by the machine's manufacturer.
Safety connector
For information on the safety connector's purpose,
specification and wiring see Ä Chapter 4.5.8
“Safety Function” on page 81.
12.01.2017 | 16

Further Applicable Documents
Personal Injury
PA 8000 PAMIO
Safety
2.8 Machine Safety
The PAMIO module type 4ENC4A (and only this one) provides
specific safety connectors. The following instructions apply only
when these modules are part of the PAMIO components configuration.
For information on the machine's safety devices
and emergency stop chain see the manual provided by the CNC machine's manufacturer. The
manufacturer of the CNC machine is responsible
for the proper installation of the emergency stop.
2.8.1 'CNC ready' signal - Emergency stop interlocking
DANGER!
Injuries due to uncontrolled operation!
An inactive 'CNC Ready' signal represents a safety
related situation. The "CNC Ready" relay is
switched off when the PA CNC control unit is in a
situation where the axes' movements are not controlled.
As the axes may continue to move in an uncontrolled manner, the contacts of the "CNC Ready"
relay must be used to disconnect the machine's
emergency stop safety chain. All actions necessary for safety must be executed in the same way
as when the Emergency Stop button is pushed.
n Properly integrate the 'CNC ready' relay into the machine's
emergency stop chain.
All safety related actions must ensure that at least all axes
movements and spindle rotation (or beam power) are stopped as
quickly as possible.
n Refer to the drive manufacturer manual, to determine the best
way of stopping movements and other dangerous power on the
machine.
n If drive capability does not exist, the use of external braking
resistors might be necessary.
Unbalanced axes have to execute with the mechanical brake.
The contacts for 'CNC Ready' and 'Power OK' are available on
connector X19.
12.01.2017 | 17

PA 8000 PAMIO
Safety
2.8.2 'Power ok' signal
The "Power ok" relay is triggered by the hardware monitoring of the
internal supply voltages and the temperature sensor.
The "Power ok" relay is switched off when the power supplies do
not match the allowed range or the internal temperature is too high.
n Use the contacts of the "Power ok" relay to switch off the main
power supply of the control unit to avoid any unexpected damages to the control unit.
The contacts for 'CNC Ready' and 'Power OK' are available on
connector X19.
– When an external 5V power supply (RMS) is
necessary to supply incremental measuring
systems, use the corresponding entry in the
control unit's drive configuration file
(DriveCfg.ini) to activate the monitoring of
the correct range of these 5 V.
When the monitoring is activated, an error on
this power supply will cause the "Power ok"
relay to drop.
2.8.3 Control Units and associated PAMIO 4ENC4A
DANGER!
Use all CNC Ready contacts!
When a Power Automation control unit is used in
association with PAMIO components of type
4ENC4A it is necessary to use both the CNC
Ready contacts of the control unit and those of
these PAMIO components in the Emergency Stop
Chain.
DANGER!
Use all Power OK contacts!
When a Power Automation control unit is used in
association with PAMIO components of type
4ENC4A it is necessary to use both the Power OK
contacts of the control unit and those of these
PAMIO components in the Emergency Stop Chain.
12.01.2017 | 18

PA 8000 PAMIO
Safety
2.9 Conduct in a dangerous situation and in case of accidents
Preventive Measures
In Case Of Accidents
n Stay informed about locations of first aid equipment (first aid
kit, covers, etc.) and fire extinguishers at the site of installation.
n Instruct personnel about accident reporting, first aid and rescue
facilities at the site of installation.
n Disconnect power supply immediately.
n Initiate first aid measures.
n Inform responsible persons at the site.
n Call for rescue service if applicable.
2.10 Environmental protection
CAUTION!
Environmental hazard caused by incorrect han-
dling!
Incorrect handling of environmentally hazardous
substances, especially incorrect waste disposal,
can cause considerable damage to the environment.
The following environmentally hazardous components or substances are contained in the control unit:
Electronic Components
Electronic components are considered special waste. They must
be properly disposed of.
Power Automation will accept the control unit to properly dispose of
its components upon decommissioning.
n Follow the standard return procedure, as described in
Ä
Chapter 6.3 “Return policy and procedure” on page 132.
12.01.2017 | 19

Label - Overview
PA 8000 PAMIO
Safety
2.11 Labels
NOTICE!
Readability Of Labels
Over the course of time labels may become dirty or
nonreadable for any other reason. Improper input
voltages applied due to readability of labels can
damage the control unit.
– Keep labels in readable condition at all times.
– Replace damaged labels (not including mate-
rial warranty seals).
– Replacements can be obtained from
Power Automation.
Fig. 1: PAMIO box labels
The following labels are attached on the back of each PAMIO
box:
12.01.2017 | 20

PA 8000 PAMIO
Safety
Fig. 2: PAMIO article label
This label shows the model of the PAMIO box (type code) and its
article number (Fig. 2).
Fig. 3: PAMIO ArtNo+SNo label
This label shows the serial number of the PAMIO box (Fig. 3).
12.01.2017 | 21

PA 8000 PAMIO
Safety
12.01.2017 | 22

PA 8000 PAMIO
3 Overview
Table 1: The following products belong to the PA PAMIO-Accessories:
Product Code Description See
Overview
PAMIO module boxes PAMIO 2416 PAMIO module box
2416 / faceplate
PAMIO 4ENC4A PAMIO module box
4ENC4A / faceplate
PAMIO PWM PAMIO module box
PWM / faceplate
PAMIO 2416-2416 PAMIO module box
2416 / 2416
PAMIO
4ENC-4ENC
PAMIO 2416-4ENC PAMIO module box
PAMIO PWM-2416 PAMIO module box
PAMIO PWM-4ENC PAMIO module box
PAMIO 2ENC4A PAMIO module box
PAMIO Accessories PAMIO PWM
CONV
PAMIO module box
4ENC4A / 4ENC4A
2416 / 4ENC4A
PWM / 2416
PWM / 4ENC4A
2ENC4A
PAMIO PWM 5V to
24V signal converter
Ä
“PAMIO Combi-
nations” on page 27
Ä
“PAMIO Combi-
nations” on page 27
Ä
“PAMIO Combi-
nations” on page 27
Ä
“PAMIO Combi-
nations” on page 27
Ä
“PAMIO Combi-
nations” on page 27
Ä
“PAMIO Combi-
nations” on page 27
Ä
“PAMIO Combi-
nations” on page 27
Ä
“PAMIO Combi-
nations” on page 27
Ä
“Special PAMIO
Component”
on page 28
Ä
Chapter 4.6.2.2
“5V to 24V signal
converter”
on page 90
PAMIO STOPPER PAMIO set of lat-
eral rail stoppers
PAMIO TERM PAMIO termination
plug
PAMIO cables CAB PAMIO 0.5 PAMIO cable 0.5m
CAB PAMIO 2 PAMIO cable 2m
CAB PAMIO 5 PAMIO cable 5m
CAB PAMIO 10 PAMIO cable 10m
Ä
Chapter 4.2.4
“Stopping brackets”
on page 36
Ä
Chapter 4.2.6
“Termination plug”
on page 39
Ä
“Available
Superbus Cables”
on page 47
Ä
“Available
Superbus Cables”
on page 47
Ä
“Available
Superbus Cables”
on page 47
Ä
“Available
Superbus Cables”
on page 47
12.01.2017 | 23

PA 8000 PAMIO
Product Code Description See
Overview
CAB PAMIO 20 PAMIO cable 20m
CAB PAMIO 25 PAMIO cable 25m
PAMIO plug sets PLUG 2416 Plug set for 24/16
I/O
PLUG 4ENC4A Plug set for PAMIO
4ENC4A
PLUG PWM Plug set for PAMIO
PWM
PLUG 2ENC4A Plug set for PAMIO
2ENC4A
Ä
“Available
Superbus Cables”
on page 47
Ä
“Available
Superbus Cables”
on page 47
Ä
Chapter 4.4
“PAMIO 2416”
on page 52
Ä
Chapter 4.5
“PAMIO 4ENC4A”
on page 64
Ä
Chapter 4.6
“PAMIO PWM”
on page 85
Ä
Chapter 4.7
“PAMIO 2ENC4A”
on page 97
12.01.2017 | 24

General
Number Of PAMIO Modules
PA 8000 PAMIO
PAMIO Components
4 PAMIO Components
4.1 Generality
4.1.1 General specifications
The Power Automation Modular Input Output (PAMIO) components
are extension modules that allow a Power Automation control unit
to add more PLC digital input/output, PLC and/or NC analog outputs, NC analog axes.
PAMIO components are not stand-alone components. They can
only be used in conjunction with a Power Automation control unit.
PAMIO boxes can be snapped onto DIN-rails and plugged side by
side, or connected through optional cables.
4.1.2 Maximum Number of PAMIO Modules
All the control units of Power Automation are able to control up to
31 I/O modules. The total number of 31 includes the axis and I/O
modules built in the control unit.
Calculation
Build-In modules
– Power Automation control units are available
with build-in axes and I/O modules.
– Control units with analog axis interface have
one axis module built in.
– One or two I/O modules (depending) on control
unit model are built in every control unit.
Refer to the installation manual of your specific control unit to
check the number of built-in modules!
The Power Automation software attributes a fixed
number of 8 bytes to each module, without consideration of how many bytes are effectively required
by each module.
The following formula applies for the calculation of the maximum
configuration of a PAMIO system rack:
N
Build-In
+ N
2416
+ N
4ENC4A
+ N
2ENC4A
+ N
PWM
= 31
12.01.2017 | 25

Example 1
Example 2
PA 8000 PAMIO
If there are only 2416 modules on the PAMIO
rack, the maximum number of I/Os is:
As an example with a control unit PA 8000 LW
with analog axes:
N
=> Max. number of PAMIO 2416: N
Max. number of digital I/Os:
– 28 x 24 Inputs = 672 inputs + (build-in inputs) =
– 28 x 16 Outputs = 448 outputs + (build-in out-
If a system rack requires 1 box with 2 modules
4ENC4A and 1 box with 1 module PWM, the
maximum number of modules 2416 is:
N
N
As an example with a control unit PA 8000 E2 with
SDI axes:
N
=> Max. number of PAMIO 2416: N
Max. number of digital I/Os:
– 26 x 24 Inputs = 624 inputs + (build-in inputs) =
– 26 x 16 Outputs = 416 outputs + (build-in out-
PAMIO Components
= 3 (one axis module and two I/O modules)
Build-In
2416
720 inputs
puts) = 480 inputs
= 31 - N
2416
= 31 - N
2416
= 2 (no axis module and two I/O modules)
Build-In
672 inputs
puts) = 448 inputs
Build-In
Build-In
- N
4ENC4A
- 2 - 1
- N
PWM
2416
= 28
= 26
12.01.2017 | 26

Hardware Configuration
PA 8000 PAMIO
PAMIO Components
4.1.3 PAMIO Boxes and PAMIO Modules
With the exception of the PAMIO module 2ENC4A (which has a
unique hardware construction), the PAMIO boxes have flexible and
adaptable hardware configuration.
Each PAMIO Box is constituted of:
– one PAMIO backplane
– one or two PAMIO single module(s)
– one cover plate (or face plate) when only one
single module is mounted in the backplane
There are 3 different models of PAMIO single modules
– 2416 (24 digital inputs + 16 digital outputs)
– 4ENC4A (4 encoder in + 4 analog out + 4
analog in)
– PWM (2 digital outputs)
PAMIO Combinations
The PAMIO boxes are available either in the form of predefined
configuration or as individual components. In case of ordering individual components, the customer is responsible for the correct
assembly of these components.
Table 2: There are 9 different predefined possible combinations:
Code Designation
PAMIO 2416 PAMIO box with one 2416 and
a faceplate
PAMIO 4ENC4A PAMIO box with one 4ENC4A
and a faceplate
PAMIO PWM PAMIO box with one PWM and
a faceplate
PAMIO 2416-2416 PAMIO box with two 2416
PAMIO 4ENC-4ENC PAMIO box with two 4ENC4A
PAMIO 2416-4ENC PAMIO box with one 2416 and
one 4ENC4A
PAMIO 2416-PWM PAMIO box with one 2416 and
one PWM
PAMIO 4ENC-PWM PAMIO box with one 4ENC4A
and one PWM
12.01.2017 | 27

PA 8000 PAMIO
PAMIO Components
Individual Components
Special PAMIO Component
Table 3: There are 4 individual components:
Code Designation
PAMIO MB PAMIO Backplane with 2 slots
for single modules
PAMIO 2416 PAMIO module with 24 digital
inputs and 16 digital outputs
PAMIO 4ENC4A PAMIO module with 4 encoder
inputs, 4 analog outputs and 4
analog inputs
PAMIO PWM PAMIO module with 1 PWM
output and 1 Fast Output
PAMIO Faceplate PAMIO cover plate for unused
slot
Table 4: There is one special PAMIO component:
Code Designation
PAMIO 2ENC4A PAMIO module with 2 encoder
inputs, 4 analog outputs, 4
analog inputs and integrated
bus termination
12.01.2017 | 28

Connection
PA 8000 PAMIO
PAMIO Components
4.1.4 Connection to the control unit and interconnection
The first PAMIO box of the configuration in use must be connected
to the control unit with a Superbus cable. The corresponding 50pins connector on the control unit side is numbered X13.
The Superbus cable is not included in the control
unit's basic scope of delivery. It has to be ordered
separately (see Ä Chapter 6.1.1 “Service
addresses” on page 130).
One application may require more than one PAMIO box. The
PAMIO backplanes have 50-pins connectors on each side, a male
connector on the left side (front view) as input and a female connector on the right side as output. Thus it is possible to simply
press two boxes together to establish a full bus connection
between the boxes (Fig. 4).
PAMIO System With Two Racks
Fig. 4: Assembling PAMIO boxes
When the total number of required PAMIO boxes is too big, it can
make sense to create two system racks, connected one to the
other by a Superbus cable (Fig. 5).
Fig. 5: PAMIO system with two racks
12.01.2017 | 29

Bus Termination
General
PA 8000 PAMIO
PAMIO Components
4.1.5 Bus termination
As with other fast bus systems, the PA Superbus requires a termination to avoid line reflections that could disturb the data transmission.
The last PAMIO box of a system rack must carry a bus termination
plug on its Superbus output connector. In the particular case of a
PAMIO of model 2ENC4A, there is no Superbus output connector
and the bus termination is integrated in the module (by the way, it
is not possible to use more than one such a module per system
rack!).
4.2 Mechanical Installation
4.2.1 Dimensions
4.2.1.1 PAMIO models 2416 / 4ENC4A / PWM
Property Value Unit
Dimensions 112 x 123 x 181.5 mm
4.4 x 4.84 x 7.15 inch
Weight of the backplane
Max. weight 1.36 kg
The weight of a PAMIO box depends on the model
and the number of single modules mounted on the
backplane. The example here above gives the
weight of a box including two modules 4ENC4A.
Refer to the specific technical data of each single
module to determine the exact weight of your box.
0.66 kg
1.46 lb
3.00 lb
12.01.2017 | 30

PA 8000 PAMIO
PAMIO Components
Fig. 6: PAMIO box dimensions
12.01.2017 | 31

Allgemeine Daten
PA 8000 PAMIO
PAMIO Components
4.2.1.2 PAMIO Modell 2ENC4A
Eigenschaft Wert Einheit
Abmessungen 107 x 177 x 14 mm
4,21 x 6,97 x 0,55 Zoll
Gewicht der Rückenwandplatine
0,55 kg
1,21 lb
Fig. 7: Abmessungen des PAMIO 2ENC4A
12.01.2017 | 32

Specification
PA 8000 PAMIO
PAMIO Components
4.2.2 DIN rail installation
The PAMIO components are designed for DIN rail installation.
For the DIN rail specification see Fig. 8.
Fig. 8: Din rail for PAMIO mounting
Because of the weight of the boxes, due to their rugged construction with metal cases, it is necessary to ensure a correct and a safe
fixation of the DIN rail to avoid any torsion.
For the suggested installation of the rail see Fig. 9.
Fig. 9: DIN rail fixation
12.01.2017 | 33

PA 8000 PAMIO
PAMIO Components
M6 Fixation
Place M6 fixation screws every 105.3 mm (4.16 inches) (see
Fig. 10).
Fig. 10: M6 fixation
In this way the DIN rail fixation screws are placed right in the
middle of the PAMIO boxes (Fig. 11). So, optimum fixation is guaranteed and the user can install and/or remove PAMIO boxes
without any problem.
Fig. 11: DIN rail fixation
12.01.2017 | 34

Mounting Of The PAMIO Boxes
PA 8000 PAMIO
PAMIO Components
4.2.3 Mechanical assembly
The PAMIO boxes must always be mounted on the rail in such a
way that the power supply connector of the modules is on the top
side.
Snap the back of the PAMIO box onto the DIN rail by inserting the
top on the rail and then pressing simultaneously down and in at the
bottom of the box. Be sure to hold the box absolutely horizontally
when pressing down. Also make sure that a fastening screw of the
DIN rail is located right in the middle of the PAMIO box bracket.
Shift the boxes together. The box should slide on the DIN rail. If it
does not slide then slightly press the box down while moving the
box.
The total length of a PAMIO box rack is given by
the formula:
– Total length = N x 105.3 mm + 5 mm
– Total length = N x 4.16 inches + 0.20 inches
where N stands for the number of PAMIO boxes
12.01.2017 | 35

Risk Of Disconnection
PA 8000 PAMIO
PAMIO Components
4.2.4 Stopping brackets
Stopping bracket sets are available as options
from Power Automation (see Ä Chapter 6.1.1
“Service addresses” on page 130).
Ordering code for one set:
– PAMIO STOPPER (each set = one pair of
stopping brackets)
As the boxes are fixed one to the other only by the way of the
plugged connectors, there is always a risk of disconnection (due to
any vibration) that would prevent the entire control unit from
working.
To avoid accidental disconnection of the PAMIO boxes be sure to
fix the entire rack of interconnected boxes with stopping brackets
on each side (Fig. 12). This is always necessary if a system rack
consists of more than one module box plugged into each other.
Space
Fig. 12: Stopping brackets disposition
Each stopping bracket requires a space of 50 mm (1.97 inches) on
the DIN rail (Fig. 13).
Fig. 13: Stopping bracket size
12.01.2017 | 36

PA 8000 PAMIO
PAMIO Components
The stopping brackets are fixed on the DIN rail with a screw M4x20
(Fig. 14).
Fig. 14: Stopping bracket fixation
When another rail than the one specified is used, the length of the
stopping bracket fixation screw may have to be adapted. However
it has to be selected in such a way that this screw does not collide
with the Superbus connector or the termination plug!
If a rail in accordance with DIN-EN 50022 is used, for example, the
screw must be changed for M4x12.
12.01.2017 | 37

Minimum Vertical Distance
PA 8000 PAMIO
PAMIO Components
4.2.5 Ventilation
To ensure proper heat dissipation, PAMIO system racks must
always be mounted horizontally.
There must be a minimum vertical distance of 100 mm (3.94
inches) between a PAMIO system rack and other devices in the
electrical cabinet (Fig. 15).
It is recommended not to place devices with high power dissipation
(like transformers or drive units) close below the PAMIO system
rack.
When the number of PAMIO boxes is so large that it requires an
assembly of two (or more) system racks, the same rules applies:
there must be a distance of at least 100 mm (3.94 inches) between
the two racks.
Fig. 15: PAMIO rack mounting for correct ventilation
12.01.2017 | 38

Termination
PA 8000 PAMIO
PAMIO Components
4.2.6 Termination plug
Termination plugs are available as options from
Power Automation (see Ä Chapter 6.1.1 “Service
addresses” on page 130).
Ordering code: PAMIO TERM
The PAMIO termination plug (Fig. 16) is used to terminate the
Superbus. As with other fast bus systems, the PA Superbus
requires a termination to avoid line reflections that could disturb the
data transmission.
Fig. 16: PAMIO termination plug
The last PAMIO box of an application must carry a bus termination
plug on its output Superbus connector (50 pin Sub-D) (Fig. 17).
Fig. 17: Position of PAMIO termination plug
12.01.2017 | 39

PA 8000 PAMIO
PAMIO Components
Bus Termination (PAMIO 2ENC4A)
In the particular case of a PAMIO of model 2ENC4A, there is no
Superbus output connector and the bus termination is integrated in
the module (Fig. 18). It is not possible to use more than one such
module per system rack, and this module must be the last module
of the system rack!
Fig. 18: PAMIO system rack with ending PAMIO 2ENC4A
NOTICE!
Be sure that the termination plug is always plugged
in the output connector of the last PAMIO box (or
that the last box is a PAMIO 2ENC4A), and that the
termination plug is fixed against accidental disconnection.
For the fixation of the termination plug, the screws
that fix the 50 pin Sub-D output connector of the
last PAMIO box must be replaced by studs! These
studs are delivered with the PAMIO backplane.
If there is a need to install a new supplementary
PAMIO box in an existing system rack, it is suggested to place it between the first and the last
module.
Otherwise, the termination plug and the corresponding studs of the last module have to be
replaced with the corresponding screws (i.e. those
from the new module) because when studs are
mounted, the connection from box to box is not
possible. After adding the new module as new last
module, the studs and the termination plug must
be tightened on its right side.
12.01.2017 | 40

Connection
PA 8000 PAMIO
PAMIO Components
4.2.7 Superbus cables
The first PAMIO box of the configuration in use must be connected
to the control unit by a Superbus cable (Fig. 19).
Fig. 19: Superbus cable
The Superbus cable is not included in the control
unit's basic scope of delivery. It has to be ordered
separately.
Superbus PAMIO Connector
The corresponding 50-pins connector on the control unit side is
numbered X13 (Fig. 20).
Fig. 20: Superbus PAMIO Connector
NOTICE!
It is highly recommended to use a cable that has
been tested and certified by Power Automation, as
well as between the control unit and the system
rack, as (if required) between several racks. -If
non-adapted cables are used, there is a high risk
of data transmission errors!
12.01.2017 | 41

PA 8000 PAMIO
PAMIO Components
Cable Specification
Property Value
Cable type round twisted pair, shielded
Number of leads 50 (25 x 2)
Lead cross section
Outside diameter 8 - 9 mm (0.3 ")
Maximum length 30 m (98 ft)
Connector types sub-D, case shielded
Connector genders male/female
Connector pins 50 (3 rows)
Connector attachment 4-40/UNC screws
NOTICE!
All cables connected to the control unit are
intended for stationary use only.
The cable shield is connected to both connector
casings.
0.09 mm2 (AWG 28)
Pin Assignment
Table 5: The one-to-one wiring between the cable's connectors is
set up as follows:
Pair Pins Pair Pins
1 = 1/34 14 = 26/10
2 = 18/2 15 = 43/27
3 = 35/19 16 = 11/44
4 = 3/36 17 = 28/12
5 = 20/4 18 = 45/29
6 = 37/21 19 = 13/46
7 = 5/38 20 = 30/14
8 = 22/6 21 = 47/31
9 = 39/23 22 = 15/48
10 = 7/40 23 = 32/16
11 = 24/8 24 = 49/33
12 = 41/25 25 = 17/50
13 = 9/42
12.01.2017 | 42

Cable Fixation
PAMIO Systems With Several
Racks
PA 8000 PAMIO
PAMIO Components
NOTICE!
To avoid unexpected disconnections, it is necessary to fix the cable on both sides as well on the
control unit, as on the first PAMIO box.
For the fixation of the Superbus cable, the screws
that fix the 50 pin Sub-D input connector of the first
PAMIO box must be replaced by studs! These
studs are delivered with the PAMIO backplane.
Fig. 21: PAMIO system with two racks
NOTICE!
In case of interconnection between racks, the
screws that fix the 50 pin Sub-D output connector
of the last PAMIO box in the first rack and those of
the input connector of the first PAMIO box in the
following rack must be replaced by studs! These
studs are delivered with the PAMIO backplane.
12.01.2017 | 43

Bending Radius
PA 8000 PAMIO
PAMIO Components
NOTICE!
The cables delivered from Power Automation are
only intended for stationary use!
They must not be used in moving cable chains!
Fig. 22: Superbus cable bending radius
NOTICE!
Do not bend the cable more than with a radius of
30 mm (1.18 inches) to avoid permanent damage!
12.01.2017 | 44

Location Of The PAMIO Modules
PA 8000 PAMIO
PAMIO Components
4.2.8 Changing PAMIO modules
Any of the different types of PAMIO modules available can be
located in any available slot of the system rack of PAMIO boxes.
Therefore it is not necessary to replace the entire module box in
case of a system change. It is enough to change the respective
module.
Each module is fixed in the PAMIO box by means of six screws, 3
located on the top side and 3 on the bottom side. The location of
these screws differs slightly depending if the module is located on
the left side or on the right side of the PAMIO box.
Fig. 23: Location of mounting screws
NOTICE!
Before changing a module, always switch off the
24V power supply!
NOTICE!
When inserting a new module, be sure that the
module is connected properly in the backplane
connector.
12.01.2017 | 45

PA 8000 PAMIO
PAMIO Components
4.3 Electrical Installation
4.3.1 Connection to the CNC
The first PAMIO box of the configuration in use must be connected
to the control unit by a Superbus cable. The corresponding 50-pins
connector on the control unit side is numbered X13.
The Superbus cable is not included in the control
unit's basic scope of delivery. It has to be ordered
separately.
Fig. 24: Superbus cable
NOTICE!
It is highly recommended to use a cable that has
been tested and certified by Power Automation,
between the control unit and the system rack (if
required), as well as between several racks.
If cables that don't meet the required specification
are used, there is a high risk of data transmission
errors!
NOTICE!
Do not connect or disconnect PAMIO boxes when
the control unit is under power. The control unit
software has to initialize the input/output system
during the start-up process.
12.01.2017 | 46

Available Superbus Cables
PA 8000 PAMIO
PAMIO Components
Superbus cables are available as options from
Power Automation (see Ä Chapter 6.1.1 “Service
addresses” on page 130).
Ä
Ordering code: see
on page 47
Length in m Length in ft Ordering code
0.5 1.6 CAB PAMIO 0.5
2 6.5 CAB PAMIO 2
5 16.5 CAB PAMIO 5
10 33 CAB PAMIO 10
20 66 CAB PAMIO 20
25 82 CAB PAMIO 25
“Available Superbus Cables”
On-Board Logic Power Supply
The PAMIO cable (0.5m / 1.6 ft) is only usable with
a PAMIO box mounted on the left side of the CNC.
4.3.2 PAMIO On-Board Logic Power Supply
Every PAMIO module requires a 24V DC power supply for its OnBoard logic. The backplane in which the module is mounted is supplied as well from this input.
Depending on the model, there can be more than one power
supply connector on a PAMIO module. But all models use he same
connector X30 for the On-Board logic power supply.
12.01.2017 | 47

PA 8000 PAMIO
PAMIO Components
Each module has a 5 pin connector (X30) with the following pin
assignment (see Fig. 25).
Fig. 25: X30 – Power supply pins
Pin Assignment
Pin 1 Used depending on model
Pin 2 + 24 V DC power supply for
on-board logic
Pin 3 0 V
Pin 4 Used depending on model
Pin 5 Used depending on model
Technical Specifications
Depending on the modules, the pins 1, 4 and 5 of
this connector can be used for other power supply
inputs. Refer to individual characteristics of the
model!
The 0V connection is always common to the different power supplies that have to be applied on
this connector.
Property Value Unit
Operating voltage +24 V DC
Tolerances -15 / +12.5 %
Effective range 20.4 - 27.0 V DC
Reference Pin 3 (0 V)
NOTICE!
Remember that every PAMIO module must be supplied with 24V DC separately!
12.01.2017 | 48

PA 8000 PAMIO
PAMIO Components
Power Requirement
Power Requirement Of Standard
PAMIO Configurations
PAMIO model Value Unit
Backplane 0.1 A
2416 0.1 A
4ENC4A 0.5 A
2ENC4A 0.2 A
PAMIO PWM 0.1 A
The 24V power supply necessary for the on-board logic of the
complete I/O rack system has to be determined by making the sum
of all the components in use.
The following table shows the requirements of the standard predefined combinations available from Power Automation.
PAMIO model Calculation Total Unit
PAMIO with 1x
2416
PAMIO with 1x
4ENC4A
0.1+0.1 0.2 A
0.1+0.5 0.6 A
PAMIO with 1x
PWM
PAMIO with 2x
2416
PAMIO with 2x
4ENC4A
PAMIO with 1x
2416 + 1x
4ENC4A
PAMIO with 1x
2416 + 1x
PWM
PAMIO with 1x
4ENC4A + 1x
PWM
NOTICE!
When the same power supply is used for the OnBoard logic and the digital inputs/outputs,
remember to add to the above values the output
currents required by the digital outputs.
0.1+0.1 0.2 A
0.1+0.1+0.1 0.3 A
0.1+0.5+0.5 1.1 A
0.1+0.1+0.5 0.7 A
0.1+0.1+0.1 0.3 A
0.1+0.5+0.1 0.7 A
12.01.2017 | 49

Grounding
PA 8000 PAMIO
PAMIO Components
4.3.3 Protective Grounding
To ensure the best noise immunity, each PAMIO module comes
with at least one connection (X2) for the protective grounding.
Fig. 26: X30 - Power supply pins
NOTICE!
Remember that every PAMIO module must be connected to the protective grounding separately!
12.01.2017 | 50

Technical Data
PA 8000 PAMIO
PAMIO Components
4.3.4 Ambient Conditions
Property Value Unit
Operating temperature
Storage temperature
Relative humidity
(non-condensing)
Maximum acceleration (non-operating)
Maximum acceleration (operating)
Protection class (EN
60529)
Do not expose the PAMIO components to the following conditions:
– corrosive gases
– high variation of temperature
– extremely or salt laden air
– metal chip or metal dust - splash water or other
chemicals
+5 - +55 °C
+32 - +131 °F
-20 - +75 °C
-4 - +167 °F
80 %
4.0 G
3.5 G
IP20
NOTICE!
Functional defects!
The PAMIO casing does not provide sufficient protection against environmental influences. Dust and
moisture may cause malfunctions.
– Only operate the PAMIO components inside a
cabinet that ensures at least a protection class
IP 54!
12.01.2017 | 51

PA 8000 PAMIO
4.4 PAMIO 2416
PAMIO Components
Connections Of The PAMIO 2416
General
Connection Values
The PAMIO module 2416 has connections for:
n 24 digital inputs (3 bytes)
n 16 digital outputs (2 bytes)
All the signals are 24V DC.
Each output byte can be supplied separately. Each output can
drive up to 0.7A, each byte being limited to 4A maximum.
The status of the inputs, the outputs and the monitor is displayed
via LEDs.
4.4.1 Technical Data
Property Value Unit
Weight 0.29 kg
0.64 lb
Property Value Unit
Input voltage 24 V DC
Tolerance -15 / +12.5 %
Frequency 20.4 - 27.0 V DC
Max. current 0.1 A
12.01.2017 | 52

Overview
PA 8000 PAMIO
PAMIO Components
4.4.2 Design and Functions
Fig. 27: PAMIO 2416 overview
1 Output byte 2 (X41)
2 Power connector +24 V (X30)
3 Output byte 1 (X40)
4 Protective grounding tab (X2)
5 Input byte 3 (X47)
6 Input byte 2 (X46)
7 Input byte 1 (X45)
8 Status LEDs output byte 1
9 Status LEDs output byte 2
10 Module status LEDs
11 Status LEDs input byte 1
12 Status LEDs input byte 2
13 Status LEDs input byte 3
12.01.2017 | 53

PA 8000 PAMIO
4.4.2.1 Digital Inputs
PAMIO Components
Connection
Fig. 28: PAMIO 2416 inputs
5 Input byte 3 (X47)
6 Input byte 2 (X46)
7 Input byte 1 (X45)
n Each byte is connected with an 8 pole terminal block (Fig. 29).
n The conductor cross-section of the wire must be 0.3 to 1.75
mm2 (AWG 22 to 15).
n The inputs are always referenced against 0 V, located in the
power connector (X30 pin 3).
Fig. 29: Input terminal block
12.01.2017 | 54

PA 8000 PAMIO
PAMIO Components
Pin Assignment
Input Status LEDs
Byte 1 +24 V
input
pin 1 1. in bit pin 1 9. in bit pin 1 17. in bit
pin 2 2. in bit pin 2 10. in bit pin 2 18. in bit
pin 3 3. in bit pin 3 11. in bit pin 3 19. in bit
pin 4 4. in bit pin 4 12. in bit pin 4 20. in bit
pin 5 5. in bit pin 5 13. in bit pin 5 21. in bit
pin 6 6. in bit pin 6 14. in bit pin 6 22. in bit
pin 7 7. in bit pin 7 15. in bit pin 7 23. in bit
pin 8 8. in bit pin 8 16. in bit pin 8 24. in bit
The input LEDs are located in the input path and therefore show
the real state of the 24V inputs
n a HIGH input signal causes the corresponding LED to turn ON
n a LOW input signal causes the corresponding LED to turn OFF
Byte 2 +24 V
input
Byte 3 +24 V
input
Fig. 30: PAMIO 2416 inputs status LEDs
12.01.2017 | 55

PA 8000 PAMIO
PAMIO Components
Input Characteristics
Property Value Unit
Number of inputs 24
Maximum DC
voltage
Input current at 24V
(typical)
Power dissipation at
24V per input
Input impedance 2.2 kΩ
Operating DC
voltage OFF
Operating DC
voltage ON
Input ON delay (typical)
Input OFF delay
(typical)
Isolation By opto-coupler
Input ON display LED
27 V DC
7 mA
0.17 W
5 V max
11 V min
5 μs
35 μs
Input Schematic
External connection 1 block per byte
The following figure (Fig. 31) shows how the inputs are realized on
each PAMIO 2416 module.
Fig. 31: Inputs equivalent schematic
12.01.2017 | 56

PA 8000 PAMIO
4.4.2.2 Digital Outputs
PAMIO Components
Fig. 32: PAMIO 2416 outputs
1 Output byte 2 (X41)
3 Output byte 1 (X40)
12.01.2017 | 57

PA 8000 PAMIO
PAMIO Components
Connection
n Each byte is connected with an 8 pole terminal block.
n Each output byte has its own power supply connection. This
feature can be used to turn off a whole byte by means of a
unique external switch.
n The outputs are always referenced against 0 V, located in the
power connector (X30 pin 3)
Fig. 33: Input terminal block
The current limitation of each output is 0.7 - 2.5A
per pin in case of short circuits.
– Consider that the power supply cable for one
output byte has to be chosen accordingly.
Each output has a nominal output capability of 0.7
A. Nevertheless each output byte is globally limited
to 4 A.
– Take care of this specification by appropriate
output definition toward the external actuator.
Pin Assignment
Outputs are monitored for faults. In case of errors,
the according output is switched off.
Since every 4 adjacent outputs have a common
status signal, the onboard monitor always switches
off 4 outputs in such a case (1 - 4, 5 - 8, 9 - 12, 13
- 16).
Byte 1 +24 V output Byte 2 +24 V output
pin 1 1. out bit pin 1 9. out bit
pin 2 2. out bit pin 2 10. out bit
pin 3 3. out bit pin 3 11. out bit
pin 4 4. out bit pin 4 12. out bit
pin 5 5. out bit pin 5 13. out bit
pin 6 6. out bit pin 6 14. out bit
pin 7 7. out bit pin 7 15. out bit
pin 8 8. out bit pin 8 16. out bit
12.01.2017 | 58

PA 8000 PAMIO
PAMIO Components
Output Status LEDs
The output LEDs are located in the input path and therefore show
the real state of the 24V outputs.
n if an output is HIGH, the corresponding LED is ON
n if an output is LOW, the corresponding LED is OFF
Fig. 34: PAMIO 2416 outputs status LEDs
12.01.2017 | 59

PA 8000 PAMIO
PAMIO Components
Output Characteristics
Property Value Unit
Number of outputs 16
Max. continuous
output per bit
Max. continuous
output per byte
Power dissipation
per bit at 24V for
0.5A
Power dissipation
per bit at 24V for
0.7A
Output ON delay
(typical)
Output OFF delay
(typical)
Watchdog (max.) 64 ms
Short circuit outputDC0.7 A
Delay time current
limitation (max.)
0.7 A
4 A
0.27 W
0.37 W
175 μs
175 μs
100 μs
Isolation By opto-coupler
Input ON display LED
External connection 1 block per byte
12.01.2017 | 60

PA 8000 PAMIO
PAMIO Components
Output Schematic
The following figure shows how the outputs are realized on each
PAMIO 2416 module.
Fig. 35: Outputs equivalent schematic
1 Supplied from PCI Superbus board
2 Output supply input (-15 % - +12.5 %)
3 Output n + 1
4 Output n
5 Logic
6 Internal serial bus
12.01.2017 | 61

PA 8000 PAMIO
PAMIO Components
4.4.2.3 Power Supply
Each of the output bytes on the PAMIO 2416 needs a separate
+24V DC power supply. This is done on the power supply connector X30 (Fig. 36).
Connection
Fig. 36: PAMIO 2416 power connection
2 Power connection (X30)
Each module has a 5 pin connector (X30) with the following pin
assignment (Fig. 37):
Fig. 37: X30 – Power supply pins
12.01.2017 | 62

PA 8000 PAMIO
PAMIO Components
Pin Assignment
Pin Assignment
Pin 1 + 24 V DC power supply for
output byte 1
Pin 2 + 24 V power supply for on-
board logic
Pin 3 0 V
Pin 4 Not used
Pin 5 + 24 V DC power supply for
output byte 2
The 0V connection is common to the different
power supplies that have to be applied on this connector.
The power supply of the output bytes being independent from the on-board logic power supply
allows i.e. disconnecting the output byte(s) in case
of emergency stop, setting all of the output bytes to
a safe state.
Technical Data
Property Value Unit
Operating voltage +24 V DC
Tolerances -15 / +12.5 %
Effective range 20.4 - 27.0 V DC
Max. current for the
on-board logic
Max. current for the
output bytes
Reference Pin 3 (0 V)
0.1 A
4 A / byte
12.01.2017 | 63

Overview
PA 8000 PAMIO
PAMIO Components
4.4.2.4 Status LEDs
The PAMIO 2416 has four LEDs for diagnostic purposes.
Connections Of The PAMIO
4ENC4A
General
Fig. 38: PAMIO 2416 module status LEDs
1 Status
2 Access
3 Bustest
4 Monitor
For a detailed assignment of the LEDs' states see Ä Chapter 5.2.1
“PAMIO 2416 LEDs” on page 119.
4.5 PAMIO 4ENC4A
The PAMIO module 4ENC4A has connections for:
n 4 analog axes (4 analog command outputs +/-10V DC / 16 bit)
n 4 incremental measurement systems
n 4 additional analog inputs (+/-10V DC / 12 bit)
The status of the monitor is displayed via LEDs.
4.5.1 Technical Data
Property Value Unit
Weight 0.35 kg
0.77 lb
12.01.2017 | 64

PA 8000 PAMIO
PAMIO Components
Connection Values
Overview
Property Value Unit
Input voltage 24 V DC
Tolerance -15 / +12.5 %
Frequency 20.4 - 27.0 V DC
Max. current 0.5 A
4.5.2 Design and Functions
Fig. 39: PAMIO 4ENC4A overview
1 RMS input 1. axis (X31)
2 Power supply input for RMS encoders (X35)
3 Analog out axes 1 to 4 (X37)
4 Protective grounding tab (X2)
5 Power connector +24 V (X30)
6 RMS input 2. axis (X32)
7 Module status LEDs
8 RMS input 3. axis (X33)
9 Safety function connector (X38)
10 Analog inputs 1 to 4 (X36)
11 RMS input 4. axis (X34)
12.01.2017 | 65

PA 8000 PAMIO
PAMIO Components
4.5.3 Axis Measurement Inputs (RMS)
Fig. 40: PAMIO 4ENC4A RMS inputs
1 RMS input 1st axis (X31)
6 RMS input 2nd axis (X32)
8 RMS input 3rd axis (X33)
11 RMS input 4th axis (X34)
Connection
Each axis measurement input has a 15 pin Sub-D connector
female (Fig. 41).
Fig. 41: RMS Input Connector
12.01.2017 | 66

PA 8000 PAMIO
PAMIO Components
Pin Assignment
RMS Input Characteristics
Pin Assignment
Pin 1 Track A+
Pin 2 Track A-
Pin 3 Track B+
Pin 4 Track B-
Pin 5 Track R+
Pin 6 Track R-
Pin 7 Probe input
Pin 8 Probe ground
Pin 9/11/13/15 RMS grounding
Pin 10/12/14 +5 V RMS
Property Value Unit
Interface type RS 422
Track common
mode range
-7 - +7 V
Max. track input
voltage
Min. track input
voltage
Track input impedance
Max. track frequency (no filter)
Max. count frequency (no filter)
External connector 15 pin Sub-D female / axis
Each probe input is referenced against its probe
ground.
-11 - +14 V
+/- 500 mV
150 Ω
5 MHz
20 MHz
12.01.2017 | 67

PA 8000 PAMIO
PAMIO Components
Probe Input
Property Value Unit
Max. probe input
voltage
Probe input current
(at 24 V)
Probe input impedance
Probe operating
voltage OFF
Probe operating
voltage ON
Probe input ON
delay
Probe input OFF
delay
Probe isolation Opto coupler
Interface type digital input 24 V
Probe wiring
When the probe input is used in an application,
each input of all used axes must be wired in parallel.
27 v
7 mA
2200 Ω
5 V DC max.
11 V DC min.
200 ns
300 ns
Input Equivalent Schematic
The following figure (Fig. 42) shows how the axis measurement
inputs are realized on each PAMIO 4ENC4A module.
Fig. 42: RMS input equivalent schematic
12.01.2017 | 68

PA 8000 PAMIO
PAMIO Components
RMS Encoder Wiring Example
The following schematic demonstrates the recommended way of
connecting the CNC RMS inputs to the encoders (or any other
device with incremental output).
Fig. 43: RMS encoder wiring example
12.01.2017 | 69

Precondition
PA 8000 PAMIO
PAMIO Components
The distance between the measuring systems and
the power supply can be relatively long. The ohmic
resistance of the power supply cable and the RMS'
current consumption generate a voltage drop.
Fig. 44: Schematic encoder power supply voltage drop
1 Power supply
2 Rotating measurement system (RMS)
UASupply output voltage
U1Voltage drop
U2Voltage at the RMS
U3Voltage drop
As shown in the figure, the voltage U2 equals the difference
between the output voltage UA and the voltage drop U1+U3.
Adjusted voltage U2 = UA - (U1 + U3)
12.01.2017 | 70

PA 8000 PAMIO
PAMIO Components
Examples
The voltage drop depends on the cable length and the conductor's
cross section.
The following table shows some cable examples. The values are
typical and only offered as guidelines.
n For proper compensation, calculate the actual values as shown
in the following section.
Conductor
cross section
[mm2]/[AWG]
Specific
resistance
[Ω/m]
Cable length
[m]
Voltage drop
at 100 mA [V]
0.08 / AWG 28 0.235 10 0.47
20 0.94
35 1.65
0.14 / AWG 25 0.131 10 0.26
20 0.52
35 0.92
0.25 / AWG 23 0.075 10 0.15
20 0.30
Calculation
35 0.53
0.5 / AWG 20 0.040 10 0.08
20 0.16
35 0.28
0.75 / AWG 18 0.025 10 0.05
20 0.10
35 0.18
n Use the actual data obtained from the cable's technical
specifications.
n Double the cable's physical length.
This is necessary as there are two lines: one line to the
RMS (+5 V) and one line from the RMS (grounding).
n Calculate the voltage drop as follows:
Voltage drop [V] = 2 x L x CR x P
C
L - Cable length [m]
C - CR Specific resistance per meter [Ω/m]
P - PC Power consumption [A]
12.01.2017 | 71

Compensation
PA 8000 PAMIO
PAMIO Components
Personnel:
1. Install a power supply with adjustable output voltage to
supply the RMS supply input.
This is a requirement for voltage drop compensation.
2. Calculate the actual voltage drop between RMS power
supply and RMS.
3. Adjust the external RMS power supply to feed a slight
overvoltage of 5.1 V to 5.5 V depending on the measured
drop.
A measurement system contains integrated electronic components. Relating to the current consumption Power Automation only indicates mean
values. Current peaks of a multiple of the mean
value may occur for several microseconds during
operation.
– Select a conductor cross-section which guar-
antees a maximum voltage drop of 0.2 V.
– Set the power supply to the upper limit of the
RMS supply voltage.
These steps guarantee that the RMS' supply
voltage does not drop below the required minimum.
Skilled electrician
n
Overview
4.5.4 RMS Power Supply
Fig. 45: PAMIO 4ENC4A RMS power supply
2 Power supply input for RMS encoders (X35)
12.01.2017 | 72

PA 8000 PAMIO
PAMIO Components
Connection
Pin Assignment
Technical data
Voltage Drop
The power supply for encoders is connected with a 2 pole terminal
block (Fig. 46).
Fig. 46: RMS power terminal block
Pin Voltage Assignment
1 +5 V RMS supply
2 0 V RMS ground
Property Value Unit
Tolerance 0 - +20 %
The distance between the measuring systems and
the power supply can be relatively long. The resistance of the power supply cable and the RMS' current consumption generate a voltage drop (see
Ä
“Precondition” on page 70).
Overview
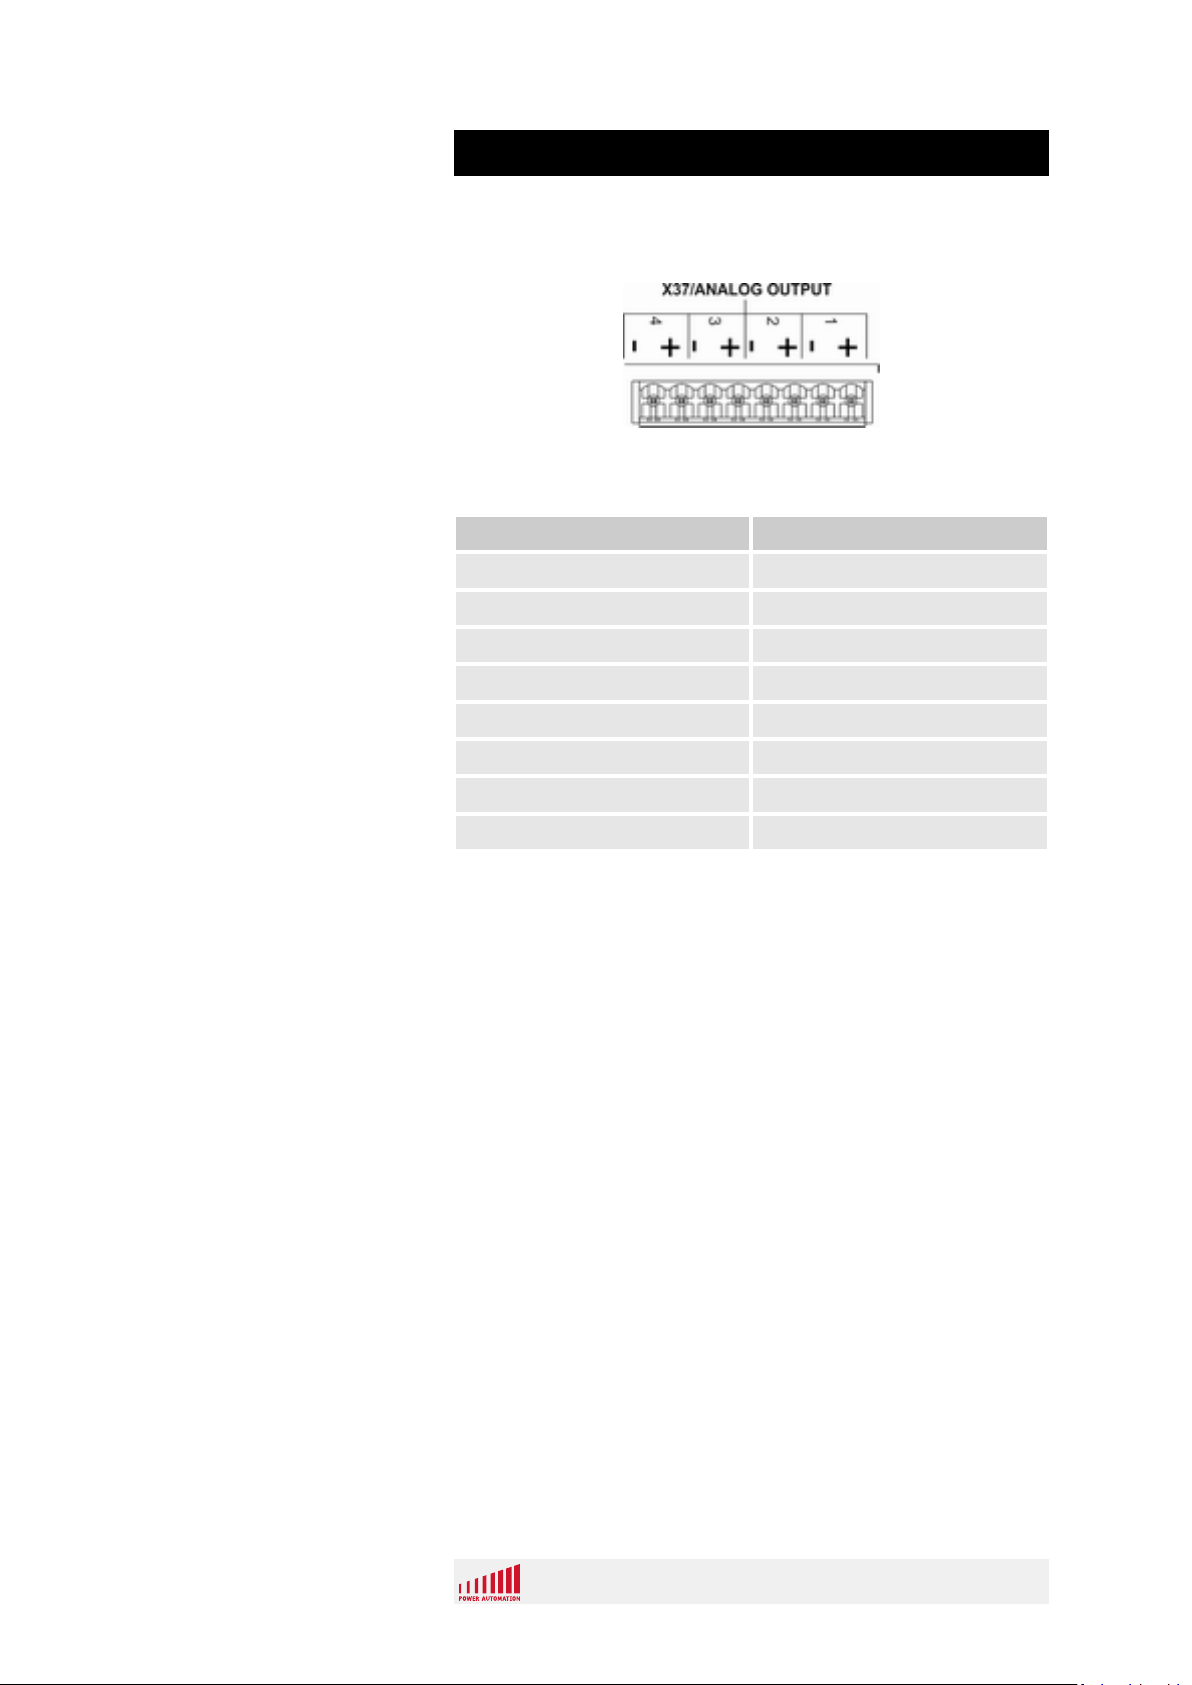
4.5.5 Axes Analog Outputs
Fig. 47: PAMIO 4ENC4A axes analog outputs
3 Analog outputs axes 1 to 4 (X37)
12.01.2017 | 73
PA 8000 PAMIO
PAMIO Components
Connection
Pin Assignment
The analog outputs are connected with an 8 pole terminal block
(Fig. 48).
Fig. 48: Axes output terminal block
Pin Description
Pin 1 +/- output channel 1
Pin 2 reference channel 1
Pin 3 +/- output channel 2
Pin 4 reference channel 2
Pin 5 +/- output channel 3
Pin 6 reference channel 3
Pin 7 +/- output channel 4
Pin 8 reference channel 4
12.01.2017 | 74

PA 8000 PAMIO
PAMIO Components
Output Characteristics
Property Value Unit
Number of analog
output points
Output signal range
(max.)
Output current load
(max.)
Output capacitive
load (max.)
Bipolar zero error
(max.)
Full scale error
(max.)
Channel to channel
mismatch (max.)
Linearity error
(max.)
Resolution 305 μV
Conversion time
(max.)
4
+/- 10 V
+/- 15 mA
350 pF
+/- 40 mV
+/- 1 1 %
+/- 1 %
+/- 2.44 mV
10 μs
Output slew rate
(typ.)
Watchdog (max.) 64 ms
External connector 8 pole terminal block
0.4 μV/s
12.01.2017 | 75

Output Schematic
PA 8000 PAMIO
PAMIO Components
Fig. 49: Analog axis output equivalent schematic
Analog output wiring
The wiring of the analog output command voltages
to the drive depends on the type of drive analog
inputs.
– During drive installation take into consideration
whether the drive's analog inputs are grounded
or not.
– If the analog inputs are grounded, connect the
drives according to the schematic for non-differential inputs.
– If the analog inputs are not grounded, connect
the drives according to the schematic for differential inputs.
Drives With Non-Differential Inputs
(Unipolar)
The following schematics demonstrate the recommended way of
connecting the CNC analog outputs to the analog inputs of the
drives, depending on the analog input type of the drive.
Fig. 50: Schematic non-differential inputs (unipolar)
12.01.2017 | 76

Drives With Differential Inputs
Overview
PA 8000 PAMIO
PAMIO Components
Fig. 51: Schematic differential inputs
4.5.6 Analog Inputs
Connection
Fig. 52: PAMIO 4ENC4A analog inputs
10 Analog inputs 1 to 4 (X36)
The analog inputs are connected with a 9 pole terminal block
(Fig. 53).
Fig. 53: Analog inputs terminal block
12.01.2017 | 77

PA 8000 PAMIO
PAMIO Components
Pin Assignment
Input Characteristics
Pin Description
Pin 1 + input channel 1
Pin 2 - input channel 1
Pin 3 + input channel 2
Pin 4 - input channel 2
Pin 5 + input channel 3
Pin 6 - input channel 3
Pin 7 + input channel 4
Pin 8 - input channel 4
Pin 9 analog ground (ACOM)
Property Value Unit
Input signal range -10 - +10 V
Common mode
range
Max. input voltage -15 - +15 V
-15 - +15 V
Input impedance 16 kΩ
Max. bipolar zero
error
Max. full scale error +/- 1 %
Max. channel to
channel mismatch
Max. linearity error +/- 4.88 mV
Resolution 4.88 mV
Conversion time 160 μs
+/- 10 mV
+/- 1 %
12.01.2017 | 78

Input Schematic
PA 8000 PAMIO
PAMIO Components
Fig. 54: Analog input equivalent schematic
U
A/D
= (U
+IN
- U
ACOM
) - (U
-IN
- U
ACOM
)
Overview
n U
n U
n U
n U
= A/D Converter Output
A/D
= + Differential input
+IN
= - Differential input
-IN
= Analog ground ACOM
ACOM
4.5.7 Power Supply
Fig. 55: PAMIO 4ENC4A power connection
5 Power connector +24 V (X30)
12.01.2017 | 79

PA 8000 PAMIO
PAMIO Components
Connection
Pin Assignment
Technical Data
Each module has a 5 pin connector (X30) with the following pin
assignment (Fig. 56).
Fig. 56: Power terminal block
Pin Assignment
Pin 1 Not used
Pin 2 + 24 V power supply for on-
board logic
Pin 3 0 V
Pin 4 Not used
Pin 5 Not used
Property Value Unit
Operating voltage + 24 V DC
Tolerances -15 / +12.5 %
Effective range 20.4 - 27.0 V DC
Max. current for the
on-board logic
Max. current for the
output bytes
Reference Pin 3 (0 V)
0.5 A
4 A / byte
12.01.2017 | 80

Overview
PA 8000 PAMIO
PAMIO Components
4.5.8 Safety Function
Fig. 57: PAMIO 4ENC4A safety function
9 Safety function connector (X38)
Connection
Pin Assignment
Each module has a 6 pin connector (X38) with the following pin
assignment (Fig. 58).
Fig. 58: Safety function terminal block
Pin Assignment
Pin 1 Power OK, common
Pin 2 Power OK, normally closed
Pin 3 Power OK, normally open
Pin 4 CNC ready, common
Pin 5 CNC ready, normally closed
Pin 6 CNC ready, normally open
12.01.2017 | 81

PA 8000 PAMIO
PAMIO Components
Technical Data
Relay "Power OK"
Property Value Unit
Number of relays 2
Max. switching
voltage
Max. switching current
Typical switch on
time
Typical switch off
time
The first relay is called "Power OK" and switches when the following conditions are met:
n The power supply voltages are in operating range.
n The operating temperature is below +60 °C (+140 °F).
Logic Condition Result
+ 5 V OK Power OK relay
AND +15 V OK
30 V DC
1 A
4 ms
3 ms
active
AND -15 V OK
AND T < 60 °C (140 °F)
NOTICE!
Damage to the control unit!
Voltage faults and/or temperatures above the
allowed specification can cause damage to the
control unit.
Properly wire the "Power OK" relay to protect the
control unit from damaging voltages and temperatures.
12.01.2017 | 82

PA 8000 PAMIO
PAMIO Components
Relay "CNC Ready"
The second relay is called "CNC Ready" and switches to active
state when the following conditions are met:
n The control unit is ready when:
– The "Power OK" relay is in active state.
– The watchdog is re-triggered. This means the software is
monitored as working properly.
– All axes measurement signals are correct.
– All axes position loops are under control.
n The RMS power supply voltage is within operation range.
n The operating temperature is below +55°C (+131°F).
Logic Condition Result
+ 5 V RMS OK CNC Ready relay
AND Control unit ready
AND T < 55 °C (131 °F)
NOTICE!
Damage to the machine!
If the "CNC ready" relay is not wired properly to the
machine's emergency stop circuit, the machine
may be damaged upon operation.
– Ensure that the "CNC ready" relay is wired
properly to the machine's emergency stop circuit.
active
12.01.2017 | 83

PA 8000 PAMIO
PAMIO Components
Fig. 59: Safety relays equivalent schematic
12.01.2017 | 84

Overview
PA 8000 PAMIO
PAMIO Components
4.5.9 Status LEDs
The PAMIO 4ENC4A has ten LEDs for diagnostic purposes.
Fig. 60: PAMIO 4ENC4A module status LEDs
1 Status
2 Access
3 Bustest
4 Monitor
5 Axis 1
6 Axis 2
7 Axis 3
8 Axis 4
9 Power OK
10 CNC Ready
Connections Of The PAMIO PWM
General
For a detailed assignment of the LEDs' states see Ä Chapter 5.2.2
“PAMIO 4ENC4A LEDs” on page 121.
4.6 PAMIO PWM
The PAMIO module PWM has connections for:
n 1 opt. isolated output for PWM signal
n 1 opt. isolated fast output
n opt. isolated output with inverted PWM signal
The status of the monitor is displayed via LEDs.
4.6.1 Technical Data
Property Value Unit
Weight 0.35 kg
0.77 lb
12.01.2017 | 85
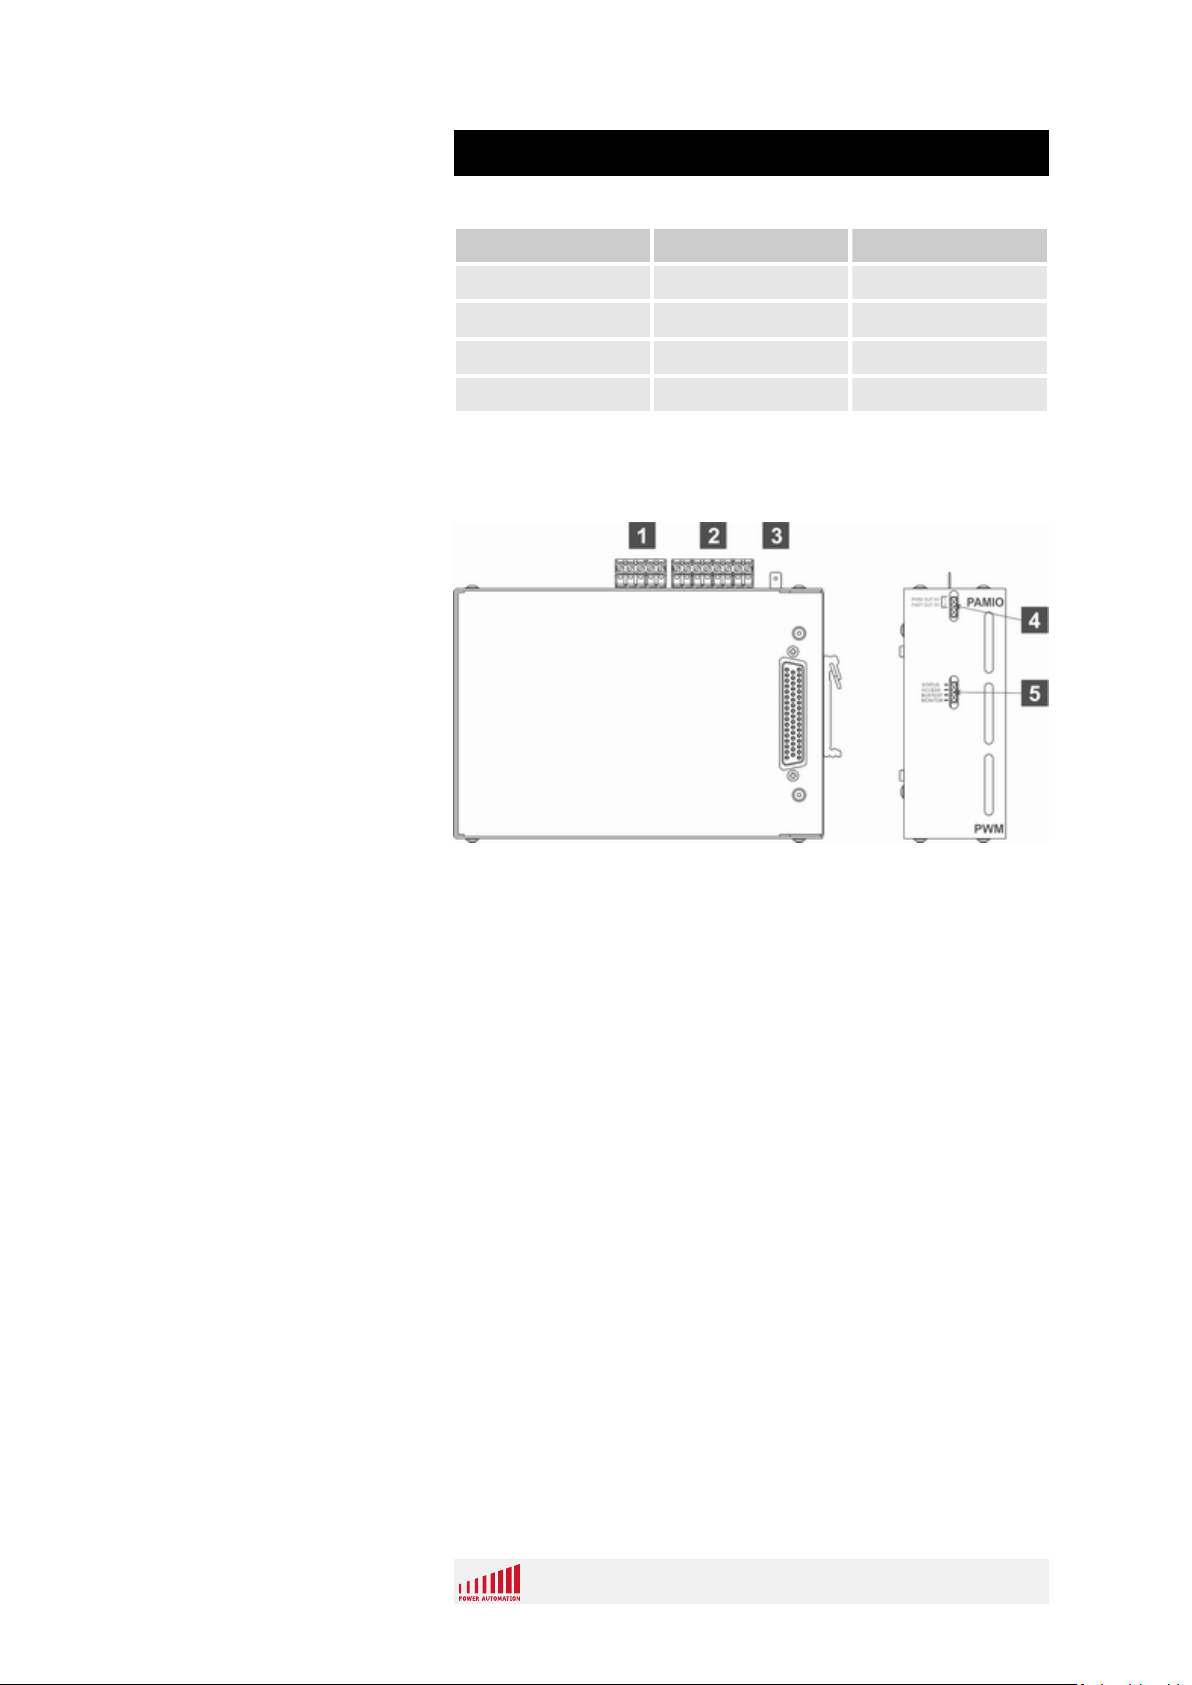
PA 8000 PAMIO
PAMIO Components
Connection Values
Overview
Property Value Unit
Input voltage 24 V DC
Tolerance -15 / +12.5 %
Frequency 20.4 - 27.0 V DC
Max. current 0.5 A
4.6.2 Design and Functions
Fig. 61: PAMIO PWM overview
1 Power connector +24 V (X30)
2 Output byte
3 Protective grounding tab (X2)
4 Status LEDs output byte
5 Module status LEDs
12.01.2017 | 86

PA 8000 PAMIO
4.6.2.1 Digital Outputs
Fig. 62: PAMIO PWM outputs
2 PWM and Fast Output (X25)
PAMIO Components
Connection
Pin Assignment
n Each byte is connected with an 8 pole terminal block.
n The PWM and Fast Output have their own power supply con-
nection (X30, Pin1). This makes it possible to turn off the
output function by using an external switch.
n The outputs are always referenced against 0 V, located in the
power connector (X30, pin 3).
Fig. 63: Output terminal block
Byte 1 +24 V output
pin 1 PWM out 5V
pin 2 Fast Out 5V
pin 3 Not used
pin 4 PWM OUT 5V Inverted
pin 5 Not used
pin 6 Not used
pin 7 Not used
pin 8 Not used
12.01.2017 | 87

PA 8000 PAMIO
PAMIO Components
Output Status LEDs
The output LEDs are located on the front side of the PAMIO PWM
and show the current state of the PWM and Fast Output.
n if an output is HIGH, the corresponding LED is ON
n if an output is LOW, the corresponding LED is OFF
Fig. 64: PAMIO PWM Output LEDs
1 PWM Out 5V
2 FAST Out 5V
Output Characteristics
Property Value Unit
Number of outputs 2
Max. continuous
output per bit
Output ON delay
(typical)
Output OFF delay
(typical)
Isolation By opto-coupler
Input ON display LED
External connection 1 block per byte
0.5 mA DC
100 ns
100 ns
12.01.2017 | 88

PA 8000 PAMIO
PAMIO Components
Output Schematic
The following figure shows how the outputs are realized on each
PAMIO PWM module.
Fig. 65: Outputs equivalent schematic
12.01.2017 | 89

Overview
PA 8000 PAMIO
PAMIO Components
4.6.2.2 5V to 24V signal converter
The 5V to 24V converter is available as an option
from Power Automation (see Ä Chapter 6.1.1
“Service addresses” on page 130).
Ordering code for one set:
– PAMIO PWM CONV
The 5V to 24V signal converter module is intended to convert 5V
signals into 24V signals.
This converter has been developed especially for the PAMIO PWM
module, because the 24V output drivers of this module are not able
to switch at high frequencies.
Fig. 66: Signal Converter overview
1 Input Connector
2 Status LED
3 Power Supply Connector
4 Output Connector
12.01.2017 | 90

Input Connector (5V Signals)
PA 8000 PAMIO
PAMIO Components
Fig. 67: Input Connector
1 Input Connector
Table 6: The eight pin input connector has the following pinning:
Pin Description
Pin 1 5V signal IN
Pin 2 5V signal IN
Pin 3 5V signal IN
Pin 4 5V signal IN
Pin 5 Any signal IN
Pin 6 Any signal IN
Pin 7 Any signal IN
Pin 8 Any signal IN
Fig. 68: Eight pin input connector
12.01.2017 | 91

Output Connector (24V Signals)
PA 8000 PAMIO
PAMIO Components
Fig. 69: Output Connector
4 Eight pin Output Connector
Table 7: The eight pin output connector has the following pinning:
Pin Description
Pin 1 24V signal OUT
Pin 2 24V signal OUT
Pin 3 24V signal OUT
Pin 4 24V signal OUT
Pin 5 Any signal OUT
Pin 6 Any signal OUT
Pin 7 Any signal OUT
Pin 8 Any signal OUT
Fig. 70: Eight pin output connector
12.01.2017 | 92

Power Supply Connector
PA 8000 PAMIO
PAMIO Components
Fig. 71: Power Supply Connector
3 Two pin Power Supply Connector
Table 8: The two pin power supply connector has the following pinning:
Pin Description
Status LED
Pin 1 +24V
Pin 2 0V
Fig. 72: Two pin Power Supply Connector
There is a LED which gives information whether the 24V power is
applied or not.
Fig. 73: Status LED
LED state Module status
ON +24V power supply is applied
OFF +24V power supply is not
applied
12.01.2017 | 93

PA 8000 PAMIO
PAMIO Components
4.6.2.3 Power Supply
The output byte on the PAMIO PWM needs a separate +24V DC
power supply. This is done on the power supply connector X30
(Fig. 74).
Connection
Fig. 74: PAMIO PWM power connection
1 Power connection (X30)
Each module has a 5 pin connector (X30) with the following pin
assignment (Fig. 75):
Fig. 75: X30 – Power supply pins
12.01.2017 | 94

PA 8000 PAMIO
PAMIO Components
Pin Assignment
Pin Assignment
Pin 1 + 24 V DC power supply for
PWM and Fast Output function
Pin 2 + 24 V power supply for on-
board logic
Pin 3 0 V
Pin 4 Not used
Pin 5 Not used
The 0V connection is common to the different
power supplies that have to be applied on this connector.
The power supply of the PWM and Fast output
function is independent from the on-board logic
power supply allows e.g. disconnecting the output
byte in case of emergency stop, making the whole
byte in a safe situation.
Technical Data
Property Value Unit
Operating voltage +24 V DC
Tolerances -15 / +12.5 %
Effective range 20.4 - 27.0 V DC
Max. current for the
on-board logic
Max. current for the
PWM and Fast
output function
Reference Pin 3 (0 V)
0.1 A
4 A / byte
12.01.2017 | 95

Wiring Example
PA 8000 PAMIO
PAMIO Components
4.6.2.4 Wiring Example
Fig. 76: PAMIO PWM Wiring example
n Number of inputs
Overview
NOTICE!
The outputs of PAMIO PWM must be connected to
a shielded twisted pair cable. The shield is applied
to the housing of the connected device.
4.6.2.5 Status LEDs
The PAMIO PWM has four LEDs for diagnostic purposes.
Fig. 77: PAMIO PWM module status LEDs
1 Status
2 Access
3 Bustest
4 Monitor
12.01.2017 | 96

PA 8000 PAMIO
PAMIO Components
For a detailed assignment of the LEDs' states see Ä Chapter 5.2.3
“PAMIO PWM LEDs” on page 124.
4.7 PAMIO 2ENC4A
Connections Of The PAMIO
2ENC4A
General
The PAMIO module 2ENC4A has connections for:
n 2 analog axes (4 analog command outputs +/- 10 V DC / 16 bit)
n 4 incremental measurement systems)
n 2 supplementary analog inputs (+/-10V DC / 12 bit)
This special module has an integrated bus termination. Because of its internal bus termination,
there can be only one such PAMIO model in a
system rack, and it must be the last module of the
rack.
The status of the monitor is displayed via LEDs.
4.7.1 Technical Data
Property Value Unit
Weight 0.55 kg
1.21 lb
Connection Values
Property Value Unit
Input voltage 24 V DC
Tolerance -15 / +12.5 %
Frequency 20.4 - 27.0 V DC
Max. current 0.2 A
12.01.2017 | 97

Overview
PA 8000 PAMIO
PAMIO Components
4.7.2 Design and Functions
Fig. 78: PAMIO 2ENC4A overview
1 RMS input 1. axis (X31)
2 Protective grounding tab (X2)
3 Power connector +24 V (X30)
4 RMS input 2. axis (X32)
5 Power supply input for RMS encoders (X35)
6 Module status LEDs
7 Analog outputs 1 to 4 (X37)
8 Analog inputs 1 to 4 (X36)
12.01.2017 | 98

PA 8000 PAMIO
PAMIO Components
4.7.3 Axis Measurement Inputs (RMS)
Connection
Fig. 79: PAMIO 2ENC4A RMS inputs
1 Measurement input 1st axis (X31)
4 Measurement input 2nd axis (X32)
Each axis measurement input has a 15 pin Sub-D connector
female (Fig. 80).
Fig. 80: RMS Input Connector
12.01.2017 | 99

PA 8000 PAMIO
PAMIO Components
Pin Assignment
RMS Input Characteristics
Pin Assignment
Pin 1 Track A+
Pin 2 Track A-
Pin 3 Track B+
Pin 4 Track B-
Pin 5 Track R+
Pin 6 Track R-
Pin 7 Probe input
Pin 8 Probe ground
Pin 9/11/13/15 RMS grounding
Pin 10/12/14 +5 V RMS
Property Value Unit
Interface type RS 422
Track common
mode range
-7 - +7 V
Max. track input
voltage
Min. track input
voltage
Track input impedance
Max. track frequency (no filter)
Max. count frequency (no filter)
External connector 15 pin Sub-D female / axis
Each measurement input is referenced against its
measurement reference.
-11 - +14 V
+/- 500 mV
150 Ω
5 MHz
20 MHz
12.01.2017 | 100
 Loading...