

Power Acoustik PD-650, PD-650B Owner's Manual

PD-650/PD-650B
In-Dash 6.5” Monitor
Touch Screen
DVD/CD/MP3/MP4
AM/FM Radio
With Bluetooth (only for PD-650B)
Owner’s Manual
Take the time to read through this owner’s manual.
Familiarity with installation and operation procedures will help you obtain the best
Performance from your new DVD-receiver.

2
WARNING!
To promote safety, certain functions are disabled unless the parking brake is on. The Unit is
designed to detect parked status and must be connected to the power supply side of the
parking brake switch. Improper connection or use of his connection may violate applicable law
and may result in serious injury or damage. To avoid the risk of damage and injury and the
potential violation of applicable laws, this unit is not for use with a video screen that is visible to
the driver.
To avoid the risk of accident and the potential violation of applicable laws, the front Video
image feature should never be used while the vehicle is being driven. Also, other video
displays should not be in a location where it is a visible distraction to the driver. In some
countries or states the viewing of images on a display inside a vehicle even by persons
other than the driver may be illegal. Where such regulations apply, they must be obeyed
and this unit’s DVD features should not be used.
Please remember to wear your seat belt at all times while operating your vehicle. If you are
ever in an accident, your injuries can be considerably more severe if your seat belt is not
properly buckled.
The supplier waves any and all liability when these warnings are not followed.
OPERATION PRECAUTIONS
Only connect to a 12Vdc battery and negative grounding.
Avoid placing the product in direct sunlight, in areas with high levels of dust, high
temperatures (over 40°C) or high humidity (over 90%). In case of high temperatures, cool
down the car interior by means of ventilation or air-conditioning.
Operate in well ventilated areas.
Do not turn on or off the product in short intervals. When turning the unit off, wait for at least
10 seconds prior to turning the unit on again. Do not operate the player with scratched,
bended or broken discs and when a disc is not loaded properly, do not force it into the
player.
Do not watch video playback while driving which will cause serious danger and risks of
traffic accident. It may violate the laws and regulations.
(There may be exceptional case, i.e., using rear view camera and navigation system)
Do not install the unit where the operation for safety driving is restrained.
Do not disassembly the unit by yourself, if need repairing, please take the unit to the after
service center.
Do not open and close the monitor manually, it may damage the monitor tilt system.
Do not touch the LCD screen by hard objects, it may damage or give scratch to the LCD
screen.
If the back of monitor touches dashboard or air-conditioner inlet etc after open the monitor ,
then setup TILT level in monitor TILT menu to prevent damage from repeat touching.
Car parking under direct sunlight may increase the temperature inside the car and the unit
may not be in proper operation, please try it again after the temperature returns to normal.
Do not replace the fuse on the power cable without professional guidance, using improper
fuse may cause damage to the unit or ev en c ause bur n the unit .
Do not use irregular shaped Disk.
IR remote control operation may be hindered by monitor when the monitor is opened, thus
please use the remote control at the similar level of remote control receiver.
Do not install the unit where the cooling fan is blocked.

3
CONTENTS
WARNING! ................................................................................................................. 2
OPERATION PRECAUTIONS .................................................................................... 2
CONTENTS ................................................................................................................ 3
ACCESSORIES .......................................................................................................... 4
INSTALLATION .......................................................................................................... 5
WIRING CONNECTIONS ........................................................................................... 6
Front panel .................................................................................................................. 8
Inner panel .................................................................................................................. 9
REMOTE CONTROL .................................................................................................. 9
REMOVE BATTERY ................................................................................................. 12
MAIN MENU ............................................................................................................. 13
◆ RADIO PLAYER .................................................................................................... 13
◆ DVD PLAYE R ....................................................................................................... 14
◆DISC/USB/SD/MMC interface ................................................................................ 15
◆AV-IN Mode ............................................................................................................ 15
◆SE TTING CO NTR O L ............................................................................................. 16
SOUND CONTROL .................................................................................................. 16
DISPLAY CONTROL ................................................................................................ 16
RADIO CONTROL .................................................................................................... 17
GENERAL CONTROL .............................................................................................. 17
DVD SETUP MENU .................................................................................................. 17
SYSTEM INFORMATION ......................................................................................... 19
CALIBRATION .......................................................................................................... 19
Other functions ......................................................................................................... 19
BLUETOOTH SECTION (Only for PD-650B) ............................................................ 20
NOTES ON DISC ..................................................................................................... 22
TROUBLESHOOTING .............................................................................................. 23
TROUBLESHOOTING .............................................................................................. 24
TECHNICAL SPECIFICATIONS ............................................................................... 25
4
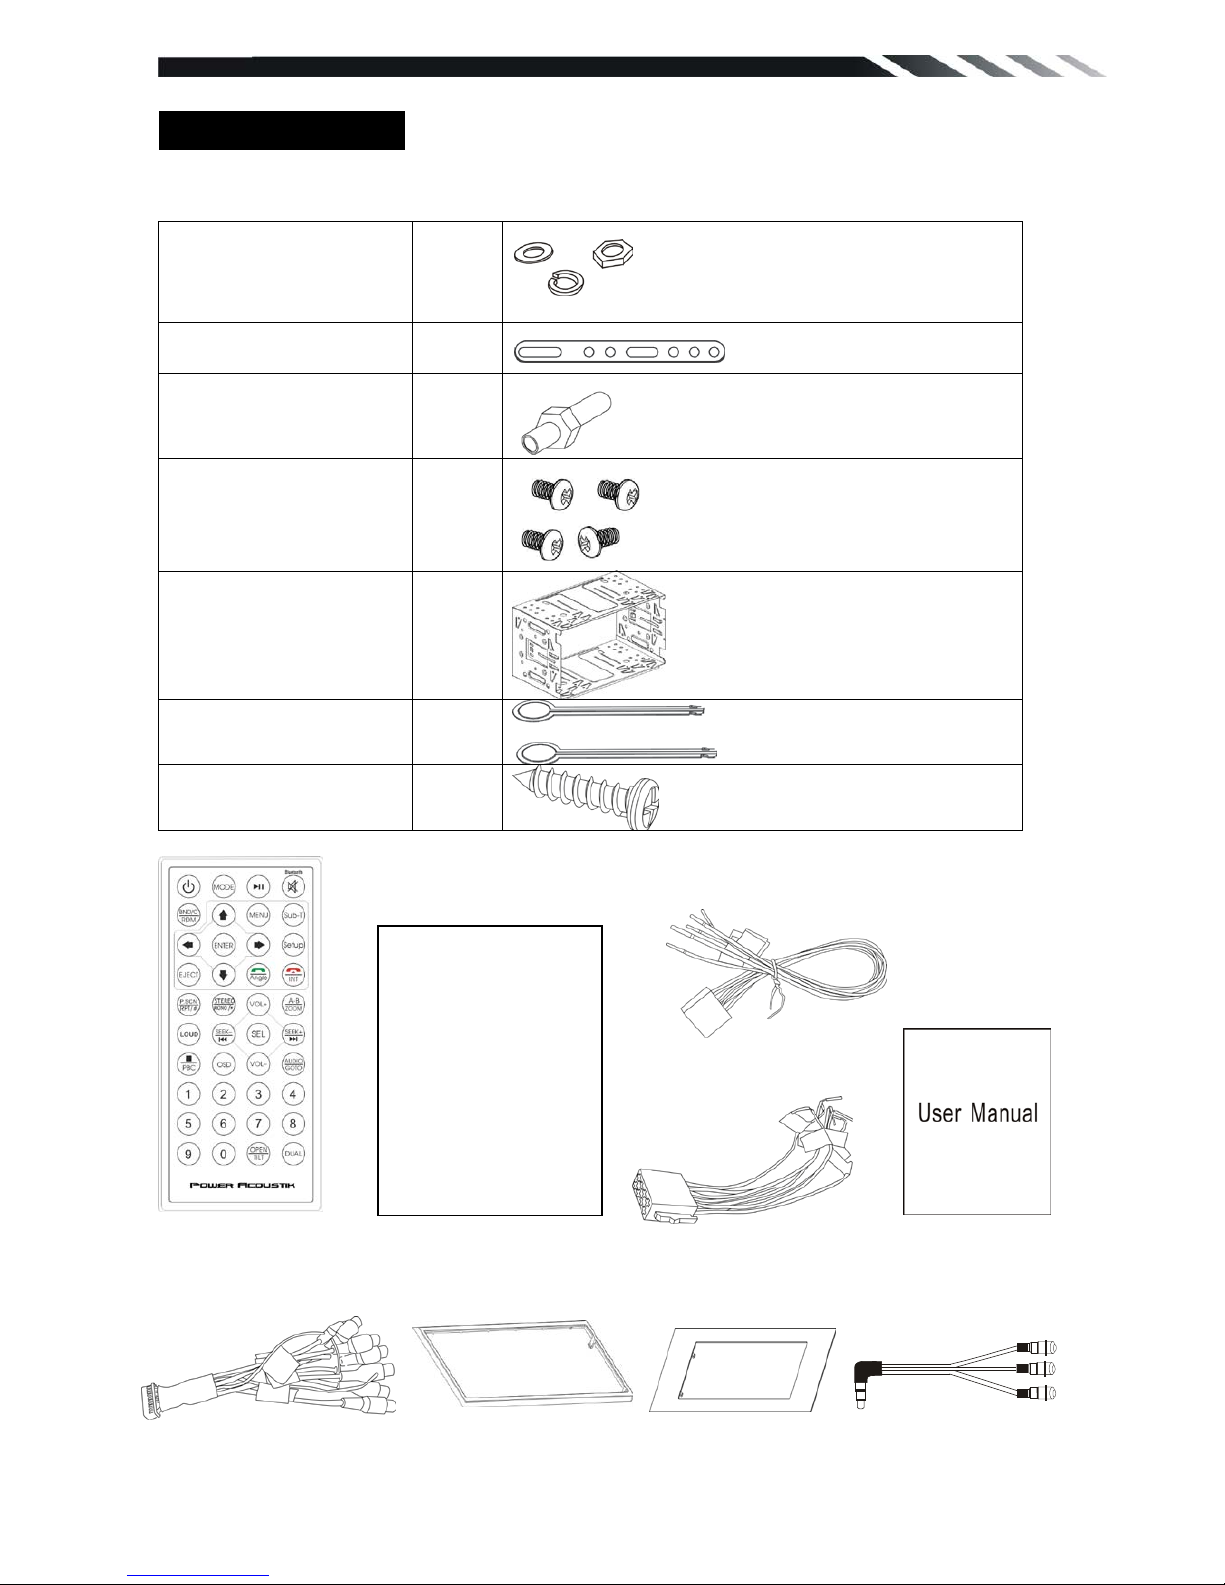
ACCESSORIES
Package contains the following accessories for installation and operation of the unit.
(1) Washer, Spring
Washer, M5 Nut
1 each
(2) Mounting Strap 1
(3) Bolt 1
(4) Screw 4
(5) Mounting Collar 1
(6) Release Key 2
(7) Screw 5*20 1
1x AV-IN Cable
Warranty card
User Manual
Remote Control
RCA Cable
Trim ring 1
Trim ring 2
Speaker cable
Power cable
5
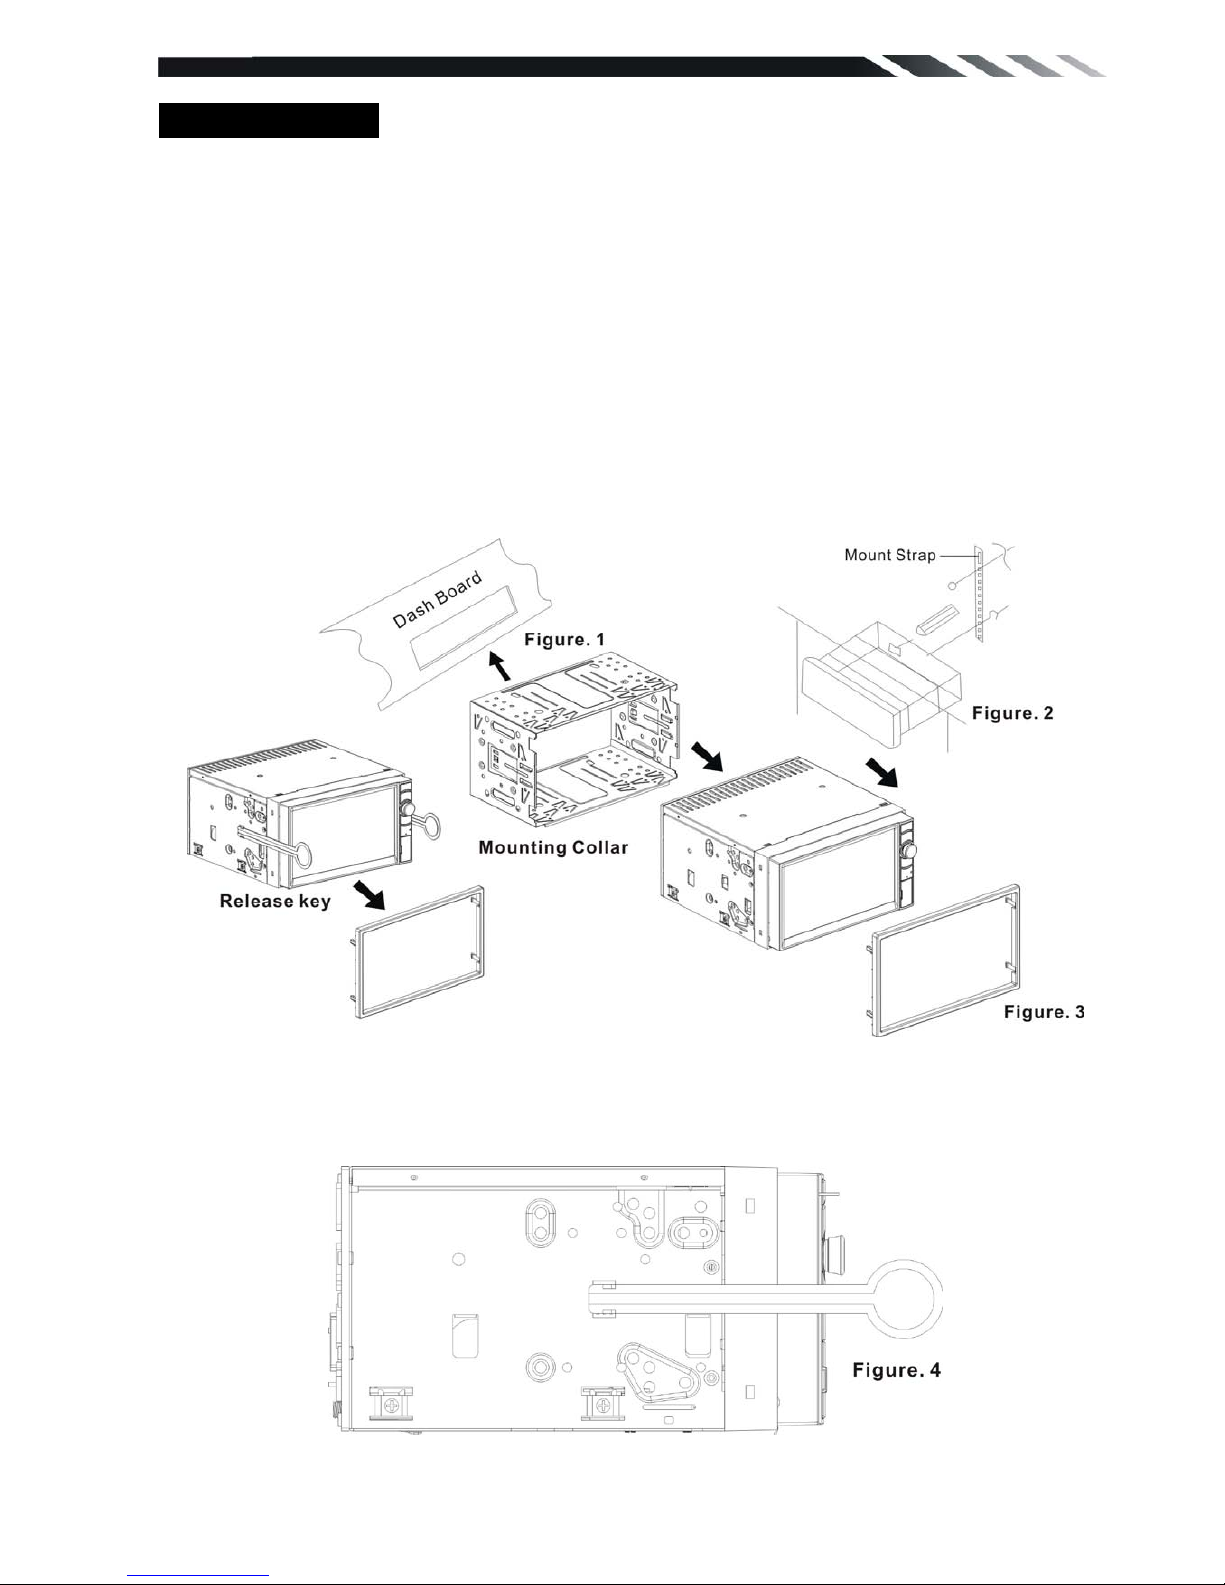
INSTALLATION
Note
Before starting installation of the unit, make sure the wiring is connected properly.
Use only the parts provided with the unit to ensure proper installation.
The use of unauthorized parts may cause malfunction.
Install the unit where it does not get in the driver’s way and will not injure the passenger in case
there is a sudden stop, like an emergency stop.
INSTALLATION (Figure 1)
Insert Half Sleeve into dash-board hole and bend m ount tabs outwards to fix it as fig ure 1.
If necessary, place the mount strap at the rear of the unit and fix it with provided washer as
figure 2.
Push the unit into the Half Sleeve until you hear a click sound.
Place Trim Ring over the unit and installation is completed as figure 3. (Some vehicle may
not need Trim Ring)
UN-INSTALLATION
Insert the supplied extraction keys into the unit and pull the unit out with keeping the extraction
keys. (as Figure. 4)
6
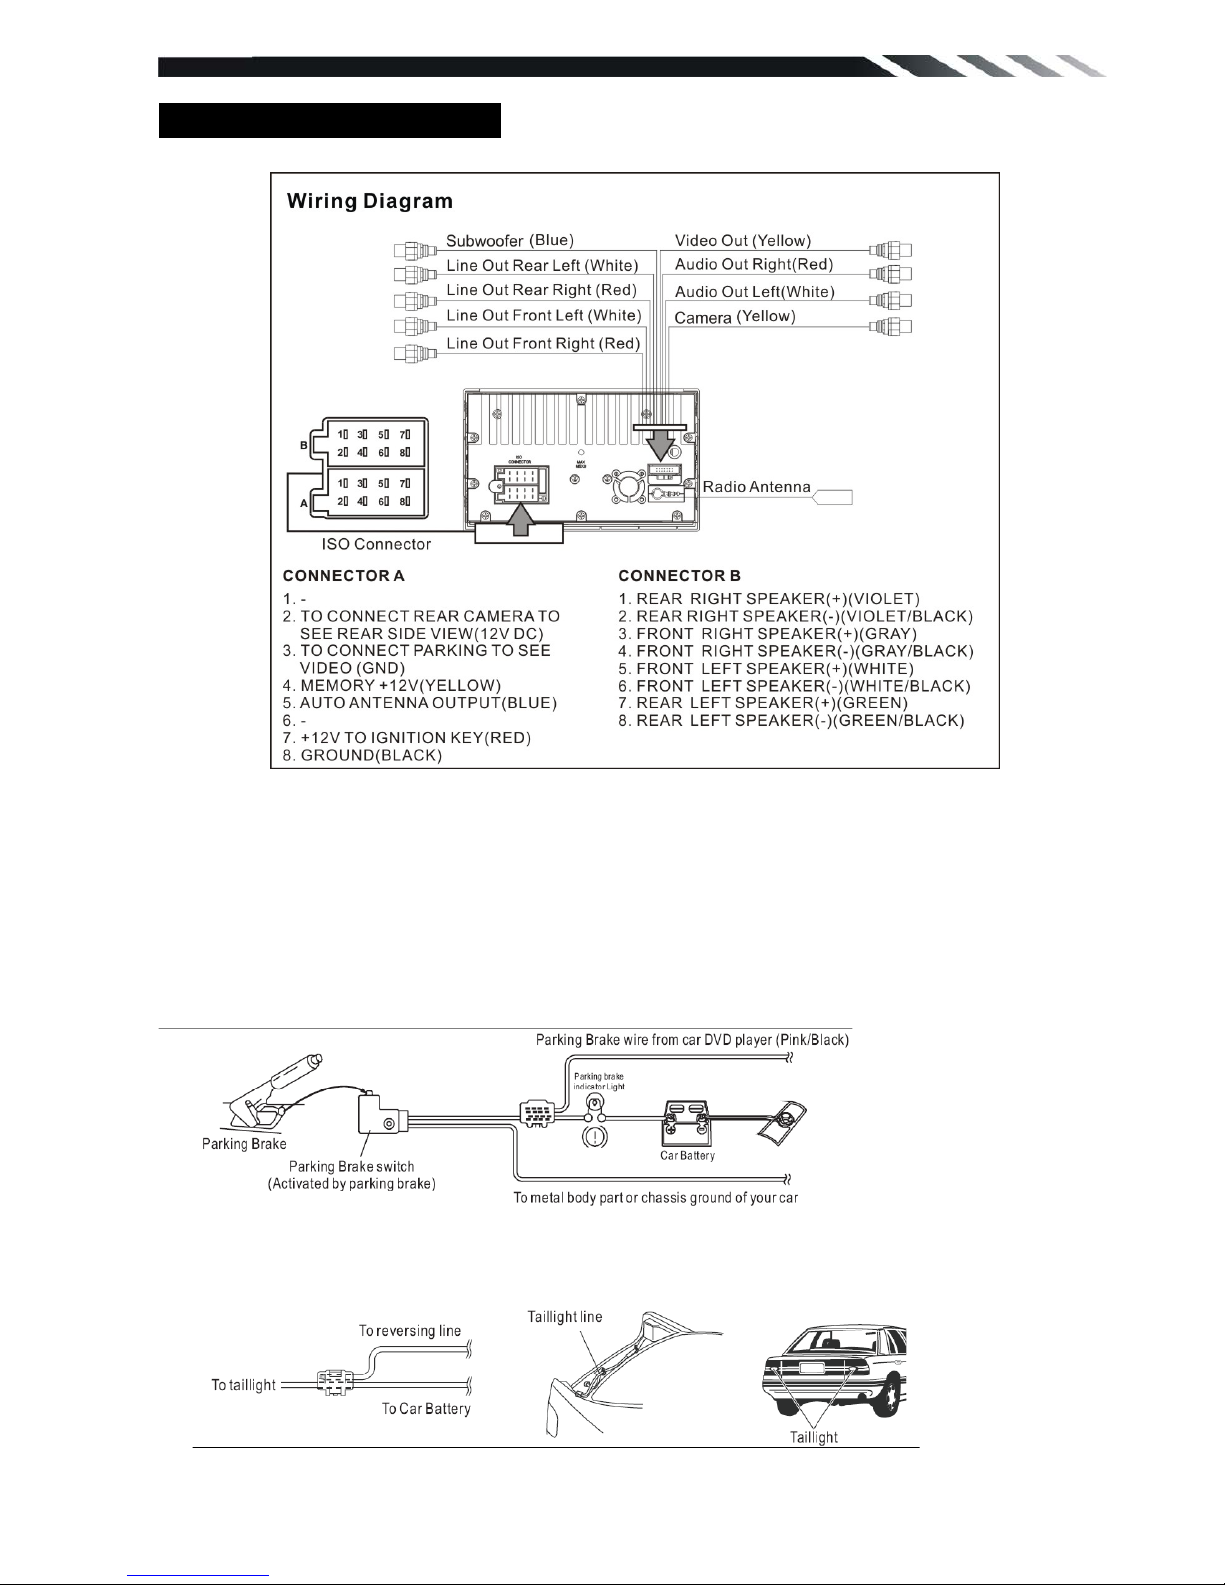
WIRING CONNECTIONS
NOTE: Never connect cable to the system while it is connected to the battery power. Whenever
the unit is disconnected from the battery, the preset memory will be erased and the unit will go
back to its factory defaults.
Note: To watch video the parking wire should be connected to break signal. 2 cables is
connected to a Hands-Free device (not included).
Parking wire
Note: The parking wire is connected with brake signal; for safety, the programs can be seen on
the monitor after braking the car.
Connecting the reversing line to taillight on the
car
After connecting, when you start up the reverse gear, the unit will receive the picture from car
rear view camera.
7
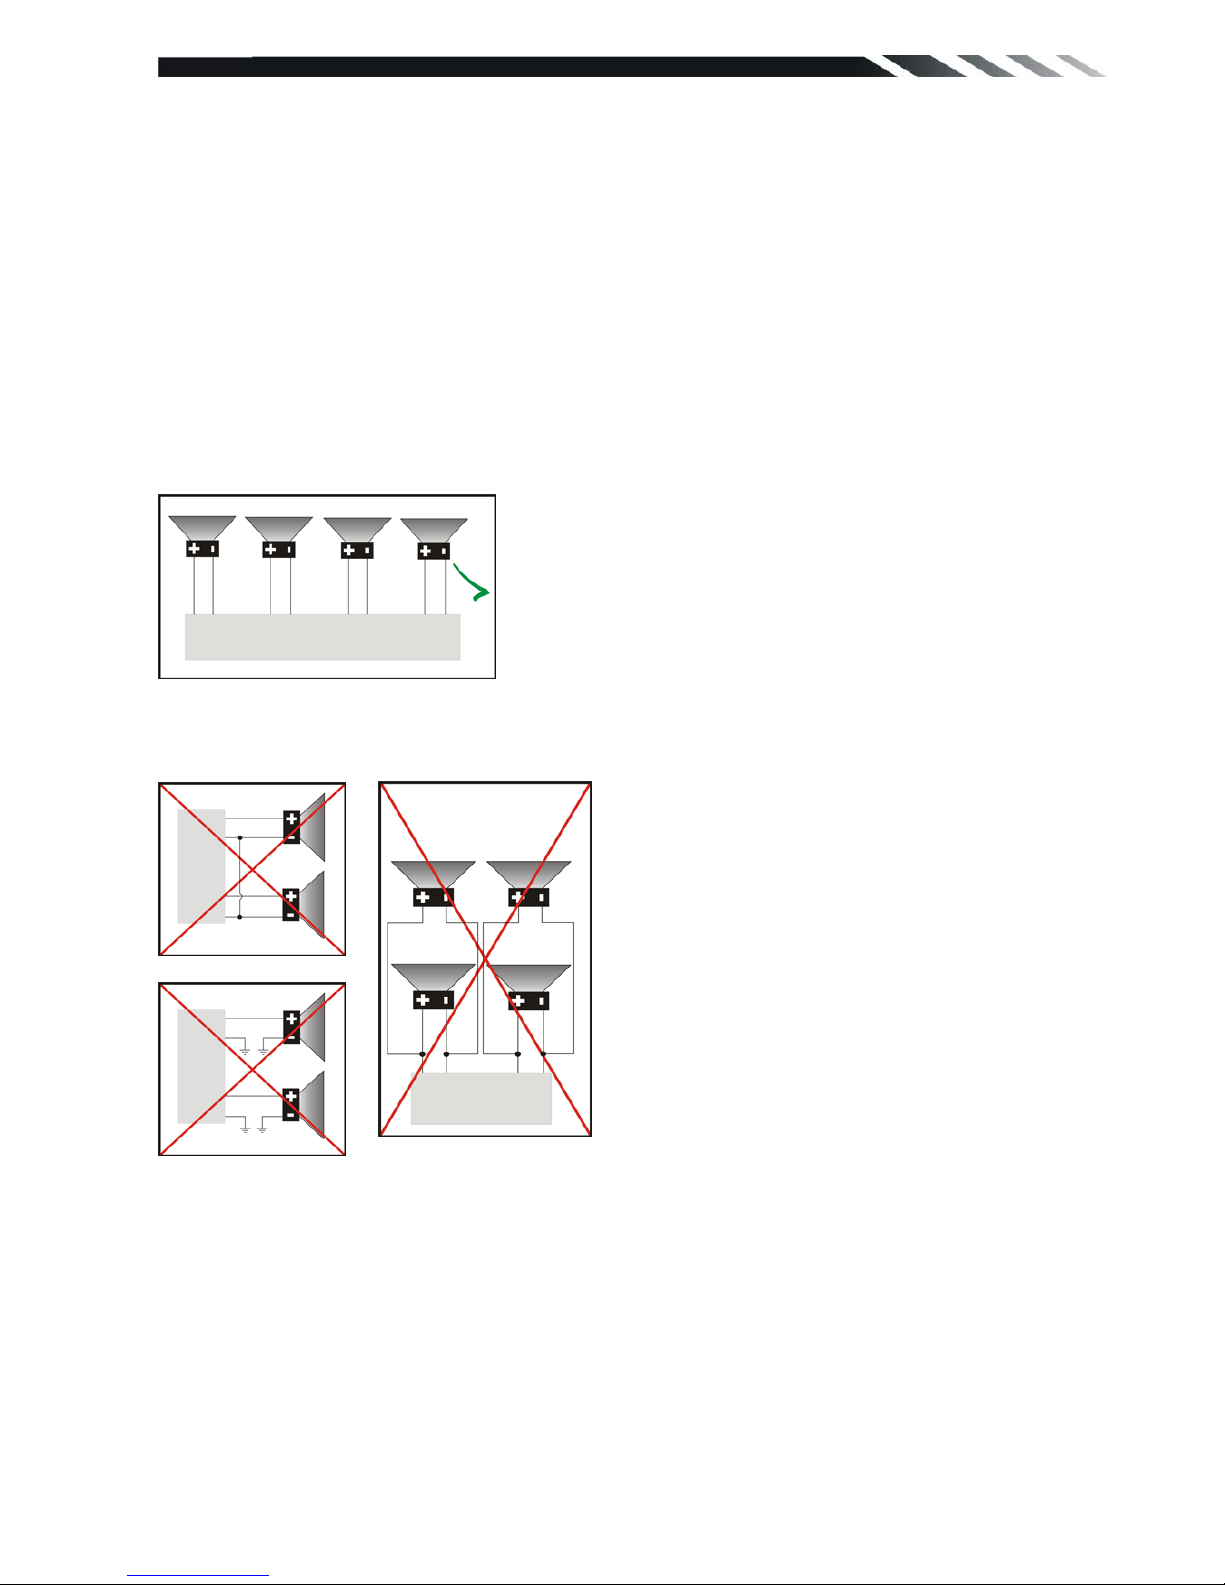
Note:
- Only use groundless loudspeakers.
- Use only loudspeakers of m inimal 40W at t, using fewer watts m ay result in dam agi ng your lo udspeak er s at
higher volumes.
- Use 4~8 Ω (Ohm impedance) loudspeakers only; using higher or lesser impedance may damage the unit.
- Do not use 3-cable loudspeak ers and do not c onnect the l oudspeak ers m inus to the car bod y (GND). T he
unit is using a BTL circuit and each loudspeaker m ust be connected with insulated cables accord ing the
diagram.
- Loudspeaker cables and/or optional exter nal power am plifiers mus t always be about 30c m away from the
antenna and/or antenna extension parts.
Connect the speakers according the following diagram, incorrect connections will damage the unit or
your loudspeakers
Correct connection
Left front - Right front | Left rear - Right rear
Incorrect connections

8
Front panel
1. POWER/MUTE Button
Press it to turn on the unit. Press and hold for 2 seconds to turn the unit off .Press the button
briefly to Mute .Please note that the volume will be muted on all audio output connector.
2. MODE Button
Press it to select the mode: Radio, DISC (if there is a disc in unit), USB (if there is a USB
device in the unit), CARD (if there is a SD/MMC card in the unit), Bluetooth (only for PD-650B)
and AV IN.
3. VOL Knob /DUAL Button
Rotate VOL knob to adjust the volume level by turning the knob clockwise to increase or
counterclockwise to decrease.
DUAL KEY setting: Press briefly it to switch C-DUAL and DUAL OFF.
During C-DUAL mode, long press it switch C-DUAL and D-DUAL. Again press it briefly it to
close Dual operation. For detail, please see remote control dual describe.
4. EJECT Button
Press once to release the front panel, you can insert memory card in the card slot; press twice
to eject a disc. If the disc is not removed for about 10 seconds after eject, the disc is reinserted
automatically.
5. Mic (Microphone)
During a telephone call you should speak in the direction of the built-in microphone.
6. RESET Button
Press it with a thin, sharp object. The device will then be reset to factory default settings.
7. USB slot
If you would like to play back data contained on a USB stick, please insert the stick into t he
opening provided. A word USB Loading appears on the display. The data is played back
automatically.
8. AV-in Jack
Put the AV plug into the AV-IN jack which was marked on front panel.
 Loading...