

Page 1

Page 2

Page 3

Contents
Important Safety Instructions .......................2
Safety ..............................................................2
Warning ...........................................................2
Identifying the Parts .....................................3
Main Unit ........................................................3
Remote Control ...............................................4
Preparations ................................................5
Install Batteries ...............................................5
Prepare the Remote Control ...........................5
Precautions Concerning Batteries ..................5
Connect Power
Play..............................................................5
Power ..............................................................5
Set Time ..........................................................6
Play from iPod/iPhone/iPad ............................6
Play from an External Audio Device ...............6
Set the Alarm Timer ........................................7
Activate and Deactivate the Alarm Timer .......7
Repeat Alarm ..................................................7
Stop Alarm Ring ..............................................7
View the Alarm Settings ..................................7
Set the sleep timer ..........................................7
Adjust Display Brightness ...............................7
Adjust Volume Level .......................................7
Select a Preset Sound Effect ..........................7
Mute Sound .....................................................7
Listening to the FM Radio............................7
Tuning in a Station ..........................................7
Presetting Stations ..........................................7
Tune to a Preset Radio Station .......................7
Troubleshooting ...........................................8
Specications
...............................................5
..............................................8
Standard Accessories .................................8
1
Page 4
Important Safety Instructions
WARNING
RISK OF ELECTRIC SHOCK
DO NOT OPEN
CAUTION: TO REDUCE THE RISK OF ELECTRIC SHOCK , DO NOT
REM OVE COVER (OR BACK ). N O US ER-SE RVIC EABL E PART S
INSIDE. REFER SERVICING TO QUALIFIED SERVICE PERSONNEL.
The lightning flash with arrowhead
symbol, within an equilateral triangle, is
intended to alert the user to the presence
of uninsulated “dangerous voltage” within
the product’s enclosure that may be of
sufficient magnitude to constitute a risk of
electric shock to persons.
The exclamation point within an equilateral
triangle is intended to alert the user to
the presence of important operating and
maintenance (servicing) instructions in the
literature accompanying the appliance.
Safety
1 Read these instructions.
2 Keep these instructions.
3 Heed all warnings.
4 Follow all instructions.
5 Do not use this apparatus near water.
6 Clean only with dry cloth.
7 Do not block any ventilation openings. Install in
accordance with the manufacturer’s instructions.
8 Do not install near any heat sources such as
radiators, heat registers, stoves, or other
apparatus (including amplifiers) that produce
heat.
9 Protect the power cord from being walked on or
pinched particularly at plugs, convenience
receptacles, and the point where they exit from
the apparatus.
10 Unplug this apparatus during lightning storms or
when unused for long periods of time.
11 Refer all servicing to qualified service personnel.
Servicing is required when the apparatus has
been damaged in any way, such as power supply cord or plug is damaged, liquid has been
spilled or objects have fallen into the apparatus,
the apparatus has been exposed to rain or
moisture, does not operate normally, or has
been dropped.
12 Unit shall not be exposed to dripping or splashing.
13 Do not place any sources of danger on the
apparatus (e.g. liquid filled objects, lighted
candles).
14 Only use attachments/accessories specified by
the manufacturer.
15 Do not defeat the safety purpose of the polarized
or grounding plug. A polarized plug has two
blades with one wider than the other. A grounding
plug has two blades and a third grounding prong.
The wide blade or the third prong is provided for
your safety. If the provided plug does not fit into
your outlet, consult an electrician for replacement
of the obsolete outlet.
16 Use only with the cart, stand, tripod, bracket, or
table specified by the manufacturer, or sold with
the apparatus. When a cart or rack is used, use
caution when moving the cart / apparatus
combination to avoid injury from tip-over.
17 WARNING: The battery (battery or batteries or
battery pack) shall not be exposed to excessive
heat such as sunshine, fire or the like.
18 When the appliance coupler is used as the
disconnect device, the appliance coupler shall
remain readily operable.
19 This equipment is a Class II or double
insulated electrical appliance. It has been
designed in such a way that it does not require a
safety connection to electrical earth.
20 Do not expose the apparatus to any dripping or
splashing and make sure no object filled with
liquids. such as vases, etc., are placed on them.
21 To reduce the risk of fire or electric shock, do not
expose this apparatus to rain or moisture.
Caution:
- Use of controls or adjustments or performance
of procedures other than here in may result in
hazardous radiation exposure or other unsafe
operation.
Warning
Before operating this system, check the voltage
of this system to see if it is identical with the
voltage of your local power supply.
The ventilation should not be impeded by
covering the ventilation openings with items such
as newspaper, table-cloths, curtains etc. Make
sure there is at least 20 cm of space above and
at least 5cm of space on each side of the unit.
Do not place this unit close to strong magnetic
field.
2
Page 5
Do not place the unit on the amplifier or receiver.
Should any solid object or liquid fall into the
system, unplug the system and have it checked
by qualified personnel before operating it any
further.
Do not attempt to clean the unit with chemical
solvents as this might damage the finish. Use a
clean, dry or slightly damp cloth.
When removing the power plug from the wall
outlet, always pull directly on the plug, never
yank on the cord.
Depending on the electromagnetic waves used
by a television broadcast, if a TV is turned on
near this unit while it is also on, lines might
appear on the TV screen. Neither this unit nor
the TV are malfunctioning. If you see such lines,
keep this unit well away from the TV set.
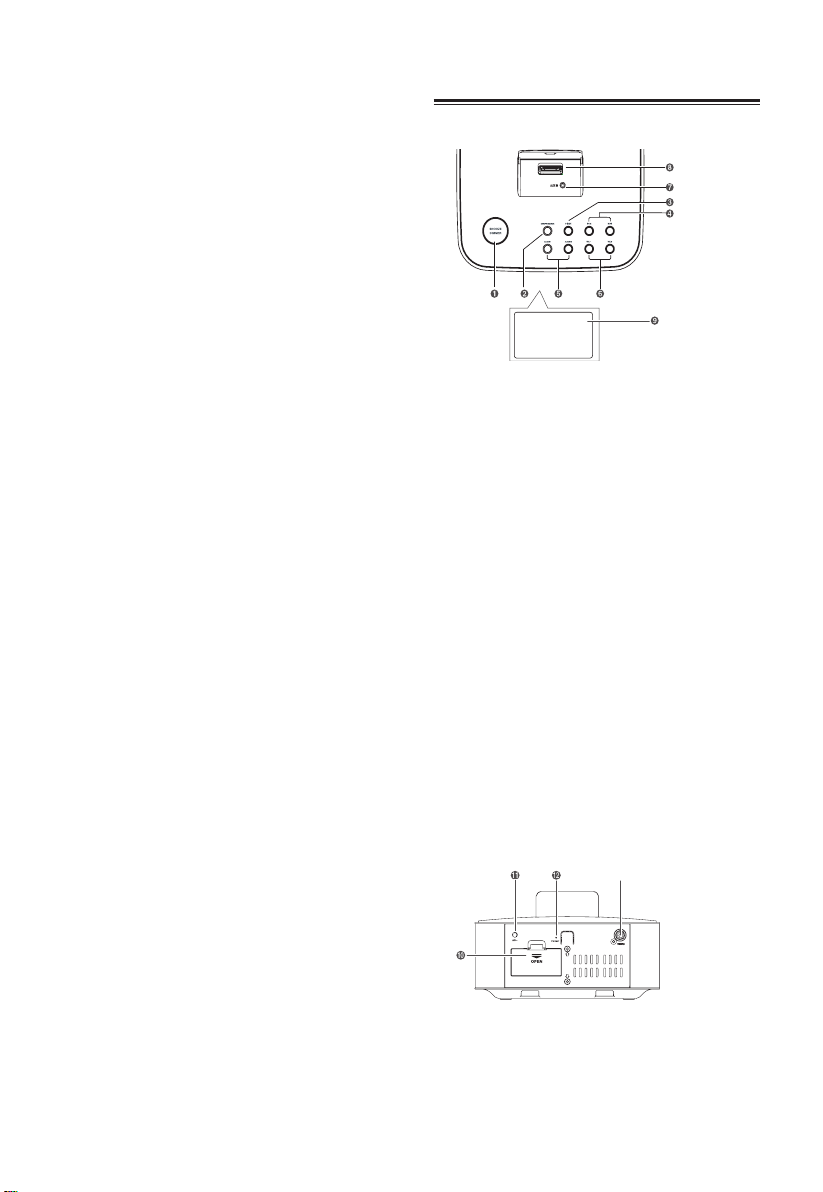
Identifying the Parts
/OK
G
Top View
Main Unit_
SNOOZE/DIMMER
1
- Repeat the alarm.
- Adjust the display brightness.
ON/OFF/SOURCE
2
- Turn on or turn off the unit.
- Select the play function.
BF
3
- Start or pause play.
H/
4
- Skip to previous/next audio file.
- Search radio stations manually.
- Press and hold this button to search radio
stations automatically.
ALARM 1/ALARM 2
5
- Set the alarm timer.
- View alarm settings.
VOLUME +/-
6
Decrease or increase the volume level.
AUX IN
7
Connect to an external audio device.
DOCK for iPod/iPhone/iPad
8
Load an iPod/iPhone/iPad.
Display Panel
9
Show the current status.
Rear View
Battery Compartment
10
AC~
11
Connect to power.
FM ANT
12
Connect to a FM antenna.
3
Page 6
13 Video Terminals
Connect to a TV.
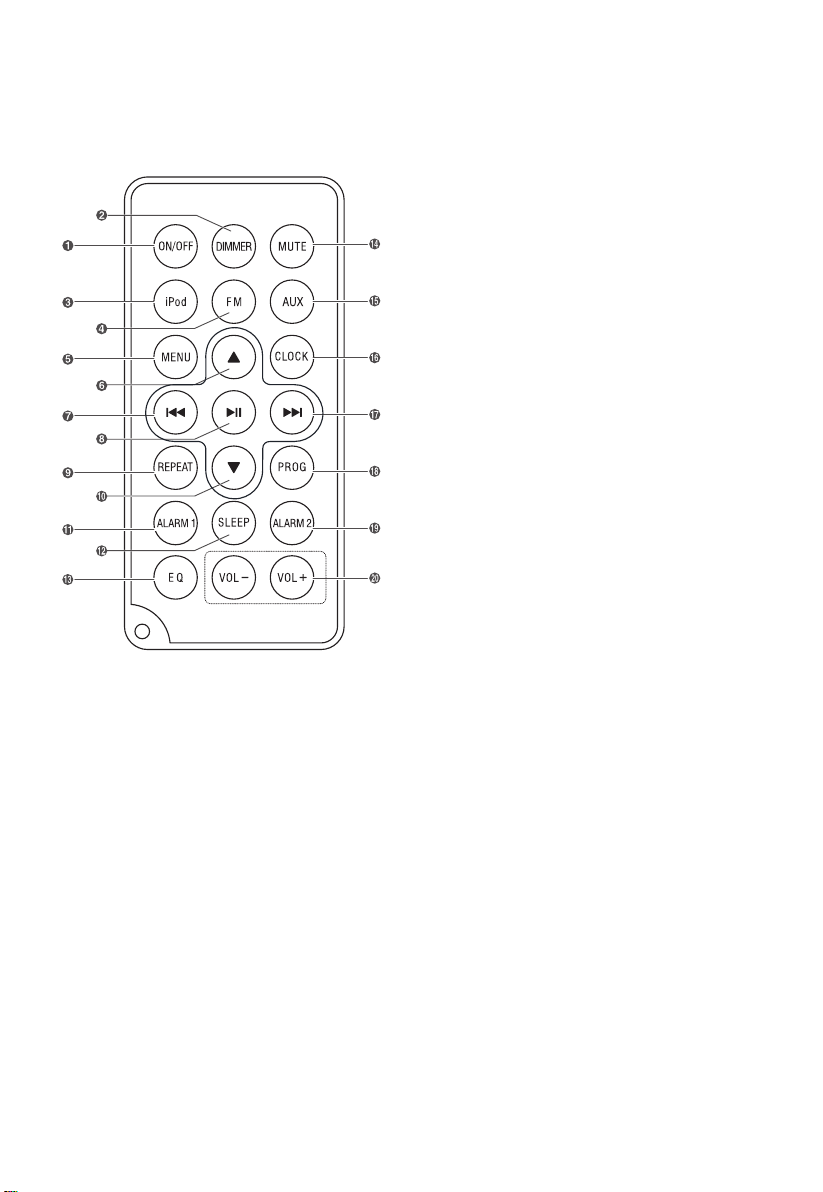
Remote Control
ON/OFF
1
Turn on or turn off unit.
DIMMER
2
Adjust display brightness.
iPod
3
Select iPod/iPhone/iPad function.
FM
4
Select FM function.
MENU
5
Switch between the folder list and the file list for
iPod/iPhone/iPad.
6
- Navigate through iPod/iPhone/iPad menu.
- Select a next preset station.
- Adjust time.
H
7
- Skip to previous audio file.
- Search radio stations manually.
- Press and hold this button to search radio
stations automatically.
BF
8
- Start or pause play.
- Confirm selections.
REPEAT
9
- Select repeat play modes.
10
- Navigate through iPod/iPhone/iPad menu.
- Select a previous preset station.
- Adjust time.
ALARM 1
11
- Set the alarm 1 timer.
- View alarm 1 settings.
SLEEP
12
Set the sleep timer.
EQ
13
Select a preset sound effect:
Classic, Rock, Jazz, Pop, FLAT.
MUTE
14
Mute or resume the sound.
AUX
15
Select AUX function.
CLOCK
16
Press and hold this button in the standby mode
to set the clock.
G
17
- Skip to next audio file.
- Search radio stations manually.
- Press and hold this button to search radio
stations automatically.
PROG
18
Preset stations for tuner.
ALARM 2
19
- Set the alarm 2 timer.
- View alarm 2 settings.
VOL+ /VOL-
20
- Increase the volume level.
- Decrease the volume level.
4
Page 7

Preparations
Install Batteries
Note:
- You can only use AC power as power supply.
Batteries ( not supplied ) are for backup purpose.
Open the batteries compartment.
1
Install two batteries (AAA) with correct polarity
2
as indicated.
Close the battery compartment.
3
Prepare the Remote Control
The provided Remote Control allows the unit to be
operated from a distance.
Even if the Remote Control is operated within
the effective range (6m), remote control
operation may be impossible if there are any
obstacles between the unit and the remote
control.
If the Remote Control is operated near other
products which generate infrared rays, or if
other remote control devices using infrared
rays are used near the unit, it may operate
incorrectly. Conversely, the other products may
operate incorrectly.
For First-time use:
The unit has a pre-installed lithium CR2025 battery.
Remove the protective tab to activate the remote
control battery.
To Replace the Remote Control Battery:
Pull out the battery tray and remove the old
1
battery.
Place a new CR2025 battery into the battery tray
2
with correct polarity (+/-) as indicated.
Insert the battery tray back into the slot.
3
Precautions Concerning Batteries
When the Remote Control is not to be used
for a long time (more than a month), remove the
battery from the Remote Control to prevent it
from leaking.
If the batteries leak, wipe away the leakage
inside the battery compartment and replace the
batteries with new ones.
Do not use any batteries other than those
specified.
Do not heat or disassemble batteries. Never
throw them in fire or water.
Do not carry or store batteries with other metallic
objects. Doing so could cause batteries to short
circuit, leak or explode.
Never recharge a battery unless it is confirmed
to be a rechargeable type.
Connect Power
Caution:
- Risk of product damage! Ensure that the power
supply voltage corresponds to the voltage printed
on the back or the underside of the unit.
- Before connecting the AC power cord, ensure
you have completed all other connections.
Connect the AC power cord to the wall socket.
Play
Power
You can use all the functions on the top of the unit or
the remote control after connecting to power supply
(called Standby Mode).
Note:
- You can only use AC power as power supply.
Batteries ( not supplied ) are for backup purpose.
- If the system is unplugged or if a power failure
occurs, all setups of the unit will be erased
unless there are batteries in the unit and don’t
change them at this time. Once setups had be
erased, please re-setup all items ( tuner
stations;Source... ) which you desire.
Turn On
Pres s ON/OFF/SO URCE button to turn the
system on from standby mode.
Press ON /O FF /SOURCE to select different
functions.
Note:
When turning the system on, the system will
cont inue in the mod e it was in when it was
turned off last time.
Turn Off
Press and hold ON/OFF/SOURCE button again
to turn the system off and go to standby mode.
Note:
Be sure to unplug the power cord from the outlet
when the system is not in use for an extended
period of time.
5
Page 8

Set Time
The built-in clock shows the correct time in the
display.
1 In standby mode, press and hold the CLOCK
button for some seconds, hour indicator will
blink.
2 Set the hour with the button or button.
3 Press the CLOCK button to confirm, minute
indicator will blink.
4 Repeat steps 2-3 to set the minutes, day, month
and year.
Note:
In standby mode, press and hold the CLOCK
button for some seconds, then press the
BF
button to select 12/24 hour format.
Play from iPod/iPhone/iPad
Compatible iPod/iPhone/iPad
Apple iPod models with a 30-pin dock connector:
- iPod
- iPod classic.
- iPod touch.
- iPod nano
- iPhone
- iPad
Listen to the iPod/iPhone/iPad
You can enjoy audio from iPod/iPhone/iPad through
this unit.
- During play iPod/iPhone, to navigate the
menu: press MENU button, then press
,to select, and press BF to confirm.
- To select repeat play options: press the
REPEAT button repeatedly to select a repeat
option play mode.
View the iPod/iPhone/iPad video
Using iPod video socket
iPod VIDEO
VIDEO IN
Connect the iPod/iPhone/iPad composite video
cable to:
- the iPOD VIDEO socket on this unit.
- the video input socket on the TV.
Note:
Some iPods need to set the TV out setting to “ON”,
then could View the video.
Charge the iPod/iPhone/iPad
The docked iPod/iPhone/iPad begins to charge as
soon as the unit is connected to AC power.
1 Lift up the iPod/iPhone/iPad dock on the top panel.
2 Place the iPod/iPhone/iPad into the dock.
3 Press the iPod button on remote control or
SOURCE button on top panel to select the
iPod/iPhone/iPad source.
Start to play the connected iPod/iPhone/iPad.
- To pause/resume play, press the BFbutton.
- To skip to a track, press the
- To search during play: press and hold
G
buttons, then release to resume normal
H/G
buttons.
/
H
play.
Play from an External Audio Device
You can listen to an external audio device through
this unit.
1 Connect the audio player.
Connect the AUX IN cable to the AUX socket on
the top of unit and to the headphone socket on
the audio player.
2 Press the AUX button to select the AUX IN
source.
3 Start to play on the audio player.
6
Page 9

Set the Alarm Timer
You can set two alarms which go off at different time.
Ensure that you have set the clock correctly.
1
2 Press ALARM1 or ALARM2, [AL1 ] or [AL2 ]
begin to blink.
3 Press / on the remote control to select an
alarm sound source: iPod/iPhone/iPad,
FM tuner, or buzzer.
4 Press ALARM 1 or ALARM 2. The hour digits
begin to blink.
5 Press / repeatly to set the hour.
6 Press ALARM 1 or ALARM 2. The minute digits
begin to blink.
7 Repeat steps 5-6 to set the minute.
8 Repeat steps 5-6 to select whether to ring alarm
the whole week, on weekdays, or at weekend.
9 Repeat steps 5-6 to set the alarm volume.
Activate and Deactivate the Alarm Timer
Press ALARM 1 or ALARM 2 repeatly to activate
or deactivate the timer.
- If the timer is activated, [AL1 ] or [AL2 ]
is displayed.
- If the timer is deactivated, [AL1 ] or
[AL2 ] disappears.
Repeat Alarm
You can press to adjust the interval to repeat alarm.
When the alarm rings, press SNOOZE/DIMMER.
The alarm repeats ringing 9 minutes later.
Stop Alarm Ring
When the alarm rings, press the corresponding
ALARM 1or ALARM 2. The alarm stops but the
alarm settings remain.
View the Alarm Settings
Pres s ALARM 1or ALA RM 2 to view th e alarm
settings.
Set the sleep timer
This unit can switch to standby automatically after a
set period of time.
1 Press SLEEP repeatedly to select a set period
of time (in minutes).
- When the sleep timer is activated, the
display show , the volume will gradually
decrease before the unit power off.
2 Press SLEEP repeatedly until [OFF] is displayed.
- When the sleep timer is deactivated,
disappears on the display.
Adjust Display Brightness
Press DIMMER repeatedly to select different levels
of display brightness.
Adjust Volume Level
During play, press the VOL+/- buttons to increase/
decrease the volume level.
Select a Preset Sound Effect
During pl ay, pres s the EQ button repeatedly to
select: [FLAT], [Pop], [Classic], [Rock], [Jazz]
Mute Sound
During play, press the MUTE button to mute or
restore sound. Press this button again to cancel the
effect.
Listening to the FM Radio
Tuning in a Station
Press the FM button to select the FM source.
1
Press and hold the H/G buttons, the
2
frequency changes down or up automatically
until a station is found.
Presetting Stations
You can preset up to 20 FM stations.
Program radio stations automatically
Press and hold the PROG button for 2 seconds
to activate automatic programming. All available
stations are programmed in the order of
waveband reception strength.
- The first programed radio station is played
automatically.
Program radio stations manually
Tune in the desired station, then press the PROG
1
button.
Press the / buttons to select the preset number.
2
Press the PROG button to store the station.
3
Repeat above steps 1 to 3 for each station you
4
want to store in memory with a preset number.
Note:
- If the system is unplugged or if a power failure
occurs, the preset stations will be erased unless
there are batteries in unit and don't change
batteries at this time.
Tune to a Preset Radio Station
Press the or buttons to select a preset
number that you want.
7
Page 10

Troubleshooting
To keep the warranty valid, never try to repair the
system yourself. If you encounter problems when
using this unit, check the following points before
requesting service.
No power.
- Ensure that the AC cord of the apparatus is
connected properly.
- Ensure that there is power at the AC outlet.
- Press standby button to turn the unit on.
Remote control does not work
- Before you press any function button, first select
the correct source.
- Reduce the distance between the remote control
and the unit.
- Insert the battery with its polarities (+/-) aligned
as indicated.
- Replace the battery.
- Aim the remote control directly at the ensor on
the front of the unit.
No Response From the Unit
- Disconnect and reconnect the AC power plug,
then turn on the unit again.
Poor radio reception
- Increase the distance between the unit and your
TV or VCR.
- Fully extend the FM antenna.
- Connect an outdoor FM antenna instead.
Timer does not work
- Set the clock correctly.
- Switch on the timer.
Clock/timer setting erased
- Power has been interrupted or the power cord
has been disconnected.
- Reset the clock/timer.
Using iPhone to play music
- While the iPhone is playing the music throught
the docking, there may be a chance that the
iPhone may not be under a good receiption
mode to get the incoming call signal.
Specications
General
Power Requirements
Power Consumption
Output Power .................................................5W x 2
Total Harmonic Distortion
Audio Input Sensitivity/Impedance ...... 500mV/47k
Frequency Response ............. 40Hz - 20kHz(+/-3dB)
Tuning Range
Unit Dimensions (W x H x D) .......198 x 89 x 198mm
Speaker
Front
Impedance.............................................................6
Rate Power
Remote
Distance ............................................................... 6m
Angle ................................................................... 30
...................... AC 120V ~ 60Hz
........................................... 25W
...................1%(1kHz, 1W)
..................................87.5 - 108.0MHz
...........................................................5W
Standard Accessories
Remote Control ....................................................x 1
Owner’s Manual ....................................................x 1
Ω
Ω
O
Design and specifications are subject to change
without notice.
8
Page 11

Page 12

Contenido
Instrucciones importantes de seguridad
Seguridad ....................................................................... 2
Advertencia .................................................................... 2
Identicación de los componentes
Unidad Principal ............................................................. 3
Control Remoto .............................................................. 4
Preparativos
Instalación de las pilas ................................................... 5
Preparar el mando a distancia ....................................... 5
Precauciones con las pilas ............................................ 5
Conexión de la alimentación .......................................... 5
Reproducir
Poder .............................................................................. 5
Ajuste de la hora ............................................................ 6
Reproducir desde el iPod/iPhone/iPad........................... 6
Jugar desde un dispositivo externo de audio ................ 6
Ajuste el temporizador de alarma .................................. 7
Activar y desactivar el temporizador de alarma ............. 7
Repetir alarma ................................................................ 7
Detener el timbre de alarma ........................................... 7
Ver los ajustes de alarma ............................................... 7
Ajuste el temporizador de apagado automático ............. 7
Ajuste Brillo de la pantalla .............................................. 7
Ajuste el nivel de volumen ............................................. 7
Seleccione un efecto de sonido ..................................... 7
Silenciar sonido .............................................................. 7
Escuchar la radio FM
Sintonización de una estación de .................................. 7
Memorización de Estaciones ......................................... 7
Sintonice una emisora de radio ...................................... 7
Solución de problemas ............................................... 8
Especicaciones ......................................................... 8
Accesorios estándar ................................................... 8
1
Page 13

Instrucciones importantes de seguridad
WARNING
RISK OF ELECTRIC SHOCK
DO NOT OPEN
PRECAUCIÓN: PARA REDUCIR EL RIESGO DE DESCARGA ELÉCTRICA, NO
RETIRE LA CUBIERTA (O VUELTA). NO HAY PARTES EN EL INTERIOR
CONSULTE AL PERSONAL CUALIFICADO.
El rayo con punta de flecha dentro de
un triángulo equilátero, pretende alertar
al usuario de la presencia de "voltaje
peligroso" dentro de la caja del producto,
que puede ser de magnitud suficiente para
constituir un riesgo de descarga eléctrica
para las personas.
El signo de exclamación dentro de un
triángulo equilátero es para alertar al
usuario de la presencia de importantes
instrucciones de mantenimiento (servicio)
en la literatura que acompaña al aparato.
Seguridad
1 Lea estas instrucciones.
2 Guarde estas instrucciones.
3 Tenga en cuenta todas las advertencias.
4 Siga todas las instrucciones.
5 No utilice este aparato cerca del agua.
Limpiar con un paño seco 6.
7 No bloquee las aberturas de ventilación. Instale
de acuerdo con las instrucciones del fabricante.
8 No instale cerca de fuentes de calor tales como
radiadores, calefactores, estufas u otros aparatos
(incluyendo amplificadores) que produzcan calor.
9 Proteja el cable de alimentación de ser pisado
o aplastado, especialmente en los enchufes, los
receptáculos y el punto donde salen del aparato.
10 Desconecte este aparato durante tormentas
eléctricas o cuando no se utilice durante largos
períodos de tiempo.
11 Confíe las reparaciones a personal cualificado.
Se requiere servicio cuando el aparato ha sido
dañado de alguna manera, como por ejemplo el
cable de alimentación o el enchufe está dañado, se
ha derramado líquido o han caído objetos dentro
del aparato, el aparato ha sido expuesto a la lluvia
o la humedad, no funciona con normalidad , o se ha
caído.
12 La unidad no debe ser expuesto a goteos ni
salpicaduras.
13 No coloque ningún foco de peligro sobre el
aparato (por ejemplo recipientes con líquidos, velas
encendidas).
14 Utilice sólo los accesorios especificados por el
fabricante.
15 No anule el propósito de seguridad del enchufe
polarizado o con toma de tierra. Un enchufe
polarizado tiene dos clavijas, una más ancha que
la otra. Una clavija polarizada tiene dos cuchillas y
un tercer diente de tierra. La hoja ancha o la tercera
clavija se proporciona para su seguridad. Si el
enchufe no encaja en su tomacorriente, consulte
a un electricista para reemplazar el tomacorriente
obsoleto.
16 Utilice únicamente la carretilla, plataforma,
trípode, soporte o mesa especificados por el
fabricante, o vendidos con el aparato. Cuando un
carro o un estante se utiliza, tenga cuidado al mover
la combinación carro / aparato para evitar lesiones
por vuelco.
17 ADVERTENCIA: La batería (pilas o las pilas o la
batería) no deben exponerse al calor excesivo como
el sol, el fuego o similares.
18 Cuando el acoplador del equipo se utiliza como
dispositivo de desconexión, el acoplador del equipo
debe ser accesible fácilmente.
19 Este equipo es de la Clase II o doble aparato de
aislamiento eléctrico. Se ha diseñado de tal manera
que no requiere una conexión de seguridad a la
tierra eléctrica.
20 No exponga el aparato a cualquier goteo o
salpicaduras y asegurarse de que ningún objeto
lleno de líquido. tales como floreros, etc, se colocan
en ellos.
21 Para reducir el riesgo de incendios o descargas
eléctricas, no exponga este aparato a la lluvia o la
humedad.
Precaución.:
- El uso de controles o ajustes o la realización de
procedimientos distintos a los aquí puede resultar
en exposición a radiaciones peligrosas ya otros
peligros.
Advertencia
• Antes de utilizar este sistema, comprobar la
tensión de este sistema para ver si coincide con la
tensión de suministro eléctrico local.
• La ventilación no debe ser impedida cubriendo
las aberturas de ventilación con objetos como
periódicos, manteles, cortinas, etc Asegúrese de
que haya por lo menos 20 cm por encima y por lo
menos 5 cm de espacio a cada lado de la unidad.
• No coloque este aparato cerca de campos
magnéticos intensos.
2
Page 14

• No coloque la unidad en el amplificador o receptor.
• Si algún objeto sólido o líquido en el sistema,
desenchufe el sistema y que sea revisada por
personal especializado antes de volver a utilizarla.
• No intente limpiar la unidad con solventes
químicos, ya que esto podría dañar el acabado.
Utilice un paño limpio, seco o ligeramente
húmedo.
• Cuando desenchufe el cable de alimentación de la
toma de corriente, tire siempre de la clavija, nunca
jale el cable.
• En función de las ondas electromagnéticas
utilizadas por un programa de televisión, si el
televisor está encendido cerca de esta unidad,
mientras que también es activado, las líneas
pueden aparecer en la pantalla del televisor. Ni
esta unidad ni la televisión están funcionando mal.
Si usted ve estas líneas, mantenga la unidad lejos
del televisor.
Identicación de las partes
Unidad Principal - Vista desde arriba
1 SNOOZE/DIMMER
- Repetir la alarma.
- Ajuste el brillo de la pantalla.
2 ON/OFF/SOURCE
- Repetir la alarma.
- Ajuste el brillo de la pantalla.
3 BF/OK
- Iniciar o pausar el juego.
4 H/
G
- Ir al archivo de audio anterior / siguiente.
- Búsqueda de estaciones de radio de forma
manual.
- Mantenga pulsado este botón para buscar las
emisoras de radio de forma automática.
5 ALARM 1/ALARM 2
- Ajuste el temporizador de alarma.
- Ver la configuración de la alarma.
6 VOLUME +/Aumentar o disminuir el nivel de volumen.
7 AUX IN
Conectar a un dispositivo de audio externo.
8 DOCK para iPod/iPhone/iPad
Carga de un iPod/iPhone/iPad.
9 Panel de visualización
Muestra el estado actual.
Vista trasera
10 Compartimiento de la batería
11 AC ~
Conéctate al poder.
12 FM ANT
Conectar a una antena de FM.
3
Page 15

13 Terminales de Video
Conectar a un televisor.
Control Remoto
1 ON / OFF
Encender o apagar la unidad.
2 DIMMER
Ajustar brillo de la pantalla.
3 iPod
Seleccione el iPod / iPhone / iPad función.
4 FM
Seleccione la función de FM.
5 MENÚ
Cambiar entre la lista de carpetas y la lista de
archivos para el iPod / iPhone / iPad.
6
- Navegue a través de iPod / iPhone / iPad menú.
- Seleccione una emisora que viene.
- Ajustar el tiempo.
7
H
- Ir al archivo de audio anterior.
- Búsqueda de estaciones de radio de forma
manual.
- Mantenga pulsado este botón para buscar las
emisoras de radio de forma automática.
8
BF
- Iniciar o pausar el juego.
- Confirmar selecciones.
9 Repita
- Seleccione los modos de repetición de juego.
10
- Navegue a través de iPod / iPhone / iPad menú.
- Seleccione una emisora anterior.
- Ajustar el tiempo.
11 ALARMA 1
- Ajuste el temporizador de alarma 1.
- Ver la configuración de la alarma 1.
12 SLEEP
Ajuste el temporizador de apagado automático.
13 EQ
Seleccione un efecto de sonido:
Clásico, Rock, Jazz, Pop, FLAT.
14 MUTE
Silenciar o reanudar el sonido.
15 AUX
Seleccione la función AUX.
16 RELOJ
Mantenga pulsado este botón en el modo de espera
para ajustar el reloj.
17
G
- Pasar al siguiente archivo de audio.
- Búsqueda de estaciones de radio de forma
manual.
- Mantenga pulsado este botón para buscar las
emisoras de radio de forma automática.
18 PROG
Sintonizador de emisoras preprogramadas para
más.
19 ALARMA 2
- Ajuste el temporizador de alarma 2.
- Ver la alarma 2 ajustes.
20 VOL + / VOL-
- Aumentar el nivel de volumen.
- Disminuir el nivel de volumen.
4
Page 16

Preparativos
Instalación de las pilas
Nota:
- Sólo se puede utilizar alimentación de CA como
fuente de alimentación. Pilas (no incluidas) son para
fines de copia de seguridad.
1 Abra el compartimento de las pilas.
2 Instale dos pilas (AAA) con la polaridad correcta
como se indica.
3 Cierre el compartimiento de la batería.
Preparar el mando a distancia
El mando a distancia suministrado permite que la
unidad para ser operado desde una distancia.
• Incluso si el mando a distancia funciona dentro del
rango efectivo (6m), la operación de control remoto
puede ser imposible si hay algún obstáculo entre la
unidad y el mando a distancia.
• Si el control remoto se opera cerca de otros
productos que generen rayos infrarrojos, o si
otros dispositivos de control remoto que utilizan
rayos infrarrojos se utilizan cerca de la unidad,
es posible que no funcione correctamente. Por el
contrario, los demás productos pueden funcionar
incorrectamente.
Por primera vez de usar:
La unidad tiene un pre-instalado de litio CR2025
battery.Remove la pestaña protectora para activar la
pila del control remoto.
Para reemplazar la batería del control remoto:
1 Retire la bandeja de la batería y retire la batería
vieja.
2 Coloque una nueva pila CR2025 en la bandeja de
la batería con la polaridad correcta (+ / -) según se
indica.
3 Inserte la bandeja de la batería en la ranura.
Precauciones con las pilas
• Cuando el control remoto no se va a utilizar durante
mucho tiempo (más de un mes), retire la batería del
mando a distancia para evitar que se escape.
• Si tienen fugas, limpie la fuga en el interior del
compartimiento de las pilas y cambie las baterías
por otras nuevas.
• No utilice pilas que no sean los especificados.
• No caliente o desarme las pilas. Nunca las tire al
fuego ni al agua.
• No transporte ni guarde las pilas con otros
objetos metálicos. Si lo hace, podría causar un
cortocircuito en las baterías, fugas o explosiones.
• Nunca recargue la batería si no se confirma que
es un tipo recargable.
Conexión de la alimentación
Precaución:
- Riesgo de daños al producto! Asegúrese de que
la tensión de alimentación corresponda al voltaje
impreso en la parte posterior o inferior de la unidad.
- Antes de conectar el cable de alimentación de CA,
asegúrese de haber completado todas las demás
conexiones.
Conecte el cable de alimentación de CA a la toma
de corriente.
Reproducir
Poder
Usted puede utilizar todas las funciones en la
parte superior de la unidad o el mando a distancia
después de la conexión a la red eléctrica (llamado
modo de espera).
Nota:
- Sólo se puede utilizar alimentación de CA como
fuente de alimentación. Pilas (no incluidas) son para
fines de copia de seguridad.
- Si el sistema está desconectado o si se produce
un fallo eléctrico, todas las configuraciones de la
unidad se borrarán a menos que existan baterías
en la unidad y no cambiarlos en este momento.
Una vez que las configuraciones se pueden borrar,
por favor, vuelva a configurar todos los elementos
(emisoras de radio, fuente ...) que usted desea.
Activar
Presione el botón ON / OFF / FUENTE botón para
encender el sistema en modo de espera.
Presione el botón ON / OFF / SOURCE para
seleccionar las diferentes funciones.
Nota:
Al encender el sistema, el sistema continuará en el
modo en que estaba cuando se apagó la última vez.
Desactivar
Pulse la tecla ON / OFF / FUENTE otra vez para
apagar el sistema y vaya al modo de espera.
Nota:
Asegúrese de desenchufar el cable de alimentación
de la toma cuando el sistema no está en uso
durante un período prolongado de
5
Page 17

Ajuste de la hora
El reloj incorporado en la muestra la hora correcta
en la pantalla.
1 En el modo de espera, presione y mantenga
presionado el botón CLOCK durante unos
segundos, el indicador de hora parpadeará.
2 Ajuste la hora con el botón o el botón
o .
3 Pulse el botón CLOCK para confirmar, indicador
de los minutos parpadeará.
4 Repita los pasos 2-3 para ajustar los minutos, día,
mes y año.
Nota:
En modo de espera, presione y mantenga
presionado el botón CLOCK durante unos
segundos, luego presione el botón para seleccionar
12/24 horas en formato.
BF
Reproducir desde el iPod / iPhone /
iPad
Compatible con iPod / iPhone / iPad
Los modelos de iPod de Apple con un conector de
30 pines:
- iPod
- IPod classic.
- IPod touch.
- IPod nano
- iPhone
- iPad
Cómo escuchar el iPod / iPhone / iPad
Usted puede disfrutar de audio de iPod / iPhone /
iPad a través de esta unidad.
- Durante el juego para iPod / iPhone, para navegar
por el menú: pulse el botón MENÚ, a continuación,
pulse
, para seleccionar, y BF de prensa para
confirmar.
- Para seleccionar las opciones de repetición de
juego: pulse el botón REPEAT varias veces para
seleccionar una opción de repetición modo de
reproducción.
Ver el vídeo iPod / iPhone / iPad
Uso de toma de vídeo del iPod
iPod VIDEO
VIDEO IN
Conecte el iPod / iPhone / IPAD cable de vídeo
compuesto de:
- La toma de videos de iPod en esta unidad.
- La toma de entrada de vídeo del televisor.
Nota:
Algunos iPods necesitan para establecer la salida
de TV ajuste a "ON", se podría ver el vídeo.
Carga el iPod / iPhone / iPad
El iPod / iPhone / iPad comienza a cargarse en
cuanto la unidad está conectada a la red eléctrica.
Reproducir desde un dispositivo de
audio externo
Usted puede escuchar un dispositivo de audio
externo a través de esta unidad.
1 Levante la base para iPod / iPhone / iPad en el
panel superior.
2 Coloque el iPod / iPhone / iPad en el muelle.
3 Pulse el botón del iPod en el control remoto
o el botón SOURCE en el panel superior para
seleccionar la fuente iPod / iPhone / iPad.
Empezar a tocar el iPod / iPhone conectado / IPAD.
- Para hacer una pausa / reanudar la reproducción,
pulse el BF button.
- Para saltar a una pista, pulse los botones H /
.
G
- Para buscar durante el juego: pulse y mantenga
pulsado H / G botones, a continuación, suelte
para reanudar la reproducción normal.
1 Conecte el reproductor de audio.
Conecte el cable de AUX IN a la toma AUX en la
parte superior de la unidad ya la toma de auriculares
del reproductor de audio.
2 Pulse el botón AUX para seleccionar la fuente
AUX IN.
3 Inicie la reproducción en el reproductor de audio.
6
Page 18

Ajuste el temporizador de alarma
Puede establecer dos alarmas que se disparan en
el momento diferente.
1 Asegúrese de que ha ajustado el reloj
correctamente.
2 Pulse ALARM1 o ALARM2, [AL1
comenzará a parpadear.
3 Pulse / en el mando a distancia para
seleccionar una fuente de sonido de la alarma: iPod
/ iPhone / iPad,
Sintonizador de FM, o el timbre.
4 Pulse ALARM 1 o ALARM 2. Los dígitos de la
hora empezarán a parpadear.
5 Pulse / varias veces para ajustar la hora.
6 Pulse ALARM 1 o ALARM 2. Los dígitos de los
minutos comenzará a parpadear.
7 Repita los pasos 5-6 para ajustar los minutos.
8 Repita los pasos 5-6 para seleccionar ya sea para
que suene la alarma de toda la semana, de lunes a
viernes, o en fin de semana.
9 Repita los pasos 5-6 para ajustar el volumen de la
alarma.
Activar y desactivar el temporizador de alarma
Pulse ALARM 1 o ALARM 2 varias veces para
activar o desactivar el temporizador.
- Si el temporizador está activado, [AL1
[AL2 ] se muestra.
- Si el temporizador está desactivado, [AL1 ] o
[AL2 ] desaparece.
] o [AL2 ]
] o
Repetir alarma
Puede presionar para ajustar el intervalo se repetirá
la alarma.
Cuando suene la alarma, pulse SNOOZE /
DIMMER. La alarma vuelve a sonar 9 minutos más
tarde.
Detener el timbre de alarma
Cuando suene la alarma, pulse el botón ALARMA 1
o 2 correspondiente. La alarma se detiene pero se
mantienen los ajustes de la alarma.
Ver los ajustes de alarma
Pulse ALARMA 1 o 2 para ver los ajustes de la
alarma.
Ajuste el temporizador de apagado automático
Esta unidad puede cambiar al modo de espera
automáticamente después de un período de tiempo.
1 Pulse SLEEP varias veces para seleccionar un
período de tiempo (en minutos).
- Cuando el temporizador de apagado automático
está activado, la pantalla muestra , el volumen
disminuirá gradualmente antes de que el poder de
unidad.
2 Pulse SLEEP varias veces hasta que aparezca
[NO].
- Cuando el temporizador de apagado automático
está desactivado, desaparece de la pantalla.
Ajuste Brillo de la pantalla
Pulse DIMMER repetidamente para seleccionar
diferentes niveles de brillo de la pantalla.
Ajuste el nivel de volumen
Durante la reproducción, presione la tecla VOL + / botones para subir / bajar el volumen.
Seleccione un efecto de sonido
Durante la reproducción, pulse el botón EQ
repetidamente para seleccionar: [FLAT], [Pop],
[clásico], [Rock], [Jazz]
Silenciamiento del sonido
Durante la reproducción, pulse el botón MUTE para
silenciar o restaurar el sonido. Pulse el botón otra
vez para cancelar el efecto.
Escuchar la radio FM
Sintonización de una estación
1 Pulse el botón FM para seleccionar la fuente de
FM.
2 Mantenga pulsado los botones H / G,
la frecuencia cambia hacia arriba o abajo
automáticamente hasta que se encuentre una
emisora .
Memorización de Estaciones
Es posible memorizar hasta 20 emisoras de FM.
• Programa de las estaciones de radio de forma
automática
Mantenga pulsado el botón PROG durante 2
segundos para activar la programación automática.
Todas las emisoras disponibles se programan en el
orden de potencia de recepción de banda.
- La primera estación de radio programada se
reproducirá automáticamente.
• Programa de las estaciones de radio de forma
manual
1 Sintonice la emisora deseada y pulse el botón
PROG.
2 Pulse los botones
número preestablecido.
3 Pulse el botón PROG para almacenar la emisora.
4 Repita los pasos 1 a 3 para cada emisora que
desee almacenar en la memoria con un número
preestablecido.
Nota:
- Si el sistema está desconectado o si se produce
un fallo eléctrico, las emisoras memorizadas se
borrarán a menos que existan baterías en la unidad
y no cambiar las baterías en este momento.
Sintonice una emisora de radio
• Presione o para seleccionar un número de
presintonía que desee.
7
/ o para seleccionar el
Page 19

Solución de problemas
Para mantener la validez de la garantía, no intente
reparar el sistema usted mismo. Si tiene problemas
al utilizar esta unidad, compruebe los siguientes
puntos antes de solicitar servicio.
No hay alimentación.
- Asegúrese de que el cable de alimentación del
aparato está correctamente conectado.
- Asegúrese de que haya corriente eléctrica en la
toma de CA.
- Presione el botón de espera para encender la
unidad.
El control remoto no funciona
- Antes de pulsar cualquier botón de función,
primero seleccione la fuente correcta.
- Reducir la distancia entre el mando a distancia y la
unidad.
- Inserte la batería con la polaridad (+ / -) de la
forma indicada.
- Vuelva a colocar la batería.
- Apunte el control remoto directamente hacia el
Ensor en la parte frontal de la unidad.
No hay respuesta de la Unidad de
- Desconecte y vuelva a conectar el cable de
alimentación de CA y vuelva a encender la unidad.
Mala recepción de radio
- Aumente la distancia entre la unidad y el televisor
o VCR.
- Extienda completamente la antena de FM.
- Conecte una antena FM exterior.
El temporizador no funciona
- Ajustar el reloj correctamente.
- Encienda el temporizador.
Reloj / temporizador borrados
- Se ha interrumpido o el cable de alimentación ha
sido desconectado.
- Reinicie el reloj / temporizador.
Us and o e l i Pho ne para r eproduci r
música
- Mientras que el iPhone se está reproduciendo la
música hasta alcanzar las de acoplamiento, puede
haber una posibilidad de que el iPhone no puede
ser en un modo de receiption buena para obtener la
señal de llamada entrante.
Especicaciones
General
Requisitos de alimentación AC 120V ~ 60Hz
Consumo de energía 25W
Potencia de salida 5W x 2
Distorsión Armónica Total 1% (1 kHz, 1 W)
AudioSensibilidad/Impedanciade500mV/47kΩ
Respuesta de frecuencia 55 Hz - 20 kHz (+ /-3dB)
Margen de sintonía 87,5 - 108,0 MHz
Dimensiones de la unidad
(W x alto x profundidad) 198 x 89 x 198mm
Altavoz
Frente
Impedancia 6
Tarifa de energía 5W
Remoto
Distancia 6m
Angulo 30
Accesorios Estándar
Control Remoto x 1
Manual del usuario x 1
Diseño y las especificaciones están
sujetas a cambios sin previo aviso.
o
8
Page 20

 Loading...