

Page 1
before being charged
• Rechargeable batteries
should be charged under adult
supervision
• Do not short circuit the supply
terminals
• Comfortable size and grip for
secure, extended play
•
Oversized backlit buttons
•
Uses (2) “AA” batteries (not
included)
•
Taille et prise confortables pour
un jeu sûr et de longue durée.
•
Boutons rétroéclairés de grande
taille.
•
Utilise (2) piles 1.5V « AA » (non
fournies).
•
Dimensioni ridotte e impugnatura
facile per giocare con sicurezza
ed a lungo.
•
Tasti retroilluminati di grandi
dimensioni.
•
Richiede (2) batterie 1.5V “AA”
(non incluse).
•
Komfortables Format und Grif-
figkeit für sicheren Halt und lange
Spielzeit.
•
Übergroße hintergrund-
beleuchtete Tasten.
•
Betrieb mit (2) 1.5V AA-Batterien
(nicht im Lieferumfang enthalten).
•
Tamaño y agarre confortables
para jugar con seguridad durante
más tiempo.
•
Botones retroiluminados de gran
tamaño.
•
Utiliza (2) pilas 1.5V “AA” (no
incluidas).
2-Year Limited Warranty
Visit PowerA.com for details
and to register
Quick Start Guide
POWER A
Customer Service
PowerA.com
1-888-664-4327
BDA, Inc.
15525 Woodinville-Redmond Rd NE
Woodinville, WA 98072
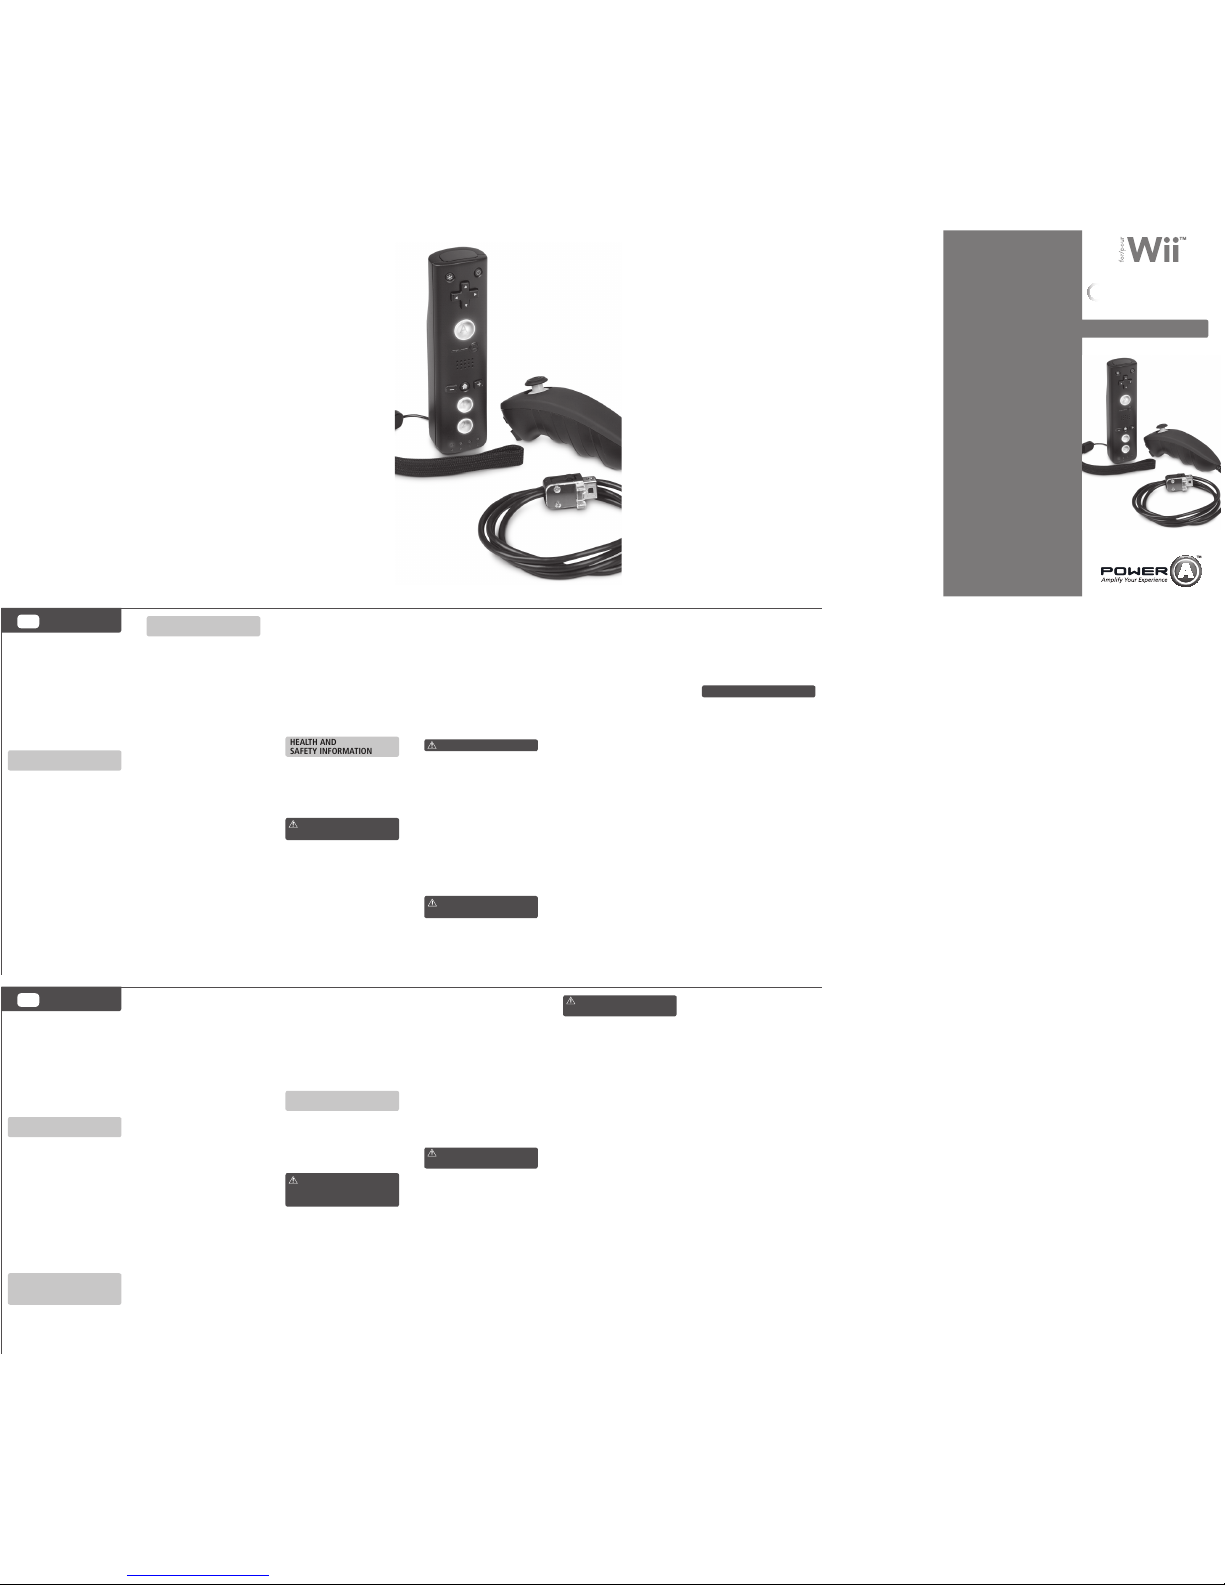
The MiniRemote™ and Secondary
remote are designed specifically
for Wii™ and are not compatible
with other game consoles. Your
POWER A MiniRemote™ and
Secondary controller function in
place of the Wii Remote™ and
Wii Nunchuk™.
POWER A PRO PACK MINI
INCLUDES:
(1) MiniRemote™
• Functions in place of the original
Nintendo Wii Remote™
• Small, comfortable size
• LED illuminated color changing
action buttons
• Soft-touch surface
• Textured grip
• Safety wrist strap
(1) Secondary Controller
• 3 foot connection cord
• Small, comfortable size
• Rubber grip
SETUP AND USE
OF THE MINIREMOTE™
1. Open the battery lid located on
the back of the MiniRemote and
insert 2 “AA” batteries.
2. Thread the wrist strap through
the hole at the bottom of the
remote. Please use the wrist strap
at all times to prevent losing your
grip on the remote and causing
damage to the remote and
surrounding objects, or injury to
other people.
3. Sync the MiniRemote™ with
your console:
Note: make sure you have
placed the batteries in the
MiniRemote™.
a. Press the Power button on the
Wii console to turn it on.
b. Remove the battery cover on
the back of the remote. Press
and release the SYNC button
inside the cover. The Player LEDs
will blink.
c. Open the SD Card Slot cover on
the front of the Wii console. Press
and release the SYNC button on
the inside of the compartment.
d. When the Player LED stops
blinking, connection is complete.
The LED that is illuminated
indicates the player number.
4. For additional details on how
to program your remote, please
see the Wii Operations Manual.
After 3-5 minutes of inactivity
the MiniRemote will enter “Sleep
Mode” to conserve battery life.
Press any button to reactivate
the remote.
5. To change the LED color of your
MiniRemote™, press the LED
color-select button.
HEALTH AND
SAFETY INFORMATION
If product will be used by young
children, this manual should be
read and explained to them by
an adult. Failing to do so may
cause injury.
WARNING - Repetitive
Motion Injuries and Eyestrain
Playing video games can make
your muscles, joints, skin or eyes
hurt. Follow these instructions to
avoid problems such as tendinitis,
carpal tunnel syndrome, skin
irritation or eyestrain:
• Avoid excessive play. Parents
should monitor their children for
appropriate play.
• Take a 10 to 15 minute break
every hour, even if you don’t think
you need it.
• If your hands, wrists, arms or
eyes become tired or sore while
playing, or if you feel symptoms
such as tingling, numbness,
burning or stiffness, stop and rest
for several hours before playing
again.
• If you continue to have any of
the above symptoms or other
discomfort during or after play,
stop playing and see a doctor.
WARNING - Electric Shock
The MiniRemote™ can emit
radio waves that can affect the
operation of nearby electronics,
including cardiac pacemakers.
• Do not operate the
MiniRemote™ within 9 inches of
a pacemaker.
• If you have a pacemaker or
other implanted medical device,
do not use the MiniRemote™
without first consulting your
doctor or the manufacturer of
your medical device.
WARNING -
Battery Leakage
Leakage of battery fluid can cause
personal injury as well as damage
to your remote. If battery leakage
occurs, thoroughly wash the
affected skin and clothes. Keep
battery fluid away from your eyes
and mouth. Leaking batteries may
make popping sounds.
To avoid battery leakage:
• Do not mix used and new
batteries (replace all batteries at
the same time).
• Do not mix different brands of
batteries.
• POWER A recommends alkaline
batteries. Do not use Lithium ion,
nickel cadmium (nicad), or carbon
zinc batteries.
• Do not leave batteries in the
remote for long periods of
non-use.
• Do not recharge alkaline or non-
rechargeable batteries.
• Do not put the batteries in
backwards. Make sure that the
positive (+) and negative (-)
ends are facing in the correct
directions. Insert the negative
end first.
• When removing batteries,
remove the positive end first.
• Do not use damaged, deformed
or leaking batteries.
• Remove exhausted batteries
from the MiniRemote
• Rechargeable batteries must be
removed from the MiniRemote
ENGLISH
EN
FRENCH
FR
This device com plies with Part 15 of the FCC R ules. Operat ion is
subject to the fo llowing two cond itions: (1) this device m ay not cause
harmful inter ference, and (2) th is device must acce pt any interfere nce
received, inc luding interfe rence that may cau se undesired op eration.
Warning: Chan ges or modific ations to this unit n ot expressly
approved by the p arty respon sible for compli ance could void the
user’s autho rity to operate the e quipment.
Note: This equ ipment has been te sted and found to co mply with
the limits for Cla ss B digital dev ice, pursuant to Par t 15 of the FCC
Rules. These li mits are desig ned to provide reaso nable protectio n
against harmf ul interferen ce in a residential in stallation. Th is
equipment g enerates, use s and can radiate rad io frequenc y energy
and, if not inst alled and used in ac cordance with the in structions,
may cause harmfu l interference to ra dio communicat ions. However,
there is no guara ntee that interfere nce will not occur in a p articular
installation . If this equip ment does cause ha rmful interfe rence to
radio or televi sion reception , which can be dete rmined by turnin g the
equipment o ff and on, the u ser is encourage d to try to correct t he
interferenc e by one or more of the fo llowing measure s:
- Reorient or re locate the receivin g antenna.
- Increase the sepa ration betwee n the equipme nt
and rece iver.
- Connect the eq uipment into an o utlet on a circuit
different fro m that to which the rece iver is connect ed.
- Consult the dea ler or an exper ienced radio/ T V
technician for h elp.
This device com plies with Indu stry Canada lice nse-exempt R SS
standard(s). O peration is subje ct to the followin g two condition s:
(1) this device may not cau se interferenc e, and (2) this devic e must
accept any inter ference, inclu ding interfe rence that may cause
undesired o peration of the de vice.
This Class [B] dig ital apparatu s complies with Ca nadian ICES -003.
Cet appareil nu mérique de la cla sse B est conforme à la no rme
NMB-00 3 du Canada. Cet a ppareil s’accorde ave c Industrie Cana da
licence-exe mpte RSS standa rd. (1) cet appareil ne pe ut pas causer
l’interventio n, et (2) cet appare il doit accepte r de l’interventi on, y
compris l’inte rvention qui p eut causer l’opé ration non dési rée de.
MiniRemote™
MiniRemote™
Secondary
Controller
Secondary
Controller
Pro Pack Mini™Plus
Q: Why is my Mi niRemote not
connec ting to my Wii?
A: Confir m you have insert ed
2 “AA” batteries i nto the
MiniRemot e and that your Wii is
powered “ON.”
A: Your MiniRem ote may not have
synced pr operly with you r Wii.
To sync your Min iRemote, try t he
following steps
1. Open the smal l door located on
the front of t he Wii.
2. Remove the b attery lid fr om the
MiniRemote.
3. Press th e “Sync” button on t he
Wii Console
4. Press th e “Sync” button on t he
MiniRemote
5. A connec tion has been mad e
when the ind icator lights b ecomes
solid on chan nel 1, 2, 3 or 4.
A: Some gam es need to be
launched before the MiniRemote
will connect. Always confirm
TROUBLESHOOTING
confirm t hat the batter ies are
not draine d (replace batte ries if
needed).
A: This coul d indicate your
MiniRemote batteries are low and
need to be re placed.
Q: My Mini Remote is
connected but the on-screen
cursor i s not accurate .
A: Confir m you are within the
proper dis tance of your con sole.
Try moving cl oser to the conso le
and see if th e issue is resolve d.
A: This coul d indicate your Mi ni
Remote batteries are low and
need to be re placed.
Q: My Mini Remote becom es
disconnected from the Wii.
Why is thi s?
A: You may need to r eplace the
batteri es in the MiniRemo te. You
can check t he battery ch arge
status by p ressing the “Hom e”
button on t he MiniRemote. T his
will allow you t o view the charge
status in t he Wii menu scree n.
A: Make sure yo u do not have
too many oth er electronic
devices ne ar your Wii Consol e.
Sometime s wireless devi ces can
interfere with your MiniRemote.
that your T V and Wii console a re
powered “ON ,” and that your
game has bee n placed into the
Wii console.
A: When tr ying to sync ad ditional
MiniRemot es a game may requir e
you to choos e (with a synced
remote) the total number of
players before other remotes can
be synced.
Example: You wan t to play a 2
player game bu t only one of the
controlle rs is connected . Before
the 2nd Remote ca n connect, you
must first cho ose 2 players in the
game you want to pla y.
Q: What if m y MiniRemote
isn’t con necting to c hannel 1?
A: Press t he “Home” button to
access the Wii’s Remote Settings
feature. Fr om this menu you
can switch between different
controller channels and reconnect
active controllers.
Q: My Mini Remote is
connected but not functioning
properly. What should I do?
A: This usua lly indicates a
problem wi th your Wii Senso r
Bar. Confir m that your Wii Sens or
Bar is prope rly connecte d. If you
are using a Wi reless Sensor B ar,
Make sure your W ii Console is
far from oth er electroni cs and or
large met al objects.
A: Confir m you are not too far
away from you r game console.
Try moving cl oser to your conso le
and confir m if the problem is
resolved.
Q: My Mini Remote LED
illumination is decreasing?
A: You may need to r eplace the
batteri es in the MiniRemo te. You
can check t he battery ch arge
status by p ressing the “Hom e”
button on t he MiniRemote. T his
will allow you t o view the charge
status in t he Wii menu scree n.
The LED Illu mination on the
MiniRemot e will decrease a s the
batteries become weaker.
For even fur ther Syncing
Instructions please reference
your original Nintendo Wii
Console Instruction Manual.
Les accessoires MiniRemote™ et
contrôleur secondaire sont spécialement conçus pour la Wii™ et ne
sont pas compatibles avec les autres
consoles de jeu. Les accessoires MiniRemote™ et contrôleur secondaire
POWER A remplacent les accessoires
Wii Remote™ et Wii Nunc huk™.
LE PRO PACK MINI POWER A
COMPREND :
(1) MiniRemote™
• Remplace la Nintendo Wii
Remote™ d’origine
• Taille petite et confortable
• Boutons d’action éclairés par DEL
• Surface texturée pour assurer
la prise
• Dragonne de sécurité
(1) Contrôleur secondaire
• Stick analogique éclairé
• Cordon de connexion d’environ 1 m
• Taille petite et confortable
CONFIGURATION ET
UTILISATION DE LA TÉLÉCOM MANDE MINIREMOTE™
1. Ouvrir le couvercle du compartiment des piles à l’arrière du
MiniRemote sans fil et introduire 2
piles « AA ».
2. Introduisez la dragonne dans
le trou qui se trouve au bas de la
télécommande. Utilisez toujours la
dragonne pour éviter de lâcher la
télécommande et de l’endommager
ainsi que les objets alentour, ou de
blesser d’autres personnes.
3. Synchronisez la télécommande
MiniRemote™ avec votre console:
Remarque : vérifiez que vous avez
bien placé les piles dans la télécommande MiniRemote™.
a. Appuyez sur le bouton de mise
en marche de la console Wii pour la
mettre sous tension.
b. Retirez le couvercle du compartiment des piles à l’arrière de la
télécommande. Appuyez sur le
bouton SYNC dans le compartiment,
puis relâchez-le. Les DEL « Joueur »
se mettent à clignoter.
c. Ouvrez le logement de la carte SD
à l’avant de la console Wii. Appuyez
sur le bouton SYNC dans le logement, puis relâchez-le.
d. Lorsque la DEL « Joueur » cesse de
clignoter, la connexion est terminée.
La DEL qui est éclairée indique le
numéro du joueur.
4. Pour plus de détails sur la
programmation de la télécommande,
reportez-vous au manuel d’utilisation
de la console Nintendo Wii. Re-
marque : la télécommande passe en
mode de veille après 3 à 5 minutes
d’inactivité pour économiser les piles.
Il suffit d’appuyer sur un bouton
quelconque pour la réactiver.
5. Pour modifier la couleur des
voyants LED de votre MiniRemote™,
appuyez sur le bouton de sélection
de la couleur LED
INFORMATIONS RELATIVES À
LA SANTÉ ET À LA SÉCURITÉ
Si ce produit sera utilisé par des
jeunes enfants, un adulte doit leur
lire et expliquer ce manuel pour
éviter le risque de blessures.
AVERTISSEMENT -
Microtrau matismes répétés
et fatigue oculaire
Les jeux vidéo peuvent provoquer
des douleurs au niveau des muscles,
des articulations, de la peau ou
des yeux. Respectez ces consignes
pour éviter les problèmes tels
que tendinite, syndrome du canal
carpien, irritation cutanée ou fatigue
oculaire :
• Évitez de jouer trop longtemps. Les
parents doivent surveiller que leurs
enfants jouent de manière appropriée.
• Faites une pause de 10 à 15 minutes
après chaque heure de jeu, même si
vous n’en ressentez pas la nécessité.
• Si vos mains, poignets, bras ou yeux
deviennent fatigués ou endoloris
pendant le jeu, ou si vous ressentez
des symptômes tels que picotements,
engourdissement, brûlure ou raideur,
arrêtez de jouer et reposez-vous
pendant plusieurs heures avant de
reprendre le jeu.
• Si l’un des symptômes cités persiste
ou si vous ressentez une gêne prolongée pendant ou après le jeu, arrêtez
de jouer et consultez un médecin.
AVERTISSEMENT –
Choc électrique
La télécommande MiniRemote™
est susceptible d’émettre des
ondes radio qui peuvent nuire au
fonctionnement des appareils électroniques se trouvant à proximité, y
compris les stimulateurs cardiaques.
• N’utilisez pas la téléco mande
MiniRemote™ à moins de 20 cm
d’un stimulateur cardiaque.
• Si vous portez un stimulateur
cardiaque ou un autre dispositif
médical implanté, n’utilisez pas la
télécommande MiniRemote™ sans
avoir au préalable consulté votre
médecin ou le fabricant de votre
dispositif médical.
AVERTISSEMENT –
Fuite des piles
La fuite de liquide des piles peut
entraîner des blessures ainsi que des
dommages sur la télécommande. En
cas de fuite des piles, lavez à fond
la peau et les vêtements concernés.
Évitez le contact entre le liquide des
piles et les yeux et la bouche. Les
piles qui fuient peuvent émettre des
claquements.
Pour éviter une fuite des piles :
• Ne mélangez pas des piles neuves
avec les anciennes (remplacez toutes
les piles en même temps).
• Ne mélangez pas des piles de
marques différentes.
• POWER A recommande des piles
alcalines. N’utilisez pas de piles
au lithium-ion, au nickel-cadmium
(nicad) ou au carbone-zinc.
• Ne laissez pas les piles dans la
télécommande si celle-ci ne sera pas
utilisée pendant une longue période.
• Ne rechargez ni les piles alcalines ni
les piles non rechargeables.
• Ne placez pas les piles à l’envers.
Veillez à ce que les extrémités positive (+) et négative (-) soient bien
orientées. Insérez d’abord l’extrémité
négative.
• Lorsque vous retirez les piles, sortez
d’abord l’extrémité positive.
• N’utilisez pas des piles endomma-
gées, déformées ou qui fuient.
•
Retirer les piles épuisées les piles
•
MiniRemote rechargeables doivent
être retirées de la MiniRemote avant
d’être inculpé
•
Les piles rechargeables doivent être
rechargées sous la surveillance d’un
adulte
•
Ne pas court-circuiter les bornes
d’alimentation
Page 2
GERMAN
DE
ITALIAN
IT
SPANISH
SP
Il MiniRemote™ e il Controller
secondario sono progettati
appositamente per Wii™ e non sono
compatibili con altre console da
gioco. Il MiniRemote™ e il Controller
secondario POWER A sostituiscono il
Wii Remote™ e il Wii Nunchuk™.
IL PRO PACK MINI DI POWER A
CONTIENE:
(1) MiniRemote™
• Sostituisce il telecomando
originale Nintendo Wii Remote™
• Piccole dimensioni e comodo
da usare
• Pulsanti di attivazione illuminati
da LED
• Superficie ruvida per una presa
sicura
• Cinturino di sicurezza
(1) Controller secondario
• Stick analogico illuminato
• Cavo di connessione di un metro
circa
• Piccole dimensioni e comodo
da usare
CONFIGURAZIONE E USO
DEL MINIREMOTE™
1. Aprire il coperchio del vano batterie situato sul retro del MiniRemote
ed inserire 2 batterie “AA”.
2. Far passare il cinturino nel foro
situato sulla parte inferiore del
telecomando. Per evitare di perdere
la presa sul telecomando, causando
danni allo stesso e agli oggetti circostanti, o lesioni ad altre persone,
usare sempre il cinturino.
3. Sincronizzare il MiniRemote™ con
la console.
Nota: assicurarsi di aver
inserito le batterie nel
MiniRemote™.
a. Premere il tasto di alimentazione
sulla console Wii per accenderla.
b. Togliere il coperchio del vano
batteria sul retro del telecomando.
Premere e rilasciare il pulsante
SYNC all’interno del coperchio. I LED
“Giocatore” lampeggeranno.
c. Aprire il coperchio del comparto
della scheda SD sulla parte anteriore
della console Wii. Premere e
rilasciare il tasto SYNC all’interno
dello scomparto.
d. Quando i LED “Giocatore” smettono di lampeggiare, il collegamento
è completato. Il LED illuminato indica
il numero del giocatore.
4. Per maggiori informazioni su
come programmare il telecomando,
fare riferimento al Manuale d’uso
di Nintendo Wii. Nota: dopo 3-5
minuti di inattività, il MiniRemote
entra in modalità sospensione per
preservare la durata delle batterie.
Per riattivarlo, è sufficiente premere
un tasto qualsiasi.
5. Per cambiare il colore del LED del
MiniRemote™ premere il pulsante di
selezione corrispondente
INFORMAZIONI SU
SICUREZZA E SALUTE
Se il prodotto viene utilizzato
da bambini, un adulto deve leggere e spiegare loro il contenuto del
presente manuale. L’inosservanza di
questa raccomandazione potrebbe
causare lesioni.
AVVERTENZA – Affaticamento
degli occhi e danni causati da
movimenti ripetuti
I videogiochi possono provocare
dolori muscolari, articolari, cutanei
o agli occhi. Seguire le seguenti
indicazioni per evitare problemi
quali tendinite, sindrome del tunnel
carpale, irritazione cutanea o affaticamento degli occhi:
• Evitare di giocare troppo a lungo. Si
consiglia ai genitori di controllare che
i figli giochino in modo appropriato.
• Fare una pausa di 10/15 minuti
ogni ora, anche se si ritiene di non
averne bisogno.
• Se durante il gioco si avverte una
sensazione di affaticamento o dolore
in mani, polsi, braccia o occhi, o se si
avvertono sintomi come formicolio,
intorpidimento, bruciore o rigidità,
smettere di giocare e riposare per
diverse ore prima di riprendere
il gioco.
• Se si continua ad avvertire uno dei
sintomi sopra descritti o altri disturbi
durante o dopo il gioco, smettere di
giocare e rivolgersi a un medico.
AVVERTENZA – Pericolo di
scossa elettrica
Il MiniRemote™ può emettere onde
radio in grado di incidere sul funzionamento di dispositivi elettronici
vicini, incluso i pacemaker cardiaci.
• Non utilizzare il MiniRemote™ nel
raggio di 23 cm circa di distanza da
un pacemaker.
• Se si è portatori di pacemaker o
di un altro dispositivo medico impiantato, non usare il MiniRemote™
senza prima consultare il proprio
medico o il produttore del dispositivo
medico.
AVVERTENZA –
Perdite dalle batterie
La perdita di liquido dalle batterie
può provocare lesioni personali e/o
danni al telecomando. Se si verifica
una perdita dalle batterie, lavare
accuratamente la pelle interessata e
gli indumenti. Non contaminare gli
occhi o la bocca con il liquido delle
batterie. La batterie che perdono
possono produrre un rumore scoppiettante. Per evitare perdite dalle
batterie:
• Non utilizzare insieme batterie
nuove e usate (sostituire tutte le
batterie contemporaneamente).
• Non utilizzare batterie di marche
diverse.
• POWER A consiglia batterie
alcaline. Non utilizzare batterie agli
ioni di litio, al nichel cadmio (nicad) o
in zinco carbonio.
• Non lasciare le batterie nel
telecomando durante lunghi periodi
di inutilizzo.
• Non ricaricare batterie alcaline o
non ricaricabili.
• Non inserire le batterie al contrario.
Assicurarsi che i poli positivo (+)
e negativo (-) siano rivolti nella
giusta direzione. Inserire prima il polo
negativo.
• Quando si tolgono le batterie,
estrarle dal polo positivo.
• Non utilizzare batterie danneggiate,
deformate o che presentino perdite.
• Rimuovere le batterie scari-
che dalla batterie
• MiniRemote ricaricabili
devono essere rimosse dal
MiniRemote prima di essere
ricaricate
• Le batterie ricaricabili
devono essere caricate sotto
supervisione di un adulto
• Non cortocircuitare i termi-
nali di alimentazione
MiniRemote™ und Sekundären
IDE-Controller wurden speziell für
Wii™ entwickelt und sind mit keinen
anderen Spielkonsolen kompatibel.
Sie können Ihre POWER A
MiniRemote™ und Sekundären IDEController anstelle der Wii Remote™
und Wii Nunchuk™.
POWER A PRO PACK MINI
ENTHÄLT:
(1) MiniRemote™
• Zur Verwendung anstelle der origi-
nalen Nintendo Wii Remote™
• Kompaktes, komfortables Format
• Aktionstasten mit LED-Beleuchtung
• Texturierte Oberfläche für sicheren
Halt
• Sicherheitsarmband
(1) Sekundären IDE-Controller
• Beleuchteter analoger Stick
• Ca. 1 Meter langes Anschlusskabel
• Kompaktes, komfortables Format
EINRICHTUNG UND VER
WENDUNG DER
MINIREMOTE™
1. Öffnen Sie den Deckel des Batteriefachs, das sich auf der Rückseite
des MiniRemote befindet, und legen
Sie 2 AA-Batterien (Mikrozellen) ein.
2. Führen Sie das Armband durch das
Loch am Boden der Fernbedienung
ein. Bitte verwenden Sie immer das
Armband, damit eine Lockerung
Ihres Griffs an der Fernbedienung
verhindert wird. Dadurch werden
sowohl Schäden an der Fernbedienung und Objekten in der näheren
Umgebung als auch Verletzungen an
anderen Personen vermieden.
3. Synchronisieren Sie die
MiniRemote™ mit Ihrer
Konsole: Hinweis: Vergewis
sern Sie sich, dass Batterien
in die MiniRemote™
eingelegt sind.
a. Drücken Sie die Netztaste an der
Wii-Konsole, um diese einzuschalten.
b. Entfernen Sie die Batterieabdeckung an der Rückseite der
Fernbedienung. Drücken Sie kurz
den SYNC-Knopf an der Innenseite
der Abdeckung. Die „Player“-LEDs
blinken.
c. Öffnen Sie den Deckel des
SD-Kartensteckplatzes an der
Vorderseite der Wii-Konsole. Drücken
Sie kurz den SYNC-Knopf auf der
Innenseite des Fachs.
d. Wenn die „Player“-LED aufhört
zu blinken, ist die Verbindung hergestellt. Die jeweils leuchtende LED
zeigt die Player-Nummer an.
4. Weitere Informationen zum
Programmieren Ihrer Fernbedi-
enung entnehmen Sie bitte dem
Benutzerhandbuch zum Nintendo
Wii. Hinweis: Nach 3-5 Minuten
Inaktivität schaltet die MiniRemote in
den „Ruhemodus“, um die Batterie
zu schonen. Zum erneuten Aktivieren
der Fernbedienung drücken Sie eine
beliebige Taste.
5. Um die LED-Farbe des MiniRemote™ zu ändern, drücken Sie auf
die Select-Taste für die LED-Farbe.
INFORMATIONEN ZUR
GESUNDHEIT UND SICHERHEIT
Wenn das Produkt von Kindern verwendet wird, muss dieses Handbuch
von einem Erwachsenen gelesen
und dem Kind erklärt werden. Bei
Nichtbeachtung dieser Anweisung
besteht Verletzungsgefahr.
WARNUNG – Mögliches
RSI-Syndrom durch wiederholte
Belastung und Überanstrengung
der Augen
Längeres Videospielen kann zu
schmerzenden Muskeln, Gelenken,
Hautflächen oder Augen führen.
Beachten Sie diese Anweisungen,
um Probleme wie Tendinitis,
Karpaltunnelsyndrom, Hautreizungen
oder Augenüberanstrengungen zu
vermeiden:
• Übermäßig langes Spielen
vermeiden. Eltern sollten Ihre Kinder
beaufsichtigen, um ein angemessenes Spielverhalten sicherzustellen.
• Nach jeder Stunde Spielzeit sollte
unbedingt eine 10 bis 15 Minuten
lange Pause eingelegt werden.
• Wenn während des Spielens die
Hände, Handgelenke, Arme oder
Augen müde werden oder schmerzen
oder wenn Symptome wie Kribbeln,
taubes oder brennendes Gefühl oder
Steifheit auftreten, muss vor dem
Weiterspielen eine mehrere Stunden
lange Pause eingelegt werden.
• Sollten irgendwelche der oben
genannten Symptome oder ein
anderes Unbehagen während oder
nach dem Spielen auftreten, sollte
ein Arzt aufgesucht werden.
WARNUNG -
Stromschlaggefahr
Die MiniRemote™ kann Funkwellen
ausstrahlen, die den Betrieb von in
der Nähe befindlichen Elektronikgeräten, u. a. auch von Herzschrittmachern, beeinträchtigen können.
• Die MiniRemote™ muss deshalb
stets in einem Abstand von mindestens 23 cm von einem Herzschrittmacher verwendet werden.
• Personen mit Herzschrittm-
acher oder anderen implantierten
medizinischen Geräten dürfen die
MiniRemote™ nicht verwenden,
ohne vorher ihren Arzt oder den
Hersteller des medizinischen Gerätes
zu konsultieren.
WARNUNG –
Auslaufen der Batterie
Die auslaufende Batterieflüssigkeit
kann Verletzungen verursachen und
die Fernbedienung beschädigen. Im
Fall einer auslaufenden Batterie die
betroffenen Hautflächen und Kleidungsstücke gründlich waschen.
Die Batte rieflüssig keit nicht in die
Augen oder in den Mund gelangen
lassen. Bei auslaufenden Batterien
ist oft ein knallendes Geräusch
zu hören.
So kann ein Auslaufen der Batterien
vermieden werden:
• Niemals alte und neue Batterien
gemeinsam verwenden (alle Batterien zur gleic hen Zeit wechs eln).
• Niemals verschiedene Batterie-
marken mischen.
• POWER A empfiehlt die Verwend-
ung von Alkali-Batterien. Keine
Lithiumionen-, Nickel-Cadmium-
(NiCad) oder Kohlenstoff-ZinkBatterien verwenden.
• Bei längerem Nichtgebrauch
der Fernbedienung die Batterien
herausnehmen.
• Alkali- oder andere nicht-
aufladbare Batterien niemals
aufladen.
• Die Batterien nicht verkehrt
herum einlegen. Darauf achten,
dass die Plus- (+) und Minuspole
(-) richtig ausgerichtet sind. Immer
zuerst die Minuspolseite einsetzen.
• Beim Herausnehmen immer
zuerst die Pluspolseite entfernen.
• Keine beschädigten, verformten
oder auslaufenden Batterien
verwenden.
• Nehmen Sie die Batterien
erschöpft von der MiniRemote
• Wiederaufladbare Batterien
müssen aus dem MiniRemote vor
dem Aufladen
• Akkus sollten unter Aufsicht eines
Erwachsenen
• kostenfrei beseitigt werden Sie
keinen Kurzschluss der Anschlusskl-
emmen
MiniRemote™ y
Controlador secundario han sido
diseñados específicamente para
Wii™ y no son compatibles con otras
consolas de juego. Tu MiniRemote™
y Controlador secundario de
POWER A reemplazan al mando a
distancia del sistema Wii™ y al Wii
Nunchuk™.
EL PRO PACK MINI DE
POWER A INCLUYE:
(1) MiniRemote™
• Reemplaza al mando a distancia
original Nintendo Wii Remote™
• Tamaño pequeño y confortable
• Botones de acción con luces LED
• Superficie texturada para un
agarre más seguro
• Correa de seguridad para la
muñeca
(1) Controlador secundario
• Bastón analógico iluminado
• Cable de conexión de aproximada-
mente 1 metro
• Tamaño pequeño y confortable
CONFIGURACIÓN Y USO
DEL MINIREMOTE™
1. Abre la tapa de la batería ubicada
al dorso del MiniRemote e inserta 2
pilas “AA”.
2. Pasa la correa para la muñeca
por el orificio que se encuentra en la
parte inferior del mando a distancia.
Usa la correa para la muñeca del
mando a distancia en todo momento
para evitar que se te caiga y no
dañarlo, dañar objetos cercanos o
lesionar a otras personas.
3. Sincroniza el MiniRemote™ con
la consola.
Nota: Asegúrate de haber
colocado las baterías en el
MiniRemote™.
a. Oprime el botón de encendido de
la consola Wii para encenderla.
b. Retira la tapa del compartimiento
para baterías que se encuentra
en la parte posterior del mando a
distancia. Oprime y suelta el botón
SYNC en la parte interior de la
tapa. Parpadearán las luces LED de
“Player” (Jugador).
c. Abre la tapa de la ranura para
tarjeta SD que se encuentra en la
parte delantera de la consola Wii.
Oprime y suelta el botón SYNC en el
interior del compartimiento.
d. Cuando deje de parpadear la luz
LED de “Jugador”,habrá finalizado
la conexión. La luz LED encendida
indica el número de jugador.
4. Para obtener más detalles
sobre cómo programar el mando
a distancia, consulta el Manual
de operaciones de Nintendo Wii.
Nota: Luego de 3 a 5 minutos de
inactividad, el MiniRemote se pondrá
en modo de reposo para conservar
la vida útil de las baterías. Oprime
cualquier botón para reactivar el
mando a distancia.
5. Para cambiar el color LED de tu
MiniRemote™, presiona el botón de
selección de color LED.
INFORMACIÓN SOBRE
SALUD Y SEGURIDAD
Si niños pequeños utilizarán el
producto, un adulto les debe leer
y explicar este manual. No hacerlo
puede significar que se produzcan
lesiones.
ADVERTENCIA - Lesiones
por movimientos repetitivos y
cansancio de la vista
Jugar videojuegos puede causar
lesiones y dolor en los músculos,
las articulaciones, la piel o los ojos.
Siga estas instrucciones para evitar
problemas como tendinitis, síndrome
del túnel carpiano, irritación de la
piel o cansancio visual:
• Evite jugar en exceso. Los padres
deben controlar a los niños para que
jueguen correctamente.
• Descanse entre 10 y 15 minutos
cada una hora, aunque no crea que
es necesario hacerlo.
• Si se le cansan o le duelen las
manos, las muñecas, los brazos o los
ojos mientras está jugando, o siente
síntomas como hormigueo, entumecimiento, escozor o rigidez, deje
de jugar y descanse durante varias
horas antes de volver a hacerlo.
• Si sigue teniendo cualquiera de
los síntomas antes mencionados o
cualquier otra molestia durante el
juego o después de jugar, deje de
jugar y consulte a un médico.
ADVERTENCIA -
Descarga eléctrica
El MiniRemote™ puede emitir
ondas de radio que pueden afectar
al funcionamiento de los aparatos
electrónicos cercanos, incluidos los
marcapasos cardíacos.
• No utilice el MiniRemote™ a
menos de 9 pulgadas de distancia de
un marcapasos.
• Si tiene un marcapasos o un
dispositivo médico implantado, no
utilice el MiniRemote™ sin antes
consultar al médico o al fabricante
del dispositivo médico.
ADVERTENCIA –
Fuga de las baterías
La fuga del líquido de las baterías
puede causar lesiones personales
y dañar el mando a distancia. Si se
produce una fuga de las baterías,
lave muy bien la piel y las prendas
afectadas. Mantenga el líquido
de las baterías alejado de los ojos
y la boca. Las baterías con fuga
pueden emitir sonidos crepitantes.
Para evitar una fuga de las baterías:
• No mezcle baterías nuevas y
usadas (cambie todas las baterías al
mismo tiempo).
• No mezcle distintas marcas de
baterías.
• POWER A recomienda el uso de
baterías alcalinas. No utilice baterías
de iones de litio, níquel-cadmio
(nicad) o carbón-zinc.
• No deje colocadas las baterías en el
mando a distancia durante períodos
prolongados en los cuales no usa
el mando.
• No recargue las baterías alcalinas o
no recargables.
• No coloque las baterías al revés.
Asegúrese de que los extremos
positivo (+) y negativo (-) estén
orientados hacia el lado correcto.
Inserte primero el extremo negativo.
• Cuando saque las baterías, retire
primero el extremo positivo.
• No utilice baterías dañadas,
deformadas o con fugas.
• Retire las pilas gastadas
de las baterías recargables
MiniRemote
• Debe ser retirado de la Mini-
Remote antes de ser cargadas
las baterías recargables
• deben ser cargadas bajo la
supervisión de un adulto
• No cortocircuite los termina-
les de la fuente
 Loading...