

Page 1

High-Speed Hand Dryer
Instruction Manual
Introduction How to use Maintenance
Safety Cautions
Spare Parts
Dimension Drawing
Functional Introduction
How to use
Electrical wiring diagram
Installation procedures
6
1
2
2
3
4
5
~8
Installation
procedures:
Maintenance
Troubleshooting
Specifications
Thank you for your purchasing. Please read all of the instructions thoroughly before
attempting the installation and operation.
This manual should be kept for future reference.
9~1 0
1 1~1 2
1 3
Troubleshooting
Page 2

Safety Cautions
These precautions are important for safe usage. Be sure to use the product correctly by following these
precautions.
Symbols and meanings
WARNING
CAUTION
May result in death or serious injury.
May result injury or property damage.
The following symbols are used to indicate improtant safety instructions for the
use of the product.
Symbol
This symbol indicates a prohibited use of the product.
This symbol is used to in dicate a required in the use of this product.
Definition
WARNING
Always use specified power supply. Otherwise, a fire could result.
Do not damage the power line. Continued use of a unit with a damaged line could cause fire,
electric shock, or product problems.
Never disassemble, repair or modify the product. Doing so could cause fire or electric shock.
Do not stub out cigarettes on this product. Doing so could result in burns on the surface or cause a fire.
Do not cover Air nozzles with hand or insert any object into Air nozzles. Doing so could result in burns
or other product problems.
Do not squirt water on the main dryer unit when cleaning it. Doing so could result in electrical shock or
other product problems.
Before cleaning, turn off the power switch. Failure to do so could result in sudden activation of the
unit or electrical shock.
CAUTION
Do not hang on, tread on, or lean on the product. Otherwise, there are risk of falling.
While cleaning, pay attention to potential user; secure enough ventilation, and prohibit anyone from
using the product. Users may become sick or suffer from abnormal bodily reactions depending on
the soap or chemicals used for cleaning.
REQUESTS
Use water-resistant material for nearby walls or floor as small water drops may spread about if a user moves hands
violently when drying hands.
Do not insert rubbish or foreign objects into Drying compartment. Doing so could cause malfunction.
1
Page 3

Spare parts
Vent
Adjusting switch
FULL line
Water level indicator lamp
Indicator light
Sensor
LED light
HEPA filter
No-spill water channel
HEPA Filter
Dimension Drawing
295
265
530
Drain tank
190
Power cord
180
260
160
(mm)
2
Page 4

Functional Introduction
Switch
Mode
Power off
Power on
Low speed
High speed
Heater off
Heater on
3
Page 5
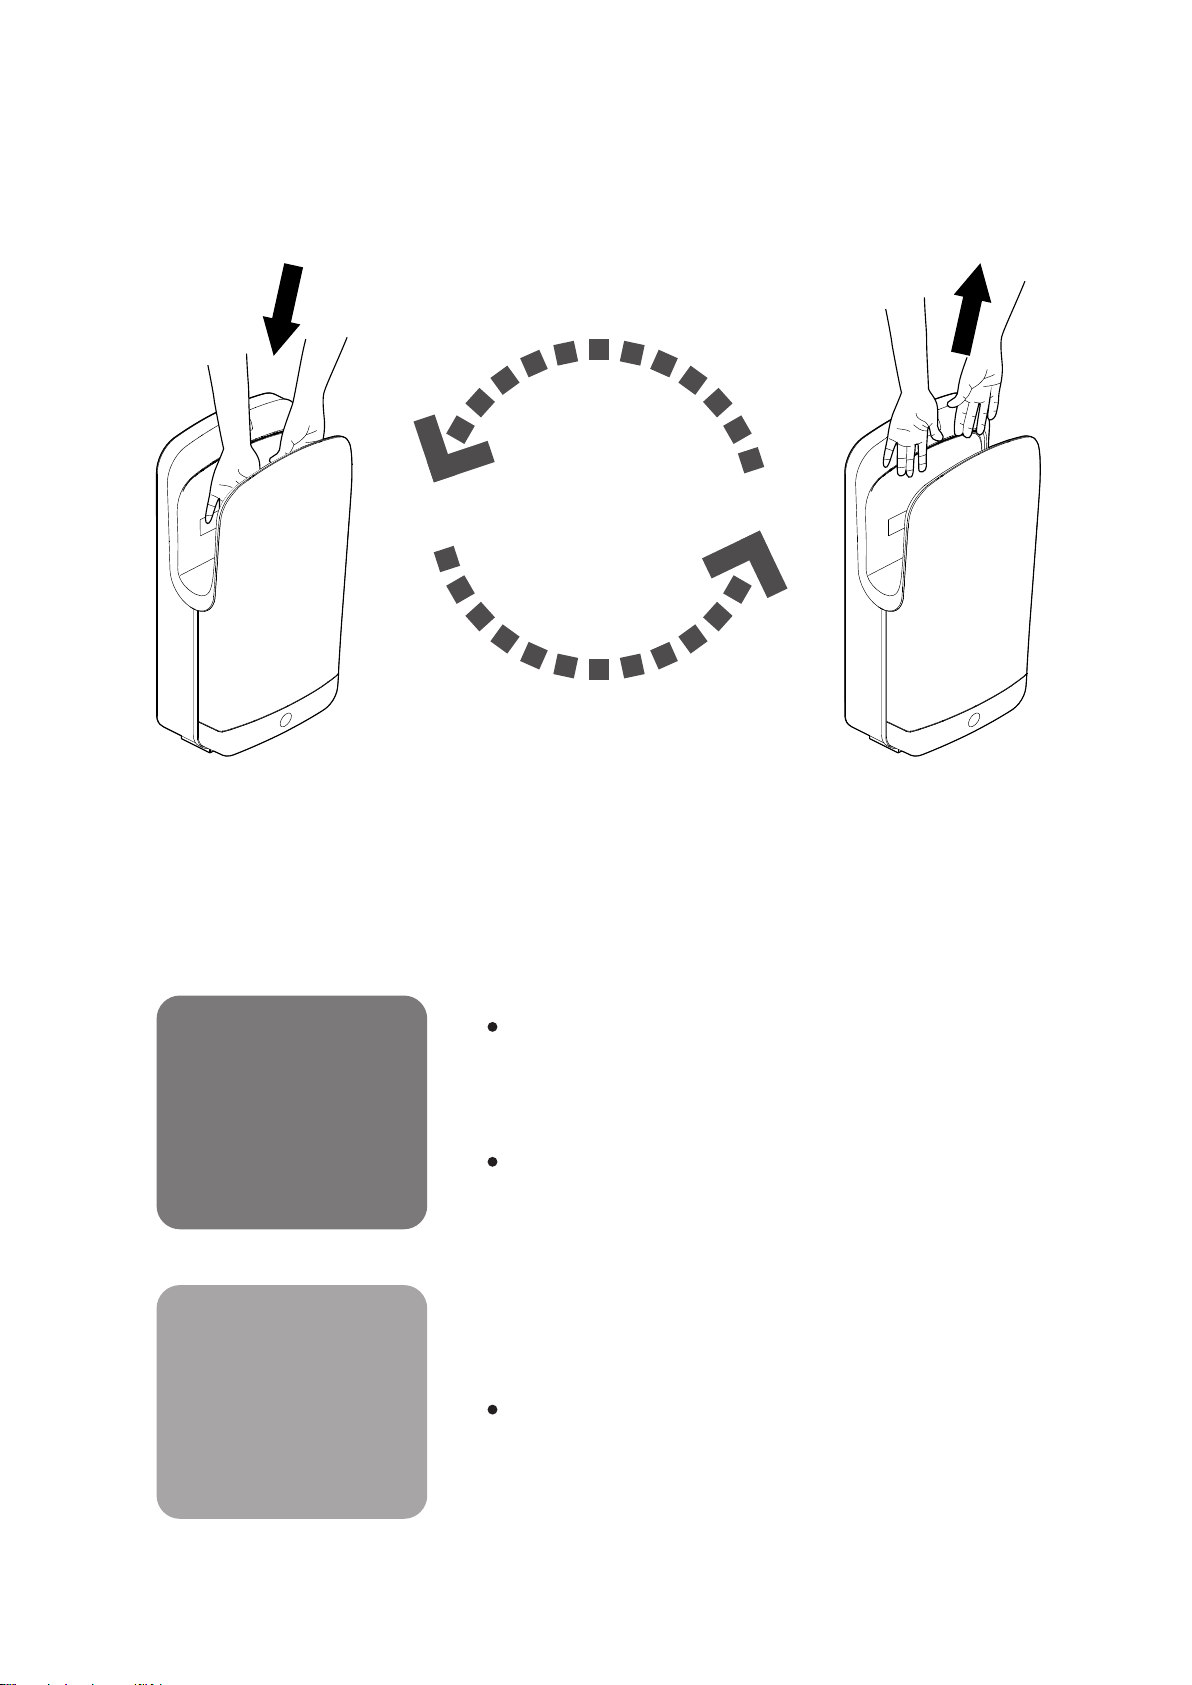
How to use
Repeat
Ouststretch fingers and insert hands
all the way into the product.
CAUTION
Afert the dryer is activated, slowly
lift hands white water is blown off.
Move hands side to side if dryer does not activate.
Small water drops may spread around if user moves
hands violently when drying hands.
Anti-damage timer
The hand dryer stops automatically after approxinmaterly
30 second of continuous operation. In order to continue
to use the product, remove hands again.
4
Page 6

Installation diagram
Do not install the product in a humid place or the place where water could drip onto, such
as outdoors or a bathroom.
Otherwise, a fire, electric shock or product problems could result.
Do not install the product in an area with corrosive or inflammable gas, dust, or salt.
Otherwise, a fire, electric shock or product problems could result.
Do not use the product with any power supply other than specified. Otherwise,a fire could result.
Do not damage power line. Continued use of a unit with a damaged line could cause fire,
eleceric shock, or product problems.
Never disassemble, repair or modify the product. Doing so could cause fire or electric shock.
Electric work must be done by qualified personel following.
Technical Standards of Electric Equipment, Indoor wiring requlations, and the Installion Guide.
Improper wiring could cause fire to ignite.
Install an earth leakage circuit breaker to the power supply.
If the earth leakage circuit breaker is not installde, electric shocks could occur if there is a malfunction
or a short circuit.
Use a power line of the rated capacity and connect it securely. An insecure connection may result in fire.
WARNING
CAUTION
Install the main dryer unit on a flat and vertical wall strong enough to support it securely.
Otherwise, the main dryer unit may fall and result in injury or damage.
REQUESTS
Use water-resistant material for nerady walls and floor as small water drops may spread dbout if a user moves
hands violently when drying hands.
Electrical wiring diagram
Emitter board
Lighting and
receptor board
Display board
Panel control board
Microcomputer master control board
Power supply
Balanced inductor
Temperature sensor
Check the malfunction
Fault LED Check items Causes and treatment
Power / abnormal
voltage
Tamper-proof timer
light go out blinking
Check the power connection and
confirm the voltage normal.
Sensor fault, continuous operation,
check whether or not the sensor is
blocked.
PTC heater
Motor
Magnetic ring
Inductor
5
Page 7

Installation procedures:
Space requirement
20 20
40
(mm)
Included parts
Mounting plate
Power Switch
Instr uctio n
Manua l
Four screws
Four tubes
Instruction Manual
Leave enough space around the product to allow for use.
Use screws with drawing strength of 1000N or more.
Check parts
Power supply
Install a single Earth leakage circuit breaker with a sufficient
current rating and rating and apply the specified power.
Earth leakage
circuit breaker
Power supply
Rated 10 A or more
AC22 0~240V
To Installaton Contractors
After verifying the trial operation, give the customer
the Instruction Manual and Cleaning Instruction Sheet
and explain how to use the product.
6
Page 8

1 Unpack the product
2 The installation of the base plate
Height of the installation
of the base plate
For Man 900mm
For Woman 870mm
For disabled 800mm
For Children 700mm
3 The location of power line.
认电源线长度
4 The length of the power line
500mm
200mm
40mm
5 Install the machine
7
Page 9

6 Installation of Anti-theft screw
7 Install filter screen
8 Confirm the switch position
9 Test operation
10 Installation drain tank
Lighting
Lock
8
Page 10

Maintenance
Clean the product regularly to make sure it is functioning properly.
Use a damp soft cloth to wipe.
1
1
2
3
Hand drying area
(once a week)
2
2
4
2
Front cover
(once a week)
Warning
Do not squirt water on the main dryer unit when cleaning it.
Doing so could result in electrical shock or other product problems.
Do not install the water tray with cleaning agent residue into the product.
Doing so could cause product problems.
Do not use acid or alkali chemicals designde for cleaning toiltes.
Do not use benzine, thinners or cleansers. Do not use nylon sponges or dry cloth.
Before cleaning, turn off the power switch.
Failure to do so could result in sudden activation of the product.
9
Page 11

3
Drain tank
(
When the water is full, clean it in time)
(1) (2) (3) (4)
FULL line
4
(5) (6) (7) (8)
HEPA Filter (Once every 100 days to 150 days )
Take out the HEPA filter and replace it
Cleaning filter box
10
Page 12

Troubleshooting
Please read these sections for troubleshooting before requesting repair services.
Trouble
Indicator status
No light
No dry air blow when hands put in.
Lights on
Light was flashing
See below
Light was flashing
See below
soltuions
Power Switch might be set to OFF
If so, set Power Switch to ON.
Has the circuit breaker been tripped?
If is OFF, Please reset it.
Due to the location of Sensors, detection of hands is difficult in some
areas, including between Sensors and near the corners
Align fingers and put both hands fully into drying compartment .
If air blows,the dryer is working properly.
Has Filter accumulated dust or debris?
Clean Filter if these is an accumulation of dust or debris.
Is the ambient temperature within opetating temperature limits?
Set the temperature within -10 to 40 ℃。
Has something been placed inside the unit that could be blocking a sensor?
If there is something in the unit, remove it.
Is the sensor dirty?
If the sensor is not clean, wipe it with a soft damp cloth.
If the problem persists after the sensor is cleaned, the sensor is malfunctioning.
See page 3
See page 2
Dryer not stopped when
hands removed
Warm air is not blown
(only for units with a heater)
Warm air is blown
The air volume is weak
Stopping 1-2 seconds after removing hands is normal.
Is the sensor dirty?
If the sensor is not clean, wipe it with a soft damp cloth.
Heater Power Switch might be set to OFF.
If so, set Heater Power Switch to ON.
Is the ambient temperature low?
The air might feel colder when the temperature is low.
See page 2
See page 3
(Only for the unit with aheater)Heater Power Switch might be set to ON.
If so, set Heater Power switch to OFF
Has Filter accumulated dust or debris?
Clean Filter if dust or debris has accumulated.
Is the ambient temperaure high?
The air might feel warmer when the temperature is high.
Is the dryer active for along time?
The air might become wamer if hand dryer is active for a long time
due to heat from the fan motor.
Has Filter accumulated dust or debris?
Clean filter if it has accumulated dust or debris.
Is the Fan Strength Switch set to Low?
Set the Fan Strength to High.
See page 3
See page 10
See page 10
See page 3
If the problem still prosists after preforming suggested actions, turn off the power switch and set
the breaker to Off. Please contact the supplier.
11
Page 13

Indicators
Standby
The dryer is activated
Nomal state
Always ON
ON
OFF
Always On
ON
OFF
Stautus indicator lights
Indicator ligh t
LED Light
Meaning or the indicators
Power is being supplied
(Standby)
Power is being supplied
(While the dryer is
activated)
Operation the product/
Corrective actions
An indicator is lit dimly
all the time.
An indicator is lit brighter
than standby.
Power ON
Flashing Flashing
Abnormal state
Always ON
ON
OFF
Light was flashing
ON
OFF
Light was flashing
ON
OFF
LED Light
Water tray is full
Light was flashing
The sensor feels
abnormal
Discard water from the
water tray.
The machine has been
working on 30s,machine
Think it's a prank.
Machine stopwork.
Please clear the barrier.
Unable to work
Make sure that sensors
are clean.If they are not
clean, wipe them with a
soft damp cloth
LED Light
If the indicator does not
turn off, consult with the
installion contractor.
12
Page 14

Specifications
For brushless motor DC
Item
Model name
Model number
Power Rating
Power supply specifications
Power
consumption
DC Motor
Heater
High
speed
Low
speed
Standby power consumption
Heater on
Heater off
Heater on
Heater off
Description
High-Speed Hand Dryer
AC220V~240V 50Hz~60Hz
Directly connect to power supply
1600W
700W
1200W
500W
Approximately 2.3W or lower
DC/brushless motor
PTC
Safety device
Dimensions(mm)
Weight
Drain tank capacity
Available set temperature range
For brush motor AC
Item
Model name
Model number
Power Rating
Power supply specifications
Power
consumption
DC Motor
High
speed
Low
speed
Standby power consumption
Heater on
Heater off
Heater on
Heater off
Temperature sensor ·
Width 300mm, depth 165mm
Between
- 10~40℃ *Set a temperature that prevents condensation
High-Speed Hand Dryer
current fuse · temperature fuse
, height 535mm
10 Kg
Approximately 1200mL
Description
AC220V~240V 50Hz~60Hz
Directly connect to power supply
2000W
1300W
1500W
1100W
Approximately 2.3W or lower
AC/brush motor
Heater
Safety device
Dimensions(mm)
Weight
Drain tank capacity
Available set temperature range
PTC
Temperature sensor · current fuse · temperature fuse
Width 300mm, depth 165mm, height 535
9 Kg
Approximately 1200mL
Between - 10~40℃ * Set a temperature that prevents condensation
mm
13
 Loading...