

Page 1

Pouian*
Please do not return unit to retailer.
Por favor, no devuelva el aparato al lugar de compra.
Veuillez ne pas retourner l’outi! au détaillant,
1-800-554-6723
www.poulan.com
Manual de Instrucciones
Manuel d’instructions
WARNING:
A
Read and follow all Safety Rules and Operating Instructions before
using this product. Failure to do so can result in serious injury.
ADVERTENCIA:
Lea el manual de instrucciones y siga todas las advertencias e
instrucciones de seguridad. E! no hacerlo puede resultar en lesiones
graves.
AVERTISSEMENT;
Lire le manuel d’instructions et bien respecter tous les avertisse
ments et toutes les instructions de sécurité. Tout défaut de le faire
pourrait entraîner des blessures graves,
Instruction Manual
PLN3516F
2^15157
Pouian
1030 Stevens Creek Road
Augusta, GA 30907
850 Matheson Blvd, West
Pûuîan
Mississauga, Ontario L5V 0B4
9096-212604
Page 2

INTRODUCTfON
TABLE OF CONTENTS
1 GENERAL INFORMATION .................................................3
1-1, General Identification
1-2. Safety Features
1 -3 Glossary
1- 4. Specificaiioin
2 SAFETY PRECAUTIONS.....................................................5
2- 1, Kickback Safety Labels
2-2. Important Safety Instructions
2-3. Other Safety Precautions
2-4. General Safety Precautions for chain saw users
2-5. More About Kickback
2- 6. International Symbols
3 ASSEMBLY INSTRUCTIONS...............................................9
3- 1. Introductioin
3-2. Assembly Requirements
3-3. Guide Bar / Saw Chain Installation
3-4. Saw Chain Tension Adjustment
3-5. Filling Oil Tank
3- 6. Selecting the Proper Extension Cord for Your Saw Model
4 OPERATING INSTRUCTIONS
4- 1. To Start Saw
4-2. To Stop Saw
4-3. Chain and Bar Lubrication
4-4. CHAIN BRAKE® / Hand Guard
4- 5. Extension Cords
5 GENERAL CUTTING INSTRUCTIONS
5- 1. Felling
5-2. Limbing
5-3. Bucking
5- 4. Bucking Using a Sawhorse
6 BAR/CHAIN MAINTENANCE
6- 1. Guide Bar Maintenance
6- 2, Chain Maintenance Instructions
..........................................11
.........................
.......................................
13
15
7 BAR/CHAIN MAINTENANCE .......................................17
7- 1. Preventive maintenance
7-2. Chain Replacement Information
8 LIMITED WARRANTY ..................................................18
Page 3
1 - GENERAL INFORMATION
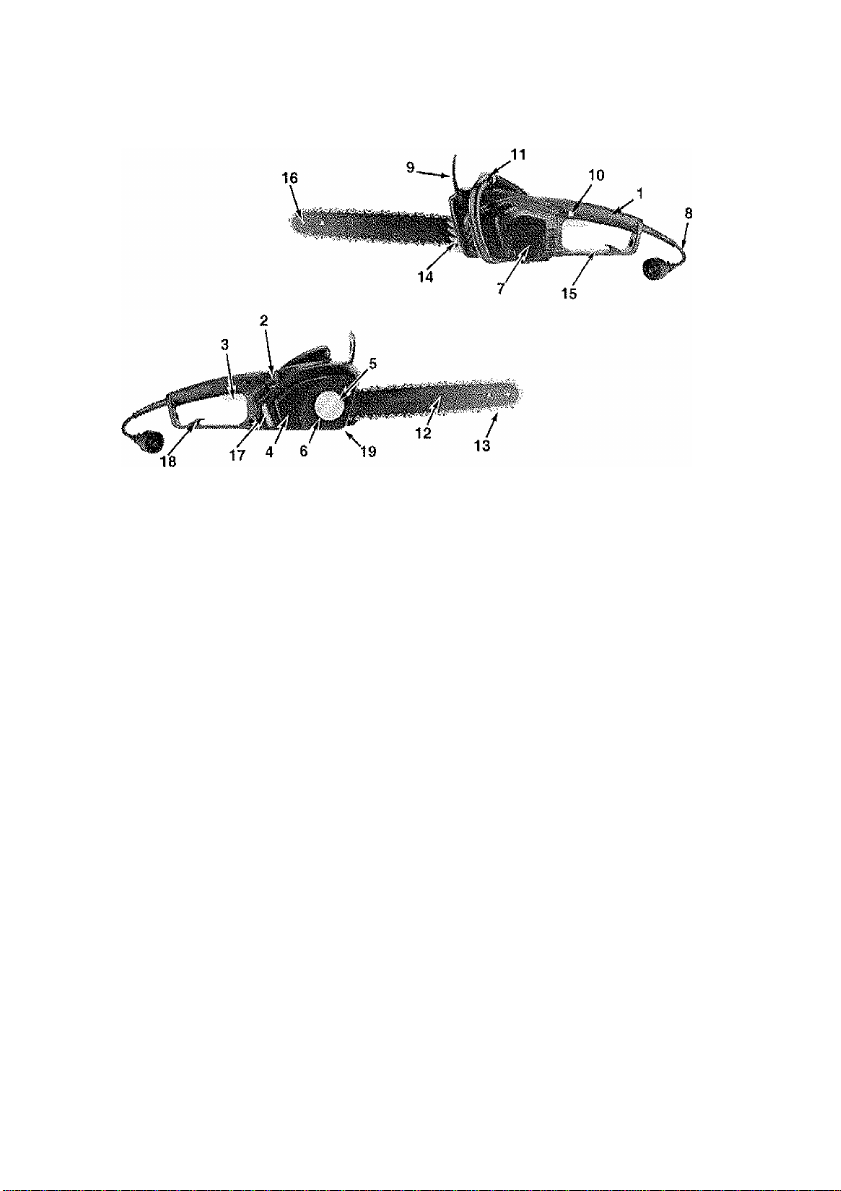
1-1. GENERAL IDENTIFICATION
1. REAR HANDLE
2. OIL TANK CAP
3. TRIGGER START/STOP SWITCH
4. SPROCKET COVER
5. BAR BOLT KNOB
6. CHAIN TENSION RING
7. ELECTRIC MOTOR
8. ELECTRIC CORD
9. CHAIN BRAKE® LEVER /
HAND GUARD
10. LOCK/OFF BUTTON
11. FRONT HANDLE
12. GUIDE BAR
13. SAW CHAIN
14. SPIKES
15. REAR HAND GUARD
16. SPROCKET
17. OIL TANK WINDOW
18. CORD RETAINER
19. CHAIN CATCHER
1-2. SAFETY FEATURES
Numbers preceding the descriptions
correspond with the numbers
on preceding page to help you locate the
safety feature.
3 TRIGGER START / STOP SWITCH
stops saw motor when released.
7 ELECTRIC MOTOR is double
insulated for added safety.
9 CHAIN BRAKE® LEVER / HAND
GUARD activates the chain brake and
protects the operator’s left hand in the
event it slips off the front handle while
saw is running.
10 LOCK / OFF BUTTON prevents
accidental acceleration of the saw
motor.The trigger cannot be squee:;?ed
unless lock/off button is depressed.
12 GUIDE BAR Reduced kickback guide
bar reduces the intensity of kickback,
13 LOW-KICKBACK CHAIN helps
significantly reduce kickback, or the
intensity of kickback, due to specially
designed depth gauges and Guard
links.
19 CHAIN CATCHER reduces the danger
of injury in the event saw chain breaks
or derails during operation. The catcher
is designed to intercept a whipping
chain.
Page 4

1-3. GLOSSARY 13. LOW-KICKBACK CHAIN - A chain
1. BUCKING - The process of cross that complies with the kickback
cutting felled tree or log into lengths,
2. CHAIN BRAKE-A device used to Slop B175.M991 when tested on a
thp rhflin isflw representative sample of chain saws.
3. cSsrvi^POlVEffHEAO-Achain U. NORMAL CUTTING POSITION -
saw without the saw chain and guide I^ose positions assumed in performing
u “ the bucking and felling cuts.
4. DRIVE SPROCKET OR SPliOCKET- IS. NOTCHING IMDERCUT-ArtOchcul
The toothed part that drives the saw
6. F£i.i./NO-The process of cutting ,, ? tT“''®'"'e n ai
down a tree 17. t?£/4f?W>tWDL£-The support handle
6. FELLING BACK CUT- The final cut in
a tree felling operation made on the ^apnijrFn KiCKRArK nuinp bar
opposite side of the tree from the . tT u
not^hinn iinopmijt ^ guide bar which has been
16, OILER CONTROL - A system for oiling
7. FHONTH71«D1.£'-Thesupporthandlo demonstrated to reduce kickback
chain* °* *'*'* RAPIECEMENT SAW CHAIN - A
8. FRONT HANDLE GUARD . A chain lhat compiles with the kicki^ck
structural barrier between the Iron! grÎ?T^nt ° r.
handle of a chain saw and the guide B175.1-1991 when tested vv, h sprteiic
bar, typically located close to the hand
position on the front handle and pertorrnance requirements when used
fevefloTfoZ'Se"' ^0. SAW CHAfN-\ loop ol chain having
9. GUIDE BAR-A Lid ratted structure cuttirtg teeth, that cut the worçd, and
that supports and guides the saw “
rhain supported by the guide bar,
lO.SBACK-Thebackwardorupward 21. s™h7BUMPERJ-Sn/CE;-The
motion, or both of the guide bar '°“‘P^^
occurring when the saw chain near the ‘’““'''"a P'™‘ "'p
nose ol the lop area of the guide bar ,, 'SlTj-’'iF°ïT
contacts any obieot such as a log or 22. SOTTCH-A device that when
branch, or when the wood closes In "P® *" complete or mtermpt an
and pinches the saw chain in the cut. P““'
11. WCKB/tCK, PINCH-The rapid .
pushback of the saw which can occur LINKAGE ■ The mechani^sm
Ivhen the wood closes in and pinches “ ^
iie tTriïïhÎmrPrÎe iJ," 2“. SWiTcH LOCKOUT- A movable stop
the top of the guide bar. , ... _ ,, . ^
12. KICKBACK, hTATIONAL-TM that proven s the unintentional
rapid upward and backward motion of ‘I®
the saw which can occur when the actuatea.
moving saw chain near the upper
portion of the tip of the guide bar
contacts and object, such as a log or
branch.
1-4. SPECIFICATIONS
Model No
Input
Peak Horsepower
No Load Speed.........................................................5500/min
Bar Length
Culling Speed............................................................10.5m/sec
Chain Oil Capacity
Net Weight (Without guide bar and chain)
............................................................
.........................................................................
.....................................................
...............................................................
...................................................
..............
4
PLN3516F
120V-, 60H2, 13.5 Amp
3.5HP
16" (40cm)
180ml
4.2 kg (9.24 Lbs)
Page 5
2 - SAFETY PRECAUTIONS
SAFETY PRECAUTIONS FOR CHAIN SAW USERS
(ANSI/UL 1662-1995) (CAN/CSA-Z62.1-03)
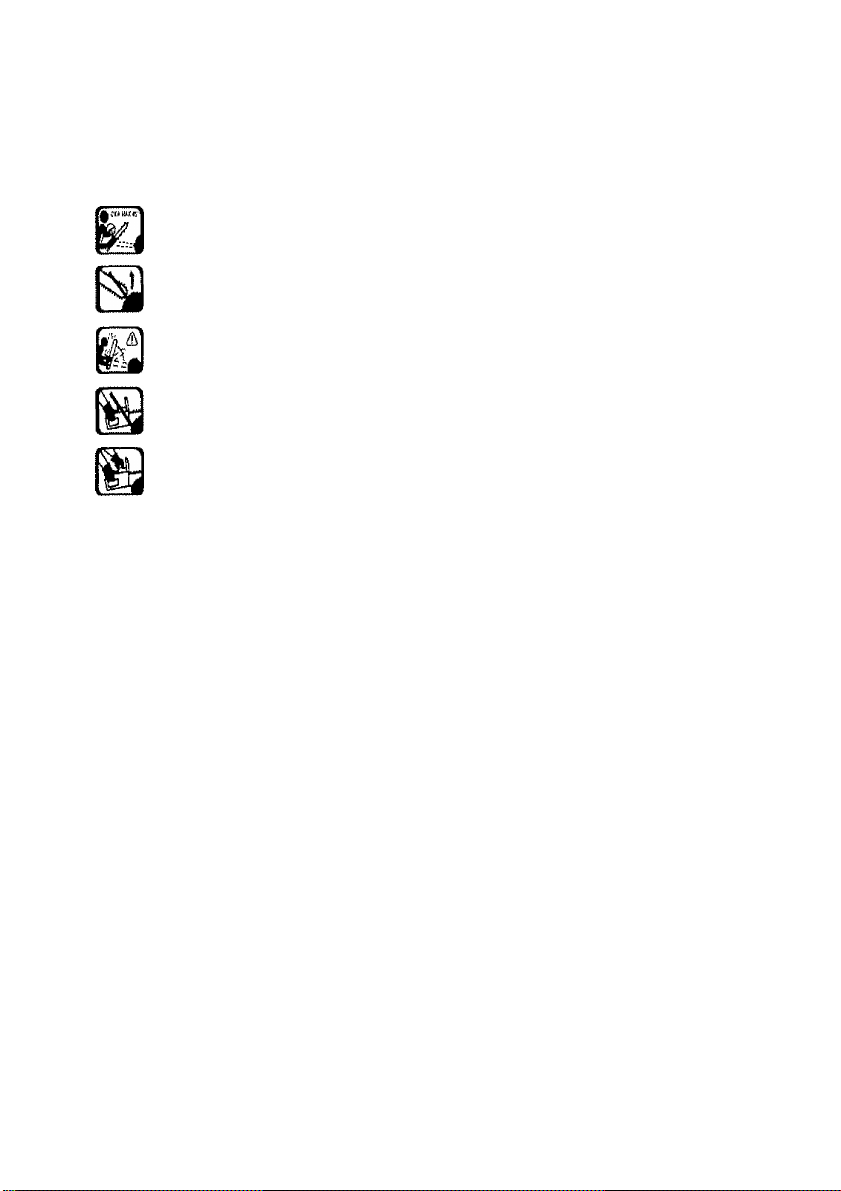
2-Í. KICKBACK SAFETY LABELS
1. Worst-case computed kickback
angle.
2. Avoid bar nose contact.
3. Beware of kick back.
4. Do not attempt to hold saw with
one hand.
RECOMMENDED
5, Hold Saw properly with both
hands,
2-2. IMPORTANT SAFETY
INSTRUCTIONS
1. REPLACEMENT PARTS - When
servicing use only identical
replacement parts.
2. POLARIZED PLUGS - To reduce the
risk of electric shock, this equipment
has a polarized plug {one blade is
wider than the other). This plug will tit
in a polarized extension cord only one
way. If the plug does not fit fully in the
extension cord, reverse the plug. Do
not change the plug in any way.
3. KEEP THE WORK AREA CLEAN:
Cluttered areas invite injuries. Do not
start cutting until you have a clear work
area, secure footing, and a planned
retreat path from the falling tree.
4. CONSIDER THE WORK AREA
ENVIRONMENT: Use extreme caution
when cutting small sized brush and
saplings because the slender material
may catch the saw chain and be
whipped toward you or pull you off
balance. Do not operate a chain saw in
a tree unless specifically trained to do
so. When cutting a limb that is under
tension, be alert for spring back so that
you will not be struck when the tension
in the wood fibers is released. Do not
expose the chain saw to rain. Do not
use the chain saw in damp or wet
locations. Do not use the chain saw in
presence of flammable liquids or
gases.
5. GUARD AGAINST ELECTRIC
SHOCK: Prevent body contact with
grounded surfaces. For example: metal
pipes, wire fences.
6. KEEP CHILDREN AWAY: Do not let
visitors contact the chain saw or
extension cord. All visitors should be
kept away from the work area.
7. STORE IDLE CHAIN SAW: When not
in use, chain saws should be stored in
a dry, and high or locked-up place - out
of the reach of children. When storing
saw, use a scabbard or carrying case.
8. DO NOT FORCE CHAIN SAW: It will
do the job better and safer at the rate
for which it was intended.
9. USE RIGHT TOOL: Cut wood only.
Don’t use chain saw for purposes not
inteded - for example - Don’t use the
chain saw for cutting plastic, masonry,
or nonwood building materials,
10. DRESS PROPERLY: Do not wear
loose clothing or jewelry. They can get
caught in moving parts. Rubber gloves
and non-skid footwear are recommend
ed when working outdoors.Wear prote
ctive hair covering to contain long hair,
11. USE SAFETY GLASSES: Also use
safety footwear; snug fitting clothing;
protective gioves; head safely chaps
protection.
12. CARRYING SAW: Carry the chain saw
by the front handle with the saw
stopped, finger off the switch, the guide
bar and saw chain to the rear.
13. MAINTAIN CHAIN SAW WITH CARE:
Inspect chain saw cords periodically
and if damaged, have repaired by
authorized service facility. Keep cord
dear of the chain and operator at all
times. Never carry saw by the cord or
pull it to disconnect from receptacle.
Keep the cord free from oil and away
from sharp edges. Inspect extension
cords periodically and replace if
damaged. Keep tools sharp and clean
for better and safer performance.
Follow instructions for lubricating and
changing accessories. Keep handles
dry, dean and free from oil and grease.
14. DISCONNECT CHAIN SAW: Disconn
ect the chain saw when not in use,
before servicing, and when changing
accessories and attachments, such as
saw chain and guard.
Page 6

15. OUTDOOR EXTENSION CORDS: Use
only extension cords intended for
outdoor use and marked accordingly.
16. STAY ALERT; Watch what you are
doing. Use common sense. Do not
operate the chain saw when you are
tired. Keep all parts of the body away
from the saw chain when the motor is
operating. Before you start the saw,
make sure the saw chain is not
contacting anything.
17. CHECK DAMAGED PARTS: Before
further use of the chain saw, a guard or
other part that is damaged should be
carefully checked to determine that it
will operate properly and perform its
intended function. Check for alignment
of moving parts, binding of moving
parts, breakage of parts, mounting, and
any other conditions that may affect its
operation. A guard or other part that is
damaged should be properly repaired
or replaced by an authorized service
center unless otherwise indicated
elsewhere in this instruction manual.
18. GUARD AGAINST KICKBACK:
WARNING:
Kickback may occur when the nose or tip
of the guide bar touches an object, or
when the wood closes in and pinches the
saw chain in the cut. Tip contact in some
cases may cause a lightening fast reverse
action, kicking the guide bar up and back
towards the operator. Pinching the saw
chain along the top of the guide bar may
push the guide bar rapidly back towards
the operator. Either of these reactions may
cause you to lose control of the saw which
could result in serious injury to the user.
The following precautions should be
followed to minimize kickback:
A. GRIP SAW FIRMLY: Hold the chain
saw firmly with both hands when the
motor is running. Use a firm grip with
thumbs and fingers encircling the
chain saw handies. Note : If a
manual oiler control is provided,
additional or modified instructions
regarding its use is to be provided.
B. Do not over reach,
C. Keep proper footing and balance at
ail times,
D. Don’t let the nose of the guide bar
contact a log. branch, ground or
other obstruction.
E. Do not cut above shoulder height.
F. Use devices such as low kickback
chain, guide bar nose guards, chain
brakes and special guide bars that
reduce the risks associated with
kickback.
G. Only use replacement bars and
chains specified by the manufacturer
or the equivalent,
H. There are no other replacement
components for achieving kickback
protection,
19, POWER SUPPLY; Connect the chain
saw to correct voltage, that is, be sure
that the voltage supplied is the same
as that specified on the nameplate of
the tool.
2-3. OTHER SAFETY PRECAUTIONS
1, DO NOT operate a chain saw that is
damaged, improperly adjusted, or not
completely and securely assembled.
Be sure that the saw chain stops
moving when the trigger is released.
2, DO NOT attempt operations beyond
your capacity or experience,
3. DO NOT operate a chain saw with one
hand! Serious injury to the operator,
helpers, or bystanders may result from
one-handed operation, A chain saw is
intended for two-handed use.
4. TO REDUCE potential for electric
shock, do not operate the saw on wet
or slippery surfaces, or during snow
storms, rain storms, and other adverse
weather conditions.
6. Keep the handles dry, clean, and free
of oil or grease.
6. DO NOT allow dirt, debris or sawdust
to build up on the motor or outside air
vents.
7. Follow the manufacturer’s sharpening
and maintenance instructions for the
saw chain,
8. Cut at high motor speeds.
9. Operation of a chain saw should be
restricted to mature, properly instructed
individuals.
10. Your chain saw is intended for
occasional homeowner use. it is not
made for continuous heavy duty use.
11. DO NOT FORCE a small saw to do a
job requiring a heavier duty unit.
12. EXAMINE THE ELECTRICAL
SWITCHES. Do not use the chain saw
if the switches do not properly turn on
and off. Do not attempt to make any
repairs to the electric switches. Take
your saw to a Poulan Authorized
Service Center,
13. MAINTAIN EXTENSION CORDS.
Inspect the extension cords periodically
and replace if damaged, Oniy use
power cords that are suitably marked
for outdoor use,
Page 7

14. DO NOT OPERATE YOUR CHAIN
SAW near or around flammable liquids
or gases, whether in or out of doors.
An explosion and/or fire may result.
15. All chain saw service, other than the
items listed in the user manual safety
and maintenance instructions, should
be performed by competent chain saw
personnel. Do not attempt to repair it
yourself: there are no user serviceable
parts inside.
16. NEVER REMOVE, modify or make
inoperative any safety device furnished
with your unit. The CHAIN BRAKE®/
Hand Guard is a major safety feature.
The saw wil) not run when the CHAIN
BRAKE® is tripped.
17. This electric powered saw is intended
for infrequent use by homeowner's,
cottagers and campers, and for such
générai appiications such as clearing,
pruning, cutting firewood, etc. It is not
intended for prolonged use. if the
intended use involves prolonged
periods of operation, this may cause
circulatory problems in the user’s
hands due to vibration. It may be
appropriate to use a saw having an
anti-vibration feature,
18. Safety clothing required by your safety
organizations, government regulations,
or your employer should be used;
otherwise, snug fitting clothing, safety
footwear, safety chaps and hand and
ear protection should be worn.
19. When felling, keep at least two (2) tree
lengths between yourself and your
fellow workers,
2-4. GEN£RAL SAFETY PRECAU
TIONS FOR CHAIN SAW USERS
1. Fatigue causes carelessness. Be more
cautious before rest periods and
towards the end of your shift,
2. Personal protective clothing required
by your safety organizations,
government regulations, or your
employer should be used. At all times
when using a chain saw, snug-fitting
clothing, safety chaps protective eye
wear, safety footwear, and hand, leg,
and hearing protection should be worn.
3. When felling, keep at least two (2) tree
lengths away from your fellow workers.
4. Plan your work, ensuring an obstacle-
free work area and, in the case of
felling, at least one escape path from
the falling tree.
5. Follow the instructions in your
operator’s manual for starting the chain
saw and control the chain saw with a
firm grip on both handles when it is in
operation. Keep handies dry, clean,
and free of oil.
6. When transporting your chain saw, use
the appropriate transportation covers,
which should be available for the guide
bar and saw chain.
7. Never operate a chain saw that is
damaged or improperly adjusted or that
is not completely and securely
assembled. Be sure that the saw chain
stops moving when the power control
system trigger is released. Never
adjust the guide bar or saw chain when
the motor is operating.
8. Do not attempt a pruning or limbing
operation in a standing tree unless
specifically trained to do so,
9. Guard against kickback. Kickback is
the upward motion of the guide bar that
occurs when the saw chain, at the
nose of the guide bar, contacts an
object. Kickback can lead to dangerous
loss of control of the chain saw.
10. A chain saw is intended for two-handed
use. Serious injury to the operator,
helpers, and/or bystanders could result
from one-handed operation.
11. See section 1-6 for symbol defirmtions,
page 14.
12. When carrying a chain saw with the
motor running, engage the chain brake.
13. Keep other persons or animals a safe
distance away from a running chain
saw or the area where a tree is being
felled.
14. Use extreme caution when cutting
small brush and saplings because
slender material can catch the saw
chain and be whipped toward you.
15. When cutting a limb that is under
tension or compression, be alert for
springback.
2-5. MORE ABOUT KICKBACK
WARNING;
DANGER! BEWARE OF KICKBACK!
Kickback can lead to dangerous loss of
control of the chain saw and result in
serious or fatal injury to the saw operator
or to anyone standing close by. Always be
alert because rotational kickback and pinch
kickback are major chain saw operational
dangers and the leading cause of most
accidents.
Page 8

BEWARE OF:
ROTATIONAL KICKBACK (Figure 2-5A)
A = Kickback path
B = Kickback reaction zone
THE PUSH (PINCH-KICKBACK) AND
PULL REACTIONS (Figure 2-5B)
A = Puli
B = Solid objects
C = Push
2-5B
2-6, {DENTfFtCATtON OF SAFETY SYMBOLS
KICKBACK may occur when the NOSE or
TIP of the guide bar touches an object, or
when wood closes in and pinches
the saw chain in the cut.
Tip contact in some cases may cause a
lightening-fast reverse reaction, kicking the
guide bar up and back toward the operator.
PINCHING the saw chain along the
BOTTOM of the guide bar may PULL the
saw forward, away from the operator.
(See Fig. 2-5B “A")
PINCHING the saw chain along the TOP of
the guide bar may PUSH the guide bar
rapidly back toward the operator
(See Fig, 2-5B "C”).
Any of these reactions may cause you to
lose control of the saw, which could result
in serious personal injury.
A
WARNING! This chain saw can
be dangerous, careless or
improper use can cause serious
or even fatal injury.
Read and understand the
instruction manual before using
the chain saw.
Double insulated - When
servicing use only identical
replacement parts. Replace
damaged cord immediately.
To reduce shock hazard, do not
expose unit to water or operate
on wet ground.
Contact of the guide bar tip with
any object should be avoided. Tip
contact may cause the guide bar
to move suddenly upward and
backward, which may cause
serious injury.
Always use both hands when
operating the chain saw.
There may be other replacement
components for achieving
Kickback protection.
Hearing protection should be
worn.
Page 9

3 - ASSEMBLY INSTRUCTIONS
3-i. INTRODUCTION
This unit is designed for occasiona)
homeowner use and shouid not be used
for commercial purposes or subjected
to heavy continuous use.
Your new chain saw can be used for a
variety of projects such as cutting firewood,
making fence posts, leiling small trees,
limbing, pruning at ground level, and iighl
carpentry. Cut only wood or wood products
with your saw,
3-2. ASSEMBLY REQUIREMENTS
Your new chain saw will require adjust
ment of chain and filling the oil tank with
lubricating oil before the unit is ready for
operation. Do not start the saw motor until
the unit is properly prepared. Read all
instructions carefully. Do not install any
other size bar and chain than what is
recommended for your model,
3-3. GUIDE BAR/SAW CHAIN
INSTALLATION
CAUTION
Disconnect the chain saw from power
souce before checking or adjusting the
chain saw tension,
TO INSTALL GUIDE BAR & SAW CHAIN:
These instructions are for replacing a bar.
The unit is fully assembled when shipped.
NOTE: Always wear heavy gloves when
handling the saw chain.
1. Place power unit on flat surface.
2. Loosen knob (B) slightly by turning
knob counter-ciockwise and then turn
the chain tension ring (C) counter
clockwise to relief chain tension. To
remove the sprocket cover (A), turn
knob (B) counter-clockwise, (Fig, 3-3A)
3. Remove saw chain form around the
guide bar and the sprocket. Siide the
guide bar, with tension plate (D)
attached, from the unit. (Fig. 3-3B)
4. Remove screw (C) from the tension
plate (D) to remove it from the old bar
and attach it to the new bar. (Fig, 3-3B)
5. Spread the chain out with the cutting
edges (E) of the chain pointing in the
DIRECTION OF ROTATION.
(Fig. 3-3C)
To fit the chain links into the groove on
the guide bar, turn the tension plate (D)
counter-clockwise to the end. Install
the chain and bar on the power unit,
turn the tension plate (D) clockwise and
then put the side cover (A) on.
(Fig. 3-3D)
Turn the knob clockwise, adjust the
chain tension ring (F) and then tighterr
the knob. After running the chain saw
about for one (1 ) hour - retension the
chain, if needed, based on figure 3-4A,
Page 10

3~4. SAW CHAIN TENSION
ADJUSTMENT
Proper tension of the saw chain is extrem
ely important and must be checked before
starting, as well as during, any cutting
operation. Taking the time to make needed
adjustments to the saw chain will result in
improved cutting performance and
prolonged chain life,
NOTE: A new chain and bar will need
readjustment after as few as 5 cuts. This is
normal during the break-in period, and the
interval between future adjustments will
lengthen quickly (Figure 3-4A).
CAUTION
If a chain is TOO LOOSE or TOO TIGHT,
the bar chain and saw bearings will wear
more rapidly. Study Figure 3-4A for infor
mation concerning correct cold tension (A),
correct warm tension {B}, and as a guide
for when saw chain needs adjustment (C).
TO ADJUST SAW CHAIN TENSION:
With no tools system - wear gloves while
tensioning chain.
NOTE: Make sure the CHAIN BRAKE® is
disengaged. Disengage the CHAIN
BRAKE*^^ (D) by pulling it backward (Figure
3-4B),
1. Tensioning the chain is easy. Turn bar
boit knob (E) counter clock wise. Then
turn ring (F) counter clock wise to
loosen chain or clock wise to tighten
chain, (Fig, 3-4C)
2. After adjustment and while wearing
heavy duty work gloves, move the saw
chain back and forth on the guide bar
to be sure the chain moves freely and
is in proper mesh with sprocket,
NOTE: If the chain is difficult to rotate or if
it binds on the guide bar, too much tension
has been applied and must be adjusted as
described in step 1,
3. While tensioning the chain. Hold tip of
the bar up and then tighten the bar bolt
knob (E).
3-4 B
3-4C
3-5. FILLING OIL TANK
Using a funne!, fill oil tank with Genuine
Factory Parts Chain, Bar and Sprocket oil.
Wipe up any spills. Make sure no dirt gets
into the oil tank.
The saw chain requires lubrication while in
use to minimize friction with the guide bar.
The oi! tank holds 4.5 ozs of oli, enough to
lubricate the chain for 12-15 minutes of
sawing.
We recommend using Genuine Factory
Parts Chain, Bar and Sprocket Oil, which
contains additives to reduce friction
wear and reduce resin residue formations.
CAUTION
The oil tank level should be frequently
checked during operation to avoid starving
the bar and chain of lubrication.
NOTE: Your chain saw is equipped with an
Automatic Oiler system and is the ONLY
source of lubrication for the bar
and chain (Figure 3-5A).
OIL CAP
OIL TANK INSPECTION SLOT
3-5A
10
Page 11

3~6. SELECTING THE PROPER EXTENSION CORD FOR YOUR SAW MODEL
Minimum Gauge Wire
Saw Mode!
PLN3516F
The extension cord is to be for outdoor use, marked with the suffix W or W-A following
the cord type designation, for example - SJTW or SJTW-A.
Make sure the extension cord is in good condition before using.
Keep the cord away from the cutting area and to position cord so that it will not be
caught on branches, and the like, during cutting.
Ampere
Rating
13.5 120 16 Gauge 16 Gauge
Volts AC
25 ft. / 7.5m
Length of Power Cord
50 ft./15m
100 ft./30m
14 Gauge
4 - OPERATING INSTRUCTIONS
4-1. TO START SAW
1. Make sure the CHAIN BRAKE® IS
DiSENGAGED.The motor will not start
if the CHAIN BRAKE® is in the
ENGAGED position. Disengage the
CHAIN BRAKE® by pulling backward
toward the motor {Figure 4-1 A).
WARNING
Ensure the extension cord is of the proper
size and type for your saw,
2. An extension cord retainer (A) (Fig.
4-1B) is built into the rear handle that
prevents the extension cord from
pulling out of the handle. To use this
feature, simply double the extension
cord, about a foot from the end, and
insert it through the hole at the end of
the handle. Hook the loop formed by
doubling the cord over the tab. Gently
tug on the cord to ensure that it is firmly
retained in the saws handle. Plug the
receptacle end of the extension cord
into the tool’s power supply cord.
WARNING
Make sure the extension cord does not
come in contact with the guide bar and
saw chain.
3. Grip the saw with both hands, left hand
holding the front handle (DO NOT
HOLD CHAIN BRAKE®) and the right
hand holding the rear handle. Thumbs
and fingers should encircle both
handles (Figure 4-1C),
4. With your RIGHT THUMB, depress the
LOCt^OFF button (C) on the top of the
rear handle, and at the same time
squeeze the trigger. To stop the saw,
release the trigger (Figure 4-1D).
NOTE: It is not necessary to maintain
pressure on the LOCK/OFF button once
the trigger is squeezed and the motor is
running. The LOCK/OFF button is a safety
device to avoid accidental starting.
4-1D
11
Page 12

4-2. TO STOP MOTOR
The saw motor wiN automalicaily stop
when the trigger is released. The LOCK/
OFF button will have to be depressed and
the trigger squeezed to restart the motor.
4-3. CHAIN AND BAR LUBRICATION
Adequate iubrication of the saw chain
during cutting operations is essential to
minimize friction with the guide bar.
Your chain saw is equipped with an
automatic oiler system.
The oiler automatically delivers the proper
amount of oil to the bar and chain. There is
no flow adjustment,
The oif tank level can be checked in the
inspection slot {A} provided on the right
Side of the saw. Tank is full when oil is at
the top of the slot (Figure 4-3A).
CAUTION
Never starve the bar and chain of
lubrication oil. Running the saw DRY or
with TOO LITTLE OIL will decrease cutting
efficiency, shorten chain saw life, and
cause rapid dulling of the chain and
excessive wear of the bar from
overheating. Too iittie is evidenced by
smoke or bar discoloration.
NOTE: The saw chain stretches during
use, particuiarly when it is new, and
occasional adjustment will be needed.
A new chain requires more frequent
adjustment during the break-in period. This
is normal. See Section 3-4, Saw Chain
Tension Adjustment instructions,
WARNING / CAUTION
A loose chain can jump off the bar while
you are cutting, as well as wear the bar
and chain. A chain that is too tight can
damage the saw. Either situation, chain too
loose or too tight, could cause serious
personal injury.
4-3A
4-4. CHAIN BRAKB^ / HAND GUARD
This Poulan chain saw is equipped with
chain brake/hand guard.
The Hand Guard protects your left hand in
the event it slips off the front handle.
The CHAIN BRAKE® is a safety feature
which is activated if pressure is applied
against the guard or when, in the event of
kickback, the operator’s hand strikes the
lever. When the CHAIN BRAKE® is
activated, chain movement abruptly stops
and the power supply to the motor is
immediately cut off.
The purpose of the CHAIN BRAKE® is to
reduce the possibility of injury due to
kickback. The CHAIN BRAKE® cannot,
however, provide the measure of intended
protection if the saw is carelessly operated.
The CHAIN BRAKE® is disengaged (chain
can move) when the brake is pulled back
and locked. This is the norma! running
position (Figure 4-4A).
The CHAIN BRAKE® is engaged (chain
cannot move) when the brake is in forward
position (Figure 4-4B),
NOTE: The motor will not start if the
CHAIN BRAKE® is in the engaged
position.
CAUTION
The CHAIN BRAKE® should not be used
for starting and stopping the saw during
normal operation.
4-4B
CHAIN BRAKES TEST
Before cutting with your saw, the CHAIN
BRAKE® shouid be tested as follows:
A. Make sure the CHAiN BRAKE® is
disengaged (Figure 4-4A).
B,
Place the saw on a firm, flat, dry
surface that is clear of any debris. Do
not let the saw come in contact with
any objects.
Plug the unit into the power source.
Grasp the front handle (not the CHAIN
BRAKE*/Hand Guard Lever) with your
left hand. Thumb and fingers should
encircle the handle.
12
Page 13

E. Grasp the rear handle with your right
hand. Thumb and fingers should
encircle the handle,
F. Depress the LOCK/OFF button with
your right thumb. Squeeze the trigger
with your index finger. (See Fig.4-1D).
G. While the motor is running, activate the
CHAIN BRAKE® by rolling your left
hand forward against the lever.
H. Chain and motor should stop abruptly.
WARNING
If the chain and motor fail to stop when the
CHAIN BRAKE® is engaged, take the saw
to the nearest Authorized Service Center.
Do not use the saw if the CHAIN BRAKE®
is not in proper working order.
4~5. EXTENSION CORDS
When using an electric chain saw, plug it
into the extension cord oniy when you are
ready to cut wood. Connect the extension
cord to a 110/120 voltage outlet, see chart
CAUTION
A cord that is hot to the touch is
overloaded.
WARNING
Do not operate your chain saw in a wet or
damp environment. Do not expose the saw
to rain, snow or sleet, Moisture will cause
short circuits. Replace or repair any
damaged or frayed extension cords before
using your saw. Keep the cord away from
the cutting area and position the cord so
that it will not be caught on branches or
other objects during cutting.
DOUBLE INSULATION ©WHEN
SERVICING USE ONLY IDENTICAL
REPLACEMENT PARTS
Do not use if the cord or plug is damaged.
Your appliance is double insulated to help
protect against electric shock.
Double insulation construction consists of
1wo(2) separate ‘layers" of electrical
insulation.
Appliances built with this insulation system
are not intended to be grounded. As a
result, the extension cord used with your
appliance can be plugged into any
conventional 120 volt electrical outlet.
Normal safety precautions must be
observed when operating an electrical
appliance. The double insulation system is
only for added protection against injury
resulting from a possible internal electrical
insulation failure,
WARNING
Your double insulated appliance has no
serviceable parts inside. Do not attempt to
repair it yourself. For service information,
contact the Poulan Product Service
Department tolFfree number listed on the
back cover of this manual.
5 - GENERAL CUTTING INSTRUCTIONS
5-1. FELLING
Felling is the term for cutting down a tree.
Small trees up to 6-7 inches (15-18cm) in
diameter are usually cut in a single cut.
Larger trees require notch cuts. Notch cuts
determine the direction the tree wiil fall.
FELLING A TREE:
WARNING
A retreat path (A) should be planned and
cleared as necessary before cuts are
started, The retreat path should extend
back and diagonally to the rear of the
expected line of fall, as illustrated in Figure
5-1 A.
CAUTION
If felling a tree on sloping ground, the chain
saw operator should keep on the uphill
side of the terrain, as the tree is likely to
roll or slide downhill after it is felled.
NOTE: Direction of fall (B) is controlled by
the notching cut. Before any cuts are
made, consider the location of larger
branches and natural lean of the tree to
determine the way the tree will fail.
WARNING
Do not cut down a tree during high or
changing winds or if there is a danger to
property. Consult a tree professional.
Do not cut down a tree if there is a danger
of striking utility wires; notify the utility
company before making any cuts.
GENERAL GUIDELINES FOR FELLING
TREES:
Normally felling consists of two (2) main
cutting operations, notching (C) and
making the felling cut (D). Start making the
upper notch cut (C) on the side of the tree
facing the felling direction (E). Be sure you
don’t make the lower cut too deep into the
trunk.
13
Page 14

The notch (C) should be deep enough to
create a hinge (F) of sufficient width and
strength. The notch should be wide
enough to direct the fall of the tree for as
long as possible.
WARNING
Never walk in front of a tree that has been
notched.
Make the felling cut (D) from the other side
of the tree and 1.5 - 2.0 inches (3~5 cm}
above the edge of the notch (C)
{Figure 5-1B),
Never saw completely through the trunk.
Always leave a hinge. The hinge guides
the tree. If the trunk is completely cut
through, control over the felling direction is
lost.
insert a wedge or feiling lever in the cut
well before the tree becomes unstable and
starts to move. This will prevent the guide
bar from binding in the feiling cut if you
have misjudged the falling direction. Make
sure no bystanders have entered the range
of the tailing tree before you push it over.
WARNING
Before making the final cut, always
recheck the area for bystanders, animals
or obstacles,
FELLING CUT:
1. Use wooden or plastic wedges (G) to
prevent binding the bar or chain (H) in
the cut. Wedges also control felling
(Figure 5-1C).
2, When diameter of wood being cut is
greater than the bar length, make 2
cuts as shown (Figure 5-1D),
WARNING
As the feiling cut gets dose to the hinge,
the tree should begin to fall. When tree
begins to fall, remove saw from cut, stop
engine, put chain saw down, and leave
area along retreat path (Figure 5-1 A).
I i|"^
a a^-4 _ t
i'JlZ
.
' '[Bi c
u. .
5-1B
5-1C
5-2. LIMBING
Limbing a tree is the process of removing
the branches from a fallen tree. Do not
remove supporting iimbs (A) until after the
log is bucked (cut) into lengths (Figure
5-2A). Branches under tension should be
cut from the bottom up to avoid binding the
chain saw.
WARNING
Never cut tree limbs while standing on tree
trunk.
5-3. BUCKING
Bucking is cutting a fallen log into lengths.
Make sure you have a good footing and
stand uphill of the log when cutting on
sloping ground. If possible, the log should
be supported so that the end to be cut off
is not resting on the ground. If the log is
supported at both ends and you must cut
in the middle, make a downward cut
halfway through the log and then make the
undercut. This will prevent the log from
pinching the bar and chain. Be careful that
the chain does not cut into the ground
when bucking as this causes rapid
dulling of the chain.
14
Page 15

When bucking on a slope, always stand on
the uphill side.
1. Log supported along entire length; Cut
from top (overbuck), being careful to
avoid cutting into the ground (Figure
5-3A).
2. Log supported on 1 end: First, cut from
bottom (underbuck) 1/3 diameter of log
to avoid splintering. Second, cut from
above (overbuck) to meet first cut and
avoid pinching (Figure 5-3B).
3. Log supported on both ends: First,
overbuck 1/3 diameter of log to avoid
splintering. Second, underbuck to meet
first cut and avoid pinching (Figure
5-3C).
NOTE: The best way to hold a log while
bucking is to use a sawhorse. When this is
not possible, the log should be raised and
supported by the limb stumps or by using
supporting logs. Be sure the log being cut
is securely supported.
5-3C
5^4. BUCKING USING A SAWHORSE
For personal safety and ease of cutting,
the correct position for vertical bucking is
essential (Figure 5-4A).
VERTICAL CUTTING:
A. Hold the saw firmly with both hands
and keep the saw to the right of your
body while cutting.
B. Keep the left arm as straight as
possible.
C. Keep weight on both feet.
CAUTION
While the saw is cutting, be sure the chain
and bar are being properly lubricated,
6 - BAR/CHAIN MAINTENANCE
6-1. GUIDE BAR MAINTENANCE
WARNING
Ensure that the power cord is disconnect
ed before performing any maintenance on
your saw.
Proper maintenance of the guide bar, as
explained in this section, is essential to
keep your saw in good working order.
SPROCKET TIP LUBRICATION:
(For units supplied with sprocket tip guide
bars only.)
CAUTION ©
Failure to lubricate the guide bar sprocket
tip as explained below will result in poor
performance and seizure, voiding
the manufacturer’s warranty.
Lubrication of the sprocket tip is recomme
nded after each saw use. Always
thoroughly clean the guide bar sprocket tip
before lubrication.
Tool for lubrication: Poulan Lube Gun
(disposable)
This grease gun is designed to fit the small
lubrication point on the guide bar.
The disposable Lube Gun is packed with
grease. For information on where to
purchase a lube gun, contact the Poulan
Product Service Department toll-free
number listed on the back cover of this
manual.
15
Page 16

TO LUBRICATE SPROCKET TIP:
WARNING
Wear heavy duty work gloves when
performing this application
to reduce risk of personal injury,
1, Unplug the chain saw from the power
source.
NOTE: It is not necessary to remove the
saw chain to lubricate the guide bar
sprocket tip. Lubrication can be done on
the job,
2. Clean the guide bar sprocket tip.
Using disposable Lube gun, insert tip
3.
of lube gun into the lubrication hole and
inject grease until it appears at the
outside edge of the sprocket tip (Figure
6-1 A).
4.
Make sure that the CHAIN BRAKE® is
deactivated. Rotate the saw chain by
hand. Repeat the lubrication procedure
until the entire sprocket tip has been
greased.
OIL PASSAGES - Oil passages at bar pad
should be cleaned to ensure proper
lubrication of the bar and chain during
operation. This can be done using a soft
wire small enough to Insert into the oil
discharge hole,
NOTE: The condition of the oil passages
can be easily checked. If the passages are
clear, the chain will automatically give off a
spray of oil within seconds of starting the
saw.Your saw is equipped with an
automatic oiler system.
TO CLEAN GUIDE BAR RAILS:
1. Remove sprocket cover, bar and chain,
(see Section 3-3)
2. Using a screwdriver, putty knife, wire
brush or other similar instrument, clear
residue from the rails on the guide bar.
This will keep the oil passages open to
provide proper lubrication to the bar
and chain (Figure 6-1B).
3. Reinstall the bar, chain, sprocket cover
and bar bolt knob. (See Section 3-3),
aUlDE BAR MAINTENANCE
Most guide bar problems can be prevented
merely by keeping the chain saw well
maintained.
Incorrect filing and non-uniform cutter and
depth gauge settings cause most guide bar
problems, primarily resulting in uneven bar
wear. As the bar wears unevenly, the rails
widen, which may cause chain clatter and
difficulty in making straight cuts.
Insufficient guide bar lubrication and
operating the saw with a chain that is TOO
TIGHT will contribute to rapid bar wear
(see Section 6-2).
To help minimize bar wear, the foiiowing
guide bar maintenance is recommended.
BAR WEAR - Turn guide bar frequently at
regular intervals (for example, after 5 hours
of use), to ensure even wear on top and
bottom of bar.
BAR GROOVES - Bar grooves (or rails
which support and carry the chain) should
be cleaned if the saw has been heavily
used or if the saw chain appears dirty.
Rails should always be cleaned every time
the saw chain is removed.
6-2. CHAIN MAINTENANCE
INSTRUCTIONS
WARNING
Unless you have experience and specializ
ed training for dealing with kickback (see
Safety Precautions), always use a lowkickback saw chain, which significantly
reduces the danger of kickback. Low-kickback saw chain does not completely
eliminate kickback, A low-kickback or
"safety chain", should never be regarded
as total protection against injury.
A low-kickback saw chain should always
be used in conjunction with other kickback
protection devices such as the CHAIN
BRAKE®/Hand Guard furnished with your
unit.
Always use a replacement saw chain
designed as “low-kickback" or a saw chain
which meets the iow-kickback performance
requirements of ANSI (American National
Standards Institute).
A standard saw chain (a chain which does
not have the kickback reducing guard
links) should only be used by an experien
ced professional chain saw operator.
16
Page 17

WHAT IS A LOW-KICKBACK SAW
CHAIN?
A low-kickback saw chain is a chain which
has met the kickback performance
requirements of ANSI B175,1.
By keeping the CHAIN BRAKES and saw
chain in good working condition and
correctly serviced as recommended in this
manual, you will be able to maintain the
safety system of your chain saw over the
life of the product.
WARNING
Never remove, modify or make inoperative
any safety device furnished with your unit.
The CHAIN BRAKE®/Hand Guard and
low-kickback saw chain are major safety
features provided for your protection.
WARNING
Always wear heavy duty protection work
gloves and disconnect the extension cord
when working on the saw chain.
CHAIN TENSION:
Check the chain tension frequently and
adjust as often as necessary to keep the
chain snug on the bar, but loose enough to
be pulled around by hand. (See Section
3-4, Saw Chain Tension Adjustment).
BREA KING IN A NEW W CHAIN
A new chain and bar will need readjust
ment after as few as five (5) cuts. This is
normal during the break-in period, and the
interval between future adjustments will
begin to lengthen quickly.
Over a period of time, however, the moving
parts of the saw chain will become worn,
resulting in what is called CHAIN
STRETCH. This is normal. When it is no
longer possible to obtain correct chain
tension adjustment, a link will have to be
removed to shorten the chain. See your
nearest Authorized Service Center to have
this repair performed.
WARNING / CAUTION
Never have more than three (3) links
removed from a loop of chain. This could
cause damage to the sprocket.
CHAIN LUBRICATION:
Always make sure the automatic oiler
system is working properly, Keep the oil
lank fiiled with Genuine Factory Parts
Chain, Bar and Sprocket Oil.
Adequate lubrication of the bar and chain
during cutting operations is essential to
minimize friction with the guide bar.
Never starve the bar and chain of
lubricating oil. Running the saw dry or with
too little oil will decrease rapid cutting
efficiency, shorten saw chain life, cause
rapid dulling of the chain, and lead to
excessive wear of the bar from
overheating. Too little oil is evidenced by
smoke or bar discoloration.
7 - PREVENTIVE MAINTENANCE
7-1. PREVENTIVE MAINTENANCE
WARNING©
SERVICING A DOUBLE INSULATED
APPLIANCE
In this double insulated appliance. 2
systems of insulation, instead of
grounding, are provided. No grounding
means is provided on a double insulated
appliance, nor should a means for
grounding be added to the appliance. No
serviceable parts are inside. A double
insulated appliance is marked with the
words, “DOUBLE INSULATION" or
"DOUBLE INSULATED", The symbol m
(square within a square) may also be
marked on the appliance.
1, Place switch in OFF position and
unplug the power supply before the
appliance is serviced, cleaned, or
maintenance is performed.
2, Keep the air intake clean and air vents
free of debris to avoid overheating the
motor.
3, Clean with a damp sponge and miid
soap. Do not squirt with a water hose
or douse with water or other liquids,
4, Inspect the saw chain for proper
tension before each use and frequently
during cutting. Sharpen as required.
5, Clean the guide bar and bar pad to
ensure free path for oil.
6, Turn the bar over after each use to
achieve even wear.
7, No motor lubrication is necessary. The
motor is equipped with lifetime
lubricated bearings.
17
Page 18

8. If the saw does not operate, turn switch
to OFF position and disconnect the
extension cord, first from the power
supply, then from the saw. Check the
power supply for blown fuses or tripped
circuit breakers, if it stiil does not
7-2. CHAIN REPLACBM£NT INFORMATION
Drive
Links
55 DL 966-051301
There may be other quality equivalent replacement components for achieving kickback
protection.
Bar
Length
16" 966-051603
operate, contact the Poulan Product
Service Department, through the toll-
free number listed on the back cover of
this manual, for service information. Do
not attempt to repair It yourself. No
serviceable parts are inside.
Chain
P/N Length
16"
Gauge
0.05
Pitch
3/8"
8 - LIMITED WARRANTY
Poulan, a division of Husqvama Consumer Outdoor Products N,A,. Inc., warrants to the original
consumer purchaser that each new Poulan brand electric or cordless product is free from
defects in materia! and workmanship and agrees to repair or replace under this warranty any
defective Poulan brand electric product within one (1) year from the originai date of purchase.
If your Poulan brand electric or cordless product should faif within the limited warranty period,
you may return it in complete condition, prepaid, with proof of purchase to the dealer from whom
it was purchased for repair or replacement at the optiori of Poulan.
This warranty is not transferable and does not cover damage or liability caused by improper
handling, improper maintenance or alteration, or the use of accessories and/or attachments not
specifically recommended by Poulan for this product. This warranty does not cover parts that will
wear and require replacement with reasonable use during the warranty period. This warranty
does not cover pre-delivery setup or normal adjustments explained in the instruction manual.
Should you have any unanswered questions regarding this warranty, please contact:
Poulan, a division of Husqvama
Consumer Outdoor Products N.A.
1030 Stevens Creek Road
Augusta, GA 30907
1-800-554-6723
Inc.
In Canada, contact:
Poulan
850 Matheson Blvd. West
Mississauga. Ontario L5V 0B4
Giving the model number, serial number and date of purchase of your product and the name and
address of the authorized dealer from whom it was purchased,
THIS WARRANTY GIVES YOU SPECIFIC LEGAL RIGHTS, AND YOU MAY HAVE OTHER
RIGHTS WHICH VARY FROM STATE TO STATE.
NO CLAiMS FOR CONSEQUENTIAL OR OTHER DAMAGES WILL BE ALLOWED, AND
THERE ARE NO OTHER EXPRESS WARRANTIES EXCEPT THOSE EXPRESSLY
STIPULATED HEREIN.
SOME STATES DO NOT ALLOW LIMITATIONS ON HOW LONG AN IMPLIED WARRANTY
LASTS OR THE EXCLUSION OR LIMITATIONS OF INCIDENTAL OR CONSEQUENTIAL
DAMAGES, SO THE ABOVE LIMITATIONS OR EXCLUSION MAY NOT APPLY TO YOU.
This is a limited warranty within the meaning of that term as defined in the Magnuson-Moss Act
of 1975.
The policy of Poulan is to continuously improve its products. Therefore, Poulan reserves the
right to change, modify, or discontinue models, designs, specifications, and accessories of all
products at any time without notice or obligation to any purchaser.
18
 Loading...