

Poulan P3818AV, P3314, P4018, P3314WSA, P4018AV BH User Manual
...
R
Please do not return unit to retailer.
Por favor, no devuelva el aparato al lugar de compra.
Veuillez ne pas retourner l’outil au détaillant.
1--800--554--6723
www.poulan.com
Instruction Manual
Manual de Instrucciones
Manuel d’Instructions
P3314 / P3314WS / P3314WSA
P3416 / P3516PR / P4018
P4018WM / P4018WT / P3818AV
P4018AV / P4018AV BH
For Occasional Use Only
ENGLISH
ESPAÑOL
WARNING:
Read and follow all Safety Rules and Operating Instructions before
using this product. Failure to do so can result in serious injury.
ADVERTENCIA:
Lea el manual de instrucciones y siga todas las advertencias e enstrucciones de seguridad. El no hacerlo puede resultar en lesiones
graves.
AVERTISSEMENT:
Lire le manuel d’instructions et bien respecter tous les avert issements et toutes les instructions de sécurité. Tout défaut de le faire
pourrait entraîner des blessures graves.
Poulan
1030 Stevens Creek Road
Augusta, GA 30907
Mississauga, Ontario L5V 3E4
5855 Terry Fox Way
545137250 11/30/06
Poulan
FRANÇAIS
IDENTIFICATION OF SYMBOLS
WARNING! This chain
saw can be dangerous! Careless or improper use can cause
serious or even fatal injury.
Always wear appropriate earprotection, eye protection and head protection.
XX_
Measured maximum kickback value without chain brake for the bar
and chain combination on the label.
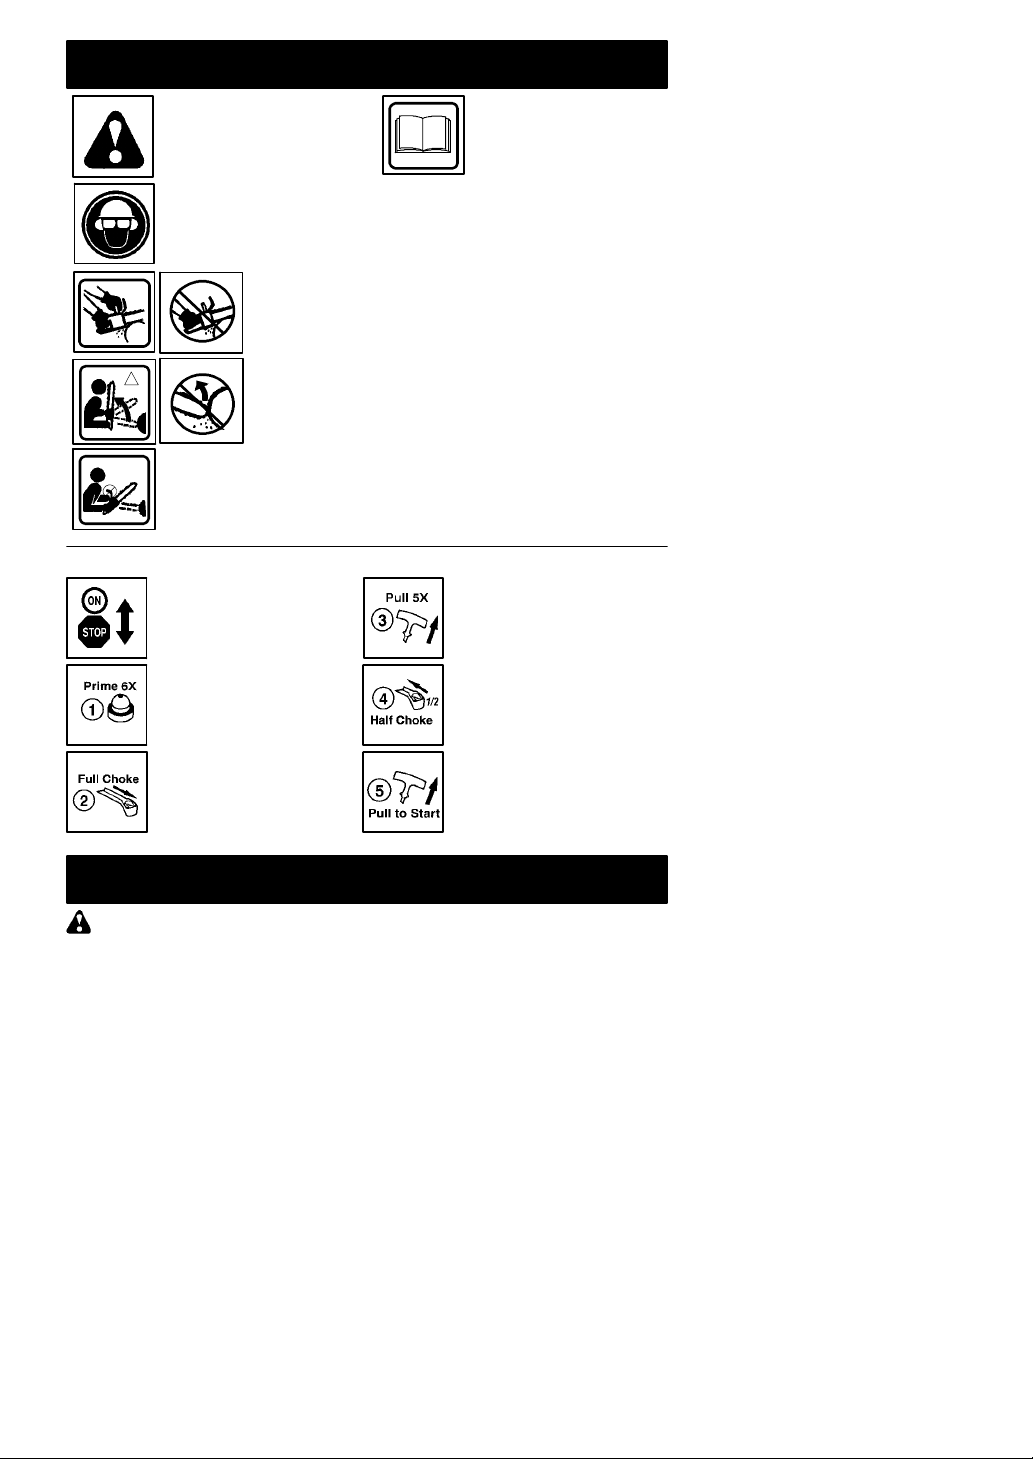
Starting Reminder
Move ON/STOP switch to
the ON position.
Read and understand the
instruction manual before
using the chain saw.
Always use two hands when operating the chain saw.
WARNING! Contacting the guide bar tip with any object
should be avoided; tip contact may cause the guide bar to
move suddenly upward and backward, which may cause serious injury.
Pull the starter rope
sharply 5 times with your
right hand.
Slowly press primer bulb
6times.
Pull choke/fast idle lever
out to the full extent (to
the FULL CHOKE position).
SAFETY RULES
WARNING: Always disconnect
spark plug wire and place wire where it cannot contact spark plug to prevent accidental
starting when setting up, transporting, adjusting or making repairs except carburetor
adjustments.
Because a chain saw is a high-speed woodcutting tool, special safety precautions must
be observed to reduce the risk of accidents.
Careless or improper use of this tool can
cause serious injury.
Push the choke/fast idle
lever in to the HALF
CHOKE position.
Pull the starter rope sharply
with your right hand until
the engine starts.
PLAN AHEAD
S Read this manual carefully until you com-
pletely understand and can follow all safety
rules, precautions, and operating instruc tions before attempting to use the unit.
S Restrict the use of your saw to adult users
who understand and can follow safety
rules, precautions, and operating instructions found in this manual.
S Wear protec tive gear. Always use steel-
toed safety footwear with non-slip soles;
snug-fitting clothing; heavy-duty, non-slip
2
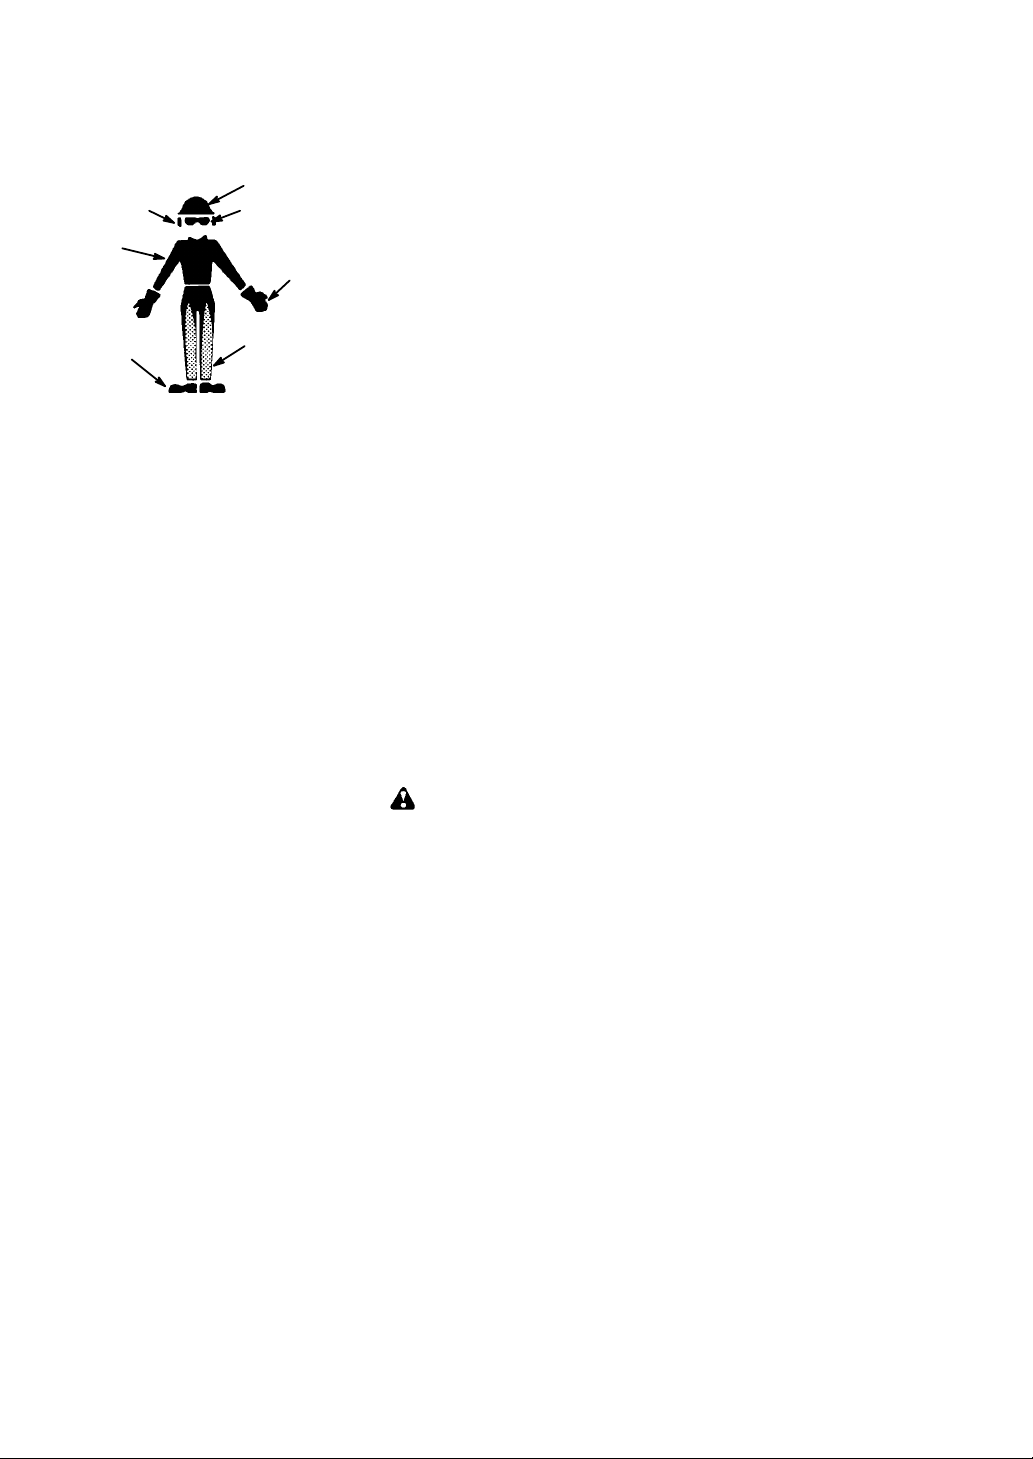
gloves; eye protection such as non-fogging, vented goggles or face screen; an
approved safety hard hat; and soundbarriers (ear plugs or mufflers) to protect your
hearing. Regular users should have hearing checked regularly as chain saw noise
can damage hearing. Secure hair above
shoulder length.
Hearing
Protection
Snug
Fitting
Clothing
Safety
Shoes
S Keep all parts of your body away from the
chain when the engine is running.
S Keep children, bystanders, and animals a
minimum of 30 feet (10 meters) away from
the work area. Do not allow other people
or animals to be near the chain saw when
starting or operating the chain saw.
S Do not handle or operate a chain saw when
you are fatigued, ill, or upset, or if you have
taken alcohol, drugs, or medication. You
must be in good physical condition and mentally alert. Chain saw work is strenuous. If
you have any condition that might be aggravated by strenuous work, check with your
doctor before operating a chain saw.
S Carefully planyour sawing operation in ad-
vance. Do not start cutting until you have a
clear work area, secure footing, and, if you
are felling trees, a planned retreat path.
OPERATE YOUR SAW SAFELY
S Do not operate a chain saw with onehand.
Serious injury to the operator, helpers, bystanders or any combination of these persons may result from one-handed operation. A chain saw is intended for
two-handed use.
S Operate the chain saw only in a well-venti-
lated outdoor area.
S Do not operate saw from a ladder or in a tree.
S Make sure the chain will not make contact
with any object while starting the engine.
Never try to start the saw when the guide
bar is in a cut.
S Do not put pressure on the s aw at the end of
the cut. Applying pressure can cause you to
lose control when the cut is completed.
S Stop the engine before setting the saw
down.
S Do not operate a chain saw that is dam-
aged, improperly adjusted, or not completely and securely assembled. Always
replace bar, chain, hand guard, or chain
brake immediately if it becomes damaged,
broken or is otherwise removed.
Safety Hat
Eye
Protection
Heavy Duty
Gloves
Safety Chaps
S With the engine stopped, hand carry the
chain saw with the muffler away from your
body, and the guide bar and chain to the
rear, preferably covered with a scabbard.
MAINTAIN YOUR SAW IN GOOD
WORKING ORDER
S Have all chain saw service performed by a
qualified service dealer with the exception
of the items listed in the maintenance section of this manual. For example, if improper tools are used to remove or hold the flywheel when servicing the clutch, structural
damage to the flywheel can occur and
cause the flywheel to burst.
S Make certain the saw chain stops moving
when the throttle trigger is released. For
correction, refer to CARBURETOR ADJUSTMENT.
S Never modify your saw in any way.
S Keep the handles dry, clean, and free of oil
or fuel mixture.
S Keep fuel and oil caps, screws, and fas-
teners securely tightened.
S Use only Poulan accessories and repla c e-
ment parts as recommended.
HANDLE FUEL WITH CAUTION
S Do not smoke while handling fuel or while
operating the saw.
S Eliminate all sources of sparks or flame in
the areas where fuel is mixed or poured.
There should be no smoking, open flames,
or work that could cause sparks. Allow engine to cool before refueling.
S Mix and pour fuel in an outdoor area on
bare ground; store fuel in a cool, dry, well
ventilated place; and use an approved,
marked container for all fuel purposes.
Wipe up all fuel spills before starting saw.
S Move at least 10 feet (3 meters) from fuel-
ing site before starting engine.
S Turn the engine off and let saw cool in a
non-combustible area, not on dry leaves,
straw, paper, etc. Slowly remove fuel cap
and refuel unit.
S Store theunit and fuel in an area where fuel
vapors cannot reach sparks or open
flames from water heaters, electric motors
or switches, furnaces, etc.
KICKBACK
WARNING: Avoid kickback which
can result in serious injury. Kickback is the
backward, upward or sudden forward motion
of the guide bar occurring when the saw
chain near the upper tip of theguide bar contacts any object such as a log or branch, or
when the wood closes in and pinches the
saw chain in the cut. Contacting a foreign object in the wood can also result in loss of
chain saw control.
S Rotational Kickback canoccur when the
moving chain contacts an object at the upper tip of the guide bar. This contact can
cause the chain to dig into the object,
which stops the chain for an instant. The
result is a lightning fast, reverse reaction
which kicks the guide bar up and back toward the operator.
3
S Pinch-Kickback can occur when the the
wood closes in and pinches the moving
saw chain in the cut along the top of the
guide bar and the saw chain is suddenly
stopped. This sudden stopping of the
chain results in a reversal of the chain
force used to cut wood and causes the
saw to move in theopposite direction of the
chain rotation. The saw is driven straight
back toward the operator.
S Pull-In can occur when the moving chain
contacts a foreign object in the wood in the
cut along the bottom of the guide bar and the
saw chain is suddenly stopped. This sudden
stopping pulls the saw forward and away
from the operator and could easily cause the
operator to lose control of the saw.
Avoid Pinch--Kickback:
S Be extremely aware of situations or ob-
structions that can cause material to pinch
the top of or otherwise stop the chain.
S Do not cut more than one log at a time.
S Do not twist the saw as the bar is with-
drawn from an undercut when bucking.
Avoid Pull--In:
S Always begin cutting with the engine at full
speed and the saw housing against wood.
S Use wedges made of plastic or wood.
Never use metal to hold the cut open.
Kickback Path
Avoid Obstructions
S Begin and continue cutting at full speed. If
the chain is moving at a slower speed,
there is greater chance of kickback occurring.
S Cut one log at a time.
S Use extreme caution when re-entering a
previous cut.
S Do not attempt cuts starting with the tip of
the bar (plunge cuts).
S Watch for shifting logs or other forces that
could close a cut and pinch or fall into chain.
S Use the Reduced--Kickback Guide Bar
and Low--Kickback Chain specified for
your saw.
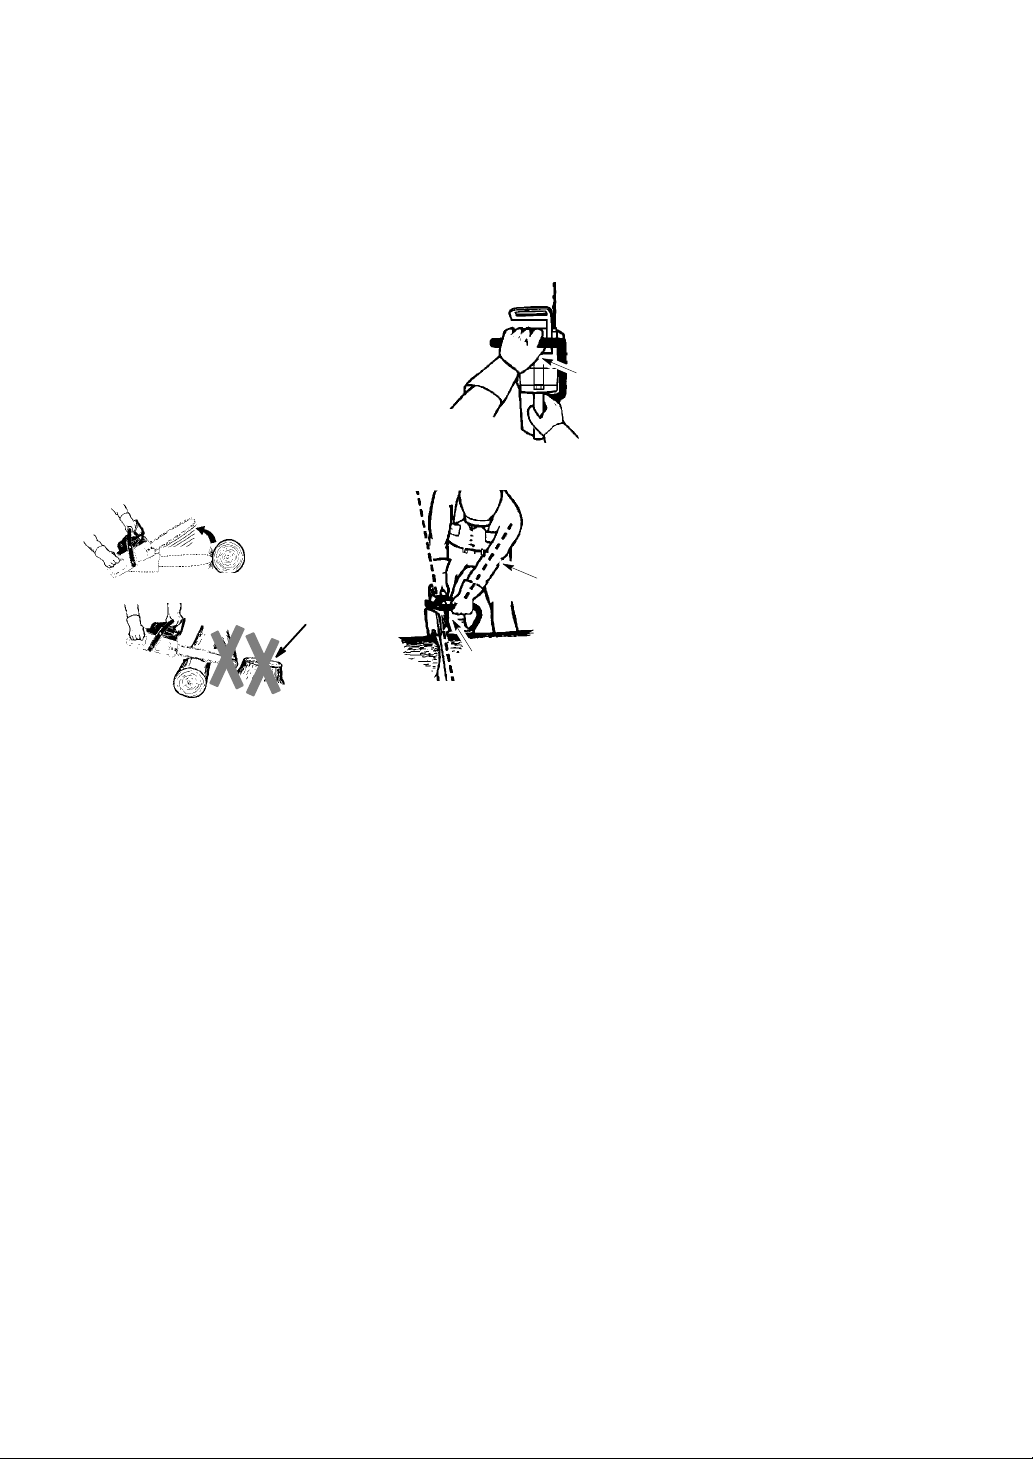
MAINTAIN CONTROL
Stand to the
left of the saw
Thumb on
underside of
handlebar
Never reverse
hand positions
Elbow locked
Clear The
Working Area
REDUCE THE CHANCE OF
KICKBACK
S Recognize that kickback can happen.
With a basic understanding of kickback,
you can reduce the element of surprise
which contributes to accidents.
S Never let the moving chain contact any ob-
ject at the tip of the guide bar.
S Keep the working area free from obstruc-
tions such as other trees, branches, rocks,
fences, stumps, etc. Eliminate or avoid
any obstruction that your saw chain could
hit while you are cutting. When cutting a
branch, do not let the guide bar contact
branch or other objects around it.
S Keep your saw chain sharp and properly
tensioned. A loose or dull chain can increase the chance of kickback occurring.
Follow manufacturer’s chain sharpening
and maintenance instructions. Check tension at regular intervals with the engine
stopped, never with the engine running.
Make sure the bar nuts are securely tightened after tensioning the chain.
Thumb on underside of
handlebar
S Keep a good, firm grip on the saw with both
hands when the engine is running and don’t
let go. A firm grip will help you reduce kickback and maintain control of the saw. Keep
the fingers of your left hand encircling and
your left thumb under the front handlebar.
Keep your right hand completely around the
rear handle whether your are right handed or
left handed. Keep your left arm straight with
the elbow locked.
S Position your left hand on the front handle-
bar so it is in a straight line with your right
hand on the rear handle when making
bucking cuts. Never reverse right and left
hand positions for any type of cutting.
S Stand with your weight evenly balanced on
both feet.
S Stand slightly to the left side of the saw to
keep your body from being in a direct line
with the cutting chain.
S Do not overreach. You could be drawn or
thrown off balance and lose control of the
saw.
S Do not cut above shoulder height. It is diffi-
cult to maintain control of saw above
shoulder height.
4
KICKBACK SAFETY FEATURES
WARNING: The following features
are included on your saw to help reduce the
hazard of kickback; however, such features
will not totally eliminate this danger. As a
chain saw user, do not rely only on safety devices. You must follow all safety precautions, instructions, and maintenance in this
manual to help avoid kickback and other
forces which can result in serious injury.
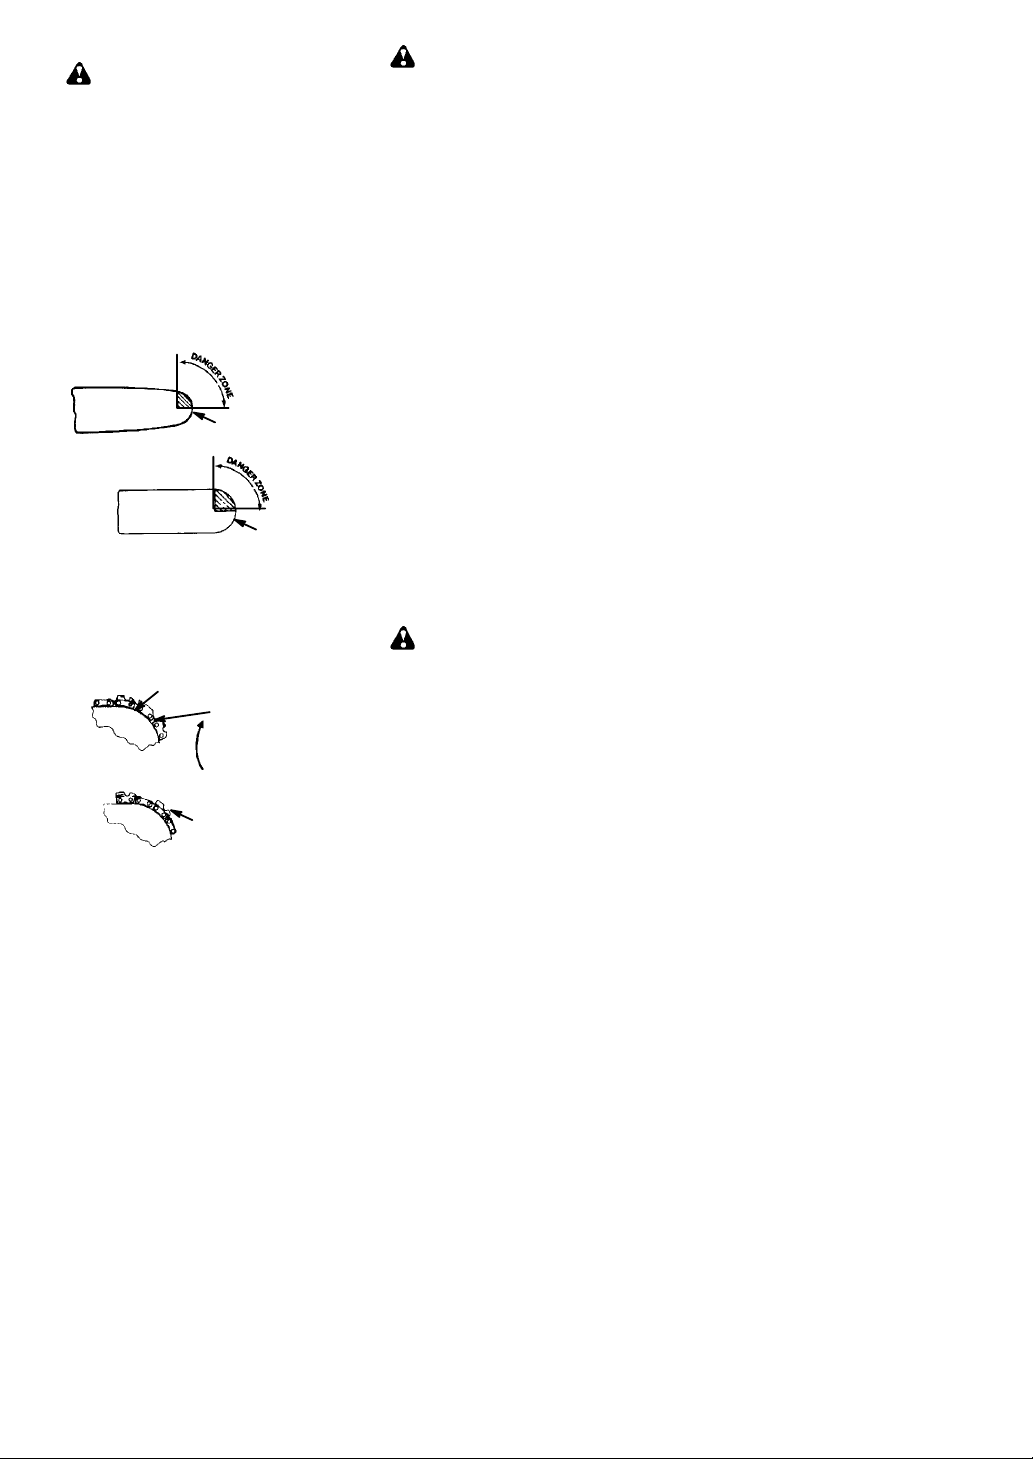
S Reduced--Kickback Guide Bar, designed
with a small radius tip which reduces the
size of the kickback danger zone on the
bar tip. A Reduced-- Kickback Guide Bar
has been demonstrated to significantly reduce the number and seriousness of kickbacks when tested in accordance with
safety requirements for gasoline powered
chain saws as set by ANSI B175.1.
Reduced Kickback Symmetrical Guide Bar
Small Radius Tip
Symmetrical Guide Bar
S Low-- Kickback Chain, designed with a
contoured depth gauge and guard link
which deflect kickback force and allow
wood to gradually ride intothe cutter.Low-Kickback Chain has met kickback performance requirements when tested on a
representative sample of chain saws below 3.8 cubic inch displacement specified
in ANSI B175.1.
L o w --- K i c k b ac k
Chain
Not a Low- -- Kickback Chain
S Front Hand Guard, designed to reduce the
chance of your left hand contacting the chain
if your hand slips off the front handlebar.
S Position of front and rear handlebars, de-
signed with distance between handles and
“in-line” with each other. The spread and “inline” position of the hands provided by this
design work together to give balance and resistance in controlling the pivot of the saw
back toward the operator if kickback occurs.
Contoured Depth Gauge
Large Radius Tip
Elongated Guard Link
Deflects
kickback force
and allows wood
to gradually ride
into cutter
Can Obstruct Material
CHAIN BRAKE A ND CKA ANGL E
S Chain Brake, designed to stop the chain in
the event of kickback.
WARNING: WE DO NOT REP-
RESENT AND YOU SHOULD NOT ASSUME THAT THE CHAIN BRAKE WILL
PROTECT YOU IN THE EVENT OF A KICKBACK. Kickback is a lightning fast action
which throws the bar and rotating chain back
and up toward the operator. Kickback can be
caused by allowing contact of the bar tip in the
danger zone with any hard object. Kickback
canalsobecausedbypinchingthesawchain
along the top of the guide bar. This action may
push the guide bar rapidly back toward the operator. Either of these events may cause you
to lose control of the saw which could result in
serious injury or even death. DO NOT RELY
UPON ANY OF THE DEVICES BUIL T INTO
YOUR SAW . YOU SHOULD USE THE SAW
PROPERLY AND CAREFULLY TO AVOID
KICKBACK. Reduced--kickback guide bars
and low- -kickback saw chains reduce the
chance and magnitude of kickback and are
recommended. Your saw has a low kickback
chain and bar as original equipment. Repairs
on a chain brake should be made by an authorized servicing dealer. Take your unit to the
place of purchase if purchased from a servicing dealer, or to the nearest authorized master
service dealer.
S Tip contact in some cases may cause a light-
ning fast reverse REACTION, kicking guide
bar up and back toward operator.
S Pinching the saw chain along the top of the
guide bar may push the guide bar rapidly
back toward the operator.
S Either of these reactions may cause you to
lose control of the saw which could result in
serious injury. Do not rely exclusively upon
devices built into your saw.
WARNING: Computed kickback
angle (CKA) listed on your saw and listed in the
CKA table below represents angle of kickback
your bar and chain combinations will have
when tested in accordance with CSA (Canadian Standards Association) and ANSI standards. When purc hasing replacement bar and
chain, considerations should be given to the
lower CKA values. Lower CKA values represent safer angles to the user, higher values indicate more angle and higher kick energies.
Computed angles represented indicate total
energy and angle associated without activation
of the chain brake during kickback. Activated
angle represents chain stopping time relative to
activation angle of chain break and resulting
kick angle of saw. In all cases lower CKA values represent a s afer operating environment
for the user.
The following guide bar and chain combinations meet kickback requirements of CSA
Standards Z62.1, Z62.3, & ANSI B175.1
when used on saws listed in this manual.
Use of bar and chain combinations other
than those listed is not recommended and
may not meet the CKA requirements per
standard.
5

Computed kickback angle (CKA) Table
BAR
MODEL
P3314 / P3314WS
P3314WSA
P3416 / P3516PR 16″
P4018 / P3818AV
P4018WM / P4018WT
P4018AV / P4018AV BH
NOTE: Ifthissawistobeused forcom-
mercial logging, a chain brake is required
and shall not be removed or otherwise disabled to comply with Federal OSHA Regulations for Commercial Logging.
SAFETY NOTICE: Exposure to vibrations
through prolonged use of gasoline powered
hand tools could cause blood vessel or nerve
damage in the fingers, hands, and joints of
people prone to circulation disorders or
abnormal swellings. Prolonged use in cold
weather has been linked to blood vessel
damage in otherwise healthy people. If
symptoms occur such as numbness, pain,
loss of strength, change in skin color or texture,
or loss of feeling in the fingers, hands, or joints,
discontinue the use of this tool and seek
medical attention. An anti-vibration system
does not guarantee the avoidance of these
problems. Users who operate power tools on
a continual and regular basis must monitor
closely their physical condition and the
condition of this tool.
SPECIAL NOTICE: Your saw is equipped
with a temperature limiting muffler and spark
arresting screen which meets the
requirements of California Codes 4442 and
4443. All U.S. forest land and the states of
P/N Length CHAIN P/N
952044368 14″
952044370
952044418
18″ 33_
California, Idaho, Maine, Minnesota, New
Jersey, Oregon, and Washington require by
law that many internal combustion engines
to be equippedwith a spark arresting screen.
If you operate a chain saw in a state or locale
where such regulations exist, you are legally
responsible for maintaining the operating
condition of these parts. Failure to do so is
a violation of the law. Refer to the SERVICE
section for maintenance of the spark
arresting screen.
Failure to follow all Safety Rules and Precautions can result in serious injury. If situations
occur which are not covered in this manual,
use care and good judgement. If you need
assistance, contact your authorized service
dealer or call 1-800--554--6723.
STAN DARDS: This saw is listed by Under-
writer’s Laboratories, Inc., in accordance with:
ANSI B175.1-- 2000 American National
Standards for Gasoline-- Powered Chain
Saws -- Safety Requirements
CSA Z62.1-- 03 Chain Saws -- Occupational
Health and Safety
CSA Z62.3-- 96 Chain Saw Kickback Occupational Health and Safety
952051209
952051211
952051338
CKA without chain brake
33_
33_
ASSEMBLY
Protective gloves (not provided) should be
worn during assembly.
ATTACHING THE BAR & CHAIN (If not
already attached)
WARNING: If recei ved assemb led,
repeat all steps to ensure your saw is properly
assembled and all fasteners are secure. Always wear gloves when handling the chain.
The chain is sharp and can cut you even when
it is not moving!
1. Loosen and remove the bar nuts and the
clutch cover from the saw.
2. Remove the plastic shipping spacer (if
present).
Clutch cover
Bar nuts
Chain adjustment tool
(Bar Tool)
3. An adjusting pin and screw is used to adjust the tension of the chain. It is very important when assembling the bar, that the
pin located on the adjusting screw aligns
into a hole in the bar .Turning the screw will
move the adjustment pin up and down the
screw. Locate this adjustment before you
begin mounting the bar onto the saw. See
following illustration.
Location of
shipping
spacer
6
 Loading...