

Page 1
Poulan
t_ Please do not return unit to retailer.
Por favor, no devuelva el aparato al lugar de compra.
Veuillez ne pas retourner routil au detaillant.
• 1-800-554-6723
www.poulan.com
Instruction Manual
Manual de Instrucciones
Manuel d'lnstructions
A
1950 / 1975 / 2055 / 2050 / 2075 / 2150
2155/2175/2350/2375/2150PRLE Series /
For Occasional Use Only
WARNING:
Read and follow all Safety Rules and Operating Instructions before
using this product. Failure to do so can result in serious injury.
ADVERTENCIA:
Lea el manual de instrucciones y siga todas las advertencias e en-
strucciones de seguridad. El no hacerlo puede resultar en lesiones
graves.
AVERTISSEMENT:
Lire le manuel d'instructions et bien respecter tousles avertisse-
merits et routes les instructions de securite. Tout defaut de le faire
pourrait entra_ner des blessures graves.
Poulan
1030 Stevens Creek Road
Augusta, GA 30907
545123622 8/25/06
Page 2

f_l
WARNING! This chain I_1
U
saw can be dangerous! Care-
less or improper use can cause
serious or even fatal injury.
Read and understand the
instruction manua( before
using the chain saw.
Always wear appropriate ear protection, eye protection and head protection.
Always use two hands when operating the chain saw.
WARNING! Contactingtheguidebartipwithanyobject
should be avoided; tip contact may cause the guide bar to
move suddenly upward and backward, which may cause se-
rious injury.
Measured maximum kickback va)ue without chain brake for the bar
and chain combination on the (abel
_k WARNING: Always disconnect
spark plug wire and place wire where it can-
not contact spark plug to prevent accidental
starting when setting up, transporting, ad-
justing or making repairs except carburetor
adjustments.
Because a chain saw is a high-speed wood-
cutting tool, special safety precautions must
be observed to reduce the risk of accidents.
Careless or improper use of this tool can
cause serious injury.
PLAN AHEAD
• Read this manual carefully until you com-
p(etely understand and can follow all safety
rules, precautions, and operating instruc-
tions before attempting to use the unit.
• Restrict the use of your saw to adult users
who understand and can follow safety
rules, precautions, and operating h_struc-
t)ons found in this manual.
• Wear protective gear. Always use steeF
toed safety footwear with non-slip soles;
snug-fitting clothing; heavy-duty, non-slip
gloves; eye protection such as non-fog-
ging, vented goggles or face screen; an
approved safety hard hat; and sound barri-
ers (ear plugs or mufflers) to protect your
hearing. Regular users should have hear-
ing checked regularly as chain saw noise
can damage hearing. Secure hair above
shoulder length.
Hearing Safety Hat
Protection _ Eye
"_'_, i m,e _"" Protection
Snug
Fittinc Heavy Duty
Clothing Gloves
Safety Safety Chaps
Shoes
Keep all parts of your body away from the
chain when the engine is running.
Keep children, bystanders, and animals a
minimum of 30 feet (10 meters) away from
the work area. Do not allow other people
or animals to be near the chain saw when
starting or operating the chain saw.
Do not handle or operate a chain saw when
you are fatigued, ill, or upset, or if you have
taken alcohol, drugs, or medication. You
must be ingood physical condition and men-
tally aiert. Chain saw work is strenuous. If
you have any condition that might be aggra-
vated by strenuous work, check with your
doctor before operating a chain saw.
Page 3
• Carefullyplanyoursawingoperationinad-
vance.Donotstartcuttinguntilyouhavea
clearworkarea,securefooting,and,ifyou
arefellingtrees,aplannedretreatpath.
OPERATEYOURSAW SAFELY
• Do not operate a chain saw with one hand.
Serious injury to the operator, helpers, by-
standers or any combination of these per-
sons may result from one-handed opera-
tion. A chain saw is intended for
two-handed use.
• Operate the chain saw only in a welFventi-
iated outdoor area.
• Do not operate saw from a ladder or in a
tree.
• Make sure the chain will not make contact
with any object while starting the engine.
Never try to start the saw when the guide
bar is in a cut.
• Do not put pressure on the saw at the end
of the cut. Applying pressure can cause
you to lose control when the cut is com-
pleted.
• Stop the engine before setting the saw
down.
• Do not operate a chain saw that is dam-
aged, improperly adjusted, or not com-
pletely and securely assembled. Always
replace bar, chain, hand guard, or chain
brake immediately if it becomes damaged,
broken or is otherwise removed.
• With the engine stopped, hand carry the
chain saw with the muffler away from your
body, and the guide bar and chain to the
rear, preferably covered with a scabbard.
MAINTAIN YOUR SAW IN GOOD
WORKING ORDER
• Have aH chah_ saw service performed by a
qualified service dealer with the exception
of the items listed in the maintenance sec-
tionofthis manual. Forexample, ifimprop-
er tools are used to remove or hoid the fly-
wheel when servicing the clutch, structural
damage to the flywheel can occur and
cause the flywheel to burst.
• Make certain the saw chain stops moving
when the throttle trigger is released. For
correction, refer to CARBURETOR AD-
JUSTMENTS.
• Never modify your saw in any way.
• Keep the handles dry, clean, and free of oil
or fuel mixture.
• Keep fuel and oil caps, screws, and fas-
teners securely tightened.
• Use only Poulan accessories and re-
placement parts as recommended.
HANDLE FUEL WITH CAUTION
• Do not smoke while handling fuel or while
operating the saw.
• Eliminate all sources of sparks or flame in
the areas where fuel is mixed or poured.
There should be no smoking, open flames,
or work that could cause sparks. Allow en-
gine to coot before refueling.
• Mix and pour fuel in an outdoor area on
bare ground; store fuel in a cool, dry, well
ventilated place; and use an approved,
marked container for all fuel purposes.
Wipe up all fuel spills before starting saw.
• Move at least t0 feet (3 meters) from fuel-
ing site before starting engine.
• Turn the engine off and let saw cool in a
non-combustible area, not on dry leaves,
straw, paper, etc. SIowly remove fuel cap
and refuel unit.
• Store the unit and fuel in an area where fuel
vapors cannot reach sparks or open
flames from water heaters, electric motors
or switches, furnaces, etc.
KICKBACK
_, WARNING: Avoid kickback which
can result in serious injury. Kickback is the
backward, upward or sudden forward motion
of the guide bar occurring when the saw
chain near the upper tip of the guide bar con-
tacts any object such as a log or branch, or
when the wood closes in and pinches the
saw chain in the cut. Contacting a foreign ob-
ject in the wood can also result in loss of
chain saw control,
• Rotational Kickback can occur when the
moving chain contacts an object at the up-
per tip of the guide bar. This contact can
cause the chain to dig into the object,
which stops the chain for an instant, The
result is a lightning fast, reverse reaction
which kicks the guide bar up and back to-
ward the operator.
• Pinch-Kickback can occur when the the
wood closes in and pinches the moving
saw chain in the cut along the top of the
guide bar and the saw chain is suddenly
stopped. This sudden stopping of the
chain results in a reversal of the chain
force used to cut wood and causes the
saw to move in the opposite direction of the
chain rotation, The saw is driven straight
back toward the operator.
• Pull-In can occur when the moving chain
contacts a foreign object in the wood in the
cut along the bottom of the guide bar and the
saw chain is suddenly stopped. This sudden
stopping pulls the saw forward and away
from the operator and could easily cause the
operator to lose control of the saw.
Avoid Pinch-Kickback:
• Be extremely aware of situations or ob-
structions that can cause material to pinch
the top of or otherwise stop the chain,
• Do not cut more than one log at a time,
• Do not twist the saw as the bar is with-
drawn from an undercut when bucking,
Avoid Pull-In:
• Always begin cutting with the engine at full
speed and the saw housing against wood.
• Use wedges made of plastic or wood.
Never use metal to hold the cut open.
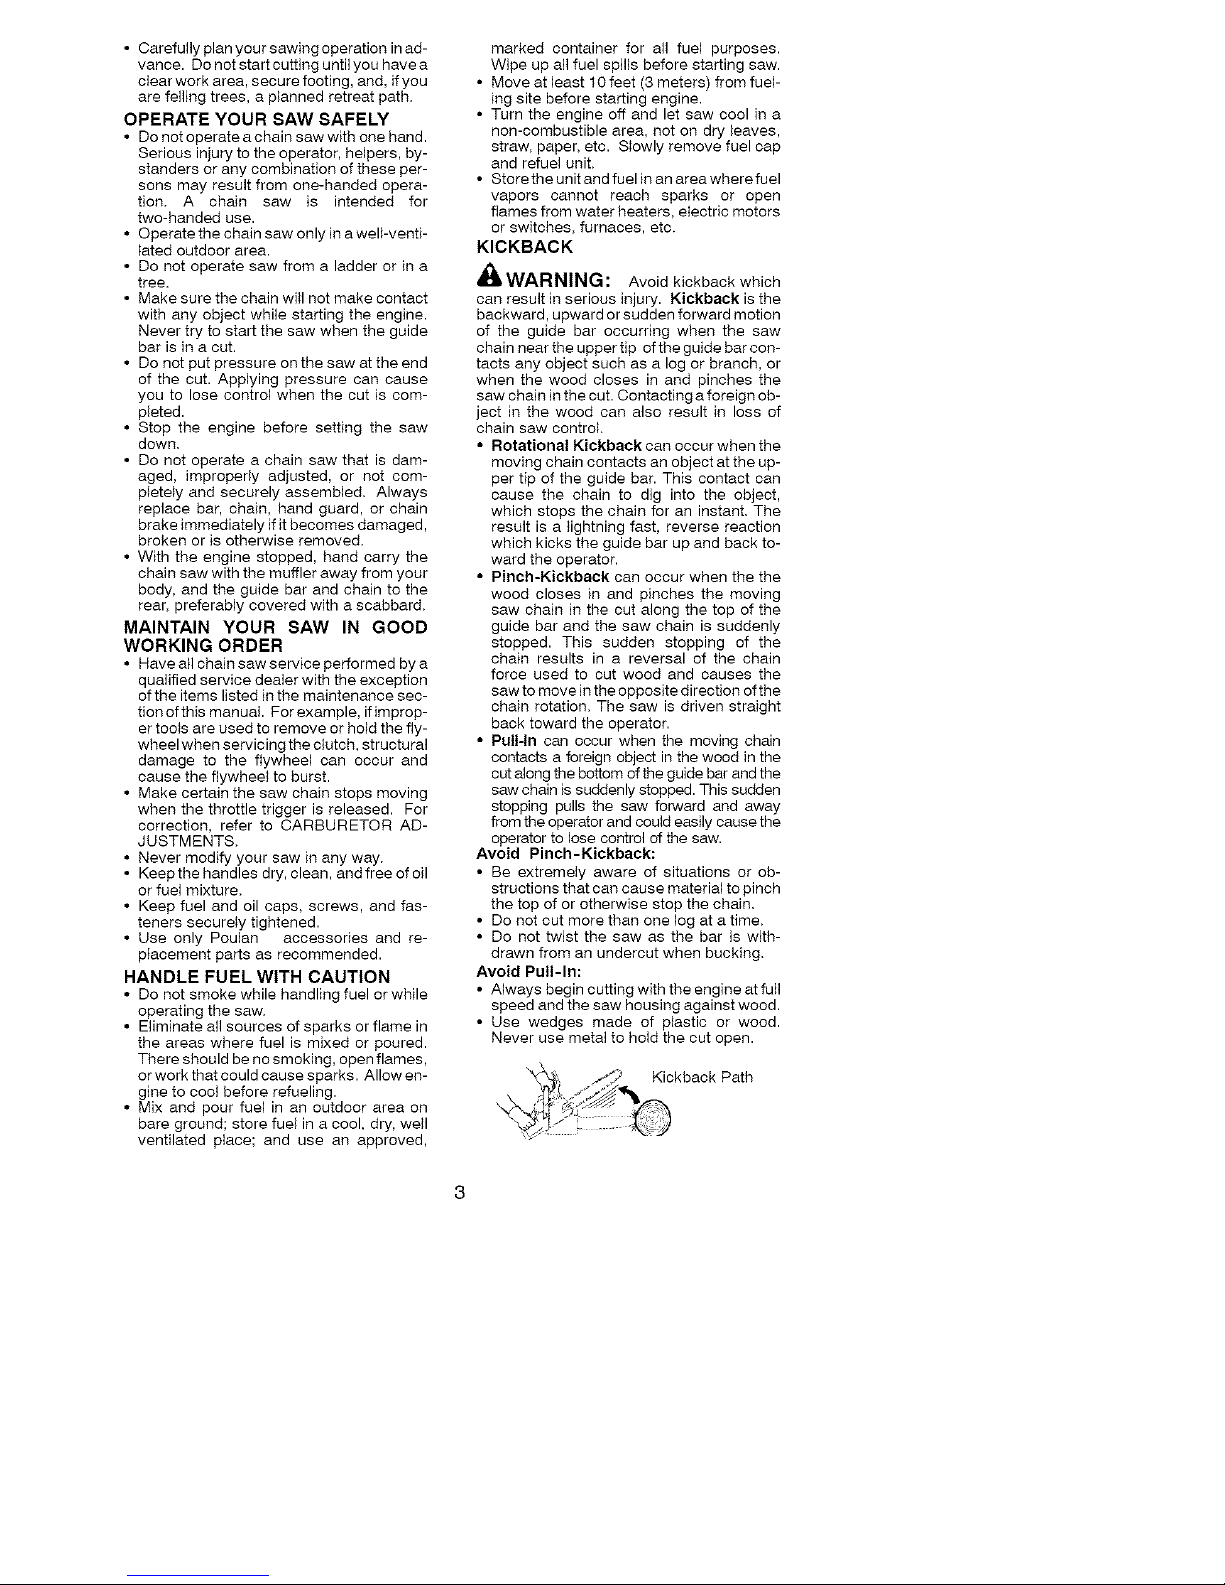
\X_i _ _2 Kickback Path
Page 4
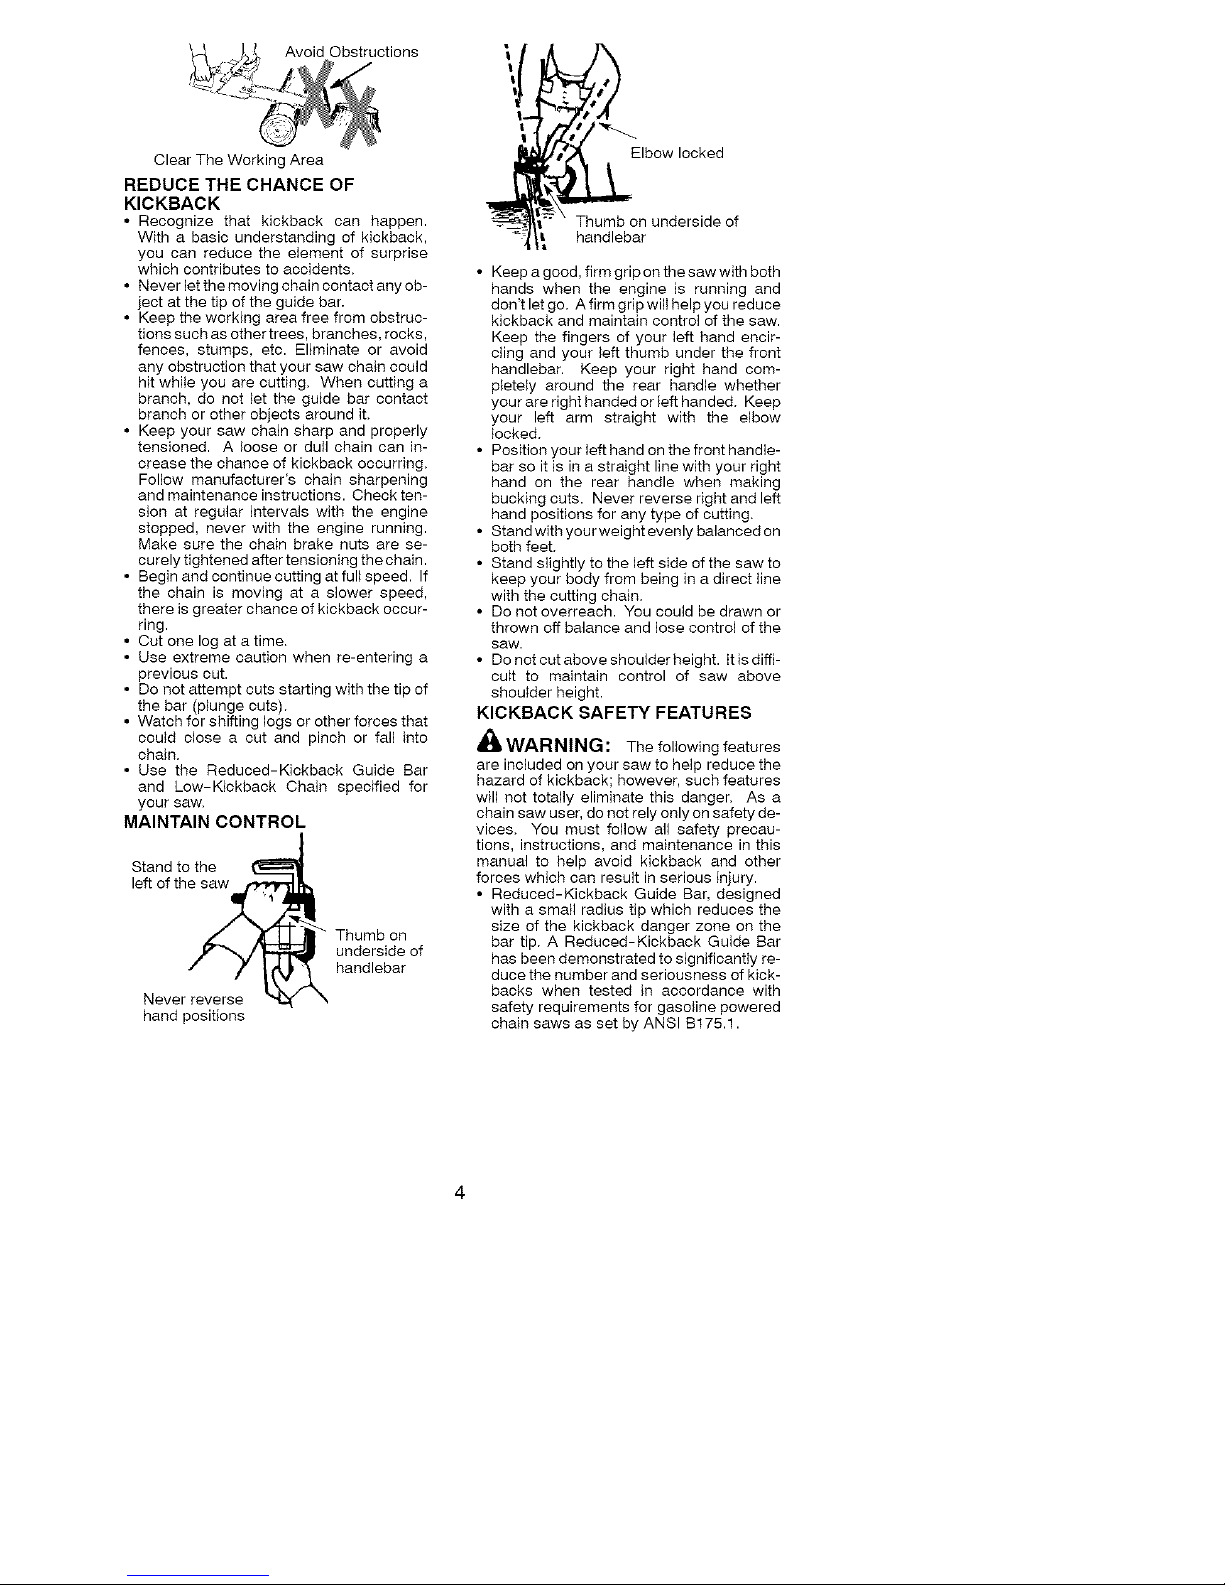
AvoidObstructions t
t
ClearTheWorkingArea
REDUCE THE CHANCE OF
KICKBACK
• Recognize that kickback can happen.
With a basic understanding of kickback,
you can reduce the element of surprise
which contributes to accidents,
• Never let the moving chain contact any ob-
ject at the tip of the guide bar.
• Keep the working area free from obstruc-
tions such as other trees, branches, rocks,
fences, stumps, etc. Eliminate or avoid
any obstruction that your saw chain could
hit while you are cutting, When cutting a
branch, do not let the guide bar contact
branch or other objects around it,
• Keep your saw chain sharp and properly
tensioned. A loose or dull chain can in-
crease the chance of kickback occurring,
Follow manufacturer's chain sharpening
and maintenance instructions. Check ten-
sion at regular intervals with the engine
stopped, never with the engine running.
Make sure the chain brake nuts are se-
curely tightened after tensioning the chain.
• Beginandcontinuecuttingatfullspeed. If
the chain is moving at a slower speed,
there is greater chance of kickback occur-
ring.
• Out one log at a time,
• Use extreme caution when re-entering a
previous cut.
• Do not attempt cuts starting with the tip of
the bar (plunge cuts),
• Watch for shifting logs or other forces that
could close a cut and pinch or fall into
chain,
• Use the Reduced-Kickback Guide Bar
and Low-Kickback Chain specified for
your saw,
MAINTAIN CONTROL
Stand to the
leill tel _
hand positions
Thumb on
underside of
handlebar
\
!
t
Elbow locked
Thumb on underside of
handlebar
• Keep a good, firm grip on the saw with both
hands when the engine is running and
don't let go, A firm grip will help you reduce
kickback and maintain control of the saw.
Keep the fingers of your left hand encir-
cling and your left thumb under the front
handlebar. Keep your right hand com-
pletely around the rear handle whether
your are right handed or left handed, Keep
your left arm straight with the elbow
locked,
• Position your left hand on the front handle-
bar so it is in a straight line with your right
hand on the rear handle when making
bucking cuts. Never reverse right and left
hand positions for any type of cutting,
• Stand with your weight evenly balanced on
both feet,
• Stand slightly to the left side of the saw to
keep your body from being in a direct line
with the cutting chain,
• Do not overreach. You could be drawn or
thrown off balance and lose control of the
saw.
• Do not cut above shoulder height. It isdiffi-
cult to maintain control of saw above
shoulder height.
KICKBACK SAFETY FEATURES
,_ WARNING: The following features
are included on your saw to help reduce the
hazard of kickback; however, such features
will not totally eliminate this danger, As a
chain saw user, do not rely only on safety de-
vices, You must follow all safety precau-
tions, instructions, and maintenance in this
manual to help avoid kickback and other
forces which can result in serious injury.
• Reduced-Kickback Guide Bar, designed
with a small radius tip which reduces the
size of the kickback danger zone on the
bar tip, A Reduced-Kickback Guide Bar
has been demonstrated to significantIy re-
duce the number and seriousness of kick-
backs when tested in accordance with
safety requirements for gasoline powered
chain saws as set by ANSI B175.1.
Page 5
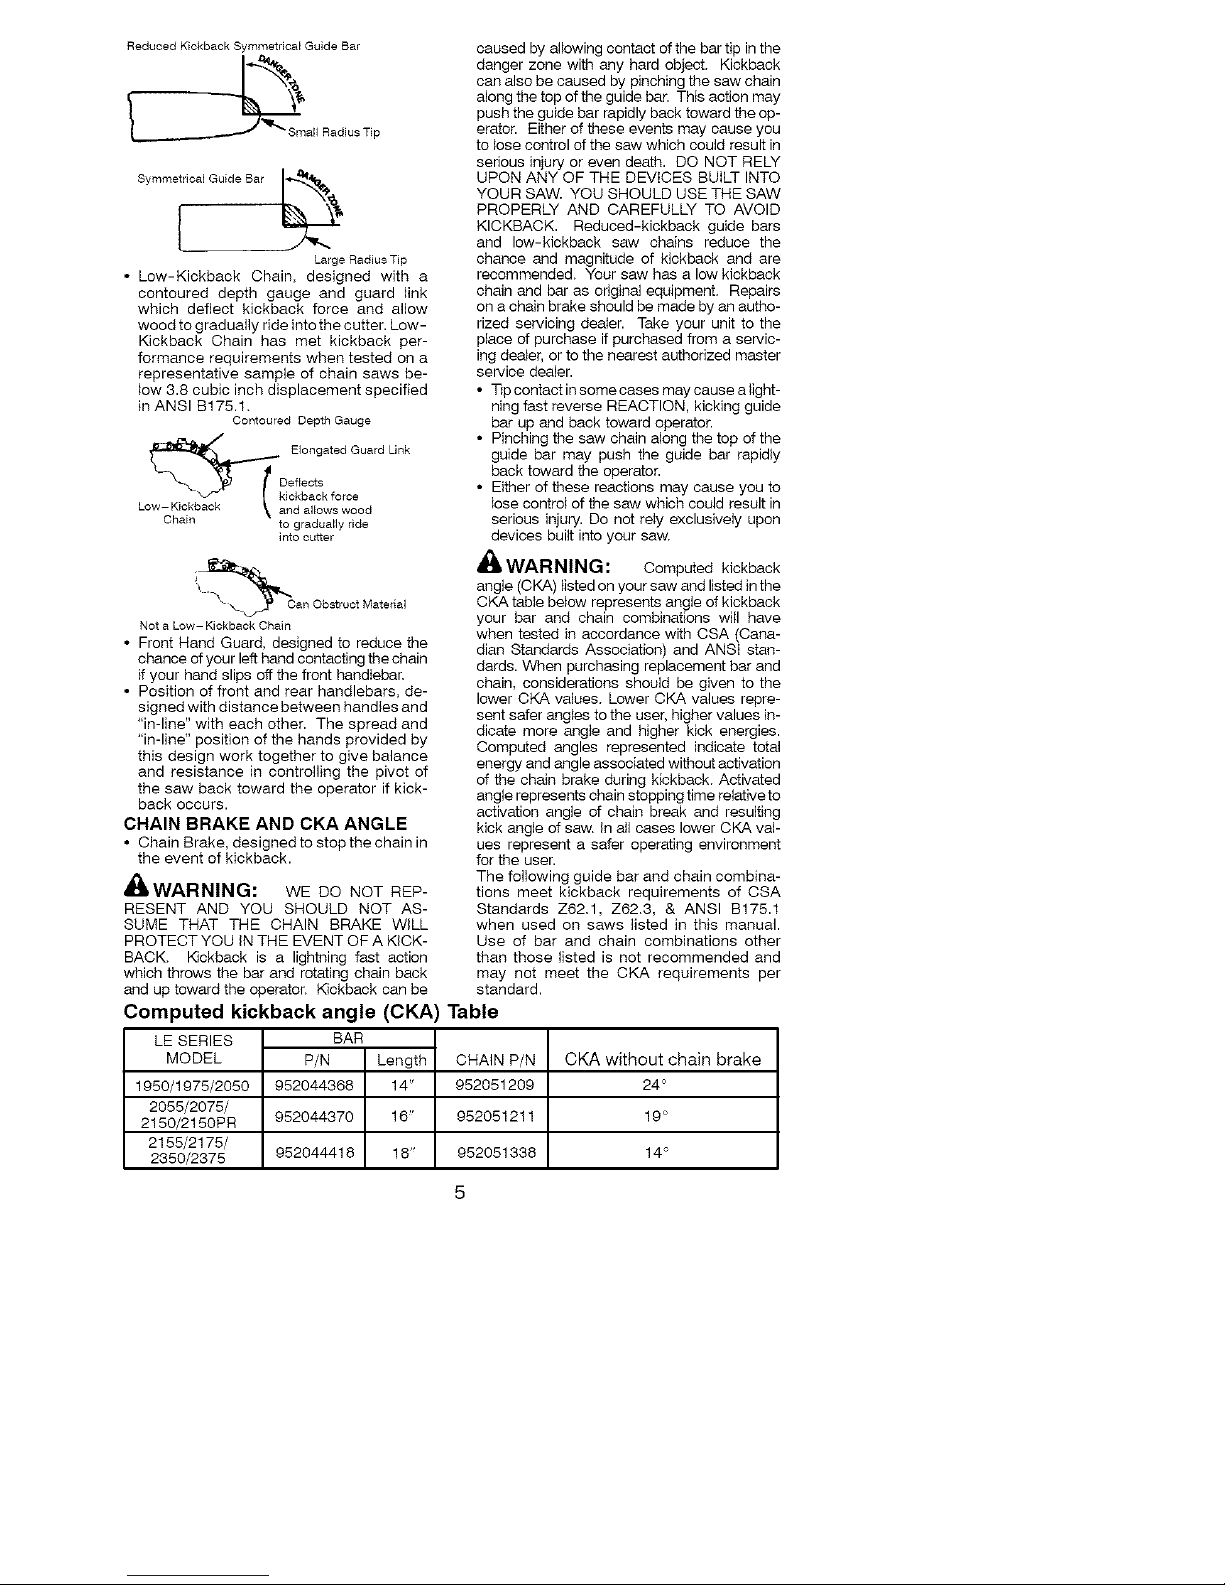
L
Large Radius Tip
• Low-Kickback Chain, designed with a
contoured depth gauge and guard link
which deflect kickback force and allow
wood to gradually ride into the cutter. Low-
Kickback Chain has met kickback per-
formance requirements when tested on a
representative sample of chain saws be-
low 3.8 cubic inch displacement specified
in ANSI B175.t,
Contoured Depth Gauge
D Elongated Guard Link
....
Low-Kickback _ and allowswood
Chain to gradually ride
into culter
"_ "\_" _Can(_ "%_ Obstruct Matedal
Not a Low- Kickback Chain
• Front Hand Guard, designed to reduce the
chance of your left hand contacting the chain
if your hand slips off the front handlebar,
• Position of front and rear handlebars, de-
signed with distance between handles and
"in-line" with each other. The spread and
"in-line" position of the hands provided by
this design work together to give balance
and resistance in controlling the pivot of
the saw back toward the operator if kick-
back occurs.
CHAIN BRAKE AND CKA ANGLE
• Chain Brake, designed to stop the chain in
the event of kickback.
_WARNING: WE DO NOT REP-
RESENT AND YOU SHOULD NOT AS-
SUME THAT THE CHAIN BRAKE WiLL
PROTECT YOU iN THE EVENT OF A KICK-
BACK, Kickback is a lightning fast action
which throws the bar and rotating chain back
and up toward the operator, Kickback can be
caused by afiowing contact of the bar tip in the
danger zone with any hard object, Kickback
can also be caused by pinching the saw chain
along the top of the guide bar. This action may
push the guide bar rapidly back toward the op-
erator. Either of these events may cause you
to tose control of the saw which could result in
serious injury or even death. DO NOT RELY
UPON ANY OF THE DEVICES BUILT INTO
YOUR SAW. YOU SHOULD USE THE SAW
PROPERLY AND CAREFULLY TO AVOID
KICKBACK. Reduced-kickback guide bars
and low-kickback saw chains reduce the
chance and magnitude of kickback and are
recommended, Your saw has a low kickback
chain and bar as original equipment, Repairs
on a chain brake should be made by an autho-
rized servicing deaIer. Take your unit to the
piace of purchase if purchased from a servic-
ing dealer, or to the nearest authorized master
service dealer.
• Tip contact in some cases may cause a light-
ning fast reverse REACTION, kicking guide
bar up and back toward operator.
• Pinching the saw chain along the top of the
guide bar may push the guide bar rapidly
back toward the operator.
• Either of these reactions may cause you to
lose control of the saw which could result in
serious injury. Do not rely exclusively upon
devices built into your saw,
_b WARNING: Computed kickback
angle (OKA) listed on your saw and listed inthe
CKA table betow represents angle of kickback
your bar and chain combinations will have
when tested in accordance with CSA (Cana-
dian Standards Association) and ANSI stan-
dards. When purchasing replacement bar and
chain, considerations should be given to the
lower CKA values, Lower CKA values repre-
sent safer angtes to the user, higher values in-
dicate more angle and higher kick energies.
Computed angles represented indicate total
energy and angle associated without activation
of the chain brake during kickback, Activated
angle represents chain stopping time relative to
activation angle of chain break and resulting
kick angle of saw, in atl cases lower OKA val-
ues represent a safer operating environment
for the user.
The following guide bar and chain combina-
tions meet kickback requirements of CSA
Standards Z62,1, Z62,3, & ANSI B175.1
when used on saws listed in this manual.
Use of bar and chain combinations other
than those listed is not recommended and
may not meet the CKA requirements per
standard.
Computed kickback angle (CKA) Table
LE SERIES
MODEL Length
1950/1975/2050 14"
2055/2075/
2150/2150PR 16"
2155/2175/
2350/2375
BAR
P/N CHAIN P/N
952044368 952051209
952044370 952051211
952044418 18" 952051338
CKA without chain brake
24 °
19 °
14 °
Page 6
NOTE:ifthissawistobeusedforcam-
merciallogging,achah_brakeisrequired
andshallnotberemovedorotherwisedis-
abledtocomplywithFederalOSHARegula-
tionsforCommercialLogging.
SAFETYNOTICE:Exposuretovibrations
throughprolongeduseofgasolinepowered
handtoolscouIdcausebloodvesselornerve
damageinthefingers,hands,andjointsof
peoplepronetocirculationdisordersor
abnormalswellings.Prolongeduseincold
weatherhasbeenlinked to blood vessel
damage in otherwise healthy people. If
symptoms occur such as numbness, pain,
loss of strength, change in skin color or texture,
or toss of feeling in the fingers, hands, or joints,
discontinue the use of this tool and seek
medical attention. An anti-vibration system
does not guarantee the avoidance of these
problems. Users who operate power tools on
a continual and regular basis must monitor
closely their physical condition and the
condition of this tool
SPECIAL NOTICE: Your saw is equipped
with a temperature limiting muffler and spark
arresth_g screen which meets the
requirements of California Codes 4442 and
4443. All U.S. forest land and the states of
California, Idaho, Mah_e, Minnesota, New
Jersey, Oregon, and Washington require by
law that many internal combustion engines
to be equipped with a spark arresting screen.
if you operate a chain saw in a state or Iocale
where such regulations exist, you are legally
responsible for maintaining the operating
condition of these parts. Failure to do so is
a violation of the law. Refer to the SERVICE
section for maintenance of the spark
arresting screen.
Failure to follow all Safety Rules and Precau-
tions can result inserious injury, if situations
occur which are not covered in this manual,
use care and good judgement, if you need
assistance, contact your authorized service
dealer or call 1-800-554-6723.
STANDARDS: This saw is listed by Under-
writer's Laboratories, Inc., in accordance with:
ANSI B175.1-2000 American National
Standards for Gasoline-Powered Chain
Saws - Safety Requirements
CSA Z62.1-03 Chain Saws - Occupational
Health and Safety
CSA Z62.3-96 Chain Saw Kickback Occu-
pational Health and Safety
Protective gloves (not provided) should be
worn during assembly.
ATTACHING TH E BAR & CHAIN (if not
already attached)
WARNING: if received assembled,
repeat all steps to ensure your saw is properly
assembled and all fasteners are secure. Al-
ways wear gloves when handling the chain.
The chain is sharp and can cut you even when
it is not moving!
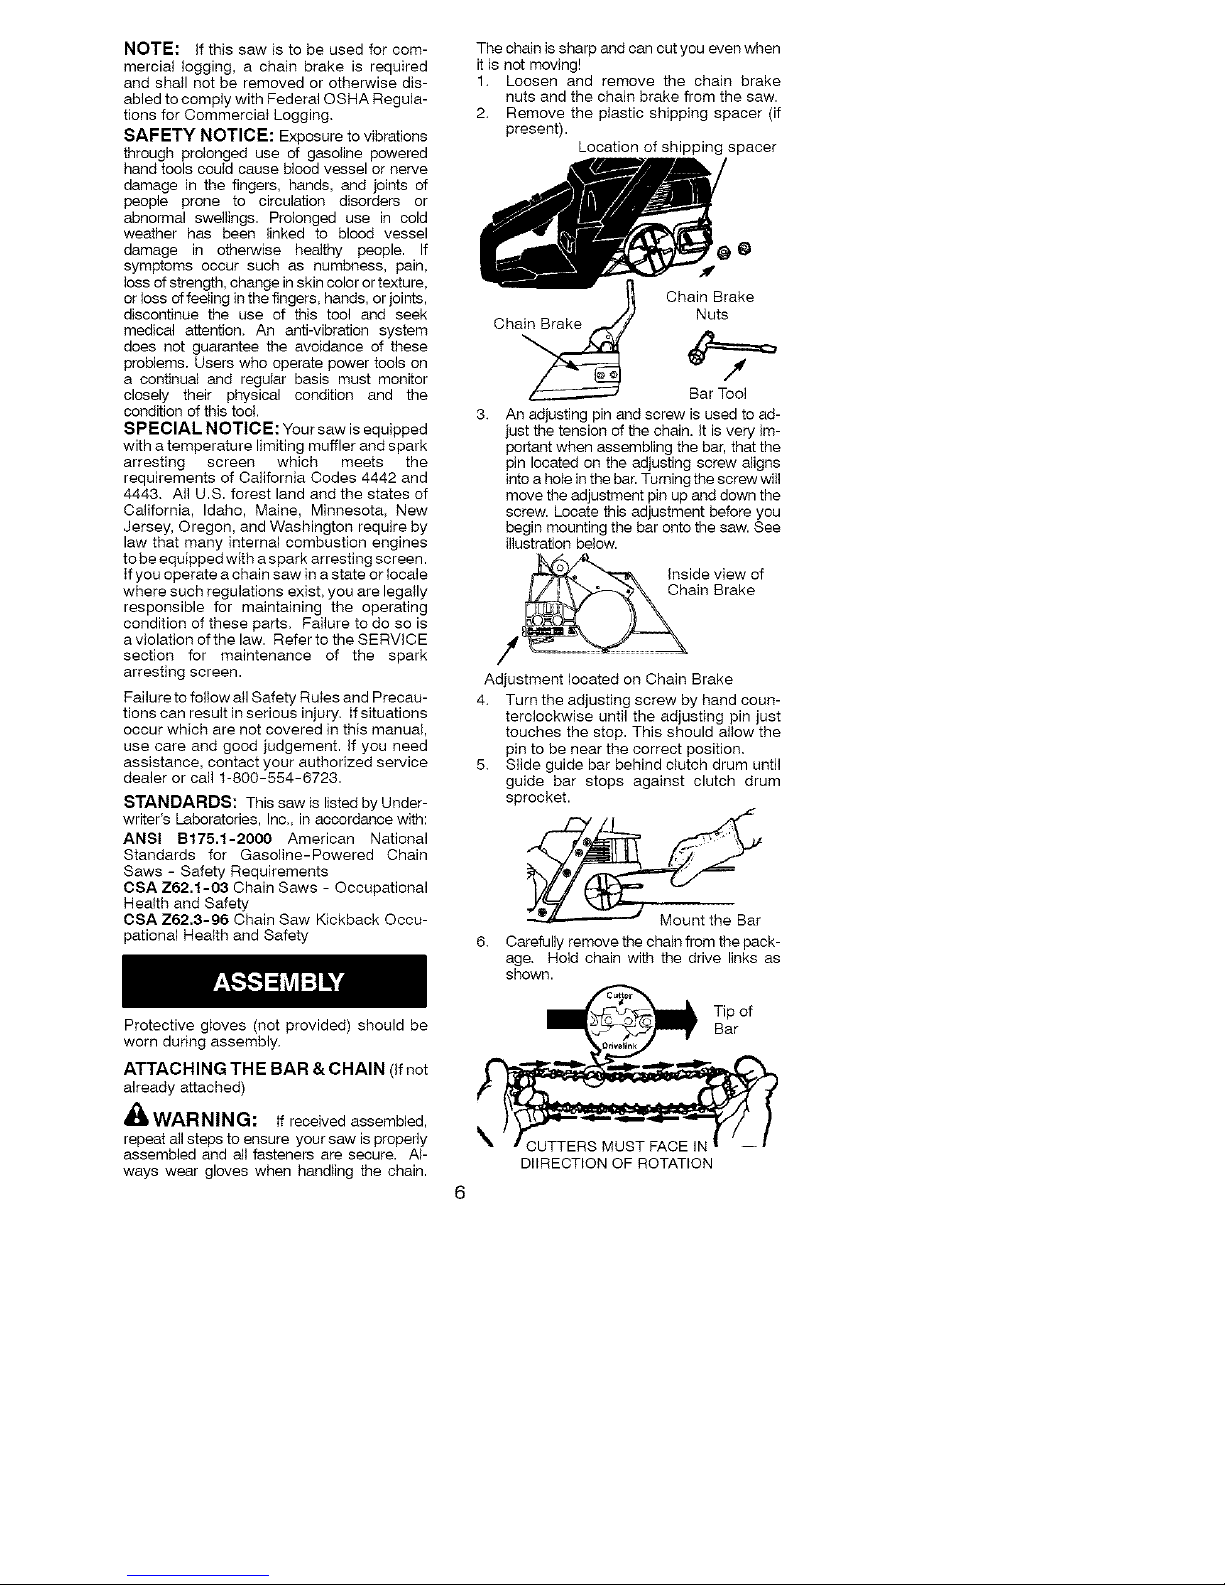
1. Loosen and remove the chain brake
nuts and the chain brake from the saw.
2. Remove the plastic shipping spacer (if
present).
Location of shipping spacer
G
a_ Chain Brak_e
Ch Nuts
Bar Tool
3. An adjusting pin and screw is used to ad-
just the tension of the chain, it is very im-
portant when assembling the bar, that the
pin located on the adjusting screw aligns
intoa hole in the bar. Turning the screw will
move the adjustment pin up and down the
screw. Locate this adjustment before you
begin mounting the bar onto the saw. See
illustration below.
inside view of
_,__hain Brake
Adjustment located on Chain Brake
4. Turn the adjusting screw by hand coun-
terclockwise until the adjusting pin just
touches the stop. This should aflow the
pin to be near the correct position.
5. Slide guide bar behind clutch drum until
guide bar stops against clutch drum
sprocket.
6. Carefully remove the chain from the pack-
age. Hold chain with the drive links as
shown.
_ ip of
Bar
DIIRECTION OF ROTATION
Page 7
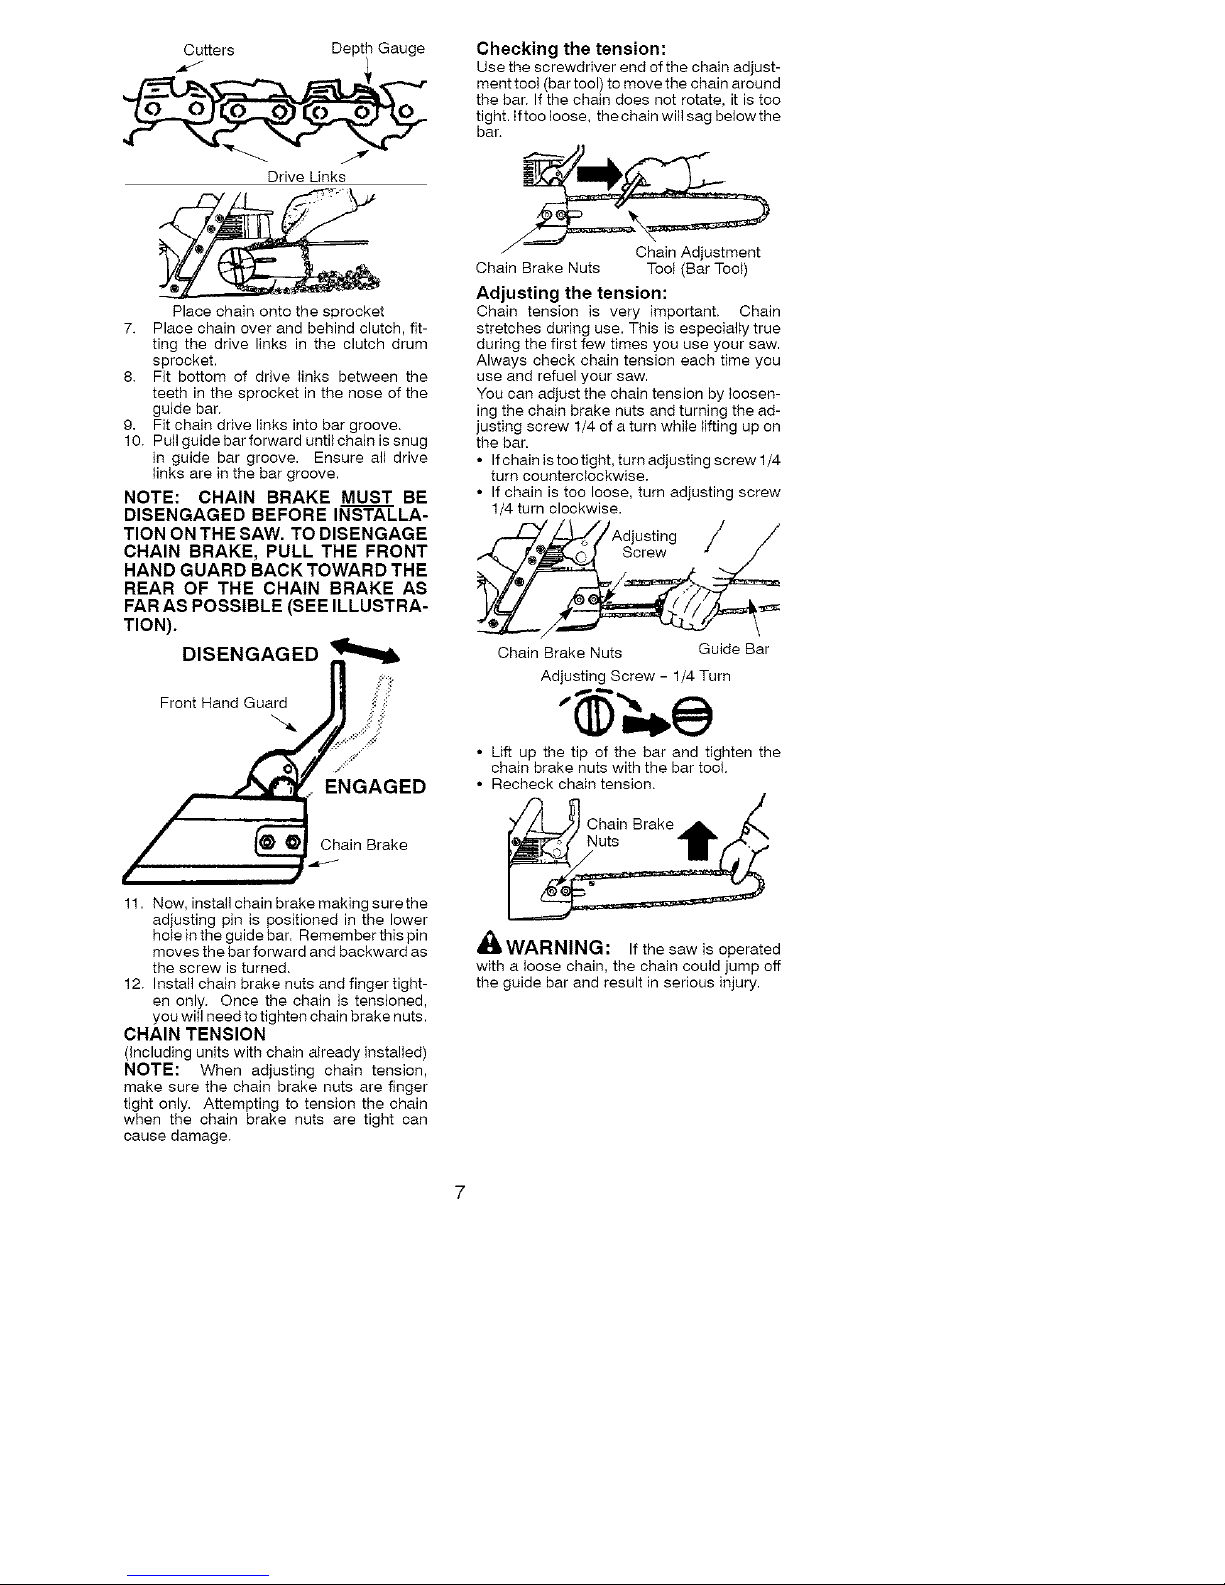
Cutters DepthGauge
DriveLinks
Placechainontothesprocket
7. Placechainoverandbehindclutch,fit-
tingthedrivelinksintheclutchdrum
sprocket.
8. Fitbottomofdrivelinksbetweenthe
teethinthesprocketinthenoseofthe
guidebar.
9. Fitchaindrivelinksintobargroove.
10.Pullguidebarforwarduntilchainissnug
inguidebargroove.Ensurealldrive
linksareinthebargroove.
NOTE: CHAIN BRAKE MUST BE
DISENGAGED BEFORE INSTALLA-
TION ON THE SAW. TO DISENGAGE
CHAIN BRAKE, PULL THE FRONT
HAND GUARD BACK TOWARD THE
REAR OF THE CHAIN BRAKE AS
FAR AS POSSIBLE (SEE ILLUSTRA-
TION).
DISENGAGED _
GAGED
/
11. Now, installchain brakemaking surethe
adjusting pin is positioned in the lower
hole in the guide bar. Remember this pin
moves the bar forward and backward as
the screw is turned.
12. Install chain brake nuts and finger tight-
en only. Once the chain is tensioned,
you will need to tighten chain brake nuts.
CHAIN TENSION
(including units with chain already h_stalled)
NOTE: When adjusting chain tension,
make sure the chain brake nuts are finger
tight only. Attempting to tension the chain
when the chain brake nuts are tight can
cause damage.
Checking the tension:
Use the screwdriver end of the chain adjust-
ment toot (bar tool) to move the chain around
the bar. If the chain does net rotate, it is too
tight. Ifteo loose, the chain will sag below the
bar.
Chain Adjustment
Chain Brake Nuts Tool (Bar Toot)
Adjusting the tension:
Chah_ tension is very h_qportant> Chain
stretches during use. This is especially true
during the first few times you use your saw.
Always check chain tension each time you
use and refuel your saw.
You can adjust the chain tension by loosen-
ing the chain brake nuts and turning the ad-
justing screw 1/4 of a turn while lifting up on
the bar.
• If chain is too tight, turn adjusting screw 1/4
turn counterclockwise.
• If chain is too loose, turn adjusting screw
1/4 turn clockwise.
,--Z:Z_ZD--/o/Adjust,ng / /
"_ I_ Screw "f J
Chain Brake Nuts Guide Bar
Adjusting Screw - 1/4 Turn
• Lift up the tip of the bar and tighten the
chain brake nuts with the bar tool.
• Recheck chain tension.
Chain Brake
_IWARNING: If the saw is operated
with a loose chain, the chain could jump off
the guide bar and result in serious injury.
Page 8
KNOW YOUR CHAIN SAW
READ THIS INSTRUCTION MANUAL AND SAFETY RULES BEFORE OPERATING YOUR
CHAIN SAW. Compare the illustrations with your unit to familiarize yourself with the location of
the various controls and adjustments. Save this manual for future reference.
Chain Front Hand Guard ''-_ r'J) t_,_/- Front Handle
Adjustment Tool I II I k- Starter Roe
tBerToo,/ I\.,", / P
/_ _ k'_l _/ ON/STOP
_t _====_ _ F/_ _ _/_- Switch
Cha,'_' n Muffler fill
' -*_IA F/IIIII "_z._"_//k"_J Primer
Bulb
Bar Oil Fill Cap Housing Fuel Mix Fill Cap
Cylinder Cover
ThrottIe Chain
Lockout Direction
of Travel
Guide
Throttle Choke/ _ Chain Brake
Trigger Fast Idle Chain Chain Nuts Bar Sprocket Hole
Lever Brake Catcher
ON/STOP SWITCH
The ON/STOP SWITCH is used to stop the
engine.
THROTTLE TRIGGER
The THROTI-LE TRIGGER controls engine
speed.
THROTTLE LOCK-OUT
The THROTi-LE LOCK-OUT must be
pressed before you can squeeze the throttle
trigger. This feature prevents you from acci-
dentally squeezing the trigger.
CHOKE/FAST IDLE LEVER
The choke and fast idle are set by pulling the
CHOKE/FAST IDLE LEVER out to the full ex-
tent for cold starting or after refueling. The
choke provides additional fuel to the engine
during cold starting.
PRIMER BULB
The PRIMER BULB circulates fuel to the car-
buretor to provide quicker starting.
CHAIN BRAKE
The CHAIN BRAKE is a device designed to
stop the chain if kickback occurs. The chain
brake activates automatically in the event of
kickback. The chain brake activates manually
if the front hand guard is pushed forward. The
chain brake is disengaged by pulling the front
hand guard back toward the front handle as far
as possible.
CHAIN TENSION
it is normal for a new chain to stretch during the
first 15 minutes of operation. You should check
your chain tension frequently. See CHAIN
TENSION under the ASSEMBLY section.
WARNING: Muffler is very hot dur-
ing and after use. Do not touch the muffler or
allow combustible material such as dry
grass or fuel to do so.
Page 9
season.SeeSTORAGEsectionforaddi-
tionatinformation.
FUELING ENGINE
_. WARNING: Remove fuel cap slow-
ly when refueling.
HELPFUL TIP ]
\ Toobtain the correct oilmix J
t ratio, pour 3.2 ounces of |
2-cycle synthetic off into I
one gallon of fresh gas. J
This engine is certified to operate on unleaded
gasoline. Before operation, gasoline must be
mixed with a good quality synthetic 2-cycle air-
cooled engine oil designed to be mixed at a ra-
tio of 40:1. Poulan/WEED EATER brand syn-
thetic oit is recommended, A 40:1 ratio is
obtained by mixing 3,2 ounces (95 ml) of oil
with 1 gallon (4 liters) of unleaded gasoline, in-
cluded with this saw is a 3.2 ounce container of
PoulanAA/EED EATER brand synthetic oil.
Pour the entire contents of this container into 1
gallon of gasoline to achieve the proper fuel
mixture, DO NOT USE automotive or marine
oil These oits will cause engine damage.
When mixing fuel follow the instructions
printed on the container, Always read and
follow the safety rules listed under HANDLE
FUEL WITH CAUTION,
BAR AND CHAIN LUBRICATION
The bar and chain require continuous lubri-
cation. Lubrication is provided by the auto-
matic oiler system when the oil tank is kept
filled. Lack of oil will quickly ruin the bar and
chain. Too littIe oil will cause overheating
shown by smoke coming from the chain and/
or discoloration of the bar.
In freezing weather oil will thicken, making it
necessary to thin bar and chain oil with a
small amount (5 to 10%) of #1 Diesel Fuel or
kerosene. Bar and chain oil must be free
flowing for the oit system to pump enough oil
for adequate lubrication.
Genuine Poulan bar and chain oil is recom-
mended to protect your unit against exces-
sive wear from heat and friction. Poutan oil
resists high temperature thinning.
If Poulan bar and chain oil is not available,
use a good grade SAE 30 oil.
• Never use waste oil for bar and chain lubri-
cation.
• Always stop the engine before removing
the oil cap.
IMPORTANT
Experience indicates that alcohol-blended
fuels (called gasohol or using ethanol or
methanol) can attract moisture which leads
to separation and formation of acids during
storage. Acidic gas can damage the fuel
system of an engine while in storage. To
avoid engine problems, the fuel system
shouM be emptied before storage for 30
days or longer. Drain the gas tank, start the
engine and let it run untit the fuet lines and
carburetor are empty. Use fresh fuel next
r=WARNING: The chain must not
move when the engine runs at idle speed. If
the chain moves at idle speed refer to CAR-
BURETOR ADJUSTMENT within this
manual, Avoid contact with the muffler. A hot
muffler can cause serious burns.
To stop the engine move the ON/STOP
switch to the STOP position.
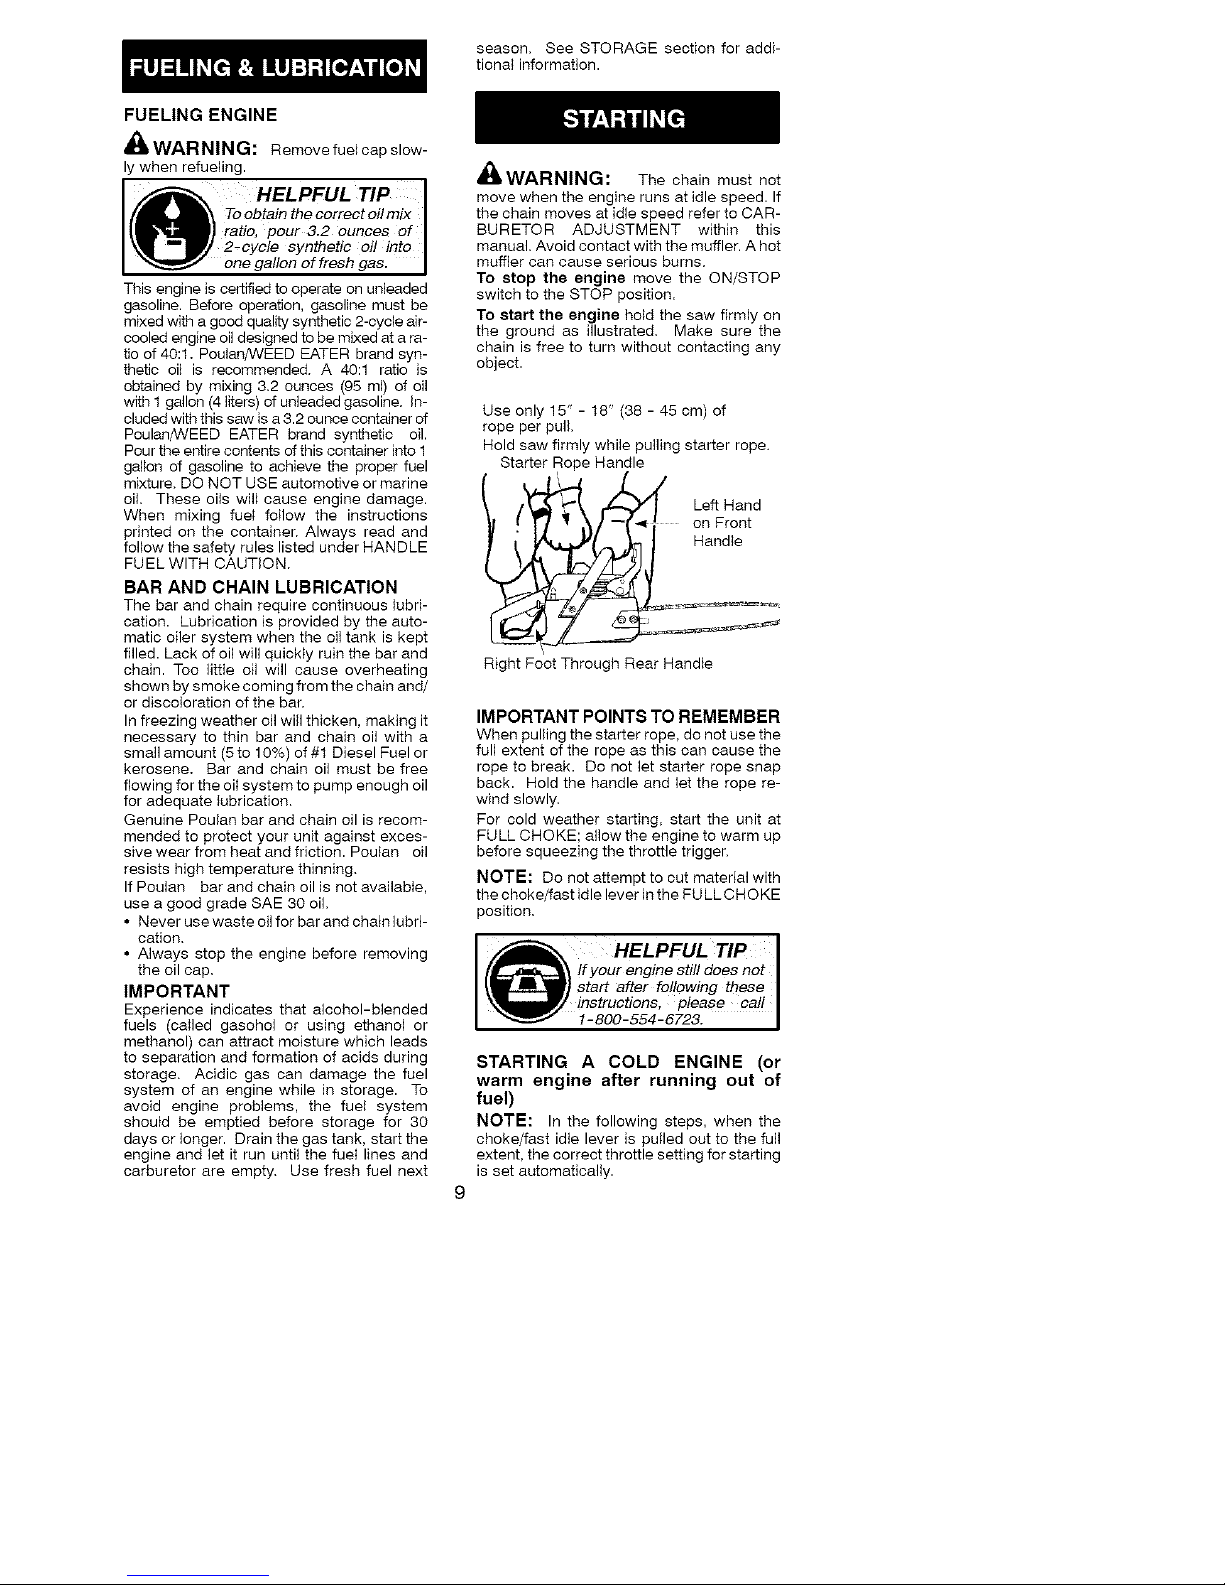
To start the engine hold the saw firmly on
the ground as illustrated. Make sure the
chain is free to turn without contacting any
object.
Use only 15" - 18" (38 - 45 cm) of
rope per pull.
Hold saw firmly while pulling starter rope.
Starter Rope Handle
__ Left Hand
• on Front
Handle
Right Foot Through Rear Handle
IMPORTANT POINTS TO REMEMBER
When pulling the starter rope. do not use the
full extent of the rope as this can cause the
rope to break. Do not let starter rope snap
back. Hold the handle and let the rope re-
wind slowly.
For cold weather starting, start the unit at
FULL CHOKE; allow the engine to warm up
before squeezing the throttle trigger.
NOTE: Do not attempt to cut material with
the choke/fast idle lever in the FULL OH O KE
position.
Ji HELPFUL TIP J
(_ !f your engine still does not J
_l___Ii start after following these J
_// instructions, please cafl I
1-800-554-5728. J
STARTING A COLD ENGINE (or
warm engine after running out of
fuel)
NOTE: In the following steps, when the
choke/fast idle lever is pulled out to the full
extent, the correct throttle setting for starting
is setautomatically.
Page 10
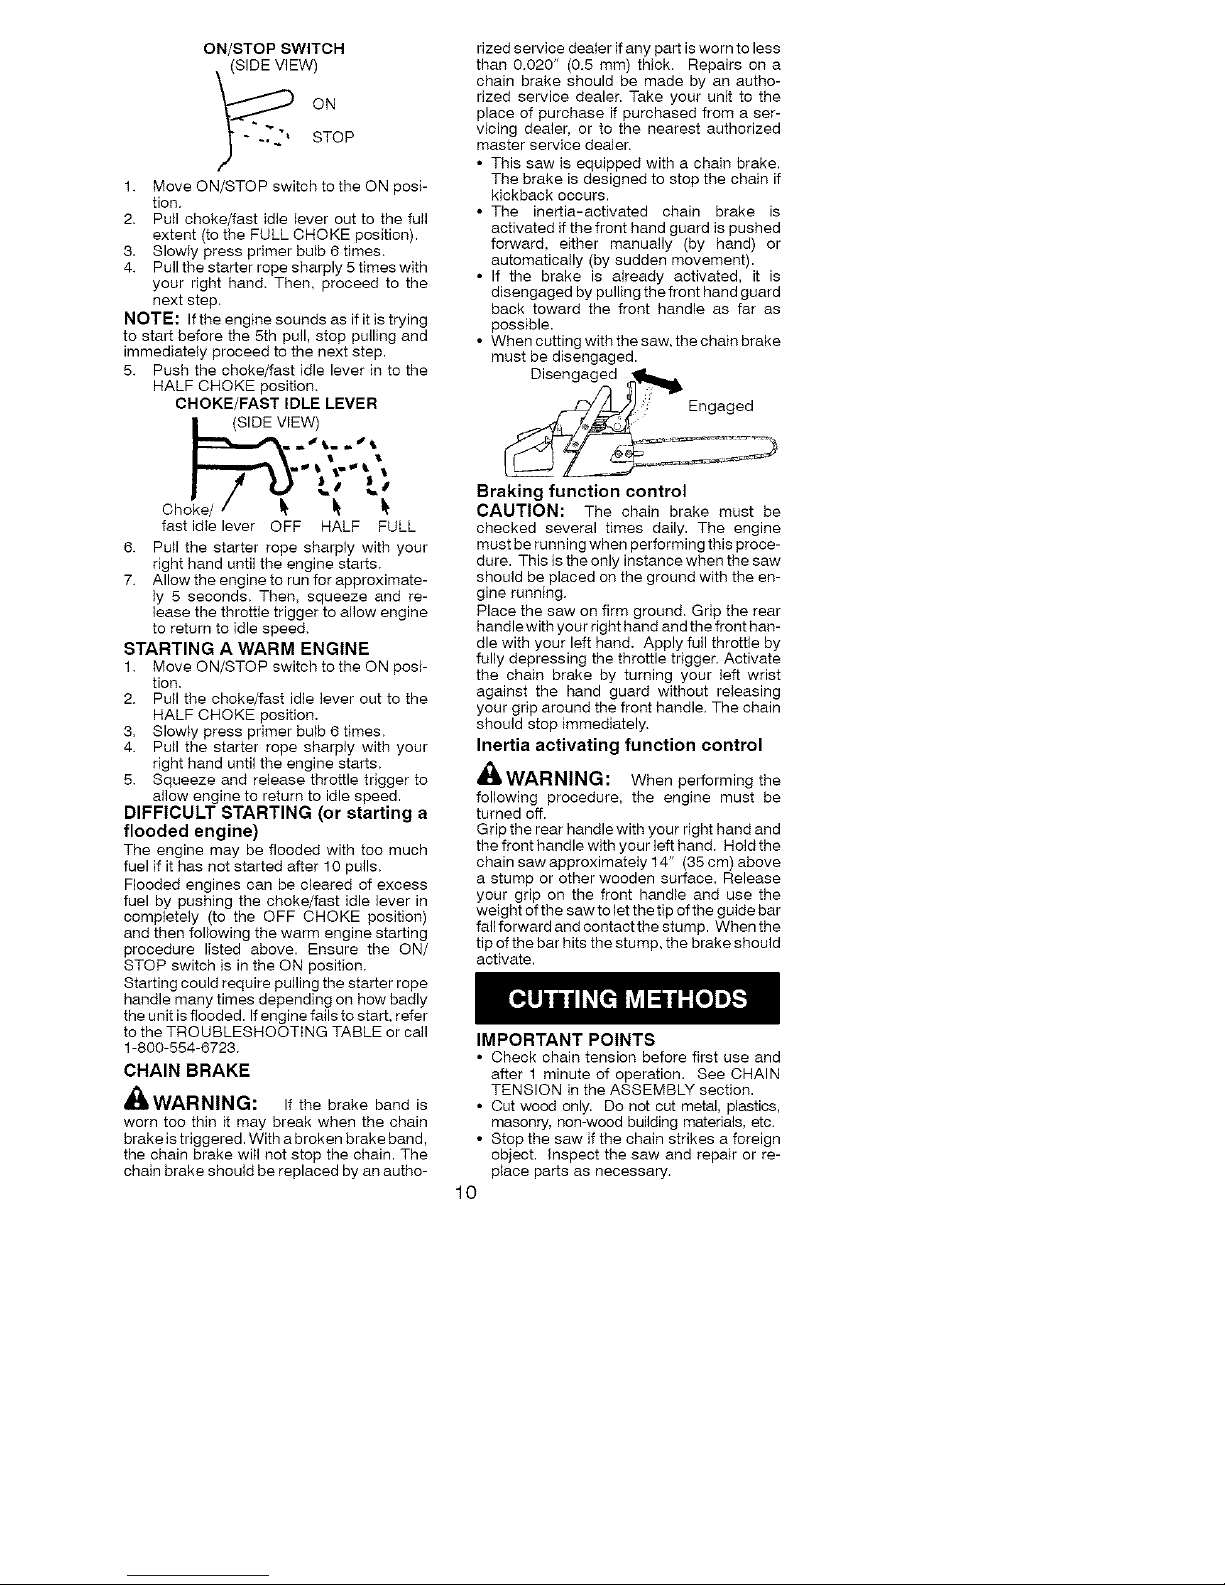
ON/STOP SWITCH
(_ .SIDE VIEW)
ON
-,72' STOP
1. Move ON/STOP switch to the ON posi-
tion.
2. Pull choke/fast idle lever out to the full
extent (to the FULL CHOKE position).
3. Slowly press primer bulb 6 times.
4. Pull the starter rope sharply 5 times with
your right hand. Then. proceed to the
next step.
NOTE: Ifthe engine sounds as if it is trying
to start before the 5th pull, stop pulling and
immediately proceed to the next step.
5. Push the choke/fast idle lever in to the
HALF CHOKE position.
CHOKE/FAST IDLE LEVER
o_IEW)
J J
Ch _
fast idle lever OFF HALF FULL
6. Pull the starter rope sharply with your
right hand until the engine starts.
7. Allow the engine to run for approximate-
ly 5 seconds. Then. squeeze and re-
lease the throttle trigger to allow engine
to return to idle speed.
STARTING A WARM ENGINE
1. Move ON/STOP switch to the ON posi-
tion.
2. Pull the choke/fast idle lever out to the
HALF CHOKE position.
3. Slowly press primer bulb 6 times.
4. Pull the starter rope sharply with your
right hand until the engine starts.
5. Squeeze and release throttle trigger to
allow engine to return to idle speed.
DIFFICULT STARTING (or starting a
flooded engine)
The engine may be flooded with too much
fuel if it has not started after 10 pulls.
Flooded engines can be cleared of excess
fuel by pushing the choke/fast idle lever in
completely (to the OFF CHOKE position)
and then following the warm engine starting
procedure listed above. Ensure the ON/
STOP switch is in the ON position.
Starting could require pulling the starter rope
handle many times depending on how badly
the unit is flooded. If engine fails to start, refer
to the TROUBLESHOOTING TABLE or call
1-800-554-6723.
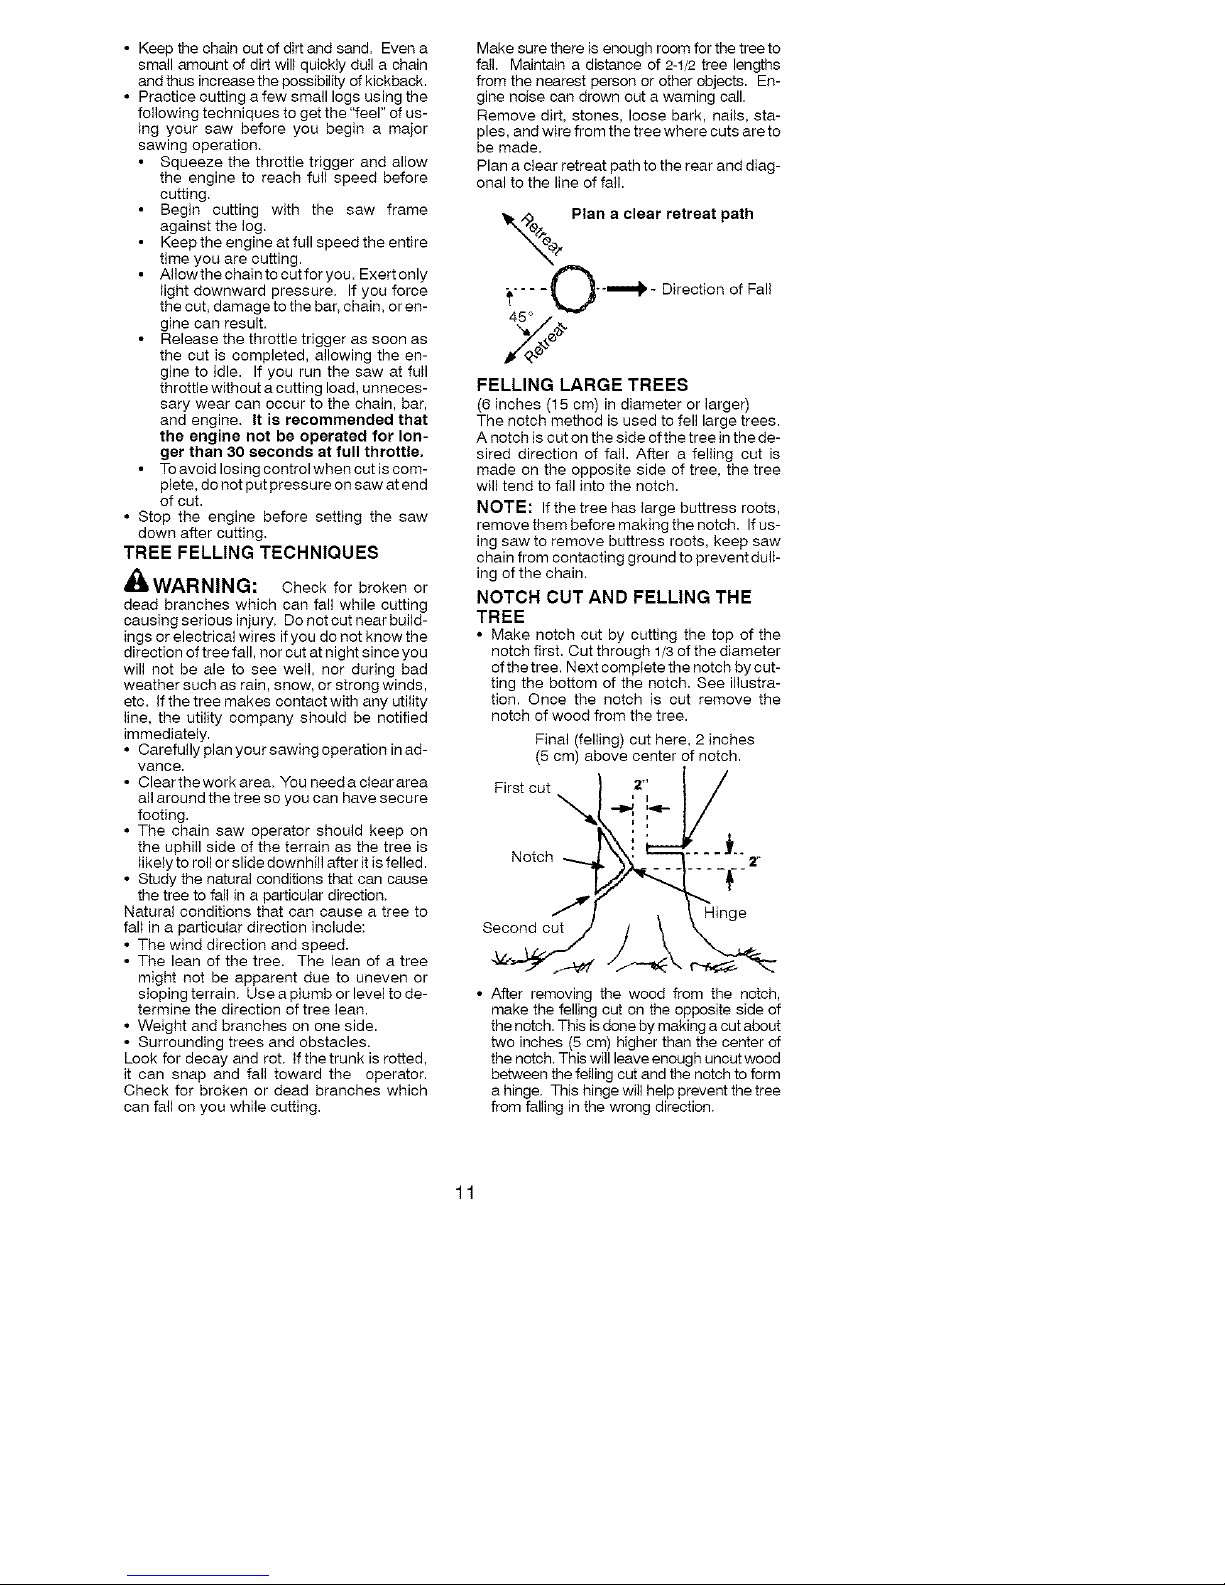
CHAIN BRAKE
_WARNING: If the brake band is
worn too thh_ it may break when the chain
brake is triggered. With a broken brake band,
the chain brake will not stop the chain. The
chain brake should be replaced by an autho-
rized service dealer ifany part is worn to less
than 0.020" (0.5 mm) thick. Repairs on a
chain brake should be made by an autho-
rized service dealer. Take your unit to the
place of purchase if purchased from a ser-
vicing dealer, or to the nearest authorized
master service dealer.
• This saw is equipped with a chain brake.
The brake is designed to stop the chain if
kickback occurs.
• The inertia-activated chain brake is
activated if the front hand guard is pushed
forward, either manually (by hand) or
automatically (by sudden movement).
• If the brake is already activated, it is
disengaged by pulling the front hand guard
back toward the front handle as far as
possible.
• When cutting with the saw. the chain brake
must be disengaged.
Disengaged _
'_ Engaged
Braking function control
CAUTION: The chain brake must be
checked several times daily. The engine
must be running when performing this proce-
dure. This is the only instance when the saw
should be placed on the ground with the en-
gine running.
Place the saw on firm ground. Grip the rear
handle with your right hand and the front han-
dle with your left hand. Apply full throttle by
fully depressing the throttle trigger. Activate
the chain brake by turning your teft wrist
against the hand guard without releasing
your grip around the front handle. The chain
should stop immediately.
Inertia activating function control
_WARNING: When performing the
following procedure, the engine must be
turned off.
Grip the rear handle with your right hand and
the front handle with your left hand, Hold the
chain saw approximately 14" (35 cm) above
a stump or other wooden surface. Release
your grip on the front handle and use the
weight of the saw to let the tip of the guide bar
fall forward and contact the stump. When the
tip of the bar hits the stump, the brake should
activate.
IMPORTANT POINTS
• Check chain tension before first use and
after 1 minute of operation. See CHAIN
TENSION in the ASSEMBLY section.
• Cut wood only. Do not cut metal, plastics,
masonry, non-wood building materials, etc.
• Stop the saw if the chain strikes a foreign
object. Inspect the saw and repair or re-
place parts as necessary.
10
Page 11
• Keepthechainoutofdirtandsand.Evena
smallamountofdirtwillquicklydullachain
andthusincreasethepossibilityofkickback.
• Practicecuttingafewsmalllogsusingthe
followingtechniquestogetthe"feel"ofus-
ingyoursawbeforeyoubeginamajor
sawingoperation.
• Squeezethethrottletriggerandallow
theenginetoreachfullspeedbefore
cutting.
• Begincuttingwiththesawframe
againstthelog.
• Keeptheengineatfullspeedtheentire
timeyouarecutting.
• Allowthechaintocutforyou.Exertonly
lightdownwardpressure.Ifyouforce
thecut,damagetothebar,chain,oren-
ginecanresult.
• Releasethethrottletriggerassoonas
thecutiscompleted,allowingtheen-
ginetoidle.Ifyourunthesawatfull
throttlewithoutacuttingload,unneces-
sarywearcanoccurtothechain,bar,
andengine.It is recommended that
the engine not be operated for lon-
ger than 30 seconds at full throttle.
• To avoid Iosh_g control when cut is com-
plete, do not put pressure on saw at end
of cut.
• Stop the engine before setting the saw
down after cutting.
TREE FELLING TECHNIQUES
_WARNING: Check for broken or
dead branches which can fall while cutting
causing serious injury, Do not cut near build-
ings or electrical wires if you do not know the
direction of tree fall, eor cut at night since you
will not be ale to see well, nor during bad
weather such as rain, snow, or strong winds,
etc. if the tree makes contact with any utility
line, the utility company should be notified
immediately.
• Carefully plan your sawing operation in ad-
vance.
• Cleartheworkarea, You needacieararea
all around the tree so you can have secure
footing.
• The chain saw operator should keep on
the uphill side of the terrain as the tree is
likely to roll or slide downhill after it is felled.
• Study the natural conditions that can cause
the tree to fall in a particular direction,
Natural conditions that can cause a tree to
fall in a particular direction include:
• The wind direction and speed.
• The lean of the tree. The lean of a tree
might not be apparent due to uneven or
sioping terrain, Use a plumb or level to de-
termine the direction of tree lean.
• Weight and branches on one side.
• Surrounding trees and obstacles.
Look for decay and rot, If thetrunk is rotted,
it can snap and fall toward the operator.
Check for broken or dead branches which
can fall on you while cutting.
Make sure there is enough room for the tree to
fail. Maintain a distance of 2-t/2 tree lengths
from the nearest person or other objects. En-
gine noise can drown out a warning call.
Remove dirt, stones, loose bark, nails, sta-
ples, and wire from the tree where cuts are to
be made.
Plan a clear retreat path to the rear and diag-
onal to the line of fail.
x2. Plan a clear retreat path
(}'-====_ - Direction of Fall
45 ° / ,_
/q.e _"
FELLING LARGE TREES
(6 inches (15 ore) in diameter or larger)
The notch method is used to fell large trees.
A notch is cut on the side of the tree in the de-
sired direction of fall. After a felting cut is
made on the opposite side of tree, the tree
will tend to fall into the notch.
NOTE: If the tree has targe buttress roots,
remove them before making the notch. Ifus-
ing saw to remove buttress roots, keep saw
chain from contacting ground to prevent dull-
ing of the chain.
NOTCH CUT AND FELLING THE
TREE
• Make notch cut by cutting the top of the
notch first. Out through 1/3 of the diameter
of the tree. Next complete the notch by cut-
ting the bottom of the notch. See illustra-
tion. Once the notch is cut remove the
notch of wood from the tree.
Final (felling) cut here, 2 inches
(5 cm) above center of notch.
First cut } 2'; I /
Notch _ _'_" 2"
• After removing the wood from the notch,
make the felling cut on the opposite side of
the notch. This is done by making a cut about
two inches (5 cm) higher than the center of
the notch. This will leave enough uncut wood
between the felling cut and the notch to form
a hinge. This hinge will help prevent the tree
from falling in the wrong direction.
11
Page 12
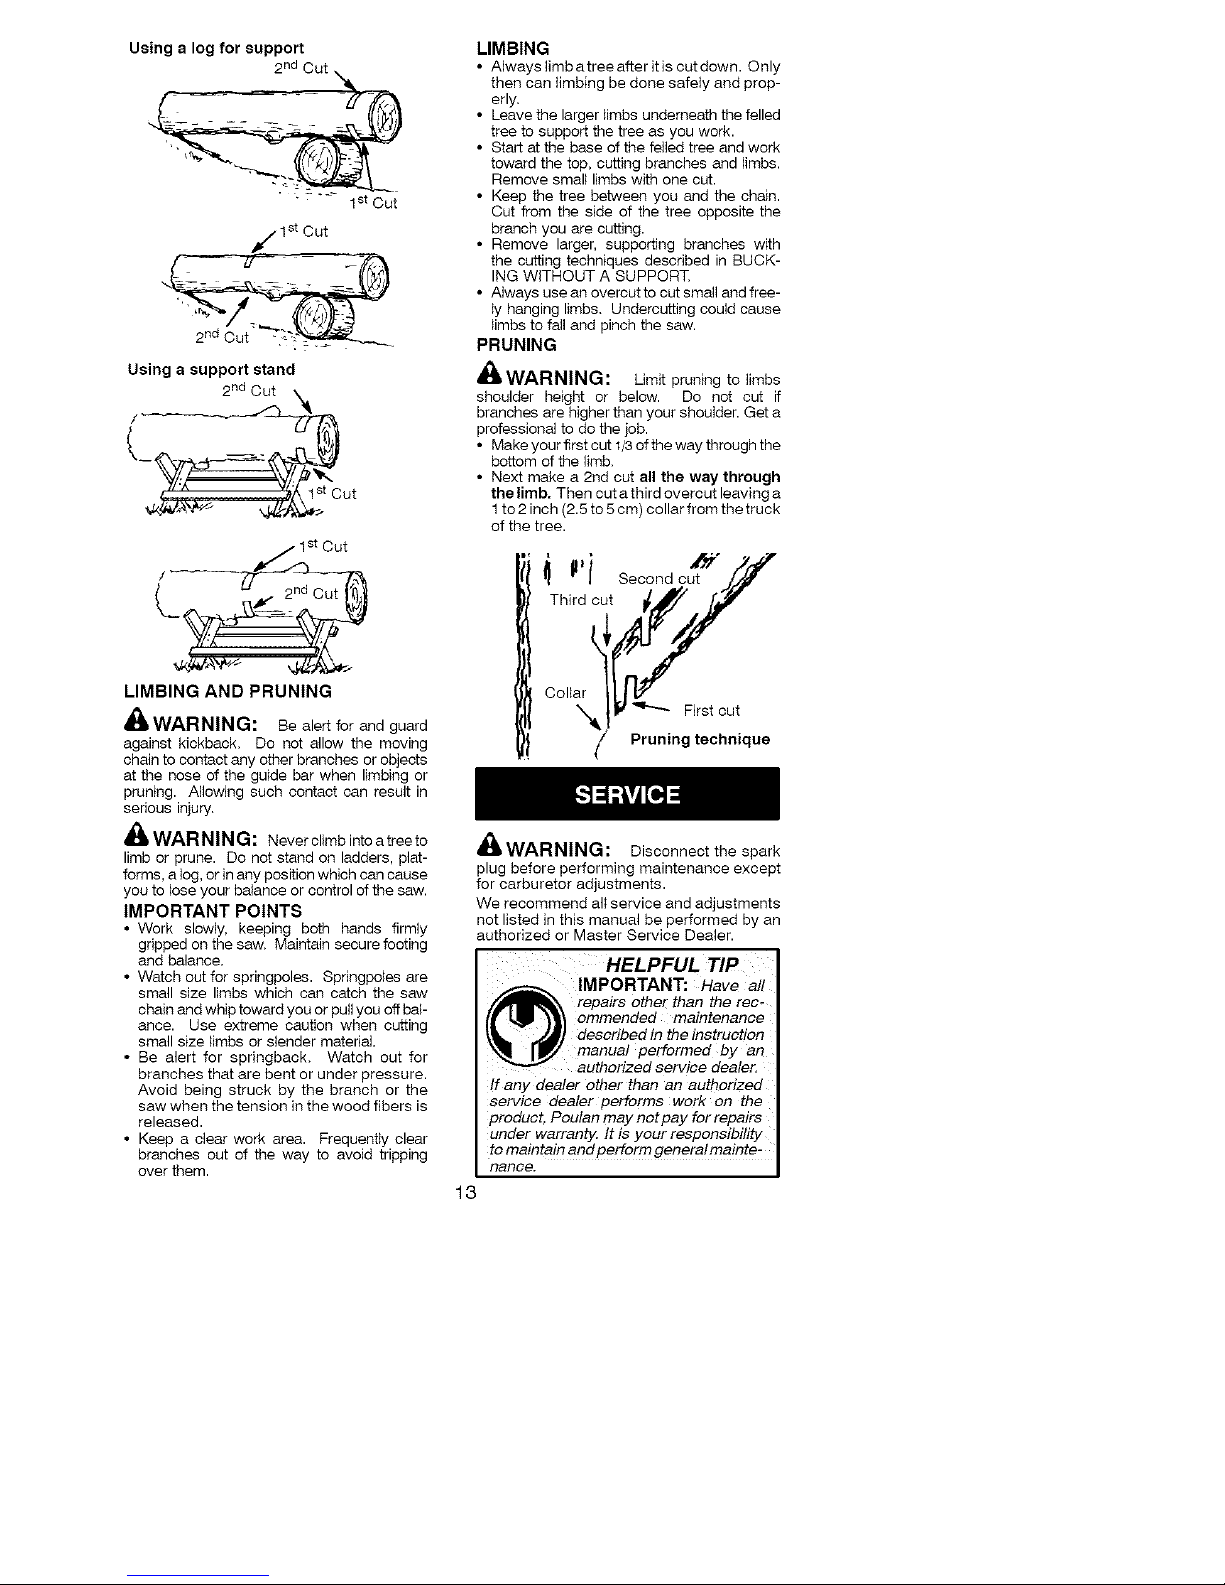
Hinge holds tree on stump and helps
control fall
Opening
of felling
use a metal wedge. Do not attempt to restart
your saw when it is pinched or hung in a log.
Use a wedge to remove pinched saw
Closing of
notch
NOTE: Before felling cut is complete, use
wedges to open the cut if necessary to
control the direction of fail. To avoid kickback
and chain damage, use wood or plastic
wedges, but never steel or iron wedges.
• Be alert to signs that the tree is ready to
fall: cracking sounds, widening of the fell-
ing cut, or movement in the upper
branches.
• As tree starts to fall, stop saw, put it down,
and get away quickly on your planned re-
treat path.
• DO NOT cut down a partially fallen tree
with your saw. Be extremely cautious with
partially fallen trees that may be poorly
supported, When a tree doesn't fall com-
pletely, set the saw aside and pull down the
tree with a cable winch, block and tackle,
or tractor.
CUTTING A FALLEN TREE
(BUCKING)
Buckh_g is the term used for cutting a fallen
tree to the desired log size,
_ WARNING: Do not stand on the log
being cut. Any portion can roll causing loss
of footing and control. Do not stand downhill
of the log being cut.
IMPORTANT POINTS
• Cut only one tog at a time.
• Cut shattered wood very carefully; sharp
pieces of wood could be flung toward opera-
tor,
• Use a sawhorse to cut small logs. Never
allow another person to hold the log while
cutting and never hold the log with your leg
or foot,
• Do not cut in an area where logs, limbs,
and roots are tangled such as in a blown
down area. Drag the logs into a clear area
before cutting by pulling out exposed and
cleared logs first,
TYPES OF CUTTING USED FOR
BUCKING
_WARNING: If saw becomes
pinched or hung in a log, don't try to force it
out, You can lose control ofthe saw resulting
in injury and/or damage to the saw. Stop the
saw, drive a wedge of plastic or wood into the
cut until the saw can be removed easily. Re-
start the saw and carefully reenter the cut. To
avoid kickback and chain damage, do not
Turn saw OFF and use a plastic or
wooden wedge to force cut open,
Overcutting begins on the top side of the log
with the bottom of the saw against the log.
When overcutting use light downward pres-
sure.
_Overcutting J _ L /
"-<2;ri
Undercutti <''"
Undercutting involves cutting on the under-
side of the tog with top of saw against the log.
When undercutting use light upward pres-
sure. Hold saw firmly and maintain control.
The saw will tend to push back toward you,
_i, WARNING: Never turn saw upside
down to undercut, The saw cannot be con-
trolled in this position,
Always make your first cut on the compres-
sion side of the log, The compression side of
the log is where the pressure of the log's
weight is concentrated,
First cut on compression side of log
Second cut
Second cut
First cut on compression side of tog
BUCKING WITHOUT A SUPPORT
• Overcut through 1/3 of the diameter of the
log.
• Roll the tog over and finish with a second
overcut,
• Watch for logs with a compression side to
prevent the saw from pinching, See il-
lustrations for cutting logs with a compres-
sion side.
BUCKING USING A LOG OR
SUPPORT STAND
• Remember your first cut is always on the
compression side of the log,
(Refer to the illustrations below for your
first and second cut)
• Your first cut should extend 1/3 of the
diameter of the log,
• Finish with your second cut.
12
Page 13
Using a log for support
2 nd Cut
I st Cut
,_1 st Cut
Using a support stand
2 nd Cut X_
ut
/ - _ 1st Cut
_A\_ -_ ,_
LIMBING AND PRUNING
WARNING: Bealertforandguard
against kickback, Do not allow the moving
chain to contact any other branches or objects
at the nose of the guide bar when limbing or
pruning. Allowing such contact can result in
serious injury,
_WARNING: Neverslimbintoatreeto
limb or prune. Do not stand on ladders, plat-
forms, a log, or in any position which can cause
you to lose your balance or control of the saw.
IMPORTANT POINTS
• Work slowly, keeping both hands firmly
gripped on the saw, Maintain secure footing
and balance,
• Watch out for springpoles. Springpoies are
small size limbs which can catch the saw
chain and whip toward you or pull you off bal-
ance. Use extreme caution when cutting
small size limbs or slender material,
• Be alert for springback, Watch out for
branches that are bent or under pressure.
Avoid being struck by the branch or the
saw when the tension in the wood fibers is
released.
• Keep a clear work area. Frequently clear
branches out of the way to avoid tripping
over them.
LIMBING
• Always limbatreeafter itis cutdown. Only
then can limbing be done safely and prop-
erly,
• Leave the larger limbs underneath the felled
tree to support the tree as you work.
• Start at the base of the felled tree and work
toward the top, cutting branches and limbs.
Remove small limbs with one cut.
• Keep the tree between you and the chain.
Cut from the side of the tree opposite the
branch you are cutting.
• Remove larger, supporting branches with
the cutting techniques described in BUCK-
ING WITHOUT A SUPPORT,
• Atways use an overcut to cut small and free-
ly hanging limbs, Undercutting could cause
limbs to fall and pinch the saw.
PRUNING
,_ WARNING: Limit pruning to limbs
shoulder height or below. Do not cut if
branches are higher than your shoulder. Get a
professional to do the job.
• Make your first cut I/3 of the way through the
bottom of the limb,
• Next make a 2nd cut all the way through
the limb. Then cut a third overcut leaving a
1 to 2 inch (2.5 to 5 cm) collar from the truck
of the tree.
_ThiPrl! Sec°nd cut_'_
Collar lit_
"_!_ _ First cut
/ Pruning technique
z_
WARNING: Disconnect the spark
plug before performing maintenance except
for carburetor adjustments.
We recommend all service and adjustments
not listed in this manual be performed by an
authorized or Master Service Dealer.
HELPFUL TIP
IMPORTANT: Have all
/'j_lmllL_ , repairs other than the rec-
Ur _,_ _ ommended maintenance
_Vdll_ ___] described in the instruction
manual performed by an
authorized service dealer.
!f any dealer other than an authodzed
service dealer performs work on the
product, Poulan may not pay for repairs
under warranty. It is your responsibility
to maintain and perform general mainte-
nanoe.
13
Page 14
MAINTENANCE SCHEDULE
Check:
Fuel mixture level .... Before each use
Bar lubrication ....... Before each use
Chain tension ....... Before each use
Chain sharpness ..... Before each use
For damaged parts ... Before each use
For loose caps ...... Before each use
For loose fasteners... Before each use
For loose parts ...... Before each use
Inspect and Clean:
Bar ................ Before each use
Complete saw ....... After each use
Air filter ............. Every 5 hours*
Chain brake ......... Every 5 hours*
Spark arresting screen
and muffler .......... Every 25 hours*
Replace spark plug . Yearly
Replace fuel filter ... Yearly
* Hours of Operation -
Each hour of operation is approximately
2 tanks of fuel.
AIR FILTER
CAUTION: Do not clean filter in gasoline
or other flammable solvent to avoid creating
a fire hazard or producing harmful evapora-
tive emissions.
Cleaning the air filter:
A dirty air filter decreases the life and perfor-
mance of the engine and h_creases fuel con-
sumption and harmful emissions. Always
ctean your air filter after 10 tanks of fuel or 5
hours of operation, whichever comes first.
Clean more frequently h_dusty conditions. A
used air filter can never be completely
cleaned, it is advisable to replace your air fil-
ter with a new one after every 50 hours of op-
eration, or annually, whichever comes first.
1. Loosen 3 screws on cylinder cover.
2. Remove cylinder cover.
3. Remove air filter.
4. Clean the air filter using hot soapy water.
Rh_se with clean cool water. Air dry
completely before reinstalling.
5. Lightly oil air filter before installing to im-
prove the efficiency of air filter. Use
2-cycle engine oil or motor oil (SAE 30).
Squeeze excess oil from filter.
6. Reinstall air filter.
7. Reinstall cylinder cover and 3 screws.
Tighten securely.
_ I Cylinder Cover
Air Filter _f Screws
er
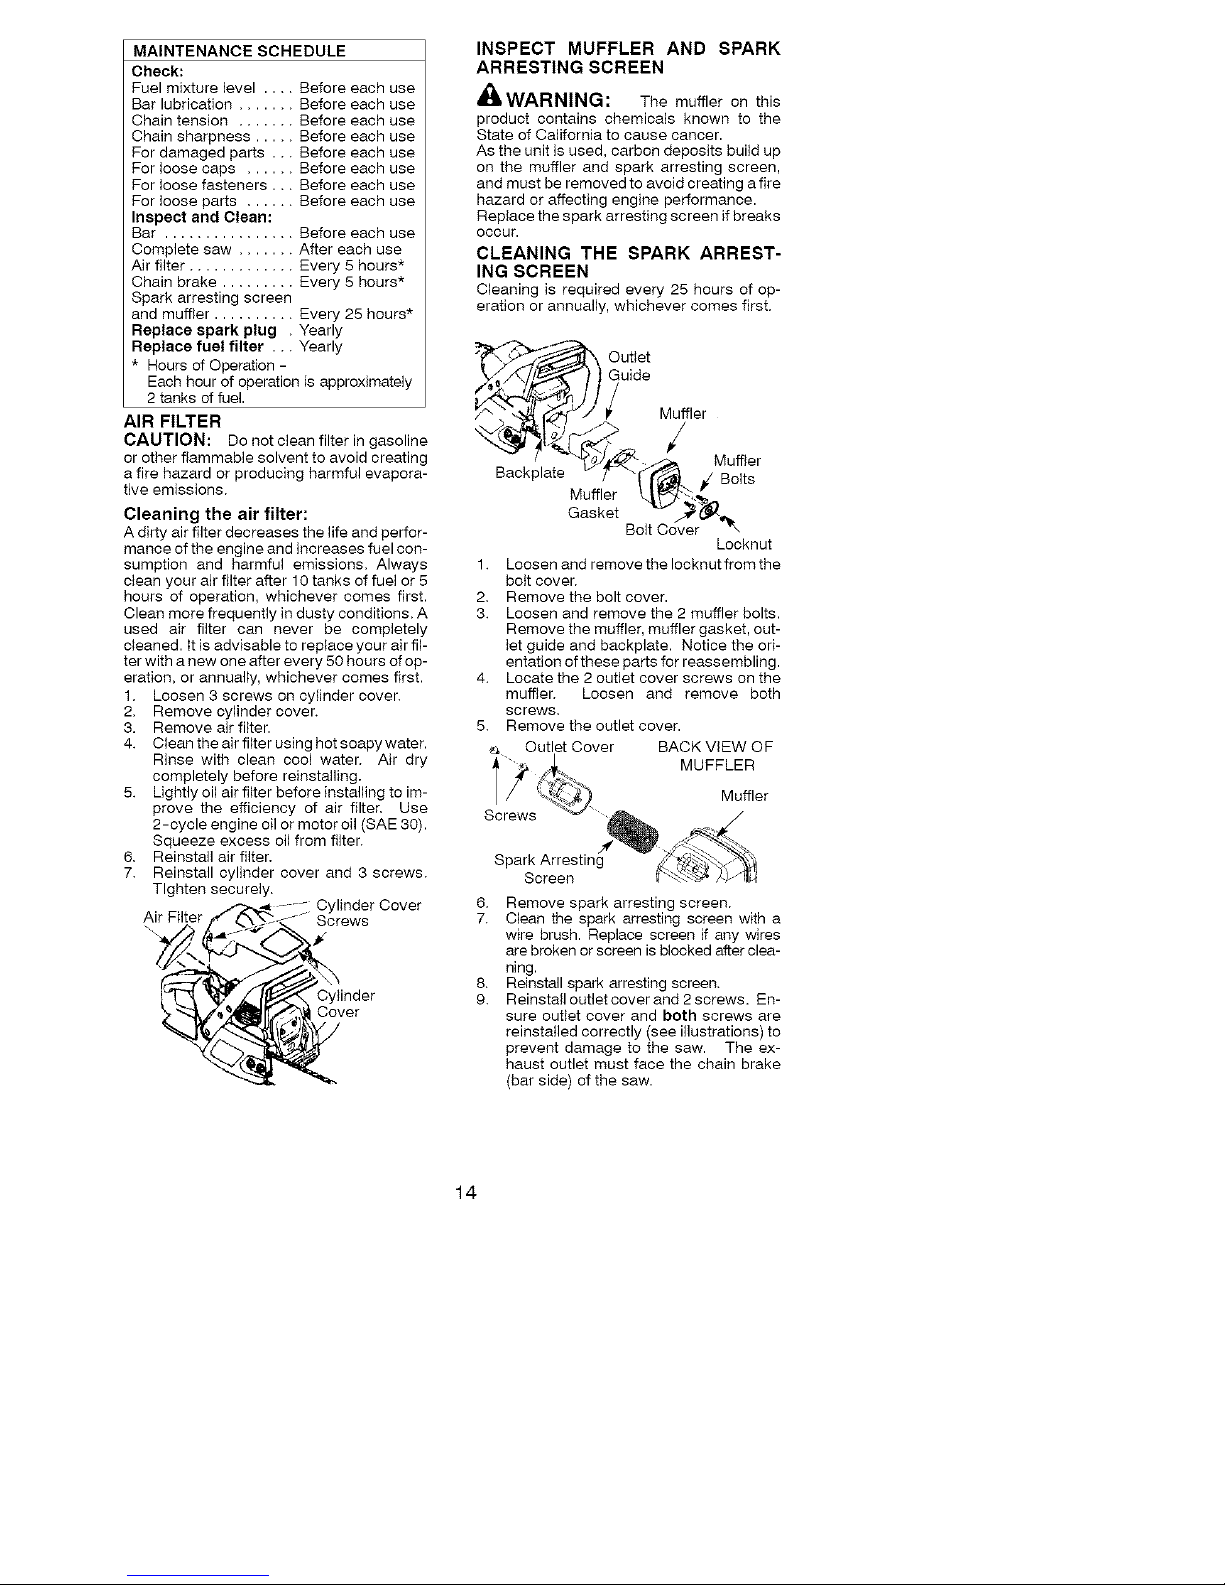
INSPECT MUFFLER AND SPARK
ARRESTING SCREEN
_WARNING: The muffler on this
product contains chemicals known to the
State of California to cause cancer.
As the unit is used, carbon deposits build up
on the muffler and spark arresting screen,
and must be removed to avoid creating a fire
hazard or affecting engine performance.
Replace the spark arresting screen if breaks
OCCUr.
CLEANING THE SPARK ARREST-
ING SCREEN
Cleaning is required every 25 hours of op-
eration or annually, whichever comes first.
Outlet
Guide
Backplate
Muffler
Gasket
Muffler
/
Muffler
_/ Bolts
Bolt Cover
Locknut
1. Loosen and remove the Iocknutfrom the
bott cover.
2. Remove the bolt cover.
3. Loosen and remove the 2 muffler bolts.
Remove the muffler, muffler gasket, out-
let guide and backplate. Notice the ori-
entation of these parts for reassembling.
4. Locate the 2 outlet cover screws on the
muffler. Loosen and remove both
screws.
5. Remove the outlet cover.
_ Outlet Cover BACK VIEW OF
MUFFLER
Screws
Muffler
Spark Arresting
Screen
6. Remove spark arresting screen.
7. Clean the spark arresting screen with a
wire brush. Replace screen if any wires
are broken or screen is blocked after clea-
ning.
8. Reinstall spark arresting screen.
9. Reinstall outlet cover and 2 screws. En-
sure outlet cover and both screws are
reinstalled correctly (see illustrations) to
prevent damage to the saw. The ex-
haust outlet must face the chain brake
(bar side) of the saw.
14
Page 15
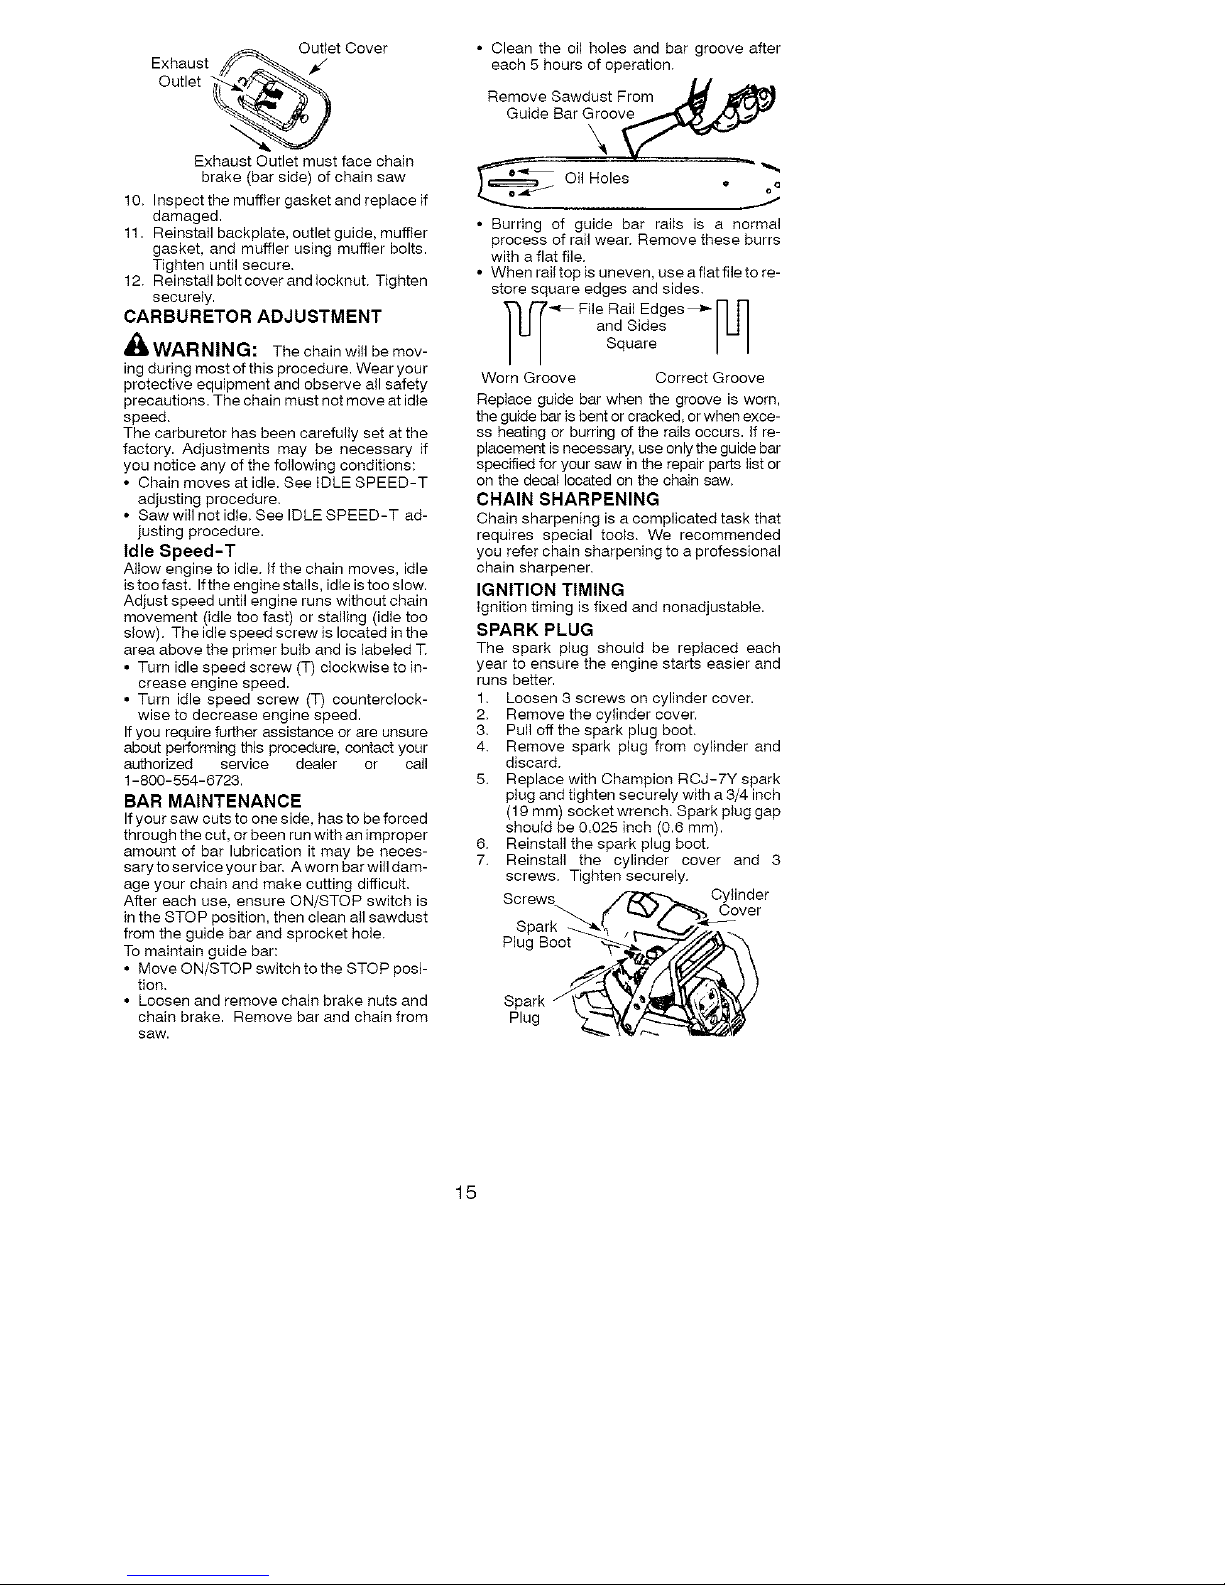
Outlet Cover
Exhaust _. _/
Outlet _o?';_ 2-.""-_"_. `
Exhaust Outlet must Nee chain
brake (bar side) of chain saw
10. Inspect the muffler gasket and replace if
damaged.
11. Reinstall baskplate, outlet guide, muffler
gasket, and muffler using muffler bolts.
Tighten until secure.
12. Reinstall bolt cover and Iocknut. Tighten
securely.
CARBURETOR ADJUSTMENT
_l_ WARNING: The chain will be mov-
ing during most of this procedure. Wear your
protective equipment and observe all safety
precautions. The chain must not move at idle
speed.
The carburetor has been carefully set at the
factory. Adjustments may be necessary if
you notice any of the following conditions:
• Chain moves at idle. See iDLE SPEED-T
adjusting procedure.
• Saw will not idle. See IDLE SPEED-T ad-
justing procedure.
Idle Speed-T
Allow engine to idle. If the chain moves, idle
is too fast. Ifthe engine stalls, idle is too slow.
Adjust speed until engine runs without chain
movement (idle too fast) or stalling (idle too
slow). The idle speed screw is located in the
area above the primer bulb and is labeled T.
• Turn idle speed screw (T) clockwise to in-
crease engine speed.
• Turn idle speed screw (T) counterclock-
wise to decrease engine speed.
If you require further assistance or are unsure
about peffon-ning this procedure, contact your
authorized service dealer or call
1-800-554-6723.
BAR MAINTENANCE
If your saw cuts to one side. has to be forced
through the cut. or been run with an improper
amount of bar lubrication it may be neces-
sary to service your bar. A worn bar will dam-
age your chain and make cutting difficult.
After each use. ensure ON/STOP switch is
in the STOP position, then clean all sawdust
from the guide bar and sprocket hole.
To maintain guide bar:
• Move ON/STOP switch to the STOP posi-
tion.
• Loosen and remove chain brake nuts and
chain brake, Remove bar and chain from
saw.
• Clean the oil holes and bar groove after
each 5 hours of operation.
Remove Sawdust From
Guide Bar Groove
\
Oil Holes
oc
• Burring of guide bar rails is a normal
process of rail wear. Remove these burrs
with a flat file.
• When rail top is uneven, use a flat file to re-
store square edges and sides.
_ File Rail Edges_ FI FI
and Sides I U I
Square ] ]
Worn Groove Correct Groove
Replace guide bar when the groove is worn,
the guide bar is bent or cracked, or when exce-
ss heating or burring of the rails occurs. If re-
placement is necessary, use only the guide bar
specified for your saw in the repair parts list or
on the decal located on the chain saw.
CHAIN SHARPENING
Chain sharpening is a complicated task that
requires special toots. We recommended
you refer chain sharpening to a professional
chain sharpener.
IGNITION TIMING
Ignition timing is fixed and nonadjustable.
SPARK PLUG
The spark plug should be replaced each
year to ensure the engine starts easier and
runs better.
1. Loosen 3 screws on cylinder cover.
2. Remove the cylinder cover.
3. Pull off the spark plug boot.
4. Remove spark plug from cylinder and
discard.
5. Replace with Champion RCJ-7Yspark
plug and tighten securely with a 3/4 inch
(19 mm) socket wrench. Spark plug gap
should be 0.025 inch (0.6 mm).
6. Reinstall the spark plug boot.
7. Reinstall the cylinder cover and 3
screws. Tighten securely.
Screws
Cover
Plug Boot
Spark
Plug
15
Page 16
STORAGE
_'WARNING: stop engine and allow
to cool, and secure the unit before storing or
transporting in a vehicle. Store unit and fuel
in an area where fuel vapors cannot reach
sparks or open flames from water heaters,
electric motors or switches, furnaces, etc.
Store unit with all guards in place. Position so
that any sharp object cannot accidentally
cause h3jury to passersby. Store the unit out
of reach of children.
• Before storing, drain all fuel from the unit.
Start engine and allow to run until it stops.
• Clean the unit before storing. Pay particu-
lar attention to the air intake area, keeping
it free of debris. Use a mild detergent and
sponge to clean the plastic surfaces.
• Do not store the unit or fuel in a closed area
where fuel vapors can reach sparks or an
open flame from hot water heaters, electric
motors or switches, furnaces, etc.
• Store in a dry area out of the reach of chil-
dren.
TROUBLESHOOTING TABLE
HELPFUL TIP I
Duringstorageofyourgas/ I
_1_,_ oil mixture, the oil will sepa: I
'l_l_Y._\ rate from the gas. I
,m_] We recommend that you I
_--_ljlrj shake the gas can weekly I
to insure proper blending of I
the gas and oil. I
CAUTION: It is important to prevent gum
deposits from forming in essential fuel system
parts such as the carburetor, fuel filter, fuel
hose, or fuel tank during storage. Alcohol
blended fuels (called gasohoI or using ethanol
or methanol) can attract moisture which leads
to fuel mixture separation and formation of
acids during storage. Acidic gas can damage
the engine.
NEED ASSISTANCE?
Call 1-800-554-6723.
NEED SERVICE PART?
Contact your dealer or place of purchase.
_, WARNING: Always stop unit and disconnect spark plug before performing all of
the recommended remedies below except remedies that require operation of the unit.
TROUBLE REMEDY
Engine will not
start or will run
only a few
seconds after
starting.
CAUSE
1. ignition switch off.
2. Engine flooded.
3. Fuel tank empty.
4. Spark plug not firing.
5. FueI not reaching
carburetor.
1. Move ignition switch to ON.
2. See "Difficult Starting" in
Operation Section.
3. Fill tank with correct fuel mixture.
4. Install new spark plug.
5. Check for dirty fuel filter; replace.
Check for kinked or split fuel line;
repair or replace.
1. See "Carburetor Adjustment" in the
Service and Adjustments Section.
2. Contact an authorized service dealer.
Engine will 1. Idle speed requires
not idle adjustment.
properly. 2. Carburetor requires
adjustment.
Engine wilt not 1. Air filter dirty. 1. Clean or replace air filter.
accelerate, 2. Spark plug fouled. 2. Clean or replace plug and regap.
lacks power. 3. Chain brake engaged. 3. Disengage chain brake.
or dies under 4. Carburetor requires 4. Contact an authorized service deater.
a load. adjustment.
Engine 1. Too much oil mixed with 1. Empty fuel tank and refill with
smokes gasoline, correct fuel mixture.
excessively.
Chain moves 1. Idle speed requires 1. See "Carburetor Adjustment" in the
at idle speed, adjustment. Service and Adjustments Section.
2. Clutch requires repair. 2. Contact an authorized service dealer.
16
Page 17

Poulan warrants to the original purchaser
that each new Poulan brand gasoline chain
saw is free from defects in material and
workmanship and agrees to repair or replace
under this warranty any defective gasoline
chain saw as follows from the original date of
purchase,
1 YEAR - Parts and Labor, when used for
Household purposes.
60 DAYS - Parts and Labor, when used for
Commercial Professional, or Income Pro-
ducing purposes,
30 DAYS - Parts and Labor, if used for rental
purposes,
This warranty is not transferable and does
not cover damage or liability caused by im-
proper handling, improper maintenance, or
the use of accessories and/or attachments
not specifically recommended by Poulan for
this chain saw, Additionally, this warranty
does not cover damage caused by improper
handling, improper maintenance, or if the
saw is altered in any way which in our judge-
ment affects its condition or operation. This
warranty does not cover tune-up, spark
plugs, filters, starter ropes, starter springs,
chain sharpening, bars, chains, and other
parts which wear and require replacement
with reasonable use during the warranty pe-
riod, This warranty does not cover predeliv-
ery set-up, installation of guide bar and
chain, and normal adjustments explained in
the instruction manual such as carburetor
adjustments and chain tension adjustments.
This warranty does not cover transportation
costs,
THIS WARRANTY GIVES YOU SPECIFIC
LEGAL RIGHTS, AND YOU MAY HAVE
OTHER RIGHTS WHICH VARY FROM
STATE TO STATE,
NO CLAIMS FOR CONSEQUENTIAL OR
OTHER DAMAGES WILL BE ALLOWED,
AND THERE ARE NO OTHER EXPRESS
WARRANTIES EXCEPT THOSE EX-
PRESSLY STIPULATED HEREIN,
SOME STATES DO NOT ALLOW LIMITA-
TIONS ON HOW LONG AN IMPLIEDWAR-
RANTY LASTS OR THE EXCLUSION OR
LIMITATIONS OF INCIDENTAL OR CON-
SEQUENTIAL DAMAGES, SO THE
ABOVE LIMITATIONS OR EXCLUSION
MAY NOT APPLY TO YOU,
The policy of Poulan is to continuously im-
prove its products. Therefore, Poulan re-
serves the right to change, modify, or discon-
tinue models, designs, specifications, and
accessories of all products at any time with-
out notice or obligation to any purchaser.
YOUR WARRANTY RIGHTS AND OBLIGA-
TIONS: The U.S. Environmental Protection
Agency, California Air Resources Board, Envi-
ronment Canada and Poulan/WEED EATER
are pleased to explain the emissions control
system warranty on your year 2005 and later
small off-road engine, in California, all small
off-road engines must be designed, built, and
equipped to meet the State's stringent anti-
smog standards. Poulae/WEED EATER
must warrant the emission control system on
your small off- road engine for the periods of
time listed below provided there has been no
abuse, neglect, or improper maintenance of
your small off-road engine. Your emission
control system includes parts such as the
carburetor and the ignition system. Where a
warrantable condition exists, Poulan/WEED
EATER will repair your small off-road engine
engine at no cost to you. Expenses covered
under warranty include diagnosis, parts and
labor. MANUFACTURER'S WARRANTY
COVERAGE: if any emissions related part
on your engine (as listed under Emissions
Control Warranty Parts List) is defective or a
defect in the materials or workmanship of the
engine causes the failure of such an emis-
sion related part, the part will be repaired or
replaced by Poulan/WEED EATER. OWN-
ER'S WARRANTY RESPONSIBILITIES:
As the small off-road engine engine owner,
you are responsible for the performance of
the required maintenance listed in your in-
struction manual, Poulan/WEED EATER rec-
ommends that you retain all receipts covering
maintenance on your small off-road engine,
but Poulan/WEED EATER cannot deny war-
ranty solely for the lack of receipts or for your
failure to ensure the performance of all sched-
uled maintenance, As the small off-road en-
gine engine owner, you should be aware that
Poulan/WEED EATER may deny you warran-
ty coverage if your small off-road engine en-
gine or a part of it has failed due to abuse, ne-
glect, improper maintenance, unapproved
modifications, or the use of parts not made or
approved by the original equipment manufac-
turer. You are responsibte for presenting your
smalt off-road engine to an Poulan/WEED
EATER authorized repair center as soon as a
probtem exists. Warranty repairs should be
completed in a reasonable amount of time, not
to exceed 30 days. If you have any questions
regarding your warranty rights and responsibili-
ties, you should contact your nearest autho-
rized service center or call Poulan/WEED
EATER at 1-800-554-6723. WARRANTY
COMMENCEMENT DATE: The warranty pe-
riod begins on the date the small off-road en-
gine is purchased. LENGTH OF COVER-
AGE: This warranty shah be for a period of two
years from the initial date of purchase. WHAT
IS COVERED: REPAIR OR REPLACE-
MENT OF PARTS, Repair or replacement of
any warranted part witl be performed at no
charge to the owner at an approved Poulan/
17
Page 18

WEED EATER servicing center. If you have
any questions regarding your warranty
rights and responsibilities, you should con-
tact your nearest authorized service center
or call Poulan/WEED EATER at
1-800-554-6723. WARRANTY PERIOD:
Any warranted part which is not scheduled
for replacement as required maintenance, or
which is scheduled only for regular inspec-
tion to the effect of "repair or replace as nec-
essary" shall be warranted for 2 years. Any
warranted part which is scheduled for re-
placement as required maintenance shall be
warranted for the period of time up to the first
scheduled replacement point for that part.
DIAGNOSIS: The owner shall not be
charged for diagnostic labor which leads to
the determination that a warranted part is de-
fective ifthe diagnostic work is performed at
an approved Poulan/WEED EATER servic-
ing center, CONSEQUENTIAL DAMAGES:
Poulan/WEED EATER may be liable for
damages to other engine components
caused by the failure of a warranted part still
underwarranty, WHATIS NOTOOVERED:
All failures caused by abuse, neglect, or im-
proper maintenance are not covered.
ADD-ON OR MODIFIED PARTS: The use of
add-on or modified parts can be grounds for
disallowing a warranty claim. Poulan/WEED
EATER is not liable to cover failures of war-
ranted parts caused by the use of add-on or
modified parts, HOW TO FILE A CLAIM: If
you have any questions regarding your war-
ranty rights and responsibilities, you should
contact your nearest authorized service center
or caII Poulan/WEED EATER at
1-800-554-6723. WHERE TO GET WAR-
RANTY SERVICE: Warranty services or re-
pairs shall be provided at all Poulan/WEED
EATER service centers. Call:
1-800-554-6723 MAINTENANCE, RE-
PLACEMENT AND REPAIR OF EMISSION
RELATED PARTS: Any Poulan/WEED EAT-
ER approved replacement part used in the per-
formance of any warranty maintenance or re-
pair on emission related parts will be provided
without charge to the owner if the part is under
warranty, EMISSION CONTROL WARRAN-
TY PARTS UST: Carburetor, Ignition System:
Spark Plug (covered up to maintenance
schedule), Ignition Module, Muffler including
catalyst, MAINTENANCE STATEMENT: The
owner is responsible for the performance of all
required maintenance as defined in the instruc-
tion manual.
The information on the product label indicates which standard your engine is certified.
Example: (Year) EPA Phase 1 or Phase 2 and/or CALIFORNIA.
41 I 61 I 81 I
This engine is certified to be emissions compliant for the following use:
[] Moderate (50 hours)
[] Intermediate (125 hours)
[] Extended (300 hours)
18
Page 19

ADVERTENClA:iEsta
sierra de cadena puede ser
peligrosa! El uso descuidado
o indebido de esta herramienta
puede causar graves heridas.
D Lea y comprenda et
manual de instruc-
ciones antes de usar la
sierra.
Use siempre la proteccion de oidos apropiada, la proteccion de
ojos y la protecci6n de la cabeza.
Use siempre las dos manos cuando trabaje con la sierra de
oadena.
ADVERTENClA: Debe evitarse cualquier contacto de
la punta de la barra guia con cualguier objeto, ya que puede
causar que la barra guia se desplace repentinamente hacia
arriba y hacia atr&.s, con posibles graves heridas.
MAximo valor de kickback medido sin et freno de cadena para la
combinaci6n de barra y cadena indicada en la etiqueta.
'_ ADVERTENCIA: Desconecte
siempre el cable de la bujia y colSquelo
donde no puede entrar en contacto con el
bujia, para evitar cualquier arranque acci-
dental al preparar, transportar, ajustar o re-
parar el aparato, excepto en e} case de
ajustes al carburador.
Debido a que las sierras de cadena son
instrumentos para cortar madera a alta velo-
cidad, deben observarse precauciones de
seguridad especia}es para reducir el riesgo
de accidentes. El use descuidado o indebi-
do de esta herramienta puede causar
graves heridas.
PIENSE ANTES DE PROCEDER
• Antes de utilizar ta sierra, lea attentamente
este manual hasta estar seguro o compren-
dedo comptetamente y poder seguir todas
tas reglas de seguridad, precaucions e
instrucciones de uso que se dan en el.
• Umite el uso de la sierra a aquellos usuarios
adultos que comprendad y puedan imple-
mentar todas las precauciones, reglas de
seguridad e instrucciones de uso que se en-
cuentran en este manual.
Proteccion Casco Duro
de Oidos _
_. =-J Proteceion de
_'_I_I_ Ojos
Ropa Ajustada
al Cuerpo _ Guantes de
Uso Industrial
Zapatos de Pantorrilleras
Seguridad uridad
• Use equipo protector. Siempre use calzado
de seguridad con puntas de acero y suelas
anti-destizantes; ropa ajustada el cuerpo;
guantes gruesos de uso industrial anti-desli-
zantes; protecci6n de ojos tales como gafas
de seguridad que no se empa[_an y con ab-
erturas de ventillaci6n o mascara protectora
para la cara; casco duro aprobado; y barrera
de sonido (tapones de oido u orejeras anti-
sonido) para proteger la audicion. Los que
usan sierras de fuerza deberan hacerse re-
visar la audici6n frecuentemente ya que el
19
Page 20

ruido de las sierras de cadena puede da_fiar
tos oidos.
• Mantenga todas las partes del cuerpo aieja-
das de la cadena siempre que el motor este
en funcionamiento.
• Mantenga a los niSos, espectadores y anF
males a una distancia minima de t0 metros
(30 pies) de1Area de trabajo o cuando esta
haoieeoo arranoar el motor.
• No levante ni opere la sierras de cadena
cuando estA faigado, enfermo, ansioso o si
ha tornado alcohol, drogas o remedios. Es
imprescindible que ed. este en buenas con-
diciones fisicas y alerta mentalmente. Si ud.
sufre de cualquier condici6n que pueda em-
peorar con el trabajo arduo, ases6rese con
su medico.
• No ponga en marcha ia sierra sin tener un
Area de trabajo despejada, superficie est-
able para pararse y, si esta derrubando
arboles, un camino predeterminado de retro-
eeso.
USE LA SIERRA OBSERVANDO
TODOS LOS PROCEDIMIENTOS
DE SEGURIDAD
• Mantenga }as dos manos en las manijas
siempre que el aparato este en march& El
uso del aparato con una sola mano puede
causar graves heridas al usuario, a los asis-
tentes, o a los espectadores. Las sierras de
cadena est&.n diseSadas para que se las use
con las dos manos en todo momento.
• Haga uso de la sierra de cadena Onicamente
en lugares exteriores bien ventiltados.
• No haga uso de la sierra desde las escaler-
as portatiles ni de los arboles.
• AsegQrese de que la cadena no vaya a hac-
er contacto con ningLin objeto antes de pon-
er en marcha el motor. Nunca intente hacer
arrancar la sierra con ta barra quia en un
corte.
• No aplique presi6n a la sierra al final de los
cortes. Apiicar presi6n puede hacer que
pierda el control al completarse el corte.
• Pare el motor antes de apoyar la sierra en
ningOn tado.
• No ponga en funcionamiento ia sierra de ca-
dena si esta daSada, incorrectamente ajus-
tad& o si no esta armada completa y segu-
ramente. Siempre cambie el barre, cadena,
protector de mano, freno de cadena, o el
otras piezas immediatamente si da[fiado,
roto, o se sate pot cualquier motivo.
• Cuando cargue la sierra de cadena en las
manos, hagalo con et motor parado, el silen-
ciador alejado det cuerpo, y la cadena hacia
atras y cubierta con un estuche.
MANTENGA LA SIERRA EN BUE-
NAS CONDICIONES DE FUNC-
TIONAMIENTO
• Ueve la sierra de cadena a un proveedor de
servicio autorizado para que haga todo ser-
vicio menos aqueIIos procedimientos lista-
dos en la seccion de mantenimiento de este
manual. Por ejempplo, si se usae herra-
mientas que no corresponden para retirar o
sostener el volaete al hacer servicio al era-
brague, pueden ocurrir daffios estructurates
at volante y causar que reviente.
• AsegQrese de que la cadena se detenga por
completo cuaedo se sueita el gatillo. Para
hacer correcciones, yea los AJUSTES AL
CARBURADOR.
• Nunca haga modificaciones de ninguna in-
dole a su sierra.
• Mantenga las manijas secas, limpias y libres
de aceite o de mezcia de combustible.
• Mantenga las tapas y los fijadores blen fijos.
• Use exclusivamente los accesorios y re-
puestos Poulan recomendados.
MANEJE EL COMBUSTIBLE CON
EXTREMO CUIDADO
• No fume mientras trabaja con el combustible
ni cuando est#t haciendo uso de la sierra.
• Elimine todas las posibles fuentes de chis-
paso llamas en las _.reas donde se mezclao
vierte el combustible. No debe haber el fu-
mar, llamas abiertas, o trabajo que podria
causar chispas. Permita que el motor es frio
antes de reaprovisionar de combustible.
• Mezcte y vierta et combustible afuera y use
recipiente aprobado para combustibles y
marcado como tal. Umpie todos los der-
tames de combustible.
• Alejese a por lo mendos 3 metros (10 pies)
del lugar de abastecimiento antes de poner
el motor en march&
• Apague el motor y deje que la sierra se
enfrie en un lugar libre de substancias com-
bustibles y no sobre hojas secas, paja, pa-
pel, etc. Retire latapa Ientamente y reabas-
tezca el aparato.
• Guarde el aparato en un espaciuo fresco,
seco y bien ventilado donde los vapores del
combustible no pueden entrar en contacto
con chispas ni llamas ablertas provenientes
de termotangues, motores o interruptores
electricos, calefactores centrales, etc.
RECULADA
_ILADVERTENCIA: Evite reculada le
pueden causar graves heridas. Reculada
es el movimiento hacia et frente, hacia atras
o rapidamente hacia adelante, esto puede
ocurrir cuando la punta de la barra guia de la
sierra de oadena entra en oontaoto con ouat-
quier objeto como puede ser otra rama o
tronco, o ouando la madera se cierra y atas-
ca mientras se hace el corte. El entrar en
coetacto con algLin objeto extra{rio a la mad-
era le puede causar al usuario la perdida del
controI de la sierra de cadena.
• La Reculada Rotacional puede acontecer
cuando la cadena en movimiento entra en
contacto con algOn objeto en la parte superi-
or de la punta de la barra guia puede causar
que la cadena entre al material y se detenga
por un instante. El resultado es una reacci6n
inversa, a velocidad de ret#.mpago, que hace
recular la barra guia hacia arriba y hacia
atras hacia el usuario.
• La Reculada por Atasco aoontesen suan-
do la madera se cierra y atasca la cadena en
movimiento en el corte a Io largo de la parte
20
Page 21

superior de la barra gufa y la cadena se de-
tiene repentinamente> Esta detenci6n re-
pentina de la cadena tiene come resuitado
una inversi6n de la fuerza de la cadena usa-
da para cortar madera y causa que la sierra
se mueva en sentido opuesto al de la rota-
ci6n de la cadena. La sierra directamente
hacia atr&.s en direcci6n al usuario.
• La Reculada pot Impulsion puede acon-
tecer cuando la cadena en movimiento entra
en contacto con algLin ebjeto extraSo a la
madera en el corte a Io largo de la parte infe-
rior de la barra guia y ta cadena se detiene
repentinamente> Esta detencion repentina
de la cadena tira de lasierra adelaete y lejos
del usuario y podria hacer f&cilmente al
usuario perder el control de la sierra,
Para Evitar la Reculada pot Atasco:
• Mantengase completamente conciente de
toda situacian u obstrucci6n que pueda hac-
er que el material presione la cadena en la
parte superior o que pueda parar la cadena
de cuatquier otro mope.
• No corte m&s de un tronco a la vez.
• No retuerza la sierra al retirar la barra de un
corte ascendiente cuando est@tseccioeando
tronoos.
Para Evitar la Reculada pot Impulsion:
• Empiece todo corte con el motor acelerade a
fondo y con la caja de la sierra apoyada con-
tra la madera.
• Use cuf_as de plastico o de madera (nunca
de metal) para mantener abierto el corte.
Trayectoria de la
\_' i") Reculada
Evite las obstrucciones
Siga las instrucciones del fabricante para aft-
tar y efectuar mantenimiento de la cadena.
Verifique la tension a intervalos regulates
con el motor parado, nunoa en maroha.
AsegQrese de que las tuercas de la freno de
cadena esten ajustadas fimqemente.
• Empiece y efectt3e latotalidad de cada corte
con el aceierador a foedo. Si la cadena se
estA moviendo a una veloeidad menor que la
maxima, hay m&.s probabilidad de que la
sierra reoule.
• Corte Qnicamente un tronco a la vez.
• Use cuidado extremo al entrar de nuevo en
un corte ya empezado>
• No intente hacer cortes empexando con la
punta de la barra (cortes de taladro)>
• Tenga cuidado con troncos que se despia-
zan y con las demas fuerzas que podrian
cerrar un corte y apretar la cadena o oaer
sobre ella.
• Use la Barra Guia Reducidora de Recula-
das y la Cadena Minimizadora de Recula-
das>
MANTENGA EL CONTROL
Parese hacia la l
izquierda de la
_'_""Ei pulgar por
. /t I(_ debajodela
Nunca invierta _man_ja
la posieion de
las manos
Despeje el Area de Trabajo
REDUZCA LAS PROBABILIDADES
DE RECULADA
• Reconozca que la sierra puede recular, Con
una comprension b#tsica del fenomeno de la
reculada de la sierra, ud, puede reducir el
elemento de sorpresa que coetribuye a los
accidentes.
• Nuncapermitaque lacadenaenmovimiento
toque ningLin objeto en la punta de la barra
gut&
• Mantenga el Area de trabajo tibre de obstruc-
ciones como por ejemplo otros #trbotes, ra-
mas, piedras, cercas, tocones, etc> Elimine
o evite todo obstaculo que la sierra pueda
enfrentar al cortar. AI cortar una ram& no
deje la barra guia entrar en contacto con otra
rama o otros objetos alrededon
• Mantenga la sierra afilada y con la tensi6n
correcta. Las cadenas con poco filo o flojas
incrementan la probabilidad de recuiada.
Codo rigido
21
El pulgar por debajo de
la manija
Sostener firmemente con las dos manse le
ayudar_t a mantener el control de la sierra.
No afloje> Mantenga la mano derecha envol-
viendo totalmente la manija trsera, sea ud.
derecho o zurdo. Sostenga la manija delan-
termcon la mano izquierda, colocando el puF
gar debajo de la maeija y rodeando la manija
con los dedos> Maetenga el brazo izquierdo
totalmeete extendido con el codo fijo>
Cotoque le mane izquierda el la manija de-
lantera, de modo que quede en linea recta
con la mane derecha en ta maeija trasera,
cuando este haciendo cortes de secciona-
miento> P_trese levemente hacia la izquierda
de la sierra para evitar que el cuerpo este el
iTnea directa con la cadena>
Parese con el peso distribuido igualmente
entre los dos pies.
Page 22

• P#.resetevementehaciaiaizquierdadela
sierradecadenaparaevitarqueelcuerpo
esteenlineadirectaconlacadena.
• Noseextiendaexcesivamente.Lasierra
puedeimpulsariooempujarloyud.puede
perderelequilibrioyelcontroldelasierra.
• Nocortearribadelnivaldeloshombres.Es
dificilmantenerelcontroldelasierrasiesta
porencimadelniveldeloshombres.
DISPOSITIVOSDESEGURIDAD
CONTRALASREGULADAS
_ADVERTENCIA: Los siguientes
dispositivos hart sido incluidos en la sierra
para ayudar a reducir el riesgo de reculadas;
sin embargo, tales implementos no pueden
eliminar totalmente esta peligro. Coma
usuario de sierra de cadena, ud. no debe
confiarse solamente en los dispositivos de
seguridad. Ud. debe seguir todas las pre-
cauciones de seguddad, instrucciones y
mantanimiento que se enouentran en este
manual para ayudar a evitar las reculadas y
otras fuerzas que pueden oausar graves
heridas.
• Barra Guia Reducidora de Reculadas, dis-
eSada con punta de redio pequeSo que re-
duce el tama(_o de la zona de peligro en la
punta de la barra. Este tipo de barra ha de-
moestrado que reduce significativamente la
caetidad y la seriedad de las reculadas
cuando han sido examinado de acuerdo con
ANSi (American National Standards Insti-
tute, Inc.) B175.1.
Barra Guia Simetrica Reducidora de Reculadas
Zona De Peligro
Punta de Radio
Pequefio
Z_na De
Barra Gula Simetrica ligro
I .
Punta de Radio Grande
• Las Cadenas Mieimizadoras de Reculadas
hae satisfecho los requisitos de rendimiento
en pruebas con una muestra representativa
de sierras de cadena con desplazamiento
de menos de 3,8 pulgadas, coma se espe-
cifica en ANSi B175.t.
Marcador de Profundidad Peffflado
stabdn Protector Alargado
Desv[a la fuerza de
reacoion y permite
t u°,.ood°r.
Oadena Mini- _ entre gradualmente
mizadora de a la cuchilla
Reculadas
,_ \j._ Puede Obstruir Material
No un Oadena Minimizadora de Reouladas
• Protector de Mano Delantera, dise[_ado para
reducir la probabilidad que su mane izquier-
da entre en contacto con la cadena, si la
mane se desprende de la manija delantera.
• La posicion de las manijas delantera y tras-
era, dise[_adas con distancia entre las man-
ijas y "en linea" la una con la otra, La separa-
ci6n y la colocaci6n en linea que este diseSo
provee se combinan para dar equilibrio y re-
sistencia para controlar la propulsion de la
sierra haoia el usuario si aconteoe una recu-
lad&
FRENO DE CADENA Y ANGULO
ACR
• Freno de Cadena, dise[_ado para detener la
cadena en el case de reculada,
A_,ADVERTENCIA: NUESTRA
COMPANIA NO REPRESENTA Y USTED
NO DEBERAASUMIR QUE EL PRENO DE
CADENA LO PROTEGERA EN CASO DE
RECULADAS. Una reculadaes unaacci6n
rapida la cual taeza la barra y lacadena rota-
tiva hacia arras y hacia arriba en direcci6n al
usuario. Uea reculada podria ser causada
cuando se permite que la punta de la barra
en la zona de peligro entre en contacto con
cualquier objeto en la zona superior de la
barra guia. Esta accion puede empujar la
barra guia rapidamente hacia atr#.s en direc-
ci6n donde se encuentra el usuario. Cual-
quiera de estos dos acontecimientos puede
causar que el usuario pierda el contro_ de la
sierra Io que podria resultar en lesiones de
alta gravedad o hasta la muerte. NO DE-
PENDA CIEGAMENTE EN CUALQUIERA
DE LOS DISPOSITIVOS INCLUIDOS EN
SU CUIDADOSAMENTE PARA EVITAR
LAS RECULADAS, Las barras guia reduci-
doras de reculadas y las cadenas de sierra
de baja accion de reculadas reducen la oca-
si6n y magnitud de las reculadas y son re-
comendadas, Con su sierra vienen in-
cluidas uea cadena de baja acci6n de
reculadas y una barra de equipo original.
Las reparaciones del freno de cadena deb-
eran ser efectuadas por un distribuidor auto-
rizado del servicio. Ueve su aparato al lugar
de compra, si Io adquirio en una agencia de
servicio, o al agente perito autorizado para
este tipo de servicio m&.s cercano,
• Ei contacto con la punta de la sierra puede
causar una REACCION contraria que a una
velocidad vertiginosa expulsa la espada ha-
cia arriba y hacia atr_ts, en direcci6n al
operador.
• Si la cadena queda atrapada por la parte su-
perior de la espada, esta puede rebotar
bruscamente hacia el operador,
• Cualquiera de estas dos reaceiones puede
provocar la perdida del control de tamotosie-
rray causar una grave lesi6n. No confie ex-
clusivamente en los dispositivos de seguri-
dad que incorpora su sierra.
A_,ADVERTENCIA: El angulo compu-
tado de reculada (ACR) que consta el lasierra
(como CKA) y el la tabla a continuaci6n, re-
presenta el #.ngulo de reculada que teedr_, la
combinacion de barra y cadena de su aparato,
el ser probada de acuerdo con los critedos de
22
Page 23

CSA (Asociaci6n Canadiense de Normas) y
ANSI. AI comprar barra y cadena de repuesto,
deben tomarse en consideraci6n los valores
mas bajos de ACR. Los valores mas bajos de
ACR representan angulos mrs seguros para
et usuario, mientras que los valores mrs altos
indican mayor angulo y energias mrs altas en
las reculadas. Los angulos computados re-
presentados en la columna no-activada indi-
can taenergia totai y el Rngub asociado sin ac-
tivacion del freno de cadena durante la
reculada. El Rngulo activado representa el
tiempo de detencion de la cadena relativo al
Tabla de angulo computado de reculada
MODELO BARRA
SERIE LE NOpza.
1950/1975/2050 952044368
2055/2075/
2150/2150PR 952044370
2155/2175/
2350/2375 952044418 18"
AVISO: Siesta sierra ha de usarse para el
tumbado comercial de arboles, un freno de ca-
dena se requiere y no sera quitado ni serR Iisia-
do de otra manera conformarse con las Regu-
laciones Federales del OSHA para el tumbado
comercial de arboles.
AVlSO SEGURIDAD: EI estar expuestoa
tas vibraciones traves det uso prolongado de
herrarnientas de fuerza a gasolina puede cau-
sar da(fos a los vasos sanguJneos o a los ner-
vios de los dedos, las manos y tas coyunturas
en aquellas personas que tienen propensidad
a los trastornos de la circulaci6n o alas hincha-
zonees anormales. El uso prolongado en tiem-
po frio ha sido asociado con dafios a los vasos
sanguineos de personas que por otra parte se
encuentran en perfecto estado de satud. Si
ocurren sintomas tales como el entumecimien-
to, el dolor, la falta de fuerza, las cambios en el
color o la textura de la piel o falta de sentido en
los dedos, las manos o las coyunturas, pare de
suar esta mRquina immediatamente y procure
atension medica. Los sisternas de anti-vibra-
ci6n no garantizan que se eviten tales probte-
mas. Los usuarios que haoen usa continuo y
proIongando de tas herramientas de fuerza de-
ben fiscalizar atentamente su estado fisico y el
estado del aparato.
AVlSO ESPECIAL: Su sierra viene
equipada con silenciador timitador de
temperatura y con rejilla antichispa que cumple
los requisitos de los Cddigos de California
4442 y 4443. Todas las tierras forestadas
federales, mrs los estados de California,
idaho, Maine, Minnesota, Nueva Jersey,
Washington y Oreg6n. requieren por ley que
muchos motores de combusti6n interna esten
equipados con rejilla antichispa. Si usted usa
una sierra de cadena donde existen tales
reglamentos, usted tiene la responsabilidad
juridica de mantener estas piezas en correcto
estado de funcionameineto. De Io contrado,
estara en infraccion de la ley. Refiera a la
seccion del SERVICIO para el mantenimiento
de la rejilla antichispas.
Rngulo con activaci6n y el Rngulo resultante de
reculada de la sierra.
La siguiente combinacion de barra guia y ca-
den& satisface los requisitos en contra de
recutadas de CSI Z62.1, Z62.3 y de ANSI
B175.1. al ser usadas en conjunto con las
sierras que mencionamos en este manual.
El uso de cualquier otra combinaci6n de bar-
ra y cadena no menoionada en el manual no
es recomendado y ademas, puede que no
satisfaga los requisitos de las normas de
CKA.
(ACR- [CKA])
NOpza.
Largo Cadena
14" 952051209
16" 952051211
ACR sin freno cadena
24 °
19 °
,_"
Tuercas del
freno de cadena
Herramienta
23
Es necessario utilizar guantes protectores
(no incluidos) durante el montaje.
INSTALACION DE LA BARRA Y LA
CADENA (si no vinieron ya instaladoas)
_bADVERTENCIA: Verifique cada
paso del montaje si recibi6 la sierra ya armada.
Use siempre quantes protectiores al tocar la
cadena, iLa cadena es filosa y Io puede cortar,
aLin no estando en movimiento!
1. Afloje y saque las tuercas de la freno de
cadena y la freno de cadena de la sierra.
2. Retire el separador de plastico (si pres-
ente).
Ubicacion del separador de plastico
CRITERIOS: Este producto esta enlista-
do por Underwriter's Laboratores, Inc., de
aouerdo con:
ANSI B175.1-2000 Padron Estadounidense
Nacionat para Herramientas de Fuerza - Sier-
ra de Cadena A Gasolina-Requisitos de Se-
guridad
OSA Z62.1-03 Seguridad y Salud Ocupa-
cional en relaci6n con las Sierras de Cadena
OSA Z62.3-96 Seguridad y Salud Ocupa-
cional en relaci6n con Reculadas de Sierras
de Cadena
952051338 14 °
Page 24

3. Elaparatotieneclavijaytornillodeajuste
paraejustarletensi6ndelacadena.Es
muyimportantequealinstelariaberra,la
clevijaqueseencuentraeneltornillode
ajusteestealineadaconunorificioenla
barra.Girareltornillohacequelaciavija
deajustesedeslicehaciaarribeyhacia
abajoporeltornillo.Ubiqueesteajuste
antesdeempezareinstalarIabarraenla
sierra.Yealailustraci6nsiguiente.
VistainternedeI
no de cadena
Ajuste situado en el freno de cadena
4. Gire el tornillo de ajuste a mano hacia la
izquierda (en contra del sentido de1reloj)
hasta que la clavija de ejuste toque el re-
tentor. Esto debe cotocar el clavija cerca
de la posici6n correcta.
5. Hega deslizer la berra por detr#ts del ci-
lindro del embrague hasta que la berra
se detenga al tocar el engranaje det cilin-
dro de1 embrague.
6. Retire muy cuidadosamente la cadena
del paquete. Sostenga la cadene con Ion
eslabones de impulsion orientados
como se ve en la ilustraci6n.
de
DEBERAN APUNTAR EN
DIRECOION A LA ROTACION
Cuchillas Marcador de Profundidad
Eslabones de Funcionamiento
_ _'_, i; _"
Apoye la cadena en el engrenaje
7. Coloque la cadena por encima y detras del
embrague, poner las eslabones de funcio-
namiento en el cilindro del embrague.
8. Coioque los eslabones de proputsi6n
entre los dientes de le engranaje en la
punta de la barra.
9. Coioque los eslabones de propulsi6n en
la ranura de la barra.
10. Tire ta barra hacia adelante hasta que la
cadena quede tirante en la ranura de la
barra. Asegure todas las eslabones de
propulsi6n est&.n en el ranurade la barra.
AVISO: EL FRENO DE CADENA
DEBE SER DESACTIVADO ANTES
DE LA INSTALACION DE LA SIER-
RA. PARA DESACTIVAR EL FRENO
DE CADENA, TIRE DEL PROTEC-
TOR DELANTERO DE MANO HACIA
LA PARTE TRASERA DEL FRENO
DE CADENA LO MAS LEJOS POS-
IBLE (VEA LA ILUSTRACI(_N).
DESACTIVADO _
Delantera_ . i, ii::
/
11. Ahora instale la freno de cadena ase-
gurandose que la clavija de ajuste este
posicionada en el orificio inferior en la
barra guia.
12. Instale las tuercas de la freno de cadena
y ajListelas a mano L_nicamente. Ajuste
las tuercas de la freno de cadena
despues de que la cadena este tensio-
nada.
TENSION DE LA CADENA (inclusive
los aparatos con la cadena ya instalada)
AVlSO: AI hacer ajuste a la tension de la
cadena, assegt3rese que las tuercas del fre-
no de cadena esten ajustadas a mano Onica-
mente. Si intente tensionar la cadena con
las tuercas del freno de cadena ajustedas,
puede deSar el aparato.
Para verificar la tension:
Use la punte destorniHadora de la herra-
miente doble pera hecer girar la cadena alre-
dedor de la barra. Si la cadena no gira, esta
demasiado tirante. Si est&. demasiado floja,
se la verst colgar separada de la parte inferior
de la barra.
Tuerea del de la Cadena (Herra-
freno de cadena mienta de la Barra)
24
Page 25

Para ajustar la tension:
La tension de lacadena es muy importante> La
oadena se va estirando con el use,
especialmente durante tas primeras veces que
usa la sierra> Vedfique sin fatta ta tensi6n de la
cadena caga vez que use la sierra y cada vez
que la abastezca de combustible.
Se ajusta la tensi6n de ta cadena aflojando tas
tuercas del freno de cadena y ajust&ndolas de
vuerta a mano Onicamente> Luego se gira el
tornillo de ajuste 1/4 de vuelta mientras se
manteine la barra levantada.
• Si la cadena esta demasiado tirante, gire el
tornillo de ajuste 1/4 de vuelta a la izquierda
(en coetra del sentido det reloj)>
• Si lacadena esta demasiado floja, gire el tor-
nitlo de ajuste 1/4 de vuerta a la derecha (en
el sentido del reloj)>
Tue'rcas de la Barra Gui_
freno de cadena
CONOZCA EL APARATO
Tornillo de Ajuste - 1/4 de Vuelta
• Levante la punta de la barra y ajuste firme-
mente ias tuercas de la freno de cadena
con la herramienta.
• Vuelva a verificar la tensi6n de la cadena>
Tuercas de J
la freno de
_L, ADVERTENCIA: Si la sierra se
funciona con un cadena flojo, la cadena
podria saltar de la barra y resultado en acci-
dentes muy graves.
LEA ESTE MANUAL DE INSTRUCCIONES Y LAS REGLAS DE SEGURIDAD ANTES DE USAR
LA SIERRA DE CADENA. Compare las ilustraciones con su aparato para familiarizarse con la ubica-
ci6n de los vanos controles y ajutes. Guarde este manual para use future.
Herramienta de Protector de Mane Manija Delantera
la Cadena F_I ('%_ ....
Ajuste de Delantera
(Herramienta de la Barra) _L'__ t
Cad ena Silenciador
Tapa del Tanque de
Lubricante de Barra
Soga de Arranque
'__A Interruptor
ON/ST©P
Bombeador
Caja del Arranque
Tapa del Cilindro
TrabadeI/ /3
Aceterador ./ r"_/ /I
Manij, / F-U--/
Trasera _, _ _' ,_ ('._
Palanca del cebador/ Freno de
marcha inactiva rapida Cadena
Tapa del Tanque de Combustible
Ouchillas Marcador de profundidad
t_) Direccidn de
_ _ ;_ _" aotaci6n de
Tornillo -- Eslabonesde la Cadena
de Ajuste Funcionamiento
k "_lWOrifieio del
Tuercas de la freno de cadena Engranaje
Captador de Cadena
25
Page 26

INTERRUPTOR ON/STOP
E_INTERRUPTOR ON/STOP estaacostum-
brado a detener la maquina.
GATILLO DE ACELERADOR
E_GATILLO DE ACELERADOR controla ve-
Iocidad de maquina.
TRABA DEL ACELERADOR
Es necesario apretar primero la TRABA DEL
ACELERADOR para poder accionar el aceler-
ador. Este dispositivo previene el acionamien-
to accidental de1 acelerador.
PALANCA DEL CEBADOR/
MARCHA LENTA RAPIDA
El cebador y la marcha lenta rapida son fijadas
tirando la PALANCA DEL CEBADOR/MAR-
CHA LENTA RAPIDA completamente para ar-
rancar el aparato en frio o despues reaprovi-
sionado de combustible. La palaeca del
cebador provee combustible adicional al motor
ai arrancar frio.
BOMBEADOR
Et BOMBEADOR circula combustible al car-
burador.
FRENO DE CADENA
El FRENO DE CADENA estA dise_ado para
detener la cadena en caso de reculada. El
freno de cadena se activa automaticamente
en caso de reculadas. Et freno de cadena se
activa manualmente si empujan at protector
de mano delantero adelante. Para desactF
var el freno de cadena, tire Io mrs posible del
protector de mano delantero hacia la manija
delantera.
TENSION DE LA CADENA
ES eormal que las cadenas nuevas se estiren
durante los primeros 15 minutos de uso. Deb-
err verificarse la tension de ia cadena frecuen-
temente. Vea TENSION DE LA CADENA en
la secci6n de MONTAJE.
_L, ADVERTENCIA: El silenciador es
extremadamente caliente durante el uso y
despues de usar el aparato, No toque el si-
lenciador ni permita que el material combus-
tible tal como gasolh_a o hierba seca hagan
contacto.
ABASTECIMIENTO DEL MOTOR
ADVERTENCIA: Remuevalatapa
del tanque de combustiMe lentamente al
reabastecer combustible.
I INFORMACIONUTILI
[_ll_ Para obtener la proporcion I
_D"_lml correcta de mezcla de I
_1 -- FJ aceite vierta 8,2 onzas de I
aceite eintetico de 2 ciclos I
dentro de gaeolina freeca. I
Este motor esta habilitado para funcionar con
gasolina sin plomo. Antes de usar, se debera
mezclar la gasolina con un aceite de sintetico
de buena calidad para motores de 2 tiempos
enfriados a aire diseSado para ser usado en
una mezcla con proForci6n de 40:1.
Recomendamos el aceite de sintetico de la
marca Poulae/WEED EATER. Se obtiene una
proporci6n de 40:1 mezclando 3,2 onzas (95
ml) de aceite con cada galon (4 titros) de
gasolinasin plomo. Se incluyecon esta sierra
un recipiente de 3,2 onzas de aceite de
sintetico de la marca Pouian/WEED EATER.
Adiera el contenido entero de este recipiente
en 1 gal6n de gasolina para alcanzar le mezcla
apropiada del combustible.
NO USE aceite para autom6viles ni para
barcos. Estos aceites da_arAn e{ motor. AI
mezciar combustible, siga las instrucciones
impresas en el recipiente de aceite. Lea
siempre y siga las reglas de seguridad que se
encuentran bajo MANEJE EL
COMBUSTIBLE CON EXTREMO
CUIDADO.
LUBRICACION DE LA BARRA Y DE
LA CADENA
La barra y la cadena requieren lubricaci6n
constante. El sistema automatico de lubrica-
ci6n provee la lubricaci6n necesaria mientras
se mantenga Henoel taeque de aceite. La falta
de aceite arruinara la barra y la cadena rapida-
mente. El uso de demasiado poco aciete cau-
sara exceso de calentamiento que serA detect-
able For el humo proveniente de la cadena y/o
FOr la descoloraci6n de la barra.
Cuando la temperaturea es inferior a O grados
centrigrados, el aceite se pone mAs grueso,
tomando necesaria ia adici6n de una pequeSa
cantidad (de 5 a 10%) de Fuel Oil #1 (#1 Diesel
Fuel) o querosen para diluir el aceite de la barra
y lacadena. El aceite para barra y cadena fluir
libremente para que el sistema de lubricaci6n
pueda bombear suficiente aceite para lubricar
adecuadamente.
Se recomienda e_aceite Poulan genuino para
barra y cadena para proteger el aparato contra
el desgaste excesivo provocado pot el calor y
la fricci6n. El aceite Poulan resiste la perdida
de espesura a altas temperaturas. Si no nay
disponibiiidad de aceite para barra y cadena
Poulan use un aceite de buena calidad tipo
SAE 30.
• Nunca utilice aceite usado para la lubrica-
ci6n de la barra y de la cadena.
• Pare siempre el motor antes de abrir la tapa
del tanque de aceite.
IMPORTANTE
La experiencia india que los combustibles
mezclados con alcohoi (los Ilamados gasohol
o los que contienen etanol o los que contienen
etanol o metanol) pueden atraer humedad. Io
que puede causar la separacion y la formaci6n
de acidos durante el almacenamiento. La ga-
solina acidica puede daSar el sistema de com-
bustible del motor durante el almacenamiento.
Para evitar problemas con el motor, debera va-
ciarse el sistema de combustible antes de ala-
macenar el aparato por 30 dias o mAs. Vacie
el tanque de combustible, ponga el motor en
marcha y dejelo en marcha hasta que ias
lineas de combustible y el carburador queden
vacios. Cuando vaya a usar el aparato nueva-
26
Page 27

mente,usecombustiblefresco.Vealasecci6n
de ALAMACENAJE para mas informaciones.
ill
allADVERTENClA: La cadena no
debe rnoverse cuando el motor se encuentre
en marcha inactiva. Si ia cadena se mueve
en marcha inactiva, vea la secci6n de
AJUSTES AL OARBURADOR en este
manual. Evite contacto con el silenciador.
Un silenciador caliente podria causar que-
rnaduras muy graves.
Pata detener el motor, mueva el interrupter
ON/STOP a la posicion STOR
Para poner en marcha el motor, sujete la
sierra firmemente en el suelo como se ilus-
tra. Aseg0rese de que la cadena pueda mev-
erse libremente sin tocar ning0n objete.
Use Linicamente de 38 a 45 cm (15 a 18
pulgadas) de cuerda por tir6n.
Sujete la sierra firmemente mientras
tira de la cuerda de arranque.
Mango de la cuerda de arranque
El pie derecho en el interior de la
mango trasera.
PUNTOS IMPORTANTES PARA
RECORDAR
Ai tirar de la cuerda de arranque, no use la ex-
tensiSn completa de la cuerda ya que esto
puede causar que ia cuerda se parta. No per-
mita que la cuerda de arranque regrese a su
lugar bruscamente. Sujete el mango y permita
que la cuerda rebobine lentamente.
Para arranques bajo condiciones de ciima frio,
ponga en marcha el motor con el cebador en la
posici6n FULL CHOKE; permita que el motor
caliente antes de apretar el gatitlo acelerador.
AVISO: No intente a cortar ningOn tipo de
material si ta palanca de1 cebador/marcha
lenta rapida se encuentran en la posici6n
FULLCHOKE.
1_ !NFORMACION UTILI
/_ Si el motor de su aparato I
_-_--_1 no ae pusiera en marcha I
_V_/ deepues de haber seguido I
estas instrucciones, Ilame
al 1-800-554-6723.
PARA ARRANCAR EL MOTOR FRIO
(o motor caliente despues de que-
dar sin combustible)
NOTE: En los pasos siguientes, cuando la
palanca del cebador/marcha lenta rapida se
activa en su maxima extensi6n, automatica-
mente fijarA la aceleracion para la puesta en
marcha.
INTERRUPTOR ON/STOP
(VISTA LATERAL)
STOP
1. Mueva el interrupter ON/STOP a la posi-
ci6n ON.
2. Tire de la palanca del cebador/marcha
lenta rapida su maxima extensi6n.
3. Lentamente, oprima el bombeador 6
veces.
4. Firmemente, tire dei mango de la cuerda
de arranque 5 veces con su mane dere-
cha. Luego, pase al siguiente paso.
AVISO: Si el motor parece que este intentan-
do arrancar antes del quinto tir6n, pare de tirar
y proceda inmediatamente at siguiente paso.
5. Empuje la palanca dei cebador/marcha
lenta rapida a la posici6n HALF CHOKE
PALANOA DEL CEBADOR/
MARCHA LENTA RAPIDA
(VISTA LATERAL)
I J
Palanea It It
cebador/marcha OFF HALF FULL
lenta rapida
6. Tire del mango de la cuerda de arranque
hasta que el motor se ponga en marcha.
7. Permita que el motor contint3e en mar-
cha por approximadamente 5 segundos.
Luego, apriete y suelte el gatillo acelera-
dor para permitir que el motor regrese a
marcha lenta.
PARA ARRANCAR CON EL
MOTOR CALIENTE
1. Mueva el interrupter ON/STOP a la posi-
ci6n ON.
2. Tire de la palanca del cebador/marcha
lenta rapida a la posicion HALF CHOKE.
3. Lentamente, optima el bombeador 6
veces.
4. Firmemente, tire de la cuerda de arran-
que con su mano derecha hasta que el
motor se ponga en marcha.
5. Apriete y suelte eI gatillo acelerador para
para permitir que el motor regrese a mar-
cha lenta.
ARRANQUE DIFICIL (o arranque de
motor ahogado)
El motor puede encontrarse ahogado con
demasiado combustible si no se ha puesto
en marcha despues dei 10 tir6n.
27
Page 28

Unmotorqueseencuentreahogadopuede
seraclaradodelexcesodecombustibleempu-
jandotapalancade1cebador/marchalentara-
pidaentotalmente(alaposici6nOFFCHOKE)
yluegosiguiendoelprocedimientodepuesta
enmarchaparamotorescalientesquesehas
indicadoanteriormente.AsegQresedequeel
interruptorON/STOPseencuentreenlaposi-
ci6nON.
Queetmotorsepongaenmarchapuedere-
querirquesetiredelacuerdadearranque
muchasveces,dependiendocu&nahogado
seencuentreelmotor.Sielmotornoarran-
ca,refierasealaTABLADIAGNOSTICAo
Ilameal1-800-554-6723.
FRENO DE CADENA
_ADVERTENCIA: Si la banda del
freno podr& romperse al activar el freno si esta
se encuentra demasiado usada y fina. Si la
banda dei freno se encuentra rota, el freno de
cadena no detendr& la cadena. La banda del
freno se debe substituir por un distribuidor au-
todzado de1servicio si cualquier parte se des-
gasta menos de 0,5 mm (0,020 pulgada) de
grueso. Las reparaciones del freno de cadena
deber&n ser efectuadas pot un distribuidor au-
todzado del servicio. Lleve su aparato al lugar
de compra, si Io adquiri6 en una agencia de
servicio, o al agente perito autorizado para este
tipo de servicio m&s cercano.
• Esta sierra viene equipada con un freno de
cadena diseSada para detener la cadena en
et case de recutada.
• El freno de cadena inercia-activado se acti-
va si el protector delantero de mano es em-
pujado hacia adelante ya sea manualmente
(a mane) o autom&ticamente (per el movi-
miento repentino).
• Si el freno ya est& activado, se to desactiva
tirando el protector de mano delantero hacia
&nob.,acerc&ndoio a la manija delantera todo
lo que sea posibie.
• Para cortar con la sierra, es necesario de-
sactivar el freno de cadena.
Desactivado _,
]" :_"_b Activado
Control del freno
PRECAUCION: El freno de cadena debe
ser inspeccionado varias veces al dia. AI hac-
er esta inspeccion, el motor siempre debe es-
tar prendido.
Cotoque la sierra en suelo firme. Sostenga la
manija trasera con la mane derecha y la manija
detantera con la mane izquierda. Aplique a la
velocidad m&xima presionando el gatillo del
acelerador. Active el freno de cadena dando
vuelta a su mu[fieca izquierda contra el protec-
tor de mano delantera sin soltar la manija de-
lantera. La cadena debe parar inmediata-
mente.
Control del funcionamiento activa-
do por inercia
_ADVERTENCIA: Cuando Ileve a
cabo el procedimiento siguiente, el motor
deber& estar apagado.
Sostenga la manija trasera con ta mane dere-
cha y la manija delantera con la mane izquier-
da. Sujete la sierra unos 35 cm (14 pulgadas)
pot encima de un tocon u otto superfice de
madera. Libere la empuSadura del mango de-
lantero y que la punta de la barra guia caiga ha-
cia adelanta y pueda entrar en contacto con el
tocon. Cuando ta punta de ia barra golpee el
tocon, el freno debe activarse.
PUNTOS IMPORTANTES
• Verifique la tension de la cadena antes del
primer uso y despues de un minuto de fun-
cionamiento. Vea TENSION DE LA CADE-
NA en ta seccion de MONTAGE.
• Corte madera _nicamente. No corte metal,
pl&stico, ladrillos, cemento, otros materiaIes
de construccion que no sean de madera,
etc.
• Pare la sierra si lacadena toca cualquier ob-
jeto ajeno. Inspeccione la sierra y repare o
instale repuestos segOn la necesidad.
• Mantenga la cadena fuera de la arena y la
tierra. La menor cantidad de tierra desafila
r&pidamente las cadenas yasi incrementa la
posibilidad de reculadas.
• Corte varies troncos peque[fios como
pr&ctica, usando la siguiente tecnica, para
acostumbrarse al manejo de la sierra,
antes de empezar un proyecto de grandes
dimensiones.
• Acelere el motor a fondo antes de em-
pezar a cortar apretando el gatillo aceF
erador.
• Empiece el corte con el bastidor de la
sierra apoyada contra el tronco.
• Mantenga el motor con acelerador a
fondo constantemente mientras corta.
• Deje que la sierra haga todo el trabajo
de cortar; no use m&s que una muy lig-
era presi6n hacia abajo.
• Suelte el gatillo acelerador
inmediatamente al terminar de cortar,
dejando que el motor funcione a mar-
cha lenta. Si mantiene la sierra en mar-
cha con acelerador a fondo sin estar
cortando, puede causar desgaste in-
necesario. Se recomienda que no
opere el motor pot mas de 30 segun-
dos a la velocidad maxima.
• Para no perder el controi cuando se
haya completado el certe, no le ponga
presi6n a la sierra al final del corte,
• Pare el motor antes de apoyer la sierra al
flnalizar un corte.
TECNICAS PARA TUMBAR ARBOLES
_L, ADVERTENCIA: veaque nohaya
ramas rotas o muertas que podrian caerle
encima mientras corta, causando heridas
28
Page 29

graves. No corte cerca de edificios ni cables
electrbos si no sabe la direcci6n de tumbado
del Arbol, ni de noche ya que no podra ver
bien, ni durante mal tiempo come Iluvia,
nieve, o vientos fuertes, etc. Si el Arbol hace
contacto con algQn cable de linea de servbio
pLibflco, la compaSa de servicio p6blico deb-
era ser notificada de inmediato.
• Planifique ia operaci6n de corte cuidadosa-
mente por adelantado.
• Despeje al Area de trabajo. Ud. precisa un
Area despejada en todo el contorno de arbol
doede pueda pisar con firmeza entodo mo-
mento.
• El usuario de la sierra de cadena deberA per-
manecer del lado cuesta arriba det terreno
ya que es probable que el Arbol rodillo o se
des_ice cuesta abajo despues de caer.
• Estudie las condiciones naturales que pue-
dan causar que el arbol caiga en una direc-
ci6n determinada.
Entre las condiciones naturales que pueden
causar que el arbol caiga en una direcci6n
determh_ada, se encuentran:
• La direccion y la velocidad del viento.
• El angulo de inclieaci6n del arbol. El angulo
de los Arboles a veces no se nota debido al
deciive del terreno o a terreno desparejo.
Use ptana o cordel de sonda para determi-
nart direcci6n de la inclinaci6n del arboL
• El arbol es mas pesado o tieno mucho mas
ramas de un lade.
• Arboles y obstaculos en derredor.
Verifique si hay porciones descompuestas o
podridas. Si et tronco esta podrido, puede
partirse repentinamente sin aviso y caer
sobre el usuario.
AsegOrese de que haya suficiente espacio
para la caida del arbol. Mantenga una dis-
tancia equivalente a dos veces y medio del
larbo del arbol que esta cortando entre el
Arbol y la persona mas cercana u otros obje-
tos. El ruido del motor puede impedir que se
escuchen las advertencias gritadas.
Retire ta tierra, las piedras, la corteza suelta,
los clavos, las grampas y el alambre que
pueda haber en el arbol en el lugar del corte.
Planifique una ruta predeterminada
y despejada de retroceso
roceso
.... (}"""""_- Retroceso
y,
roceso
PARA TUMBAR ARBOLES
GRANDES (con diametro de 15 cm
(6 pulgadas) o mas)
Se usa el metodo de corte de muesca para
los Arboles grandes. La muesca es un corte
en el lado del Arbol hacia el cual se desea
que caiga. Despues de hacer el corte de
tumbado del lado opuesto, el arbol tendra la
tendencia de caer hacia el lade en que se ha
hecho el corte de muesca.
AVISO: Si el arbol tiene raices de apoyo
grandes, retirelas antes de hacer eI corte de
muesca. Si uso la sierra para quitar raices
grandes de apoyo, prevenir lacadena de en-
bar en contacto con la tierra esto le previene
de perder del file.
CORTE DE MUESCA Y TUMBADO
DEL ARBOL
• Haga el corte de muesca cortando primero
la base de la muesca. Haga queet corte
atraviese un tercio del ancho del tronco.
Luego complete el corte de muesca cortan-
do en angulo como se muestra en la ilustra-
ci6n "Metodo muesca", abajo. Una vez com-
pleto el corte de muesca, retire la cuba de
madera del arbol.
Corte finat (corte de tumbada)
aqui, a 5 cm (2 pulgadas) arriba
del centro de la muesca.
Primercorte I 5ctm I /
Segundo _ _ -'_
corte _ _
• Despues de retirada la cu[_a de madera del
muesca, del lado opuesto al corte de mues-
ca haga el corte de tumbado. El corte de
tumbado debe quedar a 5 cm (2 pulgadas)
mas arriba que la base del corte de muesca.
Este procedimiento dejara suficiente madera
sin cortar entre el corte de tumbado y la
muesca para formar una bisagra. Esta bisa-
gra ayudara a evitar que el arbol ciaga en la
direcci6n equivocada.
La bisagra sostiene el _trbol en el
toc6n y ayuda a controlar la caida
Abertura del
corte de
tumbada
/
Cierre de
la muesca
AVISO: Antes de completar el tumbado, use
cu[_as para abrir el corte, cuando sea
necesario, para controlar ta direcci6n de la
caida. Use cuSas de madera o de plastico,
pero nunca de acero o de hierro, para evitar
que la sierra recule y para evitar daSos a la
cadena.
• Este alerta a los indicios de que el arbol esta
pot caer: los crujidos, el ensanchamiento del
29
Page 30

cortedetumbadoylosmovimientosdelas
ramassuperiores.
• Ee el instante en que el _trbol comienza a
caer, pare la sierra, apoyela en el suelo y re-
troceda r_tpidamente, pot la trayectona de
retroceso prevista.
• Para evitar heridas. NO corte un arbol par-
cialmente caido con la sierra. Tome extremo
cuidado con los #trboles parcialmente tum-
bados que tienen apoyo precario. Cuaedo el
arbol no cae totalmente, ponga la sierra de
lado y use un montacargas a cable, un apa-
rejo de poleas o un tractor para bajarlo.
CORTANDO UN ARBOL TUMBADO
(SECCIONAMIENTO)
El termino seccionamiento significa cortar
un arbol tumbado en secciones del largo de-
seado.
_IL ADVERTENClA: Nosepare sobre
el tronco que esta siendo cortado. Cualquier
parte de1 tronco puede rodar haciendo que el
usuario pierda el equilibrio y el control No se
posicione cuesta abajo dei tronco que esta
siendo cortado.
PUNTOS IMPORTANTES
• Corte Qnicamente un troeco a la vez.
• Corte con sumo cuidado la madera astiHada.
La sierra puede arrojar pedazos punteagu-
dos y filosos hacia el usuario.
• Use un caballete para cortar troncos pe-
que[fos. Nunca permita a otra persona que
sostenga el tronco mientras ud. corta ni sos-
tenga el tronco con la piema o el pie.
• Nocorte en lugares donde haya troncos, ra-
mas y raices entrelazadas como puede
acontecer despues de un vendaval. Arrastre
los troncos hasta un lugar despejado antes
de cortarlos, empezando por los troncos ex-
puenstos y ya retirados.
TIPOS DE CORTE QUE SE USAN
PARA EL SECCIONAMIENTO
ADVERTENCIA: si lasierra queda
apretada o atascada dentro del tronco, no in-
tente sacarla a la fuerza. Puede perder el con-
trel de la sierra, causando heridas o daSos al
aparato, Pare la sierra, martille una cuSa de
pi&.stico o de madera en el corte hasta que la
sierra saiga f&.cilmente. Ponga ta sierra de
nuevo en marcha y coloquela cuidadosamente
de nuevo en elcorte, No intente poner en mar-
cha la sierra de nueve cuando est&.apretada o
atasoada ee un tronoo.
Use una cu5a para sacar la sierra
Apague la sierra y use una curia de
madera o de pl&stico para abrir el tajo.
Corte descendiente
..........
-- oortoss en°,on."
Cotte Ascendiente: empieza desde el lade
inferior del tronco con la parte de arriba de la
sierra contra el tronco; haga una leve fuerza
hacia arriba. Sujete la sierra firmemente
para mantener el control. La sierra tendr&, la
tendencia de empujar al usuario hacia atr_ts.
ADVERTENCIA: Nunca invierta la
sierra para hacer cortes ascendientes. No
se puede controlar la sierra de esa forma.
Haga siempre el primer corte del lado del
tronco que esta bajo compresion. El tado de
compresi6n del tronco es donde la presi6n
del peso deI tronco se concentra.
Primer corte del lado del tronco
bajo compresion ,_
Segundo corte
/€' Segundo corte
Primer corte de iado dei tronco
bajo compresion
SECCIONAMIENTO SIN APOYO
• Haga el corte descendiente de un tercio del
di&metro.
• Haga rodar el tronco y termine con otro corte
descendiente.
• Tenga cuidado con los troncos presionados
de un iado. Vea la ilustraciones anterior para
seccionar un tronco presionado.
SECCIONAMIENTO USANDO
TRONCO O CABALLETE DE
APOYO
• Recuerde que el primer corte siempre es de
lado del tronco bajo compresi6n. (Vea en la
ilustraciones que sigue el primer corte y el
segundo corte.)
• El primer corte deber_t extenderse per 1/3
del di_.metro del tronco,
• Termine per el segundo corte.
Uso de tronco como apoyo
2do torte
Corte Descendiente: empieza desde el
lado superior del tronco con la parte de abajo
de la sierra contra el tronco; haga una leve
presion hacia abajo.
30
Page 31

1er corte
Con caballete corn* apoyo
2de sorte
/
ler corte
b_" ler corte
PARA CORTAR RAMAS Y PODAR
ADVERTENCIA: Este ale[ta y ten-
ga cuidado con los reculada. Cuando cortar
ramas y podar, nunca permita que la cadena
en movimiento toque ningOn objeto en la
punta de la barra guia. Permitir tal contacto
puede causar graves heridas.
_i&ADVERTENCIA: Nunce trepe a
los #.rboles para cortar ramas o para podar.
No se pare sobre escaleras, pIataformas,
troncos ni en ninguna posicion que podria
causarle que pierda el equilibrio o el control
de la sierra.
PUNTOS IMPORTANTES
• Trabaje lentamente, con las dos manos su-
jetando firmemente la sierra. Mantenga el
equilibrio, con los pies en una superficie est-
able.
• Tome cuidado con las ramas chicas. El ma-
terial de poso di&metro puede entredarse en
la cadena, dando un latigazo al usuario o ha-
ciendo que pierda el equilibrio. Use extremo
cuidado al co[tar ramas pequei_as.
• Este aierta contra los rebotes. Tenga cuida-
do al co[tar ramas dobiadas o bajo presi6n
para evitar ser golpeado por ia rama o la
sierra cuando se suelte la tensi6n en las fi-
bras de madera.
• Despeje frecuentemente las rams acumula-
das para no le hagan tropezar.
PARA CORTAR RAMAS
• Siempre corte las ramas del &rbol despues
de que se Io haya tumbado. Unicamente asi
se puede cortar las ramas de forma adecua-
day segura.
• Deje las ramas m&s gruesas debajo del
&rbol tumbado para que apoyen el &.rbol
mientras ud. trabaja.
• Empiece pot la base del Arbol tumbado y
vaya trabajando hacia el tope, cortando tas
ramas. Corte las ramas peque[_as de un
solo corte.
• Maetenga el tronco del &.rbol entre ud. y la
cadena tanto como fuere posible.
• Retire las ramas mas grandes y las ramas
de apoyo con la tecnica de un tercio y dos
tercios descirta en la secci6n SECCIONA-
MIENTO SiN APOYO.
• Use siempre un corte descendiente para
co[tar ramas pequeflas y ramas que cueF
gan iibremente. Los cortes ascendientes
podrian hacer que las ramas caigan y apre-
ten ia sierra.
PARA PODAR
,_ ADVERTENCIA: Pode Qnica-
mente last la altura del hombro. No corte las
ramas que queden m&s altas que los horn-
bros. Consiga a un profesional para efectuar
ese trabajo.
• Haga el primer corte en forma ascendiente
de 1/3 del diamentro de la ram&
• Despues haga un segundo corte atravesan-
do completamente la rama. Finalmente haga
un tercer corte, descendiente, dejando un
toco de 2,5 a 5 cm (1 a 2 pulgada) sobresaF
iendo del tronco del arbol.
q II't Segundocor_e!J
Tercercorte I_,,_ [7
TO or,e
_L'ADVERTENCIA: Desconecte la
bujia antes de hacer cualquier mantenimiento,
con la excepcion de los ajustes al carburador.
Recomendamos que todo el servicio y todos
los ajustes no Iistados en este manuai sean
efectuados pot un distribuidor autorizado del
servicio.
INFORMACION UTIL
IMPORTANTE: Permita
que toda reparaalSn que no
I_ _ _ sea el mantenimiento re-
_dl_ ._._] comendado en el manual
de instrucciones Sea efec-
tuada pot un distribuidor
autorizado de/servicio.
Si un distribuidor NO autorizado efec-
tuara cualquier trabajo en el producto,
Poulan no pagara reparaciones bajo la
garantia. Es su responsabilidad el man-
tener y efectuar el mantenimiento general
del producto.
31
Page 32

PLANILLA DE MANTENIMIENTO
Verifique:
El nivel de combustible . Antes de cada uso-
Lubricaci6n de la barra . Antes de cada uso
Tension de la cadena.. Antes de cada uso
Afilaci6n de la cadena . Antes de cada uso
Piezas daSadas ....... Antes de cada uso
Tapas sueltas ......... Antes de cada uso
Fijadores sueltas ...... Antes de cada uso
Piezas sueltas Antes de cada uso
Inspeccionar y Limpiar:
Barra ................ Antes de cada uso
Sierra completa ........ Despues de cada
uso
Fittro de aire .......... Cada 5 horas*
Freno de cadena ...... Cada 5 horas*
Rejiita antichispas y
siIenciador ............ Cada 25 horas*
Cambiar la bujia ...... Anualmente
Cambiar et filtro de
combuctible .......... Anualmente
* Horas de uso
Cada hora de ]a funcionamiento toma
aproximadamente 2 tanques de
combustible
FILTRO DE AIRE
PRECAUCION: No use gasolina ni ningQn
otro liquido inflamaMe para limpiar el filtro,
para evitar h_cendios y emisiones nocivas.
Limpieza del filtro de aire:
Elfiltro de aire sucio disminuira la vida Qfil y el
rendimiento del motor e incrementarA elcon-
sumo de combustible y la producci6n de
contaminantes. Umpie siempre e_ filtro de
aire despues de 10 tanques de combustible
o 5 horas de uso, el que acontezca primero.
Limpielo con mas frecuencia en condiciones
muy polvorientas. Los filtros usados nunca
quedan totalmente limpios. Se aconseja re-
emplazar al ffltro de aire par uno nuevo des-
pues du cada 50 horas de uso o anualmente,
lo que acontezca primero.
1. Afloje los 3 tomiHos en la tapa deI cilindro.
2. Retire la tapa del ci_indro.
3. Retire el filtro de aire.
4. Limpie el filtro de aire con agua caliente y
jab6n. Enjuague bien con agua clara y
fria. Sequelo al aire totalmente antes de
reinstalarlo.
5. Coloque una peque_a cantidad de aceite
al filtro antes de instalarlo. Use aceite para
motores de 2 tiempos o aceite de motores
SAE 30. Escurra bien e_exceso de aceite
apretando el filtro para mejorar la eficiencia
det filtro de aire.
6. Reinstale de filtro de aire.
7. Reinstale la tapa del cilindro y los 3tomil-
los. Apriete firmemente.
Filtro de
Aire
.... Tornillos de
_._--_ la Tapa del
/Cilindro
INSPECCIONE EL SILENCIADOR Y
LA REJILLA ANTICHISPAS
_L, ADVERTENCIA: Elsilenciador en
este producto contiene las substancias
quimicas que eI estado de California recon-
oce como causantes de cancer.
A medida que se use el aparato, el silencia-
dory la rejilla antichispas se van carbonizan-
do. Es necesario sacar la carbonizaci6n
para evitar el riesgo de incendio o afectar el
rendimiento del motor.
PARA LIMPIAR LA REJILLA ANTI-
CHISPAS
Se requiere se haga limpieza despues de
cada 25 horas de operaci6n o anualmente, Io
que ocurra primero.
Guia de la Salida
e Desahogo
Silenciador_
".._'--."_ _l._'_I ,-_.-". ,Z Tornillos del
_,'---,,-Y _ "_k_., /=_,,r Silenciador
Placa Trasera T _" ['_"-_
/
Junta del Silenciaaor tqL___7"_
Cubierta del tornillo ./_ ¢_-
Tuerca
1. Afloje y retire la tuerca de ta cubierta del
tornillo.
2. Retire la cubierta del tornillo.
3. Afloje y remueva los dos tornilios del si-
lenciador. Retire el silenciador, la junta
del sitenciador, la guia de la salida de de-
sahogo y la placa trasera. Tome nota de
la orientaci6n de estas piezas para su re-
instalaci6n.
4. Localice los 2 tornillos de la cubierta del
salida de desahogo del silenciador.
Afloje y remueva ambos torniflos.
5. Retire ia cubierta del salida de desahogo.
Cubierta del Satida VISTA
¢_ de Desahogo TRASERA DEL
SiLENCIADOR
Silenciador
Tornillos
Rejilla Antichispas
32
Page 33

Retire la rejilla antichispas.
Limpie ia rejilla antichispas con un cepillo
de alambre. Cambie ia rejiHa si cuenta con
alambres rotos o si despues de limpiarla
oontara con obstrucciones.
Reinstale la rejilla antichispas.
Reinstale la cubierta det salida de desaho-
go y los 2 tomiHos. AsegL_rese de instalar
correctamente la cubierta de1salida de de-
sahogo y ambos tornillos (vea ias ilustra-
ciones) para prevenir da[_os a lasierra. La
salida de escape deberb, estar colocada
mirando hacia el frees de la cadena (del
lads de la barra) de la sierra.
Cubierta del
Salida de S_¢_-_'_Salida
i
de
Desahogo
Esoapo
La salida de escape deber_t estar colo-
cada mirando hacia et freno de la cade-
na (del lads de la barra) de la sierra.
1O. Inspeccione la junta del silenciador y re-
emplace siesta se encontrara daSada.
11. Reiestale la placa trasera, la guia de la
salida de desahogo, la junta de1 silencia-
dor. y el silenciador utilizando los toreii-
los del silenciador. Apriete firmemente
hasta quedar seguros.
12. Reinstale la cubierta del torniilo y la tuer-
ca. Apriete firmemente.
AJUSTE AL CARBURADOR
_ADVERTENCIA: La cadena es-
tar& en movimiento durante la mayor parte
de este prodecimiento. Use el equips protec-
tor y observe todad las precauciones de se-
guridad. La cadena no debe moverse con el
motor en marcha lenta.
EI carburador ha sido ajustado suidadosa-
mente en la f&brica. Posibiemente se hagan
necesarios ajustes si se nota cuaiquiera de las
siguientes condicioees:
• La cadeea se mueve con el motor en mar-
cha lenta. Vea procedimiento de MARCHA
LENTA "T'.
• La sierra no anda a marcha ienta. Vea pro-
cedimiento de MARCHA LENTA "T".
Marcha Lenta "T"
Deje que eI motor trabaje en marcha lenta. Si
la cadena se mueve, la marcha lenta es de-
masiado. Si el motor se para, la marcha len-
ta es demasiado lenta. Ajuste ias revoiu-
ciones hasta que el motor se mantenga en
marcha sin que ia cadena se mueva (ia mar-
cha lenta es demasiado) o que el motor se
ahogue (ia marcha ienta es demasiado len-
ta). El tornillo de la marcha est&. situado arri-
ba del bombeador y marcado con la "T".
• Gire el tomi]io de la marcha lenta "T" a la der-
echa (en el sentido del reloj) para aumentar
las revoluciones del motor.
• Gire et tomillo de la marcha lenta "T' a la iz-
quierda (en contra del sentido del reloj) para
bajar las revoluciones.
Si necesita m_ts ayuda o no ester seguro de
c6mo hacer el procedimiento, entre en con-
tacto con su distribuidor autorizado dei servi-
cio o llame al 1-800-554-6723.
MANTENIMIENTO DE LA BARRA
Si la sierra corta para un lads, si hay que for-
zada para que atraviese el corte, o si se la ha
hecho funcionar con una cantidad inadecua-
da de lubricante de barra, tai vez sea nece-
saris un mantenimiento de la barra. Las bar-
ras gastadas da[fian la cadena y tornan dificil
el trabajo de cortar.
Despues de usar. asegt3rese el interruptor
ON/STOP esta en posici6n STOP, luego lim-
pie todo el aserrin y cualquier otro escombro
de la raeura de la barra y del orificio del en-
granaje.
Para mantener la barra guia:.
• Mueva el interruptor ON/STOP en posi-
cion STOR
• Afloje y retire las tuercas del freno de ca-
dena y el frees de cadena. Retire ia barra y
ia cadena de1 aparato.
• Limpie los orificios delaceite y el ranurade
la barra despues de cada 5 horas de la op-
eraci6n.
Retire el Aserrin de la
Ranura de la Barra
\
¢11
J
• ASada lubricante al orificio del engranaje
despues de cada uso.
• Los rieles de la barra desarroilan protuber-
ancias al gastarse. S#tquelas con una lima
piana.
• Si la superficie superior del riel est#t desni-
velada, use una lima plana para restaurar
la forma cuadrada.
"'_ Encuadre los _ _]
Bordes del Riels
con una Lima
Ranura Ranura
gastada correcta
Cambie la barra si la ranura esta gastada, si
la barra esta torcida o resquebrajada o si hay
calentamiento excesivo o formacion de pro-
tuberancias en los deles. Si es necesario
cambiar la barra, use exclusivamente la bar-
ra guia especificada para su sierra en la lista
de repuestos, especificada tambien en la
calcomania de repuesto de barra y cadena
que se enouentra en la sierra.
AFILADO DE LA CADENA
El afilado de la cadena es una tarea compli-
cada que requiere herramientas especiales.
Recomendamos que ileve la cadena a un
afilador profesional.
ENCENDIDO
El encendido es fijo y no ajustable.
33
Page 34

BUJIA
DeberA cambierse la bujia anualmente para
asegurar que el motor arranque mAs facil-
mente y marche mejor.
1. Afloje los tres tornillos en la tapa del cilin-
dro.
2. Retire la tape del cilindro.
3. Saque la cubierta de la bujia.
4. Retire la bujia del cilindro y desechela.
5. Reemplacela con una bujia Champion
RCJ - 7Y ajt3stela con una Ilave de 19 mm
(3/4 de pulgada). Apriete firmemente.
SeparaciAn de electrodos: 0,6 mm
(0,025 de pulgada).
6. Reinstale la cubierte de la bujia.
7. Reinstale le tape del cilindro y tos tres
torniltos. Apriete firmemente.
Tornillos Tapa del
Cilindro
de la
Bujia
ALMACENAJE
_ADVERTENCIA: Pare el motor y
deje que se enfrie y fije bien el aperato antes
de guardaflo o de transportarlo en un
vehiculo. Guarde el eperato y el combustible
en un lugar donde los vapores de combus-
tible no pueden hacer contacto con chispas
ni llamas abiertas provenientes de los termo-
tenques, los motores o interruptores etectri-
cos, los calefactores centrales, etc. Guarde
el aperato con todos los protectores en sus
lugares respectivos. ColAquelo de modo
que no pueda haber accidentes a los trans-
eLintes con objetos filosos. Guarde el apara-
to fuera det alcance de los nii_os.
• Antes de guardar el apereto, vacie todo el
combustilbe. Ponga en marcha el motor y
dejelo en marcha lenta hesta que el motor
para solo.
• Umpie el aparato antes de guerdarto. Preste
atencion especialmente al Area de entrada
de aire. manteniendola libre de escombros.
Use un detergente suave y una esponja
pera limpiar las superficies de plastico.
• No guarde el aparato ni el combustible en
lugares cerrados donde los vapores de
combustible puedan alcanzer chispses o
llamas abiertas de los termotanques, cale-
factores centrales, motores o interrup-
tores electricos, etc.
• Guarde el aparato en un iugar seco fuera del
atcance de los ni[_os.
INFORMACION UTIL
Si almacenara su mezcla de
gasolin a y ace#e, Con el
I tiempo, elaceite se aeparara
de la gasolina.
Recomendamos agite el re-
cipiente cada semana para
asegurarse de que la mez-
cla de gaselina y aceite sea
la apropiada.
PRECAUClON: Es importante prevenir la
formeciAn de depAsitos de goma en las piezas
esenciales del sistema de combustible, tales
como el carburador, el _tro de combustible, la
manguera de combustible o el tenque, durante
el aimacenado. Los combustibles con mezcla
de alcohol (el Ilamedo gasohol o que use eta-
nolo methanol) pueden atreer humedad, que
lleva a lasepereciAn y a la formacion de acidos
durente el almacenado. La gasolina acida
puede da[_er el motor.
i.,N ECESITA AYUDA?
Lleme al 1-800-554-6723.
&NECESITA REPUESTO?
Entre en contacto con su distribuidor autori-
zado del servicio.
34
Page 35

TABLA DIAGNOSTICA
_, ADVERTENCIA: Siempreapagueetaparatoydesconectelabujiaantesdehacer
cualquiera de ]as reparaciones recomendadas a continuaci6n excepto reparaciones
que requieran que la unidad este en operacion,
PROBLEMA
EI motor no
arranoa o se
mantieee et3
marcha s61o
unos segundos
despues de ar-
rancar.
EI motor no
anda elq
marcha lenta
como debe.
E] motor no
acelera, le faita
potencia o se
para bajo car-
ga.
CAUSA
1. El interruptor est#t off.
2. El motor esta ahogado.
3. El taeque de
combustible est#t vacio.
4. La bujia eo hace chispa.
5. El combustible no est#t
Ilegando al carburador.
1. La marcha lenta
requiere ajuste.
2. El carburador requiere
ajuste.
1. El filtro de aire esta
sucio.
2. La bujia est#t
carbonizada.
3. La freno de cadena es
activado.
4. El carburador requiere
ajuste.
1. La mezcla de combus-
tible se ha hecho.
SOLUClON
1. Coloque el interruptor en ON.
2. Vea "Arranque Dificil" en la
secci6n Uso.
3. Uene el tanque con la mezcla
correcta de combustible.
4. Instale uea bujia nueva.
5. Verifique si el fiitro de combustible
esta sucio; limpielo. Verifique si hay
dobieces en la linea de combustible
o si ester partida: reparla o cambiela.
1. Vea"Ajuste a] Carburador" en la
seccion Servicio.
2. Entre en contacto con su distribuidor
autorizado del servicio.
1. Umpie o cambie el filtro de aire.
2. Limpie o cambie la bujia y
calibre ia separacion.
3. Desactive el freno de cadena.
4. Entre en contacto con su distribuidor
autorizado del servicio.
El motor 1. Vacie el tanque de combustible
humea y ilenelo de combustible con la
excesivamente, mezcla correcta.
La cadena se 1. La marcha lenta 1. Vea"Ajuste al Carburador" en ia
mueve en requiere ajuste, secci6n Servicio.
marcha lenta. 2. El embrague requiere 2. Entre en contacto con su distribuidor
reparaciones, autorizado del servicio.
Poulan garantiza al comprador original que
cada sierra de cadena a gasolina marca
Poulan nueva seth. libre de defectos de ma-
teriales y de mano de obra y que se compro-
mete a reparar o reempiazar, bajo las condi-
ciones de esta garantia, toda sierra de
cadena a gasofina domestica defectuosa,
como se detalia a continuacion, a partir de la
fecha de compra original:
1 Ai_lO = Repuestos y Mano de Obra. cuando
usada para prop6sitos domesticos.
60 DIAS - Repuestos y Mano de Obra, si usa-
do para propositos comerciales, profesionales
o para producir ingresos.
30 DIAS = Repuestos y Mano de Obra. si usa-
do para prop6sitos de alquiler.
Esta garantia no es transferible y no cubre
daflos ni responsabilidad civil debidos a man-
ejo indebido, mantenimiento incorrecto ni uso
de accesorios y/o juegos de piezas adicio-
naies no recomendados especificamente por
Poulan para esta sierra de cadena. Asimismo,
esta garantia no cubre da[_os causados por
manejo indebido, mantenimiento incorrecto ni
tampoco si la sierra ha sido alterada de cuaiqu-
ier modo que segOn nuestro criterio afecte su
condici6n o su operaci6n. Esta garantia no
cubre afinaciones, bujias, filtros, sogas de ar-
raeque, resortes de arraeque, afilado de cade-
nas. barras, cadenas ni otras piezas que se
gastan y requieren reemplazo con el uso ra-
zonable durante el periodo de vigencia de la
garantia. Esta garantia no cubre la preparaci6n
de pre- entrega, la instalacion de la barra guia y
la cadena y los ajustes normales explicados en
el manual de instrucciones tales como los
ajustes al carburador y a la tensi6n de la cade-
na. Esta garantia no cubre el costo de flete.
ESTA GARANTIA CONFIERE DERECHOS
JURIDICOS ESPECIFICOS AL COMPRA-
DOR. QUE PUEDE TENER OTROS DERE-
CHOS QUE VARIAN ENTRE ESTADOS.
NO SE ADMITIRAN RECLAMOS POR
DA_OS CONSECUENTES NI POR OTROS
DANOS NI SE APLICARA NINGUNA OTRA
GARANTIA EXPRESA ADEMAS DE
AQUELLAS EXPRESAMENTE ESTIPULA-
DAS EN LA PRESENTE.
35
Page 36

ALGUNOS ESTADOS NO PERMITEN LIMI-
TACIONES DEL PERIODO DE VIGENCIA
DE GARANTIAS IMPUCITAS, NI LA EXCLU-
SION DE DANOS CONSECUENTES O IN-
CIDENTALES, NI SU UMITACION, DE
MODO QUE LA EXCLUSION Y LAS LIMITA-
CLONES ANTERIORES PUEDEN NO TEN-
ER VALIDEZ EN SU CASO.
Es norma de Poulan mejorar sus productos
continuamente. Por Io tanto, Poulan se reser-
va et derecho decambiar, modificar o desconti-
nuar modelos, diseSos, especificationes y ac-
cesorios de todos los productos en cualquier
momento sin previo aviso ni responsaWidad
para con ningOn comprador.
SUS DERECHOS Y OBLIGACIONES DE
GARANTIA: LaAgenciade Protecci6nAm-
biental de los Estados Unidos, la Junta de
Recursos Ambientales de California, la
Agencia Ambiental Canadiense y Poulan/
WEED EATER se complacen en expiicar la
garantia con la que cuenta el sistema de
control de emisi6n en su motor pequei_o,
modelo 2005 y m&s adelante, para uso fuera
de carretera. En Catifornia, todos los mo-
tores pequei_os para uso fuera de carretera
deben ser dise[fiados, construidos y equipa-
dos para satisfacer las rigurosas normas an-
tihumo que posee el estado. Poulan/WEED
EATER deber&.garantizar el sistema de con-
trol de emision en su m&quina de motor pe-
que[fio para uso fuera de carretera por los
periodos de tiempo que explicamos a conti-
nuaci6n y con la condici6n de que su m&qui-
na de motor peque[fio para uso fuera de car-
retera no haya sufrido ningOn tipo de abuso,
negligencia o mantenimiento inapropiado.
Su sistema de control de emisi6n incluye pie-
zas tales como el carburador y el sistema de
ignicion. Donde exista una condici6n que re-
quiera reparacion bajo garantia, Poulan/
WEED EATER reparara gratis su motor pe-
quef_o para uso fuera de carretera. Los gatos
cubiertos bajo lagarantia incluyen el diagnosti-
co, las piezas y labor. CUBIERTA DE GA-
RANTIA DEL FABRICANTE: Si cualquier
pieza relacionada con el sistema de emisi6n
de su motor (como hemos enumerado en la tis-
ta de piezas de controi de emisi6n bajo ga-
rantia) se encontrara defectuosa o defectos en
et material o en la labor del motor causaran que
tal pieza comenzara a fallar, la pieza set&.repa-
rada o reemplazada por Poulan/WEED
EATER, GARANT[A DE RESPONSABILI-
DAD DE DEL DUENO: Como duei_o de una
m&.quina de motor peque[_o para uso fuera
de carretera, usted ser&. responsable por el
mantenimiento adecuado en los periodos
previamente programados y enumerados
en su manual de instrucciones. Poulan/
WEED EATER recomienda que guarde to-
dos los recibos que indiquen que se ha de-
sempei_ado mantenimiento en su m&quina
de motor pequei_o para uso fuera de carret-
era, pero Poulan/WEED EATER no podr&
negar el servicio bajo garantia Onicamente a
causa de la falta de recibos o por el incumpli-
miento de su parte en asegurarse que el
mantenimiento programado haya sido de-
sempeSado. Como duello de una m&quina
de motor pequeSo para uso fuera de carret-
era, usted debera contar con el conocimien-
to de que PoulanANEED EATER puede ne-
gar la cubierta bajo garantia si su m_tquina
de motor pequeSo para uso fuera de carret-
era o alguna pieza de la misma ha dejado de
funcionar debido al abuso, negligencia,
mantenimiento inapropiado, modificaciones
no aprobadas o el uso de piezas que no hay-
an sido fabricadas o aprobadas por el fabri-
cante original del equipo. Es responsabili-
dad suya el Ilevar su m_tquina de motor
peque[_o para uso fuera de carretera a un cen-
tro de reparacion autorizado Poulan/WEED
EATER tan pronto como se presente el proble-
ma. Las reparaciones bajo garantia deberan
ser completadas en un periodo de tiempo ra-
zonable, que no exceda los 30 dias. Si cuenta
usted con alguna pregunta en retaci6n a sus
derechos y responsabilidades de garantia,
usted deber_t comunicarse con su centro de
servicio autorizado m#ts cercano o Ilamar a
Poulan/WEED EATER al 1-800-554-6723.
FECHA DEL COMIENZA DE LA GARAN-
TIA: EI periodo de garantia comienza en la
fecha de compra de la m&.quina de motor pe-
que[_o para uso fuera de carretera. DURA-
OlON DE LA GARANTIA: Esta garantia
cuenta con un periodo de duraci6n de dos
a_os comenzando en la fecha inicial de com-
pra. QUE OUBRE LA GARANTIA: REPA-
RAOION O REEMPLAZO DE PIEZAS, La
reparaci6n o el reemplazo de cualquier pie-
za garantizada ser&.n desempe[_ados y ofre-
cidos al due[_o sin costo alguno en un centro
de servicio Poulan/WEED EATER, Si cuen-
ta usted con alguna pregunta en relacion a
sus derechos y responsabilidades de ga-
rantia, usted debera comunicarse con su
centro de servicio autorizado mrs cercano o
Itamar a Poulan/WEED EATER al
1-800-554-6723. PERIODO DE GARAN-
TIA: Cualquier pieza garantizada que no
este programada para ser reemplazada
como parte del mantenimiento requerido, o
que este programada Linicamente para in-
speccion regular para efectos de "repara-
ci6n o reemplazo si fuera necesario" debera
garantizarse pot un periodo de dos a[_os.
Cualquier pieza garantizada que este pro-
gramada para ser reemplazada como parte
del mantenimiento requerido deber&, estar
garantizada par el periodo de tiempo que
comienza en la fecha de compra inicial hasta
la fecha del primer reemplazo programado
para dicha pieza.
36
Page 37

DIAGNOSTICO: No se deber_t cobrar al
dueSo ningOn tipo de cargos por la labor de
diagn6stico ia cual determine que una pie-
za garantizada se encuentra defectuosa si
el trabajo de diagn6stico ha sido de-
sempef_ado por un centro de servicio auto-
dzado Poulan/WEED EATER, DANOS
POR CONSEOUEOIA: Poulan/WEED
EATER podra ser responsable de daSos
ocurfidos a otras piezas dei motor causados
por la faila de una pieza garantizada que se
encuentre bajo el periodo de garantia.
QUE NO OUBRE LA GARANTIA: Todas
las fallas causadas por el abuso, negiigencia
o mantenimiento h_apropiado no estan cu-
biertas. PIEZAS ANADIDAS O MODIFI-
OADAS: El uso de piezas a{_adidas o la mo-
dificaci6n de piezas podran servir como
base para que se aeu]e la reclamaci6n de
garantia. La garantia de Poulan/WEED
EATER no se responsabiliza por el mal fun-
cionamiento debido al uso de piezas aSadF
das o de piezas modificadas. OOMO ENTA-
BLAR UNA RECLAMACION: Si cuenta
usted con aiguna pregunta relacionada con
sus derechos y responsabifidades de ga-
rantia, usted deber&, entrar en contacto con
su centro de servicio autorizado Poulan/
WEED EATER mAs cercano o liamar a
Poulan/WEED EATER al
1-800-554-6723. DONDE OBTENER
SERVIClO DE GARANTIA: Servicio o re-
paraciones bajo garaetia deberAn ser pro-
vistas en todos los centros de servicio Pou-
lan/WEED EATER. Por favor comuniquese
al 1-800-554-6723. MANTENIMIENTO,
REEMPLAZO Y REPARAOION DE PIE-
ZAS RELAOIONADAS CON LA EMISlON:
Cuaiquier pieza de repuesto Poulan/WEED
EATER aprobada y utilizada en el de-
sempe[_o de cualquier servicio de manten-
imiento o servicio de reparacion bajo ga-
rantia de piezas relacionadas con ia emisi6n
sera provisto sin costo aiguno al due[_o si la
pieza se encuentra bajo garantia. LISTA SE
PIEZAS DE CONTROL DE EMISION GA-
RANTIZADAS: Carburador, Sistema de Ig-
nici6n: Bujia (cubierta hasta ]a fecha de
mantenimiento programada), Modulo de Ig-
nicion, S}lenciador incluyendo el Cataliza-
dor. DEOLARAOION DE MANTENIMIEN-
TO: El duello es responsabie de adquirir
todo el mantenimiento requerido como Io de-
fine en el manua_ de instrucciones.
La informaci6m en la etiqueta del producto indica las normas de certificaci6n de su motor.
Ejemplo: (ASo) EPA Fase 1 o Fase 2 y/o CALIFORNIA.
Informacion Importante en relacion
al motor. Este motor satisface las
regulaciones de emision para mo-
tores pequeSos operados fuera de
la carretera.
Familia
# De Serie
Horas de la durabilidad del motor
Yea el manuat de instrucciones
para especificaciones de manten-
imiento y ajustes.
Se certifica este motor para satisfacer los requisitos de emision para los uso siguientes:
[] Moderado (50 horas)
[] Intermedio (125 horas)
[] Extendido (300 horas)
37
Page 38

AVERTISSEMENT: cede
tron_onneuse peut _tre danger-
euse! L'emploi negligeant ou im-
propre peut causer des blessures
graves ou m6mes fatales.
D Lisez et comprenez le
manuel d'instructioes
avant d'utiiiser la
tron_oneeuse.
Portez toujours la protection de roule appropriee, la protection des yeux et
la protection de t&te.
_n
Employez toujours I'appareil & deux mains.
AVERTISSEMENT! II faudra 6viter soigneusement
tout contact de la pointe de la barre avec n'importe quel ob-
jet; ce contact peut faire que la barre saute soudainement
vers le haut et vers I'arriere, ce que pourrait entrainer des
blessures graves.
La valeur mesuree de recui, sans frein de chaine, pour la combinai-
son de barre et de chaine sur I'etiquette.
_ AVERTISSEMENT: Debranchez
toujours le fil de la bougie d'allumage et le fil
d'endroit oQ il ee peut pas entrer en contact
avec ta bougie d'allumage pour emp&cher
commencer accidentel en installant,
transport, s'ajustant ou en depannant
exceptez ies r6giages de carburateur.
Puisque les tronconneuses sont des
machines & haute vitesse pour ie coupage
de bois, il faura bien respecter les
precautions speciales de securit6 afin de
reduire le risque d'accidents. L'emploi
negligeant ou impropre de cet appareil
pourra entrainer des blessures graves.
PENSEZ AVANT D'AGIR
• Lisez attentivement _e manuel
d'instructions, assurez-vous d'avoir bien
compris les consignes de securite et
suivez-les attentivement avant d'utiliser
t'appareil.
• Limitez I'emploi de votre trongonneuse
aux utilisateurs adultes qui comprennent
et qui peuvent bien respecter les regles de
securit6, les precautions et les
instructions d'utilisation qui se trouvent
dans ce manuel.
Protection j- Casque de
Securite
& rAudition
_'_,lu,,oll=-'-'-_ Protection
Habits aux Yeux
Gants & Haute
Resistance
38
Chaussures Jambieres
de Securite de Securite
Portez de i'equipement de securite.
Employez toujours des chaussures de
securite avec des bouts en acier et des
semelies non-giissantes; des habits
ajustes; des gants & haute resistance
non-glissants; de ia protection aux yeux
telle comme des lunettes protectrices
aerees non embuantes ou masque
protecteur; un casque de securite
approuve; et de la protection & I'audition
(des boules ou des cache-oreilles). Les
utilisateurs devront se faire examiner
Page 39

I'auditionregulierement,puisquetebruit
destrongonneusespeutnuitI'audition.
Fixezlescheveuxau-dessusdes
epaules.
• Tenez toutes les parties du corps
eliognees de la chaine quand le moteur est
en marche.
• Tenez les enfaets, les passants et les
animaux eloignes d'au moins 10 metres
(30 pieds) de I'espace de travail ou quand
vous mettez I'appareil en marche.
• Ne maniez pas ni utiHsez pas la
trongonneuse quand vous &tes fatigue,
malade, bouleverse ou si vous avez pris
de I'alcool, des drogues ou des
medicaments. IIfaudra que vous soyez en
bonne condition physique et mentalment
vigilant. Si vous souffrez d'une condition
de sante qui pourrait s'aggraver en raison
de travail ardu, consultez votre medecin.
• Planifiez soigneusement & I'avance votre
travail de coupe. Ne commencez pas &
couper sans avoir debarasse l'espace de
travail et sans avoir une surface stable
pour vous tenir debout et, Iorsqu vous
abattez des arbres, un chemin de retraite.
UTILISEZ LA TRON(_ONNEUSE
RESPECTANT LES BESOINS DE
SECURIT t_
• N'employez pas I'appareil a une main
seule, puisque cela peut entratner des
biessures graves & rutilisateur, aux
assistants, aux passants. Les
trongonneuse demandent I'utilisation &
deux mains a.tout moment.
• Utilisez i'appareil exciusivement dans les
endroits exterieurs bien aeres.
• N'employez pas I'appareil debout ou assis
sur une echelle ou un arbre.
• Assurez-vous que la chaTne ne va pas
toucher quoi que se soit tandis que vous
mettez I'appareil en marche. Ne tentez
jamais de mettre le moteur en marche
avec la barre dans le trou.
• N'exeroez auoune pression sur la
trongonneuse & la fin d'une coupure. La
pression pourrait vous faire perdre le
contr61e Iorsque la coupure est achevee.
• Arr6tez le moteur avant de poser
rappareil.
• N'employez pas l'appareil qui est
endommagee, incorrectement ajuste, ou
pas completement et soiidement reuni.
Substituez toujours la barre, la ehaine, le
protege-main, ou le frein & chaines
immediatement s' il devient endommage,
casse ou 6tes autrement retire.
• Lorsque vous transporterez I'appareil,
faites-le toujours avec le moteur arr&te, le
silencieux eloigne du corps et labarre et la
ehaine & I'arriere, couverts d'un fourreau.
TENEZ TOUJOURS LA
TRON(_ONNEUSE EN BON ETAT
DE FONCTIONNEMENT
• Tout service a _atronconneuse devra _tre
fait par un Autorise de Service
apres-vente, sauf ies services decrits
dans la section de service de ce manuel.
Par exemple, au cas d'6tre empioyes des
outils incorrectes pour enIever ou serrer le
volant Iors de faire un service &
rembrayage, cela peut entrainer des
dommages structurels au volant, qui
pourrait donc eclater.
• Assurez-vous que la chaine s'arr6te
quand I'accelerateur est declenche. Le
regiage est decrit dans REGLAGE DU
CARB URATEU R.
• Ne modifiez jamais l'appareil en quoi que
ce soit.
• Tenez toujours les anses seches, nettes et
depourvues d'huile ou carburant.
• Tenez les bouchons et ies fermoirs
soigneusement fermes.
• Employez exclusivement les accessoires
et les pieces de rechange Poulan
recommandes.
MANIEZ LE CARBURANT AVEC
SOIN
• Ne furnez pas alors que vous maniez le
carburant ou employez la tronconneuse.
• Elimineztoutes les sources d'etincelles et
de flammes dans les endroits o3 I'on m&le
ou verse le carburant. II ne devrait y
compris y fumee, les flammes ouvert, ou
travail qui pourrait causer des etinceIles.
Permettez au moteur de se refroidir avant
le ajouter ie carburant au reservoir.
• M61ez et versez le carburant dehors, en
utilisant un recipient de carburants
approuve et etiquete. Essuyez tousles
deversements de carburant.
• Eloignez-vous au moins de 3 metres (10
pieds) de I'endroit de ravitaillage avant de
mettre ie moteur en marche.
• Arr6tez le moteur et laissez I'appareil se
refroidir dans en endroit non-combustible,
pas sur des feuilles seches, de ia paille, du
papier, etc. Enlevez le bouchon du
carburant lentement et ravitaiHez
I'appareil.
• Gardez I'appareil dans un endroit frais,
sec et bien aere o0 les vapeurs du
carburant ne peuvent pas atteindre des
etincelles ou des flammes hues des
chauffeurs d'eau, des moteurs ou des
interrupteurs electricques, le chauffage
central, etc.
RECUL
,_ AVERTISSEMENT: Evitez le recul
qui peut entra_ner des blessures graves. Le
Recul est le mouvement vers I'arriere et/ou le
haut de la barre-guide qui se produit quand la
partie de la chaine du haut du bout de la
barre-guide entre en contact avec tout objet,
tel qu'une autre boche ou branche, ou quand le
bois se referme et piece la chatne de la
trongonneuse dans la coupe. Entre en contact
avec un objet etranger qui se trouve dans le
bois peut egalement avoir comme
consequence la perte de commande
trongonneuse.
• Le Reeul de Rotation peut se produire
quand la chaine en mouvement entre en
contact avec un objet & I'extremit6
superieure du bout de la barre-guide. Ce
39
Page 40

contact peut enfoncer la chaine dans cet
objet, ce qui I'arr&te pour un instant. Le
resultat est une reaction ultra-rapide qui
projette la barre-guide vers le haut et I'arriere,
vers I'utilisateur.
• Le Pincement-Recul peut se produire
quand le bois se referme et pince la chatne
en mouvement darts la coupe, le long du
bout de la barre-guide et ta chaTne s'arr6te
soudainement. Cet arr6t soudain de la
chaine cause un renversement de la force
de la chatne utilisee pour couper le bois et
projette la tron_onneuse dans la direction
inverse de la rotation de la chaine. La
tron_onneuse directement vers t'utilisateur.
• Le Retraction peut se produire quand le
chaine en mouvement entre en contact
avec un objet etranger qui se trouve dans
le bois, le long du bas de la barre-guide et
la chaine s'arr6te soudainement. Cet arr6t
soudain de la chatne tire la tronponneuse en
avant et loin de I'operateur et pourrait
facilement faire detruire I'operateur la
commande de la tron_onneuse.
I_vitez le pincement-recul:
• Soyez tres vigilant des situations ou des
obstructions qui pourraient faire serrer la
partie superieure ou autrement arr6ter la
chaine.
• Ne coupez pas plus d'un rondin d'une fois.
• Ne tordez pas la tron9onneuse Iorsque
vous I'enlevez d'une ooupure asoendante
Iorsque vous sectionnez des rondins.
I_vitez les retraction:
• Quand vous commencez la coupe,
asurez-vous toujours que le moteur est &
pleine vitese et que le chassis de la
tron9onneuse est contre le bois.
• Employez des cales en plastique ou bois,
jamais en metal, pour tenir la coupure
ouverte.
\'_,_ ._/2 Direction de recul
Evitez les obstructions
evitez toute obstruction que la chaine
pourrait toucher pendant la coupure. En
coupant les branches, ne laissez pas le
barre-guide contactez le branchement ou
d'autres objets autour de lui.
• Maintenez ta chaine tranchante et avec la
tension correcte. Les chaines t&ches ou
emoussees peuvent augmenter les
possibilites de recuL Respectez les
instructions du fabriquant a I'egard
d'aiguisement de la chaine et les
instructions d'entretien. Verifiez la tension
regulierement, mais jamais avec le moteur
en marohe. Assurez-vous que les eorous
de la frein de chaine sont bien ajustes.
• Commencez et oontinuez la ooupure avec
l'acceleration a fond. Si la chatne tourne
une vitesse moindre que le maximum, il
existe une possibilite plus grande de recul.
• Ne coupez qu'un rondin au m6me temps.
• Soyez extr&mement soigneux en rentrant
dans une soupure deja commencee.
• Ne tenez pas commencer les ooupures
avec la pointe de la barre (coupure de
perceuse).
• Prenez garde aux rondins glissants et aux
autres forces qui pourraient fermer la
coupure et serrer la chaine ou tomber sur
elle.
• Emptoyez ta barre au recul reduit et la
chaine au recut reduit specifiees.
MAINTENEZ LE CONTROLE
Tenez-vous de-
bout legerement &
gauche de la
trongonn_,
N'inversez jamais
les positions des
mains.
Le pouce
en bas de
I'anse.
Degager l'endroit du travail
RI_DUISEZ LA PROBABILITI_
DE RECUL
• Soyez toujours conscient de la possibilite
de recul. Avec une comprehension
basique du recul, vous pourrez reduire la
surprise qui contribut aux accidents.
• Ne permettez jamais que la chain, etant en
mouvement, touche n'emporte quel objet
& la pointe de la barre.
• Tenez I'espace de travail debarrasse des
obstructions tels comme les autres
arbres, les branches, les .pierres, les
cl6tures, les souches, etc. Eliminez ou
Le coude rigide
Le pouce en bas de l'anse.
t
• Serrez fortement ta tron9onneuse avec les
deux mains afin de maintener le contr61e.
Ne I&chez pas. Serrez t'anse d'arriere
avec la main droite, soit que vous soyez
droitier ou soit que vous soyez gaucher.
Tenez les doigts de la main gauche autour
de, avec le pouce em bas de, I'anse
d'avant. Maintenez le bras gauche tout
droit avec le coude rigide.
40
Page 41

• Quand vous faites une coupe de
trongonnage, mettez la main gauche sur la
poignee avant de fagon & I'atigner avec la
main droite sur la poignee arriere.
N'inversez jamais les positions des mains,
quelle que soit ta coupe.
• Tenez-vous avec te poids distribue
egaiment entre les deux pieds.
• Tenez-vous legerement a. gauche de la
trongonneuse afin d'eviter que te corps soit
en ligne droite avec le chaine.
• Ne vous penchez pas. Vous pourrez perdre
l'Gquilibre et le contrGle.
• Ne coupez pas plus haut que les epaules. II
est tres difficiie de maintenir te contrGte de la
trongonneuse quand elle est plus haut que
les epaules.
DISPOSITIFS DE SI_CURIT# DANS
LE RECUL
_AVERTISSEMENT: Les disposi-
tifs suivants ont ete inclus darts votre
trenoconneuse afin de reduire le danger de
recul, neanmoins, de tels dispositifs n'eliminent
pas completement ce danger. Ne vous cenfiez
pas au seuls dispositifs de securit& Respectez
toutes les regles de securite afin d'eviter le
recul et ies autres forces qui peuvent causer
des blessures graves.
• La barre au recul reduit, con9ue avec une
pointe de rayon court qui reduit les
dimensions du zone de danger de recul
dans ia pointe de la barre. Ce type de barre
reduit de facon significative ie hombre et la
gravite des reculs aux tests faits en
conformite avec ANSi B175.1.
Barre symetrique au recul reduit
_ointe de
Barre symetrique ray_t
{
Pointe de rayon large
• La chaTne au recul reduit satisfait les
demandes de performance aux tests d'un
echantillon represantatif des
trongonneuses avec deptacement de 3,8
pouces cubiques specifies darts ANSI
B175.1.
Indicateur de Profondeur
_z;:_ A'_'.! de Forme Speciale
[ "%_'_"'Maillon Protecteur Allonge
_-__.f_e_ t Detourne la force du
^ /recut et permet que le
Chame au \ bois entre graduelle-
Recul Reduit ment dans le coupeur
Peut creer des obstructions
\_-_"../_Pare une basse Chame
" \V_au Recul Reduit *
• Protecteur de main d'avant: con9u pour
reduir la possibilite que votre main gauche
touche la cha_ne si vous I&chez I'anse
accidentalement.
• La position des anses d'avant et d'arriere,
con cue avec distance entre les deux et en
ligne. La separation et Ia position en iigne
offertes par cette conception cooperent
pour donner de I'equilibre et de la
resistance darts le contrGle du pivotement
de la tronoconneuse vers I'utilisateur darts
_ecas de recuL
FREIN DE CHAINE ET ANGLE CKA
(ANGLE CALCULE DE RECUL DE LA
CHAINE)
• Freie & cha_ne, con_u pour arr_ter la
chaine en cas du recul.
_ AVERTISSEMENT: NOUS
N'EXPRIMONS PAS ET VOUS NE DEVEZ
PAS SUPPOSER QU,E LE FREIN DE
CHAiNE VOUS PROTEGERA DANS LE
CAS DE RECUL, Le recul est une action
rapide comme un eclair qui jette en arriere et
en i'air la barre et la chaine rotative vers
I'operateur, Le recul peut 6tre cause en
permettant le contact de I'extremite de barre
darts la zone de danger avec n'importe quel
objet dur. II peut 6tre cause aussi en pin cant
la chaine le tong du haut du barre-guide.
Cette action peut pousser le barre
rapidement en arriere vers I'operateur, L'un
ou i'autre de ces evenements peut vous faire
perdre le contrGle de la tron9onneuse, ce qui
peut produire des blessures serieuses ou
mGme la mort. NE VOUS REPOSEZ PAS
SUR N'IMPORTE QUEL DISPOSITIF
INCORPORE DANS VOTRE
TRONQONNEUSE. VOUS DEVEZ
UTILISER LA TRONQONNEUSE
CORRECTEMENT ET AVEC SOIN POUR
EVlTER LE RECUL. Les barres & recul
reduit et les chatnes & recul reduit bas
reduisent le chance et la grandeur du recul ;
iis sont donc recommandes. Votre
trongonneuse a une chaine et une barre &
faible recul en tant qu'equipement d'origine.
Sur un freie & chaines devraient &tre
depannes par un distributeur de service
autoris& Prenez votre unite & I'endroit de
I'achat si achete d'un distributeur de service,
ou au marchand principal autorise le plus
proche de service.
• Si le bout touche un objet, des etincelles
peuvent 6tre produites et la direction peut
6tre INVERSEE, renvoyant le chaine en
haut et en arriere vers i'utilisateur.
• Si la chaine est bloquee au niveau du
chaine, ii peut sauter rapidement en
arriere en direction de I'utilisatuer.
• Ces deux maneuvres peuvent vous faire
perdre le conrGle de la trongonneuse.
,_ AVERTISSEMENT: L'anglecalcule
de recui (CKA) sur votre troe9onneuse et darts
la liste ci-dessous represente I'angle de recul
qu'auront vos combinaisons de barre et chatne
quand eltes seront testees en coeformite avec
les criteres CSA (Association Canadienne De
41
Page 42

Normes) et ANSI. Au moment d'acheter barre
et chaTne de rechange, les valeurs CKA tes
plus bas devront 6tre considerees. Les vateurs
CKA plus bas representent les angles ayant
moins danger pour I'utilisateur, tandis que les
valeurs plus hauts representent des angles
plus grands et des energies plus fortes. Les
angles calcules representes darts la rubrique
non-actionne indiquent I'energie totale et
I'angle associe sans actionner le frein de
chatne pendant le recuL L'angle actionne
represente le temps d'arr6t relatif & I'angle
d'actionnement du frein de chaine et I'angle
consequent de recul de la trongonneuse.
Tableau de I'angle calcule de recul (CKA)
MODELE BARRE
SERIE DE LE P/N" Longueul
1950/1975/2050 952044368 14"
2055/2075/
2150/2150PR 952044370 16"
2155/2175/
2350/2375 952044418 18"
REMARQUE: Si cette tronconneuse doit
&tre utilisee pour I'abattement d'arbres, un
frein de chaine est exige et ne sera pas retire
ou ne sera pas autrement invalide pour &tre
conforme aux regles OSHA federales pour
I'abattement d'arbres.
AVIS DE SI_CURITIe: L'exposition aux
vibrations a travers I'utilisation proiongee
d'outils a moteur d'essence serres dans les
mains peut causer des dommages aux
vaisseaux sanguins ou aux nerfs dans les
doigts, les mains et les articulations des
personnes qui sont sujets aux maladies de
la circulation ou aux enflures anormales.
Uutilisation pdongee au temps froid a et6
relationee aux dommages des vaisseauz
sanguins dans des personnes qui autrement
ont une bonne sante. Si vous avez des
symptomes tels que I'engourdissement, la
douleur, manque de forces, changement de
couleur ou texture de la peau, ou perte de
sensation dans les doigts, les mains ou les
articulations, arr6tez Futilisation de cet
appareil et consultez un medicin. Les
systemes anti-vibration ne peuvent pas
garantir que ce type de problemes sera
evit& Les utilisatieurs qui travaillent avec les
outits a moteur continuellement devront
surveiller leur condition physique, et la
condition de I'appareil, soigneusement.
AVIS SPC:CIAL: Votre tronconneuse vient
equipee d'un silencieux Iimiteur de
temperature et un ecran anti-etincelles afin
de satisfaire les conditions des codes de
Californie 4442 et 4443. Toutes les terres
fiscales boisees et les etats de Califronie,
idaho, Maine, Minnesota, Nouvelle Jersey,
Oregon et Washington exigent par Ioi un
ecran anti-etincelles dans beaucoup de
moteurs de combustion interne. Si vous
utilisez une tron9onneuse ot3il y a de telles
regles, vous &tes juridiquement responsable
du maintien de ces pieces. Le manque de
ces conditions est une violation de la Ioi. Voir
la section SERVICE.
La combinaisons suivante de barre et
cha_ne correspond aux normes sur le recul
CSA Z62.1, Z62.3 et ANSi B175.1.
Uutilisation Iors qu'elle est utilisee avec les
tronconneuses indiquees dans ce manual.
N'utilisez pas de combinaisons de barre et
de cha_ne differentes que celles indiquees
dans ce manual, car elles risqueraient de ne
pas correspondre aux criteres CKA selon
les normes.
CHAIN P/N °
952051209
952051211
CKA sans frein de cha_ne
24 °
19 °
II est conseille de porter des gants de
proteccion (non fournis) Iors de montage.
INSTALLATION DE LA BARRE ET
LA CHAINE (Si elles n'ont pas ete dej&
instatlees)
_, AVERTISSEMENT: Verifiez
chaque pas du montage si vous avez recu
I'appareil dej& mont& Employez toujours
des gants quand vous maniez la chaine. La
chatne est tranchante et peut vous blesser
m&me quand elle n'est pas en mouvement.
1. Desserrez et enlevez les ecrous de la
frein de chaine et enlevez la frein de
chatne de la tronconneuse.
2. Enlevez le separateur d'emballage en
plastique et recyclez-le.
42
Tout defaut de respecter tous les
avertissements et regles de securite peut
entrainer des blessures graves. Dans des
situations qui ne sont pas couvertes dans ce
manuel, soyez prudent(e) et faites preuve de
bon sens. Si vous avez besoin d'aide,
mettez-vous en rapport avec le distributeur
autorise de service ou appelez al numero
1-800-554-6728.
NORMES: Cet appareil est homologue par
Underwriter's Laboratories, Inc., comme se
conformant & ta:
ANSI B175.1-2000 Norme Nationale
Americaine pour les outils moteurs -
tronconneuse & essence - Reglementation
sur la Securite (ANSI B175.1-2000).
OSA Z62.1-08 "La S6curite et Sante de
I'utilisateur de la Trongonneuse"
OSA Z62.3-96 "La Securite de Sante de
I'utilisateur en ce qui Concerne le Recul de
la Tronconneuse"
952051338 14 °
Page 43

Separateurdetransport
Freinde J Lese'_crous
L'outildereglage
delacha_ne
3. IIyaunegoupilleetunevisder6giage
employeespourreglertatensiondela
cha_ne.IIesttresimportantdartsle
montagedelabarrequelagoupillequise
trouvesurlavisdereglagesoitalignee
avecuntrouquisetrouvedanslabarre.
Quaedonfaittournezlavis.lagoupille
monteretdescendreparlavis.Trouvezce
reglageavantd'installertabarredans
I'appareil.VoirI'illustrationquisuit.
_oo)/!tt_ Vuedecoupedu
/
Reglage du frein de la cha_ne
4. ,&,la main. toureez la vis de reglage darts la
sees contraire de I'horloge pour deplacer la
goupille de reglage jusqu'a ce qu'elle
touche la butee. Ceta permet pour la
goupille d'etre pres de la bonne position.
5. Glissez ta barre-guide derriere le
tambour de I'embrayage jusqu'_t ce
qu'elle bute contre le pigeon du tambour
de I'embrayage.
Installez la barre
6. Enlevez la chaine de son embaltage
avec soin et tenez la avec les coupoirs
tel qu'iedique.
Extremite
du barre-
guide
LES LAMES DOIVENT
FAIRE FACE DANS LA
DIRECTION DE LA ROTATION
Coupoirs indicateur de profondeur
Maiilons d'entrainement
r
Placez la chaine sur le pignon
7. Placez la chaine dans le pignon situe
derriere le tambour d'embrayage.
Mettez ia chaine entre les dents du
pigeon.
8. Introduisez les bas des maillons
d'entrainement entre les dents de la
pigeon en la embout de la barre-guide.
9. Introduisez _es maillons d'entra_nement
darts la rainure de ta barre-guide.
10. Tirez la barre-guide vers I'avant jusqu'&
ce que ta chaine soit bien dans la rainure
de la barre-guide. Assurez-vous tous
les mailions d'entra_nement sont dans la
rainure de la barre-guide.
REMARQUE: L E FREIN DE. CHA|NE
DOlT ETRE DESACTIONNE AVANT
INSTALLATION SUR LA TRON_ON-
NEUSE. POUR DE SACTIONNER LE
FREIN DE CHAINE, TIREZ LE
PROTECTEUR DE MAIN AVANT
VERS L'ARRIF:RE DU FREIN DE
CHAINE AUSSI LOIN QUE POSSIBLE
(VOIR L'ILLUSTRATION).
DI_SACTIONNI_ _
retecteurde a n SIi
Avan_ .:_',ii'
ASTIONNI_
]1. installez maintenant le frein de cha_ne en
vous assurant que la goupilie de reglage
est dans le trou inferieur de la
barre-guide. Souvenez-vous que cette
goupilie fait bouger vers t'avant et
I'arriere le barre-guide quand vous
tournez le vis.
12. Instaliez ies ecrous de la frein de chaine
et ajustez-les avez les doigts. Apres
avoir tensione la chaTne, ilfaudra ajuster
les ecrous de la frein de chatne.
43
Page 44

TENSION DE LA CHAINE (y compris
les appareHs avec la chaine dej& install6e)
REMARQUE: Tandis que vous reglez la
tension de la chatne, assurez-vous que les
ecrous de la frein de chaTne ont et6 ajustes
seulement avec les doigts. Si I'on tente
regler la tension de la chaTne avec tes ecrous
bien ajustes, on pourra endommager
I'appareil.
Verification de la tension:
Employez I'extr6mite de tournevis de I'outil de
r6gtage & chaine (outN de ta barre) pour
deplaeer la chaine autour de la barre. Si la
cha_ne ne tourne pas, elle est trop serree. Si
elle est trop I&che, erie pendra en bas de la
barre.
Ecrous de la frein Outil de reglage de la
de chaTne chaine (outil de la
barre)
Reglage de la tension:
La tension de la ct_aTne est tres importante.
La chaTne s'etend avec I'usage,
sp6cialement pendant les premieres fois
que la tronconneuse est employ6e> V6fifiez
toujours la tension de Ia chaTne chaque fois
que vous utiNsez I'apparaN et chaque fois
que vous le ravitaillez>
On fait le reglage en desserrant les ecrous
de la barre et en faisant tourner la vis de
r6gtage 90_ pendant qu'on hausse la barre.
• Si ia chaTne es trop tensionee, faites tourner
la vis 90_ dans le sens inverse des aiguiltes
d'une montre>
• Si la chatne est trop I&che, tournez la vis 90_
dans le sens des aiguilles d'une motre.
/'_!_'_Z°/Visder6- /"_/._glage ." /
frein de ehaTne Barre-guide
Vis de reglage - 1/4 detour
• Haussez la pointe de la barre et ajustez les
ecrous avec route
• Verifiez, encore une fois, la tension de la
chaTne.
./"7,lr! Eerousde/
IZ_;_=t/'/} la frein de_bi _
_k, AVERTISSEMENT: si le
tronQonneuse est fonctionne avec une cha_ne
I&che, la chaine pourrait saut de la barre et du
resultat dans les btessures graves.
FAMILIARISEZ-VOUS AVEC VOTRE TRONCONNEUSE
AVAN T D'UTIL!SER VOTRE TRONCONNEUSE, LISEZ BIEN CE MANUEL ET LES REGLES
DE SECURITE. Oomparez les illustrations & votre appareH pour voir oQ se trouvent les
commandes et les reglages. Conservez ce manuel pour vous y reporter plus tard>
Outil de reglage Protecteur _ £'h f"_./ Poignee avant
de la chaTne de main lit I k" Oorde du demarreur
(Outil de la barra) I_ I ] \ _ / Interrupteur de raise
1_ _N_J _1 en route/d'arr6t
<ill I/I (ON/STOP)
OhaTne Silencieux-i_l. _ __ Poire
d'amorQage
Capuchon de remplissage B&ti du Capuchon de remplissage
(huile pour la barre) demarreur (carburant)
44
Page 45

Calotte du c
Verrouillage
des gaz
Poignee
arriere
\
% de
Indicateur de
Ooupoirs profondeur
Maillonsd'entralnement Direction de
rotation de
la chatne
G&chette Levier de
des gaz I'etrangieur/ Frein
du ratenti de
rapide chaTne
Ecrous du Barre-guide
frein de ohaine
Bouclier
de la
chaTne
Trou de pignon
INTERRUPTEUR DE MISE EN
ROUTE/D'ARRET (ON/STOP)
Le INTERRUPTEUR DE MISE EN
ROUTE/D'ARRET (ON/STOP) est utiiise
pour arr6ter le moteur,
GACHETTE DES GAZ
Le GACHEqq-E DES GAZ contr61e la
vitesse du moteur.
VERROUILLAGE DES GAZ
Le VERROUILLAGE DES GAZ doit 6tre
presse avant de pouvoir presser la g&chette
des gaz, Itevite tes demarrages accidentels.
LEVIER DE L'ETRANGLEUR/DU
RALENTI RAPIDE
Pour le demarrage d'un moteur froid ou
apres un nouveau rempflssage de
carburant, I'etrangleur et le ralenti rapide
sent declepches en tirant & fond le LEVER
DE L'ETRANGLEUR/DU RALENTI
RAPIDE. Uetrangleur foumit du carburant
supplementaire au moteur Iors d'un
demarrage a froid.
POIRE D'AMOR(_AGE
Le POiRE D'AMORCAGE fait oirculer le
carburant pour I'amener au carburateur et
accelerer le demarrage.
FREIN DE CHAINE
Le FREIN DE CHAiNE concu pour arr_ter la
cha_ne en cas du recul. Le frein de chaine
est actionne automatiquement en cas du
recuk Le frein de chaine est actionne
manuellement si la protecteur de main est
pousse en avant. Si le frein est dej&
actionne, on peut le desactionner tirant le
protecteur de main vers ranse d'avant
autant que possible.
TENSION DE LA CHAiNE
II est normal qu'une chaine neuve se
detende durant les 15 premieres minutes
d'utilisation, Vous devez verifier souvent la
tension .de votre cha_ne. Voir TENSION DE
LA OHAINE dans la section des MONTAGE.
_J' AVERTISSEMENT: Le silencieux
est tres chaud pendant et apres utilisation.
Ne touchez pas le silencieux ou ne
permettez pas le materiel qui est
combustible (seche herbe, carburant) pour
entrer en contact avec le silencieux,
[_ I=id
RAVITAILLEMENT DU MOTEUR
_AVERTISSEMENT: Enlevez le
capuchon de remplissage (carburant)
lentement quand ajoutant plus de carburant
a. rappareil,
RENSEIGNEMENTS UTILES
Pour obtenir le bon melange
[_ d'huile et d'essenc e, vereez
_'_.'.'.'.'.'.'.'_1 3,2 onces d'huile synth_ti-
I _ -- _PJ que a deux temps dane un I
[ _ gallon d'essence fraiche. J
II est certifie que ce meteur fonctiennera
avec de t'essence sans plomb, Avant
d'utiliser I'appareil, vous devrez melanger
I'essence & une synthetique huile de bonne
qualite pour les moteurs & 2 temps refroidis &
air specifiee pour les melanges & 40:1, Nous
recommandons I'huile Poulan/WEED
EATER, La proportion de melange est de 40
& 1 et est obtenue en utilisant 95 ml d'huile
par 4 litres d'essence sans plomb, Inclus
avec cette tronc onneuse est un recipient de 95
ml d'huile. Versez le contenu entier de ce
recipient dans 4 litres d'essence pour realiser
le melange approprie de carburant.
N'UTIUSEZ PAS d'huiles pour automobiles
ni pour bateaux, Elles peuvent endommager
le moteur, Lors du melange du carburant,
suivez les instructions imprimees sur le
contenant. Apres avoir ajoute I'essence,
secouez le contenant pendant un moment
pour vous assurer d'un parfait melange.
Avant de remplir votre appareil, lisez et
respectez toujours les regles de securite du
carburant,
45
Page 46

LUBRIFICATION DE LA CHAINE ET
DE LA BARRE
La barre et la cha_ne ont besoin de
iubrification continueIle. La lubrification est
fournie par un systeme de lubrification
automatique quand le reservoir d'huile est
maintenu rempli. Le manque d'huiie detruira
la barre et la chaine rapidement. Le manque
d'huile causera surchauffement qui se
pourra detecter par la fumee qui sort de la
chaine et/ou par la decoloratioe de la barre.
Quand la temperature est sous zero, I'huile
devient pIus epaisse, donc il faudra Ia diluer
avec un peu (5 a 10%) de gazole N° 1 ou
petrole. Uhuile de barre et cha_ne dolt courir
librement.
L'huile Poulan de barre et chaTee est
formuiee pour proteger votre appareil contre
ies deg&ts excessifs causes par la chaleur et
ia friction e telie resiste la perte d'epaisseur &
hautes temperatures. Si I'huile Poulan de
barre et chaine n'est pas disponible, utilisez
une bonne huile de la categorie SAE 30.
• N'employez jamais d'huiie usee.
• Arrdtez le moteur avant d'enlever les
bouchons.
IMPORTANT
IIa ete prouve que les carburants contenant
de I'alcool (ou utilisant de 1'dthanol ou du
metanol) peuvent attirer i'huimidite qui
entraine ie separation du carburant et la
formation d'acides durant le rangement. Le
gaz acidiques peuvent endommager le
dispositif du carburant d'un moteur. Pour
eviter les problemes de moteur, _edispositif
du carburant dolt 6tre purge avant de ranger
I'outil pendant 30 jours ou plus. Videz le
reservoir du carburant, faiter demarrer le
moteur et laissez-le tourner jusqu'& ce que
les tuyaux de carburant et le carburateur
soient vides. La saison suivante, utilisez du
carburant frais. Pour plus de details, voir la
section ENTREPOSAGE.
=I=
='_AVERTISSEMENT: La chaine ne
dolt pas &tre en mouvement Iorsque le
moteur est au ralenti. Si c'est le cas,
referez-vous #tla partie intitulee REGLAGE
DU CARBURATEUR dans ce mode
d'emptoi. Ne touchez pas le pot
d'echappement ; ceci pourrait resulter en
brQlure serieuse.
Pour arrdter le moteut, mettez I'interrupteur
ON/STOP en position ,,STOPm
Pout demarrer le moteur, tenez bien la
trongonneuse par terre comme illustre, La
chaine devra pouvoir tourner sans toucher
d'autres objets.
Utilisez entre 38 &45 cm (15 & 18
pouces) de corde par tentative.
Tenez bien la tron9onneuse en place Iors
de chaque tentative.
Poignee de la corde de demarreur
J(,_-.._-I la poignee
Pied darts la poignee arriere
RENSEIGNEMENTS IMPORTANTS
En tirant la corde, ne la tirez pas jusqu'au
bout. Ceci peut faire casser ia corde. Ne
laissez pas ia corde revenir vioiamment.
Tennez la poignee en laissant la corde
revenir doucement.
Lors d'un temps froid, demarrez votre
appareil avec I'etraegleur en position FULL
CHOKE. Laissez le moteur se rechauffer
avant de presser la g&chette d'acelerateur.
REMARQUE: N'utilisez pas pour couper le
materiel quand le ievier de I'etraegleur/du
ralenti rapide est en position ,,FULL CHOKE,_.
RENSEIGNEMENTS UTILES I
Si vous ne reussieeez pas I
& faire demarrer votre mo- I
_} teur apres avoir suivi ces I
instructions appelez le
-800-554'-6723. I1
i
D#MARRAGE D'UN MOTEUR
FROID (ou d'un rnoteur apres
epuisernent du carburant)
REMARQUE: Pour les etapes suivantes,
le juste reglage s'engage automatiquement
quand le levier de I'etraegleur/du ralenti
rapide est mis au maximum.
INTERRUPTEUR ON/STOP
(VUE DE PROFIL)
STOP
]. Mettez I'ieterrupteur ON/STOP en
position _,0 N,>.
2. Tirez le levier de I'etrangleur/du ralenti
rapide au maximum (dans la position
,,FULL CHOKE_>).
3. Pressez lentement 6 fois la poire
d'amorcage.
4. Avec la main droite, tirez rapidement la
corde de demarreur 5 fois. Puis,
procedez & 1'dtape suivante.
REMARQUE: Si le moteur pourrait sembler
essayer de demarrer avaet 5eme tirage, arrdt
tiraet et procedez immediatement & I'etape
suivaete.
46
Page 47

5. Mettez le levier de l'etrangteur/du ralenti
rapide dans la position ,,HALF CHOKE,,.
LEVIER DE L'I_TRANGLEUR/
DU RALENTI RAPIDE
(VUE DE PROFiL)
l'etrangleur/ OFF HALF FULL
du ralenti rapide
6. Avec la main droite, tirez rapidement la
corde de demarreur jusqu'b, ce que le
moteur demarre.
7. Laissez le moteur tourner au ralenti
acc6Iere pendant 5 secondes. Apres,
pressez la g&chette d'acelerateur puis
I&chez-la pour que le moteur tourne au
ralenti normal.
DleMARRAGE D'UN MOTEUR
CHAUD
1. Mettez I'interrupteur ON/STOP en
position _.ON_.
2. Tirez le levier de retrangleur/du ralenti
rapide dans la position ,,HALF CHOKE_..
3. Pressez lentement 6 fois la poire
d'amorgage.
4. Avecla main droite, tirez rapidement la
corde de demarreur jusqu'& ce que le
moteur demarre.
5. Pressez la g&chette d'acelerateur puis
I&chez-la pour que le moteur tourne au
ralenti normal.
DIFFICULTES DE DI_MARRAGE (ou
d'un moteur noye)
IIest possible que le moteur soit noye s'il n'a
pas demarre apr', 10 tentatives.
Pour vider un moteur noye, mettez le levier
de l'_,trangteur/du ratenti rapide en
compl_,tement (dans la position ,,OFF
OHOKE_) et puis suivez les consignes
indiquees pour un moteur chaud. II faut que
l'interrupteur ON/STOP soit en position
,,ON,_.
Si le moteur est extr6ment noye, il faudra
peut-6tre plusieurs tentatives. Si le moteur
ne demarre toujours pas, voyez le
TABLEAU DE DEPANNAGE ou appelez au
numero 1-800-554-6723.
FREIN DE CHAiNE
AVERTISSEMENT: si lecollierde
frein de chaTne est use, il peut se casser
Iorsque le frein de chaine est active,. Si le
collier de frein est defectueux, le frein de
chaine n'arr6tera pasta chaTne. La collier de
frein devrait &tre remplacee par un
distributeur autorise de service si n'importe
quelle pattie est usee moins de 0,5 mm
(0,020 pouce) d'epaisseur. Sur un frein &
chaines devraient 6tre d_,pannes par un
distributeur de service autorise. Prenez
votre unite & I'endroit de I'achat si achete
d'un distributeur de service, ou au marchand
principal autorise le plus proche de service.
• Cet appareil est fourni d'un frein de chaTne
congu pour arr6ter tacha_ne en cas de recul.
• Le frein de chaTne inertie-lance est
actionne si la protecteur de main est
pousse en avant, soit manuellement (& la
main) ou automatiquement (par le
mouvement soudain).
• Si le frein est dejb. actionne, on peut le
desactionner tirant te protecteur de main
vers I'anse d'avant autant que possible.
• Pour pouvoir couper avec la tronconneuse,
le frein dolt 6tre desactionne.
Desactionne _u_._.
Contr61e de la fonction de freinage
ATTENTION: Vous devez verifier le frein de
cha_ne plusieurs lois par jour. Le moteur dolt
tourner en executant ce procede. O'est le seul
exemple quand la sierra devrait _tre placee sur
la terre avec le fonctionnement de moteur.
Mettez ta tronconneuse sur un endroit
solide. Serrez la poignee arriere avec votre
main droite et la poignee avant avec votre
main gauche. Appliquez la vitesse
maximum en appuyant entierement le
gb.chette des gaz. Enclenchez le frein de
cha_ne en faisant tourner votre poignet
gauche contre le protege-main, sans I&cher
la poignee avant. La chaine devrait s'arr_ter
immediatement.
Verification de la force d'inertie
_f_'AVERTISSEMENT: Quand vous
faites ce qui suit, Ie moteur dolt 6tre arr6te.
Serrez la poignee arriere avec votre main
droite et ta poignee avant avec votre main
gauche. Tenez la tron9onneuse & environ 35
cm (14 pouces) au dessus d'une souche ou
d'un trongon ou de toute autre surface en bois..
Rel&chez votre prise sur la poignee avant et
utilisez le poids de la tron_onneuse laissez le
dessus du barre ta chute en avant et entrer en
contact avec le tron9on. Quand I'extremite de
la barre frappe le tronc on. le frein devrait lancer.
RENSEIGNEMENTS IMPORTANTS
• V_,rifiez la tension de la cha_ne avant la
premiere utilisation et apr_,s 1 minute de
travail. Voir TENSION DE LA CHAINE
dans MONTAJ E.
• Ooupez bois seulement. Ne coupez pas
m_,tal, plastique, magonnerie, materiaux
de construction qui ne sont pas bois, etc.
• Arr&tez I'appareil si la chaine touche unobjet
etranger. Paites une inspection de la
tronconneuse et reparez les pieces si
necessaire.
• Evitez que la cha_ne touche de ta salete ou
du sable. M6me un peu de salete
t'emoussera rapidement, ce qui accrottra
le risque de recul.
47
Page 48

• Coupezdesrondinspetits,enemployant
testechniquessuivantes,afindevous
habituer&I'utilisationdeI'appareiLavant
detenteruntravailimportant.
• Serrezi'acc61erateuretlaissezquele
moteuratteigneiavitessemaximum
avantdecommenceracouper.
• Commencezchaquecoupureavecle
cadredeI'appareilappuyesurlerondin.
• Maintenezle moteur& vitesse
maximumentoutmomentpendantque
vous6tesentraindecouper.
• LaissezqueI'appareilfasseletravail.
N'exercezqu'unepressiontreslegere.
• L&chezI'acc6ierateurdesI'instantoQ
vousacheveztacoupure,laissantle
moteurtournerauralentLSivouslaissez
tournertemoteur&vitessemaximum
sanscouper,I'apparei]pourrasubirdes
degb.tsexcessifs.Onluirecomrnande
quelemoteurpournepas6tre
fonctionnependantplusque30
secondes a la vitesse maximum.
• Afin d'eviter la perte du contr61e au
moment d'achever _a copure,
n'exercez pas de pression sur la
tronoconeeuse & ce moment.
• Arr6tez le moteur avant de poser I'appareil
sur la terre.
TECHNIQUES POUR ABATTRE
LES ARBRES
_AVERTISSEMENT: Verifiez les
branchements casses ou morts qui peuvent
tomber tout en coupant entraTnant des
dommages serieux. Ne coupez pas pres de
b&timents ou de ills d'electdcite si vous ne
savez pas la direction dans laquelle I'arbre
va tomber, ni de nuit non plus, parce qu'il n'y
pas visibilite suffisante, ni avec mauvais
temps tel que la pluie, la neige, ou ies vents
forts parce qu'il est difficile dejuger oQI'arbre
va tomber, Si I'arbre touche &tout fil electrique,
vous devez en aviser immediatement la
compagnie de services publics.
• Planifiez soigneusement & I'avance votre
travail de coupe.
• Degagez I'aire de travail, II vous faut une
mire degagee tout autour de I'arbre oQvous
pourrez conserver un bon equilibre,
• L'utilisateur de latronoconneusedoit setenir
en amont du terrain, puisque I'arbre abattu
roulera ou gtissera vers le bas,
• Etudiez ies conditions natureHes qui
peuvent faire tomber un arbre dans une
direction particuliere,
Les conditions naturelles qui peuvent
determiner ia direction dans laquelle un
arbre va tomber comprennent:
• La direction et la vitesse des vents,
• Uinclination de I'arbre. Parfois eile n'est pas
evidente & cause de la pente. Employez un
fil & plomb ou equivalent pour determiner la
direction de I'inclination de I'arbre.
• Poids et branches d'un seul c6te.
• Les arbres et les obstacles autour de
l'arbre.
Verifiez s'il y a des elements pourris. Si
I'arbre est pourri ii peut casser net et tomber
dessus i'utilisateur.
Assurez-vous qu'ii y a de i'espace pour que
I'arbre tombe. Etablissez une distance
equivalente a deux Iongueurs et demi de
I'arbre entre celui-ci et la personne ou i'objet
plus proche. Le bruit du moteur peut
masquer votre avis crie.
Enlevez la poussiere, les pierres, ecorce
libre, clous, agrafes, et fil de cuivre de I'arbre
que I'on va couper.
Ptanifiez une vole d'acces claire de retraite &
I'arriere et & la diagonale & la ligne de la chute.
_, Planifiez une vole
"_°e_ d'acces claire de retrait
;_.... {r-_.._m),. Direction
" _ de chute
45 ° /
"_/,e¢
#.,_€,%"
POUR ABATTRE DE GRANDS
ARBRES
(Diametre de 15 ore. ou p_us large)
La methode de i'entaille est employee pour
abattre des arbres grands. On coupe une
entaille du c6te de I'arbre vers iequel on
desire que i'arbre tombe. Apres avoir fait une
coupure de chute de I'autre c6te, I'arbre aura
la tendance de tomber vers I'entailie.
REMARQUE: Si I'arbre a de grosses
racines de contrefort, enlevez-ies avant de
faire I'entaiile, Si & I'aide de ia tron_onneuse
pour retirer des racines de contrefort, emp&che
la chatee d'entrer en contact avec la terre pour
emp6cher la chaine de devenir emoussee,
COMMENT FAIRE L'ENTAILLE ET
ABATTRE L'ARBRE
• Faites I'entaille coupant tout d'abord la
pattie superieure, Coupez jusqu'& 1/3 du
diametre de I'arbre, Puis completez
i'entaille coupant ia partie de bas, Voir
l'illustration. Apres avoir complete le
coupage, enlevez i'entaille de i'arbre.
Coupure finale (coupure de
chute) ici, & 5 cm (2 pouces) plus
haut que le centre de I'entaille
5 cm I /
Premiere coupure , _ I /
"-,J,-'! ',"-I/
• Apres avoir enleve le bois de I'entaille, faites
la coupure de chute de I'autre c&te de I'arbre.
Faites une coupure a 5 cm (2 pulgadas) plus
haut que le centre de I'entaille. IIrestera bois
48
Page 49

suf%ant sans couper entre la coupure de
chute et I'entaille pour former un goed, qui
aidera a. eviter que I'arbre tombe en une
direction erronee.
Le gond maintient I'arbre sur la
souche et aide a contr61er la chute
Ouverture de
la coupure
de chute
Uentaille
ferme
REMARQUE: Avant d'aehever la coupure
de chute, employez des cales pour ouvrir la
coupure si necessaire afin de contrSler la
direction de chute. Employez des cales en
plastique ou en bois, mais jamais en acier ou
en fer, afin d'eviter de recul et des deg&ts a.la
cha_ne.
• Soyez attentif aux signes qui indiquent
que I'arbre est pr6t &tomber: des bruits de
bois. la coupure de chute devient plus
grande, ou mouvement darts les branches
les plus hautes.
• Des le moment que I'arbre commence la
chute, arr6tez le tronconneuse, laissez-la
sur la terre et sortez par la route de retraite
pre-etablie.
• Afin d'eviter des blessures, NE COUPEZ
PAS les arbres incompletement tombes
avec la trongonneuse. Soyez extr&ment
soigneux avec les arbres qui ne tombent pas
completemeet parce qu'il peuvent avoir un
support tres precaire. SiI'arbre ne tombe pas
compIetemeet, laissez la tronconneuse de
c6te et employez un treuiL une moufle ou un
tracteur pour aoheveit
COMMENT COUPER UN ARBRE
TOaBle
(TRON(_ONNAGE)
Tronconnage est te terme utilise pour la
coupe d'un arbre tonbe en bOches de la taille
desiree.
_l_ AVERTISSEMENT: Ne restez pas
debout sur t'arbre que vous 6tes en train de
couper. N'importe quelie partie du rondin
peut rouler et vous pourrez tomber. Ne
restez pas debout sur une pente ptus bas
que le rondin qu'on est en train de couper.
RENSEIGNEMENTS IMPORTANTS
• Ne coupez qu'un rondin & la fois.
• Prenez garde quand vous coupez du bois
bris& L'appareil pourrait jeter des
morceaux tranchants vers l'utilisateur.
• Employez un chevalet pour sectionner
des rondins petits. Ne permettez jamais
qu'une autre personne serre le rondin
pendant que vous ooupez et ne serrez
jamais de rondin avec le pied ou la jambe.
• Ne coupez pas dans une aire oQ des
rondins, des branches et des racines sont
entass@es. Avant de les couper, deplaces
les rondins pour les mettre dans une aire
d@gagee.
TYPES DE COUPURES EMPLOY¢:S
POUR TRON(_ONNAGE
_L, AVERTISSEMENT: si la
trongonneuse reste attrapee dans un rondin,
ne tentez pas tirer pour I'enlever. Vous
pourriez perdre le contr61e de la
tronconneuse et subir des blessures et/ou
des dommages a I'appareil. Arr6tez
I'appareil. martelez une cale en plastique ou
bois dans la coupure jusqu'& ce que vous
pouvez enlever I'appareil facilment. Mettez
la trongonneuse en marohe encore une fois
et entrez dans la coupure avec beaucoup de
soin. Ne tentez jamais mettre I'appareil en
march quand il est pris darts un rondin.
Utilisez un cale pour enlever une
trongonneuse pinc6e
Arretez la tron_onneuse et martelez une
cale en plastique ou bois pour ouvrir la
coupure.
Coupe par le dessus - du c6te de haut
avec le cadre de rappareil appuye contre le
rondin, et descendent. Employez une
pression tres legere vers le sol.
Coupe par le dessus
Coupe par le dessous
Coupe par le deasous - pour faire une
entailte en partant du bas, vous devez
couper le bas de la grume avec le haut de
votre tronconneuse. Utilisez une pression
legere vers le haut. Tenez bien votre
tronconneuse et contrSlez-ta bien. Votre
tronconneuse aura tendance & revenir vers
vous pendant la coupe.
_ AVERTISSEMENT: N'inversez
jamais la trongonneuse pour effectuer une
coupure assendante. L'appareil ne peut pas
&tre contrSle de cette fagon.
Faites toujours votre premiere coupure du
cSte de compression du rondin. Le cSte de
compression du rondin est oQla pressien du
poids du rondin est concentree.
Premiere coupure du cote de
compression du rondin
Deuxieme coupure
49
Page 50

PremiX, re coupure du cote de
compression du rondin
COMMENT TRON(_ONNAGE SANS
SUPPORT
• Faites une coupe par le dessus jusqu'&
1/3 du diam_,tre du rondin.
• Faites rouler le rondin et inversez sa
position, finissant par une seconde coupe
par le dessus.
• Faites attention speciale aux rondins qui
ont un c6te dec compression afin d'eviter
que ia barre reste prise darts la coupure
(illustrations ci-dessus de cette coupe).
COMMENT TRON(_ONNAGE
UTILISANT UN RONDIN OU UN
CHEVALET
• N'ouMiez pas que votre premiere coupe
est toujours sur le c6te de compression de
ia rondin. (Voir 1_,re et 2ieme coupes dans
rillustrations ci-dessous).
• Votre premiere coupe devrait 6tre de 1/3
du diametre de la rondin.
• Terminez par votre seconde coupe.
Utilisation d'un rondin pour le support
1_,re coupure
Utilisation d'un stand de support
2eme coupure
_re coupure
_lere coupure
/
COMMENT COUPER DES
BRANCHES ET TAILLER
_k, AVERTISSEMENT: Garde contre
le recuL Ne permettez jamais que la chaine,
etant en mouvement, touche n'emporte quel
objet &pointe de la barre pendant couper des
branches et tailler.
_AVERTISSEMENT: Ne grimpez
jamais aux arbres couper branches ou
tailler. N'empioyez pas de plate-formes,
echelles, rondh_s ou n'importe quel
superficie pas stable. Vous pourriez perdre
I'equilibre ou le contr61e de la tron9onneuse.
RENSEIGNEMENTS IMPORTANTS
• Travaillez lentement, en maintenant les
deux mains fermement saisies sur la
trongonneuse. Conservez un bon
_,quiiibre.
• Observez dehors pour des branches
petits. Les branches petites fines peuvent
s'attraper contre la chaine et battre
l'utilisateur ou le tirer et faire perdre
r_,quilibre. Prenez garde aux branches
petites et employez extr6me caution.
• Prenez garde a la reaction de branches
pliees ou sous pression. Evitez &tre battu
par les branches ou l'appareil quand la
tension dans tes fibres est liberee.
• Debarrassez-vous des branches tombees
fr_,quemment afin d'eviter les chutes.
POUR COUPER LES BRANCHES
• Coupez toujours les branches apr_,s que
I'arbre est tomb& C'est seulement ainsi
que I'on peut couper les branches avec
securite.
• Laissez ies branches les plus grandes
sous I'arbre tombe le supporter pendant
que vous travaillez.
• Commencez & la base de I'arbre et
travaiHez vers le haut, coupant les
branches. Enlevez les branches bien
petites d'une seule coupore.
• Toujours que possible, maintenez I'arbre
entre vous et la chaine.
• Enlevez les branches plus grandes avec
la techniques decrites dans la section
precedente COMMENT TRON_ON-
NAGE SANS SUPPORT.
• Employez toujours une coupe par le dessus
en eoupant des branches petites et celles
qui pendent librement. Les coupures
ascendantes pourraient faire que les
branches tombent et serrent la chaine.
POUR TAILLER
_i, AVERTISSEMENT: Netafllezque
les branches qui sont & la hauteur des
epaules et plus bas. Pour les autres,
contratez un professionnel.
• Faites la premiX, re coupure 1/3 du
diam_,tre, commenc ant d'en bas.
• Puis faites une deuxi&,me coupure
completement b. travers la branche.
Achevez avec une troisieme coupure,
descendante, pour laisser un col de 3 &5 cm
(1 & 2 pouces) du trone.
50
Page 51

Deuxieme coupure
Troisieme cou'p(Jre
oo!
_ AVERTISSEMENT: Debranchez
toujours tefil de ta bougie quand vous ferez des
reparations, sauf les reglages de carburateur.
Nous recommandons que tout service et
reglage pas decrits dans ce manuel soient
effectues par un distributeur autorise de
service.
RENSEIGNEMENTS UTILES
_) IMPORTANT : Faites ef-
fectuer toutes les repara-
tions autres que les op#ra-
tions d'entretien recom-
mand#es dans le manuel
d'instructions par un distri-
buteur autoris# de service.
Si un r#parateur qui n'est pas un distribu-
teur autoris# fait des r#parations sur rap-
pareil, Poulan ne paiera pas les r#para-
tions sous garantie. Vous #tes respons-
able d'entretenir et de faire I'entretien g#-
n#raf de votre appareil.
ENTRETIEN
Verifiez:
Niveau du Carburant ... Avant chaque
utilisation
Lubrification de la Barra Avant chaque
utilisation
Tension de la Cha'_ne ... Avant chaque
utilisation
Tranchant de ]a chaTne Avant chaque
utilisation
Pieces Endommagees .. Avant chaque
utilisation
Bouchons L&ches ...... Avant chaque
utilisation
Fermoirs L&ches ....... Avant chaque
utifisation
Pieces L&ches ........ Avant chaque
utilisation
Faire Inspection et Nettoyer:
Barre ................ Avant chaque
utifisation
Appareil complet ....... Apres chaque
utiHsation
Filtre d'Air ............ Chaque 5
heures*
Freie de cha_ne ........ Chaque 5
heures*
Ecran pare-etincelles
et silencieux .......... Chaque 25
heures *
Remplacer Is bougie .. Aenueltement
Remplaeer le filtre de
carburant ............ Aenuellement
• Heures d'utiiisation
Chaque heure d'operation est
approximativement 2 reservoirs de
carburant.
FILTRE D'AIR
ATTENTION: Ne nettoyez pas le filtre en
essence ni aucun autre soivant combustible,
afin d'eviter ia creation du danger d'incendie
ou de production de vapeurs evaporatives
nuisibles.
Comment Nettoyer le filtre d'air:
Un filtre & air saie nuit & la duree et & la
performance du moteur et augmente la
consommation de carburaet et ies
echappemeets nocifs. Nettoyez toujours votre
filtre & air apres 10 remplissages du reservoir
de carburant ou 5 heures d'uti]isation, seloe la
premiere de ces eventuafites. Nettoyezqe plus
souvent si vous travaillez dans des endroits
poussiereux. Un filtre & air usage ne peut
jamais 6tre bien nettoye et il est recommande
de remplacer le filtre & air apres 50 heures
d'utilisatioe ou chaque annee, selon la
premiere de ces eventualites.
1. Desserrez les 3 vis de la calotte du
cyfindre.
2. Enlevez la calotte du cylindre.
3. Enlevez le filtre & air.
4. Nettoyez le filtre a. air avec de I'eau
savonneuse chaude. Rincez-le & I'eau
froide et propre. Laissez-le secher
completement & Fair avant de le
reinstaller.
5. Pour ameliorer son efficacit& graissez
legerement le filtre & air avant de I'instaHer.
Utilisez de i'huile pour moteur 2-temps
(SAE 30). Pressez le filtre pour en enlever
I'excedent d'huile.
6. Reinstaliez le filtre & air.
7. Reinstaliez la calotte du cylindre et les 3
vis. Serrez solidement.
\'_ ----,:,_'_:_" _¢c_uverClere
'oy,ind
,. j--'_2," G
i___Couvercle
__cylindre
SILENCIEUX ET ECRAN DU
PARE-ETINCELLES
_1_AVERTISSEMENT: Lesilencieux
sur ce produit contient des produits
chimiques connus de I'etat de la Californie
pour causer le cancer.
Durant I'utifisation de I'outiL des dep6ts de
carbone se ferment sur le silencieux et le
51
Page 52

pare-etincetles et doivent 6tre enleves pour
eviter le risque d'incendie et une mauvaise
performance du moteur. S'it se brise,
remplacez I'ecran pare-etincelles.
NETTOYAGE DE L'ECRAN DU
PARE-ETINCELLES
Ce nettoyage doit _tre fait toutes les 25
heures d'utitisation ou chaque annee, selon
la premiere de ces eventualites.
G io rtie e
Silencieux
1 Esrous u
P,aq,ue 7 /
arriere Joint de _..._.._
SilencieUXcouv erc,e_ _ %
de la vis Ecrou de
Blocage
1. Desserrez et enlevez I'ecrou de blocage
du couvercle de la vis.
2. Enlevez le couvercle de la vis.
3. Desserrez et enlevez les deux vis du
silencieux. Enlevez lesilencieux, lejoint
de silencieux, le guide de sortie etla
plaque arriere. Prenez note de
I'assemblage pour plus tard.
4. Trouvez les deux vis du couvercle de
sortie sur le silencieux. Desserrez et
enlevez les deux vis.
5. Enlevez le couvercle de sortie.
Vis
Couvercle de VUE ARRIERE
sortie DU SILENCIEUX
Silencieux
Ecran
Pare-etincelles
6. Enlevez I'ecran pare-etincelles.
7. Nettoyez I'ecran pare-etincelles avec une
brosse metallique. Remplacez I'ecran si
des ills de fer sont casses ou si I'ecran est
bloque malgre votre nettoyage.
8. ReinstaUez I'ecran pare-etinceUes.
9. Reinstaltez le couvercle de sortie et les
deux vis. Assurez-vous que le
couvercle de sortie et les deux vis soient
bien remis en place (voir I'illustration)
pour ne pas endommage la
tronconneuse. La sortie d'echappement
dolt faire face au frein de chaSne (c6te du
barre-guide) de la tronconneuse.
Sortie _ Couvercle de sortie
d'echappe- _ _-_.._ _
ment _._
La sortie d'echappement doit faire
face au frein de chaTne (c6te du
barre-guide) de la tronconneuse.
10. Inspectez le joint de silencieux et
remptacez-le s'il est endommage.
11. Reinstallez la plaque arriere, le guide de
sortie, le joint de silencieux et le
silencieux a Faide des ecrous du
silencieux. Serrez bien.
12. Reinstallez le couvercle de la vis et
• I'ecrou de blocage. Serrez solidement.
REGLAGE DU CARBURATEUR
_,AVERTISSEMENT: Durant la plus
grande partie de ce travail, la chaine
tournera. Portez votre equipement de
protection et suivez toutes les regles de
securite. La cha_ne ne dolt pas bouger
quand le moteur est au ralenti.
Le carbureteur a ete soigneusement regle &
I'usine, mais des reglages peuvent &tre
requis si vous remarquez ce qui suit :
• La cha_ne bouge quand le moteur est au
ralenti. Voir RALENTI-T procedure de
reglages.
• La tronconneuse refuse de tourner au
ralenti. Voir RALENTI-T procedure de
reglages.
Ralenti-T
Permettez au moteur de tourner au ralenti.
Si la chaine bouge, te ratenti est trop rapide.
Si le moteur s'arr6te, le ralenti est trop lent.
Ajustez la vitesse jusqu'& ce que le moteur
tourne sans mouvement & chaine (ralenti
trop rapide) ou s'arr6ter (ralenti trop lent). La
vis au ralenti se trouvent juste au dessus de
la poire d'amor9age et est marquee T.
• Toumez la vis du ralenti (T) dans te sens de
i'horloge pour augmenter la vitesse du
moteur.
• Tournez la vis du ralenti (T) dans le sens
contraire de I'horloge pour baisser la
vitesse du moteur.
Si vous avez besoin d'aide ou n'6tes pas
sOt(e) de pouvoir bien faire ce travail,
contactez un distributeur autorise de service
ou appetez au 1-800-554-6723.
MAINTIEN DE LA BARRE
Si votre appareil coupe vers le c6te, s'il est
necessaire de le forcer afin de completer la
coupure, ou s'il a ete utilise avec une
quantite insuffisante de lubrification, il sera
peut-etre necessaire de faire un service de
la barre. La barre usee peut endommager la
cha_ne et rendre le coupage difficile.
Apres chaque utilisation, assurez-vous le
interrupteur ON/STOP est en position
-STOP,_, puis enlevez la sciure de la
barre-guide et de trou du pignon.
52
Page 53

Pour maintien de la barre-guide:
• Mettez I'interrupteur ON/STOP en position
<,STOP...
• Desserrez et entevez la ecrous de la frein
de chatne et la frein de chatne. Enlevez la
barre et chaine de la tronconneuse.
• Enlevez la rainure de la barre et la trous de
huilage apres toutes les 5 houres de la
utilisation.
Vis
bougie
Bouc
Calotte du
Enlevez la sciure de la
rainure de la barre-guide
\
a_ Trous de lubrification o
• Un ebarbage des glissieres de la
barre-guide est normal Enlevez-le avec
une lime plate.
• Quand le haut de la glissiere est inegal,
utilisez une time plate pour redonner un
bord bien droit au bout et aux c6tes.
']'_ Limez les _ FU ]
bords et les
c6tes en carre
Rainure usee Rainure comme
elle doit &tre
Rempiacez ia barre-guide quand la glissiere
est usee, quand ia barre-guide est tordue ou
craquelee ou quand un trop grand
echauffement ou ebarbage des glissieres se
produit. Si vous devez remplacer la
barre-guide, n'utilisez que cefle qui est
specifiee pour votre tronponneuse dans la liste
de pieces ou sur le decalque de la
tronconneuse.
AIGUlSEMENT DE LA CHAINE
L'aiguisement de la chatne est un precede
compfique qui exige des outils speciaux.
Nous vous recommandons de faire faire
i'aiguisement chez un professionnel.
TEMPS D'ALLUMAGE
L'allumage est fixe et non-reglable.
REMPLACEMENT DE LA BOUGIE
La bougie doit _tre remplacee chaque annee
pour vous assurer que le moteur demarre
plus facilement et fonctionne mieux.
1. Desserrez les 3 vis de la calotte du
cylindre.
2. Enlevez la calotte du cylindre.
3. Enlevez la bougie de son puit.
4. Enlevez la bougie du cyiindre et
jettez-la.
5. Remplacezqa par une bougie Champion
RCJ- 7Y et serrez-la avec une cle a.tube
de 19 mm (3/4 pouce). Serrez
solidement. Uecartement doit 6tre de 0.6
mm (0,025 pouce).
6. Reinstallez le puit de la bougie.
7. Reinstaliez la calotte du cylindre et les 3
vis. Serrez solidement.
ENTREPOSAGE
,_AVERTISSEMENT: Arr&tez le
meteur et laissez-le refreidir, et verifiez que
tout est bien attache, avant de mettre
I'appareil en entreposage ou de le
transporter dans un vehicule. Gardez
I'appareil et ie carburant darts un endroit
eOles vapeurs du carburant ne puissent pas
atteindre des etincelles eu des flammes des
chaffeures d'eau, les moteurs et les
interrupteurs electriques, chauffage central,
etc. Gardez I'appareil avec teus les
protecteurs & leur place. Placez-ie de facon
que personne ne puisse se Messer
accidentalement, et hors de la pertee des
enfants.
• Avant de garder, versez tout le carburant
de I'appareil. Mettez le moteur en marche
et laissez-le tourner jusqu'& ce qu'il
s'arr_te tout seuL
• Nettoyez I'appareii avant de le garder.
Faites attention specialement aux
bouches d'entree d'air et maintenez-les
d6barrassees de dechets. Employez un
detergent leger et une eponge pour le
nettoyage des surfaces en plastique et les
etiquettes.
• Rangez le tronconneuse et le carburant
dans un endroit bien aere oQ les vapeurs
d'essence ne peuvent pas atteindre
d'etincelles ou de flammes nues de
chauffeau, de moteurs ou d'interrupteurs
electriques, de foumaises, etc.
• Rangez bien ie tronconneuse hors de
portee des enfants.
RENSEIGNEMENTS UTILES
Quand vous conservez un
melange d'huile et d'ess-
ence, I'huile se separe de
I'essence avec le temps.
Nous vous recommandons
de secouer le bidon cha-
que semaine pour assurer
un bon melange de !'hu lie
et de l'essence.
ATTENTION: II est tres important d'6viter
la formation de dep6ts de gomme dans les
pieces essentieltes du systeme de
carburation, tefies comme le carburateur, le
filtre de carburant, la ligne de carburant et le
reservoir de carburant pendant
I'entreposage. Les carburants m&les avec
I'alcooi (dits "gasohol" e aussi ethanol, ou
methanol) peuvent attiror I'humidite. qui
ontraine une separation du carburant et la
formation d'acides, durant I'entreposage. qui
peuvent nuire le moteur.
53
Page 54

VOUS AVEZ BESOIN D'AIDE?
Telephonez au 1-800-554-6723,
VOUS AVEZ BESOIN D'UNE PIECE
DE RECHANGE?
Mettez-vous en rapport avec votre
disttibuteur autorise de service.
TABLEAU DE DEPANNAGE
_ AVERTISSEMENT: arr_tez _'unite et debranchez la
Toujours bougie d'allumage
avant d'executer tout le recommande ci-dessous excepte les remedes qui exigent
fonctionnement de appareiL
PROBLF:ME CAUSE REM_:DE
Le moteur
ne demar-
rer pas ou
Re tourne
que queF
ques
instants
apres le
demarrage.
1. Interrupteur sur art&t.
2. Moteur noye.
3. Reservoir d'essence vide.
4. La bougie ne fait pas feu.
5. Le carburant n'atteint pas le
carburateun
1.Mettre i'interrupteur sur mise en
route (ON).
2.Voir "Instructions de demarrage".
3. Remptir ie reservoir du bon
melange de carburant.
4. Poser une nouveIle bougie.
5.Voir si le filtre & essence est sale.
Le remplacer. Voir si le tuyau
d'essence est entortille ou brise.
Reparer ou remplacer.
1.Voir "Reglage du carburateur"
dans la section Service.
2.Contactez un disttibuteur autorise
de service.
1.Nettoyer ou remplacer le filtre & air.
2. Nettoyer ou remplacer la bougie et
regler I'ecartement.
3. Desactionne le frein de chaTne.
4.Contactez un disttibuteur autorise
de service.
Le moteur 1. Reglage du ralenti requise.
ne tourne
pas bien au 2. Le carburateur exige un reglage.
ralenti.
Le moteur 1. Fiitre & air sale.
refuse d'ac- 2. Bougie encrassee.
celerer,
manque de 3. Le frein de cha_ne est actionne.
puissance 4. Le carburateur exige un reglage.
ou meurt
sous la
charge.
Le moteur 1. Melange de carburant incorrect. 1. Vider le reservoir du carburant et le
fume exces- remplir du bon melange.
sivement.
Au ralenti, 1. Reglage du ralenti requise. 1. Voir "Reglage du carburateur"
la chaTne dans la section Service.
bouge. 2. Reparation de l'embrayage 2. Contactez un distfibuteur autorise
requise, de service.
Poulan garantit & I'acheteur d'origine que
chaque trongonneuse & essence neuve de
marque Poulan ne presente aucun defaut
materiel ou de fonctionnement et convient de
reparer jou de remplacer sous cette garantie
tousles produits ou accessoires a essence
defectueaux& partir de la date d'achat
originale comme suit :
1 AN - Pieces et main d'oeuvre, si utilis6e
dans des buts domestiques.
60 JOURS - Pieces et main d'oeuvre, si
utiiisee dans des buts commerciaux,
professionnels ou pour la generation de
revenus.
30 JOURS - Pieces et main d'oeuvre, si
utilisee dans des buts de location.
Cette garantie n'est pas transferable et ne
couvre pas les dommages et la responsabilite
resultant d'un mauvais usage, d'un mauvais
entretien de I'outil, ni de I'utilisation
d'accessoires et/ou de necessaires qui nesont
pas specifiquement recommandees par
Poulan pour cette trongonneuse. De plus,
cette garantie ne couvre pas les dommages
resultant d'un mauvais usage, d'un mauvais
entretien de I'outil. ni des modifications faites &
la tronconneuse qui. & notre avis. alterent sa
condition ou son fonctionnement. Cette
garantie ne couvre pas les reglages, les
bougies, les filtres, les cordes du starter, les
ressorts du starter. I'aiguisement de ta cha_ne,
les barres, les chaines et les autres pieces qui
54
Page 55

s'useront et exigeront un remplacement suite &
un usage raisonnabte durant la periode de
garantie. Cette garantie ne couvre pas le
reglage d'avant la livraison, I'installation du
guide & barre et de la chatne, ni les reglages
normaux expliques darts le manuel
d'instructions, par exemple le regige du
carburateur et de la tension de la chatne. Cette
garantie ne couvre pas les frais de transport.
CETTE G ARANTIE VOUS DONNE DES
DROITS LEGAUX SPECIFIQUES ET VOUS
POURRIEZ AVOIR AUSSI D'AUTRE,S
DROITS QUI VARIENT D'UN ETAT A
L'AUTRE.
AUCUNE R,EGLAMATION SE
RATTACHANT A DES DOMMAGES
INDIRECTS OU AUTRES NE SERA
ACCEPTEE ET IL N'Y A AUCUNE
GARANTIE EXPRESSE AUTRE QUE
CELLES STIPULEES ICI.
CERTAINS ETAINS NE PERMETTENT
PAS LES RESTRICTION DE LA DUREE
D'UNE GARANTIE IMPLICITE, NI
UEXCLUSION, NI LES RESTRICTIONS
QUANTAUX DOMMAGES INDIRECTS ET
LES RESTRICTIONS ET EXCLUSIONS
CI-DESSUS P,EUVENT DONC NE PAS
S'APPLIQUER A VOUS.
La philosophie de Poulan est de toujours
ameliorer ses articles et elie se reserve donc
le droit de modifier, changer ou discontinuer
les modeles, les concepts, les
caracteristiques et accessoires de tousles
articles, en tout temps et sans avis
prealable, ni obligations envers I'acheteur.
DROITS ET OBLIGATIONS DE VOTRE
GARANTIE: UAgence de Protection de
l'Environnement des E-U, California Air
Resources Board, Environnement Canada et
Poulan/WEED EATER ont te plaisir d'expliquer
la garantie du systeme de contr61e des
emissions sur votre petit moteur tout-terrain,
pour tes annees 2005 et plus tard. En
Californie, tousles petits moteurs tout-terrain
doivent 6tre con cus, construits et equipes de
maniere & se conformer aux normes severes
anti-smog de I'Etat. Poutan/WEED EATER
doit garantir le systeme de contrite des
emissions de votre petit moteur tout-terrain
pendant la periode indiquee ci-dessous, &
condition qu'i] n'y ait eu aucun mauvais
traitement, negligence ou mauvais entretien du
petit moteur tout-terrain. Votre systeme de
contrSle des emissions comprend des pieces
comme le carburateur et le systeme
d'atlumage. S'il se produit une panne couverte
par la garantie, Poulan/WEED EATER
reparera votre petit moteur tout-terrain
gratuitement pour vous. Les frais couvertes
par la garantie comprennent le diagnostic, les
pieces et la main-d'oeuvre. COUVERTURE
DE GARANTIE DU FABRICANT : Si une
piece relative aux emissions de votre moteur
(figurant sur la liste de pieces garanties &titre
du contr61e des emissions) est defectueuse ou
si un vice de materiau ou de main-d'oeuvre du
moteur occasionne la panne d'une piece
relative aux emissions, cette piece sera
changee ou reparee par Pqulan/WEED
EATER. RESPONSABILITES DE
GARANTIE DU PROPRIETAIRE : En qualite
de proprietaire du petit moteur tout-terrain,
vous &tes responsabte d'effectuer I'entretien
requis tel qu'indique dans votre manuel
d'instructions, mais Poulan/WEED EATER ne
peut annuler votre garantie uniquement parce
que vous n'avez pas conserve vos regus ou
parce que vous n'avez pas effectue tout
I'entretien prevu. En qualite de proprietaire du
petit moteur tout-terrain, vous devez realiser
que Poulan/WEED EATER peut vous refuser
de couvrir votre garantie si votre petit moteur
tout-terrain ou une piece de ce moteur tombe
en panne Ala suite d'un mauvais traitement, de
negligence, de mauvais entretien, de
modifications non approuvees ou & la suite de
I'utilisation de pieces qui ne sont pas faites ou
approuvees par le fabricant de materiel
original. Vous &tes responsable de presenter
votre petit moteur tout-terrain & un centre de
service autorise de Poulan/WEED EATER
aussit6t que se presente un probleme. Les
reparations couvertes par cette garantie
doivent 6tre terminees dans des detais
raisonnables, ne pouvant pas depasser 30
jours. Si vous avez des questions sur vos
droits et vos responsabilites en vertu de la
garantie, vous pouvez contacter votre centre
de service le plus proche ou appeler
PoulanAA/EED EATER au numero
1-800-554-6723. DATE DE DI_BUT DE
GARANTIE : La periode de garantie
commence & la date & taquelle vous avez
achete votre petit moteur tout-terrain. DUREE
DE COUVERTURE : Cette garantie est
valable pendant deux ans b. partir de la date
d'achat initial. OE QUI EST OOUVERT:
REPARATION OU REMPLACEMENT DES
PARTIES, La reparation ou le remptacement
de toute piece sous garantie sera effectuee
gratuitement pour le proprietaire de I'appareil
dans un centre de service approuve
Poulan/WEED EATER. Si vous avez des
questions sur vos droits et vos responsabilites
relativement & cette garantie, vous devez
cot_tacter votre centre de service autorise le
plus proche ou appeler Poutan/WEED EATER
au numero 1-800-554-6723. PERIODE DE
GARANTIE : Toute piece sous garantie qui ne
doit pas &tre remplacee pour un entretien
normal, ou qui doit seulement 6tre inspectee
regulierement pour voir s'il faut la reparer ou la
remplacer, est garantie pendant deux ans.
Toute piece qui dolt 6tre remplacee pour un
entretien normaI est garantie jusqu'& la date de
premier remplacement prevu.
55
Page 56

DIAGNOSTIC : Le proprietaire ne dolt pas
payer la main-d'oeuvre pour le diagnostic &
I'aide duquel on a determine qu'une piece sous
garantie est defectueuse si le travail de
diagnostic a ete effectue dans un distributeur
de service Poulan/WEED EATER.
DOMMAGES INDIREOTS : Poulan/WEED
EATER peuvent 6tre responsables de
dommages & d'autres elements de moteur
occasionnes par la panne d'une piece sous
garantie. CE QUI N'EST PAS COUVERT :
Toute panne occasionnee par un mauvais
traitement, la negligence ou un ma,uvais
entretien n'est pas co uverte. PIECES
AJOUTEES OU MODIFIEES : L'utilisation de
pieces ajoutees ou modifiees peut constituer
une raison d'annulation de reclamation en
vertu de la garaetie. Poulan/WEED EATER
n'est pas responsable de couvrir les paenes de
pieces sous garantie occasionnees par
l'utilisation de pieces ajoutees ou modifiees.
COMMENT REMPLIR UNE RECLAMATION
: Si vous avez des questions sur vos droits et
vos responsabilites de garantie, vous pouvez
coetacter votre centre de service le plus
proche ou appeler Poulan/WEED EATER au
numero 1-800-554-6723. OU OBTENIR LE
SERVICE EN VERTU DE LA GARANTIE :
Le service ou ies reparations en vertu de la
garantie sont offerts dans tousies centres de
service Poulan/WEED EATER. Appelez le
numero 1-800-554-6723_ ENTRETIEN,
RE_MPLAOEMENT Ot, I REPARATION DE
PIECES RELATIVES A L'EMISSION : Toute
piece de remp_acement approuvee
Poulan/WEED EATER utilisee dans
I'accomplissement de tout entretien ou
reparation en vertu de la garantie sur les pieces
relatives a.I'emission sera foumie gratuitement
au proprietaire si cette pierce est sous garantie.
LISTE DES PIECES (_ARANTIES
R,ELATIVES AU CONTROLE DES
EMISSIONS : Carburateur, systeme
d'allumage, bougie (couverte jusqu'b.la date de
remplacement pour I'entretien), module
d'aflumage, silencieux, y compris le catalyseur.
DECLARATION D'ENTRETIEN : Le
proprietaire est responsable d'effectuer tout
I'entretien requis tel qu'indique dans le manuel
d'instructions.
Les renseigeements figurant sur I'etiquette du produit iediquent pour quelles normes le
moteur est certifi& Exemple : (Annee) EPA Phase 1 ou Phase 2 et/ou CALIFORNIE.
Renseigeements importaets sur le
moteur, Ce moteur est oonforme
aux reglements sur les emissions
des petits moteurs hors route
Famille
N° De Serie
Heures de longevite du moteur
(emission)
Consultez le Guide d'instructions
afin de connaitre les specifications
relatives a I'entretien et aux reglages.
41 I GI I 81
Ce moteur est certifie se conformer aux regles d'emissions pour les usages suivants
[] Modere (50 heures)
[] Intermediaire (125 heures)
[] Etendu (300 heures)
56
 Loading...