

Poulan Pro 965899401 Assembly Instructions Manual
10
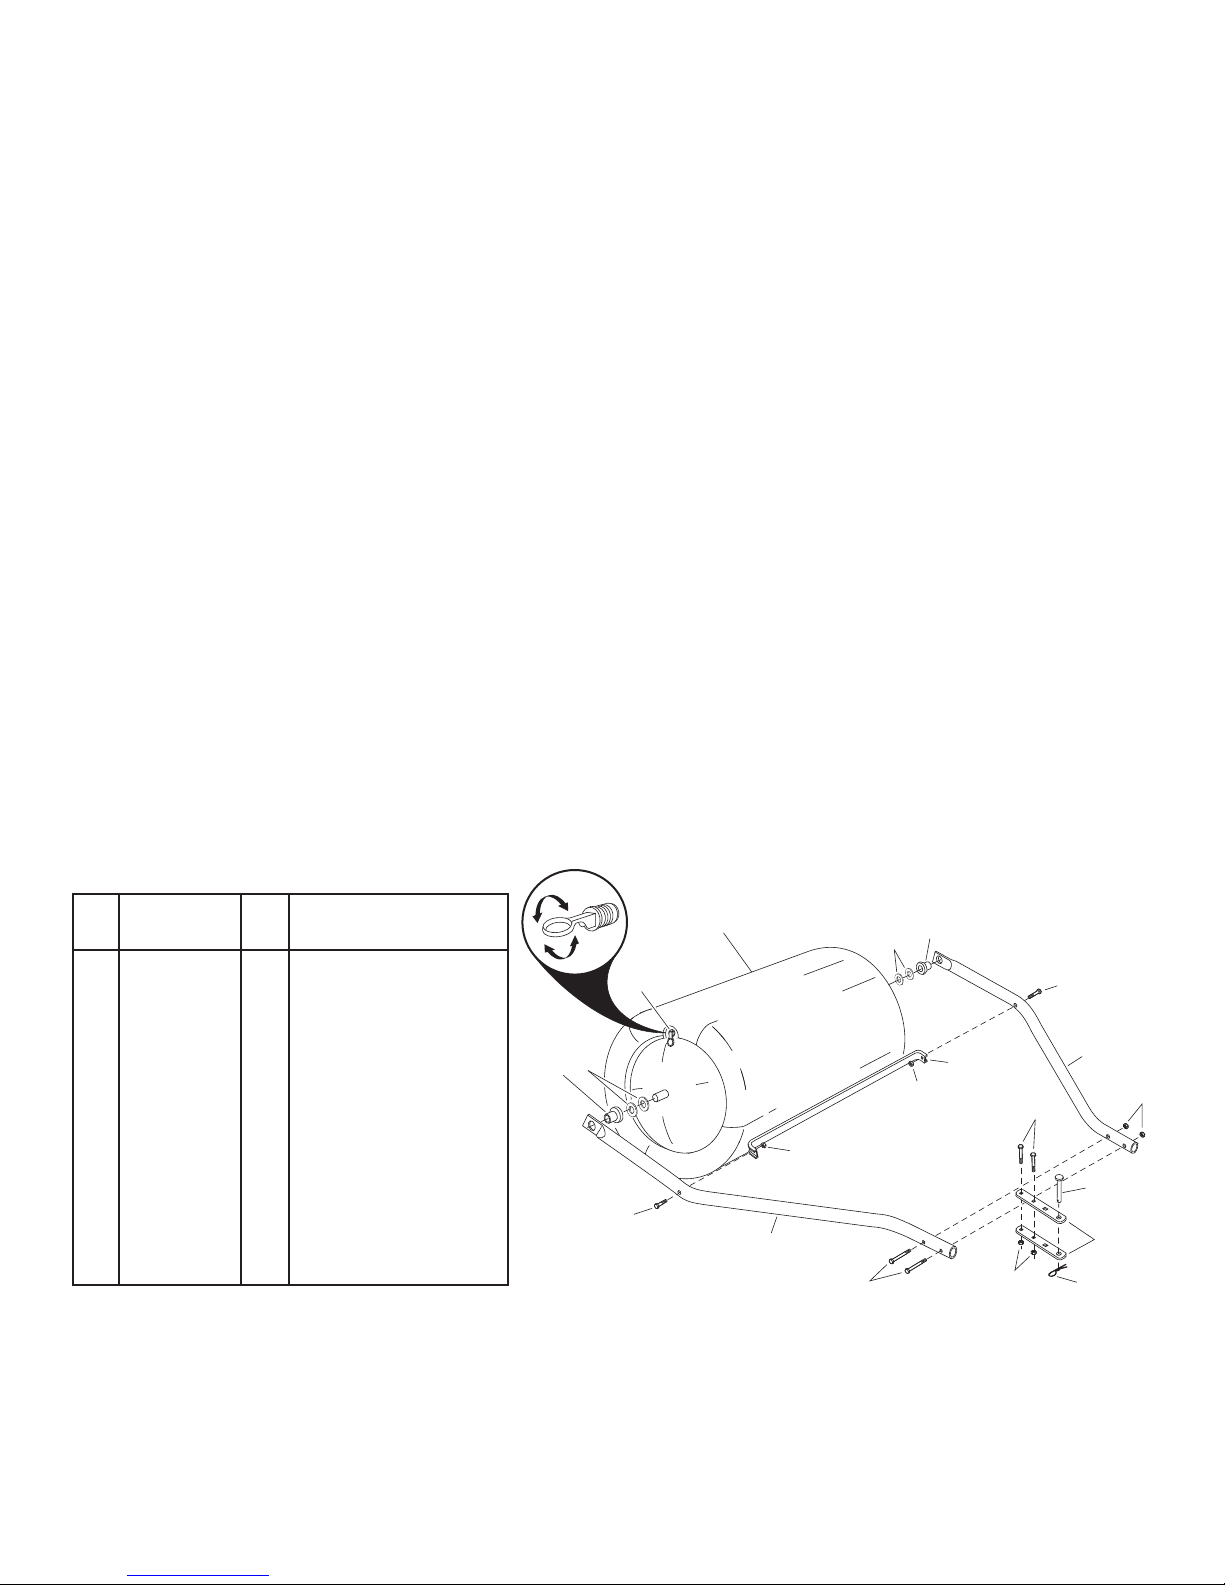
ASSEMBLY INSTRUCTIONS
INSTRUCCIONES DE ENSAMBLE
INSTRUCTIONS D’ASSEMBLAGE
NOTE: Do not tighten until all bolts
are assembled.
1. Assemble two washers (6)) onto
each end of the roller.
2. Assemble a flange bearing (5)
through each hitch tube (3) so
that the flange will face toward
the roller. (To assemble, you may
need to carefully tap against the
flange bearing with a block of
wood or a hammer.)
3. Place the hitch tubes (3) onto
both ends of the roller. Assemble
the scraper bar (2) to the hitch
tubes using two hex bolts (9)
and hex lock nuts (10).
4. A ssemble the hitch tubes (3)
together using two hex bolts (7)
and hex lock nuts (10).
5. Assemble the hitch brackets (4)
to the hitch tubes (3) using two
hex bolts (8) and hex lock nuts
(10). Tighten all bolts at this
time.
6. Adjust plug (11) size by twisting
handle. Lock plug in roller drum
by flipping handle down.
NOTE: No ajuste hasta que todas las
tuercas estén ensambladas.
1. Ensamble dos arandelas (6) sobre
cada extremo del rodillo.
2. Ensamble un rodamiento de bridas
(5) a través de cada tubo de
enganche (3) demanera que la brida
enfrente el rodillo. (Para ensamblar
usted puede tener que golpear
suavemente contra el rodamiento
de bridas con un bloque de madera
o martillo.)
3. Co l oque los tubos de enganche
(3) sobre cada extremo del rodillo.
Ensamble la barra raspadora (2)
a los tubos de enganche usando
dos tuercas hexagonales (9) y
contratuercas hexagonales (10).
4. Ensamble los tubos de enganche
(3) juntos usando dos pernos
hexagonales (7) y contratuercas
hexagonales (10).
5. Ensamble los soportes de enganche
(4) a los tubos de enganche (3)
usando dos pernos hexagonales (8)
y contratuercas hexagonales (10).
Ajuste todos los pernos en este
momento.
6. Ajuste el tamaño del tapón (11)
girando la manija. Asegure el tapón
en el tambor del rodillo moviendo la
manija hacia abajo.
REMARQUE : Ne pas serrer tant que tous
les boulons ne sont pas montés.
1. Monter deux rondelles (6) à chaque
extrémité du rouleau.
2. Monter un roulement à bride (5) dans
chaque tube d’attelage (3) de sorte que
la bride soit orientée vers le rouleau.
(Pource montage, il peut êtrenécessaire
de frapper doucement le roulement
à bride avec un bloc en bois ou un
marteau).
3. Placer les tubes d’attelage (3) sur les
deux extrémités du rouleau. Monter
la barre de raclage (2) sur les tubes
d’attelage à l’aide de deux boulons à
six pans (9 et écrous de blocage à six
pans (10).
4. Monter les tubesd’attelage (3) ensemble
à l’aide de deux boulons à six pans (7)
et écrous de blocage à six pans (10).
5. Monter les supports d’attelage (4) aux
tubes d’attelage (3) à l’aide de deux
boulons à six pans (8) et écrous de
blocage à six pans (10). Serrer tous les
boulons maintenant.
6. Réglez la taille du bouchon (11) en
tournant la poignée. Bloquez le bouchon
dans le rouleau en rabattant la poignée
vers le bas.
Ref.
No.
1 ——— 1 Roller Drum
2 522 75 07-01 1 Scraper Bar
3 522 75 09-01 2 Hitch Tube
4 522 75 10-01 2 Hitch Bracket
5 522 75 11-01 2 Bearing, Nylon Flange
6 522 75 12-01 4 Washer, 1.59 x 25/32
7 522 75 13-01 2 Hex Bolt, 5/16-18 x 3"
8 522 75 14-01 2 Hex Bolt, 5/16-18 x 2-1/4"
9 522 75 15-01 2 Hex Bolt, 5/16-18 x 1-3/4"
10 522 75 16-01 6 Hex Lock Nut, 5/16-18
11 522 75 17-01 1 Plug, Lawn Roller
12 522 75 18-01 1 Hitch Pin
13 522 75 20-01 1 Hair Cotter Pin, 3/32"
Part
No.
Qty.
Description
(Not sold separately)
1
11
6
5
10
9
3
7
5
6
9
2
10
10
3
8
12
4
13
 Loading...