

Poulan 545186755 User Manual
R
Please do not return unit to retailer.
Por favor, no devuelva el aparato al lugar de compra.
Veuillez ne pas retourner l’outil au détaillant.
1-800-554-6723
www.poulan.com
Instruction Manual
Manual de Instrucciones
Manuel d’Instructions
1420
1630
ENGLISH ESPAÑOL
WARNING:
Read and follow all Safety Rules and Operating Instructions before
using this product. Failure to do so can result in serious injury.
ADVERTENCIA:
Lea el manual de instrucciones y siga todas las advertencias e
instrucciones de seguridad. El no hacerlo puede resultar en lesiones
graves.
AVERTISSEMENT:
Lire le manuel d’instructions et bien respecter tous les avertissements et toutes les instructions de sécurité. Tout défaut de le faire
pourrait entraîner des blessures graves.
Poulan
1030 Stevens Creek Road
Augusta, GA 30907
850 Matheson Blvd. West
Mississauga, Ontario L5V 0B4
545186755 Rev. 2 3/15/09 BRW
Poulan
FRANÇAIS
SAFETY RULES
WARNING: When using electric
gardening appliances, basic safety precautions must always be followed to reduce the risk of fire, electric shock, and
serious injury. Read and follow all instructions.
WARNING: Always disconnect unit
from power source when making repai r s,
adjustments, and when changing accessories and attachments such as saw bar,
chain or guards.
Because a chain saw is a high-speed
woodcutting tool, special pr ecauti ons
must be observed to reduce risk of accidents. Careless or improper use of this
tool can cause serious injury.
PLAN AHEAD
S Restrict the use of your saw to adult
users who understand and can follow
the safety rules, precautions, and operating instructions found in this
manual.
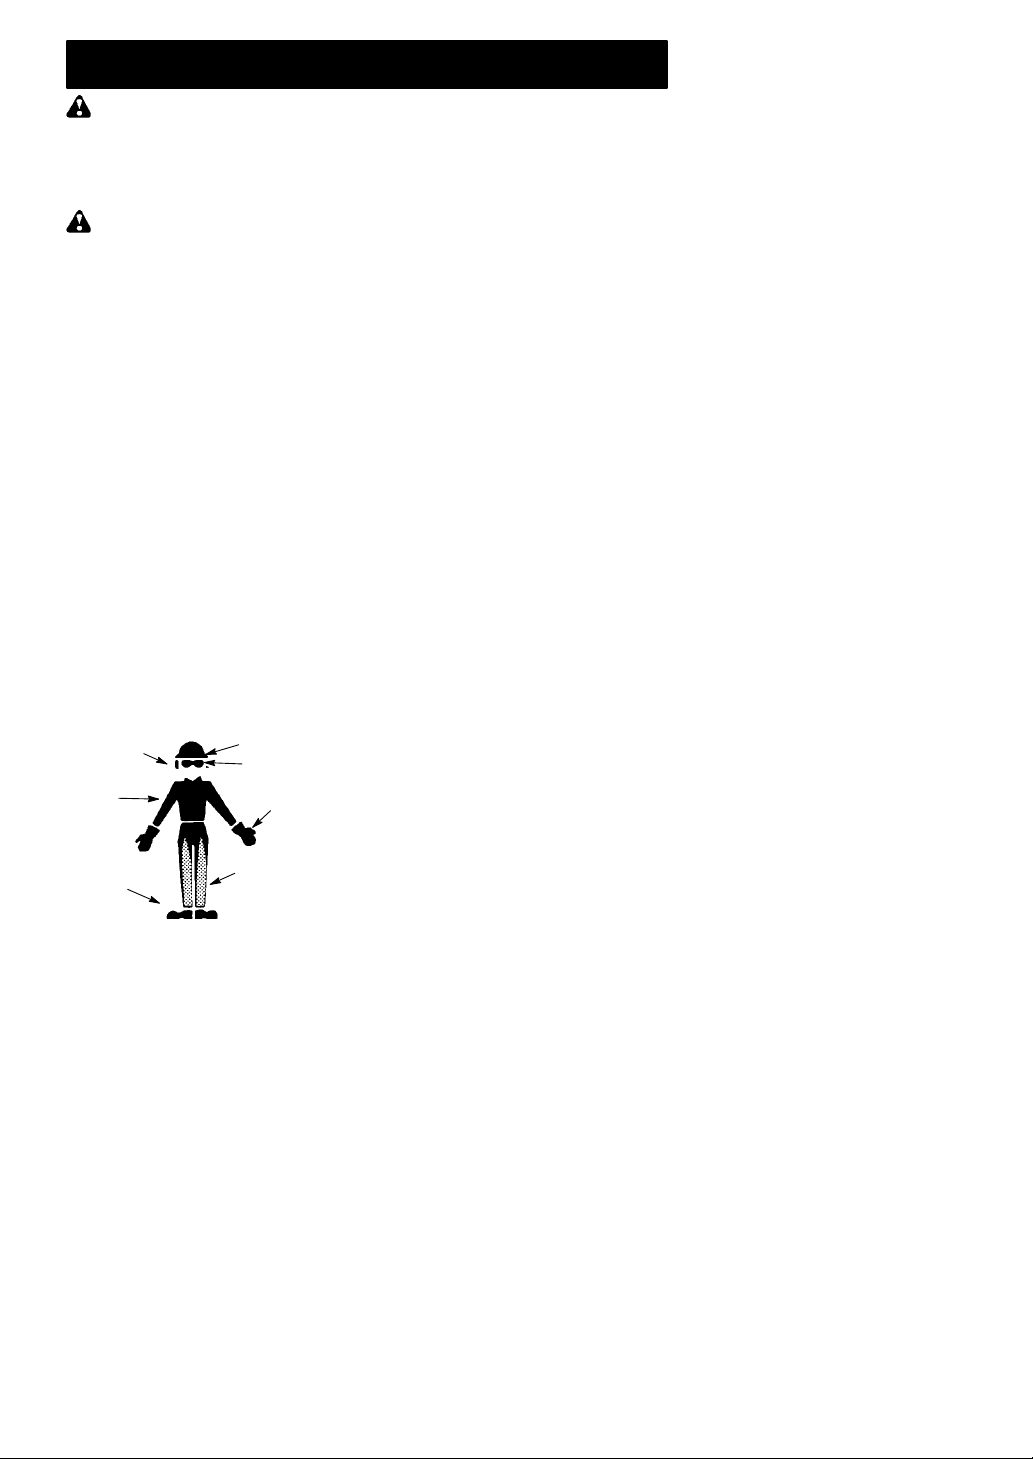
S Dress properly. Wear protective gear.
Always use steel-toed safety footwear
with non-slip soles; snug-fitting clothing; hea vy-duty, non-slip gloves; eye
protection such as non-fogging,
vented goggles or face screen; an approved safety hard hat; and sound
barriers (ear plugs or mufflers) to protect your hearing. Regular us ers
should have hearing checked regularly as chain saw noise can damage
hearing.
S Secure hair above shoulder length. Do
not wear l oose clothing or j ewel r y; they
can get caught in moving parts.
Hearing
Protection
Snug
Fitting
Clothing
Safety
Shoes
S Keep all parts of your body away from
the chain when saw is running.
S Keep children away. Do not let visitors
contact chai n saw or extension cord.All
visitors shoul d be kept at least 30 feet
(10 meters) away from work area.
S Do not handle or operate a chain saw
when you are fatigued, ill, upset, or if
you have taken alcohol, drugs, or me-
Safety Hat
Eye
Protection
Heavy Duty
Gloves
Safety Chaps
dication. You must be in good physical
condition and mentally alert. If you
have any condition that might be aggravated by strenuous work, check
with doctor before operating. Watch
what you are doing. Use common
sense.
S Do not start cutting until you have a
clear work area, secure footing, and
especially if you are felling a tree, a retreat path. Keep work area clean.
OPERATE YOUR SAW SAFELY
S Do not operatewith one hand. Serious
injury to the operator, helpers, or bystanders may result from one-handed
operation. A chain saw is intended for
two-handed use.
S Do not operate saw from a ladder or in
atree.
S Make sure thechain willnot make con-
tact with any object while starting the
saw. Never start the saw when the
guide bar is in a cut.
S Don’t force chain sa w. It will do the job
better and safer at the rate for which it
was intended.
S Do not put pressure on the saw, espe-
cially at the end of the cut. Doing so
can cause you to lose control when
the cut is completed.
S Stop the saw before setting it down.
S Hand carry saw only when motor is
stopped. Carry the chain saw by the
front handle with the saw stopped, finger
off the switch, the guide bar and saw
chain to the rear .
S Use the right tool, cut wood only.Don’t
use chain saw for purpose not intended; for example, don’t use chain
saw for cutting plastic, masonry, nonwood building materials.
S Do not operate a c hain saw that is
damaged, improperly adjusted, or not
completely and securely assembled.
Always replace bar, chain, hand
guard, or other parts immediately if
they become damaged,broken, or are
otherwise removed.
S Inspect chain saw cords periodically
and if damaged, have repaired by an
authorized service dealer.
MAINTAIN YOUR SAW IN GOOD
WORKING ORDER
S Have all chain saw servi ce performed
by an auth o rized service dealer except
the items listed in the
MAINTENANCE
section of thi s manual.
S Make certain saw chain stops moving
when trigger switch is released.
2

S Keep the handles dry and clean and
free from oil and grease.
S Keep oil cap and fasteners securely
tightened.
S Nonconforming replacement compo-
nents or the removal of safety devices
may cause damage to the unit and possible injury to the operator or bystanders. Use only Poulan accessories and
replacement parts as recommended.
Never modify your saw.
S Maintain chain saw with care.
S Keep unit sharp and clean for better
and safer performance.
S Follow instructions for lubricating and
changing accessories.
S Unplug the chain saw from the power
source when not in use, before servicing, and when changing accessories
and att achments, such as saw chain
and guard.
S Check for damaged parts. Before fur-
ther use of the chain saw, a guard or
other part that is damaged should be
carefully checked to determine that it will
operate properly and perform its intended function. Check for alignment of
moving parts, binding of moving parts,
breakage of parts, mounting and any
other condit i ons that may af f ect its operation. A guard or other part that is
damaged should be properly repaired
or replaced by an authori zed service
dealerunless otherwise indicated elsewhere in t he instruction manual.
S When not in use, chain saws should
be stored in a dry, high or locked-up
place out of the reach of children.
S When storing saw, unplug and use a
bar sheath or carrying case.
ELECTRICAL SAFETY
WARNING: A void a dangerous en-
vironment. T o reduce the ri sk of electri cal
shock, do not use in rain, in damp or wet
locations, or around swimmi ng pools, hot
tubs, etc. Do not expose to snow, rain, or
water to avoid the possibility of electrical
shock. Do not handle extension cord or
plug with wet hands.
S Use a voltage supply as shown on the
nameplate of t he unit.
S Avoid dangerous situations. Do not use
in the presence of flammable liquids or
gases to avoid creati ng a fi re or explosion and/or causing damage to uni t.
S To reduce the risk of electrical sho ck,
this appliance has a polarized plug (one
blade iswider than the other) and willrequire the use of a polarized extension
cord. The appliance plug will fit into a polarized extension cord onl y one way. If
the plug does not fit ful l y into the extension cord, re verse t he plug. If the plug
still does not fit, obtain a corr ect polarized extension cord. A polarized extension cord will require the use of a polarized wall outlet. This plug will fit into the
polarized wall outlet only one way. If
plug does not fit fully into the wall outlet,
reverse the plug. If the plug still does not
fit, contact a qualified electrician to install
the properwall outlet. Do not change the
equipment plug, extension cord receptacle, or extension cord plug in any way.
S To reduce ri sk of electrical shock, use
extension cords specifically marked as
suitable for outdoor appliances. The
electrical rating of the cord must not be
less than the rating of the unit. The cord
must be marked with suffix “W--A” (in
Canada, “W”). Use a polarized cord.
Make sure your extension cord is in
good condition. Inspect extension cord
before use and repl ace if damaged. Do
not use a damaged cord. Cord insulation must be intact with no cracks or deteriorati on. Plug connectors must be
undamaged. An undersized extension
cord will cause a drop in line voltage resultingin loss of power and overheating.
If in doubt, use the next heavier gauge.
The lower the gauge number , the heavier the cord (see
in the OPERATION sectio n). Do
CORD
SELECT AN EXTENSION
not use multiple cords.
S Do not abuse cord. Never carry the
unit by the extension cord or yank extension cord to disconnect unit.
S Secure extension cord to power cord
to prevent disconnection from unit.
S Do not use the unit if the switch does
not turn the unit on and off properly, or
if the lock-- out does not work. Repairs
to the switch must be made by an
authorized service dealer.
S Keep extension cord clear of operator
and obstacles at all times. Position
cord so that it will not be caught on
branches. Do not expose cords to
heat, oil, water, or sharp edges.
S T o avoid the possibility of electric shock,
avoid b ody contact w i th any grounded
conductor, such as metal fences or
pipes.
S Ground Fault Circuit Interrupter
(GFCI) protection should be provided
on circuit or outlet to be used. Receptacles are available having built-in
GFCI protection and may be used for
this measure of safety. Inspect chain
saw cords periodically and if damaged, have repaired by an authorized
service dealer.
3
GUARD AGAINST KICKBACK
A
v
K
Follow all safety rules to help avoid kickback and ot her forces which can result in
serious injury.
Kickback Path
oid Obstructions
Clear The Working Area
WARNING: Avoid kickback which
can result in serious injury. Kickback is
the backward, upward or s udden forward motion of the guide bar occurring
when the saw chain nearthe upper tip of
the guide bar contacts any object such
as a log or branch, or when the wood
closes in and pinches the saw chain in
the cut. Contacting a foreign object in
the wood can also result in loss of chain
saw control.
S RotationalKickbackcan occur when
the moving chain contacts an object at
the upper tip of theguide bar. This contact can cause the chain to dig into the
object, which stops the chain for an
instant. The result is a lightning fast,
reverse reaction whichkicks theguide
bar up and bac k toward the operator.
S Pinch-Kickback can occur when the
the wood closes in and pinches the
moving saw chain in the cut along the
top of the guide bar and the saw chain
is suddenly s topped. This sudden
stopping of thechain results in a reversal of the chain force used to cut wood
and causes the saw to move in the opposite direction of the chain rotation.
The saw is drivenstraight back toward
the operator.
S Pull-In canoccurwhenthemoving
chain contacts a foreign object in the
wood inthe cutalong the bottom of the
guide bar and the saw chain is suddenly stopped. This sudden stopping
pulls the saw forward and away from
the operator and could easily cause
the operator to lose controlof the saw.
REDUCE THE CHANCE OF
KICKBACK
The following precautions should be followed to minimize kickback:
S Recognize that kickback can happen.
With a basic understanding of kickback,
you can reduce the element of surprise
which contributes to accidents.
S Never let the moving chain contact
any object at the tip of the guide bar.
S Keep working area free from obstruc-
tions such as other trees, branches,
rocks, fences, s tumps, etc. Eliminate
or avoid any obstruction thatyour saw
chain could hit while cutting.
S When cutting a branch, do not let the
guide bar contact another b ranch or
other objects around it.
S Keep saw c hain sharp and properly
tensioned.A looseor dull chain can increase thechance of kickback. Follow
manufacturer’s chain sharpening and
maintenance instructions. Check tension at regularintervals, but never with
engine running. Makesure barmounting nuts are securely tightened.
S Begin and continue cutting at full
speed. If the chain is moving at a slower speed, there is greater chance of
kickback occurring.
S Use extreme caution when re-enter-
ing a cut.
S Do not attempt cuts starting with the tip
of the bar (plunge cuts).
S Watch for shifting logs or otherobjects
that could close a cut and pinch or fall
onto chain.
S Use the specified Reduced-Kickback
Guide Bar and Low Kickback Chain.
Avoid Pinch--Kickback:
S Be extremely aware of situations or ob-
structi on s that can cause materi al to
pinch the top of or otherwise stop t he
chain.
S Do notcut more than one log at a time.
S Do not twist the saw as the bar is with-
drawn from an undercut when bucking.
Avoid Pull-In :
S Always begin cutting with the saw at
full speed and the saw housing
against wood.
S Use wedges made of plastic or wood.
Never use metal to hold the cut open.
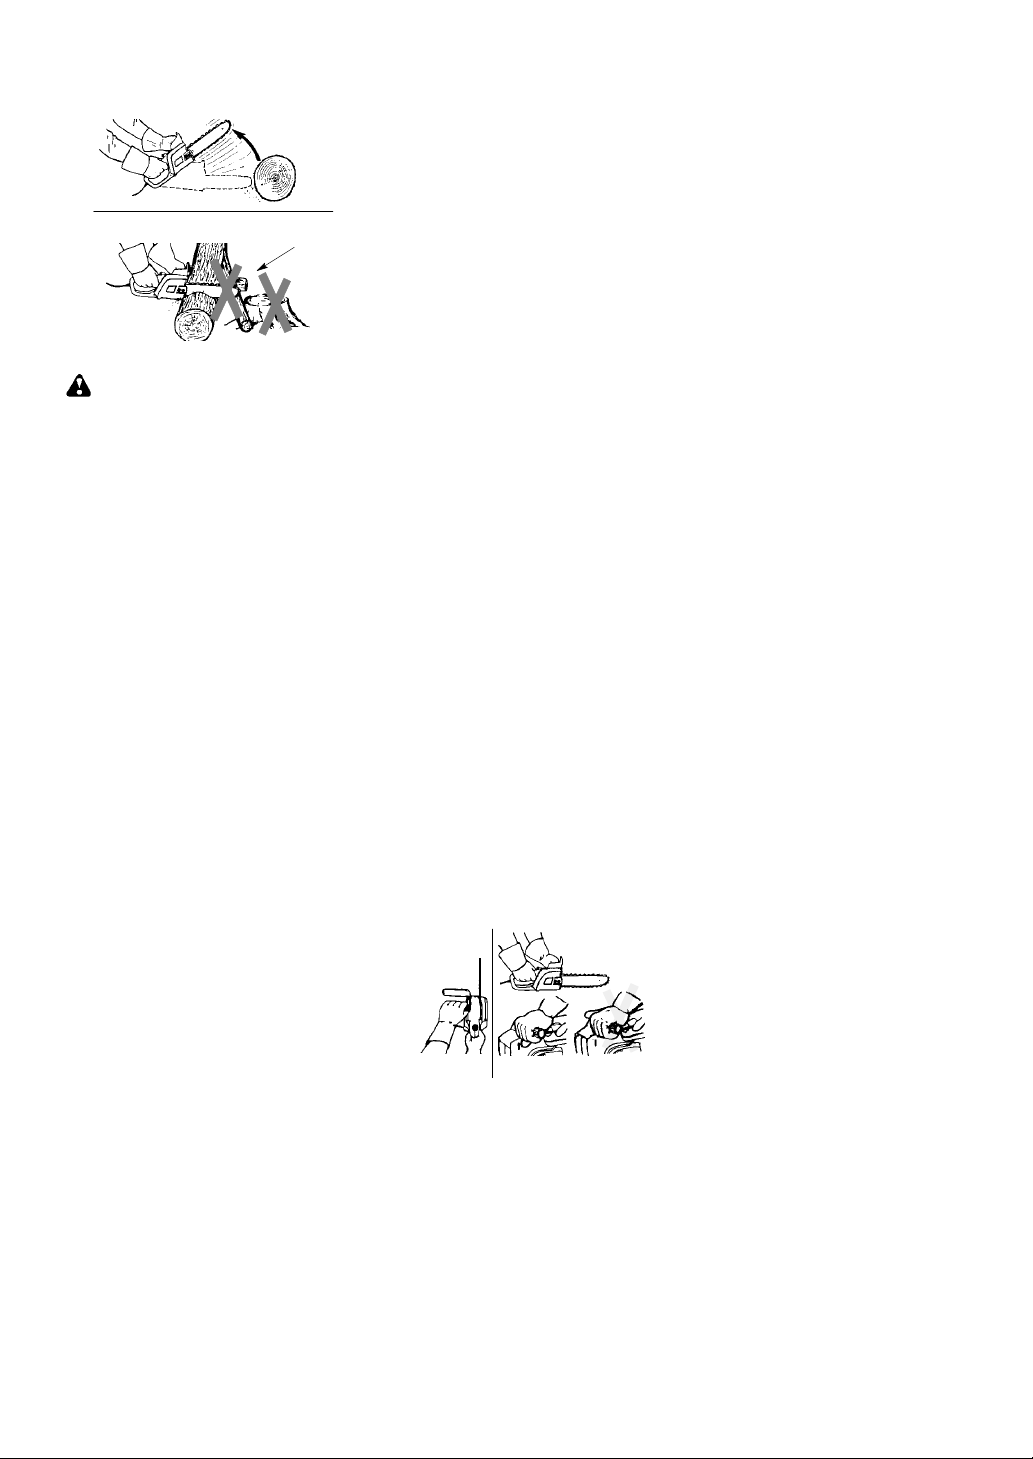
MAINTAIN CONTROL
Never Reverse
Hand Positions
Correct Position Correct Grip Incorrect Grip
eep afirm grip
with both hands,
left thumb under
4
handle
S A good, firm grip on the saw with both
hands will help you maintain control.
Don’t let go. Grip the rear handle with
your right hand whether you are right or
left handed. Wrap the fingers of your left
hand over and around the fr ont handlebar, and your left t humb under the front
handlebar. Keep your left arm str ai ght
with the elbow locked.
S Position your left hand on the front
handlebar so it is in a straight line with
your right hand on the rear handle
when making bucking cuts. Stand
slightly to the left side of the saw to
keep your body from being in a direct
line with the cutting chain.
S Stand with your weight evenly bal-
anced on both feet.
S Do not over reach. You could be drawn
or thrown off balance and lose control .
S Do not cut above s houlder height. It is
difficult to maintain control of saw
above shoulder height.
KICKBACK SAFETY FEATURES
WARNING: The following features
are included on your saw to helpreduce
hazard of kickback; however, such features will not totally eliminate this danger. Do not rely only on safety devices.
S Hand Guard: designed to reduce the
chance of your left hand contacting
the chain if your hand slipsoff the front
handlebar.
S Position of front and rear handlebars:
designed with distance between handles and “in-line” with each other. The
spread and “in-line” position of the
hands provided by this design work together to give balance and resistance
in controlling the pivot of the saw back
toward the operator if kickback occurs.
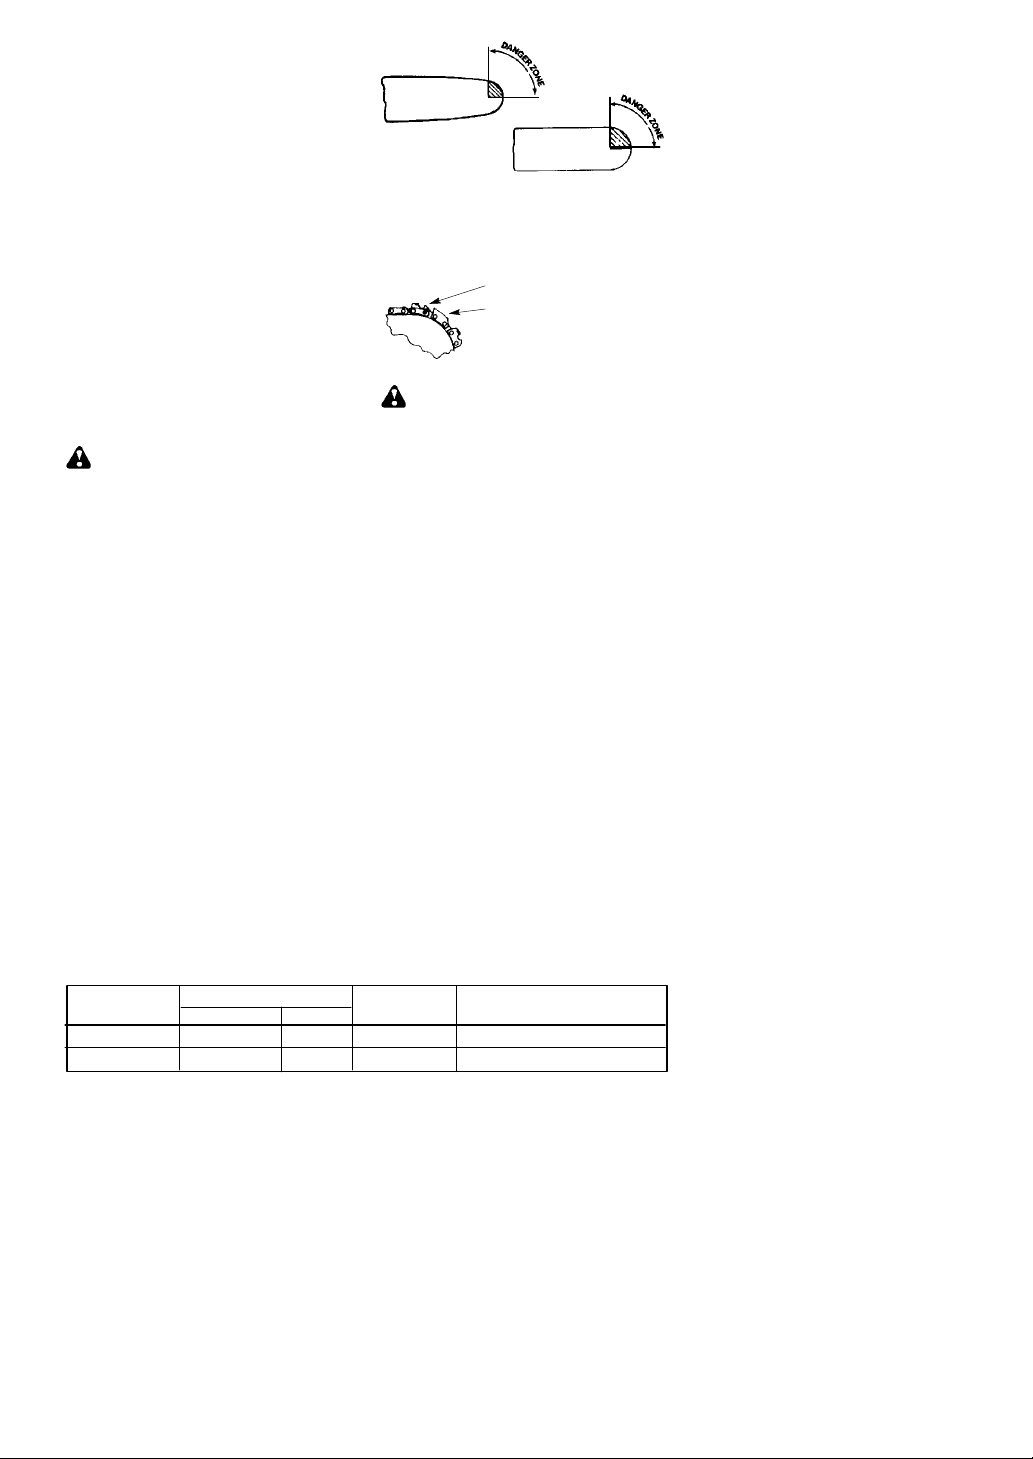
S Reduced-Kickback Guide Bar: de-
signed with a small radius tip whichreduces the size of the kickback danger
zone on the bar tip. This type bar has
been demonstrated to significantly reduce the number and s eriousness of
kickbacks when tested in accordance
with ANSI B175.1.
Computed kickback angle (CKA) Table
MODEL
1420
1630
952044368
952044370 16″ 952051211 37_
P/N
BAR
Length
14″
Small Radius
Tip Guide Bar
Large Radius
Tip Guide Bar
S Low Kickback Chain has metkickback
performance requirements when
tested on therepresentativesample of
these chain saws specified in ANSI
B175.1.
LowKickback Chain
Contoured Depth Gauge
Elongated Guard Link
Deflects Kickback Force
And Allows Wood To
Gradually Ride Into Cutter
WARNING: Computed Kickback
Angle(CKA)listedonyoursawandlisted
in the following CKA T able represents the
angle of kickback your bar and chain
combinations will have when tested in accordance with CSA and ANSI standards.
Computedangles represented in the CKA
column indicate total energy and angle
associated without a chain brake. When
purchasing replacements, considerations
should be given to the lower CKA values.
In all cases, lowerCKA values represent a
safer operating environment f or the user.
S Tip contact in some cases may cause
a lightning fast
guide bar up and back toward the operator.
S Pinching the saw chain along the tip of
the guide bar may push the guide bar
rapidly back towards the operator.
S Either of these reactions may cause
you to lose c ontrol of the saw which
could result in serious injury. Do not
rely exclusively upon safety devices
built into your saw.
The fol lowing guide bar and chain combinations meet kickback requirements of
CSA Z62.1 & Z62.3 and ANSI B175.1
when used on saws listed in this manual .
Use of bar and chain combinations other
than those listed is not recommended and
may not meet the CKA requirements per
standard.
CHAIN P/N
952051209
REACTION,kickingthe
CKA
37_
5
 Loading...